atmega8 系列的EEPROM读写
ATMEGA8加密实例说明

DLL源程序开发环境:VC++6.0
ATMEGA8 C源程序开发环境:CCAVR V6.31A TL866编程器软件:VER3.01以上
测试步骤:
1.选择ATMEAG8芯片
2.调入OBJ录中的HEX数据文件到缓存CODE区
配置信息设定,默认不更改。
3.设定DLL加密算法
这个过程同自定义编号算法
方法:<主菜单>--<操作>--<自动编号设定>
在对话框内设定自定义算法Get_M8_LED_DATA.dll,并选中允许自动编号后保存
4.在主程序左下角选择<允许自动编号>,编程芯片。
(配置位选择不进行物理加密,否则后面读不出这个芯片的内容进行复制)
5.按原理图连接电路,通电测试,LED有规律闪动正常。
6.读取刚编程芯片内的程序,把这个程序复制到另一个芯片中,运行测试结果。
(复制芯片时,不可调用DLL算法,否则芯片中是按这个芯片RC值得出的数据)
此时LED,无规律闪动。测试完成。
atmega8a 烧写程序
atmega8a 烧写程序英文回答:Introduction.The ATmega8A is an 8-bit microcontroller from Atmel that is widely used in embedded systems. To program the ATmega8A, you will need a programmer and software that supports the microcontroller. This guide will provide you with step-by-step instructions on how to burn a program to an ATmega8A microcontroller using an AVR programmer.Required Materials.ATmega8A microcontroller.AVR programmer (e.g., USBasp, AVRISP mkII)。
Programming software (e.g., AVRDUDE, Atmel Studio)。
USB cable.Breadboard (optional)。
Jumper wires (optional)。
Step-by-Step Instructions.1. Connect the ATmega8A to the programmer. Refer to the datasheet of your programmer for the correct pin connections. Typically, the programmer will have a 6-pin or 10-pin header that connects to the corresponding pins on the ATmega8A.2. Connect the programmer to your computer. Use a USB cable to connect the programmer to a USB port on your computer.3. Install the programming software. Download andinstall the programming software that you will be using. Follow the instructions provided by the software developer.4. Configure the programming software. Open the programming software and select the correct programmer and microcontroller type. You may also need to specify the baud rate and other communication settings.5. Load the program into the software. Open the program file that you want to burn to the ATmega8A. The file should be in a supported format, such as a HEX or ELF file.6. Verify the program. Before burning the program tothe ATmega8A, you should verify that the program is correct. The programming software will typically have a "Verify" or "Check" button that you can use to compare the program in the software to the program that is stored on the microcontroller.7. Burn the program to the ATmega8A. Once you have verified the program, you can burn it to the ATmega8A.Click the "Burn" or "Program" button in the programming software. The programming process may take a few seconds or minutes, depending on the size of the program.8. Disconnect the programmer. Once the programming process is complete, you can disconnect the programmer from the ATmega8A.Troubleshooting.If you encounter any problems while programming the ATmega8A, check the following:Make sure that the programmer is properly connected to the ATmega8A and to your computer.Verify that the programming software is configured correctly.Check the program file to make sure that it is in the correct format and that it is compatible with the ATmega8A.Try using a different programmer or programming software.中文回答:简介。
eeprom读写程序详解
eeprom读写程序详解EEPROM(Electrically Erasable Programmable Read-Only Memory) 是一种可编程只读存储器,可以在电信号的作用下进行擦写和改写。
它通常用于存储单片机或其他嵌入式系统中的数据、设置参数、配置文件等。
对于 EEPROM 的读写程序,需要考虑以下几个方面:1. 读操作:读操作通常包括以下步骤:- 等待上次读操作完成。
- 获取要读取的数据的单元地址。
- 将 EEPGD 位和 CFGS 位清零。
- 启动读操作控制位 RD。
- 等待本次读操作完成。
- 将该单元地址中对应的数据返回。
在读取 EEPROM 数据时,为了避免芯片在一瞬间无法获取到数据,需要给芯片一定的时间来稳定获取数据。
因此,在读取操作中需要加入等待步骤。
2. 写操作:写操作通常包括以下步骤:- 等待上次写操作完成。
- 获取要写的数据的单元地址。
- 将要写的数据写入 EEPROM 的单元中。
- 将 EEPGD 位和 CFGS 位清零。
- 启动写操作控制位 WP。
- 等待写操作完成。
在写操作中,为了确保数据的可靠性,需要将要写的数据写入EEPROM 的单元中,并等待写操作完成。
同时,在写操作过程中,需要注意避免对无关的单元进行写操作,以免损坏 EEPROM 芯片。
3. 中断处理:在 EEPROM 的读写操作中,通常需要加入中断处理机制,以便在读写过程中及时响应和处理异常情况。
例如,在读取 EEPROM 数据时,如果 EEPROM 芯片出现故障,可能会导致读取失败。
为了避免这种情况,可以在读取操作中加入中断处理机制,在读取失败时及时报警或采取相应的应对措施。
总之,EEPROM 读写程序的实现需要考虑多个方面的因素,包括读操作、写操作、中断处理等。
同时,需要考虑 EEPROM 芯片的特性和限制,以便实现高效、稳定、可靠的 EEPROM 读写操作。
ATMEGA8系列规格书,Datasheet资料

ATMEGA8系列规格书,Datasheet资料FeaturesHigh-performance, Low-power AtmelAVR 8-bit Microcontroller Advanced RISC Architecture–130 Powerful Instructions – Most Single-clock Cycle Execution –32 × 8 General Purpose Working Registers –Fully Static Operation–Up to 16 MIPS Throughput at 16MHz–On-chip 2-cycle MultiplierHigh Endurance Non-volatile Memory segments–8Kbytes of In-System Self-programmable Flash program memory–512Bytes EEPROM–1Kbyte Internal SRAM–Write/Erase Cycles: 10,000 Flash/100,000 EEPROM–Data retention: 20 years at 85°C/100 years at 25°C(1)–Optional Boot Code Section with Independent Lock BitsIn-System Programming by On-chip Boot ProgramTrue Read-While-Write Operation–Programming Lock for Software SecurityPeripheral Features–Two 8-bit Timer/Counters with Separate Prescaler, one Compare Mode–One 16-bit Timer/Counter with Separate Prescaler, Compare Mode, and Capture Mode–Real Time Counter with Separate Oscillator–Three PWM Channels–8-channel ADC in TQFP and QFN/MLF packageEight Channels 10-bit Accuracy–6-channel ADC in PDIP packageSix Channels 10-bit Accuracy–Byte-oriented Two-wire Serial Interface–Programmable Serial USART–Master/Slave SPI Serial Interface–Programmable Watchdog Timer with Separate On-chip Oscillator–On-chip Analog ComparatorSpecial Microcontroller Features–Power-on Reset and Programmable Brown-out Detection–Internal Calibrated RC Oscillator–External and Internal Interrupt Sources–Five Sleep Modes: Idle, ADC Noise Reduction, Power-save, Power-down, andStandbyI/O and Packages–23 Programmable I/O Lines–28-lead PDIP, 32-lead TQFP, and 32-pad QFN/MLFOperating Voltages–2.7V - 5.5V (ATmega8L)–4.5V - 5.5V (ATmega8)Speed Grades–0 - 8MHz (ATmega8L)–0 - 16MHz (ATmega8)Power Consumption at 4Mhz, 3V, 25°C–Active: 3.6mA–Idle Mode: 1.0mA–Power-down Mode: 0.5µA 8-bit with 8KBytes In-System ProgrammableATmega8ATmega8L SummaryPinConfigurationsOverview The ATmega8 is a low-power CMOS 8-bit microcontroller based on the AVR RISC architecture. By executing powerful instructions in a single clock cycle, the ATmega8 achieves throughputs approaching 1 MIPS per MHz, allowing the system designer to optimize power consumption ver-sus processing speed.Block Diagram Figure 1. Block DiagramThe AVR core combines a rich instruction set with 32 general purpose working registers. All the32 registers are directly connected to the Arithmetic Logic Unit (ALU), allowing two independent registers to be accessed in one single instruction executed in one clock cycle. The resulting architecture is more code efficient while achieving throughputs up to ten times faster than con-ventional CISC microcontrollers.The ATmega8 provides the following features: 8 Kbytes of In-System Programmable Flash withRead-While-Write capabilities, 512 bytes of EEPROM, 1 Kbyte of SRAM, 23 general purposeI/O lines, 32 general purpose working registers, three flexible Timer/Counters with comparemodes, internal and external interrupts, a serial programmable USART, a byte oriented Two-wire Serial Interface, a 6-channel ADC (eight channels in TQFP and QFN/MLF packages) with10-bit accuracy, a programmable Watchdog Timer with Internal Oscillator, an SPI serial port,and five software selectable power saving modes. The Idle mode stops the CPU while allowingthe SRAM, Timer/Counters, SPI port, and interrupt system to continue functioning. The Power-down mode saves the register contents but freezes the Oscillator, disabling all other chip func-tions until the next Interrupt or Hardware Reset. In Power-save mode, the asynchronous timercontinues to run, allowing the user to maintain a timer base while the rest of the device is sleep-ing. The ADC Noise Reduction mode stops the CPU and all I/O modules except asynchronoustimer and ADC, to minimize switching noise during ADC conversions. In Standby mode, thecrystal/resonator Oscillator is running while the rest of the device is sleeping. This allows veryfast start-up combined with low-power consumption.The device is manufactured using Atmel’s high density non-volatile memory technology. TheFlash Program memory can be reprogrammed In-System through an SPI serial interface, by aconventional non-volatile memory programmer, or by an On-chip boot program running on theAVR core. The boot program can use any interface to download the application program in theApplication Flash memory. Software in the Boot Flash Section will continue to run while theApplication Flash Section is updated, providing true Read-While-Write operation. By combiningan 8-bit RISC CPU with In-System Self-Programmable Flash on a monolithic chip, the AtmelATmega8 is a powerful microcontroller that provides a highly-flexible and cost-effective solutionto many embedded control applications.The ATmega8 AVR is supported with a full suite of program and system development tools,including C compilers, macro assemblers, program debugger/simulators, In-Circuit Emulators,and evaluation kits.Disclaimer Typical values contained in this datasheet are based on simulations and characterization of other AVR microcontrollers manufactured on the same process technology. Minimum and Maxi-mum values will be available after the device is characterized.Pin DescriptionsVCC Digital supply voltage. GND Ground.Port B (PB7..PB0) XTAL1/XTAL2/TOSC1/ TOSC2Port B is an 8-bit bi-directional I/O port with internal pull-up resistors (selected for each bit). The Port B output buffers have symmetrical drive characteristics with both high sink and source capability. As inputs, Port B pins that are externally pulled low will source current if the pull-up resistors are activated. The Port B pins are tri-stated when a reset condition becomes active, even if the clock is not running.Depending on the clock selection fuse settings, PB6 can be used as input to the inverting Oscil-lator amplifier and input to the internal clock operating circuit.Depending on the clock selection fuse settings, PB7 can be used as output from the inverting Oscillator amplifier.If the Internal Calibrated RC Oscillator is used as chip clock source, PB7..6 is used as TOSC2..1 input for the Asynchronous Timer/Counter2 if the AS2 bit in ASSR is set.The various special features of Port B are elaborated in “Alternate Functions of Port B” on page 58 and “System Clock andClock Options” on page 25.Port C (PC5..PC0)Port C is an 7-bit bi-directional I/O port with internal pull-up resistors (selected for each bit). The Port C output buffers have symmetrical drive characteristics with both high sink and sourcecapability. As inputs, Port C pins that are externally pulled low will source current if the pull-upresistors are activated. The Port C pins are tri-stated when a reset condition becomes active,even if the clock is not running.If the RSTDISBL Fuse is programmed, PC6 is used as an I/O pin. Note that the electrical char-acteristics of PC6 differ from those of the other pins of Port C.If the RSTDISBL Fuse is unprogrammed, PC6 is used as a Reset input. A low level on this pinfor longer than the minimum pulse length will generate a Reset, even if the clock is not running.The minimum pulse length is given in Table 15 on page 38. Shorter pulses are not guaranteed togenerate a Reset.The various special features of Port C are elaborated on page 61.Port D (PD7..PD0)Port D is an 8-bit bi-directional I/O port with internal pull-up resistors (selected for each bit). The Port D output buffers have symmetrical drive characteristics with both high sink and sourcecapability. As inputs, Port D pins that are externally pulled low will source current if the pull-upresistors are activated. The Port D pins are tri-stated when a reset condition becomes active,even if the clock is not running.Port D also serves the functions of various special features of the ATmega8 as listed on page63.Reset input. A low level on this pin for longer than the minimum pulse length will generate areset, even if the clock is not running. The minimum pulse length is given in Table 15 on page38. Shorter pulses are not guaranteed to generate a reset.AV CC AV CC is the supply voltage pin for the A/D Converter, Port C (3..0), and ADC (7..6). It should be externally connected to V CC, even if the ADC is not used. If the ADC is used, it should be con-nected to V CC through a low-pass filter. Note that Port C (5..4) use digital supply voltage, V CC. AREF AREF is the analog reference pin for the A/D Converter.ADC7..6 (TQFP and QFN/MLF Package Only)In the TQFP and QFN/MLF package, ADC7..6 serve as analog inputs to theA/D converter. These pins are powered from the analog supply and serve as 10-bit ADC channels.Resources A comprehensive set of development tools, application notes and datasheets are available for download on /doc/9e818e5c767f5acfa1c7cdaf.html /avr.Data Retention Reliability Qualification results show that the projected data retention failure rate is much less than 1 PPM over 20 years at 85°C or 100 years at 25°C.Register SummaryAddress Name Bit 7Bit 6Bit 5Bit 4Bit 3Bit 2Bit 1Bit 0Page0x3F (0x5F)SREG I T H S V N Z C11 0x3E (0x5E)SPH–––––SP10SP9SP813 0x3D (0x5D)SPLSP7SP6SP5SP4SP3SP2SP1SP013 0x3C (0x5C)Reserved0x3B (0x5B)GICR INT1INT0––––IVSEL IVCE49, 67 0x3A (0x5A)GIFR INTF1INTF0––––––67 0x39 (0x59)TIMSKOCIE2TOIE2TICIE1OCIE1A OCIE1B TOIE1–TOIE072, 100, 119 0x38 (0x58)TIFR OCF2TOV2ICF1OCF1A OCF1B TOV1–TOV072, 101, 119 0x37 (0x57)SPMCR SPMIE RWWSB–RWWSRE BLBSET PGWRT PGERS SPMEN206 0x36(0x56)TWCR TWINT TWEA TWSTA TWSTO TWWC TWEN–TWIE165 0x35 (0x55)MCUCR SESM2SM1SM0ISC11ISC10ISC01ISC0033, 66 0x34 (0x54)MCUCSR––––WDRF BORF EXTRF PORF41 0x33(0x53)TCCR0–––––CS02CS01CS0071 0x32 (0x52)TCNT0Timer/Counter0 (8 Bits)72 0x31 (0x51)OSCCAL Oscillator Calibration Register31 0x30 (0x50)SFIOR––––ACME PUD PSR2PSR1058, 74, 120, 186 0x2F (0x4F)TCCR1ACOM1A1COM1A0COM1B1COM1B0FOC1A FOC1B WGM11WGM1096 0x2E (0x4E)TCCR1B ICNC1ICES1–WGM13WGM12CS12CS11CS1098 0x2D (0x4D)TCNT1H Timer/Counter1 – Counter Register High byte99 0x2C(0x4C)TCNT1L Timer/Counter1 – Counter Register Low byte99 0x2B (0x4B)OCR1AH Timer/Counter1 – Output Compare Register A High byte99 0x2A (0x4A)OCR1AL Timer/Counter1 – Output Compare Register A Low byte99 0x29(0x49)OCR1BH Timer/Counter1 – Output Compare Register B High byte99 0x28 (0x48)OCR1BL Timer/Counter1 – Output Compare Register B Low byte99 0x27 (0x47)ICR1H Timer/Counter1 – Input Capture Register High byte100 0x26(0x46)ICR1L Timer/Counter1 – Input Capture Register Low byte100 0x25(0x45)TCCR2FOC2WGM20COM21COM20WGM21CS22CS21CS20114 0x24 (0x44)TCNT2Timer/Counter2 (8 Bits)1160x23 (0x43)OCR2Timer/Counter2 Output Compare Register116 0x22 (0x42)ASSR––––AS2TCN2UB OCR2UBTCR2UB117 0x21 (0x41)WDTCR–––WDCE WDE WDP2WDP1WDP0430x20(1) (0x40)(1)UBRRH URSEL–––UBRR[11:8]152 UCSRC URSEL UMSEL UPM1UPM0USBSUCSZ1UCSZ0UCPOL1500x1F (0x3F)EEARH–––––––EEAR820 0x1E (0x3E)EEARL EEAR7EEAR6EEAR5EEAR4EEAR3EEAR2EEAR1EEAR020 0x1D (0x3D)EEDR EEPROM Data Register20 0x1C (0x3C)EECR––––EERIE EEMWE EEWE EERE20 0x1B(0x3B)Reserved0x1A (0x3A)Reserved0x19 (0x39)Reserved0x18 (0x38)PORTB PORTB7PORTB6PORTB5PORTB4PORTB3PORTB2PORTB1PORTB065 0x17 (0x37)DDRBDDB7DDB6DDB5DDB4DDB3DDB2DDB1DDB065 0x16 (0x36)PINBPINB7PINB6PINB5PINB4PINB3PINB2PINB1PINB065 0x15 (0x35)PORTC–PORTC6PORTC5PORTC4PORTC3PORTC2PORTC1PORTC065 0x14 (0x34)DDRC–DDC6DDC5DDC4DDC3DDC2DDC1DDC065 0x13 (0x33)PINC–PINC6PINC5PINC4PINC3PINC2PINC1PINC065 0x12 (0x32)PORTD PORTD7PORTD6PORTD5PORTD4PORTD3PORTD2PORTD1PORTD065 0x11 (0x31)DDRDDDD7DDD6DDD5DDD4DDD3DDD2DDD1DDD065 0x10 (0x30)PINDPIND7PIND6PIND5PIND4PIND3PIND2PIND1PIND065 0x0F (0x2F)SPDR SPI Data Register127 0x0E (0x2E)SPSR SPIF WCOL–––––SPI2X126 0x0D (0x2D)SPCR SPIE SPE DORD MSTR CPOL CPHA SPR1SPR0125 0x0C (0x2C)UDR USART I/O Data Register148 0x0B (0x2B)UCSRA RXC TXC UDRE FE DOR PE U2X MPCM148 0x0A (0x2A)UCSRB RXCIE TXCIE UDRIE RXEN TXEN UCSZ2RXB8TXB8149 0x09 (0x29)UBRRL USART Baud Rate Register Low byte152 0x08 (0x28)ACSR ACD ACBG ACO ACI ACIE ACIC ACIS1ACIS0186 0x07 (0x27)ADMUX REFS1REFS0ADLAR–MUX3MUX2MUX1MUX0199 0x06 (0x26)ADCSRA ADEN ADSC ADFR ADIF ADIE ADPS2ADPS1ADPS0200 0x05(0x25)ADCH ADC Data Register High byte201 0x04 (0x24)ADCL ADC Data Register Low byte201 0x03 (0x23)TWDR Two-wire Serial Interface Data Register167 0x02 (0x22)TWAR TWA6TWA5TWA4TWA3TWA2TWA1TWA0TWGCE167 Register Summary (Continued)Address Name Bit 7Bit 6Bit 5Bit 4Bit 3Bit 2Bit 1Bit 0Page0x01 (0x21)TWSR TWS7TWS6TWS5TWS4TWS3–TWPS1TWPS0166 0x00 (0x20)TWBR Two-wire Serial Interface Bit Rate Register165 Notes: 1.Refer to the USART description (“USART” on page 129) for details on how to access UBRRH and UCSRC (“Accessing UBRRH/UCSRC Registers” on page 146)2.For compatibility with future devices, reserved bits should be written to zero if accessed. Reserved I/O memory addresses should never be written3.Some of the Status Flags are cleared by writing a logical one to them. Note that the CBI and SBI instructions will operate onall bits in the I/O Register, writing a one back into any flag read as set, thus clearing the flag. The CBI and SBI instructions work with registers 0x00 to 0x1F onlyInstruction Set SummaryMnemonics Operands Description Operation Flags#Clocks ARITHMETIC AND LOGIC INSTRUCTIONSADD Rd, Rr Add two Registers Rd ← Rd + Rr Z, C, N, V, H1 ADC Rd, Rr Add with Carry two Registers Rd ← Rd + Rr + C Z,C, N, V, H1 ADIW Rdl,K Add Immediate to Word Rdh:Rdl ← Rdh:Rdl + K Z, C, N, V, S2 SUB Rd, Rr Subtract two Registers Rd ← Rd - Rr Z, C, N, V, H1 SUBI Rd, K Subtract Constant from Register Rd ← Rd - K Z, C, N, V, H1 SBC Rd, Rr Subtract with Carry two Registers Rd ← Rd - Rr - C Z, C, N, V, H1 SBCI Rd, K Subtract with Carry Constant from Reg.Rd ← Rd - K - C Z, C, N ,V, H1 SBIW Rdl,K Subtract Immediate from Word Rdh:Rdl ← Rdh:Rdl - K Z, C, N, V, S2 AND Rd, Rr Logical AND Registers Rd ← Rd ? Rr Z, N, V1 ANDI Rd, K Logical AND Register and Constant Rd ← Rd ? K Z, N, V1OR Rd, Rr Logical OR Registers Rd ← Rd v Rr Z, N, V1 ORI Rd, K Logical OR Register and Constant Rd ← Rd v K Z, N, V1 EOR Rd, Rr Exclusive OR Registers Rd ← Rd ⊕ Rr Z, N, V1 COM Rd One’s Complement Rd ← 0xFF ? Rd Z, C, N, V1 NEG Rd Two’s Complement Rd ← 0x00 ? Rd Z, C, N, V, H1 SBR Rd,K Set Bit(s) in Register Rd ← Rd v K Z, N, V1 CBR Rd,K Clear Bit(s) in Register Rd ← Rd ? (0xFF - K)Z, N, V1 INC Rd Increment Rd ← Rd + 1Z, N, V1 DEC Rd Decrement Rd ← Rd 1 Z, N, V1 TST Rd Test for Zero or Minus Rd ← Rd ? Rd Z, N, V1 CLR Rd Clear Register Rd ← Rd ⊕ Rd Z, N, V1 SER Rd Set Register Rd ← 0xFF None1 MUL Rd, Rr Multiply Unsigned R1:R0 ← Rd x Rr Z, C2 MULS Rd, Rr Multiply Signed R1:R0← Rd x Rr Z, C2 MULSU Rd, Rr Multiply Signed with Unsigned R1:R0 ← Rd x Rr Z, C2 FMUL Rd, Rr Fractional Multiply Unsigned R1:R0 ← (Rd x Rr) << 1Z, C2FMULS Rd, Rr Fractional Multiply Signed R1:R0 ← (Rd x Rr) << 1Z, C2 FMULSU Rd, Rr Fractional Multiply Signed with Unsigned R1:R0 ← (Rd x Rr) << 1Z, C2 BRANCH INSTRUCTIONSRJMP k Relative Jump PC ← PC + k + 1None2 IJMP Indirect Jump to (Z)PC ← Z None2 RCALL k Relative Subroutine Call PC ← PC + k + 1None3 ICALL Indirect Call to (Z)PC ←Z None3 RET Subroutine Return PC ← STACK None4 RETI Interrupt Return PC ← STACK I4 CPSE Rd,Rr Compare, Skip if Equal if (Rd = Rr) PC ← PC + 2 or 3None 1 / 2 / 3 CP Rd,Rr Compare Rd ? Rr Z, N, V, C, H 1 CPC Rd,Rr Compare with Carry Rd ? Rr ? C Z, N, V, C, H1 CPI Rd,K Compare Register with Immediate Rd ? K Z, N, V, C, H1 SBRC Rr, b Skip if Bit in Register Cleared if (Rr(b)=0) PC ← PC + 2 or 3 None 1 / 2 / 3 SBRS Rr, b Skip if Bit in Register is Set if (Rr(b)=1) PC ← PC + 2 or 3None 1 / 2 / 3 SBIC P, b Skip if Bit in I/O Register Cleared if (P(b)=0) PC ← PC + 2 or 3 None 1 / 2 / 3 SBIS P, b Skip if Bit in I/O Register is Set if (P(b)=1) PC ← PC + 2 or3None 1 / 2 / 3 BRBS s, k Branch if Status Flag Set if (SREG(s) = 1) then PC←PC+k + 1None 1 / 2 BRBC s, k Branch if Status Flag Cleared if (SREG(s) = 0) then PC←PC+k + 1None 1 / 2 BREQ k Branch if Equal if (Z = 1) then PC ← PC + k +1None 1 / 2 BRNE k Branch if Not Equal if (Z = 0) then PC ← PC + k + 1None 1 / 2 BRCS k Branch if Carry Set if (C = 1) then PC ← PC + k + 1None 1 / 2 BRCC k Branch if Carry Cleared if (C = 0) then PC ← PC + k + 1None 1 / 2 BRSH k Branch if Same or Higher if (C = 0) then PC ← PC + k + 1None 1 / 2 BRLO k Branch if Lower if (C = 1) then PC ← PC + k + 1None 1 / 2 BRMI k Branch if Minus if (N = 1) then PC ← PC + k + 1None 1 / 2 BRPL k Branch if Plus if (N = 0) then PC ← PC + k +1None 1 / 2 BRGE k Branch if Greater or Equal, Signed if (N ⊕ V= 0) then PC ← PC + k + 1None 1 / 2 BRLT k Branch if Less Than Zero, Signed if (N ⊕ V= 1) then PC ← PC + k + 1None 1 / 2 BRHS k Branch if Half Carry Flag Set if (H = 1) then PC ←PC + k + 1None 1 / 2 BRHC k Branch if Half Carry Flag Cleared if (H = 0) then PC ← PC + k + 1None 1 / 2 BRTS k Branch if T Flag Set if (T = 1) then PC ← PC + k + 1None 1 / 2 BRTC k Branch if T Flag Cleared if (T = 0) then PC ← PC + k + 1None 1 / 2 BRVS k Branch if Overflow Flag is Set if (V = 1) then PC ← PC + k + 1None 1 / 2 BRVC k Branch if Overflow Flag is Cleared if (V = 0) then PC ← PC + k + 1None 1 / 2Instruction Set Summary (Continued)Mnemonics Operands Description Operation Flags#ClocksBRIE k Branch if Interrupt Enabled if ( I = 1) then PC ← PC + k + 1None 1 / 2 BRID k Branch if Interrupt Disabled if ( I = 0) then PC ← PC + k + 1None 1 / 2 DATA TRANSFER INSTRUCTIONSMOV Rd, Rr Move Between Registers Rd ← Rr None1 MOVW Rd, Rr Copy Register Word Rd+1:Rd ← Rr+1:Rr None1 LDI Rd, K Load Immediate Rd ←K None1LD Rd, X Load Indirect Rd ← (X)None2LD Rd, X+Load Indirect and Post-Inc.Rd ← (X), X ← X + 1None2LD Rd, - X Load Indirect and Pre-Dec.X ← X - 1, Rd ← (X)None2LD Rd, Y Load Indirect Rd ← (Y)None2LD Rd, Y+Load Indirect and Post-Inc.Rd ← (Y), Y ← Y + 1None2LD Rd, - Y Load Indirect and Pre-Dec.Y ← Y - 1, Rd ← (Y)None2 LDD Rd,Y+q Load Indirect with Displacement Rd ← (Y + q)None2LD Rd, Z Load Indirect Rd ← (Z)None2LD Rd, Z+Load Indirect and Post-Inc.Rd ← (Z), Z ← Z+1None2LD Rd, -Z Load Indirect and Pre-Dec.Z ← Z - 1, Rd ← (Z)None2 LDD Rd, Z+q Load Indirect with Displacement Rd ← (Z +q)None2 LDS Rd, k Load Direct from SRAM Rd ← (k)None2ST X, Rr Store Indirect(X) ← Rr None2ST X+, Rr Store Indirect and Post-Inc.(X) ← Rr, X ← X + 1None2ST- X, Rr Store Indirect and Pre-Dec.X ← X - 1, (X) ← Rr None2ST Y, Rr Store Indirect(Y) ← Rr None2ST Y+, Rr Store Indirect and Post-Inc.(Y) ← Rr, Y ← Y + 1None2ST- Y, Rr Store Indirect and Pre-Dec.Y ← Y - 1, (Y) ← Rr None2 STD Y+q,Rr Store Indirect with Displacement(Y + q) ← Rr None2ST Z, Rr Store Indirect(Z) ← Rr None2ST Z+, Rr Store Indirect and Post-Inc.(Z) ← Rr, Z ← Z + 1None2ST-Z, Rr Store Indirect and Pre-Dec.Z ← Z - 1, (Z) ← Rr None2 STD Z+q,Rr Store Indirect with Displacement(Z + q) ← Rr None2 STS k, Rr Store Direct to SRAM(k) ← Rr None2 LPM Load Program Memory R0 ← (Z)None3 LPM Rd, Z Load Program Memory Rd ← (Z)None3 LPM Rd, Z+Load Program Memory and Post-Inc Rd ← (Z), Z ← Z+1None3 SPM Store Program Memory(Z) ← R1:R0None-IN Rd, P In Port Rd ←P None1 OUT P, Rr Out Port P ← Rr None1 PUSH Rr Push Register on Stack STACK ← Rr None2 POP Rd Pop Register from Stack Rd ← STACK None2 BIT AND BIT-TEST INSTRUCTIONSSBI P,b Set Bit in I/O Register I/O(P,b) ←1None2 CBI P,b Clear Bit in I/O Register I/O(P,b) ←0None2 LSL Rd Logical Shift Left Rd(n+1) ← Rd(n), Rd(0) ← 0Z, C, N, V1 LSR Rd Logical Shift Right Rd(n) ← Rd(n+1), Rd(7) ← 0Z, C, N, V1 ROL Rd Rotate Left Through Carry Rd(0)←C,Rd(n+1)← Rd(n),C←Rd(7)Z, C, N, V1 ROR Rd Rotate Right Through CarryRd(7)←C,Rd(n)← Rd(n+1),C←Rd(0)Z, C, N, V1 ASR Rd Arithmetic Shift Right Rd(n) ← Rd(n+1), n=0..6Z, C, N, V1 SWAP Rd Swap Nibbles Rd(3..0)←Rd(7..4),Rd(7..4)←Rd(3..0)None1 BSET s Flag Set SREG(s) ← 1SREG(s)1 BCLR s Flag Clear SREG(s) ← 0 SREG(s)1 BST Rr, b Bit Store from Register to T T ← Rr(b)T1 BLD Rd, b Bit load from T to Register Rd(b) ←T None1 SEC Set Carry C ←1C1 CLC Clear Carry C ← 0 C1 SEN Set Negative Flag N ←1N1 CLN Clear Negative Flag N ← 0 N1 SEZ Set Zero Flag Z ←1Z1 CLZ Clear Zero Flag Z ← 0 Z1 SEI Global Interrupt Enable I ←1I1 CLI Global Interrupt Disable I ← 0 I1 SES Set Signed Test Flag S ←1S1 CLS Clear Signed Test Flag S ← 0 S1 SEV Set Twos Complement Overflow.V ←1V1 CLV Clear Twos Complement Overflow V ← 0 V1 SET Set T in SREG T ←1T1Instruction Set Summary (Continued)Mnemonics Operands Description Operation Flags#ClocksCLT Clear T in SREG T ← 0 T1 SEH Set Half Carry Flag in SREG H ←1H1 CLH Clear Half Carry Flag in SREG H ← 0 H1 MCU CONTROL INSTRUCTIONSNOP No Operation None1 SLEEP Sleep(see specific descr. for Sleep function)None1Notes:1.This device can also be supplied in wafer form. Please contact your local Atmel sales office for detailed ordering informationand minimum quantities2.Pb-free packaging complies to the European Directive for Restriction of Hazardous Substances (RoHS directive). Also Halide free and fully Green3.Tape & ReelSpeed (MHz)Power Supply (V)Ordering Code (2)Package (1)Operation Range8 2.7 - 5.5A Tmega8L-8AU A Tmega8L-8AUR (3)A Tmega8L-8PU A Tmega8L-8MU A Tmega8L-8MUR (3)32A 32A 28P332M1-A32M1-A Industrial (-40°C to 85°C)16 4.5 - 5.5A Tmega8-16AU A Tmega8-16AUR (3)A Tmega8-16PU A Tmega8-16MU A Tmega8-16MUR (3)32A 32A 28P332M1-A 32M1-APackage Type32A 32-lead, Thin (1.0mm) Plastic Quad Flat Package (TQFP)28P328-lead, 0.300” Wide, Plastic Dual Inline Package (PDIP)32M1-A32-pad, 5 × 5 × 1.0 body, Lead Pitch 0.50mm Quad Flat No-Lead/Micro Lead Frame Package (QFN/MLF)32AErrata The revision letter in this section refers to the revision of the ATmega8 device.ATmega8 Rev. D to I, M ?First Analog Comparator conversion may be delayedInterrupts may be lost when writing the timer registers in the asynchronous timerSignature may be Erased in Serial Programming ModeCKOPT Does not Enable Internal Capacitors on XTALn/TOSCn Pins when 32KHz Oscillator is Used to Clock the Asynchronous Timer/Counter2Reading EEPROM by using ST or STS to set EERE bit triggers unexpected interrupt request1.First Analog Comparator conversion may be delayedIf the device is powered by a slow rising V CC, the first Analog Comparator conversion will take longer than expected on some devices.Problem Fix / WorkaroundWhen the device has been powered or reset, disable then enable theAnalog Comparator before the first conversion.2.Interrupts may be lost when writing the timer registers in the asynchronous timerThe interrupt will be lost if a timer register that is synchronized to the asynchronous timer clock is written when the asynchronous Timer/Counter register(TCNTx) is 0x00.Problem Fix / WorkaroundAlways check that the asynchronous Timer/Counter register neither have the value 0xFF nor 0x00 before writing to the asynchronous Timer Control Register(TCCRx), asynchronous Timer Counter Register(TCNTx), or asynchronous Output Compare Register(OCRx).3.Signature may be Erased in Serial Programming ModeIf the signature bytes are read before a chiperase command is completed, the signature may be erased causing the device ID and calibration bytes to disappear. This is critical, espe-cially, if the part is running on internal RC oscillator.Problem Fix / Workaround:Ensure that the chiperase command has exceeded before applying the next command.4.CK OPT Does not Enable Internal Capacitors on XTALn/TOSCn Pins when 32K HzOscillator is Used to Clock the Asynchronous Timer/Counter2When the internal RC Oscillator is used as the main clock source, it is possible to run the Timer/Counter2 asynchronously by connecting a 32KHz Oscillator between XTAL1/TOSC1 and XTAL2/TOSC2. But when the internal RC Oscillator is selected as the main clock source, the CKOPT Fuse does not control the internal capacitors on XTAL1/TOSC1 and XTAL2/TOSC2. As long as there are no capacitors connected to XTAL1/TOSC1 and XTAL2/TOSC2, safe operation of the Oscillator is not guaranteed.Problem Fix / WorkaroundUse external capacitors in the range of 20pF - 36pF on XTAL1/TOSC1 and XTAL2/TOSC2.This will be fixed in ATmega8 Rev. G where the CKOPT Fuse will control internal capacitors also when internal RC Oscillator is selected as main clock source. For ATmega8 Rev. G, CKOPT = 0 (programmed) will enable the internal capacitors on XTAL1 and XTAL2. Cus-tomers who want compatibility between Rev. G and older revisions, must ensure that CKOPT is unprogrammed (CKOPT = 1).5.Reading EEPROM by using ST or STS to set EERE bit triggers unexpected interruptrequest.Reading EEPROM by using the ST or STS command to set the EERE bit in the EECR reg-ister triggers an unexpected EEPROM interrupt request.Problem Fix / WorkaroundAlways use OUT or SBI to set EERE in EECR.Datasheet Revision History Please note that the referring page numbers in this section are referred to this document. The referring revision in this section are referring to the document revision.Changes from Rev. 2486Y- 10/10 to Rev. 2486Z- 02/111.Updated the datasheet according to the Atmel new Brand Style Guide.2.Updated “Ordering Information” on page 13. Added Ording Information for“Tape&Reel” devicesChanges from Rev. 2486X- 06/10 to Rev. 2486Y- 10/101.Max Rise/Fall time in Table 102 on page 239 has been corrected from 1.6ns to 1600ns.2.Note is added to “Performing Page Erase by SPM” on page 209.3.Updated/corrected several short-cuts and added some new ones.4.Updated last page according to new standard.Changes from Rev. 2486W- 02/10 to Rev. 2486X- 06/101.Updated “DC Characteristics” on page 235 with new V OL maximum value (0.9V and0.6V).Changes from Rev.2486V- 05/09 toRev. 2486W- 02/101.Updated “ADC Characteristics” on page 241 with V INT maximum value (2.9V).Changes from Rev. 2486U- 08/08 to Rev. 2486V- 05/091.Updated “Errata” on page 289.2.Updated the last page with Atmel’s new adresses.Changes from Rev.2486T- 05/08 toRev. 2486U- 08/081.Updated “DC Characteristics” on page 235 with I CC typical values.Changes from Rev. 2486S- 08/07 to Rev. 2486T- 05/081.Updated Table 98 on page 233.2.Updated “Ordering Information” on page 285.- Commercial Ordering Code removed.- No Pb-free packaging option removed.。
eeprom的读写原理

eeprom的读写原理
EEPROM是可擦除可编程只读存储器(Electrically Erasable Programmable Read-Only Memory)的缩写。
它是一种非易失性存储器,可以在不需要电源的情况下保持存储的数据。
EEPROM的读写原理涉及到内部的电子结构和操作方式。
首先,让我们从写入数据开始。
EEPROM的写入原理是通过在内部的存储单元中存储电荷来表示数据。
当需要写入数据时,首先要将写入地址和数据发送到EEPROM芯片。
然后,根据写入数据的逻辑状态(0或1),相应的存储单元内的电荷状态会被改变。
这是通过在存储单元中施加特定的电压来实现的,这会改变存储单元内部的绝缘体的电荷状态,从而表示特定的数据。
接下来是读取数据的原理。
当需要读取数据时,读取地址会被发送到EEPROM芯片,芯片会根据地址找到相应的存储单元,并读取存储单元内的电荷状态。
这些电荷状态会被转换成数字信号,然后输出给外部系统。
通过这种方式,存储在EEPROM中的数据可以被读取出来并用于系统操作。
总的来说,EEPROM的读写原理涉及到内部存储单元的电荷状态
表示数据,并通过外部电压和信号的控制来实现数据的写入和读取操作。
这种原理使得EEPROM成为一种非常有用的存储器,适用于许多需要长期存储数据并且需要在断电后保持数据的应用场景。
mega128程序之EEPROM
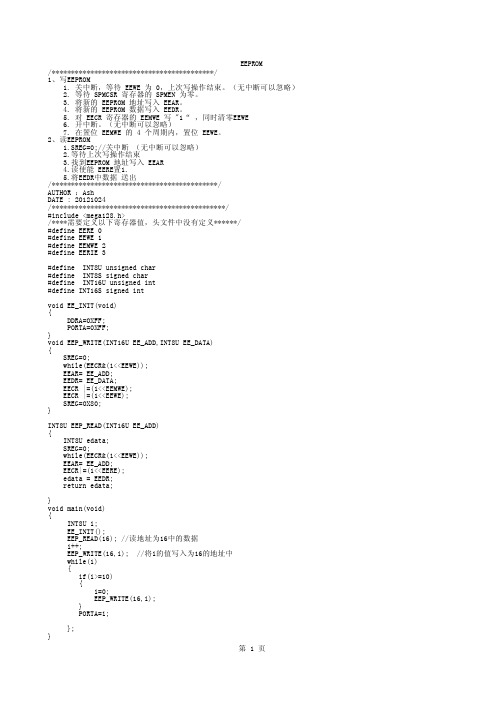
/******************************************/ 1、写EEPROM
1. 关中断,等待 EEWE 为 0,上次写操作结束。(无中断可以忽略) 2. 等待 SPMCSR 寄存器的 SPMEN 为零。 3. 将新的 EEPROM 地址写入 EEAR。 4. 将新的 EEPROM 数据写入 EEDR。 5. 对 EECR 寄存器的 EEMWE 写 "1“ ,同时清零EEWE 6. 开中断。(无中断可以忽略) 7. 在置位 EEMWE 的 4 个周期内,置位 EEWE。 2、读EEPROM 1.SREG=0;//关中断 (无中断可以忽略) 2.等待上次写操作结束 3.找到EEPROM 地址写入 EEAR 4.读使能 EERE置1. 5.将EEDR中数据 送出 /*******************************************/ AUTHOR :Ash DATE : 20121024 /*********************************************/ #include <mega128.h> /****需要定义以下寄存器值,头文件中没有定义******/ #define EERE 0 #define EEWE 1 #define EEMWE 2 #define EERIE 3
INT8U EEP_READ(INT16U EE_ADD) {
INT8U edata; SREG=0; while(EECR&(1<<EEWE)); EEAR= EE_ADD; EECR|=(1<<EERE); edata = EEDR; return edata;
} void main(void) {
icc教程

iccavr教程之一,普通I/O口实验作者:未知 AVR单片机来源:网络点击数:2771 更新时间:2007-12-15iccavr教程之二,定时器实验iccavr教程之二,定时器实验作者:未知 AVR单片机来源:网络点击数:2465 更新时间:2007-12-15作者:未知 AVR单片机来源:网络点击数:1943 更新时间:2007-12-15作者:未知 AVR单片机来源:网络点击数:2566 更新时间:2007-12-15[iccavr教程] 第四节,AD转换并显示实验第四节,AD转换并显示实验DIP封装的ATMEGA8有6路10位的ADC,在开发板上有一个精密可调的电位器,可以调节电压从0 - VCC,并连接到了PC0口上。
下面的程序任务就是将ADC转换的值显示在数码管上。
首先要编写数码管显示程序。
与上一节不同的是,上一节中显示是静态的,只能点亮一位数码管;要使4位数码管全部点亮要采用动态刷新的方式。
首先第一个数码管点亮5豪秒,其他的数码管是灭的;然后再点亮第二个数码管,时间为5豪秒,依次循环下去。
这样刷新一便要用20豪秒,每秒钟可以刷新50次,就可以骗过人的眼睛了。
定义下列全局变量unsigned char display[4]; // 显示缓冲区unsigned char dis; // 当前显示unsigned int adc; // 保存AD转换的值unsigned char time; // AD转换的时间间隔在5豪秒定时中断中加入显示过程,程序如下:switch(dis){case 0: write164(display[dis] | 0x70); break;case 1: write164(display[dis] | 0xB0); break;case 2: write164(display[dis] | 0xD0); break;case 3: write164(display[dis] | 0xE0); break;}if(++dis > 3) dis = 0;ADC转换每隔200豪秒转换一次,200豪秒可以通过5豪秒定时器间接得到,在定时器中加入一个记数变量time,只要记数到40即可得到200豪秒。
MEMORY存储芯片ATMEGA8A-AU中文规格书
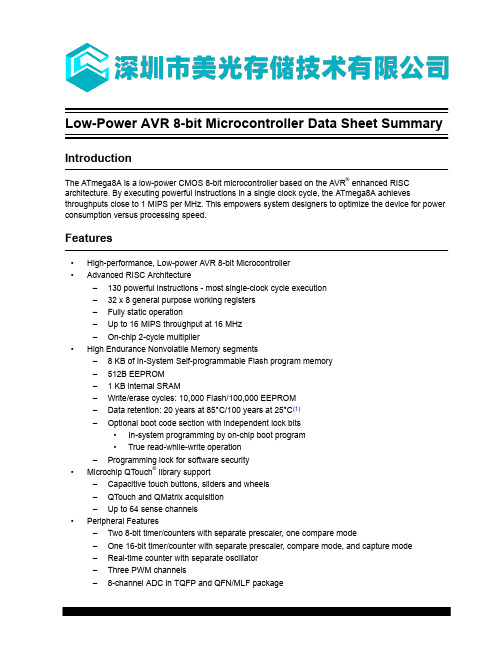
Low-Power AVR 8-bit Microcontroller Data Sheet Summary IntroductionThe ATmega8A is a low-power CMOS 8-bit microcontroller based on the AVR® enhanced RISC architecture. By executing powerful instructions in a single clock cycle, the ATmega8A achieves throughputs close to 1 MIPS per MHz. This empowers system designers to optimize the device for power consumption versus processing speed.Features•High-performance, Low-power AVR 8-bit Microcontroller•Advanced RISC Architecture–130 powerful instructions - most single-clock cycle execution–32 x 8 general purpose working registers–Fully static operation–Up to 16 MIPS throughput at 16 MHz–On-chip 2-cycle multiplier•High Endurance Nonvolatile Memory segments–8 KB of In-System Self-programmable Flash program memory–512B EEPROM– 1 KB internal SRAM–Write/erase cycles: 10,000 Flash/100,000 EEPROM–Data retention: 20 years at 85°C/100 years at 25°C(1)–Optional boot code section with independent lock bits•In-system programming by on-chip boot program•True read-while-write operation–Programming lock for software security•Microchip QTouch® library support–Capacitive touch buttons, sliders and wheels–QTouch and QMatrix acquisition–Up to 64 sense channels•Peripheral Features–Two 8-bit timer/counters with separate prescaler, one compare mode–One 16-bit timer/counter with separate prescaler, compare mode, and capture mode–Real-time counter with separate oscillator–Three PWM channels–8-channel ADC in TQFP and QFN/MLF package11.Packaging Information 11.1 32-pin 32A11.2 28-pin 28P311.3 32-pin 32M1-AErrata。
ATmega8A 单片微处理器中文资料

ATmega8A 单片微处理器中文资料【用途】单片微处理器【性能参数】主要特性如下:◆高性能、低功耗的8 位AVR?微处理器◆先进的RISC 结构●131条指令–大多数指令执行时间为单个时钟周期●32个8 位通用工作寄存器●全静态工作●工作在16MHz 时吞吐量高达16MIPS●片内2 周期乘法器◆高耐久度非易失性存储器●8K字节的在系统内可自编程Flash 程序存储器*擦写寿命:10,000 次●512字节的EEPROM*擦写寿命:100,000 次●1K字节的片内SRAM●数据保存:20 年@85℃/100 年@25℃●带有独立锁定位的引导程序区*通过片内引导程序在系统编程*真正的边写边读操作●可以对锁定位进行编程以及实现EEPROM 数据的加密◆外设特点●2个具有独立预分频器和比较器功能的8 位定时器/计数器●1个具有预分频器、比较功能和捕捉功能的16 位定时器/计数器●带有独立晶振的实时计时器●3路PWM 通道●8路ADC(TQFP,QFN/MLF32)*8 路10 位精度●6路ADC(PDIP)*8 路10 位精度●基于字节的2-wire 串行接口●可编程串行USART●主/从SPI 串行接口●具有独立片内振荡器的可编程看门狗定时器●片内模拟比较器◆特殊的微控制器特点●上电复位和可编程掉电检测●经过标定的片内RC 振荡器●片内/外中断源●12个引脚中断源5 种睡眠模式:空闲模式、ADC 噪声抑制模式、省电模式、掉电模式、和待机模式◆I/O 和封装●23个可编程的I/O 口线●PDIP28,TQFP32,QFN/MLF32◆工作电压:2.7 – 5.5V for ATmega8A◆工作速度等级:0-16 MHz for ATmega8A◆低功耗@4 Mhz,3V,25℃●正常模式:3.6 mA●空闲模式:1.0 mA●掉电模式:0.5μA 【互换兼容】。
STM8教程实验26-片内EEPROM的读写

例程二十六Flash_eeprom读写实验EEPROM是单片机应用系统中经常会用到的存储器,它主要用来保存一些掉电后需要保持不变的数据。
在以前的单片机系统中,通常都是在单片机外面再扩充一个EEPROM芯片,这种方法除了增加成本外,也降低了可靠性。
现在,很多单片机的公司都推出了集成有小容量EEPROM的单片机,这样就方便了使用,降低了成本,提高了可靠性。
STM8单片机芯片内部也集成有EEPROM,容量从640字节到2K字节。
最为特色的是,在STM8单片机中,对EEPROM的访问就象常规的RAM一样,非常方便。
EEP ROM的地址空间与内存是统一编址的,地址从004000H开始,大小根据不同的芯片型号而定。
下面介绍一下STM8S了EEPROM:风驰电子STM8开发板就是大容量的了解了那么多关于STM8S 的EEPROM的知识,下面看看软件方面是如何编程的,老规矩,从主函数看起。
看到主函数,是否觉得很容易呢,在这个例程中我发了一个晚上的时间去调试,还是不行,到了第二天早上才调试成功,所以希望大家珍惜我的写的教程文档,这些教程和例程是我发了不知多少时间是总结,为了都是各位爱好者能缩短一下开发使用时间。
好了,转入正题吧,大家在做这个实验的时候要注意2个重要的地方。
第一在“stm8s_conf.h”文件中取消注释,在“stm8s.h”的文档中改成如下这样才能使用几个重要的函数。
还有一个重要的地方是,Flash_eeprom_writeread_Init()初始化一定先初始化。
下面再看看初始化的原函数这个初始化是初始化Flash正常编程方式,开启EEPROM的数据存贮器。
这是一个EEPROM的读写测试程序,EEPROM的读的话是可以每个地址每个地址的读,但是写的话必须是一个扇区一个扇区的写,每个扇区为128Byte。
至于里面的各个函数,相信大家一个就知道是什么意思了,在这里就不多说了。
里面还有一个地方要注意的,FLASH_WaitForLastOperation(FLASH_MEMTYPE_DATA);这条语句就是等待EEPROM写完成,必须的,无论EEPROM的读还是写,都必须要这条语句。
学习笔记之内部eeprom读写
程序修改后重新编译下载到单片机后, 打开串口调试助手, 肯定会发现什么数据都没有, 别急, 重新按下单片机的复位键就可以看到数据了。 因为在主程序中发送数据的指令只执行 了一次, 速度很快, 在你打开串口调试助手前就已经过去了, 因此需复位一下才能看到现象。 现象如下图所示:
读回的数据分别是 00,01,02,03,04,05,06,07,08,09,发现和写入的数据是相同的,那么说 明成功的对 eeprom 进行了读写操作。 只要会了这两个最基本的读写操作,那么 Atmega16 内部的 512 字节的 eeprom 空间就 可以为你所用了。
AVR 学习笔记之内部 EEPROM 读写
AVR 单片机的多数型保存的数据。 Atmega16 内置的 EEPROM 的容量是 512 字节, 可以重复擦写的次数 是 10 万次。
AVRGCC 自带的 EEPROM 读写函数可对 Atmega16 内部的 EEPROM 进行读写操作。如果要使用 AVRGCC 中自带的 EEPROM 读写函数,首先要在程序中包含#include<avr/eeprom.h>这个头文件。 AVRGCC 内置 EEPROM 访问函数库如下: (1)void eeprom_read_block(void *buf, unsigned int addr, size_t n):从 EEPROM 的 addr 地址
} void usart_init() { UCSRA=0X00; UCSRC|=(1<<URSEL)|(1<<UCSZ1)|(1<<UCSZ0);//写 UCSRC, 异步操作, 禁止奇偶校验, 停止位数为 1,8 位字符长度 UBRRH=(F_CPU/BAUD/16-1)/256;//波特率高 4 位 UBRRL=(F_CPU/BAUD/16-1)%256;//波特率低 8 位 UCSRB|=(1<<TXEN);//使能发送,使能接收,使能接受中断 } void usart_put_char(unsigned char TX_data)//发送一个字节的数据 { while(!(UCSRA&(1<<UDRE)));//检测 UDRE 是否为 1, 只有在 UDRE 为 1 的情况下, 才 能向缓冲器 UDR 中写入数据。 UDR=TX_data; } int main() { unsigned char i; port_init(); usart_init(); for(i=0;i<10;i++)eeprom_write_byte(i,i); while(1); } 上段程序是对 EEPROM 进行写操作,通过 for(i=0;i<10;i++)eeprom_write_byte(i,i);这段 程序实现的是在地址 0—9 分别写数据 0—9。 那么怎么知道我数据是否成功写入了呢?下面 还要进行读操作,作用是把刚才写入的数据读出来,看看是否和写入的一样,只需要修改主 程序即可。修改后的代码如下: int main() { unsigned char i; port_init(); usart_init(); for(i=0;i<10;i++) usart_put_char(eeprom_read_byte(i)); while(1); }
ATMEGA8的熔丝位说明
ATMEGA8的熔丝位说明.txt婚姻是键盘,太多秩序和规则;爱情是鼠标,一点就通。
男人自比主机,内存最重要;女人好似显示器,一切都看得出来。
ATMEGA8的熔丝位说明1、功能熔丝熔丝说明默认1 0RSTDISBL PIN1用作复位引脚PIN1用作IO口,复位为内部复位 1WDTON 看门狗完全由软件控制看门狗始终工作,软件只可以调节溢出时间 1 SPIEN 禁止串行编程允许串行编程0EESAVE 擦除时不保留EEPROM数据擦除时保留EEPROM数据 1BODEN BOD功能禁止BOD功能允许1BODLEVEL BOD门槛电平2.7V BOD门槛电平4.0V 1BOOTRST 复位后从0地址执行复位后从BOOT区执行(参考BOOTSZ0/1) 12、BOOT区配置熔丝BOOTSZ1 BOOTSZ0 BOOT区大小BOOT区地址默认0 0 1024WORD 0x0C00 默认0 1 512WORD 0x0E001 0 256WORD 0x0F001 1 128WORD 0x0F803、时钟源选择系统时钟源CKSEL3..0外部石英/陶瓷振荡器 1111-1010外部低频晶振(32.768KHZ) 1001外部RC振荡 1000-0101可校准的内部RC振荡 0100-0001外部时钟00004、外部振荡器外部振荡器的不同工作模式熔丝位工作频率范围(MHz) C1、C2容量(pF)(仅适用石英晶振)CKOPT2 CKSEL3..11 101 0.4-0.9 仅适合陶瓷振荡器11 110 0.9-3.0 12-221 111 3.0-8.0 12-220 101,110,111 ≥1.0 12-22注:1、对陶瓷振荡器所配的电容,按陶振厂家说明。
2、当CKOPT=0(编程)时,振荡器的输出振幅较大,适用于干扰大的场合;反之,振荡器的输出振幅较小,可以减少功耗,对外电磁幅射也较小。
使用外部振荡器时的启动时间选择熔丝位从掉电模式开始的启动时间从复位开始的附加延时(Vcc=5.0V) 推荐使用场合CKSEL0 SUT 1..00 00 258 CK 4.1ms 陶瓷振荡器、快速上升电源0 01 258 CK 65ms 陶瓷振荡器、慢速上升电源0 10 1K CK - 陶瓷振荡器BOD方式0 11 1K CK 4.1ms 陶瓷振荡器、快速上升电源1 00 1K CK 65ms 陶瓷振荡器、慢速上升电源1 01 16K CK - 石英振荡器BOD方式1 10 16K CK 4.1ms 石英振荡器、快速上升电源1 11 16K CK 65ms 石英振荡器、慢速上升电源5、使用外部低频晶振时的启动时间选择可以使用32.768KHZ的手表晶振作为MCU的时钟源(同图一),此时CKSEL应当编程为1001;CKOPT=0(编程)时,选择使用内部和XTAL1/XTAL2相连的电容,没有必要再外接电容;内部电容是36pF,应用时可以参考32.768KHZ晶振的使用手册来选择C1、C2电容。
ATmega8中文资料

ATmega8中文资料ATmega8 是ATMEL公司在2002年第一季度推出的一款新型AVR高档单片机。
在AVR家族中,ATmega8是一种非常特殊的单片机,它的芯片内部集成了较大容量的存储器和丰富强大的硬件接口电路,具备AVR高档单片机MEGE 系列的全部性能和特点。
但由于采用了小引脚封装(为DIP 28和TQFP/MLF3 2),所以其价格仅与低档单片机相当,再加上AVR单片机的系统内可编程特性,使得无需购买昂贵的仿真器和编程器也可进行单片机嵌入式系统的设计和开发,同时也为单片机的初学者提供了非常方便和简捷的学习开发环境。
ATmega8的这些特点,使其成为一款具有极高性能价格比的单片机,深受广大单片机用户的喜爱,在产品应用市场上极具竞争力,被很多家用电器厂商和仪器仪表行业看中,从而使ATmega8迅速进入大批量的应用领域.ATmega系列单片机属于AVR中的高档产品,它承袭了AT90所具有的特点,并在AT90(如AT9058515、AT9058535)的基础上,增加了更多的接口功能,而且在省电性能。
稳定性、抗干扰性以及灵活性方面考虑得更加周全和完善。
ATmega8 是一款采用低功耗CMOS工艺生产的基于AVR RISC结构的8位单片机。
AVR单片机的核心是将32个工作寄存器和丰富的指令集联结在一起,所有的工作寄存器都与ALU(算术逻辑单元)直接相连,实现了在一个时钟周期内执行的一条指令同时访问(读写)两个独立寄存器的操作。
这种结构提高了代码效率,使得大部分指令的执行时间仅为一个时钟周期.因此, ATmega8可以达到接近1MIPS/MHz的性能,运行速度比普通CISC单片机高出10倍。
ATmega8的主要性能如下:*高性能、低功耗的8位AVR微控制器,先进的RISC精简指令集结构130条功能强大的指令,大多数为单时钟周期指令32个8位通用工作寄存器工作在16MHz时,具有16MIPS的性能片内集成硬件乘法器(执行速度为2个时钟周期)*片内集成了较大容量的非易失性程序和数据存储器以及工作存储器8K字节的Flash程序存储器,擦写次数:>10000次支持可在线编程(ISP)、可在应用自编程(IAP)带有独立加密位的可选BOOT区,可通过BOOT区内的引导程序区(用户自己写入)来实现IAP编程.512个字节的E2PROM,擦写次数:100000次1K字节内部SRAM可编程的程序加密位*丰富强大的外部接口(Peripheral)性能2个具有比较模式的带预分频器(Separate Prescale)的8位定时/计数器1个带预分频器(SeParat Prescale),具有比较和捕获模式的16位定时/计数器1个具有独立振荡器的异步实时时钟(RTC)3个PWM通道,可实现任意<16位、相位和频率可调的PWM脉宽调制输出8通道A/D转换( TQFP、MLF封装),6路10位A/D+2路8位A/D6通道A/D转换( PDIP封装),4路10位A/D+2路8位A/D1个I2C的串行接口,支持主/从、收/发四种工作方式,支持自动总线仲裁1个可编程的串行USART接口,支持同步、异步以及多机通信自动地址识别1个支持主/从(Master/Slave)、收/发的SPI同步串行接口带片内RC振荡器的可编程看门狗定时器片内模拟比较器*特殊的微控制器性能可控制的上电复位延时电路和可编程的欠电压检测电路内部集成了可选择频率(l/2/4/8MHZ)、可校准的RC振荡器外部和内部的中断源18个五种睡眠模式:空闲模式(Idle)、ADC噪声抑制模式(ADC Noise Reduction)。
和我一起用ATMEGA8做遥控器-上

Coldbloodanimal低成本自制航模电子设备系列之一和我一起用ATMEGA8做遥控器(8通道所有资料已公布)上7月份的时候,在5imx看到一个网友说想用ATMEGA系列8位单片机做遥控器、电调、陀螺仪、平衡仪一个系列,引起了我的极大兴趣,确实航模用的遥控器、电调、锁尾式陀螺仪、平衡仪这些产品,从技术的角度来说,应该是比较简单的东西,不知道为什么,国内的模友们自己做的很少,买成品的较多,而且很多人也是提到国产设备就指是垃圾设备,非国外的产品不买,其实这种精神并不利于我国航模事业的进步。
个人认为,航模作为一项运动,从国家的角度来看,水平的提高,一方面是利用成品设备(当然也包括国外先进设备)组装调试出操控性非常好的航模,并通过个人的良好操作技能,能够在各种比赛中获得名次;但另一方面,应该是在航模运动中,不断地锻炼、培养、发掘出自己的技术力量。
从航模及相关电子产品的种类发展来看,国外比我们要先进好几年,各类新的航模电子产品(如最初的无刷电机、电调等)或者新类型的航模(如四轴等)往往都是国外的爱好者们研究并应用之后,才传到国内来的。
大家都说他们的创新能力很强,可是真正静下心来想一想,创新能力的发展不光要靠新的点子,还要破除技术的神秘感,要靠实际动手能力强,才能变成现实。
我们现在爱好航模的人有很大一部分人是在校的学生,从我国的高等教育体系来看,学校教的过份注重理论,而轻实践,大家往往学了很多基础知识,而现实中却完全无法自己动手,他们自己有很多人都会觉得外国的技术很神秘。
如果搞工科的学生都觉得技术神秘的话,我们的自主创新就会成为一句空话。
而当你深入去了解那些我们以为很神秘的技术,特别是发现很多东西都是自己可以掌握,自己可以应用的东西的时候,也许我们离自主创新的天花板就只需轻轻一跃了。
当然,从个人业余制作的角度来说,不要去选技术含量过高,自己完全无法实现的内容,如自制遥控器所需的芯片、自制陀螺仪芯片等等,那些创新是需要高端试验室环境和设备的,个人业余制作的条件完全不具备。
ATmega8指令(详细)

地址寄存器名称$3E($005E)H$3D($005D)L SREG 状态寄存器GICR 通用中断控制寄存器GIFR 通用中断标志寄存器MCUCR MCU通用控制寄存器SPH、SPL 堆栈指针高、低字节MCUCSR MCU控制和状态寄存器SFIOR 特殊功能I/O寄存器$30($0050)$34($0054)$35($0055)$3A($005A)$3B($005B)$3F($005F)PORTX(BCD)(BCD口)数据寄存器DDRX(BCD)(BCD口)数据方向寄存器PINX(BCD)(BCD口)输入脚$31($0051)OCSSAL RC振荡器校准寄存器TWBRTWI波特率寄存器TWDR TWI数据寄存器SPMCR 程序存储器存储控制寄存器ASSR T/C2异步状态寄存器$21($0041)WDTCR看门狗定时控制寄存器TWCR TWI(I2C总线)控制寄存器TWAR TWI(被控器)地址寄存器TWSR TWI状态寄存器TIMSK T/C中断屏蔽寄存器$22($0042)$37($0057)TIFR T/C中断标志寄存器TCCR0T/C0控制寄存器TCNT0T/C0初值TCCR1B T/C1控制寄存器BTCCR1A T/C1控制寄存器AOCR1AH、OCR1AL T/C1输出比较寄存器A高、低字节OCR1BH、OCR1BL T/C1输出比较寄存器B高、低字节ICR1H、ICR1L T/C1输入捕获寄存器高、低字节TCNT1H、TCNT1L T/C1初值高、低字节TCNT2T/C2初值OCR2T/C2输出比较寄存器TCCR2T/C2控制寄存器SPDR SPI数据寄存器SPSR SPI状态寄存器SPCR SPI控制寄存器UBRRH、UBRRL USART波特率寄存器UDR UART数据寄存器EEARH、EEARLEEPROM地址寄存器高、低字节EEDR EEPROM数据寄存器EEPROM控制寄存器ADCSRA ADC控制与状态寄存器AUCSRA USART控制和状态寄存器AUCSRB USART控制和状态寄存器BUSART控制和状态寄存器C(与UBRRH共享一个I/O地址)UCSRC EECRADCH、ADCL ADC数据寄存器高、低字节ADMUX ADC多路复用选择器位 说 明(适用于Atmega8)Bit7-I:全局中断使能。
atmega8原理及应用手册

atmega8原理及应用手册ATmega8是一款8位微控制器,由Atmel公司生产。
它是AVR系列微控制器的一部分,具有高性能、低功耗和易于编程的特点。
下面是关于ATmega8原理及应用手册的详细介绍:1. ATmega8原理:ATmega8采用了基于Harvard架构的8位RISC(精简指令集计算机)架构。
它具有32KB的闪存程序存储器,1KB的EEPROM数据存储器和2KB的SRAM数据存储器。
它还具有23个可编程I/O引脚,包括8个模拟输入引脚和15个数字I/O引脚。
ATmega8还支持多种通信接口,如UART(串行通信)、SPI(串行外设接口)和I2C(双向串行总线)。
2. ATmega8应用手册:ATmega8应用手册提供了关于ATmega8微控制器的详细信息,包括芯片的功能、引脚配置、时钟设置、编程和调试方法等。
手册通常包括以下内容:- 芯片功能:介绍ATmega8的主要功能和特性,如时钟源选择、中断控制、定时器/计数器、PWM(脉宽调制)等。
- 引脚配置:列出了每个引脚的功能和用途,包括I/O引脚、复位引脚、电源引脚等。
- 时钟设置:描述了如何配置和使用ATmega8的时钟源,包括外部晶体振荡器、内部RC振荡器和外部时钟输入。
- 编程方法:介绍了如何使用编程器和开发环境(如AVR Studio)对ATmega8进行程序编写、下载和调试。
- 调试方法:提供了一些调试技巧和方法,以帮助开发人员解决在ATmega8上开发过程中可能遇到的问题。
此外,ATmega8应用手册还可能包括电气特性、时序图、寄存器描述、指令集、示例电路和代码等内容,以帮助开发人员更好地理解和应用ATmega8微控制器。
总之,ATmega8原理及应用手册提供了关于ATmega8微控制器的详尽信息,帮助开发人员了解其功能和特性,并指导他们在实际应用中正确地配置和使用ATmega8。
ATmega8_l介绍

ATmega8/8L 介绍
如果 RSTDISBL 熔丝位被编程 PC6 就作为一个 I/O 引脚 注意 PC6 的电气特性与 C 口的其他引 脚不同
如果 RSTDISBL 熔丝位未被编程 PC6 就作为复位输入脚 即使此时时钟还未起振 超过 50ns 的 低电平将引起系统复位 低于 50ns 的脉冲不能保证可靠复位 Port D (PD7..PD0)
广州天河双龙电子有限公司
ATmega8/8L 介绍
2 4.5 5.5V(ATmega8) 8 速度等级
1 0 8MHz ATmega8L 2 0 16MHz ATmega8 9 在 4MHz 3V 25 C 的功耗 1 激活模式 3.6mA 2 空闲模式 1.0mA 3 掉电模式 0.5 A
Sl-MEGA8 开发实验器上配 ATmega8 器件 复位电路 RESET 有二种选择:外部按键复位或 PC6 作 I/O 口用 有外接 DC-9V 电源插座,输入整流滤波后,产生+9V 电源,供 LM358 运放用 电源输入整流稳压滤 波后+5V,供整个电路用 有 RS232 接口,可做 PC 机与 ATmega8 的异步串行 UART 通讯,用 ATmega8 BOOT 区创建 ATmega8 自监控后,可作用户程序(Flash/EEPOM)下载 读/写等操作,也可把 PC 机屏幕作为用户 显示终端使用,可充分利用 PC 机资源 晶振有四种选择: 外接 8MHZ 无源晶振; 也可外接 8MHZ 有源 晶振; 接实时时钟晶振 32.768K; 用内部 RC 振荡器,可做成无外接器件应用系统 有二个按键作外部 中断 INT0,INT1 输入信号 ATmega8 芯片有对应引脚输出插针,供用户实验用 有 DAC0,DAC1 信号输出 接口, DAC 电压也可通过 ADC 采样转换为数字值显示到 PC 屏幕上 有主/从 SPI 同步通讯接口,供并口 ISP 下载编程用 有无源音响器,使实验有声有色 有 ADC 输入接口,用多圈电位器调 A/D 模拟电压供测 试用,用短路块可连接其它通道做 ADC 实验 有通用 PC 机键盘 PS/2 接口 有 4 位 LED 数码管作显示用 有 8 位 LED 发光二极管,供 ATmega8 的 I/O 口作电平指示实验用 有电源指示,通讯忙指示 有 IIC 总线 配套外围接口电路 AT24C02,供实验用 有 AREF 基准电压通 断选择 有模拟比较器接口电路 有二路 PWM(D/A)输出接口 三级网络滤波 模拟电压放大电路供用户实验 印制板右侧有大面积布线区,供用 户增加驱动接口实验 SL-MEGA8 仿真开发实验器也可配上组态监控, 成为 SL-MEGA8 组态开发实验器系统 这样充分
EEPROM读写访问

EEPROM写使能。当EEPROM的 地址和数据准备好后,用户必须 设置EEWE为“1”,才能将数据 写入EEPROM中。在置EEWE为 “1”前,EEMWE必须置“1”, 否则写入操作无效。
位 位名 读/写 初始值 7 6 5
EEPROM读使能。此位用于对 EEPROM的数据读取,当EEAR中 设置了EEPROM的读取地址后, EERE的置“1”操作将使单元的数 据送至EEDR寄存器中,此时EERE 位自动清“0”。
1
1
(1)休眠状态 为进入休眠状态,MCUCR中的SE位被设为1,且须执 行一条SLEEP指令。系统发生的任何一种中断和复位将使 MCU恢复到正常模式。
(2)空闲模式 SM位必须清零,SLEEP指令使MCU进入空闲状态, 当系统发生外部中断、定时器/计数器溢出中断和看门狗复 位单片机时返回正常模式。 (3)掉电模式 此模式下,只有复位和外部中断可以使单片机恢复正 常模式。 (4)节电方式库函数 void sleep_enable(void) //允许低功耗模式 void sleep_disable(void) //禁止低功耗模式 void idle(void) //闲置模式 void powerdown(void) //掉电模式 void powersave(void) //休眠模式 在调用这些库函数之前必须将头文件#include <sleep.h> 加入到源程序文件中。
