思科OSPF实验1:基本的OSPF配置
OSPF实验配置步骤详解
OSPF试验指南目标:对于OSPF的理解达到CCNA试验考察的要求。
需要掌握的知识点:OSPF的配置。
需要掌握的命令:IOS中OSPF配置的相关命令。
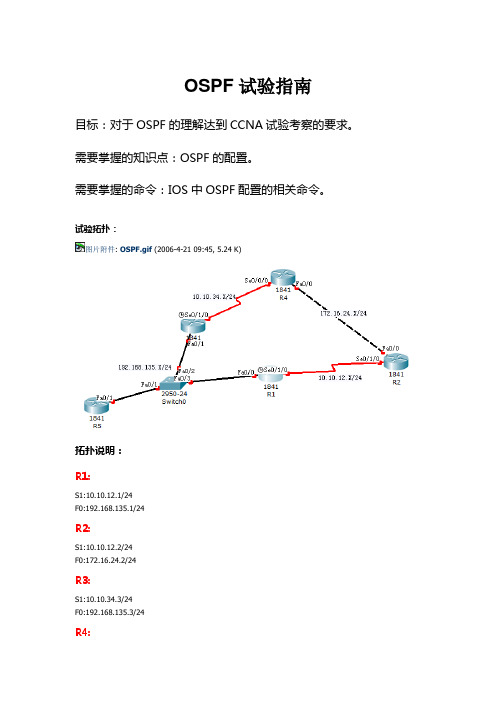
试验拓扑:图片附件: OSPF.gif (2006-4-21 09:45, 5.24 K)拓扑说明:R1:S1:10.10.12.1/24F0:192.168.135.1/24R2:S1:10.10.12.2/24F0:172.16.24.2/24R3:S1:10.10.34.3/24F0:192.168.135.3/24R4:S1:10.10.34.4/24F0:172.16.24.4/24R5:F0:192.168.135.5/24试验要求:1.路由器的IP地址如上所示。
每个路由器都有一个环回口,地址为X.X.X.X/32,X是你的路由器编号,例如: R1的环回口地址为1.1.1.1/32。
2.在所有路由器上开启OSPF路由协议。
3.配置结束后所有路由器都能看到所有网络的路由,并且能够ping通所有IP地址。
配置步骤:一.配置预配R1:Router>enable 进入特权模式Router#configure terminal 进入全局配置模式Router(config)#hostname R1 设置名字R1(config)#enable secret cisco 加密的R1(config)#no ip domain-lookup 关闭自动域名解析R1(config)#line console 0 进入线路con口R1(config-line)#password cisco 设置登陆密码R1(config-line)#login 启用密码R1(config-line)#logging synchronous 关闭同步日志R1(config-line)#exec-timeout 0 0从 con登陆永不超时(试验环境下)R1(config-line)#exitR1 (config)#line vty 0 4 telnet 远程登陆线路口R1 (config-line)#password ciscoR1 (config-line)#loginR1 (config-line)#logging synchronousR1 (config-line)#exec-timeout 0 0R1 (config-line)#exitR2:Router>enable 进入特权模式Router#configure terminal 进入全局配置模式Router(config)#hostname R1 设置名字R2(config)#enable secret cisco 加密的R2(config)#no ip domain-lookup 关闭自动域名解析R2(config)#line console 0 进入线路con口R2(config-line)#password cisco 设置登陆密码R2(config-line)#login 启用密码R2(config-line)#logging synchronous 关闭同步日志R2(config-line)#exec-timeout 0 0从 con登陆永不超时(试验环境下)R2(config-line)#exitR2 (config)#line vty 0 4 telnet 远程登陆线路口R2 (config-line)#password ciscoR2 (config-line)#loginR2 (config-line)#logging synchronousR2 (config-line)#exec-timeout 0 0R2 (config-line)#exitRouter>enable 进入特权模式Router#configure terminal 进入全局配置模式Router(config)#hostname R1 设置名字R3(config)#enable secret cisco 加密的R3(config)#no ip domain-lookup 关闭自动域名解析R3(config)#line console 0 进入线路con口R3(config-line)#password cisco 设置登陆密码R3(config-line)#login 启用密码R3(config-line)#logging synchronous 关闭同步日志R3(config-line)#exec-timeout 0 0从 con登陆永不超时(试验环境下)R3(config-line)#exitR3 (config)#line vty 0 4 telnet 远程登陆线路口R3 (config-line)#password ciscoR3 (config-line)#loginR3 (config-line)#logging synchronousR3 (config-line)#exec-timeout 0 0R3 (config-line)#exitR4:Router>enable 进入特权模式Router#configure terminal 进入全局配置模式Router(config)#hostname R1 设置名字R4(config)#enable secret cisco 加密的R4(config)#no ip domain-lookup 关闭自动域名解析R4(config)#line console 0 进入线路con口R4(config-line)#password cisco 设置登陆密码R4(config-line)#login 启用密码R4(config-line)#logging synchronous 关闭同步日志R4(config-line)#exec-timeout 0 0从 con登陆永不超时(试验环境下)R4(config-line)#exitR4 (config)#line vty 0 4 telnet 远程登陆线路口R4 (config-line)#password ciscoR4 (config-line)#loginR4 (config-line)#logging synchronousR4 (config-line)#exec-timeout 0 0R4 (config-line)#exitRouter>enable 进入特权模式Router#configure terminal 进入全局配置模式Router(config)#hostname R1 设置名字R5(config)#enable secret cisco 加密的R5(config)#no ip domain-lookup 关闭自动域名解析R5(config)#line console 0 进入线路con口R5(config-line)#password cisco 设置登陆密码R5(config-line)#login 启用密码R5(config-line)#logging synchronous 关闭同步日志R5(config-line)#exec-timeout 0 0从 con登陆永不超时(试验环境下)R5(config-line)#exitR5 (config)#line vty 0 4 telnet 远程登陆线路口R5 (config-line)#password ciscoR5 (config-line)#loginR5 (config-line)#logging synchronousR5 (config-line)#exec-timeout 0 0R5 (config-line)#exitSwitch0Switch>enable 用户模式到特权模式Switch#configure terminal 特权模式到全局配置模式Switch(config)#hostname Switch0 设置名字Switch0(config)#enable secret cisco 加密的Switch0(config)#no ip domain-lookup 关闭自动域名解析Switch0(config)#line console 0 进入线路console口Switch0(config-line)#password cisco 设置登陆密码Switch0(config-line)#login 启用密码Switch0(config-line)#logging synchronous 关闭同步日志Switch0(config-line)#exec-timeout 0 0 从 console登陆永不超时(试验环境下)Switch0(config-line)#exit 退出Switch0(config)#line vty 0 4 telnet 远程登陆线路口Switch0(config-line)#password ciscoSwitch0(config-line)#loginSwitch0(config-line)#logging synchronousSwitch0(config-line)#exec-timeout 0 0Switch0(config-line)#exit二、配置各接口IP地址R1:R1(config)#interface fastEthernet 0/0 以太网接口R1(config-if)#ip address 192.168.135.1 255.255.255.0 R1(config-if)#no shutdownR1(config-if)#exitR1(config)#interface serial 0/1/0 串行接口R1(config-if)#ip address 10.10.12.1 255.255.255.0R1(config-if)#clock rate 64000R1(config-if)#no shutdownR1(config-if)#exitR1(config)#interface loopback 0R1(config-if)#ip address 1.1.1.1 255.255.255.255R1(config-if)#no shutdownR1(config-if)#exitR2:R2(config)#interface serial 0/1/0R2(config-if)#ip address 10.10.12.2 255.255.255.0R2(config-if)#no shutdownR1(config-if)#clock rate 64000R2(config)#interface fastEthernet 0/0R2(config-if)#ip address 172.16.24.2 255.255.255.0 R2(config-if)#no shutdownR2(config)#interface loopback 0R2(config-if)#ip address 2.2.2.2 255.255.255.255R2(config-if)#no shutdownR3:R3(config)#interface serial 0/1/0R3(config-if)#ip address 10.10.34.3 255.255.255.0R3(config-if)#no shutdownR1(config-if)#clock rate 64000R3(config)#interface fastEthernet 0/1R3(config-if)#ip address 192.168.135.3 255.255.255.0 R3(config-if)#no shutdownR3(config)#interface loopback 0R3(config-if)#ip address 3.3.3.3 255.255.255.255R3(config-if)#no shutdownR4:R4(config)#interface serial 0/0/0R4(config-if)#ip address 10.10.34.4 255.255.255.0R4(config-if)#no shutdownR1(config-if)#clock rate 64000R4(config)#interface fastEthernet 0/0R4(config-if)#ip address 172.16.24.4 255.255.255.0 R4(config-if)#no shutdownR4(config)#interface loopback 0R4(config-if)#ip address 4.4.4.4 255.255.255.255R4(config-if)#no shutdownR5(config)#interface fastEthernet 0/1R5(config-if)#ip address 192.168.135.5 255.255.255.0 R5(config-if)#no shutdownR5(config)#interface loopback 0R5(config-if)#ip address 5.5.5.5 255.255.255.255R5(config-if)#no shutdown三、配置OSPF协议R1:R1(config)#router ospf 1R1(config-router)#network 10.10.12.1 0.0.0.0 area 0R1(config-router)#network 192.168.135.1 0.0.0.0 area 0 R1(config-router)#network 1.1.1.1 0.0.0.0 area 0R2:R2(config)#router ospf 2R2(config-router)#network 10.10.12.2 0.0.0.0 area 0R2(config-router)#network 172.16.24.2 0.0.0.0 area 0 R2(config-router)#network 2.2.2.2 0.0.0.0 area 0R3:R3(config)#router ospf 3R3(config-router)#network 10.10.34.3 0.0.0.0 area 0R3(config-router)#network 192.168.135.3 0.0.0.0 area 0 R3(config-router)#network 3.3.3.3 0.0.0.0 area 0R4(config)#router ospf 4R4(config-router)#network 10.10.34.4 0.0.0.0 area 0R4(config-router)#network 172.16.24.4 0.0.0.0 area 0 R4(config-router)#network 4.4.4.4 0.0.0.0 area 0R5:R5(config)#router ospf 5R5(config-router)#network 192.168.135.5 0.0.0.0 area 0 R5(config-router)#network 5.5.5.5 0.0.0.0 area 0四、查看配置。
思科OSPF命令配置手册
思科OSPF命令配置手册OSPF 命令配置手册本书是一本简洁而完整的OSPF命令手册.书中提供了很多示例场景,演示了可在由最少数量的路由器组成的网络环境中实施的每条OSPF命令的正确用法.这可以让读者学会每条OSPF命令,而不需搭建一个庞大的,昂贵的实验室环境.这些示例场景清晰地展示了每条OSPF 命令的目的和用法.有的例子介绍了一些常见的不能正常工作的环境,帮助读者加深对一些特别的OSPF命令的理解.本书覆盖了OSPF中的很多主题,包括接口配置,OSPF区域配置,路由过滤,OSPF进程配置,路由成本,缺省路由产生,路由再分布,管理距离,OSPF邻居关系,路由汇聚,以及"show","debug"和"clear"命令等. 本书的使用方式与读者的目标有关.如果读者是要准备CCIE的笔试和LAB考试,那么本书可被用作学习每条OSPF命令的目的和正确用法的实验室指南.如果读者是一位网络设计人员,那么本书可被用作OSPF命令的参考书.第1章 OSPF进程配置命令 31.1 router ospf process-id 31.2 route ospf process-id vrf name 5第2章 OSPF区域命令 92.1 area area-id authentication 92.2 area area-id authentication message-digest 162.3 area area-id default-cost cost 252.4 area area-id nssa 302.5 area area-id nssa default-infromation-originate 362.6 area area-id nssa no-redistribution 432.7 area area-id nssa no-summary 532.8 area area-id range ip-address mask 602.9 area area-id range ip-address mask advertise 602.10 area area-id range ip-address mask not-advertise 602.11 area area-id stub 662.12 area area-id stub no-summary 722.13 area transit-area-id virtual-link router-id 762.14 area transit-area-id virtual-link router-idauthentication authentication-key password 822.15 area transit-area-id virtual-link router-idauthentication message-digest 822.16 area transit-area-id virtual-link router-idauthentication null 832.17 area transit-area-id virtual-link router-idauthentication-key password 952.18 area transit-area-id virtual-link router-id dead-interval seconds 1012.19 area transit-area-id virtual-link router-id hello-interval seconds 1072.20 area transit-area-id virtual-link router-id message-digest-key key-id md5 password 1122.21 area transit-area-id virtual-link router-id retransmit-interval seconds 1192.22 area transit-area-id virtual-link router-id transmit-delay seconds 125第3章默认成本 1293.1 auto-cost reference-bandwidth bandwidth 129第4章产生缺省路由 1394.1 default-information originate 1394.2 default-information originate always 1424.3 default-information originate metric cost 1454.4 default-information originate always metric cost 1454.5 default-information originate metric-type type 1484.6 default-information originate always metric-type type 1484.7 default-information originate route-map route-map-name 152第5章为再次分布协议设置缺省的度量 1595.1default-metric cost 159第6章管理距离 1656.1 distance administrative-distance 1656.2 distance administrative-distance source-ip- address source-ip-mask 1696.3 distance administrative-distance source-ip- address source-ip-mask access-list-number1696.4 distance ospf external administrative-distance 1746.5 distance ospf inter-area administrative-distance 1746.6 distance ospf intra-area administrative-distance 174第7章用分布列表过滤路由 1817.1 distribute-list access- list-number in 1817.2 distribute-list access-list-number in interface-type interface-number 1867.3 distribute-list access-list-number out 1917.4 distribute-list access-list-number out interface-type interface-number 1917.5 distribute-list access-list-number out routing-process 1927.6 distribute-list access-list-number in 1977.7 distribute-list access-list-name in interface-type interface-number 2017.8 distribute-list access-list-name out 2067.9 distribute-list access-list-name out interface-type interface-number 2077.10 distribute-list access-list-name out routing-process 2077.11 distribute-list prefix prefix-list-name in 2127.12 distribute-list prefix prefix-list-name in interface-type interface-number 2177.13 distribute-list prefix prefix-list-name out 2227.14 distribute-list prefix prefix-list-name out interface-type interface-number 2227.15 distribute-list prefix prefix-list-name out routing-process 222第8章 MOSPF LSA的处理 2318.1 ignore lsa mospf 231第9章记录OSPF邻居状态的改变 2339.1 log-adjacency-changes 2339.2 log adjacency-changes detail 233第10章最大路径配置 23710.1 maximum-paths number-of-paths 237第11章 OSPF邻居命令 24311.1 neighbor ip-address 24311.2 neighbor ip-address cost cost 25611.3 neighbor ip-address database-filter all out 25911.4 neighbor ip-address poll-interval interval 26111.5 neighbor ip-address priority priority 263第12章 OSPF网络命令 26712.1 network ip-address wild-card-mask area area-id 267第13章被动的OSPF接口 27313.1 passive-interface interface-name interface-number 27313.2 passive-interface default 276第14章路由的再次分布 28114.1 redistribute routing-process process-id 28114.2 redistribute routing-process process-id metric ospf-metric 28114.3 redistribute routing-process process-id metric-type metric-type 28114.4 redistribute routing-process process-id subnets 28114.5 redistribute routing-process process-id tag tag-value 28214.6 redistribute routing-process process-id route-map route-map-name 292第15章控制OSPF路由器ID 30715.1 router-id ip-address 307第16章汇聚外部路由 31516.1 summary-address ip-address mask 31516.2 summary-address ip- address mask not-advertise 31516.3 summary-address ip-address mask tag value 318第17章 OSPF计时器 32517.1 timers lsa-group-pacing seconds 32517.2 timers spf delay interval 326第18章流量分担 32918.1 traffic-share min across-interfaces 329第19章接口配置命令 33119.1 ip ospf authentication 33119.2 ip ospf authentication authentication-key password 33119.3 ip ospf authentication message-digest 33119.4 ip ospf authentication null 33119.5 ip ospf cost cost 33819.6 ip ospf database-filter all out 34219.7 ip ospf dead-interval seconds 34419.8 ip ospf demand-circuit 34619.9 ip ospf flood-reduction 34819.10 ip ospf hello-interval seconds 35119.11 ip ospf message-digest-key key-id md5 password 35419.12 ip ospf mtu-ignore 35919.13 ip ospf network broadcast 36319.14 ip ospf network non-broadcast 37419.15 ip ospf network point-to-multipoint 37519.16 ip ospf network point-to-multipoint non-broadcast 37519.17 ip ospf network point-to-point 38419.18 ip ospf priority priority 39119.19 ip ospf retransmit-interval seconds 39419.20 ip ospf transmit-delay seconds 397第20章 show命令 40120.1 show ip ospf 40120.2 show ip ospf process-id 40120.3 show ip ospf border-routers 40320.4 show ip ospf process-id border-routers 40320.5 show ip ospf database 40420.6 show ip ospf process-id database 40420.7 show ip ospf database adv-router router-id 40420.8 show ip ospf process-id database adv-router router-id 40420.9 show ip ospf database asbr-summary 40420.10 show ip ospf process-id database asbr-summary 40520.11 show ip ospf database asbr-summary asbr-id 40520.12 show ip ospf process-id database asbr-summary asbr-id 40520.13 show ip ospf database database-summary 40520.14 show ip ospf process-id database database-summary 40520.15 show ip ospf database external 40520.16 show ip ospf process-id database external 40520.17 show ip ospf database network 40520.18 show ip ospf process-id database network 40520.19 show ip ospf database nssa-external 40520.20 show ip ospf process-id database nssa-external 40620.21 show ip ospf database router 40620.22 show ip ospf process-id database router 40620.23 show ip ospf database self-originate 40620.24 show ip ospf process-id database self-originate 40620.25 show ip ospf database summary 40620.26 show ip ospf process-id database summary 40620.27 show ip ospf flood-list 40820.28 show ip ospf process-id flood-list 40820.29 show ip ospf flood-list int-name int-number 40820.30 show ip ospf process-id flood-list int-name int-number 40820.31 show ip ospf interface 40920.32 show ip ospf process-id interface 40920.33 show ip ospf interface int-name int-number 40920.34 show ip ospf process-id interface int-name int-number 40920.35 show ip ospf neighbor 41120.36 show ip ospf process-id neighbor 41120.37 show ip ospf neighbor neighbor-id 41120.38 show ip ospf process-id neighbor neighbor-id 41120.39 show ip ospf neighbor int-name int-number 41120.40 show ip ospf process-id neighbor int-name int-number 41120.41 show ip ospf neighbor detail 41120.42 show ip ospf process-id neighbor detail 41120.43 show ip ospf neighbor detail neighbor-id 41120.44 show ip ospf process-id neighbor detail neighbor-id 41120.45 show ip ospf neighbor int-name int-number 41120.46 show ip ospf process-id neighbor int-name int-number 41220.47 show ip ospf request-list 41320.48 show ip ospf process-id request-list 41320.49 show ip ospf request-list neighbor-id 41320.50 show ip ospf process-id request-list neighbor-id 41320.51 show ip ospf request-list int-name int-number 41320.52 show ip ospf process-id request-list int-name int-number 41320.53 show ip ospf retransmission-list 41420.54 show ip ospf process-id retransmission-list 41420.55 show ip ospf retransmission neighbor-id 41420.56 show ip ospf process-id retransmission neighbor-id 41420.57 show ip ospf retransmission int-name int-number 41520.58 show ip ospf process-id retransmission int-name int-number 41520.59 show ip ospf summary-address 41620.60 show ip ospf process-id summary-address 41620.61 show ip ospf virtual-links 41620.62 show ip ospf process-id virtual-links 416第21章 debug命令 41921.1 debug ip ospf adj 41921.2 debug ip ospf events 42021.3 debug ip ospf flood 42221.4 debug ip ospf flood ip-access-list-number 42221.5 debug ip ospf lsa-generation 42521.6 debug ip ospf lsa-generation ip-access-list-number 42521.7 debug ip ospf packet 42621.8 debug ip ospf retransmission 42721.9 debug ip ospf spf 42721.10 debug ip ospf spf external 42721.11 debug ip ospf spf external access-list-number 42721.12 debug ip ospf spf inter 42721.13 debug ip ospf spf inter access-list-number 42721.14 debug ip ospf spf intra 42721.15 debug ip ospf spf intra access-list-number 428第22章 clear命令 43122.1 clear ip ospf counters 43122.2 clear ip ospf process-id counters 43122.3 clear ip ospf process-id counters neighbor 43122.4 clear ip ospf process-id counters neighbor int-name int-number 43122.5 clear ip ospf process 43222.6 clear ip ospf process-id process 43222.7 clear ip ospf redistribution 43322.8 clear ip ospf process-id redistribition 433。
思科CCNP教程之OSPF

高的IP地址
注意:用作Router ID的接口不一定运行OSPF协议 Router ID不一定要存在的配置地址 router ID一但选定就不改了,除非重启或删除进程
b) Topology table:Typically referred to as LSDB (routers and links in the area or network) All routers within an area have an identical LSDB
c) Routing table:Commonly named a forwarding database
© 2003, Cisco Systems, Inc. All rights reserved.
BSCI 2.0—1-4
什么是OSPF
➢ OSPF(OPEN SHORTEST PATH FIRST),即开放最短路径优先。 ➢ 是一种链路状态协议,采用Dijkstra算法,也叫最短路径算法(SPF); ➢ OPEN代表OSPF是一个标准 、开放的、与产商无关的标准路由协议;它由IETF制
© 2003, Cisco Systems, Inc. All rights reserved.
BSCI 2.0—1-6
OSPF的报头
© 2003, Cisco Systems, Inc. All rights reserved.
BSCI 2.0—1-7
OSPF的Router ID
所有运行OSPF的路由器都需要一个能够唯一标识自己的RouterID
OSPF协议基本配置

OSPF协议基本配置注意:此实验拓扑图是以机房的实验拓扑画的,如果是使用模拟器来做此实验,请根据模拟器的拓扑来更改。
实验目的:1.能够独立的配置OSPF的单区域,实现整个区域之间的网络通信。
2.能够使用各种SHOW命令进行检查。
3.理解DR/BDR的选举原则,OSPF的邻接关系的建立过程。
4.邻接关系建立的必须匹配的几个参数5.3张表的形成过程,OSPF协议的基本原理实验要求:1.按照拓扑图把基本的链路连接配置起来,并且配置完成以后检查基本的链路通信(检查直连链路之间能否进行通信)2.运行OSPF协议,实现整个网络之间可达。
(配置OSPF单区域)3.保证R1成为DR,其他的路由器成为DROTHER实验配置:(基本的常见配置和链路配置这里不给出)R1上的配置:R1(config)#int loopback 0R1(config-if)#ip address 11.11.11.11 255.255.255.0 //回环接口,一般回环接口我们主要用来做测试或者模拟网段的时候使用,需要注意回环接口是一个逻辑上的接口。
没有真实的物理接口和他对应,但是回环接口基本上具有所有物理借口的特性R1(config-if)#R1(config)#router ospf 1 //运行OSPF协议,进程ID为1。
进程ID只是为了识别路由器本地运行了几个OSPF进程。
R1(config-router)#router-id 1.1.1.1 //指定R1的router-id为1.1.1.1R1(config-router)#network 12.12.12.0 0.0.0.255 area 0 //将属于12.12.12.0/24这个网段的所有接口公告到区域0里去。
R1(config-router)#network 172.16.1.0 0.0.0.255 area 0R1(config-router)#R2上的配置:R2(config)#router ospf 1R2(config-router)#router-id 2.2.2.2R2(config-router)#network 12.12.12.0 0.0.0.255 area 0R2(config-router)#network 13.13.13.0 0.0.0.255 area 0R2(config-router)#network 172.16.1.0 0.0.0.255 area 0R2(config-router)#R3上的配置:R3(config)#interface loopback 0R3(config-if)#ip address 33.33.33.33 255.255.255.0R3(config)#router ospf 1R3(config-router)#router-id 3.3.3.3R3(config-router)#network 13.13.13.0 0.0.0.255 area 0R3(config-router)#network 172.16.1.0 0.0.0.255 area 0R3(config-router)#network 33.33.33.0 0.0.0.255 area 0当完成上述配置以后我们可以发现已经可以实现整个网络之间的相互通信了。
思科路由器设置OSPF

思科路由器设置OSPF推荐文章路由器设置端口映射方法是什么热度:双路由器时设置连接方法和单路由器一样吗热度:路由器UPNP是什么怎么设置热度:Linksys无线路由器怎么样设置热度:怎么设置cisco思科无线ap 热度:OSPF也称为接口状态路由协议,OSPF路由协议是一种典型的链路状态(Link-state)的路由协议,一般用于同一个路由域内有不少用户不知道cisco怎么设置ospf?店铺为大家分享了具体操作方法,供大家参考!思科路由器设置OSPF命令参考以下步骤:router(config)#router ospf 1 启动OSPF路由进程router(config-router)#router-id 1.1.1.1 配置Router IDrouter(config-router)#network 1.0.0.0 0.255.255.255 area 0 指定OSPF协议运行的接口和所在的区域多区域OSPF:router(config)#router ospf 1router(config-router)#router-id 1.1.1.1router(config-router)#network 1.0.0.0 0.255.255.255 area 0 router(config-router)#network 2.0.0.0 0.255.255.255 area 1 末梢区域:router(config)#area1 stub完全末梢区域:router(config)#area1 stub no-summary路由重分发配置:router ripredistribute ospf 10 metric 10router ospf 10redistribute rip metric 10 subnetsNSSA区域配置:router(config)#area1 nssa虚链路配置:router(config)#area 100 virtual-link 1.1.1.1对方RID 店铺分享了cisco设置ospf的解决方法,希望大家喜欢。
CISCO多区域OSPF讲解

R2#show ip route ospf
以上输出表明R2 对R1 的四条环回接口的路由汇总后,会产生 一条指向Null0 的路由;同时收到经路由器R3 汇总的路由, 因为是重分布进来的外部路由,所以路由代码为“O E2”。
R3#show ip route ospf
以上输出表明R3 对四条环回接口的RIP 路由汇总后,会产生一 条指向Null0 的路由;同时收到经路由器R2 汇总的路由,由于 是区域间路由汇总,所以路由代码为“O IA”。
OSPF 多区域的拓扑结构有如下的优势:
1. 降低SPF 计算频率 2. 减小路由表 3. 降低了通告LSA 的开销 4. 将不稳定限制在特定的区域
OSPF 路由器类型
1. 内部路由器:OSPF 路由器上所有直连的链路都处于同一个区域; 2. 主干路由器:具有连接区域0 接口的路由器; 3. 区域边界路由器(ABR):路由器与多个区域相连; 4. 自治系统边界路由器(ASBR):与AS 外部的路由器相连并互相交换 路由信息;
多区域OSPF
高级多区域OSPF技术
多区域OSPF
在一个大型OSPF 网络中,SPF 算法的反复计算,庞大的 路由表和拓扑表的维护以及LSA的泛洪等都会占用路由器的资源, 因而会降低路由器的运行效率。 OSPF 协议可以利用区域的概念来减小这些不利的影响。因 为在一个区域内的路由器将不需要了解它们所在区域外的拓扑细 节。
关键实验步骤
配置时采用环回接口尽量靠近区域0 的原则。路由器R4 的环回 接口不在OSPF 进程中通告,通过重分布的方法进入OSPF 网络。
路由器R1 R1(config)#router ospf 1 R1(config-router)#router-id 1.1.1.1 R1(config-router)#network 1.1.1.0 255.255.255.0 area 1 R1(config-router)#network 192.168.12.0 255.255.255.0 area 1
实验 11.6.1:基本 OSPF 配置实验
实验 11.6.1:基本 OSPF 配置实验学习目标完成本实验后,您将能够:•根据拓扑图完成网络电缆连接•删除路由器启动配置并将其重新加载到默认状态•在路由器上执行基本配置任务•配置并激活接口•在所有路由器上配置 OSPF 路由•配置 OSPF 路由器 ID•使用 show 命令检验 OSPF 路由•配置静态默认路由•向 OSPF 邻居传播默认路由•配置 OSPF Hello 计时器和 Dead 计时器•在多路访问网络上配置 OSPF•配置 OSPF 优先级•理解 OSPF 选举过程•记录 OSPF 配置场景在本实验练习中有两个独立的场景。
在第一个场景中,您将使用场景 A 中的拓扑图所示的网络学习如何配置 OSPF 路由协议。
该网络中的各个网段使用 VLSM 划分了子网。
OSPF 是一种无类路由协议,可用于在路由更新中提供子网掩码信息。
这将使 VLSM 子网信息可传播到整个网络。
在第二个场景中,您将学习在多路访问网络中配置 OSPF。
您还将学习使用 OSPF 选举过程来确定指定路由器 (DR)、后备指定路由器 (BDR) 和 DRother 状态。
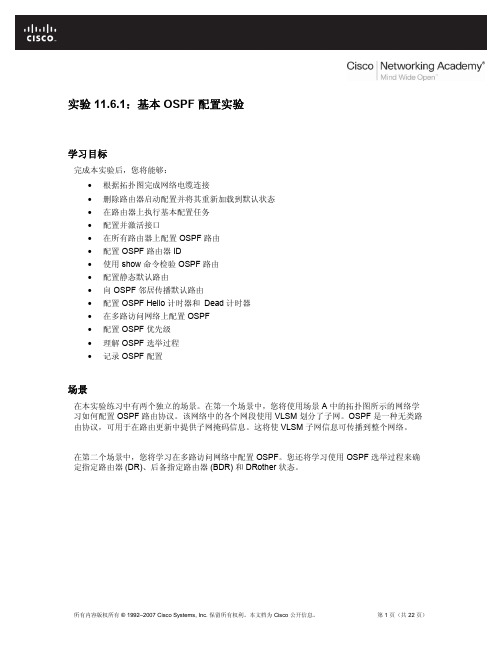
场景 A:基本 OSPF 配置拓扑图地址表设备接口IP 地址子网掩码默认网关Fa0/0 172.16.1.17 255.255.255.240 不适用R1S0/0/0 192.168.10.1 255.255.255.252 不适用S0/0/1 192.168.10.5 255.255.255.252 不适用Fa0/0 10.10.10.1 255.255.255.0 不适用R2S0/0/0 192.168.10.2 255.255.255.252 不适用S0/0/1 192.168.10.9 255.255.255.252 不适用Fa0/0 172.16.1.33 255.255.255.248 不适用R3S0/0/0 192.168.10.6 255.255.255.252 不适用S0/0/1 192.168.10.10 255.255.255.252 不适用PC1 网卡172.16.1.20 255.255.255.240 172.16.1.17 PC2 网卡10.10.10.10 255.255.255.0 10.10.10.1 PC3 网卡172.16.1.35 255.255.255.248 172.16.1.33任务 1:准备网络。
思科OSPF实验1:基本的OSPF配置

OSPF实验1:基本的OSPF配置实验拓扑:实验步骤:1.首先在3台路由器上配置物理接口,并且使用ping命令确保物理链路的畅通。
2.在路由器上配置loopback接口:R1(config)#int loopback 0R1(config-if)#ip add 1.1.1.1 255.255.255.0R2(config)#int loopback 0R2(config-if)#ip add 2.2.2.2 255.255.255.0R3(config)#int loopback 0R3(config-if)#ip add 3.3.3.3 255.255.255.0路由器的RID是路由器接口的最高的IP地址,当有环回口存在是,路由器将使用环回口的最高IP 地址作为起RID,从而保证RID的稳定。
3.在3台路由器上分别启动ospf进程,并且宣告直连接口的网络。
R1(config)#router ospf 10R1(config-router)#network 192.168.1.0 0.0.0.255 area 0R1(config-router)#network 1.1.1.0 0.0.0.255 area 0R1(config-router)#network 192.168.3.0.0.0.255 area 0ospf的进程号只有本地意义,既在不同路由器上的进程号可以不相同。
但是为了日后维护的方便,一般启用相同的进程号。
ospf使用反向掩码。
Area 0表示骨干区域,在设计ospf网络时,所有的非骨干区域都需要和骨干区域直连!R2,R3的配置和R1类似,这里省略。
不同的是我们在R2和R3上不宣告各自的环回口。
*Aug 13 17:58:51.411: %OSPF-5-ADJCHG: Process 10, Nbr 2.2.2.2 on Serial1/0 from LOADING to FULL, Loading Done配置结束后,我们可以看到邻居关系已经到达FULL状态。
计算机网络实验-OSPF配置

计算机网络实验:基本OSPF配置一.实验要求:a)根据拓扑图完成网络电缆连接b)在路由器上执行基本配置任务c)配置并激活接口d)配置OSPF路由器IDe)使用show命令检验OSPF路由f)向OSPF邻居传播默认路由二.实验配置1.基本拓扑结构:以上表格中完成了对于各台机器的IP配置此为第一个小网络,需要对Route0进行配置:(注意是哪个接口)对应的IP地址改为10.104.160.1,子网掩码为255.255.255.0此为第二个小网络,需要对Route1进行配置:(注意是哪个接口)对应的IP地址改为10.104.165.1,子网掩码为255.255.255.0此为第三个小网络,需要对Route0和Route1进行配置:(注意对应的接口)这是一个新的小网络,所以两个路由器的IP地址不能相同,此实验中我的设置为:Route0的IP地址为10.104.1.1,子网掩码为255.255.255.0Route1的IP地址为10.104.1.2,子网掩码为255.255.255.0到此,拓扑结构构建完毕。
2.对各路由器进行OSPF设置,以Route0为例:打开Route0的CLI窗口,如图:输入exit命令,直到出现Route#输入configure terminal,如图:接下来输入router ospf 1,如图:输入配置LAN的network语句:将本路由器连接的几个子网IP的网络号输入进去,然后子网掩码为255.255.255.0的补码即为0.0.0.255,再加上area 0代表为第一个网络。
配置后以end结束。
如图:同理Route1的配置方法类似3.对LAN的配置进行检查。
在Route0和Route1的CLI中输入show ip route如图:注意最下面的O一项,说明OSPF协议已经正常工作,C的两项是初始化配置。
4.检验网络能否正常工作检查Route0:检查Route1:检查Route0和Route1能否正常进行数据交换:三.实验总结这个实验考察的是对OSPF协议的理解与基本的IP配置,其中也有些小细节需要注意的,如路由器和路由器通过交换机连接时也会作为一个小网络,IP地址不能相同。
思科路由器ospf实验手册
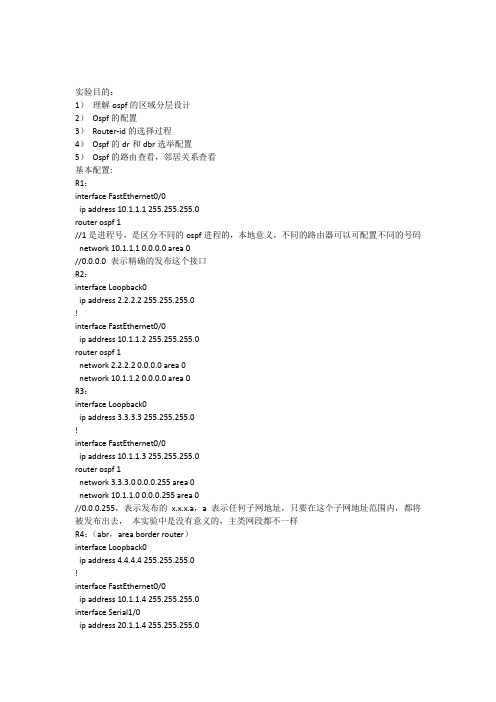
实验目的:1)理解ospf的区域分层设计2)Ospf的配置3)Router-id的选择过程4)Ospf的dr和dbr选举配置5)Ospf的路由查看,邻居关系查看基本配置:R1:interface FastEthernet0/0ip address 10.1.1.1 255.255.255.0router ospf 1//1是进程号,是区分不同的ospf进程的,本地意义,不同的路由器可以可配置不同的号码network 10.1.1.1 0.0.0.0 area 0//0.0.0.0 表示精确的发布这个接口R2:interface Loopback0ip address 2.2.2.2 255.255.255.0!interface FastEthernet0/0ip address 10.1.1.2 255.255.255.0router ospf 1network 2.2.2.2 0.0.0.0 area 0network 10.1.1.2 0.0.0.0 area 0R3:interface Loopback0ip address 3.3.3.3 255.255.255.0!interface FastEthernet0/0ip address 10.1.1.3 255.255.255.0router ospf 1network 3.3.3.0 0.0.0.255 area 0network 10.1.1.0 0.0.0.255 area 0//0.0.0.255,表示发布的x.x.x.a,a表示任何子网地址,只要在这个子网地址范围内,都将被发布出去,本实验中是没有意义的,主类网段都不一样R4:(abr,area border router)interface Loopback0ip address 4.4.4.4 255.255.255.0!interface FastEthernet0/0ip address 10.1.1.4 255.255.255.0interface Serial1/0ip address 20.1.1.4 255.255.255.0network 4.4.4.4 0.0.0.0 area 0network 10.1.1.4 0.0.0.0 area 0network 20.1.1.4 0.0.0.0 area 1//因为r4是abr(区域边界路由器),不同的接口应该划在不同的区域中R5:interface Loopback0ip address 5.5.5.5 255.255.255.0ip ospf 1 area 1 前面的1是进程号,后面的1是区域号//是ospf另外一种发布接口的方法interface Serial1/0ip address 20.1.1.5 255.255.255.0ip ospf 1 area 1router ospf 1可以在r4上看一下ospf的邻居关系R4上应该有4个邻居关系Show ip ospf neighborrouter-idRouter-id 的作用?1. 标识路由器,用router-id来区分不同的路由器的链路状态数据库2. 类似于人的名字(身份证号码)3. Router-id如果规划好了,对路由器的识别就很容易。
思科实验-实验1报告
思科实验-实验1报告实验报告⼀、实验⽬的(本次实验所涉及并要求掌握的知识点)实验1.1:第 1 部分:检查DR 和BDR ⾓⾊变化第 2 部分:修改OSPF 优先级和强制选举实验1.2第 1 部分:配置基本交换机设置第 2 部分:通过思科PAgP 配置EtherChannel第 3 部分:配置802.3ad LACP EtherChannel第 4 部分:配置冗余EtherChannel 链路⼆、实验内容与设计思想(设计思路、主要数据结构、主要代码结构)实验1.1:在本练习中,您将检查DR 和BDR ⾓⾊并观察⽹络变化时⾓⾊的变化。
然后您将修改优先级以控制⾓⾊并强制进⾏新的选举。
最后,您将检验路由器是否充当所需⾓⾊。
实验1.2三台交换机已完成安装。
在交换机之间存在冗余上⾏链路。
通常只能使⽤这些链路中的⼀条;否则,可能会产⽣桥接环路。
但是,只使⽤⼀条链路只能利⽤⼀半可⽤带宽。
EtherChannel 允许将多达⼋条的冗余链路捆绑在⼀起成为⼀条逻辑链路。
在本实验中,您将配置端⼝聚合协议(PAgP)(Cisco EtherChannel 协议)和链路聚合控制协议(LACP)(EtherChannel 的IEEE 802.3ad 开放标准版本)。
三、实验使⽤环境(本次实验所使⽤的平台和相关软件)Cisco Packet Tracer四、实验步骤和调试过程(实验步骤、测试数据设计、测试结果分析)实验1.1:第⼀部分:检查DR 和BDR 的⾓⾊更改第 1 步:请等待,直到链路指⽰灯由琥珀⾊变为绿⾊。
当您在Packet Tracer 中⾸次打开⽂件时,您可能会注意到交换机的链路指⽰灯为琥珀⾊。
这些链路指⽰灯会保持琥珀⾊50 秒钟,在此期间,交换机会确认所连接的是路由器⽽不是交换机。
或者,您可以单击“Fast Forward Time”来跳过此过程。
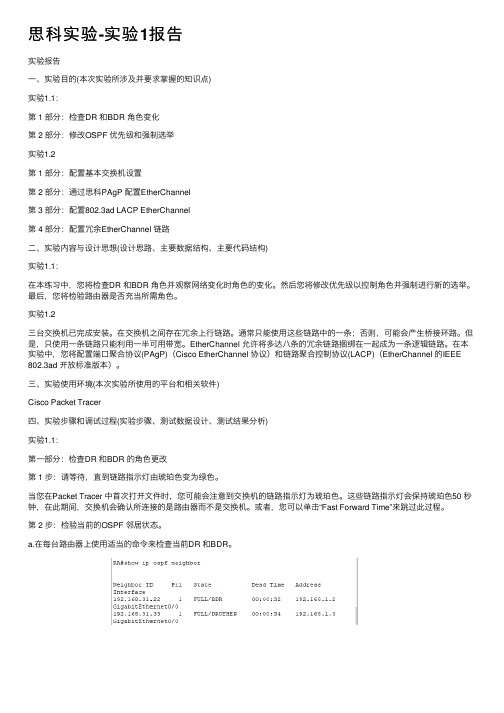
第 2 步:检验当前的OSPF 邻居状态。
a.在每台路由器上使⽤适当的命令来检查当前DR 和BDR。
在思科模拟器中OSPF怎样设定思科模拟器怎么配置四个路由器四个区域OSPF100

在思科模拟器中OSPF怎样设定思科模拟器怎么配置四个路由器四个区域OSPF100在思科模bai拟器中ospf设定的du步骤如下:zhi1、router1的dao配置版;配置环回口和int2/0的介面的ip地址和ospf的配置。
2、权router2的配置;配置环回口和int2/0的介面的ip地址和ospf的配置。
以及int2/0 的时脉频率。
3、router3的配置;配置环回口和int3/0的介面的ip地址和ospf 的配置。
以及int3/0 的时脉频率。
4、以router3为例,show??ip ospf inte***ce,此命令可以显示路由器的介面状态,如区域号、路由器的id、网路型别、介面成本。
5、以router 3为例。
通过show ?ip router命令,显示路由的情况,设定完成这样问题就解决了。
enable 进入特权复模式configuration terminal 进入配置模式router ospf xx(进位制程号,随意就一个bai标示)du 进入路由zhi模式***work x.x.x.x x.x.x.x area 0 宣告网路show ip ospf neighbor 检视daoospf邻居关系show ip route protocol ospf 检视ospf路由买本ospf的书看看,有点复杂思科模拟器怎么配置四个路由器四个区域ospf100把中间路由器的的四个介面的ip网段在ospf的程序下宣告到area 0区域。
把其他四个路由器连线中间路由器的埠的网段地址也宣告到area 0中。
剩下4个loopback介面的网段地址按图分别宣告到不同的area中就可以了这个只要做一个中心型的网路即可,中心是一个公共区域0,其他3个路由器其他介面连线交换机或pc机组成各个非骨干区域。
拓扑图如下:用思科模拟器怎么配置这个图多区域ospf ,求大神把中间路由器的的四个介面的ip网段在ospf的程序下宣告到area 0区域。
思科路由器OSPF协议实验
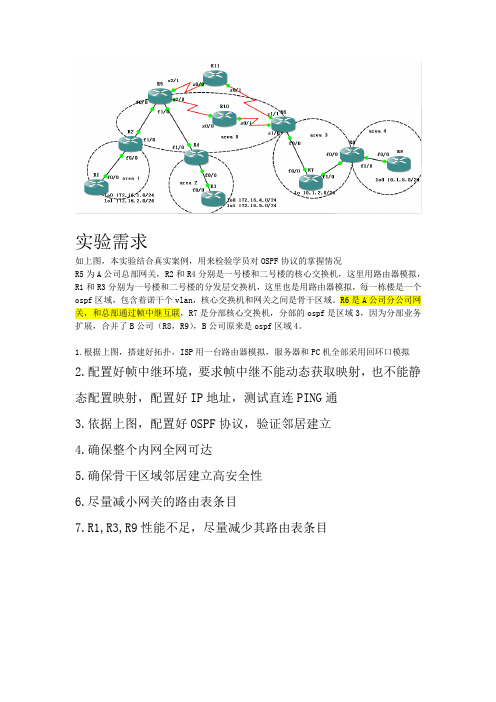
实验需求如上图,本实验结合真实案例,用来检验学员对OSPF协议的掌握情况R5为A公司总部网关,R2和R4分别是一号楼和二号楼的核心交换机,这里用路由器模拟,R1和R3分别为一号楼和二号楼的分发层交换机,这里也是用路由器模拟,每一栋楼是一个ospf区域,包含着诺干个vlan,核心交换机和网关之间是骨干区域。
R6是A公司分公司网关,和总部通过帧中继互联,R7是分部核心交换机,分部的ospf是区域3,因为分部业务扩展,合并了B公司(R8,R9),B公司原来是ospf区域4。
1.根据上图,搭建好拓扑,ISP用一台路由器模拟,服务器和PC机全部采用回环口模拟2.配置好帧中继环境,要求帧中继不能动态获取映射,也不能静态配置映射,配置好IP地址,测试直连PING通3.依据上图,配置好OSPF协议,验证邻居建立4.确保整个内网全网可达5.确保骨干区域邻居建立高安全性6.尽量减小网关的路由表条目7.R1,R3,R9性能不足,尽量减少其路由表条目实验步骤1、对各路由器配置IP地址2、将R10模拟为帧中继R10#conf tR10(config)#frame-relay swiR10(config)#frame-relay switchingR10(config)#int s0/0R10(config-if)#no shutR10(config-if)#encapsulation frame-relayR10(config-if)#frame-relay intf-type dceR10(config-if)#clock rate 64000R10(config-if)#frame-relay route 506 int s0/1 605R10(config-if)#int s0/1R10(config-if)#encapsulation frame-relayR10(config-if)#frame-relay intf-type dceR10(config-if)#clock rate 64000R10(config-if)#frame-relay route 605 int s0/0 506R10(config-if)#exit在R5的s2/0,及R6的s1/0做相应的帧中继封装R5(config)#int s2/0R5(config-if)#encapsulation frame-relayR5(config-if)#frame-relay intf-type dteR5(config-if)#exitR6(config)#int s1/0R6(config-if)#encapsulation frame-relayR6(config-if)#frame-relay intf-type dteR6(config-if)#exit3、配置OSPF协议,并验证邻居建立R1(config)#router ospf 1R1(config-router)#router-idR1(config-router)#router-id 1.1.1.1R1(config-router)#net 172.16.3.1 0.0.0.0 a 1R1(config-router)#exit其他路由器的配置命令类似在R10帧中继线路上,R5的接口s2/0与R6接口s1/0的OSPF类型为非广播因此不能产生Hello包以建立OSPF邻居。
思科OSPF加单臂路由配置的综合实训
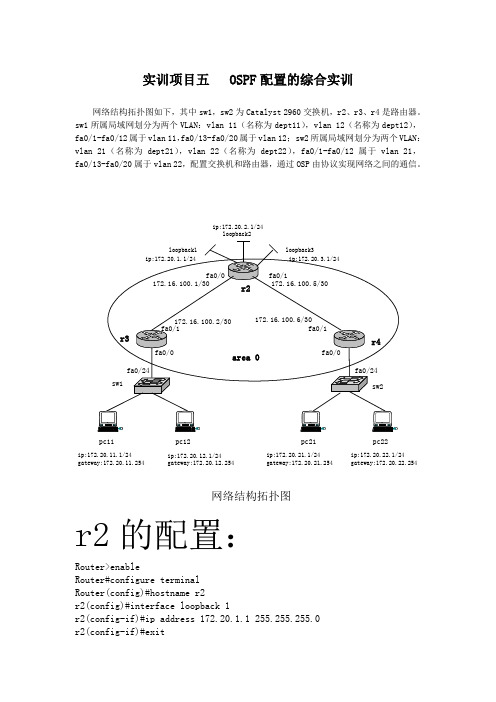
实训项目五 OSPF 配置的综合实训网络结构拓扑图如下,其中sw1,sw2为Catalyst 2960交换机,r2、r3、r4是路由器。
sw1所属局域网划分为两个VLAN :vlan 11(名称为dept11),vlan 12(名称为dept12),fa0/1-fa0/12属于vlan 11,fa0/13-fa0/20属于vlan 12; sw2所属局域网划分为两个VLAN :vlan 21(名称为dept21),vlan 22(名称为dept22),fa0/1-fa0/12属于vlan 21,fa0/13-fa0/20属于vlan 22,配置交换机和路由器,通过OSP 由协议实现网络之间的通信。
ip:172.20.11.1/24gateway:172.20.11.254pc11pc12pc22pc21网络结构拓扑图ip:172.20.12.1/24gateway:172.20.12.254ip:172.20.21.1/24gateway:172.20.21.254ip:172.20.22.1/24gateway:172.20.22.254loopback2ip:172.20.2.1/24r2的配置:Router>enableRouter#configure terminal Router(config)#hostname r2r2(config)#interface loopback 1r2(config-if)#ip address 172.20.1.1 255.255.255.0 r2(config-if)#exitr2(config)#interface loopback 2ip address 172.20.2.1 255.255.255.0r2(config-if)#exitr2(config)#interface loopback 3r2(config-if)#ip address 172.20.3.1 255.255.255.0r2(config-if)#exitr2(config)#interface fastEthernet 0/0r2(config-if)#ip address 172.16.100.1 255.255.255.252r2(config-if)#no shutdownr2(config-if)#exitr2(config)#interface fastEthernet 0/1r2(config-if)#ip address 172.16.100.5 255.255.255.252r2(config-if)#no shutdownr2(config-if)#exitr2(config)#router ospf 1r2(config-router)#network 172.20.0.0 0.0.3.255 area 0r2(config-router)#network 172.16.100.0 0.0.0.3 area 0r2(config-router)#network 172.16.100.4 0.0.0.3 area 0r2(config-router)#exitr2(config)#r3的配置:Router>enableRouter#configure terminalRouter(config)#hostname r3r3(config)#interface fastEthernet 0/1r3(config-if)#IP address 172.16.100.2 255.255.255.252r3(config-if)#no shutdownr3(config-if)#exitr3(config)#interface fastEthernet 0/0r3(config-if)#no shutdownr3(config-if)#exitr3(config)#interface fastEthernet 0/0.11r3(config-subif)#encapsulation dot1Q 11r3(config-subif)#ip address 172.20.11.254 255.255.255.0 r3(config-subif)#exitr3(config)#interface fastEthernet 0/0.12r3(config-subif)#encapsulation dot1Q 12r3(config-subif)#ip address 172.20.12.254 255.255.255.0 r3(config-subif)#exitr3(config)#router ospf 1r3(config-router)#network 172.20.11.254 0.0.0.255 area 0r3(config-router)#network 172.20.12.254 0.0.0.255 area 0 r3(config-router)#network 172.16.100.0 0.0.0.3 area 0r3(config-router)#exitr3(config)#r4的配置:Router>enableRouter#configure terminalRouter(config)#hostname r4r4(config)#interface fastEthernet 0/1r4(config-if)#ip address 172.16.100.6 255.255.255.252r4(config-if)#no shutdownr4(config-if)#exitr4(config)#interface fastEthernet 0/0r4(config-if)#no shutdownr4(config-if)#exitr4(config)#interface fastEthernet 0/0.21r4(config-subif)#encapsulation dot1Q 21r4(config-subif)#ip address 172.20.21.254 255.255.255.0 r4(config-subif)#exitr4(config)#interface fastEthernet 0/0.22r4(config-subif)#encapsulation dot1Q 22r4(config-subif)#ip address 172.20.22.254 255.255.255.0 r4(config-subif)#exitr4(config)#router ospf 1r4(config-router)#network 172.20.22.1 0.0.0.255 area 0 r4(config-router)#network 172.20.21.1 0.0.0.255 area 0 r4(config-router)#network 172.16.100.4 0.0.0.3 area 0r4(config-router)#exitr4(config)#sw1的配置:Switch>enableSwitch#configure terminalSwitch(config)#hostname sw1sw1(config)#vlan 11sw1(config-vlan)#name dept11sw1(config-vlan)#exitsw1(config)#vlan 12sw1(config-vlan)#name dept12sw1(config-vlan)#exitsw1(config)#interface fastEthernet 0/24sw1(config-if)#switchport mode trunksw1(config-if)#exitsw1(config)#interface range fastEthernet 0/1 - 12 sw1(config-if-range)#switchport mode accesssw1(config-if-range)#switchport access vlan 11sw1(config-if-range)#exitsw1(config)#interface range fastEthernet 0/13 - 20 sw1(config-if-range)#switchport mode accesssw1(config-if-range)#switchport access vlan 12sw1(config-if-range)#exisw1(config)#sw2的配置:Switch>enableSwitch#configure terminalSwitch(config)#hostname sw2sw2(config)#vlan 21sw2(config-vlan)#name dept21sw2(config-vlan)#exitsw2(config)#vlan 22sw2(config-vlan)#name dept22sw2(config-vlan)#exitsw2(config)#interface fastEthernet 0/24sw2(config-if)#switchport mode trunksw2(config-if)#exitsw2(config)#interface range fastEthernet 0/1 - 12 sw2(config-if-range)#switchport mode accesssw2(config-if-range)#switchport access vlan 21sw2(config-if-range)#exitsw2(config)#interface range fastEthernet 0/13 - 20 sw2(config-if-range)#switchport mode accesssw2(config-if-range)#switchport access vlan 22sw2(config-if-range)#exitsw2(config)#路由表验证:r2的路由表:r2#show ip route172.16.0.0/30 is subnetted, 2 subnetsC 172.16.100.0 is directly connected, FastEthernet0/0C 172.16.100.4 is directly connected, FastEthernet0/1172.20.0.0/24 is subnetted, 7 subnetsC 172.20.1.0 is directly connected, Loopback1C 172.20.2.0 is directly connected, Loopback2C 172.20.3.0 is directly connected, Loopback3O 172.20.11.0 [110/2] via 172.16.100.2, 00:18:06, FastEthernet0/0O 172.20.12.0 [110/2] via 172.16.100.2, 00:18:06, FastEthernet0/0O 172.20.21.0 [110/2] via 172.16.100.6, 00:13:56, FastEthernet0/1O 172.20.22.0 [110/2] via 172.16.100.6, 00:13:56, FastEthernet0/1r2#r3的路由表:r3#show ip route172.16.0.0/30 is subnetted, 2 subnetsC 172.16.100.0 is directly connected, FastEthernet0/1O 172.16.100.4 [110/2] via 172.16.100.1, 00:14:21, FastEthernet0/1 172.20.0.0/16 is variably subnetted, 7 subnets, 2 masksO 172.20.1.1/32 [110/2] via 172.16.100.1, 00:18:30, FastEthernet0/1 O 172.20.2.1/32 [110/2] via 172.16.100.1, 00:18:30, FastEthernet0/1 O 172.20.3.1/32 [110/2] via 172.16.100.1, 00:18:30, FastEthernet0/1 C 172.20.11.0/24 is directly connected, FastEthernet0/0.11C 172.20.12.0/24 is directly connected, FastEthernet0/0.12O 172.20.21.0/24 [110/3] via 172.16.100.1, 00:14:11, FastEthernet0/1 O 172.20.22.0/24 [110/3] via 172.16.100.1, 00:14:11, FastEthernet0/1 R3#R4的路由表:r4#show ip route172.16.0.0/30 is subnetted, 2 subnetsO 172.16.100.0 [110/2] via 172.16.100.5, 00:14:59, FastEthernet0/1 C 172.16.100.4 is directly connected, FastEthernet0/1172.20.0.0/16 is variably subnetted, 7 subnets, 2 masksO 172.20.1.1/32 [110/2] via 172.16.100.5, 00:14:59, FastEthernet0/1 O 172.20.2.1/32 [110/2] via 172.16.100.5, 00:14:59, FastEthernet0/1 O 172.20.3.1/32 [110/2] via 172.16.100.5, 00:14:59, FastEthernet0/1 O 172.20.11.0/24 [110/3] via 172.16.100.5, 00:14:59, FastEthernet0/1 O 172.20.12.0/24 [110/3] via 172.16.100.5, 00:14:59, FastEthernet0/1 C 172.20.21.0/24 is directly connected, FastEthernet0/0.21C 172.20.22.0/24 is directly connected, FastEthernet0/0.22r4#。
思科OSPF协议配置命令笔记

路由器OSPF协议配置命令strong>OSPF协议配置命令4.7.1 default redistribute cost配置引入外部路由时缺省的花费值,no default redistribute cost命令取消配置。
default redistribute cost costno default redistribute cost【参数说明】cost为花费值,范围1~65535之间的整数。
【命令模式】OSPF协议配置模式【使用指南】在OSPF将路由器上其它路由协议发现的路由引入作为自己的自治系统外部路由信息时,还需要一些额外的参数,包括:路由的缺省花费和缺省的标记等。
【举例】配置OSPF引入外部路由时缺省的花费值为10。
Quidway(config-router-ospf)#default redistribute cost 10【相关命令】default redistribute tagdefault redistribute type4.7.2 default redistribute interval配置OSPF引入外部路由的时间间隔,no default redistribute interval命令恢复缺省值。
default redistribute interval timeno default redistribute interval【参数说明】time为引入外部路由的时间间隔,以秒为单位,范围1~65535之间的整数。
【缺省情况】OSPF引入外部路由的时间间隔缺省为1秒。
【命令模式】OSPF协议配置模式【使用指南】由于OSPF总是要不停的引入外部的路由信息并将它们传播到整个自治系统中去,因此,有必要规定协议引入外部路由的时间间隔。
【举例】指定OSPF引入外部路由的时间间隔为2秒。
Quidway(config-router-ospf)#default redistribute interval 2【相关命令】default istribute limit4.7.3 default redistribute limit配置OSPF可引入路由数量的上限,no default redistribute limit命令恢复缺省值。
实验十一配置OSPF路由协议

实验^一配置OSPF各由协议作者: 日期:实验十一配置OSPF路由协议11. 1路由协议OSPF既述OSPF路由协议是一种典型的链路状态路由协议,用于一个自治系统内部•在这个自治系统中,所有的OSPF路由器都维护一个相同的描述这个自治系统结构的数据库,其中存放路由域中相应链路的状态信息。
OSPF路由器正是通过这个数据库计算出OSPF路由表的•作为一种链路状态的路由协议,OSPFF将链路状态广播数据包LSA ( Link State Advertisement )传送给区域内的所有路由器,这一点与距离向量路由协议不同。
运行距离向量路由协议的路由器是将部分或全部的路由表传递给相邻的路由器。
对于OSPF路由协议,度量与网络中链路的带宽等因素相关,也就是说OSPF路由信息不受物理跳数的限制。
另外,OSPF路由协议还支持TOS(Type of Service )路由,因此OSPF适用于大型网络中•1 •区域在RIP协议中,网络是一个平面的概念,并无区域及边界的定义。
在OSPF路由协议中,一个网络或者说是一个路由域可以划分为很多个区域area ,每一个区域通过OSPF边界路由器相连,区域间可以通过路由总结(Summary)来减少路由信息,减小路由表,提高路由器的运算速度。
在OSPF路由协议的定义中,可以将一个自治系统划分为几个区域,我们把按照一定的OSPF路由法则组合在一起的一组网络或路由器的集合称为区域(area ).在OSPF路由协议中,每一个区域中的路由器都按照该区域中定义的链路状态算法来计算网络拓扑结构,这意味着每一个区域都有该区域独立的网络拓扑数据库及网络拓扑图•对于每一个区域,其网络拓扑结构在区域外是不可见的,每一区域内部的路由器对域外的其余网络结构也不了解,这意味着OSPF路由域中的网络链路状态数据广播被区域的边界挡住了,这样有利于减少网络中链路状态数据包在全网范围内的广播,也是OSPF将一个自治系统划分成很多个区域的重要原因。
思科Cisco路由器配置——使用OSPF协议实现的全网互通配置实验详解
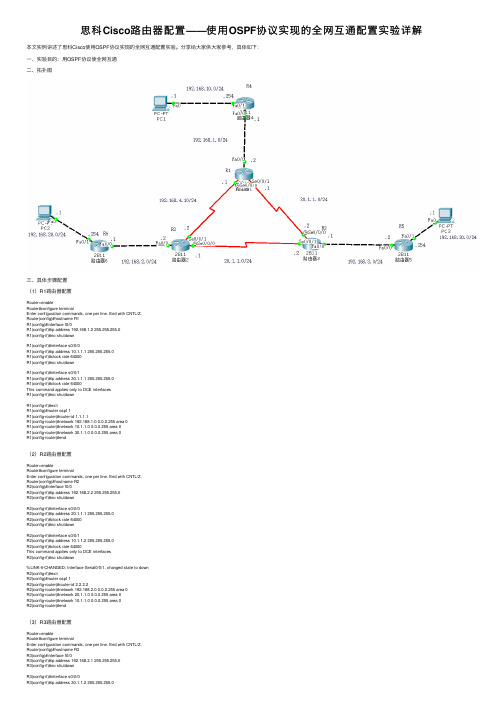
思科Cisco路由器配置——使⽤OSPF协议实现的全⽹互通配置实验详解本⽂实例讲述了思科Cisco使⽤OSPF协议实现的全⽹互通配置实验。
分享给⼤家供⼤家参考,具体如下:⼀、实验⽬的:⽤OSPF协议使全⽹互通⼆、拓扑图三、具体步骤配置(1)R1路由器配置Router>enableRouter#configure terminalEnter configuration commands, one per line. End with CNTL/Z.Router(config)#hostname R1R1(config)#interface f0/0R1(config-if)#ip address 192.168.1.2 255.255.255.0R1(config-if)#no shutdownR1(config-if)#interface s0/0/0R1(config-if)#ip address 10.1.1.1 255.255.255.0R1(config-if)#clock rate 64000R1(config-if)#no shutdownR1(config-if)#interface s0/0/1R1(config-if)#ip address 30.1.1.1 255.255.255.0R1(config-if)#clock rate 64000This command applies only to DCE interfacesR1(config-if)#no shutdownR1(config-if)#exitR1(config)#router ospf 1R1(config-router)#router-id 1.1.1.1R1(config-router)#network 192.168.1.0 0.0.0.255 area 0R1(config-router)#network 10.1.1.0 0.0.0.255 area 0R1(config-router)#network 30.1.1.0 0.0.0.255 area 0R1(config-router)#end(2)R2路由器配置Router>enableRouter#configure terminalEnter configuration commands, one per line. End with CNTL/Z.Router(config)#hostname R2R2(config)#interface f0/0R2(config-if)#ip address 192.168.2.2 255.255.255.0R2(config-if)#no shutdownR2(config-if)#interface s0/0/0R2(config-if)#ip address 20.1.1.1 255.255.255.0R2(config-if)#clock rate 64000R2(config-if)#no shutdownR2(config-if)#interface s0/0/1R2(config-if)#ip address 10.1.1.2 255.255.255.0R2(config-if)#clock rate 64000This command applies only to DCE interfacesR2(config-if)#no shutdown%LINK-5-CHANGED: Interface Serial0/0/1, changed state to downR2(config-if)#exitR2(config)#router ospf 1R2(config-router)#router-id 2.2.2.2R2(config-router)#network 192.168.2.0 0.0.0.255 area 0R2(config-router)#network 20.1.1.0 0.0.0.255 area 0R2(config-router)#network 10.1.1.0 0.0.0.255 area 0R2(config-router)#end(3)R3路由器配置Router>enableRouter#configure terminalEnter configuration commands, one per line. End with CNTL/Z.Router(config)#hostname R3R3(config)#interface f0/0R3(config-if)#ip address 192.168.3.1 255.255.255.0R3(config-if)#no shutdownR3(config-if)#interface s0/0/0R3(config-if)#ip address 30.1.1.2 255.255.255.0R3(config-if)#clock rate 64000R3(config-if)#no shutdown%LINK-5-CHANGED: Interface Serial0/0/0, changed state to down R3(config-if)#interface s0/0/1R3(config-if)#ip address 20.1.1.2 255.255.255.0R3(config-if)#clock rate 64000This command applies only to DCE interfacesR3(config-if)#no shutdown%LINK-5-CHANGED: Interface Serial0/0/1, changed state to down R3(config-if)#exitR3(config)#router ospf 1R3(config-router)#router-id 3.3.3.3R3(config-router)#network 192.168.3.0 0.0.0.255 area 0R3(config-router)#network 30.1.1.0 0.0.0.255 area 0R3(config-router)#network 20.1.1.0 0.0.0.255 area 0R3(config-router)#end(4)R4路由器配置Router>enableRouter#configure terminalEnter configuration commands, one per line. End with CNTL/Z. Router(config)#hostname R4R4(config)#interface f0/0R4(config-if)#ip address 192.168.1.1 255.255.255.0R4(config-if)#no shutdownR4(config-if)#interface f0/1R4(config-if)#ip address 192.168.10.254 255.255.255.0R4(config-if)#no shutdownR4(config-if)#exitR4(config)#router ospf 1R4(config-router)#router-id 4.4.4.4R4(config-router)#network 192.168.1.0 0.0.0.255 area 0R4(config-router)#network 192.168.10.0 0.0.0.255 area 0R4(config-router)#end(5)R5路由器配置Router>enableRouter#configure terminalEnter configuration commands, one per line. End with CNTL/Z. Router(config)#hostname R5R5(config)#interface f0/0R5(config-if)#ip address 192.168.3.2 255.255.255.0R5(config-if)#no shutdownR5(config-if)#interface f0/1R5(config-if)#ip address 192.168.30.254 255.255.255.0R5(config-if)#no shutdownR5(config-if)#exitR5(config)#router ospf 1R5(config-router)#router-id 5.5.5.5R5(config-router)#network 192.168.3.0 0.0.0.255 area 0R5(config-router)#network 192.168.30.0 0.0.0.255 area 0R5(config-router)#end(6)R6路由器配置Router>enableRouter#configure terminalEnter configuration commands, one per line. End with CNTL/Z. Router(config)#hostname R6R6(config)#interface f0/0R6(config-if)#ip address 192.168.2.1 255.255.255.0R6(config-if)#no shutdownR6(config-if)#interface f0/1R6(config-if)#ip address 192.168.20.254 255.255.255.0R6(config-if)#no shutdownR6(config-if)#exitR6(config)#router ospf 1R6(config-router)#router-id 6.6.6.6R6(config-router)#network 192.168.2.0 0.0.0.255 area 0R6(config-router)#network 192.168.20.0 0.0.0.255 area 0R6(config-router)#end四、验证测试1、查看R1路由表信息2、查看ip路由协议配置与统计信息3、查看OSPF数据库信息4、查看OSPF进程及区域的细节。
- 1、下载文档前请自行甄别文档内容的完整性,平台不提供额外的编辑、内容补充、找答案等附加服务。
- 2、"仅部分预览"的文档,不可在线预览部分如存在完整性等问题,可反馈申请退款(可完整预览的文档不适用该条件!)。
- 3、如文档侵犯您的权益,请联系客服反馈,我们会尽快为您处理(人工客服工作时间:9:00-18:30)。
思科OSPF实验1:基本的OSPF配置实验步骤:1.首先在3台路由器上配置物理接口,并且使用ping命令确保物理链路的畅通。
2.在路由器上配置loopback接口:R1(config)#int loopback 0R1(config-if)#ip add 1.1.1.1 255.255.255.0R2(config)#int loopback 0R2(config-if)#ip add 2.2.2.2 255.255.255.0R3(config)#int loopback 0R3(config-if)#ip add 3.3.3.3 255.255.255.0路由器的RID是路由器接口的最高的IP地址,当有环回口存在是,路由器将使用环回口的最高IP地址作为起RID,从而保证RID的稳定。
3.在3台路由器上分别启动ospf进程,并且宣告直连接口的网络。
R1(config)#router ospf 10R1(config-router)#network 192.168.1.0 0.0.0.255area 0R1(config-router)#network 1.1.1.0 0.0.0.255 area 0R1(config-router)#network 192.168.3.0.0.0.255 area 0ospf的进程号只有本地意义,既在不同路由器上的进程号可以不相同。
但是为了日后维护的方便,一般启用相同的进程号。
ospf使用反向掩码。
Area 0表示骨干区域,在设计ospf网络时,所有的非骨干区域都需要和骨干区域直连!R2,R3的配置和R1类似,这里省略。
不同的是我们在R2和R3上不宣告各自的环回口。
*Aug 13 17:58:51.411: %OSPF-5-ADJCHG: Process 10, Nbr 2.2.2.2 on Serial1/0 from LOADING to FULL, Loading Done配置结束后,我们可以看到邻居关系已经到达FULL状态。
4. 在R1上查看路由表,可以看到以下信息:R1#show ip routeCodes: C - connected, S - static, R - RIP, M - mobile, B - BGPD - EIGRP, EX - EIGRP external, O - OSPF, IA - OSPF inter areaN1 - OSPF NSSA external type 1, N2 - OSPF NSSA external type 2E1 - OSPF external type 1, E2 - OSPF external type 2i - IS-IS, su - IS-IS summary, L1 - IS-IS level-1, L2 - IS-IS level-2ia - IS-IS inter area, * - candidate default, U - per-user static routeo - ODR, P - periodic downloaded static routeGateway of last resort is not set1.0.0.0/24 is subnetted, 1 subnetsC1.1.1.0 is directly connected, Loopback0C192.168.1.0/24 is directly connected, Serial1/0O192.168.2.0/24 [110/65] via 192.168.1.2, 00:03:42, Serial1/0C192.168.3.0/24 is directly connected, FastEthernet0/我们看到R1学到了192.168.2.0/24这个网段的路由。
后面的数字[110/65],分别表示OSPF的管理距离(AD)和路由的Metric值OSPF的Metric值是由cost值逐跳累加的。
Cost=100Mb/带宽值。
5. 在R1上show ip ospf neighbor 、show ip ospf interfaceR1#show ip ospf neighborNeighbor IDPriStateDead TimeAddressInterface3.3.3.31FULL/BDR00:00:34192.168.3.3FastEthernet0/02.2.2.2FULL/-00:00:32192.168.1.2Serial1/0我们看到R1和R3选取了DR和BDR,而R1和R2没有选取。
在ospf的五种网络类型中。
Point-to-Point,Point-to-Multipoint(广播与非广播)这三种网络类型不选取DR与BDR; Broadcast,NBMA选取DR与BDR。
R1#show ip ospf interfaceFastEthernet0/0 is up, line protocol is upInternet Address 192.168.3.1/24, Area 0Process ID 10, Router ID 1.1.1.1, Network Type BROADCAST, Cost: 1Transmit Delay is 1 sec, State DR, Priority 1Designated Router (ID) 1.1.1.1, Interface address 192.168.3.1Backup Designated router (ID) 3.3.3.3, Interface address 192.168.3.3Timer intervals configured, Hello 10, Dead 40, Wait 40, Retransmit 5oob-resync timeout 40Hello due in 00:00:03Index 3/3, flood queue length 0Next 0x0(0)/0x0(0)Last flood scan length is 1, maximum is 1Last flood scan time is 0 msec, maximum is 0 msecNeighbor Count is 1, Adjacent neighbor count is 1Adjacent with neighbor 3.3.3.3(Backup Designated Router)Suppress hello for 0 neighbor(s)Serial1/0 is up, line protocol is upInternet Address 192.168.1.1/24, Area 0Process ID 10, Router ID 1.1.1.1, Network Type POINT_TO_POINT, Cost: 64 Transmit Delay is 1 sec, State POINT_TO_POINT,Timer intervals configured, Hello 10, Dead 40, Wait 40, Retransmit 5oob-resync timeout 40Hello due in 00:00:02Index 1/1, flood queue length 0Next 0x0(0)/0x0(0)Last flood scan length is 1, maximum is 1Last flood scan time is 4 msec, maximum is 4 msecNeighbor Count is 1, Adjacent neighbor count is 1Adjacent with neighbor 2.2.2.2Suppress hello for 0 neighbor(s)Loopback0 is up, line protocol is upInternet Address 1.1.1.1/24, Area 0Process ID 10, Router ID 1.1.1.1, Network Type LOOPBACK, Cost: 1Loopback interface is treated as a stub Host在这里我们看到环回口的网络网络类型是Loopback,这是一种特殊的网络类型,只针对环回口存在。
我们到R2上看看路由表:R2#show ip routeCodes: C - connected, S - static, R - RIP, M - mobile, B - BGPD - EIGRP, EX - EIGRP external, O - OSPF, IA - OSPF inter areaN1 - OSPF NSSA external type 1, N2 - OSPF NSSA external type 2E1 - OSPF external type 1, E2 - OSPF external type 2i - IS-IS, su - IS-IS summary, L1 - IS-IS level-1, L2 - IS-IS level-2ia - IS-IS inter area, * - candidate default, U - per-user static routeo - ODR, P - periodic downloaded static routeGateway of last resort is not set1.0.0.0/32 is subnetted, 1 subnetsO1.1.1.1 [110/65] via 192.168.1.1, 00:12:34, Serial1/02.0.0.0/24 is subnetted, 1 subnetsC2.2.2.0 is directly connected, Loopback0C192.168.1.0/24 is directly connected, Serial1/0C192.168.2.0/24 is directly connected, Serial1/1O192.168.3.0/24 [110/65] via 192.168.1.1, 00:12:34, Serial1/0[110/65] via 192.168.2.3, 00:12:34, Serial1/1R2的路由表显示来自环回口的路由,掩码为/32,既我们所说的“主机路由”。
