Macs2 操作手册与介绍
MACSII软件安装说明书

MACS II 装机方法一、总则1.安装顺序:首先安装WIN NT操作系统,然后安装ServerPack,在格式化硬盘,安装驱动程序,网络,再装ServerPack,最后安装工具及其公司软件即可。
2.MACSⅡ系统运行环境:服务器站:NT4.0Server+PACK6A工程师站、操作员站:NT4.0WorkStation+PACK6A3.MACSⅡ软件包括:服务器站:①MACSⅡ服务器程序②Ser-u ③cuteftp工程师站:①MACS离线组态②SQL anywhere ③Office 2000 ④IE5操作员站:①MACS操作员站程序②Ser-u ③Office2000 ④IE54.硬盘划分为四个区:C:NT系统文件及辅助软件D:MACS系统工作盘E:工程备份F:NT系统备份文件盘建议:最好为服务器历史库分配一个独立的硬盘,如果没有独立的硬盘,也需要将其指定到一个独立的磁盘分区。
该分区使用NTFS。
如果条件允许,推荐使用SCSI硬盘。
二、硬盘的分区、格式化及文件存放1.分区及格式化磁盘分区时,因该考虑历史库的存储要求即,将历史库分配尽可能多一点。
40G硬盘C:4G D:10G E:10G F:16G 全部格式化为NTFS格式80G硬盘C:4G D:20G E: 20G F: 36G全部格式化为NTFS格式2.文件存放①服务器站C:\Winnt 存放NT系统文件,\Program Files 存放工具等程序文件,\Temp 为系统临时文件夹D:\服务器程序存放MACS服务器程序文件E:\i386 存放NT的i386文件,以便装机使用F:\ 历史库存档目录(一般是外加一块36G SCSI硬盘)②操作员站C:\Winnt C:\Program Files C:\Temp 与服务器站相同D:\操作员站程序用于存放MACS操作员站程序③工程师站C:\Winnt C:\Program Files C:\Temp 与服务器站相同\Sqlany\Sybtools 存放SQL Any where 文件D:\MACS组态软件存放MACS离线组态软件E:\MACS安装盘存放MACS安装文件,子目录为MACSII V2.3.0等\工程文件夹存放工程组态文件,以“工程名+备份时间”的格式给子目录取名\工程文档存放所有工程文档,如测试记录、测点清单、往来文件、工程图纸等F:\i386 存放NT的i386文件,以便装机使用三、工程师站软件安装1.在工程师站上安装WINDOWS NT WORKSTATION 4.0软件:(1)用WINDOWS NT WORKSTATION 4.0引导启动,在未分区空间上创建一个新的磁盘分区,使用NTFS格式格式化该磁盘分区,创建磁盘分区大小为(单位MB):4096。
MACSV系统知识串讲
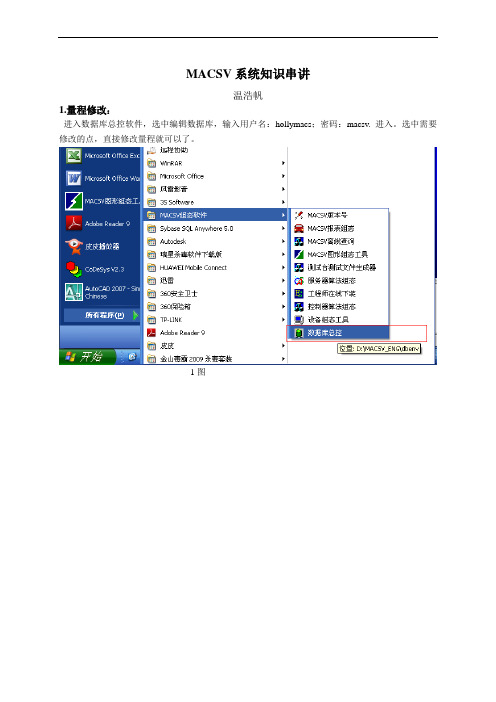
点击‘动态特性快捷定义‘进入如下图24
图24
将上图弹出窗口中的蓝色部分的点名修改为要加入的点名,如图25
图25
修改完后点击‘关闭’。画面上的点就改为了你所要加入的点。如下图26
图26
图形上的工作也做完了。然后我们要将修改后的程序及画面更新到服务器和操作员站里去。
打开’MACSV组态软件’中的‘工程师在线下装’点击进入如下图27
2 进入‘MACSV组态软件’中‘控制器算法组态’登陆到控制器中,进行下载,更新控制器(重复图10到图17)
3 进入‘MACSV组态软件’中‘工程师在线下装’,下装服务器及操作员站(重复图27到图28)
至此工程恢复就做完了。
图15
IP地址选好后,点击上图13中的登录,系统就会登陆到控制器中,在登录过程中,会弹出窗口,内容是图16或是图17的内容
图16
图17
如果弹出的是图16的窗口,意思是说此次下载只会影响修改的程序,对其它程序不会有影响。
如果弹出的事图17的窗口,意思是说所有程序都恢复为初始值。如果设备正常运行,进行了图17的初始化下装所有设备恢复到初始值。
接着我们进入‘操作员在线’软件,重复图18,图19的步骤,就这样,在设备正常运行的情况下,我们就可以吧增加的点先临时引入到‘操作员在线’里来看了。待到检修设备停机以后,再重数据库总控中将增加的点彻底的增加近程序。
修改一般在停车的时候进行,正常开车后应尽可能避免修改,以避免影响正常生产。
系统投运正常后,一般由系统本身引发的故障及少,故障多发于现场侧。下面就常见故障现象的处理总结归纳如下,供参考。
图27
输入用户名:superman口令:macsv确认进入如下图28
图28
选中该项目的工程名,‘确定’进入如下图29
Macs2 操作手册与介绍

Using MACS - setup
• cd /home/work/public • mkdir macsout_<user ID>
– <user ID> : e.g. ‘spheikki’ for me – each student MUST have their own folder!!
• to avoid overlapping MACS outputs
ChIP-seq analysis with MACS2
Tips and tricks
Sami Heikkinen, PhD Docent in Molecular Bioinformatics Institute of Biomedicine, UEF
ChIP-Seq simplified
Where?
• checks on seq files
– ls –l seq – head seq/*
• check that macs2 works
– macs2 callpeak
callpeak - Options
Various options to indicate/control input, output, peak modelling and peak calling macs2 callpeak usage: macs2 callpeak [-h] -t TFILE [TFILE ...] [-c [CFILE [CFILE ...]]] [-f {AUTO,BAM,SAM,BED,ELAND,ELANDMULTI,ELANDEXPORT,BOWTIE, BAMPE}] [-g GSIZE] [--keep-dup KEEPDUPLICATES] [--buffer-size BUFFER_SIZE] [--outdir OUTDIR] [-n NAME] [-B] [--verbose VERBOSE] [--trackline] [--SPMR] [-s TSIZE] [--bw BW] [-m MFOLD MFOLD] [--fix-bimodal] [--nomodel] [--shift SHIFT] [--extsize EXTSIZE] [-q QVALUE] [-p PVALUE] [--to-large] [--ratio RATIO] [--down-sample] [--seed SEED] [--nolambda] [--slocal SMALLLOCAL] [--llocal LARGELOCAL] [--broad] [--broad-cutoff BROADCUTOFF] [--call-summits]
Mac、移动端、平板电脑端用户指南说明书

目录账户注册 (3)手机号码验证 (4)未成年用户 (5)账户登录、预约及支付系统 (6)预约练习 (7)订单与支付 (10)银行卡支付 (11)兑换券支付 (13)准备工作 (15)参加练习 (16)练习变更 (21)取消预约和退款 (24)服务台 (26)账户注册如您尚未注册账户,请登录,进入 SpeakUP 预约及支付门户网站,然后点击“Register”按钮进行账户注册。
请依次填写您的手机号码,设置登录密码并选择您所在的地区及出生日期。
手机号码验证选择您所在的国家代码并输入手机号码,然后点击“Send Code”按钮获取验证码。
此外,您还需要进行安全验证,向右拖动滑块完成拼图。
顺利通过验证后,您会收到系统发送的短信验证码。
请注意,验证码有效时间为2 分钟。
如果您1分钟内未收到短信验证码,可点击“resend”按钮请求重新发送。
未成年用户系统要求账户所有者须年满18周岁,如您未满18周岁,请您的父母或监护人代为注册。
请在正式注册完成前,阅读隐私条款并勾选“I have read and accepted”确认框。
账户登录、预约及支付系统您可以选择以下两种方式进行登录:•手机号+短信验证码•手机号+密码点击下方相应链接切换登录方式(短信验证码或密码)。
如果您忘记登录密码,请点击“Forget Password”按钮,通过手机找回密码。
预约练习在正式预约之前,请先设置您所处的时区。
请选择您要参加练习的时间并预约练习时段。
点击“Book”按钮后,您需要依次输入您本人或未成年用户的全名、出生日期以及第一语言。
如您未满18周岁,出于保护未成年人安全的目的,您还需要输入父母或监护人的联系信息。
XXX全部确认完后,请点击“Next”按钮进行下一步操作。
在用户须知栏内,您可查阅SpeakUP 相关条款细则。
确认信息无误后,请点击“Submit Order”按钮。
XXX订单与支付订单提交成功后,您有30分钟的时间进行付款。
Mac操纵说明完全指南1.01张宁博

双指开合缩放 用用拇指和任一一手手指轻 轻开合,即可缩放显 示示照片片和⺴网网⻚页。
轻扫导航 翻阅⺴网网⻚页、文文档和 更多内容,就像翻 书一一样流畅自自如。
• Magic Mouse 鼠鼠标 Multi-Touch 触控区覆盖了 Magic Mouse 的上表面面,鼠鼠标本身身就是按键。使用用单指向任意方方向滚动,双指轻扫浏览⺴网网⻚页和照片片,可随
45W 适用于 MacBook Air
60W适用于 MacBook Pro13
85W适用于MacBook Pro15 /17
MagSafe2 电源适配器插头比 MagSafe更加小巧,同时电源适配 器电源线借助磁性固定到位,如果 有人绊到线缆,它能够干净利落地 断开,从而确保你的 MacBook 安 然无恙。
*适用于具有内置红外线 (IR) 接 收器的 Apple 产品
Apple 电池充电器
它针对 Apple 提供的电池进 行了优化,也适用于其他公 司的 AA 镍氢电池
Apple USB SuperDrive 光驱
通过 USB 接口与你的 Retina MacBook Pro、iMac、MacBook Air 或 Mac mini 连接
在登陆OS X之前需要了解Mac操作中的手手势
• Multi-Touch 触控板 每台 Mac 笔记本上的 Multi-Touch 触控板都可让你以全新的方方式与文文档、图像和应用用软件进行行互动,所有操作都变得更直观、更直接。 使用用双指借助弹性滚动功能流畅地上下移动⻚页面面。双指轻扫可翻阅⺴网网⻚页、文文档和更多内容。三指轻扫可翻阅全屏应用用软件。用用双指连续轻 点触控板两下,即可快速放大大⺴网网⻚页,或者通过双指开合更准确地缩放照片片和⺴网网⻚页。用用指尖来旋转图片片。使用用三指轻扫,可在 Mac 的 Mission Control 中查看每个打开的窗口口。
MACSV系统手册

本手册的目的
本手册用于帮助用户理解 MACS V 系统的整体概貌、基本功能和特性,以及主要技术指标; 运行本系统需要的软件环境,硬件环境以及系统的各项功能。
.
.
目录 第一章 系统概述.............................................................................................................................8
1.1. 概述...........................................................................................................................8 1.2. 系统能力...................................................................................................................9 1.3. MACSV 系统的实时数据流..................................................................................10 1.4. 系统各部分的主要功能......................................................................................... 11
Mac 使用教程(基础篇)

Mac 使用教程(基础篇)如果您是计算机新手,或只是需要一些教学课程,帮助您将 Mac 的功能发挥到淋漓尽致,那么您就来对地方了。
我们将带领您以最有效率的方式使用 Mac。
无论您想知道如何操作使用Mac 桌面(或只是要知道什么是桌面)、找出连接打印机、iPod、数字相机或其他设备的方式、搜寻电子邮件和 Internet、认识各种功能的操作方式、学习如何使用 Mac 随附的软件,或在无法得心应手地操作时需要协助指点,这种种问题的答案,我们都为您准备好了。
准备好了吗?请把您的问题告诉我们:第一课:Mac 基础操作如果您是初次接触计算机,才刚开始学习各项操作技巧,不用紧张,其实操作 Mac 不过就是靠一连串的点选动作。
这一课将为您介绍与计算机界面互动的基本方式,也会教您如何在 Mac 上完成一些基本工作。
让我们进入课程内容吧!INCLUDE-PICTURE "/support/mac101/work/images/work01-1.jpg" \* MERGEFORMATINET第一次使用 Mac 吗?那就从学习 Mac 基础操作开始吧!点点选选轻松操作如果您对 Mac 桌面和 Finder 视窗的操作不是很熟练,建议您从这里开始学起,如果已经很熟悉了,可以直接跳到“建立帐号”那部分。
我们先来谈谈计算机操作的基本技巧。
移动鼠标时(iBook 或PowerBook 的使用者是以手指在触控式轨迹板上滑动),您会看到有个箭头(即光标)在屏幕上四处游移。
您可以利用这个箭头选取或操作屏幕上的项目,像是选取档案、按下按钮、拖移滑杆等等。
有时候在执行不同的操作或应用程式时,箭头会变成手、十字型、I 型或其他图像。
举例来说,如果您用 Safari 来浏览这个网页,并在网页上移动箭头,您会发现,当箭头移到文字或文字栏位(如 Google 文字框或 URL 栏位)上的时候,它会变成 I 型光标(有点像字母 "I" 的形状),通常这表示您可以与文字或栏位有所互动(例如输入或拷贝文字)。
Mac 使用教程

Mac 使用教程(基础篇)如果您是计算机新手,或只是需要一些教学课程,帮助您将 Mac 的功能发挥到淋漓尽致,那么您就来对地方了。
我们将带领您以最有效率的方式使用 Mac。
无论您想知道如何操作使用 Mac 桌面(或只是要知道什么是桌面)、找出连接打印机、iPod、数字相机或其他设备的方式、搜寻电子邮件和 Internet、认识各种功能的操作方式、学习如何使用 Mac 随附的软件,或在无法得心应手地操作时需要协助指点,这种种问题的答案,我们都为您准备好了。
准备好了吗?请把您的问题告诉我们:第一课:Mac 基础操作如果您是初次接触计算机,才刚开始学习各项操作技巧,不用紧张,其实操作 Mac 不过就是靠一连串的点选动作。
这一课将为您介绍与计算机界面互动的基本方式,也会教您如何在 Mac 上完成一些基本工作。
让我们进入课程内容吧!第一次使用 Mac 吗?那就从学习 Mac 基础操作开始吧!点点选选轻松操作如果您对 Mac 桌面和 Finder 视窗的操作不是很熟练,建议您从这里开始学起,如果已经很熟悉了,可以直接跳到“建立帐号”那部分。
我们先来谈谈计算机操作的基本技巧。
移动鼠标时(iBook 或PowerBook 的使用者是以手指在触控式轨迹板上滑动),您会看到有个箭头(即光标)在屏幕上四处游移。
您可以利用这个箭头选取或操作屏幕上的项目,像是选取档案、按下按钮、拖移滑杆等等。
有时候在执行不同的操作或应用程式时,箭头会变成手、十字型、I 型或其他图像。
举例来说,如果您用 Safari 来浏览这个网页,并在网页上移动箭头,您会发现,当箭头移到文字或文字栏位(如 Google 文字框或 URL 栏位)上的时候,它会变成 I 型光标(有点像字母 "I" 的形状),通常这表示您可以与文字或栏位有所互动(例如输入或拷贝文字)。
当箭头移到按钮或链接上,它会变成手的形状,告诉您这个项目可以点选。
有时候 Mac 忙于工作时,箭头会暂时变成旋转中的彩色圆盘(有的 Mac 使用者称之为海滩球或风车),这代表某项工作正在执行中。
MACS2操作员站

第一章引言 (4)1操作员站功能描述 (4)2运行环境 (4)3操作员站硬件设备 (4)3.1操作员站硬件配置 (4)3.2操作员站屏幕配置 (4)3.3操作员站专用键盘和轨迹球 (7)第二章操作员站投入在线过程 (11)1操作员站进入在线的前提 (11)2操作员站数据下装过程 (11)2.1用户管理 (11)2.2系统命令 (13)2.3数据文件管理 (16)3操作员站启动过程 (17)3.1服务器启动过程 (17)3.2操作员站启动过程 (17)4进入在线系统 (18)4.1进入在线系统 (18)4.2工具栏功能菜单介绍 (19)5操作员站登录过程 (21)6用户自定义键的定义 (22)第三章操作员站各功能说明 (23)1模拟流程图显示 (23)1.1概述 (23)1.2流程图画面的调用 (23)1.3相关工具的使用 (24)2报警监视 (25)2.1报警监视 (25)2.2页确认 (27)2.3行确认 (27)3表格 (28)3.1禁止强制 (28)3.2开关量抖动 (28)4日志 (29)4.1全日志 (29)4.2 SOE日志 (31)引言4.3简化日志 (32)4.4操作日志 (33)4.5设备日志 (34)5参数成组 (35)6趋势、事故追忆和SOE (38)6.1趋势 (38)6.2事故追忆和SOE (44)7打印操作 (49)7.1打印设置 (49)7.2报表打印 (49)7.3硬拷贝 (51)8设备状态图显示 (51)9工程师功能 (54)9.1工程师台专用功能 (54)9.2选择工作域及登录 (54)9.3设置服务器时间 (55)9.4服务器切换 (55)9.5用户管理 (56)9.6权限管理 (56)9.7打印管理 (57)9.8算法调试 (58)10鼠标右键功能菜单 (60)10.1变量的强制 (60)10.2点详细 (61)10.3增加点到趋势组 (62)11控制调节 (63)11.1 PID调节器 (63)11.2模拟量手操器 (68)11.3开关手操器 (71)11.4顺控设备 (73)11.5调节门 (75)11.6组合伺放 (76)11.7磨煤机控制 (76)11.8磨煤机控制2 (79)12其它操作 (82)12.1硬锁操作 (82)12.2灯测试 (82)12.3 CRT切换 (82)引言附录1 操作员站设置管理 (83)中央键盘串口设置 (83)服务器设置 (84)高级设置(底图窗口设置) (85)附录2操作员站部分功能说明 (86)趋势管理 (86)参数成组 (86)报表打印管理 (86)文件存放 (86)需要进行控制表组态的在线功能 (87)用户管理与权限管理 (87)引言第一章引言本手册着重描述系统操作员与MACS系统之间的人机交互方法。
peak calling with macs2 简书

peak calling with macs2 简书Macs2是一个常用的功能基因组学分析软件,用于识别染色质免疫沉淀测序(ChIP-seq)数据中的峰值,获得与转录因子结合相关的DNA序列。
为了更好地理解Macs2的使用方法和原理,我们首先需要了解ChIP-seq实验的基本原理。
ChIP-seq是一种广泛应用于研究转录因子、组蛋白修饰以及DNA甲基化等在基因组水平上的特定结合位点的技术。
通过将转录因子与组蛋白浓缩在某一特定区域,然后用化学交联固定它们与DNA的交换,最后以特定的抗体富集与DNA结合的复合物,ChIP-seq技术可以用于研究基因组上特定的结合位点及其在基因表达调控中的功能。
Macs2软件是Chip-seq数据分析的重要工具之一。
它能够对ChIP-seq数据进行预处理、对控制样品进行标准化比较以得到峰值,以及对峰值进行过滤和注释等操作。
我们首先需要准备好ChIP-seq数据,包括ChIP样品(需要富集转录因子或组蛋白)和对照样品(没有处理的基因组DNA或非特定抗体的样品)。
然后,我们可以使用Macs2来进行如下的数据分析流程:1.数据预处理首先,我们需要处理原始的ChIP-seq测序数据,将其转换为.bam 格式的对齐文件。
针对双端测序,我们可以使用Bowtie2或BWA来将reads映射到参考基因组上,生成对应的sam文件,之后再用samtools将sam文件转换为bam文件。
对于单端测序数据,可以直接使用Bowtie或者BWA进行比对然后转换为bam格式。
2.样品比对和控制比对使用Macs2之前,我们需要对样品以及对照样品进行比对。
这一步主要是为了获得比对后的.bam文件。
3.样品标准化和对照标准化为了可以进行后续的峰值检测,我们需要对样品和对照进行标准化。
标准化的目的在于消除不同样本之间的测序深度差异,以及其他可能导致假阳性的因素。
常见的标准化方法有两种,即基于控制样品的标准化和基于基因组的标准化。
MASTR II 重复器和基站音频板说明书

The 19A129924G2 Audio Board is used in remote/ repeat station combinations. The receiver audio amplifiers, de-emphasis network and repeater audio switch operate in the same manner as described for the 19A129924G1 Board. A separate emitter follower (Q4) is connected to the emitter of Q3 for repeater applications. The REPEATER TX LEVEL control (R15) is connected in the emitter circuit of Q4. R14 in the emitter circuit of (Q3) now serves as the LINE OUT level control.
CIRCUIT ANALYSIS
Audio Board 19A129924G1
Audio from the station receiver is coupled to emitter follower Q1 through the high-pass filter consisting of C2-C3 and R1-R2. This filter attenuates 60 and 120 Hz to reduce the hum and noise. The output of the emitter follower is passed through a de-emphasis network C5 and R6. This network provides a 6dB/octave rolloff. The signal is then amplified by Q2 and fed to another emitter follower
苹果MacBook用户指南说明书

Welcome to your MacBookLet’s begin. Press the power button or lift the lid to start up your MacBook, and Setup Assistant guides you through a few simple steps to get you up and running. It walks you through connecting to your Wi-Fi network and creating a user account. And it can transfer your documents, photos, music, and more to your new MacBook from another Mac or PC.You can sign in with your Apple ID in Setup Assistant. This sets up your account in the App Store and the iTunes Store, andin apps like Messages and FaceTime. It also sets up iCloud, so apps such as Mail, Contacts, Calendar, and Safari all have your latest information. If you don’t have an Apple ID, you can create one in Setup Assistant.USB-C Charge MacBook and connect external storage or an external displayFaceTime camera HeadphoneDual microphonesPower buttonForce Touch trackpadGet to know your desktopYour MacBook desktop lets you find everything and do anything. Keep the apps you use most in the Dock at the bottom of the screen. Open System Preferences to customize your desktop and other settings. Click the Finder icon to get to all your files and folders.The menu bar at the top provides useful information about your MacBook. To check the status of your wireless Internet connection, click the Wi-Fi icon. Siri is always ready to help you find information, locate files, and accomplish a variety of tasks on your Mac just by using your voice.Help menu MenubarWi-Fi SiriFinder Dock System PreferencesControl your Mac with Multi-Touch gesturesYou can do a lot on your MacBook using simple gestures on the trackpad. And with built-in pressure-sensing capabilities, the trackpad can distinguish between a light click and a deep press for an entirely new level of interactivity. To learn more, choose System Preferences in the Dock, and then click Trackpad.ClickPress anywhere on the trackpad.Force clickClick and then press deeper to look up more information—on a word to see its definition, on an address to see a preview of a map, and more.Secondary click (right click) Click with two fingers to open shortcut menus. Two-finger scrollBrush two fingers along the trackpad to scroll up, down,or sideways.Back up your dataYou can wirelessly back up your MacBook using Time Machine with an AirPort Time Capsule (sold separately). Open System Preferences and click the Time Machine icon to get started.An important notePlease read this document and the safety information in the MacBook Info guide carefully before you first use your computer.Learn moreTo view the MacBook Essentials guide in iBooks, open iBooks, then search for “MacBook Essentials” in the iBooks Store. You can also find information, watch demos, and learn about MacBook features at /macbook.HelpYou can find answers to your questions, as well as instructions and troubleshooting information, in Mac Help. Click the Finder icon, click Help in the menu bar, and choose Mac Help or“Get to know your Mac.”macOS UtilitiesIf you have a problem with your MacBook, macOS Utilities can help you restore your software and data from a Time Machine backup or reinstall macOS and Apple apps. If your MacBook detects a problem, open macOS Utilities by restarting your computer while holding down the Command and R keys.SupportFor comprehensive support information, go to / support/macbook.Or to contact Apple, go to / contact.Not all features are available in all areas.TM and © 2017 Apple Inc. All rights reserved. Designed by Apple in California. Printed in XXXX. 034-01870-A。
MacBook设置指南说明书

Quick Start GuideWelcome to your MacBookLet’s begin. Press the power button to start up your Mac, and Setup Assistant guides you through a few simple steps to get you up and running. It walks you through connecting to your Wi-Fi network and creating a user account. And it can transfer your documents, photos, music, and more to your new Mac from another Mac or PC.You can sign in with your Apple ID in Setup Assistant. This sets up your account in the Mac App Store and the iTunes Store, and in apps like Messages and FaceTime. It also sets up iCloud, so apps such as Mail, Contacts, Calendar, and Safari all have your latest information. If you don’t have an Apple ID, you can create one in Setup Assistant.USB-C Charge MacBook, connect external storage, or an external displayFaceTime camera Headphone Dual microphones Power buttonForce Touch trackpadGet to know your desktopYour Mac desktop lets you find everything and do anything. Keep the apps you use most in the Dock at the bottom of the screen. Open System Preferences to customize your desktop and other settings. Click the Finder icon to get to all your files and folders.The menu bar at the top provides useful information about your Mac. To check the status of your wireless Internet connection, click the Wi-Fi icon. Spotlight lets you find anything on your Mac or look up information online. It can also open your favorite apps.Help menu Menu bar SpotlightFinder Dock System PreferencesControl your Mac with the Force Touch trackpadYou can do a lot on your MacBook using simple gestures on the trackpad. And with built-in pressure-sensing capabilities, the trackpad can distinguish between a light click and a deep press for an entirely new level of interactivity. To learn more, choose System Preferences in the Dock, and then click Trackpad.ClickPress anywhere on the trackpad.Force clickClick and then press deeper. You can Force click tolook up more information—on a word to see its definition,on an address to see a preview of a map, and more.Secondary click (right click)Click with two fingers to open shortcut menus.Two-finger scrollBrush two fingers along the trackpad to scroll up,down, or sideways.Back up your dataYou can wirelessly back up your MacBook using Time Machine with an AirPort Time Capsule (sold separately). Open System Preferences and click the Time Machine icon to get started.An important notePlease read this document and the safety information in the Important Product Information guide carefully before you first use your computer.Learn moreTo view the MacBook Essentials guide in iBooks, open iBooks, then search for “MacBook Essentials” in the iBooks Store. You can also find information, watch demos, and learn about MacBook features at /macbook.HelpYou can find answers to your questions, as well as instructions and troubleshooting information, in Mac Help. Click the Finder icon, click Help in the menu bar, and choose Mac Help or “Get to know your Mac.”OS X UtilitiesIf you have a problem with your Mac, OS X Utilities can help you restore your software and data from a Time Machine backup or reinstall OS X and Apple apps. If your Mac detects a problem, open OS X Utilities by restarting your computer while holding down the Command and R keys.SupportVisit /support/macbook for MacBook technical support. Or call 1-800-275-2273. In Canada, call 1-800-263-3394.Not all features are available in all areas.TM and © 2015 Apple Inc. All rights reserved. Designed by Apple in California. Printed in XXXX. 034-00960-B。
Macs2 操作手册与介绍

ChIP-Seq simplified
Where?
Park, Nat Rev Genetics, 2009
Schmidt et al, Methods, 2009
From binding to binding sites
ChIP-seq
~200 bp
Control sample: “Input” or “IgG” - Input: sonicated chromatin without immunoprecipitation - IgG: “unspecific” IP
Using MACS – connect to server
• Open the SSH client
– at Win –> All programs –> SSH Secure shell –> Secure shell client – “Quick connect”
• connection : intron.uef.fi • username : <your user ID> • password: <your password>
Unix 101
• pwd
– show Present Working Directory
• cd
– Change Directory – e.g. ‘cd /home/work/public’ to get to the folder we use today (from wherever you are) – or, to get back to your home directory: ‘cd $HOME’ – or, back one step ‘cd ..’, or two steps ‘cd ../../’
这可能是最棒的MACS2使用说明
这可能是最棒的MACS2使用说明生信媛太长不看版如果你就想简单地,快速地call peak, 那么就用从从下面两行挑一个走吧1.macs2的基本命令2.macs2 callpeak -t treatment.bam -c control.bam -g hs -B -f BAM -n prefix -q 0.000013.4.双端测序使用5.macs2 callpeak -t treatment.bam -c control.bam -g hs -B -f BAMPE -n p下面进入最长的工具参数说明.核心:callpeak用法这是MACS2的主要功能,因为MACS2的目的就是找peak,其他功能都是可有可无,唯独 callpeak不可取代。
最简单的用法就是1.# 常规的peak calling2.macs2 callpeak -t ChIP.bam -c Control.bam -f BAM -g hs -n test -B -q 0.013.# 较宽的peak calling4.macs2 callpeak -t ChIP.bam -c Control.bam --broad -g hs --broad-cutoff 0.1我们先来介绍这个案例里的参数。
首先是常规的peak calling用到的参数•-t/--treatment FIELNAME和 -c/--control FILENAME表示处理样本和对照样本输入。
其中 -t必须,很好理解,没有处理组你还找啥Peak。
•-f/--format FORMAT用来声明输入的文件格式,目前MACS能够识别的格式有'ELAND', 'BED', 'ELANDMULTI', 'ELANDEXPORT', 'ELANDMULTIPET' (双端测序), 'SAM', 'BAM', 'BOWTIE', 'BAMPE', 'BEDPE'. 除'BAMPE', 'BEDPE'需要特别声明外,其他格式都可以用 AUTO自动检测。
Mac系统操作说明
Mac系统操作说明Mac系统操作说明重置系统控制管理器首先把电源适配器连上电源和设备,在关机状态下按住shift control option 电源键10秒钟,这个过程没有任何反应也不会开机,10秒之后就可以松开手,可以留意电源指示灯会变状态。
然后开机之后,立刻马上迅速按住option command P R 你会一直听到开机启动声“咚”的声音,然后按着不松手,必须要听完第三声启动声之后才可以松开手,之后会自动重启登入mac系统。
前期我们讲了《输入法符号秘籍大揭底》和《Mac——键盘输入符号的技巧》,让你可以分别用输入法和键盘快速输入一些常用符号,但是这些都是比较有限的符号,而一些特殊的符号,比如快捷键中常用符号?(command)、?(option)、?(shift)、?(caps lock)、?(control)、(return)、?(enter)甚至其他更多的符号等却无法用这两种方法快速输入,那么如何输入这些特殊符号,有三种方式cmd+A:全选全屏截图:Command-Shift-3使用快捷键后会马上截取当前的全屏指定区域截图:Command-Shift-4使用快捷键后会出来一个带有座标的瞄准器,用鼠标的拖放可以选择需要截图的区域。
其他常用快捷键:* cmd+C:拷贝* cmd+V:粘贴* cmd+W:关闭窗口*dit+command+I:增加附件* cmd+Q:退出程序* cmd+I:显示文件/文件夹属性* cmd+Backspace:删除* cmd+shift+3:捕获整个屏幕* cmd+shift+4:捕获选择的区域* cmd+shift+4+space:捕获某个应用程序的窗口* cmd+F:在应用程序中搜索* cmd+Space:用Spotlight进行桌面搜索* fn+Backspace:相当于Windows里面的Delete键(笔记本键盘专用,台式机键盘有Delete键)* 开机时,听到启动音后,按住Option(相当于Windows的Alt)键,可以选择从Windows或者Mac启动。
MACS2peakcalling实战

MACS2peakcalling实战MACS是一款最为流行的peak calling软件,最初是针对转录因子的chip数据来设计的,在最新版本中,也添加了对组蛋白修饰的适配。
目前最新版本为v2.0,官网如下https:///taoliu/MACS在2.0版本中提供了以下多个子命令1.callpeak2.bdgpeakcall3.bdgbroadcall4.bdgcmp5.bdgopt6.cmbreps7.bdgdiff8.filterdup9.predictd10.pileup11.randsample12.refinepeak每个子命令和对应的功能描述如下本文主要介绍macs2最经典的使用场景peak calling, 基本用法如下input样本,值得一提的是,macs支持多种格式的输入文件,除了上述代码中使用的bam格式外,还支持SAM/BED格式。
NGS数据中,测序reads在基因组上的覆盖度并不是100%,而且有些重复区域的比对信息是不可信的,剩下的能够利用的区域通常只占整个基因组区域的70%到90%,这个区域的大小就是有效大小,对于常见的物种,程序内置了有效大小,我们只需要指定物种的缩写即可对于其他物种,则需要自己指定有效基因组的大小,单位为bp。
输出文件如下model.r是一个可执行的R脚本,通过以下代码可以产生一个PDF 的输出文件第一页表示peak邻近区间正负链测序分布,用于评估数值,示意如下第二页是cross-correlation分析的结果,示意如下后缀为xls的文件是peak的输出结果,内容示意如下于核查;其他的行记录了peak的区间信息,这里的起始位置采用的是从1开始计数的方式。
后缀为narrowpeak的文件是一个BED格式的文件,内容示意如下前四列代表peak区间和名称,注意bed格式中起始位置从0开始计数,第五列的值为第七列第九列为peak的中心,即summit距离peak起始位置的距离,对应abs_summit - start。
- 1、下载文档前请自行甄别文档内容的完整性,平台不提供额外的编辑、内容补充、找答案等附加服务。
- 2、"仅部分预览"的文档,不可在线预览部分如存在完整性等问题,可反馈申请退款(可完整预览的文档不适用该条件!)。
- 3、如文档侵犯您的权益,请联系客服反馈,我们会尽快为您处理(人工客服工作时间:9:00-18:30)。
-t/--treatment FILENAME
This is the only REQUIRED parameter for MACS.
Using MACS – connect to server
• Open the SSH client
– at Win –> All programs –> SSH Secure shell –> Secure shell client
the lab of X. Shirley Liu at the Dana-Farber Cancer Institute, Boston
– Genome Biology 2008, 9:R137 – now at version 2.1.0.20140616, developed and maintained by Tao
• Usage tip: use up/down arrow keys to move in command history • ls
– “Quick connect”
• connection : intron.uef.fi • username : <your user ID> • password: <your password>
Hale Waihona Puke Unix 101• pwd
– show Present Working Directory
• cd
– Change Directory – e.g. ‘cd /home/work/public’ to get to the folder we use today (from wherever
you are) – or, to get back to your home directory: ‘cd $HOME’ – or, back one step ‘cd ..’, or two steps ‘cd ../../’
predictd
OUTPUT FILEs
peaks.xls peaks.narrowPeak
summits.bed model.r model.pdf
treat_pileup.bdg control_lambda.bdg
pileup
refinepeaks
bdgpeakcall bdgbroadcall
[-g GSIZE] [--keep-dup KEEPDUPLICATES] [--buffer-size BUFFER_SIZE] [--outdir OUTDIR] [-n NAME] [-B] [--verbose VERBOSE] [--trackline] [--SPMR] [-s TSIZE] [--bw BW] [-m MFOLD MFOLD] [--fix-bimodal] [--nomodel] [--shift SHIFT] [--extsize EXTSIZE] [-q QVALUE] [-p PVALUE] [--to-large] [--ratio RATIO] [--down-sample] [--seed SEED] [--nolambda] [--slocal SMALLLOCAL] [--llocal LARGELOCAL] [--broad] [--broad-cutoff BROADCUTOFF] [--call-summits]
Liu at https:///taoliu/MACS/ – https:///taoliu/MACS/blob/macs_v1/README.rst
• Package of command line programs to call peaks in ChIPseq data
• Much improved since v1.x!!!
MACS2 – program(s)
INPUT DATA: aligned sequence reads
ChIPed sample “treat”
Input/IgG “control”
filterdup randsample
callpeak
Park, Nat Rev Genetics, 2009
Schmidt et al, Methods, 2009
From binding to binding sites
ChIP-seq
Control sample: “Input” or “IgG” - Input: sonicated chromatin
ChIP-seq analysis with MACS2
Tips and tricks
Sami Heikkinen, PhD Docent in Molecular Bioinformatics
Institute of Biomedicine, UEF
ChIP-Seq simplified
Where?
bdgcmp bdgdiff diffpeak
pileup.bdg refinepeak.bed
OUTPUT
callpeak - Options
Various options to indicate/control input, output, peak modelling and peak calling
macs2 callpeak usage: macs2 callpeak [-h] -t TFILE [TFILE ...] [-c [CFILE [CFILE ...]]]
[-f {AUTO,BAM,SAM,BED,ELAND,ELANDMULTI,ELANDEXPORT,BOWTIE, BAMPE}]
without immunoprecipitation - IgG: “unspecific” IP
~200 bp
36-50 bp
Typically millions of reads per sample
Park, Nat Rev Genetics, 2009
MACS2
• Model-based Analysis of ChIP-Seq • Original version published by Yong Zhang and Tao Liu from
