联想项目可靠性测试标准
Lenovo成品检验标准

Asia Vital Components (Dongguan) Co., Ltd.Lenovo AIO FQC 檢驗規範機種Model 編號版本制定日期制定人審核修改日期MONTREAL A 薛國民檢驗前准備1.檢驗工具及設備缺點規、厚薄規、Golden Sample(承認樣品) or Limit Sample(限度樣品)(限度樣品定義: 對於文字難以描述清楚或不易判定合格與不合格之外觀缺點, 則以R&D單位所提供之承認樣品作為檢驗依據)2.ESD防護:凡接觸半成品必須配帶良好靜電防護措施(配帶防靜電手環接上或戴至腳踝上);對於作業位置是移動性頻頻之人員,不便配戴防靜電環,須戴上防靜電手套。
對亮面不允許指紋的機台必須戴上pvc膠手套.3.檢驗前先確認所使用工作平台無雜物,不得因雜物而損傷產品外觀。
4.目視檢驗條件4.1 亮度:於作業正常照明下(為500 - 800 LUX)4.2 視角:檢驗員視線與被測物夾角爲45°,每一級面轉角度95+/-45度能見之缺點一、A面檢驗標准及重點注意事項:指産品之立即可見面,即正面(如下圖)1、LCD檢驗規范1.1. 外观检查1) LCD显示屏表面不应有腐蚀及碎裂,涂覆层应均匀,无凝结、脱落、龟裂及磨损现象。
2) 不能有凹痕、气泡、污点、异物、有感刮伤、无感刮伤。
1.2. 机构尺寸检查實配,LCD显示屏各机构部分,如背板、PCB表面、金属边框等不得变形,不得与未来需组装的AIO电脑主机LCD模组前后背盖有明显机构干涉1.3.电性能检查1)系统开机(单体点亮)后,无不显示、背光管不亮、背光暗、闪烁等异常现象,无亮线、暗线,LCD四边靠近Bezel 处无亮边和漏光现象。
系统关机后LCD四边靠近Bezel处不漏金属边。
阴影:目视不可见。
LCD液晶显示屏单体点亮后,固定位置的水波纹不允许有,非固定位置水波纹,现象出现2秒内消失即为OK牛顿环: 因高温高湿状态下LCD 模组内部各层之间因热形变程度的稍许不均造成显示画面在全白屏下出现,但在正常使用条件下经回温一段时间会恢复。
联想项目可靠性测试标准
联想项目可靠性测试标准
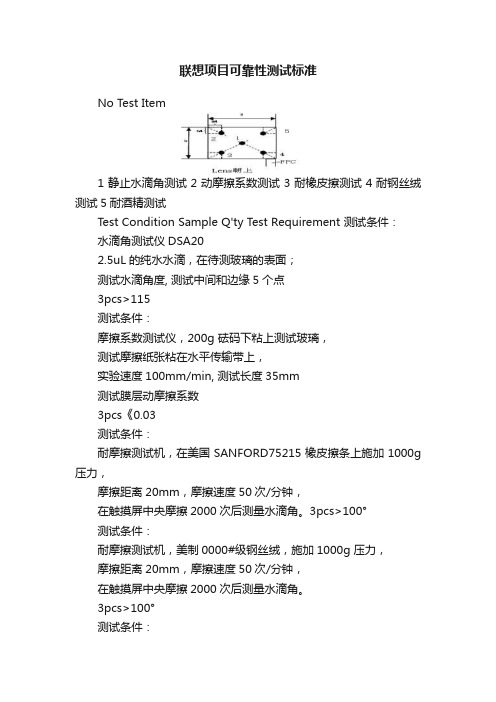
No Test Item
1静止水滴角测试2动摩擦系数测试3耐橡皮擦测试4耐钢丝绒测试5耐酒精测试
Test Condition Sample Q'ty Test Requirement 测试条件:
水滴角测试仪DSA20
2.5uL的纯水水滴,在待测玻璃的表面;
测试水滴角度, 测试中间和边缘5个点
3pcs>115
测试条件:
摩擦系数测试仪,200g 砝码下粘上测试玻璃,
测试摩擦纸张粘在水平传输带上,
实验速度100mm/min, 测试长度35mm
测试膜层动摩擦系数
3pcs《0.03
测试条件:
耐摩擦测试机,在美国SANFORD75215橡皮擦条上施加1000g 压力,
摩擦距离20mm,摩擦速度50次/分钟,
在触摸屏中央摩擦2000次后测量水滴角。
3pcs>100°
测试条件:
耐摩擦测试机,美制0000#级钢丝绒,施加1000g 压力,
摩擦距离20mm,摩擦速度50次/分钟,
在触摸屏中央摩擦2000次后测量水滴角。
3pcs>100°
测试条件:
耐摩擦测试机,美国SANFORD75215橡皮擦条蘸99.5%无水酒精,
橡皮擦上施加1000g 压力,
摩擦距离20mm,摩擦速度50次/分钟,
在触摸屏中央摩擦2000次后测量水滴角。
3pcs>100°。
联想-数据卡终端产品试验要求及测试方法V1.0(2009.3.31)

文件名称:数据卡终端产品试验要求及试验方法 编号版次:LML-S-QMD-386 V1.0 拟 制:丘寿玉2009-3-24 审 核: // 批 准:姜锋云2009-3-31收文人TO :林金强、刘伟、陈朋伟、冯雨、薛国晔、陈越祺、沈院生、邓玲、 丘寿玉、林黄晟、黄小彬、吕华东 收文部门TO DPT :质量管理部、测试工程部、产品开发部抄送CC :梁军、杨万丽、姜锋云、洪明威、潘体宏附件ATTACHMENT :无□ 传阅CIRCULAR ■阅后存档FILI G □ 保密/期限CONFIDENTIAL/TERM □ 其他OTHERS ■ 页数NO.OF PAGES :8会 议 记 录更 改 记 录联想通信移动科技有限公司LENOVO MOBILE COMMUNICATION TECHNOLOGY LTD.1. 范围本标准规定了联想移动通信科技有限公司生产的移动通信数据卡产品(含GSM、CDMA、TD-SCDMA、WCDMA 制式及双模终端等)例行试验方法及质量评定规则;适用于联想移动通信科技有限公司在新产品开发及生产过程中周期性质量监控,确保产品的可靠性。
2.试验环境要求除特殊规定外,所有测试均应在下列正常条件下进行:环境温度:15℃~35℃相对湿度:45%~75%大气压力:86~106KPa3.可靠性试验要求及试验方法3.1 环境适应性试验3.1.1 低温存储试验样机数量:5台试验要求试验样机在关机状态下经 -40℃(±3℃)低温存储16h,在标准条件下恢复2小时后,射频性能、功能、外观及装配应符合相关标准要求。
试验方法:(a) 试验样机按正常要求在标准条件下先进行射频性能、功能、外观及装配的初始检测。
(b) 初始检测合格后,样机不包装关机状态,放入低温温度箱。
启动温度箱,按平均值不大于1℃/min 的变化速率逐步降至要求的试验条件,在温度稳定后持续16h。
(c) 条件试验结束后,将试验样品在标准条件下恢复2小时,然后进行射频性能、功能、外观及装配检测,应能符合相应的要求。
整机可靠性测试标准
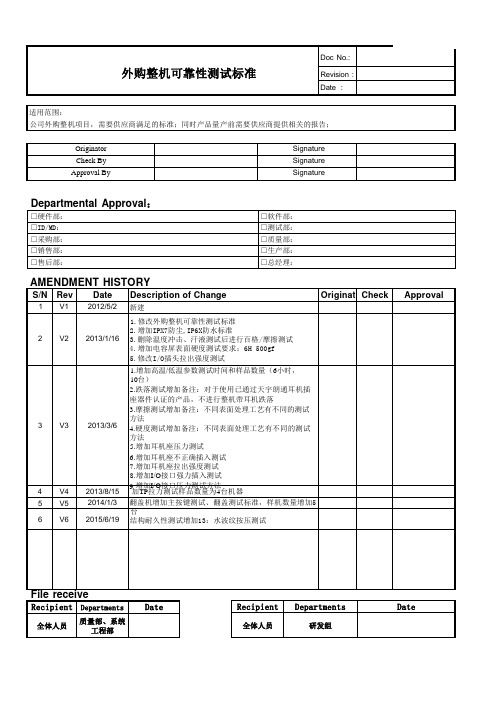
(2台)
√
表(1)。
☆ 测试方法:将手机处于关机状态,放入温
度实验箱内的架子上。在高温持续24个小时后 ☆ 检验标准:手机功能正常,內存无丢失, 转至低温持续24个小时后取出,并放置2小时 外壳无变形。
(2台)
√
恢复至常温,然后进行功能检查。
跌落测试:
6.5''及6.5'' 以上LCM跌落0.5m; ☆ 测试方法:将手机处于开机状态,插入SIM
☆ 测试方法:将手机关机在能通过筛孔为 ☆ 检验标准:手机各项功能正常,所有活动
1
灰尘测试:35℃,8hrs,参考国标 GB 4208-2008
75um、金属丝直径为50um的方孔筛的干燥滑 元器件运转自如,显示区域没有明显灰尘。 石粉、试验箱内(工作室和管通道)灰尘量为 防尘IP6X产品检验标准:手机各项功能正常, 2kg/m3的粉尘中放置8h,然后将手机从实验 所有活动元器件运转自如,显示区不允许粉尘
1
4.3''及4.3''~6.5''LCM跌落0.6m; 3.8''及3.8''~4.3''LCM或数码手机 跌落0.8m;
3.0''及3.0''~3.8''LCM跌落1.0m; 2.8''及2.4''~2.8''LCM跌落1.2m; 2.4''及2.4'' 以下LCM 跌落1.3m; 大理石地面, 6 个面,每面跌落1 次,共2个循环;一半数量插入耳机 测试
PR1 计划 备注
PR2 计划 备注 测试项目 数量
联想要求可靠性条件对比
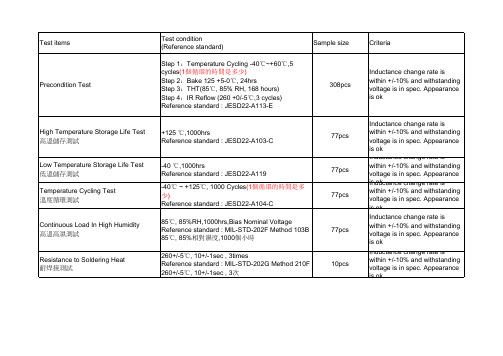
77pcs 77pcs 77pcs 77pcs 10pcs
Criteria
Inductance change rate is within +/-10% and withstanding voltage is in spec. Appearance is ok
Inductance change rate is within +/-10% and withstanding voltage is in spec. Appearance is ok Inductance change rate is within +/-10% and withstanding voltage is in spec. Appearance iIsndoukctance change rate is within +/-10% and withstanding voltage is in spec. Appearance is ok Inductance change rate is within +/-10% and withstanding voltage is in spec. Appearance is ok Inductance change rate is within +/-10% and withstanding voltage is in spec. Appearance is ok
Test items Precondition Test
Test condition (Reference standard)
Step 1:Temperature Cycling -40℃~+60℃,5 cycles(1個循環的時間是多少) Step 2:Bake 125 +5-0℃, 24hrs Step 3:THT(85℃, 85% RH, 168 hours) Step 4:IR Reflow (260 +0/-5℃,3 cycles) Reference standard : JESD22-A113-E
可靠性测试标准
可靠性测试标准可靠性测试是产品质量保证的重要环节,其标准的制定和执行对于产品的稳定性和可信度至关重要。
在进行可靠性测试时,需要遵循一定的标准和规范,以确保测试结果的准确性和可靠性。
本文将就可靠性测试标准进行探讨,以期为相关从业人员提供一些参考和指导。
首先,可靠性测试标准应包括测试的对象和范围。
在确定测试标准时,需要明确测试的具体对象是什么,以及测试的范围是什么。
例如,对于某一电子产品的可靠性测试,应明确测试的对象是产品的哪些部分,测试的范围是产品的哪些功能和性能。
只有明确了测试的对象和范围,才能有针对性地进行测试,并得到可靠的测试结果。
其次,可靠性测试标准应包括测试的方法和流程。
在确定测试标准时,需要明确测试所采用的方法和流程。
例如,对于某一汽车零部件的可靠性测试,应确定测试所采用的具体方法,如寿命测试、环境适应性测试等,以及测试的具体流程,如测试前的准备工作、测试过程中的监测和记录、测试后的数据分析和结论等。
只有明确了测试的方法和流程,才能保证测试的科学性和规范性,从而得到可靠的测试结果。
再次,可靠性测试标准应包括测试的指标和要求。
在确定测试标准时,需要明确测试所要求达到的指标和要求。
例如,对于某一新型材料的可靠性测试,应确定测试所要求达到的指标,如抗拉强度、耐磨性等,以及测试所要求达到的要求,如在特定条件下的使用寿命、使用环境等。
只有明确了测试的指标和要求,才能对测试结果进行科学的评价和判断,从而得到可靠的测试结论。
最后,可靠性测试标准应包括测试的评价和验证。
在确定测试标准时,需要明确测试所要进行的评价和验证。
例如,对于某一新型产品的可靠性测试,应确定测试所要进行的评价,如测试结果的可信度、稳定性等,以及测试所要进行的验证,如测试结果与实际使用情况的符合程度等。
只有进行了科学的评价和验证,才能确保测试结果的可靠性和准确性。
综上所述,可靠性测试标准的制定和执行对于产品质量保证至关重要。
在确定测试标准时,需要明确测试的对象和范围,方法和流程,指标和要求,以及评价和验证。
可靠性测试实用标准(一)

测试目的:用来评估产品有可能储存或者使用在湿热交变环境中的影响
测试级别:非破坏性测试
测试要求: 1、测试前对样品进行外观和功能检测;
2、不包装,于常温状态下置入测试箱;
3、调节测试箱,使湿度在 1 小时内升到 95%,测试箱
温度保持在 25℃;
4、将测试箱温度在 3 小时内升到 60℃,湿度保持在
95%不变;
5、测试箱温度在 60±2℃,湿度在 95%±3%,保
持 9 小时;
6、将测试箱温度在 3 小时内降到 25℃,湿度保持在
95%不变;
7、测试箱温度在 25±3℃,湿度在 95%,保持 9 小
时;
8、以上为一个循环,共进行 2 个循环;
9、样品在该测试环境下保持运行状态;
10、测试完成后,在标准大气条件、室温下用强迫空
气循环(电风扇)进行 1 小时的恢复,以充分除去
测试样品表面的潮气;
11、测试样品充分恢复后,在8 小时内必须完成功能和
外观检测。
可靠性测试标准
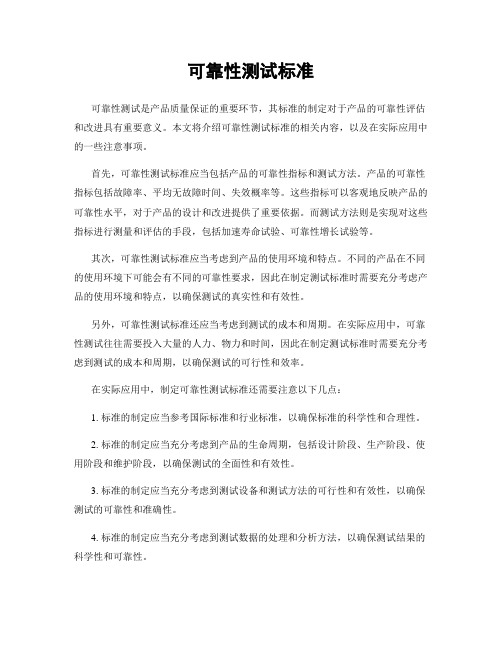
可靠性测试标准可靠性测试是产品质量保证的重要环节,其标准的制定对于产品的可靠性评估和改进具有重要意义。
本文将介绍可靠性测试标准的相关内容,以及在实际应用中的一些注意事项。
首先,可靠性测试标准应当包括产品的可靠性指标和测试方法。
产品的可靠性指标包括故障率、平均无故障时间、失效概率等。
这些指标可以客观地反映产品的可靠性水平,对于产品的设计和改进提供了重要依据。
而测试方法则是实现对这些指标进行测量和评估的手段,包括加速寿命试验、可靠性增长试验等。
其次,可靠性测试标准应当考虑到产品的使用环境和特点。
不同的产品在不同的使用环境下可能会有不同的可靠性要求,因此在制定测试标准时需要充分考虑产品的使用环境和特点,以确保测试的真实性和有效性。
另外,可靠性测试标准还应当考虑到测试的成本和周期。
在实际应用中,可靠性测试往往需要投入大量的人力、物力和时间,因此在制定测试标准时需要充分考虑到测试的成本和周期,以确保测试的可行性和效率。
在实际应用中,制定可靠性测试标准还需要注意以下几点:1. 标准的制定应当参考国际标准和行业标准,以确保标准的科学性和合理性。
2. 标准的制定应当充分考虑到产品的生命周期,包括设计阶段、生产阶段、使用阶段和维护阶段,以确保测试的全面性和有效性。
3. 标准的制定应当充分考虑到测试设备和测试方法的可行性和有效性,以确保测试的可靠性和准确性。
4. 标准的制定应当充分考虑到测试数据的处理和分析方法,以确保测试结果的科学性和可靠性。
综上所述,可靠性测试标准的制定对于产品的可靠性评估和改进具有重要意义。
在实际应用中,需要充分考虑产品的使用环境和特点,以及测试的成本和周期,制定科学合理的测试标准,以确保测试的可行性和有效性。
同时,还需要参考国际标准和行业标准,充分考虑测试设备和测试方法的可行性和有效性,以确保测试结果的科学性和可靠性。
联想电子可靠性实验测试条件要求
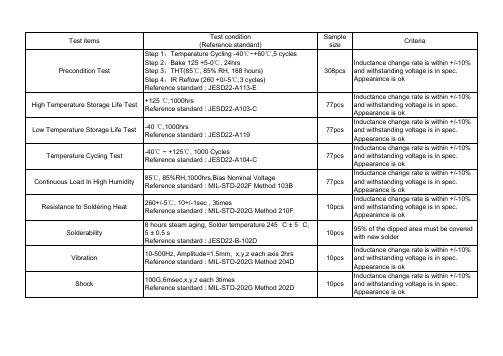
High Temperature Storage Life Test
+125 ℃,1000hrs Reference standard : JESD22-A103-C
Low Temperature Storage Life Test
-40 ℃,1000hrs Reference standard : JESD22-A119
10-500Hz, Amplitude=1.5mm,ard : MIL-STD-202G Method 204D
Shock
100G,6msec,x,y,z each 3times Reference standard : MIL-STD-202G Method 202D
Temperature Cycling Test
-40℃ ~ +125℃, 1000 Cycles Reference standard : JESD22-A104-C
Continuous Load In High Humidity
85℃, 85%RH,1000hrs,Bias Nominal Voltage Reference standard : MIL-STD-202F Method 103B
Resistance to Soldering Heat Solderability Vibration
260+/-5℃, 10+/-1sec , 3times Reference standard : MIL-STD-202G Method 210F
8 hours steam aging, Solder temperature 245 °C ± 5 °C, 5 ± 0.5 s Reference standard : JESD22-B-102D
内隐联想测验信度、效度及原理
内隐联想测验信度、效度及原理一、本文概述内隐联想测验(Implicit Association Test,简称IAT)是一种在社会科学领域中广泛使用的心理测量方法,主要用于评估个体对特定对象或概念的内隐态度。
自其诞生以来,IAT因其独特的非自我报告特性,即能够在个体无意识的情况下揭示其真实态度,而受到了广泛的关注和应用。
然而,任何一种测量方法都需要经过严格的信度、效度检验,才能确保其测量结果的准确性和可靠性。
本文旨在全面梳理和分析内隐联想测验的信度、效度及其背后的原理,以期为相关领域的研究者提供有益的参考。
文章首先将对内隐联想测验的基本概念和操作流程进行简要介绍,帮助读者了解该方法的理论基础和操作要点。
随后,文章将重点探讨内隐联想测验的信度问题,包括其重测信度、内部一致性信度等,分析影响信度的因素及如何提高测验的稳定性。
在效度方面,文章将关注内隐联想测验的构念效度、预测效度等,通过对比研究验证其在不同领域、不同人群中的应用效果。
文章将深入挖掘内隐联想测验背后的心理学原理,探讨其与传统显性测验的区别与联系,以及其在揭示个体内隐态度方面的独特优势。
通过本文的阐述,我们希望能够为相关领域的研究者提供一套完整的内隐联想测验信度、效度及原理的分析框架,为未来的研究提供有益的参考和借鉴。
我们也期望通过不断深入研究和实践应用,进一步推动内隐联想测验在社会科学领域的发展和创新。
二、内隐联想测验的基本原理内隐联想测验(Implicit Association Test,简称IAT)是一种用于测量个体内隐态度或内隐偏见的心理学实验方法。
它基于认知心理学中的联结主义理论,认为个体的心理结构是由各种概念之间的联结形成的,这些联结强度决定了个体对特定刺激的反应速度和准确性。
内隐联想测验的基本原理在于,通过测量个体对两个概念(如自我和积极评价词汇)之间的联结强度,来推断其内隐态度或偏见。
实验过程中,被试者需要完成一系列快速的分类任务,这些任务要求他们将特定的刺激(如词汇、图片等)归类到不同的类别中。
联想笔记本电脑UV漆层的信赖性测试

性)
2.汗水摩擦测试须满足:
2.摩擦测试: 23±2℃,人工汗液 1)5000 cycles; 浸湿的脱脂棉折迭4层,500g的力,
距离6cm,来回擦拭被测试区域, 一
2.人工汗水(碱性)配方:1)1公升蒸馏水; 2)氯化钠(Nacl)10g/L;3)磺酸氨 (NH3CO3)4g/L;4)磷酸氢钠(NaHPO4)2.5g/L 适量(调节溶液 PH 值达到8.7) 。
2.与标准封样色板对比,无明显目视可见色差;
比对很淡的颜色时可能会低到540LX,在比对很 深的颜色时可能会高到2150LX。照明范围必须
在60%对色板大小的照明范围内;
色差计:参考ASTM D2244;
3.色差要求(D65光源):
3.样板最小尺寸为90×165mm;
3.
颜色、色差 分光光度计结合目测,D65光源, 23±2℃,65±10%RH。
1)表面不可有异常变化(包括出现凹痕、起泡、龟裂 、剥离、破裂、脱落、露底材等缺陷);2)自然光源 下,无明显目视可见褪色、变色、异色,表面无可见 光泽度改变或阴影。色差ΔL:±1.5, Δa: ±0.5, Δb: ±0.5,ΔE≤2.0;光泽度改变≤5度;3)橡皮耐 磨测试须满足;4)附着性≥4B ;
塑胶底材
≥2H
说明:对于深咬花底材应适当提高喷漆厚度, 以满足漆膜的耐磨耗性能。
1.以产品最终干燥漆层为准; 2.铅笔与涂膜呈45度角,推出6.5mm距离,检视 涂膜有无划破或刮痕(起始位置划破可忽略, 以中间段及尾段判断);
三菱Uni铅笔,笔尖荷重500g, 要
求在平面板上测试。
5.
硬度
硬度测试仪
5B(特殊情况可以放宽到不 可低于4B,由Lenovo工程师 确认)
平板电脑可靠性测试规范
3) 电气性能:通过综测仪或其它测试仪器进行检测得到的数据信息;
4) 实验室条件:
温度:15℃~35℃
湿度:25%~75% R. H
大气压:86~106Kpa
平板电脑可靠性测试规范
文件编号 版本号
V1.0
5. 测试内容
5. 1 环境适应性
5. 1. 1 低温存储
5. 1. 1. 1 测试目的:验证产品在低温下存储的适应性
图 2 高温存储‐剖面图 5. 1. 2. 3 样机数量:3 台 5. 1. 2. 4 判定标准:样机的外观结构、基本功能及电气性能均正常。
平板电脑可靠性测试规范
文件编号 版本号
V1.0
5. 1. 3 低温工作
5. 1. 3. 1 测试目的:验证产品在低温下工作的适应性
5. 1. 3. 2 测试方法:
0. 5 小时,并观察是否有充电指示,确定低温下充电截止的温度,如果‐10℃能正常充电,电流正常,则继 续降低温度至‐15℃进行测试,若‐15℃下仍能充电,则不再继续降低温度测试。即判定低温充电保护测试 FAIL。 3) 然后依次温度上升到 55℃和 60℃,并插入配套电源适配器(此时关闭外部电源,不充电)。待温度稳定后 保持 2 小时后开启电源进行充电,每个温度下各充电 0. 5 小时,并观察是否有充电指示,确定高温下充电 截止的温度; 如 60℃下仍能充电,则不再继续升高温度进行测试。 5. 1. 7. 3 样机数量:3 台 5. 1. 7. 4 判定标准:低温充电的截止温度:‐10~‐15℃,高温充电的截止温度:55~60℃。
1) 测试前在实验室条件下检查样机的外观结构、基本功能及电气性能,将样机以不包装关机状态放入恒温恒湿
箱中;
2) 启动实验设备,使箱内温度以不大于 3℃/min 的速度逐渐上升到 60℃的存储温度,保持该存储温度 24h,
最新硬件测试标准(最全可靠性测试)
最新硬件测试标准(最全可靠性测试)1. 目的此可靠性测试标准的目的是尽可能地挖掘设计,制造中的潜在性问题,在正式生产之前寻找改善方法并解决上述问题点,为正式生产的产品在质量上做必要的保证;并检测产品是否具备设计上的成熟性、使用上的可靠性.具体包括新产品的试验、物料的试验及例行抽检试验等等。
2. 范围此指引适用于所有诺亚信高科技集团有限公司生产的移动产品。
3. 定义3.1 技术员:设定仪器,完成相关测试项目,并记录测试结果.解决检测过程中的问题;并向工程师反馈检测方法的缺陷和不足。
3.2 工程师:判断测试结果是否可接受;跟进问题的解决情况;改善检测方法。
4. 抽样方案4.1 以具体的实验项目要求为准。
5. 检验内容5.1 环境可靠性试验5.1.1 高温运行试验试验目的:验证手机在高温环境的适应性。
试验样品:2sets试验内容:55℃,手机配齐SIM卡/T卡,装电池开机,进行12小时测试,运行时间从到达55℃温度始算起.试验后在箱内检查,要求产品的功能、外观正常.受测前样机胶塞必须安装归位.射频指标符合国家标准.对于翻/滑盖手机,1台开盖,1台合盖.(若屏/主板不同供应商,则样机各选2pcs,共4pcs)。
判定标准: 1、壳体外观检查,缝隙,镜片以及使用背胶固定的装饰件等粘贴牢固度。
2、功能检查(注意屏的显示是否有黑影,坏点等异常)。
3、触摸屏划写,点压准确性(如有触摸不准偏位等现象,进行屏幕校准看是否可恢复)。
4、MP3,FM,耳机,充电,滚轮…。
5、实网通话一次,看送话和受话是否正常。
5.1.2 低温运行试验试验目的:验证手机在低温环境下的适应性。
试验样品: 2 sets试验内容: -20℃,手机配齐SIM卡/T卡,装电池开机并运行老化软件,进行12小时测试,运行时间从到达-20℃温度始算起.试验后在箱内检查,要求产品的功能、外观正常.受测前样机胶塞必须安装归位.射频指标符合国家标准.对于翻/滑盖手机,2台开盖,1台合盖.(若屏/主板不同供应商,则样机各选2pcs,共4pcs)。
联想--平板ORT(持续可靠度测试) TEST
Lenovo MIDH ORT Test PlanRevision History1.0 ScopeThis procedure is designed for Lenovo MIDH product,including tablet & phone2.0 MIDH Phone ORT Test PlanDetail test criteria please refer to attachmentLenovo MIDH PhoneORT Test Plan.xlsx3.0 Lenovo MIDH Tablet ORT Test Items:Remark: Detail ORT test spec following different project requirements4.0 ORT test criteria:All ORT test criteria should follow project design spec5.0 A: Weekly Test Items5.1 Vibration Test 随机振动测试5.1.1 Test units do non-operation random vibration test normal.5.1.1.1 Non-Operation Vibration :X,Y axis Test Time: 30 minutesRandom Vibration: Grms =1.045.1.1.2 Check screw, machine and system functions should not fail after finished test. no mechanical, cushions, cardboard cartons damage.5.1.1.3 use 4direction keyboard test touch, no No function/ No sensitive issueDetail test spec follow project RD’s criteria5.2 Manual Power on/off Test in cold (0℃)5.2.1 With only battery, do low temperature power on/off test. 带电池,做开关机测试Set the temperature chamber to keep 0℃ enough time for this test.With only battery, put samples into 0℃ chamber, power off, and storage more than 30 minutes.Power on; check if can start OK.(Couldn’t happen fail.)Power off; check if can shut down OK.(Couldn’t happen fail.)Repeat 10 cycles; Please keep interval 3 minutes between power on and power off.5.2.2 With battery and plug in AC adapter, do low temperature power on/off test.带电池连充电器做开关机测试Set the temperature chamber to keep 0℃ enough time for this test.With only battery, put samples into 0℃ chamber, power off, and storage more than 30 minutes.Power on; check if can start OK.(Couldn’t happen fail.)Power off ; check if can shut down OK.(Couldn’t happen fail.)Repeat 10 cycles; Please keep interval 3 minutes between power on and power off.5.3 Manual Suspend/Resume Test in Cold (0℃)5.3.1 With only battery, do low temperature suspend/resume test.Set the temperature chamber to keep 0℃ enough time for this test.With only battery, put samples into 0℃ chamber, power on, then press power button, make them suspend, and storage more than 30 minutes.Press power button by manual; check if can resume OK.(Couldn’t happen fail.)Repeat 10cycles; Please keep interval 3 minutes between press power button5.3.2 With battery and plug in AC adapter, do low temperature suspend/resume test.Set the temperature chamber to keep 0℃ enough time for this test.With battery and plug in AC adapter, put samples into 0℃ chamber, power on, then press power button,Make them suspend, and storage more than 30 minutes.Press power button by manual; check if can resume OK.(Couldn’t happen fail.)Press power button by manual; check if can suspend OK.(Couldn’t happen fail.)Repeat 10cycles from; Please keep interval 3 minutes between press power button5.4 Manual AC adapter Plug in/out Test in Cold (0℃)With battery and plug in AC adapter, do low temperature plug in/out test.Set the temperature chamber to keep 0℃ enough time for this test.With battery and plug AC adapter, put samples into 0℃ chamber, power on, confirm power supply OK,and storage more than 30 minutes.Plug out AC adapter by manual; check if can power supply OK.(Couldn’t happen fail.)Plug in AC adapter by manual; check if can power supply OK.(Couldn’t happen fail.)Repeat 30cycles; Please keep interval 1 minutes between plug in and plug out5.5 Manual Power on/off Test in Hot (40℃)With only battery, do low temperature power on/off test.Set the temperature chamber to keep 40℃ enough time for this test.With only battery, put samples into 40℃ chamber, power off, and storage more than 30 minutes.Power on; check if can start OK.(Couldn’t happen fail.)Power off; check if can shut down OK.(Couldn’t happen fail.)Repeat 10 cycles; Please keep interval 3 minutes between power on and power off.With battery and plug in AC adapter, do high temperature power on/off test.Set the temperature chamber to keep 40℃ enough time for this test.With only battery, put samples into 40℃ chamber, power off, and storage more than 30 minutes.Power on; check i f can start OK.(Couldn’t happen fail.)Power off; check if can shut down OK.(Couldn’t happen fail.)Repeat 10 cycles; Please keep interval 3 minutes between power on and power off.5.6 Manual Suspend/Resume Test in Hot (40℃)With only battery, do high temperature suspend/resume test.Set the temperature chamber to keep 40℃ enough time for this test.With only battery, put samples into 40℃ chamber, power on, then press power button, make them suspend, and storage more than 30 minutes.Open LCD cover b y manual; check if can resume OK.(Couldn’t happen fail.)Close LCD cover by manual; check if can suspend OK.(Couldn’t happen fail.)Repeat 10cycles; Please keep interval 3 minutes between press power buttonWith battery and plug in AC adapter, do high temperature suspend/resume test.Set the temperature chamber to keep 40℃ enough time for this test.With battery and plug in AC adapter, put samples into 40℃ chamber, power on, press power button Make them suspend, and storage more than 30 minutes.Open LCD cover by manual; check if can resume OK.(Couldn’t happen fail.)Close LCD cover by manual; check if can suspend OK.(Couldn’t happen fail.)Repeat 10cycles ; Please keep interval 3 minutes between press power button5.7 Manual AC adapter Plug in/out Test in Hot (40℃)With battery and plug in AC adapter, do high temperature plug in/out test.Set the temperature chamber to keep 40℃ enough time for this test.With battery and plug AC adapter, put samples into 40℃ chamber, power on, confirm power supply OK, and storage more than 30 minutes.Plug out AC adapter by manual; check if can power supply OK.(Couldn’t happen fail.)Plug in AC adapter by manual; check if can power supply OK.(Couldn’t happen fail.)Repeat 30cycles; Please keep interval 1 minutes between plug in and plug out5.8 Cold boot testTemperature: under room temperature.Running cold re-BOOT program 24hrs.Criteria: Not system hang when re-BOOT testing.5.9 Multi-task Test5.11.1 Under 40℃ degree environment operation.5.11.2 Run Burn-In test soft, and play 1 video files at the same time,set volume to 70%, for running 72 hrs.5.11.3 Check if happen fail in testing.-Touch panel sensitive life test-WIFI test-E-compass test-GPS test-Camera test-3G test5.10 Battery Voltage leakage test( power consumption )Sample Rate: 2 units/ Model/ WeeklyProcedure:Power on then enter into OS environment to ensure battery capacity 100%.Check battery leakage current value.The leakage current criterionS3 mode (with WOL enable and Max memory size):1, charge 100%2,test system leakage current (including Battery leakage current)Pass Criteria: following project BSP requirement6.0 B: Monthly Test Items6.1 Package/ Non-package Storage Test (no-operation)6.1.1 Testing before: check all of over lap & gap data OK.6.1.2 Test Process:Bare system: minimum 1 system per each SKU; Minimum 5 systems for this test.Package:x in 1 package: 2 sets; single package : 2 sets.DC mode Power OFF.Test Cycles : 1 cycle(For Package Sea shipping method, run 2 cycles.) Duration: 82 hrs After test, check cosmetic, then run Diagnostics for all component function check Pass Criteria: EMMC can random write, touch panel, OFN, camera and other basic no function issueNo mechanical problem6.1.3 Finished test: the over lap & gap not over specification or functional issue found.6.1.4 LCD display quality check by White/ Black/ Red/ Green/ Blue pattern.6.1.5 Criterion: plastic not deform, LCD display normally.6.2 Package Drop Test6.2.1 Check samples machine and function OK. Pack samples as shipping status for test.6.2.2 The drop test high as below table .Free drop on flat metalsurface.Drop Sequence: 1 corner, 3 edges and 6 surfaces, all drop on one boxTest height 76cm.6.2.3 Drop sequence as: - 1 corner first. (Select the most critical component or product direction)- 3 edge of adjacent the corner.- 6 surface of carton box. (Start from one side, then opposite side)6.2.4 After drop test must perform structure to review if any mechanical issue on system and physical damage 6.2.5 Check machine and LCD ca n’t have cracked ,check basic function, no defect.6.2.6 use 4direction keyboard test touch, no No function/ No sensitive issue6.3 Connector life testDC mode, power OFFMini USB/ /Mini HDMI/SD Card/ SIM card/ IO jack( Microphone, Headphone): 5000 timesPass Criteria: no mechanical or electrical damage6.4 Conduction testEvery monthly samples 1~2 units from production line to do conduction test.6.5 EMI test:Every monthly samples 2 units from production to do EMI check.The plan follows EN55022 / CISPR22 request.Do horizontal and vertical direction EMI test from 30Hz~~1000Hz,1000MHz~~6000MHz6.6 ESD test:Every monthly samples 2 units from production to do ESD check.2 units. Test mode: stand alone and full system Air ConRequire±8kV ±4kV Temporary degradation or less of function or performance which is self-recoverable(B)±15kV ±8kV Temporary degradation or loss of function or performance which requires operatorintervention or system reset (C)ReferenceDo air discharge as model, No system shut down or re-start OK.Do contact discharge as model, No system shut down or re-start OK.6.7 HW performance test6.7.1: Max output -power test of receiver6.7.2: Max output-power test of speaker6.8 Battery life testTemperature: under room temperature.Installed and Options Battery TestCriteria: Follow project Spec6.9 Static RF performance testSample be tested by three channel : High / Middle / LowDetail refer to project specLink w/ RF equipment for below testGGE according to YD/T1215-2006,follow 8960 or CMU200 test coverage for testingTD according to YD/T1368.1-2008、YD/T1779-2008,follow SP6010 test coverage for testingWCDMA according to YDT 1548.1-2009,follow 8960、CMW500 or CMU200 test coverage for testing (3GPP34.121)C2K according to C.S0011、C.S0033,follow 8960、CMW500 or CMU200 test coverage for testing6.10 OTA Antenna performance testa. TRP transmit powerb. TIS sensitive of receiving.GSM/TD/WCDMA/C2K/WIFI/AGPS. Detail refer to project spec7.0 OBE function check and disposal for those tested units.After finished above all test item, all tested units should not ship directly.- No-destructive test: all units reflow the process and re-testing follow normal process and perform OBE testing, and should record the serial number in SFIS as tracking.- Destructive test: should scrap those related parts.8.0 CAR:When found failures,report to QA &PE. The issue must be closed as quickly as possible.9.0 Report :After finished the ORT, will summary the ORT testing report..。
联想主机硬件和可靠性测试

C1.16_高温贮存试验
持续时间:48h,常温恢复2h 试验环境:低温-40℃±2℃/1h,在1min内转到高温
C1.17_温度冲击试验
75℃±2℃/1h为一个循环, 试验环境:55℃(±2℃)相对湿度90%~95%
C1.18_恒定湿热试验
持续时间:48h(例行试验)/96小时(新品认
C1.19_外壳丝印RCA耐磨试验
E4.4.4_数据线抗拉力试验
将线数据线线材末端500mm处自上而下悬挂一个重量 为1000g的砝码持续1min。试验后数据线应无断裂现 象,且充电及数据传输正常。
E4.3.7 _盐雾试验
将数据线放入盐雾设备中持续48H,实验结束后取出 在常温下隔置48H,试验完成后进行导通性和外观检 测需正常。
E4.4.7数据线剪切力试验 E4.3.1_高温贮存
Hale Waihona Puke 9. 其它Rohs检测
试验方法
文档来源
试验样品经过交变盐雾试验后进 行外观检测应无异常
试验方法: (a) 试验设备:耐摩擦试验机-
MIDH-S-T&E-002 移 动终端部件试验要求 及方法V2.0 MIDH-S-T&E-002 移 动终端部件试验要求
Model5600、日本三菱试验专用铅 及方法V2.0 试验方法:
试验要求及方法: 试验环境:55℃(±2℃)相对湿度90%~95% 持续时间:48h(例行试验)/96小时(新品认 将数据线线材悬挂在摇摆试验机上,线材末端 500mm处自上而下悬挂一个重量为500g的砝码,摇摆 角度±60度,摇摆频率为20来回/分钟,摇摆次数为 3000次。试验后数据线应无断裂现象,且充电及数 据传输正常。 试验方法及要求: 将样品从1.0m的高度自由跌落到混凝土地板或大理 石地板表面上,每个面向下跌落2次,6面共计12
笔记本可靠性测试项

笔记本电脑的可靠性测试 (SIT)2008-06-02 19:13如今笔记本电脑的使用越来越普及!人们对笔记本电脑的要求也越来越多!即使,业界一直都在cost down!那么,我就来说说笔记本电脑的常见的测试项目供大家参考!先来说说,SITSystem integration test:DVT1 1month and DVT2 1month Q'ty : 3sets1.General Function Test Item:CPU:Necessary minimum 2 units for this test under all OS.1.1 Under DOS : Bios detect,check the CPU type and CPU speed.1.2 When Post or windows,check CPU information,Including :In POST.Show the correct CPU type and CPU speed.Properties of system/system tools/Dxdiag under windows1.3 System test Amidiag 6.20\PC Doctor1.4 Bench Mark 3D winbench2000\3D Mark2006\Mobile Mark 2007\PC Mark 2005 1.5 Speed step2 enable/disable and Battery discharge test1.6 Power on/Shutdown test under windows1.7 Reboot/Restart test1.8 S31.9 S4Memory:1.1 Total capacity of memory under BIOS\Post screen\Windows1.2 test by tools: Mem Test2.59 or memory86+1.3 Operation under windows : 3D Mark 2006 auto run 8hrs ,or other1.4 After STR/Resume 5times ,STF/Resume 5times1.5 Diagnostic tool test: Rebooter , Stresstest ,Ntbench,S3 toggle1.6 Power on/off ,Each OS 5times1.7 Reboot ,Each OS 5timesVGA:1. Install driver2. Diagnostic Tool Test,AMIDiag 6.20-DOS,AMIDiag2.0-Win3. BIOS setup utility4. Check DOS screen5. Setup OS each OS,Driver install.6. Start OS,Cold boot\reboot\MS-DOS Display mode change each 5 times7. Check VGA resolution & Color Depth.640*480,800*600,1024*768,1024*800,1280*800,under 16bits\32bits\265colors8. LCD off by time out, under windows 5times9. Hot key Fn+F310. S3 Standby11. S4 Hibernate12. Check virtual screen under windows13. Check cursor moving range under windows14. Screen saver\Video playback\DVD playback\various video outputLCD+CRT the test item same as above (But it need check CRT DDC in the OS device management)And, LCD/CRT/TV Mode change:Dual display: 1.3~2.4Extended desktop: Different color depth,Mouse cursor move area,monitor time-out,screen saver previewPCMCIA:1.Hot insert 16bit\32bit Modem/LAN/SCSI/ATA confirm the recognition2.Cold insert , confirm the boot and recognition3.Operation , Eject without stop PC card.4.Insert/Remove the card5.After STR/Resume,After STF/Resume under windows6.Power on/Shutdown each OS7.Reboot8.Warm eject ,Remove card when system in S3\S4 then resume.Modem:1.Mdeom properties2.Driver install3.Medom function ,Internet Explorer and download test.4.Fax function,send/receive,check the dial sound5.Wake up on ring. in AC/DC mode6.Operation STR/STF, while communicationplink test,100MB files8.S3/S4LAN:work adapters properties2.Driver installN Boot4.Delete,confirm system can delete the driver5.Connect to internal ,download 500MB,upload 100MB6.File copy7.STR,STF/Resume:by start menu/power switch/time out/lid swtichConfirm WOL:Wake on Lan under Enable/Disable mode, Using Magic Packet 1.0 software to wake computer.8.Legal operation,while communication STR/STF9.Aging(File send/receive more 24hrs), TCP/IP,Net/BEUI,IPX/SPX10.System log on/log offWLAN:1.The test item same as above.2.Distance (Check the transfer rate) 30m/50m/100m3.Signal interference (Bluetooth) 30m/50m/100m4.Access point log on/log off5.Peer to peer/Access Point ,file send/receive, TCP/IP,Net/BEUI,IPX/SPXAudio:1.Driver install2.Audio recording3.Internal\External microphone sound record test,Confirm noise4.Speaker balance ,Max\Min\Mute\Left\Right,Built-in speaker\External speaker5.Headphone balance test same as speaker balance test.6.SPDIF out test by optical.7.Line-in/out test (Ex.CD audio play)8.Windows volume control test by Media player, VCD\AVI\MIDI\WAV\CD\HDCD Sound enable/disable,left/right balance,Volume control,mute,wave balance9.Noise check: operate HDD,operate screen saver,operate slide pad,Poweron/off,S3,S4,Lcd open/close.10.Audio information & audio setting check11.ACPI function check with various audio function testsIDE:1.IDE HDD1.1 Detect device(Bios\Post\Win),confirm the capacity of HDD,mode name of HDD 1.2 AMIDiage 6.12 for DOS,AMIDiag2.0 for windows1.3 HDD led1.4 File copy\compare\delete1.5 Defragment1.6 Scandisk1.7 Partition -format, Fat16\Fat32\NTFS1.8 OS boot1.9 Time out test,HDD off1.10 DMA function,Advance function check1.11 Searching and accessing ,AC adapter insert/remove1.12 Power on/off under windows 5 times1.13 Warm Boot under windows 5 times1.14 S3/S42.DVD-ROM2.1 Driver configuration,Check F/W & mode name2.2 Tray open/close2.3 Drive performance ,Nero speed 99 and CD winbench 992.4 Check auto run function, CD\VCD\DVD palyback2.5 AMIDiag 2.0 for Windows2.6 Dolby digital , Dolby headphone check it.2.7 Dos operation (MS-DOS\DOS)2.8 CD Boot (WinNT 4.0 or Bootable CD)2.9 Led indicator2.10 OS install , H/L recovery, Using DVD Diso to install OS2.11 Application Install , MicroSoft Office 2000\2003\20072.12 Virtual Disk ,Disk Format\Erase\Rewrite , File copy/Compare/Delete2.13 Burn CD : CD-R : Disc 800MB/700MB/650MB/550MB (Type90min/80min/74min/63min)Disc High\Low speedODD High'low speed2.14 Burn DVD DVD-R\DVD-R DL\DVD+R\DVD+R DL\DVD-RW\DVD+RW\DVD-RAM2.15 Play DVD movies , SSSL\SSDL\DSSL DVD-5\DVD-9,Check Region Code , Code=1(USA),Code=2(Japan),Code=3(Twaiwan)2.16 Using 0.3g CD (Eccentric media) that from ODD vendor, Check noise and vibration2.17 Legal operation,STR while accessing\STD while accessing\eject while accessing 2.18 After STR\STF resume2.19 Running over 12 hours , VCD\Audio-CD\DVDMouse and KeyboardInternal keyboard1.Keyboard test use the AMIDiag 6.122.Hot keys test under the DOS/Windows3.Key locks, Caps\Num\Scroll indicator4.Hot plug/unplug PS2 K/B5.All key input ,Using keyview programB K/B test ,Wireless K/B test,Numeric K/B7.After STR/STF resumeGlide pad:1.Detect the device, Post screen/under windows2.Driver install3.PC doctor test4.Button swap5.Scroll button6.Cursor operation7.Drag8.Operate direction9.Tapping/Corner tapping10.Wheel emulation11.Disabled function12.Response on taskbar,Indicator on system tray13.Under expanded video,Check indicator moving functionbination test,USB Mouse and Glide pad -in same time15.Power on/off , Warm boot ,After STR/STF resumeIEEE1394:1.Check detect2.Check driver install in the device management,No any error3.Direct connection by IEEE 1394 link cablework setup and confirm under network property5.Share the folder or drive(HDD or ODD),And File copy\Compare\Delete More 100MB6.While communication STR/STF resume7.Power on/off 5 times8.Warm boot 5 times9.S3/S410.Connect to IEEE 1394 HDD deviceUSB Port:1.Chip detect,system will auto detect2.Check driver install in the device management3.System can run under battery only with all the bus-power (USB camera,HDD)B Mouse: Basic functionScroll switch,Cursor operation.Drag,Hot plug/unplugB speaker :Sound output ,Using CD-DA/Midi/Mp3/Wav fileSound quality check ,power on/off the speakerVolume control,Maximum\MinimumHot plug/unplugAfter STR/STF resumeB Camera:Input image and previewRecord video ,Take a pictureHot plug/unplugAfter STR/STF resumeB Ext.HDD:File copy\delete\format , While accessing STR/STF resume8.After STR/STF resume ,In S3-remove device-resume,In S3 insert device-resumeUser I/F:1.Power switch:power on/off mode each OS2.Short cut key,check function3.Status indicator :Power/suspend status DOS/WindowsBattery status:Normal\Low\WarningCD/DVD ststus\FDD ststus\Caps lock status\Scroll lockstatus\Num lock status\wireless lan status\Mail arrival status4.Beep Action :Power on each OS\Suspend\LCD+CRT mode Fn+F3\Sound Muteon/off \Battery warning\Battery Low\Beep on/off5.Function key including hot key6.Keyboard Function ,check all key7.Pointing device:Glide pad,Buttons,Scroll buttons8.Lid swtichWindows Power Management(ACPI)1.Manual STR\STF resume (Power switch\Led switch)2.Software STR\STF resume3.Enter S3 by Timer\Power switch\Lid switch in AC/DC mode ,Resume by power switch in AC/DC modeEnter S3 by Timer\Power switch\Lid switch in AC/DC mode ,Resume by lid switch in AC/DC modeEnter S3 by Timer\Power switch\Lid switch in AC/DC mode,Resume by power switch in DC/AC modeEnter S3 by Timer\Power swtich\Lid swtich in AC/DC mode,Resume by lid switch in DC/AC mode4.Power schemesTurn off monitor\Turn off hard disk\System stand by\System hibernates5.AlarmsLow battery\Critical battery6.Power meter7.Advanced , Password\Lid close\Power button8.Hibernate Enable/DisableAC adapter /Battery:1.Configure AC Adapter : Connect\Disconnect2.Battery Charging :Power on charge\Power off charge3.Battery Full Charge :Power on charge\Power off charge4.Battery Discharging5.Battery Warning: Alarm,Power meter6.Low Battery7.STR\STF by Power schemes8.Battery Operation , W/O AC adapter9.Replace Battery10.RTC battery : Leap year renewal (day/month/year) under Power on/off/S3BIOS:1.BIOS Flash2.BIOS Crisis , Jump Dip switch and flash Bios.wph by usb floppy3.Boot :Post screen\Boot message\Bios setup\Lan bootRegion Kind of K/B,Fast boot:Boot\resume from STR\resume from STF4.Check setup screen and Multi language5.Bios version (Version & VBIOS)CPU type/speed\system memory\extended memory\internal HDD Maximum capacity\internal DVD\Diskette typeSystem time\date6.Advanced: LCD Panel\View ExpansionSummary screen ,UMA (Unified memory architecture) Frame buffer size7.Security :Set supervisor password\Password on bootCorrect password\Wrong password\Bad charterFixed disk boot sectorBoot sequence,DVD-ROM\Diskette driver\Hard driver\USB disk\Lan boot server8.OS install\boot , each OS9.STR/STD,Windows menu\Lid switch\Power button\Time-out10.Wake on ring,by internal modem11.Wake on Lan,internal Lan12.Battery:battery charging\discharging,Low battery alarm13.Short cut key function check14.Status indicator check15.Hot key check16.I/O function check17.Reboot test toolNoise :1.Power on/off2.Reboot3.STR\STF4.Operate volume control , Playback\Recording under WIN5.Check fan noise under WIN and DOS6.Plug headphone under Win7.Microphone echo sound under Win and Dos8.Play music CD (Max sound) under winB data convey10.Operate mobile-phone around the system under win11.Inverter noiseRTC:1. RTC Leap year (day/month/year) Power on/off ,Enter S3/S42. RTC specification check .Power on/ff under High\Room\Low tempSD/MS card:1.Indicator2.File Copy\Compare\Delete3.Defragment4.Scandisk5.Partition Fat\Fat32\NTFS6.While accessing AC adapter insert/remove and STR\STF7.Playback Mp3 and other8.STR/STF/RebootAdditional Acer test item:1.MDA 2008 1>Microsoft windows logo must stand alone and must be left 5 mm clear space2>The system resume from standby time whin in 5 seconds for XP (Less than 2 seconds for Vista)3>No unsigned driver be found by sigverif.exe,All drivers must be signed by WHQL4>AeroAT test must be passed2.Boot time test 1>Cold boot <=40 sec2>Raid support <=55 sec3>Resume from S43.BIOS check4.INT 15 test & WMI test5.Security function test (BIOS Password\HDD Password\HDD lock function\Smart card security\Finger print security\ACPI security\TPM security)6.Indication function check:1>Led on off 2>Color 3>Blinking 4>Flashing7.RTC check: 8 hrs off\24 hrs off . Within +/- 2.5 seconds2. Stability Test Item:1.Cold Boot/shut down , High Temp\Low temp\Room Temp2.Warm Boot , High Temp\Low Temp\Room Temp3.Suspend to RAM/Resume , High Temp\Low Temp\Room Temp4.Screen Saver,Hight Temp\Low Temp\Room Temp5.3D application running , Room Temp6.AMIDiag Running , Room Temp7.VCD and DVD , 12 hrs Room Temp8.IEEE 1394 Long run ,12 hrs Room Temp9.IEEE 1394 battery only ,1hrs Room TempB long run ,12 hrs Room TempB Run battery only ,1 hrs Room Temp12.Wireless Lan long run,24 hrs Room Temp13.WLAN Run battery only,1 hrs Room Temp14.Bluetooth long run , 24hrs Room Temp15.B/T Run battery only ,1hrs Room Temp16.Modem long run ,24hrs Room Temp17.Modem run battery only,1hrs Room Temp18.Internal Lan long run , 24hrs Room Temp19.Int/Lan battery only,1hrs Room Temp20.Loading testing,Including USB-HDD to HDD and IEEE 1394 and WLAN and 3D screen saver3.Software Compatibility Test1.Operating system test(Microsoft Windows XP Pro/Home,Vista)2.Windows application test2.1 Microsoft Office 2003/20072.2 Microsoft Visual Basic\C++\Foxpro2.3 Acrobat reader2.4 Winbench 20002.5 Intel media benchmark2.6 3D Mark 20052.7 WinZIP2.8 Microsoft internet Explorer2.9 Skype2.10 MSN messenger2.11 WinDVD2.12 Nero burning ROM3.Diagnostic Running Test3.1 AMIDiag for windows\PC Doctor for windows\SiSoftware sandra standardmunication Test4.1 Hyper terminal windows4.Performance Test Item1.Performance tableZiff Davis Media Business Winstone 2001 Version:1.01Ziff Davis Media Winbench 99/2000Ziff Davis Media Content Creation 2001 Version:1.0.1Ziff Davis Media Audio Winbench 99 Vwesion:1.0.1Intel Media banchmark 1.0SysMark2004PC Mark2004Mobile Mark 20023D WinMark 20003D Mark 2003\2005\2006\2007Record the score of test2.Battery TestBattery Charge\Dischage TimeNow~ SysMark 2004/2007PCMark 053D Mark 03/05/06Mobile Mark 05BWS Battery Mark 20045.Hardware Compatibility Test ItemB Port DeviceCheck Mouse:Logitech USB mouse\Wheel MouseMicrosoft mouseAcer mouseCheck Ext.HDD:BusLink USB2.0 HDDIBMNo Brand Mobile device TD starCheck Lan:Billionton USB 2.0 10/100MB Ethernet adapter D-Link USB Fast Ethernet adapterCheck Floppy:Teac USB FloppyCheck USB Camera:Canon Digital camera (PowerShot A20)\Logitech Check Speaker:AITEC\JS\Philips USB speakerCheck Printer:Epson\HPCheck Scanner:Acer\Epson\BenQCheck Modem:Billionton\MITAC\GVCCheck Bluetooth:BilliontonCheck Joystick:Microsoft\LogitechCheck Keyboard:ELECOM\Logitech\DellCheck CardReader:Billionton\SandiskCheck USB Link Cable :No Brand USB to Mini USB\USB to RS232\USB to LPTCheck USB HUBNo BrandCheck USB Flash DiskUSB 2.0 128MB\512MB\1GB2.Audio PortCheck Headphone:Sony headphone\Yamaha Dolby Digital 6-piece Speakers\Merry Micphone 3.CRT PortCheck SAMPO 15''\19''\21''\17'' CRTADI\ViewSonic\MAG\HP\NEC CRTDSC 17'' TFT LCD-out PortCheck Philips 14''\21'' TVChangHong 21''TVSharp 37'' LCD TV5.IEEE 1394 PortCheck IBM\Maxtor\Buffalo\TSE\Cubig HDDPanasonic\Sony DVCheck HUBBUSlinkCheck Cable3C IEEE 1394 4 pin to 4 pin Cable6.SPDIF-out TestCheck Sharp\Sony MDYamaha\Creative Speaker7.ATA/Storage CardCheck SanDisk\IBM\Compact\Kingston\Panasonic32MB/64MB/256MB/512MB/1GBSD\MS\CF\MMC8.Data/Fax/Modem PC CardCheck APEX Modem PCMCIA Card (16 bit)\Xircom Modem PCMCIA Card (32 bit)work Interface PCMCIA CardCheck D-Link\3COM , PCMCIA Lan(16 bit\32 bit)10.SCSI PCMCIA CardCheck Ratoc PCMCIA SCSI CardBus11.IEEE 1394 PCMCIA CardCheck 1394 I/O CardBus PCMCIA Card12 WLAN PCMCIA CardCheck Buffalo WLAN Card。
联想笔记本电脑质量标准

联想笔记本电脑质量标准V1.10甲方:联想(上海)有限公司甲方代表签字:日期:乙方:乙方代表签字:日期:更改记录版本号更改部门更改人审核人批准人生效日期更改内容V0.1 QPE 李刚2007-04-11V0.2 QPE 袁晓岚2007-05-03V1.0 QPE 袁晓岚2007-06-05V1.10 QPE 李刚2007-06-25 根据研发部门提供的信息更改部分内容目录2、主要部件3、整机4、试验方法5、软件6、附件1、范围1.1本标准适用于联想笔记本产品。
1.2本标准中涉及lenovo Consign的部件,单体标准适用于部件supplier原厂,单体部件标准以及部件中涉及到整机兼容性、可靠性、安全、稳定性等相关标准必须符合联想笔记本产品Spec要求;部件中涉及到整机兼容性、可靠性、安全、稳定性等相关标准同时适用于乙方,且乙方有义务提供相应技术支持以及协助解决整机系统中发现的有关部件的不良问题。
2、主要部件2.1 内存参照联想笔记本产品Spec的要求。
2.2LCD亮度、对比度等一般特性参照各个Panel的技术规格书请参照附件二,《LCD 外观标准》。
2.3 ODD(Slim 12.7mm)2.3.1 尺寸:128.0mm x 12.7mm x 126.1 mm(W*H*D)(不含Bezel),公差0.2mm,光驱尺寸规格如图1:图1 光驱尺寸规格示例(参考Toshiba SD-C2612-10E)2.3.2 前面板必需件:弹出按键(高度符合0~0.5mm),紧急弹出针孔(直径:1.2mm~2.0mm,深度:<15mm)电源开/忙 LED指示灯图2 紧急弹出插孔规范2.3.3 后面板IDE接口连接器(50 Pins)如图3所示。
图3 后面板(包括IDE连接口)尺寸规范图4 IDE接口示范IDE接口连接器推荐使用:JAE KX14-50KLD 系列或者与之相兼容2.3.4 重量:DVD< 200g Combo<250g2.3.5 安装:可以水平和垂直安装,安装角度左右5度内正常工作;托盘式(tray)或者Slot式取放光盘;外表面能够承受0.2mm的变形;上顶盖承受压力如图5所示;下底盖全区域承受压力最大2N。
- 1、下载文档前请自行甄别文档内容的完整性,平台不提供额外的编辑、内容补充、找答案等附加服务。
- 2、"仅部分预览"的文档,不可在线预览部分如存在完整性等问题,可反馈申请退款(可完整预览的文档不适用该条件!)。
- 3、如文档侵犯您的权益,请联系客服反馈,我们会尽快为您处理(人工客服工作时间:9:00-18:30)。
No Test Item
1静止水滴角测试2动摩擦系数测试3耐橡皮擦测试4耐钢丝绒测试5耐酒精测试
Test Condition Sample Q'ty Test Requirement 测试条件:
水滴角测试仪DSA20
2.5uL的纯水水滴,在待测玻璃的表面;
测试水滴角度, 测试中间和边缘5个点
3pcs>115
测试条件:
摩擦系数测试仪,200g 砝码下粘上测试玻璃,
测试摩擦纸张粘在水平传输带上,
实验速度100mm/min, 测试长度35mm
测试膜层动摩擦系数
3pcs《0.03
测试条件:
耐摩擦测试机,在美国SANFORD75215橡皮擦条上施加1000g 压力,
摩擦距离20mm,摩擦速度50次/分钟,
在触摸屏中央摩擦2000次后测量水滴角。
3pcs>100°
测试条件:
耐摩擦测试机,美制0000#级钢丝绒,施加1000g 压力,
摩擦距离20mm,摩擦速度50次/分钟,
在触摸屏中央摩擦2000次后测量水滴角。
3pcs>100°
测试条件:
耐摩擦测试机,美国SANFORD75215橡皮擦条蘸99.5%无水酒精,
橡皮擦上施加1000g 压力,
摩擦距离20mm,摩擦速度50次/分钟,
在触摸屏中央摩擦2000次后测量水滴角。
3pcs>100°。
