AtmelStudio6.0 下程序的烧录操作
烧录机操作流程

继续重复以上步骤,持续进行
烧录机操作流程
单击输入您的封面副标题
操 作 流 程
插入OK料管 插入NG料管 货架取料(带有芯片料管) 目检装有芯片的物料管 拔开物料管的一头插入备料口中 将摇臂合上 按运行按钮开始运行 OK料管装满之后取下换上新的OK料管 备料口物料管全部空时,将其取下
继续重复以上操作流程
第一步:插入OK料管
第二步:插入NG料管
第三步:从物料架取装有芯片的物料管
第四步:对装有芯片的物料管进行目检,检查物料管里面的芯 片是否装满。
第五步:拔开物料管的一头并将其插入备料口中(如下图所示)
第六步:将摇臂合上
第七步:按下运行按钮开始运行
第八步:OK料管装满之后将其取下,换上新的OK料管
ቤተ መጻሕፍቲ ባይዱ
第九步:当备料口物料管全部空时,将其取下
固件烧录流程
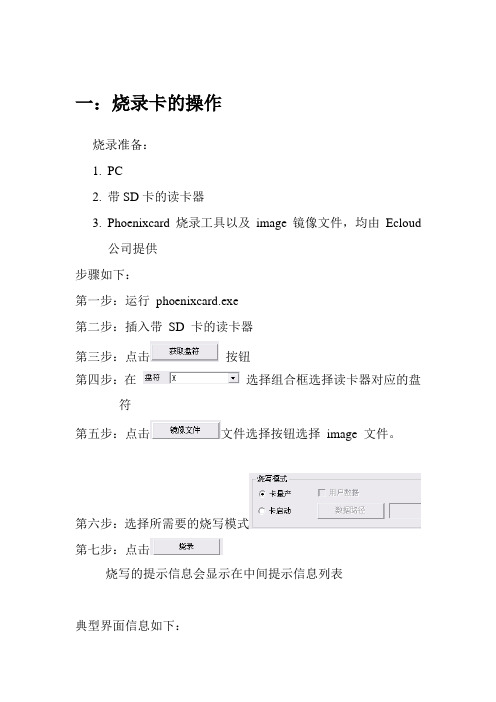
一:烧录卡的操作
烧录准备:
1.PC
2.带SD卡的读卡器
3.Phoenixcard烧录工具以及image镜像文件,均由Ecloud
公司提供
步骤如下:
第一步:运行phoenixcard.exe
第二步:插入带SD 卡的读卡器
第三步:点击按钮
第四步:在选择组合框选择读卡器对应的盘符
第五步:点击文件选择按钮选择image 文件。
第六步:选择所需要的烧写模式
第七步:点击
烧写的提示信息会显示在中间提示信息列表
典型界面信息如下:
二:烧录固件的操作:
1.将烧录好的TF卡插到迷你电脑TF卡槽中。
2.然后上电,蓝灯亮表示正在烧录中。
3.蓝灯熄灭后,取掉TF卡,上电即可。
4.第一次开机需要比较久的时间,一次开机均在2分35秒到3
分25之间。
烧录培训教程

技术支持
优先选择有良好技术支 持和售后服务的厂商和
型号。
04
烧录操作流程演示
准备工作检查清单
确认烧录器型号与芯片匹配
01
选择适合目标芯片的烧录器,确保其支持该芯片的烧录操作。
检查电源和连接线
02
确保电源稳定且连接线完好,避免因电源或连接问题导致烧录
失败。
准备芯片和烧录文件
03
将需要烧录的芯片和对应的烧录文件准备好,确保文件完整且
连接线
选择质量稳定、传输速度 快的连接线,以保证数据 传输的稳定性和效率。
注意事项
选用适配器与连接线时, 需注意与烧录器和芯片的 兼容性,避免损坏设备或 芯片。
操作软件安装与设置
软件下载与安装
从官方网站或可靠来源下载烧录软件,按照提示完成安装。
设备连接与驱动安装
将烧录器与电脑连接,并安装相应的驱动程序,确保设备正常识 别。
烧录的应用领域
烧录广泛应用于嵌入式系 统、功能
通过烧录可以将控制程序或数据加载 到目标设备中,使设备具备特定的功 能或性能。
更新或修复设备程序
提高生产效率
在生产过程中,通过烧录可以快速地 将程序或数据批量写入到设备中,提 高生产效率。
当设备程序存在缺陷或需要更新时, 可以通过烧录进行修复或升级。
烧录培训教程
目录
• 烧录基础概念 • 烧录设备与工具 • 芯片识别与选型指南 • 烧录操作流程演示 • 数据安全与保护措施 • 批量生产中的自动化烧录方案
01
烧录基础概念
什么是烧录
01
02
03
烧录的定义
烧录是指将程序代码或数 据写入到芯片、存储器等 电子设备的过程。
AtmelStudio-6.0简易入门教程(精炼实用)(2021年整理精品文档)

(完整word版)AtmelStudio-6.0简易入门教程(精炼实用)编辑整理:尊敬的读者朋友们:这里是精品文档编辑中心,本文档内容是由我和我的同事精心编辑整理后发布的,发布之前我们对文中内容进行仔细校对,但是难免会有疏漏的地方,但是任然希望((完整word 版)AtmelStudio-6.0简易入门教程(精炼实用))的内容能够给您的工作和学习带来便利。
同时也真诚的希望收到您的建议和反馈,这将是我们进步的源泉,前进的动力。
本文可编辑可修改,如果觉得对您有帮助请收藏以便随时查阅,最后祝您生活愉快业绩进步,以下为(完整word版)AtmelStudio-6.0简易入门教程(精炼实用)的全部内容。
一、建议工程文件AtmelStudi6。
0这个全新的环境使用起来极其不顺手,因为首先我对AtmelStudio以前的版本也根本没有使用经验,就根据很陌生,其次,这个新版本软件还根本没有人用,根本没有任何的相关教程资料,唯一可以参考的只是官网的比较简单的视频教程,还是英文讲解,反正没怎么搞透。
不过还是硬着头皮用下去,因为软件是免费的,而且当后来我知道代码编辑环境其实就是微软VS环境的时候,我就更不犹豫了,大家应该都了解VS的代码编写环境是很智能的,尤其自动补全功能。
现在,我已经能很熟练的使用AtmelStudio6。
0软件了,随着使用我也更加喜欢玩AVR单片机做一些小作品了,而不再用普通51和STC了。
当使用熟练以后也就感觉到其实这个免费智能的编译环境其实是很简单的,那现在我就帮助更多喜欢使用AVR而没用使用AtmelStudio软件的同学们轻松越过这一个门槛,进入一个美好的编程世界.该软件的不足之处:一是软件相对较大,打开比较慢,但是运行还是比较顺利的;二是不支持山寨仿真器,这可苦了没钱的劳苦电工们了。
(不过我都是用ISP烧录调试,一般不用仿真)最下面附件有一个简单的LED_test工程文件,编译通过的.大家可以试用。
刻录软件ashampoo_burning_studio_6的安装与使用
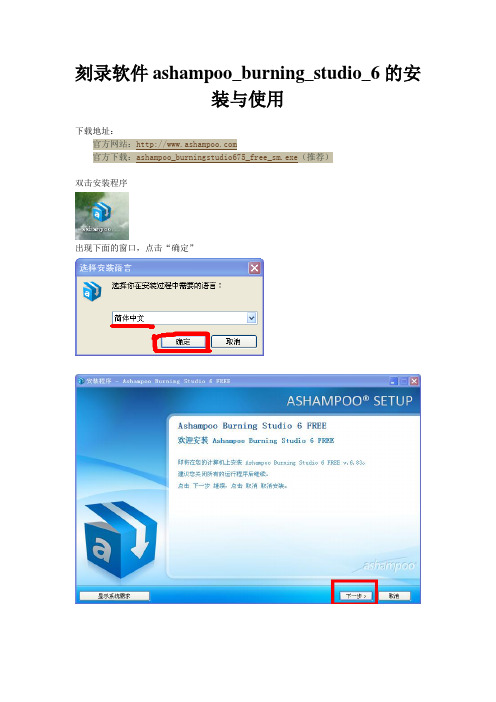
刻录软件ashampoo_burning_studio_6的安
装与使用
下载地址:
官方网站:
官方下载:ashampoo_burningstudio675_free_sm.exe(推荐)
双击安装程序
出现下面的窗口,点击“确定”
上图上“。
同意”,“下一步”
上图默认,“下一步”
接下来,正在安装的界面
“完成”
关闭广告网页
双击桌面上的图标,打开软件界面
首次打开,去掉弹出的对话框上的两项前的勾,并关闭这个窗口
前面都是准备工作,现在正式开始介绍一般情况下我们如何刻录
把空白的刻录盘放入刻录光驱中。
然后如下界面点击
在“标签”处,输入给光盘的命名,再点击“添加”,添加需要刻录的文件或者文件夹
单击要刻录的文件或文件夹1,点击2“添加”按钮,完成后,点击3“结束”按钮
“下一步”
在光驱中放入空白的刻录光盘,然后,点击“刻录”,即可!
2013.4.10。
软件烧录操作详解

软件烧录操作详解一、软件烧录前的准备1、软件烧录的压缩包(发给大家的软件)2、软件烧录用到的工具二、具体操作步骤1、首先将发给大家的压缩包进行解压,会得到如下3个压缩包。
分别解压3个压缩包,将解压出来的“tftpd32”文件夹放置于D盘符下,如下图:然后打开“ttermp23”文件夹,找到“setup.exe”(如图下)的应用程序,双击运行开始安装。
2、按上面要求安装完成以后即可开始摄像机的软件烧录步骤,先将串口线连接至烧写板,(接口接烧写板上J2插口处,串口线白线靠近JP2插口方向),如PC无端口,则用端口转USB线连接串口线与PC相连;拆开摄像机找到烧录插槽.用软排线连接烧写板与机器烧录插口。
如下图:运行tftpd32文件夹下的tftpd32子文件夹中的tftpd32.exe.此时本电脑即为一个虚拟的临时服务器.电脑主机IP地址即为服务器IP地址.将烧录文件(即解压出来的“ubl”文件夹)放置在D盘符下“tftpd32”文件夹下的“tftpboot”文件夹下即运行烧录软件(如tera temp pro)打开软件之后进入的界面:默认的选项是第一个:TCP/IP ,这里我们是通过COM来进行烧录程序的因此这个地方需要改为Serial ,切记!!!!!!对应的Port根据你电脑主机的COM来进行选择,例如:我的端口:如果不想在每次开启烧录软件的时候选择COM端口,使用如下的方式:点击“Setup”选择“Serial port”如下图然后选择你电脑对应的端口再点击“OK”即可。
在”Hit any key to stop autoboot”命令倒数结束之前按任意键盘键,进入烧录状态.如下图:指向服务器地址.输入下方两行命令:set serverip 192.168.1.34回车(其中192.168.1.34是步骤1中的服务器IP地址)savee回车如下图打开烧录文档,即:复制文档中的第一条命令,并在烧录工具界面中点右键,再回车确认.即可运行该行命令.依次逐条运行,直到文档最后一条命令。
AtmelStudio-6.0简易入门教程(精炼实用).
一、建议工程文件AtmelStudi6.0这个全新的环境使用起来极其不顺手,因为首先我对AtmelStudio以前的版本也根本没有使用经验,就根据很陌生,其次,这个新版本软件还根本没有人用,根本没有任何的相关教程资料,唯一可以参考的只是官网的比较简单的视频教程,还是英文讲解,反正没怎么搞透。
不过还是硬着头皮用下去,因为软件是免费的,而且当后来我知道代码编辑环境其实就是微软VS环境的时候,我就更不犹豫了,大家应该都了解VS的代码编写环境是很智能的,尤其自动补全功能。
现在,我已经能很熟练的使用AtmelStudio6.0软件了,随着使用我也更加喜欢玩AVR单片机做一些小作品了,而不再用普通51和STC了。
当使用熟练以后也就感觉到其实这个免费智能的编译环境其实是很简单的,那现在我就帮助更多喜欢使用AVR而没用使用AtmelStudio软件的同学们轻松越过这一个门槛,进入一个美好的编程世界。
该软件的不足之处:一是软件相对较大,打开比较慢,但是运行还是比较顺利的;二是不支持山寨仿真器,这可苦了没钱的劳苦电工们了。
(不过我都是用ISP烧录调试,一般不用仿真)最下面附件有一个简单的LED_test工程文件,编译通过的。
大家可以试用。
下面开始介绍的软件工程的建立。
1. 软件总界面总体界面还是比较简洁的,和其他编译软件都是差不多的,而且和KEIL软件的界面是很相似的,使用很方便。
2. 新建工程新建工程很简单:FILE->NEW->Project 然后就看到下面的新建工程界面了,选择第一个GCC C Executable工程就可以,第二个GCC C static Library 是用来新建 .h文件的。
然后下面蓝圈1是C文件的名称,蓝圈2 Solution Name 是工程的文件,中间的Location是文件存放位置,自己选择合适的位置即可。
点击下面的OK3. 下面接着是单片机型号选择界面,选择合适的单片机就可以了。
程序烧录步骤

运用开发板烧录程序
单片机安装:
装之前:
将单片机芯片缺口朝下插入槽中
软件安装
选择ch341ser.exe
1、USB转串口驱动的安装
双击USB驱动SERIAL程序的Setup
安装成功后,会出现一下提示画面
点“确定”即可以结束安装过程。
安装完驱动程序成功后,把开发板与电脑连接可以看到设备管理器中的COM口。
在图标“我的电脑”右键,→属性,→硬件,→设备管理器(这是XP 系统,WIN 系统与其相似找到设备管理器)
显示成功的COM口
安装不成功解决办法
如果发现是下图感叹号,则没有安装成功或者没有安装、右键点击更新驱动程序
选择“从列表或指定位置安装(推荐)”
出现此对话框,选择不要搜索,自己选择安装点“下一步”
点击"下一步"
出现此对话框、点击“从磁盘安装”
点击“浏览”到USB驱动文件夹找到安装文件打开
点击“确定”和“下一步”
点击"完成"安装结束
B口,普中软件
我们插上USB口,打开开发板电源开关。
然后打开普中ISP下载软件,如下图:
串口号10
在usb转串口驱动安装成功后,打开软件应该有串口号,如图指示。
然后设置为低速下载
2.芯片类型选择STC90C5XX
如下图。
加载我们要下载到单片机里的程序,单击,选择下载的后缀为.Hex 的文件,
打开后,会在文件名处有提示:文件路径,还有代码大小。
代码大小
4最后一步:点击下载程序,下载成功如图显示。
此时继电器工作会有小的啪啪的响声。
下载成功!
机自1103班徐青松。
AtmelStudio-6.0简易入门教程(精炼实用)
一、建议工程文件AtmelStudi6.0这个全新的环境使用起来极其不顺手,因为首先我对AtmelStudio以前的版本也根本没有使用经验,就根据很陌生,其次,这个新版本软件还根本没有人用,根本没有任何的相关教程资料,唯一可以参考的只是官网的比较简单的视频教程,还是英文讲解,反正没怎么搞透。
不过还是硬着头皮用下去,因为软件是免费的,而且当后来我知道代码编辑环境其实就是微软VS环境的时候,我就更不犹豫了,大家应该都了解VS的代码编写环境是很智能的,尤其自动补全功能。
现在,我已经能很熟练的使用AtmelStudio6.0软件了,随着使用我也更加喜欢玩AVR单片机做一些小作品了,而不再用普通51和STC了。
当使用熟练以后也就感觉到其实这个免费智能的编译环境其实是很简单的,那现在我就帮助更多喜欢使用AVR而没用使用AtmelStudio软件的同学们轻松越过这一个门槛,进入一个美好的编程世界。
该软件的不足之处:一是软件相对较大,打开比较慢,但是运行还是比较顺利的;二是不支持山寨仿真器,这可苦了没钱的劳苦电工们了。
(不过我都是用ISP烧录调试,一般不用仿真)最下面附件有一个简单的LED_test工程文件,编译通过的。
大家可以试用。
下面开始介绍的软件工程的建立。
1. 软件总界面总体界面还是比较简洁的,和其他编译软件都是差不多的,而且和KEIL软件的界面是很相似的,使用很方便。
2. 新建工程新建工程很简单:FILE->NEW->Project 然后就看到下面的新建工程界面了,选择第一个GCC C Executable工程就可以,第二个GCC C static Library 是用来新建 .h文件的。
然后下面蓝圈1是C文件的名称,蓝圈2 Solution Name 是工程的文件,中间的Location是文件存放位置,自己选择合适的位置即可。
点击下面的OK3. 下面接着是单片机型号选择界面,选择合适的单片机就可以了。
程序烧录步骤

程序烧录步骤1,USB ,安装驱动程序,驱动程序在“学习光盘”中,具体安装方法参考配套“使用说明书”B COM 驱动安装完后,请检查的端口号。
当前为COM1文件路径:学习光盘\烧录工具\PZISP.exe ,打开PZISP.exe 烧录软件。
串口最好不要默认在C OM 3上注意:如果插上某个US B口出现“连接超时”或串口不能正常使用时,请换一个US B口试试使用PZISP 自动下载51单片机程序时,请将J0短接AUTO 端,使用STM32ARM 处理器时,请J0断开或跳到ON 端此款软件也是普中科技公司的自动下载软件(),性能稳定,下载速快开发仪端口中名字是推荐使用此款软件。
最大地兼容所有PL2303驱动:Prolific USB-to-Serial Comm Port 注意使用时,短接的实现自动下载为了保障开关的使用寿命,请使用自动下载方式。
J0Auto,电源当使用时,如果启动出现下图错误,这是由于你系统缺少文件引起.PZISP 解决办法时,需要把这个文件安装你的系统中.我们光盘提供了此安装文件.程序烧录工具\_.VCredist x86exe如果出现此提示,说您的电脑上驱动程序不是兼容性最好的版本,从而降低了下载速度.但不影响正常使用.。
建议安装光盘中驱动程序安装时注意:用安装软件自带“移除”功能来卸载掉你电脑中原来的驱动程序,否则无法卸载干净。
然后重新安装光盘中配的驱动。
注意使用时,短接的实现自动下载为了保障开关的使用寿命,请使用自动下载方式。
J0Auto,电源4.选择扩展名为的程序文件×××().HEX B COM与的口一致 2.STC 请选择系列单片机 3.500-999此处最佳设置范围 5.点击“下载”完成烧录程序6T/12T 模式切换这是另一款老版本的下载软件,目前还不支持最新的MCU使用官方烧录工具STC 首先,将的短路冒断开或者跳到端,好红框中的相关参数再点击“下载”。
Atmel Studio6用户指南
Atmel AVR4029: Atmel Software FrameworkUser GuideFeatures• Getting Started• Access to ASF examples and applications• Add ASF modules to a project• Atmel® Studio 6• IAR™• GNU makefile / GCC1 IntroductionThe Atmel software framework (ASF, /asf) provides software drivers and libraries to build applications for Atmel megaAVR®, AVR XMEGA®, AVR UC3and SAM devices. It has been designed to help develop and glue together the different components of a software design. It can easily integrate into an operating system (OS) or run as a stand-alone product.In this application note developers can read about how to get started with Atmel Studio 6, IAR and GNU GCC makefile:•How to install the ASF•How to start ASF reference applications•How to get ASF documentationIt is recommended but not required to read the ASF reference manual for advanced knowledge on the ASF architecture to read this getting started document. Atmel Microcontrollers Application NoteRev. 8431C-AVR-03/20132 ASF OverviewThe following is a basic overview of the ASF. For more details, consider reading theASF Reference manual.2.1 ASF LayersThe ASF is basically organized in layers for each Atmel family of devices (see figurein Introduction).2.2 ASF ItemsThere are mainly three kinds of items in the ASF:•ASF Module: a software entity that does not have an int main(void) function(e.g. a USART software driver, a USB stack). ASF modules are provided bythe Drivers, Components and Services layers. An ASF module may bestatically and/or dynamically configurable.•ASF Application (aka ASF Example): a software entity in the ASF that can bebuilt into an executable. This can be: a demo application, or an example ofusage of an ASF module. ASF applications are provided by the Drivers,Components, Services and Applications layers. An ASF application used asan example of usage of one ASF module is called an ASF Example. An ASFapplication may be statically configurable.•ASF Board: abstraction layer for each Atmel kit supported in the ASF. Usuallyassociated with one device. The “special” board named “User board” is anempty board abstraction layer used to create a user-specific/custom board.2.3 ASF PortsThere are four ports of the ASF, one for each Atmel family of devices: megaAVR,AVR XMEGA, AVR UC3 and SAM.The common top folder gathers modules and applications shared amongst severalarchitectures: in some cases the implementations are shared while for some modulesonly the API is common. For the latter, the common folder thus also contains ports foreach Atmel family of devices.The thirdparty top folder contains modules and applications with licenses other thanthe Atmel ASF license. As for the common folder, thirdparty is not dedicated to onefamily but contains instead ports to for each Atmel family of devices.2.4 ASF Directory StructureThere is a top level folder for each Atmel family of devices as well as the commonand thirdparty folders.The organization beneath each of these folders is following the ASF layers split(applications, services, components, drivers, boards).Note that the folder of an ASF module always contains at least an example of usagewhich is an ASF item of type ASF application.2.5 ASF Releases FormatsEach ASF release is fully documented and available online at .2 Atmel AVR40298431C-AVR-03/2013AtmelAVR4029Each ASF version is released in two ways:•As an extension to Atmel Studio 6,•Stand-alone zip package of the whole ASF directory tree with, for each ASFapplication, a make project and an IAR project.Note that Atmel Studio 6 has dedicated menus and actions for the ASF (which arepresented later in the document).3 8431C-AVR-03/20134 Atmel AVR40298431C-AVR-03/2013 3 Getting started with ASF and Atmel Studio 6Atmel Studio 6 is the integrated development environment (IDE) for developing and debugging Atmel ARM ® Cortex™-M and Atmel AVR ® microcontroller (MCU) based applications.Content and features of Atmel Studio 6:• Solutions and projects creation,• a powerful editor with visual assist and plug-ins support to enhance the IDE, • a GNU C/C++ Compiler for generating target executables,• the ASF and ASF-oriented wizards,• Programming & Debugging mode supporting all Atmel debuggers,programmers and the AVR simulator. In debugging mode, the IDE presents MCU status in nicely formatted views, giving fast access to critical system parameters.• Atmel Gallery3.1 Installation - Requirements3.1.1 Software Tools1. Download Atmel Studio 6 on /atmelstudio . The Atmel ASF is included in Studio 6 and does not require a separate download.2. Install.3. Launch Atmel Studio: refer to embedded Atmel Studio user guide and getting started in the welcome screen to get started with Atmel Studio.Further ASF updates: get ASF updates from the Extension Manager.3.1.2 Hardware ToolsOn top of the AVR simulator provided with Atmel Studio 6, Atmel Studio 6 connects to all hardware kits, programmers and debuggers supporting all existing Atmel devices.3.2 Start ASF examples1. In the file menu, select New -> Example Project from ASF.Figure 3-1. New example project from ASF.AtmelAVR4029It is possible to sort the ASF examples by kits (for example, Atmel EVK1100, AtmelAVR Xplained…), by technology keywords (for example, USB, IO, Interrupt…) or bycategory (drivers, components, services, applications). The example documentationcan be viewed by clicking the help icon in the right panel of the New Example Projectwindow. Find the project "USART Example – XMEGA-A1 Xplained" and click OK tocreate it.Figure 3-2. Selecting a new ASF example for a kit.5 8431C-AVR-03/2013Figure 3-3. ASF examples solution explorer view.2. It is now possible to compile, load and debug the project. The Atmel ASF files areimported into a new Atmel Studio project in the src folder. Example files arelocated in the src/ folder. Dependency files are located in the src/asf/ folder.Connect a debugger to the PC and run the ASF example.3. The ASF Explorer is a logical view of ASF code, with easy access to API anddocumentation.Figure 3-4.ASF Explorer view.6 Atmel AVR40298431C-AVR-03/2013AtmelAVR40297 8431C-AVR-03/2013 3.3 Get ASF examples documentation• Right click on the project name• Select “View ASF Project Examples help”Figure 3-5. ASF examples documentation.3.4 Add ASF modules to an existing projectIt is possible to add/remove ASF modules to any project.1. Right click on the project or project menu, and then click on “ASF Wizard”. Figure 3-6. Adding Atmel ASF modules to a project.8 Atmel AVR40298431C-AVR-03/2013 2. Select one or several ASF modules, and then click on “Add to selection” (displayed as “>>”). In this example, the RTC driver is selected.Figure 3-7. Adding an Atmel ASF module to a project.3. The RTC driver is then added to the “Selected Modules” list in green and in italic. This means it is not yet fully added and requires confirmation. Click on the “Apply” button for that.Figure 3-8.Adding an Atmel ASF module to a project (continued)AtmelAVR40299 8431C-AVR-03/2013 4. After clicking on “Apply”, a pop-up window appears summarizing theaddition/deletion operations that will be performed on the current project. Note that non-selected modules may appear due to dependencies (for example the RTC driver uses the Sleep manager which relies on the Sleep Controller driver (see screenshot here below)).Figure 3-9Adding an Atmel ASF module to a project (continued)5. Finally, click on “OK”. For example, the RTC – Real Time Counter driver rtc.c and rtc.h files are added in the src/asf/xmega/drivers/rtc folder.Figure 3-10 Solution explorer of an ASF example.3.5 Start a new project with a template: User Application TemplateUser application templates are ready to use projects with:• A main.c file and a main() function• A basic set of ASF drivers (GPIO, interrupt) located in src/asf/ folder for theselected Atmel MCU•An ASF board definition file. For example, for the Atmel XMEGA-A1 Xplained kit,the src/asf/xmega/boards/xmega_a1_xplained/xmega_a1_xplained.h file is added.To access User Application Template:1. Click on File->New -> Project.2. In C/C++-> Atmel Boards menu, select the User Application Template for thewanted Atmel board.Figure 3-11. New user template project for an Atmel board.3. Click OK.10 Atmel AVR40298431C-AVR-03/2013AtmelAVR402911 Figure 3-12. New user template project for the Atmel XMEGA-A1 Xplained.3.6 Using the Atmel GalleryThe Atmel Gallery contains extensions to the Atmel Studio platform in the form of development tools or embedded software.The Atmel Gallery is accessible through the Extension Manager. The Extension Manager is used to add, remove, enable, and disable Atmel Studio extensions. To open the Extension Manager, on the Tools menu, click Extension Manager. Figure 3-13.Extension Manager Installed ExtensionsFor more information see the Atmel Studio Help (ctrl-F1), section “Extending Atmel Studio”. For installing new extensions in Atmel Studio, select the step by step section “Installing new extensions in Atmel Studio”. Check also the “XDK – User Guide” document available on .3.7 VideoGetting started with a video of Atmel Studio and ASF, follow Atmel videos on/user/AtmelCorporation.12 Atmel AVR4029AtmelAVR40294 ASF-based Development Flow in Atmel StudioGiven the numerous available ASF Modules, Applications and Boards provided by theASF and the ASF-based wizards provided in Atmel Studio, there is more than oneway to develop an application based on the ASF. The purpose of this section is toguide the user on how to use the ASF in Atmel Studio along a typical developmentflow.We will first identify a list of development scenarios then we’ll see how each can bedone using the ASF in Atmel Studio.4.1 Development Types: OverviewThere are mostly, if not only, two main kind of development with the ASF:•on an Atmel board,•on a custom board (aka user board).4.1.1 Development on an Atmel BoardThere are mainly four scenarios:•Run (and eventually modify) an existing ASF Example on an AtmelReferenced Board•Develop a New ASF-based Application on an Atmel Referenced Board•Using the ASF, port a non-ASF existing application on an Atmel ReferencedBoard•Develop a non-ASF-based Application on an Atmel Referenced Board: out ofscope.4.1.2 Development on a Custom Board (aka User Board)We will consider only the most relevant scenario: develop a Custom Application on aCustom Board. There are mainly three approaches to do that:•Modify an existing ASF example that is the closest to the target application,port it to the custom board, then modify the application as needed•Develop a New ASF-based Application to a Custom Board•Using the ASF, port a non-ASF existing application to a Custom Board•Develop a non-ASF-based Application on a custom board: this is out of thissection’s scope4.1.3 Release on the Atmel GallerySince the introduction of the Atmel Gallery and the Atmel Studio ExtensionDeveloper’s Kit (XDK), it is now possible to release any development to the AtmelGallery. Refer to the XDK User Guide.135 Getting started with ASF and IAR Embedded Workbench5.1 Install1. Download IAR Embedded Workbench® on .2. Install IAR.3. Download the ASF standalone archive (.zip file) from /asf.4. Extract the ASF standalone archive on your hard drive (preferably on a locationclose to the root, to avoid any potential long name length issue on Windows®).5.2 Header files updateFor 8-bit AVR users it is recommended to update the toolchain header files, adescription about how to do that is located in the readme.txt file under thexmega/utils/header_files/ directory.For AVR UC3 users, it is recommended to update the IAR header files. To do that,unzip the avr32-headers.zip file (located under the avr32/utils/header_files/ directory)to the IAR EWAVR32 installation folder under "IAR installation folder"/EmbeddedWorkbench x.y/avr32/inc/.5.3 Navigating in the ASF standalone archiveThe top folder organization is as follow:•The avr32/ folder contains software modules (source code and projects) dedicatedto AVR UC3 devices•The mega/ folder contains software modules (source code and projects) dedicatedto Atmel megaAVR devices•The xmega/ folder contains software modules (source code and projects)dedicated to Atmel AVR XMEGA devices•The common/ folder contains software modules (source code and projects) sharedby all Atmel AVR devices•The sam/ fodler contains software modules (source code and projects) dedicatedto Atmel SAM devices•The thirdparty/ folder contains software modules (source code and projects) fromthirdparty providers for all AVR devicesThe thirdparty/ folder is organized by thirdparty software module (that is, one folderper thirdparty software module).The avr32/, xmega/, mega/, sam/ and common/ folders are organized as follow:•The drivers/ folder contains low-level software drivers for Atmel MCU on-chipresources (for example, cpu, usart, adc drivers)•The boards/ folder contains board-specific source code files•The utils/ folder contains files that are used by all other modules: it holds severallinker script files, IAR & GCC pre-compiled libraries of some ASF modules, andC/C++ utility files with general usage defines, macros and functions•The services/ folder contains application-oriented pieces of software that are notspecific to boards nor chips (for example, FAT, TCP/IP stack, OS, JPEG decoder).For the common/ top folder, the services/ folder also contains chip-specific code 14 Atmel AVR4029AtmelAVR4029•The components/ folder offers, for each supported hardware component, asoftware interface to interact with the component (for example, memories likeSDRAM, SD card, or display)•The applications/ folder contains hefty examples of applications using servicesand drivers5.4 Start ASF examplesUsing an example of usage of the Atmel AVR UC3 GPIO driver module, the IARprojects are located under:•avr32/drivers/gpio/peripheral_bus_example/at32uc3a0512_evk1000/iar/ for anAtmel EVK1100 board•avr32/drivers/gpio/peripheral_bus_example/at32uc3a0512_evk1105/iar/ for anAtmel EVK1105 board•avr32/drivers/gpio/peripheral_bus_example/at32uc3b0256_evk1101/iar/ for anAtmel EVK1101 board•avr32/drivers/gpio/peripheral_bus_example/at32uc3a3256_evk1104/iar/ for anAtmel EVK1104 board•avr32/drivers/gpio/peripheral_bus_example/at32uc3l064_stk600-rcuc3l0/iar/ for anAtmel STK®600-RCUC3L0 setup•avr32/drivers/gpio/peripheral_bus_example/at32uc3c0512c_uc3c_ek/iar/ for anAtmel AT32UC3C-EK board•avr32/drivers/gpio/peripheral_bus_example/at32uc3l064_uc3l_ek/iar/ for an AtmelAT32UC3L-EK boardEach iar/ folder contains a full IAR project with:•an IAR EWAVR32 workspace file(avr32_drivers_gpio_peripheral_bus_example_uc3l_ek.eww: double-click on thisfile to open the whole project)•an IAR EWAVR32 project file(avr32_drivers_gpio_peripheral_bus_example_uc3l_ek.ewp)•an IAR EWAVR32 debug configuration file(avr32_drivers_gpio_peripheral_bus_example_uc3l_ek.ewd)15Figure 5-1. IAR project location in the ASF.5.5 Get ASF project documentation5.5.1 Online DocumentationAll ASF module and reference application Doxygen documentation can be found on.5.5.2 Manual Documentation Generation (offline)All modules are fully documented using doxygen tags. Each project within the AtmelASF contains a doxyfile.doxygen (used to configure doxygen for a properdocumentation generation): to generate the .html documentation, doxygen must beinstalled (see /download.html) and the doxyfile.doxygen mustbe used as the input configuration file for doxygen.Using an example of usage of the Atmel AVR UC3 GPIO driver module as an example,for an Atmel AT32UC3C-EK board, the associated doxyfile.doxygen file is under theavr32/drivers/gpio/peripheral_bus_example/at32uc3c0512c_uc3c_ek/doxygen/ folder.Run doxygen and use this doxyfile.doxygen as configuration file for doxygen.Using the command line, this is done with the following command:doxygen doxyfile.doxygenThe documentation entry file is:avr32/drivers/gpio/peripheral_bus_example/at32uc3c0512c_uc3c_ek/doxygen/html/index.html16 Atmel AVR4029Atmel AVR4029 6 Getting started with ASF and GNU makefile6.1 Install1. Download the Atmel ASF standalone archive (zip file) from/asf.2. Extract the ASF standalone archive on your hard drive.3. Install Atmel AVR Studio® 5 (/avrstudio5) for the compilingand programming tools.4. The software framework build system assumes that you have some basicsoftware tools installed on the build machine. These tools are easy to install onmost modern operating systems. On Microsoft® Windows systems these softwareapplications are installed with the WinAVR package for 8-bit AVR(/) and with the Atmel AVR GNU toolchain(/dyn/products/tools_card.asp?tool_id=4118) for 8-bit and32-bit users, while on Linux® systems they are usually available using thedistributions package system. Software which must be installed for the softwareframework to be useful:•make, sed, grep, sort, tac, bc, etc., often referred to as build essentials•sh – command interpreter (shell)6.2 Header files updateFor 8-bit AVR users it is recommended to update the toolchain header files, adescription about how to do that is located in the readme.txt file under thexmega/utils/header_files/ directory.For Atmel AVR UC3 users, it is recommended to update the IAR header files, adescription about how to do that is located in the readme.txt file under theavr32/utils/header_files/ directory.6.3 Navigating in the ASF standalone archiveThe top folder organization is as follow:•The avr32/ folder contains software modules (source code and projects) dedicatedto AVR UC3 devices•The mega/ folder contains software modules (source code and projects) dedicatedto Atmel megaAVR devices•The xmega/ folder contains software modules (source code and projects)dedicated to Atmel AVR XMEGA devices•The common/ folder contains software modules (source code and projects) sharedby all Atmel AVR devices•The thirdparty/ folder contains software modules (source code and projects) fromthirdparty providers for all AVR devicesThe thirdparty/ folder is organized by thirdparty software module (that is, one folderper thirdparty software module).The avr32/, xmega/ and common/ folders are organized as follow:•The drivers/ folder contains low-level software drivers for AVR on-chip resources(for example, cpu, usart, adc drivers)•The boards/ folder contains board-specific source code files17•The utils/ folder contains files that are used by all other modules: it holds severallinker script files, IAR & GCC pre-compiled libraries of some Atmel ASF modules,and C/C++ utility files with general usage defines, macros and functions•The services/ folder contain application-oriented pieces of software that are notspecific to boards or chips (for example, FAT, TCP/IP stack, OS, JPEG decoder).For the common/ top folder, the services/ folder also contains chip-specific code•The components/ folder offers, for each supported hardware component, asoftware interface to interact with the component (for example, memories likeSDRAM, SD card, or display)•The applications/ folder contains hefty examples of applications using servicesand drivers6.4 Start ASF examplesUsing an example of usage of the Atmel AVR UC3 GPIO driver module as anexample, the GCC projects are located under:•avr32/drivers/gpio/peripheral_bus_example/at32uc3a0512_evk1000/gcc/ for anAtmel EVK1100 board•avr32/drivers/gpio/peripheral_bus_example/at32uc3a0512_evk1105/gcc/ for anAtmel EVK1105 board•avr32/drivers/gpio/peripheral_bus_example/at32uc3b0256_evk1101/gcc/ for anAtmel EVK1101 board•avr32/drivers/gpio/peripheral_bus_example/at32uc3a3256_evk1104/gcc/ for anAtmel EVK1104 board•avr32/drivers/gpio/peripheral_bus_example/at32uc3l064_stk600-rcuc3l0/gcc/ foran Atmel STK600-RCUC3L0 setup•avr32/drivers/gpio/peripheral_bus_example/at32uc3c0512c_uc3c_ek/gcc/ for anAtmel AT32UC3C-EK board•avr32/drivers/gpio/peripheral_bus_example/at32uc3l064_uc3l_ek/gcc/ for anAtmel AT32UC3L-EK boardEach gcc/ folder contains a GCC project with:• a makefile• a project configuration file config.mk18 Atmel AVR4029Atmel AVR402919 Figure 6-1. GNU makefile project location in the ASF.6.5 Building the projectTo build an application, simply enter the appropriate project directory (/gcc folder) and type make.For example, for the Atmel AT32UC3A0512 GPIO peripheral bus example running on Atmel EVK1100 board, typing make in the avr32/drivers/gpio/peripheral_bus_example/at32uc3a0512_evk1100/gcc folder will result:$ makeMKDIR avr32/drivers/intc/CC avr32/drivers/intc/intc.oMKDIR avr32/drivers/gpio/CC avr32/drivers/gpio/gpio.oMKDIR avr32/drivers/gpio/peripheral_bus_example/CC avr32/drivers/gpio/peripheral_bus_example/gpio_peripheMKDIR avr32/utils/startup/AS avr32/utils/startup/startup_uc3.oAS avr32/utils/startup/trampoline_uc3.oAS avr32/drivers/intc/exception.oLN avr32_drivers_gpio_peripheral_bus_example_evk1100.elfSIZE avr32_drivers_gpio_peripheral_bus_example_evk1100.elfavr32_drivers_gpio_peripheral_bus_example_evk1100.elf :section size addr.reset 0x2004 0x80000000.text 0x134 0x80002004.exception 0x200 0x80002200.rodata 0xa0 0x80002400.dalign 0x4 0x4.bss 0xf0 0x8.heap 0xef08 0xf8.comment 0x30 0x0.debug_aranges 0x158 0x0.debug_pubnames 0x3ad 0x0.debug_info 0x11ca 0x0.debug_abbrev 0x554 0x0.debug_line 0x1b6f 0x0.debug_frame 0x294 0x0.debug_str 0x8f0 0x0.debug_loc 0x408 0x0.debug_macinfo 0x2b7053 0x0.stack 0x1000 0xf000.debug_ranges 0x170 0x0Total 0x2cdce5text data bss dec hex filename0x23d8 0x0 0xfffc 74708 123d4 avr32_drivers_gpio_pere_evk1100.elfOBJDUMP avr32_drivers_gpio_peripheral_bus_example_evk1100.lssNM avr32_drivers_gpio_peripheral_bus_example_evk1100.symOBJCOPY avr32_drivers_gpio_peripheral_bus_example_evk1100.hexOBJCOPY avr32_drivers_gpio_peripheral_bus_example_evk1100.binThe result of the build is located in the same folder as the makefile location:•Elf file (.elf)•Listing file (.lss)•Symbol file (.sym)•Hex file (.hex)•Binary file (.bin)6.6 Programming6.6.1 Windows users6.6.1.1 GUI-based solution•Launch Atmel Studio•Select “File->Open->Open Object File for Debugging” and select the generated.elf file. Select “Next”•In the “Device Selection” menu, select the corresponding MCU. Click “Finish”•The project is now available to program and debug. Refer to Atmel Studio gettingstarted and user guide from the welcome screen6.6.1.2 Command-line based solution for AVR Users•Program utilities are installed with Atmel Studio•Use atprogram.exe (e.g. in C:\Program Files (x86)\Atmel\Atmel Studio 6.0\avrdbg)as a programmer•For example to program an at32uc3b0512 with a JTAGICE3 debugger:atprogram -t jtagice3 -i jtag -d at32uc3b0512 program -f e:\file.elfC:\Program Files (x86)\Atmel\Atmel Studio 6.0\avrdbg>atprogram.exeAVR Studio Command Line InterfaceCopyright (C) 2011 Atmel Corporation.Usage: atprogram [options] <command> [arguments] [<command> [arguments] ...]Options:-t --tool <arg> Tool name: avrdragon, avrispmk2, avrone, jtagice3,jtagicemkii, qt600, stk500, stk600 or samice.-s --serialnumber <arg> The programmer/debugger serialnumber. Must be20 Atmel AVR4029Atmel AVR4029specified when more than one debugger isconnected.-c --comport <arg> The com port to use for the programmer/debugger.e.g. -c COM1 or -c 1-i --interface <arg> Physical interface: aWire, debugWIRE, HVPP, HVSP,ISP, JTAG, PDI or TPI.-d --device <arg> Device name. E.g. atxmega128a1 or at32uc3a0256.-v --verbose Verbose output (debug).-h --host <arg> Target host which runs the avrdbg process.-p --port <arg> Specify which port to use for the avrdbg process.Ignored if the host option is not given.-f --force Force command even if firmware is not up to date.-cl --clock <arg> The frequency to use for communication with adevice (hz, khz, mhz, default hz). E.g. -cl 10mhz-mb --max-baudrate <arg> The maximum baud rate for communication on awire(Kbps).-xr --externalreset Apply external reset when starting a session.-dc --daisychain <args,..> Set up a JTAG daisychain. Arguments are <devices-before devices-after instr-before instr-after>.-tv --target-voltage <arg> Set the STK600 or STK500 target voltage (floatvalue).-a0 --aref0 <arg> Set the STK600 Aref0 or STK500 aref generatorvoltage (float value).-a1 --aref1 <arg> Set the STK600 Aref1 generator voltage (floatvalue).-cg --clock-generator <arg> Set the STK600 or STK500 Clock generator frequenc(hz, khz, mhz, default hz).--timeout <arg> Set the timeout value in seconds for commands. Thedefault is 180 seconds. Set to 0 for no timeout.-q --quiet Do not display activity indicator.-? --help Display help information.Commands:chiperase Full erase of chip.erase Erase the specified memory.help Displays help for a specific command.info Display information about a device.list Detect and print information about connected Atmel Tools.program Program device with data from <file>.read Read the contents of the memory on the device.secure Set the security bit on UC3 and ARM devices.verify Verify content of memory based on a file.version Display the version.write Write to the memory with values entered on the command line.21 8431C-AVR-03/20136.6.1.3 Command-line based solution for SAM UsersRefer to Atmel SAM-BA® In system programmer:/tools/ATMELSAM-BAIN-SYSTEMPROGRAMMER.aspx6.6.2 Linux users•For 8-bit users, use AVRDUDE for MCU programming.(/avrdude/)•For 32-bit AVR users, refer to “AVR32 Studio Users” section for a GUI-basedsolution•For ARM users, refer to SAM-BA In System programmer(/tools/ATMELSAM-BAIN-SYSTEMPROGRAMMER.aspx)6.7 AVR32 Studio users32-bit AVR users can use Atmel ASF GNU makefile in 32-bit Atmel AVR Studio. It ispossible to work with an unzipped ASF package from within 32-bit AVR Studio: this isdescribed in the application note "AVR32769: How to Compile the standalone AVR32Software Framework in AVR32 Studio V2":/dyn/resources/prod_documents/doc32115.pdf.6.8 Access to project documentation6.8.1 Online DocumentationAll ASF module and reference application Doxygen documentation can be found on.6.8.2 Offline DocumentationAll modules are fully documented using doxygen tags. Each project within the ASFcontains a doxyfile.doxygen (used to configure doxygen for a proper documentationgeneration): to generate the html documentation, doxygen must be installed (see/download.html) and the doxyfile.doxygen must be used asthe input configuration file for doxygen.Using an example of usage of the Atmel AVR UC3 GPIO driver module as an example,for an Atmel AT32UC3C-EK board, the associated doxyfile.doxygen file is under theavr32/drivers/gpio/peripheral_bus_example/at32uc3c0512c_uc3c_ek/doxygen/ folder.Run doxygen and use this doxyfile.doxygen as configuration file for doxygen.Using the command line, this is done with the following command:doxygen doxyfile.doxygenThe documentation entry file is:avr32/drivers/gpio/peripheral_bus_example/at32uc3c0512c_uc3c_ek/doxygen/html/index.html22 Atmel AVR40298431C-AVR-03/2013。
使用AVR Studio烧写程序
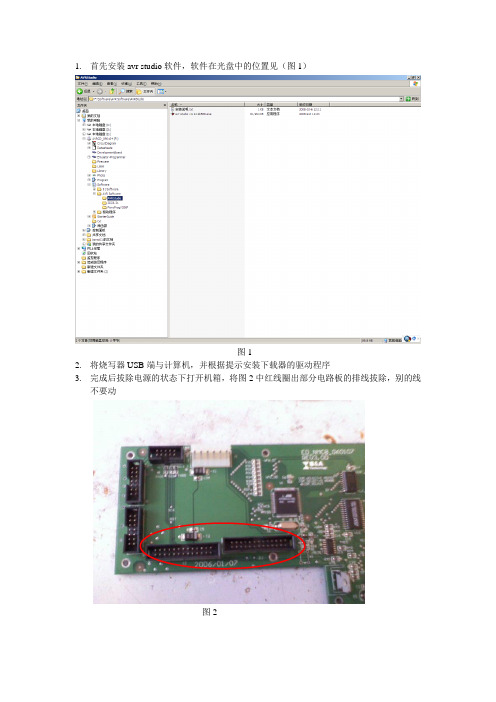
图1
2.将烧写器USB端与计算机,并根据中红线圈出部分电路板的排线拔除,别的线不要动
图2
4.将烧写器另一头插于电路板图3红线圈出位置
图3
5.以上步骤完成后打开设备电源,打开AVR Studio软件,出现图4所示,点击Cancel,
图4
6.点击图5中圈出位置,设置端口,端口具体设置见图6,端口号可以在设备管理器里查看,设置完后点击connect
图5
图6
5.点击connect后会跳出图7所示对话框,选择图中圈出位置,不要点击旁边按键,然后进入Program选项卡
图7
熔丝位,如图8所示进行勾选,并点击program
图8-1(ATmega128熔丝位)
图8-2(ATmega2561熔丝位,注意区分芯片型号并在“main”中选择型号)
5.根据图9所示正确设置并选择所要烧写的程序,最后点击Program
图9
- 1、下载文档前请自行甄别文档内容的完整性,平台不提供额外的编辑、内容补充、找答案等附加服务。
- 2、"仅部分预览"的文档,不可在线预览部分如存在完整性等问题,可反馈申请退款(可完整预览的文档不适用该条件!)。
- 3、如文档侵犯您的权益,请联系客服反馈,我们会尽快为您处理(人工客服工作时间:9:00-18:30)。
AtmelStudio6.0 下程序的烧录操作
点击tools->Device Programming
出现如下画面:
选择Tool->JTAGICE mkll070000004699,这个选项是选择仿真器类型的,根据自己的仿真器类型选择就行了。
选择Device下的下拉菜单,选择自己的单片机型号。
选择Interface下的下拉菜单,选择ISP,然后点击Apply。
依次点击Target Voltage和Device signature下的Read,此时会读出当前片子的电压和地址。
点击左边栏目中的Memories,在右侧的复选框中找到工程路径下的.hex文件,点击Program,即可将程序下载到单片机内。
下载完成后会出现如下界面:
点击Fuses,此处是对单片机熔丝位的设置,所以选择要谨慎,否则单片机会被锁。
根据自己的晶振选择系统时钟,INTRCOSC为内部时钟信号,EXTXOSC 为外部时钟信号;内部时钟信号是以单片机内部的时钟为参考,外部时钟信号是以外接晶振为参考;由于atmega88单片机内部的晶振是LC震荡,所以并不精确,因此要用到定时器或者时序等,建议用外部晶振。
选择内部晶振:
选择外部晶振:
选择完成之后点击Program ,之后会出现如下显示,表示下载完成;如果熔丝位没有更改此处就不需要点击Program,如果更改了则需要重新Program之后才能生效。