modlflow2016安装教程
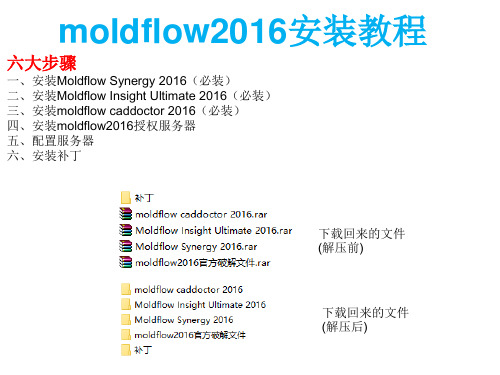
moldflow2016安装教程
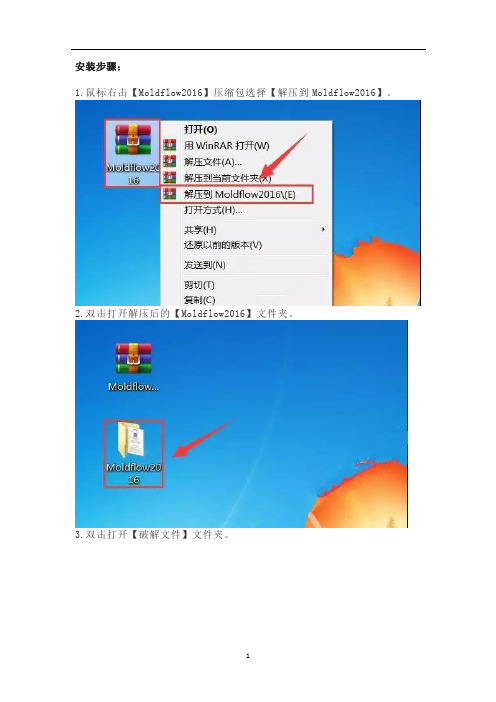
安装步骤:1.鼠标右击【Moldflow2016】压缩包选择【解压到Moldflow2016】。
2.双击打开解压后的【Moldflow2016】文件夹。
3.双击打开【破解文件】文件夹。
4.鼠标右击【lic.dat】选择【打开】。
5.选择【从已安装程序列表中选择程序】然后点击【确定】。
6.选择【记事本】然后点击【确定】。
(请不要关闭此页面)7.点击左下角的【开始菜单】,然后点击【命令提示符】。
8.输入【ipconfig /all】然后点击键盘上的【Enter】键。
9.将左边图片上的【主机名】与【物理地址】替换到第6步打开的记事本中的【主机名】和【MAC地址】。
10.替换后使用快捷键Ctrl+S保存。
温馨提示:MAC地址不要【-】符号。
11.打开安装包解压后的【Moldflow2016】文件夹里面的【1.MFS】文件夹。
12.鼠标右击【Setup】选择【以管理员身份运行】。
13.点击【安装】。
14.选择【我接受】然后点击【下一步】。
15.序列号输入:【666-69696969】,产品密钥输入:【579H1】,服务器的名称输入:【127.0.0.1】,然后点击【下一步】。
16.点击【浏览】更改软件的安装目录,建议安装在除C盘之外的其它盘符,可以在D盘或其它盘新建一个【Autodesk】文件夹,然后点击【安装】。
17.安装中。
18.点击【完成】。
19.打开安装包解压后的【Moldflow2016】文件夹里面的【2.MFIA】文件夹。
20.鼠标右击【Setup】选择【以管理员身份运行】。
21.点击【安装】。
22.选择【我接受】然后点击【下一步】。
23.序列号输入:【666-69696969】,产品密钥输入:【575H1】,服务器的名称输入:【127.0.0.1】,然后点击【下一步】。
24.点击【下一步】。
25.点击【浏览】更改软件的安装目录,建议安装在除C盘之外的其它盘符,可以在D盘或其它盘新建一个【Autodesk】文件夹,然后点击【安装】。
realflow安装教程
realflow安装教程RealFlow安装教程RealFlow是一款强大的流体模拟软件,广泛应用于电影、游戏和广告等领域。
它能够模拟各种复杂的流体行为,如水、火、气体等,为艺术家提供了创造逼真的流体效果的可能。
本文将为您提供RealFlow的安装教程,帮助您顺利使用这一强大的软件。
第一步:下载RealFlow安装程序首先,您需要从RealFlow官方网站或其他可信的软件下载网站下载RealFlow的安装程序。
建议选择官方网站下载,确保获得最新版本的软件。
在下载过程中,您可以选择32位或64位版本,根据您的操作系统选择相应的版本。
第二步:运行安装程序下载完成后,找到安装程序的文件并双击运行。
在安装向导中,您需要同意软件许可协议。
仔细阅读协议内容,如果您同意,请勾选“我接受协议”选项,然后点击“下一步”。
第三步:选择安装路径接下来,您需要选择RealFlow的安装路径。
默认情况下,安装程序将提供一个默认路径,您可以选择接受该路径或点击“浏览”按钮选择其他路径。
建议选择一个易于记忆和访问的路径,然后点击“下一步”。
第四步:选择组件RealFlow安装程序还会让您选择安装哪些组件。
根据您的需求,选择适合您的组件。
通常情况下,建议选择所有组件以便获得完整的功能。
点击“下一步”继续安装。
第五步:选择启动菜单文件夹在这一步,您需要选择RealFlow的启动菜单文件夹。
同样,您可以选择接受默认文件夹或点击“浏览”按钮选择其他文件夹。
点击“下一步”继续安装。
第六步:创建桌面快捷方式RealFlow安装程序还会询问是否需要在桌面上创建快捷方式。
如果您希望可以方便地访问RealFlow,建议勾选此选项。
点击“下一步”继续安装。
第七步:开始安装现在,安装程序已经准备好开始安装RealFlow。
点击“安装”按钮,等待安装程序完成文件的复制和配置。
这个过程可能需要一些时间,取决于您的计算机性能和文件大小。
第八步:完成安装安装完成后,您会看到一个安装完成的对话框。
FLOW-3D安装方法
nintex 2016 安装指南说明书

安裝指南:Nintex for SharePoint2016最後更新日期2016年8月9日法律聲明若要瞭解最新資訊,請參閱/company/legal。
目錄簡介1工作表(可選)1安裝檢查清單1安裝工作表1Nintex工作流程與Nintex表單2快速安裝1執行安裝程式並匯入授權檔1部署Nintex工作流程企業解決方案(可選)1設定資料庫1啟動網頁應用程式2設定Nintex工作流程電子郵件設定2啟用外部功能(可選)2啟用Nintex工作流程動作3在SharePoint中啟動功能3計劃測試和生產的環境3系統需求3檢視拓撲細則與最佳實務4高可用性4容量考量4儲存空間4內容資料庫與效能4SharePoint和SQL Server5安全性5備份和恢復5資料庫對應5同時進行備份和還原5SharePoint和SQL Server6設定安裝拓撲6確保服務正在執行6停用防毒軟體7設定用於執行安裝程式的伺服器7安裝Nintex產品以測試環境並確認8安裝Nintex產品至生產環境8取得具有足夠權限的帳戶8用於Nintex安裝的典型帳戶8所需的最低權限9取得Nintex授權檔9安排部署9執行安裝程式10 Nintex安裝程式10匯入授權檔10部署解決方案步驟11設定資料庫與其他項目11 Nintex產品設定11為Nintex工作流程和表單設定資料庫12啟動網頁應用程式13啟用Nintex工作流程動作14設定SharePoint電子郵件的先決條件14設定Nintex工作流程電子郵件設定15設定LazyApproval15連接並啟用外部連結和外部表單功能17啟用基於表單的Nintex Mobile驗證19啟用「外部啟動」19在SharePoint中啟動功能20確認產品安裝21測試Nintex功能21確認安裝程式及設定工作(可選)22 Nintex組件與功能22解決方案部署22授權22資料庫23已啟用的動作(安全控制項)24恢復原始伺服器設定24附錄24 Nintex Workflow Exchange Connector Service安裝24簡介24系統需求24安裝Nintex Workflow Exchange Connector Service24完成安裝後工作25從Nintex工作流程連接Exchange27手動匯出和匯入Nintex產品和解決方案28部署解決方案29解決方案與所需部署29解決方案部署的順序29解除安裝Nintex產品30若您計劃重新安裝Nintex平台30完全解除安裝30簡介本文件為安裝SharePoint2016Nintex提供指引。
moldflow2016安装教程.
7、正在安装中,请稍等;
8、成功安装;
二、再安装Moldflow Insight Ultimate 2016 1、双击“MFIA_2016_Multilingual_Win_64bit_dlm.sfx.exe” 自解压到c:\autodesk,安装完后可以删除;
2、右上角选择语言版本,这里以中文简体为例;
3、右上角选择语言版本,这里以中文简体为例;
4、接受协议;
5、产品序列号【666-66666666】和产品密钥【579H1】,服务器地址为【127.0.0.1】
6、安装选项,第一项autodesk moldflow synergy 2016一定要安装,其它的可根 据需要选择安装,另外安装路径一定要是英文,建议安装在D盘; 三角形处建议展开,将临时目录和工作目录更改到F:盘 Moldflow Design Link 2016安装到同一目录下
3、找到刚安装好的服务器目录,把破解补丁中的两个文件 "adskflex"和"lic"复制到安装目录里,覆盖旧文件;
4、替换主程序中的文件;
Байду номын сангаас
将文件adlmint.dll复制到 Moldflow Insight 2016\bin Moldflow Synergy 2016\bin CADdoctor for Autodesk Simulation 2016\bin Moldflow Design Link 2016\bin 将原有的文件覆盖掉
6、切换到start/stop/reread;
按启动,下面会提示启动成功!
六、安装补丁
2 4 1 3 5 6
数字为补丁安装顺序
最后启动Moldlow 2016
Visual MODFLOW 4.X 入门教程
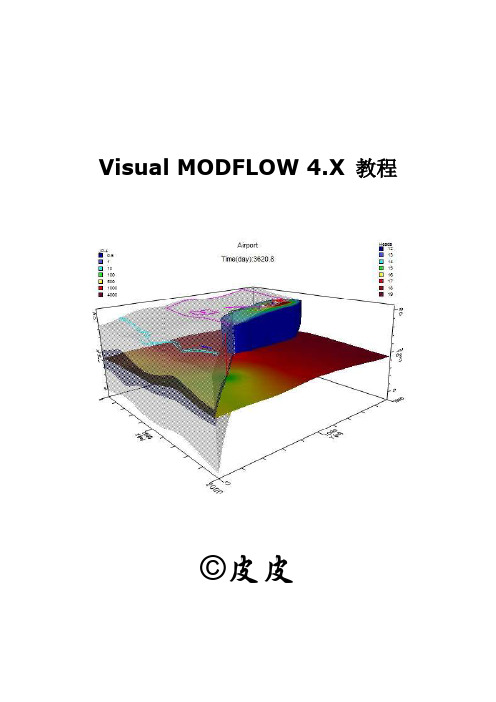
Visual MODFLOW 4.X 教程
©皮皮
目录
1 Visual MODFLOW 简介........................................................................................................... 1
演示版软件功能限制................................................................................................................. 5 如何使用该指南......................................................................................................................... 5
flow插件使用方法
flow插件使用方法Flow是一个JavaScript类型检查工具,它可以帮助我们在代码编写阶段检测出一些潜在的类型错误,从而提高代码的可靠性。
Flow 可以与许多前端框架、库以及构建工具配合使用,同时也提供了一些插件,可以让我们更加方便地使用它。
下面介绍一下 Flow 插件的使用方法:1. 安装插件我们可以通过 npm 安装 Flow 插件,例如要安装 Flow 与React 配合使用的插件,可以执行以下命令:```npm install --save-devbabel-plugin-transform-flow-strip-types babel-preset-flow```其中,`babel-plugin-transform-flow-strip-types` 是用来处理 Flow 类型注解的,`babel-preset-flow` 是用来配置转译器的预设,这里我们需要将其加入到 `.babelrc` 文件中。
2. 配置插件在 `.babelrc` 文件中添加以下配置:```{'presets': ['flow'],'plugins': ['transform-flow-strip-types']```这样我们就可以将 JavaScript 文件中的 Flow 类型注解转换为普通的 JavaScript 代码了。
3. 在编辑器中使用插件我们可以在编辑器中安装 Flow 插件,例如 VSCode 中可以安装`flow-for-vscode` 插件,在编辑器中自动启用 Flow 功能。
4. 在构建工具中使用插件如果我们使用了构建工具来打包我们的代码,那么我们需要在构建工具中配置 Flow 插件。
例如使用 Webpack 来打包代码,需要安装 `babel-loader` 并在配置文件中添加以下配置:```module: {rules: [{test: /.js$/,exclude: /node_modules/,use: {loader: 'babel-loader',options: {presets: ['flow'],plugins: ['transform-flow-strip-types']}}]}```这样我们就可以使用 Flow 插件来检查我们的代码了。
moldflow 安装说明-简体

8.如果需要安装中文语言包,请返回到第4步骤的安装界面,选择第二项“Install Autodesk Moldflow Insight 2010 Chinese Languange Pack”语言包。接下来的各个安装步骤全都选择默认的安装就行。
16. 点击第12个步骤窗口中“Path to the debug log file”单行文字输入框右侧的”Browse”按键,在文件类型那里选择“All Files(*.*)”,在窗口内空白处按滑鼠右键,选择“新建”=》“文本文件”,并将新建的文本文件改名为“Login.log”,文件主名是什么,不是很重要,文件的扩展名(后缀)需要是“.log”
在这里可以自行选择用户的工作文件夹,点击“Next”,
点击“Next”,开始出现安装界面:
6. 安装结束后,因为原来没有安装Autodesk公司的许可证管理软件,所以会出现以下安装界面:
7.点击“下一步”,开始出现安装界面:
出现安装程序的安装文件夹选择,点击“下一步”,
9. 如果需要安装其它模块,请返回第2步骤的安装界面,选择其它模块安装即可。
二、安装软件模块说明
10. 复制“X:\MAGNiTUDE\Program Files”文件夹中的所有文件和子文件夹到你相应安装文件夹中(在第个5步骤和第7个步骤指定的安装文件夹),覆盖原文件夹和文件。 源自 正常运行软件的窗口—参数设置界面
到此为止,大功告成!
如果安装过程中再遇到麻烦,只有求菩萨保佑啦。。。。。。。
3. 选择安装第一项“Autodesk Moldflow Insight 2010” ,将会出现以下窗口界面;如果想安装其模块,在安装“Autodesk Moldflow Insight 2010”完成之后,可以接着安装。
如何安装Linux版FLOW
如何安装Linux版FLOW-3D及注意事项安装linux版的flow3d流程:1、复制flow3d安装CD盘中unix文件夹到linux系统桌面;(或从CD中直接安装也可以)2、从terminal进入unix文件夹;3、./install或./install_flow3d4、提示是否接受license协议,回答:yes;5、提示输入安装路径:FLOW3D/v9.4/6、提示选择下列linux操作系统:1. 32-bit RHEL 3 or above2. 32-bit SUSE 9 or above (client only)3. 64-bit RHEL 3 or above4. 64-bit SUSE 9 or above (client only)5. None of the above -- exitPlease enter a number from 1 to 5:根据自己具体情况选择;(如果系统是CentOS版本可以选择1或者3)7、提示选择flow3d的安装类型:1. FLOW-3D 9.4 and Flexlm License Server - Client/Server Installation2. FLOW-3D 9.4 only - Client Installation3. Flexlm license server only - Server Installation4. None of the above -- exitPlease enter a number from 1 to 4:根据自己需要选择;(一般选择1)8、选择完后,自动安装软件,并检查系统的兼容性,判断所需要的库文件是否都已经安装,如果缺少库文件,会自动提示所缺的库文件。
Checking system compatibilityshared library libqwt5.so.1 not foundshared library libifcore.so.5 not foundshared library libifport.so.5 not foundshared library libimf.so not foundshared library libQtXml.so.4 not foundshared library libQtOpenGL.so.4 not foundshared library libQtGui.so.4 not foundshared library libQtCore.so.4 not foundshared library libirc.so not foundSome require shared libraries were not found in your system. FLOW-3D will use the libraries bundled with this installation. To resolve the missing libraries on your system, the LD_LIBRARY_PATH environment variable has been appended in the flow3dvars.sh and flow3dvars.cshfiles to include the libraries included with FLOW-3D. The libraries included with FLOW-3D provide maximum compatibility but may not be the latest available for your system. If you choose to resolve these libraries by installing the appropriate package, comment out the corresponding setting in flow3dvars.sh and/or flow3dvars.csh and source them to refresh the LD_LIBRARY_PATH environment variable.如果缺少库文件时,需要执行下面指令:source FLOW3D/v9.4/local/flow3dvars.sh 或者source FLOW3D/v9.4/local/flow3dvars.csh9、现在可以进入flow3d安装目录的licenses文件夹,cd FLOW3D/v9.4/licenses启动license server:./lmgrd -c flow3d.lic -l flow3d.log &查看lmgrd的启动状态:./lmstat./lmutil lmdiag -c flow3d.lic如果出现下面提示,说明lmgrd启动成功了:License server status: 27000@flow3dLicense file(s) on flow3d: FLOW3D/v9.4/licenses/flow3d.lic:flow3d: license server UP (MASTER) v11.6Vendor daemon status (on flow3d):F3DTKNUX: UP v11.6如果出现下面提示,说明lmgrd没有正常启动:License server status: 27000@flow3dLicense file(s) on flow3d: FLOW3D/v9.4/licenses/flow3d.lic:flow3d: license server UP (MASTER) v11.6Vendor daemon status (on flow3d):F3DTKNUX: The desired vendor daemon is down. (-97,121)(注:FLEXLM -97,The desired vendor daemon is down. )如果没有正常启动,需要检查下面内容:1、license是否是有效license?如已经过期,请更新;2、license中的hostname是否正确?可以输入指令:hostname,来确认;3、dongle是否和license中的flexid相匹配?4、系统时间是否在license的授权时间范围内?如时间不对,请调整系统时间;10、进入flow3d安装目录的local文件夹,cd FLOW3D/v9.4/local启动flow3d:./flow3d如果此时出现error while loading shared libraries: libqwt5.so.1: cannot open shared object file: No such file or directory则需要执行分享库文件指令:source FLOW3D/v9.4/local/flow3dvars.sh这样再./flow3d就可以正常运行了!可以使用ssh等字符界面远程启动flow3d程序,也可以通过ssh+win32等图形界面远程启动flow3d程序。
MODFLOW操作说明
Visual MODFLOW 4.2实例操作手册王全荣中国地质大学(武汉)环境学院2011-11-5Emil: wqr88@ QQ:283278961引言MODFLOW是英文名称Modular Three-dimensional FiniteDifference Groundwater flow model (三维有限差分地下水流模型)的简称。
由美国地质调查局(Unite State Geological Survey)于80 年代开发出的一套专门用于孔隙介质中地下水流动相关问题数值模拟的软件。
自问世以来,MODFLOW 已经在全世界范围内,在科研、生产、环境保护、城乡发展规划、水资源利用等许多行业和部门得到了广泛的应用,是供水文地质工作者使用的一套功能强大的实用计算机软件。
同时,MODFLOW软件的源代码可以在美国内政部网站上免费下载,供水文地质工作者参考和修改,以提高数值模拟的仿真性。
Visual MODLFOW软件中不仅包括MODLFOW模块,还有SEAWAT、MT3D、MODPATH等模块。
为了让广大水文地质工作者能快速入门并精通该数值模拟软件,作者参考相关文献分别针对上述的模块自拟几个实例,并给出相应的操作步骤,供大家练习参考。
作者:王全荣2011年11月目录实例1 地下水流-污染物迁移规律数值模拟实例 (4)1、实例模型背景介绍及概念模型 (4)2、VM软件模拟该问题所需要的资料以及资料整理格式 (5)2.1数值模拟资料 (5)2.2资料整理格式 (5)3、VM软件模拟地下水流场:F LOW F IELD (6)3.1新建工程项目 (6)3.2模块I:模型输入 (8)3.3模块II:计算(Run) (23)3.4模块III:输出的可视化 (24)3.5模型校正 (26)4、VM软件模拟地下水流迹线:MODPATH.............................................................错误!未定义书签。
3d2016安装教程
3d2016安装教程3D2016是一款强大的3D建模和渲染软件,常用于电影、动画、游戏开发等领域。
下面是一份简单的3D2016安装教程,以帮助您顺利安装这款软件。
第一步,访问3D2016的官方网站。
您可以在搜索引擎中搜索“3D2016官方网站”,然后点击进入官网页面。
第二步,登录或注册账号。
如果您已经有了3D2016的账号,直接登录即可。
如果没有账号,可以点击注册按钮,填写必要的信息,完成注册。
第三步,选择适用于您的操作系统的安装文件。
在官网页面上,你可以找到下载区域,并选择适用于您的操作系统的安装文件。
一般而言,3D2016适用于Windows和Mac操作系统。
第四步,点击下载按钮,并等待下载完成。
这可能需要一些时间,具体时间取决于您的网络速度和文件大小。
第五步,打开下载的安装文件。
找到您的下载文件夹,并双击打开3D2016的安装文件。
第六步,运行安装程序。
您会看到一个安装程序界面,跟随程序的指示一步一步进行安装。
您可以选择安装路径、语言偏好等选项。
确保您选择完毕后点击“下一步”按钮。
第七步,等待安装完成。
安装过程可能需要一些时间,请耐心等待。
一旦安装完成,您会看到一个安装完成的提示。
第八步,运行3D2016。
在安装完成后,您可以选择在您的桌面上创建一个快捷方式或在开始菜单中找到3D2016的图标。
双击图标,启动3D2016。
第九步,激活您的3D2016软件。
在首次启动3D2016时,您可能需要输入激活码或登录您的帐户以激活软件。
按照程序的指示进行操作。
第十步,开始使用3D2016。
一旦您成功激活软件,您就可以开始使用3D2016进行3D建模、渲染等操作了。
您可以参考官方网站提供的教程、视频和文档来学习如何使用各种功能。
以上就是一份简单的3D2016安装教程,希望能对您有所帮助。
请注意,安装过程可能会因个人电脑配置和网络状况的不同而有所变化。
如遇到任何问题,请参考官方网站或联系3D2016的客户支持。
moldflow6.1安装教程
moldflow6.1安装教程Moldflow plastics insight5.0MPI5.0的安装指南一、安装准备在安装和运行Moldflow Plastics Insight软件之前,计算机应该配备最小为500MHz的处理器,至少2GB的可用磁盘空间和256MB 的RAM,一般要求显存32MB以上,推荐使用GEFORCE4以上的显卡,如果显卡性能太低,操作时会严重影响效率,同时建议使用3键滚轮鼠标。
如果准备获得最佳性能,实际需求可能会明显增加,具体情况取决于所分析模型的大小、分析的类型以及同时开始运行的分析的数量。
就时间方面而言﹐Moldflow5.0分析计算过程所用的时间长短﹐很大一部分取决于计算机的系统配置。
较高的系统配置会大大缩短Moldflow分析计算时间﹐从而提高工作效率。
二、安装过程以下所有步骤图例﹐是使用Moldflow Plastics Insight 5.0版本﹑在Wndows XP操作系统完成的﹐若使用其它操作系统﹐则不会有多大差异﹐以下步骤可供参考。
在安装Moldflow5.0之前﹐请确认网络卡是否稳定﹑正常等。
安装步骤﹕1. 打开Moldflow5.0安装光盘﹐找到文件夹并打开﹐双击文件,弹出对话框如图2-1所示。
图2-1 安装对话框2. 单击按钮即可进入如图2-2所示安装界面。
图2-2 安装界面3. 单击按钮开始安装4. 单击按钮5.单击按钮6.单击按钮四次,安装进程如图2-3所示。
图2-3 安装进程7.出现提示重启计算机界面时(如图2-4),单击按钮重新启动计算机。
图2-4 安装信息框8.重新开机后,在桌面“我的电脑”图标上单击右键,并选择“管理”项,如图2-5所示。
图2-5 右键菜单9.弹出如图2-6所示计算机管理对话框后,单击左栏“+”号展开项,然后单击项。
此时对话框会如图2-7所示图2-7 计算机管理对话框10.找到并双击图示2-7中的项,弹出对话框如图2-8所示。
MoldFlow6[1].1安装图解
![MoldFlow6[1].1安装图解](https://img.taocdn.com/s3/m/dde988be69dc5022aaea0024.png)
Moldflow2007安装详解把杀毒软件关掉。
解压安装压缩包第1步:打开Moldflow Plastics Insight 6.1文件夹。
双击MPI 6.1.exe进入安装,如下图:第2步:,点击“Next”如下图:第3步:,点击“Next”如下图:第4步:,点击“Next”如下图:第5步:,点击“Next”如下图:第6步:,点击“Next”如下图:第7步:,点击“Next”如下图:第8步:,点击“Install”如下图:第9步:,点击“Next”如下图:第10步:,点击“Next”如下图:第11步:,点击“Next”如下图:第12步:,点击“Next”如下图:第13步:,点击“Instal”如下图:第14步:,把“Obtain License Keys”的勾选去掉,再点击“Finsh”如下图:第15步:点击“Finsh”如下图第16步在我的电脑,右击。
在快捷菜单中选择“服务”第17步“找到Moldflow Product Security”停止其服务,找到”Plastics Insight 6.1 Job Manager”停止其服务第18步选中桌面图标选择属性第19步点击“查找目标”用于打开“C:\Program Files\Moldflow\Plastics Insight 6.1\bin “文件夹第20步把安装文件解压文件夹中的拷贝到上面的“bin“文件夹中,并双击它第21步。
直接”向上”找到选择进入C:\Program Files\Moldflow\Product Security文件夹。
把刚复制的文件再次粘贴在其中并双击第22步再将Moldflow 2007 含MPI 6.1等\MAGNiTUDE中的keyfile和mfpsd.exe拷贝到上述文件夹第23步启动在17步关闭的两个服务。
第24步:等待一分钟点击桌面的“Plastics Insight 6.1”图标启动MoldFlow6. 到此就安装完成了。
visual modflow用户手册[整理版]
![visual modflow用户手册[整理版]](https://img.taocdn.com/s3/m/762e19eb1711cc7931b716cf.png)
visual modflow用户手册[整理版] VisualMODFLOW专业地下水流动和污染物运移模拟的集成三维图形模拟环境Waterloo Hydrogeologic许可证Waterloo Hydrogeologic公司(WHI)保留这个软件复制品的所有权。
该许可证允许你在以下条件下使用该软件复制品:1、版权说明本软件受加拿大版权法和相关国际协定条款保护。
因此,你必须象对待一本书一样对待该软件,但有一例外。
为了让你能长期使本软件,保证你的投资不受损失。
Waterloo Hydrogeologic公司授权你可以复制软件的文档副本。
说该软件“象一本书”, Waterloo Hydrogeologic公司的意思是,比如,任何人可以使用该软件,并且它可以自由地从一台计算机移到另一台计算机上,只要它不是同时在两台计算机上使用。
正象一本书不能同时被不同地方的读者浏览一样。
特别是,你不能出售、出租、分发下一级许可、或租借本软件或其文档;在没有得到Waterloo Hydrogeologic公司书面同意以前不能对该软件或文献做篡改、修订、或摘用,包括,但不仅限于翻译、反编译、反汇编、或制造下游产品。
所提供的软件和文档包含有商业秘密,持证者同意在没有得到Waterloo Hydrogeologic公司书面同意以前不会将这些商业秘密对非持证者公开。
2、保证Waterloo Hydrogeologic公司保证,在正常使用情况下,从购买之日起30天内磁盘材料和文件在材料和制造工艺上不会受到损坏,一旦材料和制造工艺上有缺损,Waterloo Hydrogeologic公司将给你替换缺损的磁盘和文件。
该保证仅限于替换,并不包括其他的任何损伤,包括但不仅限于利润方面以及特别的、偶然性的、连续的,或其他相似的索赔。
3、弃权除如上所述以外,不管是该软件的研制者还是其它的个人或组织都没有权力代表他(他们)制定有关该软件的明确的或者是隐含的保证。
Moldflow安装详细图示全面指导安装参考教程
看到下面文件,开始做操作工作
1-
对于--- 解压
对里面的压缩包都接压,然后删除压缩包
2-
双击--
Install
这个过程需要点时间—请耐心等待..
出现安装画面—开始正式安装
二开始安装
1-
2-
3-
选择语言—一般汉语选择-
4-
5-
6-
请等待………………………
7-
8-
SN-----------------------495-89744521
我32位,解压
找到
找到—
复制该文件
打开—安装目录—粘贴该文件,覆盖原文件
2-
3-
粘贴--
OK
复制---
到安装目录---粘贴---
最后一步设置服务器
4-
5-
6-
7-
8-
最重要的
9-
10-
11-
12-
Ok,破解结束.等3分钟………………….
恭喜您,安装破解成功!
运行软件
Product Key:-----575D1
27-
28-
29-
30-
31-
32-
33-
安装汉语简体语言包—其它语言不需要安装
34-
35-
36-
37-
38-
三破解软件
1-
开始破解软件---------我安装了2次,最后安装在
接压----
X86为32位破解文件
X64为64为破解文件
根据你电脑位数情况,选择解压------以前的电脑基本都是32位的.
Product Key:-----------579D1Fra bibliotek9-10-
Autodesk Moldflow Communicator 2016 安装补充说明书
Autodesk® Moldflow® Communicator 2016 Moldflow Installation Supplement01-20-2015Autodesk® Moldflow® Communicator© 2015 Autodesk, Inc. All Rights Reserved. Except where otherwise noted, this work is licensed under a Creative Commons Attribution-NonCommercial-ShareAlike 3.0 Unported License. Please see the Autodesk Creative Commons FAQ for more information.Certain materials included in this publication are reprinted with the permission of the copyright holder.TrademarksThe following are registered trademarks or trademarks of Autodesk, Inc., and/or its subsidiaries and/or affiliates in the USA and other countries: 123D, 3ds Max, Alias, ATC, AutoCAD LT, AutoCAD, Autodesk, the Autodesk logo, Autodesk 123D, Autodesk Homestyler, Autodesk Inventor, Autodesk MapGuide, Autodesk Streamline, AutoLISP, AutoSketch, AutoSnap, AutoTrack, Backburner, Backdraft, Beast, BIM 360, Burn, Buzzsaw, CADmep, CAiCE, CAMduct, Civil 3D, Combustion, Communication Specification, Configurator 360™, Constructware, Content Explorer, Creative Bridge, Dancing Baby (image), DesignCenter, DesignKids, DesignStudio, Discreet, DWF, DWG, DWG (design/logo), DWG Extreme, DWG TrueConvert, DWG TrueView, DWGX, DXF, Ecotect, ESTmep, Evolver, FABmep, Face Robot, FBX, Fempro, Fire, Flame, Flare, Flint, ForceEffect, FormIt, Freewheel, Fusion 360, Glue, Green Building Studio, Heidi, Homestyler, HumanIK, i-drop, ImageModeler, Incinerator, Inferno, InfraWorks, InfraWorks 360, Instructables, Instructables (stylized robot design/logo), Inventor, Inventor HSM, Inventor LT, Lustre, Maya, Maya LT, MIMI, Mockup 360, Moldflow Plastics Advisers, Moldflow Plastics Insight, Moldflow, Moondust, MotionBuilder, Movimento, MPA (design/logo), MPA, MPI (design/logo), MPX (design/logo), MPX, Mudbox, Navisworks, ObjectARX, ObjectDBX, Opticore, Pixlr, Pixlr-o-matic, Productstream, Publisher 360, RasterDWG, RealDWG, ReCap, ReCap 360, Remote, Revit LT, Revit, RiverCAD, Robot, Scaleform, Showcase, Showcase 360, SketchBook, Smoke, Socialcam, Softimage, Sparks, SteeringWheels, Stitcher, Stone, StormNET, TinkerBox, ToolClip, Topobase, Toxik, TrustedDWG, T-Splines, ViewCube, Visual LISP, Visual, VRED, Wire, Wiretap, WiretapCentral, XSI.All other brand names, product names or trademarks belong to their respective holders.DisclaimerTHIS PUBLICATION AND THE INFORMATION CONTAINED HEREIN IS MADE AVAILABLE BY AUTODESK, INC. "AS IS." AUTODESK, INC. DISCLAIMS ALL WARRANTIES, EITHER EXPRESS OR IMPLIED, INCLUDING BUT NOT LIMITED TO ANY IMPLIED WARRANTIES OF MERCHANTABILITY OR FITNESS FOR A PARTICULAR PURPOSE REGARDING THESE MATERIALS.ContentsChapter 1Introduction to Product Installation . . . . . . . . . . . . . . . . 1 About Preparing for Installation . . . . . . . . . . . . . . . . . . . . . . 1About Product Language Selection . . . . . . . . . . . . . . . . . . . . . 3About the Installation Path and Product Configuration . . . . . . . . . . 3Chapter 2Windows Installation . . . . . . . . . . . . . . . . . . . . . . . . 5 To Install this Product . . . . . . . . . . . . . . . . . . . . . . . . . . . 5User Interface Language . . . . . . . . . . . . . . . . . . . . . . . . . . 6Uninstall the product . . . . . . . . . . . . . . . . . . . . . . . . . . . . 6Chapter 3Frequently Asked Questions . . . . . . . . . . . . . . . . . . . . 9 What if I want to install to a different location? . . . . . . . . . . . . . . 9Do I have to install all configuration options at once? . . . . . . . . . . 9Can I install different products to different locations? . . . . . . . . . . 9iiiivIntroduction to Product Installation This Install Guide is divided into different sections:■An overview of the installation process using the Autodesk installer, how to prepare for the process, and some useful background information.■Steps to follow for installing on a Windows operating system ■Frequently asked questions about product installation Further details are provided in the following sections.IMPORTANT This overview describes the various pages of the installer to help you navigate the installation. For Autodesk ® Moldflow ® Communicator which does not require licensing, many of the items described are not options, despite being part of the installer. Please disregard all references to licensing in this Install Guide.About Preparing for InstallationA checklist of prerequisites.Before starting to install, check the following details:■Confirm that your computer meets the minimum system requirements. If in doubt, click System Requirements at the bottom of the installer screen.■Review product documentation to clarify details such as the type of installation to do, and which products to install. Documentation is accessiblefrom links on the lower left corner of the installer:11■Ensure that your user name has Administrator permissions to installapplications on the computer or network.■Obtain serial numbers and product keys for all products you want to install.These are on the product package or email provided at the time youdownload the software.■When you are ready to run the installer, close all running applications.Windows 8/8.1 and the .NET 3.5 RequirementSome Autodesk products require Microsoft DirectX, which, in turn, requiresthe Microsoft .NET Framework. But Windows 8/8.1 has enforced restrictionson installing .NET 3.5 and earlier versions from local media. Therefore,Autodesk products require Internet access so that Windows Update can installor enable the .NET Framework.If the Autodesk installer is unable to install .NET 3.5 or an earlier version onWindows 8/8.1, the following message appears:An Internet connection is required to install a Windows component.Please connect and re-launch the installer.The .NET installation is prevented by any of the following conditions:■An Internet connection is not available during installation.■The computer is configured to use Windows Server Update Services (WSUS) instead of Windows Update.■The Windows 8/8.1 update for Microsoft Security Advisory ( 2749655) is not installed.If any of these conditions cannot be resolved, then the System Administratoror user must manually enable .NET 3.5 on each Windows 8/8.1 computerbefore running the Autodesk installer.To manually enable .NET 3.5 on a Windows 8/8.1 computer1Right-click Start screen ➤ All Apps ➤ Control Panel ➤ Programs ➤Turn Windows Features On or Off.2In the feature list, select Microsoft .NET Framework 3.5, ensuring that a check mark is visible for this feature.3Click OK.For more information, see the following MSDN article.2 | Chapter 1 Introduction to Product InstallationAbout Product Language SelectionYou can select the language you want to use during installation, using thisdrop-down menu on the installer:Language Selection MenuYou can also select the language for the installed product on the ProductInformation page, when you enter the serial number and other productinformation. If you install the product with one language, and then find youwant to use a different language, you can run the installer again and selectthe different language on the Product Information page, by clicking onthe Information button and following the instructions.These conditions apply to product language selection:■All deployments must be in a single language. One administrative image can support deployments for different languages, but each deployment isfor one language.■If you are installing multiple products and select a language that is not supported by some products, these products use a default language. About the Installation Path and Product Configur-ationInstallation PathThis path specifies where the product folder will be installed. If you changethe location, use only valid ASCII characters in the install path.Product ConfigurationOn the Configure Installation page, for every product listed there is atriangular control which you can click for access to a configuration panel.Click anywhere in the product box to open the configuration panel. For manyproducts, you can select an installation type, either Typical to accept theAbout Product Language Selection | 3default configuration settings, or Custom to review the settings and decidewhether to modify them.4 | Chapter 1 Introduction to Product Installation2 Windows InstallationAutodesk Moldflow Communicator uses an installation Wizard to guide you through the installation process.To Install this ProductThe Installation Wizard guides you through several steps. See the InstallationOverview for additional information.1Uninstall (page 6) any pre-release versions you may have.2If installing from a downloaded executable file, navigate to the■file, right click on it, and double-click on the installationexecutable to start the installation.3In the Welcome page, click Install to begin the installation process.4In the License Agreement page,■Select the appropriate entry in the Country or Region list.■Review the agreement.■Select the option to accept the agreement, then click Next.NOTE If you reject the license agreement, you cannot install thesoftware.5In the Product Information page,■Select the Product Language.■Click Next.56In the Configure Installation page, all the available software isselected by default. If you don't want to install everything now,deselect the options you don't want.■Accept the default Installation Path, or click Browse to selecta different folder.■Click Install to start the process.7The Wizard begins installing the software. In the InstallationProgress page a progress indicator shows how much of theinstallation has been completed. Once the installation is complete,the Installation Complete page appears. The successfully installedproducts are listed, as are any products that failed to install.8Click Finish to close the Setup Wizard.User Interface LanguageThe User Interface is available in the following languages:■Chinese (Simplified)■Chinese (Traditional)■English■French■German■Italian■Japanese■Korean■Portuguese■SpanishUninstall the productThe Uninstall feature enables you to remove this product from yourWindows-based computer. You should remove this product from yourcomputer if you plan to upgrade it to a newer version, or if you would like tochange the configuration settings.■Open the Windows Start menu and navigate to the Autodesk Folder.■Click the Uninstall tool and select the product you want to uninstall.6 | Chapter 2 Windows Installation■Click Uninstall then click Exit when the process is complete.Uninstall the product | 783 Frequently Asked Ques-tionsWhat if I want to install to a different location?During installation, you can install to a different location by changing theinstallation path to another valid drive or folder on your computer. Autodesktools, utilities, and service packs will be able to find the installed location. Do I have to install all configuration options at once?For many installers, the Configure Installation page provides a list of productsthat can be installed. You can choose to install as many or as few of these asyou want. If you have already installed other Autodesk products, some of theseoptions may already be installed.If you do not want to install all these options, you can install them at a latertime by relaunching the installer.NOTE You will need your license information to relaunch the installer.Can I install different products to different loca-tions?All products installed at the same time will be installed to the Installation pathindicated at the bottom of the Configure Installation page.9If you would like to install products to different locations, install each productseparately, changing the installation path for each installation.NOTE Some products must be installed to the same path as related products. Inthis case, a warning will be provided, indicating that the Installation path hasalready been set by a previous installation.10 | Chapter 3 Frequently Asked Questions。
Matlab 2016a 安装教程
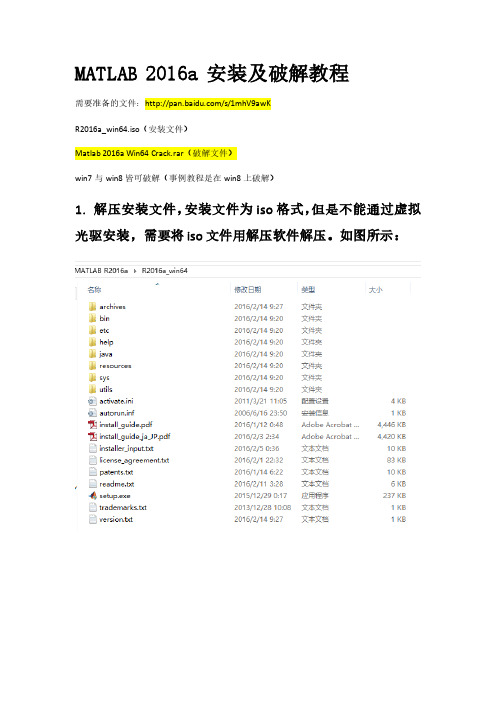
MATLAB 2016a 安装及破解教程需要准备的文件:/s/1mhV9awKR2016a_win64.iso(安装文件)Matlab 2016a Win64 Crack.rar(破解文件)win7与win8皆可破解(事例教程是在win8上破解)1. 解压安装文件,安装文件为iso格式,但是不能通过虚拟光驱安装,需要将iso文件用解压软件解压。
如图所示:2. 点击setup.exe,进行安装。
3. 点击setup.exe,之后稍等一会儿,MathWorks安装程序启动,启动后选择“使用文件安装密钥不需要Internet连接”,如图所示:4. 点击下一步,是否接受许可协议的条款哪儿选择“是”,如图所示:5. 点击下一步,选择“我已有我的许可证的文件安装密钥”,在下面输入秘钥:“09806-07443-53955-64350-21751-41297”,如图所示:6. 选择要安装的目录,我安装在“E:\MATLAB\R2016a”,如图所示:7. 选择需要安装的产品,建议全选,也可根据自己需要选择要安装的产品,我是全选的,选择之后点击“下一步”。
如图所示:8. 点击“安装”,如图所示:9. 进入安装界面,有进度条显示安装进度,安装过程需要较长时间,如图所示:10. 安装完成之后,进入“产品配置说明”界面,点击“下一步”继续,如图所示:之后进入“安装完毕”界面,点击“完成”按钮,完成安装,如图所示:11. 解压“Matlab 2016a Win64 Crack.rar”文件,其中,文件夹中的“license_standalone.lic”就是许可文件,如图所示:12. 打开MATLAB的安装目录E:\MATLAB\R2016a\bin\win64,点击“activate_matlab.exe”进行激活:13. 选择“在不选择Internet情况下手动激活”,点击“下一步”继续。
14. 选择“输入许可证文件的完成路径(包括文件名)”,点击“浏览”,选择刚才解压到桌面的Matlab 2016a Win64 Crack文件夹中的许可文件,点击选择,如图所示:15. 之后进入“离线激活”界面,现在的许可证文件的路径已经填写完整,点击“下一步”如图所示:提示“激活完成”,如图所示。
- 1、下载文档前请自行甄别文档内容的完整性,平台不提供额外的编辑、内容补充、找答案等附加服务。
- 2、"仅部分预览"的文档,不可在线预览部分如存在完整性等问题,可反馈申请退款(可完整预览的文档不适用该条件!)。
- 3、如文档侵犯您的权益,请联系客服反馈,我们会尽快为您处理(人工客服工作时间:9:00-18:30)。
第一步安装:Moldflow Synergy 2016
填写好,序列号,产品密钥,服务器名称填127.0.0.1 如图,设置好后一路点安装
双击此应用,等下会出现下图
点确认解压,直至出现安装介面
照上图填写好后一路点安装完毕
可不装,方框内的小勾去掉
以下安装全改到D盘
第二步:安装 “Moldflow Insight 2016” 按第一步解压方法来安装Moldflow Insight 2016 按图片所示填写好序列号,产品密钥,服务器名称填127.0.0.1 如图,设置好后一路点安装
照上图填写好后一路点安装完毕,安 装盘下一步可装在D盘
第四步:安装 “Moldflow CAD Doctor2016” 按第一步解压方法来安装Moldflow CAD Doctor2016 按图片所示填写好序列号,产品密钥,服务器名称填127.0.0.1 如图,设 装盘下一步可装在D盘
至此所有破解完成,尽 情享用吧
下面就是我已装好的软件,如不能打开多打开两次,或重启下电脑
第五步:安装授权服务器 重新打开“Autodesk Moldflow Synergy 2016 Win64” 安装程序,(此程序解压在 C:\Autodesk\MFS_2016_Multilingual_Win_64bit_dlm )如下图 点左边上的“安装工具和实用程序”,一路点安装完成(如果你电脑上有旧版本的,一定要先删除 在卸载面板中找 到名字是“Autodesk Network License Manager”。),
点开始启 动服务器
如不能运行,看系统服务里有没有 moldflow2016,看是否已启动服务
1,不出意外点击桌面相应快捷方式即可进入Moldflow 2. CADdoctor 2016启动后为英方版本,进入 安装目录,打开AutodeskCADdoctor.ini文件,把AvailableLocale后面的文件 改成CHS,即可启动中文版本,注CADdoctor 2016只汉化了菜单.
1 双击图应用,出现右图 2
点此安装到完成, 可选择装在D盘
3
第六步破解: 复制破解文件夹里的各个文件夹到安装目录里替换, Autodesk Network License Manager文件夹里的lic.dat文件要按下29f2dc60f7da325c.html MAC地址
要选择以太网适配器那个
这些复制到安装目录一一替换
这里改成这你电脑名称
下面改好的参照,注意
MAC地址不要带横杠
这里改成这你网卡地址
启动LMTOOLS,桌椅同 快捷方式安装目录下匀 可以
1
新建服务器名称moldflow2016
7
2 3 4
6
5
2、3、4的文件就是文件夹
C:\Program Files\Autodesk\Autodesk Network License Manager 文件夹里的文件,其它按步骤来点
