tm-100使用说明书
TM-m10和TM-m30 POS 接收打印机产品信息指南说明书
Parts . . . . . . . . . . . . . . . . . . . . . . . . . . . . . . . . . . . . . . . . . . . . . . . . . . . . . . . . . . . . . . . . . . . . . . . . . . . . . . . . . . . . . . . . .2 What’s in the Box . . . . . . . . . . . . . . . . . . . . . . . . . . . . . . . . . . . . . . . . . . . . . . . . . . . . . . . . . . . . . . . . . . . . . . . . . . . . . . .2 Accessories . . . . . . . . . . . . . . . . . . . . . . . . . . . . . . . . . . . . . . . . . . . . . . . . . . . . . . . . . . . . . . . . . . . . . . . . . . . . . . . . . . . .2 Printer Specifications . . . . . . . . . . . . . . . . . . . . . . . . . . . . . . . . . . . . . . . . . . . . . . . . . . . . . . . . . . . . . . . . . . . . . . . . . . . . .2 Media . . . . . . . . . . . . . . . . . . . . . . . . . . . . . . . . . . . . . . . . . . . . . . . . . . . . . . . . . . . . . . . . . . . . . . . . . . . . . . . . . . . . . . . .3 Reliability . . . . . . . . . . . . . . . . . . . . . . . . . . . . . . . . . . . . . . . . . . . . . . . . . . . . . . . . . . . . . . . . . . . . . . . . . . . . . . . . . . . . .3 Electrical . . . . . . . . . . . . . . . . . . . . . . . . . . . . . . . . . . . . . . . . . . . . . . . . . . . . . . . . . . . . . . . . . . . . . . . . . . . . . . . . . . . . . .3 Safety . . . . . . . . . . . . . . . . . . . . . . . . . . . . . . . . . . . . . . . . . . . . . . . . . . . . . . . . . . . . . . . . . . . . . . . . . . . . . . . . . . . . . . . .3 Environmental . . . . . . . . . . . . . . . . . . . . . . . . . . . . . . . . . . . . . . . . . . . . . . . . . . . . . . . . . . . . . . . . . . . . . . . . . . . . . . . . .3 Dimensions . . . . . . . . . . . . . . . . . . . . . . . . . . . . . . . . . . . . . . . . . . . . . . . . . . . . . . . . . . . . . . . . . . . . . . . . . . . . . . . . . . . .3 Control Panel . . . . . . . . . . . . . . . . . . . . . . . . . . . . . . . . . . . . . . . . . . . . . . . . . . . . . . . . . . . . . . . . . . . . . . . . . . . . . . . . . .4 Printing a Status Sheet . . . . . . . . . . . . . . . . . . . . . . . . . . . . . . . . . . . . . . . . . . . . . . . . . . . . . . . . . . . . . . . . . . . . . . . . . . .4 Additional Information . . . . . . . . . . . . . . . . . . . . . . . . . . . . . . . . . . . . . . . . . . . . . . . . . . . . . . . . . . . . . . . . . . . . . . . . . . .42 - TM-m10 and TM-m30 POS Receipt PrinterParts From left to right:❏USB Type A connector (TM-m30 only; for customerdisplay and Wireless LAN unit)❏Power connector❏USB Type B connector (for host device)❏Ethernet connector (depending on model)❏DK (Drawer kick) connectorWhat’s in the Box❏Printer❏User’s manual and setup guide❏Small thermal paper roll (for operational testing)❏AC adapter ❏AC cable❏USB cable (depending on model)❏Locking wire saddle (depending on model)❏58-mm roll paper guides (TM-m30)AccessoriesPrinter SpecificationsPrintingPrint method:thermal line printing Dot density:203 dpi × 203 dpiPrint width:TM-m10:2.07" (52.5 mm), 420 dots TM-m30:2.07" (52.5 mm), 420 dots 2.82" (72 mm), 576 dotsCharacters per line:58mm roll: (standard)font A: 35, font B: 42, font C: 4680mm roll (TM-m30):font A: 48, font B: 57, font C: 64Print direction:TM-m10: unidirectional w/friction feed TM-m30: bidirectional w/friction feed Print speed:TM-m10: 5.9"/sec. (150 mm/sec.) max.TM-m30: 7.9"/sec. (200 mm/sec.)max.Continuous paper feed speed:TM-m10:approx. 5.9"/sec. (150 mm/sec.)TM-m30:approx. 7.9"/sec. (200 mm/sec.)Character sets:alphanumeric: 95 characters international: 18 setsextended graphics: 128 × 43 pages (including a user-defined page)InterfacesUSB model (TM-m10):Built-in USB 2.0 Full-speed Ethernet model:Built-in USB 2.0 Full-speed and Ethernet 10/100 Base-T/TXBluetooth ® model:Built-in USB 2.0 Full-speed, Bluetooth3.0 (EDR supported), and Ethernet (TM-m30)Wi-Fi model:Built-in USB 2.0 Full-speed,802.11b/g/n (2.4 GHz), and Ethernet1Roll paper cover 2Panel LED 3NFC tag 4Cover open lever5Feed button 6Power switch7Autocutter adjustment knob (TM-m10 only)8Status sheet buttonOptionModel Part number External buzzer unitOT-BZ20C32C890634MediaPaper type:thermal roll paperPaper width:TM-m10:58 mm: 57.5 ± 0.5 mm (2.26 ± 0.02")TM-m30:58 mm: 57.5 ± 0.5 mm (2.26 ± 0.02")80 mm: 79.5 ± 0.5 mm (3.13 ± 0.02") Max. diameter:TM-m10:60.0 mm (2.36") outside maximum18.0 mm (0.71") outer core minimumTM-m30:83.0 mm (3.27") outside maximum18.0 mm (0.71") outer core minimum Specified paper:TM-m10:TM-m30:ReliabilityPrinter mechanism:15 million lines (printing and paper feed) Thermal head:100 million pulses, 100 kmMTBF:360,000 hoursMCBF:60 million linesAutocutter:TM-m10: 1 million cutsTM-m30: 1.5 million cuts ElectricalOperating voltage:DC 24V ± 7%Power consumption:TM-m10:15.9 W (AC 115V/60 Hz) (operating)0.34 W (AC 115V/60 Hz) (standby)TM-m30:26.6 W (AC 115V/60 Hz) (operating)0.41 W (AC 115V/60 Hz) (standby) Current consumption:1.5 A (operating)Approximately 0.1 A (standby)SafetyElectromagnetic interference:USA:FCC Class ACanada:CAN ICES-3 (A)/NMB-3 (A)EnvironmentalOperating temperature range:Temperature: 41 to 113°F (5 to 45°C)Humidity: 10 to 90% RH (except for paper) Storage temperature range:Temperature: -4 to 140°F (-20 to 60°C) Humidity: 10 to 90% RH (except for paper) Operating noise:approximately 55 dBDimensionsTM-m10Dimensions(H × W × D): 4 × 4 × 4 inches(102 × 102 × 102 mm)Weight:approx. 1.98 lb (0.9 kg)TM-m30Dimensions(H × W × D): 5 × 5 × 5 inches(127 × 127 × 127 mm)Weight:approx. 2.87 lb (1.3 kg)Paper type number ManufacturerKT55FA, KT48FA Koehler Paper GroupAF50KS-E Jujo Thermal Ltd.F5041(55)Mitsubishi HiTec PaperPaper type number ManufacturerKT55FA, KT48FA Koehler Paper GroupAF50KS-E Jujo Thermal Ltd.F5041(55), F5041(48)Mitsubishi HiTec PaperTM-m10 and TM-m30 POS Receipt Printer - 3Control PanelLEDs(Power)On when power is on.Flashing when printer is powering off; when updating firmware; when the Ethernet interface is starting up.ErrorOn when the printer is offline (paper out, power-on initialization, paper cover open) or other recoverable error. Flashing if there is an unrecoverable error.Turn the printer off for a few seconds, then turn the printer back on. If the LED is still blinking, contact a dealer or qualified service person.PaperOn when there is no paper in the printer.Flashing when waiting for the self-test or a macro execution; when printing the status sheet; when the firmware is being updated.ButtonsPowerPress this button to turn the power on or off. To turn the power off, hold the button for more than two seconds. FeedPress this button to advance the paper one line. Hold the button down to advance the paper.Status sheetPress this button to print an interface status sheet or initialize interface settings.Printing a Status SheetFollow the steps below to print a status sheet on roll paper. Using the status sheet button1.Make sure the printer is on and the roll paper cover is shut.2.Remove the bottom cover if necessary.3.Press and hold the status sheet button for at least 3 seconds.The printer prints its status.Using the Feed button1.Make sure the printer is on and the roll paper cover is open.2.Press and hold the Feed button for at least 3 seconds, thenclose the roll paper cover. The printer prints its status. Additional InformationThe Epson® support site has more information about the TM-m10 and TM-m30:/supportEPSON is a registered trademark and EPSON Exceed Your Vision is a registered logomark of Seiko Epson Corporation.General Notice: Other product names used herein are for identification purposes only and may be trademarks of their respective owners. Epson disclaims any and all rights in those marks.This information is subject to change without notice.© 2015 Epson America, Inc., 11/15CPD-50291R14 - TM-m10 and TM-m30 POS Receipt Printer。
美国健康医疗仪器国际公司 IWORX 教学工具包 说明书
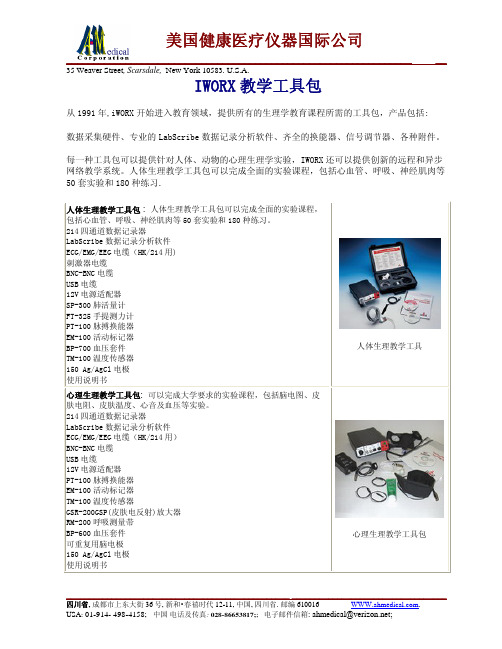
IWORX 教学工具包从1991年,iWORX 开始进入教育领域,提供所有的生理学教育课程所需的工具包,产品包括: 数据采集硬件、专业的LabScribe 数据记录分析软件、齐全的换能器、信号调节器、各种附件。
每一种工具包可以提供针对人体、动物的心理生理学实验,IWORX 还可以提供创新的远程和异步网络教学系统。
人体生理教学工具包可以完成全面的实验课程,包括心血管、呼吸、神经肌肉等50套实验和180种练习.人体生理教学工具包 : 人体生理教学工具包可以完成全面的实验课程,包括心血管、呼吸、神经肌肉等50套实验和180种练习。
214四通道数据记录器LabScribe 数据记录分析软件 ECG/EMG/EEG 电缆(HK/214用) 刺激器电缆 BNC-BNC 电缆 USB 电缆12V 电源适配器 SP-300肺活量计 FT-325手提测力计 PT-100脉搏换能器 EM-100活动标记器 BP-700血压套件 TM-100温度传感器 150 Ag/AgCl 电极 使用说明书人体生理教学工具心理生理教学工具包: 可以完成大学要求的实验课程,包括脑电图、皮肤电阻、皮肤温度、心音及血压等实验。
214四通道数据记录器LabScribe 数据记录分析软件 ECG/EMG/EEG 电缆(HK/214用) BNC-BNC 电缆 USB 电缆12V 电源适配器 PT-100脉搏换能器 EM-100活动标记器 TM-100温度传感器GSR-200GSP(皮肤电反射)放大器 RM-200呼吸测量带 BP-600血压套件 可重复用脑电极 150 Ag/AgCl 电极 使用说明书心理生理教学工具包动物生理教学工具包: 可以完成全面的实验课程,包括新陈代谢、坐骨神经刺激、肌肉运动、离子运动和渗透平衡等11套实验和23种练习。
214四通道数据记录器LabScribe数据记录分析软件ECG/EMG/EEG电缆(HK/214用)刺激器电缆BNC-BNC电缆USB电缆12V电源适配器NBC-300神经浴槽五针神经浴槽记录电缆FT-104张力换能器DT-475位移换能器IC-200细胞内探针ISE-730刺激电极ISE-730氧电极PT-100脉搏换能器EM-100活动标记器FT-325手提测力计BP-700血压套件SP-300肺活量计TM-100温度传感器150 Ag/AgCl电极使用说明书动物生理教学工具包iWorx Physiology Teaching Kits have everything you need to make physi-ology labs exciting,informative and easy.They combine a rugged,eco-nomical data recording unit with click-and-play LabScribe software to provide versatile,cost-effective data recording solutions.They also include web-ready iWorx human,animal and psychological physiology courseware and a selection of trans-ducers and accessories needed for typical college-level lab experiments.Both the hardware and the software have been designed especially for teaching.Hardware components are easy to set up and virtually bScribe,a full featured recording and analysis application,actually configures itself for the experiment at hand,and allows a wide range of easy-to-perform analyses.iWorx ®Physiology T eaching KitsWeb-ready iWorx Courseware.The iWorx solution starts with dynamic,interactive human,animal and psycho-logical physiology courseware,developed over several years by university teaching professionals.The course materials include more than 50 lab experiments and 180 learning exercises.They’re 100% web-ready.You can easily put them on your own course home page,and customize the content to suit your own teaching requirements.Coursematerials are provided in an easily repro-ducible printed format,as well as .pdf and HTML files.The courseware works seamlessly with the LabScribe software.Selecting the group of experiments that come with the standard iWorx physiology lab manual adds over 40 experiments to the Settings sampling rate,calibrations,analysis func-tions,and more that are needed to com-plete the plete documentation for that lab is automatically called up and displayed in a separate window.A unique “settings manager”lets instructors attach external resources,such as Web links,.pdf files,movies or illustrations to the experimental settings file and makes them readily available to assist students in the completion of the experiment.Instructors can use the “settings manager”to customize their curricula as well.Web versions of the laboratory documen-tation feature professionally rendered,full-color graphics illustrating physiologi-cal principals.All of the web materials can be used locally,or placed on the course/department server for generalLabScribe makes even sophisticated experiments “click and play” easy. LabScribe has been developed from the ground up for classroom teaching,and strikes an ideal balance between flexi-bility and simplicity.Setup of gains, sampling rates,display times and other criteria is automatic via the “settings”file.No complicated adjustments are ers can easily control the various aspects of recording through dialogue windows and save their pref-erences for future use.In Manual mode,the user has control of all aspects of the recording.LabScribe includes its own function generator/stimulator for maximum experiment versatility.Easy-to-use tools let the student make measurements from the data with a minimum of manipulation.For example,LabScribe can display the Mean,Min,Max, Duration and Amplitude of a selection, or it can display the Rate or Integral of incoming signals in real time.Incoming voltages can be easily converted to real units such as pH or mmHg.And,of course,built-in online help is instantly available.Recorded data is presented as distance-per-unit of time,e.g.,cm/sec,exactly as it would be on a traditional paper chart ing the built-in annotation feature,students can even “write”on the virtual chart recording to quickly locate regions of interest.For convenience,professional-looking LabScribe reports can be prepared and edited,all within the program’s own Journal.If desired,the pictures and text in the Journal can be easily exported to other programs.iWorx Physiology TeachingKits are built around professionally-developed,web-ready coursewarethat includes human,animal and psychological physiology labs.Human Physiology Labs ⅢHeartⅢCirculationⅢExerciseⅢFluid BalanceⅢMusclesⅢNervesⅢRespirationAnimal Physiology LabsⅢCellular RespirationⅢMetabolismⅢMembrane PropertiesⅢNervesⅢMusclesⅢFluid BalanceⅢHeartⅢCirculationPsychophysiology LabsⅢBrain Waves and Cortical Arousal ⅢEmotion and Skin Conductance ⅢCognition and Skin Conductance ⅢBiofeedbackⅢVagal ToneⅢCynicism and Hostility LabScribe is a comprehensive, data recording and analysis solution developed especially for classroom use. It’s easy to use, yet offers a full range of features for human, animal and psychological physiology teaching.LabScribe’s Analysis window lets you zoom in on specific areas of the recording and perform calculations on selected pieces of the data.iWorx 214 Data Recorder This rugged,reliable 4-channel data recording unit is engineered to take years of classroom use and abuse.It is constructed of extruded aluminum, with a minimum of student-accessible controls and adjustments.For mostapplications,setup is automatic and transparent to the user.From within the software the unit can be configured for EEG,EMG (EOG) or ECG.The iWorx 214 includes a dual-channel biopotential amplifier approved for use on human subjects.Two additional channels accept practically any sensor you’re likely to encounter,as well as voltage output of pH meters,spectrophotometers and other laboratory devices.The iWorx 214also provides a fully functional built-instimulator useful for a variety of humanand animal labs.The recorder interfaces to a PC or MACvia a USB connection which providesaggregate sampling at 100 kHz continu-ous,more than fast enough for justabout any teaching experiment.System RequirementsThe iWorx Physiology Teaching Kitsrequire either a Pentium level computerrunning Windows 98,ME,2000,or XP,or a Macintosh computer running OSX.In either case the computer must haveat least 512 megabytes of RAM,and atleast 10 megabytes of free space on thehard drive.All necessary transducers, cables andconnectors are included in a ruggedstorage and carry case that keepseverything in its place and ready for use.Complete Package—Everything IncludediWorx Physiology Teaching Kits are shippedwith all transducers,cables,accessories,and manuals needed for the labs in theselected group—everything designed towork together.The transducers areextremely robust and carry the samethree-year warranty as the iWorx 214Data Recorder.Warranty and UpgradesiWorx Physiology Teaching Kit comes witha 3-year warranty.Software upgrades arefree,and are automatically delivered toregistered users via e-mail and can be eas-ily downloaded from the iWorx users area.LabScribe software and courseware maybe freely distributed to students.Analog Inputs: 2 isolated differential biopotential/2 single-ended2 differential transducer InputsInput Range:±5VExcitation Voltage:±5VInput Impedance:10 GohmAmplifier Response:0–2kHzAnalog Output: 1 (differential)Output Range:±5VOutput Current:5mAOutput Resolution:12 BitADC Resolution:16 BitSystem Noise:±1 LSB (< 1mV)Sampling Rate:100,000 samples/sec aggregate continuous Trigger 1(TTL)Biopotential Amplifier:Safe for use on human subjects;includes opticallyisolated input and AAMI input cableStimulator Output:±5V (accessories available to increase Stimulatoroutput to 100V) SpecificationsWant to learn more?Just call (800) 234-1757 or contact us ************************.One Washington Street,Suite 404Dover,New Hampshire 03820Phone:(800)-234-1757603)-742-2492 (International)Fax:(603)-742-2455©2006 CB Sciences,Inc.iWorx is a registered trademark and LabScribe is a trademark of CB Sciences,Inc.Other trade-Ordering InformationPart No.DescriptionHK/214Advanced Human Physiology Kit includes:ⅢiWorx 214 Four Channel Computer Interface with Built-In Two Channel Isolated Bioamplifier and LabScribe Recording Software ⅢSpirometer with 300 Liter Flow Head ⅢHand Dynamometer ⅢPulse Plethysmograph ⅢEvent MarkerⅢTemperature SensorⅢNon-Invasive Blood Pressure Transducer and Stethoscope Ⅲ150 Pre-Gelled Ag/AgCl Electrodes Ⅲ12VDC GND.Power Supply ⅢCablesⅢPrinted,HTML and PDF Lab ManualAHK/214Advanced Animal and Human Physiology Kit includes:ⅢiWorx 214 Four Channel Computer Interface with Built-In Two Channel Isolated Bioamplifier and LabScribe Recording Software ⅢSpirometer with 300 Liter Flow Head ⅢHand Dynamometer ⅢPulse Plethysmograph ⅢEvent MarkerⅢTemperature Sensor ⅢForce TransducerⅢDisplacement TransducerⅢNerve Bath Chamber with stimulating/recording Electrodes ⅢIntracellular ProbeⅢOxygen Electrode with Current-to-Voltage AdapterⅢNon-Invasive Blood Pressure Transducer and Stethoscope Ⅲ150 Pre-Gelled Ag/AgCl Electrodes Ⅲ12VDC GND.Power Supply ⅢCablesⅢDissection KitⅢPrinted,HTML and PDF Lab ManualPK/214Psychological Physiology Kit includes:ⅢiWorx 214 Four Channel Computer Interface with Built-In Two Channel Isolated Biopamplifier and LabScribe Recording Software ⅢPulse Plethysmograph ⅢEvent MarkerⅢTemperature SensorⅢNon-invasive Blood Pressure Transducer ⅢReusable Button ElectrodesⅢGalvanic Skin Response Amplifier ⅢCablesⅢ12VDC GND.Power SupplyⅢ150 Pre-Gelled Ag/AgCl Electrodes ⅢPrinted,HTML and PDF Lab ManualInnovation in Life Science Education。
SAMSUNGTM离心式压缩机使用说明书
开
电流达到最小电流值,设定压力控制开始
0~100% IGV 继续打开,直至达到设定压力
0~100% IGV 不断自动开启或关闭以维持设定压力
4-2-2 恒压调节(可选项:恒压调节) A.流程图
4-5
TM 系列离心式压缩机使用说明书
B.恒压调节曲线(图 2)
( 图2 )
(参见图 2)
BOV
A段
100%关
TM 系列离心式压缩机使用说明书
4. 操作
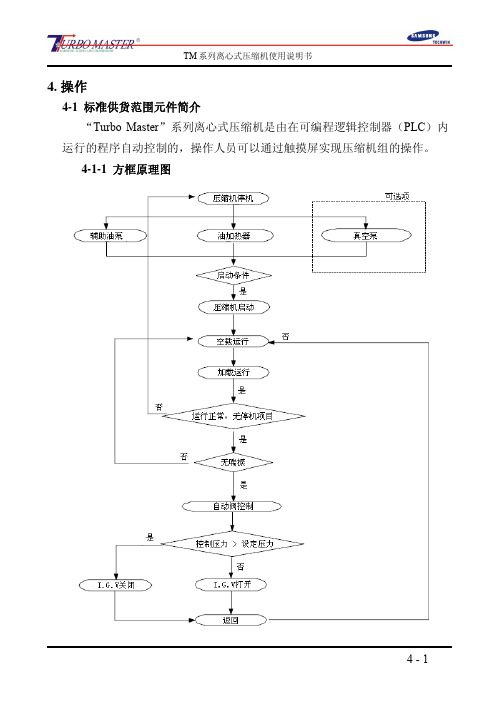
4-1 标准供货范围元件简介 “Turbo Master”系列离心式压缩机是由在可编程逻辑控制器(PLC)内
运行的程序自动控制的,操作人员可以通过触摸屏实现压缩机组的操作。 4-1-1 方框原理图
4-1
TM 系列离心式压缩机使用说明书
4. 操作
4-1 标准供货范围元件简介 “Turbo Master”系列离心式压缩机是由在可编程逻辑控制器(PLC)内
⑥ 模拟量输出模块 CST55905-01 4 通道模拟量输出(可选项)
⑦ 模拟量输入模块 CST55906-02 8 通道模拟量输入(电压)
⑧ 模拟量输入模块 CST55906-01 8 通道模拟量输入(电流)
⑨ 模拟量输入模块 CST55906-01 8 通道模拟量输入(电流)(可选项)
⑩ 热电阻模块
CST55907-01 8 通道 PT100Ω热电阻信号输入
热电阻模块
CST55907-01 8 通道 PT100Ω热电阻信号输入(可选项)
空模块
CST55919-01 如果没有可选项模块时要安装空模块
只读闪存
CST55918-01 存储备份程序
4-3
TM 系列离心式压缩机使用说明书
TM-100PR-HB Operation Manual RevL.1 CN (TE14-1138)
CHERUSAL 型号: TM-100PR-HB脉冲热压机新加坡印制型号TM-100PR-HB操作维护手册目录第 1 章 : 产品概述 (1)加热方法 (1)机器部件和特性 (1)规格 (2)桌台尺寸 (4)下压气缸 (4)压头装置 (5)热压头 (6)热电偶 (6)热电偶接口 (6)工作台 (7)水平调节 (7)视图系统 (8)变压器 (8)硅胶带装置 (8)真空发生器 (9)主供气单元 (10)输入按钮 (10)控制面板 (11)第 2 章 : 安装要求 (14)气源 (14)环境 (14)安全 (14)第 3 章 : 产品安装和使用 (15)机器安放位置 (15)包装 (15)开机 (16)用户界面 (16)快速启动 (17)功能键 (18)生产 (19)参数 (19)工程 (26)手动 (30)错误信息 (32)加热错误 (32)SCR卡报警 (32)超温 (32)硅胶报警 (32)密码恢复 (32)操作工序 (33)第 4 章 : 校正 (35)温度校正 (35)触摸屏校正 (37)第 5 章 : 产品维护 (38)热压头 (39)变压器电缆线 (39)真空 (40)夹具 (40)安装 (40)热压头保养 (40)水平调节 (40)电源 (41)气源 (41)保存 (41)安全标示 (41)接地标志 (41)PE标志 (41)有害电压标示 (42)夹伤或割伤标示 (42)高温标示 (42)第 6 章 : 故障排除 (43)第 7 章 : 电图 (46)第 8 章 : 气图 (49)信力科技(私人)有限公司成立于1995年,主要设计和制造一系列标志为品牌的精密热能应用设备,如ACF预贴机,脉冲式热压机,回流焊接机,COG/COF邦定机等。
目前,信力的销售网络已扩展至亚洲区域如台湾,中国,香港,马来西亚和菲律宾等。
协同信力机械,信力科技的目标是通过完善的世界销售网络将符合世界水准的产品和服务准时送交给我们的客户。
遥控器产品说明书

遥控器产品说明书【篇一:遥控器使用说明书】遥控器使用说明书一、面板说明1、“”键:机器通电并处于开启状态,按此键,机器进入关闭状态;机器通电并处于关闭状态,按此键,机器进入开启状态。
2、“home”键:表示选择进入系统主页面;3、“menu”键:在sw播放器界面,按此键弹出操作菜单;机器处于安卓系统界面,4、“”键:开启或关闭播放机声音。
5、“”键:按3秒钟,进入鼠标模式,可以通过遥控器方向键来控制鼠标的移动,再次按3秒钟退出鼠标模式。
6、“7、“8、“9、“”键:方向键,可以向上移动光标;在鼠标模式可以向上移动鼠标” 键:方向键,可以向左移动光标;在鼠标模式可以向左移动鼠标” 键:方向键,可以向右移动光标;在鼠标模式可以向右移动鼠标” 键:方向键,可以向下移动光标;在鼠标模式可以向下移动鼠标10、“” 键:此按键无功能11、“vol+” 键:调大播放机音量12、“ok” 键:确定按钮13、“vol-” 键:调小音量14、“tab” 键:切换光标位置15、“” 键:此按键无功能16、“” 键:在sw播放器界面,按此键弹出操作菜单;安卓系统界面,返回上一级界面。
17、“1” 键:输入数字1。
18、“2” 键:输入数字219、“3” 键:输入数字320、“4” 键:输入数字421、“5” 键:输入数字522、“6” 键:输入数字623、“7” 键:输入数字724、“8” 键:输入数字825、“9” 键:输入数字926、“0” 键:输入数字027、“.” 键:输入符号“.”28、“del” 键:删除文件或字符29、“vod” 键:此按键无功能30、“live” 键:此按键无功能31、“pause” 键:此按键无功能32、“play” 键:此按键无功能方向键包含:“”键、“” 键、“” 键和“” 键。
数字键包含:“1”“2”“3”“4”“5”“6”“7”“8”“9”“0”“.”二、常用操作1,如何退出sw播放器按“menu”键,弹出选择菜单,按向下方向键“”到“退出”,按“ok”键退出sw播放器。
EndoFectinTM-Max 转染试剂用户手册说明书

EndoFectin TM -Max 转染试剂高效转染核酸到哺乳动物细胞产品编号:EF003 / EF004 / EF003T 包装规格:1 mL / 3 mL / 100 μL储存条件:4℃~8℃密闭保存,可保持稳定至少12个月,常温运输。
产品概述EndoFectin TM -Max 转染试剂是以脂质体转染为原理的转染试剂,它能与核酸形成复合物,并使该复合物进入哺乳动物细胞。
EndoFectin TM -Max 转染试剂广泛适用于常见细胞系,如HEK-293、HEK293T 、CHO-K1、Hep G2、Hela 、MCF-7、NIH/3T3和A549等。
即使在有血清存在的情况下,该试剂仍能高效将核酸导入细胞。
GeneCopoeia 公司提供的EndoFectin TM -Max 转染试剂具有如下优点: y 转染效率更优良 y 细胞毒性低y 适用于多种细胞系的转染操作,操作简便y 与含血清的培养基相兼容,转染前不需去除细胞培养液或血清,转染后不需清洗细胞质量控制每批次EndoFectin TM -Max 转染试剂均经过转染测试。
将eGFP 表达质粒(GeneCopoeia Cat.No. EX-EGFP-M02)用EndoFectin TM -Max 转染试剂转入亚融合状态的HEK-293细胞,转染24小时后,超过95%的细胞表达eGFP 。
注意事项使用高质量的质粒:请务必使用高质量的转染级无内毒素质粒。
可通过260 nm 光吸收测定DNA 浓度,并以260 nm / 280 nm 比值确定DNA 纯度(比值应在1.8~2.0的范围内)。
如有可能,请通过琼脂糖凝胶电泳检测质粒的完整性。
保证细胞状态:请使用适当保存和经常传代的健康细胞,并确保培养基无细菌、真菌或支原体污染。
如果细胞是近期复苏的液氮冻存细胞,请在转染前至少传代两次。
实验材料y EndoFectin TM -Max 转染试剂、含目的基因的DNA 质粒y 无蛋白细胞培养液(如Opti-MEM I TM ,来自Life Technologies . 货号:31985-088) y 培养至70~80%汇合度的目的细胞条件摸索在进行正式转染前,推荐以EndoFectin TM -Max 转染试剂摸索目的细胞的最佳转染条件。
Thermo ScientificTM TDE 系列 超低温低温箱 安装和操作手册说明书

Thermo Scientific TM TDE 系列超低温低温箱安装和操作332851H62 • 修订版 A • 2022 年 8 月重要事项请阅读本安装和操作手册。
如果不遵守本手册中的说明,可能会导致设备损坏、操作人员受伤以及设备性能下降。
注意所有内部调整和维护必须由符合所需资格的服务人员进⾏。
本手册中的材料仅供参考。
手册内容及其所包含的产品信息如有变更,恕不另⾏通知。
Thermo Fisher Scientific 对本手册不作任何声明或保证。
对于任何由于使用此手册而引起的直接或间接损坏,Thermo 不承担任何责任。
© 2022 Thermo Fisher Scientific Inc。
保留所有权利。
目录型号 (1)安全考量因素 (2)符号术语 (3)拆包 (5)附件 (5)常规建议 (6)温度监测系统 (6)日常使用 (6)首次加载 (6)格栅门打开/关闭 (6)操作标准 (7)电气规格 (7)安装 (8)位置 (8)保护性导体电流 (8)布线 (8)调平 (9)刮冰刀 (9)备用系统(选配) (9)门操作 (9)安装远程报警连接器 (9)适用范围 (9)操作 (10)初始启动 (10)操作概述 (10)显示画面 (10)设置 (11)关机 (12)刮冰器说明 (13)用途 (13)备用系统(选配) (14)CO2 和 LN2 的预防措施 (14)安装 (14)启动 (15)操作 (15)温度记录仪(选配) (16)设置和操作 (16)更换图表纸 (16)校准调节 (16)维护 (17)清洁冷凝器 (17)清洁冷凝器过滤网 (17)门封维护 (17)低温箱除霜 (17)电池维护 (17)维护计划 (18)故障排除指南 (19)错误代码 (23)保修 (24)保修(国际) (25)附录A:报警汇总 (26)附录B:Modbus ASCII 参数表 (28)临终关怀 (36)WEEE 合规性 (37)联系信息 (39)型号表格 1. 适用型号TDECxxx86F*063/252/396A/D/V/L/K通用型Thermo Fisher Scientific ULT Freezers 型号 | 12 | 安全考量因素Thermo Fisher Scientific ULT Freezers安全考量因素本手册将采用以下符号规则:以下是可能在本产品上使用到的符号和安全警告:(⻅第 5 和第 6 ⻚的列表)以下是本产品的重要安全事项:此符号单独使用时指示会降低人员受伤⻛险或装置性能不良⻛险的重要操作说明。
西门子+LCC-100+软件手册说明书

U ser manualConfiguration softwareLCC-100softwarefor Monostats - Class 50 and 100CONSTRUCTEURunits - ranges - relays - set points time-delay - outputs - channelsAir velocityPressure Humidity Air flow Temperaturew e NI - Minimum System RequirementsII - Connecting the transmitterIII - Displaying and modifying the configurationIV - Saving a configurationV - Opening a configurationVI -Main menuI 1 - Minimum recommended configuration .....................................................................p 2I 2 - Installing the software ...........................................................................................p 2I 3 - Uninstalling the software ........................................................................................p 2I 4 - Launching the software ..........................................................................................p 2II 1 - Warnings .............................................................................................................p 2II 2 - ........................................................................................................p 3Connections III 1 - Principle .............................................................................................................p 3-4III 2 - Tab "Generalities"................................................................................................p 4III 3 - Tab "Channels"....................................................................................................p 4-7III 3a - Settings DIP switches .................................................................................p 4-5III 3b - Measurements ..........................................................................................p 5III 3c - Channels ..................................................................................................p 5Name of the channels .............................................................................p 5Measuring ranges - lower and upper ranges ..................................................p 5-6Units of measurement ............................................................................p 6-7Offset ...............................................................................................p 7III 4 - Tab "Alarm” (monostats)......................................................................................p 7-8III 4a - activate the relay ........................................................................................p 8III 4b - set the time-delay of the relay .......................................................................p 8III 4c - set the set points ........................................................................................p 8III 4d - set the alarm type (rising / falling edge)...........................................................p 8IV 1 - Principle .............................................................................................................p 9IV 2 - Saving a configuration .........................................................................................p 9V 1 - Principle ..............................................................................................................p 9V 2 - Opening a configuration ........................................................................................p 10-11V 3 - Transfer a configuration ........................................................................................p 11V 4 - Delete a configuration ...........................................................................................p 11"Commands" menu .....................................................................................................p 11"Parameters" menu .....................................................................................................p 11"Help" menu ...............................................................................................................p 11S ummaryI - Minimum system requirementsI 1 - Minimum system requirements:Pentium II 300 MHz - 32 MB RAM CD-Rom drive Windows 98-NT4-XP 20 MB free on hard disk Minimum resolution 800x600 (1024x 768 recommended)lllll l l Serial communication port (RS232)Internet Explorer 6.0 or betterII - Connecting the transmitterI 2 - Installing the software :Insert the CD into the CD-ROM driver. The Kimo welcome window appears automatically.If the installation does not automatically begin, click Start and click Run. In the Run dialog box, type : d:\detup (d is the letter of your CD-Rom drive) then click OK.I 3 - Uninstalling the software :To uninstall the "LCC100", it is required to have the rights (under NT) and to use the Windows tool:Go to the menu "Run", "Parameters", “Control panel", then "Install/Uninstall programms ".In the field « Installation/Uninstallation », click on “KIMO LCC100” and follow the instructions.l l I 4- Launching the software:To run the LCC application:Click on the iconfrom your desktopORClick on Start / Programms and LCC 100.llPosition of the DIP switches to access the configurationl l By positioning the DIP switches as shown beside:You may access the configuration via software.The following message will appear when starting the LCC-100 programm:In that case, you will not be able to configure the measuring ranges, the units and the offset of the transmitter.However, you will be able to access to the initial configuration (set with the DIP switch), and to modify the information relative to the alarms (for the PST, HST and TST).To position correctly the DIP switches:- unplug the cable transmitter to the PC- power off the transmitter, set the proper switches as shownbeside and re-power the transmitter.If the DIP switches are wrongly positioned:II 1 - Warnings:III - Displaying and modifying the configurationIII 1 - Principle :Using the function “Read configuration” you may access the configuration of the transmitter.Then, you can read, modify and save the configuration of the transmitter.A new configuration can be transferred to the transmitter and/or saved in a database (for a later use). Some parameters can be modified from the software, others can only be read.II 2 - Connections:To read and modify the configuration of a transmitter, please follow the instructions as below:ll lStep 1 : power up the transmitter (see drawing)Step 2 : please wait a few seconds (time required for the transmitter to initialize).Step 3 : connect the transmitter to the PC with the RS 232 cable.Rs232 cableTopArrow of the RS 232cable’s connectorconnection to transmitterconnection to PCBottomYou can connect the transmitter to the PC before or after the launch of the software.If you make the connection BEFORE launching the sof tware, themessage shown beside will appear when you start the LCC-100.Please click on “YES” and you will directly access the configuration parameters of the transmitter (see page 4).If you first launch the software (before the connection of the transmitter),you access to the 2 main menus of the LCC-100:- Read configuration.- Open configuration from databasel l When you open the software LCC-100, 2 buttons appear:- Read configuration.- Open configuration from databaseTo access to the configuration parameters, you can - click on “Read configuration” or- go in the menu “Commands” and then, click on “Display the configuration” (see page11).Click on nextIII 2 - Tab"Generalities” :The tab "Generalities” shows all relative info of the transmitter, regardless of the configuration.The description of the transmitter:It’s the part number of the transmitter which is connected (ex : TST-B, CP101, CTV100, etc).The version of the software.The analog output:It depends on the transmitter: 4-20 mA or 0-10 V.l l lThe window shown beside appears:This window has 2 or 3 tabs (according to the transmitter connected) and a function button.. Via the unction button, you can trans er the configuration to the transmitter.llThe tabs "Generalities", "Channels" and "Alarm” Click on the tab required to display the information.shows all relative info regarding the configuration of the transmitter. tab "Alarm"This tab only concerns the manostats.It is displayed only when a PST, TST or HST is connected.123III 3 - Tab"Channels" :in f ormation o f switches, the measuring ranges, the units of measurement, the offset.You can see the position of the DIP switches on the electronic board of the transmitter.For the transmitters with 2 DIP switches, the software will display both.With an air velocity and temperature transmitter type CTV 100 : the software displays both air velocity and temperature channels. The measuring ranges displayed are relative to the initial configuration of the transmitter.They are configurable using the lower and upper ranges input boxes (displayed inwhite). Via the arrows located on the right of the zone, you can modify the ranges, or you can enter the value via the keypad.When a value is modified, the writing bar becomes red. It means that the configuration displayed is not the same as the one of the transmitter. When all the modifications required are done (measuring ranges units,offset and/or alarms) click on the writing bar totransfer the new data to the transmitter.Click on the “measure” button to display in real-time the measurements made by the transmitter (see window shown beside). According to the transmitter used, the window displays one or two values, and also displays the status of the relay (for the monostats).Number of valuesPart number of the tranmsitterdisplayedPST, CP50, CP100, TST , HM50, TM100, TG1001 value 2 valuesCTV100, HST, TH100The channels are relative to the type of measurements. You may access to the parameters of measuring ranges (lower and upper ranges), the units of measurements and the offset (only for the models HM50, TH100 and the humidistats HST).depends on the transmitter connected.The description of the channels Part numberType of channel displayedof the t ransmitter channel ‘pressure’channel ‘air v elocity’ channel ‘temperature’ channel ‘humidity’PST CP50CP100TST TM100TG100HST HM50TH100CTV100[[[[[[[[[[[[[The transmitters with conf igurable units and measuring ranges (CP50, CP100, CTV100, TG100 and TH100), work as below:The zone “measuring ranges” and “units” are activated (window 1). Click on the arrow located on the right of the zone “units”, in orderto display the list of all units available. Please select the unit required (click on it). The values of low and upper ranges are changed into “0” and are displayed in red (window 2).Then, you can enter the new values of themeasuring ranges (with low and high values).Click on the writing bar (red), when all the modifications required are done.The units of measurement (on the right of the zone “measuring range)”are pre-set according to the transmitter whichis connected. The unit displayed corresponds to the initial configuration of the transmitter.To modifiy the unit of measurement, click on the arrow located on the right of the zone “units”, in order to display all the available units.When the unit is modified, the writing bar becomes red. It means that the configuration displayed is not the same as the one of the transmitter.When all the modi f ications required are done (measuring ranges, units, offset and/or alarms) click on the writing bar totransfer the new data to the transmitter.Measuring range Minim u m d e l t a Maximum delta CP500 to +10 000 Pa 1000 Pa 10000 Pa CP1010 to +1000 Pa 100 Pa 1000 Pa CP1020 to +1000 mmH 2O100 mmH 2O 1000 mmH 2O CP1030 to +500 mbar 50 mbar 500 mbar CP1040 to +2000 mbar 200 mbar 2000 mbar TH100-50 to +400 °C 50 °C 400 °C TM100-50 to +400 °C 50 °C 400 °C TG100-50 to +400 °C 50 °C 400 °C0 to 30 m/s 3 m/s 30 m/sCTV100-50 to +400 °C 50 °C 400 °C‘over’ range exclamation pointsTo define the measuring ranges, please follow thechart below. If not (for example: going beyond the max. measuring range), then 2 exclamation points will appear on the screen. Then, you will have to enter new and correct values.unit and value convertedThe offset located on the right of the window “channel” enables you to modify the measurement made by thetransmitter.Enter the positive or negative value in the field “Offset”.The writing bar becomes red. Click on it to transfer the configuration to the transmitter.Then the value of the offset is added (or deducted) from the measurement made by the transmitter.ex : a humidity transmitter displays 45 %RH. If you enter ‘10’ in the field “Offset”, and then click on the writing bar, the value measured by thell l Transmitter OFFSET OFFSETpart numberi n humidityin temperatureHST HM50TH100[[[[[III 4 - Tab "Alarm” :On the manostats, you need to configure the relaty output.With the tab “alarm”, you can configure the RCR relays with:Time-delay of relay l l l l Activation of relays Setpoint setting Setting of the type of the alarm (rising/falling edge)Part number Number of alarmsof the transmitter ‘pressure’ channel ‘temperature’ channel “humidity’ channel PST TST HST[[[[PSTCP50CP100TST TM100TG100HST HM50TH100CTV100configurable range configurable units[[[[[[[[[[[[[[[XXXX X[Xnon configurable ranges and/or units configurableranges and/or unitsNota : the humidity is a parameter which cannot be configured, neither for the measuring ranges, nor for the units.To activate the relay , please tick off the box as shown beside.To deactivate the relay, please untick the box as shown beside.The time-delay is a limit which, when being reached and/or exceeded, activates the relay and then the visual red LED alarm.To enter the time period (max. 60 seconds), you can EITHER use the arrows (on the right of the zone), OR enter the value required.ex : time-delay = 10 sec: the alarm will be activated 10 seconds after the setpoint is exceeded'.You can set the setpoint that will activate the alarm (below or above).You can EITHER use the arrows (on the right of the zone) OR enter the value required.ex : setpoint = 50 Pa: the alarm will be activated when the measurement exceeds 50 Pa.You can choose the action:above the setpoint (rising edge)below the setpoint (falling edge).ex : falling action, setpoint 50 Pa, time-delay 0: exceeds 50 Pa.l lIV 2 - Saving a configuration :Please follow carefully the different steps as below:llllUsing the “read configuration” function, read the parameters of the transmitters Make some modifications if required Write the new configuration after having modified In the menu "Commands" click on"Save configuration".IV - Saving a configurationIV 1 - Principle :Using the function “Read configuration", you can record the different configurations into a database.Using the function “Save configuration”, you can save the configurations of the transmitter, and also the the modifications.The window shown beside appears.On the bottom of the window, the field enables you to name each saved configuration.If you do not fill it in, and by default, the date and time of the save will be displayed.Nota : the names o f the con f iguration are preceded by the name of the transmitter which is connected.data field:Click on “Cancel” to cancel the save or click on “OK" to continue.By clicking on "OK", the window shown beside is displayed. Click on "OK" to return to the main menu.V - Opening a configurationV 1 - Principle :Using the function "Open configuration from database", you may access to the database of all the different configurations saved.Then, it is possible to match one configuration with one (or several) transmitter(s). You do not need to make the configuration each time.Via this function, you can:Open a configuration.Transfer a configuration to one or several transmitter(s)Delete a configuration.l l l When launching the LCC-100 software, two buttons are displayed:ll Read configurationOpen configuration from databaeV 2 - Opening a configuration :To open a configuration, click on “Open configuration from database” or go in “Commands” and then, click on “” (see p11). The window shown beside will be displayed.To choose a configuration :Open configuration from database First, select the type of transmitter (Class) that you want to configure (see beside)Then, the parameters relative to the Class chosen are displayed in a second box.Select the parameter required. Then, the configurations saved are displayed in the last box.Then, you can choose the configuration required.l llex : to choose a configuration for a transmitter TG 100, select “100” in the box “Class” . Then, select “Temperature” in the box “Parameters”.Then, the list of configurations saved for the TG 100 are displayed in the last box.To open a configuration, click on the name of the configuration required (as explained p10). The name chosen is then displayed.Click on "Open". The windown shown beside asks you to confirm the opening. Then, click on “Yes”.To transfer the configuration to a transmitter which is connected, click on the writing bar or go in “Commands” and click on “Writing of the configuration” (see p11).V 4 - Deleting a configuration :To cancel a configuration, click on the name of the configuration required (as explained p10). The name is then displayed on a blue background. Click on “Cancel”. The window shown beside appears to ask you to confirm: then, click on “Yes”."Help F1" to open the user manual of the software.V 3 - Transfering a configuration:To transfer the configuration parameters to a transmitter , please open the configuration required as explained above.Then, click on the writing bar or go in “Commands” and then, in “Write configuration” (see p11).writing barVI - Main menuR e f . N T - A N G - L C C 100 - 06/04 A .Distributed by :EXPORT DEPART MENTTel : + 33. 1. 60. 06. 69. 25 - Fax : + 33. 1. 60. 06. 69. 29site :e-mail :www.kimo.fr**************。
技声callpadtm-100桌面型数字电话录音机使用手册说明书

-100桌面型数字电话录音机使用手册数字话机&IP话机&无线固话录音技声语音软件(上海)有限公司(C)2015Eletech Enterprise Co.,LtdEletech Voice Systems Inc.All Rights Reserved目录一、面板及外观介绍 (1)(一)俯视图 (1)(二)后视图 (3)(三)侧视图 (4)(四)安装图 (5)二、按键定义 (6)(一)播放模式 (6)(二)录音模式 (7)(三)空闲模式 (7)(四)设置模式 (7)三、使用操作 (10)(一)录音模式 (10)(二)播放模式 (12)(三)设备设置 (14)(四)格式化SD存储卡 (15)(五)删除文件 (16)四、CallPad技术规格 (17)一、面板及外观介绍(一)俯视图1.麦克风孔(内置麦克风用于现场谈话录音)2.LCD 显示屏3.扬声器4.头戴式耳麦切换麦克风静音模式5.②减小输出音量;修改数值(设置模式)6.④II 播放当前录音或暂停当前播放7.退出当前设置项/停止播放/停止录音8.录音按钮(LED 灯):LED 熄灭=空闲模式;绿色=待机模式;红色=录音中自动模式(VOX ):-LED 灯熄灭状态,设备不会录音。
-按此按键,LED 灯变成绿色,进入待机模式-LED 灯绿色状态下,拿起话机手柄将开始录音(LED 灯变成红色)1.内置麦克风2.LCD 显示屏3.扬声器4.头戴式耳麦(Headset MIC )静音键5.“向下”或减小音量6.播放及暂停键7.停止键8.录音键(带LED 双色灯)9.手柄/头戴式耳麦切换Handset /Headset 10.话机/内置麦克风切换Phone/MIC11.向左或播放快退12.向上或增加音量13.向右或播放快进14.删除记录键15.重要标记键16.解锁键Unlock key17.手柄及耳麦兼容设置滑档手动模式:Manual-LED灯熄灭状态,设备不会录音。
施耐德电动操作机构说明书
!
2005
Compact NS
!"
!"#$
Compact NS
!
! Compact NS 1994
!"#$
!
!"#$%&'()*+,-./012
!
!
!" Compact NS
!"#$%&'()*+,
!"#
!"#$%&'() Compact NS
80 1250A
!"#$%&'()*
NSE 100 A
molded case switch
600Vac
UL/CSA rating 100A
IEC 947-3
Ui 750V.
Uimp 8kV.
Ue (V) 690 500
max Ie (A) 60°C
100 100 AC23A DC23A
UTE VDE BS CEI UNE
lug information :
S D
!"#$%&'(
!"# $%
!"
!"#$%&'()
≤ 2,5 mm2
SD
OF 2
E
6
OF / SD AX / AL MN /MX UVR /SHT
1,4 Nm
2
comMpEacRtLNISN GERIN
∅5...8
1
O manu/auto push
OFF
I push ON
2 Nm
McoEmRpLacINt NSGERIN
Extech TM100数字J K类温度计说明书
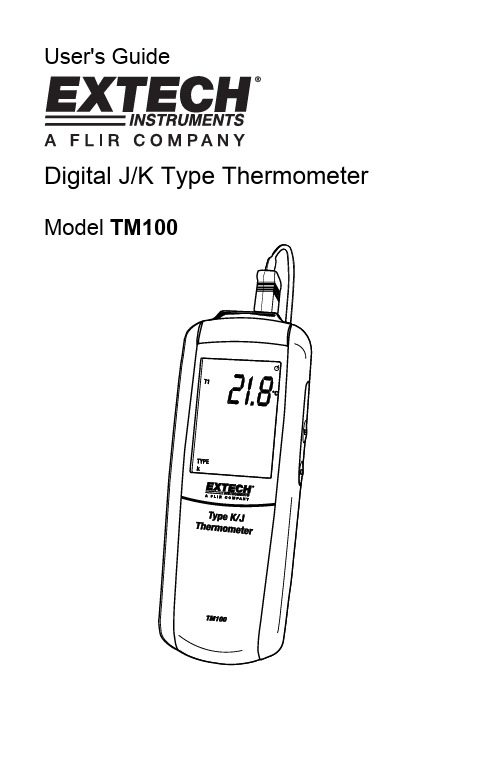
User's GuideDigital J/K Type Thermometer Model TM100IntroductionCongratulations on your purchase of the Extech TM100 Digital Thermometer with K/J single-type input. This meter is shipped fully tested and calibrated and, with proper use, will provide years of reliable service.SafetyTo prevent personal injury or meter damage, use the meter only as specified in this guideMeter DescriptionMeter1. Thermocouple input connector2. Function buttons (Power, Enter, C-F-K)3. Function buttons (Hold, MAX/MIN, Set)4. LCD display5. Battery compartmentDisplay1. Setup2. Offset option3. Hold mode4. Auto power off5. Upper display T1 reading6. Temperature units7. Lower display (max, min,avg, offset value of T1)8. Max, Min and Average9. Time display10. K/J type thermocouple11. Low BatteryOperationConnecting thermocouples1. This meter accepts any K/J-type thermocouple with spade lugs (sub-miniature typewith one spade wider than the other).2. Plug the thermocouple into the meter's thermocouple input jack.Measuring1.thermometer will display the first temperature reading (upper display).C-F-K button to select the desired temperature unit of measure. Athe2. Pressdisplay icon will reflect the selection.3. Contact the object to be measured with the probe. Read the measured temperaturein the display.Note: If the display indicates “OL” the temperature is outside the measurementrange. The display shows "- - - -" when a thermocouple is not connected.MAX/MIN/AVG modePress MAX/MIN to capture and step through the maximum (MAX), minimum (MIN) and average (AVG) temperature values. These values will be shown in the lower display with an elapsed time reference below (hrs:mins , mins:sec).1. Press MAX/MIN to enter this mode.2. Press MAX/MIN to step through maximum, minimum and average readings.3. Press MAX/MIN for 3 seconds to return to normal mode.Data HoldPress the HOLD button to freeze the reading in the display. HOLD will appear at the top right of the display. Press the HOLD button again to return to normal operation mode. BacklightPress SETUP button to turn backlight off/on.Setup optionThe setup option is used to change the thermocouple type, to turn the sleep mode off/on and to adjust the thermocouple offset.Note: In the setup mode, the upper display shows menu items and lower display shows settings.SET button for 3 seconds to enter or exit setup. When the thermometer1. Presstheis in Setup mode, the display shows SETUP.Set Type J or K thermocouple1. Press ▲ or ▼to scroll to the “TYPE” setting (shown bottom left).2. Press ENTER to choose the option.3. Press ▼ to toggle between J and K.4. Press the SET button for 3 seconds to save the setting and return to normal mode.Set Sleep/Non-sleep modeThe thermometer enters sleep mode by default. The meter will automatically shut off after 20 minutes if no button press occurs for 20 minutes. When the thermometer is in Setup mode, the display shows SETUP.1. Press▲ or ▼to scroll to the “SLP” setting.ENTER to chose the option “On” or “OFF” will appear in the display.2. Press▼ to select on or off..3. Press4. PressENTER to store the new setting in memory.SET button for 3 seconds to return to normal mode.5. PressSet OffsetUse the offset option in Setup (T1menu item) to adjust the thermometer’s readings to compensate for known temperature offset at a specific temperature. The allowableadjustment range is ± 5.0°C or ± 9.0 °F.1. Plug the thermocouple into the input connector.2. Place the thermocouple into the known, stable temperature environment (such as aice bath or dry well calibrator). Allow the reading to stabilize.3. Press▲ or ▼to scroll to the “T1” option and press ENTER.4. Change the offset temperature reading (upper display) by pressing ▼until itreaches the desired temperature.SET button for 3 seconds to return to normal mode.5. PressReplacing the Batteries1. Turn off the thermometer.2. Loosen the screw and remove the battery door.3. Replace the AAA batteries.4. Replace the battery door and tighten the screw.Support line (781) 890-7440 TechnicalSupport:Extension200;E-mail:******************Repair&Returns:Extension210;E-mail:*****************Product specifications subject to change without notice For the latest version of this User Guide, Software updates, and other up-to-the-minute product information, visit our website: Extech Instruments Corporation, 285 Bear Hill Road, Waltham, MA 02451 SpecificationsTemperature Range:K type thermocouples-200°C to 1372°C (-328°F to 2501°F) J type thermocouples-210°C to 1100°C (-346°F to 2012°F) Temperature accuracy:T1 Above –100 0C (-148 0F)± [0.15%rgd+1°C (1.8°F)] T1 Below –100 0C (-148 0F)± [0.5%rgd+2°C (3.6°F)] Display Resolution:0.1°C /°F /°K <1000, 1°C /°F /°K >1000 Battery: “AAA “1.5V×3Operating Temperature:0°C to +50°C (40°F to +122°F) Storage Temperature:−10°C to +50°C (14°F to +122°F) Dimensions:8.7 x 2.5 x 1.1” (220 x 63 x 28mm) Weight:7oz (200g) WarrantyEXTECH INSTRUMENTS CORPORATION (A FLIR COMPANY) warrants this instrument to be free of defects in parts and workmanship for one year from date of shipment (a six month limited warranty applies to sensors and cables). If it should become necessary to return the instrument for service during or beyond the warranty period, contact the Customer Service Department at (781) 890-7440 ext. 210 for authorization or visit our website for contact information. A Return Authorization (RA) number must be issued before any product is returned to Extech. The sender is responsible for shipping charges, freight, insurance and proper packaging to prevent damage in transit. This warranty does not apply to defects resulting from action of the user such as misuse, improper wiring, operation outside of specification, improper maintenance or repair, or unauthorized modification. Extech specifically disclaims any implied warranties or merchantability or fitness for a specific purpose and will not be liable for any direct, indirect, incidental or consequential damages. Extech's total liability is limited to repair or replacement of the product. The warranty set forth above is inclusive and no other warranty, whether written or oral, is expressed or implied.Calibration and Repair ServicesExtech offers repair and calibration services for the products we sell. Extech also provides NIST certification for most products. Call the Customer Care Department for information on calibration services available for this product. Extech recommends that annual calibrations be performed to verify meter performance and accuracy.Copyright © 2009 Extech Instruments Corporation (a FLIR company)All rights reserved including the right of reproduction in whole or in part in any form.。
人凝血酶(TM)说明书
人凝血酶(TM)酶联免疫分析(ELISA)试剂盒使用说明书本试剂仅供研究使用目的:本试剂盒用于测定人血清,组织及相关液体样本中凝血酶(TM)的含量。
实验原理:本试剂盒应用双抗体夹心法测定标本中人凝血酶(TM)水平。
用纯化的人凝血酶(TM)抗体包被微孔板,制成固相抗体,往包被单抗的微孔中依次加入凝血酶(TM),再与HRP 标记的凝血酶(TM)抗体结合,形成抗体-抗原-酶标抗体复合物,经过彻底洗涤后加底物TMB显色。
TMB在HRP酶的催化下转化成蓝色,并在酸的作用下转化成最终的黄色。
颜色的深浅和样品中的凝血酶(TM)呈正相关。
用酶标仪在450nm波长下测定吸光度(OD 值),通过标准曲线计算样品中人凝血酶(TM)浓度。
试剂盒组成:试剂盒组成48孔配置96孔配置保存说明书1份1份封板膜2片(48)2片(96)密封袋1个1个酶标包被板1×481×962-8℃保存标准品:45ng/mL0.5ml×1瓶0.5ml×1瓶2-8℃保存标准品稀释液 1.5ml×1瓶 1.5ml×1瓶2-8℃保存酶标试剂3ml×1瓶6ml×1瓶2-8℃保存样品稀释液3ml×1瓶6ml×1瓶2-8℃保存显色剂A液3ml×1瓶6ml×1瓶2-8℃保存显色剂B液3ml×1瓶6ml×1瓶2-8℃保存终止液3ml×1瓶6ml×1瓶2-8℃保存浓缩洗涤液(20ml×20倍)×1瓶(20ml×30倍)×1瓶2-8℃保存样本处理及要求:1.血清:室温血液自然凝固10-20分钟,离心20分钟左右(2000-3000转/分)。
仔细收集上清,保存过程中如出现沉淀,应再次离心。
2.血浆:应根据标本的要求选择EDTA或柠檬酸钠作为抗凝剂,混合10-20分钟后,离心20分钟左右(2000-3000转/分)。
台安变频器说明书
1.前言为了充分地发挥本变频器的功能及确保使用者的安全,请详阅本操作手册。
当您使用中发现任何疑难而本操作手册无法提供您解答时,请联系台安科技各地区经销商或本公司业务人员,我们的专业人员会乐于为您服务,并请您继续采用台安产品。
※使用须知变频器是精密的电力电子产品,为了您的生命财产安全,本手册中有「危险」「注意」等字样提醒您在搬运、安装、使用、检查变频器时的安全注意事项,请您配合遵守。
危险操作不当时,可能造成严重的人身伤害。
注意操作不当时,可能造成变频器或机械系统损坏。
危险z在变频器断电后,在主板上的红色充电指示灯未熄灭前,请勿触摸线路板z不可在送电过程中实施配线,变频器处于运行状态时请勿检查线路板。
z请勿自行拆装或更改变频器内部连接线或线路及零件z变频器接地端子请务必正确接地。
200V级:接地阻抗小于100Ω;400V级:接地阻抗小于10Ω。
z此产品的销售须根据EN61800-3的规定,于家庭使用时,此产品可能会引起电磁干扰,在此情况下使用者可能需要采取适当的量测。
z变频器安装于600KW(含)以上的大电力供应系统或电源侧有加装进相电容器时,可能会引起一极大峰值的电流流经电源输入端,导致其发生故障。
为预防此情况发生,建议于变频器的电源输入端加装交流电抗器抑制浪涌电流以保护变频器,同时也可改善电源供应端的功率因素。
注意z请勿对变频器内部的组件进行耐压测试,半导体零件易受高电压击穿损坏。
z绝不可以将变频器输出端子T1(U)、T2(V)、T3(W) 连接至交流电源。
z变频器主电路板CMOS集成电路易受静电影响及破坏,请勿触摸主电路板。
2. 产品检查每台台安变频器在出厂前均做过功能测试,客户拿到变频器拆封后,请执行下列检查步骤。
z变频器的机种型号是否正确符合您所订购的型号与容量。
z变频器是否因运送不慎造成损伤,若有损坏请勿接入电源。
当您发现有上述问题时请立即通知台安科技各区业务人员。
第一章安全注意事项B使用时注意事项送电前注意所选用的电源电压必须与变频器的铭牌规格相匹配。
TM100 cloner使用手册说明书

4D cloning procedure
1. Connect Cloner to PC, USB indicator display green light. Don’t need to ON the sniffer switch. 2. Connect TM100 > load TM100 software > select Tools > select Clone > select Tiris 4D. 3. Follow on screen instructions. 4. Once decoded successfully, page 4 will be shown. 5. Use CN1/CN2/TPX2/EH2 transponders > start copying.
indicator light, upon success, red indicator will blink once. Press “check” button and it should be green, otherwise repeat the procedure again. 2. Connect cloner to PC, green light should be ON. 3. Connect TM100 > load TM100 software > select Tools > select Clone > select Hitag 2. 4. Follow on screen instructions. 5. Once decoded successfully, page 4 will be shown. 6. Use YS21/GMT46/CN3 transponders > start copying.
CP 210, CTV 210, TH 210, TM 210 传感变送器操作手册说明书

操作手册210 系列传感变送器CP 210, CTV 210,TH 210,TM 210差压 / 风速 / 风量 / 湿度 / 温度 / 大气压1.1. 变送器介绍 (4)1.2. 按键介绍 (4)1.3. 选择输出信号 (5)1.4. 传感器保护盖 (5)2.进入变送器设置 (6)3.F 100 : 变送器基本设置 (7)3.1. 变送器固件版本 (7)3.2. 设置显示屏 (7)3.2.1设置显示屏对比度 (7)3.2.2设置显示屏背光时间 (7)3.2.3设置显示屏背光强度 (8)3.3. 按键安全锁 (8)4.F 200 : 通道和测量单位设置 (9)5.F 300 : 模拟输出信号设置 (10)5.1. 输出信号诊断 (10)5.1.1模拟输出信号接线 (10)5.1.2模拟输出信号诊断 (10)5.2. 设置模拟输出信号对应量程 (11)6.F 500 : 测量功能设置 (13)6.1. 自动校准 (CP 210) (13)6.2. 差压测量稳定度系数 (CP 210) (13)6.3. 自动校准周期 (CP 211, CP 212, CP 218) (14)6.4. 风速测量稳定度系数 (CTV 210) (14)6.5. 输入校准补偿值 (15)7.F 600 : 补偿, 差压风速探头系数和截面积设置 (16)7.1. 温度补偿值 (CP 218, CP 219) (16)7.1.1单位设置 (16)7.1.2设置温度补偿值 (16)7.2. 高度补偿值 (CO 212, CP 218, CP 219, CTV 210) (17)7.3. 差压风速探头系数 (CP 218, CP 219) (17)7.3.1选择差压风速探头 (17)7.3.2设置差压风速探头系数 (18)7.3.3设置风速修正系数 (18)7.4. 设置风管截面积和风量系数 (18)7.4.1设置风管种类 (CP 218, CP 219, CTV 210) (18)7.4.2选择风管尺寸单位 (CP 218, CP 219, CTV 210) (19)7.4.3设置风管尺寸 (CP 218, CP 219, CTV 210) (19)7.4.4设置其他风管系数 (CP 218, CP 219, CTV 210) (20)8.功能总结 (21)8.1. F 100 (21)8.2. F 200 (21)8.3. F 300 (21)8.4. F 500 (22)8.5. F 600 (22)9.1. CP 211 (23)9.2. CP211-R (24)9.3. CP212-213 (25)9.4. CP214-215 (26)9.5. CP218-219 (27)9.6. CTV210 (28)9.7. TH210 (29)9.8. TH210S (30)9.9. T M210 (31)1.产品简介1.1.变送器介绍含显示屏的 210 系列变送器可通过按键设置。
施耐德电气 TM 110 温度传感器 用户手册说明书
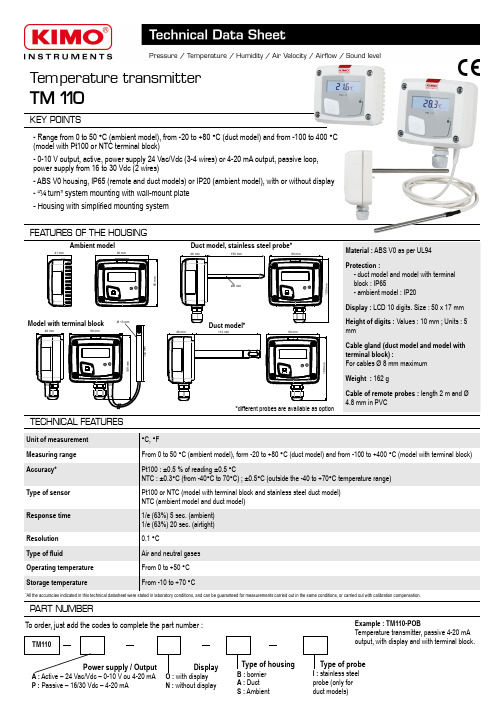
Temperature transmitterTM 110KEY POINTSMaterial : ABS V0 as per UL94Protection :- duct model and model with terminal block : IP65- ambient model : IP20Display : LCD 10 digits. Size : 50 x 17 mmHeight of digits : Values : 10 mm ; Units : 5 mmCable gland (duct model and model with terminal block) :For cables Ø 8 mm maximum Weight : 162 gCable of remote probes : length 2 m and Ø 4.8 mm in PVC- Range from 0 to 50 °C (ambient model), from -20 to +80 °C (duct model) and from -100 to 400 °C (model with Pt100 or NTC terminal block)- 0-10 V output, active, power supply 24 Vac/Vdc (3-4 wires) or 4-20 mA output, passive loop, power supply from 16 to 30 Vdc (2 wires)- ABS V0 housing, IP65 (remote and duct models) or IP20 (ambient model), with or without display - “¼ turn” system mounting with wall-mount plate- Housing with simplified mounting systemFEA TURES OF THE HOUSINGTECHNICAL FEA TURESUnit of measurement °C, °FMeasuring range From 0 to 50 °C (ambient model), form -20 to +80 °C (duct model) and from -100 to +400 °C (model with terminal block) Accuracy*Pt100 : ±0.5 % of reading ±0.5 °CNTC : ±0.3°C (from -40°C to 70°C) ; ±0.5°C (outside the -40 to +70°C temperature range) Type of sensor Pt100 or NTC (model with terminal block and stainless steel duct model)NTC (ambient model and duct model)Response time 1/e (63%) 5 sec. (ambient)1/e (63%) 20 sec. (airtight)Resolution 0.1 °CType of fluidAir and neutral gases Operating temperature From 0 to +50 °C Storage temperatureFrom -10 to +70 °CPART NUMBERTM110To order, just add the codes to complete the part number :Power supply / OutputA : Active – 24 Vac/Vdc – 0-10 V ou 4-20 mA P : Passive – 16/30 Vdc – 4-20 mADisplayO : with display N : without displayExample : TM110-POBTemperature transmitter, passive 4-20 mA output, with display and with terminal block.*All the accuracies indicated in this technical datasheet were stated in laboratory conditions, and can be guaranteed for measurements carried out in the same conditions, or carried out with calibration compensation.Type of housingB : bornier A : Duct S : AmbientModel with terminal blockDuct model, stainless steel probe*Ambient modelType of probeI : stainless steel probe (only for duct models)Duct model**different probes are available as option90mm41mm80m m46mm90mm109m m46mm90mm109m m112mm46mm90mm109m mØ13mm150m m150mmØ6 mmTECHNICAL SPECIFICA TIONSCONNECTIONSInactive switch Output / Power supply- active sensor 0-10 V or 4-20 mA (power supply 24 Vac/Vdc ± 10%), 3-4 wires - passive loop sensor 4-20 mA (power supply 16/30 Vdc), 2 wires - maximum load : 500 Ohms (4-20 mA)- minimum load : 1 K Ohms (0-10 V)Consumption2 VA (0-10 V) or max. 22 mA (4-20 mA)Electromagnetical compatibility EN61326Electrical connection Screw terminal block for cables Ø0.05 to 2.5 mm 2 PC communication Kimo USB-mini Din cable EnvironmentAir and neutral gasesInside the front housingActive switchELECTRICAL CONNECTIONS – as per NFC15-100 standardThis connection must be made by a qualified technician . To make the connection, the transmitter must not be energized.For TM110 – AO and TM110 – AN models with 0-10 V or 4-20 mA output – active, 4 wires :76L N Power supply 24 Vac class IINL12+3IT 4GND-7+6-Power supply 24 Vdc-ADisplay/regulator/PLCpassive typeor-+4 wiresTo make a 3-wire connection, before powering up the transmitter, please connect the output ground to the input ground. See drawing below.4 wires3 wires+4-20 mA output-12+3IT +54GND-7+6-3 wiresPower supply24 Vdc54GND-7L 6N +Power supply24 Vac class IILN ADisplay/regulator/PLCpassive type-+4-20 mA outputOutput terminalblockPower supply terminal blockLCC-S connectionFixed back housingRemovable front faceCable gland5orSETTINGS AND USE OF THE TRANSMITTER➢ConfigurationTo configure the transmitter, it must not be energized. Then, you can make the settings required, with the DIP switches (as shown on thedrawing below). When the transmitter is configured, you can power it up.1234To set a measuring range, put the on-switches 1, 2 and 3 of the measuring ranges as shown below.➢Measuring range setting – Active switchOn-off switchMeasuring range settingFor TM110 – PO and TM110 – PN models with 4-20 mA output – passive :2 wiresIT 57+6-Power supply 16-30 VdcVdc A+-76-2 wires+A 2 wires4Display/regulator/PLC passive typeDisplay/regulator/PLC activetype+-To set the unit of measurement, put the on-off switch 4 as show beside.➢Unit of measurement setting – Active switchUnit of measurement settingConfigurations°C °FCombinations1234123416-30 VdcAn easy and friendly configuration with the software !It is possible to configure intermediate ranges.Example : for a 0-100°C transmitter, the minimum delta of the range is 20°C. It is then possible to configure the transmitter from 0 to +100°C, or from 0 to +20°C...• To access the configuration via software :- Set the DIP switches as shown beside.- Connect the cable of the LCC-S to the connection of the transmitter.• Please refer to the user manual of the LCC 100 to make the configuration.CONFIGURA TION VIA LCC-S SOFTW ARE (option)1234Active switchThe configuration of the parameters can be done either with the DIP switch or via software (you can not combine both solutions).Caution : the minimum difference between the high range and the low range is 20.IT 5+-Vdc 4Configurations From 0 to 50 °C From -20 to +80 °C From -50 to +50 °CFrom 0 to 100 °C From 0 to 200 °C From 0 to 400 °C Combinations123412341234123412341234orF T a n g – t r a n s m i t t e r _T M 110 – 08/03/13 – R C S (24) P ér i g u e u x 349 282 095 N o n -c o n t r a c t u a l d o c u m e n t – W e r e s e r v e t h e r i g h t t o m o d i f y t h e c h a r a c t e r i s t i c s o f o u r p r o d u c t s w i t h o u t p r i o r n o t i c e .MAINTENANCEPlease avoid any aggressive solvent. Please protect the transmitter and its probes from any cleaning product containing formalin, that may be used for cleaning rooms or ducts.OPTIONS AND ACCESSORIES●KIAL-100A : Power supply class 2, 230 Vac input, 24 Vac output ●LCC-S : configuration software with USB cable●Pt100 2 or 3 wires or NTC stainless steel probe for duct and remote modelsMOUNTINGTo install the transmitter, mount the ABS plate on the wall (drilling : Ø6 mm, screws and pins are supplied).Insert the transmitter on the fixing plate (see A on the drawing beside). Rotate the housing in clockwise direction until you hear a “click” which confirms that the transmitter is correctly installed.Ambient model does not have any mounting plate.4 fixing holes are present inside the back housing. Use them to install the transmitter on the required location.7.5mm8mm4.5mm40mm50m m68m m75mm37.5mm23.75m m14mmAA。
高通量测序试剂套装(TM) 使用说明书

高通量测序试剂套装(TM)使用说明书试剂盒货号及名称:1000013817, MGISEQ-200RS 高通量测序试剂套装(TM)(SE50)1000013818, MGISEQ-200RS 高通量测序试剂套装(TM)(PE100)1000013819,MGISEQ-2000RS 高通量测序试剂套装(TM)(SE50)1000013820, MGISEQ-2000RS 高通量测序试剂套装(TM)(PE100)1000013821, MGISEQ-2000RS 高通量测序试剂套装(TM)(PE150)1000013822, BGISEQ-500RS 高通量测序试剂套装(TM)(SE50)1000013823, BGISEQ-500RS 高通量测序试剂套装(TM)(PE100)注:不同批次试剂盒严禁混用说明书版本号:A0试剂盒版本号:V1.0目录1. 介绍................................................................................................................... - 1 -1.1 预期用途 ......................................................................................................... - 1 -1.2 测序原理 ......................................................................................................... - 1 -1.3 数据分析 ......................................................................................................... - 1 -1.4 测序读长 ......................................................................................................... - 1 -1.5 测序时长 ......................................................................................................... - 2 -2. 测序工作流程 ................................................................................................... - 2 -3. 准备文库 ........................................................................................................... - 3 -3.1 片段要求 ......................................................................................................... - 3 -3.2 文库要求 ......................................................................................................... - 3 -3.3 样本安全性 ..................................................................................................... - 4 -3.4 DNB制备试剂准备 ......................................................................................... - 4 -3.5 DNB制备......................................................................................................... - 4 -3.6 DNB浓度测定................................................................................................. - 6 -3.7 DNB加载及处理 ............................................................................................. - 6 -3.7.1 MGISEQ-200RS........................................................................................... - 6 -3.7.2 MGISEQ-2000RS......................................................................................... - 7 -3.7.3 BGISEQ-500RS............................................................................................ - 8 -4. 准备测序试剂槽 ............................................................................................. - 10 -4.1 MGISEQ-200RS............................................................................................ - 10 -4.2 MGISEQ-2000RS.......................................................................................... - 11 -4.3 BGISEQ-500RS............................................................................................. - 12 -5. 准备载片、测序和清洗维护及异常处理....................................................... - 13 -5.1 MGISEQ-200RS............................................................................................ - 13 -5.2 MGISEQ-2000RS.......................................................................................... - 13 -5.3 BGISEQ-500RS............................................................................................. - 13 -6. 自备耗材 ......................................................................................................... - 14 -7. 测序试剂套装组份清单.................................................................................. - 15 -1.介绍本说明书是使用高通量测序试剂套装(TM)进行测序操作的作业指导书,内容包括初始样品制备及载片的准备,测序试剂套装组份、存储环境及使用方法,以及测序完成后的仪器维护等。
NUVOTON NuMicro Nano100系列微控制器数据手册说明书

ApplicationsNuvoton NuMicro TMFamilyNuMicro TMNano100 Base SeriesContactus:*******************Ultra-Low Power ARM ® Cortex ®-M0 MCU forWearable Device Portable Medical DeviceMobile Payment Smart Card Reader Wireless Audio, Motion Gaming IPTV Remote Control Smart Home Appliances Alarm and Security Monitoring Zigbee Smart Energy AMR Portable GPS Data Logger Electronic Shelf Label Electronic Toll Collection IoT DeviceNano100Features of NuMicro TM Nano100 Base Series◆ Core– ARM® Cortex®-M0 core running up to 42 MHz– 24-bit system tick timer– Single-cycle 32-bit hardware multiplier– NVIC for 32 interrupt inputs, each with four levels of priority– Support Serial Wire Debug (SWD) interface and two watch points/fourbreakpoints◆ Ultra-low Power– Single power supply: 1.8V ~ 3.6V– Normal mode: 200 uA/MHz at 12 MHz– Idle mode: 75 uA/MHz at 12 MHz– Power-down mode:2.5 uA (RTC on, RAM retention)1 uA (RTC off, RAM retention)– Wake-up time: less than 3.5 us◆Memory– 32/64/123 Kbytes Flash memory for program memory (APROM)– 4 Kbytes Flash memory for loader memory (LDROM)– 512 bytes page erase for flash memory– 8/16 Kbytes embedded SRAM– Configurable Data Flash (shared with APROM)◆ Clock Control– 12 MHz internal RC oscillator±2% deviation at - 40°C ~ +85°C, 1.8V ~ 3.6V±0.25% deviation at- 40°C ~ +85°C, 1.8V ~ 3.6V by 32.768 kHz oscillator auto calibration– 10 kHz internal RC oscillator for Watchdog timer and Wake-up– 4 ~ 24 MHz external crystal oscillator input for precise timing operation– 32.768 kHz external crystal oscillator input for RTC function and low power system operation– On-chip PLL, up to 120 MHz for high performance system operation◆ Timers– Four sets of 32-bit timers with 24-bit up-timer and one 8-bit pre-scale counter – Counter auto reload– Watchdog timer with 8-bit selectable time-out period– Supports event counter and pulse width capture mode◆ Peripheral DMA– 8 channels PDMA for peripheral timer, UARTs, SPIs, I²C, ADC, DAC, VDMA, CRC ◆ CRC– Supports CRC-CCITT, CRC-8, CRC-16, and CRC-32◆ RTC– Supports software compensation– RTC counter, calendar counter and alarm– 80 bytes backup register with snoop pin detection◆ PWM/Capture– 8 channels 16-bit PWM and 16-bit digital capture timers– Dead-zone generator for complementary paired PWM ◆ ADC/DAC– 12 channels 12-bit SAR ADC up to 2 MSPS– 2 channels 12-bit DAC up to 400 KSPS– 1.8V/2.5V internal voltage reference– On-chip temperature sensor◆Communication Interfaces– Five UARTs, (two UARTs up to 1 Mbit/s with flow control)– Three SPIs, up to 32 MHz (Master), 16 MHz (Salve)– Two I²C, up to 1 Mbit/s– Three ISO7816-3 (Smart card interface) with UARTs function– RS485, LIN, IrDA (SIR) function◆I2S– Interface with external audio CODEC– Master and Slave mode– Capable of handling 8, 16, 24 and 32-bit word sizes– Mono and stereo audio data◆ Wake-up Sources– RTC, WDT, I²C, Timer, UARTs, SPIs, BOD, GPIOs◆EBI Bus– Accessible space: 64 Kbytes in 8-bit mode or 128 Kbytes in 16-bit mode– 8/16-bit data width◆ Brown-out Detector– Three levels: 1.7V/2.0V/2.5V– Brown-out interrupt and reset option◆GPIOs– Up to 86 general-purpose GPIO pins– Three I/O modes: Push-Pull output, Open-Drain output, Input only with high impendence– All inputs with Schmitt trigger– All I/O pins can be configured as interrupt source with edge/level setting– Input 5V toleranceBuilt-in LDO for Wide Operating Voltage Range– 1.8V to 3.6VOperating Temperature– - 40°C ~ +85°CReliability– ESD HBM pass 8kV, EFT > ± 4kVCode Security and Series number– 96-bit unique ID– 128-bit unique customer ID◆Packages (RoHS)– QFN48 (7x7mm)– LQFP48 (7x7mm)– LQFP64 (7x7mm)– LQFP128 (14x14mm)。
磁粉离合器制动器使用说明书
磁粉离合器制动器使用说明书瑞安市胜达控制器有限公司(原瑞安市胜达控制器厂)成立于1995年,坐落于全国三大包装机械基地之一的瑞安市。
公司始终坚持以“专业、优质、高效”为企业的经营理念。
二十多年专注于磁粉离合器、磁粉制动器、张力控制器和气胀轴等系列产品,拥有完善的质量管理体系,先进的实验验证手段,完美的产品品质追求。
公司产品结构合理、造型美观、性能优越、质量可靠。
以瑞安产业基地为依托,产品广泛配套应用于印刷机、涂布机、复合机等包装机械。
玉鸽品牌,深受广大用户好评。
一、 工作原理及应用范围磁粉离合器是传动单元(输入轴)和从动单元(输出轴)由轴承支承同心安装于壳体上,壳体(磁轭)内装有线圈,两单元之间的工作间隙填有耐磨且具有高导磁率的磁粉。
当线圈不通电时,传动单元与从动单元之间不传递力矩。
但如将线圈通电,随即在工作间隙中形成一个垂直方向的磁场,磁粉在转动瞬间沿磁通连接成链状,在两单元的工作表面之间相互作用,产生切向摩擦力,从而传递力矩。
常用于收卷。
磁粉制动器的原理与磁粉离合器相同,其中的从动单元与壳体相连固定,故无输出轴,常用于放卷。
由于以上特点,现已被广泛应用于造纸、印刷、塑料、橡胶、纺织、印染、电线电缆、冶金以及其他有关卷取加工行业中的放卷和收卷张力控制。
另外,磁粉离合器还可用于缓冲启动、过载保护、调速等。
磁粉制动器还经常被用于传动机械的测功加载和制动等。
二、 型号规格及结构双轴系列磁粉离合器结构图F L100A- 1 S附加功能:S 水冷型,F 强制风冷型,自然冷却不标注A-1伸出轴式,A-4伸出轴同侧K-3孔式,B-1孔式。
公称转矩:6,12,25,50,100,200,400,N.mF 磁粉 L 离合器,Z 制动器。
孔式系列磁粉离合器结构图单轴系列磁粉离合器结构图单轴系列磁粉制动器结构图孔式系列磁粉离合器结构图三、 性能特性1、静特性:即励磁电流与转矩关系的特性,传动单元转速为常数,从动单元制动,激励电流单向由小到大,再由大到小变化所得励磁电流与转矩的关系曲线,如图。
- 1、下载文档前请自行甄别文档内容的完整性,平台不提供额外的编辑、内容补充、找答案等附加服务。
- 2、"仅部分预览"的文档,不可在线预览部分如存在完整性等问题,可反馈申请退款(可完整预览的文档不适用该条件!)。
- 3、如文档侵犯您的权益,请联系客服反馈,我们会尽快为您处理(人工客服工作时间:9:00-18:30)。
XTMA/C/D/F-100智能数字显示调节仪使用说明书上海自动化仪表股份有限公司温度数显仪表总厂(自动化仪表三厂,自动化仪表六厂)前言感谢您购买本厂的XTMA/C/D/F-100系列产品,为使您从速掌握仪表的正确操作方法,敬请阅读本说明书,如有任何疑问,欢迎来函来电联系。
目录一.概述----------------------------------------------------------------------------3二.工作原理----------------------------------------------------------------------3三.主要技术指标---------------------------------------------------------------- 4四.面板表示----------------------------------------------------------------------51.面板图----------------------------------------------------------------------- 52.面板说明-------------------------------------------------------------------- 6⑴.显示器--------------------------------------------------------------6⑵.L E D指示灯------------------------------------------------------- 6⑶.按键操作----------------------------------------------------------- 6五.安装使用-----------------------------------------------------------------------7 1.外形安装尺寸------------------------------------------------------------7 2.接线端子图---------------------------------------------------------------8 3.接线端子说明------------------------------------------------------------8六.操作使用步骤-----------------------------------------------------------------------9 1.使用准备------------------------------------------------------------------9 2.操作流程------------------------------------------------------------------10⑴.上电操作流程---------------------------------------------------- 10⑵.正常操作流程---------------------------------------------------- 10⑶.参数显示流程--------------------------------------------------- 12 3.应用指导----------------------------------------------------------------- 13七.仪表保管与维修------------------------------------------------------------ 14八.订货说明--------------------------------------------------------------------- 14一.概述XTMA/C/D/F-100系列智能数字显示调节仪是采用新一代专用电路组成的多功能智能化仪表。
它充分应用了当代微机技术和新型元器件,采用SMT表面贴装元器件及相应的生产工艺,使得仪表具有功能强、性能可靠、体积小等特点,并且具有很高的性能价格比。
仪表采用四位数码管和二只发光二极管来指示各种参数及状态,清晰直观。
所有的操作功能仅需三只按键来完成,使用操作极为简单。
仪表具有全输入功能,可在面板上直接选择输入信号类型,包括常用热电偶、热电阻、辐射感温器、远传压力表电阻输入及标准信号输入,其中后两种信号输入具有量程变换功能。
仪表具有两路继电器报警输出,每一路均可任意设置为上限报警或下限报警,报警值全量程设置,同时可设置报警不灵敏区,因此除作为报警输出外,也可作为位式控制输出。
仪表可以选配过程量变送电流输出,0或4可任意选择。
二.工作原理图一.工作原理框图仪表各种输入信号经模拟开关切换送入放大器放大后,经A/D转换成数字量送入CPU处理,输入信号经线性化、冷端补偿、外线电阻补偿等运算后,得到测量值送显示器,同时与用户设定的报警值进行比较,从而驱动继电器报警输出。
仪表的各设定参数存放在E2PROM中,断电后该参数可永久保存,另外,仪表还配有程序监视器 ( watch dog ) 电路和电源监视电路,一旦仪表受到强干扰造成仪表死机时,仪表可自动复位,回到正常的工作状态。
三.主要技术指标1.输入形式:线性输入:mV输入:0~ 、0 ~ 、0 ~电压输入:0 ~ 、1 ~电流输入:0 ~ 、4 ~电阻远传压力表信号:0 ~ 400热电偶:B 0 ~1800℃S 0 ~ 1600℃K 0 ~ 1300℃E 0 ~ 800℃T 0 ~ 300℃J 0 ~ 800℃Wu-Re 3-25 0~2000℃辐射感温器:WFH-202(F1,石英玻璃):400 ~1200℃WFH-202(F2,K9 玻璃):700 ~2000℃热电阻:Pt100 (L): ~200.0℃Pt100 (H): -200~500℃Cu50 : ~150.0℃2.输入阻抗:mV输入,电压,热电偶:≥ 1M电流输入:≤100热电阻:采用三线制接线,三根连线电阻要求相等且小于5, 通过热电阻测量电流为3.测量精度:级4.采样周期:秒5.分辨力: 14 bit6.报警:仪表具有两路报警输出,可任意设置成上限报警或下限报警。
上限报警动作:当测量值≥(上限报警设定值+报警不灵敏区)时,仪表的报警起作用,上限报警指示灯点亮,同时上限报警继电器触点闭合。
当测量值≤(上限报警设定值-报警不灵敏区)时,仪表的报警不起作用,上限报警指示灯熄灭,同时上限报警继电器触点断开。
下限报警动作:当测量值≤(下限报警设定值-报警不灵敏区)时,仪表的报警起作用,下限报警指示灯点亮,同时下限报警继电器触点闭合。
当测量值≥(下限报警设定值+报警不灵敏区)时,仪表的报警不起作用,下限报警指示灯熄灭,同时下限报警继电器触点断开。
继电器触点容量为2A、250VAC(阻性负载)报警不灵敏区:与测量值量纲相同,数值范围0 ~ 9999。
7.显示器:XTMA:四位英寸高亮红色数码管XTMA(H)、XTMD、XTMF:四位英寸高亮红色数码管XTMC:四位英寸高亮红色数码管XTMF(H):四位英寸高亮红色数码管8.数据断电保护:采用E2PROM保存各设定参数,断电后数据可永久保存。
9.工作电源:变压器电源:220VAC±10% ,频率50 ~ 60 Hz开关电源:电压86 ~ 264VAC , 频率50 ~ 60 Hz10.功耗:约3VA11.重量:变压器电源:约1.0 Kg开关电源:约0.6 Kg12.外形尺寸:XTMA:80(高)160(宽)78(深)XTMA(H) :160(高)80(宽)78(深)XTMD:96(高)96(宽)112(深)XTMC:72(高)72(宽)112(深)XTMF:48(高)96(宽)112(深)XTMF(H):96(高)48(宽)112(深)13.工作环境:环境温度:0 ~ 45℃,环境湿度:35 ~ 85% RH,周围环境无对仪表有腐蚀作用的有害气体。
四.面板表示1.面板图:图二.XTMA-100面板图图三.XTMA(H)/XTMD/XTMC/XTMF-100面板图2.面板说明⑴. 显示器在正常显示状态,显示温度测量值;在参数显示状态,交替显示参数提示符和参数数值。
⑵. LED指示灯ALM1指示灯:第一路报警指示灯,当报警起作用时,该灯点亮,否则,该灯熄灭。
ALM2指示灯:第二路报警指示灯,当报警起作用时,该灯点亮,否则,该灯熄灭。
⑶.按键操作功能选择键(FUN)1). 在正常显示状态,使用该键可进行五种状态的切换。
(显示当前测量值状态,显示第一路报警设定值状态,显示第一路报警不灵敏区状态,显示第二路报警设定值状态,显示第二路报警不灵敏区状态)。
2). 在参数修改状态,使用该键可进行8个参数循环操作(参数的显示和参数修改后的存入)。
若参数被修改过,则自动存入E2PROM中,然后进入下一个参数显示或修改,否则,直接进入下一个参数显示或修改。
值得注意的是,假若修改过程中突然断电,重新通电后该参数将保持未修改前的参数数值,修改中的数值将丢失,这是因为修改过程中参数没有存入E2PROM之故。
3). 在正常显示状态,持续按下该键3秒钟,则仪表进入参数修改状态;在参数修改状态中,持续按下该键3秒钟,则仪表回到正常显示状态,并且将刚显示的参数存入E2PROM中。
4). 在参数修改状态,超过30秒未按任何键,则仪表自动回到正常显示状态(测量值显示状态),并且将刚显示的参数存入E2PROM中。
加数键在参数修改状态,使参数数值增加,当被修改参数数值达到上限时,按下该键将引起数值显示器闪烁。
在正常测量值显示状态,该键不起作用。
减数键在参数修改状态,使参数数值减少,当被修改参数数值达到下限时,按下该键将引起数值显示器闪烁。
在正常测量值显示状态,该键不起作用。
隐藏键在参数显示输入类型时按下FUN键不放,随后立即按下隐藏键,并保持两键持续按下3秒钟,则仪表进入标定工作状态。
在标定工作状态,按下隐藏键将当前测量值作为标定值存入E2PROM中,并进入下一个参数。
按下FUN键标定值不存入E2PROM,进入下一个参数。
警告:非专业人员请勿进入标定工作状态,否则将引起正常标定值丢失,仪表无法正常工作。
五.安装使用1.外形安装尺寸:图四.XTMA-100安装开孔尺寸图图五.XTMF-100安装开孔尺图图六.XTMD-100安装开孔尺寸图图七.XTMC-100安装开孔尺寸图2.接线端子图:图八.XTMD-100,XTMF-100接线端子图图九.XTMA-100,XTMA(H)-100接线端子图图十.XTMC-100接线端子图3.接线端子说明(以下端子号仅对应XTMD、XTMF,其它请参照)⑴.输入信号端子:mV输入,电压输入,热电偶输入:输入信号正极接(10),负极接(9)。
