Jperf使用手册-
FUJITSU PRIMERGY TX300 S4 产品说明书

$"
PRIMERGY TX300 S4
Contents List
Thank you for purchasing the PRIMERGY product. Use this list to check the all contents include accessories.
The key is unique to each device. Do not lose the key. If the key is lost, the lock must be broken and replaced for value. Manage the key very carefully. Contact an office listed in the "Contact Information" of "Start Guide" if you lose it.
software. - In addition to the following items, a note of cautions may also be included.
Attachment ˘ mouse (*1) ˘ Release tie ˘ Plastic folder bag ˘ “PRIMERGY Server Books” (CD)
For setting the Server Please refer to the "Start Guide" manual.
All other hardware and software names used are trademarks or registered trademarks of their respective manufacturers. Other product names are copyrights of their respective manufacturers.
jperf-2.0.0使用教程

注意:在计算字节byte时,Kilo = 1024, Mega = 1024^2,Giga = 1024^3。通常,在网络中,Kilo = 1000, Mega = 1000^2, and Giga = 1000^3,所以,Iperf也按此来计算比特(位)。如果这些困扰了你,那么请使用-f b参数,然后亲自计算一下。
-P, --parallel # $IPERF_PARALLEL 线程数。指定客户端与服务端之间使用的线程数。默认是1线程。需要客户端与服务器端同时使用此参数。
-S, --tos # $IPERF_TOS 出栈数据包的服务类型。许多路由器忽略TOS字段。你可以指定这个值,使用以“0x”开始的16进制数,或以“0”开始的8进制数或10进制数。
-m, --print_mss $IPERF_PRINT_MSS 输出TCP MSS值(通过TCP_MAXSEG支持)。MSS值一般比MTU值小40字节。通常情况
-p, --port # $IPERF_PORT 设置端口,与服务器端的监听端口一致。默认是5001端口,与ttcp的一样。
-u, --udp $IPERF_UDP 使用UDP方式而不是TCP方式。参看-b选项。
-P, --parallel # $IPERF_PARALLEL 服务器关闭之前保持的连接数。默认是0,这意味着永远接受连接。
客户端专用选项
-b, --bandwidth #[KM] $IPERF_BANDWIDTH UDP模式使用的带宽,单位bits/sec。此选项与-u选项相关。默认值是1 Mbit/sec。
Usage: iperf [-s|-c host] [options]
jperf使用说明
经常听到有企业员工抱怨网络速度如何如何缓慢,也经常怀疑花费高昂金额租用来的网络链路是否真的物有所值而没有被电信部门缩水,还有时发现内网链路总是存在着这样或那样不稳定数据传输忽快忽慢的情况。
这些问题都是困扰各位网络管理员的实际问题,今天笔者就从自己经验入手为各位讲解如何通过iperf让内网传输速度心知肚明。
一,网络带宽测量工具简介:一般来说市面上常用的网络带宽及网络吞吐量测量工具主要有以下几种,包括iperf,netperf,chariot等专业的工具。
通过他们我们可以实现测量有线网络两个结点或者无线网络任意两个结点之间的传输速度,测量的参数包括数据流方向,吞吐量以及稳定程度等。
当然经常关注我们IT168网络频道的读者都应该对chariot工具比较了解,毕竟我们之前已经有多篇文章介绍他的使用和测量技巧了。
但是chariot在实际测量过程中操作过于复杂,很多功能对于我们这些普通用户来说都不太实际,所以在本文中笔者将为各位IT168读者介绍iperf这个工具,在操作上他比chariot更加简单更好上手,适合于初学者以及对网络带宽要求不高环境下的测量。
二,通过下载测量网络传输速度:在介绍iperf工具的使用之前我们先来看看其他测量网络传输速度的方法,首先是下载法。
这个也是大家最常用的方法,即通过到本地网络或本地ISP服务提供商的服务器上下载文件,从而通过传输速度判断自己的网络带宽。
例如笔者所在网络是通过网通服务提供商接入的,所以直接到网通服务器上下载相应的文件,为了保证测量的准确性,我们一般选择单个大容量文件下载测试,通过观察其下载平均值了解当前网络带宽情况。
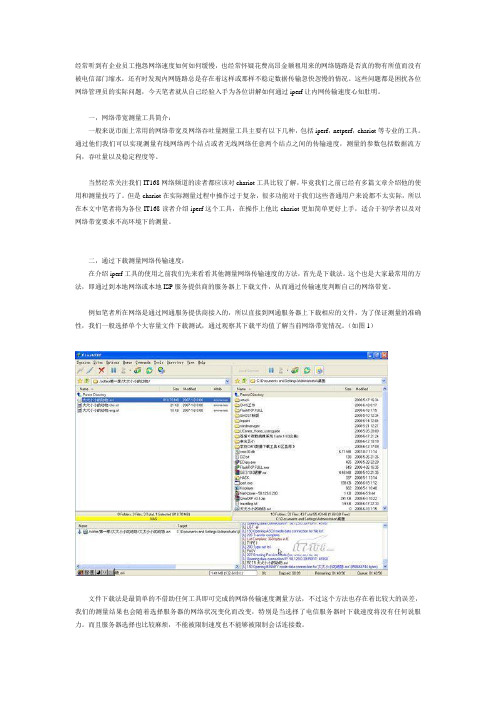
(如图1)文件下载法是最简单的不借助任何工具即可完成的网络传输速度测量方法,不过这个方法也存在着比较大的误差,我们的测量结果也会随着选择服务器的网络状况变化而改变,特别是当选择了电信服务器时下载速度将没有任何说服力。
而且服务器选择也比较麻烦,不能被限制速度也不能够被限制会话连接数。
Jperf使用方法
精心整理
2019年9月
Jperf 使用方法
Jperf 是Iperf 在windows 系统下的一种拓展软件,从原来的DOS 黑白显示增加了更加人性化的UI 界面,下面对Jperf 的使用方法做简单介绍。
一、 软件安装
否二、 图IP IP 地址,Parallel Streams 为并发数,可以根据测试情况任意填写。
需要开始测试时点击开始按钮。
图4 客户端设置
在图5显示中Transmit 设置为测试时间,Output Format 为测试结果显示格式,这里推荐使用MBits ,可以在测试结果中更加直观的显示结果。
精心整理
2019年9月
图5 时间和显示设置
三、 测试测试结果
在测试结果中,我们主要以客户端显示的结果为主要说明,这里我们将parallel Streams 设置为10,Transmit 设置为10秒,Output Format 设置为MBits 。
保持服务端处于运行状态,并点击客户端的开始按钮。
,0至10[1876] 0.0-10.0 sec 11.2 MBytes 9.37 Mbits/sec
[SUM] 0.0-10.0 sec 111 MBytes 93.2 Mbits/sec /*10秒总计传输111MBytes ,总带宽为93.2Mbps*/
图6 结果输出
.
因为两台电脑通过有线的方式进行连接,连接带宽为均为100Mbps,所以显示的结果较为接近真实带宽。
!《
.。
JPerf2.0使用图文教程
Jperf2.0使用手册JPerf2.0简介Jperf是将iperf命令行图形化的JAVA程序。
使用JPerf程序能简化了复杂命令行参数的构造,而且它还保存测试结果,同时实时图形化显示结果。
Jperf的主要功能有:测试TCP和UDP带宽质量;测量最大TCP带宽,具有多种参数和UDP特性;并且还可以报告带宽,延迟抖动和数据包丢失。
Jperf2.0下载地址:/f/23217949.htmlJPerf2.0运行环境环境要求:Java运行环境JDK7(安装过程详见附录)网络要求:Jperf可以在任何IP 网络上运行,包括本地以太网,因特网接入连接和Wi-Fi网络其他:使用Jperf需要两台终端,包括服务器端(用于监听到达的测试请求)和客户端(用于发起测试会话)。
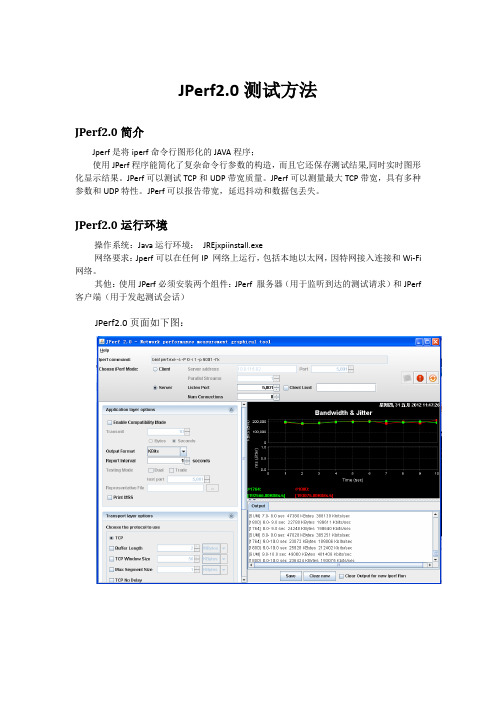
JPerf2.0页面如下图:图1 Jperf2.0图形界面Jperf2.0功能介绍将下载好的jperf-2.0.0压缩包进行解压,双击jperf.bat打开图形界面。
图2 jperf2.0.0文件夹1、Iperf命令行(无法直接输入)2、服务器端设置3、客户端设置4、应用层设置兼容旧版本(当server端和client端版本不一样时使用)设置测试模式:传输字节总量大小10Bytes或者按传输时间总长度10秒同时进行双向传输测试单独进行双向传输测试,先测客户端到服务器的带宽指定需要传输的文件显示tcp最大mtu值5、传输层设置(1)TCP协议⏹设置缓冲区大小⏹指定TCP窗口大小⏹设定TCP数据包最大mtu值⏹设定TCP不延时(2)UDP协议⏹设置UDP最大带宽⏹设置UDP缓冲区⏹UDP包封装大小6、网络层设置⏹指定TTL值⏹服务器类型⏹绑定主机Jperf2.0测试举例1、TCP测试(1)客户端设置传输时间为10s,端口号为5001,TCP缓冲区长度为2MBytes(默认),TCP窗口大小56KBytes(默认),最大传输单元为1KBytes(默认)图3 应用层配置图4 传输层配置bin/iperf.exe -c 192.168.250.104 -P 1 -i 1 -p 5001 -w 56K -M 1K -l 2M -f M -t 10------------------------------------------------------------Client connecting to 192.168.250.104, TCP port 5001TCP window size: 0.05 MByte------------------------------------------------------------[376] local 192.168.250.103 port 48771 connected with 192.168.250.104 port 5001[ ID] Interval Transfer Bandwidth[376] 0.0- 1.0 sec 2.00 MBytes 2.00 MBytes/sec[376] 1.0- 2.0 sec 0.00 MBytes 0.00 MBytes/sec[376] 2.0- 3.0 sec 0.00 MBytes 0.00 MBytes/sec[376] 3.0- 4.0 sec 2.00 MBytes 2.00 MBytes/sec[376] 4.0- 5.0 sec 0.00 MBytes 0.00 MBytes/sec[376] 5.0- 6.0 sec 2.00 MBytes 2.00 MBytes/sec[376] 6.0- 7.0 sec 0.00 MBytes 0.00 MBytes/sec[376] 7.0- 8.0 sec 2.00 MBytes 2.00 MBytes/sec[376] 8.0- 9.0 sec 0.00 MBytes 0.00 MBytes/sec[376] 9.0-10.0 sec 2.00 MBytes 2.00 MBytes/sec[376] 0.0-11.0 sec 12.0 MBytes 1.09 MBytes/secDone.传输结果如下图所示:(2)服务器端bin/iperf.exe -s -P 0 -i 1 -p 5001 -w 56K -M 1K -l 2M -f M------------------------------------------------------------Server listening on TCP port 5001TCP window size: 0.05 MByte------------------------------------------------------------[328] local 192.168.250.104 port 5001 connected with 192.168.250.103 port 48771 [ ID] Interval Transfer Bandwidth[328] 0.0- 1.0 sec 1.07 MBytes 1.07 MBytes/sec[328] 1.0- 2.0 sec 0.93 MBytes 0.93 MBytes/sec[328] 2.0- 3.0 sec 0.00 MBytes 0.00 MBytes/sec[328] 3.0- 4.0 sec 2.00 MBytes 2.00 MBytes/sec[328] 4.0- 5.0 sec 0.00 MBytes 0.00 MBytes/sec[328] 5.0- 6.0 sec 2.00 MBytes 2.00 MBytes/sec[328] 6.0- 7.0 sec 0.00 MBytes 0.00 MBytes/sec[328] 7.0- 8.0 sec 2.00 MBytes 2.00 MBytes/sec[328] 8.0- 9.0 sec 0.00 MBytes 0.00 MBytes/sec[328] 9.0-10.0 sec 2.00 MBytes 2.00 MBytes/sec[328] 0.0-11.0 sec 12.0 MBytes 1.10 MBytes/secDone.传输结果如下图所示:2、UDP测试(1)客户端设置传输时间为10s,带宽为1Mbytes,UDP缓冲区1MBytes(默认),数据包大小为32KBytes(默认)bin/iperf.exe -c 192.168.250.104 -u -P 1 -i 1 -p 5001 -w 41K -f M -b 1M -t 10 -T 1------------------------------------------------------------Client connecting to 192.168.250.104, UDP port 5001Sending 1470 byte datagramsUDP buffer size: 0.04 MByte------------------------------------------------------------[360] local 192.168.250.103 port 63212 connected with 192.168.250.104 port 5001 [ ID] Interval Transfer Bandwidth[360] 0.0- 1.0 sec 0.12 MBytes 0.12 MBytes/sec[360] 1.0- 2.0 sec 0.12 MBytes 0.12 MBytes/sec[360] 2.0- 3.0 sec 0.12 MBytes 0.12 MBytes/sec[360] 3.0- 4.0 sec 0.12 MBytes 0.12 MBytes/sec[360] 4.0- 5.0 sec 0.12 MBytes 0.12 MBytes/sec[360] 5.0- 6.0 sec 0.12 MBytes 0.12 MBytes/sec[360] 6.0- 7.0 sec 0.12 MBytes 0.12 MBytes/sec[360] 7.0- 8.0 sec 0.12 MBytes 0.12 MBytes/sec[360] 8.0- 9.0 sec 0.12 MBytes 0.12 MBytes/sec[360] 9.0-10.0 sec 0.12 MBytes 0.12 MBytes/sec[360] 0.0-10.0 sec 1.19 MBytes 0.12 MBytes/sec[360] Server Report:[360] 0.0-10.0 sec 1.19 MBytes 0.12 MBytes/sec 3.107 ms 0/ 852 (0%) [360] Sent 852 datagramsDone.传输结果如下图所示:(2)服务器端bin/iperf.exe -s -u -P 0 -i 1 -p 5001 -f M------------------------------------------------------------Server listening on UDP port 5001Receiving 1470 byte datagramsUDP buffer size: 0.01 MByte (default)------------------------------------------------------------[212] local 192.168.250.104 port 5001 connected with 192.168.250.103 port 63212[ ID] Interval Transfer Bandwidth Jitter Lost/Total Datagrams [212] 0.0- 1.0 sec 0.12 MBytes 0.12 MBytes/sec 2.688 ms 1380930387/ 85 (1.6e+009%)[212] 1.0- 2.0 sec 0.12 MBytes 0.12 MBytes/sec 4.568 ms 0/ 84 (0%)[212] 2.0- 3.0 sec 0.12 MBytes 0.12 MBytes/sec 2.953 ms 0/ 86 (0%)[212] 3.0- 4.0 sec 0.12 MBytes 0.12 MBytes/sec 2.030 ms 0/ 85 (0%)[212] 4.0- 5.0 sec 0.12 MBytes 0.12 MBytes/sec 2.919 ms 0/ 85 (0%)[212] 5.0- 6.0 sec 0.12 MBytes 0.12 MBytes/sec 1.755 ms 0/ 85 (0%)[212] 6.0- 7.0 sec 0.12 MBytes 0.12 MBytes/sec 3.777 ms 0/ 85 (0%)[212] 7.0- 8.0 sec 0.12 MBytes 0.12 MBytes/sec 2.764 ms 0/ 85 (0%)[212] 8.0- 9.0 sec 0.12 MBytes 0.12 MBytes/sec 3.590 ms 0/ 85 (0%)[212] 9.0-10.0 sec 0.12 MBytes 0.12 MBytes/sec 2.851 ms 0/ 85 (0%)[212] 0.0-10.0 sec 1.19 MBytes 0.12 MBytes/sec 3.107 ms 0/ 852 (0%)传输结果如下图所示:由上述结果可以看出,UDP传输速度为0.12MBytes/s,总时延为3.107ms,无丢失数据包(0/852),总传输为1.19MBytes。
Iperf使用方法与参数说明
Iperf使用方法与参数说明Iperf是一个网络性能测试工具。
可以测试TCP和UDP带宽质量,可以测量最大TCP带宽,具有多种参数和UDP特性,可以报告带宽,延迟抖动和数据包丢失。
Iperf在linux和windows平台均有二进制版本供自由使用。
Iperf was developed by NLANRDAST as a modern alternative for m easuring maximum TCP and UDP bandwidth performance. Iperf allows t he tuning of various parameters and UDP characteristics. Iperf rep orts bandwidth, delay jitter, datagram loss.Iperf使用方法与参数说明参数说明-s 以server模式启动,eg:iperf -s-c host以client模式启动,host是server端地址,eg:iperf -c 22 2.35.11.23通用参数-f [kmKM] 分别表示以Kbits, Mbits, KBytes, MBytes显示报告,默认以Mbits为单位,eg:iperf -c 222.35.11.23 -f K-i sec 以秒为单位显示报告间隔,eg:iperf -c 222.35.11.23 -i 2 -l 缓冲区大小,默认是8KB,eg:iperf -c 222.35.11.23 -l 16-m 显示tcp最大mtu值-o 将报告和错误信息输出到文件eg:iperf -c 222.35.11.23 -o cipe rflog.txt-p 指定服务器端使用的端口或客户端所连接的端口eg:iperf -s -p 9 999;iperf -c 222.35.11.23 -p 9999-u 使用udp协议-w 指定TCP窗口大小,默认是8KB-B 绑定一个主机地址或接口(当主机有多个地址或接口时使用该参数)-C 兼容旧版本(当server端和client端版本不一样时使用)-M 设定TCP数据包的最大mtu值-N 设定TCP不延时-V 传输ipv6数据包server专用参数-D 以服务方式运行iperf,eg:iperf -s -D-R 停止iperf服务,针对-D,eg:iperf -s -Rclient端专用参数-d 同时进行双向传输测试-n 指定传输的字节数,eg:iperf -c 222.35.11.23 -n 100000-r 单独进行双向传输测试-t 测试时间,默认10秒,eg:iperf -c 222.35.11.23 -t 5-F 指定需要传输的文件-T 指定ttl值应用实例使用 iperf -s 命令将 Iperf 启动为 server 模式,在客户机上使用 i perf -c启动client模式。
GPFS3.4安装与配置

GPFS3.4 安装与配置V1.0雪王子2011/10/20作者声明:本文是作者根据所做的GPFS实验所著,只是作为作者的一个实验笔记,供以后查看。
实验环境难免与实际的生产环境有所区别,此外,作者的经验与能力有限,在文章中不可避免会有些错误,还请使用者谅解并更正。
本文仅供参考,作者不承担任何责任,特此声明。
目录一、环境信息 (3)二、安装软件 (3)三、GPFS配置 (4)1.配置各节点访问权限 (4)2.创建节点文件 (4)3.创建GPFS集群 (5)4.修改许可 (5)5.创建NSD(网络共享磁盘)文件 (6)6.创建NSD (6)7.创建Tiebreaker文件 (6)8.创建Tiebreaker磁盘 (7)9.启动GPFS (7)10.创建GPFS文件系统 (7)11.修改pagepool大小 (8)12.挂载GPFS文件系统 (9)四、GPFS管理与维护 (9)1.增加节点 (9)2.添加硬盘到已有的GPFS设备...............................................................................10 五、删除GPFS................................................................................................................10 附录.........................................................................................................................................10 附录一:网络共享磁盘(NSD)........................................................................................10 附录二:GPFS可靠性分析和设计思路........................................................................11 参考资料 (12)2 / 13一、环境信息主机名操作系统IP地址用途DCAPP01AIX6.1192.168.18.91gpfs主服务器,quorum节点DCAPP02AIX6.1192.168.18.92gpfs从服务器,quorum节点DCAPP03AIX6.1192.168.18.93gpfs客户端DCAPP04AIX6.1192.168.18.94gpfs客户端二、安装软件需要在全部节点上安装GPFS软件。
jperf使用方法 -回复

jperf使用方法-回复jperf是一种性能测试工具,它由Java语言编写而成,主要用于测试网络带宽、延迟、丢包率等网络性能指标。
它可以模拟各种TCP/IP网络环境,并提供全面的统计数据,以帮助用户分析网络性能问题。
本文将详细介绍jperf的使用方法,帮助读者快速了解和开始使用这个强大的工具。
第一步:下载和安装jperf要使用jperf,首先需要从官方网站或其他可信的下载源下载安装程序。
jperf是跨平台的,适用于Windows、Linux和Mac操作系统。
下载完成后,双击安装程序并按照提示完成安装。
安装过程通常很简单,只需选择目标文件夹和一些其他选项,就可以开始使用jperf了。
第二步:启动jperf安装完成后,在桌面或启动菜单中找到jperf的图标,并双击打开它。
jperf 将弹出一个图形界面,供用户进行各种性能测试设置。
第三步:设置服务器和客户端jperf可以同时作为服务器端和客户端来运行,以便在两个主机之间进行性能测试。
首先需要选择一个主机作为服务器,然后在另一个主机上作为客户端。
通常,服务器主机应该具有更强的硬件配置和更可靠的网络连接,以确保测试结果的准确性。
在jperf主界面的上方,有一个“Server”选项卡和一个“Client”选项卡。
首先,单击“Server”选项卡,在弹出的界面中填写服务器主机的相关信息,如IP地址和端口号。
然后,单击“Start”按钮启动服务器。
接下来,切换到“Client”选项卡,在相应的界面中填写客户端主机的信息,包括服务器的IP地址和端口号。
还可以选择一些测试参数,如测试时间、传输协议等。
最后,点击“Start”按钮启动客户端。
第四步:执行性能测试一旦服务器和客户端都启动成功,jperf将开始执行性能测试。
它将模拟一系列的数据包传输,以评估网络的带宽、延迟和丢包率等指标。
在测试过程中,jperf会实时显示统计数据,以帮助用户了解性能表现。
用户可以查看传输速率、延迟、丢包和其他指标,以评估网络的健康状况。
Jperf使用手册-

Jperf使用手册1引言 (3)1.1JPerf2.0简介 (3)1.2JPerf2.0运行环境 (3)1.3JPerf2.0具体介绍 (3)1.3.1界面参数说明: (4)2Jperf操作步骤 (7)2.1服务端操作步骤 (7)2.1.1服务端安装配置JRE环境 (7)2.1.2服务端运行jperf: (7)2.2客户端操作步骤: (9)2.2.1客服端安装配置JRE环境 (9)2.2.2客户端运行jperf软件 (9)2.3测试结果分析 (11)3注意事项 (13)3.1.1测试时启动问题 (13)3.1.2服务端启动配置问题 (13)4附录 (14)4.1Iperf参数说明 (14)1 引言1.1 JPerf2.0简介Jperf是将iperf命令行图形化的JA V A程序;使用JPerf程序能简化了复杂命令行参数的构造,而且它还保存测试结果,同时实时图形化显示结果。
JPerf可以测试TCP和UDP带宽质量。
JPerf可以测量最大TCP带宽,具有多种参数和UDP特性。
JPerf可以报告带宽,延迟抖动和数据包丢失。
1.2 JPerf2.0运行环境操作系统:Java运行环境:JREinstall.exe网络要求:Jperf可以在任何IP 网络上运行,包括本地以太网,因特网接入连接和Wi-Fi网络。
其他:使用JPerf必须安装两个组件:JPerf 服务器(用于监听到达的测试请求)和JPerf客户端(用于发起测试会话)1.3 JPerf2.0具体介绍JPerf2.0页面如下图:图1.Jperf2.0.0-Server端运行界面图2.Jperf2.0.0-Server端运行界面1.3.1 界面参数说明:图3.Jperf启动参数设置图4.传输设置图5.应用层设置图6.带宽曲线显示图图7.结果日志输出窗口2 Jperf操作步骤2.1 服务端操作步骤2.1.1 服务端安装配置JRE环境安装java运行环境,JDK或JRE;2.1.2 服务端运行jperf:1、解压jperf-2.0.0.zip压缩包,双击运行其中的jperf.bat文件,弹出如下窗口:图8.Server端iperf运行开始界面2、选中iperf运行模式为server,点击Run IPerf!按钮(默认监听端口为5001,如果该端口被占用请修改监听端口,再运行!!)图9.Server端jperf启动时输入参数界面3、出现如下图所示窗口时server端iperf运行成功!图10.Iperf server端运行后界面2.2 客户端操作步骤:2.2.1 客服端安装配置JRE环境安装java运行环境,JDK或JRE;2.2.2 客户端运行jperf软件1、解压jperf-2.0.0.zip压缩包,双击运行其中的jperf.bat文件,弹出如下窗口:图11.Jperf运行开始界面2、选中iperf运行模式为client,输入服务端ip外网地址,点击Run IPerf!按钮(其他参数默认即可)图12.启动client端时输入参数界面3、出现如下图所示窗口时client端iperf启动运行成功!启动运行后client端界面2.3 测试结果分析测试运行结果[156] 0.0- 9.9 sec 1219 KBytes 123 KBytes/sec 5.901 ms 3/ 852 (0.35%)0.0- 9.9 sec:测试总时间:10s1219 KBytes:总传输1219 KBytes123 KBytes/sec:链路传输UDP带宽123 KBytes/sec5.901 ms:总延时5.901 ms3/ 852 (0.35%):丢包3个,占总包0.35%Ping Result:数据包: 已发送= 4,已接收= 4,丢失= 0 (0% 丢失),最短= 1ms,最长= 1ms,平均= 1ms,jitter :0.0msPing结果:发送4个包,接收4个包,丢失0个,丢失百分比:0%最短延时:1ms,最长延时:1msJitter:抖动0.0ms3 注意事项3.1.1 测试时启动问题测试时,服务端和客户端启动时间间隔不要过长,否则会对测试结果有些偏差;3.1.2 服务端启动配置问题启动服务端时,最好设置客户端连接数为1,如果多个客户端连接服务端会占用一定带宽;4 附录4.1 Iperf参数说明参数说明-s 以server模式启动,eg:iperf -s-c host 以client模式启动,host是server端地址,eg:iperf -c 222.35.11.23通用参数-f [k|m|K|M] 分别表示以Kbits, Mbits, KBytes, MBytes显示报告,默认以Mbits为单位,eg:iperf -c 222.35.11.23 -f K-i sec 以秒为单位显示报告间隔,eg:iperf -c 222.35.11.23 -i 2-l 缓冲区大小,默认是8KB,eg:iperf -c 222.35.11.23 -l 16-m 显示tcp最大mtu值-o 将报告和错误信息输出到文件eg:iperf -c 222.35.11.23 -o c:\iperflog.txt-p 指定服务器端使用的端口或客户端所连接的端口eg:iperf -s -p 9999;iperf -c 222.35.11.23 -p 9999-u 使用udp协议-w 指定TCP窗口大小,默认是8KB-B 绑定一个主机地址或接口(当主机有多个地址或接口时使用该参数)-C 兼容旧版本(当server端和client端版本不一样时使用)-M 设定TCP数据包的最大mtu值-N 设定TCP不延时-V 传输ipv6数据包server专用参数-D 以服务方式运行ipserf,eg:iperf -s -D-R 停止iperf服务,针对-D,eg:iperf -s -Rclient端专用参数-d 同时进行双向传输测试-n 指定传输的字节数,eg:iperf -c 222.35.11.23 -n 100000-r 单独进行双向传输测试-t 测试时间,默认10秒,eg:iperf -c 222.35.11.23 -t 5-F 指定需要传输的文件-T 指定ttl值操作举例:1)TCP测试服务器执行:#iperf -s -i 1 -w 1M客户端执行:#iperf -c host -i 1 -w 1M其中-w表示TCP window size,host需替换成服务器地址。
jperf使用方法 -回复
jperf使用方法-回复jperf是一款用于测试网络性能的工具,它基于Java编写,可以通过TCP/IP 进行网络性能测试。
本文将介绍jperf的使用方法,并给出详细步骤和操作示例,以帮助用户更好地运用这个工具。
首先,我们需要下载和安装jperf。
可以在官方网站(安装完成后,我们就可以开始使用jperf进行网络性能测试了。
下面是一步一步的操作指南:步骤一:启动jperf双击jperf的可执行文件,或者通过命令行进入jperf所在的目录,运行以下命令:java -jar jperf.jar在Windows系统中,也可以通过双击“jperf.jar”文件来启动jperf。
步骤二:设置服务器端点击jperf界面上的“Server”按钮,进入服务器端设置界面。
在这里,我们需要设置服务器的IP地址和监听端口号。
默认情况下,jperf使用5001作为监听端口号。
我们可以根据需要修改这个端口号。
步骤三:设置客户端点击jperf界面上的“Client”按钮,进入客户端设置界面。
在这里,我们需要设置客户端的IP地址和服务器的IP地址以及端口号。
这里建议将服务器IP地址设置为真实网络环境中的IP地址,以便更真实地模拟网络性能。
步骤四:选择测试参数在客户端设置界面的下方,我们可以看到一些测试参数,包括测试时间、并发连接数、传输带宽等。
可以根据实际需求进行调整,以便更好地模拟网络环境。
步骤五:启动测试点击jperf界面上的“Run Iperf”按钮,即可启动网络性能测试。
jperf 将自动在服务器端和客户端之间建立连接,并进行数据传输。
在测试过程中,我们可以实时监控网络性能,并查看性能统计信息。
步骤六:查看测试结果测试完成后,jperf会自动生成测试结果报告。
我们可以在jperf界面上查看报告,并分析网络性能数据,以便评估网络的稳定性和带宽利用率。
除了以上的基本操作,jperf还提供了一些高级功能,如多线程测试、TCP窗口大小调整等。
Wikifacts 0.4.2 产品说明说明书
Package‘wikifacts’October12,2022Type PackageTitle Get Facts and Data from Wikipedia and WikidataVersion0.4.2Description Query Wikidata and get facts from current and historic Wikipedia main pages.License CC0Encoding UTF-8Imports magrittr,rvest,utils,xml2RoxygenNote7.1.1Suggests covr,testthatNeedsCompilation noAuthor Keith McNulty[aut,cre](<https:///0000-0002-2332-1654>), Petr Kajzar[ctb]Maintainer Keith McNulty<***********************>Repository CRANDate/Publication2021-04-2914:20:02UTCR topics documented:wiki_define (2)wiki_didyouknow (2)wiki_inthenews (3)wiki_onthisday (4)wiki_query (5)wiki_randomfact (5)wiki_search (6)Index712wiki_didyouknow wiki_define Define a term from WikipediaDescription‘wiki_define()‘displays plaintext extract(s)of the given term(s)from’the Wikipedia article(s).Usagewiki_define(term=NULL,sentences=5L)Argumentsterm A non-empty character string or vector giving the name(s)of the term to be searchedsentences An integer(or whole number)giving the number of sentences to returnValueAn extract from the Wikipedia articleExampleswiki_define( R(programming language) )animals<-data.frame(name=c("dog","cat"))animals$definition<-wiki_define(animals$name,sentences=1)print(animals)wiki_didyouknow Generate’did you know’facts from the Wikipedia main page on aspecified date.Description‘wiki_didyouknow()‘generates’did you know’facts from the Wikipedia main page on a specified date.Usagewiki_didyouknow(n_facts=1L,date=sample(seq(as.Date("2015-01-01"),Sys.Date()-1,by="day"),1),bare_fact=FALSE)wiki_inthenews3Argumentsn_facts An integer determining the number of facts that will be generated,up to a limit of the maximum facts for the date specified.date A date string of the form YYYY-MM-DD.Default value is a random date since 1January2015.bare_fact Logical.Determining whether the fact should be quoted as is or surrounded bya preamble and courtesy statement.ValueA vector of strings with random’did you know’facts from Wikipedia’s main page if it exists for thedate specified-otherwise"I got nothin’"Exampleswiki_didyouknow(n_facts=2,date= 2020-05-02 )wiki_inthenews Generate news items from the Wikipedia main page on a specified date.Description‘wiki_inthenews()‘generates news items from the Wikipedia main page on a specified date. Usagewiki_inthenews(n_facts=1L,date=sample(seq(as.Date("2015-01-01"),Sys.Date()-1,by="day"),1),bare_fact=FALSE)Argumentsn_facts An integer determining the number of facts that will be generated,up to a limit of the maximum facts for the date specified.date A date string of the form YYYY-MM-DD.Default value is a random date since 1January2015.bare_fact Logical.Determining whether the fact should be quoted as is or surrounded bya preamble and courtesy statement.ValueA vector of strings with random’in the news’items from Wikipedia’s main page,if it exists for thedate specified-otherwise"I got nothin’"4wiki_onthisday Exampleswiki_inthenews(n_facts=1,date= 2020-05-02 )wiki_onthisday Generate’on this day’facts from the Wikipedia main page on a speci-fied date.Description‘wiki_onthisday()‘generates’on this day’facts from the Wikipedia main page on a specified date. Usagewiki_onthisday(n_facts=1L,date=sample(seq(as.Date("2015-01-01"),Sys.Date()-1,by="day"),1),bare_fact=FALSE)Argumentsn_facts An integer determining the number of facts that will be generated,up to a limit of the maximum facts for the date specified.date A date string of the form YYYY-MM-DD.Default value is a random date since 1January2015.bare_fact Logical.Determining whether the fact should be quoted as is or surrounded bya preamble and courtesy statement.ValueA vector of strings with random’on this day’facts from Wikipedia’s main page if it exists for thedate specified-otherwise"I got nothin’"Exampleswiki_onthisday(date= 2020-05-02 )wiki_query5 wiki_query Send queries to Wikidata and receive results as dataframeDescription‘wiki_query()‘sends a SPARQL query to Wikidata and collects the results in a dataframeUsagewiki_query(qry)Argumentsqry A character string representing a SPARQL query to be sent to WikidataValueA dataframe of resultsExamples#List five diseasesquery<- SELECT?itemLabel WHERE{item wdt:P31wd:Q12136.#instance of diseaseSERVICE wikibase:label{bd:serviceParam wikibase:language"[AUTO_LANGUAGE],en".} }LIMIT5wiki_query(query)wiki_randomfact Generate random facts from historic Wikipedia main pagesDescription‘wiki_randomfact()‘generates random facts from Wikipedia main pages after1January2015. Usagewiki_randomfact(n_facts=1L,fact=c("any","didyouknow","onthisday","inthenews"),bare_fact=FALSE,repeats=TRUE)6wiki_searchArgumentsn_facts An integer determining the number of facts that will be generated.fact String to determine the type of fact to be randomly generated-"any"will gen-erate a random selection.bare_fact Logical.Determining whether the fact should be quoted as is or surrounded bya preamble and courtesy statement.repeats Logical.Determining if repeat facts should be permitted.If FALSE the number of facts may be less than requested.ValueA vector of strings with random items from Wikipedia’s main page-otherwise"I got nothin’" Exampleswiki_randomfact()wiki_search Display results of a Wikipedia search in the browserDescription‘wiki_search()‘displays the results of a Wikipedia search in the browser.Usagewiki_search(term=NULL,browser=getOption("browser"))Argumentsterm A non-empty character string giving the name of the term to be searchedbrowser A non-empty character string passed to[browseURL()]to determine the browser used.ValueA display of the results of the search in the browser.Exampleswiki_search( R(programming language) )Indexwiki_define,2wiki_didyouknow,2wiki_inthenews,3wiki_onthisday,4wiki_query,5wiki_randomfact,5wiki_search,67。
jperf测试方法

1、搭建测试网络环境,如图:
2、客户端和服务器均安装JDK开发环境,配置相应环境变量
3、配置服务器参数。
服务器运行jperf.bat文件,进入程序界面
(1)choose iPerf Mode处选择server,其他默认。
如图:
(2)Output Format(输出结果显示单位),根据需要选择,默认即可(3)transport选择UDP,如图:
(4)运行程序。
点击右上角运行按钮。
如图:
4、客户端配置。
打开CMD命令行,进入iperf-2.0.0\bin目录,如图:
5、输入客户端控制发送包命令:如图:
命令解释:
-l 470B:数据包大小,可以控制帧长,数据包加上42等于帧长(根据具体网卡进行换算,实际帧长以wireshark中Frame大小为准)
-b 27837K:带宽大小,可以控制发送速率。
带宽与速率的换算为:带宽/8=速率
-F D:\Windows.2003 发送的文件名称(可自行修改,200M左右就可以)
-t 10 发送时间为10秒
注意:命令中的单位:B为Byte,b为bit,带宽单位为bit/s,速率单位为byte/s
6、运行上述命令后可得出丢包率、延时、背靠背数值。
客户端结果:
服务器结果:
服务器最后一条结果为测试结果
从上述结果可以看出,0-10秒内,传输数据总工大小为33341KB,平均速率27355Kbits/sec,延时为0.000ms,丢包个数为744,传输总包数为73384。
RAK3xx用户手册V003

RAK3xx用户手册V0.0.3深圳市瑞科慧联科技有限公司邮箱:********************目录1功能简介 (1)2硬件描述 (2)2.1开发板外观 (2)2.2接口配置 (2)2.3尺寸规格 (2)3RAK3xx无线网卡驱动移植 (3)3.1移植环境: (3)3.2RAK3xx驱动编译 (3)3.2.1解压RAK3xx驱动源码 (3)3.2.2修改配置Android.mk (3)3.2.3配置内核支持wifi网络 (4)4配置android (5)4.1修改android支持wifi功能 (5)4.2修改控制wifi管理函数库 (5)4.3配置路径和权限 (8)4.5编译android (9)5测试RAK3xx (10)5.1测试连接无线AP (10)5.2连接无线AP (11)5.3测试传输速率 (13)5.3.1、运行iperf (13)5.3.2、iperf测试结果 (14)6销售与服务 (16)7版本更新说明 (17)1功能简介RAK3xx是一款小巧功能齐全针对WIFI无线通信学习及开发应用的学习套件。
图1.1RAK310开发板该开发套件,有以下特点:●符合标准的802.11n/g/●作为普通的STA模式(普通的wifi终端,可以接入指定的AP)●AP模式(路由模式,支持无线路由功能,可以当无线路由器使用)●ADHOC点对点传输或桥接模式●支持两种网络类型Infra/adhoc●支持多种安全认证机制:WEP64/WEP128/TKIP/CCMP(AES)/WEP/WPA-PSK/WPA2-PSK ●支持多种网络协议:TCP/UDP/ICMP/DHCP/DNS/HTTP●支持内置/外置天线●支持标准接口SDIO2.0(4-bit和1-bit)●支持OS系统ANDROID2.3/4.02硬件描述2.1开发板外观图2.1RAK310正反面2.2接口配置图2.2接口定义2.3尺寸规格图2.3尺寸定义3RAK3xx无线网卡驱动移植3.1移植环境:主机操作系统:Ubuntu12.04目标系统:ANDROID4.4目标平台:Imx6q3.2RAK3xx驱动编译3.2.1解压RAK3xx驱动源码在开发平台下首先新建一个工作目录work,将附带光盘中rak3102_3_3_RC.tgz源码拷贝到work 目录下并进行解压:cp/mnt/sd/rak3102_3_3_RC.tgz/worktar zxvf rak3102_3_3_RC_.tgz解压后生成rak3xx目录。
JPerf2.0测试方法
JPerf2.0测试方法JPerf2.0简介Jperf是将iperf命令行图形化的JAVA程序;使用JPerf程序能简化了复杂命令行参数的构造,而且它还保存测试结果,同时实时图形化显示结果。
JPerf可以测试TCP和UDP带宽质量。
JPerf可以测量最大TCP带宽,具有多种参数和UDP特性。
JPerf可以报告带宽,延迟抖动和数据包丢失。
JPerf2.0运行环境操作系统:Java运行环境:JREjxpiinstall.exe网络要求:Jperf可以在任何IP 网络上运行,包括本地以太网,因特网接入连接和Wi-Fi 网络。
其他:使用JPerf必须安装两个组件:JPerf 服务器(用于监听到达的测试请求)和JPerf 客户端(用于发起测试会话)JPerf2.0页面如下图:JPerf2.0具体介绍一、Iperf命令行(无法直接输入)二、服务端设置监听端口:5001三、客户端设置服务器地址:10.0.115.82 ,端口:5001 ,并发流:1个四、应用层设置1、兼容旧版本(当server端和client端版本不一样时使用)2、设置测试模式:传输字节总量大小15Bytes或者按传输时间总长度15秒3、同时进行双向传输测试4、单独进行双向传输测试,先测c到s的带宽5、指定需要传输的文件6、显示tcp最大mtu值五、传输层设置1、TCP协议设置缓冲区大小指定TCP窗口大小设定TCP数据包的最大mtu值设定TCP不延时2、UDP协议设置UDP最大带宽设置UDP缓冲区UDP包封装大小:默认1470 byte六、IP层设置1、指定ttl值2、服务类型(Type of Service,ToS),大小范围从0x10 (最小延迟) 到0x2 (最少费用)在使用802.11e来控制服务质量的WLAN中,ToS是映射在Wi-Fi多媒体(WMM)存取范畴的。
JPerf2.0测试举例:一、测试内容(UDP):UDP buffer size:默认,0.01MUDP packet size:默认,1470 byte端口:5001TTL:1测试网卡带宽:1000M测试总时间:10 s时间间隔:1 s显示单位:M测试流:1个二、客户端:bin/iperf.exe -c 10.0.115.82 -u -P 1 -i 1 -p 5001 -f M -b 1000M -t 10 -T 1 -FC:\Documents and Settings\Administrator\桌面\Clip2_CCTV5_NBA_3.75M_V3.3M_A160k.tsUnable to open the file streamWill use the default data stream------------------------------------------------------------Client connecting to 10.0.115.82, UDP port 5001Sending 1470 byte datagramsUDP buffer size: 0.01 MByte (default)------------------------------------------------------------[1832] local 10.0.115.54 port 3297 connected with 10.0.115.82 port 5001[ ID] Interval Transfer Bandwidth[1832] 0.0- 1.0 sec 3.46 MBytes 3.46 MBytes/sec[1832] 1.0- 2.0 sec 3.32 MBytes 3.32 MBytes/sec[1832] 2.0- 3.0 sec 3.43 MBytes 3.43 MBytes/sec[1832] 3.0- 4.0 sec 3.42 MBytes 3.42 MBytes/sec[1832] 4.0- 5.0 sec 3.43 MBytes 3.43 MBytes/sec[1832] 5.0- 6.0 sec 3.39 MBytes 3.39 MBytes/sec[1832] 6.0- 7.0 sec 3.43 MBytes 3.43 MBytes/sec[1832] 7.0- 8.0 sec 3.40 MBytes 3.40 MBytes/sec[1832] 8.0- 9.0 sec 3.43 MBytes 3.43 MBytes/sec[1832] 9.0-10.0 sec 3.47 MBytes 3.47 MBytes/sec[1832] 0.0-10.0 sec 34.2 MBytes 3.41 MBytes/sec[1832] Server Report:[1832] 0.0-10.0 sec 34.2 MBytes 3.41 MBytes/sec 1.953 ms 13/24378 (0.053%) [1832] Sent 24378 datagramsbin\iperf.exe: ignoring extra argument -- andbin\iperf.exe: ignoring extra argument -- Settings\Administrator\桌面\Clip2_CCTV5_NBA_3.75M_V3.3M_A160k.tsDone.三、服务端:bin/iperf.exe -s -u -P 0 -i 1 -p 5001 -f M------------------------------------------------------------Server listening on UDP port 5001Receiving 1470 byte datagramsUDP buffer size: 0.01 MByte (default)------------------------------------------------------------[1928] local 10.0.115.82 port 5001 connected with 10.0.115.54 port 3297[ ID] Interval Transfer Bandwidth Jitter Lost/Total Datagrams[1928] 0.0- 1.0 sec 3.45 MBytes 3.45 MBytes/sec 0.281 ms 1649892402/ 2462 (6.7e+007%) [1928] 1.0- 2.0 sec 3.31 MBytes 3.31 MBytes/sec 0.264 ms 0/ 2358 (0%)[1928] 2.0- 3.0 sec 3.43 MBytes 3.43 MBytes/sec 0.288 ms 6/ 2450 (0.24%)[1928] 3.0- 4.0 sec 3.42 MBytes 3.42 MBytes/sec 0.271 ms 4/ 2445 (0.16%)[1928] 4.0- 5.0 sec 3.43 MBytes 3.43 MBytes/sec 0.269 ms 0/ 2446 (0%)[1928] 5.0- 6.0 sec 3.39 MBytes 3.39 MBytes/sec 0.662 ms 0/ 2417 (0%)[1928] 6.0- 7.0 sec 3.43 MBytes 3.43 MBytes/sec 0.252 ms 0/ 2446 (0%)[1928] 7.0- 8.0 sec 3.40 MBytes 3.40 MBytes/sec 0.232 ms 3/ 2429 (0.12%)[1928] 8.0- 9.0 sec 3.43 MBytes 3.43 MBytes/sec 0.083 ms 0/ 2448 (0%)[1928] 9.0-10.0 sec 3.47 MBytes 3.47 MBytes/sec 0.218 ms 0/ 2474 (0%)[1928] 0.0-10.0 sec 34.2 MBytes 3.41 MBytes/sec 1.953 ms 13/24378 (0.053%)四、测试结果[1832] 0.0-10.0 sec 34.2 MBytes 3.41 MBytes/sec 1.953 ms 13/24378(0.053%)[1832] Sent 24378 datagrams链路传输UDP速度:3.42MBytes/sec总延时:1.953ms丢包:13个占0.053%总传输:34.2MB。
jperf使用方法

jperf使用方法
JPerf是一个将iPerf命令行界面图形化的JAVA程序,可以测试TCP和UDP带宽质量,测量最大TCP带宽,具有多种参数和UDP特性,并可以
报告带宽、延迟抖动和数据包丢失。
关于如何使用JPerf,有以下两种方式:
1. 使用JPerf的图形化界面,该界面能够简化复杂命令行参数的构造,并且能保存测试结果,同时实时图形化显示结果。
2. 使用命令行进行操作,JPerf在命令行中的使用方式和iPerf类似。
例如:`java -jar -server [服务器地址]`。
此外,JPerf可以在任何IP网络上运行,包括本地以太网、因特网接入连接和Wi-Fi网络。
以上信息仅供参考,具体使用方法可以查阅相关教程或咨询专业人士。
cooper bussmann 245u-e 无线以太网调制解调器和设备服务器 用户手册说明书

2/wirelessresourcesCooper Bussmann 245U-E 无线以太网调制解调器和设备服务器用户手册修订版本 2.19注意!不正确的电源线端接可能会导致内部损坏和使保修失效。
为确保 245U-E 拥有较长的使用寿命,在接通电源前,请对照用户手册仔细检查所有连接。
小心为了符合 FCC 规则 1.1310 节中的 FCC 射频暴露要求,必须安装与该设备一起使用的天线,留出与所有人员至少 20 cm 的间隔距离,满足射频暴露合规要求。
请勿• 在距天线 20 cm 距离范围内有人时操作发射器。
• 在所有射频连接器都不安全并且任何开放式连接器都没有正确端接的情况下操作发射器。
• 在电雷管附近或在爆炸性环境中操作设备。
为了确保安全操作,所有设备必须正确接地。
所有设备的维修只能由合格的技术人员执行。
FCC 通告本设备符合 FCC 规则第 15.247 部分。
操作时需满足以下两个条件:• 本设备不会造成有害干扰,并且• 本设备必须接受一切外来干扰,包括那些可能引致操作不便的干扰。
必须按照埃波罗科技提供的说明操作本设备。
未经埃波罗科技书面同意就对设备做出更改或修改,可能导致用户操作设备的授权失效。
本设备必须由专业的安装人员按照 47 CFR 第 15 部分子部分 C 15.204 和 15.205 节进行安装,安装人员将负责按照 47 CFR 第 15 部分子部分 C 15.247 (b)(2)(4) 节保持 EIRP 不大于 36 dBm。
按照 47 CFR 第 15 部分子部分 C 15.203 节,只有下列天线/同轴电缆组合可用于本设备。
注意 - 未经埃波罗明确批准的任何更改或修改可能导致用户操作本设备的授权失效。
本设备应只连接到符合 FCC DoC 标准或通过 FCC 认证的 PC。
安全注意事项射频能量暴露是一个重要的安全注意事项。
FCC 已经将人员暴露安全标准用于 FCC 管制设备(摘要 93-62 和 OET 公告 65 97-01 版中规定的操作)发射的无线电频率电磁能量。
007Ethernet(以太网)详解(二)
007Ethernet(以太⽹)详解(⼆)⼀、以太⽹以太⽹是⼀种技术。
组织的标准制定了以太⽹的技术标准,它规定了包括的连线、电⼦信号和介质访问层的内容。
以太⽹有两类:第⼀类是经典以太⽹,第⼆类是,使⽤了⼀种称为的设备连接不同的计算机。
经典以太⽹是以太⽹的原始形式,运⾏速度从3~10 Mbps不等;⽽交换式以太⽹正是⼴泛应⽤的以太⽹,可运⾏在100、1000和10000Mbps那样的⾼速率,分别以、千兆以太⽹和万兆以太⽹的形式呈现。
以太⽹的标准结构为,但⽬前的快速以太⽹(、标准)为了减少冲突,将能提⾼的⽹络速度和使⽤效率最⼤化,使⽤交换机来进⾏⽹络连接和组织。
如此⼀来,以太⽹的拓扑结构就成了;但在逻辑上,以太⽹仍然使⽤总线型拓扑和(Carrier Sense Multiple Access/Collision Detection,即载波多重访问/碰撞侦测)的总线技术。
⼆、硬件设计以太⽹接⼝硬件设计中,现在CPU集成度越来越⾼,都会集成MAC,⽽对于硬件设计来说,只需要外接PHY Transceiver IC即可实现以太⽹通信,⽽PHY芯⽚(以百兆为例)外围电路基本如下所⽰:RJ45连接器ESD保护芯⽚⽹络变压器PHY TransciverMAC Controller晶体电源状态指⽰灯1、RJ45连接器RJ是Registered Jack的缩写,意思是“注册的插座”。
在FCC(美国联邦通信委员会标准和规章)中RJ是描述公⽤电信⽹络的接⼝,计算机⽹络的RJ45是标准8位模块化接⼝的俗称。
连接器由插头(8P8C接头,⽔晶头)和插座组成。
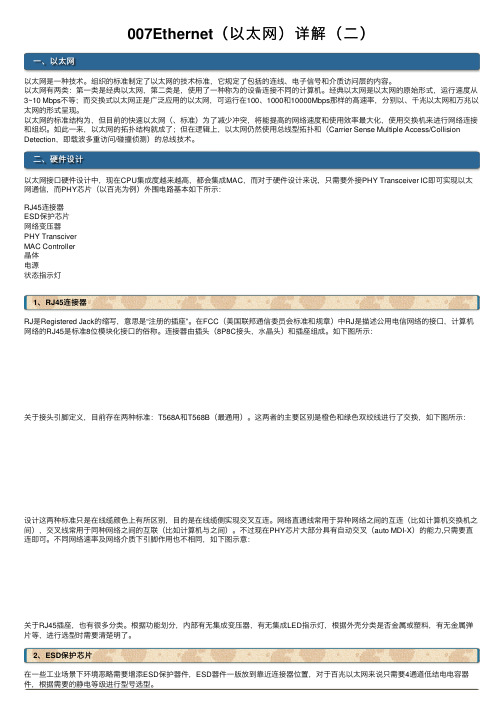
如下图所⽰:关于接头引脚定义,⽬前存在两种标准:T568A和T568B(最通⽤)。
这两者的主要区别是橙⾊和绿⾊双绞线进⾏了交换,如下图所⽰:设计这两种标准只是在线缆颜⾊上有所区别,⽬的是在线缆侧实现交叉互连。
⽹络直通线常⽤于异种⽹络之间的互连(⽐如计算机交换机之间),交叉线常⽤于同种⽹络之间的互联(⽐如计算机与之间)。
色彩 wildlife jP monitor 说明书

Instruction ManualColor LCD MonitorSoftware Version 4.1ImportantPlease read this Instruction Manual, the Installation Manual and the Setup Manual carefully to familiarize yourself with safe and effective usage.• For the latest product information including the User’s Manual, refer to our web site:About this manual* For the Instruction Manual (this document) and Installation Manual of the software version you are using, please refer to our web site. To view PDF files, you will need to install Adobe Acrobat Reader./support/db/products/manual/FDF4627W-IP#tab03This product has been adjusted specifically for use in the region to which it was originally shipped. If operated outside this region, the product may not perform as stated in the specifications.No part of this manual may be reproduced, stored in a retrieval system, or transmitted, in any form or by any means, electronic, mechanical, or otherwise, without the prior written permission of EIZO Corporation. EIZO Corporation is under no obligation to hold any submitted material or information confidential unless prior arrangements are made pursuant to EIZO Corporation’s receipt of said information. Although every effort has been made to ensure that this manual provides up-to-date information, please note that EIZO monitor specifications are subject to change without notice.Notice for this monitorCleaning• Chemicals such as alcohol and antiseptic solution may cause gloss variation, tarnishing, and fading of the cabinet or panel, and also quality deterioration of the image.• Never use any thinner, benzene, wax, and abrasive cleaner, which may damage the cabinet or panel.Note• The optional ScreenCleaner is recommended for cleaning the cabinet and panel surface.The stains on the cabinet and panel surface can be removed by moistening part of a soft cloth with water.To use the monitor comfortably• An excessively dark or bright screen may affect your eyes. Adjust the brightness of the monitoraccording to the environmental conditions.• Staring at the monitor for a long time tires your eyes. Take a 10-minute rest every hour.CONTENTSNotice for this monitor (3)Cleaning (3)To use the monitor comfortably (3)CONTENTS (4)Chapter 1 Product overview (5)1-1. System Configuration (5)Chapter 2 Turning On / Off the Power (6)●To turn on the power (6)●To turn off the power (6)Chapter 3 Operating the System (7)3-1. Remote Control (7)3-2. Live Image Screen (8)●Basic menu operations (9)3-3. Changing Over Screen Layout andDisplayed Pages (12)●To change over the screen layout (12)●To change over the page displayed onthe screen (13)3-4. Turning Smart Functions On / Off (14)3-5. Controlling Network Cameras (15)●Before operation (15)●To Operate network cameras (16)3-6. Adjusting Screen Brightness (18)3-7. To switch among input signals (18)Chapter 4 Troubleshooting (19)4-1. No picture (19)4-2. Imaging problems (19)4-3. Other problems (20)Chapter 1 Product overviewThis color LCD monitor can display images from up to 16 network cameras*1.*1 A type of camera which converts images into network signals and transmits the signals.1-1. System ConfigurationFDF4627W-IPHDMI device*2(Network video recorder etc.) *1 Up to 16 network cameras can be registered.*2 Use an HDMI device (e.g. network video recorder) if necessary.Chapter 2 Turning On / Off the Power●To turn on the power1. Turn on the main power switch on the back of the monitor.The main power switch is turned on when factory default settings are configured.2. P ress on the front of the monitor or on the remote control.The power indicator lights up blue and the live image screen is displayed.(For details on the live image screen, refer to “3-2. Live Image Screen” (page 8).)• By default, it takes approximately one minute for the live image screen to be displayed after the power is turned on (A rotating bar indicating startup is displayed). Do not turn off the monitor during startup.• When the monitor is started up for the first time, a menu for operating the monitor and network cameras isdisplayed.• When no network camera is registered, a “Not Registered” message is displayed at the network camera image display area.Note• The time required to display the live image screen can be reduced (Quick Start) by changing the power-off status.For details, refer to the Installation Manual.●To turn off the power1. Press on the front of the monitor or on the remote control.• The power indicator flashes blue while the system is shutting down.• The power-off status differs depending on the “Quick Start” setting. For details, refer to the Installation Manual.-When set to “On”: Part of the system remains running. (Power Indicator: Red)-When set to “Off”: The system is shut down completely (default setting). (Power Indicator: OFF)• When turning off the main power of the monitor, follow the procedure below.1. If “Quick Start” is set to “On”, change the setting to “Off”.2. Press on the front of the monitor or on the remote control to turn off the power.The system is shut down and the power indicator turns off.3. Turn off the main power switch.• Turning off the main power of the monitor before the system completely shuts down may cause equipmentdamage.• Use the remote control within the range illustrated in the diagram below.• When installing multip le monitors, leave sufficient space between each monitor so that only the intended monitor will be operated by the remote control. Otherwise, all monitors that receive the remote control signal will operate accordingly.Chapter 3 Operating the SystemEach menu is operated using the remote control or a USB mouse.This chapter describes operating the menus using the remote control. To operate menus when using a USB mouse, refer to each item. For details on connecting a USB mouse, refer to “Basic menu operations” (page 9).3-1. Remote Control291876111310123453-2. Live Image ScreenThe live image screen is displayed when the monitor is turned on.There are two states to the live image screen. Live image screen menu can be shown or hidden by pressing .Live image screen(camera images and menu)Live image screen (camera images only)Note• You can also operate the live image screen from your Web browser. For information on operation from a Web browser, refer to the Installation Manual.●Basic menu operations The menu is used for operation and setting of network cameras and the monitor.Live Image ScreenNetwork camera image display area- When no camera is registered, a “Not registered ” message is displayed.- When an input signal is not supported, a “Communication Error” message is displayed.Message display area(Error messages such as on camera operations are displayed.)2. System setup menu / Camera control menu• When sequence display is enabled, the system setup menu and the camera control menu are inoperable.Note• The displayed menus can be operated by remote control even if the menus on the live image screen are hidden.• When using a USB mouse to operate the menu-Connect the mouse to the USB downstream port at the back of the monitor.Display mode menuCamera images displayed on the live screen can be operated.System setup menu/ Camera control menuThe system settings menu is used for logging into and configuring the system.The camera control menu controls network cameras from the monitor in the camera operation menu.Entering characters1. Press.The text field is highlighted in green.2. Press the number buttons ( 0 to 9 ).Press a button consecutively to change over to the character next in order. For the order of character entry, refer to the table shown below.To enter a new character, press .To delete a character, press .3. Press.Note• Entering network addressesNetwork address text fields are separated by [.] (a period mark).-When a three-digit number is entered, the cursor automatically moves to the next entry position.-When entering a two-digit or one-digit number, press to move to the next entry position.• When using a USB mouse-When you enter a period “.“, the cursor moves to the next entry position.-To enter characters, click “Keyboard” on the character entry screen. Then click the keys on the displayed keyboard to enter characters.Attention• The remote control cannot be used to select the character entry screen keyboard.• The operable range of the menu differs according to the level of the user accessing this product.There are three user levels: “LIVE”, “CAMERA CONTROL” and “ADMIN”. The range of operation for each level is shown below.• When the power is turned on and after logoff, the user level is “LIVE”.• For information on setting user levels, refer to the Installation Manual.3-3. Changing Over Screen Layout and Displayed Pages ●To change over the screen layoutChanges the number of camera images to display on the live image screen.Procedure1. Press on the remote control.Each time the button is pressed, the screen layout changes over. When using a USB mouse, the screenlayout changes by selecting the display screen layout icon.Example: When the camera image is 16:91 Screen8 Screens3 Screens*14 Screens9 Screens16 Screens*1 Display set to the aspect ratio mode “Aspect” when the camera image is 16:9 (For details, refer to section “2-4. Setting the Camera Image Display Position” in the Installation Manual).When displaying the image layout in three screens:• Only the Axis network camera displays portrait images maintaining their vertical and horizontal image aspect ratios. To display images, the network camera setting is required. For details on the settings, refer to the network camera User’s Manual.Note• The selected network camera image is displayed in one screen by selecting the live image screen network●To change over the page displayed on the screen Except for when the screen layout is 16 Screens, camera images are displayed by changing over pages.Pages can be changed over either manually or automatically at a set interval (sequential display).Changing pages manuallyProcedure 1. Pressoron the remote control.Each time the button is pressed, the page displayed on the screen changes over. When using a USB mouse, selector in the display menu.Example: 4 Screens layoutCamera 5Camera 6Camera 7Camera 8Camera 9Camera 10Camera 11Camera 12Changing pages automatically (Sequential display)Procedure1. Press on the remote control.Pages displayed on the screen are changed over automatically at a specified interval.Note• The interval for page changeover can be changed (default setting: 5 sec). For information on how to change the display interval, refer to the Installation Manual.• During sequential display, camera control is disabled and the setting screen cannot be displayed. Thesequential display must be stopped in order to operate cameras or display the setting screen. For information on how to display the setting screen, refer to the Installation Manual.• Only pages registered for the network camera are displayed in the sequence display. Pages not registeredwith the camera will not be displayed.3-4. Turning Smart Functions On / OffEnable or disable settings of Smart Functions. Using Smart Functions improves the camera image visibility.Procedure1. Press on the remote control.Each time the button is pressed, Smart Functions are turned on or off.Note• For information on how to configure Smart Functions, refer to the Installation Manual.3-5. Controlling Network Cameras●Before operationNetwork camera control is allowed only when the level of the user accessing this product is“CAMERA CONTROL” or “ADMIN”.Be sure to log in to the system with a user account of either of these levels.Procedure1. Select (Login) under “System”.The login screen is displayed.1232. Enter a username and a password.3. Select “Login”.The display returns to the live image screen.4. Press on the remote control.The system frame is selected (highlighted in green).Note• For information on how to enter characters, refer to “Entering characters” (page 11).• The following user information is set by default:-Username: “admin”-Password: “admin”-User Level: “ADMIN”• For information on how to configure users, refer to the Installation Manual.• It is recommended that you log out after completing operations, so as to prevent a third party from operating the camera or altering the settings.• When the monitor power is turned off while the user is logged in, the user is logged out from the systemautomatically. In such a case, you will also be logged out from the web browser.●To Operate network camerasProcedure1. Select the camera control menu.1. Press .2. Select the camera control menu using or , then press.2. Select the network camera to operate.1. Check that “Camera” is selected and press .2. Select a network camera displayed in the live image screenusing or , then press . The frame around theselected camera image become bold.3. Press .3. Select a function to use.1. Select a function to use using or .2. Press.4. Operate the functions.Attention• Depending on the type of the network camera you are using, some functions may not be available.Note• To select a network camera to operate, use the numerical buttons on the remote control. Also, click the USB mouse to select an the image in the live image screen.• The position at which images in the live image screen are displayed can be changed. For details, refer to the Installation Manual.Brightness / Preset / Focus::::::*1 Cannot be set if using a network camera for which “Protocol” is “ONVIF” or “AXIS.”*2 If using a network camera for which “Protocol” is “ONVIF” or “AXIS,” the mode is switched to manual adjustment mode.*3 If using a network camera for which “Protocol” is “ONVIF” or “AXIS,” the mode is switched to automatic adjustment mode.Zoom / Position::Auxiliary Command*1 Auxiliary commands can be operated using only ONVIF specified devices.Note• When operating with a USB mouse, the network camera position can be adjusted automatically by clicking ona position in the image where you wish to set as the center of the image display (only supports Panasonic orAXIS network cameras equipped with pan, tilt, and zoom functions).3-6. Adjusting Screen BrightnessAdjust the brightness of the monitor screen by changing the brightness of the backlight (light source at the back of the LCD panel).Adjustable range0 to 100Procedure1. Press or on the remote control.The brightness adjustment menu is displayed.2. Set the brightness with or .The menu disappears automatically after approximately five seconds.3-7. To switch among input signalsPress on the remote control to change over the input signal.When the signal is switched, the active input port name appears at the top right corner of the screen.Note• on the monitor also can change the input.Chapter 4 Troubleshooting 4-1. No picture4-2. Imaging problems4-3. Other problems(UM-FDF4627WIP-3)03V25998A11st Edition-November, 2016Copyright © 2016 EIZO Corporation. All rights reserved .。
- 1、下载文档前请自行甄别文档内容的完整性,平台不提供额外的编辑、内容补充、找答案等附加服务。
- 2、"仅部分预览"的文档,不可在线预览部分如存在完整性等问题,可反馈申请退款(可完整预览的文档不适用该条件!)。
- 3、如文档侵犯您的权益,请联系客服反馈,我们会尽快为您处理(人工客服工作时间:9:00-18:30)。
Jperf使用手册
1引言 (3)
1.1JPerf2.0简介 (3)
1.2JPerf2.0运行环境 (3)
1.3JPerf2.0具体介绍 (3)
1.3.1界面参数说明: (4)
2Jperf操作步骤 (7)
2.1服务端操作步骤 (7)
2.1.1服务端安装配置JRE环境 (7)
2.1.2服务端运行jperf: (7)
2.2客户端操作步骤: (9)
2.2.1客服端安装配置JRE环境 (9)
2.2.2客户端运行jperf软件 (9)
2.3测试结果分析 (11)
3注意事项 (13)
3.1.1测试时启动问题 (13)
3.1.2服务端启动配置问题 (13)
4附录 (14)
4.1Iperf参数说明 (14)
1 引言
1.1 JPerf
2.0简介
Jperf是将iperf命令行图形化的JA V A程序;
使用JPerf程序能简化了复杂命令行参数的构造,而且它还保存测试结果,同时实时图形化显示结果。
JPerf可以测试TCP和UDP带宽质量。
JPerf可以测量最大TCP带宽,具有多种参数和UDP特性。
JPerf可以报告带宽,延迟抖动和数据包丢失。
1.2 JPerf
2.0运行环境
操作系统:Java运行环境:JREinstall.exe
网络要求:Jperf可以在任何IP 网络上运行,包括本地以太网,因特网接入连接和Wi-Fi网络。
其他:使用JPerf必须安装两个组件:JPerf 服务器(用于监听到达的测试请求)和JPerf客户端(用于发起测试会话)
1.3 JPerf
2.0具体介绍
JPerf2.0页面如下图:
图1.Jperf2.0.0-Server端运行界面
图2.Jperf2.0.0-Server端运行界面1.3.1 界面参数说明:
图3.Jperf启动参数设置
图4.传输设置图5.应用层设置
图6.带宽曲线显示图图7.结果日志输出窗口
2 Jperf操作步骤
2.1 服务端操作步骤
2.1.1 服务端安装配置JRE环境
安装java运行环境,JDK或JRE;
2.1.2 服务端运行jperf:
1、解压jperf-2.0.0.zip压缩包,双击运行其中的jperf.bat文件,弹出如下窗口:
图8.Server端iperf运行开始界面
2、选中iperf运行模式为server,点击Run IPerf!按钮(默认监听端口为5001,如果该
端口被占用请修改监听端口,再运行!!)
图9.Server端jperf启动时输入参数界面3、出现如下图所示窗口时server端iperf运行成功!
图10.Iperf server端运行后界面
2.2 客户端操作步骤:
2.2.1 客服端安装配置JRE环境
安装java运行环境,JDK或JRE;
2.2.2 客户端运行jperf软件
1、解压jperf-2.0.0.zip压缩包,双击运行其中的jperf.bat文件,弹出如下窗口:
图11.Jperf运行开始界面
2、选中iperf运行模式为client,输入服务端ip外网地址,点击Run IPerf!按钮(其他
参数默认即可)
图12.启动client端时输入参数界面
3、出现如下图所示窗口时client端iperf启动运行成功!
启动运行后client端界面
2.3 测试结果分析
测试运行结果
[156] 0.0- 9.9 sec 1219 KBytes 123 KBytes/sec 5.901 ms 3/ 852 (0.35%)
0.0- 9.9 sec:测试总时间:10s
1219 KBytes:总传输1219 KBytes
123 KBytes/sec:链路传输UDP带宽123 KBytes/sec
5.901 ms:总延时5.901 ms
3/ 852 (0.35%):丢包3个,占总包0.35%
Ping Result:
数据包: 已发送= 4,已接收= 4,丢失= 0 (0% 丢失),最短= 1ms,最长= 1ms,平均= 1ms,jitter :0.0ms
Ping结果:
发送4个包,接收4个包,丢失0个,丢失百分比:0%
最短延时:1ms,
最长延时:1ms
Jitter:抖动0.0ms
3 注意事项
3.1.1 测试时启动问题
测试时,服务端和客户端启动时间间隔不要过长,否则会对测试结果有些偏差;
3.1.2 服务端启动配置问题
启动服务端时,最好设置客户端连接数为1,如果多个客户端连接服务端会占用一定带宽;
4 附录
4.1 Iperf参数说明
参数说明
-s 以server模式启动,eg:iperf -s
-c host 以client模式启动,host是server端地址,eg:iperf -c 222.35.11.23
通用参数
-f [k|m|K|M] 分别表示以Kbits, Mbits, KBytes, MBytes显示报告,默认以Mbits为单位,eg:iperf -c 222.35.11.23 -f K
-i sec 以秒为单位显示报告间隔,eg:iperf -c 222.35.11.23 -i 2
-l 缓冲区大小,默认是8KB,eg:iperf -c 222.35.11.23 -l 16
-m 显示tcp最大mtu值
-o 将报告和错误信息输出到文件eg:iperf -c 222.35.11.23 -o c:\iperflog.txt
-p 指定服务器端使用的端口或客户端所连接的端口eg:iperf -s -p 9999;iperf -c 222.35.11.23 -p 9999
-u 使用udp协议
-w 指定TCP窗口大小,默认是8KB
-B 绑定一个主机地址或接口(当主机有多个地址或接口时使用该参数)
-C 兼容旧版本(当server端和client端版本不一样时使用)
-M 设定TCP数据包的最大mtu值
-N 设定TCP不延时
-V 传输ipv6数据包
server专用参数
-D 以服务方式运行ipserf,eg:iperf -s -D
-R 停止iperf服务,针对-D,eg:iperf -s -R
client端专用参数
-d 同时进行双向传输测试
-n 指定传输的字节数,eg:iperf -c 222.35.11.23 -n 100000
-r 单独进行双向传输测试
-t 测试时间,默认10秒,eg:iperf -c 222.35.11.23 -t 5
-F 指定需要传输的文件
-T 指定ttl值
操作举例:
1)TCP测试
服务器执行:#iperf -s -i 1 -w 1M
客户端执行:#iperf -c host -i 1 -w 1M
其中-w表示TCP window size,host需替换成服务器地址。
2)UDP测试
服务器执行:#iperf -u -s
客户端执行:#iperf -u -c 10.32.0.254 -b 900M -i 1 -w 1M -t 60
其中-b表示使用带宽数量,千兆链路使用90%容量进行测试就可以了。
几个命令参数:
#iperf -c 10.1.1.1 //客户端命令
iperf -s //服务端命令
-f [b|B|k|K|m|M|g|G] //f参数表示单位
-r //r参数表示双向数据测试,但要先测c到s的带宽
-d //d参数和r近似,并且功能更强,可同时测试双向数据-w [2000] //w参数后跟数字,单位是byte,
-p [12000] //p参数可指定端口号
-t [20] //t参数默认表示测试10次,后加数字可以自己定义
-i [2] //i参数表示测试开始到结束的间隔时间,单位s
-u -b 10m //udp 10mbps 测试
-m //最大mpu测试
-P //并行测试
-h //帮助。
