BrightAuthor操作说明书
HDR light浮动许可激活安装说明
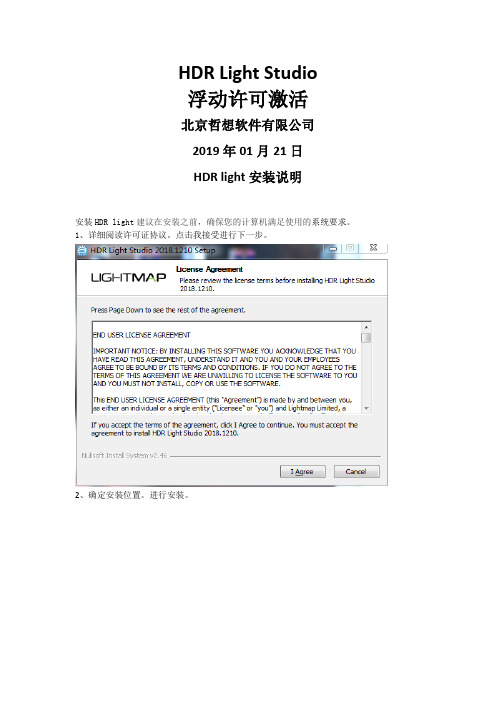
HDR Light Studio浮动许可激活北京哲想软件有限公司2019年01月21日HDR light安装说明安装HDR light建议在安装之前,确保您的计算机满足使用的系统要求。
1、详细阅读许可证协议。
点击我接受进行下一步。
2、确定安装位置。
进行安装。
3、等待安装。
4、安装成功。
5、浮动许可激活。
设置许可证服务器。
选择要承载RLM Server软件的计算机和HDR Light Studio浮动许可证文件。
RLM Server软件是一个小型应用程序,您可以在计算机上运行该应用程序,该计算机为计算机提供运行HDR Light Studio的许可权限。
当用户需要HDR Light Studio时,都需要在网络上打开并随时可用。
所有客户端计算机必须能够使用TCP / IP连接到许可证服务器。
许可证服务器可以在Mac OS X,Linux或Windows上运行。
6、下载RLM服务器软件。
7、安装并运行RLM许可服务器从存档中提取文件。
您可以将此文件夹放在服务器计算机的任何位置。
(RLM没有安装程序)启动rlm应用程序。
8、打开Web浏览器窗口。
输入地址:127.0.0.1:5054 您现在应该看到此网页,是从正在运行的RLM服务器软件提供的。
按网页左下角的“系统信息”按钮。
这将显示包含有关您的计算机系统的信息的页面:这是网页的特写。
在这里,您将找到3条重要信息(下面以红色标出)。
主机名此页面顶部显示服务器的主机名(为计算机指定的名称)。
在这个例子中它是:dell将你的主机名复制到文本编辑器文档中,我们需要很快使用它。
Mac地址以太网部分显示服务器计算机上硬件的Mac地址。
Lightmap仅需要此处的第一个Mac地址,以便为此计算机生成浮动许可证文件。
在此示例中,Mac地址为:9cebe85c95c9将12位数的mac地址复制到文本编辑器文档中,我们需要尽快使用它。
IP地址记下此IP地址,它是服务器计算机的网络地址。
PJ557D LIGHT, BRIGHT AND PORTABLE PROJECTOR 说明书
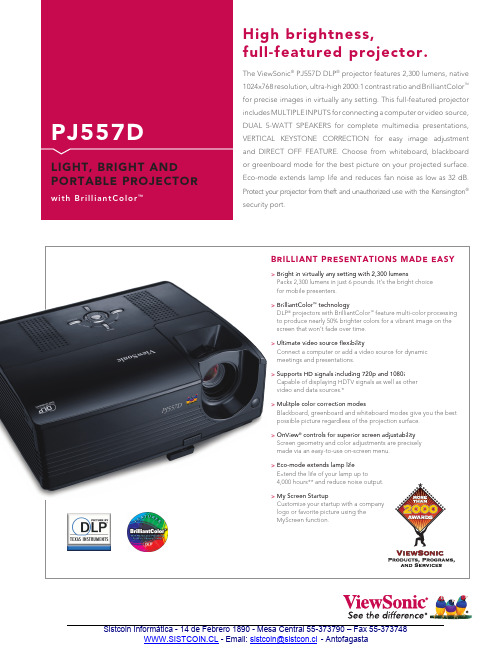
The ViewSonic ® PJ557D DLP ® projector features 2,300 lumens, native 1024x768 resolution, ultra-high 2000:1 contrast ratio and BrilliantColor ™ for precise images in virtually any setting. This full-featured projector includes MULTIPLE INPUTS for connecting a computer or video source,DUAL 5-WATT SPEAKERS for complete multimedia presentations, VERTICAL KEYSTONE CORRECTION for easy image adjustment and DIRECT OFF FEATURE. Choose from whiteboard, blackboard or greenboard mode for the best picture on your projected surface. Eco-mode extends lamp life and reduces fan noise as low as 32 dB. Protect your projector from theft and unauthorized use with the Kensington ® security port.High brightness,full-featured projector.PJ557DL I G H T , B R I G H T A N D P O R T A B L E P R O J E C T O R W I T H B r i l l i a n t C o l o r ™PROJECTOR Type0.55 DDR DMD, DLP ®DISPLAY Size27.2"–250" (diagonally)AUDIO Speakers 2x5-wattINPUT SIGNAL Computer and VideoRGB analog, NTSC, NTSC 4.43, PAL, SECAM,HDTV (480p, 720p, 1080i) Frequency F h :31–79kHz; F v :50–85HzCOMPATIBILITY PCAnalog: from VGA up to SXGA (scaled)Mac ®†Analog: up to SXGA CONNECTOR RGB (input/output) 15-pin HD, D-sub (x2)USB Type B for mouse control only and for firmware upgrade POWER Voltage 100–240VAC, 50–60Hz (universal)Consumption 250W (typ)CONTROLS Basic Standby/on, input, menuOnView ® Display mode, brightness, contrast, keystone, aspect ratio, blank screen, gamma, white peaking, color temperature, user color, video(sharpness, saturation, tint), display (phase, tracking, H. postion, V. postion), advance (auto source, select, rear, ceiling, eco-mode, lamp hours, lamp reset, auto shutdown, OSD timeout, menu position,factory reset), audio (audio mute)OPERATING Temperature 32–104ºF (0–40ºC)CONDITIONS Humidity 10–90% (non-condensing)Altitude0–10,000 ft.NOISE LEVELS Normal / Eco-mode34 dB (typ) / 32 dB (typ)DIMENSIONS Physical (W x H x D) 8.9" x 4.3" x 8.8" (277mm x 109mm x 223mm)WEIGHT Net 6.0 lb. (2.7 kg)Gross13.0 lb. (5.9 kg)REGULATIONS UL/cUL, FCC-B, CE, CB, CCC, IRAM, NOM, ICES 003, RoHS RECYCLE/DISPOSAL The lamp in this product contains mercury. Please dispose of in accordance with local, state or federal laws.PACKAGE CONTENTSProjector, power cable, VGA cable, S-video cable, remote control with built-in laser, soft case, lens cap, Quick StartGuide, ViewSonic Wizard CD (with User Guide)WARRANTY 3-year limited warranty on parts and labor, 1-year limitedwarranty on lamp, 1-year free Express Exchange ® service.***Sales:(888)881-8781•***********************•*Optional cables required. **Running eco-mode exclusively can extend lamp life. ***See for full details. †Adapter may be required. Analog adapter available from ViewSonic. DLP and the DLP logo are registered trademarks of Texas Instruments and BrilliantColor is a trademark of Texas Instruments. Specifications subject to change without notice. Selection, offers and programs may vary by country; see your ViewSonic representative for complete details. Corporate names, trademarks stated herein are the property of their respective companies. Copyright © 2009 ViewSonic Corporation. All rights reserved. [14306-00B-02/09] PJ557D-1ViewSonic Corporation’s QMS & EMS have been registered to ISO 9001 & ISO 14001, respectively,by the British Standards Institution.Optional Accessories• Replacement lamp ............................RLC-034• Soft case with wheels ........................CASE-006• Extended Express Exchange ® ..........PRJ-EE-05-03• Universal ceiling mount kit ...............WMK-005• VGA to component video adapter ...ADPT-002• Wireless G Presentation Gateway ....WPG-150。
WALTRON daytime LED 灯光使用说明书
Operating ManualDear Customer,Thank you for choosing a WALTRON daytime® LED light.Your daytime®LED light is a high-quality product that was specially designed for aquatic and terrarium applications. It satisfies the most demanding safety requirements.The selection and design of the light's materials enables it to illuminate in the most adverse conditions, even in saltwater aquariums.The usage of modern, high-quality LEDs from a reputable supplier together with a heat removal system guarantees that the light source will have a virtually unlimited service life. They also ensure that the lighting will maintain the required energy efficiency for years to come.The entire team at WALTRON wishes you a "bright" future with our daytime® lighting! Notice, warning and safety symbolsThe European Standard prescribes the use of the following symbols for specific situations; they are not intended to unsettle the user.They are a part of modern operating manuals for any electrically operated appliance.General description:Warning!Serious injuries can result from an electric shock if you do not follow the information marked by this symbol.NOTICE!The daytime® products may malfunction or be damaged if the information marked by this symbol is not observed.InfoSections marked by this symbol contain helpful recommendations and tips for using the daytime® products.Information for disposing of the product in an environmentally responsible manner Compliance with EC directivesProper and intended usageThis product is designed for private home use. It is only intended as aquarium lighting and should not be used for general lighting purposes.Thus, this is not subject to the mandatory labelling requirements regarding energy efficiency classification (refer to Regulation 874/2012 + 1194/2012).Read and observe the entire operating manual before using the lighting for the first time. The warranty does not cover damage or defects which have resulted from not observing the information in the operating manual. Keep this operating manual accessible near the device. Make sure that it is given to any subsequent users.WALTRON assumes no liability for the consequences of improper usage.For your safetyWarning!Carefully read and observe the following important safety information. In order to avoid an electric shock:Position the device in a suitable place to ensure that it is not exposed to water (from condensation or falling into water).Info! WALTRON recommends making "drip loops" in the converter cables to prevent water (condensation) from running along the cable to the converter or outlet.NOTICE!Make sure that all cables:have no kinks in them,are not routed over sharp edges, andcannot be jammed or snagged,cannot come into contact with hot surfaces (> 60 °C).Warning!If you notice that the power cable is damaged, disconnect the device from mains power supply immediately. Contact an authorized daytime®service partner or the manufacturer (WALTRON GmbH) directly.Warning!If the operating device's power cable or secondary cable(s) are damaged, they must be repaired, either by an authorized daytime®service partner or directly by the manufacturer.Never use a device which has a damaged or defective power cable (operating device).Warning!Never open or repair the operating devices and lights by yourself. Do not make any changes which are not described in these operating instructions. The operating device contains live (current-carrying) parts (with 230 V AC). A fatal injury can result from an opened device.Repairs may only be carried out by authorized daytime®service partners or by WALTRON GmbH, using only original spare parts and accessories.We hereby confirm that the design and construction of the daytime® lighting seriesmatrixcomplies with all relevant regulations, directives and safety requirements, as listed below:Low Voltage Directive2006/95/EGWaste Electrical Equipment Directive(WEEE) 2002/96/ECEMC Directive2004/108/EGProduct Safety Directive2001/95/EGErP Directive (energy related design)2009/125/EGand the applicable standardsDIN EN 60598-1Lighting – general requirements and testsDIN EN 60598-2-11Special requirements – aquarium lightingDIN EN 62471Photo-biological safety of LEDs.......Any changes in the lighting that are made without the approval of Waltron GmbH will invalidate this declaration.1. Scope of deliveryThe standard delivery of the daytime® matrix includes:1 pc. lamp, with 2-metre connection cable and protective panel1 pc. "Inline" universal adapter set with rubber pads1 pc. special key (tool for mounting and disassemblingsystem)2. Required accessories1NOTICE!Follow the instructions and notices concerning the installation and operation that are included with the accessories.The following accessories are available or required1 for setting up and operating the lighting:2.1 matrix LED modules11) At least one matrix module and converter per lamp is required for operationRatio of blue and red to white LED is Ratio of blue to white LED is 1:1 Ratio of blue to white LED is 3:125% SunLike-LED Seoul Semi.6.000 K + 440-455 nm + 620-630 nm25% SunLike-LED Seoul Semi.1) At least one matrix module and converter per lamp is required for operations.2.2 Converter (power supply) including power supply cable 11) At least one matrix module and converter per lamp is required for operation3. Optional accessoriesNOTICE!Follow the instructions and notices concerning the installation and operation that are included with the accessories.3.1 matrix adapter sets3.2 Adapter profiles for matrix3.3 Design profiles for matrix3.4 Light controls for matrix3.5 Distributor, adapter cables for matrix3.6 Miscellaneous accessories for the matrixhomepage: www.daytime.de.Our current product line is also described there. It is constantly being developed and supplemented.4. Overview and explanations of lamps5. Setup and initial usage5.1 Mounting and disassembling the protective panelsNOTICE! Carefully read the following description for installing and removing the protective panels. Carry out the necessary steps as described.minimizing the required maintenance.Mounting:NOTICE! Do not pull out, bend or fold!5.2 Mounting the matrix LED modulesNOTICE! Carefully read the following description of the module's placement and attachment. Carry out the steps described in the order listed.The correct polarity must be observed (also refer to the mounting instructions enclosed with the modules)!The modules are inserted into the lamp profile by hand without extra equipment.Use only the special key tool (included with the matrix) when attaching or removing the modules of the Inline adapter system.1.2.NOTICE!insertion will damage the threadgrooves.NOTICE!will damage the thread grooves.closed when you can no longer pushthe corner of a sheet of standardcopy paper (80 g/m²) into it.5.3 Disassembly of the matrix LED modulesNOTICE! Carefully read the following description of the module's removal. Carry out the steps described in the order listed.The modules should be removed using the special key tool supplied with the matrix....1.NOTICE!on the short shank of the key tool. Itmust also cover the key edges2.NOTICE!there are no sealing gasketsremaining between the profile5.4 Adjusting and attaching the Inline adapter systemNOTICE!During the setup and initial usage, make sure that there is at least a 15-mm gap between the bottom of the lamp and the water surface.1/4NOTICE!suspension or a middle support (e.g. glasspartition) when using this connection; this will5.5 Electrical connectionsNOTICE!Never connect or disconnect the secondary cables while voltage is applied (while the power cable is plugged in).strip with an integrated fuse.NOTICE:connection is secure and tightlyfitting. You should be able to notice6. Maintenance and cleaningThe lamps should be cleaned of any dirt or deposits regularly, especially the insides. (Also refer to the "Mounting the matrix LED modules" chapter.) Use a clean, lint-free cloth (e.g. a microfibre cloth) moistened with lukewarm water and, if necessary, a little vinegar. Do not use abrasive, chemical or solvent-based cleaners.7. Technical specificationsOperating voltage: 24 VDC (safety extra low voltage)Current consumption: Max.10 A (corresponds to 24 matrix LED modules) Protection degree:IP67 (protected against the effects of temporaryimmersion in water)Lamp housing: Aluminium, anodized E6/EV1 natural,Seawater resistance, according to DIN 81249-1 Weight (without modules): matrix20.0 > 430 gStarting from matrix30.0 > 531 g + 123 g for eachadditional 10 cm lengthAdditional information and tipsVideo instructions are available which cover all steps.An overview of the videos can be found at our channel; the link is listed on our homepage www.daytime.de.Your daytime®retailer is available to help you on-site. Our technical support staff will also be happy to assist you via e-mail or phone.Warranty noticeWe have a 24-month warranty for daytime® products that we deliver within the EU.Exceptions are damages due to non-compliance with the operating manual or other improper handling.Should you have any reason to complain within the warranty period, please return your lamp, together with the enclosed warranty card (with information filled in) and the purchase receipt to your daytime® retail dealer.daytime® – a trademark of:Sapelloh 5131606 Warmsen, GermanyTel.: +49 (0) 5767 / 941 439 – 0Fax: +49 (0) 5767 / 941 493 – 15E-Mail:*********************92-0008_V.04 | Status: 05/2021 www.daytime.de | We reserve the right to make changes. We assume no liability for printingerrors.。
BrightSpeed 控制台日常操作手册
关机(Shutdowm)
关机 (Shutdown) 1.点击此钮 系统退出 2.关闭电源
GE Medical Systems
联系我们
GE 医疗集团 CT 培训部
地址:北京经济技术开发区永昌北路1号 电话: (8610) 5806 9891 传真: (8610) 6787 3702 电子信箱: Ying.wang@
步骤要点: 移动正交视图位置
MPR图像
拖动鼠标
将层厚调厚,即 获得MPVR图像
曲面重组
从系统中删除图像
REMOVE
步骤要点:从系统中删 除检查/ 序列/ 图像 1. 选择 [Image Works] (图像操作)桌面。 2. 单击 [Remove] (删除 ) 3. 单击 [Removeexamination (删除检查)、 [Removeseries](删除 序列)或 [Removeimage] (删 除图像)。 4.单击 [OK] (确定)。
登记一般信息
选择扫描部位
选择扫描 方案
修改层厚
修改扫描条件
输入手动毫安
确认扫描条件,并按键盘上的【移床】、【曝光】键开始扫描
增加扫描组
修改床位
结束扫描
图像的后重建
图像后重建 【Retro Recon】
选择病人
选择系列 【Select Series】
修改重建层厚
选择重建层厚
将鼠标放在一幅 图像上,按F1键 照单幅图像
F2照屏幕当前页图像 F3照多分格像 F4照一序列图像
也可以用鼠标 左键将图像直 接脱入像板
图像照满后 点击打印
点击浏览【Browser】 可退回到病人列表状态
多平面重组 Reformat
多平面重组(Reformat)
雷特字幕快速使用指南

目 录前言 (2)软件配置要求 (3)最低配置 (3)推荐配置 (3)特别注意 (3)软件特色简介 (4)第一章 软件安装及使用 (5)安装 (6)快速启动 (11)独立运行 (11)在EDIUS中运行 (11)第二章 字幕模板库 (12)调出字幕模板库 (13)使用模板 (14)第三章 标题字幕 (16)编辑界面简介 (17)常规使用步骤 (17)修改动态模板播出长度 (21)新建标题字幕 (23)第四章 唱词制作 (25)制作界面简介 (26)常规使用步骤 (27)新建唱词模板 (31)第五章 滚屏制作 (34)第六章 使用动画 (40)第七章 使用动态纹理 (43)附录 常用快捷键 (46)EDIUS中字幕编辑相关快捷键 (47)字幕主程序中快捷键列表 (48)EDIUS用户高/标清图文制作的理想平台。
本快速指南作为雷特字幕软件的组成部分,针对在EDIUS中学习和使用雷特字幕软件的人员编写,帮助使用者快速掌握雷特字幕软件在EDIUS中的功能、特点和使用方法。
软件配置要求最低配置Intel Pentium 4 2.8 GHZ支持Pixel/Vertex Shader Model 3.0 以上显卡1 GB 内存以上10 GB 硬盘空间1280 * 800 分辨率以上显示器Windows XP SP2推荐配置Intel CoreDuo E8200 2.66 GHZnVidia 9800GT 以上 或 ATI 4850以上显卡2 GB 内存20 GB 硬盘空间1680*1050 分辨率 22 寸显示器Windows XP SP2(或以上)特别注意本软件渲染引擎全面使用GPU渲染,所以要求计算机显卡必须支持 ShaderModel 3.0及以上,如果您的显卡不满足要求,软件将能够安装,但可能不能正确使用。
近几年满足使用条件的显卡型号包括(没有完全列出):☆NVIDIA - Gefore 7, 8, 9全系列及以上全部支持,Quad系列专业显卡等 ☆ATI - Radeon HD 2600系列以上, HD 3xxx系列, HD 4xxx系列及以上雷特字幕- 雷特字幕快速指南模板库,直接拖拽上轨编辑、播出◆面、边、影、深度效果无限自由组合,独家提供GPU实时动态纹理贴图,打造绚丽字幕效果◆所有字幕、图元真三维空间自由3D变换,任意设置关键帧动画,并可自由叠加任意GPU加速特技◆创新的文本逐字、逐行、整体播出方法以及图元组播出方法,实现字幕图元播出无限可能◆全部文字和图形均为三次Bezier曲线,任意节点调节,创新的矢量图形布尔运算操作,让图形制作更加随心所欲◆随意制作唱词模板,附带任何静态属性和播出属性,快速制作任意效果唱词,EDIUS轨道所见即所得调节◆强大的滚屏工具,实现自定义首屏/末屏入出方式、循环播、减速、遮罩、衬底、3D滚屏等高级滚屏功能雷特字幕 - 雷特字幕快速指南安装软件安装之前,请确保:1) 已经正确安装了EDIUS系统软件 (4.0 版本以上)并能正确使用,否则无法安 装雷特字幕软件2) 待安装计算机系统已经满足雷特字幕的最低配置要求,尤其是显卡。
LED Editor说明书V1.1

LED Editor使用手册(v1.0.2.7)1.LED Editor功能简介 (1)2.安装与卸载 (2)3.LED Editor的界面及使用说明 (3)4.LED Editor的基本操作 (6)5.布线系统 (10)第一章LED Editor功能简介LED Editor是专为LED城市亮化系统开发的编辑、播放、控制的专业软件;操作简单,使用方便,以帧操作的方式将动画在计算机上流畅的播放并生成脱机数据文件供控制器播放使用。
软件功能特点简介:1,支持四色模式设置,包括四色增强、四色柔和、四色简单、四色照明等多种模式2,支持导入CAD或CorelDRAW导出的DXF文件3,自动拷贝SD卡功能,操作简单安全4,支持多种动画素材,内置效果、屏幕录制、Flash效果、AVI效果、图片、文字特效;同时还支持自定义动画效果编辑功能。
5,脱机效果读入预览LED Editor的运行环境:·操作系统Windows2000/WinXP/Win Vista/win7/win8等微软Windows系统。
·硬件配置基本配置:CPU:赛扬1.2G或者更高;内存:512M或更高;显示卡:32M显存以上。
·软件支持.NET Framework2.0及以上(Win2003以上操作系统自带2.0支持)。
第二章安装与卸载安装运行软件安装包,提示安装语言.选择下一步,及软件安装路径.软件安装完成在桌面上会自动建立图标:卸载LED Editor软件提供了自动卸载功能,使您可以方便地删除LED Editor的所有文件、程序组和快捷方式,用户可以在控制面板中选择添加/删除程序快速卸载。
第三章LED Editor 界面及操作说明软件界面:1.菜单:文件(&F)新建工程: 项目的建立打开项目: 打开本地保存的工程文件保存项目(&S): 保存项目退出(&Q): 退出 工程设置导入CAD : 导入Auto Cad 等第三方软件输出的DXF 布线文件.导入布线: 导入本机的布局(*.lay)文件灯具布局: 手动灯具布局...伽马设置: 对输出动画的Gamma 效果设置刷新场景(&R): 刷新播放场景项目属性: 更改项目参数,芯片参数等. 视频效果屏幕录制 简易的屏幕效果文字特效 文字效果图片 打开图片文件打开AVI 效果 打开avi 素材文件. 打开SWF 效果 打开SWF 素材文件. 菜单栏 工具栏 节目列表素材编辑区 播放区 帧编辑区测试效果内嵌了测试效果.推移效果内嵌的效果动画炫彩效果内嵌的效果动画自定义效果自定义动画效果编辑编辑浮动播放窗勾选后播放窗口由嵌入软件内播放改为浮动播放.播放(&P) 播放当前效果动画停止(&S) 停止播放动画.工程输出工程施工指南输出工程的基本信息文件,如控制器数量端口带载等脱机数据文件输出播放文件.bin以及配置文件.ini拷贝到SD卡位图文件将布局文件导出位图文件施工图纸文件将布线文件输出到DXF文件.输出视频文件将设计的动画输出为avi.工具视频录制(&AVI) 带可选参数的视频录制工具bin动画预览工具预览输出的控制器数据文件.SD卡写入工具预留控制器加密预留软件设置设置语言中/英文设置2.工具栏新建项目打开项目文件保存当前项目项目属性,可以在这里更改项目参数,芯片参数等.导入SWF文件录制屏幕导入Auto Cad,CorelDRAW 等第三方软件输出的DXF布线文件.自定义灯具布局.显示/隐藏软件左端的节目列表(一般配合“浮动播放窗”使用)1:1显示播放窗体.放大播放视频效果缩小播放视频效果录制屏幕工具3.节目列表:添加节目/素材.删除节目/素材.将节目/素材上移操作.将节目/素材上移操作.顺序播放节目/素材.4.播放区动画的预览区域5.素材编辑区增加SWF素材删除素材上移素材下移素材跳转到当前素材首部前一帧播放/暂停下一帧跳转素材尾部当前帧号当前每秒帧数fps当前播放到的时间.单击进行属性页设置右上角,单击进行时间轴属性的设置在此区域,按Shift可以设置时间轴横向调整.第四章LED Editor基本操作流程软件基本操作流程,分为4部分:1.项目的建立:文件-新建项目(或软件运行后直接设置)控制器列表:选择所使用控制器类型项目设置:设置项目的宽高像素数,以及动画的播放帧频参数设置:选择控制器所带载灯具芯片类型,本系统支持市面上绝大多数单线双芯芯片设置所带载芯片的时钟频率(芯片固定频率的不用设置)颜色模式:1.三色RGB:正常模式,不对用户的灯具排列做操作.2.四色增强:根据色彩心理学公式,对白光进行颜色增强,对整体灯具进行亮度补偿.3.四色柔和:根据色彩心理学,对四色进行柔和的颜色调整,色彩更加绚丽.4.四色简单:RGB颜色值相等时白色亮,可设置此时RGB为亮或灭的状态.5.四色照明:指定W灯光颜色,使W一直以此值常亮.数据反向:设置输出高、低电平有效项目名称,项目路径设置好,确定。
朗睿 LR-070AV型 彩色液晶显示器 说明书

LR-070AV型彩色液晶显示器使用说明书朗睿电子科技有限公司本说明书仅适用于朗睿科技公司生产的LR-070AV液晶显示器.本公司产品已经通过ISO9001:2000质量体系认证!目 录前言 (1)产品简介 (3)性能指标 (4)组成部分 (4)连接方法 (5)外型图纸 (6)信后支持说明 (7)运输损坏处理 (7)显示器的存储 (8)注意事项 (8)控制电路的注意事项 (10)一、产品简介随着彩色液晶显示技术的不断成熟与发展,使得液晶显示器的应用范围越来越广,逐渐取代传统CRT显示器成为主流的显示设备。
目前大部分场所使用的CRT显示器占用空间比较大,不容易安装固定,消耗功率大,而且还向周围发射有损人体健康的射线等缺点,已经越来越不适应当前的需要。
逐步被液晶显示器取代。
TFT LCD的结构,主要由偏振片、虑色器基板、液晶、TFT基板、片振片、背光源组成。
在虑色器基板和TFT基板封入扭曲向列型液晶(TN),构成液晶盒,虑色器基板上制作有透明的公共电极,TFT基板上制作了矩阵式薄模晶体管,用来开光象素电极的电压信号,为了使液晶层保持一定的厚度,在两块玻璃基板中间放有透明隔垫(聚酯模片或玻璃小球)。
标准是3个坏点以下为A级合格品!LR-070AV彩色液晶显示器可直接与影碟机、摄像头等设备连接,采用单一直流12V电源供电,亮度高、色彩逼真、体积小、节省了宝贵的空间、消耗功率小、无任何辐射。
是监控显示现场更新换代的理想产品。
本液晶显示器由真彩色TFT液晶屏、CCFL背光灯、逆变器、液晶驱动电路板、外壳(根据用户的需要可选择嵌入式或带外壳的显示器)等几部份组成。
连接操作非常简单,只要将直流12V电源和图象信号输入标准接口,通过液晶驱动电路把显示数据送至液晶屏显示出来。
二、 性能参数屏幕对角线 7.0英寸(16:9)LCD屏类型TFT外形尺寸 460×330×220mm视域尺寸 154.08(H)×87.05(V)mm分辨率 1440(W) X 234(H)像素点间距 0.107(H)×0.372(V)mm输出方式 双路视频端子、耳机插孔显示颜色 16位全彩色视野角度 左60度,右60度,上40度,下50度制式PAL/ NTSC菜单显示 OSD菜单调节工作电压 DC 12V消耗功率 7.5W工作温度 0℃ ~ +50℃保存温度 -20℃ ~ +60℃亮度 400cd/㎡液晶屏寿命 大于5万小时(连续工作)背光灯寿命 大于25000小时(连续工作)净重 1.6千克毛重 4.2千克触摸屏 属选配器件(接口方式:232/USB) 头枕 属选配部件(有多种颜色可供选择)三、 组成部件本显示器由:真彩色液晶屏、驱动电路板、逆变电源、塑料外壳及附件等几部分组成。
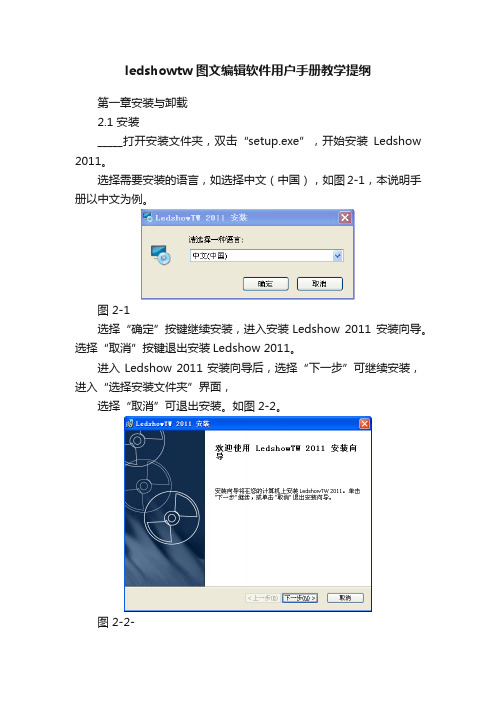
最新ledshowtw图文编辑软件用户手册

L e d s h o w T W2011图文编辑软件用户手册第一章安装与卸载2.1 安装_____打开安装文件夹,双击“setup.exe”,开始安装Ledshow 2011。
选择需要安装的语言,如选择中文(中国),如图2-1,本说明手册以中文为例。
图 2-1选择“确定”按键继续安装,进入安装Ledshow 2011 安装向导。
选择“取消”按键退出安装Ledshow 2011。
进入 Ledshow 2011 安装向导后,选择“下一步”可继续安装,进入“选择安装文件夹”界面,选择“取消”可退出安装。
如图2-2。
图 2-2-可在“选择安装文件夹”界面选择程序安装的文件夹,如图2-3。
可通过“浏览”按钮进行文件夹的选择,点击“上一步”退回到安装向导欢迎界面如上图2-2,点击“下一步”进入“准备安装界面,继续安装。
图 2-3进入“准备安装”界面,如图2-4,点击“上一步”按键退回“选择安装文件夹”界面,选择“安装”按钮开始安装如图2-5,选择“取消”按键退出安装。
图 2-4图 2-5安装完成如图2-6,点击“完成”按键退出安装向导。
图 2-62.1 卸载进入开始菜单,选择Ledshow 2011 文件夹,选择Uninstall,如图2-7图 2-7选择 Uninstall 后,弹出询问对话框“您确定要卸载此产品吗?”如图2-8图 2-8选择“是”按键,开始卸载,如图2-9,选择“否”按键,退出卸载。
图 2-9当安装最新版本的Ledshow 2011 软件时,建议先卸载之前的版本。
第二章界面介绍《LedshowTW 图文编辑系统2011》软件运行界面如图3-1 所示,共有四部分组成。
图 3-13.1 菜单工具栏3.1.1 菜单菜单栏由文件、编辑、设置、发送模式、语言和帮助,六类菜单组成。
如图3-2。
图 3-23.1.1.1 文件菜单如图 3-3 文件菜单包括新建节目文件、打开节目文件、保存节目文件、节目文件另存为、打开节目模板、保存节目模板、系统备份、系统还原、退出。
电子大屏幕led视窗用户操作手册资料教学教材
LED视窗图文编辑系统用户使用手册二〇一一年五月目录一、概述 (1)1.1、简介 (1)1.2、主要功能特点 (1)二、安装 (1)2.1、运行环境 (1)2.2、安装及卸载 (2)三、制作节目 (2)3.1、界面介绍 (2)3.1.1、软件界面 (2)3.1.2、菜单 (2)3.1.3、工具栏 (5)3.1.4、节目管理 (6)3.1.5、属性信息设置 (7)3.1.6、模拟显示窗口 (8)3.2、系统参数设置 (9)3.3、节目制作流程 (11)3.3.1、新建、编辑工程 (11)3.3.2、新建、编辑节目 (11)3.3.3、添加分区内容 (12)3.3.4、设置节目流水边框 (22)3.3.5、设置节目属性 (23)3.3.6、发送工程到显示屏 (24)四、其他功能 (25)4.1、亮度设置 (25)4.2、定时开关机及校准 (26)4.3、强制开、关机 (26)附件一 LED控制卡接线示意图 (28)一、概述1.1、简介1.2、主要功能特点●支持所有(室内、户外)单元板,单色和双基色。
●支持16扫、1/8扫、1/4扫、1/2扫和静态驱动模式(用户可随意选择),智能识别扫描类型。
●最多可存储6万多字的信息。
●支持可以显示万国字符。
●显示屏控制卡带16M存储容量。
●支持多分区同时移动。
●支持动画、表盘时钟。
●真正的表格图形文字混合文件。
●提供100多种流水边框供用户选择。
●可定时休眠显示屏。
●有单元板检测功能,卡上带检测功能按钮。
●200级亮度调节。
●每个节目可以实现时间段播放。
●系统自动查找显示屏,无需设置通信接口。
二、安装2.1、运行环境操作系统基于WIN98/WIN2000/WINXP下的集成环境;硬件配置CPU: Pentium 300MHz以上内存:64M以上相关软件Microsoft office(推荐)2.2、安装及卸载LED视窗系统作为绿色软件,不需要安装程序,只要将程序拷贝到计算机的硬盘,直接运行就可以,卸载直接在系统中删除就可以,安装和卸载都不会对系统造成任何影响。
HD2012 LED控制系统操作手册(中英文操作手册)

目录附录1 控制卡型录 (3)附录1.1控制卡选型 (3)附录1.2三代卡特色 (3)第一章概述 (3)1.1功能特点 (3)1.2运行环境 (4)第二章安装与卸载 (4)2.1安装 (4)2.2卸载 (5)第三章工具使用详解 (6)3.1软件主界面 (6)3.2标题栏 (6)3.3菜单栏 (6)3.3.1文件菜单 (6)3.3.2设置菜单 (7)3.3.3操作菜单 (9)3.3.4语言菜单: (9)3.3.5关于菜单: (10)3.4快捷方式栏 (10)3.5模拟显示屏 (11)3.6显示屏属性栏 (11)第四章显示屏节目创建流程 (12)4.1第一步:新建显示屏文件 (12)4.2第二步:新建节目 (14)4.3第三步:新建分区 (14)4.4第四步:节目制作完成 (15)第五章怎样显示不同内容 (16)5.1字幕显示 (16)5.2表格显示 (17)5.3图文显示 (18)5.4时间显示(万年历时间) (18)5.5表盘显示(模拟时钟) (19)5.5顺/倒时计显示 (20)5.6温度显示(需另购感应器) (21)第六章通信设置 (22)6.1串口线的做法 (22)6.2通信设置(串口) (23)6.3网线的做法 (24)6.4通信设置(网口) (25)6.4.1局域网单网络卡(HD-E3)通信 (25)6.4.2局域网多个网络卡(数个HD-E3)通信 (25)6.4.3局域网多个网络卡设置视频 (27)附录2 使用过程中的常用设置 (28)附录2.1控制卡如何远程升级 (28)附录2.2控制卡如何恢复出厂设置 (28)附录2.3控制卡如何测试显示屏 (29)附录2.4显示屏定时开关机 (29)附录2.5显示屏指定时间播放 (30)附录2.6字幕静止不动应该怎么设置 (30)附录1 控制卡型录附录1.1控制卡选型1:HD-S3串口卡,控制范围:单色32*1024(64个P10模组);双色32*512;2:HD-M3串口卡,控制范围:单色64*768/32*1536(96个P10模组);双色64*384/32*768;3:HD-A3-U盘卡,控制范围:单色32*1024(64个P10模组);双色32*512;4:HD-Q3-U盘卡,控制范围:单色64*768/32*1536(96个P10模组);双色64*384/32*768;5:HD-E3-网络卡,控制范围:单色128*1024/64*2048(192个P10模组);双色128*512/64*1024/32*2048 6:HD-U3-U盘卡,控制范围:单色128*1280/64*2048(256个P10模组);双色128*640/64*1024/32*2048 7:HD-X3-U盘卡,控制范围:单色256*1024/128*2048(512个P10模组);双色256*1024/128*2048/64*2048 8:HD-G3-U盘卡,控制范围:单色512*800/128*3072(800个P10模组);双色512*400/128*1600/64*3072 以上控制范围除HD-G3,HD-X3最大控制长度为3072以外,其他型号的控制卡最大控制长度为2048。
ledshowtw图文编辑软件用户手册教学提纲
ledshowtw图文编辑软件用户手册教学提纲第一章安装与卸载2.1 安装_____打开安装文件夹,双击“setup.exe”,开始安装Ledshow 2011。
选择需要安装的语言,如选择中文(中国),如图2-1,本说明手册以中文为例。
图 2-1选择“确定”按键继续安装,进入安装Ledshow 2011 安装向导。
选择“取消”按键退出安装Ledshow 2011。
进入 Ledshow 2011 安装向导后,选择“下一步”可继续安装,进入“选择安装文件夹”界面,选择“取消”可退出安装。
如图2-2。
图 2-2-可在“选择安装文件夹”界面选择程序安装的文件夹,如图2-3。
可通过“浏览”按钮进行文件夹的选择,点击“上一步”退回到安装向导欢迎界面如上图2-2,点击“下一步”进入“准备安装界面,继续安装。
图 2-3进入“准备安装”界面,如图2-4,点击“上一步”按键退回“选择安装文件夹”界面,选择“安装”按钮开始安装如图2-5,选择“取消”按键退出安装。
图 2-4图 2-5安装完成如图2-6,点击“完成”按键退出安装向导。
图 2-62.1 卸载进入开始菜单,选择Ledshow 2011 文件夹,选择Uninstall,如图2-7图 2-7选择 Uninstall 后,弹出询问对话框“您确定要卸载此产品吗?”如图2-8图 2-8选择“是”按键,开始卸载,如图2-9,选择“否”按键,退出卸载。
图 2-9当安装最新版本的Ledshow 2011 软件时,建议先卸载之前的版本。
第二章界面介绍《LedshowTW 图文编辑系统2011》软件运行界面如图3-1 所示,共有四部分组成。
图 3-13.1 菜单工具栏3.1.1 菜单菜单栏由文件、编辑、设置、发送模式、语言和帮助,六类菜单组成。
如图3-2。
图 3-23.1.1.1 文件菜单如图3-3 文件菜单包括新建节目文件、打开节目文件、保存节目文件、节目文件另存为、打开节目模板、保存节目模板、系统备份、系统还原、退出。
(word完整版)德国布朗卢比PowerMon 中文操作手册

PowerMon OERATION MANUALKOLORIMETERSILIKOMETERIONOMETERNATRIOMETERTITROMETER在安装或开始运行系统时,请仔细阅读本手册。
Bran+Luebbe公司不对由不遵守说明书而造成的损坏负责,并且质保期也会随之失效.使用非Bran+Luebbe原装的配件也会导致质保期的失效。
本说明书中的内容可以由Bran+Luebbe公司单方面更改而无需另行通知。
未经Bran+Luebbe公司的书面许可,本手册的任何部分都不允许以任何方式——电子地或机械地——被复制,传播.即便本手册被译为多种语言的版本,德文的版本为原始版本.目录1 介绍 (4)1.1 本手册的惯例 (4)2 安全建议 (5)3 运行操作 (6)3.1 概述 (6)3.2 触摸屏 (6)3.2.1 初始化 (7)3.2.2 PowerMon 的结构和布局 (8)3.3 结果 (8)3.3.1 表格 (9)3.3.2 图表 (10)3.3.3 信息 (10)3.4菜单 (11)3.4.1 系统 (11)3.4.2 传感器列表 (12)3.4.3 参数列表 (17)3.4.4应用 (17)3.4.5 服务 (23)3.4.6 帮助 (34)3.5 操作模式 (35)3.5.1 测量模式 (36)3.5.2 校准模式 (36)3.5.3 停止模式 (36)3.5.4 错误模式 (37)4 报错信息 (38)4.1 概述 (38)4.2 报错信息概述 (38)1 介绍Bran+Luebbe公司的PowerMon系列分析仪表是新一代完全自动化的在线分析仪表的。
他们用湿化学的方法,可以连续不断地测量液体样品中的多种成分的浓度。
本手册说明了以下两种分析仪表:· POWERMON KOLORIMETER·POWERMON SILIKOMETER·POWERMON LONOMETER·POWERMON NATRIOMETER·POWERMON TITROMETER操作人员需要有一定的基础技术知识.在安装调试前请仔细阅读本手册.将手册一直放在系统的附近,以方便查阅。
辅导王使用手册
目录第一章概述 (1)1.1概述 (1)1.2物品清单 (1)1.3应用环境 (1)1.4注意事项 (1)第二章安装说明 (3)2.1软件安装说明 (3)2.2用户注册说明 (3)2.3用户充值说明 (4)2.4用户登录说明 (4)2.5软件卸载说明 (5)第三章《初中几何》操作使用说明 (6)3.1软件主界面介绍 (6)3.2编辑工具栏 (7)3.2.1 文字工具 (7)3.2.2 绘图工具 (11)3.3示例 (15)3.3.1 输入题目 (16)3.3.2 发送题目 (18)3.3.3 接收答案 (18)3.3.4 读取答案 (19)3.4收藏夹 (22)3.5科普知识 (23)3.6退出 (24)3.7修改监护密码 (24)第四章《初中代数》操作使用说明 (25)4.1软件主界面介绍 (25)4.2示例 (25)第五章教材直通车 (27)5.1主界面介绍 (27)5.2功能介绍 (28)5.2.1学法指导 (28)5.2.2 节节练 (28)5.2.3 小结 (28)5.2.4 知识要点 (28)5.2.5 本章检测 (28)5.2.6 学期总结 (29)5.2.7 中考总复习 (29)第六章试卷中心 (30)6.1主界面介绍 (30)6.2功能介绍 (30)6.2.1 十年中考 (30)6.2.2 阶段考试 (31)第七章实验中心 (32)7.1主界面介绍 (32)7.2功能介绍 (32)第八章智能测评 (33)8.1主界面介绍 (33)8.2功能介绍 (33)附录 (34)第一章概述1.1 概述智能家教——“辅导王”是全球独创的网络智能辅导软件,由西安博创软件有限公司研发。
该软件采用独特的人工智能技术,能够模拟优秀教师的思维,自动理解并解答学生在学习过程中遇到的数学问题,对学生进行高水平的即时辅导。
让孩子学习能力与学习成绩同步提升,是性价比最高的辅导工具。
“辅导王”能够最大限度地满足学生个性化的学习要求,可以帮助学生梳理知识脉络、剖析重点难点、解决疑难问题、巩固所学知识,从而有效地提升学生的学习兴趣和学习效率、减轻学习负担、提高学习成绩,增强自主学习能力。
Eaton Brightlayer Home智能插座说明书
Description2-Pole, 3-wire grounding 15A, 125V/AC, 60Hz, 1/2 HP• Set up and control receptacle using the Eaton Brightlayer Home App or by voice commands • No hub required• LED indicator system alerts if the device is not set up in the network• Preset whether your device comes on or stays off following a power outage• Adjust how long lights stay on to allow for a safe, convenient exit• Neutral required for installation• Dimmable white LED indicator illuminate to indicate ON/OFF status•Provides control of one outlet leaving the other one for normal use• One outlet can be controlled with a single pole switch • Rated for 1/2 HP motor loads•Provides compliance with 2017 NEC® Article 406.9 that states that all receptacles installed in wet and damp locations must be weather resistant•Must be installed with GFCI breaker upstream prior to installation of the receptacle•Designed to offer protection against rain, snow, ice, moisture, humidity, and dust when properly installed in an approved weather protective coverEWFWRCR15Project Name:Prepared By:Project Number:Date:Catalog Number:Type:Compliances, specifications and availability are subject to change without notice.T able 1. Wi-Fi smart receptacleRating DescriptionColor suffixCatalog no.AV/AC Hz1512560Wi-Fi smart outdoor receptacleB, BK, GY, W EWFWRCR15_Amazon, Alexa and all related logos are trademarks of , Inc. or its affiliates. Google and Google Play are trademarks of GoogleLLC. Wi-Fi CERTIFIED logo is a trademark of the Wi-Fi Alliance.Wi-Fi smart outdoor receptacleEATON /smarthome Wi-Fi smart outdoor receptacleTechnical DataEffective April 2023Compliances, specifications and availability are subject to change without notice.Eaton’s Wi-Fi smart outdoor receptacle replaces regular receptacles to provide local and remote ON/OFF control of a single outlet. The receptacle can be remotely controlled and the user can create routines, schedules and group devices using the Eaton Brightlayer Home App. Ideal for controlling outdoor appliances, pool pumps, and holiday lights, making your outdoor space more livable.ApplicationsProject Name:Prepared By:Project Number:Date:Catalog Number:Type:T able 2. SpecificationsCatalog No.EWFWRCR15PerformanceMaximum amperage for receptacle is 15A Rating: 125V/AC, 60Hz Horsepower rating: 1/2 HPInstallation & Programming Please reference the Instruction Sheet included with the product for wiring installation. For programming of the device, see the Quick Start Guide Testing & Code Compliance cULus Listed Appliance Control 38DS. Tested per UL498 and UL498B. NOM Certified. Complies with FCC part 15, class B.TerminationsReceptacles have four screw terminals for line, neutral, ground and 3-way Material Characteristics Flammability: Meets UL94 requirements; V2 ratedTemperature Rating: -4 degrees F to 140 degrees F (-20 degrees C to 60 degrees C)Warranty2-year limited product warrantyT able 3. Color ordering informationFor ordering devices, include Catalog No. followed by the Color Suffix: B (Brown), BK (Black), GY (Gray), W (White).Color options:(Brown)(Black)(Gray)(White)Figure 1. EWFWRCR15Product dimensionsTechnical Data Effective April 2023Wi-Fi smart outdoor receptacleProject Name:Prepared By:Project Number:Date:Catalog Number:Type:Single location control installationKEY:cULus NOM FCCTwo location control installationusing a 3-way switchRelated productsWi-Fi smart productsEWFTRCR15, EWFSW15, EWFD30Compliances, specifications and availability are subject to change without notice.WallplatesPJS26, PJS262Weather protective coversWIUX-1CL, WIUX-2CLElectrical Sector1123 Hwy 74 SPeachtree City, GA 30269United States/WifiSmartElectrical SectorCanada Operations5925 McLaughlin RoadMississauga, Ontario, L5R 1B8CanadaEatonCanada.ca/WifiSmartElectrical SectorMexico OperationsCarr. Tlalnepantla -Cuautitlan Km 17.8 s/nCol. Villa Jardin esq.Cerrada 8 de MayoCuautitlan, Mexico CP 54800MexicoEaton.mx/WifiSmartEaton1000 Eaton BoulevardCleveland, OH 44122United StatesEaton is a registered trademark.All other trademarks are propertyof their respective owners.© 2023 EatonAll Rights ReservedPrinted in USAPublication No. TD610149ENApril 2023。
LED视窗软件用户手册V2.0
LED视窗编辑软件使用手册二〇一〇年五月目录一、概述 (1)1.1、简介............................................................................................................. 错误!未定义书签。
1.2、主要功能特点 (1)二、安装 (1)2.1、运行环境 (1)2.2、安装及卸载 (1)三、制作节目 (2)3.1、界面介绍 (2)3.1.1、软件界面 (2)3.1.2、菜单 (3)3.1.3、工具栏 (5)3.1.4、节目管理 (6)3.1.5、属性信息设置 (7)3.1.6、模拟显示窗口 (8)3.2、系统参数设置 (8)3.3、节目制作流程 (12)3.3.1、新建、编辑工程 (12)3.3.2、新建、编辑节目 (13)3.3.3、改变分区类型 (14)3.3.4、添加分区内容 (15)3.3.5、设置节目属性 (21)3.3.6、设置流水边框 (22)3.3.7、发送工程到显示屏 (22)四、其他功能 (23)4.1、亮度设置 (23)4.2、定时开关机及校准 (24)4.3、强制开、关机 (24)附件一 LED控制卡接线示意图 (25)一、概述主要功能特点●支持所有(室内、户外)单元板,单色和双基色。
●直接支持16扫、1/8扫、1/4扫、1/2扫和静态驱动模式。
●最多可存储6万多字的信息。
●支持可以显示万国字符。
●显示屏控制卡带16M存储容量。
●支持多分区。
●支持真正的表格图形文字混合文件。
●带流水边框功能。
●可定时休眠显示屏。
●有单元板检测功能,卡上带检测功能按钮。
●200级亮度调节。
●每个节目可以实现时间段播放。
●系统自动查找显示屏,无需设置通信接口。
二、安装2.1、运行环境操作系统基于WIN98/WIN2000/WINXP下的集成环境;硬件配置CPU: Pentium 300MHz以上内存:64M以上相关软件Microsoft office(推荐)2.2、安装及卸载LED视窗系统作为绿色软件,不需要安装程序,只要将程序拷贝到计算机的硬盘,直接运行就可以,卸载直接在系统中删除就可以,安装和卸载都不会对系统造成任何影响。
邦奇调试软件简要操作说明

邦奇智能照明控制系统DLight2调试软件简要操作说明1、打开调试软件2、加载一个设备:按“L”键出现列表对话,选择一个设备进行搜索。
3、勾选要上载的设备,填入BOX号,点击,即可上载设备。
4、设备上载完成后,按<F8>,切换到逻辑视窗(区域视窗),逻辑视窗中的各个区像按键一样一块一块地显示,每个区有个区名,当按一个区时会弹出一个有预置场景按键和设置调光器通道亮度(亮度滑块)的对话框。
对话框像一个小型的灯光控制台,现在一个区可显示24个通道,超过24通道可通过底部的滚动条来显示。
5、用鼠标选中所需修改的区域区域,点击后该区域出现场景编辑界面。
选择相应的预置场景去编辑和调整相应的亮度滑块。
场景编辑对话框逻辑视窗屏幕6、修改完成后点,然后点,出现,再点,即可将所修改的数据下载到设备中。
如果你要求做场景编辑不影响网络,你可选择“Mute”框,这将屏蔽信息发送,即不送信息,调光器也不响应,类似音响的静音功能。
编辑时钟管理器上载时钟,按<L>键然后选择填入BOX号12,点击即可开始上载时钟管理器。
选择已加载的时钟,按<P>键进行编程。
说明:Preset 选择要送出的场景号Area 选择要送出的场景信息的区Fade 选择要送出的场景信息的渐变时间Day 选择事件发生的日期Enable 启动这事件Disable 关闭这事件Time 选择事件发生的时间Dump 如果要下载数据到设备上必须先勾选Dump按钮。
可用选择需要修改的事件,从Time框中修改时间。
,修改完成后勾选Dump按钮,然后点击,出现,再点,即可将所修改的数据下载到设备中。
你能在屏幕按钮的右边状态条内看到下载的过程,当完成下载后状态条上将显示“Idle”(空)。
附件:面板模拟器(DLight 8键面板)屏幕顶部的工具条中有8个小按键,编号从1到8和一个标号为“C”的键,当按下这些按键时将在DyNet网上送出一个预置场景信息,这是模拟一个标准8键面板,“C”键是为面板模拟器配置的。
清华双星盲人软件使用说明

A清华双星盲人软件使用说明一、简介 (3)二、系统的构成与安装 (3)三、语音服务器及屏幕朗读 (4)1,屏幕朗读的主要热键 (4)2,读桌面文字 (5)3,文字处理中的读出 (5)4,读网页内容 (5)5,模拟鼠标 (6)四、盲用编辑器 (6)1,进入编辑器 (7)2,主菜单(击Alt键) (8)3, 文件项的菜单 (8)4,编辑项的菜单 (9)5,状态项的菜单 (9)6,功能项以下的菜单 (10)7,块操作 (10)8,读出项的功能 (10)9,字典项的菜单 (11)10,WORD 文档的转换 (11)五、盲人浏览器 (11)六、清华双星汉字输入法 (14)1、热键 (14)2、自己设定输入法热键 (15)3、输入法切换 (15)4、汉字输入操作方法 (16)5、二、三、四字词的输入 (16)6、用一个声母键找出260个高频字 (16)7、用两键定义一个读音 (17)8、输入三个字四字词和更多字的词 (18)9、造词 (18)10 、汉语普通话全部音节的编码 (19)11、双拼盲文码输入法 (21)12、盲文标点符号 (22)附一.盲人六指键盘操作法 (26)附二,现行盲文声、韵、调盲文码 (27)附三,ASCII码与所代表的点字对照表 (28)B读书机使用说明一、简介 (29)二、组成 (29)三、安装 (29)四、起动 (29)五、读书 (30)六、注意事项 (30)C清华盲文点字显示器使用说明一、概述 (31)二、组成 (31)三、全视图 (31)四、软件安装 (32)五、盲文打印编辑器 (33)六、盲文的刻印 (35)七、分词错误的纠正 (36)A清华双星盲人软件使用说明一、简介本系统为盲人提供汉字输入、文本阅读和文本编辑、屏幕朗读等各项系统功能。
系统应在586以上微机上使用,要求已装好光驱和声卡,装好WIN98或Windows/Xp 系统,并事先设臵好打印机的驱动程序,这点务必要先做好(如果没有打印机,可虚拟安装任一个型号的打印机)。
STOVE BRIGHT 用户指南说明书

Because of the high temperatures involved, stove paints are formulated to be used in particular ways. This guide contains instructions for proper use of Stove Bright® High Temperature Paint. Care in following the steps can help prevent the most common problems.Most stoves manufactured in the U.S. and Canada can be repainted with the Stove Bright® High Temperature Paint without problem. There have been rare instances where the paint formulation of the original equipment manufacturer was not compatible with Stove Bright®. Check with your stove manufacturer about the brand of paint used to coat the stove. Then call us (1-800-537-7201) to ask about paint compatibility with Stove Bright®. Another way to check compatibility is to test spray an area of your stove with Stove Bright® to see how it reacts with the original paint.If the stove paint is not compatible with Stove Bright®, or if the stove already has multiple layers of paint, then we strongly recommend removing the paint by sandblasting or sanding down to metal.There are 3 basic steps to paint your stove or stove pipe with Stove Bright® High Temperature Paint:1.Prepare the surface for paint2.Apply the paint3.Cure the paintThe most critical step is surface preparation. The paint will only adhere as well as whatever is already on the stove. If the stove is rusted, and you do not remove all of the rust, then the paint will adhere to the rust and fail. If the stove has a coating that is peeling, blistering, or chalking, then the new topcoat will release from the stove in the same way. If the stove has grease, oil, dirt or any other contaminant on it, then the paint will not adhere to the metal of the stove.1. Prepare the surface for painta.Remove ALL rust. We recommend sandblasting, sanding, or grinding to remove rust.b.Remove oil, grease, graphite, or other hard to remove contaminants. We have found Lacquer Thinner, Toluene, orAcetone to be effective against the toughest surface contaminants.WARNING:Lacquer Thinner, Toluene and Acetone are HIGHLY FLAMMABLE. Do not use near open flame or in close proximity to anything that might spark. Turn off all appliances, extinguish pilot lights, and put out all source offlame.HEALTH WARNING:Lacquer Thinner, Toluene and Acetone give off vapors that are harmful. Do not breathe these vapors in tightly enclosed area. Read and follow all instructions for product use, especially regarding eyeprotection, skin protection and breathing protection.c.To remove greasy finger prints, light dirt and dust, or simply for your final wipe down before applying the paint, theeasy to use Stove Bright® Paint Prep in aerosol is a good choice.d.In any areas where solvents cannot be used in the cleaning process you can used the brand Dirtex® in aerosol or thebrand Windex®.Caution: Do NOT use products like Formula 409 or a “tack cloth” sold in many paint stores, because these products leave a residue that inhibits the adhesion qualities of Stove Bright® High Temperature Paint.Extra effort in surface preparation leads to the best chance for a durable, beautiful finish.2. Apply the paintThe application of Stove Bright® High Temperature Paint requires some care to get the best results. There are some common techniques for using any aerosol paint and there are details specific to using Stove Bright® in aerosol.a.Shake the can for 2 minutes to completely mix the paint pigment, metallics and solvents for the best uniform finishwhen sprayed. Some folks do not shake Stove Bright® long enough.WARNING:The vapors and propellant coming from the aerosol can are HIGHLY FLAMMABLE. Extinguish all flames and keep away from sources of spark when spraying.HEALTH WARNING:Vapors are harmful if breathed directly. Use the product in a well-ventilated area. Use eye protection to avoid accidental contact with spray. Wear gloves and appropriate clothing to avoid skin irritation dueto contact with the solvents and other chemicals in the paint.b.BEFORE you spray the paint on the stove or stove pipe note the following:i.Best results are achieved when the paint, the surface of the stove and the air temperature are above 65° F and below85°F. You can warm a cold can of paint (from warehouse storage or left in a service truck in cold temperatures) byrunning hot tap water over it for two minutes. Do not over heat the can or expose it to open flame of any kind.ii.Be sure the area is well-ventilated, that all open flames have been extinguished and that you are wearing appropriate protection for spraying the paint.iii.Test spray on a piece of cardboard to be sure the paint is ready for use. Often the first spray from an aerosol can is mostly propellant with very little pigment. This test spray will bring the well-shaken paint mixture to the tip readyfor your first pass on the surface.c.Two or three light coats are better than attempting one heavy coat.d.Your first coat should be a “mist” coat. Trying to cover the surface in a single pass will likely result in drips and runs ofthis thin paint.e.Paint should be sprayed from about 12 to 18 inches. If you get too close, the paint will likely drip or run. If you get toofar away, the paint will dry in the air and result in a gritty finish.f.The paint typically dries to touch in about 20 minutes. When doing two light coats as recommended above, you canapply the second coat after about 15 minutes. The paint will dry to handle in about 2 hours. The paint can fully air cure without any heat in about 5 days. The paint is formulated to be heat cured for the long-lasting, durable, heat-resistant finish you expect from Stove Bright® High Temperature Paint.3. Cure the paintFor a wood burning stove follow these guidelines:a.Wait 4 hours before igniting a fire in the stove.b.Build a small kindling fire to start. The kindling fire should be kept burning for 10 to 15 minutes.c.Add fuel to build a medium size fire to bring the stove surface temperature to about 450°.d.The medium size fire should be kept burning for about 60 minutes.e.For the final stage of curing, add fuel to this fire to make it a very hot fire (surface temperature above 600°F) and keep itat this level for about 60 minutes.For a pellet burning stove follow these guidelines:a.Wait 4 hours before igniting a fire in the stove.b.Start the pellet stove according to the manufacturer’s instructions.c.Once lit, moderate the pellet fuel and air mix for a very low burn for 10 minutesd.Increase the fuel and air mixture in the pellet stove to a medium level and allow to burn 60 minutes.e.Increase the air and fuel mixture to its highest levels to burn as hot as possible for 60 minutes.For a gas burning stove follow these guidelines:a.Wait 4 hours before igniting a fire in the stove.b.Start the gas stove according to the manufacturer’s instructions.c.Once lit, moderate the gas for a low burn for 10 minutesd.Increase the gas setting to a medium level and allow to burn 60 minutes.e.Increase the gas stove setting to its highest levels to burn as hot as possible for 60 minutes.NOTE:During the final higher temperature burn phase there may be some visible smoke near the stove surface. There may also be an unpleasant odor. To mitigate this effect, ventilate the room with open windows and doors to provideairflow.HEALTH WARNING: The smoke from the curing process displaces oxygen. Small children, elderly folks and persons with existing breathing problems should vacate the area during the hot burn to avoid the discomfort of lost oxygen. Thesmoke is primarily Carbon Dioxide, and therefore nontoxic but uncomfortable.Trouble Shooting:Surface preparation:If rust is not removed completely before painting, rust will reappear on the newly painted surface over time. Painting over rust with Stove Bright® High Temperature Paint does not stop oxidation. That is why it is critical to remove all of the rust before painting.Paint coming off the surface in large patches indicates a problem with surface preparation. The best remedy is to remove all the paint, prepare the surface again and repaint.Application:If the paint peels or looks like shattered glass and comes off in thin strips, this is an indication that too much paint was applied. The best remedy for this condition is to remove as much of the paint as possible, wipe down the surface (as described in surface preparation) and repaint; taking care to apply the paint in two light coats while spraying from at least 12 inches from the surface (but not farther than 18” from the surface).If the finish is textured or gritty, it indicates dry spray occurred during application. This happens when the spray tip is too far from the surface, and the paint actually partially dries in the air before reaching the surface. The best remedy for this condition is to sand off the gritty areas, wipe down the surface (as described in surface preparation) and repaint; taking care to apply a light coat from a distance of less than 18 inches from the surface of the stove (but not closer than 12” from the surface).Paint curing:Take care to build slowly to the medium temperature fire. Building a hot fire immediately will “shock” the paint and cause it to release from the surface. The only remedy to this problem is to remove the paint, prepare the surface for repainting, and repaint. To avoid problems during the curing process, do not touch the surface with anything until the paint is fully cured. If something touches the surface during the curing process, the remedy is to sand and clean the area and repaint.Cured paint will be flat in terms of gloss. Many of the colors of Stove Bright® High Temperature Paint contain metallic flake, giving a nice reflective quality to the finish.There are several reasons why an aerosol can of paint doesn’t spray:1.The aerosol tip is clogged with dried paint.2.Paint pigment has separated from solvent and is clogging the draw tube of the valve.3.Can is no longer effectively charged with propellant, so there is no pressure to force the paint up through thevalve.4.Paint is old and has separated from the solvent and cannot be re-mixed.1. To clear the clogged tip:a.Be sure paint can is at room temperature (let it sit for several hours in 70° room or place can in hot tapwater for 2 to 3 minutes)b.Shake the can vigorously for at least 90 seconds. This is a long time to shake a can and requires somepatience and effort to get the job done.c.Remove the old regular spray tip and insert the new regular tip (black).d.Turn the can upside down and spray a test on cardboard … if the can sprays, then be sure the spray isclear (only propellant). This will mean your tip is clear and ready for use. If no spray comes out, or ifthe spray sputters, it indicates a clog in the draw tube.2.To clear the draw tube you should:a.Be sure paint can is at room temperature (let it sit for several hours in 70° room or place can in hot tap waterfor 2 to 3 minutes)b.Shake the can vigorously for at least 90 seconds. This is a long time to shake a can and requires somepatience and effort to get the job done.c.Remove the regular spray tip and insert the clear-out tip (green).d.Spray the paint on test cardboard for several seconds until the paint appears to flow freely.e.Replace the clear-out tip with a new regular tip.f.Turn can upside-down and press trigger until no paint comes out (only propellant).3.No propellant in the cana.The easiest test for this is to squeeze the can. If the sides of the can give way easily (like an empty soda popcan) then there is not enough propellant to drive the paint out of the can.b.See you dealer for a replacement can of paint.4. Old painta. Look at the bottom of the can for a date and batch number.b.If the date is more than 3 years past, then it is possible the product is too old and won’t ever come out ofthe can.c.Get a replacement can。
BrightAuthor操作说明书

3.1.3 实例介绍怎样将视频文件上传到播放器,并通过播放机进行播放?需要播放的视频文件、图像文件或音频文件都需要用播放器自己的编辑软件来上传到播放器;这个软件名称是“BrightAuthor”;首先要保证,用于后期上传视频的电脑已经安装了BrightAuthor这个软件;安装完后,在桌面上会出现这个图标。
在操作之前先将播放器设备升级,文件价有升级文件brightsign-4.7.146-update.bsfw;升级方法:将brightsign-4.7.146-update.bsfw升级文件拷贝到一新的SD;(注:要求SD卡的格式是FAT32;)升级完之后点击图标登陆进去,界面会显示播放器操作界面。
即为初始界面如下:第一步:需要对播放器硬件进行用户名和IP地址的设置;需要用到SD卡一,SD卡的容量根据你所要播放的视频文件的大小来定;尽量选用Class 10的SD卡,读取速度比较快;(注:后期发布视频的时候,是通过用户名来查找到播放器的;)首先将一新的SD卡放入操作电脑的卡槽;(注:SD卡的格式必须是FAT32的;)选择菜单栏“编辑”下的“显示参数”,将会弹出如下图界面:选择“网络”项,勾选“启用BrightSign本地网络”“启用Bonjour”,如下图所示。
(注:启动Bonjour选项后,软件才可使用局域网上传视频;)选择菜单栏“工具”下的“设置BrightSign播放器”,将会弹出如下图界面。
会弹出如下界面:名称规则“名称:IAPM-P4.4”对播放器进行命名,其他选项请按照图中勾选所示。
然后点击“高级网络设置”并对IP地址进行如下分配:(注:如网络带DHCP功能,可选自动获取IP地址;如需固定地址,则填入规定的IP地址、子网掩码、网关、域名服务器1;)配置好IP地址点击“确定“;会返回至如下界面:这个界面所有容设置好以后,请单击右下角的“新建设置文件”按钮,会弹出如下界面,找到你的SD卡,并点击“确定“;这样操作之后你对播放器硬件的名称和IP地址等信息就存入了SD卡;将SD卡从电脑的卡槽取出,插入播放器硬件的卡槽:在将播放器硬件供电,供电开启后旁边会有指示灯闪烁,停止闪烁后,只有绿灯亮起,这时则可以进入实用状态;IP设定完成后SD卡就永久的留在播放器硬件的卡槽,当设备存用;(注:在插拔SD卡的时候尽量将播放器断电;如何查看IP设置的是正确的,会在上传文件的那部分提到;)第二步:使用软件制作播放的文件;如何制作一个多区域的演示文件?既有视频、有图片、有字幕、又有时钟;首先需要建立一个新项目文件;点“文件“选项卡,选”新演示”选项;如下图:会弹出如下设置界面:保存为:是你创建的这个新演示文件的文件名;地址:是这个新演示文件的需要存储的路径;BrightSign型号:是你现在所使用的播放器硬件的型号;连接类型:是播放器硬件到显示器之间是选用什么接口输出;屏幕分辨率:是根据显示器的最大显示分辩率来设置;显示方向:根据你的显示器是横向安装、还是纵向安装;过扫屏幕:选择默认,不过扫-使用全屏;所有选项选添好以后点击“新建“按钮,会出现下图界面这个界面,系统默认提供了几款布局方式,可根据项目需求来选择相应的布局方式;绿色区域为视频和图片同时使用区域,蓝色仅为图片使用区域,黄色为文字滚动直播区域,橙色为音频区域;选择“三个区域“,然后点击”选择“按钮进入如下界面这个现实布局也可以手动进行设置;点击上部的“布局“按钮,如下图:进入页面:在这个页面可以对布局进行调整,也可增加更多串口,可以删减不需要的窗口;鼠标选择要删除的模块,点击键盘“Delete“键,可删掉这个图片模块,如下图:删除了区域2;删除区域3:如图窗口已经有一个“Video or Images“的模板,再添加一个文字滚动,点击添加区域:如图会弹出如下界面:选择需要的区域类型模块,然后点“确定“;新区域可通过鼠标拖拽随意的调节尺寸;接下来通过这种添加的方式,分别添加时间、添加直播滚动文字、添加背景图,并排版布局尺寸,通过左侧的参数调整,可更改名称、尺寸;如下图布局设置完成后,点击“播放表“选项;如图点击后会返回至播放表编辑界面;通过区域箭头选项,选择你要编辑的区域:如图红色圈起区域:下拉箭头会列出你所变更的名称:逐一的对每一项进行编辑,首先视频:如下图在“文件“选项卡下,点击”浏览“找到你的视频文件所处的位置,文件会自动在下方列出,将需要播放的文件鼠标拖拽至右侧;如图数量不限,根据SD卡的存储容量来定;如果以拖入了三个视频,这三个视频会循环播放;第三步:上传编辑好的演示文稿到播放器硬件:选择“发布”选项卡,红色圈起区域,进入如下图:此提示点是继续点“确定”在列表名称区域会出现“IAPM-P4.4”的播放器名称显示,这说明我们的IP设置没有问题,电脑与播放器之间可以正常通讯;在播放列表找到新建的演示文稿,将其拖拽至右侧,在播放时间选项框,可以对演示文稿的播放时间的围做设置,可确定那天播放,那天不播放,每天播放的时间段,等等都可以做设置,如图:设定好后点击“确定”按钮;返回如下图:选择网络播放器的名称,点击“发布”按钮,将其上传至播放器硬件;上传完毕会提示“完成”,如下图点击“确定”按钮;如何用BrightSign APP 软件进行控制视频的播放、暂停、调用下一文件?这部分主要针对在视频模块上,首先要将播放类型选择互动模式,如下图;将要播放的视频拖入右侧,将Video 1和Video 2这两个视频都拖拽到播放列表,如图:选中播放列表中的结束命令按钮,下图红色区域部分:然后鼠标点钟Video 1,沿着Video 1图标的边缘点击,鼠标会变成一只小手状,然后按住鼠标拖拽,会延伸出一条连线,拖到Video 2松开鼠标左键,如图这样的操作可以实现两个视频循环播放,Video 1为初始视频;怎样通过APP 控制视频的播放和暂停?在左侧“事件”选项卡下选择“UDP”命令图标,如图:鼠标点住”UDP输入”拖拽到video 1的图标上松开鼠标,会弹出如图;在“指定UDP输入”中输入“PlayVideo”,然后点击“高级”选项卡,会进入窗口如下:(注:在“指定UDP输入”这里可以随意编辑指令代码,不一定要用PlayVideo,在“指定UDP输入”这里填入什么ASCII码,中控主机就发什么指令代码;)点击“添加命令”按钮,在命令栏里选视频,在命令参数里选暂停,如上图,之后点击“确定”,会返回页面:在video 1的图标下面会多出一个UDP的箭头图标,咱挺能指令已经添加成功;再将左侧的UDP按住拖拽至Video 1视频图标,后松开鼠标,如图在“指定UDP输入”填“播放”,再点击“高级”选项卡,进入:点击“添加命令”,在命令栏里选“视频”,在命令参数栏选恢复,之后点右下角“确定”,会返回下图用同样的方式对Video 2进行操作,如下图:演示文件编辑完成,现在已经可以实现两个视频的循环播放,及通过第三方触摸屏APP控制视频的播放暂停;(比如您项目用的是AMX、CRESTRON系统,只要将你在“指定UDP输入”这里填的ASCII码通过UDP的方式发给Brightsign播放器即可;播放器的网络端口号是:5000;IP地址如上所设;)继续编辑,如果在Video 1视频播放的时候切换至Video 3;将左侧的Video 3视频文件拖拽至右侧,如图:在到“事件”选项卡,将“UDP”输入拖拽至Video1视频图标处松开鼠标,会弹出如下窗口:在“UDP输入”填入“Video 3 插播”,在“指定下一状态”选择video 3.mp4;然后点击确定;如下图:用同样的方式将UDP输入命令拖拽至Video 2视频图标处,在“UDP输入”填入“Video 3 插播”,在“指定下一状态”选择video 3.mp4;然后点击确定;如图这样就实现了,通过触摸屏APP控制,在播放Video 1和Video 2这两个视频的同时都可以快速切换到Video 3的视频播放;以上所说的是第三方中控系统通过用UDP的方式去控制BrightSign播放器;下面说下如果用RS232去控制BrightSign播放器;以上对BrightSign基本设置不在重复解释,主要说明几点主要地方的设置:1、先在“文件”菜单下的“演示属性”里设置串口波特率;端口0~5的波特率改成一样的;发送EOL、接收EOL如果选的是回车的话,在发送指令的时候结尾要加回车;这个指定端口选的和“端口设定”里是一样的;“指定串口输入”里面填通过串口向BrightSign发送的指令(随便定义);注意:显示属性一定要选显示行;之后在确定;。
- 1、下载文档前请自行甄别文档内容的完整性,平台不提供额外的编辑、内容补充、找答案等附加服务。
- 2、"仅部分预览"的文档,不可在线预览部分如存在完整性等问题,可反馈申请退款(可完整预览的文档不适用该条件!)。
- 3、如文档侵犯您的权益,请联系客服反馈,我们会尽快为您处理(人工客服工作时间:9:00-18:30)。
3.1.3 实例介绍
怎样将视频文件上传到播放器,并通过播放机进行播放?
需要播放的视频文件、图像文件或音频文件都需要用播放器自己的编辑软件来上传到播放器;这个软件名称是“BrightAuthor”;
首先要保证,用于后期上传视频的电脑已经安装了BrightAuthor这个软件;
安装完后,在桌面上会出现这个图标。
在操作之前先将播放器设备升级,文件价有升级文件brightsign-4.7.146-update.bsfw;
升级方法:将brightsign-4.7.146-update.bsfw升级文件拷贝到一新的SD;(注:要求SD卡的格式是FAT32;)
升级完之后
点击图标登陆进去,界面会显示播放器操作界面。
即为初始界面如下:
第一步:需要对播放器硬件进行用户名和IP地址的设置;需要用到SD卡一,SD卡的容量根据你所要播放的视频文件的大小来定;尽量选用Class 10的SD卡,读取速度比较快;(注:后期发布视频的时候,是通过用户名来查找到播放器的;)
首先将一新的SD卡放入操作电脑的卡槽;(注:SD卡的格式必须是FAT32的;)
选择菜单栏“编辑”下的“显示参数”,将会弹出如下图界面:
选择“网络”项,勾选“启用BrightSign本地网络”“启用Bonjour”,如下图所示。
(注:启动Bonjour选项后,软件才可使用局域网上传视频;)
选择菜单栏“工具”下的“设置BrightSign播放器”,将会弹出如下图界面。
会弹出如下界面:
名称规则
“名称:IAPM-P4.4”对播放器进行命名,其他选项请按照图中勾选所示。
然后点击“高级网络设置”并对IP地址进行如下分配:
(注:如网络带DHCP功能,可选自动获取IP地址;如需固定地址,则填入规定的IP地址、子网掩码、网关、域名服务器1;)
配置好IP地址点击“确定“;
会返回至如下界面:
这个界面所有容设置好以后,请单击右下角的“新建设置文件”按钮,会弹出如下界面,找到你的SD卡,并点击“确定“;
这样操作之后你对播放器硬件的名称和IP地址等信息就存入了SD卡;
将SD卡从电脑的卡槽取出,插入播放器硬件的卡槽:
在将播放器硬件供电,供电开启后旁边会有指示灯闪烁,停止闪烁后,只有绿灯亮起,这时则可以进入实用状态;IP设定完成后SD卡就永久的留在播放器硬件的卡槽,当设备存用;
(注:在插拔SD卡的时候尽量将播放器断电;如何查看IP设置的是正确的,会在上传文件的那部分提到;)
第二步:使用软件制作播放的文件;
如何制作一个多区域的演示文件?既有视频、有图片、有字幕、又有时钟;
首先需要建立一个新项目文件;
点“文件“选项卡,选”新演示”选项;如下图:会弹出如下设置界面:
保存为:是你创建的这个新演示文件的文件名;
地址:是这个新演示文件的需要存储的路径;
BrightSign型号:是你现在所使用的播放器硬件的型号;连接类型:是播放器硬件到显示器之间是选用什么接口输出;屏幕分辨率:是根据显示器的最大显示分辩率来设置;
显示方向:根据你的显示器是横向安装、还是纵向安装;
过扫屏幕:选择默认,不过扫-使用全屏;
所有选项选添好以后点击“新建“按钮,会出现下图界面
这个界面,系统默认提供了几款布局方式,可根据项目需求来选择相应的布局方式;
绿色区域为视频和图片同时使用区域,蓝色仅为图片使用区域,黄色为文字滚动直播区域,橙色为音频区域;
选择“三个区域“,然后点击”选择“按钮进入如下界面
这个现实布局也可以手动进行设置;点击上部的“布局“按钮,如下图:
进入页面:
在这个页面可以对布局进行调整,也可增加更多串口,可以删减不需要的窗口;
鼠标选择要删除的模块,点击键盘“Delete“键,可删掉这个图片模块,如下图:删除了区域2;
删除区域3:如图
窗口已经有一个“Video or Images“的模板,再添加一个文字滚动,点击添加区域:如图
会弹出如下界面:
选择需要的区域类型模块,然后点“确定“;
新区域可通过鼠标拖拽随意的调节尺寸;
接下来通过这种添加的方式,分别添加时间、添加直播滚动文字、添加背景图,并排版布局尺寸,通过左侧的参数调整,可更改名称、尺寸;如下图
布局设置完成后,点击“播放表“选项;如图
点击后会返回至播放表编辑界面;
通过区域箭头选项,选择你要编辑的区域:如图红色圈起区域:下拉箭头会列出你所变更的名称:
逐一的对每一项进行编辑,首先视频:如下图
在“文件“选项卡下,点击”浏览“找到你的视频文件所处的位置,文件会自动在下方列出,将需要播放的文件鼠标拖拽至右侧;如图
数量不限,根据SD卡的存储容量来定;如果以拖入了三个视频,这三个视频会循环播放;第三步:上传编辑好的演示文稿到播放器硬件:
选择“发布”选项卡,红色圈起区域,进入如下图:
此提示点是
继续点“确定”
在列表名称区域会出现“IAPM-P4.4”的播放器名称显示,这说明我们的IP设置没有问题,电脑与播放器之间可以正常通讯;
在播放列表找到新建的演示文稿,将其拖拽至右侧,在播放时间选项框,可以对演示文稿的播放时间的围做设置,可确定那天播放,那天不播放,每天播放的时间段,等等都可以做设置,如图:
设定好后点击“确定”按钮;返回如下图:
选择网络播放器的名称,点击“发布”按钮,将其上传至播放器硬件;上传完毕会提示“完成”,如下图
点击“确定”按钮;
如何用BrightSign APP 软件进行控制视频的播放、暂停、调用下一文件?
这部分主要针对在视频模块上,首先要将播放类型选择互动模式,如下图;
将要播放的视频拖入右侧,将Video 1和Video 2这两个视频都拖拽到播放列表,如图:
选中播放列表中的结束命令按钮,下图红色区域部分:
然后鼠标点钟Video 1,沿着Video 1图标的边缘点击,鼠标会变成一只小手状,然后按住鼠标拖拽,会延伸出一条连线,拖到Video 2松开鼠标左键,如图
这样的操作可以实现两个视频循环播放,Video 1为初始视频;怎样通过APP 控制视频的播放和暂停?
在左侧“事件”选项卡下选择“UDP”命令图标,如图:
鼠标点住”UDP输入”拖拽到video 1的图标上松开鼠标,会弹出如图;
在“指定UDP输入”中输入“PlayVideo”,然后点击“高级”选项卡,会进入窗口如下:(注:在“指定UDP输入”这里可以随意编辑指令代码,不一定要用PlayVideo,在“指定UDP输入”这里填入什么
ASCII码,中控主机就发什么指令代码;)
点击“添加命令”按钮,在命令栏里选视频,在命令参数里选暂停,如上图,之后点击“确定”,会返回页面:
在video 1的图标下面会多出一个UDP的箭头图标,咱挺能指令已经添加成功;再将左侧的UDP按住拖拽至Video 1视频图标,后松开鼠标,如图
在“指定UDP输入”填“播放”,再点击“高级”选项卡,进入:
点击“添加命令”,在命令栏里选“视频”,在命令参数栏选恢复,之后点右下角“确定”,会返回下图
用同样的方式对Video 2进行操作,如下图:
演示文件编辑完成,现在已经可以实现两个视频的循环播放,及通过第三方触摸屏APP控制视频的播放暂停;(比如您项目用的是AMX、CRESTRON系统,只要将你在“指定UDP输入”这里填的ASCII码通过UDP的方式发给Brightsign播放器即可;播放器的网络端口号是:5000;IP地址如上所设;)
继续编辑,如果在Video 1视频播放的时候切换至Video 3;
将左侧的Video 3视频文件拖拽至右侧,如图:
在到“事件”选项卡,将“UDP”输入拖拽至Video1视频图标处松开鼠标,会弹出如下窗口:
在“UDP输入”填入“Video 3 插播”,在“指定下一状态”选择video 3.mp4;然后点击确定;
如下图:
用同样的方式将UDP输入命令拖拽至Video 2视频图标处,在“UDP输入”填入“Video 3 插播”,在“指定下一状态”选择video 3.mp4;然后点击确定;如图
这样就实现了,通过触摸屏APP控制,在播放Video 1和Video 2这两个视频的同时都可以快速切换到Video 3的视频播放;
以上所说的是第三方中控系统通过用UDP的方式去控制BrightSign播放器;下面说下如果用RS232去控制BrightSign播放器;
以上对BrightSign基本设置不在重复解释,主要说明几点主要地方的设置:1、先在“文件”菜单下的“演示属性”里设置串口波特率;
端口0~5的波特率改成一样的;
发送EOL、接收EOL如果选的是回车的话,在发送指令的时候结尾要加回车;
这个指定端口选的和“端口设定”里是一样的;
“指定串口输入”里面填通过串口向BrightSign发送的指令(随便定义);
注意:显示属性一定要选显示行;之后在确定;。