Informatica PowerCenter 7.1 简易使用手册
Informatica_PowerCenter 参数和变量使用指南
Informatica PowerCenter 参数和变量使用指南中国区唯一总代理神州数码(中国)有限公司2014年目录第一章参数和变量 (3)1、概述 (3)2、参数与变量存在的三种形式 (4)2.1系统级变量 (4)2.2 Mapping级参数与变量 (4)2.3 参数文件级参数与变量 (10)第二章参数文件格式 (12)1、标题格式和适用范围 (12)2、参数和变量类型 (13)3、实例 (13)第三章参数文件使用要点 (15)1、创建准则和使用注意事项 (15)2、PMCMD中使用参数文件 (17)第四章应用案例介绍 (18)1、定义M APPING的变量。
(18)2、在E XPRESSION组件中引用变量 (19)3、定义W ORKFLOW变量 (19)4、在E VENT W AIT组件中引用变量 (20)5、在S ESSION中引用变量 (21)6、在C OMMAND组件中引用变量 (22)7、参数文件定义 (22)8、S ESSION参数文件引用设置 (23)9、W ORKFLOW参数文件引用设置 (24)10、W ORKFLOW流程图 (24)第一章参数和变量1、概述参数和变量可以定义在工作流、工作集或会话中。
您可以使用WordPad 或Notepad 等文本编辑器来创建参数文件。
您在参数文件中列出参数或变量及其值。
参数文件可以包含以下类型的参数和变量:◆Integration Service变量◆Integration Service process变量◆Workflow变量◆Worklet变量◆Session参数◆Mapping参数和变量当您在工作流、工作集或会话中使用参数或变量时,PowerCenter Server将检查参数文件以确定参数或变量的开始值。
您可以使用参数文件来初始化工作流变量、工作集变量、映射参数和映射变量。
如果您不定义这些参数和变量的开始值,PowerCenter Server将在其它位置检查参数或变量的开始值。
Informatica PowerCenter

Informatica PowerCenter 高可扩展性与高性能的企业数据集成标准确立企业数据集成标准Informatica® PowerCenter® 为具备高可扩展性与高性能的企业数据集成软件确立了标准。
PowerCenter 可使您的 IT 组织能够通过单一方式访问、转换和传输数据,无需任何手动编码。
该软件的高可扩展性能可以支持海量数据并满足企业对安全和性能的需求。
PowerCenter 可作为所有企业集成方案的数据集成基础,包括数据仓库、数据治理、数据迁移、面向服务的体系架构 (SOA)、B2B 数据交换以及主数据管理 (MDM)。
•在正确的时间提供正确信息,让业务部门拥有其所需的及时、相关和可信的数据与报告,以便制定更准确、更及时的业务决策 •经济高效地进行扩展,以满足增长的数据需求,节约硬件成本,并降低与数据停机相关的成本和风险 •让开发人员、分析师和管理员团队能够更快更好地协作,共享和重复利用工作成果,以加快项目的交付速度“在我们这一行,至关重要的是能够抢先取得竞争优势和研究项目的投资回报。
不断增长的竞争只会进一步强调这一点,让你更容易理解‘时间就是金钱’这句话的含义。
在此艰难的环境下,Informatica [PowerCenter ] 为进行日常报告助了一臂之力,从而保证我们的团队具备最优的响应度和效率。
”– Alain Afios ,数据处理主管 研发部门,AventisBBVA Compass 是一家金融机构,在世界各地拥有 748 间分行。
该银行必须有效地检测、调查和报告可疑的洗钱活动,以符合国家和国际法规、指令及最佳实践的要求。
同时,该银行也需要降低合规成本。
BBVA Compass 依赖于 PowerCenter 来集成 17 个跨企业的数据源,其中包括拥有不同格式、结构和延迟性的贷款、信用卡、账户及在线银行交易数据。
PowerCenter 提供了金融活动与客户风险的全面视图。
Informatica PowerCenter常用转换组件使用说明

Informatica PowerCenter常用转换组件使用说明
1 Expression 作用:实现基于单行记录的表达式计算,执行任意非聚合计算。 用法:创建Expression 组件后,将需要用的字段从上一端口拖曳到Expression 组件,双击组 件,打开编辑,新增创建所需的输出端口,只勾选“O”为只输出端口,在“Expression”中 编辑表达式,确保分配与表达式返回值相匹配的端口数据类型。输出端口的命名惯例为 OUT_PORTNAME。 可以利用一个Expression 组件实现多个表达式转换工作,只要为多个输出端口输入一个 表达式,就可以在转换中创建任意多个输出端口。 2 Aggregator 作用:对多组记录执行聚合计算。 用法:将需要聚合运行的字段拖曳到Aggregator 组件,双击组件,在Port 选项卡中,勾选 要分组的列,新增输出端口,编辑聚合运算表达式。 与sort 组件联合使用可提高性能。 常用属性: Cache Directory 属性:创建索引和数据高速缓存文件的本地目录。 Sorted Input 属性:指示已按组预排序输入数据。用于改善会话性能。只有当映射将已 排序数据传递至聚合转换时,才选择此选项。 Aggregator Data Cache Size 属性:转换的数据高速缓存大小。 Aggregator Index Cache Size 属性:转换的索引高速缓存大小。 Transformation Scope 属性:指定PowerCenter Server 如何将转换逻辑应用于接收数据: -Transaction。将转换逻辑应用于事务中的所有行。如果数据行取决于同事务中的 所有行,但与其它事务中的行无关,则选择“Transaction”。 -All Input。将事务逻辑应用于所有传入数据。选择“All Input”时,PowerCenter 将放弃接收事务边界。如果数据行取决于源中的所有行,请选择“All Input”。 4 聚合函数: AVG COUNT FIRST LAST MAX MEDIAN MIN PERCENTILE STDDEV SUM VARIANCE 只允许聚合表达式出现在Aggregator Transformation 组件中。聚合表达式可以包括条件 子句和非聚合函数。还可以包括一个嵌入另一聚合函数的聚合函数,例如: MAX(COUNT(ITEM)) 可以在任意输出端口创建聚合表达式并使用转换中的多个聚合端口。
Informatica组件应用详解

Informatica组件应⽤详解Informatica组件介绍⼀、update的功能Update 主要是与lookup相组合的搭档。
根据lookup来与源表数据相对⽐,来跟新数据数据抽取。
它起到⼀个插⼊和拒绝的作⽤。
1.Powercenter的更新策略包括两个⽅⾯:A.在Mapping中:⽤Update Strategy Transformation标识⾏为Insert,Update,Delete或者Reject;B.在Session中:配置Treat source row as 属性(Insert,Update,Delete或者Data driven),配置Target的属性(Insert,Update [as Update](只是更新) | [as Insert](把更新视为新增) | [else Insert](先更新,更新不到则新增) ,Delete,Truncate target table option);2.在Update Strategy Expression中可以输⼊常量(DD_INSERT, DD_UPDATE,DD_DELETE, DD_REJECT)或者数字值(0,1,2,3),其它数字值被解析为0,可以⽤IIF或者DECODE函数构建逻辑表达式来区别每⼀⾏的更新策略;3.Forward Rejected Rows:勾选时被Rejected的⾏会存⼊对应Target配置的Reject⽂件中去,不选时,可能会写⼊Session Log中去,根椐当前Transformation的Tracing Level的属性来决定;如果在会话属性中配置了出错⾏⽇志属性,则不会⽣成Reject⽂件;⼆、Expression 的功能表达式编辑器可以使⽤不同的颜⾊来标记表达式的语法,以便很好的阅读。
如果你有最新的Rich Edit,riched20.dll,安装到了系统,表达式显⽰表达式函数为兰⾊,注释式灰⾊,引⽤的字符串式绿⾊。
Informatica安装手册

Informatica安装配置手册David Jiang1. 准备工作 (2)1.1. 安装环境 (2)1.2. 数据库准备 (2)2. Window下安装配置手册 (3)2.1. 安装Informatica 的相关组件: (3)2.2. 创建知识库(Repository) (8)2.3. 创建目录(Folder) (11)2.4. Repository Server Administrator密码 (12)2.5. Informatica Server 配置步骤 (13)3. Informatica客户端工具简介 (16)3.1. Designer (17)3.2. Reposiotry Manager (17)3.3. Repository Server Administration Console (18)3.4. Workflow Manager (19)3.5. Workflow Monitor (19)1.准备工作1.1. 安装环境工作站IBM PC及兼容机处理器-Intel Pentium®显示器-SVGA以上内存-建议128MB磁盘空间-70MBWindows 95/98,Windows 2000,Windows XP或者Windows NT 4.0。
服务器Informatica ServerUNIX(HP-UX™,AIX™,Solaris ™,Linux)Windows 2000,Windows XP,Windows 2003或Windows NT 4.0。
内存-256 MB磁盘空间-40 MBRepository ServerUNIX(HP-UX™,AIX™,Solaris ™,Linux)Windows 2000,Windows XP,Windows 2003或Windows NT 4.0。
内存-16 MB,并且每管理一个知识库增加16M。
磁盘空间-40 MB知识库所在数据库Database: Oracle,DB2,Sybase,MS SQL Server,Informix,Teradata磁盘空间-数据库100 MB(推荐150 MB)1.2. 数据库准备1.在要安装Informatica服务的主机上,要提供连接到关系型数据库的Native Driver。
原创Informatica使用说明(图解)
Informatica使用说明(图解)唾沫星冲锋枪 2013-4-22目录前言 (3)第一篇环境搭建 (3)服务器 (3)准备 (3)安装 (3)配置 (17)客户端 (23)准备 (23)安装 (24)介绍 (28)第二篇开发应用 (28)Repository Manager (28)环境介绍 (28)配置目录 (31)Designer (33)环境介绍 (33)配数据源 (34)引入数据源 (36)引入数据目标表 (38)制作Mapping (40)WorkFlow Manager (43)制作session (43)配置服务器数据源 (44)配置session源 (46)配置session目标 (47)制作workflow (48)执行workflow (50)WorkFlow Monitor (50)第三篇监控维护 (51)基本信息查看 (51)运行时间查看 (51)Session日志查看 (52)Workflow日志查看 (52)结束语 (53)前言个人从事ETL方面工作多年,各种工具都有一定了解,POWERCENTER是较为优秀的产品之一。
POWERCENTER是C/S模式,客户端开发服务器运行,本文主要介绍POWERCENTER 基本使用部分,详细的各个组件使用可以查阅相关帮助文档。
第一篇环境搭建服务器准备因为INFORMATICA把配置信息和开发的ETL过程信息都保存在资料库里,所以要预先准备一个数据库资料库。
本文采用oracle做资料库,名称INFO用户INFO密码INFO,配置好数据库的监听。
安装找到软件SERVER目录下的install.bat运行。
POWERCENTER的授权文件是按数据库接口出售的,支持数据库越多价格越高。
这里请注意配置,之前准备好的数据库资料库。
安装完成后可以查看一下服务项里面是否正常。
安装补丁。
因机器不同选择相应的补丁版本,如64位server系统需要补丁。
[IT计算机]InformaticaPowerCenter713机能绍介
![[IT计算机]InformaticaPowerCenter713机能绍介](https://img.taocdn.com/s3/m/936d20c17e192279168884868762caaedd33bade.png)
Informatica PowerCenter V7.1.3功能特性介绍杨晓东姜炜2006年01月1. S EQUENCE G ENERATOR组件 32. 共享的S EQUENCE G ENERATOR组件 43. 读取VSAM(C OBOL)源文件 54. 利用动态L OOKUP和自定义主键实现目标表的无主键更新 65. 读取E XCEL文件76. 笛卡儿乘积87. M APPING局部变量(LOCAL V ARIABLE) 98. 条件L OOKUP和自定义代理主键109. 调用外部过程(E XTERNAL P ROCEDURE) 1110. XML文件作为数据源和目标1211. U NION组件:合并同结构数据集1312. T RANSACTION组件:自定义事务1413. 读取DBF格式文件1514. 同数据源的自关联1715. 列/行转换1816. 行/列转换+条件汇总功能1917. 增量汇总2018. M APPING的参数/变量和S ESSION的参数 2119. 读文件列表(F ILE L IST) 2620. M APPING D EBUGGER功能2721. W ORKFLOW流程控制2822. 约束性装载3023. S ESSION分区(P ARTITION) 3124. E XTERNAL L OADER3225. 断点续传(S ESSION R ECOVERY) 3426. 源和目标的P RE SQL和P OST SQL 3527. M APPING D ESIGNER中提供多种缓慢变化维模板 3628. 对象的导出\导入\知识库的备份和恢复等操作 3729. S ESSION LOG和W ORKFLOW LOG的个数控制 3830. 悬挂(S USPENDING)W ORKFLOW3931. 跟S ESSION性能相关的参数设置4032. MX V IEWS使用4233. PMCMD命令4434. PMREP命令4635. MX FOR D ATA M ODELS571.Sequence Generator组件(参见例子:SequenceGenerator)Sequence Generator组件能产生不断增加的数值,从而可作为代理主键使用。
Informatica+PowerCenter开发配置手册
Informatica PowerCenter Developer Platform开发配置手册编写: 冷鹏版本: 1.1状态:初稿日期:2008年5月29日该文档是基于Informatica PowerCenter Developer Platform SP3 for Win32的环境写的,主要介绍开发平台的安装配置步骤,针对开发调试中出现的错误信息提出解决办法。
版权信息:© Copyright DigitalChina 2008.本文档未经许可,任何单位及个人不得传播、涉露本文档信息,违者必究编写历史目录1介绍 (4)1.1背景 (4)2开发平台安装 (5)2.1安装准备 (5)2.2安装步骤 (5)2.3配置说明 (7)2.3.1 环境变量 (7)2.3.2 相关文件拷贝 (8)2.3.3 端口号配置 (8)2.3.4 样本脚本修改 (9)3样例介绍 (10)3.1JAVA应用程序样例 (11)3.2Web JSP应用样例 (14)4参考 (19)4.1示例参考 (19)4.2示例参考 (19)1 介绍1.1 背景由于有越来越多的神州数码用户需要将Informatica开发的应用部署到企业系统中,如将Informatica Client中的ETL任务调度、监控功能嵌入到企业系统应用平台中。
而目前向Informatica Service发送任务请求的途径有3种方式,一种是常用的Informatica Client方式,如PowerCenter Workflow Manager执行任务调度;一种是命令行方式,如通过PMCMD方式执行StartWorkflow;还有一种就是通过Developer Platform API接口方式来执行任务调用,可开发Java或C/C++接口内嵌到应用程序或Web平台上进行使用,这样可将ETL功能与企业原应用系统整合起来。
因此该文档是基于第3种方式,力求给这些用户在安装配置InformaticaPowerCenter Developer Platform时一些帮助,文档是基于Informatica PowerCenter DeveloperPlatform SP3 for Win32的环境写的,主要介绍开发平台的安装配置步骤、Load Manager Java API样例介绍,针对开发调试中出现的错误信息提出析疑。
Informatica_Powercenter安装与配置参考文档

—Informatica Powercenter安装、配置及简单使用文档文档控制变更记录3日期作者版本变更参考目录1概述 (1)1.1读者对象 (1)1.2参考文档 (1)2软件简介 (2)2.1概念 (2)2.2作用 (2)3安装准备 (4)3.1系统要求 (4)3.2数据库账户 (5)3.3注意事项 (5)4POWERCENTER安装 (6)4.1服务器端安装 (6)4.1.1运行安装向导 (6)4.1.2选择安装类型 (7)4.1.3选择License Key (8)4.1.4选择安装路径 (10)4.1.5设置https协议 (10)4.1.6域选择与配置 (13)4.1.7配置节点 (15)4.1.8选择System账户 (16)4.1.9安装成功 (16)4.2客户端安装 (18)4.2.1运行安装向导 (18)4.2.2选择安装类型 (19)4.2.3选择安装路径 (20)4.2.4安装成功 (22)4.3官方文档安装 .......................................................................................................... 错误!未定义书签。
4.3.1运行安装向导................................................................................................. 错误!未定义书签。
4.3.2选择安装路径................................................................................................. 错误!未定义书签。
4.3.3安装成功......................................................................................................... 错误!未定义书签。
informatica+powercenter8.6简易使用手册

informatica powercenter8.6 简易使用手册(Windows)2009年9月27日目录第1章简介 (3)1.1概念 (3)1.2作用 (3)第2章安装配置 (5)2.1下载 (5)2.2服务器安装 (6)2.3客户端安装 (17)2.4服务器配置 (22)2.5客户端介绍 (27)第1章简介1.1 概念Informatica PowerCenter 是Informatica公司开发的世界级的企业数据集成平台,也是业界领先的ETL工具。
Informatica PowerCenter使用户能够方便地从异构的已有系统和数据源中抽取数据,用来建立、部署、管理企业的数据仓库,从而帮助企业做出快速、正确的决策。
此产品为满足企业级要求而设计,可以提供企业部门的数据和电子商务数据源之间的集成,如XML,网站日志,关系型数据,主机和遗留系统等数据源。
此平台性能可以满足企业分析最严格的要求。
Informatica PowerCenter 是建立可伸缩和可扩展的Informatica数据集成平台的核心和基础。
与Informatica PowerConnect产品一起使用,Informatica PowerCenter 可以提供对广泛的应用和数据源的支持,包括对ERP系统的支持(Oracle, PeopleSoft, SAP),对CRM系统的支持(Siebel),对电子商务数据的支持(XML, MQ Series),遗留系统,及主机数据。
Informatica PowerCenter 是最突出的分析性数据集成平台。
Informatica PowerCenter 是一个可以使大的企业或组织能够按其复杂的业务信息需求,读取、转换、集成遗留系统、关系型ERP,CRM,消息信息和电子商务数据的数据集成平台。
1.2 作用数据整合引擎Informatica PowerCenter拥有一个功能强大的数据整合引擎,所有的数据抽取转换、整合、装载的功能都是在内存中执行的,不需要开发者手工编写这些过程的代码。
informatica 服务配置
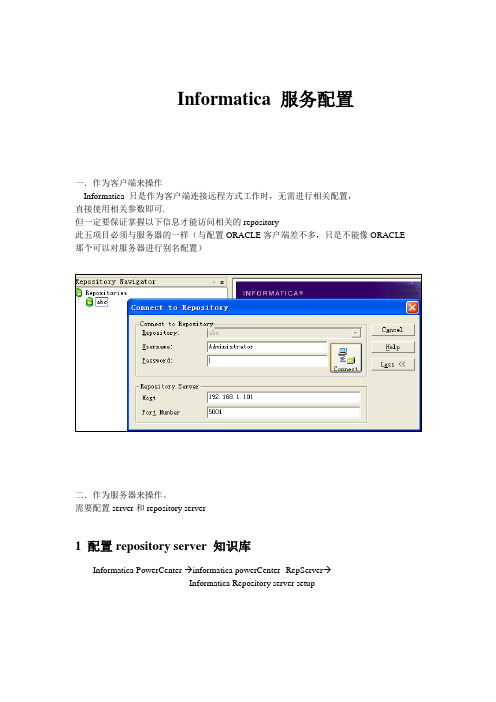
Informatica 服务配置一.作为客户端来操作Informatica 只是作为客户端连接远程方式工作时,无需进行相关配置,直接使用相关参数即可.但一定要保证掌握以下信息才能访问相关的repository此五项目必须与服务器的一样(与配置ORACLE客户端差不多,只是不能像ORACLE 那个可以对服务器进行别名配置)二.作为服务器来操作。
需要配置server和repository server1 配置repository server 知识库Informatica PowerCenter →informatica powerCenter--RepServer→Informatica Repository server setupConfigure repository server 较简单,只需要输入密码即可以。
(见图P_A11) 此密码会在连接知识库服务器时用到2启动repository server 知识库3创建知识库Informatica PowerCenter →informatica powerCenter--Client→Repository Server Administration console3.1创建知识库服务器点击New Server Registration 后出现下面界面Host name :输入主机的名字或IP3.2创建知识库Step 1 连接知识库服务器见图注意:此处的密码要与“配置知识库”的密码一致(图P_A11) 输入密码,点击OK进入下一界面Step 2 创建知识库---general页见图输入知识库的名字Step3 创建知识库---Database Connection页Databasetype : 选择数据厂商Codepage:不用理它Connectstring: 数据库连接串Dbuser: 数据库用户Dbpassword:数据库密码注意项:connectstring 根据选择的数据库厂商不同,字符串的格式也是不同的. Oracle:tns的名字SQLServer:hostserver@dbnameStep4 创建知识库---Licenses页将三种KEY (product key;option key;connective key)分别都UPDATE IJIF-NTMA-OCOX-QKQK-QBAYCLBW-KTAE-BHQH-PDXR-QBVJZQKZ-CFAY-JYZB-IIRR-NZYA如果发现已经过期(expiry) 可以调整本地日期来解决!4配置workflow manager4.1.打开workflowmanagerInformatica PowerCenter →informatica powerCenter--Client→Workflowmanager4.2.连接知识库输入password:Administrator(系统默认)可以在server config 中更改此处密码其它选项必须与知识库中的配置一致。
MATRIXx 7.1 用户指南说明书
RELEASE NOTESMATRIXx™Version 7.1These release notes contain system requirements, and information aboutnew features included in MATRIXx 7.1, the Xmath, AutoCode, andSystemBuild Modules.Platforms, Requirements, and DeliverablesMATRIXx runs on Windows 2000/NT/XP and Solaris 7 and 8.The MATRIXx 7.1 product CD includes Altia Design 5.28, AltiaFacePlate5.28, and the MATRIXx 7.1 Bookshelf in portable documentformat (PDF) .The MATRIXx Help requires an Internet Browser that can run JavaScript.Microsoft Internet Explorer or Netscape Navigator can be used. DocumentationThe MATRIXx Bookshelf is part of the MATRIXx 7.1 CD and can beinvoked from the Xmath Help menu or by opening the $MATRIXX/xmath/help/bookshelf/matrixx.pdf file in Adobe Acrobat Reader. TheMATRIXx Bookshelf displays a structured list of MATRIXx manualsavailable in PDF. To view PDF documents, you must have Adobe AcrobatReader Version 5.0.5 or later with Search and Accessibility to use thesearch functionality. You can download the reader from .The MATRIXx Bookshelf PDF includes documentation for all MATRIXxproducts including Xmath, SystemBuild, AutoCode, and DocumentIt. Italso includes FLEXlm End User Manual from Macrovision Software andanimation documentation from Altia.Hardcopy DocumentationPDF files can be printed on most printers. For more information on AdobePDF format or related products, refer to the Adobe Web site at. MATRIXx Help can be printed from the InternetBrowser.MATRIXx HelpMATRIXx provides a hypertext markup language (HTML) Help system.The MATRIXx Help is a self-contained system with multiple hypertextlinks from one topic to another. To start the MATRIXx Help and getinstructions on viewing, navigating, and printing topics, type helpmatrixx in the Xmath Commands window or direct your Internet Browserto file://$MATRIXX/xmath/help/help.html.the $MATRIXX environment variable as shown above. Alternatively, you may use theInternet Browser’s Browse feature when selecting File»Open in the browser. What’s New in MATRIXx 7.1The following features have been added since the release ofMATRIXx6.32:•Xmath graphics function plot2d()providing access to plot() anduiplot() features plus multiple windows and data viewing.•Xmath PC Debugger window allows you to interactively debug, edit,save, and re-run MathScript functions and commands.•Xmath PC command line now echoes the last invalid Xmath commandentered, highlighting the invalid part of the command. This makes iteasier to correct a mistake and re-enter the command.•Configuration management interface to commercial file and versioncontrol systems.•Enhanced SystemBuild Catalog Browser provides a Catalog view andFile view. The File view folders represent all currently openedMATRIXx data files and when selected, lists the catalog objects andXmath partitions associated with each file. The Catalog view adds newfolders for Model, Variables, User Types, and Xmath Partitions.•IfThenElse blocks now have output ports (pins) and a prolog section.•Block diagram enhancements, including allowing pins to enter or exitfrom any side, flexible block name positioning, and expandedcharacter set for labels.MATRIXx 7.1 Release •State Transition Diagram (STD) enhancements allow Input and Outputlabels to be defined and displayed on STD diagrams. The STDproperties dialog box now has Input, Output, and Comment tabs.•Optimized and restructured fixed-point functions achieving more than50% size reduction in some applications.•Code generation template for the Wind River RTOS: VxWorks 5.4.•Improvements to AutoCode and DocumentIt.•FLEXlm License Management Software was upgraded from 6.0kto8.4a. FLEXlm 8.4a has a license borrowing feature enablingMATRIXx to be used on a portable computer off-site with a borrowedlicense.•MATRIXx 7.1 replaces the FLEXlm mtxlmd license daemon in the$MTXHOME/ISILM directory with the National Instruments FLEXlmnilm license daemon residing in the new $MTXHOME/NILM directory. New or Improved FeaturesEnhanced Catalog BrowserThe Catalog Browser has an enhanced Catalog pane on the left side of theSystemBuild Catalog Browser, which has the following new sections underMain—Model, Variables, and UserTypes. A new Xmath Partitions sectionwas added. It can be expanded to display a folder to each Xmath Partition.Selecting an Xmath Partition causes the Contents pane (right side) todisplay the name, size, and comment for all of the variables in the partition.The model hierarchy tree which previously displayed under the SuperBlockfolder is now displayed under the new Model folder and will display nestedState Diagrams.The folders for SuperBlocks, State Diagrams, DataStores, Components,Variables, User Types, and Xmath Partitions each display anon-hierarchical list of elements.The Variables folder acts similarly to the DataStores folder. When selected,the Contents pane displays all of the Global Variables defined at this scopeof the catalog.The UserType folder, when selected, displays in the Contents pane all theUser Types defined in the Main SystemBuild Catalog. In previous releases,the User Types were stored in the Xmath partition _usertypes andcreated using the usertype Xmath GUI. Since the release ofMATRIXx7.0, User Types are now stored in the SystemBuild MainCatalog and can be created using the old usertype Xmath GUI, SBAcreateusertype command or by selecting File»New»UserType in theCatalog Browser.© National Instruments Corporation3MATRIXx 7.1 Release NotesState Transition Diagram EnhancementsTransition conditions displayed in the STD diagram can now optionallyselect U n (for example, U, U2, U3), InputLabels, or InputSignals in thetransition expression. The format of the outputs displayed on Bubbles(Moore) and transitions (Mealy) in the STD diagram can now optionallyselect ChannelNumbers, Y n (for example, Y, Y2, Y3), or OutputLabels.The InputLabels and OutputLabels are entered in the new Input, Output,and Comment tabs of the STD Properties dialog box. The InputLabels andOutputLabels entered in the STD Properties dialog box can be propagatedto STD references using the PropagateLabels checkbox in the STDreference block dialog box Display tab, similar to SuperBlock references.The STD Properties dialog box Input tab has the following fields:InstancePath, InputDisplay, Higher Level InputSignal(s), and InputLabel(s). The InstancePath fields display a list-box containingSBname/blkId for all locations this STD is referenced. Changing theInstancePath updates the Higher Level Input Signal(s) column to displaythe signal names of the inputs connected to the STD reference.The STD Properties dialog box Output tab has the following fields:OutputDisplay, OutputLabel(s), Activating Bubble(s), ActivatingTransition(s), Deactivating Bubble(s), and Deactivating Transition(s). Theactivating and deactivating columns show which BubbleIds or Transitions{FromBubbleId, priority} set or reset each STD output.Improved Block Face and InterfacesSystemBuild has interfaces that allow pins to enter or exit from any side(top, left, right, or bottom) for input or output pins. You can define a blockinput face and a block output face independently.You can rotate block names by using the rotation keyword. Block andblock name rotation are independent. You can use the new directionkeyword to toggle the definitions of the block input and output faces.Block Diagram EnhancementsSystemBuild 7.1 includes 4-way input/output face entry/exit. You canselect a left (existing), right, top, or bottom entry or exit for a block fromthe Inputs or the Display tab.MATRIXx 7.1 Release Configuration ManagementThe configuration management (CM) feature of SystemBuild enhances theability to manage data files in Rational ClearCase 3.2.1 or later, MerantPVCS6.6 or later, and (Windows) Microsoft Visual SourceSafe 6.0 or later.CM, accessed from the Versioning menu and the FileView tab of theCatalog Browser, has the following features:•Saves catalog items into their home files.•Provides a file view for viewing currently loaded files.•Tracks status on new, modified, moved, overwritten, and deleted items.•Provides a seamless interface to basic CM operations from withinSystemBuild.For detailed information about the above and other CM features, refer to theSystemBuild User Guide.Extended Character Set for LabelsSystemBuild supports an extended character set for block output labels andSuperBlock external input labels. This extended character set includes the!"#$%'*+,-./<=>?@^ characters and the rest of the standard ASCII128character set, except it excludes all control characters (ASCII 1–32)and (){}[]:;\`|~&.IfThenElse BlockThe IfThenElse block has been improved with output ports (pins) and aProlog section.The IfThenElse block output ports are available from the face of the firstcondition block in the IfThenElse block chain. You can connect to theseports as if they were the output ports of any other standard block. Outputfrom each of the block sections is connectable to the output ports the sameway the output of the content of a SuperBlock is connected to its externaloutput. With this capability, you no longer need to use variable blocks andthe Sequencer with the IfThenElse block.You can define default values for each output channel in the Prolog section.SystemBuild executes the Prolog section before any other IfThenElsesections. This guarantees that all of the output has been defined.If any of the output of the IfThenElse block is not connected in each sectionof the block structure, some output may not be assigned if that output is notdefined in the branch of the block that is being executed. This can causesome of the output to be undefined unless you use the Prolog section.© National Instruments Corporation5MATRIXx 7.1 Release NotesThis section appears as the uppermost section in the block and is definedby typing prolog in the Code tab of the IfThenElse Block Propertiesdialog box.Signal SplittingSignal splitting is now marked in a diagram. Signal splitting occurs whenone output is connected to the input of multiple blocks. These markers areplaced automatically on the SystemBuild diagram whenever two or moreconnection lines that share the same path from the same source branch off.AutoCode and DocumentItAutoCode7.1 provides the following new features:•Fixed-point libraries (standalone utilities and more source code files)•Variable step-size solver•Code Generation template support for VxWorks 5.4•Name mangling report•makefile generation and the acmake command•The AutoCode SDK interface is now part of the AutoCode productXmathXmath 7.1 introduces plot2d(), a graphics function that provides ashortcut to PGUI uiPlot() features for users familiar with the plotfunction. plot2d() accepts the parameters and keywords of both plot()and uiPlot(). By converting plot() function calls to plot2d(), youcan employ all uiPlot() functionality, including:•Multiple Plot Windows—You can create plots on multiple windowsfrom the Xmath Commands window and address plot commands toany given existing plot window.•Enhanced Command Capability—You can specify and update allplot attributes with keywords issued from the Xmath Commandswindow.•Interactive Data Viewing—With the mouse, you can interactivelydisplay the x and y values of points along any plot line.•Multiple Y Axes—You can display multiple Y axis scales on a plot.•Improved Default Background and Line Colors—New defaultbackground and line colors improve the visual presentation of plots.•Improved Plot Attributes—Grid line and tick mark spacings, as wellas text font sizes, are determined relative to the size of the plot.•Plot Legend Placement—You control placement of plot legends withplot2d command options.MATRIXx 7.1 Release For more information about Xmath graphics, refer to the Xmath User Guideand the uiPlot and plot2d topics of the MATRIXx Help.Xmath Debugger WindowThe Xmath Debugger Window is now available for Microsoft Windowsand allows you to interactively debug MathScript functions and commands.All debugging functions can be controlled from it. The PC DebuggerWindow has the same layout as the UNIX version. The editable sourcecode is displayed on the top with the error message area in the middle andan array of buttons for controlling the debugging session on the bottom.The line that is about to be executed is highlighted, unless there are errorsin the function, in which case the highlighted line points to the error.Breakpoints can be set by moving the cursor in the source code to thedesired line of code and the clicking the Set Break button.Watchpoints can be set by using the mouse to highlight the name of thevariable you want to watch and clicking the Set Watch button.One use case for the Debugger Window is when an error occurs in afunction. In that case, the Debugger Window displays highlightingthe line in error. The function source code can be modified and saveddirectly in the Debugger Window. By clicking the Rerun button, thefunction can be rerun using the same input arguments. Additional MATRIXx InformationFor more information on MATRIXx or other National Instrumentsproducts, refer to the National Instruments Web site at .Refer to the MATRIXx product documentation or visit /supportfor more information.© National Instruments Corporation7MATRIXx 7.1 Release NotesAutoCode™, DocumentIt™, MATRIXx™, National Instruments™, NI™, ™, SystemBuild™, and Xmath™ are trademarks of National Instruments Corporation. Product and company names mentioned herein are trademarks or trade names of their respective companies. For patents coveringNational Instruments products, refer to the appropriate location: Help»Patents in your software, the patents.txt file on your CD, or /patents.© 2003–2004 National Instruments Corp. All rights reserved.371151A-01Apr04 *371151A-01*。
informatica powercenter使用交流

Workflow Manager
• • • • 设置数据库联接 创建Mapping实例(session) 制作Workflow 实现ETL过程
Workflow调度
• 运行(Start) •flow Monitor
• 监控Workflow • 查看结果
主要内容
• • • • • ETL背景知识介绍 Informatica PowerCenter 框架介绍 客户端工具介绍 组件介绍 服务器端介绍
transformation组件介绍
• Active(所有 input/output):表示该 transformation可以改变通过它的数据 的行数
ETL的主要功能
• 数据抽取(data extract) • 数据转换(data transform) • 数据装载(data loading)
数据抽取(data extract)
• 数据抽取功能是确定数据采集所涉及到的数据 源并采集原始数据。数据抽取通过不同的数据 接口,实现从不同的网络、操作平台、数据库 及数据格式和应用中抽取数据,并能通过对数 据源的分析,抓取原始数据的元数据,为后续 的数据转换等工作提供了基础。
Repository Manager
• • • • 连接已有的repository 加入新的repository(已存在) 查看已有工作区 创建新的工作区
Designer
• • • • • 导入/创建数据源元数据 导入/创建目标数据元数据 制作ETL计算规则(Mappings) 调试Mappings 设置变量和参数
– Source Qualifier、 Aggregator、 Filter, Update , Router, Normalizer , Joiner,rank
Informatica PowerCenter for AIX安装配置手册
目录1 使用 32 位和 64 位平台 (1)2 最低系统要求 (1)3 数据库环境 (3)4 从UNIX连接至数据库 (3)4.1概述 (3)4.2连接至ORACLE数据库 (4)4.3配置本地连接 (5)5 POWERCENTER SERVER在 AIX下的安装 (7)5.1配置环境变量 (7)5.2开始安装 (9)6 创建REPOSITORY SERVICE 以及 INTEGRATION SERVICE (21)7 启动/停止NODE上的INFORMATICA SERVICES (24)7.1 UNIX下停止NODE服务 (24)7.2使用ADMINISTRATION CONSOLE停止INFORMATICA服务 (24)7.3停止DOMAIN (25)8 卸载INFORMATICA POWERCENTER ............................ 错误!未定义书签。
1使用 32 位和 64 位平台PowerCenter 支持以下 64 位平台:✧AIX✧Itanium 上的 HP-UX运行在使用 32 位和 64 位平台时请遵照以下准则:✧库。
依据以下准则链接库:◆将 32 位应用程序链接至 32 位库,而将 64 位应用程序链接至64 位库。
◆将 32 位 PowerCenter Server 链接至 32 位数据库客户端,而将64 位 PowerCenter Server 链接至 64 位数据库客户端。
✧数据库客户端。
将 32 位 Repository Server 链接至 32 位数据库客户端,而将 64 位 Repository Server 链接至 64 位数据库客户端。
✧PowerCenter Server 和 Repository Server。
32 位和 64 位PowerCenter Server 以及 Repository Server 相互兼容。
✧高速缓存。
informatic培训教材2

3
抽取, 抽取 转换 和装载
Operational Systems
RDBMS Mainframe Other
Decision Support
Data Warehouse
• Transaction level data • Optimized for transaction response time • Current • Normalized or De-normalized data
Repository
Not Shown: Client ODBC Connections for Source and Target metadata 18
PowerCenter Architecture: Engine-based and Metadata-driven
Client Tools
Windows XP, 98, NT 4.0 2000, 2003 SAP R/3 & BW PeopleSoft Siebel MQ Series Heterogeneous MSFT MQ TIBCO Sources webMethods Oracle MS SQL Server JMS
TCP/IP TCP/IP PowerCenter Server Engine Buffers
Targets
Native ODBC PowerConnect
GDR
Object Repository
Native ODBC
PowerConnect
Key Data Metadata
UNIX (AIX, HPUX, Solaris, Linux) Windows NT 4.0, 2000, XP, 2inues to lead in the ETL tools market
Informatica_PowerCenter培训教材

Administratortion Console:用于知识库的建立与维护 Repository Manager:知识库管理,包括安全性管理等 Desinger:设计开发环境,定义源及目标数据结构;设计转换规则,生成ETL映射 Workflow Manager:合理地实现复杂的ETL工作流,基于时间、事件的作业调度 Workflow Monitor:监控Workflow和Session运行情况,生成日志和报告
NATIVE
ODBC NATIVE
目标
TCP/IP
Administrator Console
Informatica客户端
PowerCenter 服务端
UNIX (AIX, HPUX, Solaris, Linux) Windows
PowerCenter Server和数据移动
源数据
已转换数据
数据源
⑤
WF
① 定义源
② 定义目标
③ 创建映射
⑥
④ 定义任务
⑤ 创建工作流
M
⑥ 工作流调度监控
Designer:
①~③
Workflow Manager: ④~⑤
Workflow Monitor: ⑥
第一步:定义源
源分析器
ODBC
Mapped Drive
NFS Mounting
Local Directory
OPB_SRC_FLD_ ……
第二步:定义目标
目标分析器
ODBC Mapped Drive NFS Mounting Local Directory
▪ 引入目标的类型
• Relational database
• Fject • Application
informaticapowercenter快速上手,入门指导
informaticapowercenter快速上手,入门指导Informatica 快速上手安装以及服务端配置那部分就不写了,直接从客户端使用开始。
本人使用的是informatica 8.6,xp系统,oracle 11g数据库首先打开PowerCenter Repository Manager然后点击菜单栏中的第一项:Repository选择Configure Domains 弹出窗口点击红圈的按钮,添加新的domains,弹出小窗按照服务端设定的内容填写,然后点击OK会出现你刚刚新添加的domains,然后右边选择你需要的资料库,勾上。
回到主界面左边的Repository Navigator里面已经有资料库了,双击你需要的那个数据库,出现弹窗这里填入你服务端里面设置的用户名密码,一般有默认的Administrator,密码也是Administrator,且权限最高,其他用户需要他赋予权限才能使用powercenter内容,所以这里直接使用Administrator用户,点击connect登录。
登陆后,进入资料库资料库里面是按文件夹存储的点击菜单栏中的Folder——create,来创建新的文件夹,跳出弹窗把Name改一下,这里是做入门上手练习,所以取名Practise然后点击确定,这时,资料库中会多出Practise文件夹,我们选中,然后点击工具栏中的D图标,进入PowerCenter Designer因为选中了Practise,所以进入PowerCenter Designer之后,会直接打开此文件夹,然后就能进行入门练习了。
但之前我们还有一步要做,就是导入表。
导入练习所需要的表,sql脚本在客户端bin文件夹内smpl_db2.sqlsmpl_inf.sqlsmpl_ms.sqlsmpl_ora.sqlsmpl_syb.sqlsmpl_tera.sql以oracle为例,执行脚本smpl_ora.sql,但是因为脚本使用的是us时间制,所以先改变数据库会话的时间格式:alter session set nls_language=American;alter session set nls_date_format = 'DD-MON-YYYY';然后执行脚本,如果有什么限制的,请赋给用户dba权限之后,再执行脚本,之后就能开始练习了。
Informatica完全快速学习手册.

1Informatica概述 (3)2安装Informatica8.6.1 (3)2.1服务端安装 (3)2.2客户端安装 (7)3配置管理服务器 (9)3.1创建知识库和集成服务 (9)3.2客户端到集成服务端的连接 (12)4PowerCenter Designer学习 (13)4.1概念和基本定义 (13)4.2Mapping设计和组件的使用 (15)4.2.1实例一:聚合抽取 (15)4.2.2实例二:取TOP前三条记录 (16)4.2.3实例三:抽取XML源 (19)4.3WorkFlow的设计和使用 (20)4.3.1创建Session (20)4.3.2设计WorkFlow (22)4.4Repository Manager (23)1 Informatica概述Informatica一直致力于为客户提供具有强大的元数据管理、数据集成和个性化分析递送功能的世界通行标准的统一数据服务平台。
Informatica的基础设施产品以可伸缩的、可扩展的企业级数据集成平台为特点,并广泛支持来自Informatica和其他的领先商务智能提供商的数据仓库基础设施和分析型应用软件的开发和管理,提供元数据管理解决方案,帮助企业集成、优化、审核信息资产以提高运营效率,增加客户收益,取得竞争优势。
详见文档:2 安装Informatica8.6.1这里以Informatica8.6.1为例:2.1 服务端安装找到安装目录pc861_win32_x86.zip\Server\Windows\Disk1\InstData\VM下点击安装选择安装语言,这里以中文版为例点击下一步,并选择安装PowerCenter8.6.1必须选择事先准备好的安装密匙选择安装路径HTTPS配置,配置管理控制台与配置管理器的安全通信(如果没有使用该端口就采用默认)配置好Informatica域并进行下一步,取掉为特定用户启动Informatica Services,点击完成安装2.2 客户端安装选择安装设置安装路径安装完成后可以看到包含的所有工具3 配置管理服务器3.1 创建知识库和集成服务接下来我们主要是配置知识库管理服务器,PowerCenter数据整合引擎是基于元数据驱动的,提供了基于元数据驱动的元数据知识库(Repository),知识库是PowerCenter的核心。
Informatica_常用组件使用方法

常用组件使用方法表1中列出的是informatica中的所有组件。
不会在本文档中出现的会在组件名后标出。
表1Lookup概要描述获得一个关联的值。
例如:源里包含employee ID,但你还需要employee name。
用于计算的值。
例如:只是汇率或者个人所得税之类的固定数值,不是计算得出来的数据。
Update slowly changing dimension tables。
主要是根据条件查出原表,若查出了,就把自己添加的标志位设为真,否则就设置为假。
Connected or unconnectedConnected 和unconnected 的transformations的输入和输出是不同的,不同点如表2列出的。
表2Connected下面是Integration Service处理connected Lookup transformation的过程:1.一个connected Lookup transformation通过pipeline从其他的transformation获得输入值。
2.为每个输入行,Integration Service会通过lookup ports 和condition从源或者缓存中查询。
3.如果组件没有使用缓存或者使用的静态缓存,Integration Service会使用lookupquery来返回值。
4.如果组件使用的动态缓存,当Integration Service在缓存找不到这行,它会把这行插入到缓存中。
当Integration Service找到这行,它会修改这行在缓存中或者什么都不做。
它标记这行是插入、修改或者是不做变动。
5.Integration Service从查询中返回值到下一个transformation。
如果transformation使用动态缓存,你可以把这行通过Filter 或者Router transformation来过滤后在到目标中。
- 1、下载文档前请自行甄别文档内容的完整性,平台不提供额外的编辑、内容补充、找答案等附加服务。
- 2、"仅部分预览"的文档,不可在线预览部分如存在完整性等问题,可反馈申请退款(可完整预览的文档不适用该条件!)。
- 3、如文档侵犯您的权益,请联系客服反馈,我们会尽快为您处理(人工客服工作时间:9:00-18:30)。
Informatica PowerCenter 7.1简易使用手册原:神州数码改:海联讯软件和集成中心编辑人:张旭2008 年11 月目录1. 使用Informatica PowerCenter 的准备工作 (3)1.1 启动Informatica Repository Server 和Informatica Server (3)1.2 创建资料库 (3)1.3 创建Folder (3)2. Informatica 客户端介绍 (3)3. Informatica PowerCenter 工作流程 (5)4. Step1:在Designer 中连接资料库 (5)5. Step2:打开Folder (7)6. Step3:引入数据源结构 (7)7. Step4:引入目标结构 (10)8. Step5:设计Mapping (11)9. Step6::设计Workflow (16)10. Step7:运行Workflow (20)11. Step8:查看作业运行情况 (21)1. 使用Informatica PowerCenter 的准备工作配合本手册使用的有两个文档:一个是安装手册;一个是中文的培训资料(介绍各客户端工具的用法)。
具体的可以参照使用,此处不再赘述1.1 启动Informatica Repository Server 和Informatica Server安装配置完后,就可以启动Informatica Repository Server:1、Windows 平台:控制面板-> 服务->启动Informatica Repository Server 和Informatica Server2、UNIX 平台:启动Repository Server 在安装目录RepServer 下,运行pmrepserver启动Informatica Server 在安装目录Server 下,运行pmserver1.2 创建资料库通过客户端Repository Server Administration Console 创建资料库具体参见安装手册相关章节1.3 创建Folder通过客户端Repository Manager 创建Folder具体参见安装手册相关章节2. Informatica 客户端介绍Informatica 提供基于对象的,无需编码的全图形化开发环境,最大地提高开发生产力,有5 个客户端工具:3. Informatica PowerCenter 工作流程在整个设计流程中涉及的客户端有:PowerCenter DesignerWorkflow ManagerWorkflow Monitor4. Step1:在Designer 中连接资料库需要连接已经创建好的资料库,方法如下:假设SQL_Test 是我创建的资料库,连接的方法有两种:1)选中后,鼠标右键->connect,见左图2)选中后,点击工具栏connect,见左图连接时需要输入用户名和密码5. Step2:创建并打开Folder资料库连接后,需要打开在Repository Manager 创建的Folder创建Folder方法:在菜单栏中找到Folder按钮,点击后选择Create打开Folder 的方法有几种:1)双击Folder2)选中Folder,右键—>open3)选中Folder,点击工具栏的OPEN6. Step3:引入数据源结构Folder 打开后,就可以进行实际的设计工作了。
首先要引入数据源结构介绍一下工作区:图Workspace_1Source Analyzer: 设定当前的工作区为Source Analyzer在Source Analyzer 中引入和创建源表结构,如:平面文件, XML, COBOL, Application 以及关系型数据源。
Warehouse Desinger: 设定当前的工作区为Warehuse Designer(8.1.1版中是Target Designer)使用Warehouse Designer 定义目标结构,如:关系型表, 平面文件, XML 文件等。
可以从关系型数据库、平面文件中引入结构,或者手工创建。
Transformation Developer: 设定当前的工作区为Transformation Developer使用Transformation Developer 来创建可复用的组件Mapplet Designer: 设定当前的工作区为Mapplet Designer使用Mapplet Designer 来创建mapplet,Mapplet 就是一系列可包含源结构以及转换组件的可复用逻辑。
Mapping Designer: 设定当前的工作区为Mapping Designer使用Mapping Designer 来创建mapping,mapping 就是一系列包括源、目标以及转换组件的逻辑组合,在这里面实现了数据转换的规则。
1、点击Source Analyzer,引入已经存在的数据源表结构。
数据源可以是RDBMS、Flat file、Cobol file、XML file、ERP(SAP 等)等对于RDBMS、Excel 等数据源需要定义ODBC,通过ODBC 连接以RDBMS 为例:图Workspace_2步骤:A.菜单栏中点SourceB.点击Import from Database按钮C.选择数据库类型,填入源数据库的用户名和密码D.选择要导入的表后,点OK键PS:导入的只是表结构按照图中标注操作,数据源结构就显示在Source Analyzer 工作区2、手工创建表结构在Source Analyzer 状态下,从菜单Sources->Create,弹出下面的界面:在上面的界面中选择Database type,输入Table name,然后点击Create->Done,这样就创建了一个空的结构。
双击或“Edit”,进入Column 定义界面,具体参见下图:数据源表结构引入后,就需要保存。
7. Step4:引入目标结构接下来引入目标结构。
在图Workspace_1 点击Warehouse Desinger(Target Designer),界面就由“Sources”变成了“Targets”。
引入目标结构的过程同“图Workspace_2:引入数据源结构”。
详细说明入下步骤:A.菜单栏中点TargetB.点击Import from Database按钮C.选择数据库类型,填入源数据库的用户名和密码(PS:因为要放入的目标库的表的结构和源数据一样,所以从源数据表中导入即可)D.选择要导入的表后,点OK键PS:导入的只是表结构。
但是上述步骤后,目标数据库中并没有相应的表,因为上述步骤只是将表结构导入到Designer软件的视图中。
所以下面还要在目标库中创建相应的表(结构)。
创建方法如下:通过菜单Targets->Generate/Execute SQL… ,见下图:在此界面中,generate from下的两项是指要在目标库中创建所有软件的操作界面(target designer)中的所有表还是在界面中选定的表,。
Generation options指创建表时,要把界面中的表结构的哪些属性传递给目标库中的表。
一般要选Create table,其它项根据实际项目情况选择,此例中按照上图中的选择点上勾就可以了。
然后点connect…按钮,在弹出的界面中填入目标库的连接信息以连接目标库,这个操作的作用是连接目标库,以便将最后产生的建表SQL语句在目标库中执行。
最后点Generate and execute按钮(作用:生成SQL语句,在目标库进行建表)。
完成后,会提示是否保存此次所执行的SQL语句,随意。
8. Step5:设计Mapping到此,数据源结构和目标结构都已经引入,接下来就可以设计Mapping 了。
Mapping 是ETL 设计的开始,是具体的ETL 规则设计,它包含三方面的信息:数据源信息、转换信息、目标信息。
在Mapping 中,主要工作就是转换。
Informatica PowerCenter 提供了20 多种组件,100 多个转换函数,基本上能够满足正常的需求;另外还可以调用外部的存储过程等。
此处举一个简单的例子,用来说明Mapping 设计流程。
需求描述:数据源是Customer 表,字段有CUST_ID、CUST_NAME 等,目标是ODS_CUSTOMER_ACTIVE,结构完全一样;转换的规则是将Customer.CUST_Name 分别加一后缀“_AA ”后赋给ODS_Customer.CUST_Name,其它数据原样加载。
设计思路:从需求看,转换部分需要使用表达式组件,负责CUST_Name 字符串处理。
在表达式组件中增加一新的字段,用来作为存储转换后的表达式结果,新的字段是CUST_Name_OUT,这个字段作为输出字段,输入字段就是CUST_Name(可以直接用鼠标从Source Qualifier 将字段拖入表达式组件),转换的表达式即CUST_Name||’_AA’。
1)点击Mapping Designer,将数据源和目标拖入工作区2)创建表达式组件,方法有二:①在工具栏处点击表达式组件,图标见下,直接拖入Mapping Designer 工作区②或者在菜单Transformation->Create,出现下面的界面在上图”Select transformation type”选择Expression,并输入新的名字:EXP_Cust_Name 3)将CUST_Name 拖入表达式组件,见下图:4)双击或编辑表达式组件,选择Ports,见下图图Workspace_3点击图Workspace_3 红颜色标注1 的按钮,新增一个Port,命名CUST_NAME_OUT,修改CUST_NAME 为输入,CUST_NAME_OUT 为输出(按照图Workspace_3 标识的操作)。
然后在图Workspace_3 红颜色标注2 处点击进入,书写表达式,见下图:图Workspace_4表达式的写法见图Workspace_4 ,这就是规则。
5)将CUST_NAME_OUT 传入目标表CUST_NAME,见下图:6)由于其它数据不做变化,直接加载,所以将SQL Qualifier 中的其它字段分别拖入目标ODS_CUSTOMER_ACTIVE,也可以利用Informatica 自动匹配功能,具体见下:①在Mapping Designer 工作区,右键,弹出一个菜单,见下:②选择Autolink,进入下图界面From:表示连接的源头,在这里选择SQ_CUSTOMERTo:表示连接的目标,在这里选择ODS_CUSTOMER_ACTIVEBy:Name 是按照名称匹配;Position 是按照位置匹配。
