标致206用户使用手册
标致206用户使用手册

资料来源:国内最大的维修资料库 精通维修下载站 :/
资料来源:国内最大的维修资料库 精通维修下载站 :/
资料来源:国内最大的维修资料库 精通维修下载站 :/
资料来源:国内最大的维修资料库 精通维修下载站 :/
资料来源:国内最大的维修资料库 精通维修下载站 :/
资料来源:国内最大的维修资料库 精通维修下载站 :/
资料来源:国内最大的维修资料库 精通维修下载站 :/
资料来源:国内最大的维修资料库 精通维修下载站 :/
资料来源:国内最大的维修资料库 精通维修下载站 :/
资料来源:国内最大的维修资料库 精通维修下载站 :/
资料来源:国内最大的维修资料库 精通维修下载站 :/
资料来源:国内最大的维修资料库 精通维修下载站 :/
资料来源:国内最大的维修资料库 精通维修下载站 :/
资料来源:国内最大的维修资料库 精通维修下载站 :/
资料来源:国内最大的维修资料库 精通维修下载站 :/
资料来源:国内最大的维修资料库 精通维修下载站 :/
资料来源:国内最大的维修资料库 精通维修下载站 :/
资料来源:国内最大的维修资料库 精通维修下载站 :/
资料来源:国内最大的维修资料库 精通维修下载站 :/
资料来源:国内最大的维修资料库 精通维修下载站 :/
资料来源:国内最大的维修资料库 精通维修下载站 :/
资料来源:国内最大的维修资料库 精通维修下载站 :/
资料来源:国内最大的维修资料库 精通维修下载站 :/
资料来源:国内最大的维修资料库 精通维修下载站 :/
资料来源:国内最大的维修资料库 精通维修下载站 :/
资料来源:国内最大的维修资料库 精通维修下载站 :/
标致206介绍解析

MA
TU5JP4 N6A
(BOSCH ME7.4.5) MA
AL4
介绍,举升
严禁用发动机支架或后桥举升
概述
车身,结构
- 车身结构是由加强区、变形区组成的,降低了对乘客造成的 伤害。 - 白车身全部使用钢板制成。
- 包括可拆卸部分白车身重量为272kg。 - 白车身有3500个焊点。 - 发动机罩、顶盖、尾门、车门(等)钢板厚度为 0,7mm。
206 介 绍
介绍
外部风格
前风档玻璃很靠前、倾斜 •前车灯拥有独特的、倾斜的轮廓曲线; •后雾灯设计在后保险杠中央;
介绍
内部风格
流线型的设计风格
尺寸
介绍,总体特性
介绍,总体特性
车辆识别
车型
DC7146A DC7146B
DC7166A DC7166B
发动机 变速箱
TU3AF KFW
机械,转向
机械转向
-助力转向装置采用集成型油缸。 - 球阀内有油道。 -泵的进油管和流向储油缸的回油管的固定是用夹板实现的。 -挺杆的调整是通过拧紧堵塞来实现的(1)
机械,转向
助力转向泵
储油罐(2) 安装在泵上面; 储油罐有一个橡胶保护装置,以防止发生事故时,储油罐破裂 ,油喷到四周。
机械,转向
装备,雨刮
前雨刮
前挡风玻璃非常宽大,左雨刮片的长度有650 mm,右雨刮 片是 400 mm。
装备,雨刮
后雨刮
间歇扫动式雨刮器,由智能电控单元盒控制,并通过铆钉 (6)固定。 只有1个前后风档玻璃储液罐(2.8升)位于右前轮罩处。 只有1个泵,根据它的极性给前或后喷嘴供水。
装备,报警
206说明书
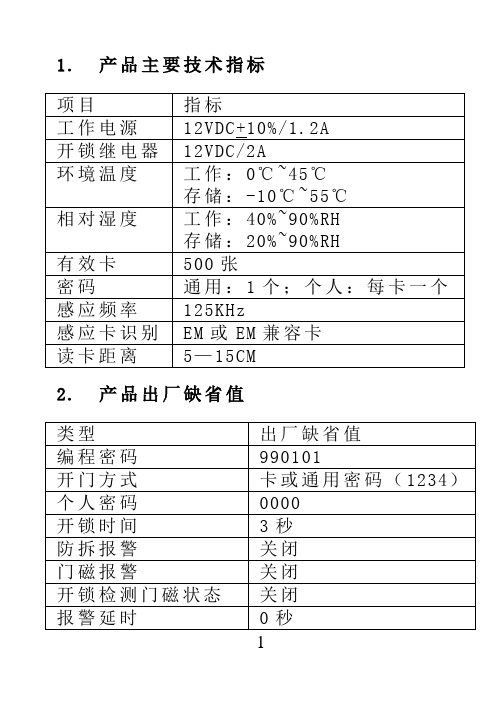
1.产品主要技术指标2.产品出厂缺省值3.声光显示3.1.正常工作状态下:3.1.1.有效指令:嘟短声3.1.2.无效指令:嘟长声3.2.编程状态下:3.2.1.绿灯常亮3.2.2.有效指令:嘟嘟两声3.2.3.无效指令:嘟嘟嘟三声4.撤销未完成的指令:在键入指令没有全部完成前,按下[*]键,可以撤销该项指令5.功能及设置5.1.进入编程:[*]+[6位编程密码]缺省:990101,使用时请修改此密码5.2.修改编程密码:[0]+[输入6位新编程密码]+[重复输入6位新编程密码]25.3.设置有效卡:[5]+[输入3位编码]嘟嘟+[感应卡1]嘟、嘟嘟+[感应卡2]嘟、嘟嘟+……+[感应卡n]嘟、嘟嘟+[*]嘟嘟,完成加卡5.3.1.3位编码:是000——500之间不可重复数字。
该编码是在卡丢失后删除卡的重要方式,请发卡人员妥善保存卡编码5.3.2.连续设置有效卡时,每张卡的编码按前一张卡的编码+1递增。
例如输入编码为015,再次读卡时,再次卡的编码为016……依次类推5.4.删除有效卡:5.4.1.编码方式删卡:[7]+[输入3位编码1]嘟嘟+[输入3位编码2]嘟嘟+……+[输入3位编码n]嘟嘟+[*]嘟嘟,完成删卡35.4.2.感应方式删卡:[7]+[感应卡1]嘟、嘟嘟+[感应卡2]嘟、嘟嘟+……+[感应卡n]嘟、嘟嘟+[*]嘟嘟完成删卡5.4.3.删除所有已设置卡:请使用恢复出厂设置的方式5.5.退出编程状态:[*]嘟嘟5.6.设置感应卡的开门方式:5.6.1.卡或通用密码:缺省5.6.2.卡+个人密码:5.6.2.1.有效卡缺省个人密码:0000,此时该卡采用“读卡开门”的通行方式5.6.2.2.当有效卡的个人密码修改为非0000的4位数字后,该卡只能采用“卡+个人密码”方式通行5.6.2.3.修改个人密码:非编程状态下[#]嘟嘟+[读感应卡]嘟、嘟嘟+[输入4位原密码](缺省0000)嘟嘟+[输入4位新密码]+[重复输入4位新密码]嘟嘟;45.7.修改通用密码:[3]+[4位通用密码]当通用密码为0000时,通用密码失效,此时控制器没有通用密码可以开门5.8.设置开锁时间:[2]+[TT]。
DPF206标准版说明书

DPF 软件说 明 书Buildwin International (Zhuhai) Limited 4/F, 3D Tech Building, No.184 Bailian Road, JiDa Zhuhai, GuangDong, PRC Tel: +86 (756) 3882190 Fax: +86 (756) 3882193 1产品简介本产品是一款便携式电子图片显示设备,用户可以方便地通过PC的USB接口将图片下载到此设备 中,随时随地进行查阅。
方案实物图:1.1 寸 3 键方案1.1 寸 4 键方案1.5 寸 3 键方案1.5 寸 4 键方案图 12功能说明DPFMate 本方案提供一款功能完善、操作快捷的 PC 端软件 DPFMate(数码相框伴侣) 。
DPFMate 主要完 成下载图片到数码相框的功能,本款软件还提供中英语言切换、图片剪切、添加“大头贴”花 边等人性化功能。
标准版 DPFMate 功能: 1) 兼容各个小屏数码相框方案 2) 兼容多种 SPI Flash 3) 相片效果预览功能 4) 读取并保存设备中相片功能 5) 图片剪切功能 6) 语言选择(中文、英文) 7) 支持图片格式:JPEG、JPG、BMP、TIF、GIF、BNG 菜单 本方案支持丰富的菜单选项并且支持用户菜单信息保存功能,扩展菜单方便快捷。
标准版现有菜单功能选项有: 1) 调节 LCD 对比度。
2) 选择二级背光状态。
3) 用户定制无操作自动关机的时间。
4) 用户定制自动播放图片时间间隔。
5) 删除当前图片、删除所有图片。
温度显示 本方案支持精度为 0.5°C 的温度显示功能,显示范围为:-20°C ~ 50°C。
2支持最多 9 个按键 本方案可以支持最多 9 个按键,除了标准版支持的 3 个按键外,用户可以进行 6 个按键的扩充 添加更多的按键控制功能。
usr-lg206-l-c-产品使用手册说明书
USR-LG206-L-C 产品使用手册目录一、基本说明 (3)1.1结构框图and 数据流向(服务器主动下发模式)....................................................................................................41.2资料下载.....................................................................................................................................................................41.3测试环境.....................................................................................................................................................................41.4测试步骤 (5)1.4.1硬件连接...........................................................................................................................................................51.4.2指示灯状态.......................................................................................................................................................61.4.3设置参数...........................................................................................................................................................61.4.4数据透传测试................................................................................................................................................121.4.5基本测试常见问题. (14)二、常见用法 (14)2.1LG220网线直连电脑通信 (14)2.2LG220连接透传云通信...........................................................................................................................................142.3LG220花生壳内网穿透说明...................................................................................................................................14三、常见问题排查方法. (14)3.1集中器无法连接到服务器或者无法连接到透传云 (14)3.2LoRa 节点无法入网.................................................................................................................................................153.3通信距离近...............................................................................................................................................................153.4同频干扰...................................................................................................................................................................153.5丢包率高...................................................................................................................................................................16四、更新历史..........................................................................................................................................................................17五、联系方式.. (18)目录Content一、基本说明集中器的有工作模式有三种:集中器轮询唤醒、节点主动上报、服务器主动下发,在介绍如可配置之前先分别对这三种模式做简要概述。
标志206使用手册PDF

概览 - 9
前雾灯/后雾灯(旋钮B) 前雾灯(将旋钮向前转动一 次) 前雾灯和后雾灯(将 旋钮向前转动二次)
雨刮器开关(*)
前雨刮
2 快速刮水 1 正常刮水 I 间歇刮水 或者 AUTO 自动刮水 0 停止 点动刮水 风窗玻璃清洗:雨刮器开关向驾驶员 方向抬起。
83 - 87
发动机........................ 83 油耗.......................... 84 质量.......................... 85 尺寸.......................... 86 识别特征...................... 87
54
47
57
16 - 概览
RD8 汽车音响
24
按键 A (按键/旋钮)
B
C
D E F G
H
I J K L J至O P
功能
开机/关机 - 音量调节 CD碟片仓口
自动/手动搜索前面的电台(收音机)/选择上一曲目-(CD)快倒
收音机/CD模式选择 静音(声音关闭)/(CD)暂停 电台自动搜索/电台自动搜索并保存(收音机) 音效调节(低音、高音、音量分配……)
功能
1
风量调节
2
空气流向分配
3
空气内外循环控制
4
空调开关
5
后风窗玻璃除霜
6
空调系统关闭
7
温度调节
8
舒适度自动调节
9
前风窗自动除霜除雾
概览 - 15
方向盘高度调节
Bell 206L 型号 Snow Deflector 修改手册说明书
TECHNICAL BULLETIN 206L-23-25813 June 2023MODEL AFFECTED: 206L-1, 206L-3, and 206L-4SUBJECT: SNOW DEFLECTOR, MODIFICATION OF HELICOPTERS AFFECTED: Serial numbers 45154 through 45790, 51001through 51612 and 52001 through 52453 that havebeen modified by TB 206L-18-255.[Serial number 52454 and subsequent will have theintent of this bulletin accomplished prior to delivery.] COMPLIANCE: At customer’s option.DESCRIPTION:This bulletin provides instructions to modify the snow deflector assemblies 206-064-226-001/-002 in order to fit on helicopters modified by TB 206L-18-255. Applicability of this bulletin to any spare part shall be determined prior to its installation on an affected helicopter.APPROVAL:The engineering design aspects of this bulletin are Transport Canada Civil Aviation (TCCA) approved.CONTACT INFO:For any questions regarding this bulletin, please contact:Bell Product Support Engineering - Light HelicoptersTel:1-450-437-2862/1-800-363-8023/*****************************based on hands-on time and may vary with personnel and facilities available. WARRANTY: There is no warranty credit applicable for parts or labor associated with this bulletin. MATERIAL: Required Material: The following material is required for the accomplishment of this bulletin and may be obtained through your Bell Supply Center. Part Number Nomenclature Qty (Note) 407-704-034-109 Kit-mod 206 snow deflector 1 (1) Consisting of: 206-064-226-119 Chafing strip 1 206-064-226-121 Chafing strip 1 206-064-226-123 Chafing strip 1 206-064-226-125 110-076-1-07-0 Chafing strip Rubber extrusion 1 2Consumable Material: The following material is required to accomplish this bulletin, but may not require ordering, depending on the operator’s consumable material stock levels. This material may be obtained through your Bell Supply Center. Part Number Nomenclature Qty (Note) Reference * 407-704-034-119 Kit-consumable Consisting of: 1(1) 2000-09182-01 Adhesive 50 grams C-317 (299-947-100,Ty II, CL2) 2000-06022-00Adhesive, paste (299-947-107, Ty 1, CL1) 1 Pint C-324 2010-00216-00 Fairing compound 13.5 OZ C-323 (299-947-072, TYI) 2000-06013-01 Silicone adhesive 1 OZ C-300 (299-947-152, Ty I, CL1) 2620-06050-00Glass cloth (AMS-C-9084, CL2, TYIIIA) 12”X12” C-404 2620-06280-00 Glass cloth 12”X12” C-560 (AMS-C-9084, CL2, TYIII) 2000-11948-00 Adhesive 50 grams (2) C-363 (299-947-100,Ty II,CL 3)1. If required, order this kit to complete the 407-704-034-109 snow deflectormodification. Available on special order only.2. Not included in 407-704-034-119 kit. To be ordered separately.SPECIAL TOOLS:None required.WEIGHT AND BALANCE:Not affected.ELECTRICAL LOAD DATA:Not affected.REFERENCES:BHT-206L-SERIES-IPB, Illustrated Parts BreakdownBHT-206L1-MM, Maintenance ManualBHT-206L3-MM, Maintenance ManualBHT-206L4-MM, Maintenance ManualBHT-ALL-SRM, Structural Repair manualPUBLICATIONS AFFECTED:None affected.ACCOMPLISHMENT INSTRUCTIONS:1. Prepare the helicopter for maintenance.2. Remove and discard the existing edging (11, Figure 1, Detail E) and the existingchaffing strips (View B, 2 through 5) from the snow deflectors (1, View A).3. Remove paint and primer from the rework area (View B and Section C-C).4. Position the snow deflector (1) on a helicopter equipped with a 407-064-004 inletcowling. Install the four bolts on the forward edge and the two bolts on the bottom edge (View A).5. Using a fine tipped non-corrosive ink marker or equivalent, draw line L1 (View B)matching the contour of the 407-064-004 inlet cowling on the protruding edge of the snow deflector (1).6. Remove the snow deflector (1) from the helicopter.7. Draw line L2 (view B) at 3.0 inches (76 mm) from the line L1. Line L2 must be parallel to line L1.8. Draw two more lines (L3 and L4) in 0.50 inch (13 mm) increments from line L2. Both lines must be parallel to line L2.Repair doublers shall be dimensioned as indicated in steps 8 through 10.9. Repair doubler P1 (C-404) is to be dimensioned to fit between the edge of part and line L2.10. Repair doubler P2 (C-404) is to be dimensioned to fit between the edge of part and line L3.11. Repair doubler P3 (C-560) is to be dimensioned to fit between the edge of part and line L4.12. Perform lay up as follows:Ply orientation is optional.a. Prepare surfaces for bonding (BHT-ALL-SRM, Chapter 4, Paragraph 4-2-9).b. Wet plies using adhesive (C-363).c. Lay repair doublers on part as marked previously (Figure 1, View B and Section C-C).d. Remove excess adhesive squeeze-out.e. Allow to cure at room temperature for 24 hours applying a pressure of 0.5 to 1.0 PSI to repair area. For the alternate high temperature cure, refer to the Table 4-12 (BHT-ALL-SRM, Chapter 4).f. Inspect for voids and unbonded area(s). Voids shall not exceed 10 % of the total bonded area. No one void shall exceed 0.025 sq. inches (1.61cm²) in area.g. As required, fill and fair with fairing compound (C-323) and sand to contour. -NOTE- -NOTE-13. Position the snow deflector (1, Figure 1) on a helicopter equipped with a 407-064-004 inlet cowling. Install the four bolts on the forward edge and the two bolts on the bottom edge (View A).14. Mark and open three 0.233 to 0.239 inch (5.92 to 6.07 mm) diameter holes throughtop flange of the snow deflector (1). Hole positions should be located from the 407-064-004 inlet cowling (Note 3, View B)15. Install three bolts on the top flange of the snow deflector (1) (View A).16. Using a fine tipped non-corrosive ink marker or equivalent, draw a line matching thecontour of the 407-064-004 inlet cowling on the protruding edge of the snow deflector(1) (Note 2, View B).17. Remove the snow deflector (1).18. Trim the protruding edge of the snow deflector (1) as marked at step 16.19. Refinish as required.20. Install the four new chafing strips (6 through 9, View B) using adhesive (C-300).21. Install the two rubber extrusions (10, Detail E) using adhesive (C-324).22. Re-identify the L/H snow deflector with P/N 206-064-226-101FM and the R/H snowdeflector with P/N 206-064-226-103FM.23. Make an entry in the helicopter logbook and historical service records indicatingcompliance with this Technical Bulletin.Figure 1 – Snow Deflector (Sheet 1 of 3)Figure 1 – Snow Deflector (Sheet 2 of 3)Figure 1 – Snow Deflector (Sheet 3 of 3)。
标致车主使用手册

标致车主使用手册!!!东风标致购车及使用手册目录东风标致选车必读验车备忘录完全版选车必读之七步为新车把脉车主买新车七律机动车辆保险分析东风标致车主使用指南之爱车零配件使用东风标致车主使用指南之仪表和控制篇东风标致车主使用指南之磨合期的驾驶和保养东风标致新车使用篇东风标致新车驾驶篇东风标致新车养护篇东风标致用车养车热点小贴士东风标致使用小窍门东风标致保养答疑技术专家袁金贵东风标致在线答疑北京标龙京津东风标致使用知识北京鹏翰东标专家谈的几个问题前挡玻璃侧翼影响视线的油箱盖为塑料的后挡玻璃没有雨挂器空调控制面盘太靠下倒车灯和尾部雾灯各只有一个,东标专家谈转速中控锁落锁后,车门仍然可以从内部打开,是否是设计缺陷?为什么?的载重性能说明东标专家谈底盘和无骨雨刷和的。
最新版本介绍东风标致发动机专家问答东风标致使用常识及问题座椅调整使用问题机械常识汽车保养维修专家建议如何驾驶自动变速器汽车汽车省油小窍门新手驾车小技巧新手毁车招数大搜捕奉送省油的九大法宝奉送养个省油车一举多得奉送雨天行车项注意驾驶技巧教您“六不跟”防追尾如何省下笔血汗钱东风标致选车必读当你确定了要买的车型之后。
首先要选定一家经销商。
在这方面一定要找大经销商。
一方面大经销商手里的车多,你又挑选的余地,另外大经销商往往产品周转得快。
你能买到刚出场的产品。
当然,对于一些货源不足的品牌大经销商的进货渠道能帮助你尽早提到车。
况且大经销商的运营渠道有时候还能帮助你顺利的快速的办齐手续。
这里我不推荐大家去综合的车市,因为那里秩序往往挺混乱的。
而且拼缝的人很多。
另外就是看车的人多。
乱哄哄的。
到远离市中心的大店,人少可以试驾。
挑好了,看好了再买。
而且由于人少服务比较快捷。
一旦确定了店,要事先和谈好价格。
不要等车挑的差不多了再谈价格,因为那会儿早就知道你肯定就买了所以价格难以坎下去。
经常会承诺送一些内饰,价值几千元。
我个人的意见是绝对不要。
因为那些东西往往不值钱。
JBL EON 206P PA系统用户指南说明书
PORTABLE PA USER’S GUIDEFor: Français, Deutsch, Español, visit ContentsSection 1: Important Safety Instructions.........................3 - 4Section 2: Precautions (5)Section 3: Declaration of Conformity (6)Section 4: Introduction To The EON 206P PA System..7 - 11 Section 5: System Specifications (12)Section 6: Cables and Connectors (13)Section 7: Contact Information (14)Section 8: Warranty Information (15)2Section 1: Important Safety Instructions1. Read these instructions.2. Keep these instructions.3. Heed all warnings.4. Follow all instructions.5. Do not use this apparatus near water.6. Clean only with dry cloth.7. Do not block any ventilation openings. Install in accordance with the manufacturer’s instructions.8. D o not install near any heat sources such as radiators, heat registers, stoves, or other apparatus(including amplifiers) that produce heat.9. D o not defeat the safety purpose of the polarized or grounding-type plug. A polarized plug has two bladeswith one wider than the other. A grounding-type plug has two blades and a third grounding prong. The wide blade or the third prong is provided for your safety. If the provided plug does not fit into your outlet, consult an electrician for replacement of the obsolete outlet.10. P rotect the power cord from being walked on or pinched, particularly at plugs,11. Only use attachments/accessories specified by the manufacturer.12. U se only with the cart, stand, tripod, bracket, or table specified by the manufacturer,or sold with the apparatus. When a cart is used, use caution when moving the cart/apparatus combination to avoid injury from tip-over.13. Unplug this apparatus during lightning storms or when unused for long periods of time.14. R efer all servicing to qualified service personnel. Servicing is required when the apparatus has beendamaged in any way, such as power supply cord or plug is damaged, liquid has been spilled or objects have fallen into the apparatus, the apparatus has been exposed to rain or moisture, does not operate normally, or has been dropped.15. Service Instruction in Owner’s Manual: “CAUTION - THESE SERVICING INSTRUCTIONS ARE FORUSE BY QUALIFIED SERVICE PERSONNEL ONLY. TO REDUCE THE RISK OF ELECTRIC SHOCK DONOT PERFORM ANY SERVICING OTHER THAN THAT CONTAINED IN THE OPERATINGINSTRUCTIONS UNLESS YOU ARE QUALIFIED TO DO SO.”16. T o completely disconnect this apparatus from the AC mains, disconnect the power supply cord plug fromthe AC receptacle.17. “WARNING – TO REDUCE THE RISK OF FIRE OR ELECTRIC – SHOCK, DO NOT EXPOSE THISAPPARATUS TO RAIN OR MOISTURE.”18. D o not expose this equipment to dripping or splashing and ensure that no objects filled with liquids, such asvases, are placed on the equipment.19. The mains plug of the power supply cord shall remain readily operable.3Care and CleaningEON 206P systems may be cleaned with a dry cloth. Do not get moisture into any of the openings in the system.Ensure that the system is unplugged from the AC outlet before cleaning.THIS APPARATUS CONTAINS POTENTIALLY LETHAL VOLTAGES. TO PREVENT ELECTRIC SHOCK OR HAZARD, DO NOT REMOVE CHASSIS, MIXER MODULE OR AC INPUT COVERS. NO USER SERVICEABLE PARTS INSIDE. REFER SERVICING TO QUALIFIED SERVICE PERSONNEL.45Section 2: PrecautionsThe EON 206P PA system covered by this manual is not intended for use in highmoisture environments. Moisture can damage the speaker cone and surround and causecorrosion of electrical contacts and metal parts. Avoid exposing the speakers to directmoisture. Keep speakers out of extended or intense direct sunlight. The driver suspensionwill prematurely dry out and finished surfaces may be degraded by long-term exposureto intense ultra-violet (UV) light. The EON 206P PA system can generate considerableenergy. When placed on a slippery surface such as polished wood or linoleum, thespeaker may move due to its acoustical energy output. Precautions should be taken toassure that the speaker does not fall off a stage or table on which it is placed. Stand Mounting Safety Precautions The EON 206P speakers contain a 36 mm receptacle cup to allow mounting on tripod stands or on a pole over subwoofers. When using stands or poles, be sure to observe the following precautions:• Check the stand or pole specification to be certain the device is designed to support the weight of thespeaker. Observe all safety precautions specified by the manufacturer.• Always verify that the stand (or subwoofer/pole) is placed on a flat, level and stable surface andbe sure to fully extend the legs of tripod type stands. Position the stand so that the legs do notpresent a trip hazard.• Route cables so that performers, production crew, and audience will not trip and topple thespeakers over.• Inspect the stand (or pole and associated hardware) before each use and do not use equipment withworn, damaged or missing parts.• Do not attempt to place more than one EON 206P series speaker on a stand or pole.• Always be cautious in windy, outdoor conditions. It may be necessary to place additional weight (i.e.sandbags) on the base of the stand to improve stability. Avoid attaching banners or similar items toany part of a speaker system. Such attachments could act as a sail and topple the system.• Unless you are confident that you can handle the weight of the speaker, ask another person to help you get it onto the tripod stand or pole.Hearing Damage, Prolonged Exposure To Excessive SPL The EON 206P system is capable of generating sound pressure levels (SPL) sufficient to cause permanent hearing damage to performers, production crew and audience members. Caution should be taken to avoid prolonged exposure to SPL in excess of 90 dB.WATCH FOR THESE SYMBOLS!The exclamation point within an equilateral triangle is intendedto alert the user to the presence of important operatingand maintenance (Servicing) instructions in the literatureaccompanying the product.The lightning flash with the arrowhead symbol within anequilateral triangle is intended to alert the user to the presenceof un-insulated “Dangerous Voltage” within the products enclusure that may be of sufficient magnitude to constitute a risk of electric shock to persons.!Section 3: EON 206P PA System Declaration of ConformityThis equipment complies with the EMC directive 89/336/EECModified by92/31/EEC93/68/EEC98/13/EEC and LVD 73/23/EEC modified by 93/68/EECThis product meets safety standards:EN60065:2002UL6500 7th Edition: 2003UL 60065 - STANDARD FOR AUDIO, VIDEO AND SIMILAR ELECTRONICAPPARATUS - SAFETY EQUIREMENTS - Edition 7 - Revision Date 2007/12/11CSA C22.2 NO 60065-03 - AUDIO, VIDEO AND SIMILAR ELECTRONICAPPARATUS – SAFETY REQUIREMENTS - Edition 1 - Revision Date 2006/04/01IEC 60065 - AUDIO, VIDEO AND SIMILAR ELECTRONIC APPARATUS -- SAFETYREQUIREMENTS - Edition 7.1 - Issue Date 2005/12/01And EMC StandardsEN55103-1 (E2)EN55103-2 (E2)FCC Compliance NoticeThis device complies with part 15 of the FCC rules. Operation is subject to the following two conditions: (1) This device may not cause harmful interference, and (2) this device must accept any interference received, including interference that may cause undesired operation.CAUTION: Changes or modifications not expressly approved by the party responsible for compliance could void the user’s authority to operate the equipment.NOTE: This equipment has been tested and found to comply with the limits for a Class A digital device,pursuant to part of the FCC Rules. These limits are designed to provide reasonable protection against harmful interference in a residential installation. This equipment generates, uses, and can radiate radio frequency energy and, if not installed and used in accordance with the instruction manual, may cause harmful interference to radio communications. However there is no guarantee that the interference will not occur in a particular installation. If this equipment does cause harmful interference to radio and television reception, which can be determined by turning the equipment off and on, the user is encouraged to try to collect the interference by one or more of the following measures.• Reorient or relocate the receiving antenna• Increase the separation between the equipment and receiver• Connect the equipment into an outlet on a circuit different from that to which the receiver is connected• Consult the dealer or an experienced radio/TV technician for help6Section 4: Introduction To The EON 206P PA SystemThank you for choosing the JBL EON 206P PA system. The EON 206P is a self-contained, portable PA system featuring multiple input channels with individual tone controls, reverb and convenient output routing capabilities that allow the user to integrate the system into any number of audio environments. And with its lightweight and ergonomic design the EON 206P is perfect for situations where ease and portability are just as important as quality and flexibility.Included in the EON 206P package are:• 2 JBL professional speakers• 1 center housing with powered mixer and compartment for storage of speaker cables• 1 pair of unshielded speaker cables• 1 power cable• User’s guideGETTING STARTED1. Remove EON 206P system from the carton.4. Connect the Mixer Module to the SpeakersOn the back side of the mixer you will notice two ¼" phone jacks – these are your speaker output jacks.Take the speaker cables and connect them from these jacks to the jacks on the back of the speakers.5)8Getting Acquainted with the EON 206P Powered MixerThis part of the EON 206P system houses the mixing board and power amplifier. You will connect all of the microphones, musical instruments, external sound sources (like MP3 or CD players), in addition to any recording devices or additional speakers like a personal monitor, subwoofer or “Front of House” feed.The BasicsLet’s look at the “inputs” first:AUDIO INPUTSMONO MIC/LINE INPUTScombination conector.9CH3/4CH5/610112. “MONITOR OUTPUTS” These outputs allow you to route the stereo mixer signal to anotherdestination like a recording device, personal monitor, subwooferor to another PA system (Front of House).MASTER VOLUME and “Limit” LED Your EON 206P is equipped with a “Master Volume” that controlsthe overall output volume of the system and a Yellow LED thatindicates that you have approached the maximum output.Section 5: System SpecificationsEON206PSystem System Type: Powered mixer with 2 two-way bass-reflex enclosuresMaximum SPL Output:113 dB peak system output (pink noise)Frequency Range (-10dB):64Hz – 22kHzFrequency Response (-3dB):77Hz – 20kHzAC input :100 - 120 VAC, 220-240 VAC 50/60 HzAmplifier Design:Class DSystem Power Rating: 160 Watts (2 x 80 W)Output Connector: 2 x 1/4" TS (unbalanced) amplifier outputsMixer Input Connectors: 6 inputs (2 Mono Mic/Line, 2 x Stereo)Channels1-2 are XLR / 1/4" jack combo connectorsXLR is a mic level input, 1/4" is a line level input3-4, one pair of 1/4" balanced TRS jacks (stereo), and a pair of RCA jacks (stereo)5-6 is a 3.5 mm stereo jackInput Impedance: Ch 1-2 Combo: XLR 40 K Ohms BalancedCh 1-2 Combo: TRS 40 K Ohms BalancedCh 3-4: TRS 20 K Ohms BalancedCh 3-4: RCA 5 K Ohms UnbalancedCh 5-6: 3.5 mm 10 K Ohms UnbalancedOutput Connectors:Monitor outputs: one pair of RCA jacks (stereo)Signal Indicators: Limit: Yellow LED indicates limiter active conditionEQ:Individual channel Bass and Treble controls, center detent, +/-12 dB cut and boostSystem Limiter:On Board DSP Limiting and TuningSpeaker LF Driver: 1 x JBL 326G 165 mm (6.5 in) wooferHF Driver: 1" neodymium black mylar dome tweeterCoverage Pattern: 100º x 80º nominalCrossover Frequency: 2.2 kHzCrossover Type:Passive network, 2nd order filters (-12 dB per octave)for high pass and low pass filtersEnclosure: PolypropyleneSuspension/ Mounting: 36 mm pole socketHandles:One on topGrille: Powder coated perforated steel20.9” X 27.8” x 13.4” (530mm x 705mm x 340mm)Shipping PackageDimensions (H x W x D):Net Weight of System:11.38 kg (25 lbs)1213Section 6: Cables and ConnectorsXLR/F to XLR/M Microphone CableThe standard cable for interconnection of microphone andline level signal in professional audio systems.• Microphone to mixer TRS (balanced) 1/4 inch phone jack to XLR/M For connecting balanced devices with 1/4 inch phone andmaybe used interchangeably.TRS (unbalanced) 1/4 inch phone jack to XLR/M For connections of instruments with unbalanced outputsto balanced XLR inputs.TS (unbalanced) 1/4 inch phone jack to XLR/M This cable is electrically identical to “TRS” (unbalanced)1/4 inch phone and may be used interchangeably.XLR/M to RCA (phono) cable Connects consumer audio products and some DJ mixeroutputs to professional audio equipment inputsTRS 1/4 inch Phone jack to dual 1/4 inch Phone jack Splits a stereo output into separate left/right signals.TRS 1/4 inch Phone jack to dual 1/4 inch Phone jackChange to a TRS mini-phone jack to connect to the outputof a portable. MP3/CD – player and computer sound cardsto a mixer. XLR/F to XLR/M audio ground liftOnly with balanced in - and outputsXLT/F to XLR/M Audio Groud Lift(no connection)14Section 7: Contact InformationMailing Address:JBL Professional8500 Balboa Blvd.Northridge, CA 91329Shipping Address:JBL Professional8500 Balboa Blvd., Dock 15Northridge, CA 91329(Do not return product to this address without first obtaining prior authorization from JBL)Customer Service:Monday through Friday8:00am - 5:00pmPacific Coast Time in the U.S.A.(800) 8JBLPRO (800.852.5776)On The World Wide Web:Professional Contacts, Outside the USA: Contact the JBL Professional Distributor in your area. A complete list of JBL Professional international distributors is provided at our U.S.A. website: Product Registration:Register your product online at Section 8: Warranty InformationThe JBL Limited Warranty on professional loudspeaker products (except for enclosures) remains in effect forfive years from the date of the first consumer purchase. JBL amplifiers are warranted for three years from thedate of original purchase. Enclosures and all other JBL products are warranted for two years from the date of original purchase.Who Is Protected By This Warranty?Your JBL Warranty protects the original owner and all subsequent owners so long as: A.) Your JBL producthas been purchased in the Continental United States, Hawaii or Alaska. (This Warranty does not apply to JBL products purchased elsewhere except for purchases by military outlets. Other purchasers should contact thelocal JBL distributor for warranty information.); and B.) The original dated bill of sale is presented whenever warranty service is required.What Does The JBL Warranty Cover?Except as specified below, your JBL Warranty covers all defects in material and workmanship. The followingare not covered: Damage caused by accident, misuse, abuse, product modification or neglect; damageoccurring during shipment; damage resulting from failure to follow instructions contained in your Instruction Manual; damage resulting from the performance of repairs by someone not authorized by JBL; claims basedupon any misrepresentations by the seller; any JBL product on which the serial number has been defaced, modified or removed.Who Pays For What?JBL will pay all labor and material expenses for all repairs covered by this warranty. Please be sure to savethe original shipping cartons because a charge will be made if replacement cartons are requested. Payment of shipping charges is discussed in the next section of this warranty.How To Obtain Warranty PerformanceIf your JBL product ever needs service, write or telephone us at JBL Incorporated (Attn: Customer Service Department), 8500 Balboa Boulevard, PO. Box 2200, Northridge, California 91329 (818-893-8411). We maydirect you to an authorized JBL Service Agency or ask you to send your unit to the factory for repair. Either way, you’ll need to present the original bill of sale to establish the date of purchase. Please do not ship your JBL product to the factory without prior authorization. If transportation of your JBL product presents any unusual difficulties, please advise us and we may make special arrangements with you. Otherwise, you are responsiblefor transporting your product for repair or arranging for its transportation and for payment of any initial shipping charges. However, we will pay the return shipping charges if repairs are covered by the warranty.Limitation of Implied WarrantiesALL IMPLIED WARRANTIES, INCLUDING WARRANTIES OF MERCHANTABILITY AND FITNESS FOR PARTICULAR PURPOSE, ARE LIMITED IN DURATION TO THE LENGTH OF THIS WARRANTY. EXCLUSION OF CERTAIN DAMAGESJBL’S LIABILITY IS LIMITED TO THE REPAIR OR REPLACEMENT, AT OUR OPTION, OF ANY DEFECTIVE PRODUCT AND SHALL NOT INCLUDE INCIDENTAL OR CONSEQUENTIAL DAMAGES OF ANY KIND. SOME STATES DO NOT ALLOW LIMITATIONS ON HOW LONG AN IMPLIED WARRANTY LASTS AND/OR DO NOT ALLOW THE EXCLUSION OF INCIDENTAL OR CONSEQUENTIAL DAMAGES, SO THE ABOVE LIMITATIONS AND EXCLUSIONS MAY NOT APPLY TO YOU. THIS WARRANTY GIVES YOU SPECIFIC LEGAL RIGHTS,AND YOU MAY ALSO HAVE OTHER RIGHTS, WHICH VARY, FROM STATE TO STATE.15Part Number: 5001426。
法国标志206电器结构培训教程

206 Full MUX
Function : Loading / Load Shedding ...
System Functioning – Loading function
• [ Loading加载 ] 每30秒打开一些用电设备( 当发动机在运转时) • The Diesel Engine ECU may request [ Loading ] for the Particle
卸载
• [ Load Shedding卸载] 和 [ Loading加载 ] 只有在启动后,正常的电压 被确定后才可以进行
• 如果电瓶电压低于12.8 Volts, BSI Unit 将确定卸载的幅度[ Load Shedding ]
• BSI unit 将每隔10秒关闭一些主要的用电设备以减少电路载荷 • [ Load Shedding卸载 ] 永远 优先于[ Loading 加载 ]
206 Full MUX
Function : Battery Charge Management...
System Functioning
• 通过监测发电机的充电能力和电瓶电压 BSI Unit 管理电器设备的用电 请求
• BSI Unit 为了优先进行电瓶充电会执行[ Load-Shedding 卸载] ,即禁 止某些用电设备的工作
206 Full MUX
Function : Loading / Load Shedding ...
Load Shedding function : Special Features
• 除霜功能 可以持续最少6 mins - 第7分钟,空调面板上的除霜警告灯将亮起 - 如果电瓶电压足够,除霜还可以进行6分钟
标致206操作规程

标致206操作规程标致206操作规程一、安全操作规程1. 在开启发动机之前,检查车辆周围是否有障碍物,确保安全启动。
2. 确保驾驶座椅和各控制器位于舒适的位置,并进行适当的调节。
3. 系好安全带,并要求所有乘客也系好安全带。
4. 在驾驶过程中,注意保持良好的视野,不要遮挡视线。
5. 遵守交通规则,包括速度限制、信号灯、路权等规定。
6. 在紧急情况下,操作防抱死刹车系统和紧急制动系统时,要稳定手握方向盘,刹车踏板适度踩下。
7. 不要在行驶中使用手机或其他电子设备,以免分散注意力。
8. 在需要变道或拐弯时,提前打转向灯,提醒其他车辆和行人。
9. 长途驾驶时,定时休息,以保持良好的状态。
10. 在停车时,记得拉起手刹,并将换挡杆置于空挡位置。
二、行驶操作规程1. 发动机启动后,等待一段时间让发动机运转平稳,然后轻踩油门增加转速,慢慢起步。
2. 正常行驶时,根据路况和车辆速度,选择合适的挡位。
3. 加速时,逐渐加大油门踏板,不要突然踩油门。
4. 减速时,松开油门踏板,轻踩刹车踏板,并预留足够的制动距离。
5. 紧急制动时,迅速用力踩下刹车踏板,并稳住方向盘。
6. 遇到有灯泡熄灭或者有异常声音的情况,在确保安全后,及时检查和修理。
7. 行驶过程中,小心观察仪表盘上的指示灯,如机油压力、水温、电池电压等,确保车辆正常运行。
三、维护保养规程1. 定期检查发动机机油、机油滤清器和空气滤清器,并根据要求进行更换。
2. 检查刹车液、制动衬片和制动器磨损情况,及时更换或修理。
3. 定期检查轮胎气压和磨损情况,并根据需要进行调整和更换。
4. 定期检查车辆照明系统,包括大灯、转向灯、刹车灯等。
5. 定期检查悬挂系统,如减震器、悬挂弹簧等,确保其正常运行。
6. 定期检查电瓶电压和蓄电池液位,及时充电或更换。
7. 定期对车身进行清洗和护理,保持车辆的外观整洁。
8. 定期检查车辆的各种管路和接头,确保其密封性和正常工作。
9. 定期对车辆进行全面的检查和维护,以保证其安全和性能。
206 车型 windshield washer 说明书
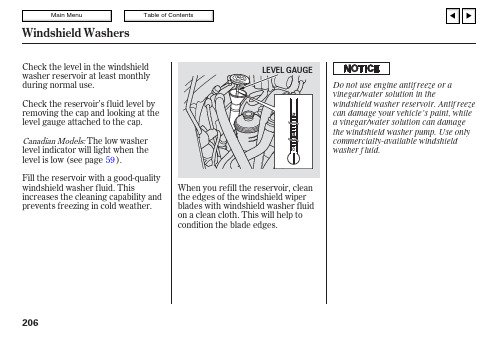
Fill the reservoir with a good-quality windshield washer fluid. This increases the cleaning capability and prevents freezing in cold weather.
After checking and adding the fluid, put the under cover back in place and tighten the bolts securely.
BOLT
UNDER COVER
To check the transmission fluid level, remove the two bolts, then pull the left part of the under cover down.
Removing the radiator cap while the engine is hot can cause the coolant to spray out, seriously scalding you. Always let the engine and radiator cool down before removing the radiator cap.
Correct level
If Honda antifreeze/coolant is not available, you may use another major-brand non-silicate coolant as a temporary replacement. Make sure it is a high-quality coolant recommended for aluminum engines. Continued use of any non-Honda coolant can result in corrosion, causing the cooling system to malfunction or fail. Have the cooling system flushed and refilled with Honda antifreeze/coolant as soon as possible. If the reserve tank is completely empty, you should also check the coolant level in the radiator.
206仪表台小计里程
206仪表台小计里程摘要:1.206 仪表台简介2.仪表台的主要功能3.仪表台的使用注意事项4.仪表台的维护与保养5.小计里程的含义及其作用6.小计里程的正确使用方法7.小计里程的维护与保养正文:一、206 仪表台简介206 仪表台是一款集多种功能于一身的汽车仪表台,适用于各种车型。
它具有时尚的外观设计,清晰的显示屏,能够为驾驶员提供各种必要的行车信息。
二、仪表台的主要功能1.速度显示:仪表台能够显示车辆的实时速度,帮助驾驶员控制车速,确保行车安全。
2.转速显示:仪表台能够显示发动机的转速,帮助驾驶员选择合适的挡位,提高燃油效率。
3.油量显示:仪表台能够显示油量,提醒驾驶员及时加油,避免行驶过程中出现油量不足的情况。
4.小计里程显示:仪表台能够显示小计里程,帮助驾驶员记录行驶过程中的里程数。
三、仪表台的使用注意事项1.避免在阳光下长时间暴晒,以免损坏仪表台的显示屏。
2.不要用湿布擦拭仪表台,以免导致短路。
3.在行驶过程中,不要频繁地查看仪表台,以免分散注意力,影响行车安全。
四、仪表台的维护与保养1.定期检查仪表台的连接线路,确保线路连接牢固。
2.定期清洁仪表台的显示屏,以免灰尘影响显示效果。
3.如发现仪表台有异常现象,应及时送修,避免故障扩大。
五、小计里程的含义及其作用小计里程是指车辆行驶过程中,仪表台显示的当前行驶里程数。
它可以帮助驾驶员记录行驶距离,便于计算油耗、行驶时间等信息。
六、小计里程的正确使用方法1.在行驶过程中,驾驶员应定期查看小计里程,以便及时记录行驶距离。
2.在加油时,驾驶员可以记录加油时的小计里程,以便计算油耗。
3.在维修保养时,驾驶员可以提供小计里程信息,以便维修人员进行相关检测。
七、小计里程的维护与保养1.定期检查小计里程的显示是否正常,如有异常应及时处理。
2.不要随意更改小计里程的显示数据,以免影响驾驶员对行驶距离的判断。
通过以上内容,我们可以了解到206 仪表台及小计里程的功能、使用注意事项以及维护与保养方法。
testo 206-pH1
用户指南 - L196WTG、L206WTG、L196WTQ、L206WTQ说明书
M ake sure to read the Important Precautions before using the product. Keep the User's Guide(CD) in an accessible place for future reference.S ee the label attached on the product and give the information to your dealer when you ask for service.L196WTG L206WTG L196WTQ L206WTQ User’s GuidePushing Latch inside, Take the stand base from stand body.4.Please pull the stand body lightly to separate it from the hinge body.NOTEOSD (On Screen Display) menu languages on the monitor may differ from the manual.Y ou were introduced to the procedure of selecting and adjusting an item using the OSD system. Listed below are the icons, icon names, and icon descriptions of the all items shown on the Menu.Press the MENU Button, then the main menu of the OSD appears.IconsCheck the following before calling for service.No image appearsDo you see a "OSD LOCKED" message on the screen?G Is the power cord of the display connected?G Is the power on and the power indicator blue or green?G Is the power indicator amber?G Do you see an "OUT OF RANGE" message onthe screen?G Do you see a "CHECK SIGNAL CABLE"message on the screen?• Check and see if the power cord is connectedproperly to the power outlet.• Adjust the brightness and the contrast.• If the display is in power saving mode, try moving the mouse or pressing any key on the keyboard to bring up the screen.• Try to turn on the PC .• This message appears when the signal from thePC (video card) is out of horizontal or vertical frequency range of the display. See the 'Specifications' section of this manual and configure your display again.• This message appears when the signal cable between your PC and your display is notconnected. Check the signal cable and try again.• You can secure the current control settings,so that they cannot be inadvertently changed.You can unlock the OSD controls at any time by pushing the MENU button for several seconds: the message“OSD UNLOCKED ”will appear.G Do you see “OSD LOCKED ” when you push MENU button?。
ZB206+全功能详细使用说明
ZB206+全功能详细使用说明编辑整理:尊敬的读者朋友们:这里是精品文档编辑中心,本文档内容是由我和我的同事精心编辑整理后发布的,发布之前我们对文中内容进行仔细校对,但是难免会有疏漏的地方,但是任然希望(ZB206+全功能详细使用说明)的内容能够给您的工作和学习带来便利。
同时也真诚的希望收到您的建议和反馈,这将是我们进步的源泉,前进的动力。
本文可编辑可修改,如果觉得对您有帮助请收藏以便随时查阅,最后祝您生活愉快业绩进步,以下为ZB206+全功能详细使用说明的全部内容。
全功能详细使用说明:一、测试操作:1。
被测试电池必须先用充电器充满电。
2.将被测试电池正极和负极分别连接至电池输入端子的“BAT+"及“BAT-”,要确保连接可靠,接线粗短!如果启用了四线测试模式,请同时将夹具的电压测试线正负极连接BV端口的“+”、“-”.给测试仪通工作电源12V,测试仪正常启动后进入电流设定状态,数码管显示设定电流(例如 1.00A),按动“S++"或者“S-—"来调整设定电流(长时间按住按键可以快速增减),调整合适后按动“SK"按键。
3.自动识别模式(出厂默认为此模式):测试仪自动识别被测试电池类型,并选择最佳终止电压及放电模式,显示2秒终止电压后进入测试工作程序.3. 手动终止电压设定模式:此模式下需要手动设定终止电压,按动“S++”、“S—-"按键改变电池终止电压(长时间按住按键可以快速增减数字),其中P*.*u代表连续电流测试模式,b*。
*u为经典的间歇电流测试模式(主要用于2线下测试电池时抵消线路电阻影响),例如P4.5u则代表连续电流测试,终止电压4。
5V.设定范围为b1。
0u—b6。
0u以及P1。
0u—P6.0u,注意当开启四线测试时,不支持间歇电流测试模式!设定好终止电压后,按动“SK”按键开始测试。
4。
测试过程初期测试仪会进行线路及电池诊断,如果线路或者电池不合适,测试仪将不进行测试,显示诊断故障代码Err*(具体代码含义以及处理方法详见前面介绍).诊断通过后会进入正常测试环节,RUN灯点亮,测试仪开始正常放电测试,数码管会以2秒A。
206仪表台小计里程
206仪表台小计里程摘要:一、引言二、206仪表台简介1.仪表台的功能2.仪表台的结构设计三、206仪表台的特点1.小巧精致的外观2.清晰的显示效果3.便捷的操作体验四、206仪表台的功能1.里程显示2.行驶速度显示3.油量显示4.温度显示5.其他辅助功能五、206仪表台的使用与维护1.使用注意事项2.清洁与保养方法六、总结正文:一、引言随着科技的进步,汽车仪表台的设计也在不断地更新换代。
一款设计合理、功能齐全的仪表台不仅可以提高驾驶体验,还能保障行车安全。
今天我们就来详细了解一下206仪表台的特点及功能。
二、206仪表台简介206仪表台是汽车驾驶室内的一个重要部件,主要用于显示车辆行驶过程中的各种信息,如里程、速度、油量等,帮助驾驶员了解车辆状况,保障行车安全。
206仪表台的结构设计紧凑,布局合理,各种功能按键操作简便,给驾驶员带来便捷的驾驶体验。
三、206仪表台的特点206仪表台具有以下特点:1.小巧精致的外观:206仪表台采用一体化设计,造型时尚,尺寸适中,不仅美观大方,还能有效节省空间。
2.清晰的显示效果:仪表台上的数字和指针都采用高亮度显示,即使在强烈的阳光下也能清晰地读取数据,提高行驶安全性。
3.便捷的操作体验:206仪表台的功能按键布局合理,操作简便,驾驶员可以在驾驶过程中轻松地切换各种功能,提高驾驶体验。
四、206仪表台的功能206仪表台具有以下功能:1.里程显示:仪表台可以实时显示车辆的总行驶里程,方便驾驶员了解车辆的使用情况。
2.行驶速度显示:仪表台上的速度表可以实时显示车辆的行驶速度,帮助驾驶员控制车速,确保行车安全。
3.油量显示:仪表台上的油表可以实时显示车辆的油量,提醒驾驶员注意油量,避免燃油耗尽导致车辆抛锚。
4.温度显示:仪表台上的温度表可以实时显示车辆的冷却液温度,确保发动机在合适的温度范围内运行。
5.其他辅助功能:206仪表台还具备计时器、转速表等辅助功能,帮助驾驶员更好地掌握车辆状况。
[业务]M-206中文说明
![[业务]M-206中文说明](https://img.taocdn.com/s3/m/66f3a17cae1ffc4ffe4733687e21af45b307feb2.png)
操作指南M-206 读卡密码盘一.安全指示非常感谢购买本产品,为了正确使用本产品,请在此使用前认真阅读本操作手册。
二.门禁控制器一体机初始化方法:1、关闭电源,S16的第2脚和第3脚相接。
2、接通电源,蜂鸣器连续继续鸣响报警,红灯,绿灯,橙灯齐闪烁。
3、断电,再接通电源,红灯,绿灯,橙灯齐闪烁。
等待S16转换。
4、S16的2、3脚断开,1、2脚接通。
5、门禁控制器初始化完成,峰鸣器鸣响一声,门禁控制器进入用户使用状态。
说明:初始化操作仅修一体机系统密码,为缺省密码12345(即为出厂默认密码),其它数据不会被删除。
三、继电器输出设置方法:1、PUSH 1继电器为干触点输出。
2、J1的NO脚连接,PUSH 1,GND 常开(继电器动作时,PUSH 1 、GND接通)。
3、J1的NC脚连接,PUSH 1,GND常闭(继电器动作时,PUSH 1 、GND断开)。
4、J2为高低电平选择。
四、门禁一体机编程方法:1、“#”键:功能键,进入编程模式(1)按“#”字键,红灯,绿灯,橙灯齐闪亮。
(2)输入5位系统密码(12345),蜂鸣器鸣响一声,红灯和橙灯亮、绿灯熄灭,门禁一体机进入系统编程状态。
2、“1”键,修改系统密码:(1)按“1”字键,橙灯亮、红灯和绿灯熄灭。
(2)用户输入5位数字密码(如:88888),输入完毕,蜂鸣器短鸣响一声,绿灯闪亮一次熄灭,橙灯和红灯闪亮,密码修改成功。
注意:该系统用户密码需妥善保存,再次进入系统编程模式时需要输入该系统密码;如果忘记密码,请执行初始化操作流程,将系统管理密码初始为出厂默认密码12345。
3、“2”键,增加(修改)用户开门密码(此密码为公共密码)按“2”输入四位数用户开门密码(如:8888)五、设置开门方式:按“301”:卡或密码开门按“302”:卡加密码开门六、授权用户卡:注:卡号是指ID卡上丝印的10位卡号的后面8位(前面为零的可以省略)(1)手动加入:单张加入:按40+#键入8位数卡号+#(可连续输入,按#结束)批量加入:按50+#键入8位数起始卡号+#,再键入欲增加的张数(三位数)+#(此项功能仅限于用户卡号可连续)(2)读卡加入:单张加入:按41+#读要授板的卡+#(可连续读卡,按#结束)批量加入:按51+# 读卡(起始卡),键入欲增加的卡张数(三位数)+#七、删除用户卡:(1)手动删除:单张删除:按60+# 键入8位数卡号+#(可连续输入,按#结束)批量删除:按70+# 键入8位数起始卡号+# 再键入欲增加卡的张数(三位数)+#(2)读卡删除:单张删除:按61+# 读要删除的卡+#(可连续读卡,按#结束)批量删除:按71+# 读卡(起始卡),键入欲删除的卡张数(三位数)+#注:若作整批卡片增加或删除时,所键入欲增加或删除的卡片张数(3位数字),不含起始卡片或8位数起始卡号,因此实际卡片张数应是3位数字+1八、删除所有用户卡:按“888#”,蜂鸣器长鸣一声,绿灯闪亮一次熄灭,橙灯和红灯亮,所有用户数据删除成功。
- 1、下载文档前请自行甄别文档内容的完整性,平台不提供额外的编辑、内容补充、找答案等附加服务。
- 2、"仅部分预览"的文档,不可在线预览部分如存在完整性等问题,可反馈申请退款(可完整预览的文档不适用该条件!)。
- 3、如文档侵犯您的权益,请联系客服反馈,我们会尽快为您处理(人工客服工作时间:9:00-18:30)。
资料来源:国内最大的维修资料库 精通维修下载站 :/
资料来源:国内最大的维修资料库 精通维修下载站 :/
资料来源:国内最大的维修资料库 精通维修下载站 :/
资料来源:国内最大的维修资料库 精通维修下载站 :/
资料来源:国内最大的维修资料库 精通维修下载站 :/
资料来源:国内最大的维修资料库 精通维修下载站 :/
资料来源:国内最大的维修资料库 精通维修下载站 :/
资料来源:国内最大的维修资料库 精通维修下载站 :/
资料来源:国内最大的维修资料库 精通维修下载站 :/
资料来源:国内最大的维修资料库 精通维修下载站 :/
资料来源:国内最大的维修资料库 精通维修下载站 :/
资料来源:国内最大的维修资料库 精通维修下载站 :/
资料来源:国内最大的维修资料库 精通维修下载站 :/
资料来源:国内最大的维修资料库 精通维修下载站 :/
资料来源:国内最大的维修资料库 精通维修下载站 :/
资料来源:国内最大的维修资料库 精通维修下载站 :/
资料来源:国内最大的维修资料库 精通维修下载站 :/
资料来源:国内最大的维修资料库 精通维修下载站 :/
资料来源:国内最大的维修资料库 精通维修下载站 :/
资料来源:国内最大的维修资料库 精通维修下载站 :/
资料来源:国内最大的维修资料库 精通维修下载站 :/
资料来源:国内最大的维修资料库 精通维修下载站 :/
资料来源:国内最大的维修资料库 精通维修下载站 :/
资料来源:国内最大的维修资料库 精通维修下载站 :/
资料来源:国内最大的维修资料库 精通维修下载站 :/
资料来源:国内最大的维修资料库 精通维修下载站 :/
资料来源:国内最大的维修资料库 精通维修下载站 :http://www.Biblioteka /
资料来源:国内最大的维修资料库 精通维修下载站 :/
资料来源:国内最大的维修资料库 精通维修下载站 :/
资料来源:国内最大的维修资料库 精通维修下载站 :/
资料来源:国内最大的维修资料库 精通维修下载站 :/
资料来源:国内最大的维修资料库 精通维修下载站 :/
资料来源:国内最大的维修资料库 精通维修下载站 :/
资料来源:国内最大的维修资料库 精通维修下载站 :/
资料来源:国内最大的维修资料库 精通维修下载站 :/
资料来源:国内最大的维修资料库 精通维修下载站 :/
资料来源:国内最大的维修资料库 精通维修下载站 :/
资料来源:国内最大的维修资料库 精通维修下载站 :/
资料来源:国内最大的维修资料库 精通维修下载站 :/
资料来源:国内最大的维修资料库 精通维修下载站 :/
资料来源:国内最大的维修资料库 精通维修下载站 :/
资料来源:国内最大的维修资料库 精通维修下载站 :/
资料来源:国内最大的维修资料库 精通维修下载站 :/
资料来源:国内最大的维修资料库 精通维修下载站 :/
资料来源:国内最大的维修资料库 精通维修下载站 :/
资料来源:国内最大的维修资料库 精通维修下载站 :/
资料来源:国内最大的维修资料库 精通维修下载站 :/
资料来源:国内最大的维修资料库 精通维修下载站 :/
资料来源:国内最大的维修资料库 精通维修下载站 :/
资料来源:国内最大的维修资料库 精通维修下载站 :/
资料来源:国内最大的维修资料库 精通维修下载站 :/
资料来源:国内最大的维修资料库 精通维修下载站 :/
资料来源:国内最大的维修资料库 精通维修下载站 :/
资料来源:国内最大的维修资料库 精通维修下载站 :/
资料来源:国内最大的维修资料库 精通维修下载站 :/
资料来源:国内最大的维修资料库 精通维修下载站 :/
资料来源:国内最大的维修资料库 精通维修下载站 :/
资料来源:国内最大的维修资料库 精通维修下载站 :/
资料来源:国内最大的维修资料库 精通维修下载站 :/
资料来源:国内最大的维修资料库 精通维修下载站 :/
资料来源:国内最大的维修资料库 精通维修下载站 :/
资料来源:国内最大的维修资料库 精通维修下载站 :/
资料来源:国内最大的维修资料库 精通维修下载站 :/
资料来源:国内最大的维修资料库 精通维修下载站 :/
资料来源:国内最大的维修资料库 精通维修下载站 :/
资料来源:国内最大的维修资料库 精通维修下载站 :/
资料来源:国内最大的维修资料库 精通维修下载站 :/
资料来源:国内最大的维修资料库 精通维修下载站 :/
资料来源:国内最大的维修资料库 精通维修下载站 :/
资料来源:国内最大的维修资料库 精通维修下载站 :/
资料来源:国内最大的维修资料库 精通维修下载站 :/
资料来源:国内最大的维修资料库 精通维修下载站 :/
资料来源:国内最大的维修资料库 精通维修下载站 :/
资料来源:国内最大的维修资料库 精通维修下载站 :/
资料来源:国内最大的维修资料库 精通维修下载站 :/
资料来源:国内最大的维修资料库 精通维修下载站 :/
资料来源:国内最大的维修资料库 精通维修下载站 :/
资料来源:国内最大的维修资料库 精通维修下载站 :/
资料来源:国内最大的维修资料库 精通维修下载站 :/
资料来源:国内最大的维修资料库 精通维修下载站 :/
资料来源:国内最大的维修资料库 精通维修下载站 :/
资料来源:国内最大的维修资料库 精通维修下载站 :/
资料来源:国内最大的维修资料库 精通维修下载站 :/
资料来源:国内最大的维修资料库 精通维修下载站 :/
资料来源:国内最大的维修资料库 精通维修下载站 :/
资料来源:国内最大的维修资料库 精通维修下载站 :/
资料来源:国内最大的维修资料库 精通维修下载站 :/
资料来源:国内最大的维修资料库 精通维修下载站 :/
资料来源:国内最大的维修资料库 精通维修下载站 :/
资料来源:国内最大的维修资料库 精通维修下载站 :/
资料来源:国内最大的维修资料库 精通维修下载站 :/
资料来源:国内最大的维修资料库 精通维修下载站 :/
资料来源:国内最大的维修资料库 精通维修下载站 :/
