《博德之门:增强版》游侠对战平台联机教程+中文免安装硬盘版下载
冷门游戏联机平台gameranger安装教程
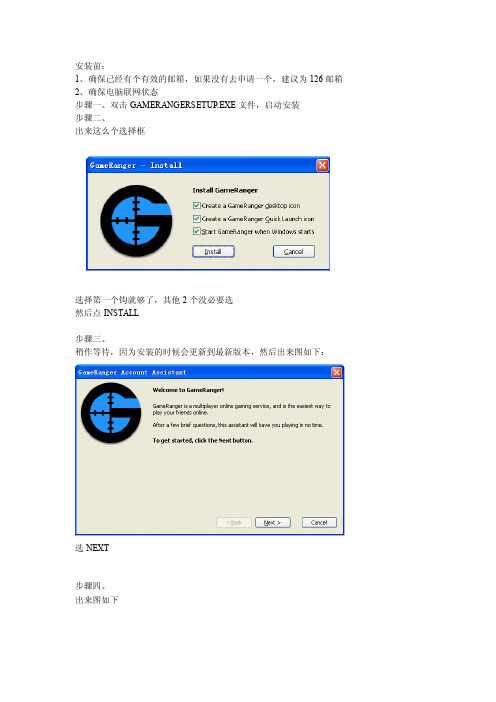
安装前:1、确保已经有个有效的邮箱,如果没有去申请一个,建议为126邮箱2、确保电脑联网状态步骤一、双击GAMERANGERSETUP.EXE文件,启动安装步骤二、出来这么个选择框选择第一个钩就够了,其他2个没必要选然后点INSTALL步骤三、稍作等待,因为安装的时候会更新到最新版本,然后出来图如下:选NEXT步骤四、出来图如下继续NEXT步骤五、出来图如下选AGREE步骤六、出来图如下:如果还没申请帐号的,则继续NEXT如果有帐号的,则选“USE MY EXISTING ACCOUNT”这里针对还没申请帐号的讲步骤七、不用填,直接NEXT步骤八、在E-MAIL那里填写你的邮箱地址在PASSWORD里面输入你自己想设定的密码CONFIRM里面再输一边密码然后NEXTNICKNAME里面输入你的IDREAL MAME里面输入姓名(可以随便输入)步骤十:过滤敏感字眼的,如果要过滤,YES,如果不要NO 然后NEXT选BEIJING CHINA 然后NEXT步骤十二、然后NEXT先不要点NEXT,到你的邮箱,这时候你应该收到了一份来自于GAMERANGER的邮件邮件里面有个内容:把那个地址COPY下来,打开任意一个网页,把这个地址拈贴进去,回车网页出现好了,恭喜你了,注册成功然后回到刚才那个GAMERANGER的注册图,点NEXT选择OK 步骤十四、在ALL GAME那里选择MY GAMES这样只剩下神话时代了!然后就可以玩了HOST是主持JOIN是加入列表中的游戏开房:选择HOSTGAMES里面,在下拉框里选AOTMAX PLAYERS是选择开几个人的房间DESCRIPTION是对房间描述,比如你只要菜鸟进来就写“NOOBS ONLY”等等LADDER不用管PASSWORD设置房间密码,一般也不选,除非是跟朋友打ALLOW FRIENDS ONLY就是只有你的好友才能看到你开的房间最后一个就是只允许金或银帐户的玩家进来,也没多大意义然后选择OK这样就等人吧,人进全了后,就选START游戏进入后就选择多人—LAN/DIRECT IP—确定—主持(把人数开到你房间设置的人数一致)。
联机破解补丁使用说明

3.打开并登入vLan(没有vLan请自行下载安装)。推荐进入“角色扮演--魔幻三杰2”专区。
4.在vLan中设置游戏启动文件:进入游戏专区后,点击软件下方的“設置”按钮,在弹出的窗口内点“瀏覽”,找到魔幻三杰2(Trine2)的安装目录,选中“trine2_32bit.exe”,确认(套用)即可。
所有版本联机补丁使用说明:
(原帖地址:/thread-2664521-1-1.html)
1.解压覆盖任意版本联机破解补丁内文件到游戏安装根目录
2.自行下载安装Steam,运行软件并用自己的账号登陆(没有个人账号的请免费注册)。推荐用SmartSteam登入Steam,下载地址请玩家自行搜索。
注:1.在登入Steam后,不登陆vLan也能联机游戏,只是本人测试用vLan后能连到更多的国内玩家,甚至可以实现Steam联机和局域网(vLan)联机的双破解!
2.其他关于存档之类的问题,请玩家参看原帖,这里不再重复。
欢迎大家对本人的联机补丁进行测试,祝大家游戏愉快!
By:nic的“啟動”按钮运行游戏。
6.进入游戏后,点击“多人游戏”(Multiplay)进入联机界面。可以搜索主机,若游戏版本相同,点击后便可联机游戏。
若建立“公共主机”,则所有在Steam上的用户都能看到
若建立“私人主机”,则只有本地局域网和自己在Steam上的好友可以看到,并能直接添加。
易安装指南 - 无缝游戏体验指南说明书

EA sy Install Guide–Your Guide to TroubleFree Gaming!Electronic Help fileYour game includes an electronic help file to help solve any problems you might have running your game.You ask the questions–it provides the answers.The help file can be accessed from the Windows Start Bar in the same group as your game.The help file also includes‘InfoPro’–a diagnostic tool that helps you,or Sold Out Software Technical Support staff diagnose the problem you’re having.Refer to the Still stuck? Give us a call section on p.22for more information.Glossary of T ermsIf you do not understand any of the terms listed in this document you will find a glossary in the menu bar of the Electronic Help file to help you.Still stuck?Give us a callIf you’re still having problems,or if you’d just prefer thepersonal touch,Sold Out offers free technical supporton all our products(standard BT national call rates apply). Manned lines open from10am-1pm&2pm-5pm Monday to Friday.Now,get a pen and paper,and youre ready to call:+44(0)2079289655Alternatively,you may write to us at the following address, including a daytime telephone number and an EAsy Info report: Customer Services,Sold Out Software122Southwark Street,London,SE10SW United KingdomOr fax us,including an EAsy Info report,on:+44(0)2072610540 When contacting us by fax or letter,please include a daytime telephone number whenever possible,so we can contact you. Creating an Easy Info report1.Open the on-line help file,and click the EAsy Infobutton in the menu bar.After a few moments,an optionswindow appears.2.Click‘OK’to begin system examination,the ElectronicArts System Information screen appears.3.Click‘Save Info’to save the report file to your desktop.Click‘OK’if you want to close the EAsy Info reportwithout saving a copy to your desktop.•If you chose to‘Save Info’,a file called EAsy_EA.txt will be placed on your desktop.Simply double-click on thisicon to view the file.N o t e:I f y o u h a v e a p r in te r c o nn e c te d to y o u r P Ca n dy o u w is h to p r in t o u t th e E A s y_EA.t x t c o n fi g r e p or t,s im p l y d o u b l e-c l ic k th e ic o n o n y o u rd e s k to p to o p e n it.T h e n,c l ic k‘F il e ’in th e m e n u b a r.F in a l l y,s e l e c t a nd c l ic k‘P r in t’fr o m th e dr o p-d o w n m e n u.224 November 1864Received confirmation from the Superintendent that I will be given the opportunity to treat a very troubled and difficult patient. Dubious honour! Her name is Alice, and her prognosis is not promising. After looking at her file, I’m astonished she has survived this long. She has been nearly comatose for a year.W o u l d I h a v e a d m it te d h e r h a d I k n ow n t h e n w h a tI k n o w n o w? -3/10/73I t p a y s t o h e e d t h e f e l in e—s o m e th in gI’v e l e a r n e do v e r t h e y e a r s. -21/10/7311 November 1864Mute on a stretcher, with her head curiously bandaged, Alice seems to cling precariously to life. Her burns have healed remarkably in the year since the fire, but she languishes in a deep trance-like dementia. It’s as if the blaze consumed her senses wholesale. Deaf, dumb, and blind to all stimulation, she’s a fair match for the infirmary’s gloom.In a frenzied instant, a cankered feline pounced on Alice while she was about to be carried inside. Startled by the cat’s yowl, the bearers lost their grip and dropped the wretched girl to the ground. Most curious to behold, the cat stood atop Alice as if claiming territorial right, or as if defending a rodent captured in the day’s hunt from other hungry predators. Only when an orderly threatened it with a stick did the creature scamper into a nearby hedge. Even then the cat crouched beneath the shrubbery. With eyes agape, it fixed on Alice as if it had some vital interest in our proceedings.CreditsCasebook Written by Greg RoenschEdited for Europe by James LenoëlCover Design: Joel ThomasDesign: Big Idea GroupSketches: Ben HallSpecial Thanks to all who contributed to this Casebook, including R. J. Berg, American McGee, Rogue Entertainment (especially Rich Fleider, Ben Hall, and Joel Thomas), Ede Clarke, Genee Higgins, Dave McCormick, Mike Kaiser, Justin Holst, Andrew YoungAll songs composed and performed by Chris Vrenna(P) 2000 © 2000Publishing courtesy of Almo Music Corp. (ASCAP) for itself and on behalf of Pink Lava (ASCAP).For a complete list of American McGee’s Alice™ credits, see the credits section in the game.For technical requirements and gameplay information, please refer to the Install Guide/Basic Gameplay Guide included with American McGee’s Alice.Software and Documentation © 2000 Electronic Arts Inc. All rights reserved. Portions © 2000 Rogue Entertainment, Inc. All rights reserved. This product contains software technology licensed from Id Software, Inc. Id Technology© 2000 Id Software, Inc. All rights reserved. Electronic Arts, EA GAMES, the EA GAMES logo and American McGee's Alice are trademarks or registered trademarks of Electronic Arts Inc. in the U.S. and/or other countries. The Rogue Entertainment logo is a trademark of Rogue Entertainment, Inc. Special Thanks to Ritual Entertainment.EA GAMES™ is an Electronic Arts™ brand.。
饥荒联机版新手入门攻略
饥荒联机版入门攻略饥荒生存类游戏,玩法简单深受玩家喜爱。
好多不喜欢游戏的女生都在尝试后喜欢上此游戏,有独特的彩蛋和奇遇。
饥荒联机版出了有一段时间了,但是一直没有比较全面且系统的攻略。
(此攻略适合刚开的世界,或后加入不想和其他人在一起的玩家)基础操作篇可鼠标单独操作,也可配合键盘进行游戏,推荐键盘鼠标配合(打BOSS和怪物走位方便)。
W.A.S.D键操控角色上下左右。
用鼠标与其他物品.生物.建筑互动。
F键用于自动攻击,空格键用于自动采集。
M键地图,TAB键玩家列表(单机TAB是地图)。
Q键位逆时针旋转视角E键位反之。
1234567890物品栏的快捷键(我都没用过都是用鼠标点)。
鼠标左键移动或安置物品,右键将物品穿戴或物品互动。
(有的mod物品有自己独特用法不一一叙述)联机介绍篇首先要先下载饥荒联机版,联机方法有很多Steam正版(请支持正版),游侠,蛤蟆吃等。
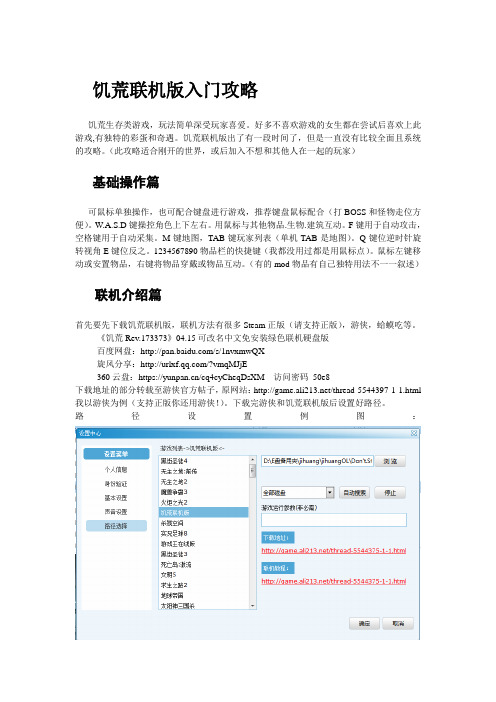
《饥荒Rev.173373》04.15可改名中文免安装绿色联机硬盘版百度网盘:/s/1nvxmwQX旋风分享:/?vmqMJjE360云盘:https:///cq4cyCheqDsXM 访问密码50e8下载地址的部分转载至游侠官方帖子,原网站:/thread-5544397-1-1.html 我以游侠为例(支持正版你还用游侠!)。
下载完游侠和饥荒联机版后设置好路径。
路径设置例图:这是开始界面:一汉化游戏方法从我这下载的游戏是英文的需要使用游戏带的mod改成中文方法如下:1.开始界面点击Play!会弹出一个对话框(这是Steam登录用的我们登录不上)2.点击Play Offline(离线登录)3.菜单页面点击Mods默认情况下是在Client Mods的选项下(不是自己改)4.选择第一个和最后一个mod在螺丝图标后面的回字框内点上对号(暗红的的图标会亮)两个mod分别是:KO1中文语言包和KO9中文语言包补充5.两个图标亮起后点击Apply出现等待画面,汉化后悔自动回到开始游戏页面,显示中文的开始游戏,汉化成功。
《肥肥公主大救援》游侠对战平台联机教程+中文免安装硬盘版下载

《肥肥公主大救援》游侠对战平台联机教程+中文免安装硬盘版下载《肥肥公主大救援》可以在游侠对战平台进行多人体验了,小伙伴们心动不如行动。
下面小编带来《肥肥公主大救援》游侠对战平台联机教程+中文免安装硬盘版下载,一起来Fighting!!!!!!前言此教程适用于游侠对战平台,请大家耐心看完,按照步骤进行。
如有什么疑问请在下面评论,小编将进行相关解答。
最后祝大家游戏愉快!游戏介绍两座城堡,两方人马,以及两位无法抗拒蛋糕魅力的王家女孩。
胖公主需要团队合作,不论你是为战士或肥胖战士。
敌人竟绑架了公主,真不公平不是吗?为了报仇,你也绑架了敌方的公主– 双方都在坚固的城堡内囚禁了对方的公主作为人质,抢救任务的时刻到了。
唯一的问题是这两位贪吃的公主一直吃个不停,她们变得越胖越需要更多人合作搬运才能安全救回。
游侠平台游侠对战平台下载地址:/游戏下载及联机教程欢迎大家下载这个游戏,用游侠对战平台联机玩。
应玩家要求,做了个PSP模拟器联机的工具,以配合平台使用,可以达到联机的效果。
建主机和联机都很简单的,大家自己下面看。
一:怎么建主机。
不想建主机的可以不看这一步,最好是网速快的玩家建主机,这样更流畅。
1:先下载工具:【必下】游侠平台PSP服务器架设V3.10.5.2百度网盘:/s/1o7ktDXo迅雷快传:/d/D389CAK6GAD7QbNWe51旋风分享:/?Fnm2QjU【必下】PSP主机开启程序百度网盘:/s/1bnAH7jh迅雷快传:/d/D389CAJiJgDy1lBT6ad【必下】请务必下载这里的PSP模拟器(0.9.9.1联机版),其它版本的会连不上游戏目录下面的模拟器运行库文件夹,里面的运行库一定要装上。
并看最下面的图,游戏设置里面的快速访问内存的选项不要打勾,有勾的去掉,以防止模拟器不稳定。
百度网盘:/s/1i3KNOTf迅雷快传:/d/D389CAJjQgA-APhU370旋风分享:/?buUNvmzPSP游戏资源怪物猎人2G汉化版百度网盘:/s/1eQmtsGi迅雷快传:/d/D389CAJsKQC.91BT43e怪物猎人P3 HD 汉化版百度网盘:/s/1qW6Tury迅雷快传:/d/D389CAIvBwBdy1RT7bf如果发现P3进去是日文,请下载汉化包百度网盘:/s/1eQsuAH0迅雷快传:/d/D389CAJIFgBMJVZT9df使用方法:打开汉化包的exe,前面载入游戏(ISO文件),后面载入汉化包中的ppf文件。
红色警戒MOD安装及联机教程

MOD安装及联机教程前序所有的MOD制作都基于《命令与征服:红色警戒3》1.12版本(台版翻译《終極動員令:紅色警報3》),1.10以下版本和《红色警戒3起义时刻》在内,都不能玩MOD。
嗯嗯,等等?红警世界大战?蓝色警戒?纳尼?我觉得我们玩的不是同一个游戏,出门任意方向转,只要别回来就行,那丫的根本不是红色警戒3。
红色警戒3原版1.12下载地址:/Soft/201310/303537.shtml如不能下载,请自行去找。
========================================================================一、如何打开游戏控制台启动MOD 1.在桌面上创建红警3的快捷方式,如下图2.右键这个快捷方式,属性3.弹出的属性框中,在“目标”里面英文的最后输入-ui(注意!-ui前面有一下空格,)如下图4.接下来先点击“应用”再点击“确定”,如下图做完上面的事,现在当我们点击这个红警游戏的快捷图标就会先打开“游戏控制台”了,这样我们就调出了这个游戏的控制台。
5.接下来要把下载好的mod放对位置,我们就能在游戏控制台里载入这个MOD,我是WIN7系统,就以WIN7为例。
5-1.首先将下载好的mod解压出来,我们解压出来的文件夹里,会有一个同名的子文件夹,这个子文件夹里面就包含一个skudef文件和一个big的MOD文件,我们只要把整个子文件夹复制或是剪切就行了!有的人可能会没有子文件夹,里面直接是MOD文件了,那我们就要把这个文件夹复制或是剪切,不要只把里面的MOD文件一个skudef文件和一个big拿来用,记注了。
如图:5-2.打开“文档”,如下图:找到Red Alert 3文件夹,如下图:如果找不到这个文档,可以按照上图的路径打开,不要打开到别的地方去了。
打开Red Alert 3文件夹,会看到一个Mods文件夹,如果没有这个Mods文件夹,自己手动创建一个。
《红色警戒2共和国之辉》中文免安装绿色硬盘版游侠对战平台局域网联机教程

《红色警戒2共和国之辉》中文免安装绿色硬盘版游侠对战平台局域网联机教程红色警戒2共和国之辉是一款经典的即时战略游戏,而在这篇文章中,我们将为大家介绍如何在中文免安装绿色硬盘版游侠对战平台上进行局域网联机。
以下是具体的教程:一、准备工作在开始联机之前,请确保你已经完成了以下准备工作:1. 确保你已经下载并安装了红色警戒2共和国之辉中文免安装绿色硬盘版;2. 确保你已经下载并安装了游侠对战平台。
二、配置游侠对战平台1. 打开游侠对战平台,进入设置界面;2. 在设置界面中,选择“网络设置”;3. 在网络设置中,找到局域网设置,确保局域网联机功能已经开启;4. 确保你的电脑和其他玩家的电脑连接在同一个局域网内。
三、创建游戏房间1. 在游侠对战平台的主界面上,点击“创建房间”按钮;2. 在创建房间的界面中,填写房间的名称和密码(如果需要),并选择适当的游戏模式和地图;3. 点击“确定”按钮创建房间。
四、加入游戏房间1. 在游侠对战平台的主界面上,点击“加入房间”按钮;2. 在加入房间的界面中,选择适当的房间,并输入房间密码(如果需要);3. 点击“确定”按钮加入房间。
五、开始游戏1. 当所有玩家都加入房间后,房主可以点击“开始游戏”按钮开始游戏;2. 游戏开始后,玩家们可以根据游戏规则进行建造基地、训练士兵、发展科技等操作;3. 在游戏过程中,玩家们可以通过局域网实时进行对战。
六、注意事项1. 确保所有玩家的游侠对战平台版本一致,以免出现不兼容的情况;2. 确保所有玩家的红色警戒2共和国之辉游戏版本一致,以免出现游戏不匹配的问题;3. 若遇到连接问题或其他故障,可以尝试重新启动游侠对战平台或游戏。
通过以上的步骤,你就可以在红色警戒2共和国之辉中文免安装绿色硬盘版游侠对战平台上进行局域网联机了。
希望这篇教程能够帮助到你,让你享受到红色警戒2的精彩对战体验。
祝你游戏愉快!。
红警尤里的复仇局域网联机方法及常见问题解决

红警尤里的复仇局域网联机方法及常见问题解决随着XP操作系统的退役,游戏的兼容性也相对慢慢的变差了。
童年时小伙伴一起玩过的红警现在在Win7和Win8都遇到了些问题,没有IPX协议如何联机.下面是店铺收集整理的红警尤里的复仇局域网联机方法及常见问题解决,希望对大家有帮助~~红警尤里的复仇局域网联机方法及常见问题解决工具/原料尤里的复仇免IPX红警系列联机补丁包中国补丁包方法/步骤首先安装工具一:尤里的复仇(网上的版本都可以),这里我以52PK网站的示例,安装完成它会生成一个文件夹,具体安装步骤我就带过。
安装完成后,下载联机补丁,并且将文件解压到游戏安装目录就行了。
文件下载链接/s/1gdzuahd游戏提示重复序列号怎么办?这个是因为我们在一个站点下载的游戏安装包所以游戏解压时序列号也完全相同。
解决方案→我们打开游戏安装目录找到一个Woldata.key或Woldata.ini文件,然后右键修改这个文件扩展名为.txt打开,将里面数字段的后两位修改成唯一的保存即可,重新将这个文件修改成原始.key文件,然后保存重新游戏即可。
这里不会修改扩展名的看链接:/article/fedf07377cd23f35ac897791.ht ml红警打开总有错误提示怎么办?这个是兼容性的问题,win8及以上系统最常见。
解决方案→选中图标右键属性,在属性框中找到兼容性然后勾选上“以兼容模式运行这个程序”然后选择“Windows xp-sp3”或者更低。
然后应用,确定重新启动游戏即可尤里的复仇没有中国怎么办?很多小伙伴比较喜欢尤里复仇是因为可以选择基地位置,但是很遗憾这款没有。
解决方案→下载中国补丁包将里面文件全部解压到游戏目录重启游戏即可。
下载链接/s/1ntEaOu1红警尤里的复仇局域网联机方法及常见问题解决法。
Desert Strike和Jungle Strike的安装说明书
1I N T E R A C T I V EPRESENTS:Senior Programmer - Alex MetallisAssistant Programmer - Clive FrancisAssistant Programmer - Jon MedhurstGraphic Artist -James HartshornAdditional Levels by Gremlin GraphicsMusic and Sound Effects - Neil BigginProducer - Tony CassonManual - Martin CalpinQuality Assurance - Tony Howe, Lee Campbell, Rob Millington,Sim Furniss and Mick Sheehan1Install Instructions Desert Strike and Jungle Strike Combined CD Turn your computer on and insert your CD-Rom into your CD-Rom Drive.To install the game(s) first change drives to your CD-Rom Drive (e.g. D:, E:).Then to install Desert Strike Type Desinst at the prompt and press the return key.To install Jungle Strike Type Junginst at the prompt and press the return key.Follow all the on screen instructions.To play either of the games move to the directory in which the game you wish to play is installed and type either Desert or Jungle(depending on which game you wish to play) at the prompt and press return. Remember you need to have the CD-Rom in the CD-Rom drive to play either game.WE DO NOT RECOMMEND THAT YOU PLA Y THIS GAME UNDER WINDOWS 95, RESTART YOUR MACHINE IN DOS MODE AND INSTALL AND PLAY THE GAME FROM DOSThis product is exempt from classification under U.K. Law. Inaccordance with The Video Standards Council Code of Practice it isconsidered suitable viewing by the age range(s) indicated.2Without warning a madman has emerged in the Middle East and threatens to start Armageddon. The international community knows very little about this menace, the self-styled “General” Kibaba, but we have enough evidence of his military capabilities to take his threats very seriously. The President of the United States has chosen you to fly a series of dangerous pre-emptive campaigns in the desert to vanquish this inimical despot.34MAIN MENU.Using the Main Menu.Use the up/down cursor keys to toggle between the red choice buttons on the mainmenu, to select press fire (if this is the first time you’ve played Desert Strike and youhaven’t changed any of the default keyboard settings - then press the default fire keys Z,X or C).CHOOSE YOUR CO-PILOTYour co-pilot is responsible for aiming the guns and operating the winch. The morecapable your co-pilot, the easier your job as pilot will be. Each co-pilot has a dossier.Press fire on the Co-Pilot button to go to the Co-pilot Menu.You will see a picture of each co-pilot and a description of their skills and attributes. Youwill notice that one of the Co-pilots is listed as MIA or Missing In Action. Y ou can’tselect a pilot who is listed as MIA. They are out there somewhere, and if you find themand return them safely to the frigate for some much needed first aid, you’ll be able to flythe subsequent campaigns with the best co-pilot of the bunch. Press fire on the nextbutton on the co-pilot menu to select a co-pilot, when you’ve chosen a co-pilot, the co-pilot shown in the window represents your selection, move to the exit button and pressfire to return to the main menu. Your co-pilots name will now be shown in the windowon the main menu.Configure CONTROLs and sound OPTIONSMove to the button and press fire to select. Y ou are will be presented with the followingoptions Define Keys, Calibrate Joystick, Sound Card and Screen Size.5Define KeysMove to the button and press fire to select. This feature allows you to change the default keys used for gameplay. The default keys are as follows:LeftRightForward ReverseGun HydraHellfireOnce you’ve chosen the keys you wish to use the menu will automatically close and return you to the Configure Controls and Sound Menu.Calibrate JoystickMove to the button and press fire to select. Follow the on screen instructions, the menu will automatically close and return you to the Configure Controls and Sound Menu once the joystick is configured. Because most joysticks have only two buttons we’ve designed the controls so that you can use the space bar to toggle between weapons (Gun, Hydra and Hellfire), if for example you are using the fire button on your joystick to operate the Gun press the space bar will switch weapons to the Hydra. Pressing the space bar again will bring the Hellfire into use, press the spacebar again and you’ll switch back to the gun.Sound CardPress fire on the Sound Card button and the name of the sound card will appear in the window on the left, select the name of the sound card you wish to use by pressing fire. Do not select a soundcard driver that isn’t installed or 100% compatible with the soundboard in your machine.Screen SizeUse the fire button to alter the size of the gameplay screen on your monitor, you can choose full, medium or small play screen area.ENTER PASSWORDIf this is the first time you’ve played Desert Strike you won’t have a password. At the end of each successful campaign you receive acharacter password and your current score. Make sure to write it down if you wish to return to the game at the beginning of the next campaign with your score intact, rounded down to the nearest thousand points. If you get the password incorrect a ? will appear the password window,simple type the password in again.The password will save your co-pilot selection but it won't save any non-standard control settings you may have chosen. Y ou have about five minutes to write down the password before it disappears.You are now ready to play Desert Strike, move to the start campaign button and press fire.z x w y C X ZIN GAME MENUsAt any point during the game you can call up the following menus by pressing:F1 THE MAP SCREEN. Y ou will need to refer to the battle map continually throughout each campaign to locate yourself in relation to your targets and objectives. You can view military data specific to your current campaign, and call up your current status for the campaign. Besides your weapons, the battle map is your most important tool as a pilot. Y our Apache is depicted as a small helicopter graphic. Select objects from the display below the battle map by using left and right cursor keys. The object selected blinks on the battle map.F2 THE MISSION INFORMATION. Y ou can obtain detailed information about the targets and objectives of a campaign from the Mission Data Log. Notice that every item on the map has a corresponding file in the data log. There you will find a picture of the item, its name, and pertinent information.ARMOUR POINTSArmour points are listed for some of the targets. The number represents the amount of damage that target can take before it is destroyed.POWER POINTSPower points are listed for the enemy’s weapons. If you get hit by a Rapier SAM, which packs a 100 point wallop, your armour will lose 100 points.F3 CURRENT MISSION ST ATUS. This gives you all the information on missionsthat have been completed and ones to be completed.Press the spacebar to exit any of the above F-key menus.6Pressing ESC during play displays the following menu on screen:F1 Sounds. Press F1 to turn on/off the sound.F4 Control method. This allows to change control method, pressing F4 will toggle between the choices. Please note that you must first calibrate your joystick (F6) before you can select it.F5 Define keys. Change the default keys used in the game to the ones you’d like to use.F6 Calibrate joystick.F10 Abandon game. Returns you to the main menuF12 Quit to DOS. Quits to DOS and returns you to the hard drive prompt.ESC. Exits this menuCRITICAL INFORMATIONY ou are allotted three lives per campaign. If you lose your third life before you accomplish the final mission of a campaign, you must return to the beginning of that campaign and complete it before you can move on to the next campaign.Although the chain gun may appear to be hitting an object, make sure you look for the grey explosion to be certain you are on target. Misses appear as yellow explosions and make only a small “gunfire” noise.At times during a campaign you will receive announcements of incoming intelligence reports. If you wait more than 10 seconds to access the report, it will not be available.Each time you drop off a passenger at a landing site your mechanics will have time to work on your armour.In Campaign #1, each passenger is worth 150 armour points. In all subsequent campaigns, each is worth 100 points. When your fuel level reaches 14 units a warning message appears on the screen. Each time you burn two more units, the message appears again. When your Armour is reduced to 125 points, you receive a similar warning message.If you crash from lack of fuel, your armour is automatically restored to a full 600 points. If you blow up from loss of armour, your fuel supply remains the same as it was before you crashed, unless you had fewer than 25 units of fuel, in which case your fuel tank is restored to 25 units.78If you bump into an object (except for the frigate) your armour loses ten damage points and you lose control of the Apache momentarily. Also,you cause ten damage points to the object you bumped into.When you crash and are restored, your “load” of passengers and your supply of ammunition remain the same.The following critical information appears on the map screen (F1).Lives – Number of lives remaining.Load – Number of passengers aboard (6 max).Armour – Protection against attack (5-600).Fuel – Fuel remaining (2-100).Guns – Rounds remaining in the chain gun (1178 max).Hydras – Hydras remaining (38 max).Missiles – Missiles remaining (8 max).Score – The higher your score, the more you’ve accomplished. Bonus points are sometimes available if you complete all tasks on a given mission. For example, if you need only rescue 14 of 16 MIAs to complete a mission, bonus points are awarded for rescuing the other two.You can lose points for destroying civilian or friendly targets.HINTS AND TIPSKEEP MOVING•You can’t win the game if you don’t learn how to out-manoeuvre the enemy’s weapons.FUEL AND AMMO CONSERVATION•In Campaigns 2, 3, and 4 there are more fuel drums and ammunition crates in the field than are indicated on the map. Numerous fuel and ammo dumps are hidden in buildings, under sand dunes, etc. The only way to find hidden supplies is to blow up the structures that conceal them.•Your missiles and Hydra are precious commodities not to be squandered. As long as it’s safe and you have fuel, use your chain gun to destroy targets.•Don’t waste fuel and ammo by picking them up when you’re already full or nearly full. It’s best to let them sit and return when you need them.JINKING•Certain targets are difficult to hit, even with Jake as your co-pilot. Jinking will help you increase your precision by allowing your Apache to move left, right, forward or backward without rotating. Hold down the control key on the keyboard while moving leftand right keys or while using the joystick.NEUTRAL TARGETS•Some targets, such as buildings and dunes, are neutral, which means that your gunner will not fire on them automatically. If you want to hit a neutral target, you must point the Apache directly at it and fire. Jinking often comes in handy here.PICKING UP PASSENGERS•When there is a crowd of waiting passengers, your co-pilot will pick out the closest one and drop the ladder for him. Y ou must pick up that passenger or back away from him before the ladder will drop for another passenger. Also, the ladder (and the winch) will appear even when it’s behind a building or other object as to better help you guide it.DROPPING OFF PASSENGERS•When you land at a landing zone, all passengers (except commandos and EANN crew) will disembark. Try to drop off your passengers at appropriate times so as not to waste the armour value they bring. Y ou need not pick up allavailable passengers to win a campaign, but you should remember the locations of the people you did not pick up so that you can use them for armour points later.9•The commandos and the EANN crew must be dropped off at their appropriate landing zones, or else they will take up valuable payload space for the rest of the campaign.ARMOUR CRATES•There are armour toolboxes hidden in all four campaigns. Picking up an armour crate restores your armour to a full 600 points. QUICK LADDER•The quick ladder allows you to pick up objects practically on the run. All four campaigns offer a quick ladder, but you have to find it.The quick ladder lasts for an entire campaign, even if you crash, but it does not carry over into subsequent campaigns.EXTRA LIVES•The box with the red cross on it contains an extra life. There are a few hidden throughout the campaigns, and you will almost certainly need some of them to win the game. Extra lives do not carry over into subsequent campaigns.ALERT ZONES•Certain targets are protected by alert zones, which dramatically increase the firepower and plating of the major weapons.•Alert zones are controlled by radar stations, power stations and objects in the game. Pay attention during your briefings and to all information you receive during a campaign to find out which buildings or objects control which alert zones.•Radar stations put out a range alert, which gives the enemy weapons an increased range. Power stations supply an aim alert, which allows the enemy to move their turrets electronically, instead of manually. Weapons on aim alert cannot be out-manoeuvred. It’s best just to stay away until you destroy the power station supplying them.FOOLS RUSH IN•Y ou can save yourself a lot of heartache by checking the map for the positions of the enemy’s defences before travelling.WEAPONS APPENDIXCHAIN GUN: inflicts 3 points of damage.HYDRA: inflicts 25 points of damage.MISSILE: inflicts 100 points of damage.carries 600 points of armour.In Alert Zones, the values of armour and weapons power are increased.ENEMY ARMOUR POWER RATE OF SPEED OF WEAPON NAME(DAMAGE)FIRE PROJECTILE AK4710 points 5 points0.5 sec.fastAPHID2575 3.0fastAAA5020 2.5fastRAPIER75100 2.5fastVDA 100250.33fastZSU 150400.33fasterSPEEDBOAT15050 1.25fasterCHOPPER 150100 1.5fasterM48200100 2.5fasterCROTALE 250150 2.0slowerENEMY ARMOURPOWER RATE OF SPEED OF WEAPONNAME (DAMAGE)FIRE PROJECTILEDESERT STRIKE TROUBLESHOOTERDesert Strike CD Trouble ShooterRequired EquipmentCD-ROM DriveVGA Minimum1 Megabytes of memory EMSSupports Soundblaster/Roland/Adlib or 100% compatiblesJoystick/Keyboard optionDOS 5 or above required550K Free of Base Memory (Largest Executable Program Size)MSCDEX 2.1 or above and CD-ROM drivers needed386/486 Compatible if above requirement are adhered too.AudioDesert Strike supports Soundblaster/Adlib/Roland cards or 100% compatibles.If you have further problems please refer to the AUDIO PROBLEMS section in the trouble shooting guide found below.Trouble shootingMemory ManagementError message -NOT ENOUGH BASE MEMORYDesert Strike requires at least 550K of base memory to run properly. If your machine hasn’t enough base memory, when you try to run the game the following error message will appear on screen. NOT ENOUGH BASE MEMORY YOU NEED 550K TO RUN DESERT STRIKE. If you are unsure as to the amount of BASE MEMORY you have, simply make sure you PC is at the DOS prompt and type ‘MEM’.This will present you with a list of different memory locations. The important one is ‘LARGEST EXECUTABLE PROGRAM SIZE’ (in other words BASE MEMORY). If this is less than 550K then you will need to free some more memory up to play Desert Strike. Consult your DOS manual for more information on base memory and how to make more available, or follow the guide to make a DOS BOOT DISK. Error message -NOT ENOUGH FREE EXPANDED MEMORYDesert Strike requires 1Megabytes of Expanded Memory (EMS) not Extended memory. You can use EMM386.EXE or other such drivers to emulate Expanded Memory using Extended Memory.You can do this by adding the line,DEVICE=C:\DOS\EMM386.EXE 1024into your CONFIG.SYS.If you have configured your PC to have 1Meg of EMS and are still experiencing the error message, then ensure that either programs like ‘Smartdrive’ are not taking up your EMS memory; or simply add more than 1megs in your EMM386 line in your CONFIG.SYSe.g..DEVICE=C:\DOS\EMM386.EXE 3072DOS Boot DiskDo not use the DOS Boot Disk section of the manual if you have any sort of disk compaction software on your hard disk drive. Consult your disk compaction software manual to create a DOS boot disk.If you do have problems with the above sections, then making a DOS Boot Disk could cure these problems. To create a DOS Boot Disk follow these easy steps exactly as shown.Please Note:All examples of code assume that your DOS directory is on the ‘C’ drive and that the directory name is ‘DOS’;i.e.. C:\DOSIf your DOS directory is on ‘D’, for example, and the directory name is MS-DOS, then replace C:\DOS with whatever your needs are;e.g.. D:\MS-DOS1.) Insert a blank floppy disk into your A: drive of your computer.2.) Make sure your machine is on and at the DOS prompt.3.) Type ‘FORMAT A:/S’ and then press return or enter4.) Wait while the disk is formatted and the system data has been transferred onto the disk.5.) You will now be asked to name the disk. Type’ DS-BOOT’ and then press return or enter.6.) If asked ‘ FORMA T ANOTHER DISK’ answer ‘N’ and press return7.) You should now be at the DOS prompt.8.) Type ‘EDIT’ and press return or enter9.) Select ‘NEW’ from the file menu, and press return or enter.10.) Type in the following information.DEVICE=C:\DOS\HIMEM.SYSDEVICE=C:\DOS\EMM386.EXE 1024FILES=20BUFFERS=20DOS=HIGH11.) Select “SAVE’ from the file menu and save as ‘ A:CONFIG.SYS’ ensuring that the DS BOOT disk is in drive A.12.) DO NOT SA VE THIS FILE TO YOUR HARD DISK.13.) Select ‘NEW’ from the file menu, and press return or enter.14.) Type in the following information.PROMPT=$P$GP A TH=C:\DOS15.) Select “SAVE’ from the file menu and save as ‘A:AUTOEXEC.BA T’ ensuring that the DS BOOT disk is in drive A.16.) DO NOT SAVE THESE FILES TO YOUR HARD DISK.17.) Y ou will now need to copy your CD-ROM drivers onto this boot-up disk. Follow the advice given with your CD-ROM drive software on how to do that.18.) After completing sections 1-17 you are now ready to play the game. Reset your computer leaving the DS-BOOT disk in the internal floppy drive. Wait until the computer has ‘booted-up‘ and is at the DOS prompt. Now follow the instructions under the heading Playing Desert Strike.Audio ProblemsIf you experience any problems with the sound in Desert Strike then check through the following.1.) Does the card work with other products?2.) Have you used and installed the software that came with the card, if any did?3.) Is your card 100% compatible with the sound cards listed?4.) Have you installed the game to use the desired soundcard?5.) Have you configured the card properly? Check the interrupt settings.6.) Have you been through the SETUP program?If Desert Strike is being run on a slow 386 you may experience a slight flickering effect while playing the game, to solve this we’ve added a few features you might like to try, after all not everyone can afford a 486. Quit the game to the main menu and choose Configure Controls and Sounds, from the Configure Menu select Screen Size. Use a fire button to toggle through the choices. Choose one that gives you the best performance.Extra ExtraIf there are any other notes or alterations to this installation guide there will be a text file on the disk. (README.TXT). Please read this file before proceding with the installation.。
《饥荒》游侠对战平台联机教程中文免安装硬盘版下载

《饥荒》游侠对战平台联机教程中文免安装硬盘版下载在《饥荒》游侠对战平台联机教程中文免安装硬盘版下载一文中,我们将为大家介绍如何使用游侠对战平台进行《饥荒》游戏的联机对战。
以下是详细的操作步骤:第一步:准备工作在开始之前,我们需要下载游侠对战平台的安装文件。
由于本文要介绍的是免安装版,所以可以直接下载免安装版的游侠对战平台。
在搜索引擎中输入"游侠对战平台免安装版下载",即可找到相应的下载链接。
务必选择可靠的下载源,以免下载到病毒或非正版的软件。
第二步:下载游戏在获得游侠对战平台免安装版的下载链接之后,点击下载按钮开始下载游戏。
下载过程可能需要一些时间,取决于您的网络连接速度和服务器的负载情况。
请耐心等待下载完成。
第三步:安装游戏下载完成后,解压游戏文件。
通常情况下,免安装版的游戏文件会以压缩包的形式提供,您需要使用压缩软件(如WinRAR等)解压缩文件。
解压缩后,您可以看到游戏的安装文件,双击运行该文件,并按照提示完成游戏的安装过程。
第四步:注册游侠对战平台账号安装完成后,打开游侠对战平台。
如果您是第一次使用该平台,您需要注册一个账号。
在注册页面填写相关信息,包括用户名、密码、邮箱等。
务必使用真实有效的信息注册账号,以便后续的游戏对战和账号管理。
第五步:登录游侠对战平台注册完成后,使用您刚才注册的账号登录游侠对战平台。
在登录界面输入用户名和密码,点击登录按钮。
如果输入的信息无误,您将成功登录游侠对战平台。
第六步:寻找游戏服务器在登录游侠对战平台后,您可以浏览平台上提供的游戏服务器列表。
找到《饥荒》的服务器,可以通过关键词搜索或按照游戏分类进行筛选。
选择一个适合自己的服务器,点击进入。
第七步:加入游戏服务器进入所选的服务器后,您可以看到服务器的详细信息,包括服务器名称、在线人数、所处地区等。
如果该服务器还有剩余的空位,您可以点击加入按钮加入服务器。
等待一段时间后,您将成功加入游戏服务器。
经典即时战略游戏局域网如何联机

经典即时战略游戏局域网如何联机经典即时战略游戏局域网如何联机经典即时战略游戏局域网如何联机工具/原料一台可以联网的电脑百度云网盘游侠对战平台方法/步骤一般来说,帝国时代和全面战争作为游戏公司的产品都提供了联机的平台。
但都需要内购或无法进入产品自带的联机平台。
这主要是由于破解和汉化之后的原因,破解该软件之后要么删除了联机模板要么导致联机模板配置文件丢失。
首先我们在网络上下载游侠对战平台,百度云下载地址这个是免安装版本,下载完成后解压即可使用。
点击ali213_pk.exe直接运行游侠对战平台,没有游侠网账号的请自行注册,直接登录后,点击大厅选择游戏,再根据网络情况选择房间就可以用游侠网账号与网友们联机对战。
选择即时战略游戏,即时战略游戏中有帝国时代3,红警共和国之辉,罗马全面战争等等一些游戏。
我以帝国时代3为例来解说如何联机对战。
点击设置选择游戏设置,在左侧选择游戏名称帝国时代3,接着在第一个输入框附近点击手动选择,找到刚才下载解压完成的帝国时代3文件夹,选择其中的age3y.exe,点击打开。
再点击确定完成设置。
这时就可以点击开始游戏了,系统消息显示游戏已正常启动,现在你可以联机对战了。
进入游戏后,点击多人联机游戏,选择局域网络,建立一个新的家乡城市,设置相关属性后点击建立,再点击进行游戏。
网络连接成功后,会进入下图所示的界面。
我们可以选择游戏类型和游戏规则作为主机游戏,等待玩家加入。
也可以加入他人已创建好的局域网游戏,还可以直接在DirectIP处填写主机游戏的虚拟IP直接连接,虚拟IP就是上文中进入房间所分配的。
祝游戏愉快!感谢您的阅读,祝您生活愉快。
红警2局域网联机方法(个人试验过的方法)

红警2局域网联机方法(个人试验过的方法)红警2局域网联机方法(个人试验过的方法)红警2是一款经典的实时战略游戏,许多玩家都希望能够通过局域网和朋友进行联机对战。
本文将介绍一些我个人试验过的红警2局域网联机方法,帮助各位玩家解决联机难题。
方法一:使用内网穿透工具内网穿透工具可以帮助我们实现在不同网络环境下的联机。
推荐使用的工具有花生壳、ngrok等。
具体操作步骤如下:步骤一:下载并安装内网穿透工具,根据软件的指引完成相应设置。
步骤二:启动红警2游戏,点击“多人游戏”进入游戏联机界面。
步骤三:在内网穿透工具中,创建一个新的映射,将红警2游戏的端口号与你的本地IP地址进行绑定。
步骤四:分享给你的朋友一个生成的链接或二维码,让他们在自己的红警2游戏中输入该链接或扫描二维码。
步骤五:等待朋友成功连接后,即可开始游戏联机对战。
方法二:使用虚拟局域网软件虚拟局域网软件可以模拟出一个局域网环境,使得不同网络下的电脑可以相互通信。
以下是使用虚拟局域网软件进行红警2联机的步骤:步骤一:下载并安装虚拟局域网软件,推荐使用的软件有蓝灯、Hamachi等。
步骤二:启动红警2游戏,点击“多人游戏”进入游戏联机界面。
步骤三:在虚拟局域网软件中创建一个新的网络,并将你的朋友邀请加入此网络。
步骤四:在红警2游戏联机界面中,输入虚拟局域网软件为你分配的IP地址进行连接。
步骤五:等待朋友成功连接后,即可开始游戏联机对战。
方法三:使用局域网直连如果你和你的朋友处于同一个局域网环境下(如同一个家庭或办公室的WiFi网络),可以直接进行局域网联机,不需要使用其他工具。
以下是直连的方法:步骤一:确保你和你的朋友都连接到同一个局域网,并且都安装了红警2游戏。
步骤二:启动红警2游戏,点击“多人游戏”进入游戏联机界面。
步骤三:在游戏联机界面中,选择“局域网直连”选项。
步骤四:在朋友的游戏联机界面中,选择“搜索游戏”或直接输入你的IP地址进行连接。
《战争之人突击小队2》中文免安装绿色硬盘版游侠对战平台局域网联机教程

《战争之人突击小队2》中文免安装绿色硬盘版游侠对战平台局域网联机教程战争游戏一直是玩家们喜爱的游戏类型之一,而《战争之人突击小队2》作为一款热门的战争游戏,吸引了众多玩家的关注。
然而,对于一些喜欢与朋友一起进行游戏的玩家来说,如何通过局域网联机是一个关键的问题。
本文将为大家介绍《战争之人突击小队2》中文免安装绿色硬盘版游侠对战平台局域网联机的具体教程。
1. 下载游戏首先,你需要确保已经下载了《战争之人突击小队2》中文免安装绿色硬盘版游戏。
可以通过各种游戏下载网站或者论坛来获取游戏的下载链接。
2. 安装游戏在下载完成后,解压游戏压缩包并运行安装程序。
按照提示完成游戏的安装过程,确保游戏成功地安装在你的电脑上。
3. 下载游戏游侠对战平台接下来,你需要下载游戏游侠对战平台,这是一款可提供局域网联机功能的游戏工具。
同样地,在游戏下载网站或者论坛上搜索并下载游戏游侠对战平台。
记得选择适合你电脑系统的版本进行下载。
4. 安装游戏游侠对战平台下载完成后,解压游戏游侠对战平台并运行安装程序。
按照提示完成对战平台的安装过程。
5. 设置游侠对战平台安装完成后,打开游戏游侠对战平台。
在设置选项中,你需要设置游戏路径,确保游侠对战平台能够找到游戏的安装位置。
6. 启动游戏游侠对战平台设置完成后,你需要点击游侠对战平台中的启动按钮,运行游戏游侠对战平台。
7. 创建游戏服务器在游戏游侠对战平台中,你可以选择创建一个局域网游戏服务器,以便与你的朋友进行游戏。
点击创建服务器的选项,并根据游戏游侠对战平台提供的提示设置游戏服务器的参数,如服务器名称、地图选择等。
8. 加入游戏服务器如果你的朋友已经创建了一个游戏服务器,你可以在游戏游侠对战平台的服务器列表中找到该服务器,并点击加入按钮以加入游戏服务器进行游戏。
总结:通过以上的步骤,你可以轻松地在局域网中与朋友一起进行《战争之人突击小队2》的游戏。
确保你和你的朋友都按照教程进行设置和操作,以获得最好的游戏体验。
无冬之夜2联机方法

无冬之夜2联机方法无冬之夜2》是由ObsidianEntertainment开发的一款角色扮演类游戏,发行于2006年,引人入胜的剧情和完整的DND3e规则,多样的角色培养,多人游戏的丰富以及绚丽的画面使其得到了全球玩家的肯定。
下面是店铺跟大家分享的是无冬之夜2联机方法,欢迎大家来阅读学习~无冬之夜2联机方法局域网多人游戏,要实行联机主要的难点在于路由器设置和IP共享。
1、宽带路由器的设置。
在硬件连接完成以后,我们需要有一台已经与宽带路由器的LAN 口相连接的PC来进行具体的设置。
在设置之前,我们应该确认这台机器已经装有TCP/IP网络协议,笔者使用的机器是XP操作系统,其他操作系统平台的设置基本上都差不多,下面来看看我们需要在这台PC 上进行如何的配置。
配置设置PC的TCP/IP选项:右键单击桌面的网上邻居图标,点击“属性”选项。
在弹出的窗口中选择本地连接,右键单击选择“属性”选项。
这时,在弹出的对话框中双击“Internet协议(TCP/IP)选项”。
在弹出的对话框中选择“使用下面的IP地址”选项,这时我们便可以设置这台PC的IP地址了。
宽带路由器的出厂IP地址一般都为192.168.0.1,所以我们在配置的时候需要将配置的PC设置和宽带路由器在同一个网段当中。
这里,我们将这台PC的IP地址设置为192.168.0.254,子网掩码255.255.255.0,默认网关为192.168.0.1。
通过以上的设置,我们就可以登陆的路由器进行具体的配置工作了,首先双击桌面的IE浏览器,在地址栏内输入192.168.0.1的IP地址。
首先双击桌面的IE浏览器,在地址栏内输入192.168.0.1的IP地址。
当输入回车以后,我们便可以看到这款路由器的配置界面了。
因为是第一次配置,在默认情况下不需要用户名的验证。
有些宽带路由器会需要用户名和验证,如D-Link的产品,默认用户名为Admin,默认密码为空,当遇到用户名和密码验证的产品,我们可以具体查看产品说明书中的用户名和密码相关的内容。
圣安地列斯局域网要如何联机的方法_圣安地列斯局域网联机
圣安地列斯局域网要如何联机的方法_圣安地列斯局域网联机
所谓的圣安地列斯是一款由Rockstar North 开发,由Rockstar Games发行的一款3D 游戏,属于侠盗猎车手系列游戏。
下面是小编为大家整理的关于圣安地列斯局域网要如何联机的方法,一起来看看吧!
圣安地列斯局域网要如何联机的方法
工具/原料
SAMP最新版
V1.0美版圣安地列斯完整版
方法/步骤
SAMP的官方网站是:www.sa-mp,前往官方网站,点击Download下载最新版SAMP 选择一个SAMP提供站点,点击进行下载
右键圣安地列斯游戏目录的gta sa.exe,如果文件为13.7M,那么是V1.0;如果是15.1M,那么是V1.01
V1.01版本在进行SAMP联机游戏会出现白屏现象,如果不是V1.0请覆盖美版V1.0免CD补丁:H://pan.baidu/s/1bntfMhT
双击SAMP的exe安装文件,点击i agree,同意安装协议
选择圣安地列斯游戏根目录,即gta sa.exe所在路径,点击install
如果不是游戏根目录则install为灰色按钮,无法进行下一步
点击圣安地列斯游戏目录的戴墨镜的美女SAMP图标
这个界面就是SAMP主界面,
昵称:最好填英文名比如我的Los_Vincent
红勾:添加游戏IP地址
绿色三角形:进入当前服务器的联机游戏
点击左下角Internet可在线搜索服务器,右键喜欢的服务器-add可保存搜索到的服务器感谢您的阅读!。
红警局域网联机的具体方法

红警局域⽹联机的具体⽅法红警局域⽹联机的具体⽅法:适⽤于原版红警、尤⾥复仇,及任何同样的扩展版。
第⼀步:安装IPX协议。
⽅法:控制⾯板——⽹络连接(或⽹上邻居·属性)——本地连接·属性——在“此连接使⽤下列项⽬”中,找找有⽆IPX协议,如果没有,点击下⾯的“安装”按钮——点选“协议”——点击添加——点选“IPX协议”——确定。
第⼆步:修改游戏序列号。
在游戏主⽬录中,有⼀个叫“Woldata”的⽂件,⽤记事本将其打开。
⽂件中的数字,联机的每台机器上必须都不⼀样,如果⼀样则改动最后两位数字使其区分。
如果打开后是乱码,可⽤下列字符替换原有字符,然后按上述步骤修改—— 10991478310537297561649622401880764126419840913672270792188169491608197372711325057266741593997146213246811979244021552319061240\SETUP.INI 第三步:设置⽬标⽹路。
进⼊游戏后,选择选项·⽹络。
在“⽬标⽹路”中,填上四个16进制的两位数,中间⽤⼩点隔开,联机的每台电脑都要⼀样。
如: 00.00.00.00或: 56.78.12.34退出游戏重新进⼊,也可能需要重启电脑。
现在你也可以在家⾥、在宿舍,像在⽹吧⼀样与朋友决战了!红警局域⽹怎么连⾸先你要确定你们安装的红警不是没有⽹络功能的版本。
不要笑,我见过这样的。
推荐你安装V1.3。
之后这样:在控制⾯板⾥打开⽹络连接(或者在⽹上邻居上点右键选择属性也⾏),右键单击⽹络连接的图标,选择属性,在弹出的菜单⾥选择中间第⼀个“安装”按钮,然后选择“协议”,点击“添加”,在弹出的列表中选择那个最长的:NWlink IPX/SPX/NetBios再点击确定就可以了。
等安装完成后,在点击“安装”的那个本地连接属性菜单⾥⾯中间的协议列表中双击你刚才安装的协议,在弹出的菜单中可以看到⼀个内部⽹络号。
《星界边境》游侠对战平台局域网联机教程+中文免安装绿色硬盘版
《星界边境》游侠对战平台局域网联机教程+中文免安装绿色硬盘版《星界边境》游侠对战平台局域网联机教程+中文免安装绿色硬盘版游侠对战平台下载地址:/thread-5162896-1-1.html游侠对战平台联机QQ群:328968415欢迎大家下载这个游戏,用游侠对战平台联机玩。
《星界边境》中文免安装绿色硬盘版(整合到2013.12.23更新的Update v.Offended Koala 最新版本):/pcgame/StarboundChs.html安装说明开始游戏或者解压缩游戏时候注意关闭杀毒软件,防止误杀免DVD文件,游戏路径最好是全英文路径。
1). 下载并安装。
2). 执行\win32\starbound_opengl.exe。
游戏目录下的_CommonRedist文件夹里面是该游戏必须的游戏运行库。
星界边境联机教程注意:必须相同版本的才能联机,不然会提示下面的信息:显示版本不一致。
一:怎么建主机。
原理:通过游侠对战平台运行服务器。
1:运行游侠对战平台,通过平台载入服务器\win32\starbound_server.exe(这个就是服务器的程序),点开始游戏。
这时会出来一个框,等它运行完毕,开着:;这样主机就建好了。
二:自己怎么进自己的主机。
1:建主机的玩家,进游戏不需要用平台,直接在本地运行\win32\starbound_opengl.exe开启游戏。
(因为平台用来建主机了,直接本地开游戏就好)进游戏之后,在多人选项中输入IP:127.0.0.1,可以加入自己的主机。
更多相关资讯请关注:星界边境专题三:别的玩家怎么进主机。
1:通过平台运行游戏(\win32\starbound_opengl.exe)。
在游戏中的多人选项里面输入主机玩家的平台虚拟IP。
(平台的虚拟IP可以在每个房间上方看到)这里需要输入的是主机玩家的IP,所以要询问主机玩家,得到他的虚拟IP,输入即可联机。
特别要注意的:主机玩家自己加服务器,只要用平台运行服务器,自己直接本地运行游戏,输入IP:127.0.0.1即可加入。
新对战平台使用说明
1、首先你要正确安装腾讯对战平台并且登录。
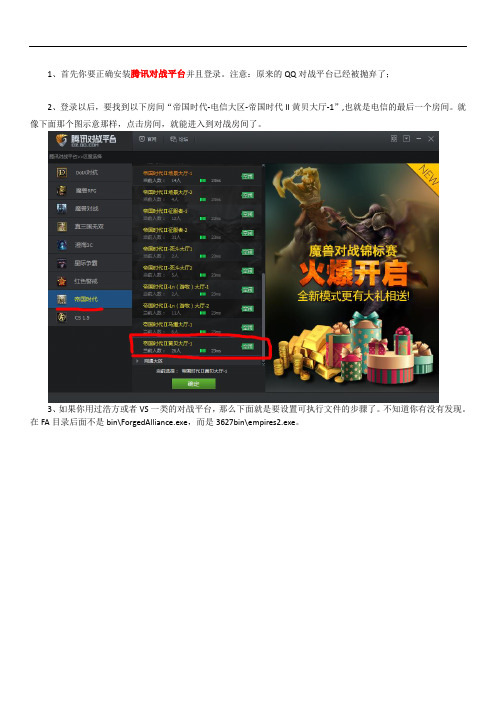
注意:原来的QQ对战平台已经被抛弃了;2、登录以后,要找到以下房间“帝国时代-电信大区-帝国时代II黄贝大厅-1”,也就是电信的最后一个房间。
就像下面那个图示意那样,点击房间,就能进入到对战房间了。
3、如果你用过浩方或者VS一类的对战平台,那么下面就是要设置可执行文件的步骤了。
不知道你有没有发现。
在FA目录后面不是bin\ForgedAlliance.exe,而是3627bin\empires2.exe。
问题一:为什么是empires2.exe呢?这是因为对战平台本身不支持FA的联机,我们就用帝国时代的环境来支撑FA。
而帝国时代的执行程序名称就是empires2.exe,所以要把ForgedAlliance.exe改名成empires2.exe。
问题二:那前面的3627bin是怎么回事呢?由于FA的不同版本录像只能由相应的版本播放,为了能让不同版本共存于机器上,你有两个选择:1、把整个FA游戏在机器上多存多个版本,每个都占8个G;2、只存多个版本的可执行文件和相关文件。
毫无疑问,后者能省下不少的空间让你存更多的小电影。
那后面这种操作涉及的操作就是把3627bin压缩包解压缩的问题。
我给你看两个图,你马上就明白是怎么回事了图1 所谓的3627,3621目录该放在什么地方要和bin目录同级图2. 里面的文件改怎么安排。
大家看上下两个目录,文件基本上一样。
也就是说,其实3627bin目录就是把bin目录改名为3627bin来得,为不影响其它版本,实际做法是不同版本共存。
4、接下来运行程序,去享受可以断线重连的新平台和游戏吧。
消逝的光芒游侠对战平台联机教程怎么联机

消逝的光芒-游侠对战平台联机教程怎么联机
【联机补丁使⽤教程】(按照顺序覆盖⽂件⾄游戏⽬录)
1、先下载此补丁覆盖游戏⽂件夹
2、在下载此补丁再次覆盖游戏⽂件夹
【联机流程】
下载“游侠对战平台"随后选择热门游戏专区最后⼀栏就是《消逝的光芒》随后设置游戏路径,选择”D y i n g L i g h t G a m e.e x e“开始游戏,然后在”在线设置“⾥⾯把连接⽅式改为”局域⽹“
P V P(僵⼫模式):不⽤过序章即可搜到房间,不过房间数量很少,需反复刷新
P V E(合作模式):需要打完第⼀个B O S S,要求主⾓回家睡觉,会提⽰解锁合作模式
【修改⽤户I D】
3D M破解版的就在根⽬录下找到:3D M G A M E.i n i打开后找到”此处为⽤户名“字样,下⽅会有3D M G A M E这个字母,这个即是联机I D
游侠破解版同样是在根⽬录下找到:A L I213.i n i然后有个玩家昵称!下⾯填写上你的名字即可
注:建议游戏下载完毕后⽴即修改⽤户名,如果之前玩了游戏包括存档、设置都会消失!
逗游⽹——中国2亿游戏⽤户⼀致选择的”⼀站式“游戏服务平台。
- 1、下载文档前请自行甄别文档内容的完整性,平台不提供额外的编辑、内容补充、找答案等附加服务。
- 2、"仅部分预览"的文档,不可在线预览部分如存在完整性等问题,可反馈申请退款(可完整预览的文档不适用该条件!)。
- 3、如文档侵犯您的权益,请联系客服反馈,我们会尽快为您处理(人工客服工作时间:9:00-18:30)。
《博德之门:增强版》游侠对战平台联机教程+中文免安装
硬盘版下载
[pagesplitxx][pagetitle]游戏下载及相关内容[/pagetitle]
《博德之门:增强版》可以在游侠对战平台进行多人体验了,小伙伴们心动不如行动。
下面小编带来《博德之门:增强版》游侠对战平台联机教程+中文免安装硬盘版下载,一起
来Fighting!!!!!!
前言
此教程适用于游侠对战平台,请大家耐心看完,按照步骤进行。
如有什么疑问请在下面评论,小编将进行相关解答。
最后祝大家游戏愉快!(直接观看联机教程:点击跳转)
游戏介绍
经典RPG《博德之门》增强版的发行商Overhaul Games最近宣布,本作除了登陆PC之外,还将登陆iPad。
自从1998年发布以来,《博德之门》在全球范围内赢得了数百万的粉丝,外加无数个奖项。
这款经典的神秘冒险传奇游戏设立了《龙与地下城》式角色扮演电脑游戏的标准。
游侠平台
游侠对战平台下载地址:/
游戏下载
《博德之门增强版》中文免安装绿色联机硬盘版下载地址
百度网盘:/share/link?shareid=2401575682&uk=856120908
迅雷快传:/d/3GvwDgI9FwBfEoVU6a8
旋风分享:/?MbymIz3
安装说明
开始游戏或者解压缩游戏时候注意关闭杀毒软件,防止误杀免DVD文件。
1). 使用winrar软件解压缩到硬盘任意目录
2). 运行Baldur.exe。
注意事项
进多人之后,必须都选择TCP/IP选项;如果选择了还没有创建游戏选项的话,就在重复选择一次TCP/IP选项。
看下图,加主机是按这个按钮。
(官方汉化,竟然没字···)
加主机的时候,必须先要知道主机的虚拟IP。
这个IP就是建主机的人平台的虚拟IP。
都
是192.168.2.XXX格式的。
建好主机之后,看下图,点人物选项,把人物名字选择成加进来的队友。
这样队友才可以创
建好主机之后,看下图,点人物选项,把人物名字选择成加进来的队友。
这样队友才可以创建人物。
疑难解答
各种问题解答:/thread-5585999-1-1.html(如果有什么疑惑,进入后
可以Ctrl+F进行搜寻)
相关游戏攻略
游戏攻略:/z/9081/
[pagesplitxx][pagetitle]联机教程[/pagetitle]
联机教程
1:通过游侠对战平台博德之门增强版房间进入游戏。
别人加主机,平台载入游戏,开始游戏。
里面输入建主机的人的房间虚拟IP。
平台的虚拟IP都是192.168.2.XXX格式。
QQ交流群
联机QQ群:1群 328968415
2群 165867368
3群 428349561
4群 497795971
游戏或者联机问题请加QQ:800172213。
欢迎大家下载这个游戏,用游侠对战平台联机玩。