android selector的使用源代码
Androidselector状态选择器的使用详解
Androidselector状态选择器的使⽤详解⼀、⽬的效果越好的⽤户体验来源更直接更明显的事件反馈。
selector可以“预存”多种响应的反馈,主要以下多种状态有:android:state_selected是选中android:state_focused是获得焦点android:state_pressed是点击android:state_enabled是设置是否响应事件,指所有事件设置不同状态的表现形式,则会在不同场景下有不同状态。
如⽂字:被选中状态,未被选中状态。
selector的普通使⽤则是为对应单个控件添加以selector为背景的资源,则能达到⽬的。
联合使⽤则是基本使⽤⼀种升级。
在我们的导航栏中,常使⽤LinearLayout或者RelativeLayout包含⼀个ImageView和⼀个TextView。
图⽚⽤于直观观感,⽂字⽤于更清晰的描述。
在⼀个整体菜单被选中时,需要图⽚及⽂字都表现对应的状态。
并为保证较⼤的事件响应范围,点击事件常赋予包含图⽚和⽂字的⽗控件。
即:为LinearLayout设置点击事件,ImageView、TextView表现对应的状态。
⼆、具体实现⽂字的selector:res添加⽬录color,res/color/bg_tv_selector.xml<?xml version="1.0" encoding="utf-8"?><selector xmlns:android="/apk/res/android"><item android:color="@color/red" android:state_pressed="true" /><item android:color="@color/black" /></selector>图⽚的selector:bg_qq_iv_selector.xml<?xml version="1.0" encoding="utf-8"?><selector xmlns:android="/apk/res/android"><item android:drawable="@mipmap/b_qq_pressed" android:state_pressed="true" /><item android:drawable="@mipmap/b_qq" /></selector>使⽤shape为Button的背景图,并设置selector:bg_bt_drawable_normal.xml:<?xml version="1.0" encoding="utf-8"?><shape xmlns:android="/apk/res/android"><corners android:radius="10dp" /><strokeandroid:width="2dp"android:color="@color/black" /></shape>bg_bt_drawable_pressed.xml:<?xml version="1.0" encoding="utf-8"?><shape xmlns:android="/apk/res/android"><corners android:radius="5dp" /><strokeandroid:width="2dp"android:color="@color/blue"android:dashGap="10dp" /><gradientandroid:centerColor="@color/red"android:endColor="@color/green" /></shape>bg_bt_selector.xml:<?xml version="1.0" encoding="utf-8"?><selector xmlns:android="/apk/res/android"><item android:drawable="@drawable/bg_bt_drawable_pressed" android:state_pressed="true" /><item android:drawable="@drawable/bg_bt_drawable_normal" />activity_main.xml中使⽤:<?xml version="1.0" encoding="utf-8"?><LinearLayout xmlns:android="/apk/res/android" xmlns:tools="/tools"android:layout_width="match_parent"android:layout_height="match_parent"android:orientation="vertical"tools:context="com.future.selectorlldemo.MainActivity"><LinearLayoutandroid:layout_width="match_parent"android:layout_height="wrap_content"android:orientation="horizontal"><LinearLayoutandroid:id="@+id/qq_ll"android:layout_width="0dp"android:layout_height="wrap_content"android:layout_weight="1"android:background="@color/green"android:clickable="true"android:gravity="center"android:orientation="vertical"><ImageViewandroid:layout_width="wrap_content"android:layout_height="wrap_content"android:src="@drawable/bg_qq_iv_selector" /><TextViewandroid:layout_width="wrap_content"android:layout_height="wrap_content"android:text="QQ"android:textColor="@color/bg_tv_selector" /></LinearLayout><LinearLayoutandroid:id="@+id/weixin_ll"android:layout_width="0dp"android:layout_height="wrap_content"android:layout_weight="1"android:background="@color/blue"android:clickable="true"android:gravity="center"android:orientation="vertical"><ImageViewandroid:layout_width="wrap_content"android:layout_height="wrap_content"android:src="@drawable/bg_weixin_iv_selector" /><TextViewandroid:layout_width="wrap_content"android:layout_height="wrap_content"android:text="WeChat"android:textColor="@color/bg_tv_selector" /></LinearLayout></LinearLayout><LinearLayoutandroid:id="@+id/text_button_ll"android:layout_width="match_parent"android:layout_height="wrap_content"android:orientation="horizontal"><TextViewandroid:layout_width="0dp"android:layout_height="wrap_content"android:layout_weight="1"android:text="⽂字和Button"android:textColor="@color/bg_tv_selector" />android:layout_width="0dp"android:layout_height="wrap_content"android:layout_weight="1"android:background="@drawable/bg_bt_selector"android:clickable="false"android:text="确认" /></LinearLayout></LinearLayout>MainActivity.Java中应⽤效果:public class MainActivity extends AppCompatActivity implements View.OnClickListener {/*** qq登录按钮*/private LinearLayout qqLoginLL;/*** 微信登录按钮*/private LinearLayout weixinLoginLL;/*** ⽂字和Button⼀起*/private LinearLayout textButtonLL;@Overrideprotected void onCreate(Bundle savedInstanceState) {super.onCreate(savedInstanceState);setContentView(yout.activity_main);qqLoginLL = (LinearLayout) findViewById(R.id.qq_ll);weixinLoginLL = (LinearLayout) findViewById(R.id.weixin_ll);textButtonLL = (LinearLayout) findViewById(R.id.text_button_ll);qqLoginLL.setOnClickListener(this);weixinLoginLL.setOnClickListener(this);textButtonLL.setOnClickListener(this);}@Overridepublic void onClick(View v) {switch (v.getId()) {case R.id.qq_ll:Toast.makeText(MainActivity.this, "你点击了QQ登录区间", Toast.LENGTH_SHORT).show();break;case R.id.weixin_ll:Toast.makeText(MainActivity.this, "你点击了WeChat登录区间", Toast.LENGTH_SHORT).show(); break;case R.id.text_button_ll:Toast.makeText(MainActivity.this, "你点击了Text_Button区间", Toast.LENGTH_SHORT).show(); break;}}}展⽰效果:三、注意细节1.默认状态放在selector的最后<?xml version="1.0" encoding="utf-8"?><selector xmlns:android="/apk/res/android"><item android:drawable="@mipmap/b_qq" /><item android:drawable="@mipmap/b_qq_pressed" android:state_pressed="true" /></selector>不能实现对应效果2.TextView selector需要放置在 res/corlor⽬录下以上就是本⽂的全部内容,希望对⼤家的学习有所帮助,也希望⼤家多多⽀持。
Android 中的ListView选中项的背景颜色怎么设置
Android 中的ListView选中项的背景颜色怎么设置?android中ListView获得焦点的项默认是黄色的(模拟器上)现在因为需求想要自己定义被选中项的背景能实现吗?最佳答案完全可以实现,这用到了Android的Selector(根据组件的状态显示该状态对应的图片,并以此图片作为背景显示)。
把下面的XML文件保存成你自己命名的.xml文件(比如list_bg.xml),注意,这个文件相当于一个背景图片选择器,在系统使用时根据 ListView中的列表项的状态来使用相应的背景图片,什么情况使用什么图片我在下面都进行了说明。
还有,你可以把它看成是一个图片来使用,放于 drawable目录下,配置背景属性android:background="@drawable/list_bg"就能达到你需要的目的了。
<?xml version="1.0" encoding="utf-8" ?><selector xmlns:android="/apk/res/android"> <item android:state_window_focused="false"android:drawable="@drawable/没有焦点时图片背景" /><item android:state_focused="true"android:state_pressed="true" <!--双条件-->android:drawable="@drawable/非触摸模式下获得焦点并单击时的背景图片" /><item android:state_focused="false" android:state_pressed="true" android:drawable="@drawable/触摸模式下单击时的背景图片" /><item android:state_selected="true" android:drawable="@drawable/选中时的图片背景" /><item android:state_focused="true" android:drawable="@drawable/获得焦点时的图片背景" /><item android:drawable="@drawable/silver" /> <!--default color --> </selector>---------------------------------------------------------------------------------------------------------------在values下新建一个color.xml<?xml version="1.0" encoding="utf-8"?><resources><drawable name="darkgray">#808080FF</drawable><drawable name="white">#FFFFFFFF</drawable><drawable name="silver">#00ffffff</drawable> <!-- 透明色 --></resources>-------------------------------------------------------------------------------------------------------------------------------------------------main布局文件中的系统 ListView 控件,注意这不是 ListViewItem 控件。
android kotlin selector扩展函数 -回复
android kotlin selector扩展函数-回复Android Kotlin Selector扩展函数:为UI控件设置状态选择器样式选择器(Selector)在Android中是一种常用的UI控件样式设置方式,可以根据控件的不同状态来显示不同的样式,例如按下、选中、禁用等状态。
在Kotlin中,我们可以通过自定义扩展函数来简化设置状态选择器样式的过程,提高代码的可读性和可维护性。
本文将一步一步地介绍如何使用Kotlin的扩展函数为Android控件设置状态选择器样式。
第一步:新建一个Selector.kt文件首先,我们需要创建一个名为Selector.kt的Kotlin文件,作为我们的扩展函数集合。
在该文件中,我们将定义几个扩展函数,用于为不同类型的控件设置不同状态下的样式。
第二步:实现扩展函数在Selector.kt文件中,我们可以定义多个扩展函数,分别用于设置不同类型控件的状态选择器样式。
例如,我们可以定义一个扩展函数用于为按钮控件设置样式:fun Button.setSelectorBackground(normalDrawable: Drawable?,pressedDrawable: Drawable?,disabledDrawable: Drawable?) {val selector = StateListDrawable().apply {addState(intArrayOf(android.R.attr.state_pressed), pressedDrawable)addState(intArrayOf(-android.R.attr.state_enabled), disabledDrawable)addState(intArrayOf(), normalDrawable)}this.background = selector}在setSelectorBackground函数中,我们使用StateListDrawable()创建一个状态选择器对象。
android presenterselector用法
android presenterselector用法[android presenterselector用法]PresenterSelector是Android中的一个类,用于根据不同的条件选择合适的Presenter来展示数据。
在Android中,我们经常需要根据不同的数据类型来展示不同的UI风格,比如在一个列表中同时展示文字、图片、视频等内容。
PresenterSelector就是为了帮助我们实现这样的需求而存在的。
接下来,我将一步一步详细回答这个主题,让我们一起来深入了解PresenterSelector的用法。
第一步:导入PresenterSelector类首先,我们需要在我们的Android项目中导入PresenterSelector类。
在项目的build.gradle文件中添加如下依赖项:implementation 'androidx.leanback:leanback:1.0.0'然后,同步一下项目,确保PresenterSelector类已经被成功导入。
第二步:创建Presenter类接下来,我们需要创建一些继承自Presenter类的Presenter子类,用于展示不同类型的数据。
比如,我们可以创建一个TextPresenter类来展示文本数据,再创建一个ImagePresenter类来展示图片数据。
这些Presenter类需要实现一个createViewHolder()方法,用于创建对应类型的ViewHolder。
例如,TextPresenter类的代码如下:javapublic class TextPresenter extends Presenter {Overridepublic ViewHolder onCreateViewHolder(ViewGroup parent) { LayoutInflater inflater =LayoutInflater.from(parent.getContext());View view = inflater.inflate(yout.text_layout, parent, false);return new TextViewHolder(view);}Overridepublic void onBindViewHolder(ViewHolder viewHolder, Object item) {String text = (String) item;TextViewHolder textViewHolder = (TextViewHolder) viewHolder;textViewHolder.textView.setText(text);Overridepublic void onUnbindViewHolder(ViewHolder viewHolder) { Clean up resources if needed}private static class TextViewHolder extendsPresenter.ViewHolder {TextView textView;TextViewHolder(View itemView) {super(itemView);textView = itemView.findViewById(R.id.text);}}}在TextPresenter中,我们首先在createViewHolder()方法中创建一个ViewHolder对象,并加载对应的布局文件。
android kotlin selector扩展函数 -回复

android kotlin selector扩展函数-回复对于Android开发者来说,使用Selector作为View的背景是一种常见的需求。
通常情况下,我们使用XML文件来定义Selector,然后将其应用于相应的View。
但是,当我们在Kotlin中开发应用程序时,我们可以使用扩展函数来简化这个过程,让代码更加简洁和易于理解。
在这篇文章中,我们将一步一步地回答问题:“如何使用Kotlin为Android应用程序编写Selector扩展函数?”我们将从引入Selector的概念开始,并逐步演示如何编写扩展函数来完成这个任务。
首先,我们需要了解什么是Selector。
在Android中,Selector是一种用于根据不同的状态选择渲染效果的XML文件。
我们可以定义不同的状态(例如按下、选中、禁用等),然后为每个状态定义相应的背景。
当状态改变时,相应的背景将自动切换,以提供更好的用户交互体验。
现在,让我们开始撰写扩展函数。
首先,我们需要在项目的`res`目录下创建一个新的`kotlin`文件夹。
然后,我们在该文件夹中创建一个名为`ViewExtensions.kt`的新文件。
此文件将包含我们的所有Selector扩展函数。
在开始编写扩展函数之前,我们需要添加必要的依赖项。
在项目的`build.gradle`文件中,我们需要添加以下依赖项:kotlindependencies {implementation "androidx.core:core-ktx:1.7.0"}这将允许我们使用Kotlin的扩展函数。
现在,我们可以编写我们的第一个扩展函数,用于设置View的Selector 背景。
我们首先定义一个名为`setSelectorBackground()`的函数。
这个函数将接受一个Selector资源ID作为参数,然后将其应用于View的背景。
kotlinfun View.setSelectorBackground(@DrawableRes selectorResId: Int) {background = ContextCompat.getDrawable(context, selectorResId)}在上面的代码中,我们使用了`@DrawableRes`注解来标记参数,并在函数体中使用`ContextCompat.getDrawable()`函数来获取Selector资源,并将其应用于View的背景。
Android:实现一个计算器--(四则运算)

Android :实现⼀个计算器--(四则运算)计算器的功能介绍:Dot 的效果展⽰:侃侃 Dot:改进的地⽅:不⾜的地⽅:补充知识:android 中的事件处理步骤如何将信息显⽰到 View(EditText)上:异常的类型:Name: Dot (从某点开始,到某点结束)功能: + 、- 、* 、/ 、%(清零,退格操作)版本:1.0Dot 与其他的计算器相⽐没有太⼤的竞争⼒,甚⾄在处理⼀些极端的问题时还存在很⼤的不⾜,例如:⼤数的四则运算,对于这个问题处理的还不够到位,⽬前只能实现⼀些简单的四则运算(只能说⾃⼰的⽔平太菜,还没有掌握⼀些实质性的内容,这个是⾃⼰需要检讨的)另外:⾮常感谢 Android ⽼师教给我们的知识,使我们可以设计出第⼀款属于⾃⼰的 app.相对于最原始的设计,更新了哪些东西呢?1、改变按钮的形状,由原始的长⽅形 -- 椭圆状,使得按钮更加形象化。
2、增加背景图⽚,使⽤户的体验效果更好。
3、增加退格操作,使得⽤户在输错信息时不⽤全盘清零,可以删除刚刚写的某个字符。
1、未实现⼀些⼤数的运算。
2、当退格退完后,再按退格时会⾃动退出(不影响总体效果,但还是有那么⼀点 bug )3、⽬前两个数操作就需要 '=' ⼀下,但是可以实现多项式的运算,只是每次都需要 '='(后续会进⾏修改,逐渐完善)a 、找到事件⽬标对象(Button),通过 findViewById(),遍历⼦对象。
b 、实现view.onClickLisenter 接⼝,重写 onClick ⽅法。
c 、在事件⽬标对象上注册,btn.setOnClickListener (实现类的对象)a 、为 EditText 定义 id -- etResultb 、通过 findViewById 获取 etResult 对象c 、通过 etResult.setText() 将信息显⽰到计算器界⾯上a 、RuntimeExceptiona、RuntimeException运⾏时异常,不要求处理(但最好处理⼀下),与业务相关,⽐较主观(每个应⽤都可以采⽤⾃⼰的⽅式进⾏处理),⼀般不严重, 对效果不会产⽣太⼤的影响。
安卓开发selector使用
安卓开发中selector的用法安卓开发中关于listview和button都要改变android原来控件的背景,网上的资料太杂了,现在总结下android的selector的用法。
首先android的selector是在drawable/xxx.xml中配置的。
先看一下listview中的状态:把下面的XML文件保存成你自己命名的.xml文件(比如list_item_bg.xml),在系统使用时根据ListView中的列表项的状态来使用相应的背景图片。
drawable/list_item_bg.xml<?xml version="1.0" encoding="utf-8" ?><selector xmlns:android="/apk/res/android"> <!-- 默认时的背景图片--><item android:drawable="@drawable/pic1" /><!-- 没有焦点时的背景图片--><item android:state_window_focused="false"android:drawable="@drawable/pic1" /><!-- 非触摸模式下获得焦点并单击时的背景图片--><item android:state_focused="true" android:state_pressed="true"android:drawable="@drawable/pic2" /><!-- 触摸模式下单击时的背景图片--><item android:state_focused="false" android:state_pressed="true"android:drawable="@drawable/pic3" /><!--选中时的图片背景--><item android:state_selected="true" android:drawable="@drawable/pic4" /><!--获得焦点时的图片背景--><item android:state_focused="true" android:drawable="@drawable/pic5" /></selector>使用些xml文件:第一种是在listview中配置android:listSelector="@drawable/list_item_bg"或者在listview的item中添加属性android:background=“@drawable/list_item_bg"即可实现,或者在java代码中使用:Drawable drawable = getResources().getDrawable(R.drawable.list_item_bg);ListView.setSelector(drawable);同样的效果。
【IT专家】使用selector修改TextView中字体的颜色

本文由我司收集整编,推荐下载,如有疑问,请与我司联系使用selector 修改TextView 中字体的颜色2012/08/20 0selector 想必大家都用过了,但是在修改字体的颜色的时候还是要细心。
我们在TextView 中设置字体颜色一般使用android:textColor= @color/red但是我们在使用selector 动态修改字体颜色的时候要使用android:color= @color/red我遇到这个问题的时候是在TabActivity 中,每个Tab 在选中的时候修改为蓝色。
tab_item.xml 的代码如下:?xml version= 1.0 encoding= utf-8 ? LinearLayout xmlns:android= schemas.android/apk/res/android android:id= @+id/ll_software_tabwidget_item android:layout_width= fill_parent android:layout_height= fill_parent android:gravity= center_horizontal android:orientation= vertical ImageView android:id= @+id/iv_software_tabwidget_icon android:layout_width= 30dip android:layout_height= 30dip android:layout_marginBottom= 1dip android:layout_marginTop= 5dip android:scaleType= fitXY / TextView android:id= @+id/tv_software_tabwidget_text android:layout_width= wrap_content android:layout_height= wrap_content android:layout_marginBottom= 5dip android:textColor= @drawable/software_textcolor android:textSize= 14dip / /LinearLayout 注意android:textColor= @drawable/software_textcolor ,即software_textcolor.xml 就是selector,源码如下:?xml version= 1.0 encoding= utf-8 ? selector xmlns:android= schemas.android/apk/res/android item android:state_selected= trueandroid:color=@color/software_textColor_selected /item item android:state_selected= false android:color= @color/software_textColor_unselected /item /selector 这个文件中就是要注意的地方了,必须使用android:color= @color/software_textColor_selected ,不。
Android中的Selector的用法详解及实例
Android中的Selector的⽤法详解及实例Android中的Selector的⽤法<?xml version="1.0" encoding="utf-8"?><selector xmlns:android="/apk/res/android" ><item android:state_pressed="true" android:drawable="@drawable/bg_selected"></item><item android:drawable="@drawable/bg_unselect"></item></selector>在⼯作的时候,由于系统给出的控件不够美观,因此开发时领导常常要我更改下界⾯,⽤美⼯给的图⽚取代系统图⽚。
开始时,我只是给按钮等设置⼀下背景图⽚,这样做虽然美观了,但界⾯看起来却⽐较死板,⽐如⽤户点击了按钮后,按钮没⼀点反应。
于是我就再给控件添加上onTouch监听事件,按下后改变背景颜⾊,松⼿后再恢复原来颜⾊。
但后来发现了selector这个利器,真是喜出望外,不⽤再添加onTouch监听事件了,⽤起来也⽅便灵活。
不得不说,多和其他开发⼈员交流技术经验等还是很有必要的,特别是像我这样独⾃负责⼀个app开发的。
Android的selector要在 drawable 下配置。
其中,selector可以设置的属性有:android:state_pressed 如果是true,当被点击时显⽰该图⽚,如果是false没被按下时显⽰默认。
android:state_focused 如果是true,获得焦点时显⽰;如果是false没获得焦点显⽰默认。
android:state_selected 如果是true,当被选择时显⽰该图⽚;是false未被选择时显⽰该图⽚。
5分钟让你掌握Android的selector用法

5分钟让你掌握Android的selector用法为了更好的学习和工作,动动小手收藏起来吧!selector的定义selector就是状态列表(StateList),它分为两种,一种Color-Selector 和Drawable-Selector。
1、Color-Selectorcolor-selector 就是颜色状态列表,可以跟color一样使用,颜色会随着组件的状态而改变。
文件的位置存储于/res/color/文件名.xml在Java中使用是:R.color.filename在XML中使用是:@[package]color/filename基本语法<?xml version="1.0" encoding="utf-8"?><selectorxmlns:android="/apk/res/android" ><itemandroid:color="hex_color" //颜色值,#RGB,$ARGB,#RRGGBB,#AARRGGBBandroid:state_pressed=["true" |"false"]//是否触摸android:state_focused=["true" |"false"]//是否获得焦点android:state_selected=["true" |"false"]//是否被状态android:state_checkable=["true" |"false"]//是否可选android:state_checked=["true" |"false"]//是否选中android:state_enabled=["true" |"false"]//是否可用android:state_window_focused=["true" | "false"] />//是否窗口聚焦</selector>示例在/res/color/文件夹下新建color_selector.xml<?xml version="1.0" encoding="utf-8"?><selector xmlns:android="/apk/res/android"><item android:state_pressed="true"android:color="#ffff0000"/> <!-- pressed --><item android:state_focused="true"android:color="#ff0000ff"/> <!-- focused --><item android:color="#ff000000"/> <!-- default --> </selector>调用:<Buttonandroid:id="@+id/btnsave"android:layout_width="fill_parent"android:layout_height="wrap_content"android:layout_margin="5dp"android:layout_below="@+id/top_relative"android:textColor="@color/color_selector"android:text="aikaifa" />效果:按下注意字体颜色的变化2、Drawable-Selectordrawable-selector 是背景图状态列表,可以跟图片一样使用,背景会根据组件的状态变化而变化。
Android实现四级联动地址选择器
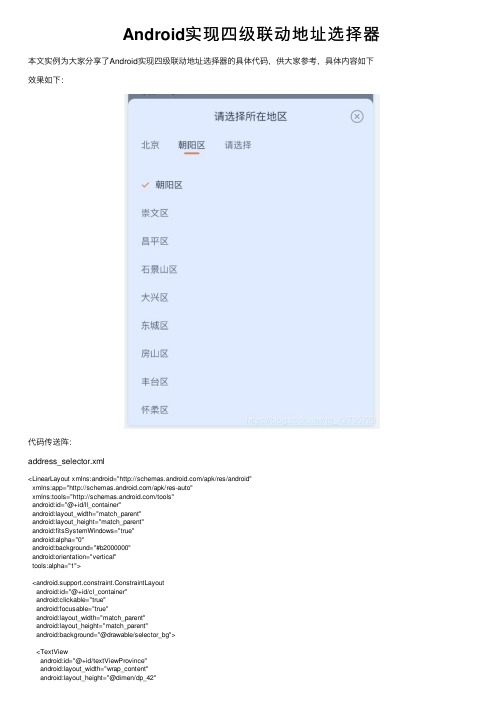
Android实现四级联动地址选择器本⽂实例为⼤家分享了Android实现四级联动地址选择器的具体代码,供⼤家参考,具体内容如下效果如下:代码传送阵:address_selector.xml<LinearLayout xmlns:android="/apk/res/android"xmlns:app="/apk/res-auto"xmlns:tools="/tools"android:id="@+id/ll_container"android:layout_width="match_parent"android:layout_height="match_parent"android:fitsSystemWindows="true"android:alpha="0"android:background="#b2000000"android:orientation="vertical"tools:alpha="1"><android.support.constraint.ConstraintLayoutandroid:id="@+id/cl_container"android:clickable="true"android:focusable="true"android:layout_width="match_parent"android:layout_height="match_parent"android:background="@drawable/selector_bg"><TextViewandroid:id="@+id/textViewProvince"android:layout_width="wrap_content"android:layout_height="@dimen/dp_42"android:ellipsize="end"android:paddingTop="@dimen/dp_13"android:maxWidth="@dimen/dp_80"android:maxLines="1"android:text="请选择"android:textColor="@drawable/selector_item_text_color"android:textSize="@dimen/sp_14"android:textStyle="bold"app:layout_constraintLeft_toLeftOf="parent"app:layout_constraintTop_toTopOf="parent"tools:text="请选择请选择"tools:visibility="visible" /><TextViewandroid:id="@+id/textViewCity"android:layout_width="wrap_content"android:layout_height="@dimen/dp_44"android:layout_marginStart="@dimen/dp_21"android:ellipsize="end"android:paddingTop="@dimen/dp_13"android:maxWidth="@dimen/dp_80"android:maxLines="1"android:text="请选择"android:textColor="@drawable/selector_item_text_color"android:textSize="@dimen/sp_14"android:textStyle="bold"android:visibility="invisible"app:layout_constraintLeft_toRightOf="@id/textViewProvince" app:layout_constraintTop_toTopOf="parent"tools:text="请选择请选择"tools:visibility="visible" /><TextViewandroid:id="@+id/textViewArea"android:layout_width="wrap_content"android:layout_height="@dimen/dp_44"android:layout_marginStart="@dimen/dp_21"android:ellipsize="end"android:paddingTop="@dimen/dp_13"android:maxWidth="@dimen/dp_80"android:maxLines="1"android:text="请选择"android:textColor="@drawable/selector_item_text_color"android:textSize="@dimen/sp_14"android:textStyle="bold"android:visibility="invisible"app:layout_constraintLeft_toRightOf="@id/textViewCity"app:layout_constraintTop_toTopOf="parent"tools:text="请选择请选择"tools:visibility="visible" /><TextViewandroid:id="@+id/textViewStreet"android:layout_width="wrap_content"android:layout_height="@dimen/dp_44"android:layout_marginStart="@dimen/dp_21"android:ellipsize="end"android:paddingTop="@dimen/dp_13"android:maxWidth="@dimen/dp_80"android:maxLines="1"android:text="请选择"android:textColor="@drawable/selector_item_text_color"android:textSize="@dimen/sp_14"android:textStyle="bold"android:visibility="invisible"app:layout_constraintLeft_toRightOf="@id/textViewArea"app:layout_constraintTop_toTopOf="parent"tools:text="请选择请选择"tools:visibility="visible" /><android.support.v7.widget.AppCompatImageViewandroid:id="@+id/iv_close"android:layout_width="@dimen/dp_23"android:layout_height="@dimen/dp_23"android:layout_marginTop="@dimen/dp_12"android:padding="@dimen/dp_5"android:src="@drawable/address_close"app:layout_constraintRight_toRightOf="parent"app:layout_constraintTop_toTopOf="parent" /><Viewandroid:id="@+id/indicator"android:layout_width="@dimen/dp_24"android:layout_height="@dimen/dp_2"android:background="#000000"app:layout_constraintLeft_toLeftOf="@id/textViewProvince"app:layout_constraintTop_toBottomOf="@id/textViewProvince" /><Viewandroid:id="@+id/divider"android:layout_width="match_parent"android:layout_height="0.5dp"android:background="#e5e5e5"app:layout_constraintTop_toBottomOf="@id/indicator" /><android.support.v7.widget.RecyclerViewandroid:id="@+id/recycler_view"android:layout_width="match_parent"android:layout_height="0dp"app:layout_constraintBottom_toBottomOf="parent"app:layout_constraintTop_toBottomOf="@id/divider" /></android.support.constraint.ConstraintLayout></LinearLayout>AddressDialog.javapublic class AddressDialog extends DialogFragment {@BindView(R.id.textViewProvince)TextView textViewProvince;@BindView(R.id.textViewCity)TextView textViewCity;@BindView(R.id.textViewArea)TextView textViewArea;@BindView(R.id.textViewStreet)TextView textViewStreet;@BindView(R.id.iv_close)AppCompatImageView ivClose;@BindView(R.id.indicator)View indicator;@BindView(R.id.divider)View divider;@BindView(R.id.recycler_view)RecyclerView recyclerView;@BindView(R.id.cl_container)ConstraintLayout clContainer;@BindView(R.id.ll_container)LinearLayout llContainer;Unbinder unbinder;private CompositeDisposable compositeDisposable = new CompositeDisposable();private float measuredHeight = 0F;// 当前tab 0省1市2区private int currentTab = 0;// 省private ArrayList<County> proviceList = new ArrayList<>();// 市private ArrayList<County> cityList = new ArrayList<>();private ConcurrentHashMap<String, ArrayList<County>> cityMap = new ConcurrentHashMap<>(); // 区private ArrayList<County> areaList = new ArrayList<>();private ConcurrentHashMap<String, ArrayList<County>> areaMap = new ConcurrentHashMap<>(); //街道private ArrayList<County> streetList = new ArrayList<>();private ConcurrentHashMap<String, ArrayList<County>> streetMap = new ConcurrentHashMap<>(); private BaseQuickAdapter<County, BaseViewHolder> mAdapter;private OnSelectListener listener;private String textProvince = "";private String textCity = "";private String textArea = "";private String textStreet = "";private ProgressDialog mProgressDialog;@Nullable@Overridepublic View onCreateView(@NonNull LayoutInflater inflater, @Nullable ViewGroup container, @Nullable Bundle savedInstanceState) { View view = inflater.inflate(yout.address_selector, container, false);unbinder = ButterKnife.bind(this, view);return view;}@Overridepublic void onCreate(@Nullable Bundle savedInstanceState) {super.onCreate(savedInstanceState);setStyle(STYLE_NO_TITLE, R.style.Style_Dialog_Transparent);}@Overridepublic void onViewCreated(@NonNull View view, @Nullable Bundle savedInstanceState) {super.onViewCreated(view, savedInstanceState);textViewProvince.setSelected(true);float measureText = textViewProvince.getPaint().measureText("请选择");indicator.getLayoutParams().width = (int) measureText;youtParams layoutParams = (youtParams)clContainer.getLayoutParams();layoutParams.topMargin = listener.getHeight() == 0 ? UIUtil.dip2px(MyApplication.applicationContext,180f) :listener.getHeight();clContainer.setLayoutParams(layoutParams);initData();initClick();ViewUtils.postMeasured(clContainer, new Runnable() {@Overridepublic void run() {llContainer.animate().alpha(1f).setDuration(150).start();float measuredHeight = (float)clContainer.getMeasuredHeight();ObjectAnimator translationY = ObjectAnimator.ofFloat(clContainer, "translationY", measuredHeight, 0f);translationY.setDuration(150);translationY.setInterpolator(new LinearInterpolator());translationY.start();}});}private void initData() {recyclerView.setLayoutManager(new LinearLayoutManager(getContext()));mAdapter=new BaseQuickAdapter<County, BaseViewHolder>(yout.item_area) {@Overrideprotected void convert(@NonNull BaseViewHolder helper, final County item) {helper.setText(R.id.textView,);helper.getConvertView().setOnClickListener(new View.OnClickListener() {@Overridepublic void onClick(View v) {switch (currentTab) {case 0:getCityList(new Consumer<ArrayList<County>>() {@Overridepublic void accept(ArrayList<County> counties) throws Exception {// 本地是否存在if (cityMap.containsKey(item.code)){ArrayList<County> list = cityMap.get(item.code);if (list==null) {list=new ArrayList<>();}notifyAdapter(list);}else {for (County next : cityList) {if (cityMap.containsKey(item.code) && item.code.equals(next.provinceCode)) {ArrayList<County> list = cityMap.get(item.code);if (list != null) {list.add(next);cityMap.put(next.provinceCode, list);}} else {@SuppressWarnings("MismatchedQueryAndUpdateOfCollection")ArrayList<County> listCounty = new ArrayList<>();listCounty.add(next);cityMap.put(next.provinceCode, listCounty);}}}ArrayList<County> list = cityMap.get(item.code);notifyAdapter(list);}});break;case 1:getAreaList(new Consumer<ArrayList<County>>() {@SuppressWarnings("MismatchedQueryAndUpdateOfCollection")@Overridepublic void accept(ArrayList<County> list) throws Exception {if (areaMap.containsKey(item.code)) {ArrayList<County> arrayList = areaMap.get(item.code);if (arrayList==null) {arrayList =new ArrayList<>();}notifyAdapter(arrayList);}else {for (County county : areaList) {if (areaMap.containsKey(item.code) && item.code.equals(county.cityCode)) { ArrayList<County> countyArrayList = areaMap.get(item.code);if (countyArrayList != null) {countyArrayList.add(county);areaMap.put(county.code, countyArrayList);}}else {ArrayList<County> arrayList = new ArrayList<>();arrayList.add(county);areaMap.put(county.cityCode,arrayList);}}}ArrayList<County> arrayList = areaMap.get(item.code);notifyAdapter(arrayList);}});break;case 2:if (mProgressDialog == null) {mProgressDialog = new ProgressDialog(getActivity());}mProgressDialog.setCanceledOnTouchOutside(false);mProgressDialog.setCancelable(true);mProgressDialog.show();getStreetList(new Consumer<ArrayList<County>>() {@Overridepublic void accept(ArrayList<County> list) throws Exception {if (streetMap.containsKey(item.code)) {ArrayList<County> arrayList = streetMap.get(item.code);if (arrayList==null) {arrayList =new ArrayList<>();}notifyAdapter(arrayList);}else {for (County county : streetList) {if (streetMap.containsKey(item.code) && item.code.equals(county.areaCode)) { ArrayList<County> countyArrayList = streetMap.get(item.code);if (countyArrayList != null) {countyArrayList.add(county);streetMap.put(county.code, countyArrayList);}}else {ArrayList<County> arrayList = new ArrayList<>();arrayList.add(county);streetMap.put(county.areaCode,arrayList);}}}ArrayList<County> arrayList = streetMap.get(item.code);notifyAdapter(arrayList);if (mProgressDialog != null) {ThreadHelper.getInstance().runOnUiPostDelayed(new Runnable() {@Overridepublic void run() {mProgressDialog.dismiss();}},1000);}}});}upTabStatus();indicatorAnim();}});}};recyclerView.setAdapter(mAdapter);getProvinceList(new Consumer<ArrayList<County>>() {@Overridepublic void accept(ArrayList<County> list) throws Exception {notifyAdapter(proviceList);}});}private void initClick() {ivClose.setOnClickListener(new View.OnClickListener() {@Overridepublic void onClick(View v) {closeDialog();}});llContainer.setOnClickListener(new View.OnClickListener() {@Overridepublic void onClick(View v) {closeDialog();}});}private void notifyAdapter(ArrayList<County> list){mAdapter.getData().clear();mAdapter.addData(list);}//indicator 动画private void indicatorAnim(){switch (currentTab){case 1:float text = textViewProvince.getPaint().measureText(textProvince);indicator.animate().translationX(text+UIUtil.dip2pxf(Objects.requireNonNull(getContext()),21f)).setDuration(200).start();break;case 2:float measureText = textViewProvince.getPaint().measureText(textProvince);float measureText1 = textViewCity.getPaint().measureText(textCity);indicator.animate().translationX(measureText+measureText1+UIUtil.dip2pxf(Objects.requireNonNull(getContext()),42f)).setDuration(200).start(); break;case 3:float measure = textViewProvince.getPaint().measureText(textProvince);float measure1 = textViewCity.getPaint().measureText(textCity);float measure2 = textViewArea.getPaint().measureText(textArea);indicator.animate().translationX(measure+measure1+measure2+UIUtil.dip2pxf(Objects.requireNonNull(getContext()),63f)).setDuration(200).start(); }}private void upTabStatus(String name){switch (currentTab){case 0:textProvince=name;textViewProvince.setText(name);textViewCity.setVisibility(View.VISIBLE);currentTab =1;break;case 1:textCity=name;textViewCity.setText(name);textViewArea.setVisibility(View.VISIBLE);currentTab =2;break;case 2:textArea=name;textViewArea.setText(name);textViewStreet.setVisibility(View.VISIBLE);currentTab=3;break;case 3:textStreet=name;textViewStreet.setText(name);dismissAllowingStateLoss();break;}textViewProvince.setSelected(currentTab==0);textViewCity.setSelected(currentTab==1);textViewArea.setSelected(currentTab==2);textViewStreet.setSelected(currentTab==3);}private void getProvinceList(Consumer<ArrayList<County>> consumer){Disposable subscribe1 = Observable.create((new ObservableOnSubscribe() {public final void subscribe(@NonNull ObservableEmitter it) {if (proviceList.isEmpty()) {String json = getJson("address/provinces.json", getContext());ArrayList<County> list = fromJson(json,new TypeToken<ArrayList<County>>(){}.getType());if (list==null) {list =new ArrayList<>();}proviceList.addAll(list);}if (!proviceList.isEmpty()) {it.onNext(proviceList);}}})).observeOn(AndroidSchedulers.mainThread()).subscribeOn(Schedulers.io()).subscribe(consumer, new Consumer<Throwable>() { @Overridepublic void accept(Throwable throwable) throws Exception {}});compositeDisposable.add(subscribe1);}private void getCityList(Consumer<ArrayList<County>> consumer){Disposable subscribe1 = Observable.create((new ObservableOnSubscribe() {public final void subscribe(@NonNull ObservableEmitter it) {if (cityList.isEmpty()) {String json = getJson("address/cities.json", getContext());ArrayList<County> list = fromJson(json,new TypeToken<ArrayList<County>>(){}.getType());if (list==null) {list =new ArrayList<>();}cityList.addAll(list);}if (!cityList.isEmpty()) {it.onNext(cityList);}}})).observeOn(AndroidSchedulers.mainThread()).subscribeOn(Schedulers.io()).subscribe(consumer, new Consumer<Throwable>() { @Overridepublic void accept(Throwable throwable) throws Exception {}});compositeDisposable.add(subscribe1);}private void getAreaList(Consumer<ArrayList<County>> consumer){Disposable subscribe1 = Observable.create((new ObservableOnSubscribe() {public final void subscribe(@NonNull ObservableEmitter it) {if (areaList.isEmpty()) {String json = getJson("address/areas.json", getContext());ArrayList<County> list = fromJson(json,new TypeToken<ArrayList<County>>(){}.getType());if (list==null) {list =new ArrayList<>();}areaList.addAll(list);}if (!areaList.isEmpty()) {it.onNext(areaList);}}})).observeOn(AndroidSchedulers.mainThread()).subscribeOn(Schedulers.io()).subscribe(consumer, new Consumer<Throwable>() { @Overridepublic void accept(Throwable throwable) throws Exception {}});compositeDisposable.add(subscribe1);}private void getStreetList(Consumer<ArrayList<County>> consumer){Disposable subscribe1 = Observable.create((new ObservableOnSubscribe() {public final void subscribe(@NonNull ObservableEmitter it) {if (streetList.isEmpty()) {String json = getJson("address/streets.json", getContext());ArrayList<County> list = fromJson(json,new TypeToken<ArrayList<County>>(){}.getType());if (list==null) {list =new ArrayList<>();}streetList.addAll(list);}if (!streetList.isEmpty()) {it.onNext(streetList);}}})).observeOn(AndroidSchedulers.mainThread()).subscribeOn(Schedulers.io()).subscribe(consumer, new Consumer<Throwable>() { @Overridepublic void accept(Throwable throwable) throws Exception {}});compositeDisposable.add(subscribe1);}public String getJson(String fileName, Context context) {StringBuilder stringBuilder = new StringBuilder();try {InputStream is = context.getAssets().open(fileName);BufferedReader bufferedReader = new BufferedReader(new InputStreamReader(is));String line;while ((line = bufferedReader.readLine()) != null) {stringBuilder.append(line);}} catch (IOException e) {e.printStackTrace();}return stringBuilder.toString();}@Nullablepublic <T> T fromJson(String json, Type typeOfT) {try {return initGson().fromJson(json, typeOfT);} catch (JsonSyntaxException e) {e.printStackTrace();}return null;}private Gson initGson(){GsonBuilder gsonBuilder = new GsonBuilder();try {Class builder = gsonBuilder.getClass();Field f = builder.getDeclaredField("instanceCreators");f.setAccessible(true);Map<Type, InstanceCreator<?>> val = (Map<Type, InstanceCreator<?>>) f.get(gsonBuilder);//得到此属性的值//注册数组的处理器ConstructorConstructor constructorConstructor = new ConstructorConstructor(val);// gsonBuilder.registerTypeAdapterFactory(new ReflectiveTypeAdapterFactory(constructorConstructor, FieldNamingPolicy.IDENTITY, // Excluder.DEFAULT,new JsonAdapterAnnotationTypeAdapterFactory(constructorConstructor)));gsonBuilder.registerTypeAdapterFactory(new MapTypeAdapterFactory(constructorConstructor,false));gsonBuilder.registerTypeAdapterFactory(new CollectionTypeAdapterFactory(constructorConstructor));// gsonBuilder.registerTypeAdapter(String.class,new StringTypeAdapter());gsonBuilder.registerTypeAdapter(int.class,new IntegerTypeAdapter());gsonBuilder.registerTypeAdapter(Integer.class,new IntegerTypeAdapter());// gsonBuilder.registerTypeAdapter(long.class,new LongTypeAdapter());// gsonBuilder.registerTypeAdapter(Long.class,new LongTypeAdapter());// gsonBuilder.registerTypeAdapter(double.class,new DoubleTypeAdapter());// gsonBuilder.registerTypeAdapter(Double.class,new DoubleTypeAdapter());// gsonBuilder.registerTypeAdapter(boolean.class,new BooleanTypeAdapter());// gsonBuilder.registerTypeAdapter(Boolean.class,new BooleanTypeAdapter());// gsonBuilder.registerTypeAdapter(float.class,new FloadTypeAdapter());// gsonBuilder.registerTypeAdapter(Float.class,new FloadTypeAdapter());} catch (NoSuchFieldException e) {e.printStackTrace();} catch (IllegalAccessException e) {e.printStackTrace();}return gsonBuilder.enableComplexMapKeySerialization().create();}public void closeDialog() {clContainer.animate().translationY(measuredHeight).setDuration(150).withEndAction(new Runnable() {@Overridepublic void run() {dismissAllowingStateLoss();}}).start();}public void dismissAllowingStateLoss() {super.dismissAllowingStateLoss();if (!TextUtils.isEmpty(textProvince) && !TextUtils.isEmpty(textCity) && !TextUtils.isEmpty(textArea)&&!TextUtils.isEmpty(textStreet)) { listener.onSelect(textProvince, textCity, textCity,textStreet);}listener.isMissing();compositeDisposable.dispose();}public void setOnSelectListener(OnSelectListener listener) {this.listener = listener;}public void setHeight(int top) {}@Overridepublic void onDestroyView() {super.onDestroyView();unbinder.unbind();}public interface OnSelectListener {int getHeight();void onSelect(String province, String city, String area,String street);void isMissing();}}使⽤⽅法private void addressDialog() {AddressDialog addressDialog =new AddressDialog();addressDialog.setOnSelectListener(new AddressDialog.OnSelectListener() {@Overridepublic int getHeight() {return 0;}@SuppressLint("SetTextI18n")@Overridepublic void onSelect(String province, String city, String area, String street) {tvPositionRtrCommunity.setText(province+" "+city+" "+area+" "+street);}@Overridepublic void isMissing() {isShowDialog = true;}});addressDialog.show(getSupportFragmentManager(),AddressDialog.class.getSimpleName()); }资源下载:以上就是本⽂的全部内容,希望对⼤家的学习有所帮助,也希望⼤家多多⽀持。
安卓--selector简单使用

安卓--selector简单使⽤selector ---选择器在App的使⽤中经常能看到selector的⾝影如:⼀个按键看上去⽩⾊或者其它颜⾊,可能是⼀张图⽚按下去⼜显⽰其它的颜⾊或者另外⼀张图⽚这⾥使⽤shape配合使⽤正常状态<?xml version="1.0" encoding="utf-8"?><!--rectangle 矩形oval 椭圆line ⼀条线ring 环形--><shapeandroid:shape="rectangle"xmlns:android="/apk/res/android"><!--4个⾓的圆⾓--><corners android:radius="8dp"/><!--内边距--><padding android:bottom="5dp"android:left="3dp"android:right="3dp"android:top="5dp"/><!--填充颜⾊--><solid android:color="#09A3DC"/><!--边框颜⾊--><stroke android:color="#88000000"android:width="1dp"/></shape>按下状态<?xml version="1.0" encoding="utf-8"?><!--rectangle 矩形oval 椭圆line ⼀条线ring 环形--><shapeandroid:shape="rectangle"xmlns:android="/apk/res/android"><!--4个⾓的圆⾓--><corners android:radius="8dp"/><!--内边距--><padding android:bottom="5dp"android:left="3dp"android:right="3dp"android:top="5dp"/><!--填充颜⾊--><solid android:color="#0066A0"/><!--边框颜⾊--><stroke android:color="#88000000"android:width="1dp"/></shape>selector<?xml version="1.0" encoding="utf-8"?><selector xmlns:android="/apk/res/android"><!--按下时显⽰这个shapeandroid:state_pressed="true"这⾥可以有多种状态选择,--><item android:drawable="@drawable/shap_btn_press" android:state_pressed="true"/><!--平时显⽰这个shape--><item android:drawable="@drawable/shap_btn_normal"/></selector>布局中引⽤<Buttonandroid:layout_margin="10dp"android:layout_width="match_parent"android:layout_height="wrap_content"android:textColor="#ffffff"android:background="@drawable/selector_main_btn"android:text="确定"/>有图⽚就去需要建⽴⼀个selector 在drawable指定不同的图⽚即可,在ImageView指定background使⽤selector,再指定相就事件来触发,下⾯是点击事件<selector xmlns:android="/apk/res/android"><item android:state_pressed="true" android:drawable="@drawable/ic_menu_add_pressed"/><item android:drawable="@drawable/ic_menu_add_normal"/></selector>。
selector的用法
selector的⽤法
selector选择器,可以根据控件不同的状态切换不同的背景
第⼀步:
<selector xmlns:android="/apk/res/android">
<item android:state_enabled="false" 这是控件的状态值,
android:drawable="@color/teal_200"/ 当控件的状态值enable为false时显⽰的背景颜⾊
>
<item android:state_enabled="true"
android:drawable="@color/lightGray"/> 最后⼀个为控件的默认状态
</selector>
第⼆步:
将selector添加到背景上,并确定控件的默认状态值
android:background="@drawable/select_first_button"
android:enabled="true"
注意:
在selector中有⼀个坑,控件根据selector来匹配状态值是从上到下匹配的,当⽬前的状态值与当前状态值⼀样时就不会在往下匹配了,⽐如若我的enabled = "false" 那么当控件匹配selector时与第⼀个状态值false匹配相同了,那么将不在往下匹配,所以⼀般情况下将默认状态值放在最后。
listview控件的基本用法access
listview控件的基本用法access关于ListView控件的基本使用,本文将一步一步回答这个问题。
一、ListView控件的基本概念ListView是一种常见的控件,用于显示列表数据。
它可以以列表的形式展示数据,并且支持用户的滑动操作,以便查看更多的数据。
二、ListView控件的常见属性1. android:id:设置ListView的唯一标识符,用于在代码中找到该控件。
2. android:layout_width和android:layout_height:设置ListView的宽度和高度。
3. android:divider:设置列表项之间的分割线,可以是颜色、图片或者绘制的形状。
4. android:dividerHeight:设置列表项之间的分割线的高度。
5. android:listSelector:设置列表项的选中效果,可以是颜色、图片或者绘制的形状。
三、ListView控件的布局在XML布局中,可以通过以下代码创建一个简单的ListView控件:xml<ListViewandroid:id="@+id/listView"android:layout_width="match_parent"android:layout_height="match_parent" />注意:要在代码中操作ListView控件,需要给它一个唯一的id,以便在后续的代码中找到它。
四、ListView控件的数据源在ListView中显示数据需要一个数据源,常用的数据源有数组或者集合。
可以通过以下代码将数组作为ListView的数据源:javaString[] data = {"item1", "item2", "item3"};ArrayAdapter<String> adapter = new ArrayAdapter<String>(this, yout.simple_list_item_1, data);ListView listView = findViewById(R.id.listView);listView.setAdapter(adapter);在以上代码中,yout.simple_list_item_1是一个内置的布局文件,用于显示一个文本的列表项。
Android开发教程:shape和selector的结合使用
Android开发教程:shape和selector的结合使⽤shape和selector是Android UI设计中经常⽤到的,⽐如我们要⾃定义⼀个圆⾓Button,点击Button有些效果的变化,就要⽤到shape和selector。
可以这样说,shape和selector在美化控件中的作⽤是⾄关重要的。
1.Shape简介作⽤:XML中定义的⼏何形状位置:res/drawable/⽂件的名称.xml使⽤的⽅法:Java代码中:R.drawable.⽂件的名称XML中:Android:background="@drawable/⽂件的名称"属性:<shape> Android:shape=["rectangle" | "oval" | "line" | "ring"]其中rectagle矩形,oval椭圆,line⽔平直线,ring环形<shape>中⼦节点的常⽤属性:<gradient> 渐变Android:startColor 起始颜⾊Android:endColor 结束颜⾊Android:angle 渐变⾓度,0从上到下,90表⽰从左到右,数值为45的整数倍默认为0;Android:type 渐变的样式 liner线性渐变 radial环形渐变 sweep<solid > 填充Android:color 填充的颜⾊<stroke > 描边Android:width 描边的宽度Android:color 描边的颜⾊Android:dashWidth 表⽰'-'横线的宽度Android:dashGap 表⽰'-'横线之间的距离<corners > 圆⾓Android:radius 圆⾓的半径值越⼤⾓越圆Android:topRightRadius 右上圆⾓半径Android:bottomLeftRadius 右下圆⾓⾓半径Android:topLeftRadius 左上圆⾓半径Android:bottomRightRadius 左下圆⾓半径2.Selector简介位置:res/drawable/⽂件的名称.xml使⽤的⽅法:Java代码中:R.drawable.⽂件的名称XML中:Android:background="@drawable/⽂件的名称"<?xml version="1.0" encoding="utf-8" ?><selector xmlns:Android="/apk/res/android"><!-- 默认时的背景图⽚--><item Android:drawable="@drawable/pic1" /><!-- 没有焦点时的背景图⽚ --><itemAndroid:state_window_focused="false"android:drawable="@drawable/pic_blue"/><!-- ⾮触摸模式下获得焦点并单击时的背景图⽚ --><itemAndroid:state_focused="true"android:state_pressed="true"android:drawable= "@drawable/pic_red"/><!-- 触摸模式下单击时的背景图⽚--><itemAndroid:state_focused="false"Android:state_pressed="true"Android:drawable="@drawable/pic_pink"/><!--选中时的图⽚背景--><itemAndroid:state_selected="true"android:drawable="@drawable/pic_orange"/><!--获得焦点时的图⽚背景--><itemAndroid:state_focused="true"Android:drawable="@drawable/pic_green"/></selector>第⼀个例⼦:圆⾓的Button第⼆个例⼦:shape+selector综合使⽤的例⼦漂亮的ListViewselector.xml<?xml version="1.0" encoding="utf-8"?><selector xmlns:Android="/apk/res/android"><item Android:state_selected="true"><shape><gradient Android:angle="270" android:endColor="#99BD4C"android:startColor="#A5D245" /><size Android:height="60dp" android:width="320dp" /><corners android:radius="8dp" /></shape></item><item Android:state_pressed="true"><shape><gradient Android:angle="270" android:endColor="#99BD4C"android:startColor="#A5D245"/><size Android:height="60dp" android:width="320dp" /><corners android:radius="8dp" /></shape></item><item><shape><gradient Android:angle="270" android:endColor="#A8C3B0"android:startColor="#C6CFCE" /><size Android:height="60dp" android:width="320dp" /><corners android:radius="8dp" /></shape></item></selector>list_item.xml<?xml version="1.0" encoding="utf-8"?><LinearLayout xmlns:Android="/apk/res/android" android:orientation="horizontal"Android:layout_width="fill_parent"android:layout_height="wrap_content"Android:background="@drawable/selector"><ImageViewAndroid:id="@+id/img"Android:layout_width="wrap_content"android:layout_height="wrap_content"Android:layout_gravity="center_vertical"android:layout_marginLeft="20dp"/><TextViewAndroid:text="data"android:id="@+id/title"Android:layout_width="fill_parent"android:layout_height="wrap_content"Android:gravity="center_vertical"android:layout_marginLeft="20dp"Android:layout_marginTop="20dp"android:textSize="14sp"Android:textStyle="bold"android:textColor="@color/black"></TextView></LinearLayout>main.xml<?xml version="1.0" encoding="utf-8"?><LinearLayout xmlns:Android="/apk/res/android" android:orientation="vertical"Android:layout_width="fill_parent"android:layout_height="wrap_content"Android:background="#253853"><ListViewAndroid:id="@+id/list"Android:layout_width="match_parent"android:layout_height="match_parent"Android:cacheColorHint="#00000000"android:divider="#2A4562"Android:dividerHeight="3px"android:listSelector="#264365"Android:drawSelectorOnTop="false"></ListView></LinearLayout>colors.xml<?xml version="1.0" encoding="utf-8"?><resources><color name="white">#FFFFFFFF</color><color name="transparency">#00000000</color><color name="title_bg">#1C86EE</color><color name="end_color">#A0cfef83</color><color name="black">#464646</color></resources>MainActivity.xmlpackage com.lingdududu.customlist;import java.util.ArrayList;import java.util.HashMap;import xb.customlist.R;import Android.R.array;import android.app.Activity;import Android.os.Bundle;import android.widget.ArrayAdapter;import Android.widget.ListView;import android.widget.SimpleAdapter;public class MainActivity extends Activity {ListView list;String data[] = new String[]{"China","UK","USA","Japan","German","Canada","ET","Narotu"};/** Called when the activity is first created. */@Overridepublic void onCreate(Bundle savedInstanceState) {super.onCreate(savedInstanceState);setContentView(yout.main);list =(ListView) findViewById(R.id.list);SimpleAdapter adapter = new SimpleAdapter(this, getData(), yout.list_item,new String[]{"title","img"}, new int[]{R.id.title,R.id.img});list.setAdapter(adapter);}private ArrayList<HashMap<String, Object>> getData() {ArrayList<HashMap<String, Object>> dlist = new ArrayList<HashMap<String,Object>>(); for(int i =0;i<data.length;i++){HashMap<String, Object>map = new HashMap<String, Object>();map.put("title", data[i]);map.put("img", R.drawable.item_left2);dlist.add(map);}return dlist;}}。
android selector用法

android selector用法Android的Selector是一个可以为View的State状态设置不同属性的XML文件。
State状态包括normal(正常状态)、focused(焦点状态)、pressed(按下状态)、selected(选中状态)等等,Selector可以根据View的State状态来匹配不同的XML属性。
Selector最早的出现可以追溯到2010年左右,当时Android推出了2.3版本,这个版本带来了很多新特性,其中就包括了Selector。
当时,Selector被广泛应用于布局中Button的样式设置中。
在2011年,随着Android 3.0版本的推出,Selector逐渐被应用到其他View组件上,如ImageView等。
同时,Selector也被用于Menu的样式设置。
随着Android版本的不断升级,Selector的功能也得到了增强。
如Android 4.0版本推出的LayerDrawable属性,它可以更方便地设置View的背景、边框、圆角等属性。
今天,随着Android系统的版本不断升级,Selector已经成为了Android应用开发中非常重要的一个组件,不仅在UI的样式设置中经常用到,还可以用于State状态切换的动画效果设置、手势动作的响应等方面。
同时,Android开发者也不仅限于使用系统内置的Selector,还可以自定义Selector来满足特定的需求。
总的来说,Android的Selector在不断地发展与完善中,它已经成为了Android应用开发中不可或缺的一个组件,为Android应用的设计与开发提供了更多的可能性。
android kotlin selector扩展函数 -回复
android kotlin selector扩展函数-回复初学者指南:Android Kotlin中的Selector扩展函数选择器是Android中常用的一种UI控件,其允许我们根据不同的状态选择不同的资源文件或者样式。
在Kotlin中,我们可以使用扩展函数为选择器提供更强大的功能。
本文将介绍如何使用Selector扩展函数来创建和使用选择器。
第一步:了解Selector在Android中,选择器是一种XML文件,在其中定义了不同状态下的资源。
选择器允许我们根据不同的状态,如按下、获得焦点或禁用等,选择不同的背景、边框或者文本颜色等资源。
一般来说,一个选择器会包含多个item,每个item都定义了一组资源文件和对应的状态。
第二步:创建Selector扩展函数为了简化选择器的使用,我们可以使用Kotlin扩展函数为选择器添加更多的便捷功能。
首先,我们需要在项目中的某个Kotlin文件中创建一个扩展函数。
kotlinfun View.setDefaultSelector(DrawableRes default: Int, DrawableRes pressed: Int? = null, DrawableRes focused: Int? = null, DrawableRes disabled: Int? = null) {val drawable = StateListDrawable()context?.let { ctx ->pressed?.let{ drawable.addState(intArrayOf(android.R.attr.state_pressed), ContextCompat.getDrawable(ctx, it)) }focused?.let{ drawable.addState(intArrayOf(android.R.attr.state_focused), ContextCompat.getDrawable(ctx, it)) }disabled?.let{ drawable.addState(intArrayOf(-android.R.attr.state_enabled), ContextCompat.getDrawable(ctx, it)) }}drawable.addState(intArrayOf(),ContextCompat.getDrawable(context, default))background = drawable}上述代码中,我们定义了一个名为`setDefaultSelector`的扩展函数,接收了四个资源参数:默认状态、按下状态、焦点状态和禁用状态。
【推荐下载】Android实用视图动画及工具系列之五:底部回复对话框,仿QQ空间微信朋友圈回复对话框
Android 实用视图动画及工具系列之五:底部回复对话框,仿QQ 空间微信朋友圈回复对话框这就是一个底部弹出对话框,仿QQ 空间微信朋友圈底部弹出对话框,用了一些普通的UI 优化,以及添加了表情框等,需要用到类似功能的自行下载源码集成。
适用于新手及新学习Android 的码友们,老玩家当然也可以看看,这个还是挺简单挺实用的,在后面会简略介绍实现方法及源代码,同时博客的最后还提供源代码和图片等资源github 下载地址。
本部分内容主要讲解底部弹出框的实现,不讲解表情栏部分,需要查看表情栏部分实现的请查看这篇文章:-------------------------------------------------------------------------------------------------------------------- -------------------------------------------------------------------------------------------------------------------- 这个底部弹出对话框只用了两张图片,其他的都是通过drawable shape 绘制实现,两个表情图:(其他图片资源在源代码内,需要的自行下载):xmlns:android=“schemas.android/apk/res/android”item android:state_focused=“true”android:state_pressed=“true”android:drawable=“@drawable/chatform_flag_face2”/ item android:state_focused=“false”android:state_pressed=“true”android:drawable=“@drawable/chatform_flag_face2”/ item android:state_focused=“false”android:drawable=“@drawable/chatform_flag_face”/ /selector ?xml version=“1.0”encoding=“utf-8”?selector xmlns:android=“schemas.android/apk/res/android”item android:state_focused=“true”shape solid android:color=“#008ee0”/ stroke android:width=“1dp”android:color=“#008ee0”/ corners android:radius=“3dp”/padding android:top=“1dp”android:bottom=“1dp”android:left=“1dp”android:right=“1dp”//shape /item item android:state_pressed=“true”shape solid android:color=“#008ee0”/ stroke android:width=“1dp”android:color=“#008ee0”/ corners android:radius=“3dp”/padding android:top=“1dp”android:bottom=“1dp”。
代码实现Selector按钮点击效果

代码实现Selector按钮点击效果⽤途:动态设置Button、ImageView等组件在不同状态下的背景/前景显⽰效果。
扩展下的话可以前景/背景的显⽰效果可以使⽤⽹络图⽚。
优点:灵活,减少xml的编写。
参考:[AndroidOpenSource]frameworks a secorejavaandroidviewview.xml[AndroidOpenSource]frameworks a secoreesesvaluespublic.xml代码如下:1. /** 设置Selector。
*/2. public static StateListDrawable newSelector(Context context, int idNormal, int idPressed, int idFocused,3. int idUnable) {4. StateListDrawable bg = new StateListDrawable();5. Drawable normal = idNormal == -1 ? null : context.getResources().getDrawable(idNormal);6. Drawable pressed = idPressed == -1 ? null : context.getResources().getDrawable(idPressed);7. Drawable focused = idFocused == -1 ? null : context.getResources().getDrawable(idFocused);8. Drawable unable = idUnable == -1 ? null : context.getResources().getDrawable(idUnable);9. // View.PRESSED_ENABLED_STATE_SET10. bg.addState(new int[] { android.R.attr.state_pressed, android.R.attr.state_enabled }, pressed);11. // View.ENABLED_FOCUSED_STATE_SET12. bg.addState(new int[] { android.R.attr.state_enabled, android.R.attr.state_focused }, focused);13. // View.ENABLED_STATE_SET14. bg.addState(new int[] { android.R.attr.state_enabled }, normal);15. // View.FOCUSED_STATE_SET16. bg.addState(new int[] { android.R.attr.state_focused }, focused);17. // View.WINDOW_FOCUSED_STATE_SET18. bg.addState(new int[] { android.R.attr.state_window_focused }, unable);19. // View.EMPTY_STATE_SET20. bg.addState(new int[] {}, normal);21. return bg;22. }复制代码⽰例代码:1. Button btnNormal = (Button) findViewById(R.id.btnSampleNormal);2. btnNormal.setBackgroundDrawable(newSelector(this, R.drawable.btn_normal, R.drawable.btn_selected,3. R.drawable.btn_selected, R.drawable.btn_unable));4. Button btnUnable = (Button) findViewById(R.id.btnSampleUnable);5. btnUnable.setBackgroundDrawable(newSelector(this, R.drawable.btn_normal, R.drawable.btn_selected,6. R.drawable.btn_selected, R.drawable.btn_unable));7. btnUnable.setEnabled(false);8. btnUnable.setOnClickListener(this);9.复制代码1. /** 对TextView设置不同状态时其⽂字颜⾊。
- 1、下载文档前请自行甄别文档内容的完整性,平台不提供额外的编辑、内容补充、找答案等附加服务。
- 2、"仅部分预览"的文档,不可在线预览部分如存在完整性等问题,可反馈申请退款(可完整预览的文档不适用该条件!)。
- 3、如文档侵犯您的权益,请联系客服反馈,我们会尽快为您处理(人工客服工作时间:9:00-18:30)。
浅谈android的selector背景选择器
2011-10-15 12:39:30 我来说两句
收藏我要投稿关于listview和button都要改变android原来控件的背景,在网上查找了一些资料不是很全,所以现在总结一下android的selector的用法。
首先android的selector是在drawable/xxx.xml中配置的。
先看一下listview中的状态:
把下面的XML文件保存成你自己命名的.xml文件(比如list_item_bg.xml),在系统使用时根据ListView中的列表项的状态来使用相应的背景图片。
drawable/list_item_bg.xml
<?xml version="1.0" encoding="utf-8" ?>
<selector
xmlns:android="/apk/res/android"> <!-- 默认时的背景图片-->
<item android:drawable="@drawable/pic1" />
<!-- 没有焦点时的背景图片-->
<item android:state_window_focused="false"
android:drawable="@drawable/pic1" />
<!-- 非触摸模式下获得焦点并单击时的背景图片-->
<item android:state_focused="true" android:state_pressed="true"
android:drawable="@drawable/pic2" />
<!-- 触摸模式下单击时的背景图片-->
<item android:state_focused="false" android:state_pressed="true"
android:drawable="@drawable/pic3" />
<!--选中时的图片背景-->
<item android:state_selected="true"
android:drawable="@drawable/pic4" />
<!--获得焦点时的图片背景-->
<item android:state_focused="true"
android:drawable="@drawable/pic5" />
</selector>
使用些xml文件:第一种是在listview中配置
android:listSelector="@drawable/list_item_bg"
或者在listview的item中添加属性android:background=
“@drawable/list_item_bg"即可实现,或者在java代码中使用:Drawable drawable = getResources().getDrawable(R.drawable.list_item_bg);
ListView.setSelector(drawable);同样的效果。
但是这样会出现列表有时候为黑的情况,需要加上:
android:cacheColorHint="@android:color/transparent"
使其透明。
其次再来看看Button的一些背景效果:
android:state_selected是选中
android:state_focused是获得焦点
android:state_pressed是点击
android:state_enabled是设置是否响应事件,指所有事件
根据这些状态同样可以设置button的selector效果。
也可以设置selector 改变button中的文字状态。
以下就是配置button中的文字效果:
drawable/button_font.xml
<?xml version="1.0" encoding="utf-8"?>
<selector
xmlns:android="/apk/res/android"> <item android:state_selected="true" android:color="#FFF" />
<item android:state_focused="true" android:color="#FFF" />
<item android:state_pressed="true" android:color="#FFF" />
<item android:color="#000" />
</selector>
Button还可以实现更复杂的效果,例如渐变啊等等。
drawable/button_color.xml
<?xml version="1.0" encoding="utf-8"?>
<selector
xmlns:android="/apk/res/android"> <item android:state_pressed="true">
<!-- 定义当button 处于pressed 状态时的形态。
-->
<shape>
<gradient android:startColor="#8600ff" />
<stroke android:width="2dp" android:color="#000000" /> <corners android:radius="5dp" />
<padding android:left="10dp" android:top="10dp"
android:bottom="10dp" android:right="10dp" />
</shape>
</item>
<item android:state_focused="true">
<!-- 定义当button获得focus时的形态-->
<shape>
<gradient android:startColor="#eac100" />
<stroke android:width="2dp" android:color="#333333" color="#ffffff" />
<corners android:radius="8dp" />
<padding android:left="10dp" android:top="10dp"
android:bottom="10dp" android:right="10dp" />
</shape>
</item>
</selector>
最后,需要在包含button的xml文件里添加两项。
假如是main.xml 文件,我们需要在<Button />里加两项。
android:focusable="true"
android:backgroud="@drawable/button_color"
这样当你使用Button的时候就可以甩掉系统自带的那黄颜色的背景了,实现个性化的背景,配合应用的整体布局非常之有用啊。
