PC端微软蓝牙协议栈的安装
基于Bluez的应用程序的开发

Linux下Bluez的编程实现1、蓝牙的各个协议栈的简介 (2)1.1、蓝牙技术 (2)1.1、蓝牙协议栈 (2)1.2、蓝牙技术的特点 (3)1.2.1、蓝牙协议栈体系结构 (3)1.2.2、蓝牙协议栈低层模块 (4)1.2.3、软件模块 (5)1.3、蓝牙的一些Profile (5)2、Bluez和D-Bus (7)2.1、Bluez和D-Bus体系结构 (7)2.2、D-Bus介绍 (8)2.3、Bluez的安全接口 (12)2.4、Bluez适配器接口 (15)2.5、Bluez配对 (16)2.6、Bluez绑定 (16)3、Bluez编程实现 (17)3.1、蓝牙开发关键技术剖析 (17)3.1.1、连接机制分析 (17)3.1.2、自动连接 (18)3.1.3、时钟设计 (18)3.1.4、配对列表管理 (19)3.1.5、蓝牙文件传输模式 (20)3.2、hci层介绍 (20)3.2.1、hci层介绍 (20)3.2.2、hci层编程 (20)3.3、L2CAP层编程 (25)3.3.1、L2CAP协议简介 (25)3.3.2、L2CAP编程方法 (25)3.4、SDP协议简介 (26)4、Openobex (28)4.1、Openobex简介 (28)4.2、Openobex与bluez编程实现 (29)5、Obexftp (31)5.1、obexftp简介 (31)5.2、基于Obexftp的应用程序开发 (31)6、参考资料 (32)1、蓝牙的各个协议栈的简介1.1、蓝牙技术蓝牙(Bluetooth)技术是由Ericsson、IBM、Intel、Nokia和Toshiba公司于1998年5月共同提出开发的,并联合成立了蓝牙特殊利益小组(SIG),负责开发无线协议规范并设定交互操作的需求。
其本质是设备间的无线链接,意在于代替有线电缆。
1.1、蓝牙协议栈协议栈是指一组协议的集合,举个例子,把大象装到冰箱里,总共要3步。
蓝牙安装说明

更改第 31 行:将 [Msft.NTamd64...1] 改为 [Msft.NTamd64...3]
3. 编辑文件:C:\BT\bthprint.inf
更改第 19 行:将 %MSFT%=Microsoft,NTamd64...1 改为 %MSFT%=Microsoft,NTamd64...3
Windows Server 2008 蓝牙驱动安装方法2008-12-22 20:03 Windows Server 2008安装蓝牙驱动,需要修改文件的基本原则是将复制的所有INF文章中的“ "NTamd64...1" 修改为 "NTamd64...3",其中"amd64”表示64位系统,数字“1”与“3”代表了系统保护等级。
更改第 34 行:将 [MicrosoftHid.NTamd64...1] 改为 [MicrosoftHid.NTamd64...3]
6. 编辑文件:C:\BT\mdmbtmdm.inf
更改第 19 行:将 %Standard% = Standard,NTamd64...1 改为 %Standard% = Standard,NTamd64...3
hidclass.sys
hidparse.sys
hidusb.sys
input.inf
mdmbtmdm.inf
netirda.inf
rfcomm.sys
tdibth.inf
3. 然后从C:\Windows\System32 复制 modemui.dll 到C:\BT
更改第 21 行:将 [Microsoft.NTamd64...1] 改为 [Microsoft.NTamd64...3]
Windows7安装蓝牙CSR4.0驱动:千月蓝牙软件BlueSoleil

Windows7安装蓝牙CSR4.0驱动:千月蓝牙软件BlueSoleil我试验了蓝牙适配器自带的光盘驱动,结果是连接手机正常,连接蓝牙立体声耳机没有蓝牙高质量音频服务。
那音质我受不了啊,呵呵,在此希望给我同样遭遇的朋友帮助。
第一步:把蓝牙适配器拔出,系统中原有的蓝牙驱动全部删除(一个都不要留啊。
)第二步:下载千月蓝牙软件(BlueSoleil),下载地址:/qianyue/Default.aspx第三步:安装千月蓝牙软件(软件会自动安装驱动),安装方法在下面,千月蓝牙软件(BlueSoleil)下载及安装指南千月蓝牙软件(BlueSoleil)安装管理器是一款可以自动检查千月蓝牙软件(BlueSoleil)最新版本并进行下载更新的工具,它会自动帮您完成软件的下载过程。
具体步骤:千月蓝牙软件(BlueSoleil)安装管理器下载完成后,双击运行程序,千月蓝牙软件(BlueSoleil)安装管理器进行数据初始化后,如果客户端软件已是最新版本,会出现提示框,提示你不需要升级了;如果客户端软件不是最新版本,会列出可以升级的最新版本,如下图所示图1点击高级,可设置自动检查升级的更新周期及安装路径,如下图所示图2点击“下一步”,软件开始自动下载更新,如下图所示图3下载更新完成后,您就可以使用升级后的千月蓝牙软件(BlueSoleil)新版本了。
如果出现重启计算机的对话框,重启计算机后,即可正常使用最新版本,如下图所示图4提示:千月蓝牙软件(BlueSoleil)会根据您的设置自动检测是否需要更新,如果客户端已经安装了千月蓝牙软件(BlueSoleil)版本,并且需要升级,系统会自动弹出升级提示,点击该升级提示,千月蓝牙软件(BlueSoleil)安装管理器自动运行,完成对千月蓝牙软件(BlueSoleil)的升级,如下图所示图5第四步:安装完成后一定要先重启计算机,然后插上蓝牙适配器(CSR4.0),打开千月软件,如图6所示,右击中间的圆月,选择启动蓝牙。
正确配置Widcomm蓝牙驱动

正确配置Widcomm蓝牙驱动,让PPC与PC共舞我是折腾一天才把HTC TOUCH 成功连接上Widcomm驱动的蓝牙适配器,现在终于可以与PC机共享上网,也可以打开手机工作室等软件读取手机上的东西,而不用再插线了。
摸索的过程是有点痛苦的,网上很多人都谈到WIDCOMM联网的问题,但是都不甚了了,或者含糊,或者条理不清。
倒让我走了不少弯路,现在把自己的认识写出来,供有需要的弟兄们参考。
我的蓝牙适配器是CCK D99,芯片是Broadcomm2045,因为Widcomm已经被Broadcom 收购,所以软件也是Broadcom的了,版本为WIDCOMM Bluetooth Software 5.0.1.801。
安装完毕WIDCOMM软件和微软ActiveSync以后,正确配置顺序如下。
注意,顺序很重要!一、WIDCOMM 正确安装后启动程序名称是“我的Bluetooth位置”,启动“我的Bluetooth 位置”点击“Bluetooth(B)”--“高级配置(A)”--“本地服务”--“添加串行服务”,Widcomm 缺省已经安装的是COM3,你要把COM4到COM6挨个都添加才行。
注意,这里没有任何捷径可走,只能一个一个的添加,而且至少要加到COM6才行(因为WM6手机里默认的链接端口就是COM6和COM7这两个),并且要在COM6属性菜单的“自动启动”前打勾!二、打开微软ActiveSync--“链接设置”,把“允许连接到以下其中一个端口(N)”打勾,下拉框中可以看到COM1到COM6和红外连接,我们选COM6。
好了,下一步不是按右上角的“连接(C)...”,而是按“确定”键退出!三、这一步该轮到手机了,你可以在设置中选“连接”--“蓝牙”--“设备”,点击“添加新设备...”,能看到PC机上的蓝牙适配器在闪动,经过10秒左右搜索后,手机提示找到PC机,点“下一步”,弹出框要求输入密码,也就是所谓配对了,可以随便输入一串数字,再按“下一步”,PC端状态栏马上提示“需要Bluetooth通行密钥”,点提示,输入刚才手机上同样的字串,按确定退出,配对成功了!四、点手机“设备”中的PC机名--“刷新”,会有三项服务的列表,中间那个就是“ActiveSync”,哈哈,终于看到曙光了,没问题的,打勾保存吧!五、不管你用TOUCH FLO也好,用程序菜单进入也行,反正点击“ActiveSync”后,右下菜单上选择“通过蓝牙连接”,同时PC状态栏提示“Bluetooth连接成功”!到此,就跟你用USB数据线一样的效果了,只要手机不离电脑太远,想怎么玩都行!总结起来,上面几个步骤,比如添加端口等非常关键,但是网上那么多文章我都没看到这一步,看来遇到问题还是多动脑筋啊。
电脑操作系统中的蓝牙设置如何配置

电脑操作系统中的蓝牙设置如何配置在如今的数字化时代,蓝牙技术已经成为我们日常生活和工作中不可或缺的一部分。
无论是连接无线耳机、音箱,还是与其他设备进行数据传输,蓝牙都发挥着重要作用。
然而,对于一些不太熟悉电脑操作系统的用户来说,正确配置蓝牙设置可能会有些棘手。
接下来,让我们详细了解一下在常见的电脑操作系统中如何进行蓝牙设置。
首先,我们来看看 Windows 操作系统中的蓝牙配置方法。
在 Windows 10 中,您可以通过以下步骤来配置蓝牙:第一步,点击屏幕左下角的“开始”按钮,然后在弹出的菜单中选择“设置”图标。
第二步,在打开的“设置”窗口中,找到并点击“设备”选项。
第三步,在“设备”页面中,您会看到左侧有一个“蓝牙和其他设备”的选项,点击它。
第四步,如果您的电脑蓝牙功能尚未开启,此时右侧窗口中的蓝牙开关会显示为关闭状态,点击该开关将其打开。
第五步,打开蓝牙后,系统会自动搜索附近可配对的蓝牙设备。
在设备列表中找到您想要连接的设备,然后点击它进行配对。
第六步,有些设备可能需要您输入配对码。
配对码通常可以在设备的说明书中找到,或者在设备上显示。
输入正确的配对码后,等待配对成功即可。
在 Windows 11 中,蓝牙设置的步骤与 Windows 10 大致相似,但界面可能会有所不同。
您同样可以通过点击“开始”按钮,然后选择“设置”,在“设置”窗口中找到“蓝牙和设备”选项,然后按照提示进行操作。
接下来,我们再了解一下 macOS 操作系统中的蓝牙设置。
对于使用苹果电脑的用户,在 macOS 中配置蓝牙也很简单。
第一步,点击屏幕左上角的苹果图标,然后在弹出的菜单中选择“系统偏好设置”。
第二步,在“系统偏好设置”窗口中,找到并点击“蓝牙”图标。
第三步,如果蓝牙处于关闭状态,点击窗口左下角的“打开蓝牙”按钮。
第四步,系统会自动搜索附近的蓝牙设备,并在列表中显示出来。
点击您要连接的设备,然后根据提示进行配对操作。
Windows CE下蓝牙协议栈驱动的实现
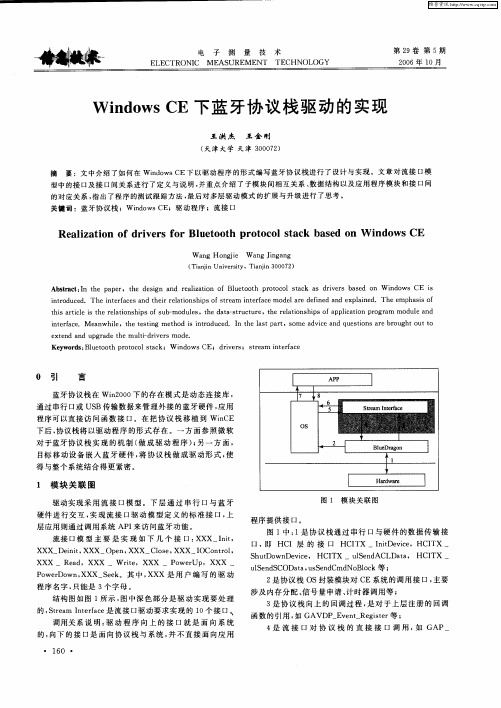
De n t XXX ii,
—
—
Op n, e XXX—Cl s XXX I o e, OCo t o , nr l
Wa g Ho gi W a g J g n n ni e n i a g n
( a j iest 。Tini 0 0 2 Ti i Unv r i nn y aj 3 0 7 ) n
Ab ta t I h a e ,t e d sg n r aia i n o l eo t r t c l t c s d i e s b s d o id ws CE i sr c :n t e p p r h e i n a d e l t f B u t o h p o o o s a k a r r a e n W n o s z o v it o u e .Th n e f c sa d t err lt n h p fs r a i t ra emo e a e d fn d a d e p an d n rd c d e i t ra e n h i ea i s i so t e m n e f c d 1 r e i e n x l i e .Th mp a i o o ee h ss f t i a t l h e a in h p fs b mo u e ,t e d t — t u t r ,t er lt n h p fa p ia i n p o r m d l n h s r i e i t e r l t s i s o u — d ls h a a s r c u e h ea i s i s o p l t r g a mo u ea d c s o o c o it ra e M e n i ,t et s i g me h d i i to u e .I h a tp r ,s m ea vc n u s in r r u h u o n efc. a wh l e h e tn t o s n r d c d n t e ls a t o d ie a d q e to s a e b o g to tt e t n n p r d h ut d i e s mo e x e d a d u g a e t em li r r d . — v Ke w r s Bl e o t r t e 1sa k; W id ws C y o d : u to hp o oo tc n o E; d i e s s r a i t r a e rv r ; t e m e f c n
电脑怎么装蓝牙功能

电脑怎么装蓝牙功能电脑是一种非常常见的电子设备,如今几乎每个家庭都拥有一台。
而蓝牙功能作为一种无线通信技术,也逐渐成为电脑的标配。
今天,我们就来谈谈电脑如何装蓝牙功能。
首先,要安装蓝牙功能,你需要确保你的电脑已经具备蓝牙适配器。
蓝牙适配器是能够创建蓝牙连接的硬件设备,它可以连接蓝牙设备,如手机、耳机、音箱等。
大部分新款电脑都已经内置了蓝牙适配器,但如果你的电脑没有内置蓝牙适配器,也可以通过USB接口的外置蓝牙适配器来实现。
安装蓝牙适配器的步骤相对简单。
首先,插入蓝牙适配器的USB接口到电脑的一个可用的USB插槽中。
接下来,电脑会自动识别并安装驱动程序。
在安装过程中,可能需要联网下载驱动程序或者使用随附的驱动光盘安装。
一旦驱动程序安装完成,你就可以开始使用蓝牙功能了。
在Windows系统中,你可以点击开始菜单并选择“设置”>“设备”>“蓝牙和其他设备”。
在这个界面上,你可以打开蓝牙功能,并搜索并添加其他蓝牙设备。
例如,如果你想连接蓝牙耳机,你可以在设备界面点击“添加蓝牙或其他设备”,然后选择“蓝牙”。
接下来,系统会开始搜索附近的蓝牙设备。
当你的耳机出现在列表中时,点击它的名字以配对连接。
一旦配对成功,你就可以在电脑上播放音乐或者接听电话时使用蓝牙耳机了。
除了连接耳机,你还可以连接其他蓝牙设备,如键盘、鼠标、音箱等。
只需按照上述步骤进行搜索和配对,然后你就可以享受无线的便利了。
此外,你还可以通过设置来自定义蓝牙功能。
例如,你可以在设置中调整音频设置,选择蓝牙耳机作为默认音频输出设备。
这样,当你连接蓝牙耳机时,电脑就会自动选用它作为音频输出设备,而不是扬声器或者有线耳机。
总的来说,安装蓝牙功能对于电脑用户来说并不难。
只需准备一个蓝牙适配器,安装驱动程序,然后使用系统内置的蓝牙设置即可。
蓝牙技术让我们能够方便地连接和使用各种蓝牙设备,为我们的电脑生活带来更多的可能性和便利。
Widcomm 技巧汇

Widcomm 蓝牙适配器驱动的安装和使用方法Widcomm 蓝牙适配器驱动的安装和使用方法WINDOWS XP SP2自带有蓝牙驱动,XP的蓝牙自带驱动比较麻烦,使用上也不是很方便. 如果电脑连接蓝牙适配器后, 电脑右下角出现两个蓝牙标志,其中一个是SP2系统自带的蓝牙驱动. 证明SP2自带蓝牙驱动跟这个驱动有冲突. 我们要做的就是屏蔽掉SP2自带的驱动..解决办法如下:sp2自带的蓝牙驱动虽然兼容性强,但很多功能无法实现。
用功能比较成熟的WIDCOMM蓝牙驱动,能完全的使用蓝牙的功能。
系统发现蓝牙设备所会自动安装自代的驱动,查找后发现C:\windows\inf\bth.inf就是自代的驱动文件,只要在把蓝牙插入电脑之前将其删除或改名XP SP2不会自动安装。
已安装过自带驱动的先将其在设备管理器中删除。
再单击“开始”-“运行”在运行中输入“del c:\windows\inf\bth.inf”后删除自带的驱动,再安装WIDCOMM蓝牙驱动即可。
★★★★★★★★★★★★★★★★★★★★★★★★★★★★★★★★★★一、驱动程序介绍:大部分的蓝牙产品采用的是Widcomm授权的硬件设备,而Widcomm的蓝牙应用程序的使用是最广泛的,这一点,很多玩过蓝牙的数码玩家相信都比较清楚。
该驱动的功能、稳定性、使用方便性都很好。
PS:其实Widcomm驱动(这里姑且叫它驱动吧)不仅仅是单纯的设备驱动程序,它具备所有必需的协议,并集成了方便使用的应用管理程序。
二、安装过程简介:安装前要说明的一点是:Widcomm的安装却要求先不要插蓝牙适配器。
(据我安装使用的经验来看,这样做才能让系统准确的识别蓝牙适配器,并为其安装相应的功能服务项目;反之,则可能会在安装过程中因为存在蓝牙设备,而直接出现要求安装相关服务功能的提示)。
另外,如果以前有安装过其他蓝牙设备,最好完全卸载掉该设备的驱动和相关应用程序。
好,那既然什么都不插,我们就直接开始安装Widcomm程序了(这里略掉N个字)~安装完成后,在桌面右下角的系统栏内大家可以看到一个蓝牙图标,但此时的图标是红色的,这表明系统还未发现蓝牙设备。
电脑无法连接蓝牙设备的解决方案
电脑无法连接蓝牙设备的解决方案在现代科技的发展下,蓝牙技术已经成为我们日常生活中不可或缺的一部分。
然而,有时我们可能会遇到电脑无法连接蓝牙设备的问题。
本文将介绍一些常见的解决方案,以帮助您解决这个问题。
1. 检查蓝牙设备的电源和信号首先,确保您的蓝牙设备已经打开,并且电池有足够的电量。
接下来,确认蓝牙设备处于可配对的状态,通常会有一个闪烁的指示灯。
在连接之前,确保设备之间的距离不超过蓝牙信号的有效范围。
2. 检查电脑上的蓝牙功能在电脑上,点击任务栏上的蓝牙图标,检查是否已打开蓝牙功能。
如果没有找到蓝牙图标,可以通过控制面板进入蓝牙设置。
在设置中,确保蓝牙功能已经启用。
3. 更新蓝牙驱动程序蓝牙设备无法连接的另一个常见原因是过时的或不正确的蓝牙驱动程序。
您可以通过以下步骤更新蓝牙驱动程序:a. 打开设备管理器。
在Windows系统中,您可以在“控制面板”中找到“设备管理器”。
b. 在设备管理器中,找到蓝牙设备选项,并右键点击。
c. 选择“更新驱动程序软件”选项,并按照提示操作完成驱动程序的更新。
4. 清除蓝牙设备配对列表有时,电脑上的配对列表可能会导致连接问题。
您可以通过清除配对列表来解决这个问题:a. 进入电脑的蓝牙设置。
b. 找到已连接的蓝牙设备列表,并选中您想要清除的设备。
c. 点击“移除”或“忘记此设备”按钮,以从配对列表中删除该设备。
d. 重新启动电脑和蓝牙设备,并尝试重新配对。
5. 禁用并重新启用蓝牙功能在一些情况下,禁用并重新启用蓝牙功能可以解决连接问题:a. 在电脑的蓝牙设置中,找到蓝牙开关,并将其关闭。
b. 等待几秒钟后,再次打开蓝牙开关。
c. 尝试重新连接蓝牙设备。
6. 检查防火墙和安全软件设置有时,防火墙和安全软件的设置可能会阻止电脑与蓝牙设备的连接。
您可以尝试临时禁用防火墙或安全软件,并检查是否可以正常连接。
如果可以,您可以重新配置防火墙或安全软件,以允许蓝牙连接。
7. 使用蓝牙适配器如果您的电脑没有内置蓝牙功能,您可以考虑购买一个蓝牙适配器。
Windows系统蓝牙设备连接与配置

Windows系统蓝牙设备连接与配置一、介绍蓝牙技术广泛应用于无线通信领域,使我们在使用电脑时能够方便地连接和配置各种蓝牙设备,如耳机、键盘、鼠标等。
本文将详细介绍在Windows系统下如何进行蓝牙设备的连接与配置。
二、连接蓝牙设备1. 打开蓝牙功能在Windows系统中,首先需要确保蓝牙功能已开启。
找到任务栏右下角的系统托盘,点击蓝牙图标,若显示为“关闭蓝牙”,则表示蓝牙已开启。
如果蓝牙图标未显示在任务栏中,可在控制面板或设置中搜索“蓝牙”并打开蓝牙设置页面,在此处开启蓝牙功能。
2. 搜索附近的蓝牙设备在开启蓝牙功能后,系统会自动搜索附近可连接的蓝牙设备。
点击任务栏中的蓝牙图标,选择“添加设备”或类似选项。
系统会列出附近检测到的蓝牙设备,包括耳机、键盘、鼠标等。
点击所需设备,系统将尝试与其建立连接。
3. 连接蓝牙设备选择所需设备后,系统会提示输入配对码以建立连接。
配对码可以在设备的说明书或包装盒上找到。
输入正确的配对码后,系统会进行设备连接。
4. 配置蓝牙设备属性部分蓝牙设备连接后需要进行进一步配置。
在设备连接成功后,可在系统中搜索该设备名称,并右键点击设备,选择“属性”或类似选项。
在设备属性中,可以进行设备配置,如更改设备名称、调整音量等。
三、配置蓝牙设备1. 管理已连接的蓝牙设备在Windows系统中,我们可以方便地管理已连接的蓝牙设备。
点击任务栏中的蓝牙图标,选择“蓝牙和其他设备设置”或类似选项。
系统将列出所有已连接的设备,包括音频设备、输入设备等。
通过点击设备,可以进行配置、解除配对等操作。
2. 调整蓝牙设备设置在管理已连接的蓝牙设备中,可以找到各个设备的设置选项。
例如,对于蓝牙耳机,可以调整音量、静音设置,甚至使用音效增强功能。
对于蓝牙鼠标或键盘,可以更改指针速度、按键重复速率等。
3. 管理蓝牙设备驱动程序如果发现蓝牙设备连接不稳定或出现问题,可能需要更新或重新安装蓝牙设备的驱动程序。
千月蓝牙

Windows Server 2008的蓝牙问题相信给一些人造成过困扰,很不幸,新一代的Windows Server 2008 R2(与Windows 7内核相同,但2008 R2只有64位版本)则根本就不支持蓝牙功能,而且用以前安装Vista修改版蓝牙驱动的方法还行不通。
经过多日的研究和经过高手的指点,我终于成功地Windows Server 2008 R2上安装了蓝牙设备,现将安装方法及软件分享如下:首先说明,我是在MacBook 403上测试成功的,理论上应该适用于所有带有蓝牙功能的Intel Mac产品,甚至某些步骤也适用于PC,但我不能保证在所有机型上都有效。
安装步骤:1、安装好系统,使用Administrator帐号登录(以下步骤需要权限,所以建议用Administrator帐号来完成)。
2、在Windows上安装Boot Camp 3.0程序及驱动。
并不一定能够直接运行setup.exe安装,但可以运行Boot Camp\Drivers\Apple\BootCamp64.msi来安装。
安装后重启系统(也许可能等安装完Toshiba驱动后再重启)。
重启后打开设备管理器,应该会有一个带惊叹号的蓝牙设备,如下图:3、安装我提供的Toshiba 囧0.02版本64位蓝牙驱动并完成破解(下载地址在此)。
运行解压后的v64002T_20090623_x64.exe,安装过程中,会提示插入蓝牙设备(如下图),此时点一下确定,等那个小对话框再出来时点取消。
安装过程结束会提示你是否重启系统,点否。
由于Toshiba驱动需要破解,否则有30天试用限制,所以我们现在就来破解。
打开我提供的Toshiba驱动包,将里面的TosBtMng.exe复制到C:\Program Files\Toshiba\Bluetooth Toshiba Stack\里面,覆盖原文件,这样就完成了破解。
现在可以重启系统。
4、重启好后删除Boot Camp安装的Apple蓝牙驱动。
蓝牙连接经验

2.重新启动计算机,插入“蓝牙适配器”待用;计算机提\“可访问性”中进行如下设置(安装后的默认情况):a.连接属性:可连接;b.可见模式:可见;c.配对模式:接受配对
4.在计算机“我的蓝牙安全”\“通用”:中级(需要密码)
5.在手机上“开始”\“其他”\“ActiveSync”内进行如下操作:a.“菜单”\“选项”\“PC设置”\“菜单”\“高级”\选“蓝牙”,选完成;b.“ActiveSync”\“菜单”\“设定蓝牙ActiveSyne”\“开始”\选“打开”,然后选“菜单”\“设备”\“菜单”\“新建”\“选择”搜索到的设备\输入“密钥”:123\“完成”c.返回ActiveSync\“菜单”\“通过蓝牙连接”,计算机上的ActiveSync提示已连接
3.在电脑上搜索手机。找到后连接。正确地连接应该会在电脑上也安装相应的两个COM口。这一点很重要。
4.电脑上ActiveSync的选项里选中outgoing的COM口,允许在它上面使用串行或红外...
5.手机上蓝牙设置里直接改为打开。
6.手机的ActiveSync里选项把对应电脑的同步方式改为蓝牙。前面步骤对的话这里肯定会有蓝牙的选项。
解决办法:
1.修改文件名并重新发送。
2.修改远程设备的区域设置与您的文件名语言相一致。
6.什么是蓝牙口令及其如何操作?
答:蓝牙口令是用来识别蓝牙的安全验证。当远程设备与您的计算机连接时,需要在两端输入相同的蓝牙口令。BlueSoleil验证口令相同就可以建立连接。并且两个设备会建立配对关系。下一次连接就不需要再次输入蓝牙口令了。配对关系从任何一端都可以解除。
7.连接远程服务失败后如何操作?
答:原因可能是由于远程设备状态改变引起的。请确认远程设备已经处于可发现模式并重新搜索远程服务。
微软蓝牙堆栈使用指南说明书
Application Note AN007 Using the Microsoft Bluetooth StackOverviewSince Windows XP Service Pack 2 Microsoft has included a Bluetooth stack within their core operating system. For most M2M and control applications, this provides all of the functionality that a developer requires. EZURiO’s USB adaptors are supported by Microsoft. Using the integrated stack provides a standard API interface across Windows platforms and is EZURiO’s recommended choice for new application development.Because both the EZURiO USB adaptor and Microsoft’s stack have been approved as Bluetooth subsystems, they can be combined to form a fully approved Bluetooth solution without any further qualification.1. IntroductionMicrosoft’s Service Pack 2 for Windows XP and subsequent releases, including Vista, contain Microsoft’s own Bluetooth stack. The stack does not provide native support for Bluetooth voice or audio applications, but covers most of the applications for embedded and cable replacement scenarios, i.e:•Printing•Transferring Data between PDAs and Mobile Phones•Connections to Serial devices (cable replacement)For developers, the stack is more tightly integrated than other stacks, and most users will find it more than adequate for their needs.Microsoft has taken the sensible approach of setting the default security levels of Bluetooth to a high level. This means that some applications may not work in the same way that they do with other Bluetooth software. This document explains how to perform everyday Bluetooth tasks with the Microsoft stack.Installing the Microsoft Bluetooth StackThe Bluetooth software is automatically installed when you upgrade to Service Pack 2 of Windows XP or above. It is activated as soon as you plug in a Microsoft compliant USB Bluetooth adapter.Note: Microsoft’s Bluetooth stack does not work with PCMCIA cardsNote: You should always use the same USB port for your adaptor. Windows XP installs a new set of drivers for each port, which means that the settings it presents to otherapplications, such as COM ports are unique (and different) for each USB port.When you plug in your Bluetooth adaptor for the first time Windows will detect it and install the Bluetooth stack. At this point it will ask you to give your PC a name. This is the name that otherdevices will see if you make your PC visible to them. Use a name that is memorable. You should also give a sensible name to all of your other Bluetooth devices. (Phones and PDAs should be given names. It is not normally possible to give a name to a headset, carkit or GPS device.)Once the USB adaptor is installed you will see a Bluetooth icon on the task bar at the bottom right of the screen. If you click on it (both right and left click work the same way), you will get a list of options.If you do not have a Bluetooth icon, open up Control Panel and Bluetooth Devices. Go to the Options Tab and check the final box on the page – “Show the Bluetooth icon in the notification area”.Pairing your Bluetooth devicesPairing is a feature of Bluetooth that allows devices to make secure connections. Although you do not always need to pair devices to exchange data, if you are likely to send information between them on a regular basis it is a good idea to do so.If you want to use Bluetooth applications such as Nokia’s Data Suite or other phone management software then you MUST pair them with your PC.To pair a device using the Microsoft stack you need to click on the Bluetooth Icon in the task bar and then select Add a Device.and ready to be found and press Next.Your PC will then start looking for Bluetooth devices that are discoverable and within range. This may take up to a minute. You will then be given a list of the devices that have been found. If your phone or PDA does not appear on the list then it is probably because it has been set up as hidden or non-discoverable. Dig out the manual (that thing you didn’t get around to reading) and find out how to make it visible. Then try again by pressing Search Again.Once your device has appeared on the list, highlight it and press Next.To ensure a secure connection between the devices, you will need to enter a passkey on both the other Bluetooth device and your PC. This is used to generate a secure code that will be used to authenticate the device and your PC every time they connect to each other. For phones and PDAs you can make this passkey up yourself. You don’t need to remember it – it is only ever needed the first time you pair the devices.To make things easier (and more secure) Windows can generate a random number for you to use as the passcode. Choose that option (Choose a passkey for me) and press Next.Windows will display the number for you to enter in your Bluetooth device:Enter this into your phone or PDA and then press OK. If the pairing is successful you will see the final screen on your PC, confirming that the devices have been paired.At this stage Windows XP assigns two COM ports to your Bluetooth device – one for incoming and one for outgoing connections. You will need to use these if you run communications programs that connect your PC to your Bluetooth devices. Typical applications include PC Suite for Nokia and Sony Ericsson handsets and Easy Studio for Samsung handsets.Sending Data from your phone.The Microsoft stack protects your PC by making it invisible to other devices. However it still allows you to send information and files from a Phone or PDA, but you need to initiate the transfer from your PC.To do this, click on the Bluetooth icon in the system tray and select Receive File.Windows XP now makes your PC discoverable for a limited time, and also enables the file receive software. Once this is complete it shows the ready to receive screen.Now select the picture or file you want to send from your phone, and select the option to send it via Bluetooth. You should see a list of devices on your phone. If your PC is not there, press Search again or M ore devices on your phone until it appears, at which point press Send.Note: Windows XP only allows access for a limited time. If your phone cannot find your PC it may be because you’ve taken too long. Check that the PC is still displaying the“Waiting for a connection” screen.Once you initiate the transfer form your phone or PDA, your PC will detect the file and ask where you want it to be stored:Use Browse to change the location if you desire. Then press Next and the file will be accepted on your PC.Note: Your virus checker may not scan files received via Bluetooth. It is a good idea toreserve a directory for incoming files and perform a virus check on this directory beforeopening them.Once the file transfer has completed, Windows will display information about the received file.Note: This is the only way of receiving files using the Windows XP Bluetoothstack. If you make the PC permanently discoverable you will still need to initiate File Receive from the Bluetooth Icon.Sending files from your PCIt’s very easy to send files to another Bluetooth device with the Microsoft stack. Just right click on the file you want to send, then select Send To > and Bluetooth Device. You can select a file from your desktop or a file list in Windows Explorer.Note: You cannot currently send from the File, Send menus in Word, Exchange or otherOffice programs.Windows will display a list of the devices that have been set up already (paired). Select the device you want to send the file to, or Browse to find other devices. (Other devices must be discoverable or set to Show to all). Then press Next.If you had requested a passkey should be used, you will be prompted to enter this on your Bluetooth device. Once the transfer is complete, Windows will finish the Transfer Wizard and display details of the transfer.You can also send a file by clicking on the Bluetooth icon in the tray and selecting Send a File. This will bring up the browse screen, where you can select the file you wish to sendMaking your PC discoverableThe Microsoft stack defaults to keeping your PC invisible. This is the safest way of operating Bluetooth on a PC. However, some applications may require the PC to be in discoverable mode. To change this, go to Control panel and click on Bluetooth devices, then choose the Options tab.Select the Turn discovery on box and click OK.Note: Setting your PC to discoverable will not allow you to automatically accept incoming file transfers. To do this you will need to run Receive File from the Bluetooth Icon.Printing to a Bluetooth PrinterWindows XP makes Bluetooth printing MUCH easier. However, you need to think ahead and set up the Bluetooth printer from the Printers menu. For some reason you’re not allowed to find a Bluetooth printer from the normal Print screen within applications. Here’s how to do it:Press Start and select the Printers and Faxes option:When the Printers and Faxes screen is displayed, click on Add a printer.The Windows XP Add Printer wizard is started.Click Next to go to the selection screen.Check the A Bluetooth Printer Option and click Next.The PC will search for any available Bluetooth printers. Make sure that they are turned on.During the search process, Windows will try and install drivers for each Bluetooth printer it detects. This can make it quite a lengthy and tedious process. If the driver is not already installed on your PC, then you will need to supply an installation disk or download the driver from the internet before completing the add printer wizard.IMPORTANT: Bluetooth Printers that were manufactured before 2004 may not be compatible with the Microsoft Bluetooth stack. For Windows XP to use a Bluetooth printer it must be capable of supporting the HCRP (Hard Copy Cable Replacement) profile. Check your printer’s specification. Some Bluetooth printers can be upgraded – please contact the manufacturer.At the end of the wizard, you will be asked if you want to print a test page. Say YES. It’s a lot easier to check whether it works at this stage rather than later on.Add Printer Wizard Page. So click Finish.Note: If more than one Bluetooth printer of the same type is discovered, it may not be obvious which is which. If in doubt try a test print to each one in turn.Next time you print, the Bluetooth printer will be listed in the Printer selection. Choose theBluetooth printer you require.Note: Windows does not identify printers as being Bluetooth, and does not remove them from the print list when they are out of range. This means that you need to remember the model number of Bluetooth printers. You may also find that you are printing to a device that is not within range.WARNING. Because there is a wireless link to the printer, you may inadvertently connect to a printer in another room. If in doubt try printing a test page.EZURiO LtdSaturn House, Mercury ParkWycombe Lane, Wooburn Green, HP10 0HHUnited KingdomTel: +44 1628 858 940Fax: +44 1628 528 382Copyright ©2007 EZURiO Ltd. All rights reserved.BLUETOOTH is a trademark owned by Bluetooth SIG, Inc., U.S.A. and licensed to EZURiO Ltd.All other trademarks are the property of their respective owners.The information contained within this Application Note is provided as a guide and is subject to change.。
Windows7安装蓝牙CSR4.0驱动:千月蓝牙软件BlueSoleil

Windows7安装蓝牙CSR4.0驱动:千月蓝牙软件BlueSoleil我试验了蓝牙适配器自带的光盘驱动,结果是连接手机正常,连接蓝牙立体声耳机没有蓝牙高质量音频服务。
那音质我受不了啊,呵呵,在此希望给我同样遭遇的朋友帮助。
第一步:把蓝牙适配器拔出,系统中原有的蓝牙驱动全部删除(一个都不要留啊。
)第二步:下载千月蓝牙软件(BlueSoleil),下载地址:/qianyue/Default.aspx第三步:安装千月蓝牙软件(软件会自动安装驱动),安装方法在下面,千月蓝牙软件(BlueSoleil)下载及安装指南千月蓝牙软件(BlueSoleil)安装管理器是一款可以自动检查千月蓝牙软件(BlueSoleil)最新版本并进行下载更新的工具,它会自动帮您完成软件的下载过程。
具体步骤:千月蓝牙软件(BlueSoleil)安装管理器下载完成后,双击运行程序,千月蓝牙软件(BlueSoleil)安装管理器进行数据初始化后,如果客户端软件已是最新版本,会出现提示框,提示你不需要升级了;如果客户端软件不是最新版本,会列出可以升级的最新版本,如下图所示图1点击高级,可设置自动检查升级的更新周期及安装路径,如下图所示图2点击“下一步”,软件开始自动下载更新,如下图所示图3下载更新完成后,您就可以使用升级后的千月蓝牙软件(BlueSoleil)新版本了。
如果出现重启计算机的对话框,重启计算机后,即可正常使用最新版本,如下图所示图4提示:千月蓝牙软件(BlueSoleil)会根据您的设置自动检测是否需要更新,如果客户端已经安装了千月蓝牙软件(BlueSoleil)版本,并且需要升级,系统会自动弹出升级提示,点击该升级提示,千月蓝牙软件(BlueSoleil)安装管理器自动运行,完成对千月蓝牙软件(BlueSoleil)的升级,如下图所示图5第四步:安装完成后一定要先重启计算机,然后插上蓝牙适配器(CSR4.0),打开千月软件,如图6所示,右击中间的圆月,选择启动蓝牙。
CSR Harmony驱动安装和产品使用说明

CSR Harmony驱动安装和产品使用说明CSR Harmony4.0蓝牙的驱动安装和产品使用说明您好~欢迎您使用本产品~让我们一起尽情享受蓝牙的无线快乐吧~首先让我们先大概了解一下本产品的特色:1. CSR V4.0蓝牙适配器采用了CSR(Cambridge SiliconRadio)公司的最新的8510芯片。
2. 支持Bluetooth High Speed v3.0与low energy v4.0,并完全向下兼容v1.1/ v1.2/ v2.0/ v2.1的蓝牙设备;3. CSR蓝牙4.0芯片通过被称为Wideband Speech的技术进行音频编码解码,并进一步消除背景噪声和干扰,使无线音频的传输质量大幅提升,A2DP蓝牙立体声音频传输的音效极佳,可以媲美有线音频传输的音质;4. 蓝牙4.0技术拥有极低的运行和待机功耗,同时拥有跨厂商互操作性,3毫秒低延迟,AES-128加密,无线覆盖范围增强; 5. 是蓝牙3.0的升级增强版本,与3.0版本相比最大的不同就是低功耗。
speed up technology results into, active guide enterprise will mature technology results into for productivity, and Translate into economic benefits, efforts to solve economic and technological "two peels" phenomenon, says from the Dongping real, is to provide research institutions with more into place. Strengthening the agricultural scientific and technological achievements in the field to improveefforts to help farmers, crop planting, processing, animal husbandry and other agricultural products, increase the intensity of transforming scientific and technological innovation, science and technology to improve agricultural efficiency, improve the mass income and services immigrants safe haven siege works. Wuhan Institute of freshwater should give full play to the Chinese Academy of Sciences, and improving the added value of Dongping Lake aquatic products. 1th, in the middle ofthis yearProposed to increase the level of modernization in agriculture, hoping the county levels to seriously study the documents. 18 plenary session "storing food in, storing food in land", this requirement is very high, population, food is not enough, and not completely rely on imports, has to rely on technology to increase food production and limited land mass, relevant departments at the county level in particular, agricultural sector, active docking tertiary institutions, the Institute took the lead in the一:驱动部分本产品是支持免驱,即插即用的。
由浅入深_蓝牙4.0BLE协议栈开发攻略大全(1)
低功耗蓝牙(BluetoothLow Energy),简称BLE。
蓝牙低能耗无线技术利用许多智能手段最大限度地降低功耗。
蓝牙低能耗架构共有两种芯片构成:单模芯片和双模芯片。
蓝牙单模器件是蓝牙规范中新出现的一种只支持蓝牙低能耗技术的芯片——是专门针对ULP操作优化的技术的一部分。
蓝牙单模芯片可以和其它单模芯片及双模芯片通信,此时后者需要使用自身架构中的蓝牙低能耗技术部分进行收发数据。
双模芯片也能与标准蓝牙技术及使用传统蓝牙架构的其它双模芯片通信。
TI用于感测应用的蓝牙低功耗装置是真正的 SoC 解决方案。
CC254x SoC 系列完美结合 TI 协议堆栈、基本软件(profile software)以及样品应用(sample application),是高弹性、低成本单模蓝牙低功耗解决方案。
接下来我们将结合CC254x,讲解从环境的搭建到蓝牙4.0协议栈的开发来深入学习蓝牙4.0的开发过程。
本教程共分为六部分,主要知识点如下所示:第一部分知识点:第一节 BLE开发环境的搭建第二节 BLE快速体验第三节创建IAR工程-点亮LED第四节控制LED第五节 LCD12864显示第二部分知识点:第六节独立按键之查询方式第七节独立按键之中断方式第八节 CC254x内部温度传感器温度采集第九节五向按键第十节蜂鸣器第三部分知识点:第十一节串口通信第十二节 Flash的读写第十三节 BLE协议栈简介第十四节 OSAL工作原理第十五节 BLE蓝牙4.0协议栈启动分析第四部分知识点:第十六节协议栈LED实验第十七节协议栈LCD显示第十八节协议栈UART实验第十九节协议栈五向按键第二十节协议栈Flash数据存储第五部分知识点:第二十一节 DHT11温湿度传感器第二十二节蓝牙协议栈之从机通讯第二十三节蓝牙协议栈主从一体之主机通讯第二十四节 OAD空中升级第二十五节 SBL串口升级第六部分知识点:第二十六节 UBL-USB升级第二十七节 MT-iBeacon基站使用iPhone空中升级第二十八节 MT-iBeacon基站在PC端实现OAD空中升级第二十九节 MT-iBeacon基站关于LightBlue软件的使用第三十节如何使用MT-USBDongle的透传功能有关TI 的CC254x芯片介绍,可点击下面链接查看:主流蓝牙BLE控制芯片详解(1):TI CC2540BLE是蓝牙4.0规范中的一种,其中master最多有7个外设,低功耗,低延迟,低吞吐量。
Windows Server 2008 X64 蓝牙设备驱动安装指南

我和很多朋友一样苦于寻找在Server 2008 64位系统上安装蓝牙设备驱动的解决方案,今天通过努力终于安装成功了,现分享一下经验!之前网上流程的安装东芝的BT-Stack 驱动软件我也试过,for 32位的是28.9M,http://support1.toshiba-tro.de/t ... zip?Submit=Downloadfor 64位的是30.7Mhttp://support1.toshiba-tro.de/t ... zip?Submit=Download我的系统是Server 2008 x64 的企业版(英文)但是安装后并不能正确安装所有蓝牙设备的驱动;首先大家安装蓝牙驱动的软件后,系统只正确安装了一个蓝牙设备:另外有四个未知设备需要手动指定inf文件安装,这个才是难点!通过努力终于找到了所谓的Bluetooth Stack驱动包:WS2008x64BluetoothStack.zip (727 KB)WS2008x64BluetoothStack.zip (727 KB)下载次数: 02008-7-26 04:06这个安装包解压后有如下文件:手动安装驱动是比较危险的一项任务,我在尝试安装的过程中就发生了一次蓝屏事故,//因为通过强行指定了inf文件中列出的设备,选择的设备驱动可能与硬件或系统有冲突。
为了让大家安全、顺利的装上驱动,我特意把已经成功安装的设备手动卸载了。
另外我发现一个重要的细节,这一堆inf文件中,bthspp.inf似乎是最关键的一个,重新安装的过程或许能证明我的猜想。
下面我介绍为那4个未知设备安装驱动的细节:首先我们选择第四个未知设备,手动安装其驱动程序:为什么先装第四个?凭之前的安装印象,这是一个很重要的蓝牙设备:BluetoothEnumerator选择更新设备驱动//Update Driver Software选择第二项手动指定驱动程序安装源的位置这里同样选择手动指定驱动程序选择设备类型,这里我选择默认选中的“Show All Devices " ,直接点”Next“这一步我们手动指定驱动程序的inf文件:在主窗口点击“Have Disk”然后找到之前解压得到的的“BT-Stack”文件夹,选择“bthspp.inf"这里我们从制造商列表中选择”Microsoft“,从型号列表(Model)中选择”Microsoft Bluetooth Enumerator“然后点击”Next“然后会有一个警告窗口弹出:不要怕,点“Yes”继续又是一个警告,说驱动未验证或签名,好,我们已经看到希望了,系统应该已经检测认为选择的驱动和硬件功能匹配,还是那句话不要怕,选择安装。
PC端微软蓝牙协议栈的安装

PC端微软蓝牙协议栈的安装利用2005平台和C# 语言编写蓝牙信息系统(包括蓝牙文件传输和蓝牙信息广播)需要微软蓝牙协议栈(MS Stack)的支持。
下面就PC端如何安装微软蓝牙协议栈进行操作说明。
1、将USB的蓝牙适配器(BlueTooth Dongle)插入到USB接口中。
Windows XP 等系统会提示发现新的硬件。
点击取消按钮。
如下图所示2、右键点击桌面上我的电脑,选择属性,进入系统属性对话框,选择硬件,点击设备管理器,将会出现下图所示:选择详细项,从下拉框中选择Hardware Ids,如下图所示:4、找到C:\Windows\inf\bth.inf目录下文件,打开bth.inf文件,找到如下所示行:;------------- Device section - Start -----------------------[ALPS.NT.5.1]ALPS Integrated Bluetooth Device= BthUsb, USB\Vid_044e&Pid_3005 Alps Bluetooth USB Adapter= BthUsb, USB\Vid_044e&Pid_3006[Belkin.NT.5.1]Belkin Bluetooth Adapter= BthUsb, USB\Vid_050d&Pid_0081 Belkin Bluetooth Adapter= BthUsb, USB\Vid_050d&Pid_00845、在Belkin Bluetooth Adapter= BthUsb, USB\Vid_050d&Pid_0084后在增加一行如下面所示即可。
;------------- Device section - Start -----------------------[ALPS.NT.5.1]ALPS Integrated Bluetooth Device= BthUsb, USB\Vid_044e&Pid_3005 Alps Bluetooth USB Adapter= BthUsb, USB\Vid_044e&Pid_3006[Belkin.NT.5.1]Belkin Bluetooth Adapter= BthUsb, USB\Vid_050d&Pid_0081 Belkin Bluetooth Adapter= BthUsb, USB\Vid_050d&Pid_0084 Belkin Bluetooth Adapter= BthUsb, USB\Vid_050d&Pid_00126、保存文件和关闭文件。
- 1、下载文档前请自行甄别文档内容的完整性,平台不提供额外的编辑、内容补充、找答案等附加服务。
- 2、"仅部分预览"的文档,不可在线预览部分如存在完整性等问题,可反馈申请退款(可完整预览的文档不适用该条件!)。
- 3、如文档侵犯您的权益,请联系客服反馈,我们会尽快为您处理(人工客服工作时间:9:00-18:30)。
PC端微软蓝牙协议栈的安装
利用2005平台和C# 语言编写蓝牙信息系统(包括蓝牙文件传输和蓝牙信息广播)需要微软蓝牙协议栈(MS Stack)的支持。
下面就PC端如何安装微软蓝牙协议栈进行操作说明。
1、将USB的蓝牙适配器(BlueTooth Dongle)插入到USB接口中。
Windows XP 等系统会提示发现新的硬件。
点击取消按钮。
如下图所示
2、右键点击桌面上我的电脑,选择属性,进入系统属性对话框,选择硬件,点击设备管理器,将会出现下图所示:
选择详细项,从下拉框中选择Hardware Ids,如下图所示:
4、找到C:\Windows\inf\bth.inf目录下文件,打开bth.inf文件,找到如下所示行:
;------------- Device section - Start -----------------------
[ALPS.NT.5.1]
ALPS Integrated Bluetooth Device= BthUsb, USB\Vid_044e&Pid_3005 Alps Bluetooth USB Adapter= BthUsb, USB\Vid_044e&Pid_3006
[Belkin.NT.5.1]
Belkin Bluetooth Adapter= BthUsb, USB\Vid_050d&Pid_0081 Belkin Bluetooth Adapter= BthUsb, USB\Vid_050d&Pid_0084
5、在Belkin Bluetooth Adapter= BthUsb, USB\Vid_050d&Pid_0084后在增加一行如下面所示即可。
;------------- Device section - Start -----------------------
[ALPS.NT.5.1]
ALPS Integrated Bluetooth Device= BthUsb, USB\Vid_044e&Pid_3005 Alps Bluetooth USB Adapter= BthUsb, USB\Vid_044e&Pid_3006
[Belkin.NT.5.1]
Belkin Bluetooth Adapter= BthUsb, USB\Vid_050d&Pid_0081 Belkin Bluetooth Adapter= BthUsb, USB\Vid_050d&Pid_0084 Belkin Bluetooth Adapter= BthUsb, USB\Vid_050d&Pid_0012
6、保存文件和关闭文件。
7、再在设备管理器中卸载未知的USB device(即刚才的蓝牙设备)。
8、从USB接口拔出USB蓝牙适配器,然后再将USB蓝牙适配器插入USB接口。
9、Windows XP 等系统会提示发现新的硬件,但这一次我们选择“No, not this time”,选择下一步按钮,如下图所示:
10、选择高级,点击下一步按钮,如下图所示:
11、选择“不要搜索”,点击下一步,如图所示:
12、选择“Belkin Bluetooth Adapter”项,点击下一步,如图所示:
13、点击完成,如下图所示:
14、Windows XP系统将会出现发现微软蓝牙适配器界面,重复以上安装步骤,如下面一系列图所示:
15、安装完之后,到控制面板,将会发现蓝牙设备管理器图标出现在控制面板中。
如下图所示:。
