户用型控制器中英文说明书
DXN7 系列户内高压带点显示装置中英文
DXN7 系列户内高压带电显示装置安装使用说明书Installation and Operation Instructions forDXN7 Serial Indoor High-voltage Live Display Device1.适用范围1. Applicable Range1.1DXN7 系列户内高压带电显示装置(以下简称显示装置),适用于户内额定电压为3, 6, 10,27. 5, 35KV; 频率为50H Z D的开关设备上,用以反映显示装置处高压回路带电状况。
1.1 DXN7serial indoor high-voltage live display device (referring to as the display devicethereinafter) is suitable for the indoor switchgear with rated voltages of 3, 6, 10, 27.5, 35KV and frequency of 50Hz to reflect charged state of high voltage circuit at the display device.1.2显示装置中支柱绝缘子式传感器,可以与各类型高压开关柜、隔离开关、接地开关等配套。
1.2 The post insulator style sensor in the display device can be matched with all kinds of highvoltage switch cabinet, isolation switch and grounding switch etc.1.3显示装置不但可以提示回路带电状况,而且还可以与电磁锁配合,实现强制闭锁开关柜操作手柄及网门。
达到防止带电关、合接地开关、防止误入带电间隔的目的。
提高开关设备防误性能。
1.3 The display device can not only prompt charged state of the circuit but also be cooperatedwith the electric magnet lock to compulsory lock the operation handle of the switch cabinet and the gate of the grid thus to prevent live switching on/off of grounding switch, prevent access into live isolation and rise up error action of the switchgear.1.4正常使用环境条件1.4 Environmental condition for normal operation1.4.1 普通型1.4.1 Normal Typea. 安装地点不超过海拔高度1000ma. The installation site should be no higher than 1000m above sea level.b. 周围环境温度上限值为40°C,下限值为:-25°Cb. The upper limit of ambient temperature is 40°C while the lower limit is -25°C.c. 相对湿度在环境温度为20C时,日平均不大于95 %c. The daily relative humidity in average under ambient temperature of 20°C is no higherthan 95%.d. 周围空气无明显地受尘埃、腐蚀性易燃性气体、水蒸气或盐雾等污染的场所。
KFD阀门控制箱中英文说明书

额定电流(安培)调节型适用电装型号Ⅲ配型、型Ⅳ配型结构形式:、抽屉式、小型R ated current (am pere)T A djusting typeZ W Q W JQ A pplicable type of electric fitting: for ZW type and Q W type.C X G Structure from : C draw er type, X sm all C ontrol cabinet of electric valve cabinetⅢⅣ抽屉式、挂壁式、、、阀门电动装置控制箱for JQ type draw er type, G wall type K F D —— 普 通 型 KFD 系 列 Common type KFD series一、概 述 Brief introduction该系列电动阀门控制箱,是与我厂生产的ZW 型、JQ 型及QW 型阀门电动装置配套使用的电控箱,用于控制阀门的开启和关闭,可用于现场单独控制或远方集中控制。
KFD 型电控箱有抽屉式和挂壁式两种结构。
This series of control cabinet of electric valve is the one to be used together with ZW type, JQ type and QW type electric valve actuator produced by our company and to control the opening and closing of valve. It can be used in site individual control or long-distance centralized control.KFD type electric control cabinet has two kinds of structure: drawer type and wall type. Designation型号表示方法 Designation二、技术数据 T echnical data1、电源:380V 50Hz 三相四线制(特殊要求,另见)2、工作环境:(1)环境温度:—20℃~+60℃ (2)相对湿度:≤85%(20℃时)(3)周围不含强腐蚀性、易燃易爆介质及导电尘埃。
SR609 太阳能热水器控制器英文说明书
ContentsContents----------------------------------------------------------------------------------1 1. Safety information --------------------------------------------------------------2 1.1 Installation and commissioning -----------------------------------------------2 1.2 About this manual ----------------------------------------------------------------2 1.3 Liability waiver ---------------------------------------------------------------------3 1.4 Important remark-------------------------------------------------------------------31.5 Description of symbols-----------------------------------------------------------32. Installation -------------------------------------------------------------------------4 2.1 Installing the controller ----------------------------------------------------------4 2.2 Power connection -----------------------------------------------------------------42.3 Terminal connection -------------------------------------------------------------63. Function setting------------------------------------------------------------------8 3.1 Illustration of controller panel--------------------------------------------------8 3.2 Setting the time--------------------------------------------------------------------8 3.3 Manual heating -------------------------------------------------------------------93.4 Timing heating--------------------------------------------------------------------104. Installation system diagram------------------------------------------------125. Protection function -----------------------------------------------------------13 5.1 Memory protection--------------------------------------------------------------13 5.2 Screen protection --------------------------------------------------------------135.3 Trouble protection---------------------------------------------------------------136. Quality guarantee -------------------------------------------------------------137. Technical data------------------------------------------------------------------148. Delivery scope-----------------------------------------------------------------149. Device matchable to this controller ------------------------------------151. Safety information1.1 Installation and commissioning•When laying cables, please ensure that no damage occurs to any of the constructional fire safety measures presented in the building. •The controller can not be installed in rooms where easily inflammable gas mixtures are present or may occur.•The permissible environmental conditions can not be exceeded at the site of installation.•Before connecting the device, make sure that the energy supply matches the specifications that controller requires.•All devices connected to the controller must conform to the technical specifications of the controller.•All operations on an open regulator are only to be conducted cleared from the power supply. All safety regulations for working on the power supply are valid. Connecting and /or all operations that require opening the regulator (e.g. changing the fuse) are only to be conducted by specialists.1.2 About this manualThis manual describes the installation, function and operation of a solar thermal controller. When installing the remaining components e.g. the solar collectors.and the storage unit, are sure to observe the appropriate installation instructions provided by each manufacturer. Installation, electrical connection, commissioning and maintenance of the device may only be performed by trained professional personnel. The professional personnel must be familiar with this manual and follow the instructions contained herein.1.3 Liability waiverThe manufacturer cannot monitor the compliance with these instructions or the circumstances and methods used for installation, operation, utilization and maintenance of this controller. Improper installation can cause damages to material and persons. This is the reason why we do not take over responsibility and liability for losses, damages or cost that might arise due to improper installation, operation or wrong utilization and maintenance or that occurs in some connection with the aforementioned. Moreover we do not take over liability for patent infringements or infringements – occurring in connection with the use of this controller- on third parties rights. The manufacturer preserves the right to put changes to product, technical date or installation and operation instructions without prior notice. As soon as it becomes evident that safe operation is no longer possible (e.g. visible damage). Please immediately take the device out of operation. Note: ensure that the device cannot be accidentally placed into operation.1.4 Important remarkWe have carefully checked the text and pictures of this manual and provided the best of our knowledge and ideas, however inevitable errors maybe exist. Please note that we can not guarantee that this manual is given in the integrity of image and text, they are just some examples, and they apply only to our own system. Incorrect, incomplete and erroneous information and the resulting damage we do not take responsibility.1.5 Description of symbolsSafety instruction:The safety instructions in the manual are marked with a warningtriangle. It indicates measures, which can lead to personal injury and safety risks.Operation steps: small triangle “►”is used to indicate operation step. Notes: Contains important information about operation or function. 2.InstallationController can only be installed indoors, and is far away from dangerous place and away from the electromagnetic field. Controller should be equipped with an additional plug, which should have minimum 3mm distance between the pole of the plug or effective compliance with the provisions of the installation. For example, switch or fuse, please note wires should be separated, and use the AC.2.1 Installing the controllerNote: the controller can only be installed in an area having an adequate level of protection.►Choosing a suitable site►Drilling the up fixing hole►Screwing on the screw►Taking away the cover plate►Hanging the bottom plate on the fixing hole ①②③►Marking the position of fixing hole &►Taking away the bottom plate②③►Drilling the hole &►Rehanging the bottom plate on screw ①►Fixing bottom plate with & screw②③2.2 Power connectionPower can only be switched on only when the housing of controller is closed; an installer must make sure that the IP protection class of the controller is not damaged during installation.Depending on the type of installation, the cables may enter the devicethrough the rear hole of the case or the lower side hole of the case④⑥④Cable come from the rear : remove the plastic flaps from the rear side of the case using an appropriate tool.Cable come from the below ⑥: Cut the left and right plastic flaps using an appropriate tool (e.g. knife) and break them out of the case.Notes: the flexible wire must be fastened to the case using thestrain-relief clamps provided2.3 Terminal connectionBefore to open the terminal, please be sure to switch-off thepower supplier and pay attention to the local electricity supplyrules.•Terminal layoutFU1 is the fuse of controller, AC250V/0.5A“Reset”button: This button is on the terminal connection panel, when system program is out of working, press “Reset” to recover the program of system to the factory settings.•Power connectionPower connection terminals are 10A current, please sure to connect to ground.•Output portsElectrical heater output H1: Electromagnetic relay, max. Switching current 20A, for electrical heater•input portsInput port T1:for NTC10K, B=3950 sensor, for measuring the temperature of tank.•Advice regarding the installation of temperature sensorOnly original factory equipped NTC10K,B=3950 temperature sensor are approved for use with tank, it is equipped with 20m PVC cable, and they are temperature resistant up to 105oC, not necessary to distinguish the positive and negative polarity of the sensor connection.All sensor cables carry low voltage, and it is necessary to take measures to avoid inductive effects, so sensor cables should not be laid close to 230 volt or 400 volt cables (minimum separation of 100mm)If external inductive effects are existed, e.g. from heavy current cables, overhead train cables, transformer substations, radio and television devices, amateur radio stations, microwave devices etc, then the cables to the sensors must be adequately shielded.Sensor cables may be extended to a maximum length of ca. 100 meter,when cable ’s length is up to 50m, and then 0.75mm 2 cable should be used. When cable ’s length is up to 100m, and then 1.5mm 2 cables should be used.3. Function settingConnect the sensor, electrical heater to the controller beforeyou connect the power supply!After switching on power to the controller, firstly it will ask for to set the time and set the parameter of system.3.1 Illustration of controller panel3.2 Setting time►Press “Clock” button, time displays on the screen, hour selection area “00” blinks on the screen.►Press “▲▼” button to set hour ofclock►Repress “Clock”, minute selectionarea“00”blinks► Press “▲▼” button to set minute of clock.► After setting, press “Clock” to exit program, or waiting for 12 seconds, controller exits automatically, the setup parameters are saved automatically.3.3 Manual heatingDescription:Electrical heater can be integrated into solar system as back-up, and it can be controlled by temperature, when controller checks the tank temperature T1 is 3o C below the preset temperature, electrical heater will be triggered. When tank temperature T1 reaches to the preset temperature, electrical heater is ceased.Condition for triggering heating: tank temperature is 3 o C below the the preset temperatureActivate/deactivate this function:► Press “manual” button, temperaturearea “60o C” blinks on the screen.► Press “▲▼” button to adjust theswitch-on temperature, adjustablerange: 30o C ~ 80o C, factory default: 60o C.After 12 seconds, this heating function is activated, heating signal displays on the screen.►Press “manual” button to switch-off manual heating function.Note: manual heating can only heat tank one time, after manual heating is triggered, when temperature of tank reaches to the setting temperature, manual heating ceases, and manual heating function will be deactivated automatically, if customer wants to heat again, you need redo according to above steps.3.4 Timing heatingFunction description:Electrical heater can be integrated into solar system used as back-up of system, and they can be triggered automatically at preset time by preset temperature. Within a preset time sections, when the temperature (T1) of tank drops below the preset switching-on temperature of this function, back-up heating starts to work, when T1 rises up to the preset turning off temperature, back-up heating is stopped. Within 24 hours, three time sections can be set with this controller.The adjustable range of switch-on temperature of heating is 30o C ~ (OFF-3o C), the adjustable range of switch-off temperature (On+3o C) ~ 80o C.Setup steps:►Press “SET” button for 3 seconds, to access the setting program, set the switch-on time of the first time section and its switch-on temperature, hour area blinks on the screen.►Press “▲▼” button, to set hour of the swith-on time of heating►Press “”button to transfer to minute area, minute blinks on thescreen►Press “▲▼” button, to set minuteof the swith-on time of heating►Press “” button to transferto temperature area, temperatureblinks on the screen,►Press “▲▼” button, to set the swith-on temperature of heating►Repress “SET” button, to access the setting program, set the switch-off time of the first time section and its switch-off temperature, hour areablinks on the screen.►Press “▲▼” button, to set hour of the swith-off time of heating►Press “”button to transfer to minute area, minute area blinks on the screen►Press “▲▼” button, to set minuteof the swith-off time of heating►Press “” button to transfer totemperature area, temperatureblinks on the screen,►Press “▲▼” button, to set the swith-off temperature of heating►Press “SET” button again, to access the setting program, set the switch-on time of the second time section and its switch-on temperature. Doling like above description, to set the second / third time section and its corresponding switch-on/ switch-off temperature.If you want to shut off one timing heating, then you can set the turning on time and turning off time same value ( for example, the second time section no this function, then you can set turning on/off time is 10:00 ~ 10:00)① Heating signal displays on the screen, it indicates timing heating is activated.Note:When time is outside of the preset time section, back-up heating doesn’t work automatically even when the tank temperature reaches the switch–on temperature of heating.The time in this controlled is 24 hours, when you set time section, the switch-off time of heating should be later than switch-on time. Forexample: if you set the switch-on time of heating is at 17:00, but switch-off time of heating is 6:00, then this setting doesn’t take effect, that means within this time section, heating function doesn’t work. The correct set is like flowing: it should be divided into two time sections, one time section is from 17:00 to 23:59, the other time section is from 00:00 to 06:00.When user selects electrical heater as back-up device, we recommend using SR801 unit connecting controller and electrical heater. (Detailed see )4. Installation system diagram5. Protection function5.1. Memory protectionIn case power failure occurs, controller keeps the parameter settings unchanged.5.2 Screen protectionWhen no any press on button for 3 minutes, screen protection is activated automatically, and then LCD lighting lamp is switched-off. Through press any button to light LCD lamp again.5.3 Trouble protectionWhen temperature sensor’s (T1) wiring is interrupted, not connected or short circuit, controller switchs off the corresponding signal output, and simultaneousely “ E1” error code displays on the screen.6. Quality GuaranteeManufacturer provides following quality responsibilities to end users: within the period of quality responsibilities, manufacturer will exclude the failure caused by production and material selection. A correct installation will not lead to failure. When a user takes incorrect handling way, incorrect installation, improper or crud handling, wrong connection of sensor in system and incorrect operation, the quality responsibility is invalid for them.The warrantee expires within 24 months after the date of purchasing the controller.7. Technical data•Appearance of controller: see product itself ( dimension: 179mm x120mm x43mm)•Power supply:AC230V ±10%•Power consumption:< 3W•Accuracy of temperature measuring:± 2o C•Range of tank temperature measuring:0 ~100 o C•Suitable power of electrical heater, ≤ 2000W•Inputs:1 piece NTC10K, B3950 sensor (≤ 135o C) for tank, (PVC cable ≤105o C),•Outputs:1 relay, for electrical heating•Ambient temperature :-10o C ~ 50o C.•Water proof grade:IP40.8. Delivery scope•Controller 1 piece •Power cable 1 piece •Customer manual 1 piece •NTC10K sensor(size: φ6*50mm,cable length20 m) 1 pieces •Plastic expansion screw 3 pieces •Screw 3 pieces •Strain-relief clamp 4 pieces9. Device matchable to this controllerl Contactor unit of high power: SR802When user selects electrical heater as back-up device, we recommend using SR802 unit connecting controller and electrical heater.Technical data of SR802Dimension: 100mmx100mmx65mmPower supply:180V~264V/AC 50/60HzSuitable power: ≤ 4000WAvailable ambient temperature: -10 ~ 50o CWater proof grade: IP43SR802 CONNECTION DIAGRAM:。
AUMA说明书中英文对照文稿

AUMA说明书中英文对照文稿操作说明手册的封面内容翻译(中英文对照):Multi-turn actuators万向驱动装置SA07.1-SA48.1 (产品型号)SAR 07.1-SAR 30.1 (产品型号)AUMA NORM (AUMA是这个阀门生产厂的品牌名称)AUMA标准Operation instructions (操作手册)目录内容:Scope of these instructions:本手册内容介绍的范围包括:These instructions are valid for multi-turn actuators for Open-close duty, SA 07.1-SA 48.1 ,and multi-turn actuators for modulating duty, SA07.1-SA 30.1.本手册的说明适应型号为SA 07.1-SA 48.1、具有开启-关闭功能系列的万向驱动装置和型号为SA07.1-SA 30.1、具有调节功能系列的万向驱动装置有效。
These operations instructions are only valid for “clockwise closing”, i.e. driven shaft turns clockwise to close the valve.这些操作说明只对"顺时针关闭"有效,即:驱动轴顺时针转动关闭阀门。
.Safety instructions (安全说明 )1.1 Range of application (应用的范围) AUMQ multi-turn actuators are designed for the operation of industrial valves, e.g, globe valves, butterfly valves and ball valves. For other applications, please consult us. AUMA is not liable for any applications. Such risk lies entirely with the user. AUMQ万向驱动装置是为工业用阀所设计的,例如:工业生产常用球瓣阀,蝶阀和球阀。
太阳能控制器中英文说明书

太阳能智能充电控制器使用说明书一、主要特点1.使用微处理器和专用控制算法,实现了智能控制。
2.五种负载工作模式:纯光控、光控+定时、手动、调试模式、常开模式。
3.具有放电率修正控制,不同放电率具有不同的终止电压,符合蓄电池固有特性。
4.科学的蓄电池管理方式,当出现过放时,对蓄电池进行提升电压充电,进行一次补偿维护,正常使用时,使用直充充电和浮充结合的充电方式,每7天进行一次提升充电,防止蓄电池硫化,大大延长了蓄电池的使用寿命;同时具有高精度温度补偿。
5.参数设置具有掉电保存功能,即系统模式和控制参数等重要数据均保存在芯片内部,掉电后不丢失,使调节更加方便,系统工作更可靠。
6.充电回路采用双MOS串联式控制回路,使回路电压损失较使用二极管的电路降低近一半,充电采用PWM模糊控制,使充电效率大幅提高,用电时间大大增加。
7.LED直观显示太阳能电池、蓄电池和负载的状态,数码管显示调节参数,让用户实时了解系统运行状况,并且具有丰富的参数设置,用户可以根据不同使用环境设置相应的工作模式。
8.具有过充、过放、过载保护以及独特电子短路保护与防反接保护,所有保护均不损害任何部件,不烧保险;具有TVS防雷保护,无跳线设计,可提高系统的可靠性、耐用性。
9.所有控制全部采用工业级芯片和精密元器件,能在寒冷、高温、潮湿环境正常运行。
同时使用晶振定时控制,使定时控制更加精确。
10.使用了数字LED显示及设置,一键式操作即可完成所有设置,使用方便直观。
二、系统说明本控制器专为太阳能直流供电系统、太阳能直流路灯系统、小型太阳能电站系统设计,使用专用电脑芯片实现了智能化控制,所有芯片均采用工业级别,可以在恶劣的环境下使用。
同时系统具有短路、过载、和独特的防反接保护,充满、过放自动关断、恢复等全功能保护措施,详细的充电指示、蓄电池状态、负载及各种故障指示。
本控制器通过电脑芯片对蓄电池电压、光电池电压、放电电流、环境温度等参数进行采样,通过专用控制模型计算,实现符合蓄电池特性的放电率、温度补偿修正的高准确控制,并采用了智能高效的PWM模糊充电方式对蓄电池进行充电,采用7段式电压控制,保证蓄电池工作在最佳状态,大大延长了蓄电池的使用寿命。
三星4824FN多功能一体机中英文对照说明书不可改

三星4824FN多功能一体机中英文对照说明书香港行货机器在国内使用,令客户头痛的不是没有中文说明书,而是没有中英文对照的说明书,因为屏幕显示英文,客户就无所适从,不知哪出错了?应客户强烈要求,本公司特请设备专家及翻译将机器的功能说明编辑成中英文对照的小册子,供客户方便使用,加上配贴的中文操作面板,相得益彰。
困绕国内客户多时的问题解决了,使用起来再也没有盲点了!!港行=大陆行也!本小册子,只是将屏幕显示的所有内容编辑成册,有关机器的详细操作使用方法,需要客户详细阅读中文说明书{电子版}。
如果客户没有,可以向公司索取。
一、install toner 安装粉盒menu菜单1.Copy feature 复印部分A、reduce/enlarge 缩小/放大B、darkness 浓度a、normal 正常b、dark 深c、cight 浅C、original type 原稿类型a、text 文字b、text/phsto 文字/图片c、photo 图片D、layour 复印设计a、normal 正常b、2-up 2面向上c、4-up 4面向上d、Id copy 身份证复印e、Poster copy 海报复印f、Clone copy 克隆复印E、adjus bkgd 调整背景二、copy setup 复印设置change default 更改参数1、copies 复印份数2、copy collation 复印调校3、reduce/enlarge 缩小/放大4、darkness 浓度5、orginal type 原稿类型三、按传真------按菜单出现1、Fax feature 传真属性A、Darkness 浓度B、Resolution 解晰度2、Fax setup 传真设置A、sending 发送B、Receiving 接收a,Receive mode 接收模式b,Fax 自动c,Tel手动d,Ans/Fax 手动/自动3、Ring to answer (1-7) 响铃次数(1-7次)四、system setup 系统设置1、machine setup 机器设置A、machine ID 机器身份B、fax no 传真号C、date and time 日期/时间D、clock mode 时钟模式E、language 语言F、default modeG、power save 省电H、time outI、j ob time outJ、altitude adj 高度调整a、normal 正常b、high1K、toner save 省粉a、off 关b、on 开2、paper setup 纸张设置A、paper size 纸尺寸B、paper type 纸类型C、paper source 纸源D、wide A4五、sound/volume 声音/音量1、key sound 按键声a、off 关b、on 开2、alarm sound 警报声a、off 关b、on 开3、speaker 扬声器a、comnb、on 开c、off 关4、ringer 铃声a、mid 中b、high 高c、off 关d、low 低5、report 报告A、all report 所有报告B、configuration 配置C、phone book 电话本D、send report 发送报告E、sent report 已经发送F、rcv report 接收报告G、schedule jobs 计划工作H、junk fax report 垃圾报告I、n etwork info 网络信息6、maintenance 维修保养A、ignore toner 忽视粉a、on 开b、off 关B、supplies life 供应寿命a、supplies info 供应信息b、total 总c、adf scan 输稿器扫描d、platen scan 平板扫描C、serial number 序列号D、paper stacking 纸张堆叠7、clear setting 清除设置A、all settings 所有B、fax setup 传真C、copy setup 复印D、scan setup 扫描E、system setup 系统设置F、network setup网络G、phone book 电话H、sent report 发送I、R CV report 接收六、network 网络1、tcp/idA、dhcpB、bootpC、static 静态2、ethernet speed 以太网A、auto 自动B、10m halfC、10m fullD、100m halfE、100m full3、clear setting 清除4、network info 网络信息。
中英文对照说明书
前言Preface感谢您使用徐州燃烧控制研究院有限公司生产的就地点火控制柜装置。
本公司的就地点火控制柜装置是徐州燃烧控制研究院有限公司自主开发生产的高品质就地控制装置,在使用系列本程控装置之前请您仔细阅读该手册以保证正确使用并充分发挥其优越性。
本说明书对就地控制柜(以下简称控制柜)的操作和安装方法等做了详细的介绍。
使用控制柜以前,在阅读本说明书的基础上,进行安全正确使用。
Thank you for choosing the Local Ignition Control Cabinet designed by our company.The local ignition control device is explored by our company for the ignition control of boiler.This manual describes installation and operation of the cabinet clearly, please read this manual before using.内容介绍Brief introduction本手册介绍了点火控制柜的组成、安装、配线、功能参数、日常使用维护及对故障的处理The manual includes the cabinet’s components, installation, wiring, data, maintenance, and troubleshooting.读者对象Applicable readers本书适合下列人员阅读This manual is applicable for设备安装人员、维护人员、设计人员Installer, maintenance man, and designer本书约定Stipulation符号约定Symbol stipulations说明提醒操作者需重点关注的地方Points operator should pay attention to由于没有按要求操作可能造成死亡或重伤的场合危险!This symbol indicates death or GBH that may occur as a resultof improper operation由于没有按要求操作可能造成中等程度伤害或轻伤或造成物质损害的场合注意!This symbol indicates secondary injury, flesh wound or objectdamage that may occur as a result of improper operation一、序言Prologue1.1 开箱检查Checking在开箱时请认真确认在运输中是否有破损现象控制柜内元器件与附图中的型号数量是否相符如发现有某种遗漏请速与供货商或我司联系解决!Check if there is any damage.Ensure the model and quantity in chart are accordance withcomponents in cabinet.If there is any mistake, please contact with supplier or ourcompany.1.2 安全注意事项Security不要安装在含有爆炸气体的环境里否则有引发爆炸的危险!必须由具有专业资格的人员进行配线作业否则有触电的危险!确认电源处于完全断开的情况下才能进行配线作业否则有触电危险!必须将控制柜的接地端子可靠接地否则有触电的危险!通电情况下不要用手触摸控制端子否则有触电的危险!Do not install in explosive environment, or it may causeexplosion.Do invite professionals for accompany when wiring, or it maycause electric shockDo shut off power before wiring.Do earth the cabinet ground terminal.Do not touch the control terminal when power is on.1.3 安装条件Installation Requirement1.4 日常维护Maintenance定期检查柜内各种元器件,确认任一单元都没有松动的螺钉,所有电源和电线的连接都安全可靠;并保持外观完好。
3810L电动执行器使用说明中英文.

3810L电动执行器使用说明书3810L Electric Actuator Instructions目录Table of Contents1. 产品概述Product Overview2. 主要技术参数The main technical parameters3. 产品型号规格Product Specification4、结构与原理The structure and principles5、安装Installation6、调整Adjusting7、外形尺寸Dimension8、配套支架The supporting bracket9、故障和解决办法fault and solutions10 、订货须知Ordering Information 11 、安全使用注意事项Safety Precautions使用本执行器时,请先认真阅读和理解本说明书,通过正确的使用和维护,充分发挥其效能。
When using this actuator, please read and understand the present specification, by the proper use and maintenance, full play to its effectiveness.1 产品概述Product Overview3810L 系列直行程电子式电动执行器有以220V 交流单相电源和380V 三相交流电源两种驱动电源的机型,接受来自调节器控制信号( D C 4 ~ 20m A 或DC 1 ~ 5V ),实现预定直线往复运动的新型执行器。
本系列执行器被用作调节阀的执行机构时,几乎具备了调节阀本身所要求的各种动作变换功能以及阀开度信号功能和手动功能。
因此被广泛应于发电、冶金、石化、轻工及环保等工业部门。
主要特点:main feature:1.1执行器设计有伺服系统(无需另配伺服放大器),只需接入DC4〜20mA (或D C1~5V )信号和对应的电源即可工作。
fenix3 中英文对照说明书

Owner’s Manual
翻译仅供参考,如有错误之处,请不吝指出,联系QQ:12594065 (SUNG),随时交流修正
February 2015
Printed in Taiwan
190-01840-00_0B
Table of Contents
Setting a Training Target .设...定....训...练...目...标........................................... 7 Cancelling a Training Target .取...消...训...练...目....标................................. 7
Setting up Garmin express 设...置.... G...a..r.m..i.n.. .e..x.p..r.e..s.s....................... 1
Activities .运...动..................................................................... 1 Starting an Activity .开...始...活...动............................................................ 2 Stopping an Activity .停...止...活...动.......................................................... 2 Skiing .滑...雪...................................................................................... 2
东岳MAM890(K)(3R)用户操作手册精品资料

螺杆空压机微电脑控制器MAM890(K)(3R)压力开关用户手册只有专业技术人员允许安装MAM***。
机械安装时务必充分考虑安装位置,确保散热良好和减少电磁干扰。
实施配线时,请按强电、弱电分开布线规则布线,减少电磁干扰。
继电器输出控制之交流接触器等感性负载必须接突波吸收器。
上电之前仔细检查输入/输出配线。
本机体之接地端子正确接地(第三种接地),可提高产品的抗杂讯能力。
电机额定电流(跳机电流)的设定按电机铭牌额定电流╳电机过载倍数/1.2倍特点:● LCD中英文显示.●远程/机旁选择控制.●对电机具有起停控制.●对空压机进行防逆转保护.●对温度进行检测与控制保护.●对电压进行检测与保护●对电机具有缺相、过载、不平衡保护功能.●高度集成,高可靠性,高性价比.目录一、基本操作 (4)1、按键说明 (4)2、指示灯说明 (5)3、状态显示与操作 (6)4、运行参数、菜单 (6)3、用户参数查看及修改 (7)4、用户参数表及功能 (8)5、厂家参数查看及修改 (10)6、厂家参数表及功能: (11)7、调整参数 (13)8、操作权限及密码管理 (15)二、控制器功能及技术参数 (16)三、型号规格 (17)1、型号说明 (17)2、适用电机功率规格表 (17)四、安装 (18)1、机械安装 (18)2、电气安装接线 (20)五、控制过程 (21)1、单机运行 (21)2、联网控制 (22)3、风机运行 (22)六、预警与提示 (22)1、空滤器预警指示 (22)2、油滤器预警指示 (22)3、油分器预警指示 (22)4、润滑油预警指示 (23)5、润滑脂预警指示 (23)6、皮带使用时间到预警提示 (23)七、安全保护 (23)1、对电机的保护 (23)2、排气超温保护 (24)3、空压机防逆转保护 (24)八、常见故障的处理 (24)1、查看现场故障 (24)2、常见故障及原因 (24)九、电气接线图 (26)一、基本操作1、按键说明图1.1.1 ——启动键:空压机处于待机状态时,按此键可启动空压机运行——停机键:空压机处于运行状态时,按此键可停止空压机运行;设备处于停机状态时,长按停机键,切换到软件版本显示界面。
HomeLink 智能门禁控制器说明书

5a. The remote has rolling code. Press the “learn” button on the remote-controlled device (e.g. garage door opener).
5b. Within 30 secs, press and hold the programmed HomeLink button for 2 secs.
1. Position the remote transmitter you wish to link 1 to 3 inches (3 - 8 cm) from the HomeLink button you want to program
2. Press and release the desired HomeLink button. Is the HomeLink indicator
4. Press and hold the programmed HomeLink
button for about a second. Does the device (garage door opener) work?
YES
NO
Canadian Garage Door Opener 3b. Press and release the HomeLink button. Press, hold and release the button on the remote every 2 secs. Does the HomeLink indicator (LED) change from slowly flashing orange to rapidly flashing or continuously on green? The process should take less than 60 seconds.
KY12S-MAM-280型控制器说明书
螺杆空压机微电脑控制器MAM-KY12S(B)-(Ⅻ)型(中文液晶显示-280)用户手册深圳市普乐特电子有限公司地址:深圳市福田区商报路天健工业区25栋西六楼电话:(0755)邮编:518034传真:(0755) E-mail:网址:特点:●LCD中英文显示●对电机具有短路、堵转、缺相、过载、不平衡等全方位保护功能●对电机具有起停控制、运行控制●对空压机进行防逆转保护●对多点温度进行检测与控制保护●自动调节负荷率控制压力平衡●高度集成,高可靠性,高性价比●远程/机旁选择控制●联动/独立选择运行●RS-485通讯功能一、基本操作1、按键说明图1︱——起动键:按此键可起动电机运行○——停机键:按此键可停止电机运行S——设定键:修改完数据后,按此键确认数据存储输入▲——上移键:数据修改时,按此键上翻修改该数位;在菜单选择时作为选择键。
▼——下移键:数据修改时,按此键下翻修改该数位;在菜单选择时作为选择键。
——移位键/确认键:修改数据时,此键作为移位键;在菜单选择时作为确定键。
C——返回键/复位键:在菜单操作时作为返回键返回上一级菜单;故障停机时,按此键复位。
2、状态显示与操作机组通电后显示如下界面:5秒后显示以下主界面:按“▼”进入以下菜单选择界面:a、运行参数查看按“▲”或“▼”移动黑色滚动条到“运行参数”菜单后,按确认键“”后弹出下一级菜单:再按“”弹出如为最后一级菜单,界面不会出现黑色滚动条,按返回键“C”返回上级菜单或主界面。
如在某一界面停止操作,数秒钟后自动返回主界面。
用“▲”、“▼”移动键、确认键“S”和返回键“C”根据上述方法可完全观察到运行时间、本次运行时间、维护参数、历史故障、出厂日期、现场故障等运行参数并返回到上级菜单。
b、用户参数1)、参数修改方法══在运行状态和停机延时过程中不能修改用户参数和厂家参数══用前述运行参数查看的方法可查看和修改用户参数,如修改压力上限,操作方法如下:按“▲”或“▼”移动黑色滚动条到“用户参数”项后按确定键“”弹出再按确定键“”弹出如不继续按确定键“”即可查看用户参数。
康力门机调试说明书-中英

中分永磁变频门机PMA2C-L,PMA2C-K,PMA2C-LJ1产品介绍1.1功能描述PMA2C系列中分永磁变频门机是一种采用永磁同步电机驱动、无极调速矢量闭环变频控制,配置一体式集成轿门锁同步门刀,满足GB7588标准(含1号修改单)要求;具有紧凑,运行平稳,噪音低等特点。
1,2技术参数输入电压:AC220V±15%;1.变频器:额定频率:50/60Hz;额定电流:2.5A;最大电流:5.0A输出电压:0~220V;输出频率:0~50Hz2.电机:额定电压:AC100/125V;额定电流:0.73/1.20A;额定转速:180r/min;额定转矩:2.3/5.0N·m;额定功率:43/94W3.编码器:采用360°范围内的无接触式、高分辨率、旋转位置编码器。
分辨率:12 位绝对值输出输出接口:同步串行接口(SSI)工作温度:-40℃—125℃采用屏蔽电缆1.3工作条件1.海拔高度 :1000m以下,100%额定电流输出;1000~2000m,95%额定电流输出;2000~3000m,85%额定电流输出;2.相对湿度不大于90%(25℃时);3.电压:200V~250V.50~60Hz;4.环境空气中不应含有腐蚀性与易燃性气体及导电尘埃存在;1.4工作原理PMA2C系列中分永磁变频门机以永磁同步电动机为动力,采用同步带传动,通过变频无级调速控制技术来控制开关门动作。
同步带门刀带动门挂板运动,轿门与挂板连接,从而控制轿门的开、关门动作。
配置一体式集成轿门锁同步门刀,该门刀可实现轿门锁功能,层门无需增加撞弓,配置手动解锁钢丝绳,安装在轿门板上,见后附图,门刀只有门机带电状态下才会张开,张开尺寸约80mm,在轿厢上下运行时,务必保持门刀张开。
2门机安装说明2.1门机安装总图PMA2C系列中分永磁变频门机可匹配轿门地坎宽度有60mm、75mm、50mm。
2.2轿顶安装将门机轿顶安装支架通过紧固螺栓与门机固定,然后将轿顶安装支架固定在轿顶的C型槽上。
POSIFLEX PD-7100 7200系列中英文客户显示器 说明书
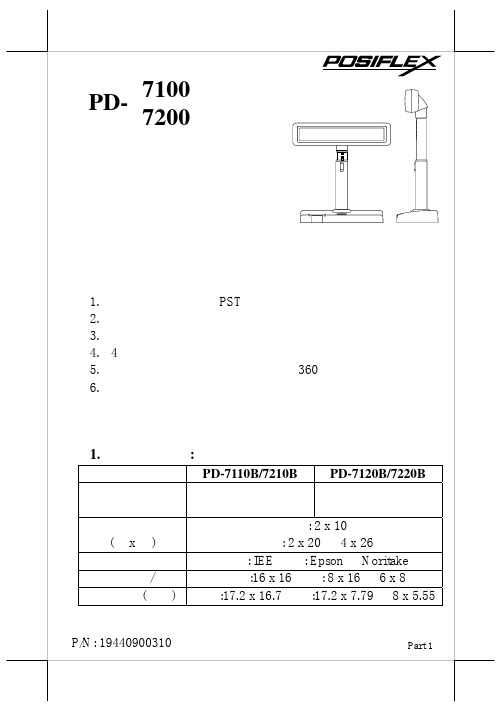
7100 7200
1. 2. 3. 4. 4 5. 6.
PST 360
1.
:
PD-7110B/7210B PD-7120B/7220B
(x) /
()
P/N: 19440900310
: 2 x 10 : 2 x 20 4 x 26 : IEE : Epson Noritake :16 x 16 : 8 x 16 6 x 8 :17.2 x 16.7 :17.2 x 7.79 8 x 5.55
(20863250900)
PD7000 “+24V DC Out”
Posiflex POS
:
DC AC
PD7000
3.
4.
Noritake
Part 4
1. SW1 SW2
Epson 2 X 20 Noritake 2 X 20
Epson 4 X 26 IEE 2 X 10
SW1 SW2
2. RS232
4. 打开电源
当打开电源,显示屏会出现系统软件版本,且在最左边第一 行出现一个光标棒,此乃为 Noritake 指令仿真模式,若设定为其 它指令仿真模式则没有光标出现,如此即安装完成。
Part 4
开关及跳接线设定
1. 指令仿真模式开关设定:
SW1 SW2
关
开
关 Epson 2 X 20 Noritake 2 X 20
注意:请勿同时使用 DC 和 AC 电源
3. 串接至下一级外围装置
本系列产品可将信号串接传送至下一级的外围装置,同时我 们也保留不串接显示功能,因此当要使用信号串接传送至下一级 的外围装置时,只要取下原安装于下级装置连接座上的端末接 头,直接插上下一级装置即可。亦请妥善保留此端末接头,以备 不串接显合一
新能源公司光伏控制器和逆变器产品手册(中英文)

特变电工新能源控制器和逆变器系列产品1.小功率充电控制器系列Small Power Charge Controller Series型号TypeXNY-TZ12/24 10BⅡXNY-TZ12/24 20BⅡXNY-TZ12/2430BⅡXNY-TZ12/24 40BⅡ充电输入Charge Input组件最大开路电压Maximum OpenCircuit Voltage ofSolar Module25V / 50V额定输入电流Rated Input Current10 A 20 A 30 A 40 A蓄电池Storage Battery标称电压Nominal Voltage12V / 24V浮充电压Float Voltage13.7V / 27.4V过充电压Over Charge Voltage14.3V / 28.6V欠压电压Lack of Voltage10.8V / 21/6V直流输出DC Output输出电压Output Voltage10.8-14.3V / 22.0-28.6V输出最大电流Maximum OutputCurrent20A 40A提示关断电压Prompt for cuttingvoltage11.5V / 23.0V欠压关断Cutting for lack ofvoltage10.8V / 21.6V欠压恢复LV resumption13.0V / 26.0V显示Display LED指示indication系统运行、欠压提示、欠压保护、过充保护、负载保护、短路保护Systematic operation, LV indication, LV protection, over chargeprotection, loads protection, short circuit protection液晶显示(可选)LCD display(optional)充电电压、充电电流、蓄电池电压、蓄电池容量、输出电流Charge voltage, charge current, voltage of storage battery,capacity of storage battery, output current报警保护Alarm Protections输入反接保护Input reverseconnectionprotection有Yes输出短路保护Output short circuitprotection有Yes蓄电池欠压保护LV protection forstorage battery有Yes蓄电池反接保护Reverse connectionprotection forstorage battery有Yes其它项Other Items防护等级Defend rank符合DIN EN60529规定IP22或IP65标准In compliance with regulations of DIN EN60529 and standards ofIP22 or IP65充电模式Charge modePWM脉宽调制,恒流-恒压模式,蓄电池自动维护功能PWM ,constant current—constant voltage, function of automaticprotection for storage battery散热方式Radiating mode 自冷Automatic cooling工作模式Working mode普通控制器、光控开+时控关、时控开+光控关General controller, lighting for on+ timing for off, timing for on +lighting for on自耗电Self electricityconsumption< 10 mA < 15mA环境Environment使用环境温度Environmentaltemperature-10℃ --45℃使用环境湿度Ambient humidity0--90%,不结露no dew海拔Altitude≤4500m体积Volume 长*宽*高Length*Width*Height120*90*45 180*110*55 180*110*55 180*110*552.小功率户用电源系列Small Power Electrical Source Series for Home Use型号Type XNY-TNX 12/24 300 L III型XNY-TNX 12/24 500 L III型充电输入Charge Input组件最大开路电压Maximum Open CircuitVoltage of SolarModule25V / 50V额定输入电流Rated Input Current25A/12.5A 50A/25A蓄电标称电压Nominal Voltage12V / 24V池Storage Battery浮充电压Float Voltage13.7V / 27.4V过充电压Over Charge Voltage14.3V / 28.6V欠压电压Lack of Voltage10.8V / 21/6V直流输出DC Output输出电压Output Voltage10.8-14.3V / 22.0-28.6V输出最大电流Maximum OutputCurrent20A 40A欠压关断Cutting for lack ofvoltage10.8V / 21.6V欠压恢复LV resumption13.0V / 26.0V交流输出AC Output输出电压Output VoltageAC220V±10%输出波形Output Wave Shape修正正弦波Modified Sine Wave输出频率Output Frequency50±1 Hz额定输出功率Rated Output Power300W 600W转换效率Conversion Efficiency>94%显示Display LED显示充电指示、直流负载输出、欠压、过压等状态指示.Charge Indication, DC Load Output, Lack of Voltage, OverVoltage and other status indication环境Environment温度Temperature-10℃—45℃湿度Humidity0—90%,不结露no dew海拔Altitude≤4500m外形Appearance参考重量Reference Weight30Kg(不带蓄电池)Not including Storage Battery参考尺寸Reference Dimension430*320*1603.小功率逆变器系列Small Power Inverter Series型号Type XNY-NS 48V 1K B I XNY-NS 24V 600 B I直流输入DC Input额定输入电压Rated input voltage48V 24V 额定输入电流Rated input current19A 23A 输入直流电压允许范围Allowed input DC voltage scope42.7V—58V 21.3V—29V开机电压范围Voltage scope of starting upequipments47V—58V 23.5V—29V欠压告警点LV alarm point46V 23V 过压告警点OV alarm point54V 27V 反灌杂音电流Anti-noise current≤10%≤10%交流输出AC Output额定容量(VA)Rated capacity1000VA 600VA 额定输出功率(W)Rated output power800W 500W 额定输出电压及频率Rated output voltage andfrequency220Vac,50Hz 220Vac,50Hz额定输出电流(A)Rated output current4.5A 2.7A输出电压精度(Vac)Output voltage precision220±5%输出频率精度(Hz)Output frequency precision50±1%波形失真率(THD)(线性负载)Rate of wave distortion(Linearity loads)≤2%动态响应时间(负载0←→100%)Dynamic response speed5S过载能力Overload capability120%,2分钟two minutes150%,15秒钟15seconds 逆变效率(80%阻性负载)Inverting efficiency80% resistive loads≥90%使用环境温度Ambient temperature-10℃ -- +40℃湿度Humidity0--90%,不结露no dew 使用海拔(m)Altitude≤4500保护功能Protection Function输入欠压保护Input LV protection输入过压保护Input OV protection输出过载保护Output overload protection输出短路保护Output Short Circuit Protection4. -48V通讯电源系列48V Communication Power Supply Series型号TypeXNY-CT48 – 120XNY-CT48 – 160XNY-CT48 -200XNY-CT48 -300输入特性Input Characteristics输入电压范围Input voltagescope0~100V输入方式Input mode 多路many loops 额定输入电压Rated inputvoltage-68V蓄电池电压级别voltage rank ofstorage battery-48V控制器性能Performances ofcharger太阳能输入接口Solar inputterminal3路3loops 4路4loops 5路5loops 8路8loops额定充电电流Rated chargecurrent120A 160A 200A 300A单路额定充电电流Rated chargecurrent of singleloop40A欠压关断Cutting for lack ofvoltage-43.2V(-43.0—-47.0V constant adjustable)欠压恢复LV resumption-53.0V(-52.0—-54.4V constant adjustable)浮充电压Float voltage-56.0V(-52.0—-56.0V constant adjustable)均充电压Average voltage-58.0V(-54.0—-58.0V constant adjustable)高压关断Cutting forhigh-voltage-60.0V(-58.0—-62.0V constant adjustable)温度补偿系数Temperaturecompensationcoefficient-4mV/cell/℃(-1—-5mV/cell/℃ constant adjustable)放电输出接口Discharge outputterminal2circuits路(每路最大60A)Max. 60A each circuit静态工作电流Static workingcurrent≤60mA显示Display LCD显示display充电电压、充电电流、电池电压、电池容量、输出电压、输出电流Charge voltage, charge current, voltage of storagebattery, capacity of storage battery, output voltage,output current通信Communication RS422/RS485历史数据存储100天,参数可修改,符合RS422/RS485标准通信接口协议。
业主户内设施使用指引(中英文)
业主户内设施使用指引(中英文)业主/住户责任:业主/住户须负责其单位内部装置及设备的保养及维修。
如需尊尚家居服务中心进行维修时,中心将会收取维修费用。
燃气用具:如发觉泄漏煤气,请立即关闭总掣及打开门窗,使空气流通,同时立即通知燃气公司检查。
请勿燃点火柴或香烟或使用任何电器用具,此举可能会导致爆炸。
厕所及去水设备:请勿把垃圾、杂物等废物投入水厕或去水设备。
此举会引致水厕及去水道闭塞,如因不适当使用引致损坏,业主/住户须负责全部修理费用。
危险物品:在居住单位内不得贮存或拥有任何危险物品(例如军火、炸药、火药、爆竹等)。
如住户贮存适量石油气和其它燃料供煮食用途,须特别小心,以策安全。
冷气机:冷气机的开启与休息时间应该相若,假如开启时间为八小时,关机时间亦需要八小时。
隔尘网(来自:)应经常保持清洁,确保通风系统畅顺,清洁频密程度和次数视乎室内环境而定,可每隔两周至一个月,用湿、干布或吸尘机清洁。
加上每年一次以专业药水清洁、加喷防锈漆等,可使冷气机更为耐用。
尊尚家居服务中心亦有为住户提供清洗隔尘网服务。
Owners'/Residents' Responsibility:Owners/Residents are responsible for the interior repairs and maintenance including all fixtures and fittings at your own costs. Our Privilege Home Services Center may provide such services.Gas Fittings:When you suspect a gas leak, turn off the main switch and open your door and windows for ventilation and inform the Gas Company. Do not light a match, cigarette or make use of any electrical appliance as this could cause an explosion.Water Closets and Drains:Please do not throw any articles into the water closets and other water apparatus as this could cause blockage. Such cost of repairs will be borne by owner/resident.Dangerous Goods:Do not store or keep any dangerous goods such as firearms, ammunition, gunpowder, fire works etc. in your premises.If you wish to store small quantities of liquid propane gas etc. for household purpose, great care should be taken in keeping those safely.Air-conditioner:The number of operating hours should be similar to the number of resting hours. For example, if the air-conditioner is on for 8 hours, you should let it rest for 8 hours.Keep the filter clean and ensure the air-conditioner is well ventilated。
HomeLink 一体化家庭设备控制器说明书

HomeLink indicator
HomeLink buttons
Training a Button
Park near the system you want to program, and follow the instructions in the flowchart below.
1 Position the remote transmitter you wish
to link 1–3 inches (3–8 cm) from the HomeLink button you want to program.
3 Press and hold the programmed HomeLink button for about a second. Does the device (garage door opener) work?
Does the LED blink at a faster rate within 20 seconds?
NO
YES
HomeLink indicator HomeLink LED flashes for 2 seconds, remains on. then remains on.
a The remote has a rolling code. Press the
Vehicle Controls
HomeLink® Universal Transceiver*
Program your vehicle to operate up to three remote-controlled devices around your home (such as garage doors, lighting, or home security systems) using the buttons on the ceiling.
Door King 9310-092 电子门控制器说明书
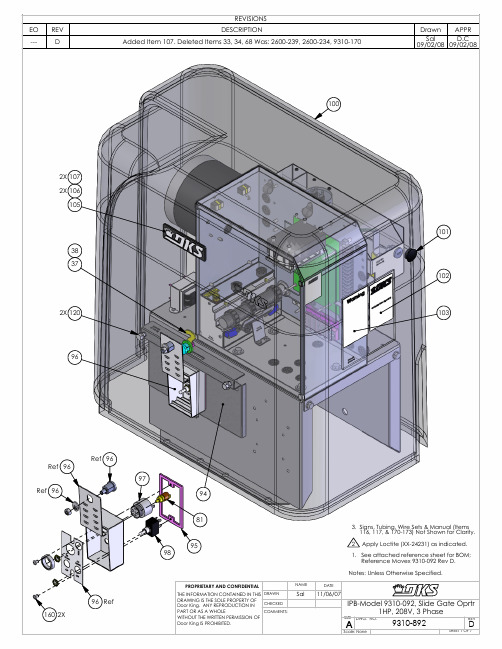
961602X Ref 95989681979696Ref RefRef 100101102103949612010510637382X 2X 1072X REVISIONSEOREV DESCRIPTION Drawn APPR ---D Added Item 107. Deleted Items 33, 34, 68 Was: 2600-239, 2600-234, 9310-170Sal 09/02/08 D.C 09/02/08DIPB-Model 9310-092, Slide Gate Oprtr 1HP, 208V, 3 Phase PROPRIETARY AND CONFIDENTIAL COMMENTS:SHEET 1 OF 7CHECKED DRAWN DATENAME REV A DWG. NO.SIZE Scale: None 9310-892Sal 11/06/07 3. Signs, Tubing, Wire Sets & Manual (Items 116, 117, & 170-173) Not Shown for Clarity.2Apply Loctite (XX-24231) as indicated. 1. See attached reference sheet for BOM; Reference Movex 9310-092 Rev D.Notes: Unless Otherwise Specified.THE INFORMATION CONTAINED IN THIS DRAWING IS THE SOLE PROPERTY OF Door King. ANY REPRODUCTION IN PART OR AS A WHOLE WITHOUT THE WRITTEN PERMISSION OF Door King IS PROHIBITED.Item Part Number Qty UM Description Rev 19310-8921EA IPB-9310-892 Model 9310-092 208V, 3 Phase D 39310-3041EA Base 931042600-3051EA Base Stiffener Model 930059310-1061EA Box Control 931062600-3181EA Bracket Wire Cover82600-3501EA Gearbox LIM-60D 10:1 931092600-2791EA Motor 1HP Spl C-Face Emerson122600-3651EA Lock Sprocket Nylon ST801132600-9082EA Magnet Rectangular142600-3661EA Sprocket 12 tooth 1" Bore #41169310-1091EA Bracket Idler 9310172600-8882EA Bushing 9300 1.5lx1.0ODx.63ID182600-3982EA Idler Chain232599-2201EA Label Caution Remove Rod244001-0951EA Trans Small 460/230/208-115252600-6194EA Wire Clp-5/8 Concord 770-1209262600-9451EA Cover Plastic Insulator309310-3901EA Panel Solenoid 9310352600-8611EA Solenoid Lock Assy 9310374001-0351EA Lock N16058BDxSFx2K Key 16120381702-5071EA Cam "J" Hook409310-1031EA Cover Solenoid Panel 9310412600-4131EA Terminal Block-3 Position422599-0381EA Label Radio 9310439310-0061EA Cover Plastic442600-8201EA Bushing 1/2504001-0201EA Terminal 20 Pin514001-0211EA Key Polarizing Tyco 1437410-5534403-0101EA PCB Gate Operator552600-4341EA Marker Strip 208V 3Phase563130-0081EA Terminal Block 5 pin572600-8401EA Jumper- Ring Tongue #8 Screw583129-0051EA Terminal Block Cover 5 Positio602599-0141EA Decal Copper Wire Only612599-0061EA Decal SUPPLY GND632600-4391EA Washer Cup - Brass652600-81028EA Bushing 7/8 Poke Thru Flaps669200-9341EA Solid State Rely 3PH SGR3053DA679200-9351EA Solid State Rely Cover701200-0282EA Outlet Snap-In Leviton 1306712599-0081EA Label Patent732600-7532EA Wire Crimp On #9 Full Insul741215-0182EA Wire Nut #71B752600-2462EA Limit Nut762600-2481EA Limit Nut w Magnet Assembly802599-0961EA Label Key Model 9310811812-0052EA Switch Push Button N.O.832600-3071EA Bracket Wheel Lock 9300852600-8572EA Spring-Compression Limits861804-0242EA Switch Micro No NC C909310-3001EA Bracket Partial Limit 9310919310-3011EA Bracket Partial Limit Mt. 9310921601-2561EA Switch Magnetic Sensor 949310-1021EA Bracket Switch 9310952600-7311EA Gasket Switch Cover962600-5331EA Switch Cover Doorking Lockable 971506-0711EA Tone Generator Loud981601-1411EA Switch Toggle 3 Pole On-Off 1002600-5031EA Cover 9300/9310 1HP 1012600-7931EA Hole Plug Blk Nylon 1.00" dia. 1022599-1991EA Label Universal1032599-0341EA Label Gate Operator1052600-7321EA Nameplate Plastic DKS 1062802-0402EA Washer Push on Clamp 1071897-0522EA Gasket, Microphone Support 1102630-0111EA Snap Ring 1" #3100-100ZD 1112630-0152EA Snap Ring 5/8" 5100-62-ZY 1152600-8581EA Accessory Box 9300 Operator 1162599-1002EA Sign Warning1179402-0551FT Tubing Flex Split 1/21202615-25211EA Bolt Whiz Lock 5/16-18 x 1/2 1212615-0528EA Bolt Hex Head 3/8-16 x 1 1222615-1804EA Bolt Hex Head 1/2-13 x 1 1/4 1232615-0352EA Bolt Hex Head 5/8-11 x 2 1/2 1242615-0312EA Bolt Hex Head 5/8-11 x 1 1252615-0024EA Bolt Hex Head 1/4-20 x 1/2 1302620-4114EA Nut Hex Flange Lock 5/16-18 1312620-4354EA Nut Hex 5/8-111322620-4052EA Nut Hex 3/8-161332902-0043EA Nut Nylon Lock 8-321342620-40010EA Nut Hex 6-321362620-3404EA Nut Center Lock 1/4-20 1372620-3992EA Nut Hex 00-90 Brass Zinc Plt 1402620-04712EA Lockwasher 3/81412620-05012EA Lockwasher 1/21422620-0494EA Lockwasher 5/81432620-0102EA Washer #10 SAE1442802-0023EA Washer #6 SAE1452802-00314EA Washer #8 SAE1462620-1094EA Washer 1/4 Split Lock1502904-0012EA Screw Round Head 4-40 x 1/4 1511816-0392EA Screw 10-32 x 1/41522616-0004EA Screw Phillips Head 6-32 x 1/4 1532616-0188EA Screw Phillips Head 8-32 x 1/2 1542616-0022EA Screw Phillips Head 6-32 x 1/2 1552616-0032EA Screw Phillips Head 6-32 x 3/4 1562616-1034EA Screw Pan Head 4-40 x 5/8 1572616-0192EA Screw Phillips Head 8-32 x 3/4 1582616-0072EA Screw Phillips Head 6-32 x 5/8 1602616-0512EA Screw Phillips 10-32 x 3/8 1622616-0312EA Screw Flat Head #0-90x1/4 Slot 1709310-0431EA Wire Set 9310 3 Phase 1739310-0631EA Manual Quick Start。
- 1、下载文档前请自行甄别文档内容的完整性,平台不提供额外的编辑、内容补充、找答案等附加服务。
- 2、"仅部分预览"的文档,不可在线预览部分如存在完整性等问题,可反馈申请退款(可完整预览的文档不适用该条件!)。
- 3、如文档侵犯您的权益,请联系客服反馈,我们会尽快为您处理(人工客服工作时间:9:00-18:30)。
CMTP01 SOLAR CHARGE CONTROLLER
User ’s manual
CMTP01 series solar charge controller is a simple-type controller which we specifically design for the good sunshine area. This series controller is suitable for 12V automatic control system. CMTP01-DU series controller has USB 5V / DC12V output which can facilitate the use of intelligent equipment and lighting.
Ⅰ. FUCTION:
1. Over-load protection
2. Short circuit protection
3. Reverse discharging protection
4. Reverse-polarity protection
5. Lightning protection
6. Under-voltage protection
7. Over-charging protection
Ⅱ. CONNECTION (AS INDICATED IN DIAGRAM):
Open the top cover of controller and connect the wire with terminals follow the diagram on the top cover of it. 1. Connect the “+”, “-” Poles of the battery to the corresponding ports of controller (the third and the fourth one from left). * The subsequent operation can be processed only if load indicator (mark: load) flickers once and starts lighting after 15 seconds. Otherwise, the subsequent operation will damage the controller.
2. Connect the “+”, “-” poles of the solar panel to the corresponding ports of controller (the first and the second one from left).
* If Connection Error it will damage your controller!
3. Connect the “+”, “-” poles of the load to the corresponding ports of controller (the fifth and the sixth one from left).
Ⅲ. INDICATOR LED
1. Charge LED is used to indicate the charging status of battery. LED turn off means charging stopped.
2. Battery Status indicator: RED ON when battery under voltage, please charging, GREEN ON when the battery full.
3. There is output and load can work if the Load LED is lighting. There isn ’t output and the load cannot work if Load LED off. Notice:
1. Please carefully check and make sure the voltage before wiring the components. The voltage of solar panel is 18V , the battery is 12V , the rated voltage of the load is 12V .
2. The rated current of solar panels and load must be less than the rated current of controller.
*
USB, DC parameters only for CMTP01-DU Parameters may customized by customers.
CMTP01系列太阳能充放电控制器
使用说明书
CMTP01系列太阳能充放电控制器是专门针对日照度良好地区而单独开发的一款简易型控制器,适合12V 系统的自动控制,CMTP01-DU 带有USB5V\DC12V 输出,以方便智能设备及照明等使用。
I 功能:
1.过载保护
2.短路保护
3.反向放电保护
4.反向极性保护
5.雷电保护
6.欠压保护
7.过充保护
II 接线:
揭开控制器上盖,露出接线端子,按上盖图示连接:
1. 将蓄电池的“+”、“-”极正确牢固地连接到控制器相应的端子上(左起第3、第4)。
*负荷指示灯(load )闪动一下并且15秒后会亮起,表示连接正确,可继续进行下列连接。
否则会损坏控制器。
2.将太阳能板的“+”、“-”极正确牢固地连接到控制器相应的端子上(左起第1、第2)。
*如果连接错误会损坏你的控制器。
3.将负载的“+”、“-”极正确牢固地连接到控制器相应的端子上(左起第5、第6)
III 指示灯:
1.充电LED 指示灯用于指示电池的充电状态。
充电LED 关闭表示停止充电。
2.电池状态LED 指示灯,红色表示电池电压不足,请为电池充电,绿色表示电池电量到达安全值,可以用电。
3.负载指示灯亮起表示有输出,负载可以工作;不亮表示没有输出,负载不能工作。
注意事项:
1.接线前请仔细核对并确认各部件的电压,太阳能板电压18V 、蓄电池12V 、负载的额定电压12V 。
2.太阳能板、负载的额定电流不得大于控制器的额定电流。
附参数表:
*USB 、DC 参数仅限于部分型号 *参数可根据用户要求定制。
