ML50V-G 真空发生器
SMC气动第三册(真空元件)
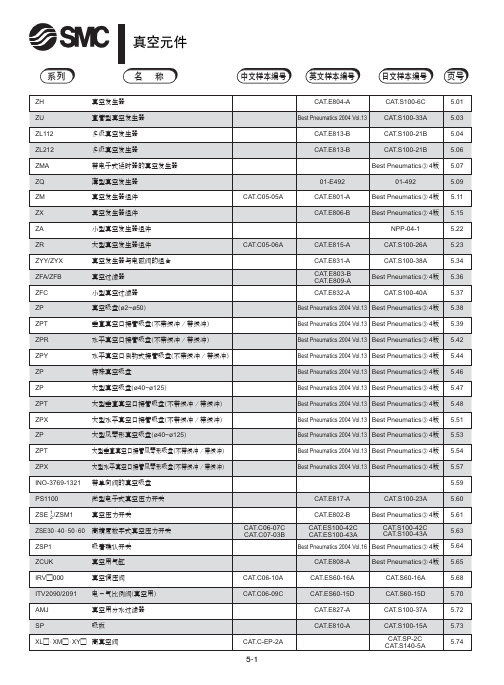
记号 06 08 10 12 01 02 03
尺寸 ø6 ø8 ø10 ø12 Rc 1 8 Rc 1 4 Rc 3 8
形式 快换接头 快换接头 快换接头 快换接头 螺纹拧入 螺纹拧入 螺纹拧入
表① 连接形式的组合
主体形式 盒型 (内置消声器) 直接配管型 (无消声器) ① ② ③ ① ② ③ SUP 快换接头 快换接头 螺纹拧入 快换接头 快换接头 螺纹拧入 VAC 快换接头 螺纹拧入 螺纹拧入 快换接头 螺纹拧入 螺纹拧入 EXH — — — 快换接头 快换接头 螺纹拧入
页号
5.01 5.03 5.04 5.06 5.07 5.09 5.11 5.15 5.22 5.23 5.34 5.36 5.37 5.38 5.39 5.42 5.44 5.46 5.47 5.48 5.51 5.53 5.54 5.57 5.59 5.60 5.61 5.63 5.64 5.65 5.68 5.70 5.72 5.73 5.74
注意
1 配管不能是螺旋状。
真空侧和供给侧都不能出现螺旋状配管, 应尽量短而直。 配管容积增 大则响应时间变长。
2 真空发生器排气侧的配管有效截面积应大。
排气一旦节流,真空发生器的性能就变差。
4 吸入流量过大,则真空开关的设定困难。
几 mm大小的小工件, 一旦选定吸入流量过大的真空发生器, 和未吸 着时的真空压力之差太小, 会使真空压力开关的设定变困难, 故要选 定合适的真空发生器。
注意
1 方向控制阀,速度控制阀等相关元件应参见各自样本的注意 事项。
维护
警告
1 要定期对真空过滤器和消声器进行清洗。
过滤器及消声器的孔眼被堵, 真空发生器的性能便降低。 在粉尘多的 场合,应使用处理流量大的真空过滤器。
AVTM56-9J复杂版A的超声波电闸和漏气探测器说明书

1981Instruction ManualAVTM56-9J Rev. AFor theUltrasonic Coronaand Leak DetectorCatalog Number 569001and AccessoriesThe industry leader since 1895, AVO Biddle Instruments offers a comprehensive line of electrical test and measurement products, from portable instruments for use in the field to fully-integrated systems for high voltage systems testing. AVO Biddle Instruments fulfills a range of requirements found in electric utility, large industrial, electrical apparatus manufacturing, military and governmental applications worldwide.Portable Field Test EquipmentAVO Biddle’s extensive product line includes its well known portable field test equipment, including the MEGGER® family of Insulation Resistance testers, which indicate the deterioration of electrical insulation; Ground Resistance Testers for installing and maintaining grounding systems; and equipment for locating faults in both power and communications cable.Precision Test & Measurement EquipmentAVO Biddle operates a calibration lab traceable to the NIST to insure the quality of its precision products, which includes the DRLO® line of digital low resistance ohmmeters.High Voltage Systems Test EquipmentAVO Biddle is a leading supplier of equipment and systems for High Voltage Systems testing applications, from rigorous QC testing of manufactured power cable to demanding R&D requirements in the Aerospace industry. This range of products includes fully-integrated systems for detecting minute levels of partial discharge to HV power supplies and DC dielectric, transformer turn ratio and capacitance/dissipation factor test sets for use in the field testing of large power apparatus.No matter whether it’s a hand-held MEGGER® Insulation Tester or a 750kV Partial Discharge Detection Systems, AVO Biddle Instruments backs it up with a full range of support services:Application AssistanceOur Application Engineers can demonstrate how AVO International can fulfill your testing requirements.Customer ServiceContact one of AVO’s Customer Service Representatives for quick answers to your questions regarding where to buy, order entry, delivery or warranty and repair information. They can also assist you in ordering replacement parts, accessories, operating/service manuals and product/application literature.Worldwide Network of Authorized Stocking DistributorsMany of our products are readily available through an Authorized Stocking Distributor near you.And More…AVO Biddle also supports you with expert calibration services traceable to the NIST, full one-year warranty, convenient leasing and much more. Because when you buy AVO Biddle, you’re getting more than a quality product.To speak to an AVO International Customer Service Representative or for information about any of Biddle’s products and services, contact us at:P.O. Box 9007Valley Forge, PA 19485-10071-800-723-2861 ext. 8578610-676-8578Shipping Address:Valley Forge Corporate Center2621 Van Buren AvenueNorristown, PA 19403Instruction Manual 56-9Jfor the use of ULTRASONIC CORONAand LEAK DETECTORCatalog Number 569001AVO InternationalP.O. Box 9007 Valley Forge, PA 19485-1007TABLE OF CONTENTSFIG. 1: ULTRASONIC CORONA AND LEAK DETECTOR CAT. NO. 569001..a1 FIG. 2: ACCESSORY ITEMS............................................................................a2 INTRODUCTION...............................................................................................A1 SAFETY PRECAUTIONS..................................................................................B1 RECEIVING INSTRUCTIONS...........................................................................C1 DESCRIPTION AND SPECIFICATIONS...........................................................D1 OPERATION......................................................................................................E1 APPLICATION....................................................................................................F1 MAINTENANCE.................................................................................................G1 WARRANTY AND REPAIRS.............................................................................H1a1FIGURE 1: ULTRASONIC CORONA AND LEAK DETECTOR CATALOG NO. 569001Contact Probe, Catalog No. 569001-8 UltrasonicTone Generator,Catalog No.569001-7FIGURE 2: ACCESSORY ITEMS.a2INTRODUCTIONElectrical discharges from a high voltage terminal to the air (corona) or along an insulated surface generate acoustical signals. Over a wide range of circumstances a significant portion of the generated signal energy will have frequencies above the range of the human ear. This is the ultrasonic frequency range and may be used to detect the presence of corona or surface discharge with the advantage that audible background noise is excluded.Corona and surface discharge are localized to small areas relative to the total size of the equipment. The Biddle Cat. No. 569001 Ultrasonic Corona and Leak Detector is equipped with a highly directional horn to permit the user to localize the source of the electrical discharge while remaining at a safe distance from the electrical terminals. This directional property also increases the sensitivity of the detector and tends to exclude any ultrasonic signals not related to the test in progress. The Cat. No. 569001 is effective in locating corona on insulators, bushings, and potheads in energized circuits such as utility poles, non-enclosed switchgear, bus bars or transformers and aids in isolating multiple sources located on the equipment under test. It is also useful in checking insulation test setups for either ac or dc to determine if corona is present on the test terminals. Pinpointing such corona and demonstrating its reduction will usually result in considerable saving of testing time and assist in obtaining reliable results.The Detector is designed for easy use. It is supplied in a compact light-weight carrying case; it operates on a single transistor battery and is quickly ready for service in the field or on the test floor.In addition to detecting corona sources, the Detector is an excellent tool for locating gas leaks and other sources of ultrasound.A1INTRODUCTION (Cont’d.)When ultrasound is generated in parts of a container or assembly, the surfaces of the container usually transmit the ultrasonic sound but may not radiate effectively. For such cases the Cat. No. 569001-8 Contact Probe accessory is available. This probe makes direct contact with the surface to detect the ultrasound, similar to the action of a stethoscope. The contact probe is used to identify such problems as defective bearings or gears, or leaking steam traps. Ultrasonics can also be used to detect leaks in a sealed container before it is filled. (This can be a significant cost saving.) The container can be considered, in the general sense, as any enclosure where a leak may be damaging. For such applications, the Cat. No. 569001-7 Ultrasonic Transmitter is available. In effect, the transmitter is sealed in the enclosure or container while it is transmitting. Since ultrasonic sound will escape through remarkably small openings, the detector is used to scan the outside to locate the leak.A2Section BSAFETY PRECAUTIONSSAFETY IS THE RESPONSIBILITY OF THE USERLA SEGURIDAD ES LA RESPONSABILIDAD DEL OPERADOR Although this test set does not contain any high voltages, it is usually operated in the vicinity of high voltage apparatus. The Test Set must be used only by persons fully aware of the proper safety procedure in such locations.Further precautions are necessary because the person wearing headphones may not hear vehicular traffic or audible alarms. When such hazards exist BIDDLE Instruments recommends that the loudspeaker or meter of the Cat. No. 569001 be used in preference to the headphones.The sound produced by the headphones of the Cat. No. 569001 can reach levels approaching those that risk hearing damage, therefore, the operator must set the volume control at a sufficiently low level to prevent discomfort.BIDDLE Instruments considers it advisable for the user to become familiar with the Cat. No. 569001 prior to using it in the field.Section CRECEIVING INSTRUCTIONSWhen your BIDDLE instrument arrives, check the equipment received against the packing list to ensure that all items are present. Notify AVO International Valley Forge, PA 19485 of any shortage. Make sure all the components shown in Figure 1 are included.Examine the instrument for damage received in transit. If any damage is discovered, file a claim with the carrier at once and notify BIDDLE Instruments or its nearest authorized sales representative, giving detailed description of the damage observed.This instrument has been thoroughly tested and inspected to meet rigid inspection specifications before being shipped. It is ready for use when set up as indicated in Section E.DESCRIPTION and SPECIFICATIONSGENERALThe Biddle Cat. No. 569001 Detector consists of several interconnecting components supplied in a cushioned carrying case as shown in Figure 1. The microphone probe and the receiver make up a basic complete system. The receiver converts and amplifies the ultrasonic signals from the microphone probe to an audible loudspeaker or headphone output and also to a meter deflection. It has a single control for on-off and volume.Although the microphone probe has directional properties, a great improvement is provided by assembling it into the directional “horn” which is the key part of the system. The horn focuses sharply enough to enable the user to locate corona sources while remaining at a safe distance from the high-voltage energized apparatus. A pistol-grip holder and a peepsight provide for aiming.A rubber “sound concentrator” tube can also be attached to the microphone; this aids in locating very small ultrasound emitters of mechanical nature such as pinhole gas leaks.Two accessories are available for use with the basic detector, (see Fig. a2). One is a contact probe that replaces the microphone. When this is used, the detector acts similar to a stethoscope to detect ultrasound transmitted in solid bodies. The second accessory is an ultrasound Tone Generator; an independent unit that can be placed in an enclosure. The ultrasound generated will penetrate small openings and can be detected using the microphone pickup with the detector. CIRCUIT DESCRIPTIONThe solid state circuit operates on the hetrodyne (heat frequency) principle. The detecting microphone probe is crystal responsive to frequencies from about 35 to 45 kilohertz.The receiving circuitry amplifies the transducer probe signal and mixes it with a signal from a fixed-frequency local oscillator to produce a beat note of about 1000 Hz when the microphone is responding to a signal of 40 kilohertz. The amplified beat frequency is used to drive the internal speaker and also rectified to operate the output meter. Plugging the headphones into the circuit diverts the signal from the speaker to the headphones.DESCRIPTION AND SPECIFICATIONS (Cont’d.)The circuit is powered from a 9-volt transistor type battery. The power requirements are small enough so that the battery life is on the order of 75 hours if used intermittently.The circuit has sufficient gain available so that the sensitivity is limited only by the noise of the input stage.SPECIFICATIONS:Operating frequency .......................range35 to 45 kHz Directivity.........................................Distinguishes point sources6 inches apart at 5 feet and1 foot apart at 10 feet. Output..............................................Headphones, speaker and meter. Sensitivity.........................................Can detect corona sources inair with as little as 5 micro-coulombsat 5 feet.Power Supply...................................9-volt transistor battery,NEDA #1604, Burgess #2V6,Eveready #216 or equivalent.Components included:Padded carrying case, receiver with meter and speaker, muff-type headphones with 12 ft. retractile cord, microphone probe with 5½ ft. retractile cord, directional horn with peep-sight and pistol-grip holder, rubber sound concentrator. PHYSICAL Dimensions......................................17 x 12 x 5 inches,(432 x 305 x 127 mm) Weight..............................................5½ lbs. (2.5Kg.)DESCRIPTION AND SPECIFICATIONS (Cont’d.)ENVI RONMENTALTemperature range..........................32ºF to 110ºF (0º to 43ºC)The instrument must be protected from direct exposure to water. It can withstand the shock and vibration normally encountered in field use.Catalog No. 569001-8 Contact Probe: Responds at 40kHz to minutedisplacements in solid bodies. Overall Length.................................10 inches (25.4 cm). Diameter..........................................1 3/4 inches (4.4 cm).Probe Stem Length..........................6 inches (15.2 cm).Probe Diameter ...............................1/8 inch (.32 cm).Catalog No. 569001-7 Ultrasonic Tone Generator (Self-Contained)Overall Size.....................................3½ x 2½ x 1 3/4 inches(8.9 x 5.7x 4.4 cm). Controls...........................................On-Off Toggle Switch.Power Supply...................................9-Volt transistor battery;NEDA 1604. Burgess 2V6, Eveready216.or equivalent.Operating Frequency.......................Centered on 40kHz.OPERATIONPRELIIMINARYSelect any accessories to be used with the basic system (microphone probe and receiver). Fit the microphone with either the sound concentrator or the directional horn by sliding it into the mating opening. In the case of the horn, the microphone must be fully inserted into the socket and the two thumb screws tightened with the fingers to prevent the microphone from dropping out if the horn is pointed overhead. Now clip the receiver to a convenient article of clothing or hold it in your hand. Connect the microphone probe cord to the fitting marked “PROBE’ making sure to tighten the lock ring.If the headphones are to be used they are simply plugged into the jack marked “PHONE”. Turn on the set by pushing the control thumb wheel to the left. Increase the volume setting until the background noise is heard. Hold your hand about an inch or two from the horn mouth (probe mouth) and lightly rub your fingers together. This will produce a distinct output to insure that everything is operating. Now turn the receiver off.LOCATING CORONA SOURCESMake a careful survey of the apparatus to be tested and take all precautions to avoid electrical shock. Identify the high voltage terminals and suspected regions to be examined. Choose a safe location that gives a clear direct air path to the suspected area.WARNING!DO NOT APPROACH ENERGIZED APPARATUS WITH THEHORN IN HAND: IT IS AN EXCELLENT ELECTRICALCONDUCTOR!Turn on the receiver and scan the suspected area with the microphone probe by simply pointing it at the suspected regions.Corona, surface discharge or arcing will be readily identified over the background noise. If the circuit is ac the corona will be identified as a very rough sounding tone with the power frequency identifiable. The sound is similar to that produced by passing a coarse file over the edge of a 3 x 5 paper card.OPERATION (Cont’d.)If the apparatus is operating with dc, you will hear a series of popping sounds when there is an intermittent discharge. For extensive discharges the sound approaches a tone.CONTACT PROBETo use the Contact Probe, connect it to the receiver in place of the microphone. Test the system just as for the microphone except lightly rub your finger on the probe stem.WARNING!THE CONTACT PROBE IS NOT INTENDED TO PROVIDEHIGH VOLTAGE INSULATION. IT SHOULD ONLY BE USEDWHERE NO DANGER OF ELECTRIC SHOCK EXISTS.TONE GENERATORTo use the Tone Generator, move the toggle switch to the “On” position. To insure that the Tone Generator is operating, place it at least 5 feet away and listen for a tone, using the receiver with the microphone. Be sure to keep the gain setting low to avoid discomfort.Section FAPPLICATIONThe Corona and Leak Detector can be adapted to many different situations.In the case of large apparatus such as a small open air substation or a portion of a larger substation, use the microphone probe without the directional horn when making a fast general survey. To localize a source such as a particular bushing, insulator or cable pothead, use the directional horn and scan the area by aiming directly at the suspected object using the peep sight for accuracy.To investigate the interior of metal-clad switchgear, use the rubber sound concentrator and listen at openings in the structure such as door seams or ventilating openings.The Detector is useful for many other purposes beside the location of electrical discharges. The most common of such uses are:Locating leaks in pressurized communication cable.Locating leaks in air systems.Detecting the flow of water in pipes.Locating leaks in steam lines or steam traps.Detecting poor bearings on rotating machinery.Detecting defective gears.The operation of the Detector is the same as for corona detection; however, since there is no high-voltage hazard, the directional horn may be required to pinpoint the source of ultrasound if the source is not easily accessible. The rubber sound concentrator is useful to pinpoint small leaks. Slide it along the suspect surface to find the maximum signal point.Section GMAINTENANCEThe BIDDLE Cat. No. 569001 Detector requires no routine maintenance except to periodically replace the battery and examine the leads from the microphone probe and headphones. It is recommended that the receiver case, headphones and microphone occasionally be wiped clean with a dry cloth.Turn the receiver off when replacing the battery (located beneath the snap-flap on the leather case).TROUBLESHOOTING and REPAIRIn the event the Detector does not work, first try replacing the battery. If this does not solve the problem, localize the trouble by disconnecting the microphone probe and headphones and turn the receiver on. Set the volume control up to almost full; if the receiver is operating a characteristic background noise will be heard on the speaker and the meter will read. To check the headphones use an ohmmeter at the plug, checking between the metal closest to the shell and (a) the insulated ring, and (b), the tip. Each should measure about 10 ohms.To check the microphone probe, connect it to a test set that is known to be operating. Do not make an ohmmeter measurement of the microphone as this may damage it.Before returning a set for repair make certain that the battery is not at fault. Headphones and microphone probe can be replaced without returning the test set.PARTS LISTThe following parts are available from AVO International for use on the Corona and Leak Detector:NUMBERITEM PARTReceiver 569001-1Carrying Case 569001-5-3Headphones 569001Microphone Probe 569001-2Directional Horn 569001-6Sound Concentrator 569001-4Instruction Manual 56-9JThe Accessory Items 569001-7 and 569001-8 must be replaced as a unit if defective.Section HWARRANTY AND REPAIRSWARRANTYAll products supplied by AVO BIDDLE Instruments are warranted against all defects in material and workmanship for a period of one year following shipment. Our liability is specifically limited to replacing or repairing, at our option, defective equipment. Equipment returned to the factory for repair will be shipped Prepaid and Insured. The warranty does not include batteries, lamps, or tubes, where the original manufacturer’s warranty shall apply. WE MAKE NO OTHER WARRANTY.The warranty is void in the event of abuse or failure by the customer to perform specified maintenance as indicated in the manual.REPAIRSAVO BIDDLE Instruments maintains a complete instrument repair service. Should this instrument ever require repairs we recommend that it be returned to the factory for repair by our instrument specialists. When returning instruments for repairs, either in or out of warranty, they should be shipped Prepaid and Insured, and marked for the attention of the Instrument Service Manager.Printed in the U.S.A.。
洪迪智能真空器说明书

SmartVacuumCleaner Instruction Manual(Household)In accordance with national standards:GB4706.1-2005GB4706.7-2014GB4706.1-2005GB4706.7-2014Model:F6SWarranty Card IncludedWe sincerely thank you for purchasing our Smart Vacuum Cleaner.The shape and color of the illustrations in this manual may be different from which of the actual product. The actual product shall prevail.Please read this instruction manual carefully before charging and using this product so as to operate correctly and extend its service life.Before all,please read[Safety Precautions]carefully before use.After reading,please keep this instruction manual for future reference.If you need to give this product to a third party,please attach this instruction manual with this product.CatalogI.Safety Precautions (2)II.Introduction (5)age (9)IV.Charging (13)V.Maintenance (14)VI.Specification (15)VII.Environmental Protection (16)VIII.Warranty Instruction (17)IX.Warranty Card (18)I.Safety Precautions1.1General Safety Regulations81.2Safety Instruction•Please read all safety precautions and instructions before operating this robot.•Please pay attention to all warnings on battery,power adapter,robot and instruction manual.•Please follow all instructions described in this manual.•All non-routine maintenance shall be the responsibility of Fushida's professional staff.•The harm and the degree of damage caused by the wrong operation are explained as follows. WarningAttention1.3About Safety Matters of ProductWarningThisAttentionThis product is for indoor use only.Avoid vacuum cleaner damage caused by inhalation of water,oil or other liquids.Before use,please tidy up the scattered wires on the ground,so asnot to interfere with the work of thevacuum cleaner.No heavy weight on the vacuumcleaner.Do not lift the vacuum cleaner by the front shell alone,as it will damage the vacuum cleaner.The charging stand should be placed against the wall.Theadapter cord should not be placed randomly onthe floor to prevent it from being wound around the bottom of thevacuum cleaner.1.4About Child SafetyChildren are not allowed touse this product alone.Children are not allowed to play with the packaging of the product,otherwise it may cause suffocation.1.5About Battery1.This product can only use the battery provided by the manufacturer;2.The battery must be taken out when the product is discarded;3.If you need to replace the battery,please contact our after-sales service department.If you use the wrong type of battery to replace it,it may cause a safety accident;4.In case of battery leakage,and if you accidentally let the liquid contact with the skin or clothing,you should immediately wipe with a dry cloth.Waste batteries should be sent to the recycle center or designated maintenance center,which cannot be thrown away.II.Introduction2.1Packing ListRobot(batteryincluded)Charging base Power adapter Instruction manual HEPA filter★Tips:*If you do not need to use the product for a long time,Please charge the machine at least every60days.2.2Product ViewRobot front viewBumperON/OFF buttonRecharge buttonOpen to take out thedust boxRobot bottom viewRight side brush Three detectors Right driving wheel Universal wheelLeft side brush Suction channelLeft driving wheel2.3Dust Box and Water Tank Installation•Take out the dust box:hold the handle and pull it out.Dust box into:dust box into the pressflat.•Water tank out:turn the machine over,hold the two sides of the tank with both hands,leftand right balance force up can be.•Water tank loading:hold both sides of the water tank with both hands,let the positioningcolumn of the water tank be aligned with the socket of the base,and press in balance.•Mop installation:after water is injected into the water tank,then the mop cloth is put intothe water tank,and then the mop cloth is flattened and pasted on the water tank.Internal structure of dust boxDust box coverHEPA filterDust boxRobot coverDust box placement zonePower adapterPower portCharging contact pinCharging contact pin2.4Clean the side brush•Clean the side brush with the cleaning brush.If there is a lot of hair on the side brush,you can use scissors to carefully cut the hair,and then clean.1.Installation steps:Align the side brush with the hole at the bottom and press down until you hear a "click"to indicate that the side brush is in place.2.Disassembly steps:Grab the bristles on both ends of the side brush and pull them out slightly.★Tips:Before each use,please check whether these side brushes have been assembled,otherwise it will affect the normal cleaning work of the vacuum cleaner.Dust box installationInstall mopAdd waterInstall the water tank into the robotDust box cover handleage*Attention:Before cleaning,it is necessary to remove the protective block at the front shell of the machine,and tidy up small objects or obstacles in the room,especially wire entanglements,to prevent them from getting stuck and winding into the bottom of the machine.3.1Application RangeRange of non-application*This product is not suitable for use in extremely hot (+60°C or above)or extremely cold (-5°C or below)environments.*This product is for indoor use only.*Do not use this product in the suspended environment without protective guard,so as to avoid the vacuum cleaner falling accidentally and causing personal injury.*Do not use this product in wet or flammable,explosive,or corrosive environments.*Do not allow this product to absorb unextinguished cigarette butts or matches.*This product cannot be used to absorb the toner used in laser printer or copier.These substances may cause fire disaster.*Do not use this product to absorb sharp objects,such as glass,nails,etc.,to avoid product damage.Protective unit Protective unitApplication rangeThe product is suitable for the following floor environment:Wooden floorUndercoat carpet Ceramic tile3.2Operating Status of Robot1.OFF statusWhen the vacuum cleaner is off,long press the""button,and the blue light will be on after the buzzer goes off.The vacuum cleaner will enter the standby mode after3secs.2.Standby statusWhen the robot is in standby state,the blue light is always on.1.If there is no operation,the vacuum cleaner will automatically shut down after5minutes of standby.2.Short press the""button once and the buzzer will go off once to indicate that the vacuum cleaner enters the automatic cleaning mode.3.Short press the""button once and the buzzer will go off once to indicate that the vacuum cleaner enters the automatic recharging mode.4.Long press the""button for3seconds,the buzzer will go off once,and the vacuum cleaner will shut down.5.Plug in the charger,the buzzer will go off once and the vacuum cleaner will enter the charging mode.3.Mobile phone WIFI connection machine operation●Download the"Tuya Smart"APP and sign up;●APP account registered successfully;●Click"Add Device"in the APP,then"Small Home Appliances",and select"Robot Vacuum"●Enter the WiFi interface,select the home WiFi account and enter the password,then click"Ok".●After starting the machine,hold down the""key for3-5seconds.After the blue light flashes,click "Flash(0.5seconds/time)"on the APP.●Enter the add device interface,connect to wifi,and pay attention to the bouncing prompts on the APP during the connection.12345674.Remote control status1.When the vacuum cleaner is off,press the“POWER”switch button on the remote controlto turn it on at distance,and the robot will enter standby mode with a beep of the buzzer. When the vacuum cleaner is in standby status,press the"POWER"button to turn it off.2.Press the“HOME”recharging button on the remote control to enter the automatic recharging mode and automatically find the charging base to charge.3.Press the“TURBO”cleaning button on the remote control to enter the automatic cleaning mode.4.Press the“WALL”edge cleaning button on the remote control to enter the edge cleaning mode.5.Press the“SPOT”spot cleaning button on the remote control to enter the spot cleaningmode,and the vacuum cleaner starts cleaning with the current point as the center.6.Press the up button on the remote control to move forward.7.Press the left button on the remote control to move left.8.Press the down button on the remote control to move backward.9.Press the right button on the remote control to move right.10.“FULLGO”repeated cleaning button.When the robot is in the charging base,long press this button for2seconds and the robot will emit two beeps to enter the automatic repeated cleaning mode with full power.When the robot is completely charged,it will automatically leave the charging base to enter the automatic cleaning mode for cleaning.In case of low battery,the robot will automatically return to the charging base for charging,so repeat twice to exit this mode.During this period,if you press other buttons to make the robot leave the charging base,the reservation function will be cancelled.11.TIMER reserved cleaning buttonWhen the robot is in the charging base,long press this button for2seconds and the robot will emit two beeps to enter the reserved automatic cleaning mode.The robot will automatically leave the charging base and enter the automatic cleaning mode after24hours from the current time.During this period,if you5.Automatic cleaningWhen the robot in the automatic cleaning status,the blue light for automatic cleaning is always on.The automatic cleaning mode is suitable for cleaning the whole home environment.The robot will clean the house according to the internal set cleaning path and automatically avoid obstacles and steps.1.Press the “”button or “”button on the robot,the buzzer willgo off once and the robot will enter standby mode.2.If the battery is low,the buzzer will go off once and the robot will enter the automatic recharging mode.3.If a fault is detected,the robot will enter the fault detected mode and give a failure alarm.4.If the charger is plugged in and the buzzer will go off once and therobot will enter the charging mode.Cleaning path in automatic cleaningmode6.Automatic recharging modeIn automatic recharging mode,the purple light flickers and the robot runs slowly for looking for the charging base,and will be automatically charged after finding it.During the search,it will turn off the vacuum motor. 1.Press the “”button or “”button on the robot,the buzzer will go off once and the robot will enterstandby mode.2.If a fault is detected,the robot will enter the fault detected mode and give a failure alarm.7.Charging modeIn charging mode,the blue and purple lights flicker alternately to indicate that the robot is in charging.After completely charged,the purple light is always on.In the charging,there are the following available function:Press the “”button on the robot,the buzzer will go off once,and the robot will leave the charging base to enter the automatic cleaning mode.8.Fault detected modeIV .Charging4.1Charging base placementIn order to facilitate the robot to find the charging base in time,it is recommended to place the charging base by the wall smoothly,and do not place anything within 2meters of the front or 1meter of the left and right.4.2Automatic chargingIn operating status,when the battery is too low,the robot will automatically start to look for the charging base and then automatically be charged after finding it.When you press the ""button on the robot,the robot will start to look for the charging base and then automatically be charged after finding it.4.3Manual chargingConnect the power adapter jack directly to the robot and then plug the charging cable into the power supply.1.Please completely charge the robot for12hours when charging for the first time.2.For daily use,please place the robot on the charging base and ensure that the charging base is connected to the power supply.3.If you do not use the vacuum cleaner for a long time,please fully charge it and then turn if off to store it ina ventilated and dry place.V.Maintenance5.1Clean the side brushPlease clean the side brush when the side brush becomes dirty.If the side brush is damaged,it can be replaced.5.2Clean the dust box and filterAfter each use,please clean the dust box and filter in time.Specific operations are shown in the following figure:★Tips:After taking out the dust box,please check whether there is any foreign object in the suction inlet and clean it.5.3Clean the sensor and charging contact pinWipe the sensor and charging contact pin gently with a cleaning tool or a soft cloth.★Tips:If there is any foreign object on the charging contact pin on the charging base,please clean it in time.VI.Specification★Note:The company reserves the right to make any technical or design changes to the product as a result of continuous improvement.The right of interpretation belongs to the company.SensorSensorCharging contact pinSensorCharging contact pinCharging contact pinVII.Environmental ProtectionElementPolybrominated PolybrominatedX:To of theproperlyVIII.Warranty InstructionAccording to the"New Three Guarantees",the warranty period of the complete machine is ONE YEAR "from the date of purchase".(The warranty is available for home use only).1.In the warranty period,as long as the fault caused by the quality of the product itself,customers can bring the completed Product Warranty Card and Purchase Invoice to the"Special Maintenance Center" around the country for free repair.2.Please keep the purchase invoice and warranty card properly as the warranty certificate.Once the invoice is altered,the warranty will become invalid.3.If the warranty period has expired,customers can contact the customer service department of the company for mail order of spare parts,or purchase from the local retailer.4.Special customer service center have the obligation to provide superior service to customers.If customers have any objection to their service quality,customers can directly complain to our customer service department.5.If the warranty period is promised in the instruction manual,the instruction manual shall prevail. No maintenance will be free under the following circumstances:1.No warranty card and valid purchase invoice.2.The complete machine and parts have exceeded the free warranty period.3.The model in the warranty card does not conform to the model of product for maintenance or the warranty card is altered.4.Fault or damage caused by failure to operate the machine as specified in the instruction manual.5.Damage caused by improper use,storage and maintenance of consumers.6.Damage caused by disassembly of other maintenance personnel(i.e.not authorized by our company).7.Fault or damage caused by accidental factors or human reasons(including operation error,liquid inlet, improper plugging,scratch,transport,collision,improper voltage input,etc.).8.Damage caused by force majeure(such as earthquake,fire disaster,lightning stroke,etc.).9.Normal and reasonable consumption or damage(such as natural consumption,wear and aging of the shell and connector parts).10.Other faults and damages not caused by quality problems of our products(including parts).Note:The customer service department of our company will still serve you warmly if the product is not within the warranty scope.IX.Warranty CardFCC Instructions:This product has been tested and found to comply with the limits for a Class B digital device,pursuant to Part15of the FCC Rules.These limits are designed to provide reasonable protection against harmful interference in a residential installation.This product generates,uses and can radiate radio frequency energy and,if not installed and used in accordance with the instructions,may cause harmful interference to radio communications.However,there is no guarantee that interference will not occur in a particular installation.If the product does cause harmful interference to radio or television reception,which can be determined by turning the equipment off and on,the user is encouraged to try to correct the interference by one or more of the following measures:-Reorient or relocate the receiving antenna.-Increase the separation between the product and receiver.-Connect the product into an outlet on a circuit different from that to which the receiveris connected.-Consult the dealer or an experienced radio/TV technicianfor help.This device complies with Part15of the FCC Rules.Operation is subject to the following two conditions:(1)this device may not cause harmful interference,and(2)this device must accept any interference received,including interference that may cause undesiredoperation.Warning:Changes or modifications not expressly approved by the party responsible for compliance could void the user’s authority to operate the product.FCC Radiation Exposure Statement:The equipment complies with FCC Radiation exposure limits set forth for uncontrolled environment.This equipment should be installed and operated with minimum distance20cm between the radiator and your body.。
E H仪器仪表价格选型报价
E+H 流量计 (工控仪表)50P2H-EC0A1AA0AAAA品牌:E+H 品名:流量计描述:Promag 50/53W 电磁流量测量,给排水领域的最佳流量测量工具货期待查咨询在线客服GkCity价:¥42,919.18E+H 分析仪 (分析仪表) CPA250-A00品牌:E+H 品名:分析仪描述:flowFit W CPA 250 pH/氧化还原测量,流通式支架货期待查咨询在线客服GkCity价:¥5,109.43E+H 分析仪 (分析仪表) CLM253-ID0005品牌:E+H 品名:分析仪描述:liquisys M CLM223/253变送器采用模块化设计,应用广泛。
基本型变送其提供简单的测量和报警功能,扩展功能软件和硬件模块化后可以应用于特殊的场合,如果需要,可使用扩展模块。
货期待查咨询在线客服GkCity价:¥13,275.36E+H 流量计 (工控仪表) 53P15-EA1B1AAOAGAA品牌:E+H 品名:流量计描述:公称直径DN 25...2000 硬橡胶或聚氨酯衬里装配长度符合DVGW及ISO 测量精度高,有利于提高过程控制质量: - Promag50:±0.5%(可选:± 0.2%) - Promag 53:±0.2% 服务及维护简单精确现场标定无需拆下传感器: - 设备维护最优化 - 可与QA系统集成坚实的现场安装外壳IP 67 IP 67墙装外壳可对远程型直接安装 Promag 53带光敏键:外部操作 - 无需打开外壳用于现场直接通讯的快速设定菜单可以和多种过程控制系统的通信接口相连: - 标准HATR接口 - Promag 50:PROFIBUS-PA - Promag53:PROFIBUS-PA/-DP基金会现场总线饮用水行业认证: KTW,NSF,WRC等货期待查咨询在线客服GkCity价:¥35,079.64E+H 分析仪 (分析仪表) CPM253-PR0010品牌:E+H 品名:分析仪描述:liquisys M CPM223/253变送器采用模块化设计,应用广泛。
派克精密流体微型泵说明书
您与运动和控制技术领域的先行者合作,就是希望促进您的业务发展和全球的发展。
从微型电磁阀到高集成型自动化系统,我们的产品对于用于药物研发和病原体检测的救生医疗设备和科学仪器至关重要。
并且对于缩短上市时间和降低总体拥有成本也十分关键。
因此,请与派克合作,准备改变这一切吧!/precisionfluidics 1 603 595-1500目录页T2-05Helix124高效和紧凑型 13.5mm 宽泵 – 高达 800 mLPM高压泵 – 超过5.5 LPM 和高达100 PSI 的压力T2-0320高性能与尺寸比率泵 – 高达2.5 LPMLTC 系列76液体系列传送泵 – 高达 650 mLPMEZ 底座92振动隔离安装系统小型活塞泵(空气)微型泵(空气/气体)微型泵(液体)T2-0494超紧凑型、高效泵 – 高达 7.5LPMBTC-IIS 系列62应用广泛的多功能双头泵系列产品 – 高达 11 LPMBTC 系列52应用广泛的多功能泵系列产品 – 高达6 LPMLTC-IIS 系列84液体系列双头传送泵 – 高达1.5 LPMCTS 系列BTX-Connect 2836高性能紧凑型 20 mm 宽泵 – 高达 2.5 LPM多功能双头和单头泵系列,适合多种应用-高达10 LPMTTC 系列74紧凑、高效、低压泵 – 高达 6 LPMTTC-IIS 系列84紧凑、高效、低压双头泵 - 高达 11 LPM附件4Helix 微型高压泵高达100 PSI (6.9 bar)压力Parker Helix 是一款紧凑型高压泵,旨在实现小型即时临床护理仪器。
Helix 可在挑战性的高海拔环境和无法使用外部压缩空气的应用中实现高压操作。
Helix 泵可提供5.5 LPM 以上的流量和高达100 PSI (6.9 bar)的压力,为性能至关重要且空间有限的台式诊断设备提供了出色的解决方案。
• 集成了用于卸荷的X 阀,可实现高压重启• 内部飞轮可在高压下低速运行• 无油活塞• 简单的安装特性• 带有推入式接头的快速流体连接• 符合RoHS 指令和REACH 标准产品特性• 液上空气• 气动驱动•微流控芯片• 即时临床护理检验• 分子诊断• 核酸纯化•基因组学典型应用典型市场产品规格物理特性电子5微型隔Helix 微型高压泵典型流量曲线• 曲线展示了0.080"偏移泵的流量性能• 使用5.0 Vdc 控制输入时,泵将以大约4400 RPM 的转速和高达8.5 LPM的流量的状态运行,但不建议连续工作。
爱柯智能装备有限公司集成式真空发生器MS2使用说明书

真空发生器使用说明书型号:M S2深圳市爱柯智能装备有限公司SHENZHEN ASICKO INTELLIGENT EQUIPMENT CO.,Ltd集成式真空发生器 MS2用于在电子、电子工程、包装技术、机器人技术和汽车工业中搬运气密性或微透气性工件吸气容量:27 I/min 至 41 I/min介绍及应用MS2H -- Kpa 85S -集成式真空发生器 MS2 订购指南----注:XI10只能对应HS ,PI12只能对应HR ;1.5mm 1.0mm 0.9mm0.8mm1510PI12XI10NC -常闭NO -常开R ---节能真空开关数字真空开关RD VD 1234MS2 10 H S NC ASVD NPN B 26750.5 Mpa 0.35 Mpa AS -吹气阀和安全单向阀-不带真空开关空白RD 为节能型真空开关;节能型真空发生器,空气消耗量消减90%(与非节能相比)带节能功能的真空数字式压力开关,达到真空设定值即停止供气。
集成式DIN 导轨安装。
89PNP NPN -高消音B -标准消音空白7为空白无需选择 ;8-1连空白10-2连2-3连3-4连4-5连5-6连6-7连7-8连8集成式真空发生器 MS2 技术参数集成式真空发生器 MS2 性能曲线5ba r工作压力下不同真空度对应的真空流量5ba r工作压力下不同真空度对应的真空流量5ba r工作压力下不同真空度对应的真空流量吸气容量:27 I/min 至41 I/min集成式真空发生器 MS2 设计参数吸气容量:27 I/min 至 41 I/minMS2...NC... MS2...NO...MS2...NC...VD/RDMS2...NO...VD/RD吸气容量:27 I/min 至 41 I/min集成式真空发生器 MS2 安装示意维修组件选型规格消音棉 (标准消音型)导轨图高消音 消音器D真空发生器使用说明书型号:M S2深圳市爱柯智能装备有限公司SHENZHEN ASICKO INTELLIGENT EQUIPMENT CO.,Ltd集成式真空发生器 MS2用于在电子、电子工程、包装技术、机器人技术和汽车工业中搬运气密性或微透气性工件吸气容量:27 I/min 至 41 I/min介绍及应用MS2H -- Kpa 85S -集成式真空发生器 MS2 订购指南----注:XI10只能对应HS ,PI12只能对应HR ;1.5mm 1.0mm 0.9mm0.8mm1510PI12XI10NC -常闭NO -常开R ---节能真空开关数字真空开关RD VD 1234MS2 10 H S NC ASVD NPN B 26750.5 Mpa 0.35 Mpa AS -吹气阀和安全单向阀-不带真空开关空白RD 为节能型真空开关;节能型真空发生器,空气消耗量消减90%(与非节能相比)带节能功能的真空数字式压力开关,达到真空设定值即停止供气。
山东多级真空发生器参数
山东多级真空发生器参数山东多级真空发生器是一种用于产生高真空环境的设备,广泛应用于化工、电子、医药、冶金等行业。
它通过逐级的真空泵的工作,逐步将气体排出,从而达到所需的高真空度。
下面是关于山东多级真空发生器的参数相关参考内容:1. 真空度范围:山东多级真空发生器可以提供不同真空度范围的工作环境,通常真空度范围从大气压附近的几百帕到超高真空的10^-7帕。
具体的真空度范围可以根据用户需求进行定制。
2. 泵速:泵速是指真空泵单位时间内排出气体的能力,通常以升/秒或升/分钟表示。
山东多级真空发生器的泵速可以根据不同工艺需求进行调节,通常在几十升/分钟至几千升/分钟的范围内。
3. 泵型:山东多级真空发生器通常由多级真空泵组成,常见的泵型包括旋片泵、分子泵、扩散泵等。
根据工艺需求和真空度要求,可以选择不同泵型的组合,实现更高效的真空抽取。
4. 电源要求:山东多级真空发生器通常需要外部电源供电,电源要求通常为三相交流电或单相交流电。
具体的电源要求可以根据设备功率和使用环境进行选择。
5. 控制系统:山东多级真空发生器通常配备有先进的控制系统,可以实现自动控制和监测真空度、泵速等参数。
控制系统通常具备参数设置、实时显示、故障报警等功能,可以提高设备的运行稳定性和可靠性。
6. 尺寸和重量:山东多级真空发生器的尺寸和重量通常根据设备的型号和配置而有所差异。
一般来说,设备尺寸较大,重量较重,需要根据使用场所和安装条件进行合理安排和布局。
7. 应用领域:山东多级真空发生器广泛应用于化工、电子、医药、冶金等行业的真空处理过程中。
例如,在光学薄膜镀膜、真空干燥、化学实验、半导体制造等领域中都有应用。
总结:山东多级真空发生器是一种能够提供不同真空度范围工作环境的设备,具有调节真空度、泵速等参数的能力。
它通常由多级真空泵组成,配备先进的控制系统,能够满足不同工艺需求和真空度要求。
山东多级真空发生器在化工、电子、医药等行业有着广泛的应用,可以提供稳定的高真空环境,满足不同工艺的需求。
濮阳微型真空发生器参数

濮阳微型真空发生器参数濮阳微型真空发生器参数一、概述濮阳微型真空发生器是一种高性能的微型真空设备,可广泛应用于半导体、精密仪器、光学仪器、生化分析仪器等领域。
下面将介绍该设备的主要参数。
二、参数列表1. 最低真空度:10^-5 Pa2. 泵速范围:1~30 L/S3. 泵头类型:离心泵、分子泵4. 泵头材质:不锈钢、铝合金、钛合金5. 气体反吹阀材质:陶瓷、不锈钢6. 接口类型:KF接口、CF接口、VCR接口7. 绝缘等级:F级8. 工作电压:220VAC/50Hz三、参数解析1. 最低真空度最低真空度是衡量真空设备优劣的重要指标之一,能够直接影响到设备的工作稳定性和精度。
濮阳微型真空发生器的最低真空度达到10^-5 Pa,能够满足大多数应用需求。
2. 泵速范围泵速是指泵头单位时间内抽真空气体的能力,是判断真空泵工作效率的重要指标。
濮阳微型真空发生器的泵速范围在1~30 L/S,可以根据实际需求进行灵活调节。
3. 泵头类型和材质濮阳微型真空发生器可配备离心泵和分子泵两种泵头,用户可以根据需求选择不同类型的泵头。
同时,泵头材质也是一个重要的选项,不锈钢、铝合金和钛合金三种材质具有不同的特点,用户可以选择适合自己需求的材质。
4. 气体反吹阀材质气体反吹阀对于真空系统中气体进入的防御功能非常重要,阀门材质的选择会影响到阀门的使用寿命和性能。
濮阳微型真空发生器的气体反吹阀材质有陶瓷和不锈钢两种,具备较高的使用寿命和稳定性。
5. 接口类型不同的真空设备具有不同的接口类型,濮阳微型真空发生器可配备KF 接口、CF接口和VCR接口。
用户可以根据自己的需求,选择适合自己设备的接口类型。
6. 绝缘等级绝缘等级是指电器设备的安全等级,通常被分为A级、B级、C级、D 级、E级、F级。
濮阳微型真空发生器的绝缘等级为F级,具有较高的安全性能和电气特性。
7. 工作电压濮阳微型真空发生器的工作电压为220VAC/50Hz,这是符合国家标准的电压规格。
真空发生器VN安全操作及保养规程
真空发生器VN安全操作及保养规程前言真空发生器是科学实验室及工业生产中常用的工具。
使用真空发生器需要注意其安全性,以及进行适当的保养,以确保其长期使用。
本文将介绍真空发生器VN的安全操作及保养规程,以供参考。
安全操作1.在使用真空发生器时,应仔细阅读使用说明,了解具体的操作方法及注意事项。
2.在将真空发生器接通电源前,应检查电气线路及电器设备,确保无异常情况。
3.在操作真空发生器时,应切断真空泵电源及主机电源。
4.在清洁及检修真空发生器时,应先切断电源,并检查设备内的真空状态,确保平衡配气阀处于关闭状态。
5.在更换真空泵油,或进行常规保养时,应先将压力放至大气压力,检查并确认设备内真空压力已经降至常温下面的大气压力。
保养规程1.在操作真空发生器之前,应先检查泵油量及油尘过滤器状态,并及时更换污物。
使用干燥过滤器可有效地对污垢进行防最。
2.在更换泵油时,应先关闭真空泵,并将油池中的油抽净。
然后,使用清洁柿子清洗泵油池中的积炭,并进行彻底清洗。
3.在清洁泵油池时,应使用温水清洗,并清洗各个孔洞。
使用清洁柿子可有效去除多余的油脂和污垢。
4.在组装泵油系统时,应先将泵油池和泵头拆开,将各个零部件都清洗干净。
然后,涂上适量的硅油润滑剂,返回原位,并紧固好螺丝。
5.在每次使用后,应使用清洁柿子将泵头周围的区域清洗干净,并将设备置于安全区域内进行存储。
总结通过以上的介绍,我们可以看出,在使用真空发生器时,我们应该逐一检查设备、了解具体操作方法、保证安全,并对设备进行适当的保养。
这样不仅可以有效地提高实验室及工业生产的效率,更可以保证设备长期的稳定运行。
希望以上内容对大家在实验及生产中有所帮助。
am50l 真空发生器工作参数
am50l 真空发生器工作参数下载温馨提示:该文档是我店铺精心编制而成,希望大家下载以后,能够帮助大家解决实际的问题。
文档下载后可定制随意修改,请根据实际需要进行相应的调整和使用,谢谢!并且,本店铺为大家提供各种各样类型的实用资料,如教育随笔、日记赏析、句子摘抄、古诗大全、经典美文、话题作文、工作总结、词语解析、文案摘录、其他资料等等,如想了解不同资料格式和写法,敬请关注!Download tips: This document is carefully compiled by the editor. I hope that after you download them, they can help you solve practical problems. The document can be customized and modified after downloading, please adjust and use it according to actual needs, thank you!In addition, our shop provides you with various types of practical materials, such as educational essays, diary appreciation, sentence excerpts, ancient poems, classic articles, topic composition, work summary, word parsing, copy excerpts, other materials and so on, want to know different data formats and writing methods, please pay attention!AM50L真空发生器:优化实验室工作环境的利器在现代科学研究和工业生产中,真空技术扮演着至关重要的角色。
FESTO气动样本
33
–
–
–
–
–
–
–
–
2008/10 – Subject to change
Internet: /catalogue/...
7
-V- 新产品
VN-...-A/M/B
真空发生器 VN
产品范围一览
功能
类型
型号
大抽气量 标准 L
VN-05-L VN-07-L VN-10-L VN-14-L VN-20-L VN-30-L
真空发生器
真空发生器
主要特性
产品概览 真空发生器
所有Festo真空发生器都是单段式 以下内容中的产品系列适用于多 列中有不同的性能级别,可以根 结构,采用文丘里管工作原理。 种不同的应用场合。单个产品系 据特定要求来选择真空发生器。
标准型和管式喷射器
VN-...
13
· 公称通径 0.45 ... 3 mm
–
–
–
–
33
–
–
标准 L ,带电磁阀 VN-05-L-...-M VN-07-L-...-M VN-10-L-...-M VN-14-L-...-M
–
–
–
–
–
33
–
–
标准 L ,带电磁阀和喷射脉冲
VN-05-L-...-B
VN-07-L-...-B VN-10-L-...-B
–
–
–
–
–
VN-14-L-...-B
VAD-M-.../VAD-M...-I-...
· 结构紧凑 · 所需安装空间少 · 响应时间短 · 内置电磁阀(开/关) · VADMI-...:附加内置电磁阀,用
于喷射脉冲 · 过滤器,带显示
Rosemount 2460 现场通讯单元快速安装指南说明书
快速安装指南00825-0106-2460, Rev AB2022 年 9 月Rosemount™ 2460 现场通讯单元用于储罐计量系统快速安装指南2022 年 9 月内容关于本指南 (3)概述 (5)一般信息 (11)安装 (13)组态 (37)操作 (58)/Rosemount2022 年 9 月快速安装指南1 关于本指南本快速入门指南提供 Rosemount 2460 现场通讯单元的基本安装和组态指导。
使用产品前请阅读本手册。
为保证人身及系统安全以及获得最佳的产品性能,安装、使用或维护本产品前请务必确保完全了解手册内容。
有关设备维修或支持需要,请联系当地艾默生自动化解决方案/罗斯蒙特储罐计量系统销售代表。
备件使用任何非认可的备件进行更换均可能危害安全性。
修理(例如更换组件)可能危害安全性,在任何情况下都是不允许的。
对于由非认可的备件或任何不是由 Rosemount Tank Radar AB 维修所导致的故障、事故等,Rosemount Tank Radar AB 概不负责。
小心确保盖子打开时上面没有积水或落雪。
否则可能会损害外壳内部的电子部件。
小心低温环境下开盖需谨慎。
高湿度和低于冰点的温度可能会造成垫圈黏附在盖子上。
这种情况下,您可以使用加热风机加热外壳,使垫圈脱落。
小心不要过热,否则可能会损坏外壳和电子部件。
小心本文档描述的产品不是专为核工业级应用而设计的。
在需要核工业级硬件或产品的应用场合,若使用非核工业级产品会导致读数不精确。
有关罗斯蒙特核工业级产品的信息,请与本地艾默生销售代表联系。
快速安装指南3快速安装指南2022 年 9 月警告不遵守安全安装与检修准则,可能导致死亡或严重受伤。
确保仅由具备资质的人员进行安装。
只能使用本手册中规定的设备。
未按照法规操作,可能削弱设备的防护能力。
不要进行本手册中包含的检修项目之外的任何检修,除非具有相关资质。
确保外壳盖在运行期间关闭。
警告引线上可能存在的高压会导致触电。
RegO 产品 90° 安全放气阀 AR4100 系列产品说明书
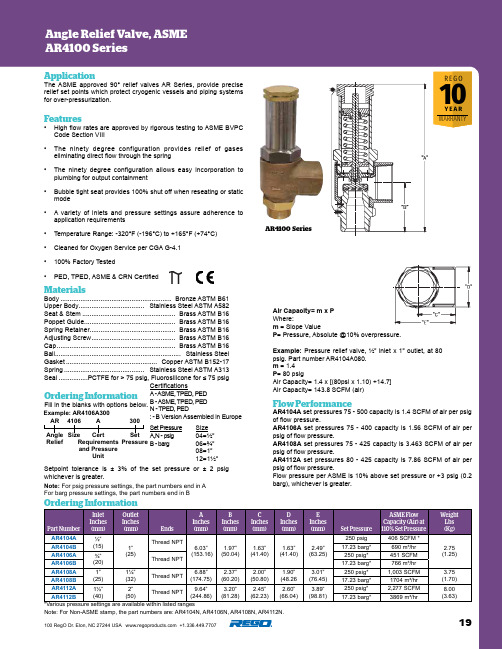
19100 RegO Dr. Elon, NC 27244 USA +1.336.449.7707ApplicationThe ASME approved 90° relief valves AR Series, provide precise relief set points which protect cryogenic vessels and piping systems for over-pressurization.Features• High flow rates are approved by rigorous testing to ASME BVPCCode Section VIII • The ninety degree configuration provides relief of gaseseliminating direct flow through the spring • The ninety degree configuration allows easy incorporation toplumbing for output containment • Bubble tight seat provides 100% shut off when reseating or static mode • A variety of inlets and pressure settings assure adherence to application requirements • Temperature Range: -320°F (-196°C) to +165°F (+74°C)• Cleaned for Oxygen Service per CGA G-4.1• 100% Factory Tested• PED, TPED, ASME & CRN CertifiedMaterialsBody ............................................................. Bronze ASTM B61Upper Body.................................... Stainless Steel ASTM A582Seat & Stem ................................................... Brass ASTM B16Poppet Guide.................................................. Brass ASTM B16Spring Retainer............................................... Brass ASTM B16Adjusting Screw .............................................. Brass ASTM B16Cap ................................................................. Brass ASTM B16Ball..................................................................... Stainless Steel Gasket .................................................. Copper ASTM B152-17Spring ............................................ Stainless Steel ASTM A313Seal ................PCTFE for > 75 psig, Fluorosilicone for ≤ 75 psigAR4100 SeriesOrdering InformationPart NumberInletInches (mm)Outlet Inches (mm)EndsA Inches (mm)B Inches (mm)C Inches (mm)D Inches (mm)E Inches (mm)Set Pressure ASME Flow Capacity (Air) at 110% Set Pressure Weight Lbs (Kg)AR4104A ½”(15)1”(25)Thread NPT6.03” (153.16) 1.97” (50.04) 1.63” (41.40) 1.63”(41.40) 2.49” (63.25)250 psig 406 SCFM * 2.75(1.25)AR4104B 17.23 barg*690 m³/hr AR4106A ¾”(20)Thread NPT250 psig*451 SCFM AR4106B17.23 barg*766 m³/hr AR4108A 1”(25)1¼”(32)Thread NPT6.88” (174.75) 2.37” (60.20) 2.00”(50.80) 1.90”(48.26 3.01” (76.45)250 psig*1,003 SCFM 3.75(1.70)AR4108B17.23 barg*1704 m³/hr AR4112A 1½”(40)2”(50)Thread NPT9.64” (244.86) 3.20” (81.28) 2.45” (62.23) 2.60”(66.04) 3.89” (98.81)250 psig*2,277 SCFM 8.00(3.63)AR4112B17.23 barg*3869 m³/hr*Various pressure settings are available within listed rangesFlow PerformanceAR4104A set pressures 75 - 500 capacity is 1.4 SCFM of air per psig of flow pressure.AR4106A set pressures 75 - 400 capacity is 1.56 SCFM of air per psig of flow pressure.AR4108A set pressures 75 - 425 capacity is 3.463 SCFM of air per psig of flow pressure.AR4112A set pressures 80 - 425 capacity is 7.86 SCFM of air per psig of flow pressure.Flow pressure per ASME is 10% above set pressure or +3 psig (0.2 barg), whichever is greater.Setpoint tolerance is ± 3% of the set pressure or ± 2 psig whichever is greater.10R E G O Y E A R WARRANTYNote: For psig pressure settings, the part numbers end in A For barg pressure settings, the part numbers end in BAir Capacity= m x P Where:m = Slope ValueP = Pressure, Absolute @10% overpressure.Example: Pressure relief valve, ½” inlet x 1” outlet, at 80 psig. Part number AR4104A080.m = 1.4P = 80 psigAir Capacity= 1.4 x [(80psi x 1.10) +14.7]Air Capacity= 143.8 SCFM (air)Note: For Non-ASME stamp, the part numbers are: AR4104N, AR4106N, AR4108N, AR4112N.Ordering Information Fill in the blanks with options below.Example:300Set Pressure A Cert Requirements and Pressure UnitAR Angle Relief AR4106A3004106Size CertificationsA- ASME, TPED, PEDB - ASME, TPED, PEDN - TPED, PED: - B Version Assembled in Europe Set PressureA,N - psig B - bargSize 04=½”06=¾”08=1”12=1½”20100 RegO Dr. Elon, NC 27244 USA +1.336.449.7707ApplicationThe ASME approved 90° relief valves AR Series, provide precise relief set points which protect cryogenic vessels and piping systems for over-pressurization.Features• High flow rates are approved by rigorous testing to ASME BVPC Code Section VIII • The ninety degree configuration provides relief of gases eliminating direct flow through the spring • The ninety degree configuration allows easy incorporation to plumbing for output containment • Bubble tight seat provides 100% shut off when reseating or static mode • A variety of inlets and pressure settings assure adherence toapplication requirements • Temperature Range: -320°F (-196°C) to +165°F (+74°C)• Cleaned for Oxygen Service per CGA G-4.1• 100% Factory Tested • PED, TPED & ASME CertifiedMaterialsBody ............................................................. Bronze ASTM B61Upper Body.................................... Stainless Steel ASTM A582Seat & Stem ................................................... Brass ASTM B16Poppet Guide.................................................. Brass ASTM B16Spring Retainer............................................... Brass ASTM B16Adjusting Screw .............................................. Brass ASTM B16Cap ................................................................. Brass ASTM B16Ball..................................................................... Stainless Steel Gasket .................................................. Copper ASTM B152-17Spring ............................................ Stainless Steel ASTM A313Seal ................PCTFE for > 75 psig, Fluorosilicone for ≤ 75 psig AR5100 SeriesOrdering InformationPart NumberInlet Inches (mm)Outlet Inches (mm)EndsA Inches (mm)B Inches (mm)C Inches (mm)D Inches (mm)E Inches (mm)Set Pressure ASME Flow Capacity (Air) at 110% Set Pressure Weight Lbs (Kg)AR5104A ½”(15)1”(25)Thread BSP6.03” (153.16) 1.97” (50.04) 1.63” (41.40) 1.63”(41.40) 2.49” (63.25)250 psig*406 SCFM 2.75(1.25)AR5104B 17.23 barg*690 m³/hr AR5106A ¾”(20)Thread BSP250 psig*451 SCFM AR5106B17.23 barg*766 m³/hr AR5108A 1”(25)1¼”(32)Thread BSP6.88” (174.75) 2.37” (60.20) 2.00”(50.80) 1.90”(48.26 3.01” (76.45)250 psig*1,003 SCFM 3.75(1.70)AR5108B17.23 barg*1704 m³/hr AR5112A 1½”(40)2”(50)Thread BSP9.64” (244.86) 3.20” (81.28) 2.45” (62.23) 2.60”(66.04) 3.89” (98.81)250 psig*2,277 SCFM 8.00(3.63)AR5112B17.23 barg*3869 m³/hr*Various pressure settings are available within listed rangesFlow PerformanceAR5104A set pressures 75 - 500 capacity is 1.4 SCFM of air per psig of flow pressure.AR5106A set pressures 75 - 400 capacity is 1.56 SCFM of air per psig of flow pressure.AR5108A set pressures 75 - 425 capacity is 3.463 SCFM of air per psig of flow pressure.AR5112A set pressures 80 - 425 capacity is 7.86 SCFM of air per psig of flow pressure.Flow pressure per ASME is 10% above set pressure or +3 psig (0.2 barg), whichever is greater.Setpoint tolerance is ± 3% of the set pressure or ± 2 psig whichever is greater.10R E G O Y E A R WARRANTYNote: For psig pressure settings, the part numbers end in A For barg pressure settings, the part numbers end in BAir Capacity= m x PWhere:m = Slope ValueP = Pressure, Absolute @10% overpressure.Example: Pressure relief valve, ½” inlet x 1” outlet, at 80 psig. Part number AR5104A080.m = 1.4P = 80 psigAir Capacity= 1.4 x [(80psi x 1.10) +14.7]Air Capacity= 143.8 SCFM (air)Note: For Non-ASME stamp, the part numbers are: AR5104N, AR5106N, AR5108N, AR5112N.Ordering Information Fill in the blanks with options below.Example:300Set PressureA Cert Requirements and PressureUnitAR Angle Relief AR5106A3005106Size CertificationsA - ASME, TPED, PEDB - ASME, TPED, PED N - TPED, PED : - B Version Assembled in EuropeSet Pressure A,N - psigB - barg Size 04=½”06=¾”08=1”12=1½”Pressure Setting and Flow Data AR Series SCFM (air)Pressure Settingpsig barg MPAGAR4104AAR5104AAR4106AAR5106AAR4108AAR5108AAR4112AAR5112A22 1.5.15546113530625 1.7.17596614633230 2.1.21677416537535 2.4.24748318441840 2.8.28829120346145 3.1.319010022250550 3.4.349810824154855 3.8.3810511726059160 4.1.4111312627963465 4.5.4512113429967870 4.8.4812814331872175 5.2.5213615133776480 5.5.5514416035680790 6.2.62159177394894100 6.9.691751944329801107.6.7619021147010671208.3.8320522850811531309.0.9022124554612401409.7.97236262584132614510.0 1.0244271603136915010.3 1.03252280622141317512.1 1.21290322718162920013.8 1.38329365813184522515.5 1.55367408908206123015.9 1.59375417927210423516.2 1.62382425946214824016.6 1.66390434965219125017.2 1.724064511003227726017.9 1.794214681041236426518.3 1.834294761060240727519.0 1.904444941098249428019.3 1.934525021118253728519.7 1.974595111137258029020.0 2.04675191156262329520.3 2.034755281175266630020.7 2.074835361194271032522.4 2.245215791289292635024.1 2.415606221384314237525.9 2.595986651479335840027.6 2.766377081575357442529.3 2.936757501670379145031.0 3.17147931765400747532.8 3.287528361860422350034.5 3.457918791956443952536.2 3.628299212051465555037.9 3.798689642146487121 100 RegO Dr. Elon, NC 27244 USA +1.336.449.7707。
YYZ-500复合式真空计说明书

YYZ-500便携式复合真空计使用说明书一. 概述YYZ-500复合真空仪,是新型的真空测量仪,它针对国内热电偶真空测量的实际情况,将国产热偶传感器和美国Hastings公司的热堆传感器的仪表组合成一个仪表,通过面板按键切换传感器测量的种类,测量数据则采用计算机技术进行优化处理,提升了产品功能性、实用性和方便性,可应用于航天、机械、石油、化工、冶金、电子及医疗、低温液体贮运设备等领域的各类真空测量。
产品符合JB/T6873-2005。
二. 工作原理1.ZJ-51热偶规管根据低压强下气体分子热传导特性,当热偶规管热丝的加热电流恒定时,热丝的温度将随管内的压强而变化,当压强降低时,气体分子的热传导运动减弱,热丝的温度升高;反之,热丝的温度减小,热偶规管输出的热电势反映了热丝温度的变化,只要测量规管的热电势值,与之对应的系统压强就确定了。
规管输出的热电势经计算机非线性处理后送液晶显示。
2. DV-6R热堆传感器美国Hastings公司DV-6系列真空测量传感器是用贵金属材料制作的热电偶真空传感器(附图)。
用低电压的交流电桥对其热电偶A和B进行加热,当真空系统中压力的变化引起气体分子碰撞的变化时,热电偶周围的气体或气体混合物的之间热传导随之变化,这使得热电偶A和B的温度变化,而温度的变化将引起热电偶A和B之间的直流输出变化(和压力变化方向相反),热电偶C用以对环境温度的瞬时变化进行补偿。
热偶变化的热电势反映了热丝温度的变化,测量热电势值,与之对应的系统压强就确定了,传感器输出的热电势经计算机非线性处理后送液晶显示。
三传感器技术指标1 ZJ-51型的主要技术指标1.1 量程:66.5Pa~ 0.1 Pa 1.2 真空度误差:± 15 %1.3 加热电流:90~130 mA2 DV-6R型的主要技术指标2.1 量程:1Torr~0.001 Torr2.2 真空度误差:±(读数的15 %+0.001 Torr)(最大)2.3 连接尺寸:1/8"npt公螺纹 2.4 操作温度:-20 ~ +60℃四仪器的技术指标1 ZJ-51型1.1 测量范围:500Pa~0.1Pa(0~ 100格)1.2 有效误差范围:68Pa~0.1Pa 1.3 压力极限误差:±20 %1.4 加热电流范围:80mA~130mA 1.5 加热电流误差:±0.5%2 DV-6R型2.1 测量范围:450Pa~0.1Pa 2.2 有效误差范围:133Pa~0.1Pa2.2 压力极限误差:±20%3 其它技术指标3.1 工作电源:DC8V;充电AC220/50Hz 3.2 显示位数:四位数码LCD3.3 重量:0.3Kg 3.4 功率: 3 VA3.5 外型尺寸:185×95×38 mm3五使用方法1 功能操作说明功能键(SET):测量转换。
ZK2(真空发生器含ZK2-ZSEA-A)
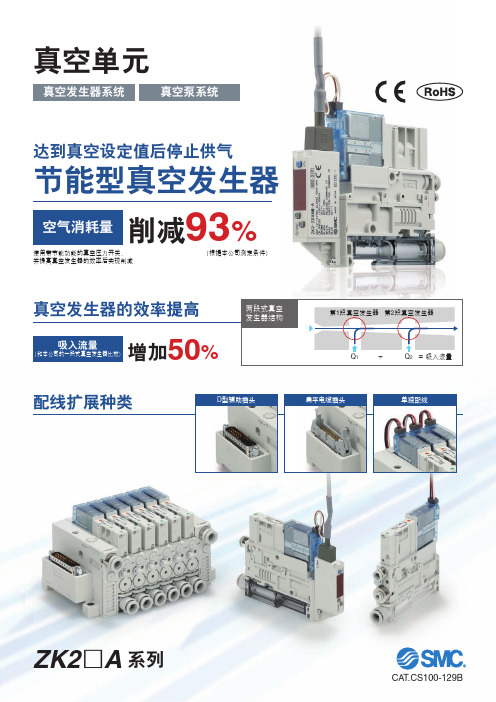
噪声降低、吸入流量提高
高效消音型消声器
通过采用高效消音效果的专用消声器, 可最大限度地发挥真空性能,降低高 频噪声。
噪声低
46dB(A)※
※喷嘴口径为ø0.7时(根据本公司测定条件)
噪声值[dB ZK2G07(高效消音型消声器排气)
50
40
ui
q 主体、排气形式
记号
主体
A
消声器 排气注1)
排气方法 消声器排气
B
单体
通口 排气
通口排气
高效消音型
高效消音型
消声器排气
G
消声器
排气
注1)w为“12 · 15”的场合,带排气口。
t 带节能功能的真空压力开关
记号
压力范围 [kPa]
K
Q
—100~100
R
S
规格
NPN PNP 1输出
注3)
带单位切换功能
双2通阀(供给阀、破坏阀)
■供给阀 :自我保持型※
供给阀一旦打开,即使断电,也可以保持真空发生状态。因此, q停电时,只要供气正常,就可以保持真空发生状态。可以防止工件掉落。 w只要瞬间通电(最低20ms)供给阀就打开,不必连续通电。可以削减耗电。
■供给阀、破坏阀连动※
对于自我保持型,打开破坏阀就自动关闭供给阀。 不必传送真空停止信号,配线和编程都得到简化。 (以前采用双动式电磁阀或定位锁时,需要真空停止信号。)
真空泵系统
真空泵系统 PE通口内螺纹规格※
※可选项
PE通口(M3)
带单独破坏压力的 供给(PD)通口※
※可选项
PD通口(M3)
真空单元 ZK2□A 系列
集装式扩展品
真空发生器组合装置和示例图

托架B
托架B
5.26
真空发生器
※ 托架安装后的尺寸
!"#$%&: ZR
真空发生器
喷嘴直径/ ø1.8,ø2.0mm ZR1-W18,20
连接板 B 型号表示
Rc 1/8 , P 供气口
(安装孔) 消声器
连接板E
(安装孔)
M5, PD 破坏阀供气口
托架B
托架B
* 1 托架P3270154 安装后的尺寸 * 2 隔板P3270157 安装后的尺寸
llommollnlommnmoghac100110v带整流器插座式直接出线式插座式dc2412653v用导线长03m无插头导线长03m无插头导线长03m无导线仅dc适用无插头导线长03m无导线仅dc适用无插头导线长03m仅dc适用导线长06m仅dc适用无记号气控式导线引出方式无记号zs无指示灯过电压保护回路仅电磁阀插头可带过电压保护回路指示灯过电压保护回路手动操作真空开关真空过滤器的组合dc的场合直接出线式没有s和z式ac的场合没有s式dc的场合过电压保护回路一旦极性接错二极管或开关元件会烧损要十分注意无记号b无记号efd1d2d3数字式真空开关规格d1d2d3053md1d2d3导线长适合开关记号25l26l65l27l26l67l输出规格npn输出模拟输出pnp输出npn输出模拟输出pnp输出非锁定推压式锁式旋具操作式单位规格无记号m带单位切换功能si单位固定无真空开关zse2真空过滤器真空过滤器zse4zse4bzse4e构成元件真空发生器单元供给阀自己保持型真空开关单元真空开关单元真空开关单元真空开关单元真空发生器单元nc
真空过滤器
真空发生器 型号
*这种真空过滤器只可单独使用,不可以安装
在真空发生器组件上。
一种气动真空发生器[发明专利]
![一种气动真空发生器[发明专利]](https://img.taocdn.com/s3/m/d918212f58f5f61fb63666de.png)
专利名称:一种气动真空发生器专利类型:发明专利
发明人:陈千荣
申请号:CN201010520432.7申请日:20101026
公开号:CN102116280A
公开日:
20110706
专利内容由知识产权出版社提供
摘要:本发明公开了一种气动真空发生器,包括内含导流板、真空板、密封板,导流板、真空板、密封板通过紧固螺栓相连接;所述的导流板顶面左端设置横置‘0’字形进气舱,进气舱内设置有导流管;进气舱右侧设置有真空舱,真空舱内设置有真空导流孔;最右侧真空舱内设置有排气孔;本发明的有益效果:本气动真空发生器体积小,无油,基本不用维护,工作可靠、效率高。
结构简单生产成本低。
申请人:陈千荣
地址:325100 浙江省瑞安市飞云镇阁巷阁一村
国籍:CN
更多信息请下载全文后查看。
- 1、下载文档前请自行甄别文档内容的完整性,平台不提供额外的编辑、内容补充、找答案等附加服务。
- 2、"仅部分预览"的文档,不可在线预览部分如存在完整性等问题,可反馈申请退款(可完整预览的文档不适用该条件!)。
- 3、如文档侵犯您的权益,请联系客服反馈,我们会尽快为您处理(人工客服工作时间:9:00-18:30)。
是决定真空吸附力的一个重要因素.原因如下:因为吸盘与被吸物
体之间不可能做到绝对密封,总有一点漏气,这种情况下,真空发生器 的流量越大,泄漏量所占的比例就越小,越有利于维持较高的真空度,
从而得到更大的吸附力.
昆山冠品优精密机械有限公司
4.5 影响真空发生器的吸附力的因素
比如,有两台真空度相同的真空发生器,A真空发生器的流量为 L/min1,B真空发生器流量为20 L/min,同样在0.5 L/min的泄漏情况 下,A真空发生器的真空度会降低很多,因为0.5 L/min的泄漏对A真
昆山冠品优精密机械有限公司
11.1 ML50V-G大流量多级静音真空发生器日常维护
图5: 图6:
说明:
清洁间隔时间根据实际 加工情况确定保养周期, 使用单位应按照要求定期 清理保养,从而最大化延 长使用性能和寿命.
当真空过滤器 内有大量铝屑 时需及时清理
拧开真空过滤器外 盖用风枪等清洁工 具将白色过滤芯和 透明外盖内壁清理 干净再拧上.
4.吸附响应时间:吸附响应时间是表明真空发生器工作性能的一个重要 参数,它是指从换向阀打开到系统回路中达到一个必要的真空度的时间.
昆山冠品优精密机械有限公司
3.1 真空发生器工作原理
真空发生器的工作原理是利用喷管高速喷射压缩空气,在喷管出 口形成射流,产生卷吸流动.在卷吸作用下,使得喷管出口周围的 空气不断地被抽吸走,使吸附腔内的压力降至大气压以下,形成一 定真空度,真空强度由真空作用面积和负压决定.示意图:
图1:
昆山冠品优精密机械有限公司
4.1 影响真空发生器的吸附力的因素
吸力大小的计算公式
吸力F=吸盘面积S *相对真空度Pa
从上述工式我们可以看出影响真空吸附力的物理量有两个:
真空度和吸附面积
在真空度不变的情况下吸附面积越大,吸力也越大.
在吸附面积不变时,影响真空度的因素分为两种情况分别为:
(1)漏气.(2)不漏气.
10.1 ML50V-G大流量多级静音真空发生器使用说明
图3:
图4: 连接 压缩 空气 气管 接口
不能 完全 覆盖
1. 所有接口螺纹处应缠绕生料 带,不宜太厚或太薄, 4~7层为宜, 生料带不能将所有螺纹都覆盖
将铜接头装上后接治具接口
了,须在螺纹的进口一侧留0.5~1
螺纹.
昆山冠品优精密机械有限公司
真空发生器因其在 汽车、化工、玻璃制造、机械制造、家电制 造、工业自动化中的机械、电子、包装、印刷、塑料及机器人等行 业中得到广泛地应用. 尤其与真空吸盘配合使用,由于它受力均匀、 不损坏工件、运动部件少响应快、体积小、重量轻、产生真空快、 防暴性能强、 振动小、噪音小、安装方便, 维修简单、控制方便、 寿命长、可靠性高等优点所以在搬运易损物品、常规方法难搬运的
昆山冠品优精密机械有限公司
5.1 真空发生器的分类
真空发生器分单级真空发生器和多级真空发生器两类,在消耗相同压 缩空气的条件下,多级真空发生器在标准大气下的真空抽气量一般是 单级真空发生器的好几倍,因此,多级真空发生器是真正高效“真空 泵”.
昆山冠品优精密机械有限公司
6.1 真空发生器的特点及应用
昆山冠品优精密机械有限公司
12.1 真空发生器与真空泵
众所周知“真空泵””和“真空发生器”是异曲同工的两种装置. 不同的是真空泵是用电驱动产生真空,而真空发生器是要用压缩空气 产生真空.真空发生器让压缩空气在腔体内形成高速气流,大家道,气 体的流动速度越高,当地的气体压力就越低(从柏努利方程可以得出) 因此就具有越强的抽吸能力.真空发生器的使用环境要求很简单,只 要有压缩空气源,就可以使用真空发生器.中国绝大部分工厂都有压
国产ML50V-G大流量多级静音真空发生器产品介绍
市场营销部 技术部
昆山冠品优精密机械有限公司
目录
1.认识真空发生器. 2.真空发器性能参数. 3.真空发生器工作原理. 4.影响真空发生器吸附力的因素. 5.真空发生器的分类.
6.真空发生器的特点及应用.
7. ML50V-G大流量多级静音真空发生器介绍.
空吸附力更强、适用范围更广、更省气节能、使用寿命更长噪音降
低..
昆山冠品优精密机械有限公司
9.2 ML50V-G大流量多级静音真空发生器优势
ML50V-G较普通空发生器比较优势:
在负压为0时最大流量702L/min,在实际应用中吸附力更强,最大 附力可达到0.92KG/M2.除应用在传统汽车、化工、玻璃制造、机械 制造、家电制造、工业自动化中的机械、电子、包装、印刷、塑料 及机器人等领域的基础上还满足某些特殊行业的要求特别是表面光
式中A1,A2----管道的截面面积,m2
v1,v2----气流流速,m/s
由上式可知,截面增大,流速减小;截面减小,流速增大.
昆山冠品优精密机械有限公司
1.3 认识真空发生器
对于水平管路,按不可压缩空气的伯努里理想能量方程为: P1+1/2ρv12=P2+1/2ρv22
式中P1,P2----截面A1,A2处相应的压力,Pa
8.1 ML50V-G大流量多级静音真空发生器参数表
昆山冠品优精密机械有限公司
9.1 ML50V-G大流量多级静音真空发生器优势
ML50V-G大流量多级静音真空发生器在继承了普通真空发生器受力 均匀、不损坏工件、运动部件少响应快、体积小、重量轻、 产生真 空快、防暴性能强、 振动小、噪音小、安装方便, 维修简单、控制 方便、寿命长、可靠性高等优点基础上做了全新的结构设计,使其真
生的吸附力数值.一般情况下,物品与吸盘之间多少会有漏气.物品与
吸盘之间的气密性是影响吸附效果乃至决定成败的关键因素,必须处 理好.
昆山冠品优精密机械有限公司
4.3 影响真空发生器的吸附力的因素
(2)不漏气的情况(只能相对减少漏气而不能绝对不漏气) . 在被抽真空的容器或空间不漏气的情况下,即密封非常好的情况
昆山冠品优精密机械有限公司
7.1 ML50V-G大流量多级静音真空发生器介绍
ML50V-G大流量多级静音真空发生器,多级喷射、省气、引射流 量大,在负压为0时最大流量702L/min,最大吸附力可达0.92KG/M2.
图 2: 真空压力表
真空发生器本体
消音器
真空过滤器
昆山冠品优精密机械有限公司
物品、易产生应力变形物品及微小物品的场合,有着无可比拟的优
势,在自动化生产中起着越来越重要的作用.
昆山冠品优精密机械有限公司
6.2 真空发生器的特点及应用
在上述应用中,一个共同特点是所需的抽气量小,真空度要求不高且 为间歇工作,因此在某些情况下不能完全满足生产要求,特别是表面光 滑不适合装夹的工件,如易碎的玻璃制品,金属外观件机加工等特殊生 产过程,而大流量多级静音真空发生器正是在这种情况下应运而生.
昆山冠品优精密机械有限公司
4.2 影响真空发生器的吸附力的因素
(1)漏气: 在被抽真空的容器或空间漏气的情况下,即密封不是很好的情况下 真空发生器的流量越大,被抽真空的容器或空间的能达到的真空度也 就越高,吸力也就越大.在密封结构已经确定的情况,尽可能选择大流 量真空度高的真空发生器.或者加强密封结构,减少漏气量,也能提高 真空度,增大吸力.真空发生器真空后在吸盘每平方厘米的面积上产
下,真空生器的极限真空度越高,被抽真空的容器或空间的真空度也
就越高,吸力也就越大.此时真空发生器的流量对吸附力没有影响,但 在实际应用中没有完全不漏气的情况 (几乎不可能)成立的.因此在选
型时因根据实际情况选择大流量真空发生器.
昆山冠品优精密机械有限公司
4.4 影响真空发生器的吸附力的因素
吸附力的大小理论上只与真空发生器的真空度和吸盘面积相关而 与真空发生器的流量无关,但在实际使用中真空发生器的流量参数
空抽气量是普通单级真空发生器的好几倍,因此更省气节能,降低用
气成本和负担.普通真空发生器采用单级或双级喷射,压缩空气消耗 量大且真空吸附力远不及多级真空发生器.
昆山冠品优精密机械有限公司
9.4 ML50V-G大流量多级静音真空发生器优势
3.过滤配置,延长使用寿命,降低成本,维护简单,提高工作效率. 3.1 ML50V-G配有过滤系统,可有效阻挡真空吸附过程中的粉尘包 括水溶性腐蚀介质进入到真空发生器腔体内, 造成堵塞、堵死性能 大大降低直至无法使用.从而延长真空发生器使用寿命,降低成本. 3.2 过滤配置,维护清理简单实用,只需打开过滤器盖清理即可. 祥见: <ML50V-G大流量多级静音真空发生器日常维护说明.> 普通真空发生器多数无过虑配置,致使在真空吸附过程中导致粉 尘被吸入真空发生器腔体内,长期使用性能大大降低,直至无法使用. 更无法清理而再次使用.
空发生器而言占据了流量的50%,太大了.但0.5 L/min的泄漏对B真
空发生器来说仅占流量的2.5%,不算什么,吸盘仍然可以维持较高的 真空度.因此,虽然二者真空度相同,但在实际中,B真空发生器产生的
吸附力更大.因此,真空发生器吸附力选型时必须同时考虑真空度和
流量两个指标,只重视真空度指标是不够的,还应选择大流量真空发 生器.
2.1 真空发生器的性能参数
1.空气消耗量(L/min): 指从喷嘴流出的流量.用基准状态下的体积流量 表示. 2.排气量(L/min): 指从真空口吸入的空气流.当真空口向大气敞开时, 其 排气 量最大, 称最大排气量. 3.到达真空度(-Kpa): 指大气压力与真空腔内的绝对压力之差.当吸 入口被完全 封闭, 即排气量为 0 时,真空腔的真空度称为最大到达真空 度.
