IxExplorer使用方法小结
x-plore使用技巧

一、使用基础首先,掌握一些快捷键是必不可少的!快捷键如下(最常用的我会用红色标记!)1——复制,将文件从一个地方复制到另一个地方2——移动,将文件从一个地方移动到另一个地方3——从十六进制查看4——收件箱(查看蓝牙接收的文件)5——查看文件详情,看文件名,文件日期,在浩如烟海的文件堆中确认文件身份6——文件属性,可以查看并修改文件属性,隐藏或者只读一类,在某些场合十分有用,比如XX后的设置只读,防止被改掉!7——重命名,这是个太好的东西了,先卖个关子,下边会继续介绍!8——编辑,没怎么用过这个功能,难度太大,没那个技术9——新建文件夹,这个就不用我多说了吧?*——向上翻页#——向下翻页,翻页功能让您在众多文件中不必一个一个的向下滑动,迅速定位到需要文件!笔形键——标记功能,按住笔形键,然后上下移动,你会发现文件被标记了绿色拨号键——发送文件,sis等格式的文件都可以通过该方式用蓝牙发送!设置中要把隐藏文件、系统文件等都打钩,方便管理!二、进阶篇对于整天鼓捣手机的人来说,光以上的一些快捷键是远远不够的,实践出真知1、是不是很羡慕文件动力的双窗口操作模式?不用羡慕!X-plore有自己的解决办法!进入X-plore,菜单——热键,你是不是看到很多的未定义的灰色字?现在就开始给它们定义!例如,本人将安装文件都放在E:/others文件夹里,选中一个未定义栏,找到E:/others,确定,完成!比如定义的位置是1,试试笔形键+1(没有笔形键的手机用#代替),是不是立刻进入了E:/others?哈哈,利用这种办法,定义一些经常操作的文件夹,例如E:/private等,方便地在文件夹之间切换,迅速地进行操作,不要再羡慕文件动力!2、关联程序设置,此功能作用是通过使用者本人的定义,给不同格式的文件选择合适的程序进行打开,相当于PC上右键的打开方式,会让你对X-plore爱不释手!例如,要将txt格式的文本通过Del文本剪辑器打开,进入菜单——工具——关联程序,新建一个关联程序,输入txt (即文件后缀,想关联什么就书什么后缀名,但不能输错!),确认,然后会出现一个程序列表,选择想要关联的程序Del,再确认,完成!就这么简单!返回X-plore试一下打开txt文件,是不是直接通过Del打开?通过这种关联,将avi、flv、mp4等视频文件关联到coreplayer 或者smartmovie4,将rm视频关联到realone,将mp3关联到天天动听……以后,想不经常使用X-plore,那是不不能的!这是我自己的一些关联设置,仅供参考!三、应用实例1、更改QQ登陆画面。
iexpress用法

iexpress用法
IExpress是Microsoft Windows中的一个工具,用于创建自解压文件(SFX)以及自动安装程序。
下面是一些IExpress的用法:
1. 打开IExpress:在Windows开始菜单中搜索“IExpress”并打开工具。
2. 创建自解压文件:使用IExpress创建一个自解压文件,其中包含一个或多个文件,在用户双击该文件时会自动解压缩并执行特定的操作。
3. 自定义设置:使用IExpress可以选择要创建的自解压文件的类型,例如自动注入注册表项、执行命令、自定义标题和消息等。
4. 添加文件:将要打包到自解压文件中的文件添加到IExpress 中。
可以选择添加单个文件或整个文件夹。
5. 配置安装程序:可以使用IExpress配置自解压文件的安装程序。
可以选择安装程序的标题、欢迎消息、安装位置、包含的文件等。
6. 保存和分发:创建完成后,可以保存自解压文件并将其分发给其他用户。
如果需要,可以将其压缩为.zip文件以便更方便地传输。
请注意,IExpress是一个相对简单的工具,通常使用于较简单的自动安装程序和文件分发。
如果你需要更复杂的安装程序功能,可能需要使用其他专业的软件。
美国康耐视智能相机操作技巧使用说明

美国康耐视智能相机操作说明书一:安装In sight Explorer 4.5.0 二:设置PC和相机在同一网段三:连接相机四:设置图像五:定位部件六:检测部件七:通讯八:保存作业九:运行作业及联机十:硬件接线COQNEX一:安装In sight Explorer4.5.0复制光盘的软件至PC硬盘,根据安装向导完成安装软件,安装成功,桌面出现Explored.5.0 图标,如下:设置相机和PC在同一网段1.双击软件,在菜单栏选择“系统” 将传感器/设备添加至网络”2.弹出“将传感器/设备调加到网络”对话框3.选择相机,然后勾选“自动获得IP地址”4.单击“应用”按钮,待弹出应用成功后,单击“关闭”按钮,显示如下画面三:连接相机,双击相机“图标”,显示Explorer编辑画面I IB—Si 耳h t 网貉XB- 2; In-5iglt 倍感器is&lOl」却甜臣四:设置图像1.新建作业2.设置图像相机下蝕发器証时C毫秒〉触发器间隔C壹秒)500^|B3E (壹秒)30.000^|五:定位部件1.选择“图案”工具六:检测部件1.选择“计数” > “斑点工具计数”、右 Bpi... 阈值鶴式 手动 ▼ 31点國值 ZJY 壬 斑点龍色 黒 审 边畀 jjbF ■當黑|蘇范園眼制 U-ioj 具“ 工1亲1 1 . 圏1010 Q a-点C1-点厂ax 交 案出案蘇点点色- 图pa 图曲边斑斑产*七:通讯1.输出设置角方閔 _f f l 图圈1010 口 E 1 点"1 ra '.M 真■■,]冥塢鱼总旦『 肛P4圏环囹边迪W 册颜*£ 跳金声■>■?!克■>■-•・2.单击“详细信息”设置输出脉冲宽度 八:保存作业,选择启动作业,勾选“联 机模式下启动作业” Ltl'< mt ■MLflfna | UP5 U4 LDET 1彌五載卜 却陌 h1剂科|L| AHH *. [|iMNM| IMWI.、 』Ml ft 亍圍憎-MU lir«El九:运行作业及联机0)耽机旨丨总|共|名称pu 山 讷Ti ib e Pi r右ng e «1 ■ 1 S Z I II111II。
Xplore最全最基本使用方法

软件官方下载地址:注册机下载地址:官方授权正版LCG X-Plore最佳手机文件管理器团购价18元
如喜欢正版可以到以下地址购买
淘宝店:教程] X-plore最全最基本使用方法
一、在启动x管理器后按0键,弹出所有的设置项,在前四个选项框上打上勾(将光标移到你须要打勾的项目上点击确定)。这样,你就可以完整地看到你手机上的C、D、E、Z四个盘。
用正版及以上版本,再也不需要等3秒啦.官方正版可以通过联网验证,可以定期升级最新版。
软件功能:
通过树形视图浏览全部磁盘/文件夹/文件*
内置text文本和图片浏览器
查看文件详细信息
编辑文件属性(隐藏,只读,系统等)
重命名和删除文件
新建和编辑text文本
新建文件夹
标记文件
复制或移动文件和文件夹
经蓝牙或红外发送文件(包括受保护文件)
四、解压,首先讲单个文件解压。将光标移到你要解压的压缩文件上,点击,再将光标移到提出来的文件上,直接按4键,然后移动光标到你要存储的文件夹,确定。或者用菜单_文件_解压到,再移动光标到你选择的文件夹确定。
再说说分卷解压,将你要解压的压缩文件移动到同一个文件夹,将分卷的压缩文件全部都标记,再按4键,再移动光标到你要选择的文件夹,确定。
注意,只支持单个文件的多个分卷的解压(最多同时支持5个分卷的解压),不支持单个文件下的多个分卷的解压。
也就是说,支持解压一个文件分卷多个压缩包的解压,不支持同一文件内有多个分卷的解压。某些二次压缩的rar文件不支持解压。
五、压缩文件,支持zip打包。将光标移到你要zip打包的文件上,点击菜单_zip_有两个选择:复制到zip和移动到zip。你选其中一个,然后将光标移到你要选择的文件夹,确定,就可以了。
ImageBrowserEX使用说明书

介绍 ............................................................................................................................. 8
导入图像 ........................................................................................................................................ 8 打印 ............................................................................................................................................. 13
1 2 3 4
1 跳转到目录 ( = 7) 。 2 返回您单击链接之前显示的页面。
3 跳转到上一页。 4 跳转到下一页。
• 单击链接以访问其他页面。
单击本说明书中以蓝色显示的链接 (如 “XXXXX” 或 (= XX) ) 以访问所提及的页面。
支持的操作环境
• 本说明书中使用Windows 7和Mac OS X v10.6的屏幕截图和步骤进行说明。 如果您使用其他版本 的操作系统, 实际的画面和步骤可能不同。 • 取决于相机 / 摄像机型号, 画面和步骤也可能不同, 并且如本说明书的相关章节中所述, 可能无法 利用所有功能。 • 请在联机时使用本软件以有效利用自动更新功能。 请注意, 自动更新功能在脱机时无效, 这会妨 碍您获取已发布的任何新功能。
Ixia IxExplore使用小窍门
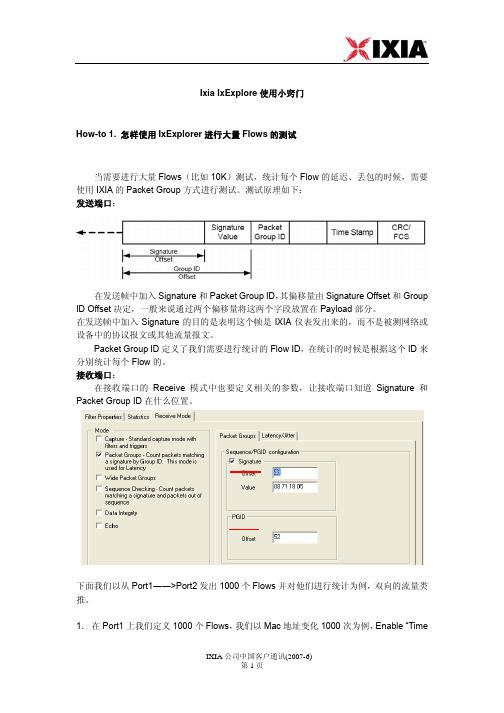
Ixia IxExplore使用小窍门How-to 1. 怎样使用IxExplorer进行大量Flows的测试当需要进行大量Flows(比如10K)测试,统计每个Flow的延迟、丢包的时候,需要使用IXIA的Packet Group方式进行测试。
测试原理如下:发送端口:在发送帧中加入Signature和Packet Group ID,其偏移量由Signature Offset和Group ID Offset决定,一般来说通过两个偏移量将这两个字段放置在Payload部分。
在发送帧中加入Signature的目的是表明这个帧是IXIA仪表发出来的,而不是被测网络或设备中的协议报文或其他流量报文。
Packet Group ID定义了我们需要进行统计的Flow ID,在统计的时候是根据这个ID来分别统计每个Flow的。
接收端口:在接收端口的Receive 模式中也要定义相关的参数,让接收端口知道Signature和Packet Group ID在什么位置。
下面我们以从Port1――>Port2发出1000个Flows并对他们进行统计为例,双向的流量类推。
1.在Port1上我们定义1000个Flows,我们以Mac地址变化1000次为例,Enable “Time_____________________________________________________________________Stamp”和“Packet Group Signature”。
点击“Edit”,进入下面的对话框。
在其中定义了Signature的偏移量、Signature的数值以及Group ID的偏移量。
这些数值需要和后面介绍的接收端口上的Receive Mode中的配置对应起来,缺省的数值已经是对应的,一般不需要进行修改。
_____________________________________________________________________2.在Port1的Stream中,通过UDF(用户自定义区域)来定义和MAC地址一起变化的PGID,也就是用UDF来做PGID。
Ixia中文文档ch6 IxExplorer
6.1. 什么是IxExplorer
IxExplorer是随Ixia机框提供的基础工具。通过这个工具可以完全配置,控制和监控Ixia仪表的所有资源。 该工具可以构造和发送报 文,捕获和分析报文,统计时延、抖动和丢包率等。通过灵活的运用,可以构造,分析和统计百万级别的业务流。
6.2. 搭建测试环境
6.2.1. 物理连接
用户PC通过网络接入Ixia仪表的管理口,参见上图蓝色的线。被测设备和Ixia测试板卡端口连接,参见上图棕色的线。
6.2.2. 仪表加电启动
把仪表插上管理口的网线,接通电源并启动。大约过3分钟后仪表可以ping通。仪表启动的时候自动启动IxServer程序,这个程序控 制着客户端和板卡之间的通信。如果IxServer启动出现Ready字样,表示启动正常,否则客户端无法接入。 如果启动正常,板卡会加电,状态指示灯亮。如果IxServer启动过程中有错误,则板卡不会加电,所有板卡的指示灯灭。
3. 在 Ping 的对话框中输入目的 IP 地址,比如DUT的IP或者是Ixia对端的IP接口地址。如果 Ixia 的接口是 IPv6 类型的,对话框 中会自动变为 IPv6。如果既有 IPv4 和 IPv6 接口,你需要手动选择 IP 的类型。 如果显示“Response Received from x.x.x.x. Sequence Number x”就说明 Ping 成功了。
2. 在“Capture View”窗口的空白的处右击选择“Import”,然后在“Import Object”的窗口中选择需要导入的文件。 注意:此处要 选择 Sniffer enc 格式的文件,不如会出现导入错误的现象。
3. 在窗口中选择需要转成 Streams 的包,然后右击选择“Convert to Streams”;
lEl浏览器一些基本操作和快捷方式

lEl浏览器一些基本操作和快捷方式
lE浏览器键盘上的快捷方式
Internet Explorer 键盘快捷方式
可以使用 Internet Explorer 快捷键快速执行许多不同任务,或在不使用鼠标的情况下正常操作。
下表描述了用于查看和浏览网页的快捷方式。
功能按键名称显示帮助F1在全屏幕和常规浏览器窗口之间进行切换F11在网页、地址栏或收藏夹栏中的项目中向前移动Tab在网页、地址栏或收藏夹栏中的项目中向后移动Shift+Tab进入您的主页Alt+Home开始插入光标浏览F7转到下一页Alt+向右键返回前一页Alt+向左键或 Backspace显示某个链接的快捷菜单Shift+F10向前移动边框和浏览器元素(仅在禁用选项卡浏览时有效)Ctrl+Tab 或F6在边框之间向后移动(仅在禁用选项卡浏览时有效)Ctrl+Shift+Tab 向文档起始处滚动向上键或Shift+空格键向文档结尾处滚动向下键或空格键以较大跨度向文档起始处翻页Page Up以较大跨度向文档结尾处翻页Page Down移动到文档的开头Home移动到文档的结尾End 在网页中查找Ctrl+F刷新当前网页F5即使 Web 上的页面与本机存储的网页时间戳相同,仍然刷新当前网页Ctrl+F5停止下载网页Esc打开新网站或页面Ctrl+O打开新窗口Ctrl+N打开一个新的InPrivate 浏览窗口Ctrl+Alt+P复制选项卡(在一个新选项卡中打开当前选项卡)Ctrl+K关闭当前窗口(如果仅打开了一个选项卡)Ctrl+W 或 Alt+F4保存当前页Ctrl+S打印当前页或当前框架Ctrl+P激活选定的链接Enter打开收藏夹Ctrl+I打开历史记录Ctrl+H打开源Ctrl+J打开“页面”菜单Alt+P打开“工具”菜单ALT+T打开“帮助”菜单ALT+H。
IxExplorer使用_袁泽根

设置:打开bit mask对话框,设置SA1=00 1332 A0 00 01,MASK设置为00 00 000FFF FF,RESULT中将出现00 13 32 AX XX XX。
过滤规则包括MAC地址(DA/SA)、数据序列(pattern:特定字段,比如高层协议及其参数、payload字节等)、帧错误、帧长度。
图3-1
●MAC地址(DA/SA)(图3-2)
图3-2
DA:目标MAC地址,可选项有:any、DA1、not DA1、DA2、not DA2
SA:源MAC地址,可选项有:any、SA1、not SA1、SA2、not SA2
举例说明:
(1):需要捕捉带有一对MAC地址的数据帧,DA=00 13 32 05 38 D9,SA=00 01 AB CD 11 AE
设置:DA=DA1=00 13 32 05 38 D9,SA=SA1=00 01 AB CD 11 AE,MASK设置为48位全0,RESULT值将为与设置的DA/SA值相等。
Bit mask对话框(图3-3)说明:在这个对话框中,可以按位设置地址值,按位设置MASK值,并可以得到一个MASK作用之后的结果值。
图3-3
当MASK中某位元组为16进制数F时,将在RESULT中相应位元组出现X,表示这个位元组中每个位(共4位)均不做匹配。当将MASK中某个位元组设置为0到F之间的任意值时,RESULT中相应位元组将出现一个?号,表示这个位元组中各个位将根据每个比特的MASK值决定是否匹配。当MASK中一个位元组设置为0时,RESULT相应位元组将出现0,表示这个位元组中每个比特均需要做匹配。
iXVL Player操作手册说明书
iXVL Player Ver. 2.0 Operation ManualFunctions and Operations of iXVL Player July 2012T able of Contents1Introduction (3)1.1 iXVL Player overview and purpose of operation manual (3)1.2 System requirements (3)1.3 Sample data (3)2Major Functions (3)2.1 Major functions of iXVL Player (3)2.2 Restrictions (4)2.3 Known issues (4)3How to operate iXVL Player (5)3.1XVL file copy (5)3.2File list operation (7)3.3File download and link saving from W eb pages (Player) (8)3.43D view window operation #1 (Player) (10)3.53D view window operation #2 (Player) (13)4F AQ and Inquiry (20)4.1 F AQ (20)4.2Inquiry (21)5Release Information (21)6Copyrights (21)1 Introduction1.1 iXVL Player overview and purpose of operation manualiXVL Player is an iPad / iPhone application for browsing XVL files output by iXVL Publisher. IiXVL Player is provided for free in the App S tore of Apple Inc or distributed based on the iOS Developer Enterprise Program if you have made a contract with Apple Inc. This document introduces the main functions and how to operate iXVL Player. Note that some of the functions described in this document are not available on iPhone.1.2 System requirements・OS: iOS 4 (4.3 or later), iOS 5・Device: iPad, iPad 2, New iPad (3rd generation), iPhone 4, iPhone 4S, iPod T ouch (4th generation)1.3 Sample dataThe sample files used in this document are included with iXVL Player and they will be installed during the application installation. Y ou can also download them and other samples from the iXVL product information site: /products/ixvl/index.html2 Major Functions2.1 Major functions of iXVL PlayeriXVL Player is an iPad / iPhone application for browsing XVL files output by iXVL Publisher. On the iPad, you can use various 3D viewer functions such as rotation, translation and zoom as well as other operations such as assembly tree display, control an element’s visibility, check element properties or view snapshots saved in the XVL files. iXVL Player enables you to browse 3D data and the technical information anywhere you want and it enhances iPad / iPhone use for manufacturing services.・View XVL files created using iXVL Publisher. XVL files are typically less than 1% of the original CAD file size. (Only XVL files created with iXVL Publisher are supported.) ・Easy, intuitive multi-touch operation to rotate, pan and zoom in/out (Drag to rotate, T wo-finger drag to pan and pinch to zoom in/out).・Fit the screen to portrait and landscape according to the iPad / iPhone position.・Apply snapshots created by XVL S tudio.・Show assembly tree.・Select assembly / parts.・Show / Hide the selected assembly / parts.・Show Properties of selected assembly / parts.・Application includes icons to fit to screen and selected assembly / parts, restore original viewpoint and select shaded or shaded with wire display mode.・Switch the display accuracy using 3 different levels.・Easily copy files to your iPad using the iT unes file transfer function.・Download XVL files and save their URLs from any web server.・List XVL files on your iPad / iPhone.・Delete XVL files by swiping the file name.・Six XVL sample files are included.・Available on iPad / iPad 2 / iPhone 4 / iPhone 4S / iPod T ouch (4th Generation).2.2 Restrictions・XVL assembly files with the extension xv0 and encrypted XVL files cannot be shown.・Signed XVL files can be imported but the signatures are not shown.・Notes and dimensions are not shown.・The initial background color, visibility, layout and viewpoint saved in XVL files are applied to iXVL Player.・Some very large XVL files may not show correctly in iXVL Player. Such files may cause iXVL Player to close because of insufficient memory or the shape may not be shown correctly.・V-XVL Ver. 5 and Ver. 7 cannot be read.・T exture images and image notes can be used only if they are embedded in data files.・If Web files are opened in iXVL Player immediately after the iPad is turned on, the error message “No Internet connection” (on iOS4 only) appears. The files can be openedafter accessing to the Internet in Safari or other applications.・Fonts unavailable on the iPad or iPhone are not displayed.2.3 Known issues・Environmental texture mapping is disabled.・XVL data signed as browsable and measurable cannot be read.・Repeated file reading may cause a black screen or corrupt the display.・Japanese characters may not be displayed correctly in environments where languages other than Japanese and English are used.・Note and dimension views are listed as “Unknown” in the snapshot list.・3D notes may not be selectable in some cases.・Elements selected in the 3D view may not be reflected in the assembly tree.・Operating with three or more fingers to operate models may cause them to be hidden on the screen.・Notes or markups corresponding to annotation views applied may not be correctly reflected.・Changing display accuracy may cause parts of shapes to be hidden.・Snapshots added via automatic update may not be applied correctly.・When snapshots are applied, the display settings for cross sections, clipping and view areas may not be applied.・The display of the elements listed below is different from that in XVL S tudio and XVL Player.Rims of notes and trace linesInfinite lines, infinite points, user coordinate systemsTrace line typesBackgrounds of circle frames for notesEdges, wireframes, markups, bounding boxes with the same black or white status as the view backgroundParts to which transparent textures are set3 How to operate iXVL Player3.1XVL file copyXVL files are copied to the iXVL Player file list by using the file sharing function of iTunes.Connect iPad / iPhone with the PC where iTunes has been installed using a USB cable, and iT unes will start. Select the iPad / iPhone device from the iT unes screen.1. Se lect a device.Select “App” and scroll down the pane to show “File sharing.”From the “App ” list, select “iXVL Player .” T o add XVL files, drag and drop XVL files to the “Document” section.In the “Documents” section, the files can be deleted or renamed and files in iPad / iPhone can be saved in the PC.・ In the “Documents” section, pre-installed sample files or the ones downloaded in the proceduredescribed in 3.3 are not shown.2. Scroll down.1. Se lect “iXVL Play er .”ToyTractor.xv22. Drag and drop an XVL file to here.・ The files copied using iTunes can be deleted or renamed. ・ XVL assembly files (*.xv0) cannot be browsed on iXVL Player .After XVL file copy finishes, you may terminate iTunes and disconnect the iPad / iPhone.3.2File list operationT ap the iXVL Player icon on iPad / iPhone. As iXVL Player starts, the file list will be shown.In the list, six sample files are shown. (T o open C01-Digital_Camera.xv2, your iPad / iPhone must be connected to the internet.)T apping a file name opens the file to browse it.T apping shown in the top right of the title bar opens the message box, in which the iXVL Player version can be confirmed.If you swipe a file (set your finger on a file and slide it horizontally on the screen), the “Delete ” button appears to delete the selected file from iPad / iPhone.※ File deletion cannot be undone. If you have deleted a sample file and want to replace it,download it from the iXVL information site (/products/ixvl/index.html) and copy the file to iXVL Player as described in section 3.1 or in section 3.3.T ap a file: Browsing the selected XVL file.1. Swipe the file to be deleted.2. T ap “Delete.”3.3File download and link saving from Web pages (Player)XVL files on any Web pages can be downloaded or the URLs of the files can be saved.T apping shown in the top right of the title bar opens the web browser. T apping the “”button opens the iXVL information page. (/products/ixvl/index2.html)Open Web BrowserEnter the URL of the Web page of XVL files and tap the link to an XVL file on the Web page, and the dialog box shown below opens.If you want to view the latest file via Wifi network, “Add as a link” is recommended. If you take your iPad to somewhere where you can’t use a Wifi network, but would like to show 3D files with iXVL Player, “Download” is recommended.Selecting “Add as a link”, the file name and its URL are saved and then appear on file list. On the file list, the file name is shown in blue with the URL.Selecting “Download”, the file has downloaded and saved on your iPad / iPhone with the URL. On the file list, the file name is shown in black with the URL.If you don’t want to “add as a link” or “download”, tap the outside of the dialog. (With iPhone, “Cancel” button appears and tap it.)When using “Download” and both the XVL file and URL are saved, tapping,the files are automatically replaced with the latest files on that web site. It is useful when you need to update the files when connected to a network and then display the files in an area when not connected.iXVL product information site (http://www /products/ixvl/index.html ) provides some sample files for iXVL Player . Downloaded fileA dded as a linkiXVL Player Operation Manual3.4 3D view window operation #1 (Player)T apping a file as described in 3.2 opens the 3D view window . The XVL file can be browsed in the window by using the operations listed below:Tapping initializes the viewpoint and layout.The 3D view window appears as shown below . Use the icons to browse the model.iPadShows the current f ile name.Goes back to the file list. Shows the version information. Initia lizes the v ie wpoint and lay out.iPhoneSome of the functions are available on the iPhone.Even if the iPad / iPhone is rotated, the view is shown in the same direction.3.53D view window operation #2 (Player)On iXVL Player, as well as the basic view functions as described in 3.4, additional functions can be used for browsing manufacturing information.・Showing and hiding wireframe displayT apping opens the dialog box to show or hide the wireframe display.・ Selecting the display accuracyOn iXVL Player , the display accuracy can be selected. When is tapped, the dialog box opens. “Normal ” is selected by default. Selecting “Fine” or “Extra Fine” shows 3D models with a finer display .※ For large-size 3D data, switching the display accuracy may take a long time to refresh theview .・Applying snapshotsT apping shown at the bottom right of the screen shows the list of snapshots saved in the file created by XVL S tudio. Selecting a snapshot from the list applies it to the 3D view.shot with opens it・Browsing the assembly tree and selecting assemblies/parts (or parts in the following description)T apping in the bottom right of the 3D viewer shows the assembly tree. In the tree, tapping on the left expands the hierarchy and the child hierarchies will be opened. T apping a part name highlights it both in the tree and on the 3D view shown in the bounding box. When the assembly tree is open, tapping a part in the 3D view selects and highlights it in the assembly tree. The selected part name is shown at the bottom of the screen.T o close the assembly tree, tap again. T o cancel the part selection, tap anywhere in the background.Note that the assembly tree shows only assemblies and parts and subordinate bodies or shells arenot shown.T apping the same part twice or more in the 3D view changes the selection to the upper assemblies.・Fitting the entire model or the selected part to the screenWhen a part is selected and is tapped, the selected part is shown to fit it to the screen. T appingwithout selecting a part shows the entire model to fit it to the screen.・ Showing and hiding the selected part2. T ap the icon.Selecting a part and tapping hides the part. T apping the icon again shows the part.In the assembly tree, the names of hidden parts are shown in gray . If a hidden part is selected in the assembly tree and is tapped, the part will be shown.1. Se lect a p art.2. T ap the icon.・ Checking the properties of the selected partSelecting a part and tap shows its properties set by a CAD system or XVL S tudio. When a part of the properties is shown in the dialog box, tap the item to show all the information.3. T ap the ite m to show all the information.1. Se lect a p art.・External LinkIf a link is set to assemblies, parts or notes, tapping these elements opens Safari andshows the link destination. If the destination is an XVL file, tapping an element does notcause Safari to open.If the iXVL Player screen does not appear when Safari opens, swipe the window with fouror five fingers to return to the iXVL Player screen. This function is available if [MultitaskingGestures] on the [General] tab of the setting application is checked.・Specifying the center of view rotationLong-touching a point with a finger moves the screen center to the point. After that, 3Dmodels are rotated with the center lying on this point.4 FAQ and Inquiry4.1 F AQWhat size XVL file can be read?XVL files up to approximately 15MB in size can be opened and viewed on iPad 2. Actual performance may vary depending on the features of the model and the spec of devices. T ypically, 15MB XVL files can represent a CAD file of approximately 1GB or larger.I have XVL files copied or downloaded via iT unes and they are shown in the file list, but themessage ”iXVL Player cannot load an XVL which is not processed by iXVL Publisher.” appears to result in an error to open the files.iXVL Player can show only XVL files output by iXVL Publisher. XVL files output by XVL Converter or XVL S tudio can be shown on iXVL View.Although the XVL file was copied by iT unes, it is not displayed on the iXVL Player file list.Only XVL files with the extension .xv2 and .xv3 are supported by iXVL Player. xv2 and .xv3 is the extension used by P-XVL / V-XVL / U-XVL files. .xv0 files must be converted to .xv2 or .xv3 before viewing with iXVL Player.iXVL Player fails to open the file.This may occur when the XVL file is too large to process. If you encounter this, we recommend using XVL S tudio to create smaller files (e.g. sub-assemblies) from the larger file.Although I was able to open the file, not all of the data is displayed.This may occur in XVL files including a shape with an extremely large amount of display polygons.There is not solution at this time and we recommend using CAD system or XVL S tudio to divide the model into smaller segments.I restored iPad / iPhone from the backup file and the file name disappeared.When iPad / iPhone is restored from the backup file or the free storage space is running short, the XVL files with URLs downloaded from the Web site will disappear from the file list. This is the currentspecifications of iXVL Player. Please access to the Web site and download the files again.Is technical support available?T elephone support is not available for the free iXVL Player product. Y ou can submit support requests via email and tell us your opinion via the Lattice T echnologywebsite. /support/support_request.htmAre there any plans to add more features/function to iXVL Player?There are plans for future updates. We will announce updates via our website when they areavailable. /products/ixvl/index.htmlAre there any plans to support other mobile devices (Android, etc.)?We are looking at the possibility of developing other versions of iXVL Player. Additionally, with XVLS tudio 10.1 or later, it will be possible to save data in an HTML5 compatible form. This will allow 3D data to be viewed in any environment that supports HTML5 (Windows, Android, etc.). Please look for details at /products/ixvl/index.html4.2InquiryIf you have any issue or inquiry related with iXVL products, you can submit support requests via email and tell us your opinion via the Lattice T echnology website.Lattice T echnology Website /products/ixvl/index.html5 Release InformationJuly 27, 2012 iXVL Player Ver. 2.0・Enabled external linking.・Enabled specification of the center for view rotation.March 23, 2011 iXVL Player V er. 1.1・Reflected “Display view with its upper direction fixed” set by XVL Studio.・Changed the contents in the Information dialog box.・Changed the default Web page opened by clicking the “+” button.・Fixed bugs.January 27, 2011 iXVL Player V er. 1.0・First release.6 CopyrightsiXVL Player V er. 2.0Copyright (C) 2012 Lattice T echnology Co.,Ltd. All rights reserved.iXVL Player V er. 1.1Copyright (C) 2012 Lattice T echnology Co.,Ltd. All rights reserved.iXVL Kernel V er. 7.4aCopyright (C) 1998-2011 Lattice T echnology Co.,Ltd. All rights reserved.Zlib version 1.1.3Copyright (C) 1995-1998 Jean-loup Gailly and Mark Adler.All rights reserved.The Independent JPEG Group's JPEG software release 6bCopyright (C) 1991-1998, Thomas G. Lane. All rights reserved.Libpng version 1.2.6 - August 15, 2004Copyright (c) 1998-2004 Glenn Randers-PehrsonCopyright (c) 1996-1997 Andreas DilgerCopyright (c) 1995-1996 Guy Eric Schalnat, Group 42, Inc.Libtiff version 3.5.7Copyright (c) 1988-1997 Sam LefflerCopyright (c) 1991-1997 Silicon Graphics, Inc.Permission to use, copy, modify, distribute, and sell this software andits documentation for any purpose is hereby granted without fee, providedthat (i) the above copyright notices and this permission notice appear inall copies of the software and related documentation, and (ii) the namesof Sam Leffler and Silicon Graphics may not be used in any advertising orpublicity relating to the software without the specific, prior writtenpermission of Sam Leffler and Silicon Graphics.THE SOFTW ARE IS PROVIDED "AS-IS" AND WITHOUT W ARRANTY OF ANY KIND, EXPRESS, IMPLIED OR OTHER WISE, INCLUDING WITHOUT LIMIT A TION, ANY W ARRANTY OF MERCHANT ABILITY OR FITNESS FOR A P ARTICULAR PURPOSE.IN NO EVENT SHALL SAM LEFFLER OR SILICON GRAPHICS BE LIABLE FOR ANY SPECIAL, INCIDENT AL, INDIRECT OR CONSEQUENTIAL DAMAGES OF ANY KIND, OR ANY DAMAGES WHA TSOEVER RESUL TING FROM LOSS OF USE, DA T A OR PROFITS, WHETHER OR NOT ADVISED OF THE POSSIBILITY OF DAMAGE, AND ON ANY THEORY OF LIABILITY, ARISING OUT OF OR IN CONNECTION WITH THE USE OR PERFORMANCE OF THIS SOFTW ARE.Lattice T echnology, Inc.582 Market S treet, Suite 1215San Francisco, CA 94104+1 415- 274-1670******************※All trademarks belong to their respective owners.※It is prohibited to copy or distribute pictures, text or any other materials which appear in this document, in any form or by any means, including electronic or technical means, without written permission from Lattice T echnology.Copyright © Lattice T echnology Co., Ltd. All Rights Reserved.。
IXIA IxExplorer 流量和动态路由配置
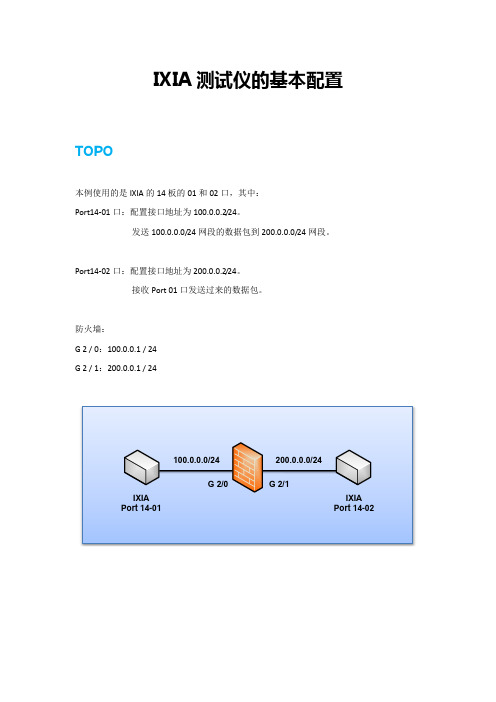
IXIA测试仪的基本配置TOPO本例使用的是IXIA的14板的01和02口,其中:Port14-01口:配置接口地址为100.0.0.2/24。
发送100.0.0.0/24网段的数据包到200.0.0.0/24网段。
Port14-02口:配置接口地址为200.0.0.2/24。
接收Port 01口发送过来的数据包。
防火墙:G 2 / 0:100.0.0.1 / 24G 2 / 1:200.0.0.1 / 24IXIA Port 14-01IXIAPort 14-02 100.0.0.0/24200.0.0.0/24G 2/0G 2/1在IXIA为端口配置IP地址,开启ARP、PING功能1、运行IXIA,展开所要使用的测试仪端口,双击右侧的“IxRouter”图标。
2、在随后弹出的对话框中,点击“Select Ports”按钮。
3、勾选14板上的01和02口,并点击OK。
随后可以看到接口已被增加4、点击“Protocol Management”,勾选“Enable ARP”和“Enable PING for IPv4”,使测试仪具备ARP和PING能力。
5、点击“Protocol Interfaces”,依次选中两个端口,分别点击“+IPv4”按钮,随后输入·14板port 01口:IP:100.0.0.2 / 24 GW:100.0.0.1·14板port 02口:IP:200.0.0.2 / 24 GW:200.0.0.1这里配置的IP地址是测试仪与防火墙连接的直连接口地址,配置后,就可以从防火墙PING通测试仪了。
6、让测试仪学习到网关的MAC。
点击“ARP”选项,在右侧将所有接口全部选中,点击“Transmit ARP”按钮,随后测试仪将自动学习到网关的地址。
学习前(只有2行):学习后(显示4行):7、依次按下图展开,点击“IP”,按照下图修改如下三项:·TestPort First IP·TestPort Last IP·Gateway/DUT Address设置后,在随后的打流过程中,当防火墙收到目的地为100.0.0.100 --- 100.0.0.199的数据包后,会在100.0.0.0/24的广播域中广播ARP请求。
Aixplorer使用指南-基础操作篇

QUICK GUIDE 快速应用指南WELCOME!欢迎!感谢并祝贺您选择Aixplorer®新声威特种鉴别诊断超声系统Aixplorer®新声威特种鉴别诊断超声系统包含以下文本文件:• 快速应用指南• 用户指南本《快速应用指南》包括关于产品使用的基础信息。
并不能替代《用户指南》。
为确保您正常、安全的使用本产品,请仔细阅读《用户指南》。
Aixplorer®新声威特种鉴别诊断超声系统的设计保证将临床操作和患者的安全风险降至合理可行的最低范围。
区域客服代表能够帮助解决您的疑问。
请与区域销售或客服人员联系,获得更多辅助信息。
GETTING STARTED系统开启1. 开/关系统开机按下位于机身后方的I 键按下控制面板左侧扬声器旁的On/Off 键系统启动关机按下控制面板上的On/Off 键主屏幕显示关机菜单选择Yes。
按下机身后方的0 键关闭系统电源。
2. 进入患者信息列表按下控制面板上的Patient 键。
您将看到以下内容:·主屏幕显示患者信息列表·触摸屏显示键盘使用轨迹球和/或键盘箭头移动光标位置。
填写相应数据。
GETTING STARTED系统开启触摸屏上会显示正在输入的文字(键盘上方的白色区域内)。
使用backspace 键删除刚刚输入的文字。
将光标移至需要删除的文字,然后单击Delete LINE,用来删除已经输入的文字。
编辑完成后,按下Patient 键退出患者信息列表。
3. 选择探头和预设置按下控制面板上的Probe 键。
触摸屏上显示探头选项。
单击tab 选择需要的应用系统。
触摸屏上将显示与此应用系统相关的探头。
单击preset 选择适合的探头和预设置条件。
系统将加在选定的预设置条件,并进入实时B-超成像模式。
更多关于系统开启、患者信息或探头选择的详细信息,敬请参考《用户指南》。
B-MODE IMAGINGB-超成像调节以下参数,以获得拥有最佳细节显示和更高分辨率的稳定图像。
xyplorer使用技巧

xyplorer使用技巧【实用版】目录1.Xshell 简介2.Xshell 的基本操作技巧3.Xshell 的高级操作技巧4.Xshell 的实用功能5.Xshell 的优点与不足正文一、Xshell 简介Xshell 是一款功能强大的 SSH 客户端,它支持 SSH1 和 SSH2 协议,可以方便地连接到远程服务器进行管理。
Xshell 不仅具有简单易用的界面,还提供了众多实用功能,如:会话管理、自动登录、远程文件编辑等,为广大用户提供了一个高效的远程管理工具。
二、Xshell 的基本操作技巧1.连接远程服务器:使用 Xshell 可以快速连接到远程服务器,用户只需输入服务器的 IP 地址或域名,然后输入用户名和密码即可。
2.终端类型选择:Xshell 支持多种终端类型,如:TTY、Xterm、VT100 等,用户可以根据自己的需求进行选择。
3.粘贴板功能:Xshell 提供了粘贴板功能,用户可以将本地文件粘贴到远程服务器上,也可以将远程服务器上的文件粘贴到本地。
4.会话管理:Xshell 可以方便地管理多个会话,用户可以同时连接到多个远程服务器,实现高效的远程管理。
三、Xshell 的高级操作技巧1.脚本编写:Xshell 支持脚本编写,用户可以通过脚本实现一些自动化的操作,如:自动登录、自动备份等。
2.远程文件编辑:Xshell 可以方便地进行远程文件编辑,用户可以直接在 Xshell 中编辑远程服务器上的文件。
3.压缩与解压缩:Xshell 支持压缩与解压缩功能,用户可以方便地将远程服务器上的文件进行压缩或解压缩。
四、Xshell 的实用功能1.自动登录:Xshell 可以实现自动登录,用户只需设置一次,以后就可以自动连接到远程服务器。
2.断点续传:Xshell 支持断点续传功能,用户可以在上次断开的地方继续传输文件。
3.文件传输监控:Xshell 可以监控文件传输过程,用户可以实时查看文件传输的进度和状态。
IxExplorer快速操作指导V1.0

Ixia China IxExplorer 快速操作指导IxiaIxExplorer快速操作指导1.在客户端的PC上启动IxExplorer连接到Ixia Chassisa.启动IxExplorerb.输入相应Ixia Chassis的IP地址c.登陆到Ixia Chassis.d.输入你的名字,最好再加上你的电话或其他的联系方式,好方便其他工程师需要这个端口时和你联系.2.占用需要使用的端口a.展开Ixia Chassis.b.展开你需要使用的测试模块.c.右击相应的测试端口,选择“Take Ownership”来占用测试端口.3.设置端口的属性a.展开测试使用的端口.b.选择相应的端口,并双击“Port Properties”.c.根据相关测试要求,选择适当的速率和双工模式.d.选择物理媒介模式和Stream模式.4.配置端口协议a.在发送端口上,双击 IxRouter.b.选择测试端口.c.选择参加测试的端口.d.在参加测试的端口上使能ARP和PING.e.在左边的目录结构中选择“Protocol Interfaces”.f.选择第一个端口,选择“Add Multiple Interfaces”,运行“InterfaceWizard”.g.选择“Connected Interfaces”.h.选择在端口上需要创建几个虚拟接口,配置相关接口IP地址和网关,如果需要可以设置虚拟接口VLAN.i.选择添加新建的虚拟接口到已经存在的借口上或者删除以前的虚拟接口添加新的接口.j.重复上述的步骤在其他接口上进行相应的设置.5.创建流a.在发送端口上点击Stream(“Advanced Streams”或者“PacketStreams”),在右边将会看到相关流的配置。
双击流,出现流的配置对话框。
b.在“Stream Properties”的配置窗口中,如果需要做三层IP的转发测试,在DA中选择“ ARP Discovery”;c.如果需要可以继续设置 VLAN, Ethernet和 IPv4;d.如果需要对IP Header进行编辑,在IPv4后选择“ Edit”,修改IP地址,TOS/DSCP等等字段;e.选择发送流量帧的大小;f.在“ Stream Control”下,设置流量发送的速率;g.重复上面的步骤设置其他端口上的流量;h.如果做三层IP测试,在“Discovered Neighbours”tab中查看是否发现被测设备;i.选择端口,点击开始发送的图标;j.在端口下的“Statistics View”中可以看到端口的流量统计;6.创建统计视图a.可以通过创建统计视图来同是观看多个端口的流量统计。
IxExplorer使用方法小结

使用方法小结From IxExplorer™ User Guide(Version 1、0)刘凯波Feb、2013目录§1、什么就是IxExplorer .................................................................................................... - 1 -§2、搭建测试环境 ............................................................................................................. - 1 -§2、1、物理连接 ........................................................................................................... - 1 -§2、2、仪表加电启动 ................................................................................................... - 1 -§2、3、记下仪表的IP地址 .......................................................................................... - 1 -§2、4、启动IxExplorer客户端并接入仪表................................................................. - 2 -§3、发送您的第一个报文 ................................................................................................. - 3 -§3、1、占用端口 ........................................................................................................... - 3 -§3、2、恢复端口出厂模式 ........................................................................................... - 4 -§3、3、设置端口属性 ................................................................................................... - 5 -§3、4、创建与编辑数据流(Packet Stream) ................................................................. - 7 -§4、流构建与时延统计 ................................................................................................... - 12 -§5、配置端口协议与IP地址 .......................................................................................... - 14 -§6、自定义报文统计-基于端口的统计.......................................................................... - 19 -§7、使用IxExplorer Ping DUT 接口地址 ....................................................................... - 21 -§8、抓包分析-基于流的统计.......................................................................................... - 23 -§9、更改IxExplorer默认抓包大小................................................................................. - 27 -§10、报文回放 ................................................................................................................. - 28 -§11、统计表格计算 ......................................................................................................... - 30 -§12、强大的自定义域UDF ............................................................................................. - 32 -§12、1、什么就是UDF与Table UDF ......................................................................... - 32 -§12、2、通过表格自定义域构造EtherIP .................................................................. - 32 -§12、2、1、EtherIP协议 ........................................................................................ - 32 -§12、2、2、提出问题 ............................................................................................. - 32 -§12、2、3、解决方法 ............................................................................................. - 32 -§1、什么就是IxExplorerIxExplorer就是随Ixia机框提供的基础工具。
Explorer700快速使用指南

Explorer 700快速使用指南一、准备工作在使用Explorer 700前请为主机电池充电,连续充电时间不小于12小时。
也可直接连接电源使用Explorer 700。
1、打开天线与主机一体扣紧装置,天线主机一体扣紧时,主机电池无法安装在主机上。
2、安装SIM卡、安装电池3取下电池示意4、连接主机和天线连接线两端接口不同,螺口端接主机,卡口端接天线。
以上工作完成后,Explorer 700初步安装完成。
二、Explorer 700接口说明Explorer 700显示屏和键盘说明开、关机键 电源指示灯信息指示灯显示屏三、开机长按开机键,电源灯变绿,屏幕变亮。
键盘 提示输入PIN码,按C 键退出进入指向模式调整天线方向对准卫星,指向蜂鸣器会根据信号强度发出提示音,声音越高信号越强待信号强度超过50dBHz时,按OK键显示屏会显示“searching”,然后跳转到“registering”,直至“Ready”这时表示您的Explorer 700已经注册进网络并处于待机状态,您可以进行语音通话了。
四、连接电脑进行数据通信在连接电脑前,请在电脑中安装BGAN LAUNCHPAD软件。
通过网线将电脑和Explorer 700LAN 1口连接打开BGAN LAUNCHPAD 软件,双击桌面图标出现设备搜索向导选择EXPLORER 700选择完成后点击“Search”BGAN LAUNCHPAD会搜索设备搜索到设备后会读取设备状态信息,并相应的反映在软件界面上。
点击BGAN LAUNCHPAD “Data”按钮进入数据连接选项上图表示一个标准数据连接已经打开,单击该图标断开连接,再次单击又恢复连接。
处于连接状态下时可以进行网络浏览或发送邮件等数据通信。
注:通过Explorer 700进行上网操作,需要将电脑TCP/IP属性设置为自动获取IP地址经过以上设置您就可以通过Explorer 700进行语音、数据通信了。
- 1、下载文档前请自行甄别文档内容的完整性,平台不提供额外的编辑、内容补充、找答案等附加服务。
- 2、"仅部分预览"的文档,不可在线预览部分如存在完整性等问题,可反馈申请退款(可完整预览的文档不适用该条件!)。
- 3、如文档侵犯您的权益,请联系客服反馈,我们会尽快为您处理(人工客服工作时间:9:00-18:30)。
使用方法小结FromIxExplorer™ User Guide(Version 1.0)刘凯波Feb.2013目录§1. 什么是IxExplorer ................................ - 1 -§2. 搭建测试环境.................................... - 1 -§2.1. 物理连接 .................................... - 1 -§2.2. 仪表加电启动 ................................ - 1 -§2.3. 记下仪表的IP地址............................ - 1 -§2.4. 启动IxExplorer客户端并接入仪表.............. - 2 -§3. 发送你的第一个报文.............................. - 3 -§3.1. 占用端口 .................................... - 3 -§3.2. 恢复端口出厂模式 ............................ - 4 -§3.3. 设置端口属性 ................................ - 5 -§3.4. 创建和编辑数据流(Packet Stream) .............. - 7 -§4. 流构建和时延统计............................... - 12 -§5. 配置端口协议和IP地址.......................... - 14 -§6. 自定义报文统计-基于端口的统计.................. - 18 -§7. 使用 IxExplorer Ping DUT 接口地址.............. - 20 -§8. 抓包分析-基于流的统计.......................... - 22 -§9. 更改IxExplorer默认抓包大小.................... - 26 -§10. 报文回放...................................... - 27 -§11. 统计表格计算.................................. - 29 -§12. 强大的自定义域UDF ............................. - 31 -§12.1. 什么是UDF和Table UDF ..................... - 31 -§12.2. 通过表格自定义域构造EtherIP ............... - 31 -§12.2.1. EtherIP协议 ........................... - 31 -§12.2.2. 提出问题............................... - 31 -§12.2.3. 解决方法............................... - 31 -§1. 什么是IxExplorerIxExplorer是随Ixia机框提供的基础工具。
通过这个工具可以完全配置,控制和监控Ixia仪表的所有资源。
该工具可以构造和发送报文,捕获和分析报文,统计时延、抖动和丢包率等。
通过灵活的运用,可以构造,分析和统计百万级别的业务流。
§2. 搭建测试环境§2.1. 物理连接用户PC通过网络接入Ixia仪表的管理口,参见上图蓝色的线。
被测设备和Ixia测试板卡端口连接,参见上图棕色的线。
§2.2. 仪表加电启动把仪表插上管理口的网线,接通电源并启动。
大约过3分钟后仪表可以ping通。
仪表启动的时候自动启动IxServer程序,这个程序控制着客户端和板卡(Card)之间的通信。
如果IxServer启动出现Ready字样,表示启动正常,否则客户端无法接入。
如果启动正常,板卡会加电,状态指示灯亮。
如果IxServer启动过程中有错误,则板卡不会加电,所有板卡的指示灯灭。
§2.3. 记下仪表的IP地址记下Ixia仪表的IP地址,方法见下。
仪表支持接上显示器和键盘鼠标来操作。
常见的任务包括察看和更改IP地址,更新Ixia软件版本,注册和管理license,故障排查等操作。
Windows的用户名是ixia,密码是机框序列号。
§2.4. 启动IxExplorer客户端并接入仪表1.启动IxExplorer程序可以通过Start-> Programs-> Ixia-> IxOS-> Ixia IxExplorer来启动也可以通过桌面快捷方式启动2.输入机框的IP地址,请参见上节。
3.IxExplorer界面测试端口工具栏图标说明测试端口界面说明§3. 发送你的第一个报文环境准备:把一对端口通过网线线自环。
背景知识:仪表的测试端口默认没有任何2层MAC地址和3层IP地址。
根据测试的需要,用户可以仿真大量的2层和3层地址。
另外也可以给端口配置3层地址以便和其他网源交互。
在这一节中,我们配置第一个端口作为源端口仿真1个MAC地址,另一个端口作为目的仿真1个MAC地址。
发送线速的报文。
§3.1. 占用端口我们需要占用端口,这样其他用户就知道此端口有人在用,避免无意中破坏实验室环境。
输入你的名字,最好再加上你的电话或其他的联系方式,方便其他同事要用时有效联系。
1.登入机框2.占用需要使用的端口,如下步骤:2.1.展开Ixia Chassis .2.2.展开你需要使用的测试模块.2.3.右击相应的测试端口(Port),选择“Take Ownership”来占用测试端口.●Clear My Ownership - 清除选中端口我的所有权●Clear All Ownership - 强制清除选中端口其他用户的所有权。
●Take Ownership - 占用选中端口●User Management... - 用户管理§3.2. 恢复端口出厂模式为了保证一个干净的测试环境,在搭建新环境之前重置一下端口状态是个良好习惯。
§3.3. 设置端口属性1.展开测试使用的端口(Port).2.选择左侧相应的端口(Port),并双击右侧“Port Properties”(端口属性),或者在端口(port)上单击右键,选择端口属性(Properties),进入端口设置页面。
打开后,可以做如下设置:●端口自协商(Auto Negotiation)。
10/100/1000M速率自协商。
模拟拔出、插入线缆等。
●传输模式(Transmit Modes)。
每个端口必须设置它的传输模式用Packet streams(报文流)还是Advenced stream(高级流)。
端口的PHY用电口(Copper)还是光口(Fiber)。
✓Packet Streams(报文流) - 允许硬件最多产生 256 streams;每个流可以包含 16 million bursts, 每个Burst可以包含 16 million packets。
✓Advenced stream(高级流) -允许硬件最多产生 256个间隔的数据流 (streams).这些流可以同时发送。
●流控(Flow Control)。
反压帧等。
3.根据相关测试要求,选择适当的速率和双工模式.4.选择物理媒介模式(PHY)和传输流模式(Stream),如b中介绍.§3.4. 创建和编辑数据流(Packet Stream)1.默认情况下,每个端口有一条64字节的数据流,发送速率为100%线速。
点击绿色的三角形就可以发送报文。
注解:可以通过右键添加或者删除数据流2.在左边相应的发送端口(Port)下点击数据流(”AdvancedStreams”或者”Pocket Stream”),如图两种可能,在右边将会看到相关流的配置。
双击流,出现配置对话框“Stream Properties”。
3.“Stream Control”标签栏中,可以设置控制参数在“Stream Properties”的配置窗口中,点击“流量控制”(Stream Control)标签栏,给流写一个名字(Name),比如test_flow。
发送类型(Control)为连续发送(Continuous Packet)。
在右边速率控制(Rate Control)可以修改报文速率,有3种方式:●速率百分比(%Max.Rate)●每秒报文数目(Packets/Sec, pps)●比特率(层二)(Bit Rate,bps)。
不包含前导码(Preamble,8字节)还有帧间隙(Inter-Packet Gap,IPG,12字节可设置)4.“Frame Data”(帧数据)标签栏中,可以编辑报文内容。
4.1.“DA/SA”子标签下可编辑MAC地址默认的源MAC(Source Adress)是00 00 00 00 0A 00,默认的目的MAC(Destination Adress)是00 00 00 00 0B 00。
可以根据用户的组网灵活修改,在“Frame Data”标签栏的子标签“DA/SA”下的“Mode”(模式),包括“Increment”(周期递增),“Continuous Increment”(连续递增),“Decrement”(周期递减),“Continuous Decrement”(连续递减),“Fixed”(固定),“Random”(随机),“ARP/ Discovery”(ARP/发现)。
4.1.1.如果需要做第三层IP的转发测试,在“Frame Data”标签栏的子标签“DA/SA”下,点击“Destination Adress”(目的MAC)里的“Mode”(模式),选择“ARP/Discovery”;4.2.“Protocols”子标签下可编辑协议。
4.2.1.如果需要可以继续设置VLAN、Ethernet和IPv4 ;以UDP报文为例,源IP是1.1.1.2,目的IP是1.1.1.1,源端口号是63,目的端口号是63。
数据链路层,可以支持VLAN和QinQ,MPLS 等。
第三层报文协议可以选择IPV4/V6。
