7s26精工表芯
精工光波表中文使用说明书
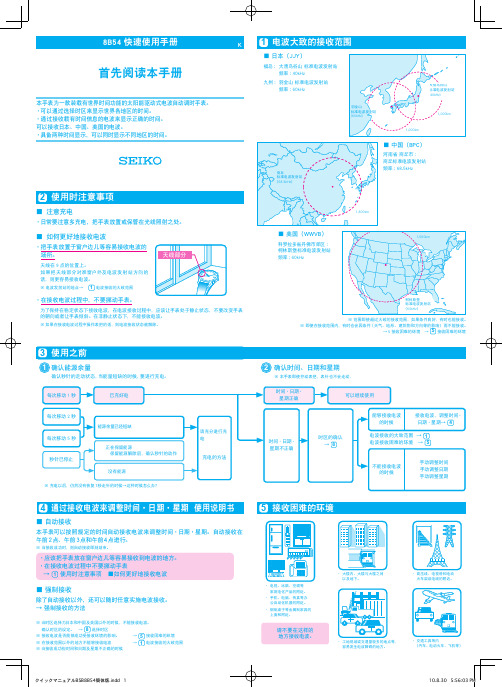
首先阅读本手册8B54快速使用手册K使用之前3确认能源余量确认时间、日期和星期确认秒针的走动状态,当能量短缺的时候,要进行充电。
※ 本手表即使拧动表把,表针也不会走动.每次移动1秒每次移动2秒每次移动5秒秒针已停止已充好电※ 充电以后,仍然没有恢复1秒走针的时候→这种时候怎么办?时间·日期·星期正确可以继续使用时间·日期·星期不正确时区的确认→ 8电波接收的大致范围 → 1电波接收困难的环境 → 5不能接收电波的时候手动调整时间手动调整日期手动调整星期能够接收电波的时候電接收电波,调整时间·日期·星期→ 412能源余量已经短缺正在保留能源 保留能源解除后,确认秒针的动作没有能源充电的方法请充分进行充电使用时注意事项2・日常要注意多充电,把手表放置或保管在光线照射之处。
■ 注意充电■ 如何更好地接收电波・ 把手表放置于窗户边儿等容易接收电波的场所。
天线在9点的位置上。
如果把天线部分对准窗户外及电波发射站方向的话,则更容易接收电波。
天线部分※ 电波发射站的地点→ 1电波接收的大致范围・在接收电波过程中,不要挪动手表。
为了保持在稳定状态下接收电波,在电波接收过程中,应该让手表处于静止状态,不要改变手表的朝向或者让手表倾斜。
在非静止状态下,不能接收电波。
※如果在接收电波过程中操作表把的话,则电波接收状态被解除。
通过接收电波来调整时间·日期·星期 使用说明书4・应该把手表放在窗户边儿等容易接收到电波的地方。
・在接收电波过程中不要挪动手表 → 1 使用时注意事项 ■如何更好地接收电波除了自动接收以外,还可以随时任意实施电波接收。
→ 强制接收的方法※ 当接收成功时,则自动接收即刻结束。
■ 自动接收■ 强制接收※ 当时区选择为日本和中国及美国以外的时候,不能接收电波。
确认时区的设定。
→ 8 选择时区※ 接收电波是否能够成功受接收环境的影响。
十大机芯

第一部分:手动部分.我很欣赏“手卷”这个日本词语.它那么的形象,那人和表的,通过那细小的动作,便紧密的联系在了一起.“我给你动力,你为我工作”.我爱手动,爱的要死.1.ETA7001:这枚机芯,是传统瑞士小三针版路的一个总结。
他的样子,够小巧,也够精制。
它是很多不需要自厂生产品牌的手动芯的首选.从1971设计制造开始,在它之前之后的2660,2691,2801,都不如他影响大.这尺寸只有23.3MM* 2.5MM的17钻芯,便被太多品牌选用.连自己有无数手动资本的OMEGA,也把他变成了CAL.651来装备自己的产品.而德国的NOMOS,更是靠它大出风头。
它的动力储存42小时注意:它以前,属于著名的Peseux。
2.ETA6497:本身是Unitas最后的通用级别的怀表芯,对于手表说,很大,有36.6MM的直径和4.5MM的厚度。
以前,除了TISSOT批量做怀表需要它,其他的厂商可以置之不理。
但流行大表的风潮,却让它美美风光了一把。
大,就是好,准确,稳定。
虽然是18000的摆幅,却可以把很多现代的小芯,打的落花流水。
同批的型号,是6498。
只是,小秒针转移了90度。
3.CELLINI 1602:没人太清楚这芯的资料,包括很多的玩家,人们太多的注意力,都集中在CELLINI那美艳不可方物的外形上,所以,并不在乎它的里面到底有什么心脏.数据如下:直径20。
8MM,厚度2。
3MM,摆幅21600/每小时。
他的机板,具有可调校大小摆系统,可以精确调整摆轮的摆幅.调校部分取消了快慢针,靠摆轮上有2颗微调螺丝控制,单层结构铍青铜合金游丝,具有4方位调校。
手感,爽的晕。
4.JLC CAL.822:这枚1992年开线生产的机芯,尺寸不大,但却是近似长圆的22.6 x 17.2的格局.厚度: 2.94. 它是现代JLC的手卷代表作.装配在翻转系列的手卷上.它衍生了823,824等多功能产品.它的妙处所在:微调在外桩上,有+-号进行控制.打磨的水平,以是顶级的感觉。
精工石英表机芯的技术参数

精工石英表机芯的技术参数------ (附机芯图和点评)几类常见机芯的技术参数1)三针简洁类1N01:时分秒针,月差20秒,电池寿命2年。
用于女款。
7N01:时分秒针,月差15秒,电池寿命3年。
7N42:时分秒针,日历,月差15秒,电池寿命5年。
7N43:时分秒针,日历,星期历,月差15秒,电池寿命5年。
7N82:时分秒针,日历,月差15秒,电池寿命3年。
用于女款。
7N83:时分秒针,日历,星期历,月差15秒,电池寿命3年。
用于女款。
6A32:时分秒针,自动日历,月差20秒,电池寿命4年。
V501:时分秒针,月差20秒,电池寿命4年。
用于ALBA。
V732:时分秒针,日历,月差20秒,电池寿命5年。
用于ALBA。
V733,V743:时分秒针,日历,星期历,月差20秒,电池寿命5年。
用于ALBA。
V782:时分秒针,日历,月差20秒,电池寿命3年。
用于ALBA女款。
V783:时分秒针,日历,星期历,月差20秒,电池寿命3年。
通常用于女表。
2)码表类7T62:三眼闹铃码表,日历,月差15秒,电池寿命3年。
7T92:三眼码表,日历,月差15秒,电池寿命3年。
用于小钢王,WIRED等。
7T94:二眼码表,日历,月差15秒,电池寿命5年。
3)年差+长寿命电池类8F32:时分秒针,永久日历,年差20秒,电池寿命10年。
用于SBQK083,085,087。
8F33:时分秒针,永久日历,星期历,年差20秒,电池寿命10年。
用于SBQL007,009。
8F35:时分秒针,永久日历,年差20秒,电池寿命8年。
用于潜水表SBCM023。
8F56:时分秒针,GMT时针,永久日历,年差20秒,电池寿命10年。
4)高档简洁类8J41:时分秒针,年差10秒,电池寿命3年。
用于Dolce的三针正装表sacm107,150,151,159,160。
4J41:时分秒针,年差10秒,电池寿命2年。
用于Exceline的三针正装表swdl177,160,161,199,200。
精工 seiko 7S26 7S36 机芯 使用 说明书

l 除非您接受過正規的潛水訓練,否則不可擅自使用本手錶實施潛水活動。為安全 起見,請遵守潛水的各項規則。
l 勿使用本錶進行利用氦氣的飽和潛水。 l 實施潛水前,要確認手錶是否操作正常。
注意
l 請仔細閱讀並遵守本手冊內規定的各項使用說明,以保證潛水錶能夠正常操作。 l 在手錶受濕或在水中時,勿操作錶把。 l 勿使手錶撞擊到石頭等堅硬的物體上。
時間/日曆設定 ............................................................................. 122
旋轉盤.......................................................................................... 126
117
目錄
頁
警告 / 注意.................................................................................... 115
使用本錶實施潛水前須知................................................................... 117
<亮度的參考數據> (A) 太陽光 〔 晴天〕:100,000 勒克斯 〔 陰天〕:10,000 勒克斯 (B) 室內 ( 白天時靠窗口邊 ) 〔 晴天〕:3,000 勒克斯以上 〔 陰天〕:1,000 到 3,000 勒克斯 〔 雨天〕:低於 1,000 勒克斯 (C) 照明裝晝(40 瓦日光燈) 〔 與錶的距離:1 米〕:1,000 勒克斯
〔與錶的距離:3 米〕:500 勒克斯(平均房間亮度) 〔 與錶的距離:4 米〕:250 勒克斯
LS26机芯新产品培训
6
LS26机芯主要特点
1超级节能(1.节能面板,开机省电40%;2.待机功 耗<1W;3.节能模式;4.动态功耗演示;5.量子芯节 能控制)2来电通(信号源自动提示及切换提示)3音 画同步播放(USB源下,MP3和JPEG同步播放)4 数码相框(个性图片随心换)5智能一键通
关键利益点
主要特点
巩固利益点
19
LS26机芯整机供电系统
11 三、整机供电系统 从电源板共有5路电压输出,+24V_1A、+5Vstb、+5V_4A、 24V_Audio、24V_INV(部分整机采用的二合一电源,如 LT24610、LT3729、LT42729F、LT46729F配AUO屏,则没 有24V_INV,直接输出点灯高压到屏背光组件)。其中 +24V_INV供LCD屏的逆变器使用,24V_Audio供伴音功放使 用, +24V_1A通过DC-DC转换器(如LM2596) 变成+12.0V, +5V_4A通过LDO转换器(如LM1117、LM1084等)变成+3.3V、 +2.5V、+1.25V等供相关功能电路和IC使用,同时+5V_4A还 给相关电路直接供电,+5Vstb主要提供给MST6M15JS、K板、 红外接收器等电路。
LS26机芯新品技术培训
技术支持处
郑晓伟
时间:2009年10月
1
LS26机芯介绍
LS26机芯机型:
LT24610,LT26729,LT32729,LT37729、 LT40729F,LT42729F,LT46729F,LT42710F 。 LS26机芯以MSTAR公司MST6M15JS为主芯片,带多媒体 功能,支持HDMI1.3、WXGA屏、FHD屏、120Hz屏。 LS26机芯液晶电视覆盖产品尺寸从24-46寸,包括 50Hz/60Hz WXGA屏(1366768)、50Hz/60Hz FULL HD屏(19201080)和120Hz WXGA屏。
ETA机芯参数资料

ETA2824 毛坯机心,约140美元 @. t6 h- Z6 H- T4 G6 L$ D5 Z
6497 机芯 ) @+ \& E2 ~, ]: k% W; m Unitas 的经典产品 6497,在被 ETA 收购后自然而然的归入 ETA 旗
下,在经历了 80 年代让瑞士人窒息的石英风暴之后,6497 成为最后残 留下的大尺寸怀表机芯,在当时的环境下,6497 难有用武之地,原因是 太大了。风水轮流转,6497 迎来了自己的春天——大表风行来临了,6497 的尺寸正好迎合了几乎所有大表壳的需要。6497 因为大,结构合理,所 以在精准度上让人再度吃惊,虽然只是 18000A/H 的低频摆,却可以轻 松通过 COSC 认证,把众多小巧的高频机芯打得落花流水。
把的扔钱进去,也未必会搞出比 ETA-7750 更耐用的计时芯来。拿来主 义,在这里是最好的策略。
怎么样最简单地辨认出 ETA-7750?6 点,9 点,12 点位置小盘的 99% 就是 ETA-7750,但是这不能倒过来说,如果一块表不是 6 点,9 点,12 点小盘的,不能说 99%就不是 ETA-7750。它就像是“变形金刚”,它的 优势不仅仅在于耐用,还是易变。从 2 个小盘到 3 个小盘到 4 个小盘, 都可以是改自 ETA-7750。就像 IWC 改为 6 点,12 点计时。
7750 机芯
在整个 ETA 的历史上,好芯不断:ETA-7750 原名是 Valjoux7750,
属于 Valjoux 公司最著名的计时统芯,后来由于 Valjoux 被 ETA 收购, 这款经典的 Valjoux7750 便自然而然地更名为 ETA-7750。
机械表中机芯的那点故事分析
手表作为聚超值的固定嘉宾之一,海淘热门必败单品,可以说让无数聚友长了草,但是毕竟不可能人人都是行家,所以今天我就献个丑,跟大家肤浅的一同学习一下自动机械表的那颗芯,由于经济和学术水平有限,所以文本很多资料是借阅前辈的经验,有错误的地方还请各位聚友见谅。
注:本帖有详尽的各种机芯资料附表,喜欢的同学不妨收藏备用。
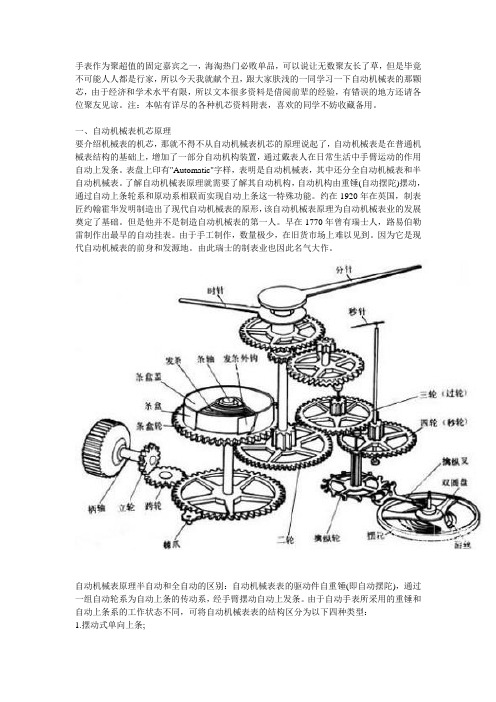
一、自动机械表机芯原理要介绍机械表的机芯,那就不得不从自动机械表机芯的原理说起了,自动机械表是在普通机械表结构的基础上,增加了一部分自动机构装置,通过戴表人在日常生活中手臂运动的作用自动上发条。
表盘上印有"Automatic"字样,表明是自动机械表,其中还分全自动机械表和半自动机械表。
了解自动机械表原理就需要了解其自动机构,自动机构由重锤(自动摆陀)摆动,通过自动上条轮系和原动系相联而实现自动上条这一特殊功能。
约在1920年在英国,制表匠约翰霍华发明制造出了现代自动机械表的原形,该自动机械表原理为自动机械表业的发展奠定了基础。
但是他并不是制造自动机械表的第一人。
早在1770年曾有瑞士人,路易伯勒雷制作出最早的自动挂表。
由于手工制作,数量极少,在旧货市场上难以见到。
因为它是现代自动机械表的前身和发源地。
由此瑞士的制表业也因此名气大作。
自动机械表原理半自动和全自动的区别:自动机械表表的驱动件自重锤(即自动摆陀),通过一组自动轮系为自动上条的传动系,经手臂摆动自动上发条。
由于自动手表所采用的重锤和自动上条系的工作状态不同,可将自动机械表表的结构区分为以下四种类型:1.摆动式单向上条;2.摆动式双向上条;3. 旋转式单向上条动,4.旋转式双向上条;摆动式自动重锤只能在表机中作120°左右的摆动,为半自动。
旋转式自动重锤在表机中能做360°旋转运,称全自动,这就是半自动和全自动机械表原理。
在早期的自动机械表表中也曾生产过自动重锤在表心上两条凹槽内作直线往复运动,这种自动机构称抽斗自动;因其上条效果差,早被淘汰。
机芯培训资料

振数
5
5
6 8 8 8 8 8 8 8 8 8 8 8 6
年份
1950
1950
1973 1973 1973 2002 2003 2003 2003 2003 2003 2002 1971 1971 1871
特征 小三针(lepine表 冠对角秒针) 小三针(savonette, 表观右90度。) 小三针 三眼计时 三眼针时、月相 7750改版之二 7750改版之三 7750改版之四 7750减自动 7760减星期和12时针 7765加月相 7750改版 2671+星期 2681+月相 2681廉价版
手卷 自动 自动 自动 自动 自动 手卷 手卷 手卷 自动 自动 自动 自动
动力时间 直径 厚度 46小时 36.6mm 4.5mm
钻数 17
46小时
42小时 44小时 44小时 44小时 46小时 44小时 44小时 44小时 44小时 44小时 38小时 38小时 44小时
36.6mm 4.5mm 17
外6497、6498系列近年来也有急起直追
的气势 ,但是定价低廉许多。
A 2824-2基础机芯基本数据为:直径25.60mm、厚度4.60mm、动力储存最低 38 小时、25颗红宝石、震频每小时28.800次、双向自动上炼
图中为百年灵所使用的天文台等级ETA 2824-2
ETA2824-2
ETA 2824-2距离原型发表的时间,已经过半个世纪, 而由Eterna与ETA所衍生的机芯种类可谓族繁不及备载, 在外观、震频与摆轮种类都略有差异,但是所使用的 传动 齿轮系与双向上炼系统,都没有做太大的更动。 在80年代后重新生产的ETA 2824-2 系列,有许多不同 种类,其中ETA 2801-2、ETA 2804-2(有日期)是取下 双向自动上炼结构的手上炼版本,但仍拥有ETA 28242的其它功能,直径相同厚度减少为 3.35mm,不过外 型实在不美观,此外打磨与零件的等级也是属于低价 位,毕竟还有 ETA 7001可选择,所以这款机芯并不常 见。另外最常见的就是ETA2836-2,这是 加上了星期 功能的款式,厚度也增加为5.05mm,相信符合大份人 的需求,可于ORIS 、TISSOT、MIDO的基本款中,见 到它的踪影。另外其它的衍生款还有附加计时模块 与 世界时区模块,不过能见度也是比较低。
精工SEIKO-精工5号机芯4R35B 4R36A-技术指南说明书
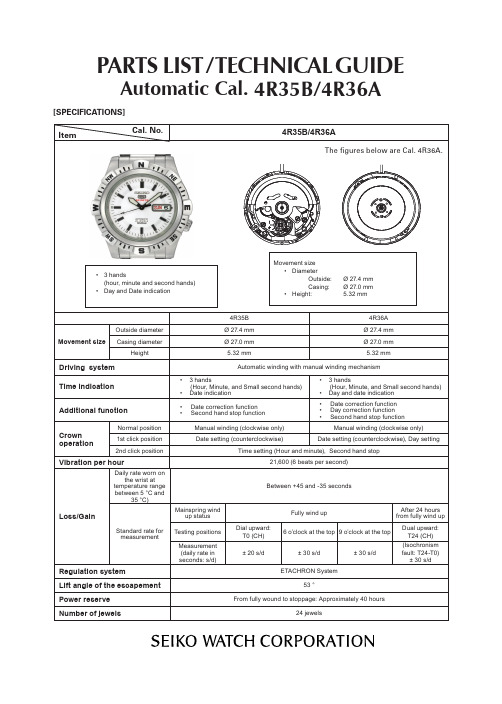
Cal. 4R35B
0808 183 0012 354 0810 183 0012 485 0836 183 0962 185 0737 183 0273 182 0261 183 0802 183 0191 183 0514 183 0114 183 0363 183 0831 183 0201 083 0224 183 0388 177 0384 183 0383 183 0601 183 0282 183 0104 182
CHARACTERISTICS OF A MECHANICAL WATCH
1. This mechanical watch operates using power obtained from a mainspring. 2. While loss/gain of a quartz watch is indicated by a monthly or annual rate, accuracy of a
The difference between Cal.4R35 and Cal.4R36 is a calendar mechanism.
REMARKS: Parts differences between 4R35A series and B series
Parts name 5 DATE DISK GUARD 4 DATE DISK GUARD SCREW 7 DATE JUMPER 9 GUARD SCREW FOR DAY-DATE CORRECTOR SETTING TRANSMISSION WHEEL 10 GUARD SCREW FOR DAY-DATE CORRECTOR SETTING TRANSMISSION WHEEL 12 INTERMEDIATE WHEEL FOR DATE SETTING C 14 DATE SETTING WHEEL 15 HOUR WHEEL 16 MINUTE WHEEL 18 DATE INDICATOR DRIVING WHEEL 23 AUTOMATIC TRAIN BRIDGE 24 SECOND REDUCTION WHEEL AND PINION 32 BARREL AND TRAIN WHEEL BRIDGE 33 RATCHET SLIDING WHEEL SPRING 35 PAWL LEVER 42 BARREL COMPLETE WITH MAINSPRING 46 CENTER WHEEL WITH CANNON PINION 48 YOKE SPRING 49 YOKE 50 SETTING LEVER 51 BALANCE STOP LEVER 52 CLUTCH WHEEL 55 MAIN PLATE
SEIKO Automatic Diver’s Watch Cal. 7S26 使用说明书

You are now the proud owner of a SEIKO Automatic Diver’s Watch Cal. 7S26. For best results, please read the instructions in this booklet carefully before using your SEIKO Automatic Diver’s Watch. Please keep this manual handy for ready reference.Usted es ahora un honrado poseedor del reloj de buceador automatico SEIKO Cal. 7S26. Para obtener de él los mejores resultados, lea las instrucciones del presente folleto con cuidado antes del uso de su reloj de buceador automatico SEIKO. Guarde este manual para fácil referencia.2CONTENTSPage FEATURES (4)HOW TO START THE WATCH (5)TIME/CALENDAR SETTING (6)ROTATING BEZEL (8)PRECAUTIONS (9)NOTES FOR USING THE WATCH (11)TO PRESERVE THE QUALITY OF YOUR WATCH (12)SPECIFICATIONS (13)a:Screwed-in position b:Normal position c:First click d:Second clickSEIKO AUTOMATIC DIVER’S WATCHCal. 7S263EnglishE n g l i s h4FEATURES200 METER WATER RESISTANCE q Suitable for scuba divingROTATING BEZELq Elapsed time measurement during diving (up to 60 minutes)SCREW DOWN CROWNTIME/CALENDARq Hour, minute & second hands q Date q Day5EnglishHOW TO START THE WATCHq To initially start your watch:Swing it from side to side in a horizontal arc for about 30 seconds.This is an automatic mechanical watch.*If the watch is worn on the wrist, the mainspring will be wound automatically through normal wristmovement.E n g l i s h6Unlock the crown by turning itcounterclockwise.Pull out the crown to the first click.Set the previous day’s date.Set the previous day of the week.TIME/CALENDAR SETTING7EnglishPull out the crown to thesecond click.Turn the hands until the desired date and day appears.Push back thecrown.Set the hands to the desired time.Lock the crown b y turning it clockwise whilepressing it.E n g l i s h8ROTATING BEZELThe rotating bezel can show up to 60 minutes of elapsed time.Read the number on the rotating bezel that the minute hand points to.9EnglishPRECAUTIONSDo not use the watch for saturation diving using helium gas.q Check that:•the watch operates normally.•the crown is locked tightly in place.•there are no visible cracks in the crystal or the watch band.•the strap or bracelet is securely fastened to the watch case.•the buckle keeps the strap or bracelet firmly secured to the wrist.•and the “ ” mark aligns with the minute hand.•If there are any malfunctions, we recommend that you contact an AUTHORIZED SEIKO SERVICE CENTER.BEFORE DIVINGE n g l i s h10q Do not operate the crown when the watch is wet or in water.q Take care not to hit the watch against hard objects such as rocks.q Bezel rotation may become slightly harder in the water but this is not a malfunction.WHILE DIVINGq After checking that the crown is screwed in completely, rinse the watch in fresh water, and wash out all seawater, soil, sand, etc.q After cleaning the watch in fresh water, be sure to wipe it thoroughly dry to prevent possible rust on the case.AFTER DIVING11EnglishNOTES FOR USING THE WATCHq If the watch is used without being wound up sufficiently, gain or loss of the watch may result. To avoid this, wear the watch for more than 8 hours a day.HOW TO START THE WATCHTIME/CALENDER SETTINGq Do not set the day between 9:00 p.m. and 4:00 a.m. Do not set the date between 9:00 p.m. and 1:00 a.m.Otherwise, it may not change properly.If it is necessary to set the date during that time period, first change the time to any time outside it, set the date and then reset the correct time.q To set the exact time, pull out the crown to the second click when the second hand is at the 12 o’clock position and push it back in to the normal position in accordance with a time signal.q When setting the hour hand, check that AM/PM is correctly set.The watch is so designed that the date changes once in 24 hours. Turn the hands past the 12 o’clock marker to determine whether the watch is set for the A.M. or P.M. period. If the date changes, the time is set for the A.M. period. If the date does not change, the time is set for the P.M. period.q When setting the hands, first set them to a time a few minutes earlier than the correct time, and then advance them to the exact time.q It is necessary to adjust the date at the end of February and 30-day months.ROTATING BEZELq For safety’s sake, the rotating bezel rotates only counterclockwise, so that the time measured is never shorter than the actual elapsed time.E n g l i s h12TO PRESERVE THE QUALITY OF YOUR WATCHq Repair of diver’s watches requires special expertise and equipment. If you find that your diver’s watch is malfunctioning, therefore, never attempt to repair it but immediately send it to a nearbySEIKO Service Center.2 - 3YearsYour watch will be adversely affected by strong magnetism.Keep it away from close contact with magnetic objects.Be careful not to expose the watch to solvents, mercury,cosmetic spray, detergents,adhesives or paints. Otherwise,the case, bracelet, etc. may b e c o m ed i s c o l or e d ,deteriorated or damaged.It is recommended that the watch be checked once every 2 to 3 years by an AUTHORIZED SEIKO DEALER or SERVICE CENTER to ensure that the case, crown, gasket and crystal seal remain intact.Your watch works with stable accuracy within a temperature range of 5° C and 35° C (41° F and 95° F).Temperatures over 60° C (140° F) or below -10° C (+14° F) may cause a slight time loss or gain or shorten the duration within which the watch keeps operating. However, the above conditions will be corrected when the watch returns to normal temperature.13EnglishTo prevent possible rusting of the case and bracelet, wipe them periodically with a soft dry cloth.If your watch has a protective film and/or a sticker on the case back,peel them off before using yourwatch.your watch or hit it against hard surfaces.SPECIFICATIONS1Vibrations per hour ............................................21,6002Operational temperature range .........................–10° C ~ +60° C (14° F ~ 140° F)3Driving system ..................................................Self-winding type 4Jewels ...............................................................21 jewels5Magnetic resistance ..........................................4,800 A/m (60 gauss)6Water resistance ...............................................Water resistant up to 200 metersThe watch is suitable for scuba diving.*The specifications are subject to change without prior notice for product improvement.。
SEIKO Cal. 6M25 6M26 手表说明书
Cal. 6M25, 6M26INSTRUCTIONS(P.3) INSTRUCTIONS(P.30) INSTRUCCIONES(P.58) BEDIENUNGSANLEITUNG(S.86) ISTRUZIONI(P.114) INSTRUÇÕES(P.143) (171 )E n g l i s h2You are now the proud owner of a SEIKO Analogue Quartz Watch Cal. 6M25/6M26. For best results, please read the instructions in this booklet carefully before using your SEIKO Analogue Quartz Watch. Please keep this manual handy for ready reference.Vous voici l’heureux propriétaire d’une montre quartz analogique SEIKO Cal. 6M25/6M26. Pour obtenir d’excellentes performances de cet article SEIKO, veuillez lire attentivement cette brochure que vous conserverez pour toute référence ultérieure.Enhorabuena por su adquisición de un reloj SEIKO analógico de cuarzo Cal. 6M25/6M26. Para óptimo resultado, lea detenidamente las instrucciones de este folleto antes de usar el reloj. Guarde este manual para consulta posterior.Sie sind jetzt Besitzer einer SEIKO Analog-Quarzuhr Kal. 6M25/6M26. Bitte lesen Sie diese Bedie-nungsanleitung vor Verwendung der Uhr sorgfältig durch und heben Sie sie gut auf.Siete ora in possesso di un orologio SEIKO Analogico al Quarzo Cal. 6M25/6M26. Per ottenere i migliori possibili risultati dal Vostro orologio, leggere attentamente le istruzioni di questo manuale prima di utilizzare il Vostro orologio SEIKO analogico al quarzo. Conservare poi il manuale stesso per ogni qualsiasi eventuale futuro riferimento.Você pode sentir-se orgulhoso de possuir um Relógio SEIKO Quartz Análogo Cal. 6M25/6M26.Para obter os melhores resultados, leia atentamente as instruções contidas neste opúsculo antes de usar o seu Relógio SEIKO Quartz Análogo. Queira conservar este manual para referências futuras.6M25/6M263CONTENTSPageFEATURES ..................................................................................................................4MODES AND DISPLAYS ............................................................................................5ADJUSTING THE HAND AND DATE POSITIONS.......................................................7TIME SETTING............................................................................................................9CALENDAR .................................................................................................................10ALARM .......................................................................................................................11TIMER .........................................................................................................................13STOPWATCH ..............................................................................................................15TACHYMETER ............................................................................................................18NECESSARY PROCEDURE AFTER BATTERY CHANGE ............................................20NOTES ON OPERATING THE WATCH.......................................................................22BATTERY LIFE INDICATOR ........................................................................................24BATTERY CHANGE.....................................................................................................24TO PRESERVE THE QUALITY OF YOUR WATCH......................................................26SPECIFICATIONS........................................................................................................29E n g l i s h4SEIKO ANALOGUE QUARTZCal. 6M25, 6M26FEATURESq Hour, minute & second handsq Up to 60 minutes can be set inminute increments.q Date displayed in numerals q Month indicated by handsq Calendar adjusts automaticallyexcept February of leap years.q Can be set to ring on a 12-hourbasis.q Measures up to 60 minutes in 1/10second increments.English5MODES AND DISPLAYS[Cal. 6M26]There are two buttons and a crown.a: Normal positionb: Extended position[Cal. 6M25]E n g l i s h6MODE CHANGE Turn at normal position clockwise or counterclockwise.Time setting¬Pull out CROWN .¬Adjusting hand & date positions Pull outCROWN .¬Pull outCROWN .¬Time settingPull out CROWN .Calendar settingTIME mode(Alarm disengaged)TIME mode (Alarm engaged)STOPWATCH modeALARM SETTING modeCALENDAR mode TIMER modeEnglish7ADJUS TING THE HAND AND DATE POS ITIONSq Before setting the time and calendar, be sure to use STOPWATCH mode to checkthe positions of Hour, Minute and Second hands and the date numeral.Turn to set MODE INDICATOR to “CHRONO.”.*If the stopwatch is counting, first press Button B to stop measurement and then press Button A to reset the hands.HOW TO RESET THE HAND AND DATE POSITIONSq If the hands do not return to the 12 o’clock position or the date numeral does not appear at the center of the calendar frame, reset them following the procedure below. If they do not need resetting, go on to the next section (“TIME SETTING”).Pull out.E n g l i s h8Press to select what is to be ad-justed (hands or date) in the fol-lowing order (See *1 on page 22) :Push back in to normal position .Press to reset the selected hand to the 12 o’clock position or put the date to the center of the cal-endar frame. (See *2 on page 22)English9TIME SETTINGTurn to set MODE INDICATOR to “TIME” or “ALM.ON”.Pull out.Push back in to normal position in accordance with a time signal.Press to set Minute hand. (See *2and *3 on page 22)Press to set Hour hand. (See *2and *4 on page 22)*Second hand automatically returns to the 12 o’clock position.E n g l i s h10CALENDARq The month is indicated by the hour marker that all three hands point to.q The date is indicated by the numeral shown in the calendar frame.qThe calendar automatically adjusts for odd and even months except February of leap years.Turn to set MODE INDICATOR to “DATE”.CALENDAR SETTING Pull out.Push back in to normal position .Press to set the month (Ex. De-cember). (See *2 on page 22)Press to set the date (Ex. 10th).(See *2 on page 22)English11ALARMALARM SETTINGqThe alarm can be set to ring on a 12-hour basis.Turn to set MODE INDICATOR to “ALM.ON” or “TIME” to engage or disengage the alarm. (See the following section)Turn to set MODE INDICATOR to “ALM.SET”. (See *5 on page 22)Press to set Minute hand. (See *2and *3 on page 22)Press to set Hour hand. (See *2 on page 22)E n g l i s h12ALARM ENGAGEMENT/DISENGAGEMENT • Alarm engagement•Alarm disengagementTurn to set MODE INDI-CATOR to “ALM.ON”.(See also *6 on page 22)Turn to set MODE INDI-CATOR to “TIME”.[TIME mode with alarm engaged][TIME mode with alarm disengaged]q Alarm rings at the designated time for 20 seconds.*To stop it manually, press Button A or B .q To check the designated alarm time, set MODE INDICATOR to “ALM.SET”.English13q The timer can be set to count down up to 60 minutes in minute increments.TIMERTurn to set MODE INDICATOR to “TIMER”.q Before setting the timer, check that the three hands are at “0” position.TIMER SETTINGPress to set the desired amount of time in minutes. (See *2 on page 22)*To set the timer for 60minutes, set Minute hand at “0” position.E n g l i s h14TIMER OPERATION ¬STARTSTOP¬RESTARTSTOP¬RESET*Restart and stop of timer can be repeated by pressing Button B .q When the set time is up, a warning sound beeps for approximately 5 seconds.*To stop it manually, press Button A or B .*See also *7 on page 22.English15q Stopwatch measures up to 60 minutes in 1/10 second increments.STOPWATCHTurn to set MODE INDICATOR to “CHRONO.”.q In the following cases, the stopwatch operations cannot be made:1)While the timer warning sound is beeping (for about 5 seconds).2)While the hands are moving quickly to catch up with the accumulated elapsed time after the split time is released (less than 5 seconds).*See also *8 on page 23.HOW TO READ THE HANDSq In STOPWATCH mode, each hand indicates the elapsed time as follows:E n g l i s h16• For the first 1 minute Ex.: 20 and 7/10 seconds • After the first 1 minuteEx.: during measurementEx.:when measurement isstopped or split time is measured Minute hand1/10 second hand**Minute hand 1/10 second hand***Minute hand*1/10 second hand moves from 0 to 9 (minute markers)repeatedly.**1/10 second hand stays at “0” position while the stopwatch is counting.***When the measurement isstopped or split time is measured, 1/10 second hand indicates the 1/10seconds measured.When the measurement is restarted or split time is released, it returns to “0”position.1/10 second hand*English17STARTSPLIT RELEASESTOPSPLIT*Measurement and release of split time can be repeated by pressing Button A .RESETSTARTRESTARTSTOPSTOPRESET*Restart and stop of stopwatch can be repeated by pressing Button B .STOPWATCH OPERATIONq Before using the stopwatch, be sure to reset the hands to “0” position.RESETE n g l i s h18TACHYMETER(for models with tachymeter scale on the dial)Use the stopwatch to determine how many seconds it takes to go1 km or 1 mile.Tachymeter scale indicated by Second hand gives the averagespeed per hour.Ex. 2:If the measuring distance is extended to 2 km or miles or shortened to 0.5 km or milesand Second hand indicates “90” on tachymeter scale:“90” (tachymeter scale figure) x 2 (km or mile) = 180 km/h or mph“90” (tachymeter scale figure) x 0.5 (km or mile) = 45 km/h or mph*Tachymeter scale can be used only when the time required is less than 60 seconds.English19Use the stopwatch to measure the time required to complete 1job.Tachymeter scale indicated by Second hand gives the average number of jobs accomplished perhour.Ex. 2:If 15 jobs are completed in 20 seconds:“180” (tachymeter scale figure) x 15 jobs = 2700 jobs/hourE n g l i s h20NECES S ARY PROCEDURE AFTER BATTERY CHANGEq When the battery is replaced, the information stored in the IC does not correspond with the time and date actually displayed. Before using the watch, therefore, be sureto reset the hands and date, following the procedure below.Turn to set MODE INDICATOR to “CHRONO.”.*If the stopwatch is counting, first press Button B to stop measurement and then press Button A to reset the hands.¬Pull out.ORPress and hold at the same time for 2 seconds.*A beep sounds when the buttons are released, and the h a n d s s t a r t t o s h o w demonstration movement.Press to stop the hands.English21Press to select what is to be ad-justed (hands or date) in the fol-lowing order (See *1 on page 22):Press to reset the selected hand to the 12 o’clock position or set the date to “1”. (See *2 on page 22)*After resetting the hands and date as explained above,set the time and calendar.(See “TIME SETTING” and “CALENDAR”)Push back in to normal position .E n g l i s h22NOTES ON OPERATING THE WATCH*1When a hand is selected, it will move back and forth and return to where it was.When the date is selected, it will advance one day and return to the current date.*2The hand(s)/date move(s) quickly if the corresponding button is kept pressed for 2seconds.*3As Minute hand moves, Hour hand also moves correspondingly.*4When setting Hour hand, check that AM/PM is correctly set.•Press Button A to turn Hour hand past the 12 o’clock marker to determine whether the watch is set for the A.M. or P.M. period. If the date changes, the time is set for the A.M. period. If the date does not change, the time is set for the P.M. period.While the date is changing, Hour hand stops on the 12 o’clock position even if Button A is kept pressed.*5The alarm time can be set with the CROWN both at the normal position and at theextended position.*6Alarm test: With the CROWN at “ALM.ON”, press and hold Buttons A and B atthe same time.*7Remarks on timer operation:•In TIMER mode, Hour hand stops at the 12 o’clock position.•With each press of the buttons, a beep sounds for confirmation.•Even if the mode is changed from TIMER to another while the timer is counting down, it continues counting. If the timer is stopped, however, the hands will be reset to “0” position by changing the mode.English23*8Remarks on stopwatch operation:•With each press of the buttons, a beep sounds for confirmation.•Even if the mode is changed from STOPWATCH to another while the stopwatch is measuring, it continues counting. If the split time is measured, however, it will be released and counting will be continued by changing the mode.E n g l i s h24BATTERY LIFE INDICATORBATTERY CHANGEThe miniature battery which powers your watch should last approximately 2 years . However, because the battery is inserted at the factory to check the function and performance of the watch, its actual life once in your possession may be less than the specified period. When the battery expires, be sure to replace it as soon as possible to prevent any malfunction.For battery replacement, we recommend that you contact an AUTHORIZED SEIKO DEALER and request SEIKO SR927W battery.*The battery life may be less than 2 years if:•the alarm is used more than once a day,•the timer is used for more than 5 minutes a day, and/or •the stopwatch is used for more than 5 minutes a day.2Yearsq The battery needs to be replaced when you see the Second hand moving at two-second intervals instead of normal one-second intervals.*The watch will, however, remain accurate while Second hand is moving at two-second intervals.English25E n g l i s h26TO PRESERVE THE QUALITY OF YOUR WATCHCondition of uses WATER RESISTANCEWATER RESISTANT 5 BAR WATER RESISTANT No indication Indication on case backNon-water resistant Degree of water resistance*Accidental contact with water such as rain and splashesSwimming,yachting and taking ashowerNo No No NoYes No No NoYes Yes No NoYes Yes Yes NoWATER RESISTANT 10/15/20 BARScuba diving**and saturation divingTaking a bath and shallowdiving 3 bar5 bar 10/15/20 barEnglish27q Non-water resistantq Water resistant 5/10/15/20 bar•If the watch becomes wet, have it checked by an AUTHORIZED SEIK O DEALER or SERVICE CENTER.•Before using in water, be sure the crown is pushed in completely.•Do not operate the crown and buttons when the watch is wet or in water.If used in sea water, rinse the watch in fresh water and dry it completely.•When taking a shower with a water resistant 5bar watch, or taking a bath with a water resistant 10, 15 or 20 bar watch, be sure to observe the following:*Do not operate the crown or push the buttons when the watch is wet with soapy water or shampoo.*If the watch is left in warm water, a slight time loss or gain may be caused. This condition, however, will be corrected when the watch returns to normal temperature.*Pressure in bar is a test pressure and should not be considered as corresponding to actual diving depth since swimming movement tends to increase the pressure at a given depth. Care should also be taken on diving into water.**We recommend that you wear a SEIK O Diver’s Watch for scuba diving.s TEMPERATURES°C (140°F) or below –10°C␣(+14°F) may cause a slight time loss or gain or battery leakage or shorten the battery life.However, the above conditions will be corrected when the watch returns to normal temperature.5 bar WRYour watch works with stable accuracy within a temperature range of 5°C and 35°C (41°F and 95°F).10/15/20bar WRE n g l i s h28s CARE OF CASE AND BRACELETTo prevent possible rusting of the case and bracelet, wipe them periodically with a soft dry cloth.s PERIODIC CHECKIt is recommended that the watch be checked once every 2to 3 years. Have your watch checked by an AUTHORIZEDSEIK O DEALER or SERVICE CENTER to ensure that the case, crown, buttons, gasket and crystal seal remain intact.sSHOCKS & VIBRATIONBe careful not to drop your watch or hit it against hard surfaces.s MAGNETISMYour watch will be adversely affected by strong magnetism.Keep it away from close contactwith magnetic objects.s CHEMICALSBe careful not to expose the watch to solvents, mercury,cosmetic spray, detergents,adhesives or paints. Otherwise,the case, bracelet, etc. may become discolored, deteriorated or damaged.s PRECAUTION REGARDING CASE BACK PROTECTIVE FILMIf your watch has a protective film and/or a sticker on the case back, be sure to peel them off before using your watch.2 - 3YearsEnglish29SPECIFICATIONS1Frequency of crystal oscillator...........32,768 Hz (Hz = Hertz ... Cycles per second)2Loss/gain (monthly rate)....................Less than 15 seconds at normal temperature range (5°C ~ 35°C) (41°F ~ 95°F)3Operational temperature range .........–10°C ~ +60°C (14°F ~ 140°F)4Driving system ..................................Step motor, 4 pieces5Display system“TIME”........................................TIME mode (hour, minute and second hands)“ALM.ON”..................................TIME mode (hour, minute and second hands)“ALM.SET”.................................ALARM SETTING mode (hour and minute hands)The alarm is set on a 12-hour basis.“TIMER”.....................................TIMER mode (minute and second hands)Up to 60 minutes can be set in minute increments.“DATE”.......................................CALENDAR mode (month indicated by the threehands and date displayed in numerals)“CHRONO.”................................STOPWATCH mode (minute, second and 1/10second hands)The stopwatch can measure up to 60 minutes in 1/10 second increments.6Battery...............................................SEIKO SR927W, 1 piece7IC (Integrated Circuit)........................C-MOS-LSI, 1 piece and Bipolar IC, 1 piece*The specifications are subject to change without prior notice for product improvement.。
精工S8261系列锂电池保护IC S-8261BAM-M6T1U S-8261BAL-M6T1U
S-8261ABLMD-G3LT2x
4.275 V 0.20 V
2.30 V
S-8261ABMMD-G3MT2x 4.280 V 0.20 V 2.80 V
S-8261ABNMD-G3NT2x 4.300 V 0.20 V 2.30 V
S-8261ABPMD-G3PT2x 4.200 V 0.10 V 2.80 V
4
精工电子有限公司
Rev.5.3_00
1节电池用电池保护IC S-8261系列
表1 (2 / 2)
过充电 过充电 过放电
产品名
检测电压 滞后电压 检测电压
[VCU]
[VHC]
[VDL]
S-8261ACMMD-G4MT2x 4.325 V 0.20 V 3.00 V
S-8261ACNMD-G4NT2x 4.215 V 0.10 V
S-8261ABZMD-G3ZT2x 4.325 V 0.25 V 2.50 V
S-8261ACAMD-G4AT2x 4.280 V 0.20 V 2.30 V
S-8261ACBMD-G4BT2x 4.250 V 0.20 V 2.60 V
S-8261ACDMD-G4DT2x 4.350 V 0.25 V 2.30 V
精度±20%
(4) 内置三段过电流检测电路(过电流 1、过电流 2、负载短路)
(5) 可以选择“允许”/“禁止”向 0 V 电池充电的功能
(6) 可以选择休眠功能的“有”/“无”
(7) 可充电器检测功能、异常充电电流检测功能
· 根据检测VM端子的负电压(典型值−0.7 V)而解除过放电滞后(充电器检测功能)。
向0 V电池的 充电功能
允许 允许 禁止 禁止 禁止 允许 禁止 禁止 允许 禁止 允许 允许 允许 禁止 允许 允许 允许 禁止 允许 禁止 禁止 允许 允许 禁止 禁止 禁止 允许 允许 禁止 禁止 禁止 允许 允许 允许 允许 允许 允许 允许
惠普 LaserJet MFP M72625、M72630 系列印表機 使用者指南说明书
HP LaserJet MFP M72625、M72630 系列印 表機
使用者南
著作權與使用授權
© Copyright 2018 HP Development Company, L.P.
Google™ 是 Google Inc. 的商標。
Microsoft®、Windows®、Windows® XP 以 及 Windows Vista® 是 Microsoft Corporation 在美國的註冊商標。
UNIX® 是 Open Group 的註冊商標。
目錄
1 簡介 ............................................................................................................................................................................................................ 1 實用資訊 ................................................................................................................................................................................... 2 有關本使用者指南 .............................................................................................
告别石英手表:美亚购马来西亚产 精工5
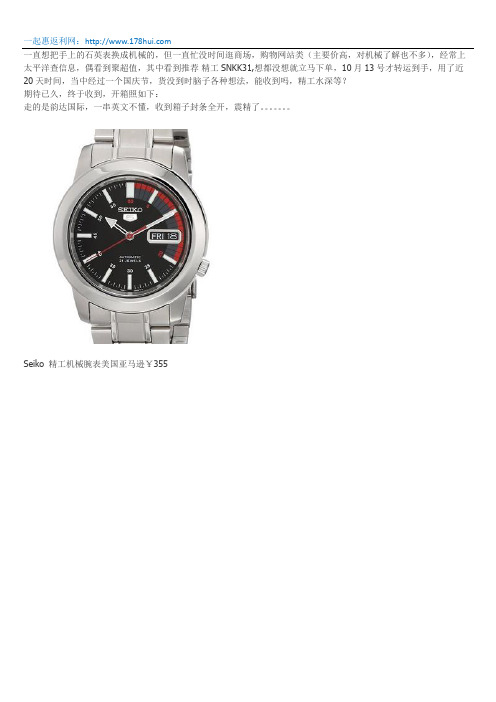
一直想把手上的石英表换成机械的,但一直忙没时间逛商场,购物网站类(主要价高,对机械了解也不多),经常上太平洋查信息,偶看到聚超值,其中看到推荐精工SNKK31,想都没想就立马下单,10月13号才转运到手,用了近20天时间,当中经过一个国庆节,货没到时脑子各种想法,能收到吗,精工水深等?
期待已久,终于收到,开箱照如下:
走的是韵达国际,一串英文不懂,收到箱子封条全开,震精了。
Seiko 精工机械腕表美国亚马逊¥355
不用折封条,打开,,,,静静躺在里面,,,,,(东西还在)
蓝色盒,外有白色套,,,,
终于看到实物了,心一下踏实了,,,
挺喜欢,全钢表盘和表带,黑红灰搭配的表盘,仿汽车仪表盘设计;强化玻璃表镜,搭配Harlex 矿物晶石表壳, 提供了良好的防划性能 表带上标有 CHINA BAND
7S26C 机芯,是全背透设计,自动机械机芯,3点钟位置有星期、日期显示,实用性较强。
表盘大小38毫米, 厚度为11mm ,约30m 防水 摆轮上标是马来西亚机芯(手机照)
全部东东,有保修卡,但无填任何内容,不知是否能保修。
使用几天,感觉还行,可能每天运动少,误差一天比一天大,每天慢10来秒,毕竟低端货,喜欢就好!休闲用, 过段时间准备入手一个前透的。
手表-最典型的五个ETA机芯

聚风尚商城手表-最典型的五个ETA机芯ETA,这个控制了当今瑞士表机芯远远超过半壁江山的厂家,年产量过亿的统芯生产者,确实提供了大量的机芯给Tissot,也给了Omega,还有更多其他著名的厂家和品牌,了解了ETA,也给了解了相当一部分的瑞士手表,现在,就让我们看看这个瑞士机芯巨人。
1793年,在瑞士Fontainemelon地区,人们发现又有一座新表厂创建了,这就是ETA集团历史的开始。
1855年又在Grenchen地区开设了另外一家专门用于制造“半成品表芯(Ebauches)”,又被称之为“空白机芯”的工厂,就是这家工厂,后来更名成了ETA。
1926年,当时的瑞士已经有了多家实力雄厚的空白机芯制造厂商,这些厂商互相联合,成立了以一家空白机芯制造商的股份公司1983年,当今世界最大的腕表生产集团之一的斯沃琪集团“Swatch Group”,SMH成立了。
并且将原先的Ebauches SA归入旗下,随后更名为ETA SA Fabriquesd`Ebauches。
今天的ETA 也就是斯沃琪集团的机芯巨人。
ETA现在拥有9千多名员工,并且早在1996年就已经达到了每年上亿的机芯产量。
公司在瑞士本土,法国,德国,泰国,马来西亚和中国都有装配或者制造工厂。
如果说Breguet,Glashutte Original,Omega,Jaquet Droz等这些品牌是斯沃琪集团的顶级品牌,撑起了整个斯沃琪集团门面的话,那么,ETA就是整个集团内部真正的钢筋水泥基础。
ETA基石在斯沃琪集团的主要业务包括:1、保证瑞士手表的技术研究2、发展以低廉价格进行的配件,机芯和整表的大规模生产3、掌握手表和生产机械的所有技术4、批量装配机芯和手表。
从上面的业务目标不难看出,ETA不仅负责机芯本身的开发和研制,更负责自身生产设备的设计和开发。
从思路,到设计,到研发,到少量测试,到批量生产,更到质量监控,ETA把整个流程控制得有条不紊。
SEIKO 7S26B 7S36B 零件目录 技术手册说明书

PARTS CATALOGUE / T ECHNICAL GUIDECal. 7S26B, 7S36B[SPECIFICATIONS]/8Cal. No.ItemTime indication Outside diameterCasing diameter Height Additional mechanismJewels2 ,600 Hz/hour (6 beats per second)4.9 mm(x .5)Ø 27.4 mm Ø 27.0 mm l Automatic windingl Date calendar l Day calendarl Date correction function l Day correction functionl 3 hands (hour, minute and second hands)SEIKO7S26B7S36B7S26B :2 jewels 7S36B :23 jewels7S26A/ 7S36A7S26B/ 7S36BRefer to“PARTS CATALOGUE/ TECHNICAL GUIDE Cal. 7S26A, 7S36A.”Refer to“PARTS CATALOGUE/ TECHNICAL GUIDE Cal. 7S26B,7S36B.”These sections are different from A Cal.* C al.7S watches are changed from caliber “A” to caliber “B” in October 2006 production. A ccording to the change, we would like you to pay attention to the design of the balance s taf f when repairing those watches.The difference between A Cal.and B Cal.MovementsizeVibration per hourMovementBrandCal. 7S26B, 7S36BOil quantityDate dial guard screw A (3 pics)qk2/8PARTS CATALOGUE Cal. 7S26B, 7S36B3/8Cal. 7S26B, 7S36BPARTS CATALOGUEParts nameParts codeParts name Parts code Upper hole jewel frame for diashock00 4 295Upper hole jewel frame for thirdwheel and pinion00 5 70Lower hole jewel frame for diashockUpper hole jewel frame for escapewheel and pinion00 5 7Diashock upper frame00 4 573Upper spring for third wheel and pin-ion00 5 703Diashock lower frame00 4 574Upper spring for escape wheel andpinionDiashock upper spring00 4 577Regulator034 020 Diashock lower spring Stud support0345 97 SCREW PARTSDate dial guard screw BBalance cock screw4/8Parts code Parts name Parts code Parts nameRatchet wheel screw0012 9190012 5390012 3540016 7050012 4200012 168Second reduction wheel andpinion screwCenter wheel bridge screwPallet cock screwDate dial guard screw ABalance cock screwBarrel and train wheelbridge screwLower bridge for thirdwheel and pinion screwTECHNICAL GUIDE Cal. 7S26B, 7S36B PARTS USED DIFFER DEPENDING ON THE CASING MODEL4Day star with dial disk0 60 ***9Date dial0878 ****The day star with dial disk and date dial used differ depending on the casing model.Refer to the parts code number printed on the day indicator.qj Dial holding spacer4408 ***The dial holding spacer for a diver’s watch has an identifying mark.Identifying mark4408 1704408 171* The dial holding spacer used differs depending on the casing model. Refer to "SEIKO Watch Parts Catalogue (SEIKO WATCH SERVICE SITE)."t; Winding stem035 **** The winding stem used differs depending on the casing model. Refer to "SEIKO Watch PartsCatalogue (SEIKO WATCH SERVICE SITE)."5/8TECHNICAL GUIDE Cal. 7S26B, 7S36BFirst reductionwheelBalance cock6/8TECHNICAL GUIDE Cal. 7S26B, 7S36B hairspring is not removed from the regulator arm.removed from the stud support.Temporarily set the stud to the stud support.* Be careful so as not to damage the hairspring.Set the balance cock and tighten the balance cock screw.Using sturdy tweezers, set the stud to the stud support 7/8TECHNICAL GUIDE Cal. 7S26B, 7S36BMaximum clearance Minimum clearance234Adjust the position of the hair-spring so that it passes through the center of the regulator slot.StudStud supportRegulator armRegulator pinMove the stud support to cor-rectly position the roller jewel.Adjust the location of the regula-tor arm to fine-tune the length ofthe hairspring.Rotate the Regulator pin to adjust the clearance to control the swing angle of the hairspring.8/8Copyright©2007 by。
ETA公司及ETA常见机芯简介
更需要一提的是OMEGA Cal 2500/2500B/2500C机芯,OMEGA同轴机芯同样是在ETA2892A2的基础上改动而来的杰作,配合了无卡度游丝的同轴擒纵体系让腕表洗油的时间大大延长,同轴不会促成精度的上升,一次试验,让同轴蝶飞计时款计时12小时后看误差——1秒。为什么那么多实力雄厚的表厂不愿意开发一款自产的简单款大三针机芯?如果花上太多人力物力财力后出品的东西还无法超越ETA2892A2,谁又会愿意去做呢。
如果说ETA2892A2是给高端市场定做的话,那么ETA2824-2就是专门用来满足中低端市场的宠儿了。ETA2824-2的结构比ETA2892A2稍稍厚些,上链陀比ETA2892A2更简单了,3颗螺丝固定改为了单颗螺丝固定。这种方法反而让ETA2824-2没有了上链不足的缺陷了。
ETA2892A2和ETA2824-2已经占据了瑞士自动表超过半壁江山的大三针
和6497有关的还有OMEGA的铁霸表,这曾经是为铁路工人专门设计的一种用于精确计时的腕表。硕大的表壳内装载的就是6498机芯,6497的孪生兄弟——只是在小秒针的位置上做了小小的改动,原先的9点位秒针改为了传统的6点位秒针。还有一款德国表也用了6497,它就是D.Dornbluth&Sohn,它是以6497为蓝本修改而成,主要是利用了6497的Gear Train传动轮系统,加上德国人对于机芯的特别打磨,展现出的是完全不同于瑞士风格的另一种样子:粉红色的3/4夹板,外露的上链钢轮,蓝钢螺丝固定的红宝石轴承,摆轮上增加了调校螺丝——一切向更美看齐。
7001机芯
从一开始的Valjoux7750,到后来的Unitas6497,再说现在Peseux7001,觉得好像有些滑稽,当重新看ETA家族中最经典的5款机芯的时候,却发现其中的3块来自于ETA的成功收购
- 1、下载文档前请自行甄别文档内容的完整性,平台不提供额外的编辑、内容补充、找答案等附加服务。
- 2、"仅部分预览"的文档,不可在线预览部分如存在完整性等问题,可反馈申请退款(可完整预览的文档不适用该条件!)。
- 3、如文档侵犯您的权益,请联系客服反馈,我们会尽快为您处理(人工客服工作时间:9:00-18:30)。
Before diving, make sure that the watch operates normally and be sure to observe the precautions described below.
PRECAUTIONS ON USING THE WATCH FOR DIVING
AFTER DIVING
● Rinse the watch in fresh water after diving and wash out all seawater, soil, sand, etc. ● Wipe the watch thoroughly dry to prevent possible rust on the case after cleaning the watch in fresh water.
CAUTION
l Please read and observe the instructions described in this booklet to ensure the proper functioning of your diver's watch. l Do not operate the crown when the watch is wet or in water. l Avoid hitting the watch against hard objects such as rocks.
Cal. 4R15/4R16/4R35/4R36/7S26/7S35/7S36
பைடு நூலகம்
INSTRUCTIONS BEDIENUNGSANLEITUNG INSTRUCTIONS ISTRUZIONI INSTRUCCIONES INSTRUÇÕES ИНСТРУКЦИИ
WHILE DIVING
● Do not operate the crown when the watch is wet or in water. ● Take care not to hit the watch against hard objects such as rocks. ● Bezel rotation may become slightly stiffer underwater. This is not a malfunction.
4
5
English
CONTENTS
Page
SEIKO AUTOMATIC DIVER'S WATCH
Cal. 4R15/4R16/4R35/4R36/7S26/7S35/7S36
l 4R16/4R36/7S26/7S36
Hour hand Minute hand
English
WARNING/ CAUTION .......................................................................................................... 3 PRECAUTIONS ON USING THE WATCH FOR DIVING........................................................ 5 FEATURES .......................................................................................................................... 8 HOW TO START THE WATCH.............................................................................................. 8 TIME/CALENDAR SETTING ............................................................................................... 10 ROTATING BEZEL................................................................................................................ 14 TO PRESERVE THE QUALITY OF YOUR WATCH................................................................ 15 LUMIBRITE........................................................................................................................... 17 SPECIFICATIONS................................................................................................................. 18
2 2
您現在是精工自動潛水錶機件編號 4R15/4R16/4R35/4R36/7S26/7S35/7S36 自豪的擁有者。為正確使用起見,請在 使用精工自動潛水錶之前,詳細閱讀本說明書。並將之妥善保管,以備今後參考。
3
English
WARNING
WARNING notes indicate any condition or practice which, if not strictly observed, could result in severe personal injury or possible death.
BEFORE DIVING
English
CAUTION
CAUTION notes indicate any condition or practice which, if not strictly observed, may result in personal injury or property damage.
(P. 3) (S. 19) (P. 35) (P. 51) (P. 67) (P. 83) (P. 99)
用法説明 (115 頁)
English
You are now the proud owner of a SEIKO Automatic Diver’s Watch Cal. 4R15/4R16/4R35/4R36/7S26/7S35/ 7S36. For best results, please read the instructions in this booklet carefully before using your SEIKO Automatic Diver’s Watch. Please keep this manual handy for ready reference. Sie sind jetzt stolzer Besitzer einer automatischen Taucheruhr SEIKO Kal. 4R15/4R16/4R35/4R36/7S26/7S35/ 7S36. Bitte lesen Sie diese Bedienungsanleitung vor der Verwendung der Uhr aufmerksam durch, um optimale Ergebnisse davon zu erhalten. Heben Sie die Bedienungsanleitung gut auf, um jederzeit nachlesen zu können. Vous voici l’heureux propriétaire d’une montre automatique de plongée SEIKO Cal. 4R15/4R16/4R35/4R 36/7S26/7S35/7S36. Pour en obtenir de bonnes performances, veuillez, avant d’utiliser la montre, lire attentivement les explications de ce mode d’emploi que vous conserverez pour toute référence ultérieure. Grazie per aver acquistato questo orologio automatico SEIKO Cal. 4R15/4R16/4R35/4R36/7S26/7S35/7S36 per subacqueo. Per ottenerne i migliori risultati leggere attentamente le istruzioni di questo libretto prima di passare all’uso dell’orologio stesso. Tenere poi il manuale a portata di mano, per ogni eventuale futura, ulteriore consultazione. Usted es ahora un honrado poseedor del reloj de buceador automatico SEIKO Cal. 4R15/4R16/4R35/4R36/ 7S26/7S35/7S36. Para obtener de él los mejores resultados, lea las instrucciones del presente folleto con cuidado antes del uso de su reloj de buceador automatico SEIKO. Guarde este manual para fácil referencia. Você pode sentir-se orgulhoso de possuir um Relógio do mergulhador SEIKO Automático Cal. 4R15/4R16/4 R35/4R36/7S26/7S35/7S36. Para obter dele os melhores resultados, leia atentamente as instruções contidas neste opúsculo antes de usar o seu Relógio do mergulhador SEIKO Automático. Conserve este manual para referências futuras.
