OSPF与RIP路由重发布
实验报告10配置RIP与OSPF路由重分发_-_副本
实验报告课程名称网络工程综合实践实验日期实验项目名称配置RIP与OSPF路由重分发实验地点实验类型√验证型□设计型□综合型学时 2一、实验目的及要求(本实验所涉及并要求掌握的知识点)配置RIP与OSPF路由重分发,通过路由重分发实验,实现在不同路由协议之间发布路由的要点。
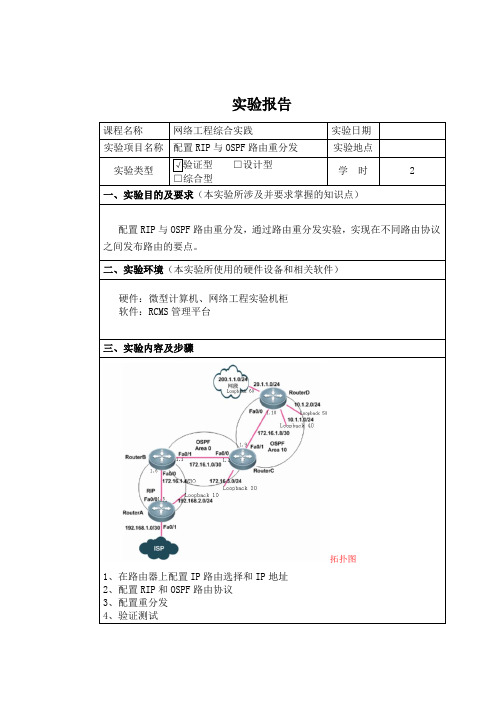
二、实验环境(本实验所使用的硬件设备和相关软件)硬件:微型计算机、网络工程实验机柜软件:RCMS管理平台三、实验内容及步骤拓扑图1、在路由器上配置IP路由选择和IP地址2、配置RIP和OSPF路由协议3、配置重分发4、验证测试四、实验结果(本实验源程序清单及运行结果或实验结论、实验设计图)1、在路由器上配置IP路由选择和IP地址1-RSR20-1>en 14Password:1-RSR20-1#configure terminalEnter configuration commands, one per line. End with CNTL/Z.1-RSR20-1(config)#hostname RouterARouterA(config)#interface fastethernet0/0RouterA(config-if-FastEthernet 0/0)#ip address 172.16.1.5 255.255.255.252 RouterA(config-if-FastEthernet 0/0)#no shutdownRouterA(config-if-FastEthernet 0/0)#exitRouterA(config)#interface loopback 10RouterA(config-if-Loopback 10)#ip address 192.168.2.1 255.255.255.0 RouterA(config-if-Loopback 10)#no shutdownRouterA(config-if-Loopback 10)#exitRouterA(config)#interface fastethernet0/1RouterA(config-if-FastEthernet 0/1)#ip address 192.168.1.1 255.255.255.252 RouterA(config-if-FastEthernet 0/1)#no shutdownRouterA(config-if-FastEthernet 0/1)#exitRouterA(config)#1-RSR20-2>en 14Password:1-RSR20-2#configure terminalEnter configuration commands, one per line. End with CNTL/Z.1-RSR20-2(config)#hostname RouterBRouterB(config)#interface fastethernet0/0RouterB(config-if-FastEthernet 0/0)#ip address 172.16.1.6 255.255.255.252 RouterB(config-if-FastEthernet 0/0)#no shutdownRouterB(config-if-FastEthernet 0/0)#exitRouterB(config)#interface fastethernet0/1RouterB(config-if-FastEthernet 0/1)#ip address 172.16.1.1 255.255.255.252 RouterB(config-if-FastEthernet 0/1)#no shutdownRouterB(config-if-FastEthernet 0/1)#exitRouterB(config)#1-RSR20-3>en 14Password:1-RSR20-3#configure terminalEnter configuration commands, one per line. End with CNTL/Z.1-RSR20-3(config)#hostname RouterCRouterC(config)#interface fastethernet0/0RouterC(config-if-FastEthernet 0/0)#ip address 172.16.1.2 255.255.255.252 RouterC(config-if-FastEthernet 0/0)#no shutdownRouterC(config-if-FastEthernet 0/0)#exitRouterC(config)#interface loopback 30RouterC(config-if-Loopback 30)#ip address 172.16.3.1 255.255.255.0 RouterC(config-if-Loopback 30)#no shutdownRouterC(config-if-Loopback 30)#exitRouterC(config)#interface fastethernet0/1RouterC(config-if-FastEthernet 0/1)#ip address 172.16.1.9 255.255.255.252 RouterC(config-if-FastEthernet 0/1)#no shutdownRouterC(config-if-FastEthernet 0/1)#exitRouterC(config)#1-RSR20-4>en 14Password:1-RSR20-4#configure terminalEnter configuration commands, one per line. End with CNTL/Z.1-RSR20-4(config)#hostname RouterDRouterD(config)#interface fastethernet0/0RouterD(config-if-FastEthernet 0/0)#ip address 172.16.1.10 255.255.255.252 RouterD(config-if-FastEthernet 0/0)#no shutdownRouterD(config-if-FastEthernet 0/0)#exitRouterD(config)#interface loopback 40RouterD(config-if-Loopback 40)#ip address 10.1.1.1 255.255.255.0RouterD(config-if-Loopback 40)#no shutdownRouterD(config-if-Loopback 40)#exitRouterD(config)#interface loopback 50RouterD(config-if-Loopback 50)#ip address 10.1.2.1 255.255.255.0RouterD(config-if-Loopback 50)#no shutdownRouterD(config-if-Loopback 50)#exitRouterD(config)#interface loopback 60RouterD(config-if-Loopback 60)#ip address 20.1.1.1 255.255.255.0RouterD(config-if-Loopback 60)#no shutdownRouterD(config-if-Loopback 60)#exitRouterD(config)#2、配置RIP和OSPF路由协议RouterA(config)#router ripRouterA(config-router)#version 2RouterA(config-router)#network 172.16.1.4 0.0.0.3RouterA(config-router)#network 192.168.1.0 0.0.0.3 RouterA(config-router)#network 192.168.2.0 0.0.0.255 RouterA(config-router)#no auto-summaryRouterA(config-router)#RouterB(config)#router ripRouterB(config-router)#version 2RouterB(config-router)#network 172.16.1.4 0.0.0.3RouterB(config-router)#exitRouterB(config)#router ospf 10RouterB(config-router)#network 172.16.1.0 0.0.0.3 area 0 RouterB(config-router)#RouterC(config)#router ospf 10RouterC(config-router)#network 172.16.1.0 0.0.0.3 area 0 RouterC(config-router)#network 172.16.3.0 0.0.0.255 area 0 RouterC(config-router)#network 172.16.1.8 0.0.0.3 area 1 RouterC(config-router)#RouterD(config)#router ospf 10RouterD(config-router)#network 172.16.1.8 0.0.0.3 area 1 RouterD(config-router)#network 10.1.1.0 0.0.0.255 area 1 RouterD(config-router)#network 10.1.2.0 0.0.0.255 area 1 RouterD(config-router)#network 20.1.1.0 0.0.0.255 area 1 RouterD(config-router)#exitRouterD(config)#3、配置重分发RouterA(config)#router ripRouterA(config-router)#default-information originate RouterA(config-router)#RouterB(config)#router ospf 10RouterB(config-router)#redistribute rip metric 50 subnetsRouterB(config-router)#default-information originateRouterB(config-router)#exitRouterB(config)#router ripRouterB(config-router)#redistribute ospf 10 metric 1RouterB(config-router)#RouterD(config)#router ospf 10RouterD(config-router)#redistribute static subnetsRouterD(config-router)#4、验证测试查看RouterA的路由信息查看RouterB的路由信息查看RouterC的路由信息查看RouterD的路由信息测试RouterA测试RouterD五、实验总结(对本实验结果进行分析,实验心得体会及改进意见)本次试验的内容是配置RIP与OSPF路由重分发,通过路由重分发实验,实现在不同路由协议之间发布路由的要点。
单元任务书23_STUP区域及路由重分发配置

子任务1:配置末梢区域 需求描述:
为了减少区域内路由器的路由条目,特把右侧区域配置为末梢区 域。该Stub区域中仅仅需要域内的路由条目和一条指向区域边界路由器 的默认路由就能实现所有的选路。
现对公司网络路由器设备使用OSPF协议进行配置,并将右侧配置成 末梢区域,实现网络互通。 推荐步骤:
1、 连接网络设备,标识OSPF区域,规划IP地址 2、 R1配置接口地址,启用OSPF协议
配置RIP与OSPF路由重分发,通过路由重分发实验,实现在不同路 由协议之间发布路由的要点。 配置主要步骤: 1、在路由器上配置IP路由选择和IP地址 2、配置RIP和OSPF路由协议 3、配置重分发 4、验证测试
任务二:路由重分发配置 实验环境:
BT公司有两家分公司,分别在上海、杭州,总公司在北京。为了提 高访问的安全性和实时性,避免出现故障,BT公司决定租用数字电路, 将分公司和总公司的网络互通,如下图所示。其中R1为总公司路由器, R2、R5为上海分公司路由器,R3、R4为杭州分公司路由器。按照以下要 求配置网络中的路由器,实现全网互通,并能访问Internet。
单元任务书23_ STUP区域及路由重分发配置
任务目标:
1、会配置STUB区域
2、会把静态路由、RIP路由重发布ห้องสมุดไป่ตู้OSPF区域内
学习形式
小组协作,分别完成
英语词汇:
Stub:残端,末梢 Destination:目的 Redistribute:重新分配,重发布 Internal Router:内部路由器 ABR:Area Border Router,区域边界路由器 ASBR:Autonomous System Boundary Router,自治系统边界路由 器 LSA:Link State Advertisement,链路状态通告 Stub Area:末梢区域 Totally Stubby Area:完全末梢区域
实验08-路由重分发
RIP与OSPF的路由重分发实验目的:1、掌握RIP与OSPF的重发布配置。
2、理解OSPF的E1与E2类型的路由。
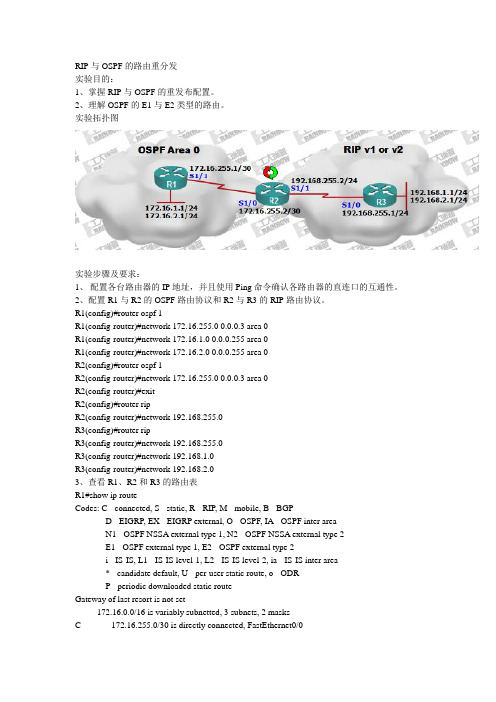
实验拓扑图实验步骤及要求:1、配置各台路由器的IP地址,并且使用Ping命令确认各路由器的直连口的互通性。
2、配置R1与R2的OSPF路由协议和R2与R3的RIP路由协议。
R1(config)#router ospf 1R1(config-router)#network 172.16.255.0 0.0.0.3 area 0R1(config-router)#network 172.16.1.0 0.0.0.255 area 0R1(config-router)#network 172.16.2.0 0.0.0.255 area 0R2(config)#router ospf 1R2(config-router)#network 172.16.255.0 0.0.0.3 area 0R2(config-router)#exitR2(config)#router ripR2(config-router)#network 192.168.255.0R3(config)#router ripR3(config-router)#network 192.168.255.0R3(config-router)#network 192.168.1.0R3(config-router)#network 192.168.2.03、查看R1、R2和R3的路由表R1#show ip routeCodes: C - connected, S - static, R - RIP, M - mobile, B - BGPD - EIGRP, EX - EIGRP external, O - OSPF, IA - OSPF inter areaN1 - OSPF NSSA external type 1, N2 - OSPF NSSA external type 2E1 - OSPF external type 1, E2 - OSPF external type 2i - IS-IS, L1 - IS-IS level-1, L2 - IS-IS level-2, ia - IS-IS inter area* - candidate default, U - per-user static route, o - ODRP - periodic downloaded static routeGateway of last resort is not set172.16.0.0/16 is variably subnetted, 3 subnets, 2 masksC 172.16.255.0/30 is directly connected, FastEthernet0/0C 172.16.1.0/24 is directly connected, Loopback0C 172.16.2.0/24 is directly connected, Loopback1R2#show ip routeCodes: C - connected, S - static, R - RIP, M - mobile, B - BGPD - EIGRP, EX - EIGRP external, O - OSPF, IA - OSPF inter areaN1 - OSPF NSSA external type 1, N2 - OSPF NSSA external type 2E1 - OSPF external type 1, E2 - OSPF external type 2i - IS-IS, L1 - IS-IS level-1, L2 - IS-IS level-2, ia - IS-IS inter area* - candidate default, U - per-user static route, o - ODRP - periodic downloaded static routeGateway of last resort is not set172.16.0.0/16 is variably subnetted, 3 subnets, 2 masksC 172.16.255.0/30 is directly connected, FastEthernet0/1O 172.16.1.1/32 [110/2] via 172.16.255.1, 00:03:33, FastEthernet0/1O 172.16.2.1/32 [110/2] via 172.16.255.1, 00:03:33, FastEthernet0/1从R1学习到的OSPF网络路由C 192.168.255.0/24 is directly connected, FastEthernet0/0R 192.168.1.0/24 [120/1] via 192.168.255.1, 00:00:25, FastEthernet0/0R 192.168.2.0/24 [120/1] via 192.168.255.1, 00:00:25, FastEthernet0/0从R3学习到的RIP网络路由R3#show ip routeCodes: C - connected, S - static, R - RIP, M - mobile, B - BGPD - EIGRP, EX - EIGRP external, O - OSPF, IA - OSPF inter areaN1 - OSPF NSSA external type 1, N2 - OSPF NSSA external type 2E1 - OSPF external type 1, E2 - OSPF external type 2i - IS-IS, L1 - IS-IS level-1, L2 - IS-IS level-2, ia - IS-IS inter area* - candidate default, U - per-user static route, o - ODRP - periodic downloaded static routeGateway of last resort is not setC 192.168.255.0/24 is directly connected, FastEthernet0/1C 192.168.1.0/24 is directly connected, Loopback0C 192.168.2.0/24 is directly connected, Loopback14、根据show ip route命令可以看出,只有R2路由才可以学习到整个网络的完整路由。
路由重分发工作原理
路由重分发工作原理路由重分发工作原理网络协议有很多种,例如isis、rip、ospf、bgp等,在大型公司中经常会出现网络设备之间运行多种网络协议的情况,各种网络协议之间如果不进行一定的配置那么设备之间是不能进行互通信息的,在这种情况下就出现了路由重分发技术,路由重分发的作用就是为了实现多种路由协议之间的协同工作。
路由重分发的工作原理:通过在各种路由协议的配置中添加一定的配置使将路由协议广播到另外的路由协议中,让各个路由协议都能检测到运行其他的路由协议的网段,从而实现数据的传输。
路由重分发技术需要用到redistribute命令rip协议的redistribute命令redistribute protocol 【metric metric-value】【match internal | external nssa-external type】【route-map map-tag】protocol:路由重分发的源路由协议 metric metric-value:设置路由重分发的度量值(1···6),没有将使用default-metric命令设置的metric值 match internal | external nssa-external type:设置重分发路由的条件,只适合重分发的源路由协议是ospf route-map map-tag应用路由图进行重分发ospf协议的redistribute命令 redistribute protocol 【subnets】【metric metric-value】【metric-type{1 | 2}】【tag tag-value】【route-map map-tag】protocol:路由重分发的源路由协议subnets:设置是否重分发子网metric metric-value:设置路由重分发的度量值(1···16777214),没有将使用default-metric命令设置的metric值metric metric-type:设置重分发的路由度量类型,默认值为2 tag tag-value:设置重分发的路由的tag(0···2147483647)默认为0 route-map map-tag应用路由图进行重分发重分发到ospf中的时候,除了直连路由和默认路由外,其他重分发的路由的默认的度量值是20,默认度量值类型是2,且默认不重分发子网。
ospf和EIGRP重发布

配置Ospf与Eigrp的路由再发布环境:三台路由器串口相连,接口配置如图要求:1.配置EIGRP和关闭自动路由汇总2.在R1上配置LOOP口的EIGRP手工路由汇总3.在R2和R3配置Ospf 接口验证4.在ASBR(R2)上做eigrp和ospf双向再发布5.在R3上将所有loopback 口再发布到ospf中,但loopback2不能被R2,R3学到,不允许使用network命令步骤一:配置三个路由器接口使其连通。
R1的配置R1(config)# interface Loopback0R1(config-if)#ip address 172.168.1.1 255.255.255.0R1(config)# interface Loopback1R1(config-if)#ip address 172.168.2.1 255.255.255.0R1(config)#interface Loopback2R1(config-if)#ip address 172.168.3.1 255.255.255.0R1(config)# interface s0R1(config-if)# ip address 10.1.1.1 255.255.255.0R1(config-if)#clock rate 64000R1(config-if)#no shutdownR2的配置R2(config)#interface s0R2(config-if)#ip address 20.1.1.1 255.255.255.0R2(config-if)#no shutdownR2(config)#interface s1R2(config-if)# ip address 10.1.1.1 255.255.255.0R2(config-if)#no shutdownR3的配置R3(config)# interface Loopback0R3(config-if)#ip address 192.168.1.1 255.255.255.0R3(config)# interface Loopback1R3(config-if)#ip address 192.168.2.1 255.255.255.0R3(config)#interface Loopback2R3(config-if)#ip address 192.168.3.1 255.255.255.0R3(config)# interface s1R3(config-if)# ip address 20.1.1.2 255.255.255.0R3(config-if)#clock rate 64000R3(config-if)#no shutdown步骤二:配置Eigrp ,OspfR1的配置R1(config)# router eigrp 100 →启用EIGRPR1(config-router)# network 10.1.1.0 0.0.0.255 →发布相应接口R1(config-router)#network 172.168.1.0 0.0.0.255R1(config-router)#network 172.168.2.0 0.0.0.255R1(config-router)#network 172.168.3.0 0.0.0.255R1(config-router)# no auto-summary →关闭自动汇总R2的配置R2(config)# router eigrp 100R2(config-router)# network 10.1.1.0 0.0.0.255R2(config-router)# no auto-summaryR2(config)# router ospf 10 →在R2上即启用EIGRP并且启用OSPFR2(config-router)# network 20.1.1.0 0.0.0.255 area 0R3的配置R3(config)# router ospf 10R3(config-router)# network 20.1.1.0 0.0.0.255 area 0步骤三:配置EIGRP手工路由汇总和Ospf接口验证R1的配置R1(config)# interface s0R1(config-if)# ip summary-address eigrp 100 172.168.0.0 255.255.252.0 →手工汇总R2的配置R2(config)# interface s0R2(config-if)# ip ospf authentication message-digest →启用接口验证R2(config-if)# ip ospf message-digest-key 1 md5 ciscoR3的配置R3(config)# interface s1R3(config-if)# ip ospf authentication message-digest →启用接口认证R3(config-if)# ip ospf message-digest-key 1 md5 cisco步骤四:在R2,R3上做路由再发布并控制loopback2不能被R1,R2学到R2的配置R2(config)# router eigrp 100R2(config-router)# redistribute ospf 10 metric 10000 100 255 1 1500→将ospf重分发进eigrp R2(config)# router ospf 10R2(config-router)# redistribute eigrp 100 subnets →将eigrp路由重分发到ospfR3的配置R3(config)# access-list 1 permit 192.168.1.0 0.0.0.255 →定义分发条件列表R3(config)# access-list 1 permit 192.168.2.0 0.0.0.255R3(config)# access-list 2 permit 192.168.3.0 0.0.0.255R3(config)# route-map o-e permit 10 →做映射列表允许相应条目R3 (config-route-map)# match ip address 1 →将列表加载R3(config)# route-map o-e deny 20 →拒绝相应条目的映射列表R3 (config-route-map)# match ip address 2 →将列表加载R3(config)# route-map o-e permit 25 →最后允许其它所有R3(config)# router ospf 10R3(config-router)# redistribute connected subnets route-map o-e步骤五:查看路由表R1#sh ip routeCodes: C - connected, S - static, I - IGRP, R - RIP, M - mobile, B - BGPD - EIGRP, EX - EIGRP external, O - OSPF, IA - OSPF inter areaN1 - OSPF NSSA external type 1, N2 - OSPF NSSA external type 2E1 - OSPF external type 1, E2 - OSPF external type 2, E - EGPi - IS-IS, L1 - IS-IS level-1, L2 - IS-IS level-2, ia - IS-IS inter area* - candidate default, U - per-user static route, o - ODRP - periodic downloaded static routeGateway of last resort is not set20.0.0.0/24 is subnetted, 1 subnetsD EX 20.1.1.0 [170/2195456] via 10.1.1.2, 00:03:50, Serial0 →外部路由条目172.168.0.0/16 is variably subnetted, 4 subnets, 2 masksD 172.168.0.0/22 is a summary, 00:03:56, Null0C 172.168.1.0/24 is directly connected, Loopback0C 172.168.2.0/24 is directly connected, Loopback1C 172.168.3.0/24 is directly connected, Loopback210.0.0.0/24 is subnetted, 1 subnetsC 10.1.1.0 is directly connected, Serial0D EX 192.168.1.0/24 [170/2195456] via 10.1.1.2, 00:01:53, Serial0D EX 192.168.2.0/24 [170/2195456] via 10.1.1.2, 00:01:53, Serial0R2#sh ip routeCodes: C - connected, S - static, I - IGRP, R - RIP, M - mobile, B - BGPD - EIGRP, EX - EIGRP external, O - OSPF, IA - OSPF inter areaN1 - OSPF NSSA external type 1, N2 - OSPF NSSA external type 2E1 - OSPF external type 1, E2 - OSPF external type 2, E - EGPi - IS-IS, L1 - IS-IS level-1, L2 - IS-IS level-2, ia - IS-IS inter area* - candidate default, U - per-user static route, o - ODRP - periodic downloaded static routeGateway of last resort is not set20.0.0.0/24 is subnetted, 1 subnetsC 20.1.1.0 is directly connected, Serial0172.168.0.0/22 is subnetted, 1 subnetsD 172.168.0.0 [90/2297856] via 10.1.1.1, 00:05:39, Serial110.0.0.0/24 is subnetted, 1 subnetsC 10.1.1.0 is directly connected, Serial1O E2 192.168.1.0/24 [110/20] via 20.1.1.2, 00:03:42, Serial0 →ospf外部路由条目类型2 O E2 192.168.2.0/24 [110/20] via 20.1.1.2, 00:03:42, Serial0R3#sh ip routeCodes: C - connected, S - static, I - IGRP, R - RIP, M - mobile, B - BGPD - EIGRP, EX - EIGRP external, O - OSPF, IA - OSPF inter areaN1 - OSPF NSSA external type 1, N2 - OSPF NSSA external type 2E1 - OSPF external type 1, E2 - OSPF external type 2, E - EGPi - IS-IS, L1 - IS-IS level-1, L2 - IS-IS level-2, ia - IS-IS inter area* - candidate default, U - per-user static route, o - ODRP - periodic downloaded static routeGateway of last resort is not set20.0.0.0/24 is subnetted, 1 subnetsC 20.1.1.0 is directly connected, Serial1172.168.0.0/22 is subnetted, 1 subnetsO E2 172.168.0.0 [110/20] via 20.1.1.1, 00:04:48, Serial110.0.0.0/24 is subnetted, 1 subnetsO E2 10.1.1.0 [110/20] via 20.1.1.1, 00:04:48, Serial1C 192.168.1.0/24 is directly connected, Loopback0C 192.168.2.0/24 is directly connected, Loopback1C 192.168.3.0/24 is directly connected, Loopback2步骤六:用ping命令测试连通性R1#ping 192.168.2.1!!!!!Success rate is 100 percent (5/5), round-trip min/avg/max = 60/60/64 msR3#ping 172.168.1.1!!!!!Success rate is 100 percent (5/5), round-trip min/avg/max = 60/60/60 ms 步骤七:查看配置R1#sh runhostname R1!interface Loopback0ip address 172.168.1.1 255.255.255.0!interface Loopback1ip address 172.168.2.1 255.255.255.0!interface Loopback2ip address 172.168.3.1 255.255.255.0!interface Serial0ip address 10.1.1.1 255.255.255.0ip summary-address eigrp 100 172.168.0.0 255.255.252.0 5 clockrate 64000!router eigrp 100network 10.1.1.0 0.0.0.255network 172.168.1.0 0.0.0.255network 172.168.2.0 0.0.0.255network 172.168.3.0 0.0.0.255no auto-summary!endR2#sh runhostname R2!interface Serial0ip address 20.1.1.1 255.255.255.0ip ospf authentication message-digestip ospf message-digest-key 1 md5 cisco!interface Serial1ip address 10.1.1.2 255.255.255.0!router eigrp 100redistribute ospf 10 metric 10000 100 255 1 1500network 10.1.1.0 0.0.0.255no auto-summary!router ospf 10redistribute eigrp 100 subnetsnetwork 20.1.1.0 0.0.0.255 area 0!endR3#sh runhostname R3!interface Loopback0ip address 192.168.1.1 255.255.255.0ip ospf network point-to-point!interface Loopback1ip address 192.168.2.1 255.255.255.0ip ospf network point-to-point!interface Loopback2ip address 192.168.3.1 255.255.255.0ip ospf network point-to-point 定义网络类型,否则为主机路由32位!interface Serial1ip address 20.1.1.2 255.255.255.0ip ospf authentication message-digestip ospf message-digest-key 1 md5 cisco clockrate 64000!router ospf 10redistribute connected subnets route-map o-e network 20.1.1.0 0.0.0.255 area 0!access-list 1 permit 192.168.1.0 0.0.0.255 access-list 1 permit 192.168.2.0 0.0.0.255 access-list 2 permit 192.168.3.0 0.0.0.255 route-map o-e permit 10match ip address 1!route-map o-e deny 20match ip address 2!route-map o-e permit 25!end。
OSPF多进程之间的路由重发布

OSPF多进程之间的路由重发布1、实验拓扑如下图:R1R4R3 R2Area 00spf 10Area 0Ospf 1002、实验目的:1、实现R2与R3之间互相访问时的数据分流。
R2访问R3的3.3.3.3/32时走R1,R2访问R3的30.30.30.30/32时走R4。
R3访问R2的2.2.2.2/32时走R1,R3访问R2的20.20.20.20/32时走R1。
2、实现线路的冗余备份。
当R1链路故障时数据可以走R4,当R4链路故障时数据可以走R1。
实现链路的冗余备份。
3、理解并掌握route-map在控制路由方面的应用。
3、实验配置文档R1配置:config terint f0/0ip add 10.0.0.1 255.255.255.252no shutint f1/0ip add 10.0.0.5 255.255.255.252no shutint lo 0ip add 1.1.1.1 255.255.255.255endwriteconfig terrouter ospf 10router-id 1.1.1.1network 10.0.0.0 0.0.0.3 area 0redistribute ospf 100 metric-type 1 subnets route-map ospf100_to_ospf10 distribute-list deny_ospf100 inendconfig terrouter ospf 100router-id 1.1.1.1network 10.0.0.4 0.0.0.3 area 0redistribute ospf 10 metric-type 1 subnets route-map ospf10_to_ospf100 distribute-list deny_ospf10 inendwriteip access-list standard deny_ospf10deny 2.2.2.2 0.0.0.0deny 20.20.20.20 0.0.0.0permit anyip access-list standard deny_ospf100deny 3.3.3.3 0.0.0.0deny 30.30.30.30 0.0.0.0permit anyaccess-list 10 permit 2.2.2.2 0.0.0.0access-list 11 permit 3.3.3.3 0.0.0.0access-list 20 permit 20.20.20.20 0.0.0.0access-list 21 permit 30.30.30.30 0.0.0.0route-map ospf100_to_ospf10 permit 10match ip address 11set metric 100route-map ospf100_to_ospf10 permit 20match ip address 21set metric 200route-map ospf10_to_ospf100 permit 10match ip address 10set metric 100route-map ospf10_to_ospf100 permit 20match ip address 20set metric 200R4配置:config terint f0/0ip add 172.16.0.1 255.255.255.252no shutint f1/0ip add 172.16.0.5 255.255.255.252no shutint lo 0ip add 4.4.4.4 255.255.255.255endwriteconfig terrouter ospf 10router-id 4.4.4.4network 172.16.0.4 0.0.0.3 area 0redistribute ospf 100 metric-type 1 subnets route-map ospf100_to_ospf10 distribute-list deny_ospf100 inendconfig terrouter ospf 100router-id 4.4.4.4network 172.16.0.0 0.0.0.3 area 0redistribute ospf 10 metric-type 1 subnets route-map ospf10_to_ospf100 distribute-list deny_ospf10 inendwriteip access-list standard deny_ospf10deny 2.2.2.2 0.0.0.0deny 20.20.20.20 0.0.0.0permit anyip access-list standard deny_ospf100deny 3.3.3.3 0.0.0.0deny 30.30.30.30 0.0.0.0permit anyaccess-list 10 permit 2.2.2.2 0.0.0.0access-list 11 permit 3.3.3.3 0.0.0.0access-list 20 permit 20.20.20.20 0.0.0.0access-list 21 permit 30.30.30.30 0.0.0.0route-map ospf100_to_ospf10 permit 10 match ip address 11set metric 200route-map ospf100_to_ospf10 permit 20 match ip address 21set metric 100route-map ospf10_to_ospf100 permit 10 match ip address 10set metric 200route-map ospf10_to_ospf100 permit 20 match ip address 20set metric 100R2的配置:config terint f0/0ip add 10.0.0.2 255.255.255.252no shutint f1/0ip add 172.16.0.6 255.255.255.252no shutint lo 0ip add 2.2.2.2 255.255.255.255int lo 1ip add 20.20.20.20 255.255.255.255 endwriteconfig terrouter ospf 10router-id 2.2.2.2network 172.16.0.4 0.0.0.3 area 0 network 10.0.0.0 0.0.0.3 area 0 network 2.2.2.2 0.0.0.0 area 0network 20.20.20.20 0.0.0.0 area 0endwriteR3的配置:config terint f0/0ip add 10.0.0.6 255.255.255.252no shutint f1/0ip add 172.16.0.2 255.255.255.252no shutint lo 0ip add 3.3.3.3 255.255.255.255int lo 1ip add 30.30.30.30 255.255.255.255endwriteconfig termrouter ospf 100router-id 3.3.3.3network 172.16.0.0 0.0.0.3 area 0network 10.0.0.4 0.0.0.3 area 0network 3.3.3.3 0.0.0.0 area 0network 30.30.30.30 0.0.0.0 area 0endwrite4、实验测试1、在R2上show ip route查看结果,可以看出实现了数据分流。
路由重分发(引入)技术
路由重分发技术一、路由重分发介绍1、两个协议之间相互学习路由条目2、可以省掉不必要的麻烦二、路由重分发之间相互采用用的什么1、OSPF:开销2、EIGRP:度量3、RIP:跳数4、Static(静态):直接重分发三、重分发配置命令1、将OSPF重分发进RIP①router rip :进入RIP进程②redistribute ospf 100(进程号) metric 1(跳数) :为OSPF路由指定跳数2、将RIP重分发到OSPF①router ospf 100 :进入OSPF进程②redistribute rip metric 100(开销) subnets :为RIP路由指定开销3、将OSPF重分发到EIGRP①router eigrp 100 :进入EIGRP进程②redistribute ospf 100 metric 10000 1000 255 1 1500 :为OSPF路由指定度量(带) (延) (可) (负) (M)4、将静态重分发进OSPF①router ospf 100 :进入OSPF进程②redistribute static subnets :将静态重分发到OSPF在OSPF中重分发不加Subnets重分到OSPF里的路由都是主类网络。
5、将直连重分发进RIP①router rip :进入RIP进程②redistribute connected :将直连重分发进RIP6、另一种重分发路由方式①router ospf 100 :进入OSPF进程②redistribute eigrp 100 :将EIGRP重分发进OSPF(OSPF默认cost:20)③default-metric 100(开销) :指定重分发的metric(度量)四、查看重分发配置命令1、show runnning-config |section router eigrp :查看EIGRP的重分发配置2、show runnning-config |section router ospf :查看OSPF的重分发配置3、show runnning-config |section router rip :查看RIP的重分发配置。
RIP与静态路由重分布
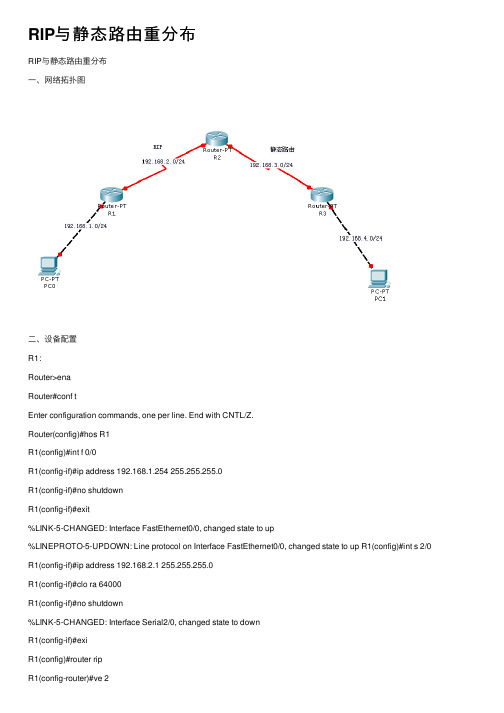
RIP与静态路由重分布RIP与静态路由重分布⼀、⽹络拓扑图⼆、设备配置R1:Router>enaRouter#conf tEnter configuration commands, one per line. End with CNTL/Z.Router(config)#hos R1R1(config)#int f 0/0R1(config-if)#ip address 192.168.1.254 255.255.255.0R1(config-if)#no shutdownR1(config-if)#exit%LINK-5-CHANGED: Interface FastEthernet0/0, changed state to up%LINEPROTO-5-UPDOWN: Line protocol on Interface FastEthernet0/0, changed state to up R1(config)#int s 2/0 R1(config-if)#ip address 192.168.2.1 255.255.255.0R1(config-if)#clo ra 64000R1(config-if)#no shutdown%LINK-5-CHANGED: Interface Serial2/0, changed state to downR1(config-if)#exiR1(config)#router ripR1(config-router)#ve 2R1(config-router)#network 192.168.1.0R1(config-router)#network 192.168.2.0R1(config-router)#exiR1(config)#do wrBuilding configuration...[OK]R2:Router>Router>enaRouter#conf tEnter configuration commands, one per line. End with CNTL/Z.Router(config)#hos R2R2(config)#int s 2/0R2(config-if)#ip address 192.168.2.2 255.255.255.0R2(config-if)#no shutdown%LINK-5-CHANGED: Interface Serial2/0, changed state to upR2(config-if)#exiR2(config)#int s 3/0%LINEPROTO-5-UPDOWN: Line protocol on Interface Serial2/0, changed state to up R2(config-if)#ip address 192.168.3.1 255.255.255.0R2(config-if)#clo ra 64000R2(config-if)#no shutdown%LINK-5-CHANGED: Interface Serial3/0, changed state to downR2(config-if)#exiR2(config)#router ripR2(config-router)#ve 2R2(config-router)#network 192.168.2.0R2(config-router)#default-information originateR2(config-router)#redistribute static metric 3R2(config-router)#exiR2(config)#ip route 0.0.0.0 0.0.0.0 192.168.3.2R2(config)#ip route 192.168.4.0 255.255.255.0 192.168.3.2R2(config)#do wrBuilding configuration...[OK]R3:Router>Router>enaRouter#conf tEnter configuration commands, one per line. End with CNTL/Z.Router(config)#hos R3R3(config)#int f 0/0R3(config-if)#ip address 192.168.4.254 255.255.255.0R3(config-if)#no shutdownR3(config-if)#exit%LINK-5-CHANGED: Interface FastEthernet0/0, changed state to up%LINEPROTO-5-UPDOWN: Line protocol on Interface FastEthernet0/0, changed state to up R3(config)#int s 2/0 R3(config-if)#ip address 192.168.3.2 255.255.255.0R3(config-if)#no shutdownR3(config-if)#exit%LINK-5-CHANGED: Interface Serial2/0, changed state to upR3(config)#ip route 0.0.0.0 0.0.0.0 192.168.3.1%LINEPROTO-5-UPDOWN: Line protocol on Interface Serial2/0, changed state to upR3(config)#ip route 192.168.2.0 255.255.255.0 192.168.3.1R3(config)#ip route 192.168.1.0 255.255.255.0 192.168.3.1Building configuration...[OK]测试结果:从PC0 ping PC1:。
路由重发布ospf重发布静态路由的个人实验体会

路由重发布ospf重发布静态路由的个人实验体会
重发布OSPF重发布静态路由是一种网络路由策略,可以实现动态路由和静态路由之间的互通。
在我的个人实验中,我注意到以下几点体会:
1. 动态路由和静态路由的结合:通过重发布OSPF重发布静态路由,可以将静态路由的网络信息发布给OSPF协议,让动态路由协议动态更新网络路由表。
这样可以灵活地控制网络流量的路径,同时又能够利用OSPF的自动发现和动态调整的特性。
2. 灵活性和可控性:通过重发布静态路由,可以将网络中的特定静态路由纳入动态路由的管理范围。
这样可以实现对这些静态路由的灵活控制,比如动态调整路由的权重、路由的优先级等。
同时,也可以利用OSPF协议的各种功能,如故障检测、负载均衡等。
3. 路由的冗余和容错:静态路由和动态路由的结合可以增加网络的冗余和容错性。
通过重发布静态路由,并配置合适的路径选择策略,可以让网络在出现故障或异常情况时,能够动态地切换到备用路由,提高网络的可靠性和容错性。
4. 配置的复杂性:重发布OSPF重发布静态路由需要进行一些复杂的配置操作,比如配置静态路由、配置重发布OSPF等。
配置不当可能导致网络的异常,需要谨慎操作,并进行充分的测试和验证。
总体来说,重发布OSPF重发布静态路由是一种强大的网络路由策略,通过合理使用可以提高网络的性能、可靠性和灵活性。
但需要注意配置的复杂性和潜在的风险,以及进行充分的测试和验证。
路由重发布实验报告

综合实训报告项目名称: RIP与ospf之间路由重发布班级: 12级网络工程姓名:魏少帅、魏彦博、马媛媛、雪玉指导老师:魏凯斌实训时间: 8月31日至9月10日一:背景需求通过做路由重发使得不同路由之间可以互通二:需求分析1.用户需求(1)利用RIP v2使得使用rip的网络互通(2)利用ospf使得使用ospf的网络互通(3)在rip与ospf相连的边界路由器上做路由重发布,使得两个网络互通2.技术分析(1):rip技术(2):ospf技术(3):路由重发布技术三:解决方案1:在路由器R3、R4上启动rip v22在路由器R1、R2上启动ospf3在R3上做路由路由重发布四:拓扑图设计五:设备需求1:2台路由器RSR20-14 2:2台路由器RSR20-24 3:两台PC六:ip地址规划七:实验步骤与配置R1#enconfhost R1confint fa0/0ip addr 10.0.2.1 255.255.255.252no shutint loopback 0ip addr 10.0.3.1 255.255.255.252no shutexitrouter ospf 10network 10.0.2.0 0.0.0.3 area 1network 10.0.3.1 0.0.0.3 area 1exitR2#enconfhost R1confint fa0/0ip addr 10.0.2.1 255.255.255.252no shutint loopback 0ip addr 10.0.3.1 255.255.255.252no shutexitrouter ospf 10network 10.0.2.0 0.0.0.3 area 1network 10.0.3.1 0.0.0.3 area 1exitR3#enconfhost R3confint fa0/0ip addr 10.0.1.1 255.255.255.252no shutint fa0/1ip addr 172.16.1.2 255.255.255.252no shutexitrouter ospf 10network 10.0.1.0 0.0.0.3 area 0exitrouter ripvers 2network 172.16.1.0 0.0.0.3no auto-exitrouter ospf 10red rip subnetsexitrouter ripred ospf 10 metric 1endR4#enconfhost R4confint fa0/0ip addr 172.16.1.1 255.255.255.252no shutexitint loopback 0ip addr 172.16.2.2 255.255.255.252no shutexitrouter ripvers 2network 172.16.1.0 0.0.0.3network 172.16.2.0 0.0.0.3no auto-exitend八、实验测试1:用show ip route来测试路由配置2:用show ip rip验证版本配置3:用show running-config查看设备所有配置信息4:用show ip interface brief查看接口状态。
关于双点双向重分布的一些总结 -未必全对
这样做完之后的结果和修改AD值是相同的。
这是方法之一,分布列表有很多控制参数,
我相信还有其他方式,也可以实现相同效果。
方法三:
使用route-map,如果在分布列表的基础上去思考使用route-map的话,会少走一些弯路。
有意思的地方出现了,既然ASBR 1和ASBR 2在相同的ospf域,
那为什么两个点的路由表不同?
观察路由表发现有一端的ASBR选择了rip协议,
另一端的ASBR选择了ospf协议,
其实经过分析之后,这种情况很容易可以解释。
在选择rip协议的ASBR端,说明rip域的路由条目是从这个点进来的,
然后形成等价的负载均衡。
我想到了樊老师回答的一个问题,
在ASBR 1和ASBR 2中,究竟哪一边会出现这种状况?
"取决于时间",
如果先在ASBR 2做好了redistribute,
那ASBR 1和B之间就会产生环路,反之亦然。
环路是如何自己消失的?
卷一上说,环路消失是因为失效计时器到时,
进来之后,又重分布进了ospf域,
然后,将这些路由条目(分布之前是rip域内路由,分布之后是ospf的O E2路由)通告给了其他ospf节点,
对端在学到O E2路由之后就会和之前学到的rip路由比较,
比较之后rip条目被丢弃,O E2留下了,就产生了这种情况。
在rip的数据库中也可以得到验证,
先看环路,
出现环路是造成网络收敛慢的主要原因,
但是在链路经过反复震荡之后
(也许几分钟,也许几十分钟,根据节点多少而定,在4个节点的环境下,使用ospf和rip时,收敛时间约在几分钟左右也,可能更短),
路由重发布(路由引入)

比如要将RIP重分发到OSPF中,那RIP路由必须位于RIP路由表中;
在重分发时设定种子metric 路由被重分发后,管理距离为目标路由选择协议的默认管理距离
重分发来的路由被视为外部路由,对BGP和EIGRP重分发后被视为外部路由,而 优先选择内部路由
常州刘国钧高等职业技术学校
从无类别路由协议向有类别路由协议重分发
R
2. Dest. ASE 150 Loopback0:Dest .
R
RTD
RTE
R RTA
R
4. redistribute ospf-ase
常州刘国钧高等职业技术学校
路由引入要注意什么?
• 开销值的变化
20 RTA
RTB
R
Import isis 1 cost 2
R
R
RTC
Loopback0:Dest.
常州刘国钧高等职业技术学校
感谢您的关注,不足之处请指正
120865845@
常州刘国钧高等职业技术学校
常州刘国钧高等职业技术学校
重分发直连路由、静态路由和默认路由示例
常州刘国钧高等职业技术学校
简易重分发路由练习
向OSPF中重分发直连路由 向OSPF中重分发静态路由 双向重分发(向OSPF中重分发RIP路由,向RIP中重分发 OSPF路由)
实验小结
常州刘国钧高等职业技术学校
OSPF的重分发小结
常州刘国钧高等职业技术学校
路由重发布的作用
• 路由重分发是指连接到不同路由选择域的边界路由器,在 不同路由选择域(自主系统)之间交换和通告路由选择信 息的能力。
常州刘国Dest. 2.2.2.2 10.0.0.0 11.0.0.0 Protocol OSPF OSPF Direct Dest. 2.2.2.2 10.0.0.0 11.0.0.0 Protocol Direct Direct Direct
RIP与OSPF双点双向重分布
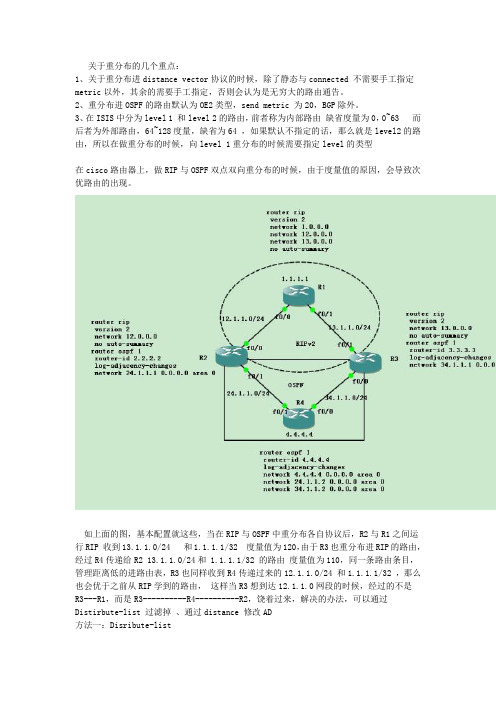
关于重分布的几个重点:1、关于重分布进distance vector协议的时候,除了静态与connected 不需要手工指定metric以外,其余的需要手工指定,否则会认为是无穷大的路由通告。
2、重分布进OSPF的路由默认为OE2类型,send metric 为20,BGP除外。
3、在ISIS中分为level 1 和level 2的路由,前者称为内部路由缺省度量为0,0~63 而后者为外部路由,64~128度量,缺省为64 ,如果默认不指定的话,那么就是level2的路由,所以在做重分布的时候,向level 1重分布的时候需要指定level的类型在cisco路由器上,做RIP与OSPF双点双向重分布的时候,由于度量值的原因,会导致次优路由的出现。
如上面的图,基本配置就这些,当在RIP与OSPF中重分布各自协议后,R2与R1之间运行RIP 收到13.1.1.0/24 和1.1.1.1/32 度量值为120,由于R3也重分布进RIP的路由,经过R4传递给R2 13.1.1.0/24和 1.1.1.1/32 的路由度量值为110,同一条路由条目,管理距离低的进路由表,R3也同样收到R4传递过来的12.1.1.0/24 和1.1.1.1/32 ,那么也会优于之前从RIP学到的路由,这样当R3想到达12.1.1.0网段的时候,经过的不是R3---R1,而是R3----------R4----------R2,饶着过来,解决的办法,可以通过Distirbute-list 过滤掉、通过distance 修改AD方法一:Disribute-listR2上:access-list 1 permit 34.1.1.0 0.0.0.255access-list 1 permit host 4.4.4.4router ospf 1disribute-list 1 inR3上 access-list 1 permit 24.1.1.0 0.0.0.255access-list 1 permit host 4.4.4.4router ospf 1distribute-list in这时候在看下路由表各自的路由域都正常收到路由,没出现次优路由的问题。
华为路由器路由引入(路由重发布)ospf-rip
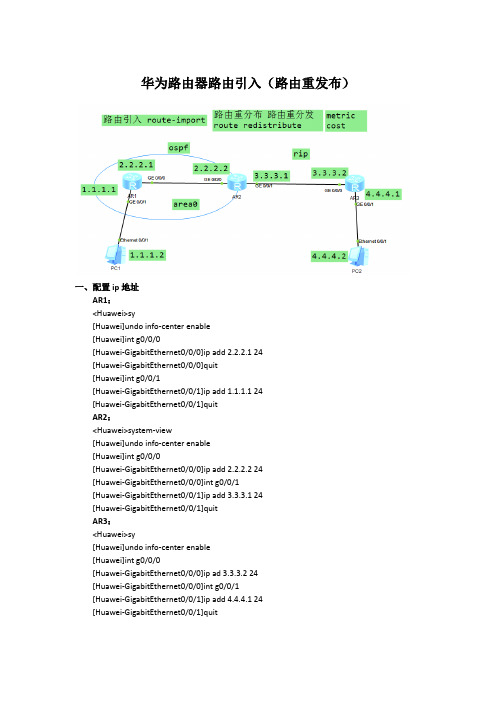
华为路由器路由引入(路由重发布)一、配置ip地址AR1:<Huawei>sy[Huawei]undo info-center enable[Huawei]int g0/0/0[Huawei-GigabitEthernet0/0/0]ip add 2.2.2.1 24[Huawei-GigabitEthernet0/0/0]quit[Huawei]int g0/0/1[Huawei-GigabitEthernet0/0/1]ip add 1.1.1.1 24[Huawei-GigabitEthernet0/0/1]quitAR2:<Huawei>system-view[Huawei]undo info-center enable[Huawei]int g0/0/0[Huawei-GigabitEthernet0/0/0]ip add 2.2.2.2 24[Huawei-GigabitEthernet0/0/0]int g0/0/1[Huawei-GigabitEthernet0/0/1]ip add 3.3.3.1 24[Huawei-GigabitEthernet0/0/1]quitAR3:<Huawei>sy[Huawei]undo info-center enable[Huawei]int g0/0/0[Huawei-GigabitEthernet0/0/0]ip ad 3.3.3.2 24[Huawei-GigabitEthernet0/0/0]int g0/0/1[Huawei-GigabitEthernet0/0/1]ip add 4.4.4.1 24[Huawei-GigabitEthernet0/0/1]quit二、在AR1和AR2上配置ospf协议AR1:[Huawei]ospf 1[Huawei-ospf-1]area 0[Huawei-ospf-1-area-0.0.0.0]net 1.1.1.0 0.0.0.255[Huawei-ospf-1-area-0.0.0.0]net 2.2.2.0 0.0.0.255[Huawei-ospf-1-area-0.0.0.0]quit[Huawei-ospf-1]quitAR2:[Huawei]ospf 1[Huawei-ospf-1]area 0[Huawei-ospf-1-area-0.0.0.0]net 2.2.2.0 0.0.0.255[Huawei-ospf-1-area-0.0.0.0]quit[Huawei-ospf-1]quit三、在AR2和AR3上配置rip协议AR2:[Huawei]rip 1[Huawei-rip-1]version 2[Huawei-rip-1]net 3.0.0.0[Huawei-rip-1]quitAR3:[Huawei]rip 1[Huawei-rip-1]version 2[Huawei-rip-1]net 3.0.0.0[Huawei-rip-1]net 4.0.0.0 //为什么向4.0.0.0段宣告,而不是4.4.4.0[Huawei-rip-1]quitAR1:[Huawei]dis ip routing-tableAR3:[Huawei]dis ip routing-table //查看路由表,看看是否完整四、在路由器AR2上,在ospf协议中引入rip<Huawei><Huawei>system-view[Huawei]ospf 1[Huawei-ospf-1]import-route rip 1//引入rip协议,可以设置cost值,也可按照默认[Huawei-ospf-1]quit五、在路由器AR2上,在rip协议中引入ospf[Huawei]rip 1[Huawei-rip-1]import-route ospf 1//引入ospf协议,可以设置cost值,也可按照默认[Huawei-rip-1]quit[Huawei]六、分别在AR1和AR2上查看路由表,与没有引入前的路由表对比。
路由重发布(路由引入)
• RIP更改metric:
路由协议下:redistribute ospf 110 metric 5
• 更改默认的metric:
路由协议下=>default-metric 5
• RIP重分发直连时,不加metric,此时,默认的metric是1
常州刘国钧高等职业技术学校
路由重发布的原则
不同协议不同路径存在时,使用度量值(metric值)和管理距离(AD)做选择 在多种协议的路由器中将管理距离最小的路由加入路由表; 在多条路径存在的路由中将度量值小的加入选择表中; 从无类别协议向有类别协议重新分配重分布原则 路由必须位于路由选择表中才能被重分发
R
11.0.0.0 OSPF
R
Loopback0:2.2.2.2/32
RTB
RTA
R
redistribute connected subnets
常州刘国钧高等职业技术学校
路由重发布的类型
引入静态路由
Dest. Protocol
Dest.
2.2.2.2 11.0.0.0
Protocol
OSPF Direct
• 有类路由选择协议不能通告携带子网掩码的路由,路由器 所接收到的每一条路由,无外有下面两种情况之一:
– 路由器有一个或多个接口连接到主网上; – 路由器没有接口连接到主网络上。
常州刘国钧高等职业技术学校
完成项目九任务2
常州刘国钧高等职业技术学校
次优路由
路由引入要注意什么?
• 次优路由
2. redistribute rip
R
2. Dest. ASE 150 Loopback0:Dest .
R
RTD
- 1、下载文档前请自行甄别文档内容的完整性,平台不提供额外的编辑、内容补充、找答案等附加服务。
- 2、"仅部分预览"的文档,不可在线预览部分如存在完整性等问题,可反馈申请退款(可完整预览的文档不适用该条件!)。
- 3、如文档侵犯您的权益,请联系客服反馈,我们会尽快为您处理(人工客服工作时间:9:00-18:30)。
实验十五OSPF与RIP路由重发布实验题目:OSPF与RIP路由重发布实验目的:在本次实验中,你将重分布RIPv2到OSPF协议,并且在RIPv2路由器提供缺省路由。
在完成本次实验之后,你需要完成下列任务:在不同的路由协议之间重分布路由信息。
实验学时: 2实验设备及环境:路由器RSR10、路由器以太网接口、 PC机实验基本配置:1.RIP 协议⑴全局设置指定使用RIP协议 router rip(2)路由设置指定与该路由器相连的网络 network network2.OSPF 协议⑴全局设置指定使用OSPF协议 router ospf process-id (2)路由设置指定与该路由器相连的网络 network address wildcard-mask area area-id 指定与该路由器相邻的节点地址 neighbor ip-address启用路由重发布命令 default-information originate 指定与该路由器相邻的节点地址 neighbor ip-address实验拓扑图图19 OSPF与RIP路由重发布实验拓扑图实验步骤1.在路由器上配置IP路由选择和IP地址。
RA#config tRA(config)# interface FastEthernet 0/0 //进入以太网接口RA(config-if)#ip address 172.16.1.5 255.255.255.252 //配置ip地址RA(config)# interface Loopback 0 //进入回环接口RA(config-if)#ip address 192.168.1.1 255.255.255.252 //配置ip地址RA(config)#interface Loopback 1 //进入回环接口RA(config-if)#ip address 192.168.2.1 255.255.255.0 //配置ip地址RB(config)#interface FastEthernet 0/0 //进入以太网接口RB(config-if)#ip address 172.16.1.6 255.255.255.252 //配置ip地址RB(config)#interface FastEthernet 0/1 //进入以太网接口RB(config-if)#ip address 172.16.1.1 255.255.255.252 //配置ip地址RC(config)# interface FastEthernet 0/0 //进入以太网接口RC(config-if)# ip address 172.16.1.2 255.255.255.252 //配置ip地址RC(config)# interface FastEthernet 0/1 //进入以太网接口RC(config-if)#ip address 172.16.1.9 255.255.255.252 //配置ip地址RC(config)#interface Loopback 0 //进入回环接口RC(config-if)#ip address 172.16.3.1 255.255.255.0 //配置ip地址RD(config)#interface FastEthernet 0/0 //进入以太网接口RD(config-if)#ip address 172.16.1.10 255.255.255.252 //配置ip地址RD(config)#interface Loopback 0 //进入回环接口RD(config-if)#i p address 10.1.1.1 255.255.255.0 //配置ip地址RD(config)#interface Loopback 1 //进入回环接口RD(config-if)#ip address 10.1.2.1 255.255.255.0 //配置ip地址RD(config)#interface Loopback 2 //进入回环接口RD(config-if)#ip address 200.1.1.1 255.255.255.0 //配置ip地址2.配置RIP和OSPF。
RA(config)# router ospf 10 //配置ospfRA(config-router)#network 10.1.1.0 0.0.0.255 area 1 //配置直连网段在区域1RA(config-router)#network 10.1.2.0 0.0.0.255 area 1 //配置直连网段在区域1RA(config-router)#network 172.16.1.8 0.0.0.3 area 1 //配置直连网段在区域1RA(config)#router rip //配置RIP协议RA(config-router)#version 2 //版本二RA(config-router)#network 172.16.0.0 //直连网段RA(config-router)#no auto-summary //关闭ip地址聚合RA(config)# ip route 0.0.0.0 0.0.0.0 Loopback 0 //配置静态路由RB(config)#router ospf 10 //配置OSPFRB(config-router)#network 172.16.1.0 0.0.0.3 area 0 //直连网段声明再主区域RB(config)#router rip //配置RIPRB(config-router)#version 2 //版本二RB(config-router)#network 172.16.0.0 //直连网段RB(config-router)#no auto-summary //关闭ip地址聚合RC(config)#router ospf 10 //配置OSPFRC(config-router)#network 172.16.1.0 0.0.0.3 area 0 //直连网段声明再主区域RC(config-router)#network 172.16.1.8 0.0.0.3 area 1 //配置直连网段在区域1RC(config-router)#network 172.16.3.0 0.0.0.255 area 0//直连网段声明再主区域RD(config)#router ospf 10 //配置OSPFRD(config-router)#network 10.1.1.0 0.0.0.255 area 1 //配置直连网段在区域1RD(config-router)#network 10.1.2.0 0.0.0.255 area 1 //配置直连网段在区域1RD(config-router)#network 172.16.1.8 0.0.0.3 area 1 //配置直连网段在区域1RD(config)# ip route 20.1.1.0 0.0.0.0 Loopback 03.配置重发布。
RA(config)# router rip //启动一个RIP进程RA(config-router)# default-information originate//向其他区域发送一条缺省路由RB(config)# router ospf 10 //启动了一个进程,进程号为10RB(config-router)#redistribute rip metric 50 subnets//将ospf引入RIP协议发现路由作为外部路由信息,路由的花费50RB(config-router)#default-information originate //向其他区域发送一条缺省路由RB(config)# router rip //启动一个RIP进程RB(config-router)#redistribute ospf10 metric 1//将RIP引入到OSPF,路由的花费为1RD(config)#router ospf 10 //启动了一个进程,进程号为10RD(config-router)#redistribute static subnets //重发布静态路由4.验证测试用show ip route 命令测试。
查看路由器A的路由表信息RA#showip routeCodes: C - connected, S - static, R - RIP, B - BGPO - OSPF, IA - OSPF inter areaN1 - OSPF NSSA external type 1, N2 - OSPF NSSA external type 2E1 - OSPF external type 1, E2 - OSPF external type 2i - IS-IS, su - IS-IS summary, L1 - IS-IS level-1, L2 - IS-IS level-2ia - IS-IS inter area, * - candidate defaultGateway of last resort is 0.0.0.0 to network 0.0.0.0S* 0.0.0.0/0 is directly connected, Loopback 0R 10.1.1.1/32 [120/1] via 172.16.1.6, 00:06:20, FastEthernet 0/0R 10.1.2.1/32 [120/1] via 172.16.1.6, 00:06:09, FastEthernet 0/0R 172.16.1.0/30 [120/1] via 172.16.1.6, 00:13:27, FastEthernet 0/0C 172.16.1.4/30 is directly connected, FastEthernet 0/0C 172.16.1.5/32 is local host.R 172.16.1.8/30 [120/1] via 172.16.1.6, 00:13:27, FastEthernet 0/0R 172.16.3.1/32 [120/1] via 172.16.1.6, 00:09:05, FastEthernet 0/0C 192.168.1.0/30 is directly connected, Loopback 0C 192.168.1.1/32 is local host.C 192.168.2.0/24 is directly connected, Loopback 1C 192.168.2.1/32 is local host.R 200.1.1.0/24 [120/1] via 172.16.1.6, 00:00:04, FastEthernet 0/0(2)查看路由器D的路由表信息RD#showip routeCodes: C - connected, S - static, R - RIP, B - BGPO - OSPF, IA - OSPF inter areaN1 - OSPF NSSA external type 1, N2 - OSPF NSSA external type 2E1 - OSPF external type 1, E2 - OSPF external type 2i - IS-IS, su - IS-IS summary, L1 - IS-IS level-1, L2 - IS-IS level-2ia - IS-IS inter area, * - candidate defaultGateway of last resort is 172.16.1.9 to network 0.0.0.0O*E2 0.0.0.0/0 [110/1] via 172.16.1.9, 00:13:47, FastEthernet 0/0C 10.1.1.0/24 is directly connected, Loopback 0C 10.1.1.1/32 is local host.C 10.1.2.0/24 is directly connected, Loopback 1C 10.1.2.1/32 is local host.C 20.1.1.0/24 is directly connected, Loopback 2C 20.1.1.1/32 is local host.O IA 172.16.1.0/30 [110/2] via 172.16.1.9, 00:19:38, FastEthernet 0/0O E2 172.16.1.4/30 [110/50] via 172.16.1.9, 00:18:23, FastEthernet 0/0C 172.16.1.8/30 is directly connected, FastEthernet 0/0C 172.16.1.10/32 is local host.O IA 172.16.3.1/32 [110/1] via 172.16.1.9, 00:10:25, FastEthernet 0/0S 200.1.1.0/24 is directly connected, Loopback 2(3)查看路由器B的路由表信息RB#showip routeCodes: C - connected, S - static, R - RIP, B - BGPO - OSPF, IA - OSPF inter areaN1 - OSPF NSSA external type 1, N2 - OSPF NSSA external type 2E1 - OSPF external type 1, E2 - OSPF external type 2i - IS-IS, su - IS-IS summary, L1 - IS-IS level-1, L2 - IS-IS level-2ia - IS-IS inter area, * - candidate defaultGateway of last resort is 172.16.1.5 to network 0.0.0.0R* 0.0.0.0/0 [120/1] via 172.16.1.5, 00:14:42, FastEthernet 0/0 O IA 10.1.1.1/32 [110/2] via 172.16.1.2, 00:08:30, FastEthernet 0/1 O IA 10.1.2.1/32 [110/2] via 172.16.1.2, 00:08:18, FastEthernet 0/1C 172.16.1.0/30 is directly connected, FastEthernet 0/1C 172.16.1.1/32 is local host.C 172.16.1.4/30 is directly connected, FastEthernet 0/0C 172.16.1.6/32 is local host.O IA 172.16.1.8/30 [110/2] via 172.16.1.2, 00:22:09, FastEthernet 0/1O 172.16.3.1/32 [110/1] via 172.16.1.2, 00:11:15, FastEthernet 0/1O E2 200.1.1.0/24 [110/20] via 172.16.1.2, 00:02:13, FastEthernet 0/1。