ManageEngine Windows AD域管理软件
AD域安装详细步骤(图解)
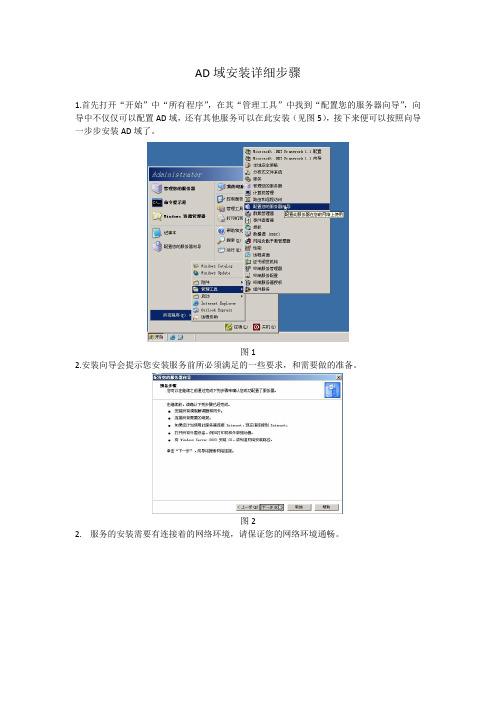
AD域安装详细步骤1.首先打开“开始”中“所有程序”,在其“管理工具”中找到“配置您的服务器向导”,向导中不仅仅可以配置AD域,还有其他服务可以在此安装(见图5),接下来便可以按照向导一步步安装AD域了。
图12.安装向导会提示您安装服务前所必须满足的一些要求,和需要做的准备。
图22.服务的安装需要有连接着的网络环境,请保证您的网络环境通畅。
图33.扫描完毕之后,会弹出配置选项,如果您不是很熟悉服务自定义安装,您可以选择“第一台服务器的典型配置”,如果您想定制安装请选择“自定义配置”或者点击“上一步”,再“下一步”。
图45.这里您会看到一台服务器可以安装的所有服务,我们这里需要安装AD域服务,所以点击“域控制器(Active Directory)”,然后下一步图56.然后向导会提示您所选择的安装对象,并进入预安装向导,下一步图6 7.进入AD安装向导,下一步图7 8.这里会提示你操作系统的兼容性问题图8 9.默认选择“新域的域控制器”,下一步图910.接下来依旧默认“在新林中的域”,下一步图1011.新的域名,你可以自定义,一般针对公司或者企业,填上其(名称.com)即可,名称要使用英文,下一步图1112.这时系统会显示上述域名对应的域NetBIOS名,默认就可以,当然你也可以自己修改填入新的名称图1213.接下来,想到会提示您存放数据库和日志文件夹的位置,通常为了让服务器获得最佳性能,这里最好要将这两个文件放到不同的物理磁盘上,如果系统目前只有一块硬盘,这时我需要新加一块硬盘,由于我在虚拟机做的实验,可以热添加,所以建议您在做AD域安装之前先添加一块硬盘,加入新硬盘后,使用新硬盘的步骤请看下一步图1314.安装好一块新的硬盘后,若是没被建立过分区,在使用系统内置的“磁盘管理”工具管理新磁盘时会提示“磁盘初始化和转换向导”,点击下一步图1415.这时向导会提示你选择初始化的磁盘,因为只添加了一块硬盘,故只有一个磁盘选项,如果您添加了多个磁盘,可以挑选,也可以多选。
ManageEngine ADAudit Plus数据表说明书
Active Directory and Azure AD Change Auditing License modules:Domain Controllers, Azure AD TenantsSupported platforms:WWindows Server 2003 and aboveAudit AD changes:Track changes to organizational units (OUs), users,groups, computers, administrative groups, andother AD objects.Trace object change history:Receive detailed change audit reports withinformation on the old and new values of thechanged attributes.Monitor DNS and schema changes:Gain visibility into the addition, modification, anddeletion of DNS nodes and zones; monitor ADschema and configuration changes; and more.Track AD permission changes: View all changes in AD permissions, such as those made to domain-level permissions, OUs, schema, configuration, and DNS.Audit user account management: Track user creation, deletion, and modification; password resets; and other account management actions.Monitor hybrid AD environments: Get a unified view of all activities happening across your on-premises and Azure AD environments with alerts for critical events.File Change MonitoringLicense modules:Windows File Servers, NAS ServersSupported platforms:• Windows Server 2003 and above • Dell VNX, VNXe, Celerra, Unity, and Isilon • Synology DSM 5.0 and above • NetApp ONTAP 7.2 and above for filers • NetApp ONTAP 8.2.1 and above for clusters • Hitachi NAS 13.2 and above • Huawei OceanStor V5 series and OceanStor 9000 V5 storage systemsMonitor file and folder accesses:Track successful and failed file access attempts—including create, read, delete, modify, copy andpaste, and move—in real time.Audit permission changes:Track NTFS and share permission changes alongwith details such as their old and new values.Monitor file integrity:Receive detailed reports on all changes made tocritical system and program files, and trigger alertswhen suspicious activity is detected.Report on file share changes: Track every access and change made to shared files and folders in your domain with details on who accessed what, when, and from where.Streamline compliance audits: Receive out-of-the-box reports for HIPAA, GDPR, FISMA, PCI DSS, SOX, GLBA, ISO 27001, and more.Audit across multiple platforms: View changes across Windows file servers, failover clusters, NetApp filers, Synology NAS, Hitachi NAS, EMC VNX, VNXe, Isilon, Celerra, and Unity from oneconsole.Group Policy settings change auditingLicense modules:Domain ControllersSupported platforms:Windows Server 2003 and aboveAudit Group Policy Objects:Keep an eye on Group Policy Object (GPO) creation,deletion, modification, and more.Track GPO setting changes:Track changes made to GPO settings and see whochanged what setting, when, from where, and thesetting’s values before and after the change.Trace GPO change history:View the change history of one or multiple GPOs in adomain to detect unwarranted activities.Configure alerts for critical changes: Trigger instant email and SMS alerts for critical changes, such as computer configuration changesand password and account lockout policy changes.Schedule GPO change reports: Send scheduled reports on important GPO or GPO settings changes to specified recipients.Windows server auditing and reportingLicense modules:Member ServersSupported platforms:Windows Server 2003 and aboveAudit Windows servers:Monitor changes to local administrative groupmemberships, local users, user rights, local policies,and more.Track scheduled tasks and processes:Report on the creation, deletion, and modification ofscheduled tasks and processes.Monitor USB and printer usage:Track USB usage and file transfers to removablestorage devices. Also track which file was printed,when, by whom, the number of pages and copiesprinted, and much more.Audit PowerShell processes: Monitor PowerShell processes that run on your Windows servers, along with the commands executed in them.Monitor ADFS, LAPS, and ADLDS: Track ADFS authentication attempts, users who have viewed local administrator passwords,changes made to a password's expiration time ordate, and more.Logon and logoff auditingLicense modules:Domain Controllers, Member Servers, WorkstationsSupported platforms:• Windows Server 2003 and above • Windows XP and aboveAudit logons and logoffs:Track logon and logoff activity and logon durationacross your domain controllers (DCs), Windowsservers, and workstations. Track user logon history:Record every user's logon activity, identify userswho are currently logged on, list users logged on tomultiple machines, and more.Audit RADIUS logons:Gain visibility into logons on your RADIUS serverswith reports on RADIUS logons, logon failures, andRADIUS (NPS) logon history.Analyze logon failures: Track all failed logon attempts with details on who attempted to log on, what machine they attempted to log on to, when, and the reason for the failure.Respond to malicious logon activity: Leverage machine learning to rapidly spot and respond to unusual volumes of logon failures, unusual logon times, and more.Account lockout analysisLicense modules:Domain Controllers, Member Servers, WorkstationsSupported platforms:• Windows Server 2003 and above • Windows XP and aboveReceive account lockout notifications:Detect AD user account lockouts in real time withemail and SMS alerts, and reduce account lockoutduration.Find the account lockout source:Analyze mobile phone logins, RDP sessions,services, scheduled tasks, and more for stalecredentials, and identify the source of accountlockouts.Check the account lockout status:Pull up reports on the status of every locked-outaccount, the time at which the lockout occurred,and more.Examine account lockouts with UBA: Identify negligent users and malicious insiders by spotting abnormal lockout activities with user behavior analytics (UBA).Improve help desk efficiency: View reports with all the information required by help desk personnel to resolve account lockout issues faster and minimize service downtime.Analyze the root cause: Maintain a clear audit trail of password resets, password changes, and account lockout sources to streamline forensic analysis.Employee activity monitoringLicense modules:WorkstationsSupported platforms:Windows XP and aboveMeasure employee productivity:Know how employees spend their work hours withcomputer startup and shutdown times, logonhistory details, file activity, and more.Track employee attendance:Maintain accurate time sheets for your employeeswith their clock-in and clock-out times, and analyzetheir logon duration.Calculate actual working hours:Find the list of users currently logged in andcalculate their actual work hours with details onwhen they were active and idle.Monitor remote workers: Track remote desktop gateway and RADIUS logons, and know who attempted to log on remotely, when, whether they were successful, and how long theirsession lasted.Monitor employees' computer activity: Find recent startup and shutdown times for a computer, along with details on who initiated it, theshutdown type, and more.Identify risky logon activity: Spot and analyze repeated failed attempts to log on to workstations, remote machines, and criticalservers with instant email and SMS alerts.Privileged user monitoringLicense modules:Domain Controllers, Member ServersSupported platforms:Windows Server 2003 and aboveAudit administrator activity:Track administrative user actions on AD schema,configuration, users, groups, OUs, GPOs, and more.Review privileged user activity:Comply with various IT regulations by maintainingan audit trail of activities performed by privilegedusers in your domain.Detect privilege escalation:Identify privilege escalation with reportsdocumenting users' first-time use of privileges, andverify if a user’s privileges are necessary for their role.Spot behavioral anomalies: Identify actions deviating from normal access patterns to find attackers using stolen or sharedcredentials of privileged accounts.Receive alerts on suspicious activity: Rapidly spot and respond to high-risk events, such as the clearing of audit logs or accessing critical dataoutside business hours, with instant alerts.Malware and insider threat detectionLicense modules:Domain Controllers, Member Servers, Windows File Servers, NAS Servers, Workstations Supported platforms:• Windows Server 2003 and above • Dell VNX, VNXe, Celerra, Unity, and Isilon • Synology DSM 5.0 and above • NetApp ONTAP 7.2 and above for filers • NetApp ONTAP 8.2.1 and above for clusters • Hitachi NAS 13.2 and above • Huawei OceanStor V5 series and OceanStor 9000 V5 storage systems • Windows XP and aboveUBA-powered threat hunting:Quickly spot repeated logon failures, user activityanomalies, privilege escalations, data exfiltration,and more with UBA.Detect ransomware intrusions:Spot telltale indicators of ransomware intrusionssuch as unusual spikes in file renaming, deletion, orpermission change events.Respond to threats instantly:Automatically execute scripts to shut downmachines, end user sessions, or carry out othertailor-made responses to mitigate threats.Identify file activity anomalies: Trigger alerts for suspicious activities such as the deletion of critical files, sudden surges in file access, or file activities at unusual times.Detect lateral movement: Spot indicators of lateral movement like out-of-the-ordinary remote desktop activity or the execution of new processes.Compliance reportingLicense modules:Domain Controllers, Member Servers, Windows File Servers, NAS Servers, WorkstationsSupported platforms:• Windows Server 2003 and above • Dell VNX, VNXe, Celerra, Unity, and Isilon • Synology DSM 5.0 and above • NetApp ONTAP 7.2 and above for filers • NetApp ONTAP 8.2.1 and above for clusters • Hitachi NAS Version 13.2 and above • Huawei OceanStor V5 series and OceanStor 9000 V5 storage systems • Windows XP and aboveLeverage over 250 reports:Ace compliance audits easily with detailed reports on changes across AD, file servers, Windows servers, and workstations.Receive out-of-the-box audit reports:Schedule periodic, ready-made reports for HIPAA, PCI DSS, GDPR, ISO 27001, GLBA, FISMA, and SOX, and customize reports for other regulations.Perform root cause analysis:In the event of a breach, analyze the incident thoroughly, identify the source of leaks or intrusions with accurate forensic data, and share your findings with custom reportsMonitor file integrity:Track every access to operating system, database, and software files; archived audit logs and reports; and other critical files.Configure instant alerts:Detect security incidents quickly using email and SMS alerts specific to files, users, time periods, or events. Reduce false positives with UBA.Mitigate damage with automated responses:Save crucial time with automated responses, such as running custom scripts to disable accounts or shut down devices.System requirementsSupported platforms Supported browsers:Internet Explorer 8 and above, Mozilla Firefox 3.6 and above, Google Chrome, Microsoft EdgeProcessor: 2.4GHzRAM: 8GBDisk space: 50GBFor the complete system requirements, see the Quick Start Guide.DC and member serverauditingWindows Server versions:2003/2003 R2 2008/2008 R2 2012/2012 R2 2016/2016 R2 2019Windows file server auditing:Windows File Server 2003 andaboveEMC auditing:VNX, VNXe, Celerra, Unity, IsilonSynology auditing:DSM 5.0 and aboveNetApp filer auditing:Data ONTAP 7.2 and aboveNetApp cluster auditing:Data ONTAP 8.2.1 and aboveHitachi NAS auditing:Hitachi NAS 13.2 and aboveHuawei OceanStor auditing:OceanStor V5 series and 9000 V5ADFS auditing:ADFS 2.0 and aboveWorkstation auditing:Windows XP and abovePowerShell auditing:PowerShell 4.0 or 5.0 File auditing Other componentsAvailable editionsLicensing and pricing detailsFREE EDITIONNever expires Audit and collect data across 25 workstations Generate reports using log data collected duringevaluation$00Try nowPROFESSIONALEDITION$945annuallyStarts atAll features of the Standard edition+Account lockout analysis AD permission changeauditing GPO settings change auditing DNS and AD schema changeauditing Old and new values of AD object attribute changes Support for MS SQL databaseAnd much moreTry nowSTANDARD EDITION$595annuallyStarts atAll features of the Free edition +Reports and alerts on event log data collected from these licensed components:DCsAzure AD tenants Windows servers Workstations Windows file servers NAS devicesTry nowLicense moduleAnnual subscription priceDomain ControllersAdd-onsAzure AD Tenants Windows File ServersNAS Servers (EMC, NetApp, Synology, Hitachi, Huawei)Member Servers WorkstationsStarts at $595Starts at $495Starts at $595Starts at $595Starts at $245Starts at $595ManageEngine ADAudit PlusContact detailsA UBA-driven change auditor that keeps your AD, Windows servers, file servers, and workstations secure and compliant.Website:Personalized demo:/products/active-direc tory-audit/demo-form.htmlGet a quote:/products/active-direc tory-audit/get-quote.html Live online demo: Email tech support:***********************Sales inquiries:**********************Toll-free call: +1.408.916.9891Download nowFree, 30-day trial。
ManageEngine AD360安装目录安全指南说明书

Guide to secure yourIf a user belongs to the Authenticated Users group, it's possible for them to tamper with the AD360 installation directory. To circumvent this and improve the security of your AD360 deployment, follow the steps in this document.DescriptionThe AD360 installation directory contains important files required for it to function properly, including files that are used to start and stop the product and the license file. By default, AD360 will be installed in the C:\ManageEngine folder. This will grant even non-admin users belonging to the Authenticated Users group Full Control permission over the files and folders in the product's installation directory, meaning any domain user can access the folder and modify its contents, potentially making the product unusable.Simply removing Authenticated Users from the Access Control List (ACL) won't help, as this will render them unable to even start AD360 as a service or application.SolutionTo overcome this issue, follow the steps outlined below based on where AD360 is installed.1. If AD360 is installed in C:\ManageEngine folder2. If AD360 is installed in C:\Program Files folder1. Steps to perform if AD360 is installed in the C:\ManageEngine folder.By default, the C: directory in a Windows Client OS has Authenticated Users with the Modify permission for subfolders. However, the C: directory in a Windows Server OS does not have Authenticated Users in its ACL. So, based on the OS in which AD360 is installed, the steps may vary.a) If AD360 is installed in a client OSb) If AD360 is installed in a server OSa. If AD360 is installed in a client OS:1.Disable Inheritance for the C:\ManageEngine\AD360 folder. Refer to theAppendix below for step-by-step instructions.2. Remove Authenticated Users from the folder's ACL. Refer to the Appendix forstep-by-step instructions.3. Remove the Authenticated Users permission for the folders listed below from theproduct's installation directory.i. bin\licenseii. temp4. Assign the Modify permission for the C:\ManageEngine\AD360 folder to users whocan start the product. Refer to the Appendix for step-by-step instructions.5. If the product is installed as a service, make sure that the account configured under the Log Ontab of the service’s properties has been assigned the Modify permission for the folder.b. If Exchange Reporter Plus is installed in a server OS:1. Remove the Authenticated Users permission for the folders listed below from the product'sinstallation directory. Refer to the Appendix for step-by-step instructions.i. bin\licenseii. temp2. Assign the Modify permission for the C:\ManageEngine\AD360 folder to users whocan start the product. Refer to the Appendix for step-by-step instructions.3. If the product is installed as a service, make sure that the account configured under the Log Ontab of the service’s properties has been assigned the Modify permission for the folder.2. Steps to perform if AD360 is installed in C:\Program Files folder.1. Remove the Authenticated Users permission for the folders listed below from the product'sinstallation directory. Refer to the Appendix for step-by-step instructions.i. bin\licenseii. temp2. Assign the Modify permission for the C:\Program Files\AD360 folder to users whohave can start the product. Refer to the Appendix for step-by-step instructions.3. If the product is installed as a service, make sure that the account configured under the Log Ontab of the service’s properties has been assigned the Modify permission for the folder.Notes:Microsoft recommends that software be installed in the Program Files directory. Based on your specific needs or organizational policies, you can choose a different location.The steps mentioned in this guide are applicable to all ManageEngine products installed inthe C:\ManageEngine folder by default.Steps to be performed for integrated productsFor integrated products, too, the Authenticated Users ACL should be removed. Refer the respective guides for instructions.ADManager Plus | ADSelfService Plus | Exchange Reporter Plus | O365 Manager PlusAppendixSteps to disable inheritance1. Right-click the folder and select Properties.2. Go to the Security tab and click Advanced.3. Click Disable inheritance.4. Click Apply and then OK.Steps to remove Authenticated Users from ACL1. Right-click the folder and select Properties.2. Go to the Security tab and click Edit.3. Select the Authenticated Users group and click Remove.4. Click Apply and then OK.To assign modify permissions to users1. Right-click the folder and select Properties.2. Go to the Security tab and click Edit.3. Click Add.4. Enter the name of the user or group, and click OK.5. Under the Permission for Users section, check the box under the Allow column for theModify permission.6. Click Apply and then OK.AD360 is an identity and access management (IAM) solution for managing user identities, governing access to resources, enforcing security, and ensuring compliance. AD360 provides all these functionalities for Windows Active Directory, Exchange Server, and Office 365. With AD360, you can choose the modules you need and start addressing IAM challenges across on-premises, cloud, and hybrid environments—all from a single console. For more information about AD360, please visit /ad360.。
AD软件使用教程
AD软件使用教程AD(Active Directory)软件是一款由微软公司开发的用于管理网络中的用户、计算机和其他资源的软件。
它使网络管理员能够集中管理和控制用户访问权限、组织结构以及其他网络资源。
本文将为你介绍AD软件的基本功能和使用方法。
第一部分:AD软件的基本概念1.1AD概述AD是一种目录服务,它允许管理员将用户和计算机组织成逻辑结构,提供一个集中管理的平台。
它基于LDAP(轻型目录访问协议)和DNS(域名系统)协议,并与Windows操作系统集成。
1.2AD的优势AD提供了许多优势,包括:-集中管理:管理员可以通过AD使用统一的界面和工具管理整个网络。
-安全性:AD提供了身份验证和访问控制功能,可以确保只有授权用户能够访问特定资源。
-自动化:AD允许管理员自动分配和管理用户和计算机的权限和设置。
-可扩展性:AD可以根据组织的变化进行扩展和调整。
第二部分:AD软件的安装和配置2.1安装AD软件- 在Windows Server操作系统中,打开服务器管理器,选择“角色和功能安装向导”。
-选择“下一步”并选择“角色基于功能或基于角色的安装”。
- 在服务器角色中选择“Active Directory域服务”。
- 完成向导,然后在服务器管理器中选择“工具”-“Active Directory用户和计算机”。
2.2创建域和组织结构-在AD用户和计算机工具中,右键点击域名,选择“新建组织单位”。
-输入组织单位的名称,并点击“确定”。
-可以在新建的组织单位上右键点击,选择“新建用户”或“新建计算机”来创建用户和计算机对象。
第三部分:AD软件的常用功能3.1用户管理-在AD用户和计算机工具中,展开域名并展开“组织单位”。
-在需要管理的组织单位上右键点击,选择“新建用户”。
-输入新用户的详细信息,并点击“确定”。
-可以在用户上右键点击,选择“重置密码”或“启用/禁用账户”来管理用户。
3.2计算机管理-在AD用户和计算机工具中,展开域名并展开“组织单位”。
AD域控制服务器教程(2023最新版)
AD域控制服务器教程
AD域控制服务器教程
⒈介绍
本文档旨在向读者介绍如何设置和管理Active Directory(AD)域控制服务器。
AD域控制服务器是一种用于集中管理网络上所有计算机、用户和组的服务器,它提供了一种安全的身份验证和授权机制,为网络管理员带来了很大的便利和管理效率。
本文将详细介绍AD域控制服务器的安装、配置和管理过程。
⒉准备工作
在安装和配置AD域控制服务器之前,需要进行以下准备工作:
⑴确保服务器符合最低硬件要求
⑵确保服务器操作系统支持AD域控制
⑶确定域名和域控制器的名称
⑷确定网络设置,包括IP地质、子网掩码、默认网关等
⒊安装AD域控制服务器
⑴并安装Windows Server操作系统
⑵添加域控制器角色
⑶运行域控制器安装向导,进行域控制器的安装
⑷完成安装过程并重新启动服务器
⒋配置AD域控制服务器
⑴连接到AD域控制服务器
⑵配置域名系统 (DNS)
⑶配置动态主机配置协议 (DHCP)
⑷配置组策略
⑸配置安全性设置
⑹配置用户和组
⒌管理AD域控制服务器
⑴添加和删除AD域用户和组
⑵设置用户和组的权限
⑶配置域控制器的复制
⑷监视域控制器的性能
⑸进行域控制器备份和恢复
⒍故障排除和常见问题解决
⑴常见错误消息及其解决方案
⑵域控制器无法启动的解决方法
⑶用户无法登录的解决方法
⑷域控制器复制失败的解决方法
附件:<附件名称>
法律名词及注释:
⒈AD(Active Directory):是由微软公司开发的一种用于集中管理计算机、用户和组的目录服务。
AD域用户账户控制管理
AD域用户账户控制管理AD域用户账户控制管理首先要在计算机上安装域控制器,登陆域控计算机。
1、打开Active Directory用户和计算机。
(路径:开始–>管理工具–> Active Directory用户和计算机)2、打开AD用户和计算机控制台后,首先选择被添加人的部门的组织单元(OU)。
如果是开发人员择需要添加到Developer内,其他部门请添加到“市场部和人力部”,如不确定其部门可添加到“Egensource”内。
*每个OU对应着独立的组策略设置((GPMO),确认被添加人加入正确的部门OU内。
3、仔细填写用户信息用户登录名一般为员工姓名的汉语拼音。
4、为该员工设定初始密码,并告知员工该密码。
当员工有过登陆记录后,可将其密码设置成“用户下次登录时必须更改密码”,由员工自行设定密码。
密码复杂度要求:必须6位以上,包含数字和字母的组合。
可根据公司要求设定其他用户密码策略。
5、打开新建的员工信息。
在“常规”页面上,填写真实的员工信息,特别是邮件地址务必确认其正确无误。
6、再“单位”标签内,仔细填写员工的注册信息。
包括职务、部门和公司。
再经理栏内,确认其上级领导。
项目成员是项目经理,产品组成员为产品组经理,不确定的列为部门总监。
7、再“隶属于”标签,将用户归入正确的组内,首先该用户必须属于“公司全体”。
如该员工属于开发人员、技术人员则属于“软件研发部”,如该员工属于市场人员属于“市场部”,如该员工属于人力及行政人与那属于“人力资源部”8、如需要更改某个员工的密码,则需要登录到域控制器上,查看该员工属性信息,选择“重置密码”即可。
择“禁用账户”,并将被禁用的账户移至“已禁用账户”OU内。
ad域管理工具
Ad域管理工具按照ITIL、COBIT、MOF等安全操作规范的要求,对于生产服务器包括活动目录域AD域服务器域控制器,应该尽量减少物理接触及直接登录,即便是AD域管理员也应该尽量实施远程管理。
这样能够最大限度的降低AD域控制器的故障几率。
那么活动目录域AD域控制器的远程管理工具都有哪些呢?活动目录域AD域控制器的远程管理工具最常见的有两种:adminpak.msi 以及 gpmc.msc。
您可以在域中的一台计算机上安装它们,从而对活动目录域AD实施远程管理。
不过有个前提,您必须使用域管理员的账户登录到这台计算机上。
提示:为了避免活动目录域管理员登录后的token被窃取攻击的可能性,用户活动目录域AD远程管理的这台计算机一定要确保它的安全,这可能包括物理隔绝。
adminpak.msi全称windows Server 管理工具包,它包含了如下三个活动目录域AD域控制器远程管理工具:• Active Directory 域和信任关系 domain.msc• Active Directory 站点和服务 dssite.msc• Active Directory 用户和计算机 dsa.msc此外还有一个和活动目录域AD管理很紧密的工具 dns管理工具 dnsmgmt.msc adminpak.msi伴随os版本而发布不同的版本,大家在下载的时候,请选择对应版本。
Windows Server 2003 R2 管理工具包 (x86)/downloads/details.aspx?displaylang=zh-cn&FamilyID=9bfb 44f5-232a-4fb5-bc14-45bfd81b7ac1Windows Server 2003 Service Pack 1 Administration Tools PackWindows Server 2003 Administration Tools Packadminpak.msi在工作站上的安装过程请参考如何使用 Adminpak.msi 在 Windows 中安装特定的服务器管理工具/default.aspx?scid=kb;zh-cn;314978gpmc.msc全称组策略管理控制台,它没有包含在adminpak.msi中,需要单独安装。
windows服务器AD域控安装与组策略设置攻略
安装与配置Active Directory/china/technet/prodtechnol/windowsserver2003/technologi es/directory/default.mspx1、实验目的让学生掌握目录服务知识。
2、实验环境多台装有Windows 2000 Server的计算机。
3、相关理论活动目录是一种目录服务,它存储有关网络对象的信息,例如,用户、组和计算机账户、共享资源和打印机等,并使管理员和用户可以方便地查找和使用网络信息。
活动目录的应用起源于Windows NT 4.0,在Windows 2000 Server中得到进一步的应用和发展,具有可扩展性和可调整性,并将结构化数据存储作为目录信息逻辑和分层组织的基础。
活动目录的优点:(1)基于策略的管理(2)扩展性(3)可调整性(4)信息复制(5)与DNS的集成(6)灵活的查询(7)信息安全性4、实验内容(1)在安装Active Directory前首先确定DNS服务正常工作,下面来安装在根域为的第一台域控制器。
(2)运行Active Directory安装向导将Windows 2000 Server计算机为域控制器创建一个新域或者向现有的域添加其他域控制器。
5、实验步骤安装活动目录的具体操作步骤如下:(1) 执行“开始”→“程序”→“管理工具”→“配置服务器”命令,打开“Windows 2000配置服务器”对话框,如下图所示。
注释:安装完Windows 2000 Server后,每次启动计算机,系统都会自动打开“Windows 2000配置服务器”对话框。
(2) 在左边的列表中单击Active Directory(活动目录)选项,并将右边的滚动条拖动到底部,使对话框如下图所示。
(3) 单击“开始Active Directory向导”选项,打开“欢迎使用Active Directory 安装向导”对话框。
该对话框显示了Active Directory安装向导的简单欢迎信息。
AD域设置及其管理
AD域设置及其管理AD域(Active Directory Domain)是一种基于Windows Server的网络服务,用于在企业内部管理和组织用户、计算机和其他网络资源。
AD域提供了集中式身份验证、授权和资源访问的功能,使得网络管理员能够更加高效地管理企业内部的IT环境。
本文将对AD域的设置和管理进行详细介绍。
一、AD域的设置1.硬件和软件要求设置AD域之前,首先需要确保服务器硬件满足要求。
具体要求包括CPU、内存、硬盘空间等方面。
2. 安装Windows Server操作系统在服务器上安装Windows Server操作系统,并进行必要的配置。
安装完成后,系统会自动启动Server Manager。
3.创建域控制器利用Server Manager的角色和功能向导创建域控制器。
在角色和功能的安装向导中,选择“Active Directory域服务”作为要安装的角色。
4.设置域和域名在安装向导中,输入要创建的域和域名。
域名是一个唯一的标识符,用于识别网络中的计算机和用户。
5.设置域控制器选项在安装向导中,对域控制器进行必要的设置,如设置数据库和日志文件的位置、密码策略等。
6.完成安装向导根据安装向导的指导完成安装过程。
完成后,系统会自动重新启动。
二、AD域的管理AD域的管理包括用户管理、计算机管理、策略管理等多个方面。
以下是对几个重要管理操作的介绍。
1.用户管理AD域的用户管理功能非常强大,可以进行用户的创建、修改和删除等操作。
管理员可以根据需要设置用户的权限、密码策略等,并可以将用户分组进行更方便的管理。
2.计算机管理AD域允许管理员管理整个网络中的计算机。
管理员可以加入新的计算机到AD域中,也可以监控和管理已经加入AD域的计算机,包括配置计算机的安全策略、更新软件和操作系统等。
3.策略管理AD域提供了策略管理功能,管理员可以根据需要设置和配置不同的策略。
策略可以用于控制用户的权限、设置计算机的安全策略、禁用特定的功能等。
Windows Server 2016中部署AD域控
Windows Server 2016中部署AD 简述AD是Active Directory的简写,中文称活动目录。
活动目录(Active Directory)主要提供以下功能:1、服务器及客户端计算机管理,2、用户服务,3、资源管理,4、桌面配置,5、应用系统支撑等;更多AD DS概述请查看微软技术文档,本文详细介绍AD DS的部署。
主题:•部署环境•森林模型•角色安装•运行部署向导部署环境森林模型角色安装在需要安装AD域控制器的电脑上打开服务器管理器,点击“添加角色和功能”打开“添加角色和功能向导”,点击“下一步”安装类型选择“基于角色或基于功能的安装”,点击“下一步”服务器选择“从服务器池中选择服务器”,再选中池中的本地服务器,点击“下一步”服务器角色选择“Active Directory域服务”,会弹出“添加Active Directory域服务所需的功能?”,点击“添加功能”服务器角色选择“Active Directory域服务”之后,点击“下一步”点击“下一步”点击“下一步”确认这里把“如果需要,自动重新启动目标服务器”打勾,点“安装”正在安装Active Directory域服务角色安装完成,点“关闭”运行部署向导运行AD DS(Active Directory域服务的简称)部署向导,打开本地服务器的服务器管理器,点“通知”-“将此服务器提升为域控制器”打开AD DS的部署向导,由于我们这里是部署新的AD控制器,所以部署配置选择“添加新林”,把“根域名”设置成“”,点击“下一步解释:将域控制器添加到现有域:在现有的域控制器中添加新的域控制器将新域添加到现有林:在现有的林中新建域,与林中现有的域不同添加新林:在没有林的情况下新建林域控制器选项:林功能级别(包含Windows Server 2008到Windows Server 2016级别都有):Windows Server 2016域功能级别(只包含Windows Server 2016域功能):Windows Server 2016 指定域控制器功能:默认键入目录服务还原模式(DSRM)密码(自己设置复杂性密码):****点击“下一步”点击“下一步”点击“下一步”AD DS的数据库、日志文件和SYSVOL的位置我们指定在D盘目录下,当然也可以默认,为了安全起见我们还是放D盘,点击“下一步”点击“下一步”先决条件检查通过,点击“安装”,如果不通过请根据提示查看原因正在进行自动部署,部署完成后会自动重启服务器AD域控制器部署完成,打开“服务器管理器”-“工具”-“Active Dir ectory用户和计算机”就可以看到我们刚才部署好的域,这样一个完整的域就部署完成了。
Application Control Plus 快速入门手册说明书

Application Control Plus Application Control Plus 快速入门手册ME产品部2023-09-01本文档旨在帮助用户快速熟悉产品的使用方法。
简介 (3)系统安装 (3)启动Application Control Plus (10)关闭Application Control Plus (11)登录Application Control Plus (12)添加计算机 (12)添加Windows计算机 (13)管理 (15)自定义组 (15)软件组-黑/白名单 (16)权限管理 (20)移除管理员权限 (22)临时申请 (24)灰名单应用程序组 (25)产品文档 (26)ManageEngine Application Control Plus根据特定的控制规则,自动生成和维护应用白名单和黑名单。
Application Control Plus是一个全面的解决方案,其内置成熟的终端特权管理功能,旨在满足每个成长中企业的应用控制需求。
Application Control Plus的特点:⚫免受恶意软件入侵的保护⚫默认严格的应用控制策略⚫减少资产清单管理工作⚫最小化特权,最大化安全性⚫防止生产力下降系统安装1.访问以下链接下载安装包https:///application-control/download.html服务器硬件要求:详细硬件要求请查看此链接:https:///application-control/system-requirements.html2.在安装包下载完成后,用户可以手动双击安装包进入安装向导,根据向导中的提示进行安装操作。
关闭防火墙及将UEMS_CentralServer在杀毒软件中设置为例外。
3.选择访问端口号:4.选择安装路径:5.完成以上操作之后,Application Control Plus开始安装。
完成后显示:6.输入注册信息,也可选择跳过,之后继续等待安装完成。
windows server 2012中创建第一个AD域控制器
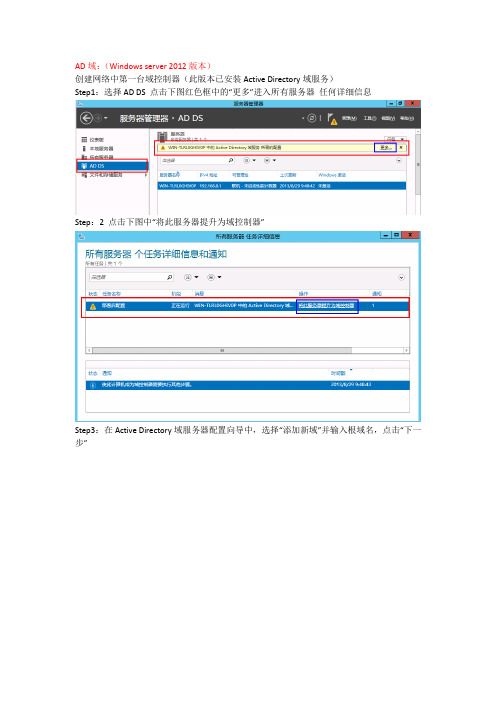
AD域:(Windows server 2012版本)创建网络中第一台域控制器(此版本已安装Active Directory域服务)Step1:选择AD DS 点击下图红色框中的“更多”进入所有服务器任何详细信息Step:2 点击下图中“将此服务器提升为域控制器”Step3:在Active Directory域服务器配置向导中,选择“添加新域”并输入根域名,点击“下一步”Step4:选择林功能级别和域功能级别,此处默认为Windows server 2012即可,然后选中“域名系统(DNS)服务器”和“全局编录”(这个为默认选项),键入目录服务还原模式(DSRM)密码,这里密码要求满足强密码要求,点击“下一步”Step5:出现关于DNS的警告,因为目前还没有安装DNS,所以不用理会,直接选择“下一步”,如图。
Step6:在NetBIOS域名界面,保持默认,选择”下一步”Step7:指定数据库、日志、sysvol的存放位置,因为是评估环境,我直接保持默认C盘Step8:在摘要界面,如果没有问题,我们可以选择下一步,如果有问题,则可以返回修改Step9:遇到错误,这里是先决条件验证失败,因为之前修改了计算机名但是没有重启,这里重启一次计算机然后继续安装。
Step10:先决条件检验成功,单击“安装”即可。
Step11:正在启动安装开始创建活动目录分区:Step12:安装完成后需要重启服务器:重启完成后,我们可以看到在开始菜单中已经有了AD相关的管理工具,如图。
第一台DC部署完成后,我们来看看windows server 2012相关的管理工具能否正常打开。
AD用户和计算机,如图。
AD管理中心,如图。
DNS管理器,如图。
组策略管理,如图。
在服务器管理器中,如果我们右击AD服务器,会发现windows server 2012提供了很多AD 的常用管理命令,如图不管是ADDS服务,还是DNS服务,还是其他的服务,都可以通过服务器管理器进行管理,如图。
★2012AD域控管理解决方案
公司产品概览
• 网络管理开发平台 • 代理开发工具 • 管理协议库 • 自动化测试工具 • 代理测试工具 • 模拟仿真工具 • 中介解决方案 • TMF解决方案 • 其他产品/解决方案
•设备厂商 •IT管理软件开发企业 •软件测评企业
• 网络监控 • 应用监控 • 存储监控 • 流量监控 • 日志审计管理 • 防火墙监控 • 帮助台 • AD管理/审计 • 桌面管理 • 网管工具
活动目录变更审计
•用户变更类 •组管理变更类 •计算机变更类 •组织单元变更类 •域策略变更类 •账户管理类
文件服务器审计模块
•所有文件和文件夹变更报表 •文件/文件夹创建情况 •文件/文件夹修改情况 •文件/文件夹删除情况 •成功读取文件 •尝试读取文件失败情况 •尝试写文件失败情况 •尝试删除文件失败情况
预置合规性的审计报表
审计告警功能
其他功能之事件归档
可以设置是否启用归档,可以配置归档周期以及归档存放路径。
其他功能之授权
为已选用户委托管理员或 操作员权限。
在ADAudit Plus中选择任 意用户委托技术员权限。
可以设置多名技术员访问ADAudit Plus门户。 ADAudit Plus允许为任何技术员配置管理员或操作员权限。操 作员只能浏览报表。管理拥有对ADAudit Plus全部使用权限。
用户支持: support@ (英文)
china-support@ (中文)
服务热线: 400 660 8680
07/22/08
带您进入IT管理的轻松时代
感谢聆听
主要功能之定制化
AD SelfService Plus可以方便的进行换标操作,同时可以将发现的违规告警通过邮件或者短信通知管理员。
ManageEngine AD360高可用性配置指南说明书
Table of contentsOverview High availability for AD360 Centralized configuration High availability architecture Important points to considerPrerequisites Configuration steps Disabling high availability (3) (3) (3) (4)...................................................................4. (5) (5) (7)OverviewAD360 is an integrated solution from ManageEngine engineered to holistically address the identity and access management (IAM) needs of enterprises that use Windows Active Directory and Office 365. AD360 solves a number of different challenges when managing AD and Office 365 user identities with features such as user life cycle management, self-service password management, single sign-on, backup and recovery, and IT security and compliance.AD360 is comprised of six components:High availability for AD360High availability describes a family of practices aimed at delivering a specific level of availability by eliminating or mitigating failure modes.AD360 supports high availability in case of system and application failures. High availability is achieved through automatic failover: when the AD360 service running on one machine fails, another instance of the AD360 service running on a different machine will automatically take over.Centralized configurationYou can set up and manage high availability for AD360 and its integrated components directly from the AD360 console. Currently, AD360 supports high availability configuration for three of its components—ADManager Plus, ADSelfService Plus, and O365 Manager Plus.High Availablity ArchitectureImportant points to consider:To implement high availability, you'll need to install AD360 and its components on twoseparate machines.The instance from which you are configuring high availability will act as the primary server. Theother instance will act as the standby server.Both servers use the same database configured in the primary server. At any given time, theprimary server will cater to user requests while the other will remain passive.Whenever the primary server experiences ten or more seconds of downtime, the standbyserver automatically becomes operational and services all requests.You'll need a virtual IP address for high availability configuration.PrerequisitesBefore you start configuring high availability, make sure that the following conditions are satisfied: Download and install AD360 along with its components on two separate machines.Configuration stepsFollow the steps below to enable high availability:Admin > Administration > High Availability.4. Click Configure Now in the AD360 row.Primary Server section, the URL of the AD360 server you are currently accessing will be auto filled.Standby Server section, enter the:URL of the AD360 standby server.Username and password of the default admin user in the AD360 standby server.Virtual IP section, enter:A virtual IP address with which you can access both the primary and standby servers. When the product isaccessed using this IP, the data is routed directly through the server that is active at that particular time.The Virtual Host Name.Disabling high availabilityHigh availability can be disabled only from the standby server. Follow the steps below to disable high availability:primary server .AD360. This will automatically route you to the standby server.High Availability settings under the Admin tab and click Remove .standby server , and then restart the primary server .Save .activate high availability.For AD360:Add the virtual IP address to the Allowed IPs list (if it's enabled) in Logon Settings.For the ADSelfService Plus component:Update the Access URL with the virtual IP address value.Add the virtual IP address value to the Admin Login page IP restriction list (if it's enabled) in LogonSettings.。
Windows_server_2003_AD_DC域配置(12)域控制器的卸载与清理
Windows_server_2003_AD_DC域配置-域控制器的卸载与清理我们现在已经有一些Active Directory的部署及管理经验了,今天我们要考虑一个问题,如果一个域控制器我们不需要了,那应该如何处理呢?直接把它砸了是不对的,这未免太暴力了,和当前的和谐环境有些格格不入哦。
关键是,如果我们让这台域控制器直接消失,那么其他的域控制器就无法得知这个消息,每隔一段时间其他的域控制器还会试图和这个域控制器进行AD复制,客户机也有可能会把用户名和口令送到这个不存在的域控制器上进行验证。
如果这个被暴力卸载的域控制器还承担着一些操作主机角色,我们就更麻烦了。
因此,我们进行域控制器卸载时,一定要把工作做到位,优先使用常规卸载,争取不留后患。
有些朋友可能会说,我也希望用常规卸载,但有时就是不能正常卸载,没办法,只好…..我们要分析一下,为什么域控制器无法正常卸载呢?当域控制器进行常规卸载时,AD的内容发生了变化,域控制器会把这个变化通知自己的复制伙伴,再由自己的复制伙伴通知其他域控制器。
如果所有的域控制器都通知到了,那就肯定可以正常卸载,而且DNS记录,操作主机角色,AD复制拓扑等问题都可以迎刃而解。
因此,域控制器卸载和域控制器之间的AD复制其实是一个硬币的两面,域控制器卸载时也要进行AD复制。
想知道一个域控制器是否可以正常卸载,我们只要在Active Directory站点和服务中查看这个域控制器和它的复制伙伴是否可以AD复制就可以了,只要能进行AD 复制,基本卸载域控制器时就没有问题。
我们举一个域控制器正常卸载的例子,拓扑如下图所示,我们准备卸载shanghai站点内的域控制器perth。
从拓扑可以看出,perth的复制伙伴应该是Firenze,只要perth和Firenze之间可以进行AD 复制,perth应该就可以进行域控制器卸载。
在perth上运行Dcpromo,如下图所示,出现Active Directory安装向导,向导判断我们准备把Active Directory删除,点击“下一步”继续。
manageengine adaudit plus 利用方法

manageengine adaudit plus 利用方法ManageEngine ADAudit Plus是一款功能强大的网络安全管理工具,可以帮助组织有效地监控、审计和保护其Active Directory环境。
下面介绍一些利用方法,以帮助您更好地使用这个工具。
首先,利用ManageEngine ADAudit Plus,您可以实时监控Active Directory中的用户活动。
您可以跟踪和记录用户的登录、注销、密码更改、账户锁定等活动。
通过分析这些日志,您可以及时发现潜在的安全漏洞和威胁,并采取相应的措施进行防范。
其次,ManageEngine ADAudit Plus还支持审计文件和文件夹的访问活动。
您可以在实时监控下,追踪用户对敏感文件的操作,包括创建、修改、删除等。
这有助于保护重要数据的安全性,减少数据泄露的风险。
此外,该工具还提供了详细的报告和分析功能。
您可以根据需要生成各种类型的报告,包括用户活动报告、安全事件报告等。
这些报告可以帮助您全面了解Active Directory环境下的安全态势,及时发现和解决潜在问题。
除此之外,ManageEngine ADAudit Plus还支持实时警报功能。
您可以设置警报规则,一旦触发了特定的安全事件,工具会立即发送警报通知给相关人员。
这有助于快速响应安全威胁,及时采取措施进行处理。
总而言之,ManageEngine ADAudit Plus是一款功能全面的网络安全管理工具,可以帮助组织实时监控、审计和保护其Active Directory环境。
通过使用该工具,您可以提高网络安全性,防止潜在的安全威胁,并及时响应安全事件。
卓豪 Applications Manager 快速用户手册说明书

目录简介 (3)系统安装 (3)硬件要求 (3)软件要求 (3)安装部署 (4)启动Applications Manager (10)访问Applications Manager (11)添加监视器 (12)示例:添加Windows监视器: (13)告警管理 (16)1:配置阈值告警 (16)配置邮件服务器 (21)创建邮件动作 (23)3:将动作与监视器关联 (24)使用6:报表 (29)产品文档 (30)是针对企业各种业务监控管理需求推出的应用性能监控管理解决方案。
它采用了无监控代理(Agentless)的最新技术,易于架构,可以对不同的业务系统、应用和网络服务(如服务器、操服务、中间件、邮件系统、其他关键应用等)进行多角use / Ubuntu / Mandri v a /和MS SQL作为后台数据库2.请阅读Manage E ngine Applications Manager的许可协议,然后点击“YES”进入下一步操作;3.这是语言选择界面,请您在下列语言中选择“S implified Chinese”代表简体中文,点击“N ext”进入下一步;4.Applications Manager有免费版,专业版和企业版三个版本,都提供30天的免费试用,请您选择“Professional E dition”专业版,点击“N ext”;5.选择Applications Manager安装路径,您可以通过点击“B rowse”自行更改其安装路径(注:路径中请不要出现中文和特殊字符),点击“N ext”;6.默认程序目录为“Manage E ngine Applications Manager 13如有需要可以更改名称。
点击“N ext”进入下一步;7.Applications Manager默认的Web服务端口为9090,SS L端口为8443,根据您的情况可自行更改,点击“N ext”进入下一步;8.请您根据提示注册技术支持信息,点击“N ext”或“Sk ip”进入下一步;9.请检查安装信息文件,确认无误后点击“N ext”进入下一步;10.请您选择“30 da y trial”选项,安装30天免费试用版,点击“N ext”进入下一步。
AD域软件设置

软件设置打开组策略软件安装打开组策略软件安装1.打开“组策略管理控制台”。
右键单击要编辑的组策略对象,然后单击“编辑”。
2.若要将软件应用程序指派给计算机,请在控制台树中展开“计算机配置\策略”。
若要向用户指派或发布软件应用程序,请在控制台树中展开“用户配置\策略”。
3.展开“软件设置”,然后单击“软件安装”。
其他注意事项要完成此过程,您必须具有编辑 GPO 的编辑设置权限。
默认情况下,Domain Administrators 安全组、Enterprise Administrators 安全组或 GroupPolicy Creator Owners 安全组成员具有编辑 GPO 的编辑设置权限。
设置组策略软件安装的默认值若要将软件安装程序包添加到用户设置,可以发布或指派程序包。
选定站点、域和组织单位的用户使用控制面板中的“添加/删除程序”或使用文件激活可以安装已发布的程序包。
选定站点、域或组织单位中的用户在下次登录时(指派给用户)或计算机重新启动时(指派给计算机)将收到已指派的程序包。
设置组策略软件安装的默认值1.打开“组策略软件安装”。
(在控制台树中,右键单击“软件安装”。
)2.单击“属性”,然后在“常规”选项卡上指定下列选项:o在“默认程序包位置”中,指定默认的软件分发点。
o在“新增数据包”中,指定将新数据包添加到用户设置中的方法。
默认情况下,数据包可以被发布或指派。
(对于计算机,只能指派。
)如果要对每个数据包都选择这些选项,请单击“显示部署软件”对话框。
若要分别对各个数据包进行更多的控制,请单击“高级”。
o根据希望安装过程对用户所显示的外观,单击“安装用户界面选项”中的“基本”或“最大”。
其他注意事项∙要完成此过程,您必须具有编辑 GPO 的编辑设置权限。
默认情况下,Domain Administrators 安全组、Enterprise Administrators 安全组或 GroupPolicy Creator Owners 安全组成员具有编辑 GPO 的编辑设置权限。
- 1、下载文档前请自行甄别文档内容的完整性,平台不提供额外的编辑、内容补充、找答案等附加服务。
- 2、"仅部分预览"的文档,不可在线预览部分如存在完整性等问题,可反馈申请退款(可完整预览的文档不适用该条件!)。
- 3、如文档侵犯您的权益,请联系客服反馈,我们会尽快为您处理(人工客服工作时间:9:00-18:30)。
ADManager Plus 提供简洁直观的操作管理界面,使管理人员能够通过从中央控制台轻松执行各项复杂的AD 管理工作,降低使用命令行或脚本进行管理的难度,从而极大地简化活动
目录的管理。
ADAudit Plus 能够对所有配置变更进行实时跟踪、审计、报告和告警,帮助IT 管理员回答“谁(Who)在什么时间(When)什么地方(Where)执行了什么行为(What)”4W 问题,满足企业内部审计和外部法规监管需要。
ADSelfService Plus 为域用户提供基于Web 的自助服务门户,无需求助帮助台,即可自行执行重置密码、解锁账户、更新个人资料等操作,
因此可有效缓解帮助台负荷并降低安全风险。
AD 综合管理解决方案ManageEngine AD Solutions。
