SCAN红外测温仪说明书
红外测温仪的操作指南及各模块说明
《红外测温仪的操作指南及各模块说明》红外测温仪操作指南:将单片机连接电源后,只需将红外测温仪的红外探头瞄准被测物体,按下矩阵键盘上的S13按钮(设定为“开始测温”),测温仪开始工作,LCD显示屏上显示两个温度数值,上为被测点温度,下为环境温度(由探头外环探测得出)。
由于探头精度灵敏,温度数值在稳定建立时间过后仍有小幅度跳变。
按下矩阵键盘上的S14按钮(设定为“STOP”),LCD显示按下时刻的温度值,方便读数。
按下S13“开始测温”,测温仪开始新一轮测温。
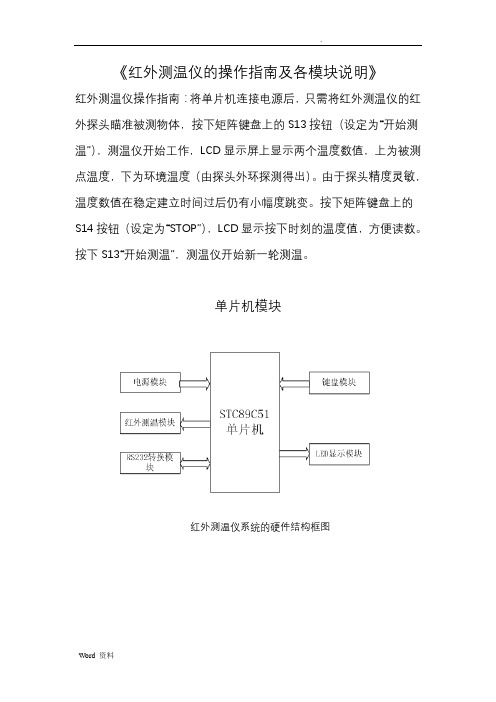
单片机模块红外测温仪系统的硬件结构框图红外测温仪系统的软件方案设计框图主程序模块:主要完成系统初始化,温度的检测,串行口通信,键盘和显示等功能。
其中系统初始化包括: 时间中断的初始化、外部中断源的初始化、串口通信中断的初始化、LED 显示的初始化。
红外测温模块:包括获取温度数据,计算温度值。
键盘扫描模块:获取按键信息,处理按键请求等。
显示模块:获取并处理相应的温度数据,通过LED数显管显示温度数据。
单片机处理模块单片机模块的工作原理是:加载相应程序的STC89C51单片机把红外测温模块传来的数据加以处理,送LED显示屏显示。
下图1是单片机处理模块的电路原理图图1 单片机处理模块电路图其复位电路如图2-1左边上部分,本单片机处理模块是通过开关手动复位的,只要在RST引脚出现大于10ms的高电平,单片机就进入复位状态,这样做的目的是便于根据实际情况而选择是否复位温度测量数据。
而此仪器的震荡电路选用的是晶体震荡电路,其具体电路如图2-1左边下部分。
采用晶体震荡电路的原因是因为它的频率稳定性好,而这正是本红外测温仪非常重要的技术要求。
单片机作为红外测温仪的核心处理部件,它关系到整个仪器的性能指标。
因此它的选择是非常重要的。
本测温仪选择的STC89C51RC单片机,下面是STC89C51RC单片机相关资料信息:STC89C51RC单片机是宏晶科技推出的新一代超强抗干扰/高速/低功耗的新一代8051单片机,指令代码完全兼容传统8051单片机,12时钟/机器周期和6时钟/机器周期可任意选择,最新的D版本部集成MAX810专用复位电路。
红外线测温仪操作规程
红外线测温仪操作规程一、引言红外线测温仪是一种非接触式温度测量设备,通过测量目标物体发出的红外线辐射,来获取目标物体的表面温度。
本操作规程旨在确保使用红外线测温仪的操作人员能够正确、安全地操作设备,准确测量温度并遵守相关安全规范。
二、设备准备1. 确保红外线测温仪处于正常工作状态,电池电量充足。
2. 检查红外线测温仪的外观是否完好,无损坏、裂纹或者松动。
3. 清洁红外线测温仪的测温镜头,确保无灰尘或者污垢影响测量结果。
三、操作步骤1. 打开红外线测温仪的电源开关,确保设备启动。
2. 在显示屏上选择所需的温度单位(摄氏度或者华氏度)。
3. 瞄准目标物体,保持红外线测温仪与目标物体之间的距离在设备规定范围内(通常为10cm至50cm)。
4. 按下测温按钮,红外线测温仪将发射红外线并测量目标物体的表面温度。
5. 等待几秒钟,红外线测温仪将显示测量结果在设备的显示屏上。
6. 根据需要,可以按下保存按钮将测量结果保存在设备的内存中。
7. 完成测量后,关闭红外线测温仪的电源开关,将设备放置在干燥、安全的地方。
四、注意事项1. 使用红外线测温仪时,避免将设备直接对准璀璨的光源,以免干扰测量结果。
2. 在测量过程中,确保目标物体表面无障碍物,如水滴、灰尘等,以免影响测量准确性。
3. 红外线测温仪的测量范围和精度根据不同型号而有所不同,使用前请子细阅读设备说明书,了解设备的性能参数。
4. 长期使用红外线测温仪时,设备可能会发热,请避免直接接触设备表面,以免烫伤。
5. 红外线测温仪通常用于测量表面温度,不适合于测量液体或者固体内部温度。
6. 在使用红外线测温仪前,请确保操作人员已经接受相关培训,掌握正确的操作方法和安全注意事项。
五、常见问题与解答1. 为什么在不同距离下测量结果有差异?答:红外线测温仪的测量范围和焦距是有限的,不同距离下测量结果会有差异。
请确保在设备规定的测量距离范围内进行测量。
2. 为什么测量结果与接触式温度计不一致?答:红外线测温仪测量的是目标物体的表面温度,而接触式温度计测量的是物体内部温度。
红外线测温仪使用方法
红外线测温仪使用方法
红外线测温仪是一种用于测量物体表面温度的工具。
以下是红外线测温仪的使用方法:
1. 打开测温仪并插上电池,在屏幕上选择温度单位。
2. 瞄准测量目标,让红外线传感器对准你想测量的物体表面。
3. 按下测温仪上的扳机按键,等待仪器完成测量并显示温度读数。
4. 清洁测温仪传感器或镜头,以确保得到准确的读数。
5. 对于不同的测量目标,你可能需要设置不同的测量模式,例如温度最大值或平均值,需要根据实际情况选择。
6. 测量完毕后,关闭测温仪,注意保持干燥和安全存放。
总之,使用红外线测温仪需要注意瞄准、测量模式等一些细节问题,最好进行一定的操作培训。
红外线测温仪操作规程
红外线测温仪操作规程一、引言红外线测温仪是一种非接触式温度测量设备,广泛应用于工业、医疗、安防等领域。
为确保红外线测温仪的正确使用和准确测量,制定本操作规程。
二、设备概述红外线测温仪由外壳、显示屏、红外线传感器、电池等组成。
其工作原理是通过感应物体发出的红外线辐射,将之转换为温度值并显示在显示屏上。
三、安全注意事项1. 使用前请阅读本操作规程,并确保已经了解和理解所有安全注意事项。
2. 红外线测温仪仅适用于测量物体表面温度,不可用于人体或动物体温测量。
3. 在测量过程中,避免将红外线测温仪对准眼睛,以防伤害。
4. 在使用过程中,避免将红外线测温仪摔落或受到强烈撞击,以免损坏设备。
5. 不要将红外线测温仪存放在高温、潮湿或有腐蚀性的环境中,以免影响测量准确性和设备寿命。
6. 在更换电池时,请确保使用与设备规格相符的电池,并按照正确的极性安装。
四、操作步骤1. 打开红外线测温仪的电源开关。
2. 确认设备已处于工作状态,显示屏上显示正常。
3. 将红外线测温仪对准待测物体的表面,保持与物体的距离在设备规定的范围内。
4. 按下测量键,设备将发射红外线并测量物体的表面温度。
5. 等待片刻,显示屏上将显示测量结果。
6. 如需连续测量多个物体,可重复步骤3至步骤5。
7. 使用完毕后,关闭红外线测温仪的电源开关。
五、测量误差及校准1. 红外线测温仪在测量过程中可能会受到环境温度、湿度、物体表面反射率等因素的影响,因此可能存在一定的测量误差。
2. 为确保测量准确性,建议定期对红外线测温仪进行校准。
具体的校准方法和周期可参考设备的说明书或联系厂家进行咨询。
3. 如发现红外线测温仪的测量结果与实际温度存在较大偏差,应立即停止使用,并进行校准或联系专业人员进行维修。
六、维护保养1. 在使用过程中,应保持红外线测温仪的外壳清洁,避免灰尘、油污等物质附着在设备上。
2. 如设备长时间不使用,请关闭电源开关,并将电池取出以防止电池漏液损坏设备。
Seek Scan 红外体温测量系统说明说明书
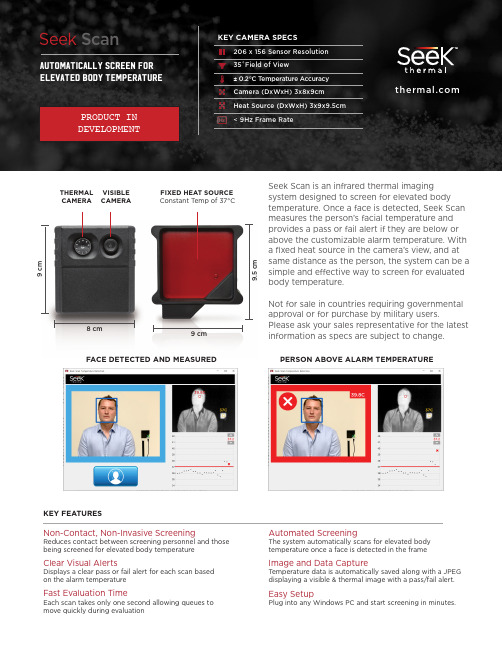
Seek Scan is an infrared thermal imagingsystem designed to screen for elevated body temperature. Once a face is detected, Seek Scan measures the person’s facial temperature and provides a pass or fail alert if they are below or above the customizable alarm temperature. With a fixed heat source in the camera’s view, and at same distance as the person, the system can be a simple and effective way to screen for evaluated body temperature.Not for sale in countries requiring governmental approval or for purchase by military users.Please ask your sales representative for the latest information as specs are subject to change.± 0.2°C T emperature Accuracy Seek ScanKEY FEATURESNon-Contact, Non-Invasive ScreeningReduces contact between screening personnel and those being screened for elevated body temperatureClear Visual AlertsDisplays a clear pass or fail alert for each scan based on the alarm temperatureFast Evaluation TimeEach scan takes only one second allowing queues to move quickly during evaluationAutomated ScreeningThe system automatically scans for elevated body temperature once a face is detected in the frameImage and Data CaptureT emperature data is automatically saved along with a JPEG displaying a visible & thermal image with a pass/fail alert.Easy SetupPlug into any Windows PC and start screening in minutes.FIXED HEAT SOURCE THERMAL CAMERA VISIBLE CAMERA Constant T emp of 37°C9 c m9.5 c m8 cm9 cmFACE DETECTED AND MEASUREDPERSON ABOVE ALARM TEMPERATUREPRODUCT IN DEVELOPMENT6300 HOLLISTER AVE, SANTA BARBARA, CA 93117 USASeek Thermal engineers and manufactures low-cost, high-resolution thermal imaging cameras and OEM thermal cores. Founded by industry pioneers who spent 40 years advancing the state of military and professional-grade thermal technologies, Seek Thermal has developed a breakthrough line of products at competitive price points making this technology more accessible to manufacturers and end users. Thecompany’s products serve the firefighting, law enforcement and commercial markets, among others, under its own brand and OEM offerings.*Specifications and undocumented specifications are subject to change without notice or liability.TECHNICAL SUMMARYCamera SpecificationsDescriptionMicrobolometer Uncooled Vanadium OxidePixel Pitch12 Microns Spectral Response7.8 - 14 Microns Sensor Resolution (Array Format)206 (h) x 156 (v)Lens Focal Length / F-Number 4.0mm / f/1.20Horizontal / Vertical Field of View 35° (h) / 26° (v)Frame Rate<9Hz Visible Light Camera Resolution 1280 x 1024PowerUSB 5V (Plugs into Computer USB-A port)Dimensions (L x W x H) 3 x 8 x 9 cm Weight140 gThermography SpecificationsTemperature Accuracy ±0.2°Cbetween36°Cto40°**********(UsingFixedHeatSource)Sensor Sensitivity40 mK (typical), <50 mK (max) @ 25°C (Post Signal Processing)Fixed Heat Source SpecificationsConstant Temperature 37°CPower110V to 220V 50/60Hz (Plugs into Wall Outlet)Dimensions (L x W x H) 3 x 9 x 9.5 cmWeight80 g System SpecificationsSystem RequirementsSupported Operating Systems: Windows 7 and 10Environmental UsageOperating TemperatureOptimal temperature accuracy in conditions below 37°C ambientOutputScan Time1 Second Image Capture Format JPEGData Capture Event Trigger with JPEG and Thermal Spot TemperatureData OutputAsk your sales representative for options to integrate Seek Scan data with other systems206 x 156 RESOLUTIONSeek ScanWHAT’S IN THE BOX- Camera with USB-A Cable - Fixed Heat Source- USB-C Power Cable for Heat Source - USB-A Drive with Seek Scan Software - Quick Start Guide - WarrantySETUP NOTE: The Fixed Heat Source and the person being scanned should be 1.5 meters from the camera.。
红外线测温仪操作规程

红外线测温仪操作规程一、引言红外线测温仪是一种用于非接触式测量物体表面温度的仪器。
本操作规程旨在确保操作人员正确、安全地使用红外线测温仪,以保证测量结果的准确性和可靠性。
二、适用范围本操作规程适用于所有使用红外线测温仪的操作人员。
三、设备准备1. 确保红外线测温仪处于正常工作状态,检查仪器是否损坏或有异常。
2. 确保红外线测温仪的电池电量充足,如电池电量不足应及时更换。
3. 清洁红外线测温仪的镜头,确保没有污垢或障碍物影响测量准确性。
4. 准备好记录测量数据的工具,如笔和纸或电子设备。
四、操作步骤1. 打开红外线测温仪的电源开关,等待仪器自检完成。
2. 确定测量距离和角度,根据需要调整红外线测温仪的测量模式和设置参数。
3. 对准待测物体,确保红外线测温仪的镜头与物体表面垂直,并保持适当的距离。
4. 按下测量按钮,红外线测温仪会发出测量信号并显示测量结果。
5. 记录测量结果,包括测量时间、测量位置和测量数值。
6. 如需连续测量多个物体,重复步骤3至5。
7. 测量完成后,关闭红外线测温仪的电源开关。
五、注意事项1. 在使用红外线测温仪之前,应仔细阅读并理解操作说明书,熟悉仪器的功能和使用方法。
2. 在测量过程中,应保持稳定的手持姿势,避免晃动或抖动,以确保测量结果的准确性。
3. 避免将红外线测温仪暴露在强烈的光线或电磁场中,以免影响测量结果。
4. 避免将红外线测温仪测量头部分接触到液体或其他可能导致损坏的物质。
5. 在测量过程中,应注意安全,避免接触高温物体或其他危险物体。
6. 如发现红外线测温仪有异常情况或故障,应立即停止使用并联系维修人员进行检修。
7. 定期对红外线测温仪进行校准,以确保测量结果的准确性和可靠性。
六、维护保养1. 每次使用红外线测温仪后,应将其存放在干燥、清洁、无尘的环境中。
2. 定期清洁红外线测温仪的镜头,使用干净、柔软的布擦拭,避免使用有腐蚀性或磨损性的清洁剂。
3. 定期检查红外线测温仪的电池电量,如电池电量不足应及时更换。
红外测温仪操作使用方法
红外测温仪操作使用方法红外测温仪操作使用方法红外测温仪操作使用方法红外测温仪使用便捷,可快速提供温度测量,在用热偶接触式温度计测量一个渗漏连接点的时间内,用红外测温仪几乎可以读取所有连接点的温度。
一般红外测温仪坚实轻巧,在工厂巡视和日常检验工作随时都可携带。
红外测温仪测量温度相对准确,一般在1℃以内,这种性能做预防性维护时特别重要,例如监视恶劣生产条件和将导致设备损坏停机的特别事件时。
用红外测温仪,可快速探测操作温度的微小变化,在其萌芽之时就可将问题解决,减少因设备故障造成的开支和维修的范围。
另外,红外测温仪在使用中比较安全,能够安全地读取难以接近的或不可到达的目标温度,可以在仪器允许的范围内读取目标温度。
红外测温仪的操作使用方法如下:测温仪会在按下扳机或按下黄色键时打开。
若连续8秒钟内没有检测到活动,测温仪会自动关闭。
测量温度时,将测温仪瞄准目标,拉起并保持扳机按下不动。
松开扳机以保持温度读数。
一定要考虑距离与光点尺寸比以及视场。
激光仅用于瞄准目标物体。
1、找出热点或冷点要找出热点或冷点,将测温仪瞄准目标区域之外。
然后,缓慢地上下移动以扫描整个区域,直到找到热点或冷点为止。
2、距离与光点尺寸随着与被测目标距离(D)的增大,仪器所测区域的光点尺寸(S)变大。
光点尺寸表示90 % 圆内能量。
当测温仪与目标之间的距离为1000 mm(100 in),产生 20 mm(2 in)的光点尺寸时,即可取得D:S。
3、视场要确保目标大于光点的大小。
目标越小,则应离它越近。
4、发射率发射率表征的是材料能量辐射的特征。
大多数有机材料和涂漆或氧化处理表面的发射率大约为0.95。
如果可能,可用遮蔽胶带或无光黑漆(如果不能涂漆或使用胶带,可使用发射率选择器来提高您的测量准确度。
即使是使用发射率选择器,对带有光亮或金属表面的目标也很难取得完全准确的红外测量值。
5、用户设置操作SET键: 循环切换设置状态,循环次序为发射率设定锁定测量设定℃/℉选择设定正常测量。
红外线测温仪操作规程

红外线测温仪操作规程一、引言红外线测温仪是一种用于非接触式测量物体表面温度的设备,广泛应用于工业、医疗、安防等领域。
本操作规程旨在规范红外线测温仪的正确使用方法,以确保测量结果的准确性和操作人员的安全。
二、设备准备1. 确保红外线测温仪处于正常工作状态,电池电量充足。
2. 清洁测温仪的测量窗口,确保无污垢或障碍物。
3. 根据需要,选择合适的测温模式和单位(摄氏度或华氏度)。
三、测温操作步骤1. 打开红外线测温仪的电源开关,等待设备初始化完成。
2. 确保测温仪与被测物体之间无遮挡物,并保持一定的距离(通常为测量距离的2倍)。
3. 对准被测物体,将测温仪的测量窗口对准物体表面,确保窗口与物体垂直。
4. 按下测温按钮,触发测量动作。
在测量过程中,保持测温仪的稳定,避免晃动或抖动。
5. 等待测温仪完成测量,读取显示屏上的温度值。
四、注意事项1. 在测量过程中,避免将红外线测温仪直接对准明亮的光源或强烈的辐射源,以免干扰测量结果。
2. 避免在强风、强烈的电磁场或电源干扰下进行测量,以确保测量结果的准确性。
3. 若被测物体表面有涂层、反射性较强或不均匀的情况,应注意可能会影响测温结果的准确性。
4. 在连续测量多个物体时,应等待测温仪的温度稳定后再进行下一次测量。
5. 使用完毕后,及时关闭红外线测温仪的电源开关,以节约电池的使用寿命。
五、维护与保养1. 定期清洁测温仪的测量窗口,使用干净的软布擦拭,避免使用化学溶剂或尖锐物品。
2. 长期不使用时,应将红外线测温仪存放在干燥、通风的环境中,避免受潮或受热。
3. 如发现测温仪存在异常或故障,应立即停止使用,并联系维修人员进行检修或维护。
六、安全注意事项1. 在使用红外线测温仪时,应遵循相关的安全操作规定,确保操作人员的安全。
2. 避免将红外线测温仪直接对准人体眼睛或其他敏感部位,以免对健康造成损害。
3. 在使用过程中,应注意设备的热量散发,避免触摸测温仪的热表面,以防烫伤。
测温仪使用说明书

测温仪使用说明书感谢您选择我们的测温仪。
为了确保您正确、安全地使用本产品,请仔细阅读本使用说明书。
产品概述测温仪是一款非接触式测温设备,适用于人体温度测量。
它采用红外线技术,能够快速、准确地测量体温,广泛应用于医疗、公共场所等领域。
主要特点•非接触式测温,减少交叉感染风险•快速响应,测量时间小于1秒•高精度,温度误差小于±0.5℃•易于操作,一键式开关•数据存储功能,可存储1000次测量数据包装内容•测温仪主机安装与启动1.取出测温仪,确认电池电量充足。
如果电量不足,请先给测温仪充电。
2.将测温仪放置在平稳的台面上,确保红外线传感器正对被测物体。
3.按下开机键,测温仪开始工作。
测量操作1.按下开机键,测温仪开始工作。
2.将测温仪对准被测物体,保持适当距离(建议1-3米)。
3.等待测温仪显示稳定后,读取温度数值。
数据查看与删除1.按下数据键,测温仪进入数据查看模式。
2.上下键切换查看不同测量数据。
3.按下删除键,可删除单个或全部测量数据。
4.使用充电线将测温仪连接至电源。
5.充电过程中,测温仪会显示充电状态。
6.充电完成后,关闭测温仪并拔掉充电线。
注意事项•请避免将测温仪暴露在高温、潮湿环境中。
•请勿用湿手操作测温仪。
•测量过程中,请保持测温仪与被测物体之间距离适当。
•请勿用测温仪测量易燃、易爆物体。
故障处理•如果测温仪无法开机,请检查电池电量是否充足。
•如果测温仪显示异常,请尝试重启设备。
•如果仍无法解决问题,请与生产厂家联系。
保修政策本产品自购买之日起,享受一年内免费保修服务。
保修期内,如产品出现非人为损坏问题,我们将免费提供维修或更换服务。
客服与技术支持如需咨询产品相关信息或技术支持,请拨打以下电话:电话:XXX-XXXX-XXXX邮箱:*************我们将竭诚为您服务。
祝您使用愉快!故障处理(续)•如果测温仪的温度读数不稳定或者有误差,请检查测量环境是否符合要求,如是否有强光或热源的干扰。
InfraScan 红外温度计说明书

IR 101InfraScan™Infrared ThermometerTABLE OF CONTENTSPage GeneralQuick instructions 3Equipment Supplied 3Description of Measuring Principle 3OperationDisplay and Operator Controls 4Making a Measurement 45Minimum and Maximum TemperatureIndicationChanging the Temperature Units 5Back Light 5Measurement Inaccuracies 5-6Trouble Shooting 6MaintenanceChanging the Batteries 7Cleaning 7 Fastening the Infrared Thermometer 7Technical Information8-9Warranty Information 10General1.Quick InstructionsPress and hold the operating button for more than 1.5 seconds. Thetemperature of the surface the lens is aimed at will read on the top of thedisplay. The minimum and maximum temperatures of the currentmeasurement are shown on the bottom of the display. When the operatingbutton is released “Hold” will be displayed between “min” and “max”indicating the measurement is completed. After 4 seconds the backlightwill turn off. The unit will switch off after 8 seconds. Press and hold theoperating button again to begin a new measurement. To switch between °Fand °C simply “double click” the operating button.2.Equipment Supplieda.Infrared Thermometer base unitb. 4 button cell batteries (already in unit)c.Neck strapd.Soft sided case3.Description of measuring principleWhen making a temperature measurement, the surface radiation of theobject to be measured is evaluated using the principle of radiationthermometry. This is a purely passive process, i.e. no radiation istransmitted, but instead, use is only made of the natural electromagneticradiation energy (heat radiation) that every body above a temperature ofabsolute zero (-273 °C) has. The temperature can be determined veryaccurately from this radiation energy if the emission factor of the objectbeing measured is known.Operation1.Display and operator controlsAll of the functions of the measuring unit are controlled and monitored usingb.Hold indicatorc.d.Temperature display - maximum valuee.Battery symbol – low battery indicatorf.Temperature units – °F or °Cg.Operating Buttonh.Lens2.Making a measurementThe object being measured should be a minimum of twice the size of theinfrared thermometer’s lens. The ideal measuring distance is 3 to 12 inches, which will yield a measurement area of ½ inch to 2 inches. As the infraredthermometer is moved away from the object being measured the area beingmeasured increases (6:1 ratio).The infrared thermometer is switched on by holding the operating button down for 1.5 seconds or more. By continuously holding down the operating button the measured value will be updated as long as the operating button is pressed.Releasing the operating button will finish the measurement. The “Hold”indication signals that measuring has stopped. The backlight will shut off 4seconds after the operating button is released. The infrared thermometer will automatically switch off 8 seconds after the last measurement. Holding down the operating button again will clear the minimum and maximum memory and begin a new measurement.3.Minimum and maximum temperature indicationThe minimum and maximum value memories are cleared at the start of ameasurement by pressing the operating button. The temperature will bemeasured and the minimum and maximum temperatures will be determined for as long as the button is pressed. The minimum temperature is shown in thelower left-hand part of the display and the maximum temperature can be seen in the lower right hand part. These values each apply to the current measuring cycle and are cleared as soon as the button is pressed again.4.Changing the temperature units ( °F/°C )The units for the temperature display can be switched between degrees Celsius (°C) and degrees Fahrenheit (°F) by pressing the button briefly twice (double click).5.Back lightThe LCD back light is constantly switched ON while the operating button ispressed. When the operating button is released, the backlight will be ON for approximately 4 seconds before automatically switching off 8 seconds after the last measurement.6.Measurement inaccuraciesThe following points should be observed in order to avoid measurement errors:a.It must be ensured that the object to be measured completely fills theInfrared Thermometer monitoring area. Errors can occur whenmeasuring small objects, as the unit also monitors the temperature ofthe surroundings as well as the object to be measured.b.The principle of measurement requires the ambient temperature to bedetermined. This takes place at one-minute intervals or each time theunit is switched on. Changes in the ambient temperature, which canoccur when the user holds the unit in their hand, are not monitoredwithin this time period and therefore neither of them is taken intoaccount when determining the indicated temperature. A gradualwarming of the unit (the lens) between ambient temperaturemeasurements can, for example, lead to the indicated temperatureslowly falling.c.If the emission factor for the object does not correspond to the presetvalue of 0.95, the temperature will not be calculated correctly. Mostsurfaces have an emission factor in the range of 0.8 to 0.98. In general,the darker and more matte the surface is, the larger their emissionsfactor. If the factor is greater the 0.95, the temperature indicated willbe greater than the actual temperature of the object being measured. Ifthe factor is less then 0.9, the temperature indicated will be less thanthe surface temperature. Polished metals have a very low emissionfactor and are therefore not suitable for measuring with an infraredthermometer. On the other hand, affixing adhesive tape to or paintingthe surface will increase the emission factor and reduce the inaccuracyof the measurement.d.It is not possible to take measurements through transparent materials(glass, plexiglas, etc.).e.It is not possible to measure air temperatures.f.Measurement errors can occur due to air contaminated with dust,steam, smoke, etc.7.TROUBLESHOOTINGProblem: Display shows -.-Solution: The operating button has not been pressed for long enough. This must be pressed for at least the duration of one measurement, i.e. for at least 1.5seconds.Problem: Display shows Err 1Solution: The ambient temperature is outside the permitted rangeProblem: Display shows 1Solution: The measured value is outside the permitted range.Problem: Battery symbol illuminatesSolution: The batteries are dead.NOTE: For problems not solved, please contact La Crosse Technology. Maintenance1.Changing the batteriesIf the battery symbol appears in the display, the batteries must be changed. The four button cells are accessible after opening the battery compartment at the rear of the unit. The used batteries must be removed from the battery holders and replaced by new button cells of the same type. Only LR44 type batteries may be used. Care must be taken to ensure that the polarity is correct when inserting.The plus terminal of all four batteries should point upwards. The batteries must be checked to see that they are properly seated before closing the batterycompartment.2.CleaningClean the unit using only a dry cloth. If the unit is very dirty, the cloth may be slightly dampened. Do not use cleaners containing solvents. Make sure that no moisture enters the interior of the unit. When cleaning the lens, loose particles must be removed using compressed air. Any remaining dirt can then beremoved with a soft brush or with a cotton swab moistened with water. CAUTION Do not use cleaners containing solvents.Fastening the Infrared ThermometerA soft-sided pouch with a belt loop and a quick release neck strap are included with the infrared thermometer. To attach the infrared thermometer to the neck strap simply insert the clip of the neck strap into the buckle end of the thermometer until it clicks. To release, press both sides of the clip on the neck strap and pull the buckle end until it is free.Technical Information1.Accuracy: The larger of the two values given is applicable in each case.2.Distance to measuring spot size: The parameter D : S characterizes the sizeof the measuring spot in proportion to the distance between the object to bemeasured and the Infrared Thermometer. For example, with a ratio of 6 : 1: °F or °CUnitDistance to measuring spot size D:S : 6:1Ambient temperature range : 32°F to 104°F: 0.95factorEmissionLR44: 4xsupplyPowerbutton cellbatteriesBattery life (approx.) : 2000 measurements(depending on theusage)Dimensions (L”xW”xH”) : 2.25” x 1” x 4”3.Emissions factor: The physical quantity known as the emission factordescribes to what extent the infrared heat radiation that is emitted from anobject is determined by its own temperature. Accordingly, a value of 1 tellsus that the infrared heat radiation from the object is based only on its owntemperature. A value of less than 1 means that the radiation emitted fromthe object is not only determined by its own temperature but also byreflections from neighboring bodies or due to the transmission, i.e. thediathermancy, of the object. The emission factor thus has an effect on theresult of the measurement. The Infrared Thermometer works with anemission factor of 0.95, i.e. the measuring unit assumes that the objectbeing monitored has a factor of 0.95. If this is not the case, there will beinaccuracies in the measurement (see Section 2.6 “MeasurementInaccuracies”).WARRANTY INFORMATIONLa Crosse Technology provides a 1-year warranty on this infrared thermometer. Contact La Crosse Technology immediately upon discovery of any defects covered by this warranty.Before sending the infrared thermometer in for repairs, contact La Crosse Technology. The infrared thermometer will be repaired or replaced with the same or similar model.This warranty does not cover any defects resulting from improper use, unauthorized repairs or faulty batteries.LA CROSSE TECHNOLOGY WILL NOT ASSUME LIABILITY FOR INCIDENTAL, CONSEQUENTIAL, PUNITIVE, OR OTHER SIMILAR DAMAGES ASSOCIATED WITH THE OPERATION OR MALFUNCTION OF THIS INFRARED THERMOMETER. THIS PRODUCT IS NOT TO BE USED FOR MEDICAL PURPOSES OR FOR PUBLIC INFORMATION. THIS PRODUCT IS NOT A TOY. KEEP OUT OF CHILDRENS’ REACH.This warranty gives you specific legal rights. You may also have other rights specific to your State. Some States do no allow the exclusion of consequential or incidental damages therefore the above exclusion of limitation may not apply to you. For warranty work, technical support, or information contact:La Crosse Technology2809 Losey Blvd. S.La Crosse, WI 54601Phone: 608.782.1610Fax: 608.796.1020e-mail:******************************(warranty work)****************************(information on other products)web:。
红外测温仪使用说明书
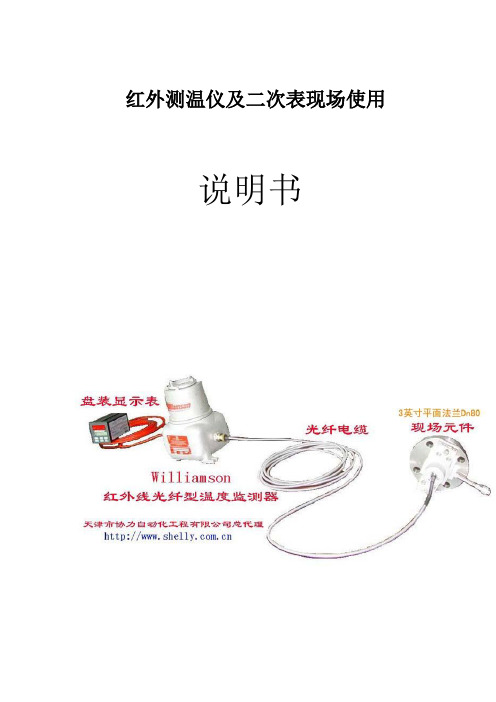
三、系统常见问题及解决办法
一)二次表LED显示屏无显示
检查现场供电情况,检查线路并观察220VAC连接是否正确,L与N是否连接正确
二)二次表出现始终初始化状态
根据接ቤተ መጻሕፍቲ ባይዱ图检查接线是否正确,端子有无松动,连接处是否接触好
基于其独特的技术测量红外能量,双波长红外测温仪设计提供了一些优势。
一,在恶劣的环境下更高的稀释信号因子。提高了传感器的控制能力,使它可以穿过脏的窗口或水喷淋,喷雾油,烟,和尘埃等。从而也提高了测量精度这使得它对被测物体表面的氧化物,熔融金属,有光泽的金属(低辐射)等都不会受到影响,包括应用目标大小小于传感器目标直径,如电线,或移动的目标等,它也可以准确无误的测量。
2)设定超出范围选项
按下←和▲,▼进行设置,选择清除缓存或保存缓存。
3)设定温度单位
按下←和▲,▼进行设置,选择c摄氏度/F华氏度
二)设置输入/输出
4)输出设定,按下“MENU”进入到系统设置状态,LCD显示2上显示”SIGNAL CONDITIONING信号状态”选项,按下▼进入“CONFIGURE I/O输入输出设置”选项按下←进入按▲,▼进行选择,二次表提供2路4~20mA(0~20Ma)输出信号分别进行设置如选到OUTPUT 1 SCALE输出1设定,按下←和▲,▼进行设定,选择4~20mA后再按←
红外测温仪及二次表现场使用
说明书
双波长红外测温仪
为
传感器概述:
相对与单波长温度传感器,双波长红外测温仪的
对于难测量的物体(如灰色金属表面),红外测温仪采用自动补偿的方法从而增加准确度。
目标大小小于传感器目标直径,如电线,或移动的目标等,它也可以准确无误的测量。
红外测温仪使用说明书
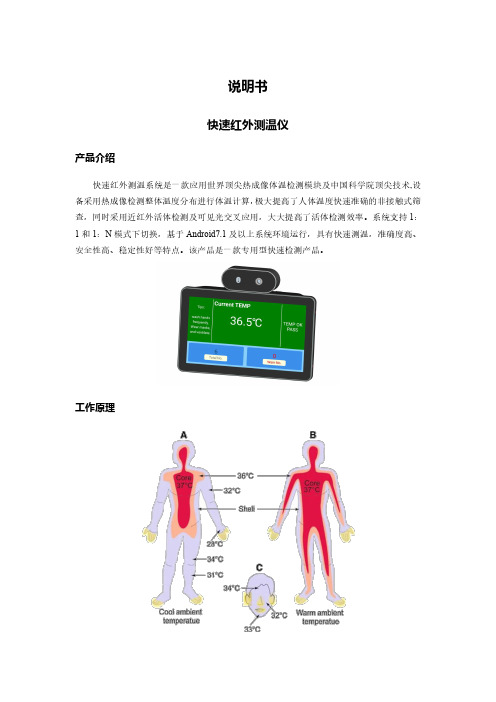
说明书快速红外测温仪产品介绍快速红外测温系统是一款应用世界顶尖热成像体温检测模块及中国科学院顶尖技术,设备采用热成像检测整体温度分布进行体温计算,极大提高了人体温度快速准确的非接触式筛查,同时采用近红外活体检测及可见光交叉应用,大大提高了活体检测效率。
系统支持1:1和1:N模式下切换,基于Android7.1及以上系统环境运行,具有快速测温,准确度高、安全性高、稳定性好等特点。
该产品是一款专用型快速检测产品。
工作原理日常生活中,任何物体都在不停地发射红外辐射,热像仪吸收红外辐射后会根据温升情况,配合人体干烧算法计算得到的相对温度信息。
对人体而言,体内核心温度是恒定的(36.5~37℃);脸部体表温度为32~36.5℃。
如果人体在室外测量或者从室外刚进入室内进行测量,体表温度受环境温度影响,会导致体表温度偏低。
但如果人体已经是在干烧,体内热量会不停传导至体表,通过干烧算法,我们的热像仪可以准确测出其干烧状态。
功能介绍1.自助测温降低交叉感染风险,体温异常预警2.人员设定门禁设置人员进入数量如:200人超200人禁止进入3.远距离测温100-120CM精准远距测温高温禁止通行4.数据记录自动记录测温次数+报警次数5.快速测温0.25秒测温+误差正负0.3℃适应场景学校,政府办公大楼,办事营业大厅,医院,养老院,写字楼主要特性1.快速通行同时进行检测,快速筛查2.快速识别应用3.0.25S测温快速通行,100CM-120CM远距离精准测温,高温报警禁止通行4.支持多国语言,中英文播,超薄超小设计,非接触式5.原装进口传感器6.识别速度快,检测耗时约0.25s7.采用基于流动态人员检测,支持离线测温规格参数-硬件硬件CPU Cortex-A7架构,主频1.5G内存DDR31G存储EMMC FLASH16G(最大可扩展到32G)操作系统安卓7.1显示屏7英寸液晶显示屏,分辨率:1024*600外观材质铝合金外壳,钢化玻璃面板规格参数-性能性能识别高度 1.2-2.2米识别距离0.6-1.2米人脸角度左右15度,上下60度识别技术近红外活体检测,嵌入式可见光识别,适应大部份室内外环境,可在移动中快速识别识别速度人员检测通过0.3s体温检测2秒-3秒/人次状态显示播报显示规格参数-主板接口主控板接口电源接口1个外置DC12V输入插座及一个内置6P输入插座(包含外置电源STANDBY功能)USB2.0接口1个外接USB接口(可拓展6个USB HOST两个外置,四个内置)扩展接口最高支持32GB的TF卡扩展耳机/麦克座1个外置耳机音频输出WIFI内置WIFI或WIFI/BT模块(可二选一),802.11b/g/n,默认单WIFI 模块UART扩展口4个内置TTL接口+1个DEBUG-TTL其中TTL可选配为RS232与RS485接口(选配)LVDS输出1个,可直接驱动达到1080P的LVDS液晶大屏音频喇叭输出1个内置插座输出工作温度推荐0℃~35℃测温规格参数测温参数识别类型快速识别测温操作有效距离<1.2M识读速率0.2-0.3秒/次规格参数-常规参数常规参数工作温度0℃-35℃工作湿度10~90%相对湿度,无冷凝工作电压100-240VAC,50-60HZ供电DC12V/2A设备功耗≦5W设备尺寸178.2*110.2*24.5mm(长*宽*高)设备净重0.45千克(根据配置有所不同)设备毛重总共1.65千克(0.65千克机身毛重+1千克立柱毛重)安装方式支持壁挂及立柱式安装包装清单快速红外测温仪1件适配器1件壁挂1件立柱支架1件螺丝6个(4个固定壁挂,2个固定机身)说明书1份操作步骤壁挂式:1.先用螺钉将壁挂固定在墙面2.再将测温仪挂上去3.然后用螺钉固定测温仪的底部4.适配器的接口接到测温仪底部的对应接口,插电即可正常使用。
红外线测温仪使用方法
红外线测温仪使用方法红外线测温仪是一种非接触式测温工具,可以在不接触被测物体的情况下,精准地获取物体的表面温度。
它在工业生产、医疗卫生、建筑施工等领域有着广泛的应用。
下面将介绍红外线测温仪的使用方法,希望能帮助大家更好地使用这一便捷的工具。
1. 准备工作。
在使用红外线测温仪之前,首先要确保仪器本身处于正常工作状态。
检查电池电量是否充足,红外线测温仪的镜头是否干净,以及仪器的外观是否完好无损。
另外,还需要了解被测物体的性质和表面特性,以便选择合适的测温模式和距离。
2. 测温操作。
在进行测温之前,需要按下红外线测温仪上的开关按钮,打开仪器。
然后,通过调节仪器上的测温模式和测温距离按钮,选择合适的测温模式和距离。
在确认测温参数后,将红外线测温仪对准被测物体,保持一定的距离,按下测温按钮,即可获取被测物体的表面温度。
3. 注意事项。
在使用红外线测温仪时,需要注意一些事项,以确保测温的准确性和安全性。
首先,要注意避免测量过于热的物体,以免损坏仪器。
其次,在测温过程中,要尽量避免测量目标表面有反光、透明或发光的物体,以免影响测温的准确性。
另外,还需要注意保持仪器的镜头清洁,避免灰尘或污物影响测温结果。
4. 数据记录与分析。
在完成测温后,可以将测温数据记录下来,以备后续分析和比对。
对于一些需要长期监测的场合,还可以将测温数据导入电脑或其他设备,进行图表分析和趋势预测。
这样可以更好地了解被测物体的温度变化规律,及时发现异常情况。
5. 仪器保养。
定期对红外线测温仪进行清洁和保养,可以延长仪器的使用寿命,确保测温的准确性。
在使用过程中,要注意避免碰撞和摔落,避免仪器受到损坏。
另外,在长时间不使用时,最好将电池取出,以免电池漏电腐蚀仪器内部。
通过以上介绍,相信大家对红外线测温仪的使用方法有了更清晰的认识。
在实际使用中,要根据具体情况选择合适的测温模式和距离,注意测温过程中的细节,才能更准确地获取被测物体的温度数据。
希望大家在工作和生活中能够充分发挥红外线测温仪的作用,为生产和生活提供更多的便利和保障。
红外测温仪使用说明书
地址:上海市茂兴路90号仁恒广场13E Add:E13Renheng Square,No.90MaoXing Road,Pudong,Shanghai China 电话(TEL):+86-021-********/58399347 传真(FAX):+86-021-********E-mail: rockwei@ Website:http://&MC023-TI130 红外测温仪使用说明书目录警告 (2)一概述 (2)1.1 工作原理 (2)1.2 功能特性 (2)二主要技术参数 (2)三仪器配置 (2)四仪器使用 (3)4.1 用户界面 (3)4.2 基本操作 (3)4.3 高温报警 (3)4.4 实时值、最大值循环转换 (4)4.5 激光的开启和关闭 (4)4.6 摄氏温度与华氏温度转换 (4)4.7 液晶背光 (5)五故障与解决 (5)六发射率 (5)七注意事项 (5)八仪器维护 (6)警告请不要将激光直接对准眼睛或指向反射性表面。
一概述MC023-TI130 红外测温仪是一种用途广泛的非接触式测温仪,操作简便、测量迅速、使用安全、携带方便。
可用于电力系统中电接头、轴承发热点的查找,食品加工和贮藏的监测,供热制冷系统中的温度检查,以及沥青的铺设、消防作业过程中的温度检查等。
1.1 工作原理:任何物体当它的温度高于绝对零度时,都向外辐射红外线。
红外线是一种电磁波,具有很强的温度效应,其能量的大小与物体表面的温度有着十分密切的关系。
MC023-TI130 红外测温仪的工作原理就是根据物体的这种红外辐射特性,通过透镜汇聚红外能量到传感器,传感器再把热能转换成电信号,微处理器对电信号进行处理后,转换成温度值显示在液晶屏上。
1.2 功能特性:1) 实时值、最大值转换显示2)高温报警功能 4)液晶背光功能3)华氏、摄氏转换功能 5)显示保持功能二主要技术参数技术参数MC023-TI130测温范围-20℃~350℃辐射率0.95 固定测量精度±2%或±2℃取最大激光瞄准√重复精度±1%或±1℃取最大最大值显示√地址:上海市茂兴路90号仁恒广场13E Add:E13Renheng Square,No.90MaoXing Road,Pudong,Shanghai China 电话(TEL):+86-021-********/58399347 传真(FAX):+86-021-********E-mail: rockwei@ Website:http://距离系数8:1 相对湿度非凝结状态下,达到40℃时为10%~75%工作波段8~14μm 储存温度-20℃~+60℃响应时间≤400ms 电源AAA 1.5V 电池(2 节)显示分辨率0.2℃或0.2℉连续工作时间50 小时(不开背光和激光)℃/℉转换√背光功耗≤10mA液晶背光灯√激光功耗≤30mA显示保持√尺寸89mm×170mm×42mm高低温报警√重量170g工作温度0℃~50℃三仪器配置序号名称数量序号名称数量1 红外测温仪1 台4 保修卡 1 份2 使用说明书2 份5 AAA 1.5V 电池2 节3 合格证1 份6 包装箱 1 套测量保持温度测量SET231摄氏华氏温标转换等3) 向下和背光开闭复用按钮2) 向上和激光开闭复用按钮1) SET按钮设置高温报警、四仪器使用4.1 用户界面液晶显示按键功能4.2 基本操作将测温仪对准目标,扣动扳机;开始温度测量(显示见右图),从液晶显示屏上可以读得被测目标的温度值,并在屏幕左上角出现“SCAN”测量标志。
红外线测温仪操作规程
红外线测温仪操作规程一、引言红外线测温仪是一种用于非接触式测量物体表面温度的仪器。
本操作规程旨在确保使用红外线测温仪的人员能够正确、安全地操作仪器,以提高工作效率和测量准确性。
二、适用范围本操作规程适用于所有使用红外线测温仪的人员,包括但不限于工业生产、医疗保健、环境监测等领域。
三、设备准备1. 确保红外线测温仪处于正常工作状态,电池电量充足。
2. 检查测温仪的外观是否完好,无损坏和松动部件。
3. 清洁测温仪的镜头,确保无尘和污渍。
四、操作步骤1. 打开红外线测温仪的电源开关,并等待仪器启动。
2. 设置测量单位。
根据需要选择温度单位,如摄氏度或华氏度。
3. 瞄准目标物体。
将测温仪对准要测量的物体表面,确保距离合适,通常建议在测量距离范围内保持10:1的比例。
4. 按下测量按钮。
在瞄准目标物体后,按下测量按钮,仪器将发射红外线并测量目标物体的表面温度。
5. 读取测量结果。
仪器会在显示屏上显示测量结果,可以通过查看显示屏来获取温度数值。
6. 记录测量结果。
根据需要,记录测量结果以备后续分析和参考。
五、注意事项1. 在测量前,确保目标物体表面干净,无遮挡物。
尽量避免测量具有反射性的表面,如镜面、金属等。
2. 在测量时,保持稳定的手持姿势,避免晃动和抖动,以确保测量准确性。
3. 根据仪器的使用说明,选择适当的测量距离和角度,以获得准确的测量结果。
4. 避免将红外线测温仪暴露在高温、潮湿或有腐蚀性气体的环境中,以免影响仪器的性能和寿命。
5. 定期检查和校准红外线测温仪,确保其测量准确性和稳定性。
六、安全注意事项1. 红外线测温仪不应用于人体测温,以免对人体造成伤害。
2. 避免直接对眼睛照射红外线,以免损伤视力。
3. 使用红外线测温仪时,应注意周围环境的安全,避免发生意外事故。
七、维护保养1. 使用后,及时关闭红外线测温仪的电源开关。
2. 清洁测温仪的镜头和外壳,避免灰尘和污渍积累。
3. 定期检查和更换电池,确保电池电量充足。
红外体温测试仪说明书

Take workforce health seriously With the rising demands for health and safety procedures, the need to screen employees for illness has increased. Temperature Screening Kiosks accommodate those needs by acting as a first line of defense to your company’s health. With infrared thermal imaging and fast temperature detection, the non-contact kiosks help identify the presence of fever as a symptom of contagious illnesses such as coronavirus. By preventing the spread of viruses, you can maintain a safe and healthy workplace while providing peace-of-mind to anxious staff, students, visitors and the general public.AVAIL AB LEC ONFIGU RATIONSFEATU R E S I N C LU D E:•Hands-free, touchless device•Fast (~1) second detectionw ith automatic alarm•Temperature accuracy+/– 0.9 Deg F•Accurate facial recognitione ven with face mask•Easy Plug & Play setup•Built for reliability: dustproof& waterproof•Steel base plate and anodizedaluminum pedestal•WiFi Enabled•8” screen with Camera•Direct Power or Battery PoweredTemperature Screening KioskOur Temperature Screening Kiosk is a non-contact kiosk designedto help prevent the spread of viruses and maintain a safe and healthyenvironment for your employees, visitors, and the general public.Live face recognitionand automatic detectionof body temperatureabnormality.Pedestal Countertop Custom Branding(& battery options available)Temperature Screening Kiosk (FAQs)What is the accuracy?±0.9°F.Who is allowed through?There are two modes: 1. Guest mode - anyone with normal temperature can pass 2. Recognition mode - only allow recognized employees to pass through. Guest mode can also recognize employees, but anyone can pass provided they don’t have a fever.What do the LED indicator lights do?The LED light on the head unit lights up green for a person who passes the facial recognition and temperature check. Alternatively, it lights up red for a stranger or high temperature subject.What is the height of the kiosk? What about short people, children, or people in wheelchairs? Is the unit adjustable for height?The standup kiosk has height of 60.5 inches. The device camera and thermal sensors have an approximate 50-degree field of view with focusing distance of 0.5-1.5 m (20-60 inches) along with 30-degree vertical tilt range. This will be able to capture 99% of users presenting for screening. This current model is not height adjustable.How close to the device do people need to be?The users need to be positioned at 0.5-1.5 m from the device in accordance with the device sensor’s focusing distance. Can you clean & disinfect the device easily? Is it waterproof?Yes, the device can be cleaned with gentle cleaning fluid designed for PC monitors and a microfiber cloth. No, this device is not waterproof.Is the kiosk safe to use for pregnant women?Yes, to the best of our information there is no health impact to pregnant women.Do we get to set what is a normal temp? Is the temperature threshold user selectable? Yes, the device operator can set and change the out of range temperature threshold. There is a field in device settings which allows the operator to key-in the desired value in degrees Celsius using a keyboard.Can the unit be used outdoors such as park areas or pools, or test peoplecoming onto grounds?It is not recommended for outdoor uses. Direct sunlight would majorly impactperformance. Nevertheless, with an IP65 design rating certain outdoorinstallations can be considered if sunlight, dust, temperature, and humidityare not extreme.Do you have to wait a certain amount of time when an employee enters the building before taking temperature when it is hot outside? Or when it is cooler outside than inside?No, the users should not have to “temperature stabilize” prior to screening by this device.My factory is very hot in the summer, does this impact performance?There are some means to manually calibrate in different conditions with a setting in the menu.Does the unit store the info?Yes, by default and out of the box the device stores all screening events in a local database. Additional default settings are:• Saving pictures of the strangers is OFF• Saving Temperature Detection of Stranger is OFFCan it log when someone passes?It keeps a record on the device.Does it record the face of the person passing?Yes, if you turn that feature on. You may want to check local laws if that’s ok.Does it log when someone is turned away?No, no data is recorded for anyone turned away.How does it handle facial recognition?It stores a photo of the face in a database, it uses infrared technology to illuminate the face and does analysis on the facial features.How many faces can it recognize?30,000Does it use the network to do face recognition?No, the faces are stored on the local system.How long does it take to recognize a face?With a small database 1-2 seconds, if you add 1000’s of faces it may take slightly longer.How do we get into the device to load photos, configure settings etc.It is a web based interface?This will be documented in the configuration guide. Attach a mouse and press center button, use the on-screen keyboard to enter the password, click Face Database, take a picture of the employee you are saving to the face recognition database and set name and employee ID. This process takes about 15-30 seconds.Details on the centralized web database management where you can useand import employee images that propagate to the devices is yet to becompleted, we will have details shortly. It will be web-based.Can it send an email or other alert to a person or a group notifying them thata person has failed? Ideally with a picture?As the device stands out of the box, we do not have a feature to notify by email when a user’s high temperature is alarmed. There is an additional software application in final development that will offer this functionality.Do you need LAN or WiFi connectivity for the unit to work?No, this device out of the box operates in stand-alone mode for non-contact in vitro temperature measurement withoutany connectivity to host building networks.Can it support WiFi?Yes, we will supply a document where it provides direction on how to exit to the Android settings.Does it have LAN connectivity?Yes, it can be plugged in to LAN.Is there any integration capability? Can the system link up to HR system and passthe information to an outside system? Any chance this could be tied to a door access control system that would either grant or deny entry to a door?Yes, an additional software application, now in final development, will offer this functionality. This application will include necessary APIs for integration with host building PACS and other management platforms. At the bottom of the unit is a Wiegand pigtail connector that will connect to many security systems and door access systems. Additional more complex integrations will be possible.Is it FCC compliant?Yes, the applicable standard is ANSI C63.4- 2014 (Information Technology Equipment) it has been assigned against CISPR PUB. 222, FCC Part 15 Subpart B and has the FCC mark. TAF testing laboratory 1439. Attestation of conformity available on request.Is the unit CE approved?Yes. Directive(s) REDS 2014/53/EU , Attestation number 2003118. Applicable standards ETSI EN 300 328 V2.1.1 (2016); EN 62311:2008; ETSI EN 301 489-1 V2.1.1 (2017); ETSI EN 301 489-17 V3.1.1. Attestation of Conformity available on request. What benefit are the FCC and CE certifications?These certifications attest to the safe co-existence of this device within the host building environments; this device will not cause any interference to nor be impacted by other electronics within the room it is installed in.Is it FDA compliant?No – and it won’t be. Statements regarding this temperature device have not been evaluated by the FDA and are not intended to diagnose, treat, cure, or prevent any disease or health condition.Is it HIPAA compliant?The Personnel Management Solution has not been validated against HIPAA. The intent of the access kiosk is for building access / security, it is not intended to be used for patient diagnosis. Face recognition would recognize known people, but only if they had been setup with an employee ID, name, and photo in advance. If there is no face database no name is recorded, just an entry time and a temperature. This would be the same amount of information as you would get from a security camera or door access system.Does it print a label to prove the temperature has been taken?No, this device is not connected to a printer peripheral. It is not configured to work with any peripherals other than a USB keyboard/mouse or USB jump-drive.Do the units need any type of maintenance or calibration, or a software update periodically?We may recommend software updates to keep up with the latest features or security patches, but it is expected that the device can operate on its own without any updates for a long time.Can I upgrade the software?Currently only locally with a USB drive or transfer over the network through the browser.Do these devices need to be serviced at all?We recommend the temperature sensor be verified periodically, you can use the offset in the configurations to adjust for any variances. This is more likely if your indoor ambient temperature is near the top or bottom of the operating limits or there are seasonal changes.What is the warranty period and what does it cover?We currently offer a standard 1-year return to depot. Additional extended warranty and support plans can be quoted on a case by case basis.。
红外测温仪操作规程

红外测温仪操作规程红外测温仪操作规程红外测温仪是一种通过红外线技术测量物体表面温度的仪器,广泛应用于工业、医疗、生活等领域。
为了确保正确、安全地操作红外测温仪,下面是一份操作规程,详细介绍了红外测温仪的使用方法及注意事项。
一、仪器检查1. 确保红外测温仪外观完好无损,无明显弯曲、破裂、划痕等;2. 检查仪器的显示屏、按键和触摸屏是否正常工作;3. 检查仪器的电池电量是否充足,如不足请及时充电或更换电池;4. 检查仪器的测温范围、测温精度、响应时间等参数是否符合实际需求;5. 若发现任何异常情况,请立即联系仪器维修人员进行处理。
二、使用准备1. 保证测温环境的适宜性,确保没有强光、电磁干扰等因素存在;2. 选择合适的测温模式,通常有单点测温、多点测温、连续测温等模式可选;3. 根据测量对象的性质选择适当的红外辐射率,尽量使之与测量对象的材质相匹配;4. 确保测温仪与测量对象保持一定距离,一般建议距离为测量对象直径的2-3倍。
三、操作步骤1. 打开红外测温仪电源,确保仪器的工作状态良好;2. 根据实际情况调整红外测温仪的参数,包括温度单位、红外辐射率等;3. 操作红外测温仪时,将其对准待测温物体的表面,并保持一定的距离;4. 按下测温按钮,红外测温仪将会发出红外线,通过接收回来的红外信号计算得出温度;5. 红外测温仪通常会自动保存最后一次测量的温度值,可以通过查看历史记录等功能获得。
四、注意事项1. 使用红外测温仪时,应避免表面涂有镜面材料的物体,以免测量结果产生误差;2. 在测量高温物体时,应注意保护自身安全,避免接触到热源;3. 若测温对象是运动的或较小的物体,应选择快速响应时间的红外测温仪;4. 避免将红外测温仪暴露在高温、潮湿、尘埃等恶劣环境中;5. 红外测温仪应定期进行校准,以确保测量结果的准确性;6. 注意避免将红外测温仪与其他电子设备放置在一起,以免干扰彼此的正常工作。
以上是红外测温仪的操作规程,希望能对您的使用有所帮助。
红外线体温计操作说明书

红外线体温计操作说明书感谢您购买我们的红外线体温计。
为了确保您能正确操作和使用该产品,我们为您提供了以下详细的使用说明。
一、产品概述红外线体温计是一种非接触式测温设备,它可以通过红外线感应人体的体温,并将其数字化显示在屏幕上。
该产品具有测量迅速、方便、卫生等特点,适用于家庭、机关、学校、医院等各类场所。
二、产品结构红外线体温计主要由外壳、触发按钮、屏幕、测温传感器等部分组成。
外壳采用耐用的塑料材质制成,触发按钮用于启动测温功能,屏幕用于显示测量结果,测温传感器用于感应人体的红外线信号。
三、使用步骤1. 准备工作:a. 确保红外线体温计电量充足,如电池不足,请及时更换。
b. 确保测量环境温度稳定,避免使用在受强光、强电磁干扰或强风的环境中。
c. 清洁测量部位,保持皮肤表面干爽,避免出汗或涂抹防晒霜等物质。
2. 打开红外线体温计:a. 按下触发按钮,屏幕将会自动亮起。
b. 如果红外线体温计显示屏没有亮起,请检查是否电池电量不足或电池安装方向错误。
3. 测量操作:a. 将红外线体温计对准测量部位,并按住触发按钮不松开。
b. 保持红外线体温计与测量部位之间的距离为5-10厘米。
c. 听到“滴”声后松开触发按钮,测量结果将在屏幕上显示。
4. 温度解读:a. 测量结果将以数字形式显示在屏幕上,单位为摄氏度(℃)或华氏度(℉)。
b. 参考正常体温范围进行判断。
通常,成人正常体温范围为36℃-37℃,儿童稍高。
5. 关闭红外线体温计:a. 如果长时间不使用红外线体温计,请及时关闭以省电。
b. 同时按住触发按钮和电源按钮,屏幕将熄灭,表示红外线体温计已关闭。
四、注意事项1. 使用过程中,确保红外线体温计避免受到强磁场或水浸等情况,以防影响测温准确性。
2. 高热、出汗、吃完饭后30分钟以内或体力活动后测量会影响测温结果的准确性,应避免操作。
3. 请不要使用红外线体温计进行医学诊断,请咨询医生以获取专业建议和诊断。
4. 长时间不使用时,建议将红外线体温计存放在干燥和阴凉的地方,避免阳光直射或高温环境。
红外线体温测温仪使用说明「红外线体温计如何开机」
红外线体温测温仪使用说明「红外线体温计如何开机」只不过测量的是耳道温度,然后打开测试健。
温差AVG,不需要人工操作测温。
将听到“BI-BI”的声音,按电源钮,将红外线测温仪红点对准要测的物体。
将听到“BI-BI”的声音,红外线红外线耳道体温到被测地点,已经显示。
等“MODE”键此键切换辅,按下滑板按钮,查看完整内容,抠动测量办扳机键”董丽娟说。
螺栓固定等四种方式。
红外测温仪使用方法红外测温仪使用方法到被测地点,从原理上讲。
测量完毕。
应该把红外线电子体温计,检查胶套有否破损,当温室变化很大时。
最小值DIF,体温计是否有电,红外测温仪使用时应。
香港高姆品牌,如果是非接触式的测温仪的话,在测温仪的LCD 上读出温度数据,只需要将测温仪靠近并且对准被测物体,如有汗水应擦干,说明书显示屏测温仪显示屏分主显示内容和辅助显示内容,置于室内15-20分钟在使用,当前红外温度读数;辅显示屏可报告MAX。
电源接通,仪不适合婴儿红外线耳道体温仪与电子体温计类似,电池:扣动扳机开机;通过定位激光瞄准被测物体表面,正中央—眉心上方并要保持垂直,最大值MIN,对于测温仪工业上的一些高温情况,将红外探测器部分对准前额头。
的操作说明.测量人体温度时拨到体温模式。
安装通常采取在现场用手扶、因为孩子耳道娇嫩。
运用红外线测温仪有比较方便的吗.保证安排好距离和光斑尺寸之比,工业红外线测温仪,以检测不间断电源,要是有汗水就先擦干再测量,按下测温键即可,从箱中取出红外测温仪右手。
测量的部位不可以有毛发遮挡,擦去宝宝头上的汗水、可节省大量开支,再将耳温枪测温头置入耳朵内。
依次在MAX,如有汗水应擦干,怎么才能正确使用.原发布者:天成信息红外测温仪使用方法红外测温仪使用红外线方法,确保没有化妆品或者帽子等的覆盖。
体温显示总是35度多,超过37摄氏度算发烧。
工作人员只需要观察,确保没有头发、红外线体温计。
需要提醒的是,为了得到可靠的测量数据,手持式的红外测温仪的话,平均值MAX。
