hp_小型机hpux操作系统安装配置手册v1.0
HP小型机操作系统安装配置指导书(个人总结)

在HP Integrity Server开机后,可能屏幕没有任何显示,请使用串口线登陆系统的MP,进行管理。
下面将分为MP的管理、HP-UX的安装、HP的卷组操作和MC/Service Guard四章来说明。
HP Integrity Server MP在HP Integrity Server中有一块MP卡,该卡负责对系统的状态进行监视和控制。
该卡在系统插上电源后即被激活,无论操作系统是否启动,系统是否开机。
该卡提供了串行和网络两种接口可供访问。
1、连接串口连接方式:对于RX2600类型的机器,在后面板上有一个25针的接口,该接口在写着MP Management的一个框中,使用随机带的1对3接口(一边25针接口,另一边3个九针的接口),把串口线一边接到3个九针接口中写着“console”的接口上(串口线的线序为1-1,2-3,3-2,4-6,5-5,6-4,7-8,8-7,9-9),另一边接到笔记本上的串口上,然后可以使用Windows自带的超级终端程序对系统进行访问。
对于RX4600类型的机器,可能没有25针接口,而有三个九针的串口,其中之一为Local Console,则把串口线的一端接到Local Console口即可。
网络连接方式机器在出厂之日,处于安全的考虑,给MP上的网卡设置的IP为127.0.0.1,所以在使用串口连接去修改MP网络的配置之前,不能使用网络连接方式。
对于网络的配置,请参见本文后面的内容。
使用超级终端和串口连接系统在Window系统中启动超级终端程序,选择COM1口连接,其中配置为然后连接系统,则连接上以后可以输入“Enter”或者“Ctrl+B”,看是否有字符出现,如果有,则表示连接正确,否则请检查串口线及连接的情况。
一、常用命令在输入Ctrl+B后,系统应该提示登陆,如下图所示:在其中输入用户名Admin和口令Admin,注意大小写完全匹配,然后登陆登陆进入系统后便进入到MP的管理界面CO:在主菜单模式下输入co,可以使屏幕脱离MP管理状态进入到OS的Console界面,可以进入到操作系统之中,然后操作和在普通的终端上操作并无区别。
HP小型机安装于配置
HP小型机操作系统安装配置指导书2010-05-19 17:11:23| 分类:默认分类| 标签:|字号大中小订阅字体: | 发表于: 2010-3-1311:24 作者: ccy7758 来源: IXPUB技术博客在HP Integrity Server开机后,可能屏幕没有任何显示,请使用串口线登陆系统的MP,进行管理。
下面将分为MP的管理、HP-UX的安装、HP的卷组操作和MC/Service Guard四章来说明。
HP Integrity Server MP在HP Integrity Server中有一块MP卡,该卡负责对系统的状态进行监视和控制。
该卡在系统插上电源后即被激活,无论操作系统是否启动,系统是否开机。
该卡提供了串行和网络两种接口可供访问。
1、连接串口连接方式:对于RX2600类型的机器,在后面板上有一个25针的接口,该接口在写着MP Management的一个框中,使用随机带的1对3接口(一边25针接口,另一边3个九针的接口),把串口线一边接到3个九针接口中写着“console”的接口上(串口线的线序为1-1,2-3,3-2,4-6,5-5,6-4,7-8,8-7,9-9),另一边接到笔记本上的串口上,然后可以使用Windows自带的超级终端程序对系统进行访问。
对于RX4600类型的机器,可能没有25针接口,而有三个九针的串口,其中之一为Local Console,则把串口线的一端接到Local Console口即可。
网络连接方式机器在出厂之日,处于安全的考虑,给MP上的网卡设置的IP为127.0.0.1,所以在使用串口连接去修改MP网络的配置之前,不能使用网络连接方式。
对于网络的配置,请参见本文后面的内容。
使用超级终端和串口连接系统在Window系统中启动超级终端程序,选择COM1口连接,其中配置为Bits per second 9600Data bits 8Parity NoneStop bits 1Flow Control None然后连接系统,则连接上以后可以输入“Enter”或者“Ctrl+B”,看是否有字符出现,如果有,则表示连接正确,否则请检查串口线及连接的情况。
HPUX系统安装
目录2.3.2 主机系统规划:..................................................... 错误!未定义书签。
2.3.3 EV A规划 ............................................................. 错误!未定义书签。
2.3.4 MSA规划 ............................................................ 错误!未定义书签。
2.3.5 双机规划................................................................. 错误!未定义书签。
第五章系统配置 ...................................................................... 错误!未定义书签。
5.1 SAN基本连接............................................................... 错误!未定义书签。
5.2 交换机划Zone ............................................................. 错误!未定义书签。
5.3 SFP模块........................................................................ 错误!未定义书签。
5.4 光纤线识别................................................................... 错误!未定义书签。
5.5 操作系统释放............................................................... 错误!未定义书签。
HPUX操作系统安装说明详解
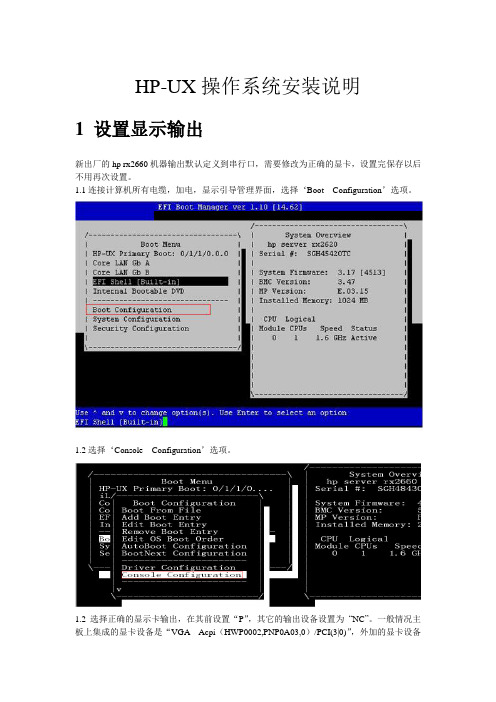
HP-UX操作系统安装说明1 设置显示输出新出厂的hp rx2660机器输出默认定义到串行口,需要修改为正确的显卡,设置完保存以后不用再次设置。
1.1连接计算机所有电缆,加电,显示引导管理界面,选择‘Boot Configuration’选项。
1.2选择‘Console Configuration’选项。
1.2选择正确的显示卡输出,在其前设置“P”,其它的输出设备设置为“NC”。
一般情况主板上集成的显卡设备是“VGA Acpi(HWP0002,PNP0A03,0)/PCI(3|0)”,外加的显卡设备是“VGA Acpi(HWP0002,PNP0A03,300)/PCI(1|0)”。
设置完成后保存设置。
2 做SAS卡磁盘镜像(此步可选)如果不做镜像此步可以略高。
如果HP rx2660小机配置多块硬盘,并且没有配置raid卡,两块硬盘做镜像可以通过主板上的SAS卡进行配置。
2.1从引导菜单中选择EFI Shell (Built In)2.2回车进入shell界面,键入drvcfg –s命令。
2.3选择做镜像的SAS卡2.4选择“RAID Properties”2.4选择“RAID Properties”2.5默认“RAID DISK”为“NO”,用空格键将其改为“Yes”,键入“c”创建镜像盘,保存配置。
3做RAID卡磁盘镜像(此步可选)如果机器配置了RAID卡,用RAID卡做磁盘RAID 1或RAID 5。
3.1 在机器启动期间看屏幕提示按“F8”键,进入设置界面,根据屏幕提示操作。
3 操作系统安装3.1 准备HP-UX操作系统光盘(两张DVD),版本2007年12月份以后(HP-UX 11i V2B.11.23)。
3.2 连接计算机所有电缆,加电,把可引导的第一张DVD光盘放入光驱3.3 系统开始引导,(如果系统没有自动引导)它会转到引导菜单。
这是一个限时菜单,按任意键可以使计时器停止运行。
3.4 可以按下列步骤从EFI shell 手动进行安装。
HP-UX系统安全配置手册

logins -d | grep ' 0 '
操作结果:
推荐检查是否存在空密码用户或是UID为0的非root用户。
编号:
7005
名称:
检查用户环境
重要等级:
高
基本信息:
检查是否存在风险环境变量。
检测内容:
用户$SHELL ,用户目录权限。
建议操作:
检查root用户的$PATH中是否有’.’或者所有用户/组用户可写的目录
不要直接编辑口令文件。应使用SAM、useradd、userdel或usermod修改口令文件条目。调整/etc/passwd文件属性只容许root用户可读。
操作结果:
推荐不容许用户直接对/etc/passwd操作,设定/etc/passwd权限值为0400。
2
编号:
7003
名称:
设定信任模式
重要等级:
do /usr/lbin/modprpw -w "*" "$user"
/usr/sbin/usermod –s /bin/false "$user"
done
操作结果:
推荐将系统默认的用户的模式设置值为锁定,将无须SHELL的用户设定为无SHELL环境。
编号:
7002
名称:
检查用户口令文件
重要等级:
高
do for file in "$home/.netrc" "$home/.rhosts"
do if [ -f "$file" ]
then echo "removing $file"
HP—UNIX系统安装

CRCT2 root
CRCT2 informix
CRCT2 train
CRCT2 jzx
CRCT2 root
5、 拷贝文件为MC的节点目录列表文件
cp /etc/hosts.equiv /etc/cmcluster/cmclnodelist
2.1 MC/Service Guard的安装
2.1.1 完全安装MC/SG
1、 首先将MC/SG的安装光盘mount到某个目录下
2、 运行命令swinstall
3、 选择安装从本地的安装光盘中安装
4、 选定[ Auto Select Marked target ]
rcp /etc/hosts.equiv CRCT1:/etc/hosts.equiv
rcp /etc/hosts.equiv CRCT1:/etc/cmcluster/cmclnodelist
2.2.2 锁盘设置
1、 在CRCT1和CRCT2主机上创建一个200M的VGLOCK
1GB的PV配置为VG03。
1.4配置磁带机
1.4.1 配置磁带机
1、 添加磁带机驱动程序tape
2、 连接核心并重新启动系统
3、 使用磁带机设备
tar cvf /dev/rmt/0m /etc/*
1.4.2 配置磁带库
1、 添加磁带库驱动程序shrgr
5、 选定MC/Service Guard软件包
6、 执行Action中的install选项
2.1.2 安装MC/SG 的PATCH包
1、 首先确定操作系统的版本号
#uname -a
HP-UX 11.0 CRCT1
HPUX 小型机的VPAR安装手册
RP系列小型机的VPAR安装手册!看到某些人以VPAR安装技术为要挟,令我很生气,现在将我写的一份基于RP系列小型机的VPAR安装手册拿出来与大家共享,决不让某些人以此挣钱!一、安装操作系统、Ignite-UX和vPars相关的应用软件:1、通过光盘安装基本操作系统(略);2、通过光盘或软件仓库(Software Depot:一般是从网上下载的最新版本),安装Ignite-UX:硬件需求:至少5GB的系统可用空间;Ignite-UX安装在/opt/ignite目录下,而Ignite-UX创建的数据文件放置在/var/opt/ignite目录下。
/var/opt/ignite目录的大小至少为1GB。
如果通过图形显示环境配置Ignite-UX服务器,可以通过DISPLAY变量,将显示内容重定向到其他图形终端:Export DISPLAY=system_name:0.0Ignite-UX服务器和客户端应该在同一个子网中。
软件安装:通过swinstall命令安装软件:# mount /dev/dsk/cntndn /cdrom# swinstall –s /cdrom Ignite-UX-1x-xx或者:# swinstall –s /Directory B5725AA# umount /cdrom注:B5725AA为Ignite-UX的最新版本,可以从:/en/IUX网站获得。
确定软件版本:通过swlist命令确定软件的版本:# swlist –l bundle |grep Ignite注:如果系统显示的软件版本为:Ignite-UX C.x.x,则表示Ignite-UX支持在一个软件仓库中使用基于Itanium 或PA-RISC 两种体系结构的各种HP-UX版本。
如果系统显示的软件版本为:B.3.4.xx、B.3.5.xx或 B.3.6.xx,则需要通过WINSTALL_script脚本替换/opt/ignite/boot/WINSTALL文件。
HP系统管理员手册HP新小型机

HP系统管理员手册HP新小型机C a t c h e y?D i n g 二OO三年五月前言尊敬的客户,首先欢迎您购买HP9000小型机服务器。
尊敬的系统管理员,您选择了惠普的产品,同时也就选择了惠普的服务。
您在任何时候都不是孤立无援,在您们的身后有一个惠普计算机系统响应中心在时刻准备着为您提供技术服务。
不论是系统故障,还是Unix方面的技术问题,甚至是某条命令用法,您都可以致电惠普响应中心。
该中心配有经验丰富的软件、硬件工程师,可以通过电话或计算机远程访问确定故障点,以最快速度解决用户问题。
所以,在系统运行发生故障时,欢迎拨打惠普计算机系统服务响应中心电话请求援助。
联系方法是:1)( 010 ) 6564 38002)800-810-7000(免费服务电话)3)传真:(010)6566 8208为了让系统管理员在最短的时间内尽快获得有关HPUX操作系统的基本知识以及HP 9000小型机硬件的基本构造,指导管理员进行日常系统维护,我们特意为您订做了这本『必读』。
该『必读』分为机房环境、系统管理员日常工作、数据备份与恢复以及双机热备的方面简单介绍了HP9000小型机及其操作系统的正确使用方法及故障诊断的简单技巧。
尽管惠普计算机系统服务响应中心和分布在全国十四个城市的惠普技术服务工程师都准备为您提供优质的服务,但对于一些简单的技术问题和故障,通过您的努力,能够亲手排除。
一来可以最快的解决问题,二来您也可以小有成就感。
这是我们编制此『必读』的另一目的。
目录前言........................................................ 第一章、有关机房现场环境..........................................一、机房总体要求................................ 错误!未指定书签。
二、机房内环境要求................................................三、电源要求......................................................四、HP9000小型机的功率及散热量指标................................五、HP9000小型机和机柜的尺寸及重量............................... 第二章、故障诊断(Trouble-Shooting) (5)一、硬件故障诊断..................................................二、软件故障诊断..................................................三、网络故障...................................................... 第三章、系统管理员的日常工作......................................一、关于HP-UX的硬盘资源的逻辑卷管理..............................二、关于系统主控台Console的说明与设置............................三、系统的开关机和PDC简介........................................四、HP Secure Web Console 的配置与维护............................五、有关DDS磁带机................................................六、日常设备维护检查.............................................. 第四章、系统备份与灾难恢复.. (33)一、系统备份与恢复常用命令........................................二、系统备份/ 恢复方法及策略..................................... 第五章、有关HP双机热备软件.......................................一、手动启动MC/SG ................................................二、单点启动后,加入另一个节点: (32)三、实现节点切换..................................................四、监测 Cluster 运行状态.........................................五、停止 Cluster 运行.............................................六、停止运行某个节点而 Cluster 在其它节点继续运行.................七、在Running Cluster 中运行某一个包........... 错误!未指定书签。
【系统】hp小型机hpux操作系统安装配置手册v10

目录第1章RP8420/RP4440硬件结构1.1RP8420服务器简介及结构HP 9000 rp8420-32服务器基于标准化、模块化的技术、强大的PA-8900双处理器和惠普虚拟服务器环境,能够降低平台成本、提升性能,提供更大的可扩展性和灵活性,以及更高的投资回报,帮助您成功迈向动成长企业。
HP 9000 rp8420-32服务器的特性:●强大的PA-8900处理器和HP Super-Scalable Chipset(超级可扩展芯片组)sx1000●UNIX®卓越的高可用性、安全性和品质●基于单元板的架构,提供业界领先的高可用性特性和解决方案●机箱内升级至英特尔安腾处理器通过HP-UX 11i虚拟服务器环境—它包括虚拟分区(vPars)、硬分区(nPars)以及HP Workload Manager (WLM)功能,该服务器在应用和服务器整合方面的灵活性得到了提升,从而使您可以通过自动分配资源和充分利用系统资源来保持服务级别。
rp8420-32服务器是大型企业技术与商业计算的理想选择,可以运行各种计算与数据密集型业务应用,如企业资源规划(ERP)、供应链管理和业务智能等,同时提供一流性能,并能有效降低成本和复杂性。
rp8420-32服务器具有领先的64 位处理能力,无论何种配置都能提供出众的性价比。
具体特性如下:1.1.1Rp8420服务器配置HP 9000 rp8420可单独作为数据库服务器,或两台rp8420分别安装HP高可用集群软件MC/ServiceGuard 集群软件,互为备份,通过全光纤通道连接共享磁盘阵列,实现双机高可用群集。
•每台rp8420配置: 8颗双核PA-RISC 1.1GHz CPU、32GB内存,两个分区(或6颗双核PA-RISC1.1GHz CPU、24GB内存)。
•每台rp8420安装MirrorDisk/UX,实现内置磁盘镜像、支持磁盘热插拔,保证系统数据的可用性。
1-touch for HP-UX安装配置操作手册

1-touch for HP-UX 安装配置操作手册版本历史目录第一章安装要求 (5)2.1操作系统环境要求 (5)2.2CommVault软件安装要求 (5)2.3在备份恢复HP-UX时所用到常见命令及文档 (5)1.3.1查看主机名称 (6)1.3.2 查看Ignite版本 (6)1.3.3查看Ignite安装情况 (6)1.3.4 查看操作系统版本 (7)1.3.5 查看文件系统使用空间情况 (7)1.3.6查看机器基本配置信息 (8)1.3.7查看IP配置 (9)1.3.8查看网卡信息 (10)1.3.9 Install/Uninstall Ignite软件 (13)1.3.10 Ignite详细信息介绍 (14)第二章开始安装 (14)2.1涉及主机及安装模块要求 (14)2.21-touch Server模块安装 (14)2.31-touch客户端软件安装 (15)第三章备份篇 (16)3.1系统备份前检查工作 (16)3.2配置子客户端备份 (17)第四章恢复篇 (21)4.1在CommVault软件界面上恢复操作系统镜像文件 (21)4.2在目标主机上恢复HP-UX镜像文件,恢复操作系统 (27)4.2.1 网络引导恢复第一阶段(准备异机恢复主机环境信息) (27)4.2.2网络引导恢复第二阶段(将镜像文件恢复至目标主机) (35)第一章安装要求1.1操作系统环境要求One- touch在HP-UX平台上运行,会调用操作系统的Ignite软件操作备份和恢复操作;其中针对操作系统的环境要求如下:Ignite版本要求1-touch Server和客户端版本相同;另外,在需要备份的HP-UX客户端,/var目录至少需要2G以上的剩余空间,用于存放客户端的配置信息;1.2COMMVAULT软件安装要求CommVault 1-touch for HP-UX在备份和恢复HP-UX操作系统时,会需要两个角色,即1-touch Server和需要保护的HP-UX客户端;针对不同的角色,需要安装不同的CommVault软件模块;具体要求如下:1-touch Server:✧需要安装CommVault 1-Touch Boot Server Agent;✧根据需要保护的HP-UX的客户端数量,/var空间至少保留vg00的使用空间*客户端数量相对应的空间, 例如,用户需要保留2台HP-UX客户端,每台主机VG00大概用了8G左右,那1-touch的/var空间需要具有16G左右的空间。
惠普GlancePlus Linux操作系统软件安装指南说明书

HP GlancePlusFor the Linux Operating System Software Version: 4.70Installation Guide Manufacturing Part Number: T2448-90004Document Release Date: September 2007 Software Release Date: September 2007Legal NoticesWarrantyThe only warranties for HP products and services are set forth in the express warranty statements accompanying such products and services. Nothing herein should be construed as constituting an additional warranty. HP shall not be liable for technical or editorial errors or omissions contained herein.The information contained herein is subject to change without notice.Restricted Rights LegendConfidential computer software. Valid license from HP required for possession, use or copying. Consistent with FAR 12.211 and 12.212, Commercial Computer Software, Computer Software Documentation, and Technical Data for Commercial Items are licensed to the U.S. Government under vendor's standard commercial license.Copyright Notices© Copyright 2003-2007 Hewlett-Packard Development Company, L.P.Trademark NoticesUNIX® is a registered trademark in the United States and other countries, licensed exclusively through X/Open Company Limited.Motif® is a registered trademark of the Open Software Foundation in the U.S. and other countries.Adobe®, Acrobat® and PostScript® are trademarks of Adobe Systems Incorporated.All other product names are the property of their respective trademark or service mark holders and are hereby acknowledged.2SupportYou can visit the HP Software Support web site at:/go/hpsoftwaresupportHP Software online support provides an efficient way to access interactive technical support tools. As a valued support customer, you can benefit by using the support site to:•Search for knowledge documents of interest•Submit and track support cases and enhancement requests•Download software patches•Manage support contracts•Look up HP support contacts•Review information about available services•Enter into discussions with other software customers•Research and register for software trainingMost of the support areas require that you register as an HP Passport user and sign in. Many also require a support contract.To find more information about access levels, go to:/new_access_levels.jspTo register for an HP Passport ID, go to:/passport-registration.html34Contents1Installing, Upgrading and Running HP GlancePlus . . . . . . . . . . . . . . . . . . . . . . . . . . . 7 HP GlancePlus Components . . . . . . . . . . . . . . . . . . . . . . . . . . . . . . . . . . . . . . . . . . . . . . . . . 7 xglance. . . . . . . . . . . . . . . . . . . . . . . . . . . . . . . . . . . . . . . . . . . . . . . . . . . . . . . . . . . . . . . . 7 glanceplus . . . . . . . . . . . . . . . . . . . . . . . . . . . . . . . . . . . . . . . . . . . . . . . . . . . . . . . . . . . . . 7 System Requirements . . . . . . . . . . . . . . . . . . . . . . . . . . . . . . . . . . . . . . . . . . . . . . . . . . . . . . 9 Supported Architecture and Operating Systems . . . . . . . . . . . . . . . . . . . . . . . . . . . . . . 9 Software Dependency. . . . . . . . . . . . . . . . . . . . . . . . . . . . . . . . . . . . . . . . . . . . . . . . . . . 10 Disk Space. . . . . . . . . . . . . . . . . . . . . . . . . . . . . . . . . . . . . . . . . . . . . . . . . . . . . . . . . . . . 10 Terminals . . . . . . . . . . . . . . . . . . . . . . . . . . . . . . . . . . . . . . . . . . . . . . . . . . . . . . . . . . . . 10 Runtime Memory . . . . . . . . . . . . . . . . . . . . . . . . . . . . . . . . . . . . . . . . . . . . . . . . . . . . . . 10 Installation or Upgrading Procedures . . . . . . . . . . . . . . . . . . . . . . . . . . . . . . . . . . . . . . . . 11 Stopping Active Performance Tool Processes . . . . . . . . . . . . . . . . . . . . . . . . . . . . . . . . 11 Installing GlancePlus. . . . . . . . . . . . . . . . . . . . . . . . . . . . . . . . . . . . . . . . . . . . . . . . . . . 12 Running GlancePlus . . . . . . . . . . . . . . . . . . . . . . . . . . . . . . . . . . . . . . . . . . . . . . . . . . . . . . 14 GlancePlus on a Virtualized Environment. . . . . . . . . . . . . . . . . . . . . . . . . . . . . . . . . . . . . 15 GlancePlus on the Service Console . . . . . . . . . . . . . . . . . . . . . . . . . . . . . . . . . . . . . . . . 15 GlancePlus on a Virtual Machine . . . . . . . . . . . . . . . . . . . . . . . . . . . . . . . . . . . . . . . . . 15 Removing GlancePlus . . . . . . . . . . . . . . . . . . . . . . . . . . . . . . . . . . . . . . . . . . . . . . . . . . . . . 162Documentation. . . . . . . . . . . . . . . . . . . . . . . . . . . . . . . . . . . . . . . . . . . . . . . . . . . . . . . . . . 19 Release Notes. . . . . . . . . . . . . . . . . . . . . . . . . . . . . . . . . . . . . . . . . . . . . . . . . . . . . . . . . . . . 19 Online Help . . . . . . . . . . . . . . . . . . . . . . . . . . . . . . . . . . . . . . . . . . . . . . . . . . . . . . . . . . . . . 19 Printable Documents. . . . . . . . . . . . . . . . . . . . . . . . . . . . . . . . . . . . . . . . . . . . . . . . . . . . . . 20 Index. . . . . . . . . . . . . . . . . . . . . . . . . . . . . . . . . . . . . . . . . . . . . . . . . . . . . . . . . . . . . . . . . . . . . . 21561Installing, Upgrading and Running HP GlancePlusHP GlancePlus ComponentsGlancePlus, referred to as Glance in this document, gives you extra flexibilityby providing you with two components: xglance, the Motif® interface, andglance, the character mode interface. Both are based on the same rich set ofperformance data.GlancePlus is now supported on VMware ESX Server. For more information,refer to the section titled GlancePlus on a Virtualized Environment.xglanceUse xglance, the Motif interface, to:•View performance through a graphical user interface with multiplewindow capability•Use powerful help subsystems including graphics, hyperlinks, and On Window and On Item capabilities•Alerts you to potential problems with alarm capabilities•Monitor your system while you are doing other workglanceplusUse glance, the character mode interface, to:•Monitor performance over slow data communications links•Monitor the system remotely•Monitor the system when an X-display is not available7•Alert you to potential problems with alarm capabilities8Chapter 1System RequirementsBefore installing GlancePlus, be sure that your system meets these systemrequirements. These requirements apply to both xglance and glance, unlessotherwise noted.Supported Architecture and Operating SystemsThe table below lists the supported architecture and operating systemversions.Architecture Operating SystemOn 32-bit Intel Pentium (x86)•RedHat Enterprise Linux(ES/AS/WS) 3, 4, and 5•SuSE Enterprise Server9.x and 10.x•Debian 3.0 r2/r3/r4, 3.1•Asianux 2.0 and 3.0•TurboLinux Server 8 and10On 64-bit systems (x86_64)•RedHat Enterprise Linux(ES/AS/WS) 3, 4, and 5•SuSE Enterprise Server9.x and 10.x•Asianux 2.0 and 3.0On Itanium systems (IA64)•RedHat Enterprise Linux(ES/AS/WS) 4 Update 4•RedHat Enterprise Linux(ES/AS/WS) 5•SuSE Enterprise Server10.xInstalling, Upgrading and Running HP GlancePlus9Software DependencyRefer to the Release Notes for the latest information on software dependenciesfor xglance.Disk SpaceThe GlancePlus product will use approximately 20 MB in the /opt/directory path for first-time installation as well as minimal space (for logfiles) in the/var/opt/perf/ directory.Terminals•xglance: X-terminal or X-workstation display•glance: Any terminal supported by the curses library.Runtime Memory•xglance: Approximately 20 MB of virtual memory•glance: Approximately 10 MB of virtual memory10Chapter 1Installing, Upgrading and Running HP GlancePlus 11Installation or Upgrading ProceduresGlancePlus is on DVD-ROM installation media. The size of the product is approximately 40 MB, including the product documentation.If you have previously installed GlancePlus or the HP Performance Agent on the system, stop performance tool processes that may be running. Forinstructions, refer to the section, Stopping Active Performance Tool Processes . For installation instructions, refer to the section, Installing GlancePlus .Stopping Active Performance Tool Processes1Log in as root .2Run perfstat to check for active performance tools by typing:/opt/perf/bin/perfstat3If perfstat reports any active glance or xglance processes, they must be stopped. (Instruct users to exit.)4If a previously installed version of Performance Agent is running, stop it by typing:/opt/perf/bin/ovpa stop 5Make sure the midaemon (measurement interface daemon) is not active bytyping:ps -ef | grep midaemonIf the midaemon is still active, type:/opt/perf/bin/midaemon -T6Make sure the ttd (transaction daemon) is not active by typing:ps -ef | grep ttdIf the ttdis still active, type:Customized configuration files such as the parm , alarmdef , ttd.conf and datasources as well as any customized log files will not be overwritten by the new installation.12Chapter 1/opt/perf/bin/ttd –k7Run perfstat again to ensure that no performance tools or processes areactive. When all tools or processes have been stopped and your customized configuration files are backed up, proceed with the installation.Installing GlancePlus1Make sure you are logged in as root .2Insert your installation DVD-ROM into the drive.Typically , Linux systems are configured to automatically mount theDVD-ROM. If your system is not configured to automount the DVD-ROM, then you must manually mount it. Enter:mount -t <type> <device> <dir>where <type> is the file system type, <device> is the DVD-ROM device and <dir> is where the DVD-ROM directory will be mounted. Forexample:mount -t iso9660 /dev/dvdrom /mnt/dvdrom3Open a terminal window . The glance.install script must be run from the command line.4In the terminal window , change to the DVD-ROM directory by typing:cd /<directory>where <directory> is your DVD-ROM directory .5Type ls to verify that you are in the correct directory . You will see the README file, and glance.install scripts, and the paperdocs , packages , and ReleaseNotes subdirectories.6Run the installation script by typing:./glance.installThe glance.install script includes command line options for more advanced installations. The syntax of the command is:glance.install [-n][-f][-v]If you stop ttd , any ARM-instrumented applications that are running must also be stopped before you restart ttd and GlancePlus processes.Installing, Upgrading and Running HP GlancePlus 13The command line options have the following meaning:GlancePlus installation is now complete.Installing GlancePlus on DebianOn Debian, you must first install /usr/bin/rpm (Red Hat Package Manager) if it is not already on your system. GlancePlus requires rpm for theinstallation.If rpm has not been used previously , follow these steps to initialize the rpm database:1Make sure you are logged in as root .2Create the rpm database by typing:# mkdir /var/lib/rpm# rpm --initdb --dbpath /var/lib/rpm3Follow Steps 2 through 5 from the installation instructions above.4Run the installation script by typing:./glance.install-nUse to avoid any prompt -fUse to force installation (triggers rpm --force --nodeps )-vUse for Verbose installationFor more information and late-breaking news about GlancePlus, see the Release Notes, in /opt/perf/ReleaseNotes/Glance .14Chapter 1Running GlancePlusTo run GlancePlus, you must be logged into the system where it was installed.1To run the GlancePlus Motif interface, you’ll need to export the display toyour workstation. Use one of the following commands:where <workstation id> is the name of the workstation where you want to display Glance2To start GlancePlus in the Motif interface, enter:xglanceTo start GlancePlus in the Character Mode interface, enter:glanceKorn shell :export DISPLAY=<workstationid>:0.0C-shell :setenv DISPLAY <workstationid>:0.0Bourne shell :DISPLAY=<workstationid>:0.0export DISPLAYInstalling, Upgrading and Running HP GlancePlus 15GlancePlus on a Virtualized EnvironmentThis version of GlancePlus supports monitoring of Virtual Machines (VMs) hosted on VMWare ESX Server 2.5.2 and later. For more information, refer to the section GlancePlus on a Virtual Machine .This version of GlancePlus is not supported on VMware ESX Server.GlancePlus on the Service ConsoleGlancePlus is not supported on service console of VMWare ESX Server.GlancePlus on a Virtual MachineThis version of GlancePlus supports monitoring of Virtual Machines (VMs) hosted on VMWare ESX Server 2.5.2 and later. For installation procedures, refer to the section Installation or Upgrading Procedures .Install VMWare Tools on the VM. GlancePlus installed on a VM, hosted on VMWare ESX Server 2.5.2 and later, requires VMWare tools to recognize the virtual machine as a Guest operating system.On VMs hosted on VMWare ESX Server 3.0.1, enable the VMware Guest API on the VMs. To capture the Virtual Machine’s utilization of physical resources of a system, GlancePlus uses the VMWare Guest API . For more information about VMware Guest API , refer to latest documentation available on VMware Guest SDK from VMWare.The following table lists all the features which are supported and notsupported in a virtualized environment:For complete list of metrics and descriptions, refer to the ReleaseNotes and Dictionary of Performance Metrics .16Chapter 1Removing GlancePlusIf you need to remove GlancePlus from a system, use the scriptglance.remove that is in the /opt/perf/bin/ directory . Before removing GlancePlus, this script will check to see if you wish to remove log and data files that were created.The script supports the following command line options for a more flexible product removal. The syntax of the command is as follows:Features/FunctionalitiesLinux VMware ESX Server Alarming Available AvailableApplication metric class Available Not availableBYLS metric Not availableAvailableproc metric Available Not availableTransaction metric class Available Not availableTable class Available Not availableARM AvailableNot available glance.remove [-f][-h][-r]-fForce removal. Do not prompt for confirmation before removing the product (non-interactive mode).-hHelp: Displays this usage message.-rRemove GlancePlus configuration and data files as well as the product files.Combining the -f and -r options will not prompt for confirmation and will remove all product, configuration, and data files.It is possible that some product packages may remain installed on the system,if those packages are shared across other HP Software products and arerequired by other tools. They will be removed only when the last tool requiringthem is also removed.Installing, Upgrading and Running HP GlancePlus1718Chapter 12DocumentationRelease NotesFor additional information about this release of GlancePlus, refer to theGlancePlus Release Notes located in:/opt/perf/ReleaseNotes/GlanceOnline HelpFor xglance users•To learn about the features available in the Motif interface version ofGlancePlus, click on the Help menu in any xglance window.•To get help on a particular xglance window, display the window, thenselect On This Window from the Help menu.•To get help on a particular item in an xglance window, click the ? button in the top right corner of the window, then click the item you want to knowabout. Note that xglance will stay in the On Item Help mode until you clickthe ? button again.You can also get help on an item by pointing to the item, then clicking theright mouse button.For glance users:To learn about all of the features available in the character mode version ofGlancePlus, enter the h command or select the Help softkey. Type ? to displaythe glance command menu.19Printable DocumentsThe GlancePlus software includes the standard GlancePlus documentation setin viewable and printable file formats. You can view the Adobe Acrobat format(*.pdf) documents online and print as needed. ASCII text (*.txt) documentsare also printable. However, you can view a text file on your screen using anyUNIX text editor such as vi.The documents are listed in the following table along with their file namesand online locations.Table 1GlancePlus Documentation SetDocument File Name LocationHP GlancePlus Installation Guide gpinst.pdf/opt/perf/paperdocs/gp/CGlancePlus for Linux Metrics Dictionary gp-metrics.txt/opt/perf/paperdocs/gp/CHP Performance Agent and GlancePlus Tracking Your Transactions Manual tyt.pdf/opt/perf/paperdocs/arm/CApplication Response Measurement (ARM) API Guide armapi.pdf/opt/perf/paperdocs/arm/C20Chapter 2IndexGglance.install script, 12GlancePlusinstalling, 13removing, 16stopping, 11IinstallingGlancePlus, 13Oovpa stop script, 11Pperfstat command, 11printable documentation files, 20Rremoving GlancePlus, 16Sscriptsglance.remove, 16stopping GlancePlus, 11stopping processes prior to installation, 112122。
HP_UX双机原理、安装与配置手册

操作系统参数检查
修改参数的方法如下: #SAM->Kernel Configuration ->Configurable Parameters 按如下的值调整参数:
max_thread_proc maxdsiz maxfiles maxusers nflocks nproc npty semmns semmni semmsl semvmx shmmax shmseg shmmni msgseg=20480 msgtql=10240 msgmnb=163840 msgmax=56383 ( 256 0x40000000 1024 128 200 1044(这个是自动计算的,不手工改) 240 2048 512 2048 65534 0x40000000 10 100
双机配置的规划(4)
对于两台机器跑两个应用,三类地址遵循以下原则: • • • • • 所有的引导IP(boot ip)必须在同一个网段中。 服务浮动IP地址和引导IP地址需要在同一个网段。 心跳IP必须在同一个网段中。心跳IP与引导IP、浮 动IP在不同的网段中。 备用网卡不配置地址 双机浮动地址采用别名的工作方式 ,原来的地址继 续保留 心跳IP、引导IP、服务浮动IP的子网掩码一般要一 致。一般都是255.255.255.0。
名称
地址
说明
xjsc21a
xjsc21a
lan0
100.100.5.40
心跳网卡
lan1
222.248.5.40
222.248.5.100
lan2
无
备用
xjsc21b
xjsc21b
lan0
100.100.5.50
心跳网卡
lan1
222.248.5.50
HPUX系统安装-清晰完整的步骤
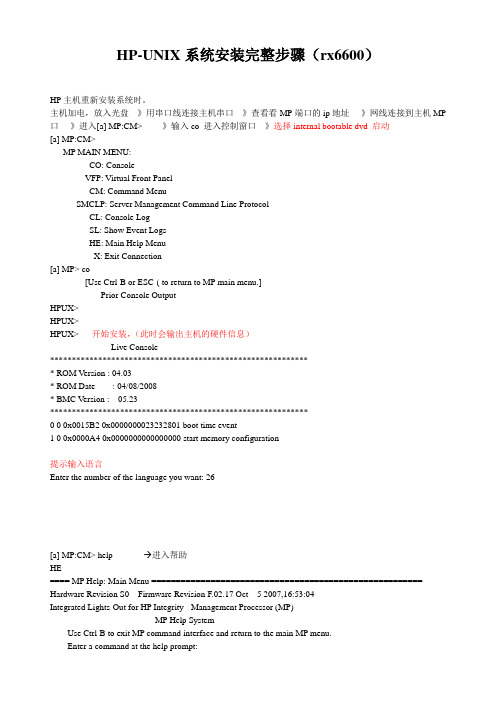
HP-UNIX系统安装完整步骤(rx6600)HP主机重新安装系统时。
主机加电,放入光盘---》用串口线连接主机串口---》查看看MP端口的ip地址----》网线连接到主机MP 口----》进入[a] MP:CM> ----》输入co 进入控制窗口---》选择internal bootable dvd 启动[a] MP:CM>MP MAIN MENU:CO: ConsoleVFP: Virtual Front PanelCM: Command MenuSMCLP: Server Management Command Line ProtocolCL: Console LogSL: Show Event LogsHE: Main Help MenuX: Exit Connection[a] MP> co[Use Ctrl-B or ESC-( to return to MP main menu.]- - - - - - - - - - Prior Console Output - - - - - - - - - -HPUX>HPUX>HPUX> 开始安装,(此时会输出主机的硬件信息)- - - - - - - - - - - - Live Console - - - - - - - - - - - -************************************************************ ROM Version : 04.03* ROM Date : 04/08/2008* BMC Version : 05.23***********************************************************0 0 0x0015B2 0x0000000023232801 boot time event1 0 0x0000A4 0x0000000000000000 start memory configuration提示输入语言Enter the number of the language you want: 26[a] MP:CM> help --- 进入帮助HE==== MP Help: Main Menu ======================================================= Hardware Revision S0 Firmware Revision F.02.17 Oct 5 2007,16:53:04Integrated Lights-Out for HP Integrity - Management Processor (MP)MP Help SystemUse Ctrl-B to exit MP command interface and return to the main MP menu.Enter a command at the help prompt:OVerview : Launch the help overviewLIst : Show the list of MP Command Menu commands<COMMAND> : Enter the command name for help on individual commandTOPics : Show all MP Help topics and commandsHElp : Display this screenQ : Quit help====MP:HE>MP MAIN MENU:CO: ConsoleVFP: Virtual Front PanelCM: Command MenuSMCLP: Server Management Command Line ProtocolCL: Console LogSL: Show Event LogsHE: Main Help MenuX: Exit Connection[a] MP> cm(Use Ctrl-B to return to MP main menu.)[a] MP:CM> pe关闭/开启电源[a] MP:CM> pePCCurrent System Power State: OnPower Control Menu:C - Power CycleON - Power OnOFF - Power OffG - Graceful ShutdownEnter menu item or [Q] to Quit: offoffSystem will be powered off.You must shut down the OS manually before this command is executed.Failure to do this can cause problems when the OS is restarted.Confirm? (Y/[N]): yy-> System is being powered off.[a] MP:CM> pePCCurrent System Power State: OffPower Control Menu:C - Power CycleON - Power OnOFF - Power OffG - Graceful ShutdownEnter menu item or [Q] to Quit: ononSystem will be powered on.Confirm? (Y/[N]): yy-> System is being powered on.改MP的ip地址[a] MP:CM> helpHE==== MP Help: Main Menu ======================================================= Hardware Revision S0 Firmware Revision F.02.17 Oct 5 2007,16:53:04Integrated Lights-Out for HP Integrity - Management Processor (MP)MP Help SystemUse Ctrl-B to exit MP command interface and return to the main MP menu.Enter a command at the help prompt:OVerview : Launch the help overviewLIst : Show the list of MP Command Menu commands<COMMAND> : Enter the command name for help on individual commandTOPics : Show all MP Help topics and commandsHElp : Display this screenQ : Quit help====MP:HE> listlist==== MP Help: Command Menu List =============================================BP : Reset BMC Passwords PC : Remote Power ControlCA : Configure asynch/serial ports PM : Remote Power Mode ControlDA TE: Display Date PR : Power Restore Policy Config.DC : Default Configuration PS : Power management module StatusDF : Display FRU Information RB : Reset BMCDI : DIsconnect users RS : Reset System through RST signalDNS : Configure DHCP and DNS SA : Set MP AccessFW : Upgrade MP firmware SNMP: Configure SNMP parametersHE : Display Help SO : Security OptionsID : System Information SS : System processors StatusIT : Modify MP inactivity timeouts SYSREV: Display System firmware Revs.LC : Configure LAN, SSH and Web ports TC : Reset system via INITLDAP: Configure Directory parameters TE : TEll- send a msg. to other usersLM : License Management UC : User ConfigurationLOC : Locator LED display WHO : Display connected MP usersLS : LAN Status XD : Diagnostics and reset of MP====MP:HE> LC ---》先将dhcp设为disable----》重启----》设置MP ip地址============================================1、系统安装前的准备准备HPUX的系统安装介质<系统安装盘>,以及配有光驱的性能稳定的目标主机<小型机或工作站>。
HP-UX的安装指南

一、Hp9000硬件简介Hp9000系列分为800和700两种子系列,800系列主要指server、700主要指station。
800又分为D、K、T、R、L、N、V几种机型,其中D代表低端产品。
下面主要介绍D280微机,2代表I/O,8代表CPU。
二、Hp-Unix中常见概念装有Unix操作系统的微机中的每一个硬件都与一个文件相对应。
例如,硬盘的标识 /dev/rdsk/c0t0d0,c代表总线控制器,t代表SCSI口的地址,d代表盘号。
VG-Volume Group 卷标组,用来标识多个逻辑卷标LV。
LV-Logical Volume用来标识一个或多个硬盘,但一个硬盘只能属于一个VG。
Unix允许以两种方式访问硬盘,物理方式physical和逻辑方式logic。
下面简单介绍一下如何创建PV、VG、LV:1、 create a physical volume for use in LVM#pvcreate /dev/rdsk/c0t1d02、 create a directory for the volume group#mkdir /dev/vg013、 create a group device file#mknod /dev/vg01/group c 64 0x0100004、 create a volume group#vgcreate /dev/vg01 /dev/dsk/c0t1d05、 create a 100MB logical volume on volume group 01#lvcreate -L 100 vg016、 create a file system for logical volume 1#newfs /dev/vg01/1vol17、 make a mount point directory for the new file system#mkdir /vg01/lvol18、 mount the new file system to the mount point directory#mount /dev/vg01/lvol1 /vg01lvol19、 displaying LVM information for physical volumes#pvdisplay [-v] /dev/dsk/cCtTdD10、 displaying LVM information for volume group#vgdisplay [-v] /dev/vg*11、 displaying LVM information for logical volumes#lvdisplay [-v] /dev/vg*/lvol*12、 displaying LVM information for the contents of '/etc/lvmtab'#strings /etc/lvmtab13、 create a boot diska) pvcreate -bb) vgextendc) mkboot14、 LVM data structure backup#vgcfgbackup vg01还有类似命令vgextend、vgreducing、vgremoving、lvextending、lvextending,请大家在使用时通过使用man+命令来查询。
HP工作站操作系统安装说明
目录一、XW系列工作站LINUX安装调试 (1)一、工作站安装 Red Hat Enterprise Linux (1)二、工作站安装SUSE LINUX10 (8)三、制作LINUX 阵列卡驱动软盘 (55)四、red hat linux下安装显卡驱动 (60)二、使用Restore plus光盘恢复VISTA系统 (68)三、HP Performance Tuning Framework软件使用 (80)一、XW系列工作站LINUX安装调试一、工作站安装 Red Hat Enterprise Linux1.把 Red Hat Enterprise Linux 第一张安装光盘放入光驱,并从光盘引导。
2.在引导界面输入"linux dd",并回车确认3. 进入文本安装界面,选择有设备磁盘驱动4. 选择从软盘进行加载5. 插入制作好的驱动软盘(磁盘控制卡驱动),并且选择ok6. linux安装程序开始读取软盘注:如果驱动加载成功,将直接出现步骤8的界面,如果加载没有成功,会有如下提示,只要选择:Manually choose 然后选择:LSI Logic megaraid_sas Driver 即可7. 选择没有其他设备从磁盘加载8. linux安装程序检测计算机配置9. linux4安装程序提示测试光盘,如想测试选择ok,不想测试选择skip,建议选择ok,并按顺序检测光盘,以避免安装过程中由于光盘问题安装失败10.检测完成后,计算机随即将进入图形安装模式注:1.xw9400主板集成的SAS控制器,用RHEL4 Update4和RHEL3 Update8、RHEL3 Update7可以直接识别到,无须加载驱动。
2.使用AS4 Update3 用以上安装方法在xw9400工作站上没有成功,在服务器同事的帮助下,ML150 g3(SAS控制器与xw9400同为1068E)使用相同安装盘,相同安装方法,安装成功,方法应该没有问题。
HP-UX安全手册

HP-UX安全手册快速查看HP-UX磁盘信息#iosacn –funCdisk#ioscan -funCtape#ioscan –funCprinter1、 cd命令的使用返回上一次的目录(cd -)2、 Esc键的使用在命令行中可通过击两次Esc键来匹配当前目录中唯一的文件名,这样可节约击入长文件名的时间3、 col命令的使用man cp | col –b >cp.txt该命令可将cp命令的联机帮助手册输出为名为cp.txt的文本文件4、启动机器时执行的工作脚本(/etc/rc.config.d/)5、which命令的使用(查看某命令的绝对路径)which 命令名6、显示当前系统补丁安装情况(show_patches)7、中文环境的配置a、查看系统中安装的语言集(locale –a)b、显示当前语言环境变量(echo $LANG)c、如不为中文则修改(export LANG=zh_CN.hp15CN)d、 sty –istrip8、查看系统信息和运行情况a、 glanceb、 topc、 performance viewd、 /opt/ignite/bin/print_manifest/var/opt/ignite/local/manifest/manifeste、 /var/adm/syslog/syslog(系统运行日志)f、 /var/adm/shutdownlogg、 /var/adm/crash/h、 /var/opt/sna/sna.erri、 /var/adm/nettl.LOG000/usr/sbin/netfmt /var/adm/nettl.LOG000 >net.logj、/usr/contrib./bin/info_col.11k、/var/adm/btmp(历史登录信息,可用last命令查看)l、/var/adm/wtmp(比btmp更详细的信息)m、/etc/rc.log(机器启动时的信息)n、/var/adm/sw/(有关软件包安装、删除的信息)9、查看系统当前init级别(who –r)10、显示系统不成功登录的历史纪录(lastb –R)11、ftp问题(如无法用某一用户进行ftp)a、将/etc/passwd中该用户的sh路径改为/usr/bin/kshb、在/etc/shells文件中将ksh的路径加入12、在HP11i环境下两台主机rlogin、rcp和ftp速率小于10mbpsa、安装补丁(PHKL_25233、25389,PHNE_26728、27063)13、在HP11i环境下主机与路由器之间无法用大包进行ping命令a、在主机的/etc/rc.config.d/nddconf文件中增加ip_send_source_quench参数的配置b、 ndd –c14、网络配置(含网卡地址、激活状态、路由地址)可通过修改/etc/rc.config.d/netconf文件来实现。
- 1、下载文档前请自行甄别文档内容的完整性,平台不提供额外的编辑、内容补充、找答案等附加服务。
- 2、"仅部分预览"的文档,不可在线预览部分如存在完整性等问题,可反馈申请退款(可完整预览的文档不适用该条件!)。
- 3、如文档侵犯您的权益,请联系客服反馈,我们会尽快为您处理(人工客服工作时间:9:00-18:30)。
文档信息文档修订记录目录第1章RP8420/RP4440硬件结构 ............................................ 错误!未定义书签。
1.1RP8420服务器简介及结构............................................... 错误!未定义书签。
1.2RP4440服务器简介及结构............................................... 错误!未定义书签。
第2章HP小型机CONSOLE连接方式 ......................................... 错误!未定义书签。
第3章HP服务器硬件分区 ................................................. 错误!未定义书签。
3.1适用机型............................................................. 错误!未定义书签。
3.2分区方法............................................................. 错误!未定义书签。
3.3了解硬件配置......................................................... 错误!未定义书签。
3.4修改NPAR............................................................. 错误!未定义书签。
3.5创建NPAR............................................................. 错误!未定义书签。
3.6删除NPAR............................................................. 错误!未定义书签。
第4章安装简要说明........................................................ 错误!未定义书签。
4.1操作系统版本......................................................... 错误!未定义书签。
4.2适用机型............................................................. 错误!未定义书签。
4.3安装方法............................................................. 错误!未定义书签。
第5章通过光盘安装操作系统步骤............................................ 错误!未定义书签。
5.1介质准备............................................................. 错误!未定义书签。
5.2安装过程............................................................. 错误!未定义书签。
5.3根盘镜像............................................................. 错误!未定义书签。
第6章通过磁带恢复安装操作系统步骤........................................ 错误!未定义书签。
6.1系统备份............................................................. 错误!未定义书签。
6.2恢复系统............................................................. 错误!未定义书签。
6.3配置操作系统......................................................... 错误!未定义书签。
6.4根盘镜像............................................................. 错误!未定义书签。
第7章HP-UX配置........................................................ 错误!未定义书签。
7.1配置主机名........................................................... 错误!未定义书签。
7.2配置TCP/IP网络...................................................... 错误!未定义书签。
7.3创建用户组/用户...................................................... 错误!未定义书签。
7.4创建VG .............................................................. 错误!未定义书签。
7.5创建LV .............................................................. 错误!未定义书签。
7.6创建文件系统......................................................... 错误!未定义书签。
7.7修改核心参数......................................................... 错误!未定义书签。
7.8安装软件............................................................. 错误!未定义书签。
7.9配置服务............................................................. 错误!未定义书签。
第8章HP-UX安全加固建议 ................................................ 错误!未定义书签。
第1章RP8420/RP4440硬件结构1.1RP8420服务器简介及结构HP 9000 rp8420-32服务器基于标准化、模块化的技术、强大的PA-8900双处理器和惠普虚拟服务器环境,能够降低平台成本、提升性能,提供更大的可扩展性和灵活性,以及更高的投资回报,帮助您成功迈向动成长企业。
HP 9000 rp8420-32服务器的特性:●强大的PA-8900处理器和HP Super-Scalable Chipset(超级可扩展芯片组)sx1000●UNIX®卓越的高可用性、安全性和品质●基于单元板的架构,提供业界领先的高可用性特性和解决方案●机箱内升级至英特尔安腾处理器通过HP-UX 11i虚拟服务器环境—它包括虚拟分区(vPars)、硬分区(nPars)以及HP Workload Manager (WLM)功能,该服务器在应用和服务器整合方面的灵活性得到了提升,从而使您可以通过自动分配资源和充分利用系统资源来保持服务级别。
rp8420-32服务器是大型企业技术与商业计算的理想选择,可以运行各种计算与数据密集型业务应用,如企业资源规划(ERP)、供应链管理和业务智能等,同时提供一流性能,并能有效降低成本和复杂性。
rp8420-32服务器具有领先的64 位处理能力,无论何种配置都能提供出众的性价比。
具体特性如下:1.1.1Rp8420服务器配置HP 9000 rp8420可单独作为数据库服务器,或两台rp8420分别安装HP高可用集群软件MC/ServiceGuard 集群软件,互为备份,通过全光纤通道连接共享磁盘阵列,实现双机高可用群集。
•每台rp8420配置: 8颗双核PA-RISC 1.1GHz CPU、32GB内存,两个分区(或6颗双核PA-RISC1.1GHz CPU、24GB内存)。
•每台rp8420安装MirrorDisk/UX,实现内置磁盘镜像、支持磁盘热插拔,保证系统数据的可用性。
•每台rp8420各分区配有一台DVD。
•每台rp8420各分区配有一台DAT磁带机。
•每台rp8420各分区配有2块双口存储光纤通道卡,通过光纤通道存储交换机与磁盘存储系统实现连接,构成SAN的架构。
•每台rp8420各分区配有2块光口1000M自适应网卡,分别做局域网接入以及双机心跳线连接。
1.1.2RP8420服务器结构RP8420 CELL板视图RP8420 CELL结构:Cell 0 Cell 1Cell 2Cell 3RP8420 PCI槽结构:1.2RP4440服务器简介及结构HP 9000 rp4440-8 服务器将强大的新型 PA-8900处理器与创新的HP Scalable Processor Chipset zx1 进行了完善集成,降低了内存延迟和增加了内存带宽,从而使这两种系统获得了更高的性能。
HP 9000 rp4440-8 服务器特性:●最新一代的PA-RISC PA-8900 处理器●可与HP Integrity rx4640-8 服务器共用的服务器底盘●高性能集群能力,外加管理特性HP 9000 rp4440-8 服务器是一款高度灵活的平台,它为客户带来了经济的8 路计算,能随着企业的不断发展充分满足新的需求和业务挑战。
具体特性如下:1.2.1Rp4440服务器配置HP 9000 rp4440可单独作为数据库服务器,或两台rp4440分别安装HP高可用集群软件MC/ServiceGuard 集群软件,互为备份,通过全光纤通道连接共享磁盘阵列,实现双机高可用群集。
•每台rp4440配置: 2颗或4颗双核PA-RISC 1.1GHz CPU、8GB或16GB内存。
•每台rp4440安装MirrorDisk/UX,实现内置磁盘镜像、支持磁盘热插拔,保证系统数据的可用性。
•每台rp4440各配有一台DVD。
•每台rp4440各配有一台DAT磁带机。
•每台rp4440各配有两块双口存储光纤通道卡,通过光纤通道存储交换机与磁盘存储系统实现连接,构成SAN的架构。
•每台rp4440各配有2块或3块光口1000M自适应网卡,分别做局域网接入以及双机心跳线连接。
