喜多力喷码机接口资料说明 Ci系列
多米诺:”喜多力”系列喷码机全面登陆中国市场
多米诺:”喜多力”系列喷码机全面登陆中国市场作者:暂无来源:《食品安全导刊》 2010年第4期□本刊记者闫燕提到多米诺,业内朋友都会不约而同的称赞其“Domino”品牌系列产品的高质量、高稳定性、高附价值和完善的售后服务。
“Domino”品牌产品一直以来给业内的印象都是定位于中高端市场的产品。
实际上,多米诺集团旗下拥有多品牌系列产品,“Citronix”便是其中之一。
面对中国市场的不断发展,以及用户需求的多元化,多米诺在2010年做出了市场战略的重大调整,将源自美国的连续式小字符喷码机著名品牌“Citronix”系列产品引入中国,并冠以极富中国色彩的中文品牌名“喜多力”。
与“Domino”品牌的定位有所不同,“喜多力”主要面向中低端用户。
多米诺标识科技有限公司销售市场总监项敏介绍说:“喜多力致力于设计和制造连续式小字符喷码机已超过20年,其产品可广泛应用于各类生产线上的标识生产。
在保持与Domino品牌产品的品质、服务水准一致的基础之上,彰显了更经济、实惠的特点,以满足不同行业对喷码机产品的基本需求。
”喜多力ci系列产品喜多力喷码机可广泛应用于各个行业,包括食品、饮料、造纸、日用百货、建材、制药、汽配和邮政行业。
喜多力ci系列连续式小字符喷码机是新一代高速、高可靠性的非接触式喷码机,可喷印最高5行的高质量文本、图形和条码信息,可在任何材质表面上,如金属、玻璃、塑料、纸张、木材,喷印生产日期、产品批号、保质期等各类信息。
ci系列针对不同的应用需求共有四种不同配置的产品:ci580、ci700、ci1000、ci2000。
ci580ci580是一款经济、智能型的连续式小字符喷码机。
其设计理念以满足多数企业的常规打码为基础,可用于生产日期、产品批号、保质期等常用标识的喷码。
ci580支持文本、图形和条形码等多种喷印格式,可喷印最高2行(12mm)的信息。
1行和2行打印格式下的最高速度分别为333米/分钟和139米/分钟。
喷码机设备操作说明书
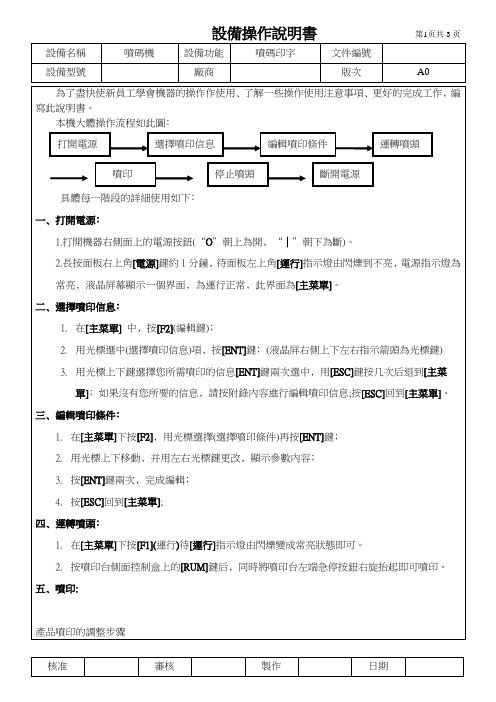
3.用光標選擇一個空白信息﹐(顯示[未登記]字樣的信息)﹐按[ENT]鍵。
4.用光標更改點陣數(常用24.按[1]鍵(A2)進入建立文本模塊﹐按[F1](選擇)鍵﹐然后連續按[F2]或[F3]﹐選擇(簡體字)﹑(常用字)﹑(符號)﹑(用戶圖案)等界面﹐選擇您所需內容(用標鍵選擇)﹐選擇完畢按[F4]
a﹑當面板左上角[補充]指示燈亮時﹐停止噴印補充墨水和溶劑﹔補充墨水或溶劑。
b﹑當面板左上角[故障]指示燈時﹐停止噴印﹐維修處理。
c﹑禁止突然斷電﹐必須按切斷電源的步驟進行。如因停電等原因突然斷電要經修理人員處理后可噴印。
d﹑禁止碰撞噴頭。
附錄﹕編輯噴印內容。
在[主菜單]界面下運行以下操作﹕
1.點擊[主菜單]中的[F2](編輯)鍵﹔
三﹑編輯噴印條件﹕
1.在[主菜單]下按[F2]﹐用光標選擇(選擇噴印條件)再按[ENT]鍵﹔
2.用光標上下移動﹐并用左右光標鍵更改﹐顯示參數內容﹔
3.按[ENT]鍵兩次﹐完成編輯﹔
4.按[ESC]回到[主菜單];
四﹑運轉噴頭﹕
1.在[主菜單]下按[F1](運行)待[運行]指示燈由閃爍變成常亮狀態即可。
鍵﹐點選完成。光標“∟”將到空白處﹐再按[1](A2)鍵可以繼續編寫此信息中的其它內容。
注﹕當插入圖案時,必須了解所存圖案的編號和點陣數﹐用對應的點陣數插入才能顯示。
6.用光標鍵移動光標“∟”選中所選內容﹐可以進行如下修改﹕
A﹑按[6]鍵可以更改所選內容的點陣數和噴印行數﹐按[ENT]鍵確認。
B﹑按[7]鍵可以進行如下內容增減修改﹕
D﹑按[9]再移動光標到目的位置﹐按[F3]完成移動。
E﹑按[0]再按[F3]所選內容在其后將復制一遍。
喜多力全新ci5000系列上市,10大优势坚守“物超所值”理念
食品加工与包装Mar 2017 CHINA FOOD SAFETY 43喜多力全新ci5000系列上市,10大优势坚守“物超所值”理念□ 多米诺 供稿喜多力中国在2016年度全国经销商大会暨新品发布会上与合作伙伴一起,见证了全新一代喜多力连续喷墨喷码产品的发布。
全新ci5000系列产品延续了喜多力的核心价值:操作简单、功能强大、稳定可靠、物超所值,为企业带来与众不同的喷码体验和令人惊喜的性价比。
十大优势,坚守与创新并存ci5000系列产品包括ci5200、ci5300、ci5500及ci5650,新的家族体系,带来了全新的应用体验。
喜多力美国总部产品经理Jesse Wollaston 先生在产品的研发及优势介绍中,阐释了选择喜多力ci5000系列的10大理由。
10.1英寸黑猩猩全彩电容屏:这是新一代ci5000系列产品较之喜多力前代产品,最大的提升之一。
黑猩猩全彩电容屏抗击打、防溶剂腐蚀,专为工业应用而设计,即使在最严苛的工业环境中,都能高速运作。
智能的所见即所得用户界面:有创新也有传承,喜多力ci 全系列产品一直以友好的用户使用体验著称,ci5000系列也不例外。
操作时,直观的触摸屏和图标式用户界面,降低对操作人员的培训要求。
ciEasyServ 免维护模块:这是ci5000系列的另一个重量级升级,快速、简单、无杂乱,自成一体的服务模块涵盖所有运行所需的溶剂及过滤器,更换时间少于1分钟。
更换过滤器时无需专业技术和工具,十分轻松,让最大化生产效率成为可能,将保养周期延长至6000~8000小时或18个月。
标配的快速接口:标准化的附件接口设计使安装更加简单和快速,在使用中也能实现不同产线之间喷码机的快速调换。
实时的在线支持:ci5000系列全新的内置特色包括可快速链接的在线帮助数据库,伴随警告和错误显示的同时,屏幕上出现的帮助键和二维码可帮助快速链接在线帮助数据库。
通过U 盘即可实现固件升级,便捷的备份和恢复:ci5000系列在升级、备份及恢复时,给予企业更大的方便,不再需要RS232或网线连接,即可升级喷码机,机载式备份和恢复,无需电脑介入。
喷码机使用说明范文

喷码机使用说明范文喷码机是一种专门用于对物体进行喷印标记的设备,常见于产品包装、制造业和物流行业。
它采用喷墨技术,利用高速喷射墨水形成字符,用于编码、标识和追踪产品信息。
以下是喷码机的使用说明及操作流程。
一、产品介绍喷码机通常包括机身、墨盒、打印头、控制面板和电源等组成部分。
机身是设备的主体部分,通常由金属制成,具有坚固的结构;墨盒是存放墨水的容器,可根据需要更换;打印头是喷墨技术的核心部分,用于喷射墨水形成字符;控制面板用于设置打印参数和监控设备状态;电源供应设备所需的电能。
二、准备工作1.设备摆放:将喷码机放置在干燥、通风良好的地方,确保设备稳定、不易受到外界干扰。
2.墨水准备:根据设备所需墨水类型,选择合适的墨盒,并填充墨水至墨盒容量的适当位置。
注意不要超过最大容量,以免溢出。
3.电源接通:将电源线插入电源插座,确保电源线无损坏,保持设备与电源的安全连接。
三、打印设置1.清洁打印头:在设备开机前,需要进行打印头清洁操作。
打开设备上的清洁通道,喷出一段墨水以清洁喷嘴,去除可能存在的尘埃和污渍。
2.连接电脑:通过USB或串口线将喷码机连接至电脑。
安装设备驱动程序,并根据软件的指引设置打印参数,如字符大小、字体样式、打印速度等。
3.校准打印位置:在标记物体前,需要将打印头的位置与物体表面进行校准。
使用调节螺丝或选择设置菜单中的校准选项进行调整,使打印位置准确无误。
4.测试打印:在实际使用前进行测试打印,检查打印效果和位置是否符合要求。
根据需要进行调整,直至满意为止。
四、打印操作1.准备标记物体:将待标记的物体放置在设备的喷印位置,确保物体表面干燥、平整,无杂质和污渍。
2.打印设置:通过控制面板或电脑软件设置希望打印的内容、字体、大小和位置等参数。
3.开始打印:点击打印按钮或启动指令,喷码机开始工作。
墨水将通过喷头喷射出形成字符,完成对物体的标记。
4.检查和清洁:打印完成后,及时检查标记效果是否清晰、准确。
【新手必看】喷码机使用说明书!
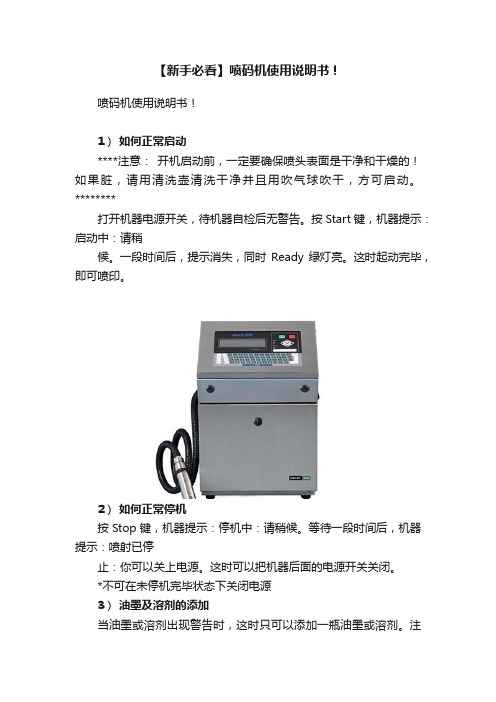
【新手必看】喷码机使用说明书!喷码机使用说明书!1)如何正常启动****注意:开机启动前,一定要确保喷头表面是干净和干燥的!如果脏,请用清洗壶清洗干净并且用吹气球吹干,方可启动。
********打开机器电源开关,待机器自检后无警告。
按Start键,机器提示:启动中:请稍候。
一段时间后,提示消失,同时Ready绿灯亮。
这时起动完毕,即可喷印。
2)如何正常停机按Stop键,机器提示:停机中:请稍候。
等待一段时间后,机器提示:喷射已停止:你可以关上电源。
这时可以把机器后面的电源开关关闭。
*不可在未停机完毕状态下关闭电源3)油墨及溶剂的添加当油墨或溶剂出现警告时,这时只可以添加一瓶油墨或溶剂。
注意是油墨还是溶剂出现警告,不可加错!4)喷嘴的清洗 ********(如果长时间未使用,下次开机一定要执行此喷嘴清洗选项)*******按F4,按D,选清洗喷嘴一栏,按输入键,输入数字(表示产生多少次倒吸力,每次约十秒。
不少于3次),按输入键,机器将出现提示:正在清洗喷嘴:请稍候。
此时把喷头倒置,用吸水纸包住同轴管,把清洗济射向喷嘴,喷嘴将清洗济吸入,提示消失后,即可。
5)清洗回收管按F4,按D,选清洗回收管一栏,按输入键,通过按??游标,把关改为开。
此时回收管会形成真空吸力,把清洗济射向回收管,听见吱吱的响声,即可。
接着按输入键,按? ?游标,把开改为关,按输入键。
6)如何输入新资料在非喷印状态下,按F3,输入新资料名称(自定),按输入键,进入资料点数一栏,选择资料高度(如7 GEN STD,表示资料最高为7点),按输入键,进入编辑状态。
这时按F1,选字体高度(如7 High Full),按输入键;按F2,选择字体是否加粗;按F4,可选择日期/时间/连续数/顺序资料/中文或图案等特别功能。
a)字体加粗按F2,进入选用粗字。
选许可,按输入键,字体为加粗;选不可,按输入键,字体为不加粗。
b)日期的输入按F4,选日期,按输入键。
多米诺喜多力CI系列说明书中文版
All rights reserved. Reproducing this publication in whole or in part without written permission is expressly prohibited. 版权所有。严禁在没有授权的情况下全部或部分印刷出版本出版物。
PCB, CPU 004-2004-001 004-2005-001
Version 1.09
X
O
O
O
O
O
Page 5
ciSeries Operation Guide
004-2008-001 PCB, Phase Assy. 002-1073-002 X O O O Table 1 The presence of an “X” symbol in Table 1, indicates that one or more of the assemblies nominated in Table 1 above, contains a toxic and hazardous substance or element at a level which is above the limits specified in China EIP Standard SJ/T 11363 - 2006. When an “O” symbol is shown in any of the columns, this indicates that the particular substance or element is below the limits specified in China EIP standard SJ/T 11363 – 2006. Signed *Original signed and available from local distributor* Richard Fox President Citronix Signature Dated 27 December 2006 O O
喜多力喷码机信息编辑
喜多力喷码机信息编辑一、打印内容分类1、文本信息:文字(中、英文)、数字、字母、符号等,可以直接从键盘输入数字:123456789字母:ABCDEFG abcdefg其他语言文字:English汉字:例如汉字合格年、月、日汉字的两种方式输入:a:机器自带字库按ALT 1(红色按键)+空格键出拼音输入方式,选择所需字母;b:非字库汉字(自己编辑的汉字)选择图形→找出自己要的汉字(注意点阵格式)。
2、自动编码:可以随时间或设定条件自动变化的内容。
日期、时间、计数器班次代码等。
日期:2011-3-16时间:10:45:32计数器(1,2):00013、图案:根据某种需要制作的图案,商标、特殊规格汉字等3、无须揭开锡封,直接将瓶子插入相应的注入口,等待液体完全注入主溶剂箱/主墨水箱4、将瓶盖拧好,空瓶按相关法规处理二、开电源将机器右侧电源开关旋至开的位置三、信息建立/编辑如果需要打印以下内容:2011/10/1015:15:45可以把信息看做由3部分内容组成:(1)日期(7点阵):2011/10/10(2)时间(7点阵):15:15:45(3)汉字16点阵或图案:1、主菜单:按或2、选择“自动编码”->“日期”->选择日期格式->”standard”—>分隔符,按,编辑->->选择“自动编码”->“时间”->选择时间格式->”standard”—>分隔符,按,编辑->7、按、箭头选择需要的汉字11、选中后按“”中编辑图案。
14、按、箭头移动信息到需要的位置17、不同字段之间的切换不断按“报打印编辑后的信息四、信息参数调整1、主菜单:按(2)按字母B可以调整字符的笔画是否加粗0-9。
如:1234 =1234 合格=合格注意:加粗的样式:横笔不加粗,竖笔加粗(3)按字母W可以设定字符的宽度。
数值越大,字符越宽。
如:喜多力= 喜多力注意:在类似线缆行业等重复打印的场合,字宽的定义是同步器脉冲的分频数。
喷码机使用说明
第一章使用条件与注意事项环境温度 0-45℃环境湿度 10-90%RH(非结露)额定电压 220±15%V AC 接地良好额定功率 150W注意事项!墨水及稀释(溶)剂为易燃品,喷码机、墨水和稀释(溶)剂放置应确保附近无明火,并备有干粉灭火器。
!喷码机内有高压,进行检查电路时应切断电源,以防触电!墨水和稀释(溶)剂为刺激性物品,如溅入眼睛或口内,请立即用清水冲洗或及时就诊。
!及时向墨水罐内添加墨水,及时向稀释(溶)剂罐内添加稀释(溶)剂。
!喷码机应可靠接地以保证人身安全!机器使用过程中应水平放置。
机器长期停用时应将墨水全部排出,用清洗剂将墨路进行清洗,方可进行长期停放。
第二章机器结构图2.1喷码机示意图喷头之架:支撑、定位、固定喷头。
喉管:连接主机和喷头的螺旋管,里面包含导线和墨水循环管路。
YX-9100型喷码机有主机和喷头(如图2.1)两大部分组成。
1)主机:主机上舱内部部件如图2.2,主机正面部件如图2.3,主机背面部件见图2.4,主机下舱部件见图2.5,图2.2 主机上舱图风扇:给主机散热。
单片机板:控制喷码机,并对喷码机的各种参数进行自动的调整,使喷码机稳定的工作。
电脑主板:与硬盘、显示屏组成电脑,通过windows系统来调控单片机板。
硬盘:和电脑主板、显示屏组成电脑,存储编辑信息。
触摸屏显示器:和硬盘、显示屏组成电脑,显示操作界面,进行编辑各种喷印信息。
图2.4主机背面图总电源:喷码机供电开关;严禁在电脑未关闭的情况下关闭此开关(断电情况例外)。
USB接口:连接外部信息,可以提取U盘信息并对其内容喷印。
光电接口:连接光电开关。
电脑开关:启动windows系统.同步器接口:连接同步器和编码器。
电源线:喷码机电源连接线。
图2.5主机下舱图主电源:为喷码机输出所需要的电压。
电磁阀:协调墨路的各项功能;稀释剂罐:盛放喷码机专用稀释(溶)剂。
墨水罐:盛放喷码机专用墨水。
小滤:过滤墨水中的杂质。
喜多力全新ci3000系列产品发布
系列 的设备采用延长6 0 0 0 墨线运行 小时或延 长至 l 2 4 个月的保养周期 。重重保 障下 , 您只需按下喜多力 的 开关, 便能即刻享受高枕无 忧。 2 完整产 品线 , 满足 所有 喷码 需求
由c i 3 3 0 0 、 c i 3 5 0 0 和c i 3 6 5 0 组 成 的全 新 c i 系列, 从
● 信 息 广 角 ◆ × i n x i G u a n g j i a 。
喜 多力全新 c i 3 0 0 0系列产 品发布
2 0 1 4 年6 月2 5 日, 上海喜 多力 ( 中国) 在2 0 1 4 年度 殊 的打 印头 , 可打 印实 际字高 为0 . 6 ~6 mm的 内容 , 全 国经销 商大会上 隆重发布 了全新一 代喜多力连续 最 高打 印速度 可达 l 0 . 3 m/ s ; 颜 料机用于喜多 力软性 喷墨打码产 品。 由此 , 全新 的c i 3 0 0 0 系列产 品c i 3 3 0 0 、 颜料 墨水, 可在深色表 面具有 良好 的对 比度 , 或在复
c i 3 5 0 0 和c i 3 6 5 0 登 陆中国市场 。 相较第一代c i 系 列, 在 合材 料表 面具有 良好 的附着 力 ; 白墨机 带有 与众 不
产 品特色和性 能上, 全新 的c i 3 0 0 0 系列 出色地传承 了
同的泵 头 , 适用 于喜 多力 白色 、 无V O C( 挥 发性有 机
系列 引入 了新的过滤器 , 耗 材流体动力得 以提高 , 墨 水管路 得 以简化 ,计划 中的停机 时间将 比从前大 大
HS 5 0 高速机 能 以极 高的速度 ( 最高达 1 0 . 6 m/ s )
喷码机使用说明书
按 ENTER 键,键盘显示 (1~128)#1 7/16 点阵:1-15(超限则通讯出错) 按 ENTER 键 信息 #1 @7(中间输入所要的内容)@9 在光标处输入”数字”后按 ENTER 键屏幕显示 编辑完成 保存(Y/N)? Y 保存
@7@Y@W@X@9 (年月日)
7/16 点阵:字符不能超过 20 个(一个汉字算 2 个,超限则通讯出错) 表示在“数字”对应的存储器里输入新的或编辑已有的要喷印的信息,输入你要喷印的数字和英文 字母,输入完毕后按 ENTER 键屏幕显示
二、技术指标
1、打印类型:2 行 7 点阵、1 行 16 点阵大字符 2、字体高度: 45mm(单列 16 点);19mm(双列 7 点) 3、字符类型:标准 ASCⅡ码字符、特定中文(年、月、日、时、分、个、批号、制造、有效 日期、合格、生产日期、班次、颜色、型号、规格等) 4、打印速度:10.7~61 米/min 5、存储信息:15 个存储器(若用 ID3 键盘,无论“打印存储器”还是“新建/修改信息”,只 能设置 1~15,否则超限,导致通讯出错,此时,只能关主机电源后重启或拔掉键盘重新插入), 每个存储器最多可存储 20(因存储器容量受限,暂定)个字符(一个汉字算 2 个字符) 6、键盘设置功能:暂用 ID3 键盘(新的 WSD-P011 键盘正改进中,2011-08 可改进完毕) 7、机械尺寸: 键盘:210mm×94mm×32mm 喷头:178mm×76mm×41mm 主机:405mm×305mm×135mm 8、主机重量:4.8 千克 9、传感器:+24V 光电开关 10、工作电压:~220±10%V,50±1Hz
精品
.
按“确定”键,屏幕显示 计数值初值 XXXXX
喷码机操作说明书
喷码机操作说明书喷码机操作说明书版本/次A/11、目的:为正确指导员工操作,提高工作效率,加强产品品质,规范现场管理。
2、范围:生产车间的全体管理干部,技术员及操作员。
3、定义:3.1 无4、职责:4.1课长:对设备的日常维护进行监督。
4.2组长:对设备的日常点检确认。
4.3 技术员/作业员:对设备的日常操作/维护和点检。
5、操作技方法:5.1正确连接好电气(注:在通入压缩空气后,喷码机会自动恢复正常位置,勿必保证没有任何杂物阻碍喷码复位动作,且气压应保持在4KG左右)。
5.2在墨盒内注入适量的墨与添加剂。
5.3调整流水线上的产品导正轨道,以便产品喷印位置标准。
5.4喷头高度调整:移动喷头行程旋扭调节,达到要求即可(喷头不可太低,直到调试印到完整图案为准,否则易损坏胶头)。
5.5编辑喷码信息:选择信息编辑/变量/第一未来日期或第二未来日期。
5.6调整好信息后试喷一个产品,检验其字体大小,上下左右位置是否正确。
5.7注意事项:5.7.1 喷印出来的图案不能有毛糙,模糊,断墨等不良现象。
5.7.2喷印前检查喷头是否完好适合生产工艺要求(比如:喷头太脏或墨线粗糙,表印字模糊等不良现象)。
5.7.3开机后半小时要注意查看是否有漏墨现象。
5.7.4油墨不可太稀或太干,添加剂不可缺少,随时注意观察油墨合添加剂的量或机台是否报警。
喷码机操作说明书版本/次A/15.7.5开始喷印前先由品保人员及线长对其尺寸,外观等问题进行确认OK后,方可生产。
5.7.6操作员必须经过培训后方可上岗。
5.7.7非指定工作人员不能擅自操作,造成不良后果自负。
5.7.8出现有报警异常时,需及时通知线长或组长,知会生技人员维修。
5.7.9非相关人员不得随意更改机台参数.6. 每日保养事项:6.1机台必须保持清洁;6.2随时保证活动部位有润滑油;6.3螺丝不可有松动现角,如有必须紧固后再开机生产;6.4检查各电磁阀有无漏气现象,如有应马上通知生技维修。
美国喜多力 进口喷码机
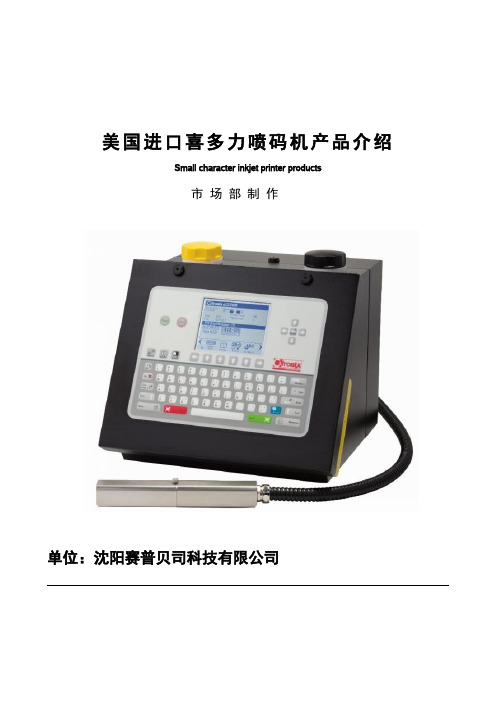
美国进口喜多力喷码机产品介绍Small character inkjet printer products市场部制作单位:沈阳赛普贝司科技有限公司目录一.公司介绍 (3)三.产品介绍 (5)1.产品概述 (5)2.设备外观图片 (5)3.主要特点介绍 (5)4.无故障工作几大理由 (7)5.墨路优越性能介绍 (8)6.打印样品 (9)7.产品主要参数 (9)四.产品外观细节展示 (10)1.产品外观细节展示 (10)五.售后服务及联系方式 (11)1.供货周期及付款方式 (11)2.设备安装与售后服务 (11)3.联系方式 (11)第一部分公司介绍赛普公司(SEPBASE)总公司位于沈阳市于洪区五金工业园,已在长春、天津、石家庄、郑州、合肥、西安、广州、上海设立了多家分公司并在多个成立了地区维修站点。
公司120多位员工,60%以上为技术人员,其中博士2名,硕士4位,公司50%以上人员为本科学历。
拥有5500平方米的、科研生产基地,是国家认证的“高新技术企业”,并通过了“ISO9001”质量管理体系认证。
我们积累了丰富的设计制作经验,现在国内轿车生产线上的自动打印设备除了进口设备以外,我公司占据了绝对的优势,已经在全球安装了35,000多套系统。
机械打标系统销量遥居全球第一,激光打标系统销量居亚洲第一。
国内部分客户如:丰田汽车、一汽大众、一汽总装、天津夏利、宁波吉利、上海华普、上海通用、江苏悦达KIA、北汽福田、广州本田、北京现代、北京奔驰、金杯汽车、华晨等厂家,均选用了我公司的随线打印设备,这些设备在生产线上连续可靠的工作,较低的故障率,为客户创造了价值,为我公司赢得了荣誉。
第三部分产品介绍1. 产品概述多米诺集团成员之一,喜多力(Citronix)源自美国,专注于连续式小字符喷码(CIJ)技术的生产和研发,为各种材质,如塑料、金属、纸张、木材、玻璃等,打印各种保质期、追溯码、LOGO、批次等信息,广泛应用于诸如食品、饮料、建材、线缆、医药等行业领域。
喜多力喷码机外部接口定义 Ci系列
针位 5 真空阀
针位 6 真空阀
针位 7 溶剂阀
针位 8 溶剂阀
针位 9 溶剂泵
针位 10 溶剂泵
(2) 五阀系统
针位 1 针位 2 粘度计阀 粘度计阀
针位 3 喷嘴冲洗 阀
针位 4 喷嘴冲洗 阀
针位 5 真空阀
针位 6 真空阀
针位 7 溶剂阀
针位 8 溶剂阀
针位 9 打印头冲 洗阀
针位 10 打印头冲 洗阀
七、RS232 端口(J21) 1、针位表:
针位 1 针位 2 针位 3 无定义 无定义 数据传输
针位 4 无定义
针位 5 针位 6 数据接收 无定义
针位 7 无定义
针位 8 无定义
针位 9 GND
针位 10 无定义
2、插头示意图:
1 3* 5* 7 9* 2 4 6 8 10
•RS232 # 2 J21 •Pin 3 – 传输 TX •Pin 5 – 接收RX •Pin 9 – 接地
回收管传感器 无定义 温度传感器
针位 4 温度传感器
针位 5 相位传感器
针位 6 相位传感器
针位 7 相位传感器
针位 8 相位传感器
2、 插头示意图
8(橙) 6(绿白) 4(黄黑) 2(N/A) 7(红白) 5(红黑) 3(灰白) 1(黑白)
十、打印头阀/开关端口(J4)
1、针位表
针位 1
针位 2
针位 3
1、针位表:
针位 1
针位 2
针位 3
DC 24V 报警 1
报警 2
针位 4 GND(0 V)
针位 5 报警 3
针位 6 无定义
2、插头示意图:
6(无定义) 4(GND) 2(报警 1)
喜多力喷码机ci系列操作手册
版本 1.0
7
Ci 系列喷码机操作手册
机主记录
型号和序列号位于喷码机的左侧。请将相关号码记录在下方的空白处。 机器型号: 序列号:
请务必使用正确的墨水,溶剂和清洗液添加或用于清洗。请在这里记录这些信息以备参 考。
墨水型号: 墨水号: 溶剂号: 清洗液号:
无尘纸零件号:
版本 1.0
8
Ci 系列喷码机操作手册
版本 1.0
5
Ci 系列喷码机操作手册
Hazardous Substances or Elements with Concentration of Toxicity (Table 1) (In accordance with SJ/T 11364 –2006) Citronix has verified ciSeries Printers against the requirements of China Ministry of Information Industry, Order No. 39, and has established that at the time of printing of this document, that there are certain items specified by the part numbers given in the table below, which could have a concentration of one or more of the listed toxic or hazardous substances or elements specified in Order No. 39. Component or Assembly part number PCB, CPU 100-0011-004 PCB, Phase Assy. 002-1073-002 Hazardous Substances or Elements Polybrominated Polybrominated Lead Cadmium Mercury Chromium VI Biphenyls Diphenyl Ethers Compounds (Pb) (Cd) (Hg) (Cr6+) (PBB) (PBDE) O O O O O O O O Table 1 The presence of an “X” symbol in Table 1 indicates that the assembly listed contains a toxic and hazardous substance or element at a level which is above the limits specified in China EIP Standard SJ/T 11363 - 2006. The presence of an “O” symbol indicates that the particular substance or element is below the limits specified in China EIP standard SJ/T 11363 – 2006. Signed, *Original signed and available from local distributor* Michael Embree Engineering Director Citronix Inc. Signature Dated 17 April 2014 O O O O
喜多力喷码机ci系列操作手册

Citronix Continuous Ink Jet Printer ci3200, ci3300, ci3500, ci3650
版本 1.0
4
Ci 系列喷码机操作手册
相关标准符合声明
我们: 位于: 喜多力有限公司 2241 S. Watson Road, Suite 111 Arlington, Texas 76010 United States of America Tel: +1-817-633-3200 Fax: +1-817-633-3207 Email: info@
CE-Marked accordingly
certification date 17 April 2014
Each product marketed, is identical to the representative unit tested and found to meet the standards. Trade Name: Type of Product: Model: Arlington, Texas USA *Original signed and available from local distributor* Michael Embree Engineering Director Citronix Inc.
所有权保留。禁止未经允许复制本刊物全部或部分内容。
版本 1.03Fra bibliotekCi 系列喷码机操作手册
DECLARATION of CONFORMITY
We: Located at: Citronix Inc. 2241 S. Watson Road, Suite 111 Arlington, Texas 76010 United States of America Tel: +1-817-633-3200 Fax: +1-817-633-3207 Email: info@
- 1、下载文档前请自行甄别文档内容的完整性,平台不提供额外的编辑、内容补充、找答案等附加服务。
- 2、"仅部分预览"的文档,不可在线预览部分如存在完整性等问题,可反馈申请退款(可完整预览的文档不适用该条件!)。
- 3、如文档侵犯您的权益,请联系客服反馈,我们会尽快为您处理(人工客服工作时间:9:00-18:30)。
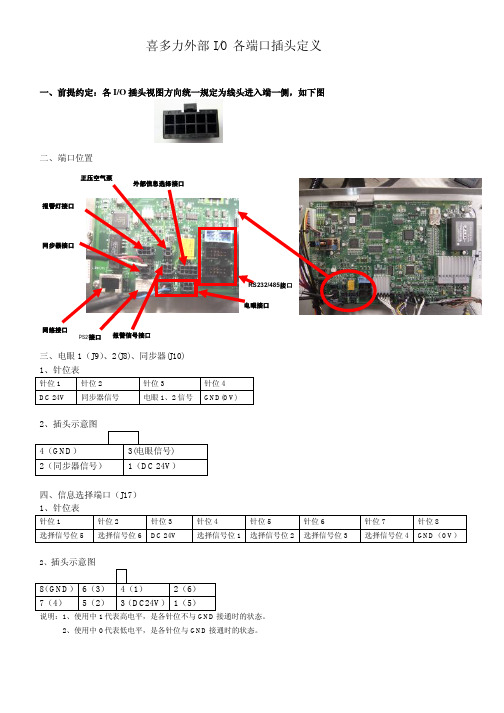
喜多力信息选择(J17)数据位选择表GND 3 1 64 2 DC24V 5J17针位示意图说明:1、表中1代表高电平,是各针位不与GND接通时的状态。
2、表中0代表低电平,是各针位与GND接通时的状态。
4.1 RS232The RS232 serial port connection is made to connector J21, labeled 232 #2.The connector J20, labeled 232 #1, is for internal monitoring and debugging, there are no user functions available at this connection.This is not a standard DB9 RS232 connector. A standard DB9 connector frequently needs some force to connect and disconnect and these DB connectors should be mounted to an external structure. The location of the main printer board does not allow this.A serial cable is available from Citronix. They are made in several lengths. The standard RS232 electrical interface is limited to 25 feet.If frequent connecting and disconnecting to the RS232 serial port is to be done, Citronix recommends that a short serial cable be installed on the board and through the external housing with a strain relief fitting. The end of this cable may be used for the connection.4.1.1 Printer SettingsThe printer has a Serial Interface parameter named “Type”. The only setting that works is “HOST”. The other modes have never been implemented.These are the usual settings for the printer’s RS232 serial interface. These settings must match those of the computer at the other end of the cable.• Baud Rate 115.2K• Data Bits 8• Stop Bits 1• Parity None4.1.2 Hyperterm SettingsThe Hyperterm settings for the RS232 hardware parameters should be set to the same values as the printer’s settings. Hyperterm has other settings that should be set as follows –• Set Function keys to “Terminal Keys”.• Set Backspace key to “CNTL+H”.• Set Emulation to “ANSI”.• Terminal Settings for the cursor may be your preference.The Hyperterm ASCII Setup should be set as follows –• Check “Send line ends with line feeds”.• Check “Echo typed characters locally”. This will enable you to see what you are typing.• Set Line Delay to 1. This will prevent the PC from overloading the printer.• Set Character Delay to 0. A non-zero number will slow down transmissions to the printer.• Uncheck “Append line feeds to incoming line ends”.• Uncheck “Force incoming data to 7-bit ASCII”.• Check “Wrap lines that exceed terminal width”.Hyperterm saves these parameters in a .ht file. The location may vary depending on the version of Hyperterm and the version of Windows. Once you have the parameters correct and can communicate with the printer, copy the standard .ht file that used by Hyperterm into a file named Citronix.ht. The next time a Hyperterm serial port communication to the printer is needed, this connection file can be opened and all the Hyperterm settings will be correct.4.1.3 TimingsThe printer’s RS232 interface does not use any Flow Control. In order to avoid buffer overflows, an external controller should pause occasionally when sending large amounts of data or sending many small commands. The pause must be 1 millisecond after every 256 characters or less. This is done in Hyperterm by setting the line delay to 1.Internal buffer processing must also be performed. A Carriage Return character is required at the end of every command. When sending large amounts of data for a Restore (RR) command, a Message (ME) command, or a Graphic (GR) command, a Carriage Return must be used every 1000 characters or less, at an appropriate spot in the data stream – not in the middle of a data field.RS232接口(10针串口)Ci系列机器利用电脑制作图案方法、导入与调用(以下操作使用中文版win XP操作系统,喷码机为Ci键盘式)一、打开电脑中的“画图”小程序(Win 98、Win 2000、Win XP、Win Vista自带)“开始”-》“所有程序”-》“附件”-》“画图”二、制作图案1、“文件(F)”-》“新建(N)”2、“图像(I)”-》“属性(A)…”-》具体设定如下,图案的高度、宽度按实际设定。
高度一般设定为12、16、21、32,单个字宽大约等同于字高。
-》“确定”-》“是(Y)”3、输入文字(以输入12点阵“多米诺标识科技”为例)点左侧工具栏中“A(文字)”;在白色区域单击鼠标左键,出现蓝色文本输入框,同时出现“文字工具栏”,如果没有请在文本输入框中单击鼠标右键,并点击“文字工具栏”。
选择合适大小的字体4、查看字体情况按“查看(V)”-》“缩放(Z)”,“自定义…(U)”-》缩放到800%-》“确定”按“查看(V)”-》“缩放(Z)”,“自定义…(U)”-》“显示网格(G)”如果字体还需要修改,选中左侧工具栏内铅笔图案,在需要的地方按鼠标左键点上黑点,按鼠标右键消除黑点。
5、保存图案按“文件(F)”-》“另存为(A)…”,指定图案储存的文件夹,给文件取名,建议用英文字母或数字,名称全长控制在15个字母(含数字)以内。
保存类型选“单色位图(*.bmp;*.dib)”-》“保存(S)”三、图案输入1、用交叉网线连接喷码机和电脑。
2、点击屏幕右下角的本地连接,跳出连接状态对话框,点击“属性”按钮3、选择Internet协议(TCP/IP)选项,并点击“属性”按钮4、选择手动设置IP地址,并输入和喷码机IP地址同一个系列地址,点击“确定”按钮5、双击打开AutoUpdate 3.7.exe软件6、在IP地址栏中输入Ci机器的IP地址,点击“find”按钮。
找到喷码机。
7、点击“Tools”并选中Graphic8、弹出对话框,选择需要输入的文件名称,点击“打开”9、输入图案成功后,电脑会显示“Graphic input without error”的信息10、在主屏幕的图案编辑菜单下可以查询输入的信息。
11、在信息编辑菜单中按正常操作调用图案。
–从插头的后部方向看(电线进入插头一侧)–在进入插头的地方有个口刻着“1”–提供的所有的插座均使用Micro-fit–安装插头需要特殊工具–传感器和同步器的接线方法不同•如果插头插座位置,主板上外部保险丝会烧掉–传感器•Pin 1 + V e•Pin 2 不用•Pin 3 信号•Pin 4 接地–同步器•Pin 1 + V e•Pin 2 信号•Pin 3 不用•Pin 4 接地。
