地图编辑器设计文档
专用中国地图可编辑

专用中国地图编辑
汇报人:XX
壹
地图编辑功能介绍贰Biblioteka 中国地图编辑实例叁
地图编辑注意事项
肆
地图编辑应用场景
伍
地图编辑未来发展
目 录
壹 地图编辑功能介绍
地图编辑器界面
地图显示区域:提供全国地图和各省份地图的显示 地图编辑工具栏:提供各种编辑工具,如添加、删除、修改地图要素等 地图属性设置:可以对地图进行各种属性设置,如缩放级别、地图样式等 地图数据管理:可以对地图数据进行导入、导出、更新等操作
地图编辑在各行业的融合与创新
地图编辑与人 工智能技术的 结合,实现自 动化地图编辑 和智能数据提 取
地图编辑与虚 拟现实技术的 融合,提供沉 浸式地图体验 和可视化数据 分析
地图编辑与物 联网的结合, 实时更新地图 数据和智能化 管理地理信息
地图编辑与社 交媒体的融合, 实现用户生成 内容和共享地 图信息
保护数据安全:避免数据泄露和非法获取 限制编辑权限:根据需要设置不同等级的编辑权限 定期备份数据:以防数据丢失或损坏 加强安全措施:使用加密技术、防火墙等手段确保数据安全
肆 地图编辑应用场景
政府机构与企事业单位
政府机构:用于规划、管理、监测和决策等
企事业单位:用于业务拓展、市场分析、物流配送等
定制化编辑服务:根据不同行业和用户需求,提供定制化的地图编辑服务,满 足用户个性化需求。
地图编辑行业规范与标准制定
制定统一的地图编辑规范,确保地图数据的准确性和完整性 建立地图编辑标准,提升地图编辑质量和效率 强化地图编辑人员的培训和管理,提高从业人员的专业素养和责任心 加强与相关行业的合作与交流,共同推动地图编辑行业的健康发展
2D横版卷轴MMORGP地图编辑器设计

根据此处要求设定背景部分文件目录结构为:
建议场景插件地图按地图名分开存放
Mapdata\
Goth\ (哥特地图)
\Background\ (背景部分)
Goth_1_1.png
Goth_1_2.png
的逻辑信息。其中静态组件信息主要包括,地图的 3 层背景信息,前层和后层的组 件信息,前景组件信息以及其他组件信息,比如传送点。
服务端部分主要包含所有的怪物信息,NPC 信息以及地图逻辑信息。 所以编辑完成一幅地图,保存后将生成 6 个文件(地图逻辑信息,客户端服务 端公用)。命名规则为: 地图载入关联信息=地图名字.map 地图缩略图=地图名字.jpg 地图静态组件信息=地图名字.part 地图逻辑信息=地图名字.logic 地图怪物信息=地图名字.monster
#组件后层 [backpart] 1=10033,x1,y1 2=10034,x2,y2 3=10035,x3,y3 „„ } #前景层 Forgeground { 1=20059,x1,y1 2=20057,x2,y2 3=20098,x3,y3 „„ } 地图逻辑层 newbie_map03.logic 的信息记录方式: Logic { 待定。。。。 } 地图怪物信息 newbie_map03.monster 的信息记录方式: Monster { #序列号=怪物 id,怪物名字,x1,y1,x2,y2,刷新数量,刷新间隔,怪物 AI
为了达到远近效果及其动态的天空云层效果。
每层都可以设置是否自行移动以及移动速度,这样背景层也可以做河流流动 等效果,前景层自行快速移动也可以给玩家场景在高速前进的感觉,这里需要增 加一个属性面板,用来自由设置图层属性。
地图编辑器

Maps editor.In the game the maps editor is invoked with the key F2, switched off – F1.Creating a map.In order to start the game in the editing mode it is necessary to fulfil the following command: theGame.exe edit <map title>In order to make new landscape editing more convenient it is proposed to write one of the titles of the pre-created map storages, called base maps, as a map title. A map is made of sets of triangles (polygons). Maps differ according to the polygons dimensions; a side of a polygon can be 3 and 4 meters long. The collection of landscape polygons is called a polygonal net. The net can be orthogonal (i.e. consists of rectangular triangles) and hexagonal (i.e. consists of equilateral triangles). The way, the textures lay without transition in relation to each other, depends on it.Base maps:200x200300x300300x300hp300x400m400x60090х90_3mThe numbers denote map dimensions in meters. The maps 300х300hp and 90х90_3m have orthogonal net. All the others have a hexagonal one.EditorUpper Panel:MAP: <the title of the map, loaded at the moment>.For example, MAP: 90x90_3mWhen pushing it there appears the window Map editor menu, offering to perform the following actions with the map:Save– to save changes in the loaded map;Save As…- to save this map under another title;Reload – to reload this map without saving unwritten changes;Load…- to load another map;Exit– Exit to the main menu.Esc allows to hide this panel without any actions.Editor modes panel:Entity– the mode for work with entities, displayed on the map, models and stamps mainly.Anchor–the mode of editing anchor points for accelerating the searching of long distance ways by materiel. It is used at the final stages of mission creating.Land–the mode, which allows to perform actions with landscape: to change heights, texturing, to change colour of triangles vertexes and to correct map sizes.Clip –the mode, which allows to assign zone of travel limitation for units and the camera on the map sides.Edifice–the mode of settings of the buildings, the roofs of which must disappear and the interior must be shown, when the gamer's soldier enters inside.The lateral editor panel:Clip camera position–allows to switch on and off the limitation of the camera position according to the settings of the Clip mode. The line is available at any editor mode on.The following parameters appear if the mode Entity is on:Rotation lock angle– fixing of the entity rotation for the angle, multiple to the given one.Season–allows to choose the season, in accordance to which the texture of the entities displayed on the map (mainly for trees and bushes) will be chosen.Preset– allows to choose a group of matters for the following location on the map.The list of entities, appropriate to the chosen group is depicted in the window a bit lower.At the present moment the following entity groups are available:Fauna– animals and birds;Construction– constructions;Flora – trees and bushes;Fx – special effects (not all special effects are depicted and saved in the map);Landscape – base maps; entities, changing the landscape; stones; stamps; water.It is not recommended to display base maps in the editor. Instead of this it is worth using them as a base for creating other maps.Properties of entitiesThe parameters are depicted in the panel Properties, when an entity is marked out on the map.In the first line there is depicted the name of the marked entity, its properties –below. The following belongs to the parameters, changed in the editor:Decal– switches the mode Decal for stamps, related to the entity;Shadow– switches depicting of the shadow;Texture – allows to choose a texture from the list of available ones;Opacity– allows to change the transparency of the polygonal views of the entity;Scale– allows to change the zoom of the entity.In order to switch a parameter off it is enough to take away a checkmark in the line of the changed property. In order to change a parameter it is necessary to click on the field in the line of the changed parameter. For example, you can change the texture of models. For that you must click with the mouse on the window Texture and on the empty field near, or on the name, shown in the field, for depicting the whole list of the textures, available for this model. For changing the value you must click on the field twice.Representation LayersThe image of the scene consists of several layers. All the entities on the map are drawn in one or several layers. The list of layers is shown in the panel Render layer list, which can be called with the key F11 beyond the dependence on the switched editor. With the help of checkmarks it is possible to switch the depiction of separate layers for map editing convenience. Drawing the layers takes place in the order, they are indicated in the panel Render layer list. Some layers do not use the information about the remoteness of the polygons from the observer; as a result there may be an incorrect image (stamps, which are seen through a mountain; in this case it is most likely that such a stamp uses an incorrect layer, or it must not be used in situations like that).Actions with the entities on the map.In order to display an entity on the map, it is necessary to chose it from the list with a left mouse button, to move the cursor to the working field of the map and to click with the same button in the necessary place.An entity remains selected till the moment of selecting another entity or pressing the right mouse button. It allows to display several same entities on the map consecutively.Marking a separate entity on the map is performed with a click of the left mouse button near the conditional center of the entity. In order to mark out a group of entities it is necessary to outlinethem with a frame, holding the left mouse button pressed. If the key Shift is held pressed during marking a group or a single entity out, the selected entities are added to the present marking. Performing this operation about the entities, already marked out, excludes them out of the group. Canceling of the whole marking out is performed with a click of the left mouse button on the field of the map.It is possible to rotate, move, copy and delete entities. these actions are performed over the marked entities.Rotation is valid both for a separate entity and a group of entities.If the key Ctr is pressed, the rotation relative to previous orientation (i.e. additional turn) is performed; but if Ctr. + Shift are pressed, then entities are oriented in the direction of the mouse cursor independently of their previous orientation. The relational rotation for a group of marked entities occurs around the conditional general group center, and the independent rotation — around the axis of every entity.Moving– occurs with right mouse button click in the necessary place. Fixing is performed with a click of the left mouse button on the map field; that takes marking off.Copying– occurs by means of pressing keys Ctr+C, the marked group is stored. For inserting a copy it is necessary to move the mouse cursor to the necessary place and to press Ctr+V. At the same time the moving mode is switched on for the marked group.For deleting the key Delete is used.The mode Land includes:Heights – heights;Colors – coloration of the polygon vertexes;Textures – texturingTerrains – types of territories for correct depicting of special effects and actors' behavior;Polygons – changing map sizes by means of adding or deleting polygons.In all the given modes the cursor has the shape of a circle, the size of which is varied with the buttons "+" and "-". The size and position of the circle assign the zone of usage of the selected action. Horizontal scroll bar Sharp-Soft allows to change the degree of using the current action when moving off the center of the circle. In the mode Sharp the action is applied equally to all vertexes within the circle. In the mode Soft the effect is a maximum in the center and comes to naught at the edge of the circle.All the actions occur with the vertexes. In order to depict the vertex net the key combination Alt+W is used. Some presses of the combination allow to depict the net in different ways and to switch it off.HeightsWith the left mouse button the heights are increased, with the right button —decreased. Changing the heights occurs either with every mouse click or when the mouse is moved with the button pressed. Fixing one level of the height occurs with the key Alt pressed.Heightmap–if switched on, depicts the heights map or the map of territory types взависимостиотрежима depending on the mode (Heights или Terrains).Water altitude–water level on the map. The default water level in the point is zero. It influences upon the height position of the matters with the mode of compensation Water, and on the automatic partitioning of the territory type Water by depth.ColorsAll default vertexes on the map are coloured grey.Adjustment occurs either with selecting achromatic colours from the palette or with moving sliders, as when selecting colour.Colour painting is performed by means of selecting a random colour from the palette or by sliders position. The lower window shows the selected colour at the given moment. The left mouse button paints the selected colour on the map, and the right one paints the inverse colour.Painting the colour is more intensive with every mouse click or with moving the mouse with the button pressed.Selecting the colour from the map is possible with the help of the pressed key Ctr with a mouse click.TexturesLibrary– library selection from the list of existing. Creation of one's own library is possible by means of the button Create. Libraries are used for rapid access to the materials, which are often used.A library consists of a list of materials; each of them contains up to two textures. If there are two textures, then such material allows to create bumpless conversion between them.It is possible to rearrange the textures by the arrow between the images of the selected textures.In order top create a new material the button Add is used; it adds a copy of the marked material into the working list of the library. Then the textures are changed. The name of the material may be changed in the insertion string under the buttons Add and Remove.Replacement of a texture is performed with a mouse click on the texture image in the window. These actions call out the window Select file with the list of proper names of the textures and the window of their representation:If there are two textures in the selected material, then the index of their mixing is changed by pressing correspondent mouse buttons in the necessary place on the map (left texture is shown with the left button; the right texture – with the right button). At the same time the current material is set for all polygons in the circle of the brush.If there is no left texture in the material, then the polygons, containing this material, are not represented. If there is no right texture, then such material realizes translucency of the left texture.The default base map is filled in with the material, standard for that map. In order to edit the material, used in the map, it is necessary, holding Ctr, to click the mouse on that place on the map, where the required material is used. At that in the list of materials either existing material is marked out or a new one is created. If the button Fill is pressed, the whole map is filled with the current material.ConversionsFor a bumpless conversion between the textures of different materials on the same map the position of the textures in the materials is assigned according to the following diagram, in which 1 and 1а– one texture, 2 – the second one, 3 and 3а– the third structure. In future this principle is repeated.In such a way the conversions appear on the map:And in such a way the materials must be arranged in the editor:Material#1 --------------------------- >Material#2------------------------------ >Material#3---------------------------- >Material#4 ---------------------------- >TerrainsAll the default map is filled with the type of territory Ground–earth. After selecting the necessary type of territory from the list in the lateral editor panel the painting of the net with the corresponding colour is performed.PolygonsIn this mode polygons are added with the left mouse button, with the right button – deleted.Note:Before to continue editing of the added polygons in other modes one should store and leave the game. Then it is necessary to load the map again and to continue editing.ClipThe mode represents the limit of gamer's units movements with a yellow line, and the limits of camera centre with a blue line.The position of the lines on the map may be changed if the cursor is brought to them –green colour shows cursor control of the line – then, having pressed the left mouse button, it is possible to draw the line to the necessary place.In the lateral editor panel one can indicate the parameters of the ultimate moving away or approach of the camera and the camera angle of inclination.The parameters take effect if there is the checkmark Clip camera position.Map rotation occurs if the mouse wheel is pressed; camera approaching-moving away –by turning the mouse wheel.EdificeIn order to depict interior when the gamer's soldier enters a building it is necessary to create a group with a help of the button Add…on the panel Edifices. At the same time there appears the dialogue Input, which offers to name the group. Then it is necessary to mark one or several buildings out and to press Add on the panel Units of…When the gamer's soldier enters one of the buildings in the group, every roof in the group disappears, representing the interior.Switching the mode occurs with putting in - taking off the checkmark in the line Show interiorsone of the houses:。
原创 红色警戒地图编辑器10页word
原创红色警戒地图编辑器要具体阐明,最好另有一个例子解释用啥子版本,最好给个下载地点人把能给的分皆给啦!最后选谜底时假如有分再加这里可以下是白警2的//down.52pk/soft/606.htm施用阐明:software界面:(下面的引见里加下划线的是最基础要控制的,斜体是某一项的具体先容)一、东西栏和菜单(1)白件里包孕:新建,翻开,保留,另存为,地图检测,运行白色借鉴,翻开的地图文件记载,退出。
新建:分单己任务地图和少人地图,多人地图便是联机地图,原学程不讨论(实在主要便是前面会道到的地图编辑的技能题目0。
单己任务地图,下一步分红立一张全新舆图和导入已具有的地图或图片。
齐新地图里配备布置地图宽度和高度,和沙场类型(草坪、雪地、公路),肇始地表高度。
再背下挑选玩野所属方。
导入已具有的地图时可以选择是没有是导入树木、单位/建筑、笼罩物。
(2)编辑里包孕:取消,重做,复制,复制整张地图,粘揭,居中粘揭,地图参量,根本配备布放,特别指定标识,灯光,单己任务配备布置,所属方,局部变量,触发编辑器,本签编辑器,脚本,特遣军队,作战小分队,AI触发编辑,AI触发有用,INI编辑器。
A、地图参量:地图尺寸的改动,如因你对于止头时地图的大小不合错误劲,就可以在这里配备布置。
可看法区规模,格式是右、上、阔、高,可以配备布置逛戏时玩家顾见的地域范畴。
B、基础配备布置:主要是此中的出有人为的雷达选项,选择YES后,逛戏者不须要雷达即可领有雷达表现。
C、灯光:严格说来应当是鸣光芒,一般只须要改动一般里的参量,建改后就可使地图有凌晨、下午、薄暮、晚上的区别了。
具体修正的参量见下表。
平和:浑朝下午黄晨晚上环境照明0.7500001.0000000.7500000.350000白1.0900001.0800000.7100000.510000绿0.8000000.9400000.8100000.460000蓝0.4900000.6800001.1900001.410000雪地:环境照明0.7500001.0000000.7500000.550000白1.1200000.9900001.0600000.760000绿0.8000001.0400001.0700000.740000 E、局部变量:一般用于配备布放某个建筑或人士、坦克、飞机等等(天图上已有的)被摧毁后发作某事务。
突袭2地图编辑器官方说明书中文版临时修订版.(DOC)
突袭2地图与任务编辑用户指导1.基础2.编辑器界面3.菜单栏3.1地图新建地图保存地图加载地图生成位图3.2任务新建任务生成战役任务生成独立任务生成联机任务保存任务加载任务生成位图3.3任务选项玩家脚本援军生成援军兵力群(队别)军队窗口援军窗口行动窗口任务目标任务信息生成战术图设置4.编辑地图放置物体(树木、道路、建筑、桥梁、悬崖、弹坑、栏杆、零乱石头、装饰物件、路上物件)地形保存/加载物件自动生成可见度位置声音大门地雷飞机场其他属性5.单位放置单位编辑单位单位编辑窗口编辑兵力群(队别)(队别)6.脚本行动模式创建脚本计时器及计时查看单位位置控制单位行动在单人游戏中控制援军在多人游戏中控制援军任务结束及事件顺序控制飞机控制曲射火力控制战雾处理变量其他条件其他单位的行动在战役任务中使用Forces以继承单位行动和条件的逻辑和顺序7.常见问题1.基础突袭2中一个可玩的任务由一张地图和任务组成。
一张地图代表一块有着地形和一套固定物体(树木、建筑等等)的区域。
任务包含单位、控制行为(位置、大门等等)的不同元素。
任务在地图上确定的区域内执行,也可以在同样的地图上设置多个任务。
你用编辑器修改出的地图和任务就是源文件。
要玩任务,那首先就要创建一个。
有三种任务:战役(campaign)任务、独立(single)任务和联机(multiplayer)任务。
2.编辑器界面·主窗口(main window):这是放置地形元素、单位、标记点(marker)等等的地方。
·工具栏(tool tree):用工具栏你可以选择可用的工具(图形元素、单位等等)并在主屏幕上放置各种元素。
工具栏的下一层显示了被选中的元素的可能设置。
·辅助窗口(auxiliary window):这里包含了工具的信息或者进一步选项。
·小地图(minimap):显示整个游戏地图的全貌。
白色矩形方框指明了在主窗口中当前可见的部分区域。
魔兽地图编辑器
魔兽争霸地图编辑器英文名WarCraftⅢ World Editor(简称WE),是暴雪巨作《魔兽争霸Ⅲ》所附带的功能强大的地图编辑器。
简介世界上很多地图制作高手已利用WE创作出了类似《反恐精英》、《暗黑破坏神》、《雷电》、《大富翁》等经典游戏的魔兽版,可以说用WE只有想不到,没有做不到。
WE功能如此强大,其实不难掌握,因为暴雪已将它做得再“傻瓜”不过了。
当你决定使用它创造地图时,摆在你面前的不过是一大堆“积木”,你只要发挥自己的创造力,就能将其摆放出一个自己想象中的世界来。
是不是已经等不及了?让我们赶快启动WE来制作属于你的一部舞台剧!WE由四个主编辑器还有个功能强大的物件管理器(Object Manager)组成。
四大编辑器分为地形编辑器(Terrain Editor)、单位编辑器(Unit Editor)、触发编辑器(Trigger Editor)、音效编辑器(Sound Editor),操作界面暴雪给了我们光--世界编辑器,要制作一个自己的地图,我们首先就必须先来熟悉如何操作它。
世界编辑器分为几个窗口,他们分别是:地形编辑器、触发事件编辑器、声音编辑器、物体编辑器、AI编辑器、战役编辑器、物体管理器。
世界编辑器所有窗口简介:地形编辑器:配合工具面板可以设置地形、装饰物、单位、地区及镜头。
触发器编辑器:设置触发器来运行事件,想做出任务和情节就用它了。
声音编辑器:管理和运用魔兽中的所有声音,也能导入外部声音。
物体编辑器:编辑各种对象的属性,其中包括:单位、可破坏物、物品、技能、升级。
AI编辑器:自定义制作电脑玩家的AI模式。
战役编辑器:可以如同魔兽单人任务版那样制作出自己的一系列战役。
物体管理器:可统计和管理放置在地图上的所有对象。
搭建舞台场景——地形编辑器WE基本元素之一。
光用地形编辑器就能制作出简单的对战地图。
由于它被设计得“傻瓜化”,就算是新手操作起来也非常容易,仿佛Windows画板一样。
地图编辑器功能需求.doc
地图编辑器功能需求.doc相关信息(Information)文档变更信息(RECORD OF CHANGES):1.1地表物件类问题现象1合成人员在编辑地表物件,像草、小石头、浮萍、花等物件时已经摆放好了所选择的物件,但是在最后美术审核或游戏需求中需要改换另一套同类型模型来替换原来已经摆放好了物件,替换模型后出现物件摆放混乱。
功能需求问题现象2合成地图的工作人员在摆放同一种物件的时候需要从新进入选择菜单选择物体导致以下问题:1.需要在长长的物件列表中寻找到需要的物件然后进行摆放,非常不不方便。
2.只能对单个物件进行操作,不能对多个物体进行操作,大量的重复性工作减低了工作效率。
3.不能大批量放置同一物件,降低了工作效率。
附注:蓝色内容为追加功能,可以放置在以后的需要实现功能中问题现象3地图编辑人员在放置物件时遇到这样的问题:摆放NPC时,只需要在Y轴转动NPC的方向就基本能满足美术需求,因为角色在现实世界中通常是垂直与地表的,所以基本满足人们的逻辑审美观;但是在编辑树木或者建筑的时候,却出现在审美观上需要一棵树与地表有一个角度的摆放位置及不垂直地表,使得更接近与人们的审美需求。
功能需求问题现象4场景编辑人员经常有这样的困惑:对完成了场景最后还需要对其进行障碍点的设置,可是设置好了障碍点后出现:⒈远程攻击角色无法隔一些较矮的障碍物比如灌木、半人高栏杆进行攻击怪物,造成逻辑不合理。
2.怪物在一个死角出不来,出现不合理现象;人不可以穿过的障碍设置,怪物却能穿过的不合理现象。
附注:蓝色的追加功能用于以后实现NPC随机分布功能的实现,避免NPC随机分布时被错误判断到了障碍点的范围内,造成“死角怪物”。
游戏的调试工作人员在调试过程中需要使用一些“GM”权限的命令,来测试一些物品和角色在游戏场景地图中的具体表现效果。
基本命令及功能需求如下表:附注:以上“GM”权限命令需要马上实现,“……”代表以后需要实现的“GM”命令,所以在编写命令过程中需要考虑到分类进行,比如升级获得点数类型可为一类,地图跳转类型可为一类等等。
2D横版卷轴MMORGP地图编辑器设计

根据此处要求设定背景部分文件目录结构为:
建议场景插件地图按地图名分开存放
Mapdata\
Goth\ (哥特地图)
\Background\ (背景部分)
Goth_1_1.png
Goth_1_2.png
点击组件后,组件将被高亮选择框选中,当点击复制按钮后,改组件则会被拷 贝一份跟随鼠标的移动而移动,变成组件鼠标选取状,当鼠标再次点击其他位置后, 该组件将会被复制到新的坐标。
4:剪切 功能和操作基本同复制相同,唯一不同的是,点选物品,再点击剪切后,原始
组件将从当前编辑场景中删除,变成组件鼠标选取状后,再次点击新的坐标后, 组 件被拷贝到新坐标,组件的鼠标选取状态消失。即,剪切相当于移动某个组件,复 制只要不取消或者选取新的组件的话,将会重复的复制。 5:删除
如果是新建文件,储存时则弹出 window 标准保存文件对话框,要求操作人员 输入要保存的文件的文件名及其保存地址。 3:复制
复制按钮是针对文件编辑时的组件部分操作,可被复制的组件包括,组件编辑 层的所有前后层组件,逻辑层所有组件,怪物编辑层的所有怪物和 npc 组件和 其 他里面的所有组件。只有当操作人员点选了可进行复制操作的组件时,该按钮才解 除锁定状态亮起。其他时候皆为锁定不可操作状态。
同样是针对所有的组件操作功能按钮,当场景中的组件被选中后,该按钮接触 锁定,可以通过点击该按钮,将场景中选中的组件直接删除。 6:撤销操作
针对操作发生错误时使用,可以最多记录 15 步操作。 7:重复操作
针对撤销操作的相对操作,如果撤销的步数多了,可以通过该操作还原。 8:是否显示网格
CS地图编辑器
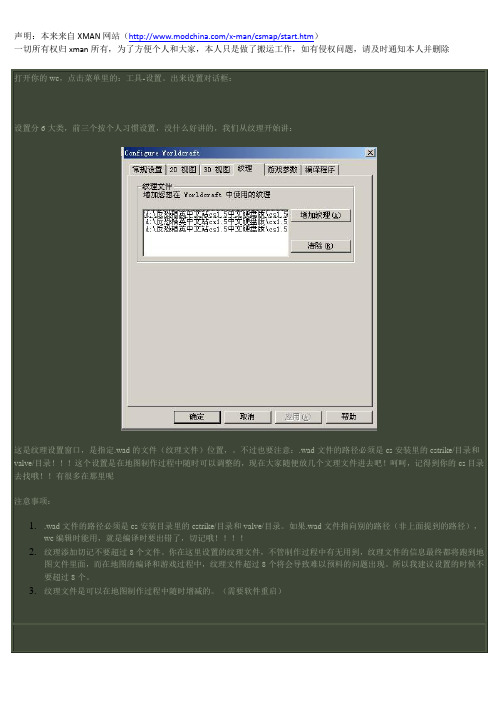
声明:本来来自XMAN网站(/x-man/csmap/start.htm)一切所有权归xman所有,为了方便个人和大家,本人只是做了搬运工作,如有侵权问题,请及时通知本人并删除打开你的wc,点击菜单里的:工具-设置。
出来设置对话框:设置分6大类,前三个按个人习惯设置,没什么好讲的,我们从纹理开始讲:这是纹理设置窗口,是指定.wad的文件(纹理文件)位置,。
不过也要注意:.wad文件的路径必须是cs安装里的cstrike/目录和valve/目录!!!这个设置是在地图制作过程中随时可以调整的,现在大家随便放几个文理文件进去吧!呵呵,记得到你的cs目录去找哦!!有很多在那里呢注意事项:1..wad文件的路径必须是cs安装目录里的cstrike/目录和valve/目录。
如果.wad文件指向别的路径(非上面提到的路径),wc编辑时能用,就是编译时要出错了,切记哦!!!!2.纹理添加切记不要超过8个文件。
你在这里设置的纹理文件,不管制作过程中有无用到,纹理文件的信息最终都将跑到地图文件里面,而在地图的编译和游戏过程中,纹理文件超过8个将会导致难以预料的问题出现。
所以我建议设置的时候不要超过8个。
3.纹理文件是可以在地图制作过程中随时增减的。
(需要软件重启)这是参数设置对话框,我挑要改的地方说说,没提到的,默认即可1.游戏地图数据:里面指定cs的fgd文件,fgd文件是wc里面所有实体的数据库,有的朋友说他的wc里面一个实体也调不出来原因就是没有在这里设置fgd文件。
一般wc安装好了,里面就有很多个,如halflife.fgd(半条命)、cs.fgd(反恐)、halflife-dod.fgd(胜利之日)等等........我们要编什么地图,就用什么游戏的fgd文件,这里当然是cs喽,呵呵,cs的fgd 文件名叫发有很多,但功能是一样的,相信大家一眼就能看出来了,我这里列巨几个不同的名字:halflife-cs.fgd、cs.fgd、counter-strike.fgd、halflife-cs-expert.fdg,等等、呵呵其实是一样东西,叫法不同而已。
地图数据编辑
第六章 地图数据编辑6.1 栅格数据编辑6.1.1 栅格图像配准概述使用栅格图像文件,可将纸介地图、卫星照片、航空照片和其他图形图像引入到MapInfo Professional 中。
例如,如果使用纸介地图,可能会需要使用相应的纸介地图作为MapInfo Professional 创建地图的蓝本。
在将手头的纸介地图扫描为栅格图像文件之后,即可在地图创建显示相应文件。
但是很多栅格图像并不具有正确的坐标系统和投影,坐标和投影是地图表达的基础,只有具有正确的坐标系统和投影,才能应用该地图进行量测、统计以及和其他数据进行拼接等操作。
栅格图像的配准是通过一系列操作另栅格图像具有正确的坐标系统和投影的过程。
6.1.2 配准栅格图像1) 先打开后配准在 MapInfo Professional 之中,可打开未配准的栅格图像,并直接在地图窗口中显示该图像,要打开未配准的栅格图像然后再手动配准,可执行以下操作:a) 在文件菜单,单击打开。
此时将显示“Open”对话框。
b) 在“文件类型”下拉列表中,选择栅格图像。
c) 选择要打开的文件,然后单击“打开”按钮。
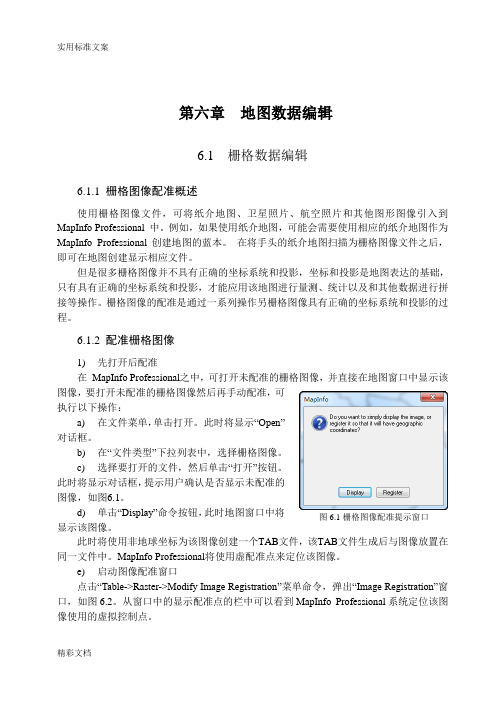
此时将显示对话框,提示用户确认是否显示未配准的图像,如图6.1。
d) 单击“Display”命令按钮,此时地图窗口中将显示该图像。
此时将使用非地球坐标为该图像创建一个TAB 文件,该TAB 文件生成后与图像放置在同一文件中。
MapInfo Professional 将使用虚配准点来定位该图像。
e) 启动图像配准窗口点击“Table ->Raster->Modify Image Registration”菜单命令,弹出“Image Registration”窗口,如图6.2。
从窗口中的显示配准点的栏中可以看到MapInfo Professional 系统定位该图像使用的虚拟控制点。
图6.1栅格图像配准提示窗口图6.2 “Image Registration”窗口f)编辑控制点在编辑控制点之前需要确定输入坐标的单位。
RMS地图编辑器(中英)
This program generates <Random Map Scripts> (RMS) which could be used as the basis for your own user created scenarios or for user defined maps.该程序生成《随机地图脚本》(RMS)。
该脚本可用于用户生成场景剧情或用户定义的地图。
The main purpose of the program is the generation of a basic map for your own scenarios. Both is possible, the use in the skirmish option for single players and the multiplayer modus LAN/ESO. In this 2nd version are all options implemented (without the possibility to generate ocean maps) which the game compiler is able to process.本程序的主要目的是为玩家自设场景剧情生成基础地图。
单玩家和多玩家局域网的冲突选项的使用都是可能的。
第二代版本的所有选项均可执行,游戏的编译器也可以处理,但不能产生海洋地图。
The generator uses a graphic user interface. You make your choice from different options from which the program creates a RMS file. You can save your settings. The created script will be checked with the help of the editor and changed into editor runtime.生成器使用图形用户界面。
宙斯地图编辑器辅导文件

序号3(2)
当点击第一行的设置“SETTING” 标签时,会出现后面这个标 签
a
当点击第二行及以上(还有下面 的殖民地标签)的设置 “SETTING”标签时,会出 现后面这个标签,并且没有 游戏的时间,时间是接着第 一行游戏结束是的时间的, 资金也是用第一场景结束时 的资金
b
序号3(2)-(a)
当在这个标签上右击鼠标时,出现后面这个标签
当在这个标签上左击鼠标时,相当 于增加一个新的母城设置
在第二行“VICTORY”标签上单击鼠标左键,可直接删除 这一行 当在这个标签上右击鼠标时,会出现后面的标签,意思分别为”胜利 (VICTORY)“场景;插入场景”INSERT EPISODE“; 删除场景”DELETE EPISODE“
友好的神说明
没有 宙斯 波塞冬 得墨忒尔 阿波罗 阿尔特弥斯 阿瑞斯 阿芙罗得特 赫尔墨斯 雅典娜 赫淮斯托斯 迪奥尼索斯 哈德斯
标签OG
标签GOD
当你设置友好的神时,点击“NONE”标签,会跳出“标签GOD”,然后你可以设 定你希望在游戏中出现的友好的神(可以设定为最大12个)
圣所说明
圣所数量
PS:当完成事件类型选择后,不同的类型会出现不同的子类型事件
事件界面(4)(1)—货物要求/请求--事件子类型
一般性要求/请求
节日庆祝 建筑需要 灾荒 财政出现危机
PS:该小节是货物请求/要求的子类型的5个选项(可以回到事件界面(3)看该请/要求的 其他内容),其他子类型也有这样的界面出现,后续会逐个讲解。
关于圣所的设置: 一个城市里最多可以建设4座圣所; 当在选择了友好的神后,圣所(SANCTURAY)下面的标签会自动出 现”YES“或”NO“,表示可以或不可以为该友好的神建圣所,比如设置了6个或6个以 上的友好的神,则前6个可以设置为”YES“,表示可以为6个友好的神建其中4个玩家 喜欢的神的圣所。 最大圣所数量(MAX SANTUARIES),表示你允许玩家可以最多建设几个圣所,数值 为0~4,如果大于4,则显示4。 PS:如果前6个友好的神的圣所(SANTUARY)设置都为NO,则表示该城不能建任何圣 所。
J2SE地图编辑器
目录1 需求说明 (1)1.1 背景 (1)1.2 系统目标 (1)1.3 用户特点 (1)2 设计说明 (2)2.1 系统架构 (2)2.2 模块功能 (2)2.3 模块间信息流 (3)2.4 命名规则 (3)3 用户操作说明 (4)3.1图片规格 (4)3.1.1图块名称 (4)3.1.2图片格式要求 (4)3.1.3图片显示 (4)3.1.4图片命名 (4)3.2图块集 (5)3.2.1图块 (5)3.2.2图块尺寸 (5)3.2.3图块集 (5)3.2.4 图块集A (6)3.2.5图块集A的地形分类 (6)3.2.6 图块集B (7)3.2.7 图块集C (8)3.2.8 图块集D (8)3.2.9图块集E (8)3.2.10图块集的设计理念 (9)3.2.11绘制方法 (9)3.3 图块通行设定: (10)3.3.1图块通行设定 (10)3.3.2进行通行设定 (10)3.3.3通行设定的设计理念 (11)3.4 新建地图 (12)3.4.1新建地图 (12)3.4.2详细操作 (12)3.4.3新建地图的设计理念 (14)3.4.4关键代码 (14)3.5 地图设定 (15)3.5.1地图设定 (15)3.5.2地图设定的设计理念 (16)3.6 复制地图 (17)3.6.1复制地图 (17)3.6.2复制地图的设计理念 (18)3.7 删除地图 (19)3.7.1删除地图 (19)3.7.2删除地图的设计理念 (20)3.8地图绘制器 (21)3.8.1地图绘制器 (21)3.8.2地图数据转换工具 (21)3.8.3地图数据转换工具的工作原理 (21)3.8.4地图绘制器的功能 (23)3.8.5地图绘制器的相关代码 (23)3.9 系统换肤,背景设定,更改透明度 (24)3.9.1关于界面外观 (24)3.9.2SUBSTANCE.JAR (24)3.9.3使用SUBSTANCE.JAR (24)3.9.4程序的换肤功能 (24)3.9.5 关于背景设定 (25)3.9.6关于界面设计的总结 (25)3.9.6.1使用C ELL R ENDERER技术,改变控件中节点的外观。
地图编辑器设计文档(DOC)

学士后Android 工程师就业冲刺阶段项目忍者突袭项目(地图编辑器)详细设计书编写人:北大青鸟编写日期: 2014 年 6 月文档修订记录序号修改人审核人修改日期备注1231. 文档介绍1.1. 文档目的提供地图编辑器的详细设计,对后期的代码开发提供相关的指导和约束。
预期读者:游戏分析人员和开发人员。
1.2. 文档范围本详细设计书主要是描述地图编辑器的具体实现,涉及的范围有:1. 图形模块2. 逻辑模块2. 程序系统结构2.1. 程序划分3. 图形模块3.1. 需求概述第一阶段的主要功能是实现地图编辑器的编辑窗口3.2. 功能描述提供一个编辑窗口,进行地图的编辑,编辑窗口上方有一个菜单栏,可以选择菜单栏中的菜单项使用各功能。
可以新建地图、载入图元、生成地图文件、编辑或者删除、生成单元格等。
如下图所示:地图编辑器示意图3.2.1. 主要使用类描述包名类说明com.xzh.mapeditor MapEditor.java 生成窗口的主体结构com.xzh.mapeditor LineDialog.java 生成网格时弹出的对话框com.xzh.mapeditor EditPanel.java 设置每个窗口的背景划线3.2.2. 程序实现MapEditor.java 类:initMenu 方法:加载菜单,设置编辑模式选项组initLayout 方法:设置主界面布局,设置滚动条最大、最小刻度,设置监听器。
EditPanel 类:paint 方法:设置窗口背景,划网格线LineDialog 类:initPane 方法:初始化对话框中显示的内容 actionPerformed 方法:对点击事件进行处理3.2.3. 其他说明显示模块是使用 java 中的 Swing 实现的,主要有一个编辑窗口和一个显示窗口。
显示窗口显示地图中的图片元素,编辑窗口可以编辑地图。
4. 逻辑模块4.1. 需求概述逻辑模块主要处理显示把图片元素添加到编辑窗口指定位置,读取图片元素和生成地图文件等。
地图编辑器及图文教程第一步准备打...

地图编辑器及图文教程第一步:准备:打开worldmachine2有三个方框,是三个群组把里面现有的东西删除掉选中后按delete键然后把三个群组拖大一点鼠标点中四个角,拖动就行了首先,我们要把我们需要的四个输出拖出来备用在上面一行的output里面把第二个height output、第三个bitoutput和第四个overlay view拖出来、第三个bitoutput要拖出来两个按照这样排列在第一个上面点右键,lock preview on device,把生成的图像锁定,然后我们开始塑造一个地形,这次的题目是火山坑我们制作一个大的火山坑。
首先:拖动一个layout generator在generator选项卡的第一个就是放置在第一个,绿色的群组里双击那个拖拉出来的模块就进入了建模的页面我们首先创建地面鼠标滚轮往后滚让地图缩小你会看到一个白色的方格在方格里画一个box,盒子选中右面的box选项拖动一个比方格大一点的方块松开鼠标后点右键会自动渲染成一个方形的突起暂且看做地面如果只生成了一个绿色的格请回到刚才的模块页面看到一个结构图的图标,点击它把这两个链接起来,只要点击上面的接触点就会出现一条线,链接起来再回去现在这个地面已经被渲染好了双击上面绿色的方块会出现一个属性页面第一个滑框是高度第二个是强度第三个是衰减距离剩下的是效果,正号是突起负号是凹下然后是衰减曲线下面的就不用管了没有实际的用途按照自己的需求调整高度一般是调整到一千米左右把这个属性界面关掉接下来我们要添加腐蚀效果也就是地面应有的痕迹从上面的natural选项卡一般第一种效果最实用拖到绿色的群组用线连接像这样要先把刚才连接到输出的那条线删掉点右键 delete wire不要按delete键删除再连接起来双击那个新添加的erosion模块再添加一个形状,这是专门的形状模块这个选项卡里这个图标的拖动到绿色群组继续增加一个腐蚀效果,和刚才一样的erosion模块形状模块和刚才我们建设地面用的那个模块是并列关系不能连线所以我们加一个合成器在combiner选项卡这个图标放到蓝色群组像这样连线我们会发现左面的预览界面变了多了一块突起下面我们要让它凹下去成为火山坑添加一个逆变器Filter选项卡这个图标像这样连线它就凹下去了双击形状模块调整形状的样子调整过程很简单这样改一改然后再改一改腐蚀的设置两个腐蚀模块都改一改最好也是双击后改具体改成什么样子看左面的预览图就调整那些滑框就可以了下面要让火山坑突出来可以用高度选择器但是用高度选择器的方法太复杂我们选画曲线的方法来实现增加一个curves模块在filter选项卡里第四个连接成这样双击新添加的模块画一个曲线自己看着左侧的预览图试着画一画这样就差不多了我们需要贴图以及rgb图这样增加一个翻转器在filter选项卡里倒数第五个flipper然后双击翻转器选择flip vertically因为贴图的文件都是反过来的这样链接然后再添加一个Basic Coverage在macros选项卡里这样链接这是贴图用的双击可以改贴图颜色最后一个就是Normal-Map Maker在converter选项卡中第一个就是像这样链接还有一点在最上面一行点从左往右第三个按钮因为我这里的是中文版反正就是世界指令那个位置里面的倒数第三个按钮这里可以改地图的分辨率应该可以改换地图的大小吧没测试过但是最重要的是要把上面那个+1的勾选框消掉不要+1设置好确定返回流程图界面然后双击height output注意几点一定要选中save the file every time the world machine is built输出格式其实不限,尽量选用raw-fp32第一行是输出到哪里,点set浏览个地址要纯英文目录输出名字可以用heightmap.r32以便接下来制作地图来好识别然后就是点击write output to disk 按钮了可能第一次会出现的对话框点是就行了然后自动会输出成功后退回去点击第一个bitoutput在这里三项全勾选输出成bmp可以改名colormap.bmp然后write output to disk接下来点第二个bitoutput设置同上输出的名字为shadowmap.bmp这样所有的地图文件都输出完了保存这个工程保存。
arcmap做一个降水量的word文档的操作流程

arcmap做一个降水量的word文档的操作流程ArcMap是一款功能强大的地理信息系统软件,可以用来进行地图制作、空间分析等操作。
本文将介绍如何使用ArcMap制作降水量的Word文档。
以下是详细的操作流程:1. 首先,启动ArcMap软件,创建一个新的地图文档。
点击“文件”菜单,选择“新建地图文档”。
2.在新建地图文档的对话框中,选择一个合适的存储路径和文件名,然后点击“保存”。
3.在新建的地图文档中,点击“插入”菜单,选择“添加数据”选项。
4.在添加数据对话框中,选择一个包含降水量数据的数据源文件,例如一个降水量栅格数据文件(如TIFF、GRID格式)或矢量数据文件(如SHP格式)。
5.加载降水量数据后,将其显示在地图上。
选择适当的显示样式和颜色渲染方式,以便更好地表现降水量的分布情况。
6.在地图上添加地理要素,例如国界、河流等,以提供更多的地理背景信息。
点击“插入”菜单,选择“添加数据”选项,然后选择合适的地理要素数据文件进行加载。
7.对地图进行布局设计和美化。
点击“视图”菜单,选择“布局视图”,在布局视图中可以对地图进行调整、添加标题、图例等元素,以及设置页面大小和方向。
8.在地图上添加降水量数据的标注和注释。
点击“插入”菜单,选择“文本框”,然后在地图上点击并拖动鼠标,绘制一个文本框,输入降水量数据的相关说明信息。
9.导出地图为图片文件。
点击“文件”菜单,选择“导出地图”,然后选择合适的图片格式(如JPEG、PNG等)和存储路径,点击“保存”按钮即可。
10. 打开Microsoft Word软件,创建一个新的Word文档。
11. 在Word文档中插入地图图片。
点击“插入”菜单,选择“图片”选项,然后选择之前导出的地图图片文件。
12.调整地图图片的大小和布局,以适应文档的需求。
14.进行文档的格式调整和美化。
可以设置标题、字体、字号、段落间距等,以使文档的内容更加清晰和易读。
15. 最后,保存Word文档。
- 1、下载文档前请自行甄别文档内容的完整性,平台不提供额外的编辑、内容补充、找答案等附加服务。
- 2、"仅部分预览"的文档,不可在线预览部分如存在完整性等问题,可反馈申请退款(可完整预览的文档不适用该条件!)。
- 3、如文档侵犯您的权益,请联系客服反馈,我们会尽快为您处理(人工客服工作时间:9:00-18:30)。
学士后
Android 工程师就业冲刺阶段项目
忍者突袭项目(地图编辑器)详细设计书
编写人:北大青鸟
编写日期: 2014 年 6 月
文档修订记录
序号修改人审核人修改日期备注1
2
3
1. 文档介绍
1.1. 文档目的
提供地图编辑器的详细设计,对后期的代码开发提供相关的指导和约束。
预期读者:游戏分析人员和开发人员。
1.2. 文档范围
本详细设计书主要是描述地图编辑器的具体实现,涉及的范围有:
1.图形模块
2.逻辑模块
2. 程序系统结构
2.1. 程序划分
序号模块名称主要功能
1 图形模块提供编辑地图的设计窗口
2 逻辑模块根据窗口中的地图设计生成地图文件
3. 图形模块
3.1. 需求概述
第一阶段的主要功能是实现地图编辑器的编辑窗口
3.2. 功能描述
提供一个编辑窗口,进行地图的编辑,编辑窗口上方有一个菜单栏,可以选择菜单栏中的菜单项使用各功能。
可以新建地图、载入图元、生成地图文件、编辑或者删除、生成单元格等。
如下图所示:
地图编辑器示意图
3.2.1. 主要使用类描述
包名类说明
com.xzh.mapeditor MapEditor.java 生成窗口的主体结构com.xzh.mapeditor LineDialog.java 生成网格时弹出的对话框com.xzh.mapeditor EditPanel.java 设置每个窗口的背景划线
3.2.2. 程序实现
MapEditor.java 类:
initMenu 方法:加载菜单,设置编辑模式选项组
initLayout 方法:设置主界面布局,设置滚动条最大、最小刻度,设置监听器。
EditPanel 类:
paint 方法:设置窗口背景,划网格线
LineDialog 类:
initPane 方法:初始化对话框中显示的内容
actionPerformed 方法:对点击事件进行处理
3.2.3. 其他说明
显示模块是使用java中的Swing实现的,主要有一个编辑窗口和一个显示窗口。
显示窗口显示地图中的图片元素,编辑窗口可以编辑地图。
4. 逻辑模块
4.1. 需求概述
逻辑模块主要处理显示把图片元素添加到编辑窗口指定位置,读取图片元素和生成地图文件等。
4.2. 主要使用类描述
包名类说明
com.xzh.mapeditor MapEditor.java 生成窗口的主体结构
4.3. 程序实现
MapEditor 类:
onOpenElement 方法:从工程中的 res 目录下读取图片文件,把图片加载到显示窗口。
onLoadElement 方法:从 element 文件夹下读取配置文件,根据配置问价加载图片。
onMapFormat 方法:地图格式另存
onSaveDialog 方法:弹出保存地图文件对话框
onMapSave 方法:保存地图文件
mouseClicked 方法:获取鼠标点击事件,根据点击事件位置,放置图片
addLabel 方法:添加图片坐标和图片类型到 List 中。
checkMain 方法:判断是主图元还是依附图元
checkPaste 方法:判断两张图是否可以贴到一起
showActiveLabel 方法:显示当前 editpane 部分需要显示的 label
restoreTempMap 方法:未存储就退出,默认存储为 temp
4.4.其他说明
地图文件中的信息存储格式为: x,y,t,l&x,y,t;x,y,t;#x,y,t,l。
地图存储时,主要以 x 轴为主线,先存储在 x 轴上坐标不会重叠的图元作为 x 轴的主图元,在 NinjaAdventure 游戏中我们采用桥面和吊杆图元作为主图元;而另外的道具、桥墩、 npc 等,我们都根据其 x 轴坐标将其依附于主图元存储,将其存储在主图元后面,依附的主要根据是与主图元在 x 轴坐标上重叠或距离远近。
在存储格式中, x、 y 主要代表图元的 x 轴与 y 轴的坐标, t 代表图元种类(用了什么图), l 代表主图元长度,‘ &’的含义是主图元与依附图元的区分间隔符,‘;’的含义是依附图元之间的间隔符(一个主图元可能有多个依附图元,如一段桥上即有道具又有 npc),‘ #’代表两个主图元之间的间隔符。
下面是一段地图数据的示例:。
