液压扳手扭矩换算
扭力扳手扭矩对照表
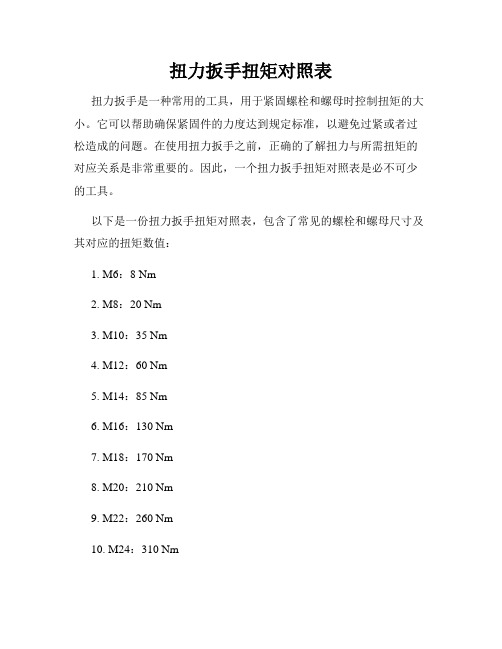
扭力扳手扭矩对照表扭力扳手是一种常用的工具,用于紧固螺栓和螺母时控制扭矩的大小。
它可以帮助确保紧固件的力度达到规定标准,以避免过紧或者过松造成的问题。
在使用扭力扳手之前,正确的了解扭力与所需扭矩的对应关系是非常重要的。
因此,一个扭力扳手扭矩对照表是必不可少的工具。
以下是一份扭力扳手扭矩对照表,包含了常见的螺栓和螺母尺寸及其对应的扭矩数值:1. M6:8 Nm2. M8:20 Nm3. M10:35 Nm4. M12:60 Nm5. M14:85 Nm6. M16:130 Nm7. M18:170 Nm8. M20:210 Nm9. M22:260 Nm10. M24:310 Nm请注意,上述数值仅供参考,并且可能因不同的螺栓和螺母类型而略有不同。
在使用扭力扳手进行紧固时,一定要参考厂商提供的具体材料规格和要求,并遵循其建议的扭矩数值范围。
扭力扳手扭矩对照表的使用方法如下:1. 确认需要使用的螺栓或螺母的尺寸。
2. 在对照表中找到相应尺寸的行,查找对应的扭矩数值。
3. 设置扭力扳手的扭矩值为对应的数值。
4. 使用扭力扳手进行紧固,直到扳手发出点击声为止,表示已经达到预设的扭矩。
使用扭力扳手进行紧固时要注意以下几点:1. 扭力扳手应保持垂直于紧固件的方向,避免侧向施力。
2. 所使用的扭力扳手应具备准确的扭矩调节装置,以确保扭矩的准确施加。
3. 在紧固之前,应确保螺栓和螺母的表面清洁,并涂抹适量的润滑剂,以确保扭矩的传递准确无误。
4. 紧固件使用过程中,要确保扭力扳手的扭矩值和对照表上的数值一致。
5. 紧固完成后,要及时将扭力扳手的扭矩值调零,以免对下次使用造成影响。
总结:扭力扳手扭矩对照表是使用扭力扳手时不可或缺的工具。
合理使用扭力扳手可以确保螺栓和螺母的紧固力度符合标准,有效预防了由于紧固不当所引起的问题。
在使用前,根据具体材料规格和要求,参考厂商提供的扭矩对照表,并正确调整扭力扳手的扭矩数值。
通过正确的使用扭力扳手和扭力扳手扭矩对照表,可以提高工作效率,降低错误的发生率,并保障工作的安全和质量。
液压扳手力矩对照表精品文档9页

M45
70mm
180
1764
280
2744
320
3136
550
5390
M48
75mm
230
2254
350
3430
400
3920
680
6664
M52
80mm
280
2744
420
4116
480
4704
850
8330
M56
85mm
360
3528
530
5194
610
5978
1050
10290
M60
90mm
37
367
640
89
870
1110
154
1509
1600
222
2175
2200
152
298
41
405
704
98
957
1222
169
1661
1760
244
2392
2400
166
326
45
443
768
106
1044
1334
185
1813
1920
266
2610
2600
179
354
49
481
832
115
1131
1446
200
1965
2080
288
2827
2800
193
382
53
519
896
124
1218
1558
216
2118
RT液压扳手扭矩对照表

150060 160064 180071 200079 220087 240095 2600103 2800111 3000119 3200127 3400135 3600143 3800151 4000159 4200167 4400175 4600183 4800191 5000199 5200206 5400214 5600222580023060002386200246640025466002626800270700027872002867400294760030278003108000318820032684003338600341880034990003579200365940037396003819800389100003971048111086124971381081521181651291791401931512071612201722341832481942622052762152902263032373172483312583452693582803722913863014003124143234273344413444553554683664823774963885103985244095384205524315654415794525934636074746204846344956485066625176765276905382Set the pressure on the pump thatcorresponds to the torque value.1Find the closest torque value foryour application, either in ft-lbsor in Nm.FOOT-POUNDS NEWTON-METERSThe above torque values are only applicable when using a calibrated RT-P5 hydraulic torque wrench powered by a 10,000 psi pumpQUICK SETUP GUIDESetting up your hydraulic torque wrench for use is easy. Please read the included user manual and safety instruc-tion booklet for additional guidelines.Wear personal protec-tive equipment, such aseyeglasses and steel-toe shoes.1 2 3SET PRESSUREMake sure the hoses are free of any defects. The couplers are on pump and the tool should be securely connected.Place tool on flat surface.Turn pump on. Cycle the tool. Press the “ON ’ but-ton on the remote, hold until tool clicks. Release, wait for the tool to click. Repeat the cycle. Ensure there is no leak.4Use the torque conver-sion chart to set the psi for the torque you need. Press the remote’s “ON ” button and slowly turn the pressure regulator clockwise to reach the right pressure.FOUR BASIC STEPS TO OPERATE YOUR RT-P5Scan the code to see a brief overview video on how to use the document or go to CYCLE YOUR TOOLCONNECT HOSES1500209 1600222 1800250 2000278 2200306 2400334 2600361 2800389 3000417 3200445 3400473 3600500 3800528 4000556 4200584 4400612 4600639 4800667 5000695 5200723 5400751 5600778580080660008346200862640089066009176800945700097372001001740010297600105678001084800011128200114084001168860011958800122390001251920012799400130796001334980013621000013901042831103021243391383771524151654521794901935282075652206032346412486782627162767542907923038293178673319053459423589803721018386105540010934141131427116844112064551244468128248213194961357510139552414325381470552150856515455791583593162160716586201696634173464817726621809676184769018852Set the pressure on the pump thatcorresponds to the torque value.1Find the closest torque value foryour application, either in ft-lbsor in Nm.FOOT-POUNDS NEWTON-METERSThe above torque values are only applicable when using a calibrated RT-1 hydraulic torque wrench powered by a 10,000 psi pumpQUICK SETUP GUIDESetting up your hydraulic torque wrench for use is easy. Please read the included user manual and safety instruc-tion booklet for additional guidelines.Wear personal protec-tive equipment, such aseyeglasses and steel-toe shoes.1 2 3SET PRESSUREMake sure the hoses are free of any defects. The couplers are on pump and the tool should be securely connected.Place tool on flat surface.Turn pump on. Cycle the tool. Press the “ON ’ but-ton on the remote, hold until tool clicks. Release, wait for the tool to click. Repeat the cycle. Ensure there is no leak.4Use the torque conver-sion chart to set the psi for the torque you need. Press the remote’s “ON ” button and slowly turn the pressure regulator clockwise to reach the right pressure.FOUR BASIC STEPS TO OPERATE YOUR RT-1Scan the code to see a brief overview video on how to use the document or go to CYCLE YOUR TOOLCONNECT HOSES1500485 1600517 1800581 2000646 2200711 2400775 2600840 2800904 3000969 32001034 34001098 36001163 38001227 40001292 42001357 44001421 46001486 48001550 50001615 52001680 54001744 560018095800187360001938620020036400206766002132680021967000226172002326740023907600245578002519800025848200264984002713860027788800284290002907920029729400303696003101980031651000032301046571107011247881388761529631651051179113919312262071314220140123414892481577262166427617522901839303192731720143312102345219035822773722365386245240025404142628427271544128034552890468297848230664963153510324152433285383416552350356535915793679593376660738546203941634402964841176624204676429269043792Set the pressure on the pump thatcorresponds to the torque value.1Find the closest torque value foryour application, either in ft-lbsor in Nm.FOOT-POUNDS NEWTON-METERSThe above torque values are only applicable when using a calibrated RT-3 hydraulic torque wrench powered by a 10,000 psi pumpQUICK SETUP GUIDESetting up your hydraulic torque wrench for use is easy. Please read the included user manual and safety instruc-tion booklet for additional guidelines.Wear personal protec-tive equipment, such aseyeglasses and steel-toe shoes.1 2 3SET PRESSUREMake sure the hoses are free of any defects. The couplers are on pump and the tool should be securely connected.Place tool on flat surface.Turn pump on. Cycle the tool. Press the “ON ’ but-ton on the remote, hold until tool clicks. Release, wait for the tool to click. Repeat the cycle. Ensure there is no leak.4Use the torque conver-sion chart to set the psi for the torque you need. Press the remote’s “ON ” button and slowly turn the pressure regulator clockwise to reach the right pressure.FOUR BASIC STEPS TO OPERATE YOUR RT-3Scan the code to see a brief overview video on how to use the document or go to CYCLE YOUR TOOLCONNECT HOSES1500839 1600894 18001006 20001118 22001230 24001342 26001453 28001565 30001677 32001789 34001901 36002012 38002124 40002236 42002348 44002460 46002571 48002683 50002795 52002907 54003019 56003130580032426000335462003466640035786600368968003801700039137200402574004137760042487800436080004472820045848400469686004807880049199000503192005143940052559600536698005478100005590104113711012131241364138151615216671651819179197119321222072274220242523425772482728262288027630322903183303333531734863313638345379035839413724093386424440043964144547427469944148514555002468515448253054965457510560852457605385912552606356562155796366593651860766706206821634697364871246627276676742769075792Set the pressure on the pump thatcorresponds to the torque value.1Find the closest torque value foryour application, either in ft-lbsor in Nm.FOOT-POUNDS NEWTON-METERSThe above torque values are only applicable when using a calibrated RT-5 hydraulic torque wrench powered by a 10,000 psi pumpQUICK SETUP GUIDESetting up your hydraulic torque wrench for use is easy. Please read the included user manual and safety instruc-tion booklet for additional guidelines.Wear personal protec-tive equipment, such aseyeglasses and steel-toe shoes.1 2 3SET PRESSUREMake sure the hoses are free of any defects. The couplers are on pump and the tool should be securely connected.Place tool on flat surface.Turn pump on. Cycle the tool. Press the “ON ’ but-ton on the remote, hold until tool clicks. Release, wait for the tool to click. Repeat the cycle. Ensure there is no leak.4Use the torque conver-sion chart to set the psi for the torque you need. Press the remote’s “ON ” button and slowly turn the pressure regulator clockwise to reach the right pressure.FOUR BASIC STEPS TO OPERATE YOUR RT-5Scan the code to see a brief overview video on how to use the document or go to CYCLE YOUR TOOLCONNECT HOSES15001200 16001280 18001440 20001600 22001760 24001920 26002080 28002240 30002400 32002560 34002720 36002880 38003040 40003200 42003360 44003520 46003680 48003840 50004000 52004160 54004320 560044805800464060004800620049606400512066005280680054407000560072005760740059207600608078006240800064008200656084006720860068808800704090007200920073609400752096007680980078401000080001041627110173512419521382169152238616526031792820193303720732542203471234368824839052624122276433929045563034772317498933152063455423358564037258573866074400629141465084276725441694245571594687376482759349678105108026524824353884605528677565889457991115939328607954562097626349979648101966621041367610630690108472Set the pressure on the pump thatcorresponds to the torque value.1Find the closest torque value foryour application, either in ft-lbsor in Nm.FOOT-POUNDS NEWTON-METERSThe above torque values are only applicable when using a calibrated RT-8 hydraulic torque wrench powered by a 10,000 psi pumpQUICK SETUP GUIDESetting up your hydraulic torque wrench for use is easy. Please read the included user manual and safety instruc-tion booklet for additional guidelines.Wear personal protec-tive equipment, such aseyeglasses and steel-toe shoes.1 2 3SET PRESSUREMake sure the hoses are free of any defects. The couplers are on pump and the tool should be securely connected.Place tool on flat surface.Turn pump on. Cycle the tool. Press the “ON ’ but-ton on the remote, hold until tool clicks. Release, wait for the tool to click. Repeat the cycle. Ensure there is no leak.4Use the torque conver-sion chart to set the psi for the torque you need. Press the remote’s “ON ” button and slowly turn the pressure regulator clockwise to reach the right pressure.FOUR BASIC STEPS TO OPERATE YOUR RT-8Scan the code to see a brief overview video on how to use the document or go to CYCLE YOUR TOOLCONNECT HOSES15001728 16001843 18002074 20002304 22002534 24002765 26002995 28003226 30003456 32003686 34003917 36004147 38004378 40004608 42004838 44005069 46005299 48005530 50005760 52005990 54006221 560064515800668260006912620071426400737366007603680078347000806472008294740085257600875578008986800092168200944684009677860099078800101389000103689200105989400108299600110599800112901000011520104234311024991242811138312415234361653749179406119343732074686220499823453102485623262593527662482906560303687231771853317497345781035881223728434386874740090594149371427968444199964551030946810621482109334961124651011558524118705381218355212495565128085791312059313432607137456201405763414370648146826621499467615307690156192Set the pressure on the pump thatcorresponds to the torque value.1Find the closest torque value foryour application, either in ft-lbsor in Nm.FOOT-POUNDS NEWTON-METERSThe above torque values are only applicable when using a calibrated RT-10 hydraulic torque wrench powered by a 10,000 psi pumpSetting up your hydraulic torque wrench for use is easy. Please read the included user manual and safety instruc-tion booklet for additional guidelines.Wear personal protec-tive equipment, such aseyeglasses and steel-toe shoes.1 2 3SET PRESSUREMake sure the hoses are free of any defects. The couplers are on pump and the tool should be securely connected.Place tool on flat surface.Turn pump on. Cycle the tool. Press the “ON ’ but-ton on the remote, hold until tool clicks. Release, wait for the tool to click. Repeat the cycle. Ensure there is no leak.4Use the torque conver-sion chart to set the psi for the torque you need. Press the remote’s “ON ” button and slowly turn the pressure regulator clockwise to reach the right pressure.FOUR BASIC STEPS TO OPERATE YOUR RT-10Scan the code to see a brief overview video on how to use the document or go to CYCLE YOUR TOOLCONNECT HOSES15002964 16003162 18003557 20003952 22004347 24004742 26005138 28005533 30005928 32006323 34006718 36007114 38007509 40007904 42008299 44008694 46009090 48009485 50009880 520010275 540010670 560011066580011461600011856620012251640012646660013042680013437700013832720014227740014622760015018780015413800015808820016203840016598860016994880017389900017784920018179940018574960018970980019365100001976010440191104287124482213853581525894165643017969661937501207803722085732349109248964526210181276107162901125230311788317123243311286034513395358139313721446738615003400155394141607542716610441171464551768246818218482187544961928951019825524203615382089755221433565219695792250459323040607235766202411263424648648251846622571967626255690267912Set the pressure on the pump thatcorresponds to the torque value.1Find the closest torque value foryour application, either in ft-lbsor in Nm.FOOT-POUNDS NEWTON-METERSThe above torque values are only applicable when using a calibrated RT-20 hydraulic torque wrench powered by a 10,000 psi pumpSetting up your hydraulic torque wrench for use is easy. Please read the included user manual and safety instruc-tion booklet for additional guidelines.Wear personal protec-tive equipment, such aseyeglasses and steel-toe shoes.1 2 3SET PRESSUREMake sure the hoses are free of any defects. The couplers are on pump and the tool should be securely connected.Place tool on flat surface.Turn pump on. Cycle the tool. Press the “ON ’ but-ton on the remote, hold until tool clicks. Release, wait for the tool to click. Repeat the cycle. Ensure there is no leak.4Use the torque conver-sion chart to set the psi for the torque you need. Press the remote’s “ON ” button and slowly turn the pressure regulator clockwise to reach the right pressure.FOUR BASIC STEPS TO OPERATE YOUR RT-20Scan the code to see a brief overview video on how to use the document or go to CYCLE YOUR TOOLCONNECT HOSES15003884 16004142 18004660 20005178 22005696 24006214 26006731 28007249 30007767 32008285 34008803 36009320 38009838 400010356 420010874 440011392 460011909 480012427 500012945 520013463 540013981 5600144985800150166000155346200160526400165706600170876800176057000181237200186417400191597600196767800201948000207128200212308400217488600222658800227839000233019200238199400243379600248549800253721000025890104526511056161246318138702015277221658425179912719398292071053122011233234119352481263726213339276140412901474330315445317161473311684934517551358182533721895538619657400203594142106142721763441224654552316746823869482245714962527451025976524266785382738055228082565287845792948659330188607308906203159263432294648329966623369867634400690351022Set the pressure on the pump thatcorresponds to the torque value.1Find the closest torque value foryour application, either in ft-lbsor in Nm.FOOT-POUNDS NEWTON-METERSThe above torque values are only applicable when using a calibrated RT-25 hydraulic torque wrench powered by a 10,000 psi pumpSetting up your hydraulic torque wrench for use is easy. Please read the included user manual and safety instruc-tion booklet for additional guidelines.Wear personal protec-tive equipment, such aseyeglasses and steel-toe shoes.1 2 3SET PRESSUREMake sure the hoses are free of any defects. The couplers are on pump and the tool should be securely connected.Place tool on flat surface.Turn pump on. Cycle the tool. Press the “ON ’ but-ton on the remote, hold until tool clicks. Release, wait for the tool to click. Repeat the cycle. Ensure there is no leak.4Use the torque conver-sion chart to set the psi for the torque you need. Press the remote’s “ON ” button and slowly turn the pressure regulator clockwise to reach the right pressure.FOUR BASIC STEPS TO OPERATE YOUR RT-25Scan the code to see a brief overview video on how to use the document or go to CYCLE YOUR TOOLCONNECT HOSES15007875 16008400 18009450 200010500 220011550 240012600 260013650 280014700 300015750 320016800 340017850 360018900 380019950 400021000 420022050 440023100 460024150 480025200 500026250 520027300 540028350 560029400580030450600031500620032550640033600660034650680035700700036750720037800740038850760039900780040950800042000820043050840044100860045150880046200900047250920048300940049350960050400980051450100005250010410677110113891241281213814236152156601651708317918507193199312072135422022778234242012482562526227049276284722902989630331319317327433313416734535590358370143723843738639861400412854144270842744132441455554554697946848403482498264965125051052674524540975385552155256944565583685795979259361215607626396206406263465486648669106626833367669757690711802Set the pressure on the pump thatcorresponds to the torque value.1Find the closest torque value foryour application, either in ft-lbsor in Nm.FOOT-POUNDS NEWTON-METERSThe above torque values are only applicable when using a calibrated RT-50 hydraulic torque wrench powered by a 10,000 psi pumpSetting up your hydraulic torque wrench for use is easy. Please read the included user manual and safety instruc-tion booklet for additional guidelines.Wear personal protec-tive equipment, such aseyeglasses and steel-toe shoes.1 2 3SET PRESSUREMake sure the hoses are free of any defects. The couplers are on pump and the tool should be securely connected.Place tool on flat surface.Turn pump on. Cycle the tool. Press the “ON ’ but-ton on the remote, hold until tool clicks. Release, wait for the tool to click. Repeat the cycle. Ensure there is no leak.4Use the torque conver-sion chart to set the psi for the torque you need. Press the remote’s “ON ” button and slowly turn the pressure regulator clockwise to reach the right pressure.FOUR BASIC STEPS TO OPERATE YOUR RT-50Scan the code to see a brief overview video on how to use the document or go to CYCLE YOUR TOOLCONNECT HOSES。
力矩扳手换算“1N等于多少公斤”
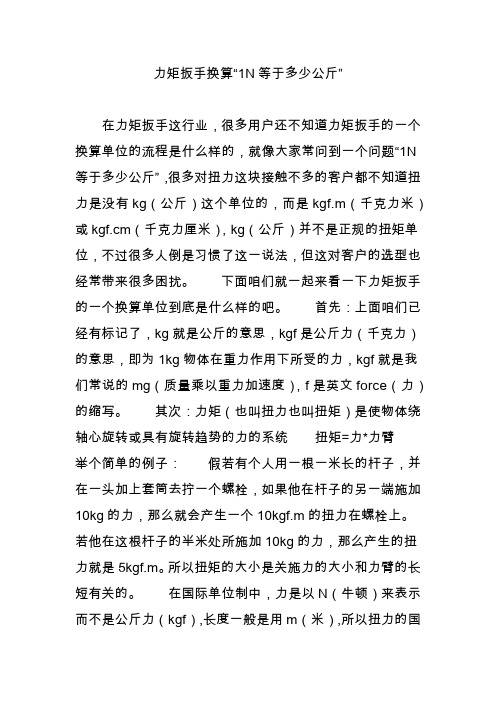
力矩扳手换算“1N等于多少公斤”在力矩扳手这行业,很多用户还不知道力矩扳手的一个换算单位的流程是什么样的,就像大家常问到一个问题“1N 等于多少公斤”,很多对扭力这块接触不多的客户都不知道扭力是没有kg(公斤)这个单位的,而是kgf.m(千克力米)或kgf.cm(千克力厘米),kg(公斤)并不是正规的扭矩单位,不过很多人倒是习惯了这一说法,但这对客户的选型也经常带来很多困扰。
下面咱们就一起来看一下力矩扳手的一个换算单位到底是什么样的吧。
首先:上面咱们已经有标记了,kg就是公斤的意思,kgf是公斤力(千克力)的意思,即为1kg物体在重力作用下所受的力,kgf就是我们常说的mg(质量乘以重力加速度),f是英文force(力)的缩写。
其次:力矩(也叫扭力也叫扭矩)是使物体绕轴心旋转或具有旋转趋势的力的系统扭矩=力*力臂举个简单的例子:假若有个人用一根一米长的杆子,并在一头加上套筒去拧一个螺栓,如果他在杆子的另一端施加10kg的力,那么就会产生一个10kgf.m的扭力在螺栓上。
若他在这根杆子的半米处所施加10kg的力,那么产生的扭力就是5kgf.m。
所以扭矩的大小是关施力的大小和力臂的长短有关的。
在国际单位制中,力是以N(牛顿)来表示而不是公斤力(kgf),长度一般是用m(米),所以扭力的国际单位是N.m(牛米),它们之间的换算单位是:1kgfcm=0.0980665Nm≈0.1Nm=0.01kgm。
(1千克力为9.8牛,1牛为0.102千克力)大家不懂的话也可以看看这个换算表:以上是铸衡力矩扳手小编为用户分析一个关于力矩扳手换算的问题,不过我觉得,还是会有很多用户不太了解的,所以不了解的用户不用急,可以来电咨询我们上海铸衡电子科技有限公司,我们会有专业的业务,为您详细讲解;上海铸衡是一家专业生产和销售力矩扳手产品的公司,我们的力矩扳手也叫扭力扳手,扭矩扳手,下面给用户为大家带来几款我司的力矩扳手高清效果图,专业厂家直销,感兴趣的用户可以来电咨询哦。
3型扳手力矩液压值与5型力矩扳手转换表

3型扳手力矩液压值与5型力矩扳手转换表摘要:1.引言2.3 型扳手力矩液压值的概念和计算方法3.5 型力矩扳手的概念和计算方法4.3 型扳手力矩液压值与5 型力矩扳手转换表的含义和应用5.结论正文:1.引言在机械行业中,扳手是一种常用的工具,用于拧紧或松开螺丝、螺母等连接件。
根据不同的需求,扳手有不同的类型,其中3 型扳手和5 型扳手是常见的两种类型。
这两种扳手在力矩的计算和应用上有所不同,因此需要进行转换。
本文将对3 型扳手力矩液压值和5 型力矩扳手进行介绍,并给出它们之间的转换表。
2.3 型扳手力矩液压值的概念和计算方法3 型扳手力矩液压值是指扳手在施加力矩时,液压缸的压力值。
它通常用微牛米(n·m)或毫牛米(mn·m)表示。
计算3 型扳手力矩液压值的方法如下:力矩液压值= 力矩/ 力臂其中,力矩是扳手施加的力乘以力臂的长度,力臂是指扳手作用点到螺丝或螺母的中心距离。
3.5 型力矩扳手的概念和计算方法5 型力矩扳手是一种基于英寸- 磅为单位的扳手,它的力矩通常用磅力英尺(lbf·in)或盎司力英尺(ozf·ft)表示。
计算5 型力矩扳手的方法如下:力矩= 扭矩值×2.306其中,扭矩值是扳手施加的力矩,2.306 是将扭矩值从英寸- 磅转换为牛顿米(Nm)的系数。
4.3 型扳手力矩液压值与5 型力矩扳手转换表的含义和应用3 型扳手力矩液压值与5 型力矩扳手转换表是指将3 型扳手力矩液压值转换为5 型力矩扳手的力矩值的表格。
这个表格可以帮助工程师或技术人员在进行扳手力矩选择时,根据实际需求快速找到合适的扳手。
例如,如果需要施加100 n·m 的力矩,根据转换表可以找到相应的5 型力矩扳手的力矩值,从而选择合适的扳手进行操作。
5.结论总之,3 型扳手力矩液压值和5 型力矩扳手是两种不同类型的扳手,它们在力矩的计算和应用上有所不同。
扭力扳手扭矩对照表
200
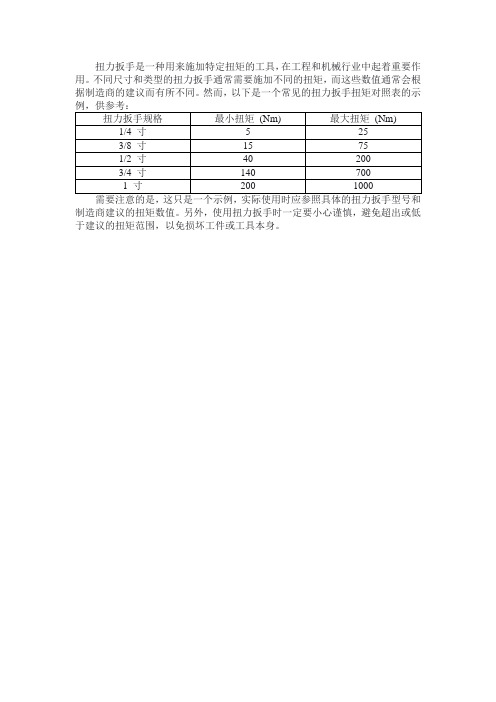
3/4寸
140
700
1寸
200
1000
需要注意的是,这只是一个示例,实际使用时应参照具体的扭力扳手型号和制造商建议的扭矩数值。另外,使用扭力扳手时一定要小心谨慎,避免超出或低于建议的扭矩范围,以免损坏工件或工具本身。
扭力扳手是一种用来施加特定扭矩的工具,在工程和机械行业中起着重要作用。不同尺寸和类型的扭力扳手通常需要施加不同的扭矩,而这些数值通常会根据制造商的建议而有所不同。然而,以下是一个常见的扭力扳手扭矩对照表的示例,供参考:
扭力扳手规格
最小扭矩(Nm)
最大扭矩(Nm)
1/4寸
5
25
3/8寸
15751/Fra bibliotek寸
扭矩与压力的计算公式

扭矩与压力的计算公式嘿,咱来聊聊扭矩与压力的计算公式这回事儿。
你知道吗,扭矩和压力这俩概念在好多领域都特别重要,像机械工程啦、物理学啦,甚至在咱们日常生活里都能找到它们的影子。
先来说说扭矩。
扭矩呢,简单说就是使物体发生转动的一种特殊的“力”。
比如说,你拧开一个瓶盖,这时候你使的劲儿就产生了扭矩。
那扭矩的计算公式是 T = F × r 。
这里的 T 表示扭矩,F 是作用力,r 是力臂。
给您举个例子哈,就好比你用扳手拧螺丝,扳手的长度就是力臂。
假如你用 10 牛的力,扳手长度是 0.5 米,那扭矩就是 10×0.5 = 5牛米。
再讲讲压力。
压力就是垂直作用在物体表面上的力。
压力的计算公式是 P = F / S ,P 代表压力,F 是作用力,S 是受力面积。
就像你站在雪地上,你的体重就是作用力,两只脚的面积就是受力面积。
要是你体重 60 千克,两只脚加起来面积是 0.06 平方米,那压力就是60×9.8÷0.06 = 9800 帕。
前几天我在家修自行车,就碰到了跟扭矩和压力有关的问题。
车链子掉了,我得把螺丝拧松重新安上。
我拿着扳手,使劲儿拧啊拧,可就是拧不动。
我就琢磨,是不是我使的力不够,还是扳手的力臂太短了。
后来我换了个长点的扳手,嘿,一下子就拧开了。
这时候我就深切感受到了扭矩的作用。
还有啊,车胎没气的时候,我用打气筒打气,明显能感觉到打气筒活塞对气体的压力。
每次压下去都得费不少劲儿,这就是压力在“作祟”。
在实际应用中,扭矩和压力的计算可太重要了。
比如汽车发动机,扭矩大小决定了它的动力性能。
压力呢,在液压系统里那是关键参数,要是压力计算不对,整个系统都可能出故障。
总之,扭矩和压力的计算公式虽然看起来简单,可真要弄明白、用好了,还真得下点功夫。
咱们得在实际生活中多观察、多琢磨,这样才能真正掌握它们的奥秘,让它们为咱们服务。
您说是不是这个理儿?。
液压扳手扭矩压力换算
液压扳手扭矩压力换算
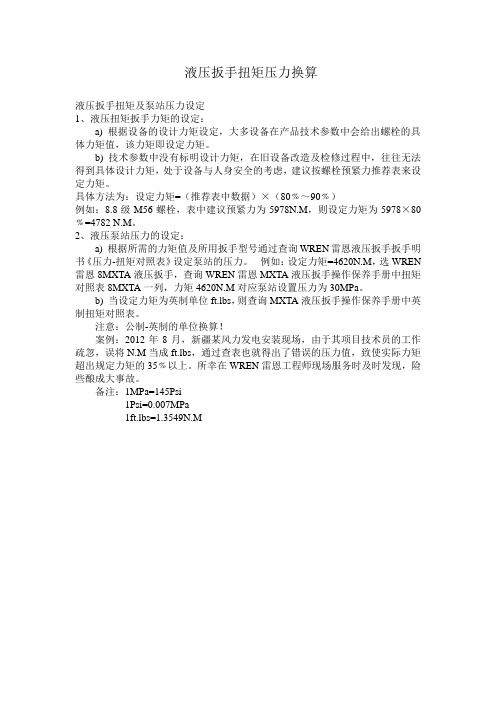
液压扳手扭矩及泵站压力设定
1、液压扭矩扳手力矩的设定:
a) 根据设备的设计力矩设定,大多设备在产品技术参数中会给出螺栓的具体力矩值,该力矩即设定力矩。
b) 技术参数中没有标明设计力矩,在旧设备改造及检修过程中,往往无法得到具体设计力矩,处于设备与人身安全的考虑,建议按螺栓预紧力推荐表来设定力矩。
具体方法为:设定力矩=(推荐表中数据)×(80﹪~90﹪)
例如:8.8级M56螺栓,表中建议预紧力为5978N.M,则设定力矩为5978×80﹪=4782 N.M。
2、液压泵站压力的设定:
a) 根据所需的力矩值及所用扳手型号通过查询WREN雷恩液压扳手扳手明书《压力-扭矩对照表》设定泵站的压力。
例如:设定力矩=4620N.M,选WREN 雷恩8MXTA液压扳手,查询WREN雷恩MXTA液压扳手操作保养手册中扭矩对照表8MXTA一列,力矩4620N.M对应泵站设置压力为30MPa。
b) 当设定力矩为英制单位ft.lbs,则查询MXTA液压扳手操作保养手册中英制扭矩对照表。
注意:公制-英制的单位换算!
案例:2012年8月,新疆某风力发电安装现场,由于其项目技术员的工作疏忽,误将N.M当成ft.lbs,通过查表也就得出了错误的压力值,致使实际力矩超出规定力矩的35﹪以上。
所幸在WREN雷恩工程师现场服务时及时发现,险些酿成大事故。
备注:1MPa=145Psi
1Psi=0.007MPa
1ft.lbs=1.3549N.M
螺栓预紧力推荐表:。
液压扳手扭矩压力换算

液压扳手-YK中空式液压扳手YK中空式液压扳手是液压扭力扳手中的一种。
它的特点是:最大限度的采用高强度轻金属,一体成型动力头,全面提高强度及寿命;较大的扭矩/重量比,双作用,高速,转角大,效率高, 一只动力头可配合多种工作头使用,工作范围广,360°×360°旋转软管接头使在狭小的空间内使用方便,绝不会出现机构卡死,扭矩重复精度高达±3%,松开时不需其它工具,存贮箱保护扳手头避免损坏,浸水和污浊,运动部件少,经久耐用,维护方便。
液压扭力扳手可分为手动扭力扳手和电动扭力扳手。
YK中空式液压扳手体积小,力矩大、预紧准确。
它广泛适用于冶金、电力、化工、机械、通信等行业的机械设备和设施,重要螺栓联接的安装及拆卸维修,能方便快捷地NJS大功率液压扭矩扳手(液压扭力扳手)一、NJS大功率液压扭矩扳手(液压扭力扳手)产品的型号及适用螺栓、螺母范围二、NJS大功率液压扭矩扳手(液压扭力扳手)产品简介随着我国机械制造业的技术水平的不断提高,为确保产品质量,许多设备和设施已经并将日益广泛的采用高强度螺栓,并对螺栓的紧固的预紧力矩提出严格的要求,尤其是承受重载荷及强烈冲击振动的重型机械设备就更为重要,为了提高螺纹联接质量及可靠性,精确地控制高强度螺栓联接的预紧力矩,本厂科技人员综合应用国内外先进技术,研制成功液压扭矩扳手,可帮助您解决这一难题。
液压扭矩扳手是帮助您装、拆螺栓、螺母,同时能比较准确的控制拧紧扭矩的理想工具,它广泛适用于冶金、电力、化工、机械、通信等行业的机械设备和设施,重要螺栓联接的安装及拆卸维修,能方便快捷地完成您的装拆螺栓任务,同时可有效地保证您所需的扭矩值。
三、NJS大功率液压扭矩扳手(液压扭力扳手)结构及工作原理液压扭矩扳手(液压扭力扳手)(见图1)由手动高压泵和带棘轮式液压扭矩扳手两部分组成。
操纵手动高压泵的手柄,液压缸产生推力,经过曲柄系统形成力矩,带动螺母转动一个角度,使扭矩传递到带棘轮装置的内六角套筒上从而传递给螺栓联接,按要求预紧螺栓。
凯特克HYTORC液压扳手力矩对照表

材质
一般构造用钢
机械制造用钢
鉻钼合金钢
镍鉻钼合金钢
螺栓
螺母
扭矩值
扭矩值
扭矩值
扭矩值
KGM
NM
KGM
NM
KGM
NM
KGM
NM
M
22mm
137
23
225
M16
24mm
10
98
14
53
M18
27mm
14
84
49
480
M2
30mm
41
402
69
676
M22
32mm
23
225
34
333
55
539
凯特克HYTORC液压扳手力矩对照表
———————————————————————————————— 作者:
———————————————————————————————— 日期:
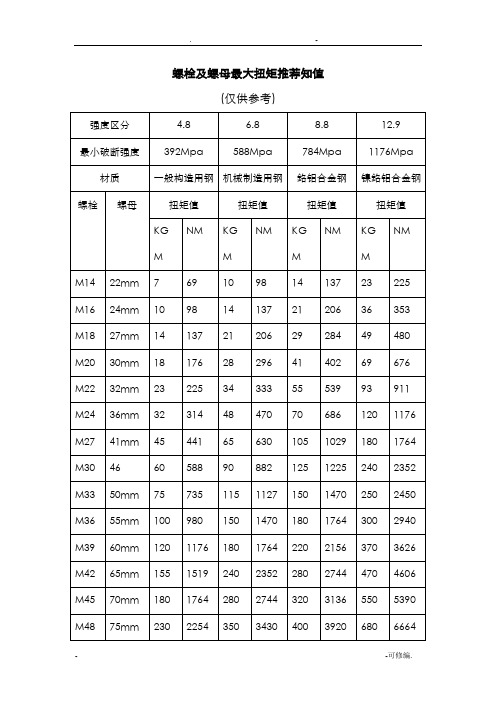
螺栓及螺母最大扭矩推荐知值
(仅供参考)
强度区分
4.8
6.8
8.8
12.9
最小破断强度
392Mpa
588Mpa
784Mpa
553
8
1
0
2037
3
75
4662
593
5750
2182
32
6
8597
8318
1
00
2328
34
8
5276
672
7850
2473
36
9
5583
71
54
1296
127
38
4
50
2746
凯特克HYTORC液压扳手力矩对照表(9页)
凯特克HYTORC 液压扳手力矩对照表(9页)Good is good, but better carries it.精益求精,善益求善。
螺栓及螺母最大扭矩推荐知值(仅供参考){?#)!)(¥[().,)》?《?'!'|$~;¥?¥);- 1 -扭荐知....型照对压扳液作作1、以上是德国工业标准,表中扭矩值为螺栓达到屈服极限的70%时所测定.2、建议锁紧力矩为:表中数据X(70-80)%.例如:M48,8.8级螺栓,则锁紧力矩为:400X80%=320(Kg-m)XLT系列压力/扭力对照表{?#)!)(¥[().,)》?《?'!'|$~;¥?¥);- 2 -扭荐知....型照对压扳液作作XLT系列压力/扭矩对照表{?#)!)(¥[().,)》?《?'!'|$~;¥?¥);- 3 -扭荐知....型照对压扳液作作MXT系列压力/扭力对照表{?#)!)(¥[().,)》?《?'!'|$~;¥?¥);- 4 -扭荐知....型照对压扳液作作{?#)!)(¥[().,)》?《?'!'|$~;¥?¥);- 5 -扭荐知....型照对压扳液作作MXT系列压力/扭力对照表{?#)!)(¥[().,)》?《?'!'|$~;¥?¥);- 6 -扭荐知....型照对压扳液作作{?#)!)(¥[().,)》?《?'!'|$~;¥?¥);- 7 -扭荐知....型照对压扳液作作XLCT系列压力/扭力对照表{?#)!)(¥[().,)》?《?'!'|$~;¥?¥);- 8 -扭荐知....型照对压扳液作作MXTA液压扳手液压/扭矩对照表{?#)!)(¥[().,)》?《?'!'|$~;¥?¥);- 9 -扭荐知....型照对压扳液作作{?#)!)(¥[().,)》?《?'!'|$~;¥?¥);- 10 -扭荐知....型照对压扳液作作{?#)!)(¥[().,)》?《?'!'|$~;¥?¥);- 11 -扭荐知....型照对压扳液作作。
凯特克HYTORC液压扳手力矩对照表
20090
M110
155mm
1670
16366
2550
24990
M120
175mm
2030
19894
3050
29890
1、以上是德国工业标准,表中扭矩值为螺栓达到屈服极限的70%时所测定.
2、建议锁紧力矩为:表中数据X(70-80)%.
例如:M48,8.8级螺栓,则锁紧力矩为:400X80%=320(Kg-m)
XLT系列压力/扭力对照表
油泵压力
设定值
扳手输出扭力值
HY-1XLT(A)
HY-3XLT(A)
HY-5XLT(A)
HY-8XLT(A)
PSI
Bar
ftib
kgm
Nm
ftib
kgm
Nm
ftib
kgm
Nm
ftib
kgm
Nm
1000
69
130
18
177
320
44
435
560
78
761
800
111
1087
1200
1919
2454
340
3335
3520
488
4784
4600
317
634
88
862
1478
205
2009
2566
356
3488
3680
510
5002
4800
331
662
92
900
1544
214
2098
2678
371
3640
3840
532
5219
3型扳手力矩液压值与5型力矩扳手转换表

3型扳手力矩液压值与5型力矩扳手转换表摘要:I.简介- 介绍3 型扳手和5 型扳手- 引出力矩液压值和力矩扳手转换表的主题II.3 型扳手力矩液压值- 解释3 型扳手力矩液压值的定义和计算方法- 提供3 型扳手力矩液压值的详细数据和图表III.5 型力矩扳手转换表- 解释5 型力矩扳手转换表的定义和作用- 提供5 型力矩扳手转换表的详细数据和图表IV.转换表的应用- 介绍如何使用3 型扳手力矩液压值和5 型力矩扳手转换表进行转换- 提供实际应用案例V.结论- 总结3 型扳手力矩液压值和5 型力矩扳手转换表的重要性- 强调正确使用转换表以保证工作质量正文:3 型扳手和5 型扳手是我们生活中常见的两种扳手类型。
它们在工业生产、机械维修等方面都有着广泛的应用。
但是,这两种扳手的力量大小不同,使用时需要进行转换。
这时,就需要了解3 型扳手力矩液压值和5 型力矩扳手转换表。
首先,我们来了解一下3 型扳手力矩液压值的定义和计算方法。
3 型扳手力矩液压值是指在使用3 型扳手时,需要施加的力矩大小。
这个值通常由扳手的尺寸、材料和设计决定。
计算方法为:力矩液压值= 扭矩× 螺纹直径。
在实际应用中,我们可以根据需要施加的力矩大小,选择合适的3 型扳手,以确保工作效果和安全性。
接下来,我们看一下5 型力矩扳手转换表。
5 型力矩扳手转换表是一种将3 型扳手力矩液压值转换为5 型扳手力矩液压值的工具。
它可以帮助我们快速、准确地选择合适的5 型扳手,以完成工作。
5 型力矩扳手转换表通常包括两种数据:一种是3 型扳手力矩液压值,另一种是5 型扳手力矩液压值。
我们可以通过对比这两种数据,找到合适的5 型扳手,并进行转换。
那么,如何使用3 型扳手力矩液压值和5 型力矩扳手转换表进行转换呢?其实很简单。
首先,我们需要测量出需要施加的力矩大小,这个值通常由工程设计给出。
然后,我们可以在5 型力矩扳手转换表中找到对应的3 型扳手力矩液压值,并选择合适的5 型扳手。
扭力扳手加长的计算公式

扭力扳手加长的计算公式在机械加工领域,扭力扳手是一种常用的工具,用于在紧固件上施加扭矩。
而当需要施加更大的扭矩时,可以通过加长扭力扳手的杠杆长度来增加施加的扭矩。
在本文中,我们将讨论如何计算扭力扳手加长后的扭矩,并给出相应的计算公式。
首先,我们需要了解一些基本的概念。
扭力扳手的扭矩可以通过以下公式来计算:T = F L。
其中,T代表扭矩,F代表施加的力,L代表杠杆长度。
这个公式告诉我们,扭矩和施加的力成正比,而与杠杆长度成反比。
也就是说,当杠杆长度增加时,施加的力可以减小,从而达到相同的扭矩。
现在,假设我们有一个标准的扭力扳手,它的杠杆长度为L1,施加的力为F1,扭矩为T1。
如果我们想要增加扭矩,可以通过增加杠杆长度来实现。
假设我们将杠杆长度增加到L2,那么施加的力可以通过以下公式来计算:F2 = T1 / L2。
这个公式告诉我们,当杠杆长度增加到L2时,需要施加的力为T1除以L2。
也就是说,我们可以通过增加杠杆长度来减小施加的力,从而实现增加扭矩的目的。
现在,我们来看一下扭力扳手加长后的扭矩计算公式。
假设我们有一个标准的扭力扳手,它的杠杆长度为L1,施加的力为F1,扭矩为T1。
如果我们将杠杆长度增加到L2,那么加长后的扭矩可以通过以下公式来计算:T2 = F2 L2。
其中,F2为施加的力,可以通过上面的公式计算得到。
将F2代入上面的公式中,我们就可以得到扭力扳手加长后的扭矩。
通过上面的讨论,我们可以得出结论,扭力扳手加长后的扭矩可以通过施加的力和加长后的杠杆长度来计算。
通过适当地增加杠杆长度,我们可以在不增加施加的力的情况下增加扭矩,从而更方便地进行工件的紧固和松解。
当然,需要注意的是,在实际使用中,加长扭力扳手的杠杆长度可能会受到一些限制。
首先,加长杠杆会增加扳手的重量和体积,从而降低其便携性。
其次,加长杠杆也会增加扳手的成本。
因此,在实际应用中,需要权衡各种因素,选择合适的杠杆长度,以满足工件施加的扭矩需求。