frsky睿斯凯d设置说明使用说明书
FrSky Taranis X9D Plus SE 2019 说明书 - 中文
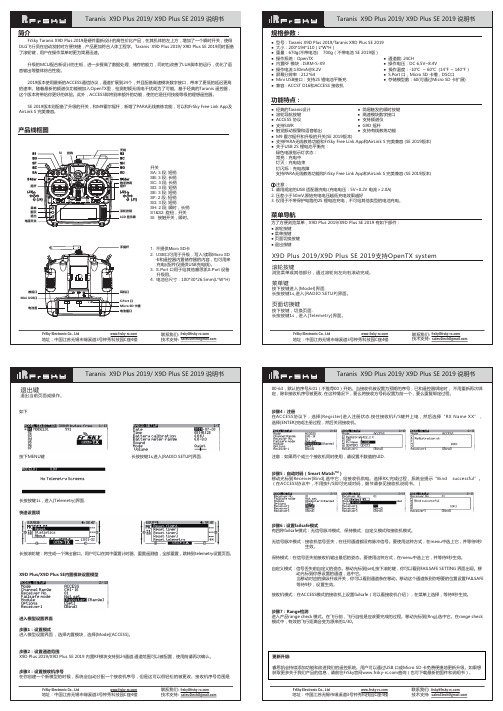
快速设置项
进入模型设置界面
步骤1:设置模式
进入模型设置界面 ,选择内置模块,选择[Mode][ACCESS]。
长按按键1s,进入[RADIO SETUP]界面.长按按键1s,进入[Telemetry]界面.长按滚轮键:将生成一个弹出窗口。
用户可以在其中重置计时器、重置遥测值,全部重置,跳转到telemetry设置页面。
步骤5:自动对码(Smart Match TM )
移动光标到Receiver[Bind],选中它,给接收机供电。
选择RX,完成过程,系统会提示“Bind successful”。
步骤6 : 设置failsafe模式
有四种failsafe模式:无信号脉冲模式、保持模式、自定义模式和接收机模式。
注意:如果两个或三个接收机同时使用,请设置不数值的UID.
按下MENU键。
TWIN Lite Pro模块使用手册说明书
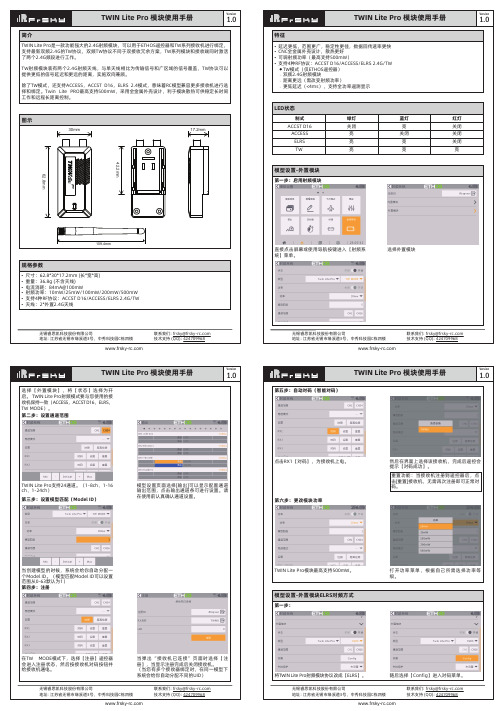
无锡睿思凯科技股份有限公司地址: 江苏省无锡市缘溪道3号,中秀科技园C栋四楼联系我们: ******************技术支持 (QQ): 424709968TWIN Lite Pro 模块使用手册无锡睿思凯科技股份有限公司地址: 江苏省无锡市缘溪道3号,中秀科技园C栋四楼联系我们: ******************技术支持 (QQ): 424709968 无锡睿思凯科技股份有限公司地址: 江苏省无锡市缘溪道3号,中秀科技园C栋四楼直接点击屏幕或使用导航按键进入【射频系统】菜单。
选择外置模块TWIN Lite Pro支持24通道。
(1-8ch、1-16ch、1-24ch)模型设置页面选择[输出]可以显示配置通道输出范围,点击输出通道条可进行设置。
请在使用前认真确认通道设置。
当创建模型的时候,系统会给你自动分配一个Model ID。
(模型匹配Model ID可以设置范围从0-63默认为1)第三步:设置模型匹配(Model ID)当弹出“接收机已连接”页面时选择【注册】,当显示注册完成后关闭接收机。
(当您有多个接收器绑定时,在同一模型下 系统会给你自动分配不同的UID)在TW MODE模式下,选择【注册】遥控器会进入注册状态,然后按接收机对码按钮并给接收机通电。
第四步:注册模型设置-外置模块ELRS对频方式第五步:自动对码(智能对码)点击RX1【对码】,为接收机上电。
然后在界面上选择该接收机,完成后遥控会提示【对码成功】。
重置功能:当接收机注册到遥控器后,点击[重置]接收机,无需再次注册即可正常对码。
TWIN Lite Pro模块最高支持500mW。
打开功率菜单,根据自己所需选择功率等级。
第六步:更改模块功率随后选择【Config】进入对码菜单。
将TWIN Lite Pro射频模块协议改成【ELRS】。
第一步:注意:● 如果未设置Failsafe,则模型将始终以信号丢失前的最后工作状态工作,使用时请注意潜在的损 害风险。
FrSky TANDEM X20S 说明书.pdf_1697355285.2770543
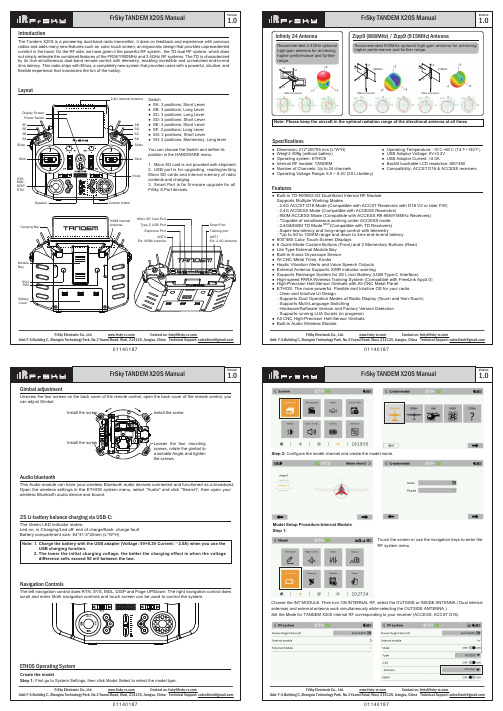
0114018701140187+X+Y+ZSMA Connector SMA Connector+X+Y+Z+X+Y+ZSMA Connector868MHz915MHzStep 2: Configure the model channel and create the model name.Model Setup Procedure-Internal ModuleStep 1:Touch the screen or use the navigation keys to enter theChoose the INT MODULE. Then turn ON INTERNAL RF, select the OUTSIDE or INSIDE ANTENNA ( Dual internal antennas and external antenna work simultaneously while selecting the OUTSIDE ANTENNA.)Set the Mode for TANDEM X20S internal RF corresponding to your receiver (ACCESS, ACCST D16).InternalFrSkyElectronicCo.,Contactus:******************Add:F-4,BuildingC,ZhongxiuTechnologyPark,No.3YuanxiRoad,Wuxi,214125,Jiangsu,ChinaTechnicalSupport:********************01140187FrSkyElectronicCo.,Contactus:******************Add:F-4,BuildingC,ZhongxiuTechnologyPark,No.3YuanxiRoad,Wuxi,214125,Jiangsu,ChinaTechnicalSupport:********************01140187Version1.0FrSky TANDEM X20S ManualVersion1.0FrSky TANDEM X20S ManualRange CheckStep 3: Set the Receiver NumberThe system will assign you the receiver a number automatically, when you create a new model, and this can be easily changed. The range of the Model ID is 00-63, with the default number being 01. Once the receiver is set to the desired number and is bound to the TANDEM X20S, the bind procedure will not need to be repeated unless the receiver number is changed. At this point, set the receiving number to your preferred number and repeat the binding operation.InternalRange CheckStep 4 : RegistrationIn ACCESS model, select the STATE [Register] into Registration status on radio side. Then Press the F/S button and power on your receiver, and select the “RX Name XX” and [REGISTER] to complete the Registration process then power down the receiver.InternalRange CheckRegisterStep 5: Automatic binding (Smart Match )Move the cursor to Rx1[BIND],and select it, power your receiver, select the RX, and complete the process, the system will confirm "Bind succeed". (Pressing the "F/S" button is not required in ACCESS to Bind. Please the receivers manual for details).InternalRange Check Register InternalRange CheckRegister Step 6: Set Failsafe modeThere are 3 failsafe modes when enable: No Pulse, Hold, Custom.Then rotate the Encoder to set your failsafe for each channel and short press Encoder to finish the setting. Wait 9 seconds before the failsafe takes effect.Notice:● When failsafe is disabled on TANDEM X20S side, the failsafe set on receiver side will be used.● SBUS port does not support the No Pulse failsafe mode and always outputs. Set “Hold” or “Custom” for SBUS port.● No Pulse: on loss of signal the receiver produces no pulses on any channel. To use this type, select it in themenu and wait 9 seconds for the failsafe to take effect.● Hold: the receiver continues to output the last positions before signal was lost. To use this type, select it in the menu and wait 9 seconds for the failsafe to take effect.● Custom: pre-set to required positions on lost signal. Move the cursor to the failsafe mode of channel and press Encoder, then choose the Custom mode. Move the cursor to the channel you want to set failsafe on, and press Encoder.Range Check Register Model Setup for TANDEM X20S External RF ModuleThe external RF module can be powered on or off by software. The setup process is the same as that for the internal RF. External modules should be closed when not in use.Range CheckBind Step 7: RangeRange refers to TANDEM X20S range check mode. A pre-flight range check should be done before each flying session. Move the cursor to “STATE”, scroll the Encoder to select “RANGE” mode and press Encoder. In range check mode, the effective distance will be decreased to 1/30. Press the Encoder again, turn to normal state.Range CheckRegister Range CheckRegisterThe product may be used freely in these countries: Germany, UK, Italy, Spain, Belgium, Netherlands, Portugal, Greece, Ireland, Denmark, Luxembourg, Austria, Finland, Sweden, Norway, France and Iceland.To ensure the safety of yourself and others, please observe the following precautions.Have regular maintenance performed. Although your atile EEPROM memory (which does not require periodic replacement) and of a battery, it still should have regular check-ups for wear and tear. We recommend sending your system to your FrSky Service Center annually during your non-flying-season for a complete check-up and service.FLYING SAFETYWarning:BatteryThis equipment has been tested and found to comply with the limits for a Class B digital device, pursuant to part 15 of the FCC RulesFCCTo prevent possible damage to your radio gear, turn the power switches on and off in the proper sequence: 1. Pull throttle stick to idle position, or otherwise disarm your motor/engine.2. Turn on the transmitter power and allow your transmitter to reach its home screen. 5. Test all controls. If a servo operates abnormally, don’t attempt to fly until you determine the cause of the problem. 8. After flying, bring the throttle stick to idle position, engage any kill switches or otherwise disarm your motor/engine.If you do not turn on your system on and off in this order, you may damage your servos or control surfaces, flood your。
FrSky TANDEM XE 说明书
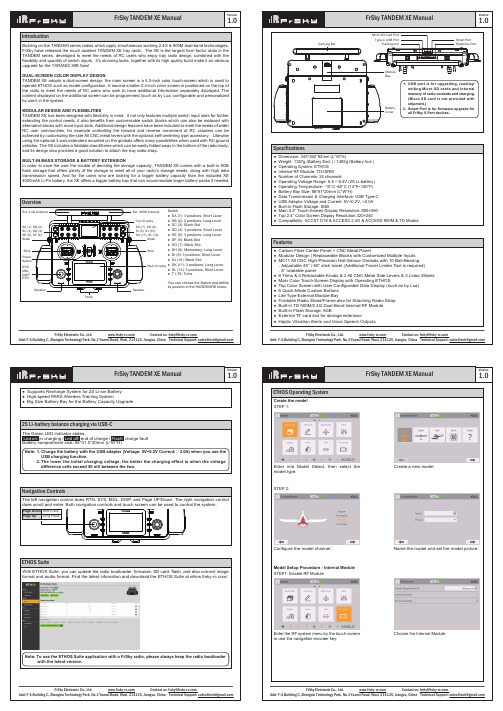
Enter into Model Select, then select the model type.Create a new model.Model Setup Procedure - Internal Module STEP1: Enable RF ModuleEnter the RF system menu by the touch-screen or use the navigation encoder key.Choose the Internal Module.STEP 2:Configure the model the model and set the model picture.FrSkyElectronicCo.,Contactus:******************Add:F-4,BuildingC,ZhongxiuTechnologyPark,No.3YuanxiRoad,Wuxi,214125,Jiangsu,ChinaTechnicalSupport:********************Then turn the state of Internal RF to On. Set the binding mode for the Internal RF module corresponding to the receiver (ACCST D16, ACCESS, TD MODE).STEP2: Channel Range SettingTD-ISRM Internal RF module supports 24 channels (CH1-8 / CH1-16 / CH1-24).The channel range is configurable by pressing the channel bars, please also make sure of the channel configuration before using the module.STEP3: Model ID Setting The system assigns the receiver a number for the receiver (Model ID) automatically while creating a new model. ( The Model ID can be set from 00 to 63, with the default ID being 1.)FrSkyElectronicCo.,Contactus:******************Add:F-4,BuildingC,ZhongxiuTechnologyPark,No.3YuanxiRoad,Wuxi,214125,Jiangsu,ChinaTechnicalSupport:********************For TD Mode as an example, select the Set [Register] for getting the radio into Registration status in the RF System-Internal Module tool, then press the F/S button on the receiver and power the receiver on.When the "RX Connected" page pops up, press the [REGISTER] to complete the Registration procedure and then power the receiver off.(The system automatically assigns the receiver a UID differently in the same model when you have several receivers to bind at the same time.)STEP6: RF Power SettingThe TD-ISRM internal RF Module can offer multiple RF power options which can achieve a further controlling range.Open the Power menu bar and select the desired power level according to usage.STEP5: Automatic Binding (Smart Match)Move the cursor to RX1 [BIND], press it and repower the receiver.Click the RX to complete the binding after the receiver window pops up, the system will confirm "Bind succeed".Reset: Registration procedure is not required to repeat anymore after the receiver was once registered even though the receiver is deleted. Pressing the [Reset] and repower the receiver can have the bound recovered.FrSky TANDEM XE ManualNote:● If the failsafe is not set, the model will always work with the last working status before the signal is lost. That could cause potential damage.● When the failsafe is disabled on the RF module side, the failsafe set on the receiver side will be applied.● SBUS port does not support the failsafe setting in No Pulses mode and always outputs signal. Please set "Hold" or "Custom" mode for the SBUS port.There are 3 failsafe modes when the setting is enabled: No Pulse, Hold, and Custom mode.● No Pulses Mode: On loss of signal, the receiver produces no pulses on any channel. To use this mode, select it in the menu and wait 9 seconds for the failsafe to take effect.● Hold Mode: The receiver continues to output the last positions before the signal was lost. To use this mode, select it in the menu and wait 9 seconds for the failsafe to take effect.● Custom Mode: Pre-set to required positions on the lost signal. Move the cursor to the failsafe mode of the channel and press Encoder, then choose the Custom mode. Move the cursor to the channel you want to set How to set FailsafeA pre-flight range check should be done before every flight, in case the signal loss is caused by the reflection of the signal by the nearby metal fence or concrete, and the shading of the signal by buildings or trees during the actual flight. Under normal circumstances, in Range Check mode, the RSSI at 150m is about 45-50.1. Place the model at least 60 cm (2 feet) above the non-metal contaminated ground (such as on a wooden bench). The receiving antenna should be in a vertical position.2. Ener the ETHOS system, move to the "RF System", scroll the Encoder to select "RANGE" mode and press Encoder. In range check mode, the effective distance will be decreased to 1/30.Range CheckVersion1.0FrSky TANDEM XE ManualThis equipment has been tested and found to comply with the limits for a Class B digital device, pursuant to part 15 of the FCC RulesFCCCE。
frsky睿斯凯d设置说明使用说明书
frsky睿斯凯d设置说明使⽤说明书睿思凯X9D设置说明希望这个也兼容PLUS;由于此控为开源,固件不断更新,设置也有所不同。
请使⽤者根据固件版本的不同,请选择性使⽤另外此⽂在整理中难免有误,请模友们多多指教,最好将修改后的版本上传,以便共享。
1.开控,插上usb ,控的tf卡就是⼀个U盘了,⾥⾯有⼀个⽂件夹叫sounds2.,就是语⾳⽂件。
在群共享⾥有中⽂语⾳包下载后把tf卡⾥的en⽂件夹覆盖就可以中⽂发声了。
建议覆盖前把tf卡⾥的数据备份,万⼀哪天要恢复。
3.只要⽀持ppm型号的外置⾼频头全都能兼容,但⼀定要与其配套的接收机⼀同使⽤。
4.在每个模型设置的第⼀页,abs是正常时间,th%是按油门⼤⼩计算时间,其它有某个开关或某个通道变化的时候开始计时。
tmr1是当前时间,如果已经开始了49秒,系统就播报49秒。
开关播报当前计时,正计时(时间设置为零)、倒计时都可以(时间设置为⾮零)。
5.x8R接收机⽤双向模式在距离遥控器20cm以内会信号堵塞,单向模式没问题6.两个控边上的滑杆钮左边是ls,右边是rs。
7.控与电脑连接有2种⽅式。
⼀是:先插usb后开控是刷固件模式,选择frmware为frsky,然后读写控。
⼆是:先开控再插usb是模型设置模式。
第⼀种⽅式不能读取参数及设置模型。
不⽤原⼚固件的话,得装驱动,就可以随便刷最新版本的固件了。
现在OPENTX固件是2940版本。
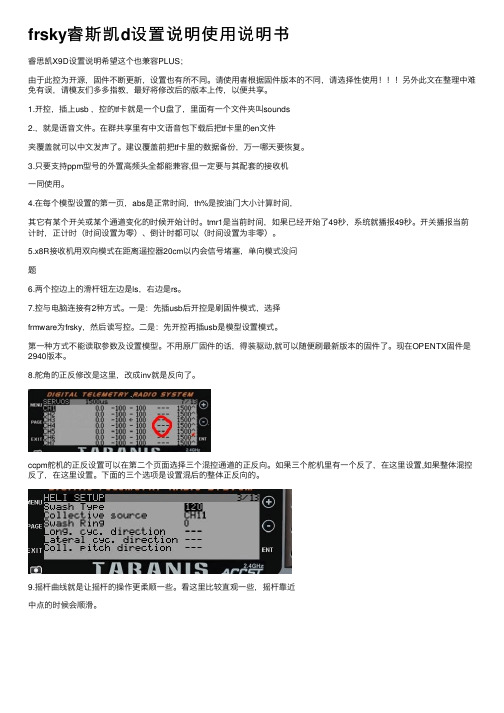
8.舵⾓的正反修改是这⾥,改成inv就是反向了。
ccpm舵机的正反设置可以在第⼆个页⾯选择三个混控通道的正反向。
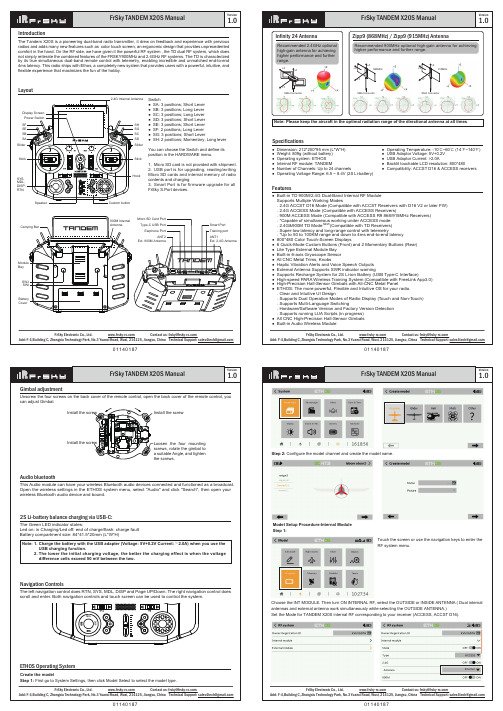
如果三个舵机⾥有⼀个反了,在这⾥设置,如果整体混控反了,在这⾥设置。
下⾯的三个选项是设置混后的整体正反向的。
9.摇杆曲线就是让摇杆的操作更柔顺⼀些。
看这⾥⽐较直观⼀些,摇杆靠近中点的时候会顺滑。
10.11.或8个相同类型的飞机,⽐如两架固定翼,可以⽤0 和1 分开设置,飞机A,在装配调试的时候副翼中点要偏移⼀点,但是飞机B不⽤偏移,设置好后选择0就飞A飞机,选择1就飞B飞机。
Frsky TANDEM X20S 说明书.pdf_1697350094.1738288
0114018701140187+X+Y+ZSMA Connector SMA Connector+X+Y+Z+X+Y+ZSMA Connector868MHz915MHzStep 2: Configure the model channel and create the model name.Model Setup Procedure-Internal ModuleStep 1:Touch the screen or use the navigation keys to enter theChoose the INT MODULE. Then turn ON INTERNAL RF, select the OUTSIDE or INSIDE ANTENNA ( Dual internal antennas and external antenna work simultaneously while selecting the OUTSIDE ANTENNA.)Set the Mode for TANDEM X20S internal RF corresponding to your receiver (ACCESS, ACCST D16).InternalFrSkyElectronicCo.,Contactus:******************Add:F-4,BuildingC,ZhongxiuTechnologyPark,No.3YuanxiRoad,Wuxi,214125,Jiangsu,ChinaTechnicalSupport:********************01140187FrSkyElectronicCo.,Contactus:******************Add:F-4,BuildingC,ZhongxiuTechnologyPark,No.3YuanxiRoad,Wuxi,214125,Jiangsu,ChinaTechnicalSupport:********************01140187Version1.0FrSky TANDEM X20S ManualVersion1.0FrSky TANDEM X20S ManualRange CheckStep 3: Set the Receiver NumberThe system will assign you the receiver a number automatically, when you create a new model, and this can be easily changed. The range of the Model ID is 00-63, with the default number being 01. Once the receiver is set to the desired number and is bound to the TANDEM X20S, the bind procedure will not need to be repeated unless the receiver number is changed. At this point, set the receiving number to your preferred number and repeat the binding operation.InternalRange CheckStep 4 : RegistrationIn ACCESS model, select the STATE [Register] into Registration status on radio side. Then Press the F/S button and power on your receiver, and select the “RX Name XX” and [REGISTER] to complete the Registration process then power down the receiver.InternalRange CheckRegisterStep 5: Automatic binding (Smart Match )Move the cursor to Rx1[BIND],and select it, power your receiver, select the RX, and complete the process, the system will confirm "Bind succeed". (Pressing the "F/S" button is not required in ACCESS to Bind. Please the receivers manual for details).InternalRange Check Register InternalRange CheckRegister Step 6: Set Failsafe modeThere are 3 failsafe modes when enable: No Pulse, Hold, Custom.Then rotate the Encoder to set your failsafe for each channel and short press Encoder to finish the setting. Wait 9 seconds before the failsafe takes effect.Notice:● When failsafe is disabled on TANDEM X20S side, the failsafe set on receiver side will be used.● SBUS port does not support the No Pulse failsafe mode and always outputs. Set “Hold” or “Custom” for SBUS port.● No Pulse: on loss of signal the receiver produces no pulses on any channel. To use this type, select it in themenu and wait 9 seconds for the failsafe to take effect.● Hold: the receiver continues to output the last positions before signal was lost. To use this type, select it in the menu and wait 9 seconds for the failsafe to take effect.● Custom: pre-set to required positions on lost signal. Move the cursor to the failsafe mode of channel and press Encoder, then choose the Custom mode. Move the cursor to the channel you want to set failsafe on, and press Encoder.Range Check Register Model Setup for TANDEM X20S External RF ModuleThe external RF module can be powered on or off by software. The setup process is the same as that for the internal RF. External modules should be closed when not in use.Range CheckBind Step 7: RangeRange refers to TANDEM X20S range check mode. A pre-flight range check should be done before each flying session. Move the cursor to “STATE”, scroll the Encoder to select “RANGE” mode and press Encoder. In range check mode, the effective distance will be decreased to 1/30. Press the Encoder again, turn to normal state.Range CheckRegister Range CheckRegisterThe product may be used freely in these countries: Germany, UK, Italy, Spain, Belgium, Netherlands, Portugal, Greece, Ireland, Denmark, Luxembourg, Austria, Finland, Sweden, Norway, France and Iceland.To ensure the safety of yourself and others, please observe the following precautions.Have regular maintenance performed. Although your atile EEPROM memory (which does not require periodic replacement) and of a battery, it still should have regular check-ups for wear and tear. We recommend sending your system to your FrSky Service Center annually during your non-flying-season for a complete check-up and service.FLYING SAFETYWarning:BatteryThis equipment has been tested and found to comply with the limits for a Class B digital device, pursuant to part 15 of the FCC RulesFCCTo prevent possible damage to your radio gear, turn the power switches on and off in the proper sequence: 1. Pull throttle stick to idle position, or otherwise disarm your motor/engine.2. Turn on the transmitter power and allow your transmitter to reach its home screen. 5. Test all controls. If a servo operates abnormally, don’t attempt to fly until you determine the cause of the problem. 8. After flying, bring the throttle stick to idle position, engage any kill switches or otherwise disarm your motor/engine.If you do not turn on your system on and off in this order, you may damage your servos or control surfaces, flood your。
FrSky TANDEM X20 HD 使用说明书
With ETHOS Suite, you can update the radio bootloader, firmware, SD card, flash, and also convert image format and audio format. Find the latest infomation and download the ETHOS Suite at /.ETHOS SuiteNote: To use the ETHOS Suite application with a FrSky radio, please always keep the radio bootloader with the latest version.How to upgrade firmware for the video receiver module3221Make sure the HD radio is connected to the [ETHOS Suite] program.Enter the [FRSK Flasher] tool and move to the [HD Video Component] tab;Click the [Flash] button of the corresponding radio model to upgrade the firmware. 312V1V2V1V2FrSkyElectronicCo.,Contactus:******************Add:F-4,BuildingC,ZhongxiuTechnologyPark,No.3YuanxiRoad,Wuxi,214125,Jiangsu,ChinaTechnicalSupport:********************FrSkyElectronicCo.,Contactus:******************Add:F-4,BuildingC,ZhongxiuTechnologyPark,No.3YuanxiRoad,Wuxi,214125,Jiangsu,ChinaTechnicalSupport:******************** S TEP2: Channel Range SettingTD-ISRM Internal RF module supports 24 channels(CH1-8 / CH1-16 / CH1-24).The channel range is configurable by pressing thechannel bars, please also make sure of the channelconfiguration before using the module.STEP3: Model ID SettingThe system assigns the receiver a number for thereceiver (Model ID) automatically while creating a newmodel. ( The Model ID can be set from 00 to 63, withthe default ID being 1.)FrSky TANDEM X20 HD (UpKit) ManualNote:● If the failsafe is not set, the model will always work with the last working status before the signal islost. That could cause potential damage.● When the failsafe is disabled on the RF module side, the failsafe set on the receiver side will beapplied.● SBUS port does not support the failsafe setting in No Pulses mode and always outputs signal.Please set "Hold" or "Custom" mode for the SBUS port.There are 3 failsafe modes when the setting is enabled: No Pulse, Hold, and Custom mode.● No Pulses Mode: On loss of signal, the receiver produces no pulses on any channel. To use this mode, select it in the menu and wait 9 seconds for the failsafe to take effect.● Hold Mode: The receiver continues to output the last positions before the signal was lost. To use this mode, select it in the menu and wait 9 seconds for the failsafe to take effect.● Custom Mode: Pre-set to required positions on the lost signal. Move the cursor to the failsafe mode of thechannel and press Encoder, then choose the Custom mode. Move the cursor to the channel you want to set How to set FailsafeA pre-flight range check should be done before every flight, in case the signal loss is caused by the reflection of the signal by the nearby metal fence or concrete, and the shading of the signal by buildings or trees during the actual flight. Under normal circumstances, in Range Check mode, the RSSI at 150m is about 45-50.1. Place the model at least 60 cm (2 feet) above the non-metal contaminated ground (such as on a wooden bench). The receiving antenna should be in a vertical position.2. Ener the ETHOS system, move to the "RF System", scroll the Encoder to select "RANGE" mode andEncoder. In range check mode, the effective distance will be decreased to 1/30.Range CheckSTEP4: RegistrationFor TD Mode as an example, select the Set [Register] for getting the radio into Registration status in the RF System-Internal Module tool, then press the F/S button on the receiver and power the receiver on.When the "RX Connected" page pops up, press the [REGISTER] to complete the Registration procedure and then power the receiver off.(The system automatically assigns the receiver a UID differently in the same model when you have several receivers to bind at the same time.)STEP6: RF Power SettingThe TD-ISRM internal RF Module can offer multiple RF power options which can achieve a further controlling range. Open the Power menu bar and select the desired power level according to usage.STEP5: Automatic Binding (Smart Match)Move the cursor to RX1 [BIND], press it and repower the receiver.Click the RX to complete the binding after the receiver window pops up, the system will confirm "Bind succeed".Reset: Registration procedure is not requiredto repeat anymore after the receiver was once registered even though the receiver is deleted. Pressing the [Reset] and repower the receiver can have the bound recovered.Version1.0FrSky TANDEM X20 HD (UpKit) Manual Then turn the state of Internal RF to On. Set the binding mode for the Internal RF module correspond-ing to the receiver (ACCST D16, ACCESS, TD MODE).Model Setup Procedure - Internal Module STEP1: Enable RF ModuleEnter the RF system menu by the touch-screen or use the navigation encoder key. Choose the Internal Module.STEP 2:Configure the model the model and set the model picture. Enter into Model Select, then select the model type.Create a new model.。
FrSky TANDEM X20 说明书
+X+Y+ZSMA Connector Touch the screen or use the navigation keys to enter the RF system menu.Choose the INT MODULE. Then turn ON INTERNAL RF, select the OUTSIDE or INSIDE ANTENNA ( Dual internal antennas and external antenna work simultaneously while selecting the OUTSIDE ANTENNA.)Set the Mode for TANDEM X20 internal RF corresponding to your receiver (ACCESS, ACCST D16).InternalStep 2: Set the Channel RangeThe TANDEM RF module supports 24 channels. the channel range is configurable, and it needs to be double checked before use.Range CheckSMA Connector +X+Y+Z+X+Y+ZSMA Connector868MHz915MHzCreate the modelStep 1: First go to System Settings, then click Model Select to select the model type.ETHOS Operating SystemNote: To use the ETHOS Suite application with a FrSky radio, please always keep the radio bootloader with the latest version.FrSkyElectronicCo.,Contactus:******************Add:F-4,BuildingC,ZhongxiuTechnologyPark,No.3YuanxiRoad,Wuxi,214125,Jiangsu,ChinaTechnicalSupport:********************FrSkyElectronicCo.,Contactus:******************Add:F-4,BuildingC,ZhongxiuTechnologyPark,No.3YuanxiRoad,Wuxi,214125,Jiangsu,ChinaTechnicalSupport:********************Version1.0FrSky TANDEM X20 ManualFrSky TANDEM X20 ManualMake sure your transmitter can’t tip it over. If it is knocked over, the throttle stick may be accidentally moved, causing the engine to speed up. Also, damage to your transmitter may occur.In order to maintain complete control of your aircraft it is important that it remains visible at all times. Flying behind large objects such as buildings, grain bins, etc. must be avoided. Doing so may interrupt the radio frequency link to the model, resulting in loss of control.Do not grasp the transmitter's antenna during flight. Doing so may degrade the quality of the radio frequency transmission and could result in loss of control.As with all radio frequency transmissions, the strongest area of signal transmission is from the sides of thetransmitter's antenna. As such, the antenna should not be pointed directly at the model. If your flying style creates this situation, easily move the antenna to correct this situation.Step 6: Set Failsafe modeThere are 3 failsafe modes when enable: No Pulse, Hold, Custom.Step 5: Automatic binding (Smart Match )Move the cursor to Rx1[BIND],and select it, power your receiver, select the RX, and complete the process, the system will confirm "Bind succeed". (Pressing the "F/S" button is not required in ACCESS to Bind. Please the receivers manual for details).Then rotate the Encoder to set your failsafe for each channel and short press Encoder to finish the setting. Wait 9 seconds before the failsafe takes effect.Notice:● When failsafe is disabled on TANDEM X20 side, the failsafe set on receiver side will be used.● SBUS port does not support the No Pulse failsafe mode and always outputs. Set “Hold” or “Custom” for SBUS port.Step 7: RangeRange refers to TANDEM X20 range check mode. A session. Move the cursor to “STATE”, scroll the Encoder to select “RANGE” mode and press Encoder. In range check mode, the effective distance will be decreased to 1/30. Press the Encoder again, turn to normal state.CEThis equipment has been tested and found to comply with the limits for a Class B digital device, pursuant to part 15 of the FCC RulesFCCThe external RF module can be powered on or off by software. The setup process is the same as that for the internal RF. External modules should be closed when not in use.Step 4 : RegistrationIn ACCESS model, select the STATE [Register] into Registration status on radio side. Then Press the F/S button and power on your receiver, and select the “RX Name XX” and [REGISTER] to complete the Registration process then power down the receiver.InternalRange CheckInternalRange CheckRegister Internal Range Check Register Range CheckBind InternalRange CheckRegister Range CheckRegisterRange CheckRegister Range CheckRegister。
睿思凯24GHz 无线电控制系统 V8 系列产品安装说明书
睿思凯2.4GHz 无线电控制系统V8系列产品安装说明书感谢您购买睿思凯V8 2.4GHz 无线电控制系统。
为了使您充分的享受此系统所有的优点,请您仔细阅读此说明书并按照下面的描述进行设备安装。
1.主要特点◆ 先进的跳频技术 (ACCST 系统是世界最先进的跳频的技术之一, ACCST 2.4GHz系统能实现每秒几百次的跳频,这意味着极低的信号冲突和中断。
),◆ 快速对码连接◆ 快速重连◆ 双天线切换◆ 所有通道有效容易设置失控保护◆ 反应灵敏◆ 舵机移动平滑◆ 距离(1.5km-2.5km).2.睿思凯V8 2.4GHz 无线电控制系统如果您是Futaba 或者JR 用户,而且想要升级你的无线电系统到2.4GHz,睿思凯V8 系统会是您最好的选择。
2.1睿思凯不同的发射模块兼容以下发射机:V8FT (Futaba模块):Futaba: 3PM, 3PK, 7U, 8U, 8J, 9C, 10C, 9Z and FN series, T10C, FC-18, FC-28Hitec: Optic 6, Eclipse 7, Prism 7.WFLY: WFT09, WFT 08.V8JT (JR 模块 ):JR: 347/388/783/U8/PCM10/PCM10S/PCM10SX/PCM10IIS/8103/J9303/MX-22/MX-24S/PX/9XIIV8JT-G (Graupner模块): Graupner :MC—18/ MC—20/ MC—242.2接收机规格:型号:V8FR-HV;V8R7-HV;V8R4;V8R7-SP工作电压范围:3.2V-7.6V 3.0V-16V (高压)工作电流:30mA分辨率:3072延时:22ms规格:V8FR-HV(8通道,14g, 49mm×24.5mm×15mm, 1.5km-2.5km),V8R7-HV (7通道, 7.5g, 40mm×21mm×10mm, 1.5km-2.5km), V8R4 (4通道, 2.6g, 34.5mm×19.5mm×8mm, ≥500m), V8R7-SP( 7通道, 9g, 49mm×23mm×12mm, 1.5km-2.5km)2.3发射模块规格:工作电压范围: 6.0V-13.0V工作电流: 50mA输出功率: 60mW分辨率: 3072尺寸: 63.9mmX48.5mmX36.5mm (V8JT); 58.5mmx37.5mmx22mm (V8FT)有效的控制范围是指发射机和接收机清除阻塞后的距离。
FrSky XSRF4PO 使用手册说明书
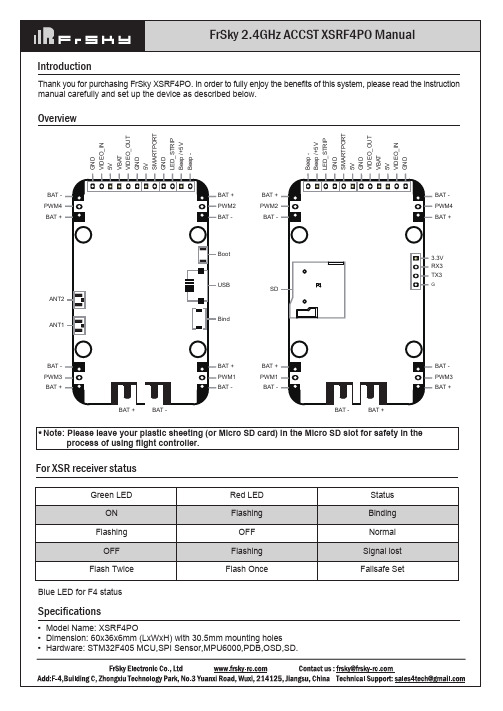
GND VIDEO_IN 5V VBAT VIDEO_OUT GND 5V SMARTPORT GND LED_STRIP Beep /+5V Beep Beep Beep /+5V LED_STRIP GND SMARTPORT 5V GND VIDEO_OUT VBAT 5V VIDEO_IN GND
After configuration, you can use the FrSky radio (wireless) to set the PID parameters for XSRF4PO, make sure the firmware versions of radio is the latest , then copy the settings script FC.lua to the SD card of the radio, bind XSRF4PO to the radio, and run the FC.lua scrip. FrSky FC firmware needs to be flashed if parameters are set through FC.lua.
For XSR receiver status
Green LED ON
Flashing OFF
Flash Twice
Red LED Flashing
OFF Flashing Flash Once
Blue LED for F4 status
Specifications
• Model Name: XSRF4PO • Dimension: 60x36x6mm (LxWxH) with 30.5mm mounting holes • Hardware: STM32F405 MCU,SPI Sensor,MPU6000,PDB,OSD,SD.
睿思凯 24GHz 无线电遥控系统
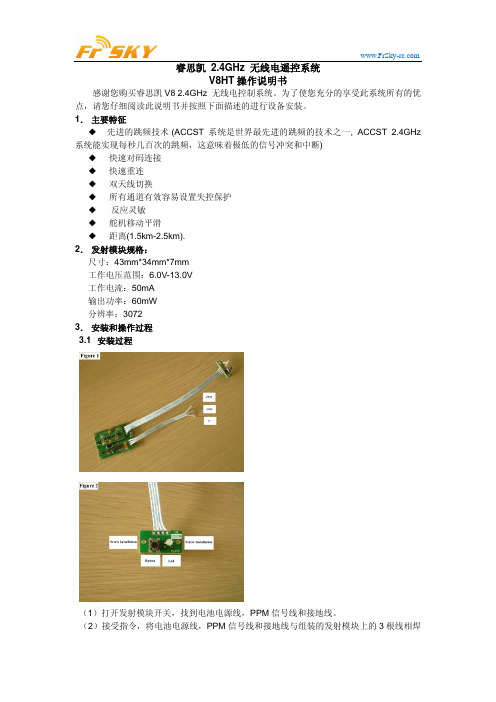
接。 (XXX PPM; --GND; WHITE: V+) (见图一) (3)如图二所示,在发射模块上钻 2 个孔, 这 2 个孔分别是为安装螺丝钉以及红、 绿 LED 灯及其按钮而设计的。 (见图二) (4)连接在发射板端口的天线连接器。 (5)在发射板合适的位置为天线连接器钻 1 个孔。直径为 7mm 为宜。 ( 6 ) 将发射机的天线安装在连接器上。将发射机电源开启,检查在 DIY 扩展板上的电源 LED 指示灯,该 LED 灯通常呈橙色。 3.2 接收机和发射模块安装指导 a) 打开您的发射模块的开关然后将其调整为 PPM 模式,然后关闭发射机。 b) 按住发射机上的 F/S 按钮并且打开发射机开关。几秒钟后释放按钮,在发射模块上的 红色 LED 灯将闪烁,表明发射机已经准备好与接收机对码。 c) 将电池电源与接收机相连接同时按住接收机上的按钮。接收机上的 LED 灯将闪烁,表 明对码操作已经完成。将接收机和发射模块关闭。 d) 打开发射模块开关,接收机连上电源,红灯长亮,几秒后,进入工作状态。 以上操作完成后,对码完成,系统可以工作。建立新系统时(发射模块或者接收机任意换一 个或者都换掉) ,需要重新对码。当需要控制多个接收机时,每个接收机都要与发射模块进 行 b 步骤对码。所有接收机都对码后,关闭控。 距离检测: 为了飞行的安全,有必要在飞行前进行距离检查。当模型在金属篱笆,混凝土建筑,或 者整排的树内飞行的时候一定要小心。如果操控的话,你可能会受到未知的干扰。 请按照如下步骤进行距离检查操作(注:此操作要求接收机装在模型上进行)。 1) 把模型放置在高于非金属污染土地最少两英寸(60cm)的地方,例如木质长凳。 2) 把接收机天线水平放置。不要让天线接触碰到地面。 3) 把发射模块天线放置在垂直的位置。 4) 打开发射机和接收机,然后按住发射模块上的“F/S Range”按钮 4 秒,发射模 块的红色 LED 将变为绿色的,这时,发射模块功率将降至正常值的 1/1000, 因 此有效距离也将相应地减少到正常距离的 30 分之一。 5) 一个人在控制遥控器的同时进行操作的同时,慢慢步行离开模型,让另一个助手 看着模型已确认所有操作正常。应该至少能够步行大概 30m 并且模型不会失去 控制。 6) 再次按一下“F/S Range”按钮,距离检查操作结束。 3.3 安全区域指示 您在使用睿思凯 2.4GHz V8 无线电控制系统进行飞行的时候,当飞行距离接近于最大 控制范围的时候,模型的反应将变慢。这即是睿思凯设计的安全特征。意味着,一旦您发现 模型反应变慢,应尽量使模型与发射机的距离拉近。 3.4 信号丢失指示 在一些特殊的情况下,诸如强干扰,信号可能会丢失。 当信号短暂丢失的时候,接收机会继续尝试寻找发射机,同时,保持从发射机收到的最 后一个命令,直到一个受到一个新的命令。 失控保护: 本接收机支持所有失控保护功能适合于每个通道,如下所示: 接收机对码后,短暂地按下接收机“F/S Range”按钮,接收机绿色 LED 灯将闪烁 2 次, 失控保护成功的建立。如果你不再需要失控保护功能,只要重新对码接收机即可。 注意: 控制距离也受环境影响。请在户外远离任何障碍物的地方测试它。空中的控制距离大 于地
FrSky TD SR18接收机使用说明书

• OFF:自稳模式不可使用• BASIC:开启默认自稳通道• ADV:需要使用RBMIXER软件进行编辑后使用注意:正常使用只需要选择BASIC模式即可,如需要使用ADV进阶自稳模式请使用 RBmixer软件编辑后开启。
注意:如不使用接收机的ADV进阶自稳模式,此选项务必保持关闭。
将IMU mode设置为ADV模式,并把ADV 过Upgrade接口完成对ADV自稳模式下的参数设置。
水平面校准模式将CaliHorizontal选项Disable更改成Enable,可触发水平面校准。
注意:此CaliHorizontal选项只用于ADV模式水平校准,使用basic模式无需注意此 选项。
两个独立的自稳功能SRX Stable菜单【Stable System1】中的Stabilizing选项1支持开启或者关闭第1组自稳通道(CH1-6),选项2支持开启或者关闭第2组自稳通道(CH7-11)。
【系统设置】→【SRX Stable】【SRX Stable】→【Stabilizing】 →【On】选择【SRX Calibration】脚本对TD SR18进行陀螺仪校准。
1. 陀螺仪需要六面校准,请将TD SR18放在平整的地面或者桌子上按照图示操作步骤进行 校准。
2. 将TD SR18 LOGO贴纸部分朝上平方至桌面,遥控器界面进入【SRX Calibration】校CH13-16的开关设定可供参考。
在【Auto-Level】模式下,检验机翼/舵机系统的反应是否与飞行姿态一致。
如果不一致,请尝试在【SRX Stable】界面中反转相应的通道输出。
1233212143飞行模式的【Gain】和【Offset】的配置AIL/ELE/RUD增稳感度AIL/ELE自水平增益ELE/RUD吊机方向增益AIL/RUD侧飞方向增益AIL/ELE自水平角度微调ELE/RUD吊机角度微调AIL/RUD侧飞角度微调1234机翼类型安装类型1212注意:TD SR18默认模式为“快速模式”。
FrSky TWIN X Lite X Lite S 用户手册说明书
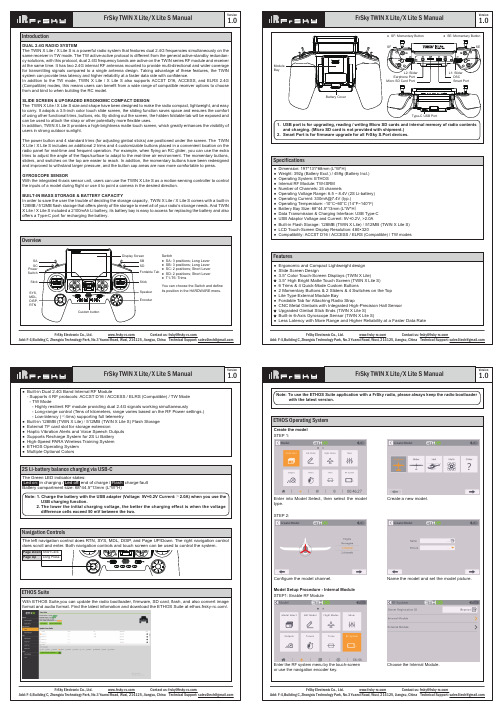
STEP 2:Configure the model the model and set the model picture.Enter into Model Select, then select the model type.Create a new model.Model Setup Procedure - Internal Module STEP1: Enable RF ModuleEnter the RF system menu by the touch-screen or use the navigation encoder key.Choose the Internal Module.Note:● If the failsafe is not set, the model will always work with the last working status before the signal is lost. That could cause potential damage.● When the failsafe is disabled on the RF module side, the failsafe set on the receiver side will be applied.● SBUS port does not support the failsafe setting in No Pulses mode and always outputs signal. Please set "Hold" or "Custom" mode for the SBUS port.A pre-flight range check should be done before every flight, in case the signal loss is caused by the reflection of the signal by the nearby metal fence or concrete, and the shading of the signal by buildings or trees during the actual flight. Under normal circumstances, in Range Check mode, the RSSI at 150m is about 45-50.1. Place the model at least 60 cm (2 feet) above the non-metal contaminated ground (such as on a wooden bench). The receiving antenna should be in a vertical position.2. Ener the ETHOS system, move to the "RF System", scroll the Encoder to select "RANGE" mode and press Encoder. In range check mode, the effective distance will be decreased to 1/30.Range CheckThis equipment has been tested and found to comply with the limits for a Class B digital device, pursuant to part FCCThen turn the state of Internal RF to On. Set the binding mode for the Internal RF module corresponding to the receiver (ACCST D16, ACCESS, TW MODE.etc).STEP2: Channel Range Setting For TW Mode as an example, select the Set [Register] for getting the radio into Registration status in the RF System-Internal Module tool, then press the F/S button on the receiver and power the receiver on.When the "RX Connected" page pops up, press the [REGISTER] to complete the Registration procedure and then power the receiver off.(The system automatically assigns the receiver a UID differently in the same model when you have several receivers to bind at the same time.)STEP5: Automatic Binding (Smart Match)Move the cursor to RX1 [BIND], press it and repower the receiver.Click the RX to complete the binding after the receiver window pops up, the system will confirm "Bind succeed".Reset: Registration procedure is not required to repeat anymore after the receiver was once registered even though the receiver is deleted. Pressing the [Reset] and repower the receiver can have the bound recovered.Change the binding mode to [ELRS] under the [TW Lite] module menu.And press [Config] to enter the binding menu.STEP2:Power the ELRS receiver on and off 3 times, and the LED on the receiver will do a quick flash twice that indicating the receiver is in the binding mode.Click the [Bind] and if the receiver LED keeps lit, it means the receiver is bound successfully.。
FrSky 2.4GHz ACCST RXSR-FC 使用说明书
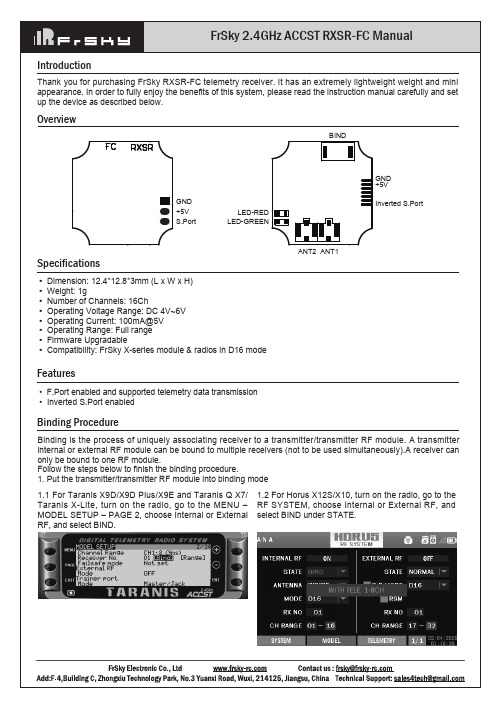
Overview
BIND
GND +5V S.Port
LED-RED LED-GREEN
GND +5V Inverted S.Port
Specifications
• Dimension: 12.4*12.8*3mm (L x W x H) • Weight: 1g • Number of Channels: 16Ch • Operating Voltage Range: DC 4V~6V • Operating Current: 100mA@5V • Operating Range: Full range • Firmware Upgradable • Compatibility: FrSky X-series module & radios in D16 mode
1.1 For Taranis X9D/X9D Plus/X9E and Taranis Q X7/ Taranis X-Lite, turn on the radio, go to the MENU – MODEL SETUP – PAGE 2, choose Internal or External RF, and select BIND.
ANT2 ANT1
Features
• F.Port enabled and supported telemetry data transmission • Inverted S.Port enabled
- 1、下载文档前请自行甄别文档内容的完整性,平台不提供额外的编辑、内容补充、找答案等附加服务。
- 2、"仅部分预览"的文档,不可在线预览部分如存在完整性等问题,可反馈申请退款(可完整预览的文档不适用该条件!)。
- 3、如文档侵犯您的权益,请联系客服反馈,我们会尽快为您处理(人工客服工作时间:9:00-18:30)。
睿思凯X9D设置说明希望这个也兼容PLUS;由于此控为开源,固件不断更新,设置也有所不同。
请使用者根据固件版本的不同,请选择性使用!!!另外此文在整理中难免有误,请模友们多多指教,最好将修改后的版本上传,以便共享。
1.开控,插上usb ,控的tf卡就是一个U盘了,里面有一个文件夹叫sounds2.,就是语音文件。
在群共享里有中文语音包下载后把tf卡里的en文件夹覆盖就可以中文发声了。
建议覆盖前把tf卡里的数据备份,万一哪天要恢复。
3.只要支持ppm型号的外置高频头全都能兼容,但一定要与其配套的接收机一同使用。
4.在每个模型设置的第一页,abs是正常时间,th%是按油门大小计算时间,其它有某个开关或某个通道变化的时候开始计时。
tmr1是当前时间,如果已经开始了49秒,系统就播报49秒。
开关播报当前计时,正计时(时间设置为零)、倒计时都可以(时间设置为非零)。
5.x8R接收机用双向模式在距离遥控器20cm以内会信号堵塞,单向模式没问题6.两个控边上的滑杆钮左边是ls,右边是rs。
7.控与电脑连接有2种方式。
一是:先插usb后开控是刷固件模式,选择frmware为frsky,然后读写控。
二是:先开控再插usb是模型设置模式。
第一种方式不能读取参数及设置模型。
不用原厂固件的话,得装驱动,就可以随便刷最新版本的固件了。
现在OPENTX固件是2940版本。
8.舵角的正反修改是这里,改成inv就是反向了。
ccpm舵机的正反设置可以在第二个页面选择三个混控通道的正反向。
如果三个舵机里有一个反了,在这里设置,如果整体混控反了,在这里设置。
下面的三个选项是设置混后的整体正反向的。
9.摇杆曲线就是让摇杆的操作更柔顺一些。
看这里比较直观一些,摇杆靠近中点的时候会顺滑。
10.11.或8个相同类型的飞机,比如两架固定翼,可以用0 和1 分开设置,飞机A,在装配调试的时候副翼中点要偏移一点,但是飞机B不用偏移,设置好后选择0就飞A飞机,选择1就飞B飞机。
0-8就是9套参数,可以给一个飞机定义9套参数,也可以每套参数对应一个飞机。
12.要改手就选择那个reta aetr ater arte等等。
13.x9d在菜单翻页长按翻页键是倒退。
14.frsky是自己的制式。
15.在5通道上设置控制原为sa,三段数据分别为-100,0,10016.三轴飞控的开关,就改一个选项即可。
17.双向接收机不用接任何设备就可以回传接收机的电压,遥控器可以看很多信息的,有三个页面可以自定义显示,每个页面能显示好几种,用过opentx 和er9x一模一样的,就是增加了写功能。
18.X9D用的是opentx修改版。
opentx用的就是er9x的源码,其实就是在er9x上扩展的。
对fs9也可以刷opentx,操作完全一样,但更强大,自定义功能增加了可编程的部分。
遥控器关机状态插上usb才能刷固件,开机状态插上usb可以用compainon9x设置遥控器的各项功能(很方便)。
19.eepe是设置er9x的,companion9x是设置opentx的,用法都是一样的。
20.说明书上就一个词reserved,预留的口,目前功能未知,frsky双工协议说明,用于链接第三方遥测设备,电池接在左边电池口上的。
上传的这个" FRSKY TELEMETRY PROTOCOL.PDF"文档是frsky djt和dft外置模块的串口数据说明,可以用来接别的遥测设备,可以把另外的发射端数据由这个串口输入到遥控器显示。
21.桔子高频头直接可以插在x9d上,fs9也可以直接插,jr的高频头可以直接插。
支持dsmx和dsm2协议,可以用便宜的dsm2接收机。
22.最底下和横道,就是状态栏的数字就是信号,在range test 状态显示的大数字,如果是正常模式,救灾屏幕最底下反色的横条里是信号强度。
可以把它自定义在显示页面里,有3个自定义页面可以设置。
要看电池电压必须外接电压传感器,也可以自己做。
电池输出并接一个传感器,或者直接在平衡口接传感23.X9D最高能到16通。
x8r是专门针对最新的d16协议模式的。
轻型的D4R-II,支持1-8通cppm输出subs。
X9d原配内置一个16通道高频头,外置空的,可以再加一个外置高频头组成32通道。
也可以插其它厂家的高频模块。
内置和外置的高频都可以选择打开或关闭,下图是用DSM2高频头。
也就是可以用JR接收机和DX系列的。
24.25.26.遥控器上有语音播报,信号差的时候或者电压低的时候会有语音提示,如果外接传感器,可以播报电池电压、高度、速度、转速、温度……等一切可以监测的数据。
有飞行正计时、倒计时播报功能,按油门大小比例计时功能。
对,除了不能直接图传,数据的双向传输都是可以实现的。
27.电压传感器加一个HUB,可以传回的是动力电池的总电压和单节锂电池的每一节电压,而且你在控上可以设置一下最低单节电池的电压报警,低于这个值(比如设置3.7V),那么当3S或6S电池中当任一一节电池的电压低于3.7V时,控就报警了。
28.29.回传是回传,显示是显示。
如果FS刷OPENTX或OPEN9X,用XJT高频头,数据能回传回来,但你如果不另加一个FRSKY的外接显示屏,数据是传回来了,但你显示不出来,看不到。
30.按一下ent键对频,再按一下停止31.32.33.下图是X9D的外接高频头引线定义:34.X9D有一个ppm选项开关,选一下正反向就可以了。
每个模型的参数都可以设置单独的ppm的正反向。
35.用开关设置油门开关:37.在混控中设置油门开关:油门是几通道就选SafetyCH(通道数)38.接收机D8R-II,A2口在侧面,供电和电压数据是插在两个口上的,注意看侧面39.40. 插错烧接收机。
用proteus模拟这个小电路,输出电压是3.12632。
最大3s41.42.换4种电阻的开关电路可以支持3-6s。
3s是三节锂电串联11.1V,6s是6节锂电串联22.2V。
43.44.就按这个做,支持3-6s 的电压传感器,用开关选择电池类型45.16通道ppm输出要30几ms才行。
sbus的数据,不清楚。
sbus官方没提供数据46.47. d4fr接收机说明里的图,cppm输出18ms,sbus应该更快吧。
18ms是所有通道信号输出一次的时间。
这个操作遥控杆到舵机动作,其中还有舵机自己的延时呢,普通舵机都是200ms,所以遥控器的输出怎么都比舵机块十倍。
就是最快的锁尾舵机0.09s也要90ms。
所以再快的遥控,操作时,舵机都会慢半拍的。
所以想打舵时舵机立即反应,估计目前没可能,遥控->接收->舵机,只有舵机的速度能感觉到,遥控和接收机通讯的速度人类是感觉不到的。
48.49.高频头有internal RF(内置) External RF(外置)和 master/slave 三个选项,内外都可以关。
当使用外置高频头时,就把内置高频头关了外置ppm1-8。
50.打开教练开关主控机就会关闭3.5口的ppm输入。
51.现在长按menu键,然后按page翻页,翻到最后一页校准,校准方法和模拟器一样,先中立,然后最大化移动遥控杆。
记得校准时别忘了中间的和两个边上的旋钮一起校准。
校准前记得全部放中位,3个旋钮也一样。
还有微调也要中位52.ls和rs是两个侧边电位器,s1和s2是两个旋钮53.第一屏,意思是按enter键开始校准,按一下enter。
54.55.第二屏,所有摇杆居中,旋钮和侧边电位器也调到物理居中,不管他的显示,然后按enter。
校准时不要太用力,刚好碰到边就可以了,不然拉到头会达不到100%,因为校准时太用力拉过了。
56.第三屏,依次把所有摇杆和旋钮都最大最小旋转几次,按enter完成。
最后按exit退出就校准好了。
57.58.在遥控器设置第一页里,选择电压范围59.设置好后,继续向下,找到battery low 设置低压报警。
60. 这个固件是官方最新的61.対频及距离检测:62.bind就是对频:按一下开始,再按一下停止。
X8r对频时离遥控器远一点,因为双向模式太近时信号会堵塞,对不上的,要20cm以上。
range是距离检测:就是让发射机功率降低到1/30,然后拉距测试,看能拉多少米不失控,然后再乘以30倍就是实际信号范围。
rssi是信号强度的意思。
在正常界面长按遥控器的page键,然后用+-号选择,有一个A1值就是rssi,百分比表示信号强度0-99。
接收机内置回传rssi功能,还有一个rssi 输出口,可以输出到第三方设备。
也许是其它的可以利用信号强度自动控制飞机的东西吧,要是信号低于某个值,可以让飞机自动往会飞。
rssi输出给fpv 图传,在地面监控屏上显示信号值。
实时视频数据叠加功能用的着。
看rssi 输出0-3.3v模拟信号,由外接AD转换成数字比例信号,0-3.3V的ad转换哦,各种外接都好用。
rssi输出0-3.3v模拟信号,由外接AD转换成数字比例信号,0-3.3V的ad转换哦,各种外接都好用。
63.把模型设置第一页里面最下面的master改成slave,然后设置ppm通道数就可以玩模拟了。
玩的时候把intarnal rf和external rf都关掉,这样内外高频头都不工作,既省电又延长高频头寿命。
短按menu 就出现模型选择页面,然后按一下page 到了单个模型的设置页面最下面。
默认是master,改为slave,这个就是模拟输出口。
Internal rf是内置高频头,external rf是外置高频头。
trainer是教练口。
遥控器背对自己,左面那个音频口是模拟口,右边是耳机孔。
64.如果是喇叭滴的一声就是中点提醒,可以关掉,若把4个旋钮设置了中点位提醒,摇杆的关掉,这样,拧旋钮的时候听声音就知道到中间了65.这个里面设置。
RETA12LR 就是八个类比输入,reta是摇杆,12是旋钮,lr 是侧边的旋钮。
66.67.这里设置黄框框是通道输出顺序,1234通道对应aetr。
红框框是设置摇杆顺序。
按照图形所指的摇杆设置对应的操作名。
这样按照你的操作类型选择默认的顺序就可以了,以后新建的模型顺序都按这个。
比如你是日本手,通道输出为aetr,那么改成美国手,通道输出依然为aetr,摇杆和通道输出自动又对应了,想想是不是很人性化68.遥控器输出的ppm值998-2102,中点为1500,对应百分比的-100到+100。
998-1500是-100-----0,1500-2102是0-----100。
69.内外高频头能同时用,还有可以把模拟口外接一个,同时3个高频头一起用。
70. 混控设置:71.把这两个ele +改成- -改成+,就改ele的,其它的不改。
