1、Lakka的正确打开方式---数码视讯Q5
Q5HD720P拇指DV使用说明书
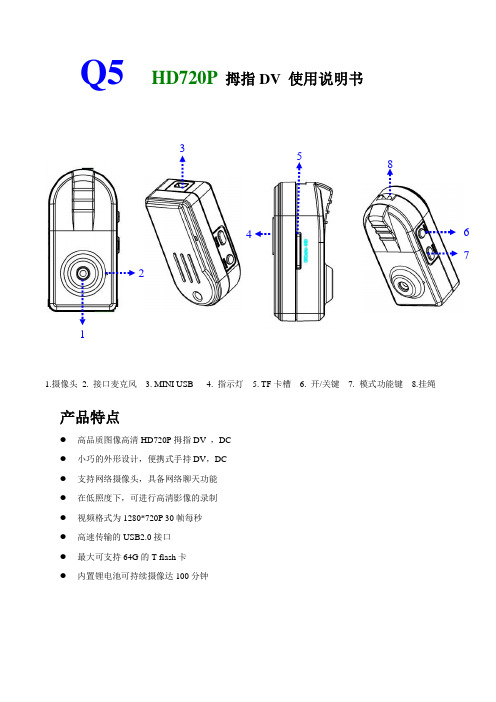
Q5 HD720P 拇指DV 使用说明书1.摄像头2. 接口麦克风3. MINI USB4. 指示灯5. TF 卡槽6. 开/关键7. 模式功能键8.挂绳产品特点● 高品质图像高清HD720P 拇指DV ,DC ● 小巧的外形设计,便携式手持DV ,DC ● 支持网络摄像头,具备网络聊天功能 ● 在低照度下,可进行高清影像的录制 ● 视频格式为1280*720P 30帧每秒 ● 高速传输的USB2.0接口 ● 最大可支持64G 的T-flash 卡 ● 内置锂电池可持续摄像达100分钟1 437256 8操作指南充电:本机内置可充电锂电池,初次使用本机时,请先进行充电, DV可以通过以下方式充电:1), 连接电脑充电, 使用USB数据线与电脑连接, 即可充电。
2), 用充电器充电, 用USB数据线与充电器座连接, 再把充电器插上电插座,即可充电。
充电时, 红灯闪烁表示充电, 红灯停止长亮表示充饱。
注意: 当电池电量不足时, T卡录满时,DV 红蓝灯快闪后会直接进入保护状态, (保存文件及自动关机)录制文件已经保存,此时,请对本机进行充电。
开机并录像请确认已将T-F卡插入产品中!(如果没有插入T卡开机,红蓝灯快闪10秒自动关机)录像:点按“ON/OFF“键,开机红蓝灯同时亮,然后蓝灯灭,红灯长亮表示待机,此时点按一下ON/OFF 键1次,红灯慢闪开始录像,录像(1280X720)每3分钟自动保存一个A VI文件夹,没有手动停止,一直往下录,直到卡满及没电为止,红蓝双闪自动保存关机,(如开机待机不进入任何功能,1分钟自动关机保存)拍照:需要切换到拍照模式,请在开机红灯长亮待机模式下,点按一次模式按键一次(MODE)进入蓝灯长亮模式为拍照模式,此时需要拍照只要点击ON/OFF一次蓝灯闪烁一次为拍照1张(1200万像素)录音:需要用到单独录音功能模式,请在开机红灯长亮模式下,点击一次为蓝灯长亮,拍照模式后,再点击一次模式键,到红蓝灯同时长亮模式下为单独录音模式,此时只要点击ON/OFF一次,蓝灯长亮红灯慢闪的状态下,为单独录音模式,再点按ON/OFF一次为停止录音。
EZCast Beam J4 迪莱普项目器快速启动指南说明书

This EZCast Beam J4 Quick Start Guide provides a guideline for basic operation.Please read the guide thoroughly before operating the projector.Please visit for additional information.Product information is subject to change without prior notice.Thank you for purchasing the EZCast Beam J4 DLP projector. Our product combines the easy to use interface, portability, and cross platform compatibility, to let you enjoy projecting media from Android, iOS phones and tablets, and laptops, anytime, anywhere.EZCast app installationPlease visit /app to download EZCast app for every supported platform.Mobile devices can proceed to the relevant download area by scanning the QR code below.(iOS users can search for EZCast in the App Store to download the app)(Android users can search for EZCast in Google Play to download the app)Never look directly into the projector lens when the lamp is turned on.The bright light can damage your eyes.Never let children look into the lens when it is on.1. PrecautionsHow to use the projector:(1)Do not point the projector lens towards human eyes. The bright light can cause damage to eyes.(2)Do not block the air vents. Blocked ventilation may cause overheating and damages to the projector electronics and components.(3)Do not use chemicals, detergents or water to clean the projector. Moisture and chemicals may corrode the projector circuit boards.(4)Do not place the projector within reach of children.(5)Only use the projector in dry environment with good ventilation.(6)Do not store the projector in extremely hot or extremely cold temperatures. Extreme heat and cold can reduce the component lifetime of projector. Recommended working environment is between 5℃~30℃.(7)Do not attempt to dry the projector in heating devices, such as dryer, microwave etc.(8)Do not squeeze or apply excess pressure to the projector. The projector may be damaged from the pressure.(9)Do not throw, knock or shake the projector. The projector may be damaged from the vibration.(10)Do not attempt to open the projector. Please refer to qualified customer support.(11)Do not attempt to service the projector. Please refer to qualified customer support in the event of projector malfunction.Remote Sensor Wireless KitSelect Back ArrowsSpeaker mode Select Back Volume up Settings1. Insert the wireless adapter into the wireless kit port of the2. Plug the power to the projector, and the power button will3. To turn on projector, hold the power button of the projector for 3 seconds till the light turn green.4. Adjust focus ring until the projection image is clear andThe projector supports full-screen vertical videos automatically when both the mobile and the projector are displayed by portrait mode.(1) Enter “Settings” and find “Image” settings.(2) Switch “Portrait mode” option to “Auto”.(3) Go “Keystone calibration” if needed.(Portrait mode)First time settings1.Select the start-up language.2. Wi-Fi setting: connect the projector to your router and enter the password. (Important)3. After starting up, enter the main menu and select the functions by arrow keys on the projector or remote control: Android, iOS, MacOS, Windows, bluetooth, EZCast, Multimedia, HDMI, and Setting, as below shown:Multimedia playback 1. Insert a USB flash drive into USB1 port on the projector.2. Select the "Multimedia">>"USB Disk">>"Video", "Music" or "Photo" to enter the file folder.3. Select the file to play with the up and down arrow keys, and press "OK" to confirm.4. When playing media, press "OK" to see the menu, and select item by the left and right keys.5. Support format: video, audio, and image.Power off:Hold the power button for 3 seconds.2. Display mode: Swtich ECO/ Standard/ Bright mode.3. Portrait mode: Switch on to project vertically. Pleasemake sure NOT to block the ventilation.4. V.Keystone: Manually vertical keystone adjustment up to ±30 degrees.5. H. Keystone: Manually adjust horizontal keystone up to ±14 degrees.6. 4 Corner Correction: Choose the corner to be adjusted and use arrows to change the location.7. Color Setting: Change brightness, Contrast, Saturation, Sharpness, R/G/B Gain, and R/G/B Offset.8. Firmware Upgrade: Upgrade via USB drive or through internet.9. Projector Location: Switch to Front/ Front Ceiling/ Rear/ Rear Ceiling.10. Language: Change language with arrows.11. Reset All: Choose yes to reset projector to factory default. All saved changes to Setting are lost. The projector will be restored to the factory settings, and the data adjusted by the user will not be saved.(V. Keystone)(H. Keystone)(4 Corner Correction)How to Plug and Play (via USB cable)AndroidiOS1. Select Android on main menu of the projector, and then select Plug and Play by pressing "OK" key.2. Connect your mobile to the projector via mobile USB data cable.3. Download and install MiraPlug app.4. Replug the cable and it will start casting automatically.1. Select the iOS on main menu of projector, and then select Plug and Play menu by pressing "OK" key.2. Connect your mobile to the projector via mobile USB data cable, and then choose "Trust This Computer" to start your projection.Note: If there’s a black screen after connecting to mobile, please reboot your mobile and then try again.1. Select MacOS on main menu of projector, and then select Plug and Play menu by pressing "OK" key.2. Install EZCast app on your PC. Please visit https:///app to download EZCast app.3. Connect your PC to the projector via USB A-to-A cable.4. Launch EZcast app on your PC and click icon.5. Find and select "Beam-XXXX" from “Search device”, and click to mirror.How to Wireless DisplayAndroidiOS1. Select Android on main menu of projector, and then select Wireless menu by pressing "OK" key.2. Select mirroring function in the setting of your phone and find”Beam-XXXX” device shown on device list to start mirroring.Note 1: The naming of mirroring function varies different brands.Visit https:///usage/android/ezmirror for demos.Note 2: Compatibility: Android 8.0 or above.Note: Compatibility: iOS 12 or above.1. Select iOS on main menu of projector, and then select Wireless menu by pressing "OK" key.2. Make sure both of your projector and mobile are connected to the same WiFi router.3. Go for Screen Mirroring of your mobile and select device name ”Beam-XXXX” shown on the list to start projection.Bluetooth Select “bluetooth” to use Beam projector as a bluetooth speaker.Connection: Turn on bluetooth of your mobile or computer, and find Beam-XXXX to connect. The projection screen will turn black during connection.Disconnection:Press “back” key on projector chassis/ remote control, or disconnect from the bluetooth list of your mobile or computer. The projection screen will turn on again after disconneted.Google Home Screen Mirroring (Android Only)1. Select Android on main menu of projector, and then select Google Home menu by pressing "OK" key2. Make sure both of your projector and mobile are connected to the same Wi-Fi router3. Download and install Google Home app from Google Play Store.4. Launch Google Home app and wait for 20 seconds for device searching. Choose device name: Beam-xxxx > Cast my screen > Cast screenDLNA streaming1. Select EZCast on main menu of projector and make sure both of your projector and mobile are connected to the same2. Launch the app that support DLNA, such as QIY, QQTV.3. Click the DLNA icon on the video you’d like to play, and select “Beam-XXXX”.Note: DLNA icon usually shows in the corner of the video, and looks like a tv which depends on different apps.TVBeam-xxxxxxxxFAQProblemsNo electricity/can't power on Unable to screen mirroring Unable to play online media Unable to upgrade online Cannot focus image Remote control not functional Unable to shut downAbnormal casting/ black screen Solutions 1. Check whether the power cord is connected properly.2. Press the Power button for 3 seconds till you hear the "beeping" sound, and then release the button and wait for the projector to start up.1. Make sure wireless adapter has been installed to wireless kit port on the projector.2. Refer to the Quick Guide to make sure you are using the correct screen mirroring function.3. If the screen stutters or lags, the distance between source and projector is too far.4. Make sure the phone is connected to the SSID of the projector.1. Check whether the network connection is normal.2. Check whether the wireless adapter is inserted into the Wireless kit port.1. Make sure the ventilation works without blocked.2. Long press the Power button to shut down.3. Wait for the projector to cool down, and then press Power button to turn on again.1. Check if the Wireless adapter is inserted into the Wireless kit port.2. Check whether the network connection is normal.3. Select OTA upgrade in the Setting.4. Check whether there is a newer firmware version available to upgrade.1. Confirm whether the projecting distance is appropriate, and try to extend the distance between projector and screen.2. Check whether the lens is clean.Replace the batteries of remote control.Press the Power button for about 10 seconds to force the shut down.Warranty1. The defective product is valid for refund and replacement if claimed with proof of purchase and warranty card within 7 days of purchase, and the defect was not caused by inappropriate usage or mishandling of product.2. Product warranty is limited to 12 months within the purchase date, and covers the main projector only. The warranty does not cover accessories and defects caused by inappropriate usage or mishandling of product. The warranty claim is only valid with proof of purchase and warranty card.3. Register the warranty online to ensure your rights:Contact Information******************Note: The shipping fee to service center is at your own expense.本《EZCast Beam投影仪-快速指南》提供基本操作,详细操作请登录EZCast官网查看电子版说明书;使用前请仔细阅读本指南》;产品外观和UI界面请以实物为准;如遇产品技术或软件升级,恕不另行通知本公司保留最终解释权。
高清锐视N2中文说明书
目录1 HDVISION N2高清播放机 1.1 简介1.2 HDVISION N2功能特点1.3 可播放的文件格式2 主机和配件2.1 产品清单2.2 前面板2.3 后面板2.4 遥控器3 安装和连接3.1 安装底座3.2 连接电源3.3 连接电视3.4 连接功放3.5 USB2.0 device 连接3.6 USB2.0 host连接3.7 网络连接4 使用遥控器4.1 使用遥控器前4.2 遥控器按键定义4.3 使用前面板上的按键5 硬盘的安装5.1 安装内置硬盘5.2 格式化内置硬盘5.3 向内置硬盘传送文件6 使用时的注意事项6.1 面板按键6.2 设定视频输出模式6.3 更换USB外接设备时,系统设备的更新 6.4 建议的开机顺序6.5 建议的关机循序6.6 网站7 主菜单8 设置参数8.1 音频设置8.2 视频设置8.3 基本设置8.4 网络设置8.5 电视设置8.6 系统信息9 常见问题及解决办法9.1 用USB光驱或者USB移动硬盘播放电影时不流畅 9.2 找不到新接入的USB 外接设备9.3 开机后找不到内置硬盘9.4 电视机没有声音9.5 同轴或光纤接功放没有声音10 产品技术规格使用前请注意:在连接高清播放器和电视的视频线缆前,请关闭高清播放机电源;1 HDVISION N2 高清播放器1.1 简介HDVISION N2高清硬盘播放机由深圳市力合锐视清信息技术有限公司制造( www,),外观时尚美观,品质优良,可以为您提供高清晰规格视频节目/高质量数字化音频/数码相片的存储和播放。
除了可以播放内置硬盘里的节目外,还可以播放外接U盘、移动硬盘、移动DVD、局域网络、个人电脑里的节目。
随着产品软件升级,可能本说明书描述与实际不符合,请用户到公司网站( )上下载最新说明书。
HDVISION N2高清硬盘播放机可以最高播放1080p格式节目,播放的电影格式支持流行的所有格式,如: MPEG1/2/4、H.264、WMV、XviD,、DVD ISO、VOB ,包括HDMI™在内的丰富的视频音频输出接口,支持汉字字幕。
完美解码-教你如何调整视频播放器看1080P

在经理了无数磨难之后,我终于再次鼓起勇气来写kmp对应高清播放的文章。
希望这次写完之后赞的多骂偶的少……kmp很多时候不同问题需要不同的对待方法,我不可能面面俱到,这里只是粗浅的带着大家入一下门,大家可以根据这些提示以及方法来自己研究合适自己的配置方案,好了,牢骚到此位置,进入正题。
kmplayer对应高清调试教程开始:预先准备工作:1.kmplayer下载地址:/html_2/1/124/id=10344&pn=0.html2.终极解码(这里解释一下为什么需要终极解码,考虑到很多新手用户找不到各种解码器,所以下载一个终极解码作为解码器合集来提供给kmp解码器)【达人绕行这步,请自行下载自己需要的解码器】下载地址:/multimedia/media/detail-10544.html3.准备电脑一台,操作系统一个,鼠标,键盘各一个,电源接入……(表打我- -)安装工作:xp下无悬念,一路默认,所有的设置都不用考虑,全默认调整即可,我们会有后续调整。
win7用户,请注意安装终极解码的时候,一定要点击右键,选择使用管理员权限进行安装。
这样可以确保解码器都正确的安装到系统(vista同win7)【关掉了UAC的用户可以同xp一样全默认】ps:这里一定要注意,先装终极解码,再装kmp,两个都要装。
进入调试工作:再次重申,要看文字,不要光看图,为了坑害只看图不看文字的人,我下了无数陷阱的说……1.终极解码调整解码中心。
解码中心按照下图所示调整。
这里解释一下为什么要选择为wmplayer这个播放器,首先wmp是微软自己的播放器,配合htpc以及遥控器看电影比较舒服,其次,这个播放器因为是微软自己出的,所以基本上没有什么报错的问题,这样我们把终极解码的解码方案指定给wmp可以说是让我们平时不用的播放器有所作为。
ps:不管你是xp还是vista win7,请确保你的wmp版本为windows mediaplayer 11.我们需要他内置的解码器以及漂亮的外观。
vagaa下载速度慢怎么办

vagaa下载速度慢怎么办以下是为大家整理的《vagaa下载速度慢怎么办》,希望大家能够喜欢!更多资源请搜索合同范文频道与你分享!Vagaa安装及端口映射问题vagaa下载速度慢怎么办(一)Vagaa安装及端口映射问题对于Vagaa协议,无论是内网或外网用户,基本上都可以平等地获得相同速度,即Vagaa协议不需要内网用户特别设置;但对于ed2k协议,内网用户和外网用户差别较大。
所以建议如果Vagaa 提示为内网,最好做端口映射,因为内网用户做端口映射可以使你从内网变成外网,从而可以下载其它内网用户的文件(两个内网用户间无法传输),来提高自己的下载速度和质量。
引起内网的原因一般有两种:使用防火墙软件或局域网内上网用户(个别ISP,如长宽、铁通等由于本身分配给用户的就是内网ip,所以无论怎么设置可能都是内网)。
» 为什么要做端口映射?对于哇嘎协议,无论是内网或外网用户,基本上都可以平等地获得相同速度,即哇嘎协议不需要内网用户特别设置;但对于ed2k协议,内网用户和外网用户差别较大。
所以建议如果哇嘎提示为内网,最好做端口映射,因为内网用户做端口映射可以使你从内网变成外网,从而可以下载其它内网用户的文件(两个内网用户间无法传输),来提高自己的下载速度和质量。
引起内网的原因一般有两种:使用防火墙软件或局域网内上网用户(个别ISP,如长宽、铁通等由于本身分配给用户的就是内网ip,所以无论怎么设置可能都是内网!)» D-LINK DSL-500宽带路由器端口映射首先把网卡IP设置为10.1.1.x在浏览器里敲入10.1.1.1出现登陆框,输入用户名及密码(默认用户名:admin密码:admin)进入配置页面后,在左面的导航栏依次点击:服务--NAT,进入“网络地址转换(NAT)配置”界面,点击下拉列表框,选择“NAT Rule Entry”,点击“添加”按钮添加新条目进入“NAT规则-添加”页面,添加NAT规则。
Nokia N76手机 说明书
存储卡工具 ....................................................... 18 文件管理 .............................................................. 18
Nokia c3-01 说明书

充电器。 对电池充电不一定要达到特定的时长,您可以在充电时使用设备。 如果电池电量已完全耗尽,则可能需要等待几分钟,屏幕上才会出现充电指 示符号,或者您才可以拨打和接听电话。 如果电池在较长时间内未使用,则为电池充电时,您可能需要先连接充电器, 然后断开并再次连接充电器才能开始充电。
首先要注意交通安全
请遵守当地的所有相关法律法规。请尽量使用双手驾驶汽车。驾车 时首先要考虑交通安全。
干扰
所有的无线设备都可能受到干扰,从而影响性能。
使用合格的维修服务 只有合格的维修人员才可以安装或修理本设备。
电池和其他配件 仅可使用经诺基亚认可、适用于此设备的电池、充电器和其他配 件。 请勿连接不兼容的产品。
14
触摸屏设置
15
交互式主屏幕元素
16
调节通话、歌曲或视频的音量 16
指示符号
16
从旧设备中复制联系人或图片 17
不插入 SIM 卡时可以使用的功能 18
离线使用设备
18
电筒
18
设备管理
19
支持
19
My Nokia
19
使用您的设备更新设备软件
19
恢复出厂设置
20
整理文件
21
将图片和其他内容备份至存储
© 2010 诺基亚。保留所有权利。
16 开机
交互式主屏幕元素 主屏幕中的元素都是交互式的。例如,您可以直接在主屏幕中更改日期和时 间、设置闹钟或编写日历项。
设置闹钟 选择时钟 (1)。
塞Gate媒体应用程序用户手册说明书

Windows 用户手册欢迎使用此媒体应用程序可帮助您管理复制到兼容的无线和网络连接存储设备的媒体及文档。
它可作为移动设备的应用程序使用,或在 Web 浏览器中使用。
在家中或外出时,您随时都可使用此媒体应用程序欣赏音乐、电影和照片或查看重要的文档。
最新功能Seagate Media 版本 2.9 提供自动上载和共享功能。
有关媒体应用程序更新、常见问题、指导视频和支持信息的信息,请访问技术支持。
Seagate Media 和 Windows T ouch 为方便使用,Seagate Media 兼容标准的 Windows 8 和 Windows RT 触控功能:应用程序栏:将您的手指从屏幕顶部向下滑动可启用此应用程序栏。
您也可以将手指在屏幕上从下向上滑动。
执行相同的操作可退出此应用程序栏。
应用程序栏功能在屏幕的顶部和底部显示。
超级栏:从屏幕的右边缘开始,通过从右向左滑动手指来启用超级栏。
触摸屏幕上的任意位置可退出超级栏。
屏幕:触摸您设备上的 Windows 图标可返回到 Windows 返回到 Windows“开始”屏幕:的“开始”屏幕。
媒体应用程序用程序::在返回到 Windows 的“开始”屏幕或切换到另一个应用程序前,退出媒体退出没有必要退出媒体应用程序。
但有时退出此应用程序非常有用,例如在进行故障排除时。
要退出打开的应用程序,请将您的手指放到屏幕的顶部中央并向下滑动。
鼠标和键盘超级栏:将鼠标光标放到右下角可打开超级栏。
屏幕:触摸您设备上的 Windows 图标可返回到 Windows 返回到 Windows“开始”屏幕:的“开始”屏幕。
媒体应用程序用程序::在返回到 Windows 的“开始”屏幕或切换到另一个应用程序前,退出媒体退出没有必要退出媒体应用程序。
但有时退出此应用程序非常有用,例如在进行故障排除时。
要退出打开的应用程序,请按 Ctrl+Alt+Del 并选择“任务管理器”。
选择打开的应用程序并选择结结束任务。
4G户外安卓播放器E30 使用说明书

4G户外安卓播放器E30使用说明书版本号:Ver.1.0更新记录限有技科子电讯熙海上声明尊敬的用户朋友,非常感谢您选择上海熙讯电子科技有限公司(以下简称熙讯科技)的产品作为您LED 广告设备的控制系统。
本文档主要作用为帮助您快速了解并使用产品,我们在编写文档时力求精准可靠,随时可能对内容进行修改或者变更,恕不另行通知。
版权本文档版权归熙讯科技所所有,未经本公司书面许可,任何单位或个人不得已任何形式对本文内容进行复制、摘录,违者必究。
商标是熙讯科技的注册商标。
上海熙讯电子科技有限公司目录更新记录........................................................................................................Ⅰ声明...............................................................................................................Ⅱ1.运行环境.....................................................................................................................42.硬件连接.....................................................................................................................53.屏幕配置.. (10)4.发送卡设置 (11)5.常规调屏...................................................................................................................126.接收卡配置...............................................................................................................177.显示屏连接...............................................................................................................218.大屏宽高设置...........................................................................................................249.AIPS 发布平台参数配置.........................................................................................2610.AIPS 云平台概览.. (32)11.终端别名修改...........................................................................................................3412.时区设置...................................................................................................................3513.简易节目制作与发布..............................................................................................3714.常见问题排查...........................................................................................................41结束页. (43)上海熙讯电子科技有限公司1运行环境1.硬件环境内存:512以上CPU:奔腾2.6Hz 以上2.软件环境操作系统:Win7/Win8/Win103.调试环境关闭杀毒软件,关闭windows 防火墙或者将应用程序添加到防火墙白名单中中文软件下载链接:/download.html 英文软件下载链接:/download.html上海熙讯电子科技有限公司2硬件连接E30拨码开关说明:注意:E30不能直接带屏。
AirCard 785 移动热点快速启动指南说明书
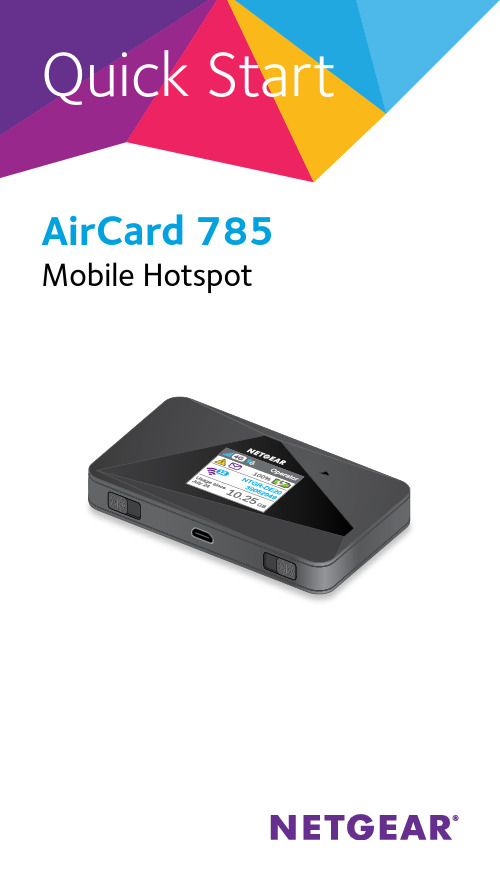
Quick Start AirCard 785 Mobile Hotspot•Blue, slow blink . Ready.•Blue, double blink . Transferring data.• Amber, slow blink . The hotspot is not connected to the network. For more information, see Why can’t my hotspot connect to the Internet? on page 15.Press and hold the Power button for two seconds to power the hotspot on, five seconds to turn the hotspot off.LCD ScreenThe LCD screen displays icons, data usage, your WiFi name, and your WiFi password.Icon Description1 bar. The hotspot signal is weak.5 bars. The hotspot signal is strong.Available network technology; variesby service provider coverage.Blue/white. WiFi offload is enabledwhile the hotspot is connected toWiFi.Gray. WiFi offload is enabled whilethe hotspot is not connected to WiFi.Solid arrows display when thehotspot is transmitting data.System alerts require attention.You received new SMS messages.The percentage of remaining batterycharge.The battery charge is less than 5%.Purple. WiFi is active.Gray. WiFi is inactive.The number indicates the number ofdevices that are connected.Set Up Your HotspotBefore you connect to your hotspot, you must insert a micro-SIM card, power up the hotspot, and charge your battery.Note: To obtain a micro-SIM card, contact your Internet service provider.¾To insert the micro-SIM card:1. Remove the back cover using thethumb catch on the corner of the2.3.4. Ensure that the micro-SIM card isseated securely.5. Reinstall the battery.If the battery does not install easily,check the orientation.6. Replace the cover.¾To power on your hotspot:Press and hold the Power button untilthe LCD screen lights.¾To recharge your battery:1. Connect the micro-USB cable to yourhotspot.2. Connect the other end of the cableto the USB port on your computer orother device.Note: Your battery comes partially charged.¾To connect to your mobile hotspot: 1. Ensure that WiFi is enabled on yourcomputer or other device.2. On your computer or other device,search for WiFi networks:• For Windows devices, click theInternet Access icon.• For Mac devices, from the WiFimenu, select the network.• For tablets, look for a settingsoption.3. Select the WiFi name displayed on yourLCD screen.4. Enter the WiFi password exactly as itappears on the LCD screen.Passwords are case-sensitive.When a computer or mobile deviceconnects to the hotspot, a 1 displaysbeside the WiFi icon on the LCD screen.Note: For you to connect to themobile broadband network, your SIMaccount must be active. If you use aprepaid or pay-as-you-go micro-SIM,the account balance must be positive.5. If desired, launch your web browserand visit http://netgear.aircard topersonalize your settings.The hotspot is completely securedusing its default security settings. Note: If you see a message indicating that the mobile broadband is disconnected, you might need to add an APN. For information about adding APNs, refer to the user manual.Hotspot Web PageOn the hotspot web page, you can do the following:• Change the WiFi SSID, WiFi password, admin password, and WiFi encryption • Set autoconnect options• View data usage• Read SMS messages• View alerts• View and change other settings• Check device status¾To access your hotspot web page: 1. Launch a web browser from acomputer or WiFi device that isconnected to the network.2. Enter http://netgear.aircard.3. Enter the administrator login password.The default password is password.The hotspot web page displays.Change Security Settings The WiFi network name and admin password provide security. Your mobile hotspot comes with a randomly generated and secured WiFi network name (SSID) and password that you can continue to use as is. Read this section if you want to change your security settings.¾To change the WiFi network name: 1. Launch a web browser from acomputer or WiFi device that isconnected to the hotspot.2. Enter http://netgear.aircard.3. Enter the administrator login password.The default password is password.The hotspot web page displays.4. Select WiFi > Options.5. Enter a new WiFi network name.6. Click the Submit button.¾To change the WiFi password:1. Launch a web browser from acomputer or WiFi device that isconnected to the hotspot.2. Enter http://netgear.aircard.The hotspot web page displays.3. Enter the administrator login password.The default password is password.The hotspot web page displays.4. Select WiFi > Options.The WiFi options screen displays.5. Enter a new WiFi password.If you change your password, be sureto keep a record of it and store it in asafe place.6. Click the Submit button.Your changes are saved.Connect DevicesYou can add devices to your network using a WiFi network manager or WPS if the device has WPS capability.Note: WPS enables you to connect WPS-enabled devices to a WiFi network without using a keyboard.¾To connect additional WiFi-capable devices:1. Open the WiFi network manager onyour computer or other WiFi device(smartphones, tablets, media players,cameras, and so on).2. Select the WiFi network namedisplayed on the LCD screen.3. Enter the WiFi password displayed onthe LCD screen.4. Launch your browser.¾To connect with devices using WPS: 1. Press the Power or Navigation buttonto awaken the LCD screen.2. Press the Navigation button until WPSsetup screen displays.3. To activate WPS, press the Powerbutton.4. Within two minutes, press the WPSbutton on the device that you want toconnect to your WiFi network.The hotspot and the WiFi deviceautomatically communicate andestablish a connection.Monitor Data UsageYou can monitor data usage using either the LCD screen or the web page. Visitthe hotspot web page to configure your monthly data usage.¾To view data usage on the LCD screen:Awaken the LCD screen by pressingeither the Power or the Navigationbutton.¾To configure your monthly data usage:1. Launch a web browser from acomputer or WiFi device that isconnected to the hotspot.2. Enter http://netgear.aircard.3. Enter the administrator login password.The default password is password. 4. Under Billing Cycle, enter the monthlystart date when your monthly datausage will automatically reset.Frequently Asked Questions Should I change my access point name (APN)?You do not need to change or set up your APN if your mobile broadband service is working.You do need to change your APN if an alert displays on the LCD screen either prompting you to do so, or asking you to confirm the APN settings by accessing the hotspot web page.Note: For information about APNs, refer to the user manual.How do I go back to the hotspot web page?Launch a web browser from a computeror WiFi device that is connected to the network and enter http://netgear. aircard or http://192.168.1.1.What is my admin password?The default administrator login password is password.What do I do if I changed the WiFi password or administrator login password and then forgot it?Reset the hotspot to the factory defaults. To reset the hotspot, press and hold the Navigation and Power buttons for five seconds.Why can’t my hotspot connect to the Internet?Confirm that your device is able to connect to your hotspot:• Verify that you are connecting with the correct WiFi SSID and password.• Check WiFi card stability by turning the WiFi on the computer or WiFi deviceoff and then back on.• Restart your computer and restart any WiFi device that is connected to thehotspot.• Connect with another computer or WiFi device.• Turn off your hotspot, remove the battery, wait 10 seconds, return thebattery, and power on your hotspot.Confirm that your hotspot is connected to the Internet.Note: If you do not see the data activity icons , your hotspot is not connected to the Internet.If your hotspot is not connected to the Internet, do the following:• Check the alerts screen and resolve any outstanding issues.• If you are using a new micro-SIM card for the first time, confirm that yourmicro-SIM’s APN and credentials areconfigured properly. Visithttp://netgear.aircard and check yoursettings.• Check your account details with your Internet service provider to see if yourrecharge credit expired.• You might need to add an APN. For more information, refer to the usermanual.Why can’t I power on my hotspot? Ensure that the battery is inserted in the hotspot and that it is fully charged or is charging.AccessoriesThe availability of the following accessories varies depending on your market: Ethernet and antenna charging cradle.A cradle provides in-dock hotspot charging and an Ethernet port and can enhance3G/4G performance in areas with poor coverage.Extended battery. The extended battery is rechargeable and lasts for up to 16 hours of active use.WiFi range extender. An extender broadens your network coverage so that you can stay connected in every corner of your home and office.Antennas. Antennas extend signal strength and range indoors or in fringe network areas.For more information, visit/ aircardaccessories.Technical Specifications Technical SpecificationsNetwork and band frequency LTE TDD. Band 40 (2300 MHz) 3G WCDMA. 2100 MHz2G GSM. 900/1800 MHzWiFiconnectionsUp to 15 usersDimensions (W×H×D)110 x 69 x 14.6 mm 4.3 x 2.7 x 5.75 inchesWeight127 g ExternalantennaportsTS9StandbytimeUp to 300 hoursOperating systems Windows® 8.1, 8, Windows 7, Vista SP2, and XP SP3Mac OS 10.6.8 and laterNETGEAR AirCard App Download the complimentary mobile app from /AirCardApps. Use this app to view your hotspot’s settings, connection status, and data usage information from your smartphone or tablet.NETGEAR, Inc.350 East Plumeria DriveSan Jose, CA 95134, USASupportThank you for purchasing this NETGEAR product.After installing your device, locate the serial number on the label of your product and use it to register your product at https:// .You must register your product before you can use NETGEAR telephone support. NETGEAR recommends registering your product through the NETGEAR website.For product updates and web support, visit .NETGEAR recommends that you use only the official NETGEAR support resources.You can get the user manual online at or through a link in the product’s user interface.Trademarks© NETGEAR, Inc. NETGEAR and the NETGEAR Logo are trademarks of NETGEAR, Inc. Any non-NETGEAR trademarks are used for reference purposes only.ComplianceFor regulatory compliance information, visit /about/regulatory/.See the regulatory compliance document before connecting the power supply.December 2014。
昂达说明书
音乐播放
音乐播放
在主菜单中短按“+/-”键选择“音乐播放” 菜单,短按MENU键进入媒体库。在媒体界面中可 选择“所有音乐,艺术家,专集,流派,我的收藏 夹,录音文件,目录列表,更新媒体库”。可按 “+/-”键选择,按MENU键进入所选择的项目。 1、在音乐播放界面中,短按ESC键,设置A-B 复读起始-结束区间。 2、在音乐播放界面中,短按MENU键,进入 音乐设置界面,设置菜单下有“重复设置、播放设置、微软音效、音效选择、我的音效设 置、屏幕显示”等选项。 3、在音乐设置界面,可短按ESC键返回到音乐播放界面。 4、长按MENU键将返回主菜单界面。 5、在“音乐播放”的“所有音乐”选项中,可显示歌曲文件列表,短按“ ”将歌 曲收录到"我的收藏夹中"。
用时间。播放器可根据用户设置“定时关机”或“关屏时间”来节约电池。 充电
充电时,请先将播放器的开关键置于ON的位置,再将播放器与电脑USB端口或充电器 相连。
如连接电脑USB端口充电,当电池电量图标显示满格时,表明充电已满。 如使用随机附带的充电器,充电时充电器的指示灯红色,当充电器的指示灯变为绿色 即表示电池电量已满。 友情提示:使用原厂配件可享受充分安全保证维修服务。 电源适配器是便携式播放器的关键组成部分,它们在保障便携式播放器的正常工作和您 的安全方面,起着至关重要的作用。通过长期的客户调查和售后服务实践表明,便携式播 放器故障是在很多情况下由于使用了不合格的配件,特别是电源适配器。 使用不合格的电源适配器,会大大缩短便携式播放器的使用寿命;不稳定的电压会严重 影响便携式播放器电路的正常工作,带来永久的损害影响播放器的性能和可靠性,播放音 质下降,容易死机可能发生燃烧爆炸,危害消费者人身安全。 ※建议充电器规格:输出电流 300mA 输出电压 5V 。
飞利浦 PAL 50Hz NTSC 60Hz DVD 播放机 说明书

连接多通道接收器 ................................................................................................................... 56 接收器具有杜比数字解码功能 ........................................................................................... 56
连接到USB闪存盘或USB存储设备 ......................................................................................... 58 使用USB接口 .................................................................................................................... 58
连接数码AV接收器 ................................................................................................................. 57 接收器有一个PCM,杜比数码或MPEG解码器 ................................................................... 57
智力快车数码播放器使用说明
智力快车数码播放器使用说明一、产品介绍智力快车数码播放器是一款高清晰度的数字媒体播放器,可以播放多种格式的音视频文件,并具备多种实用功能,如录音、FM收音等。
它不仅可以连接电视机或显示器进行高清画质输出,还可以通过蓝牙或USB接口与其他设备进行数据传输。
二、使用前准备1. 智力快车数码播放器本身:包括主机、遥控器等。
2. 电源适配器:智力快车数码播放器需要外接电源供电。
3. HDMI线或AV线:根据需要选择连接方式。
4. 存储设备:如U盘、移动硬盘等,存储需要播放的音视频文件。
三、基本操作1. 连接设备:将智力快车数码播放器通过HDMI线或AV线连接到电视机或显示器上,并将存储设备插入到USB接口中。
2. 开机:按下主机上的电源键,等待系统启动完成后即可使用。
3. 操作方式:(1)遥控器操作:使用遥控器进行操作,包括选择文件、调整音量、暂停/播放等功能。
(2)主机按钮操作:在没有遥控器时,也可以使用主机上的按键进行相关操作。
四、高级功能1. 蓝牙连接:智力快车数码播放器支持蓝牙连接,可以将手机、平板电脑等设备通过蓝牙与播放器连接,实现音频传输或遥控操作。
2. 录音功能:智力快车数码播放器具有录音功能,可以通过内置麦克风进行录音,并将录音文件保存到存储设备中。
3. FM收音功能:智力快车数码播放器可以接收调频广播信号,并进行收听。
五、常见问题解决1. 播放画面不清晰或者无法显示:检查HDMI线或AV线是否连接正确,检查电视机或显示器是否设置正确。
2. 播放声音不清晰或者无法发出声音:检查是否调整了正确的输出方式和音量大小。
3. 存储设备无法识别或者无法读取文件:检查存储设备是否格式化正确,文件类型是否支持。
六、注意事项1. 请避免在潮湿、高温、高压等环境下使用本产品。
2. 请勿在使用时强行拔插存储设备和电源适配器等外部接口。
3. 请勿在使用时将本产品摔打或受到其他外力冲击。
七、总结智力快车数码播放器是一款功能强大的数字媒体播放器,具备多种实用功能和高清晰度输出,可以满足用户对音视频娱乐的需求。
正确的进入方法视频
正确的进入方法视频
1. 首先,打开你的浏览器(如谷歌浏览器、火狐浏览器等)。
2. 输入视频网站的网址,并按下回车键。
3. 在网站的搜索栏中输入视频的关键词或相关描述,并点击搜索按钮。
4. 在搜索结果页面中,找到你需要观看的视频,并点击它的缩略图或相关链接。
5. 这时,会打开一个新的页面或弹出一个视频播放器。
6. 点击视频播放器中的播放按钮(通常是一个三角形形状的按钮)。
7. 视频现在会开始播放,你可以调整音量、全屏或其他设置。
8.如果你想暂停或停止视频播放,可以点击播放器控制栏上的相应按钮。
9. 如果你想前进或后退视频,可以点击播放器控制栏上的进度条或使用快进/快退按钮。
10. 当你观看完毕,可以关闭这个页面或者点击返回按钮回到之前的页面。
无损数字播放器 AP21 使用手册说明书
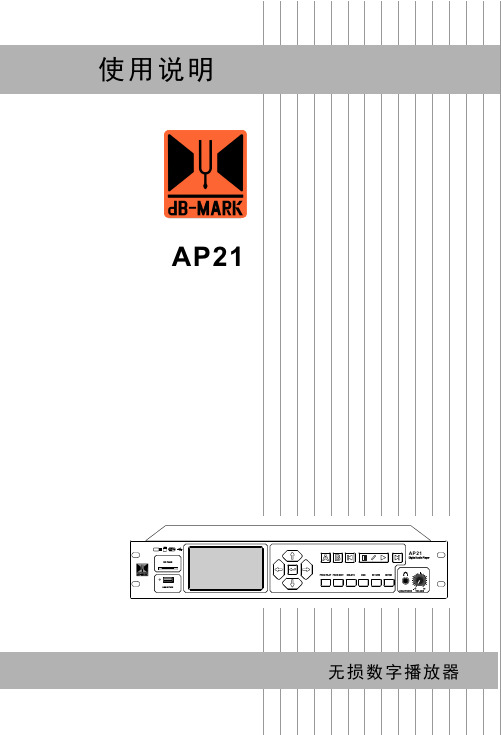
AP21注意事项警告:为了防止电气短路,请勿将设备置于有雨或潮湿的地方。
电器如遇水和其它液体进入机内,应立即切断电源,并请专业维修人员检查维修,以免发生意外。
机内没有用户能自行维修的地方,请勿打开机盖,请找专业维修人员打开和维修。
三角形内的感叹号标志是在设备进行操作和维修时,要注意安全。
三角形内闪电的箭头符号,表示设备内部有危险电压,如果触及会发生触电危险。
数量:1条天线包装清单请确认包装内的物品本使用说明仅供参考,使用说明中的内容信息如有变更,恕不另行通知!2目录第一部分:设备操作介绍1.1 符号代表意义说明1.2 功能特点1.3 前面板说明1.4 后面板说明1.5 技术参数第二部分:软件操作说明2.1 曲目列表界面操作说明2.2 曲目播放界面操作说明2.3 SD 卡、U 盘音源选择切换2.4 将设备作为外置USB 声卡使用2.5 wifi 功能播放步骤 手机通过路由器无线桥接播放歌曲2.63345678991114.......................................................................................................................................................................................................................................................................................................................................................................................................................................................................................................................................................................................................................................................................................................................... 信号流程图18.................................................................................3第一部分:设备操作介绍1.1 符号代表意义说明1.2 功能特点:1、数 字播放器是一个取代CD 机和声卡播放器的高端音响播放解决方案。
DPA-Q 放大器 用户手册说明书

DPA-Q 放大器用户手册DPA4.2Q — 四通道,2000 W 网络放大器DPA4.3Q — 四通道,4000 W 网络放大器DPA4.5Q — 四通道,8000 W 网络放大器TD-000436 -05 -A*TD-000436-05*符号说明“警告!”一词 表示有关人身安全的说明。
如果不遵照这些说明,可能会导致人身伤亡。
“小心!”一词 表示有关可能造成设备损坏的说明。
如果不遵照这些说明,可能会导致损坏设备,这种损坏不在质保范围内。
“重要信息!”一词 表示对于成功完成某一步骤至关重要的说明或信息。
“注意”一词用于指示其他有用信息。
三角中的闪电箭头符号是为了警告用户:在产品外壳中存在未绝缘的“危险”电压,在其达到足够电压时有可能会造成人体触电。
等边三角形内感叹号的目的是为了提醒用户注意本手册中存在重要的安全、操作和维护说明。
重要安全说明警告!: 为了防止火灾或电击,请勿将此设备暴露在雨中或潮湿环境中。
1. 请阅读这些说明。
2. 请保存好这些说明。
3. 请谨记所有警告。
4. 请遵守所有说明。
5. 不要靠近水的地方使用本设备。
6. 清洁设备时只能用干布擦拭。
7. 不要堵塞任何通风口。
遵循厂商的说明进行安装。
8. 不要安装在会产生热量的热源(如散热器、热调节装置、炉子或者其他设备)附近。
9. 为了降低触电的风险,电源线应连接到带有接地保护的电源插座上。
10. 请勿使极化插头或接地插头的安全性失效。
极性插头上有两块金属片,其中一片比另一片宽。
接地插头有两个叶片,还有第三个接地插脚。
较宽的叶片或第三个插脚用于安全目的。
如果提供的插头无法插入您的插座,请向电工咨询,并更换淘汰的插座。
11. 请在您来回走动,或是紧捏住插头将其拔出插座和设备的时候保护好电源线。
12. 只能使用制造商指定的附件/配件。
13. 请在雷雨期间或放置很久不用时拔掉设备插头。
14. 应由合格人员进行维护。
如果本设备损坏,必须进行维修,比如电源线或插头损坏,液体溅到或物体落入设备中,设备遭受雨淋或受潮,不能正常工作,或跌落等情况。
塞内加媒体播放器快速启动指南说明书

SIMPLE • RELIABLE • SCALABLEDIGITAL SIGNAGEQUICK STARTGUIDECongratulations on the purchaseof your Seneca media player.USB 3.1 (T eal)USB 3.0 (Blue)SPDIF (Y ellow)HDMIMic-In (Light Pink)USB 2.0 (Black or Y ellow)Line-In (Light Blue)Mini-DisplayPortUSB Type-C Audio-Out (Y ellow-Green)DisplayPortEthernet/LAN WELCOMESeneca Media Players are exclusive purpose-built digital signage appliances designed for mission critical performance ranging from single display signage to dynamic 4K video walls. Powered by industry leading processors and an array of high-performance graphics cards, Seneca media players combine performance and ease of use into one dynamic platform.CONTENTS OF PACKAGEQuantityItem 1Seneca Media Player 1Power Cable / Power SupplyOPTIONAL CONTENTQuantityItem 1Mouse and Keyboard 1Miscellaneous GPU adapters(Varies upon GPU options selected)INSTALLATIONSetting up your system is fast and easy.1. P lug in mouse, keyboard, display and power cable andboot system normally.2. F ollow the Maestro setup information on the next page…SETUPFirst Boot:➤A ccept Windows EULA: Windows will begin its setup process, which will lead you your windows desktop background, at which point you will be greeted by the Seneca Maestro application and click OK as Maestro processes Visual Media Optimizations.➤O nce optimizations are completed, your system will restart.Second Boot:➤A fter your system has rebooted, log in and navigate to the “Maestro Icon” on your desktop and open the application.➤O n your left-hand control panel within Maestro, you can now begin the installation of your software.➤O nce Software installation is completed, please navigate to the xConnect tab within Maestro. (see xConnect quick-start guide.)➤U pon completion of your Seneca integration, it is advisable to create a system backup on recovery media using SBAR, Seneca’s backup and recovery tool.**Incremental backup only available with SBAR EnterpriseBACKUP WITHRECOVERY MEDIAThis Quick Start Guide describes the use of theSeneca Backup and Recovery product.Requirements➤C omputer with Seneca Backup and Recovery (SBAR) installed on it from the factory.➤A USB Flash Drive or USB Hard Drive needed to create your factory recovery media.Important Notes:• T he USB Flash Drive will be formatted during the process so make sure you have your data backed up before. There will also be a warning to let you know it will be formatted during the Factory Recovery Media creation process.• T he USB Hard drive the partition on the drive will be shrunk and a bootable partition will be created at the end of the drive.Follow these steps:a.T he USB hard drive will need to be formatted to match your internal hard disk format.b. For Windows 10 that is set to UEFI boot in the system BIOS (default setting from most manufacturers), you will need your external USB drive to be formatted GPT. If yoursystem is set to boot Legacy in the BIOS, then you need to have your external USB Hard drive formatted MBR. This is so the system will be configured correctly to boot in the event you need to boot to your Recovery Media and restore your Factory Image to the existing or new internal hard disk.c. In Summary:i. UEFI boot in the BIOS → GPT formatted USB Hard Drive requiredii. Legacy boot in the BIOS → MBR formatted USB Hard Drive requiredStarting Seneca Backup and Recovery1. Click on the up arrow in the systray area to see the application that is running.2.H ere you will see the S icon, double click on it or right click on it and you can select to create your “Recovery Factory Media”.Creating Recovery Media on an External USB Hard Drive1. O pen the application as outlined above and connect the USB Hard drive to the system and you will see the hard drive appear.2. C lick on and highlight the drive and then click “Continue” Click “Yes” to start creating the Factory Recovery Media3. You will see when the process starts to initialize the disk.4. O nce the drive has been prepared, the process will copy the Factory Image to the USB Hard drive.5. O nce the process is complete you will see a screen that requires you to click “OK” and the application will exit.6.T hat’s it, you have created your factory recovery media on to a USB Hard Drive.Creating Recovery Media on a USB Flash Drive1. O pen the application outlined above and connect the USB flash drive to the system and you will see the drive appear.2. Click on and highlight the drive and then click “Continue”3. W arning: The drive will be formatted as you see on the screen. Make sure you have your data before continuing. Click “Yes” to start creating the Recovery Media.4. You will see when the process starts to initialize the disk.5. O nce the drive has been prepared, the process will copy the Factory Image to the USB flash drive.6. O nce the process is complete you will see a screen that requires you to click “OK” and the application will exit.7. T hat’s it, you have just created your factory recovery media on a USB Flash Drive.RECOVERYRestoring with Data BackupT o Restore your system hard drive back to the Factory Image:1. Boot to the Factory Recovery Media drive you created.2. R eboot your system to the BIOS boot screen, check your user’s manual to find the proper function key to pressduring POST.3.S elect to boot to the drive your Factory Recovery Media was created on.4.O nce the drive has booted to the Factory Recovery Media, you will see the Backup and Recovery screen.Note: if you do not have any data to backup, you can click on skip to go right to restoring your Factory ImageTo back up your data before restoring the system back to Factory, click “Next” and data backup screen will appearSelect the data you want to back up by placing a check mark next to the file or directory you want to backup. Click “Next” once you have selected all the files you would like to backup and are ready to continue.The System Recovery screen will appear as your system backs up the data you selected.Once the data has been backed up then the process will continue to prepare your hard disk.Once the Factory Image has been restored to your hard drive and is complete you will see the screen for restart.Just click on Restart and the system will reboot and start windows.Your Factory Image recovery is complete.SUPPORT INFORMATIONShould you encounter any issues or need further assistance, please contact our support team:US Business Hours800.227.3432 option 5Available Monday–Friday 8am–6pm ESTEMEA Business Hours+44 1638 569 622Available Monday–Friday 8h-18h CETE-mail************************************************************For additional support, please visit our support site at: /supportv1.08.17.21。
如何在智能电视上播放K视频

如何在智能电视上播放K视频随着科技的不断发展,智能电视已经成为现代家庭中必备的娱乐设备之一。
而K视频作为一种高清视频格式,受到越来越多人的喜爱。
那么,如何在智能电视上播放K视频呢?本文将为您详细介绍。
一、使用内置应用程序现如今,大多数智能电视都配备了内置的应用商店,通过这些应用商店您可以下载并安装各种各样的视频播放器应用程序,其中很多播放器支持K视频格式。
以下是使用内置应用程序来播放K视频的步骤:1.寻找并打开电视的应用商店,通常应用商店的图标会显示在您的电视主屏幕上。
2.进入应用商店后,使用遥控器上的导航键找到“搜索”或“应用程序”选项,并点击进入。
3.在搜索框中输入“K视频播放器”或相关关键词,然后点击搜索按钮进行搜索。
4.应用商店会显示与您搜索词相关的应用程序列表,选择一个您信任的应用程序并点击安装。
5.安装完成后,您可以返回到电视主屏幕或应用商店主界面,找到您刚安装的K视频播放器应用程序,点击打开。
6.在播放器应用程序中,您可以选择从存储设备或云端导入K视频文件,然后就可以开始播放了。
二、使用外部设备除了通过内置应用程序来播放K视频外,您还可以通过连接外部设备来实现这一目的。
以下是使用外部设备播放K视频的步骤:1.检查您的智能电视是否具备外部设备连接接口,常见的接口有HDMI、USB等。
2.将存储K视频的设备(如USB闪存驱动器、移动硬盘等)插入智能电视上的相应接口。
3.切换电视输入信号源至外部设备,一般通过遥控器上的“输入”或“源”按钮来实现。
4.电视屏幕上会显示外部设备的图标或菜单,使用遥控器上的导航键来选择并打开存储K视频文件的设备。
5.在设备中找到您要播放的K视频文件,选择并打开它即可开始播放。
三、使用流媒体播放器除了内置应用程序和外部设备,您还可以考虑使用流媒体播放器来实现在智能电视上播放K视频。
以下是使用流媒体播放器的步骤:1.如果您的智能电视上没有内置流媒体播放器应用程序,您可以到应用商店下载并安装一个流媒体播放器应用程序。
X6说明书V4.01(0504)

多媒体播放中心X6用户操作手册1.产品介绍1.1 前言非常感谢您选购此款功能强大的家用多媒体播放器。
在数字时代,她非常适合作为您的家庭娱乐伴侣。
高清多媒体播放机是一款新型的数码播放产品,可以支持1080P高清晰度电影,通过HDMI接口输出连接高清电视。
家庭电视用户可以将喜爱的电影,音乐,相册图片拷贝到U盘,SD卡,移动硬盘中.通过HD媒体播放机欣赏。
播放多种多媒体影音文件,配备多种音视频输出接口,观看高质量的电影,浏览数码照片更是赏心悦目,欣赏优美的音乐。
高清高保真影音播放,分辨率最大支持1080P;HDMI,分量输出,SPDIF输出,Composite音视频输出接口,可以连接多种电视机和投影仪、音响等设备;大容量扩展,支持多种移动设备、存储卡、U盘等,随插随用;人性化操作界面,简单易用;全部动作由遥控器操作,外观简洁。
文件过滤功能,可以把图片,音乐,电影文件分类播放,使浏览和播放文件符合用户习惯。
支持常用的媒体格式。
集合图片相册浏览,音乐,电影播放功能。
本产品的主要功能如下:电影播放- 支持1080P (FULL HD)全高清输出。
支持AVI (MPEG-4 ASP: XviD)、MPG (MPEG-2/1)、RM/RMVB、VOB (DVD)、IFO (DVD)、DAT (VCD)、MPEG-2 TS、MKV(H.264)等格式音乐播放- 支持MP3、 OGG、WMA 、FLAC等格式照片播放- 支持数码相机照片的JPEG、BMP、GIF、PNG等格式硬盘存储- 内置3.5”SATA硬盘(支持高达2TB容量)数据拷贝- 支持移动硬盘,存储卡,U盘等移动存储之间的数据拷贝网络功能- 支持以太网和无线网流媒体播放,支持作为网络附属存储(NAS)设备使用(无线网功能通过可选配的USB无线适配器实现),支持UPnP Media Server下载功能- 支持BT下载HDMI -支持数字高清多媒体接口SPDIF DTS音轨--支持光纤/同轴数字音频输出支持DTS环绕音效的高清播放机,配合数码功放拥有5.1声道环绕音效.我们希望此款产品能为您带来愉悦的享受。
布лла奇视屏分析:技巧与注意事项说明书

Position a moving camera with V ideo AnalyticsParking lot④Identify objects of interestAirport④Cover large areas and track Coastline / Harbors④Get a close-up or start tracking ④Identify vehicles stopped on a Traffic1.Install a fixed camera for an overview image2.Define V ideo A nalytics detection areas3.Fixed camera with built-in V ideo A nalytics triggers an alarm4.Moving camera is directed to detection zone5.More detail from object of interest is captured6.With Intelligent Tracking the object can be tracked outside the field of view of the fixed cameraGET MORE DETAIL IF AN ALARM IS TRIGGEREDIn a large scene with lots of activity there is often the need for more detail from a certain area when an alarm is triggered. Intelligent Bosch cameras with built-in V ideo A nalytics can direct a moving camera to an area where the V ideo A nalytics alarm is triggered by a fixed camera. The moving camera can zoom in on the object of interest by automatically moving the camera to a predefined detection zone. With this, images with more detail are captured to identify or recognize the object. The object of interest can even be followed when it moves out of the field of view from the fixed camera by using a moving camera with Intelligent Tracking. The object can automatically be tracked so it doesn’t get lost and more relevant data is captured.④Get more detail to identify or recognize objects if an alarm is triggered ④Follow objects of interest by triggering Intelligent Tracking with a fixed camera ④Ensure large areas are covered and details are capturedHOW IT WORKS:APPLICATION EXAMPLES:Supported moving cameras with built-in V ideo A nalytics Moving cameras with Intelligent Tracking (Intelligent Video Analytics)- AUTODOME IP starlight 7000 (30x zoom)- MIC IP starlight 7000i (30x zoom)- MIC IP fusion 9000i (30x zoom)Moving cameras with Essential Video Analytics- AUTODOME IP 4000i (12x zoom)- AUTODOME IP 5000i (20x zoom)- AUTODOME IP 5000i IR (30x zoom)Supported fixed cameras with built-in Video AnalyticsFixed domes with Intelligent Video Analytics - FLEXIDOME IP starlight 7000- FLEXIDOME IP starlight 8000i Fixed cameras with Intelligent Video Analytics- DINION IP starlight 7000- DINION IP starlight 8000 MP- DINION IP ultra 8000 MP (4K ultra HD)- DINION IP thermal 8000 Fixed domes with Essential Video Analytics- FLEXIDOME IP 4000i and 5000i - FLEXIDOME IP starlight 6000Fixed cameras with Essential Video Analytics-IP 3000i series-DINION IP 4000i, 5000i and 6000i IR -DINION IP starlight 6000/boschsecurity Position a Bosch camera with V ideo A nalytics which covers the complete parking area.Position a Bosch PTZ camera on a pole or rooftop so it can zoom in to areas where more detail is needed in case of an alarm.How to configure:►Create up to 8 individualVideo A nalytics detection zones throughout thescene.►Create up to 8 individual presets (#10-17), each zoomed to an area sizedappropriately to the above mentioned V ideo A nalytics detection zones.►Match each V ideo A nalytics detection zone with the corresponding preset.►Optional: Intelligent Tracking is activated automatically to help ensure thePTZ camera accurately follows the object which is triggered by V ideo A nalytic.► A script needs to be placed in the Alarm Task Editor page (in camera webbrowser) of the camera running the V ideo A nalytic task(s) which is intended to trigger an adjacent PTZ to GOTO preset.►The IP addresses in the script needs to match the IP address of the PTZcamera.The script can be found on the next pages.Tips④Multiple fixed cameras may share the same PTZ camera. Example: Four cameras may cover a large area that is reachable by the same, single PTZ camera.④There is a preconfigured timeout period of 5 minutes after which Intelligent Tracking will be turned off.This ensure that a camera will not continue tracking objects indefinitely. Instead, the camera will return to its home position or tour.④High levels of scene activity might keep a PTZ camera moving from area to area. A fixed camera always maintains the full field of view to capture activity, even if the PTZ camera moves to another area. The goal with the PTZ camera is to capture identification level image quality of the object which triggered the analytics. Even a few seconds may be enough for this.④The script can run on a schedule. E.g. during hours with expected low or high activity.④Read other tips and tricks:►Intelligent Tracking ►People counting ►Intrusion detectionExample: Large parking areaEXAMPLE: LARGE PARKING AREABosch Building TechnologiesBosch Building Technologies /boschsecurity SCRIPT://GO TO PRESET 10RCPCOMMAND PRESET10:={COMMAND("RCP.XML?COMMAND=0X09A5&TYPE=P_OCTET&DIRECTION=WRITE&PAYLOAD=0X80000201B08007050A&NUM=1") IP("10.40.50.70") };//GO TO PRESET 11RCPCOMMAND PRESET11:={COMMAND("RCP.XML?COMMAND=0X09A5&TYPE=P_OCTET&DIRECTION=WRITE&PAYLOAD=0X80000201B08007050B&NUM=1") IP("10.40.50.70") };//GO TO PRESET 12RCPCOMMAND PRESET12:={COMMAND("RCP.XML?COMMAND=0X09A5&TYPE=P_OCTET&DIRECTION=WRITE&PAYLOAD=0X80000201B08007050C&NUM=1") IP("10.40.50.70") };//GO TO PRESET 13RCPCOMMAND PRESET13:={COMMAND("RCP.XML?COMMAND=0X09A5&TYPE=P_OCTET&DIRECTION=WRITE&PAYLOAD=0X80000201B08007050D&NUM=1") IP("10.40.50.70") };//GO TO PRESET 14RCPCOMMAND PRESET14:={COMMAND("RCP.XML?COMMAND=0X09A5&TYPE=P_OCTET&DIRECTION=WRITE&PAYLOAD=0X80000201B08007050E&NUM=1") IP("10.40.50.70") };//GO TO PRESET 15RCPCOMMAND PRESET15:={COMMAND("RCP.XML?COMMAND=0X09A5&TYPE=P_OCTET&DIRECTION=WRITE&PAYLOAD=0X80000201B08007050F&NUM=1") IP("10.40.50.70") };//GO TO PRESET 16RCPCOMMAND PRESET16:={COMMAND("RCP.XML?COMMAND=0X09A5&TYPE=P_OCTET&DIRECTION=WRITE&PAYLOAD=0X80000201B080070510&NUM=1") IP("10.40.50.70") };//GO TO PRESET 17RCPCOMMAND PRESET17:={COMMAND("RCP.XML?COMMAND=0X09A5&TYPE=P_OCTET&DIRECTION=WRITE&PAYLOAD=0X80000201B080070511&NUM=1") IP("10.40.50.70") };//GO TO PRESET 18RCPCOMMAND PRESET18:={COMMAND("RCP.XML?COMMAND=0X09A5&TYPE=P_OCTET&DIRECTION=WRITE&PAYLOAD=0X80000201B080070512&NUM=1") IP("10.40.50.70") };//GO TO PRESET 19RCPCOMMAND PRESET19:={COMMAND("RCP.XML?COMMAND=0X09A5&TYPE=P_OCTET&DIRECTION=WRITE&PAYLOAD=0X80000201B080070513&NUM=1") IP("10.40.50.70") };//GO TO PRESET 20RCPCOMMAND PRESET20:={COMMAND("RCP.XML?COMMAND=0X09A5&TYPE=P_OCTET&DIRECTION=WRITE&PAYLOAD=0X80000201B080070514&NUM=1") IP("10.40.50.70") };RCPCOMMAND STARTAUTOTRACKER :={COMMAND("RCP.XML?COMMAND=0X09A5&TYPE=P_OCTET&DIRECTION=WRITE&PAYLOAD=0X8000060A00020001&NUM=1") IP("10.40.50.70") };RCPCOMMAND STOPAUTOTRACKER :={COMMAND("RCP.XML?COMMAND=0X09A5&TYPE=P_OCTET&DIRECTION=WRITE&PAYLOAD=0X8000060A00020000&NUM=1") IP("10.40.50.70") };Bosch Building Technologies /boschsecurity Video A nalytics – Tips and tricks//SET TEMPSTATE N FOR 5 MIN 10 = 1 SECOPERATIONMODE MONOSTABLE1 := {HIGH (3000)}; TEMPSTATE(1) := MONOSTABLE1;OPERATIONMODE MONOSTABLE2 := {HIGH (3000)}; TEMPSTATE(2) := MONOSTABLE2;OPERATIONMODE MONOSTABLE3 := {HIGH (3000)}; TEMPSTATE(3) := MONOSTABLE3;OPERATIONMODE MONOSTABLE4 := {HIGH (3000)}; TEMPSTATE(4) := MONOSTABLE4;OPERATIONMODE MONOSTABLE5 := {HIGH (3000)}; TEMPSTATE(5) := MONOSTABLE5;OPERATIONMODE MONOSTABLE6 := {HIGH (3000)}; TEMPSTATE(6) := MONOSTABLE6;OPERATIONMODE MONOSTABLE7 := {HIGH (3000)}; TEMPSTATE(7) := MONOSTABLE7;OPERATIONMODE MONOSTABLE8 := {HIGH (3000)}; TEMPSTATE(8) := MONOSTABLE8;OPERATIONMODE MONOSTABLE9 := {HIGH (3000)}; TEMPSTATE(9) := MONOSTABLE9;OPERATIONMODE MONOSTABLE10 := {HIGH (3000)}; TEMPSTATE(10) := MONOSTABLE10;OPERATIONMODE MONOSTABLE11 := {HIGH (3000)}; TEMPSTATE(11) := MONOSTABLE11;//FOR TESTING//IF (RELAY(1)) THEN TEMPSTATE(1) :=STOP(MONOSTABLE1),TEMPSTATE(1) := MONOSTABLE1, TEMPSTATE(1) :=TRUE; //VCA RULE TRIGGERS STATE ON FOR 5 MIN THEN OFF.IF (VCARULE(1,1)) THEN TEMPSTATE(1) :=STOP(MONOSTABLE1),TEMPSTATE(1) := MONOSTABLE1, TEMPSTATE(1) :=TRUE; IF (VCARULE(1,2)) THEN TEMPSTATE(2) :=STOP(MONOSTABLE2),TEMPSTATE(2) := MONOSTABLE1, TEMPSTATE(2) :=TRUE; IF (VCARULE(1,3)) THEN TEMPSTATE(3) :=STOP(MONOSTABLE3),TEMPSTATE(3) := MONOSTABLE1, TEMPSTATE(3) :=TRUE; IF (VCARULE(1,4)) THEN TEMPSTATE(4) :=STOP(MONOSTABLE4),TEMPSTATE(4) := MONOSTABLE1, TEMPSTATE(4) :=TRUE; IF (VCARULE(1,5)) THEN TEMPSTATE(5) :=STOP(MONOSTABLE5),TEMPSTATE(5) := MONOSTABLE1, TEMPSTATE(5) :=TRUE; IF (VCARULE(1,6)) THEN TEMPSTATE(6) :=STOP(MONOSTABLE6),TEMPSTATE(6) := MONOSTABLE1, TEMPSTATE(6) :=TRUE; IF (VCARULE(1,7)) THEN TEMPSTATE(7) :=STOP(MONOSTABLE7),TEMPSTATE(7) := MONOSTABLE1, TEMPSTATE(7) :=TRUE; IF (VCARULE(1,8)) THEN TEMPSTATE(8) :=STOP(MONOSTABLE8),TEMPSTATE(8) := MONOSTABLE1, TEMPSTATE(8) :=TRUE; IF (VCARULE(1,9)) THEN TEMPSTATE(9) :=STOP(MONOSTABLE9),TEMPSTATE(9) := MONOSTABLE1, TEMPSTATE(9) :=TRUE;IF (VCARULE(1,10)) THEN TEMPSTATE(10) :=STOP(MONOSTABLE10),TEMPSTATE(10) := MONOSTABLE1, TEMPSTATE(10) :=TRUE; IF (VCARULE(1,11)) THEN TEMPSTATE(11) :=STOP(MONOSTABLE11),TEMPSTATE(11) := MONOSTABLE1, TEMPSTATE(11) :=TRUE; //GOTO PRESET AND TURN TRACKERON AFTER 5 MIN TRACKEROFFIF (TEMPSTATE(1) ) THEN PRESET10, STARTAUTOTRACKER ELSE STOPAUTOTRACKER; IF (TEMPSTATE(2) ) THEN PRESET11, STARTAUTOTRACKER ELSE STOPAUTOTRACKER; IF (TEMPSTATE(3) ) THEN PRESET12, STARTAUTOTRACKER ELSE STOPAUTOTRACKER; IF (TEMPSTATE(4) ) THEN PRESET13, STARTAUTOTRACKER ELSE STOPAUTOTRACKER; IF (TEMPSTATE(5) ) THEN PRESET14, STARTAUTOTRACKER ELSE STOPAUTOTRACKER; IF (TEMPSTATE(6) ) THEN PRESET15, STARTAUTOTRACKER ELSE STOPAUTOTRACKER; IF (TEMPSTATE(7) ) THEN PRESET16, STARTAUTOTRACKER ELSE STOPAUTOTRACKER; IF (TEMPSTATE(8) ) THEN PRESET17, STARTAUTOTRACKER ELSE STOPAUTOTRACKER; IF (TEMPSTATE(9) ) THEN PRESET18, STARTAUTOTRACKER ELSE STOPAUTOTRACKER; IF (TEMPSTATE(10) ) THEN PRESET19, STARTAUTOTRACKER ELSE STOPAUTOTRACKER; IF (TEMPSTATE(11) ) THEN PRESET20, STARTAUTOTRACKER ELSE STOPAUTOTRACKER;。
- 1、下载文档前请自行甄别文档内容的完整性,平台不提供额外的编辑、内容补充、找答案等附加服务。
- 2、"仅部分预览"的文档,不可在线预览部分如存在完整性等问题,可反馈申请退款(可完整预览的文档不适用该条件!)。
- 3、如文档侵犯您的权益,请联系客服反馈,我们会尽快为您处理(人工客服工作时间:9:00-18:30)。
最近,在A9论坛逛了2个月左右,从各大神那学到了些关于Q5盒子安装lakka 系统玩游戏的方法,网络电视和lakka游戏双系统都可以用,插入TF卡进入lakka系统,拔出TF卡进入网络电视。
原有的IPTV将不可用,特此说明。
希望此教程能对机友们有所帮助,特别是刚入坑的机友们。
本人用的是江苏版魔百和(数码视讯)Q5,晶晨S905芯片。
浙江版的是晶晨S905m 芯片,据说浙江版的更简单,不需要干掉盒子的原生系统,由于本人没有硬件,所以没有测试,有不怕折腾的机友可以测试。
下面给大家介绍下整体思路:
一、把Q5盒子的原生系统干掉,刷入能够启动lakka的固件
二、用win32diskimager工具将lakka烧录到TF卡中
三、启动lakka进行设置,添加游戏和图片,写列表等。
本教程是给各位小白介绍的(共10篇),所以会比较啰嗦,大神可以略过此教程。
网上有很多整合版的lakka系统,整合版的只需刷入TF启动lakka,映射下手柄就可以直接玩游戏。
在教程最后我也会给大家提供一个我自己做的一个16GB整合版系统。
所需硬件设备:电脑一台,USB公对公线(见下图),USB有线键盘,TF卡读卡器,游戏手柄,拆机工具等。
事先请准备好。
需要用到的文件(固件,工具等)下面有链接,可以提前下载好备用,具体看下一篇教程。
作者:家麟
著作权归作者所有。
商业转载请联系作者获得授权,非商业转载请注明出处。
