EPSON 7910-9910 GMG新建打样曲线步骤
打样工作流程
SD-QPWI-048
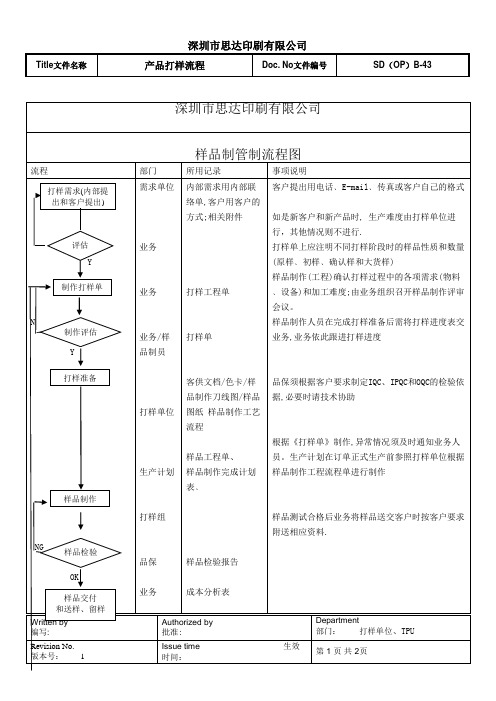
深圳市思达印刷有限公司
样品制管制流程图流程ຫໍສະໝຸດ 部门所用记录事项说明
Y
N
Y
NG
OK
需求单位
业务
业务
业务/样品制员
打样单位
生产计划
打样组
品保
业务
内部需求用内部联络单,客户用客户的方式;相关附件
打样工程单
打样单
客供文档/色卡/样品制作刀线图/样品图纸 样品制作工艺流程
样品工程单、 样品制作完成计划表﹑
样品检验报告
当样品获得客户确认后,打样单位(TPU)须将客户原始图纸、规格要求、BOM表存档备用。样品交由打样单位保管.客户下订单大货生产时,转交生管制作正式文件,由文控人员按《文件和记录控制流程》的要求进行发行.
记录名称:
打样单、材质料请购单、印前出版记录 刀线编号登录 样品检验报告、样品成本分析表、(物料清单) 、封样卡、样品清单
(接上页)
流程
部门
所用记录
事项说明
NG
Y
客户、业务
业务
业务
打样单位
TPU
封样卡
打样单、内部联络单
客户用电话﹑E-mail﹑传真或客户自己的格式通知业务样品确认结果.如不合格时确定是否需重新打样
只要客户通知打样终止,业务须要求相关部门停止打样。
只要客户要求发生变更,业务须以重新制作打样单,要求相关部门作出相应变更并确认变更所需时间.如因内部原因不能完成打样,打样单位需用内部联络单通知业务,由业务与客户沟通。
样品制作人员在完成打样准备后需将打样进度表交业务,业务依此跟进打样进度
品保须根据客户要求制定IQC、IPQC和OQC的检验依据,必要时请技术协助
Epson WorkForce 和 EcoTank 子limación 和照片贴纸打印机基本操作手册
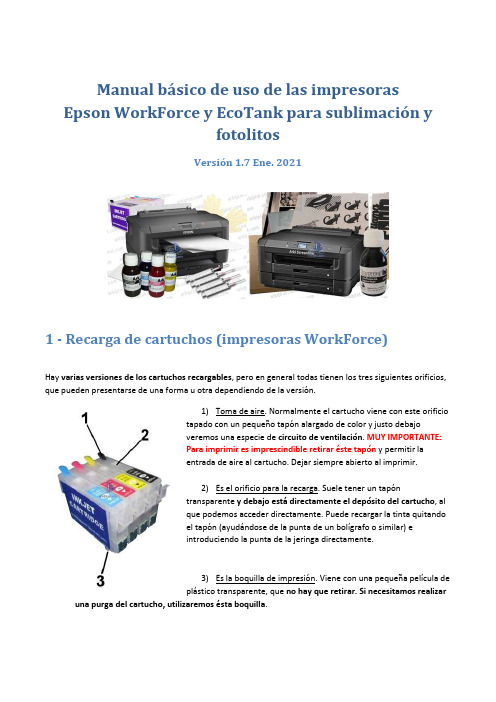
Manual básico de uso de las impresoras Epson WorkForce y EcoTank para sublimación yfotolitosVersión 1.7 Ene. 20211 - Recarga de cartuchos (impresoras WorkForce)Hay varias versiones de los cartuchos recargables, pero en general todas tienen los tres siguientes orificios,que pueden presentarse de una forma u otra dependiendo de la versión.1)Toma de aire. Normalmente el cartucho viene con este orificiotapado con un pequeño tapón alargado de color y justo debajoveremos una especie de circuito de ventilación. MUY IMPORTANTE:Para imprimir es imprescindible retirar éste tapón y permitir laentrada de aire al cartucho. Dejar siempre abierto al imprimir.2)Es el orificio para la recarga. Suele tener un tapóntransparente y debajo está directamente el depósito del cartucho, alque podemos acceder directamente. Puede recargar la tinta quitandoel tapón (ayudándose de la punta de un bolígrafo o similar) eintroduciendo la punta de la jeringa directamente.3)Es la boquilla de impresión. Viene con una pequeña película deplástico transparente, que no hay que retirar. Si necesitamos realizar una purga del cartucho, utilizaremos ésta boquilla.Recargar el cartucho hasta un 90% aprox. El indicador del nivel de tinta dela impresora no da una lectura correcta, por lo que se recomienda estaratento y no dejar en ningún momento que el cartucho se vacíe por debajode un 10%, para evitar la entrada de aire por la boquilla. Si esto pasara,realizar limpiezas hasta que vuelva a fluir la tinta nuevamente.Los cartuchos son auto-reseteables: al volver a ponerlos en la impresora(esperando al menos un minuto desde que se quitan), los niveles volveránde nuevo al 100% automáticamente. En algunas versiones, dejar sin tinta el cartucho puede provocar que no vuelva a funcionar el sistema de reseteado que incorpora el chip. Por favor, rellene el cartucho en cuanto la impresora le indique nivel bajo de tinta o cuando el contenido real de tinta sea bajo para evitar problemas. Para quitar los cartuchos y rellenarlos o resetearlos, puede hacerlo a través del menú de la impresora en la opción config./mantenimiento/sust. cartuchos o similar, dependiendo del modelo de impresora.2 – Llenado de tanques (impresoras Ecotank)En el caso de las impresoras de tipo EcoTank, hay que llenar lostanques antes de encender la impresora (no es necesario rellenarcartuchos) y recomendamos mantenerlos con un mínimo de tinta deun 20%, aproximadamente, para evitar la entrada de aire al cabezal deimpresión. Si la impresora usa dos tanques de color negro, rellenarambos de ese color.En la primera puesta en marcha, es necesario hacer una carga de tinta inicial. Normalmente la máquina la realiza automáticamente en la puesta en marcha, pero es posible realizar una nueva carga en caso necesario. El manual de usuario de la máquina indica la forma de hacerlo. En el caso de la EcoTank ET-14000 se hace con la combinación de teclas siguiente:3 - Configuración de tintas según usoLas impresoras Epson WF-7110DTW, WF-7210DTW, WF-2510WF, WF-2630WF y equivalentes permiten ser utilizadas para varios fines, utilizando diferentes tintas para cada uso: sublimación, fotolitos, transfer textil sobre algodón, impresión convencional…Una vez configurada con tintas para un tipo de impresión no es recomendable el cambio a otro tipo de tintas: pueden darse problemas en los inyectores y el proceso de purga de la tinta es muy laborioso.Es imprescindible que la impresora tenga tinta en los cartuchos. En el caso de uso para fotolitos, aunque sólo se haga uso del color negro, el resto de colores deben tener tinta para evitar que entre aire y se rompa el cabezal de impresión. Además, la impresora hace mantenimiento continuo de los inyectores y gasta algo de tinta de todos los colores, por lo que poco a poco se irán agotando aunque no se usen para imprimir. Recomendamos tener un segundo juego de cartuchos de repuesto para evitar cualquier problema posterior.Para sublimaciónSe utilizan tintas especiales para sublimación SubliArk en los 4 canales (negro, cian, magenta y amarillo), junto al papel SubliArk o Texprint (recomendado) para sublimación. Hay que recargar los 4 cartuchos con la tinta del color correspondiente.Para fotolitosSe utiliza con tinta especial para fotolitos, que proporciona máxima opacidad del negro en la impresión, junto al film transparente Thecno Film.El único canal de tinta necesario para imprimir es el negro, por lo que los 3 canales restantes de color (cian, magenta y amarillo) se pueden utilizar de varias formas:-Dejar los cartuchos originales de inicio que trae la impresora. Nos permite poder imprimir el test de inyectores y verificar todos los colores. Una vez gastados, se puede poner tinta original o compatible utilizando los cartuchos recargables correspondientes. Es la opción más sencilla y la querecomendamos.-Recargarlos con tinta pigmentada Clavata para textil. Ésta opción nos permite hacer transfer sobre algodón con papel Chromablast, sin necesidad de cambiar el color negro.-Recargar con líquido de limpieza. La ventaja del líquido limpieza es que no obstruye los cabezales, por lo que podemos olvidarnos de realizar limpieza de los mismos. La desventaja es que no podemos verificar el estado de los colores con el test de inyectores.Para transfer textil sobre algodónSe utilizan junto a las tintas pigmentadas Clavata especiales para transfer de algodón en los 4canales/colores, junto al papel transfer Chromablast.4 – Primera puesta en marcha de la máquinaLa instalación de la impresora se realiza de forma normal, instalando los controladores con el CD correspondiente.Una vez puesta en marcha la impresora con las respectivas tintas, es recomendable realizar un test de inyectores para comprobar la correcta impresión. Lo normal es que la primera vez el patrón de impresión no sea correcto y sea necesario realizar varias limpiezas de cabezales e impresiones hasta que fluya la tinta, especialmente con tinta de sublimación (debido a su mayor viscosidad).El test de inyectores/boquillas se puede hacer a través del menú de la máquina, opción “mantenimiento”, “comprobación boquillas”, o similar, dependiendo de la versión de la máquina. Consulte el manual de la impresora en caso de duda.MUY IMPORTANTE no actualizar nunca el firmware de la impresora, para evitar problemas con los cartuchos recargables.5 - Mantenimiento. Recomendaciones.-Es muy importante realizar alguna impresión, un test de inyectores/boquillas o al menos una limpieza de cabezales a la semana, para evitar obstruir los cabezales. Esto cobra más importanciaaún en estaciones de clima extremo (verano e inverno) y con alta humedad. Vea el apartado anterior “puesta en marcha” para indicaciones de cómo imprimir el test de inyectores.-Conservar las tintas y el papel en un lugar oscuro y seco.-Es muy recomendable conservar los cartuchos originales y comprar un juego de cartuchos adicional, ya que en ocasiones algún cartucho nos puede fallar sin previo aviso y tener un cartucho de reserva nos evita quedarnos sin poder imprimir algún trabajo. Los cartuchos son consumibles que no están incluidos en la garantía del producto.6 - Parámetros de impresión para diferentes configuraciones. Perfiles de color.Para sublimaciónPara la impresión de material de sublimación con tintas Subliark es recomendable el uso de un perfil de impresión específico que nos proporciona una mayor precisión en el color. Para ello se proporcionan dos perfiles para diferentes usos:-Perfil para tazas. Válido para tazas, materiales cerámicos y rígidos.-Perfil para textiles. Válido para materiales textiles como camisetas de poliéster.La forma de instalar el perfil dependerá del sistema operativo y el programa de impresión utilizado. En el ejemplo lo ilustraremos con Windows 10 y Photoshop. Pulsar con el botón derecho del ratón sobre el archivo .icc del perfil y seleccionar “instalar el perfil”.Para imprimir usando éste perfil, deberá seleccionarlo en el programacorrespondiente. Por ejemplo, en Photoshop, deberá seleccionarlo con“Archivo -> Imprimir” y en la opción “Gestión de color” seleccionar“Photoshop gestiona los colores”, seleccionar el perfil e “interpretaciónperceptual”. Para mayor precisión, recomendamos trabajar en “modoRGB”.sublimación, pueden dar algo de mejor resultado éste último, aunque hace mayor uso de tinta.En “Más opciones” seleccionar las opciones “Espejo” y desmarcar la opción “Bidireccional” (esto es opcional, si el secado es rápido y la impresión es correcta, déjelo seleccionado). En “Corrección del color”, seleccionar “Sin Ajuste de Color”, lo que desactiva la gestión de color de la impresora para utilizar la del perfil ICCespecífico.Para fotolitosImprimir con tipo de papel Epson Matte, calidad Alta, escala de grises. En la ficha “Más opciones”,desmarcar la opción “bidireccional”.Para impresoras WF-7110DTW, WF-7210DTW: Imprimir exclusivamente en la bandeja o cassette 1 o por la alimentación manual posterior. Estas bandejas están preparadas para trabajar con papel especial, como elfilm de fotolitos, y tienen menor recorrido de papel, lo que evita atascos de papel.7 - Problemas comunes y soluciones de los cartuchos recargablesLos cartuchos son reconocidos por la impresora pero no imprime uno o varios coloresMotivo A: No hemos destapado los orificios de respiración de los cartuchos.Solución: destapar los orificios. Ejecutar limpieza de cabezales y alguna impresión hasta que la tinta vuelva a fluir.Motivo B: El cartucho está vacío pero la impresora no lo indica.Solución: Rellenar el cartucho correspondiente.Motivo C: La válvula del cartucho está obstruida.Solución: Purgar el cartucho. Introducir la jeringa sin aguja por el orificio inferior y extraer un poco de tinta, volviendo a introducirla por el orificio de recarga normal. Ejecutar limpiezas de cabezales e impresiones con mucha cobertura hasta que vuelva a fluir la tinta.Motivo D: La tinta se ha secado tras mucho tiempo sin usarse.Solución: Realizar limpieza de inyectores con otro juego de cartuchos recargables lleno de líquido de limpieza. Realizar limpiezas de cabezales e impresiones hasta limpiar el inyector.Uno o varios cartuchos no son reconocidos por la impresoraMotivo A: El chip del cartucho o los contactos de la impresora están sucios.Solución: Limpiar el chip con un trapo limpio ligeramente humedecido con agua.Motivo B: La impresora no reconoce el cambio de varios cartuchos a la vez.Solución: Cambiar los cartuchos (esperando un minuto desde que se quitan) de uno en uno, colocando el siguiente sólo cuando la máquina reconozca el anterior. A veces es necesario realizar el paso más de una vez. Motivo C: Chip del cartucho roto.Solución: Cambiar el chip o el cartucho completo.Motivo D: No reconoce un cartucho en particular. Solución: Quitar el cartucho, esperar un minuto y volver a poner el cartucho, intentar varias veces. Si tampoco lo reconoce, probar a hacer lo siguiente: cambiar los cartuchos nuevamente, y cuando quitemos estos de la impresora, desenchufar la impresora totalmente de la corriente tirando del cable, bajar las tapas de los cartuchos y de la impresora, esperar 10 minutos o más, encender de nuevo la máquina y poner los cartuchos nuevamente cuando nos lo pida la máquina. Si así no funciona, cambiar los cartuchos.La impresora no reconoce ningún cartuchoMotivo A: Modelo de cartucho incorrecto.Solución: Verifique que el cartucho se corresponde con la impresora.Motivo B: Hemos actualizado el firmware o software de la impresora, o se ha actualizado automáticamente. Solución: El último software de su impresora puede hacer incompatibles los cartuchos. Quitar los cartuchos, esperar un minuto y volver a ponerlos, intentar varias veces. Si tampoco los reconoce, probar a hacer lo siguiente: cambiar los cartuchos nuevamente, y cuando quitemos estos de la impresora, desenchufar la impresora totalmente de la corriente tirando del cable, bajar las tapas de los cartuchos y de la impresora, esperar 10 minutos o más, encender de nuevo la máquina y poner los cartuchos nuevamente cuando nos lo pida la máquina. Si así no funciona, cambiar los cartuchos.Motivo C: Uno o varios cartuchos han llegado se han quedado sin tinta o con niveles muy bajos.Solución: En algunos cartuchos reseteables, si llegamos a agotar totalmente la tinta o el chip llega a marcar niveles mínimos, puede ocasionar que el chip deje de funcionar en uno o varios cartuchos por incompatibilidad. Cambie los cartuchos reseteables para solucionar el problema.。
GMG ColorProof_制作mx3
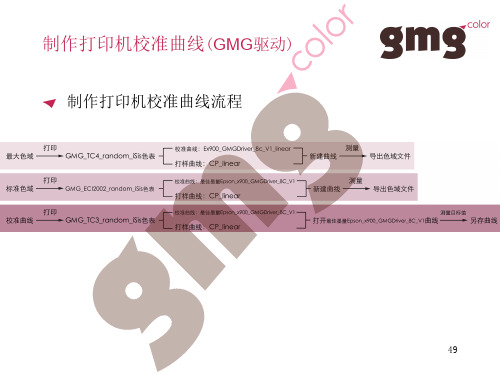
! 制作打印机校准曲线流程
49
制作打印机校准曲线(GMG驱动)
! 创建最大色域(打印TC4图表)
新建作业 选择对应测量设备的TC4图表 打开作业
50
制作打印机校准曲线(Epson驱动)
! 创建最大色域(打印TC4图表)
选择正确的打印机/介质 选择打印机校准曲线
打开特性文件编辑器 新建CMYK.MX4 选择对应的打印机机型 测量设备 测量图表
62
制作打印机校准曲线(GMG驱动)
! 创建标准色域(测量ECI2002色表)
点击测量目标值 菜单栏——测量——测量全部 目标值
注:测量前,确认测量设备已连 接电脑。
63
制作打印机校准曲线(GMG驱动)
! 创建标准色域(输出标准色域)
测量完成后,检查目标值数据 输出目标值-色域文件 命名标准色域
64
制作打印机校准曲线(GMG驱动)
! 创建校准曲线(打印TC3色表)
新建作业 选择对应测量设备的动)
! 创建校准曲线(打印TC3色表)
选择正确的打印机/介质 选择打印机校准曲线
52
制作打印机校准曲线(GMG驱动)
! 创建最大色域(测量TC4图表)
打开特性文件编辑器(ProfilerEditor)
53
制作打印机校准曲线(GMG驱动)
! 创建最大色域(测量TC4图表)
新建CMYK.MX4 选择对应的打印机机型 测量设备 测量图表
54
制作打印机校准曲线(GMG驱动)
(GMG Driver-8C - Photo Black -720)
60
制作打印机校准曲线(GMG驱动)
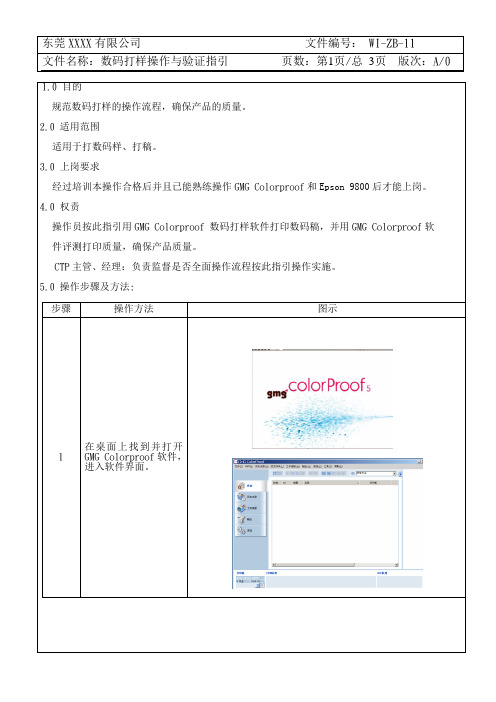
数码打样操作与验证指引
测试数码打样机打印头的状态,在如右图所示的测试结果中以没有断线为标准,如有一色或几色断线,应清洗打印头直至ok。
4
把要打印的文件放入相对应的纸张属性热文件夹里面进行RIP。
步骤
操作方法
图示
5
RIP完成后可以进行裁切、旋转、拼版等属性的更改。
6
根据文件实际大小,选择合适尺寸的纸张,点击右键“打印”。
6.相关文件
无7.Biblioteka 关记录无1.0目的
规范数码打样的操作流程,确保产品的质量。
2.0适用范围
适用于打数码样、打稿。
3.0上岗要求
经过培训本操作合格后并且已能熟练操作GMG Colorproof和Epson 9800后才能上岗。
4.0权责
操作员按此指引用GMG Colorproof数码打样软件打印数码稿,并用GMG Colorproof软
件评测打印质量,确保产品质量。
CTP主管、经理:负责监督是否全面操作流程按此指引操作实施。
5.0操作步骤及方法:
步骤
操作方法
图示
1
在桌面上找到并打开GMG Colorproof软件,进入软件界面。
步骤
操作方法
图示
2
在打印数码样之前要对打印机进行校正,一般情况下循环校正3-5次才能OK。正常是每周进行校正一次。
2024版EPSON指导教程

EPSON指导教程•EPSON品牌及产品概述•EPSON打印机使用指南•EPSON扫描仪操作教程•EPSON投影仪使用教程目•EPSON数码相机操作指南•EPSON墨水及耗材选购指南录01EPSON品牌及产品概述创立初期EPSON成立于1942年,初期以生产计时器起家,凭借精湛的工艺和卓越的品质赢得了市场认可。
技术创新20世纪60年代,EPSON开始研发并生产打印机和微型计算机,不断推动技术创新和产品升级。
全球化战略EPSON在80年代开始实施全球化战略,拓展海外市场,逐渐成为世界知名的电子产品制造商。
EPSON品牌历史与发展EPSON 打印机系列包括喷墨打印机、激光打印机、针式打印机等,适用于家庭、办公、商业等不同领域。
打印机系列EPSON 投影仪系列包括家用投影仪、商用投影仪、教育投影仪等,具有高清晰度、高亮度和丰富的接口选项。
投影仪系列EPSON 扫描仪系列包括平板扫描仪、馈纸式扫描仪等,可满足不同行业和场景的文档数字化需求。
扫描仪系列EPSON 还生产销售包括液晶显示器、智能手表、机器人等在内的多种电子产品。
其他电子产品EPSON 产品线介绍市场地位EPSON作为全球知名的电子产品制造商,在打印机、投影仪等领域占据重要地位,产品畅销全球多个国家和地区。
品质保证EPSON注重产品品质和用户体验,通过严格的生产管理和质量控制确保产品的稳定性和可靠性。
技术优势EPSON拥有强大的研发实力和先进的技术水平,不断推出具有创新性和竞争力的新产品。
多元化战略EPSON实施多元化战略,不断拓展产品线和应用领域,降低市场风险,提高整体竞争力。
EPSON市场地位与竞争优势02EPSON打印机使用指南安装步骤将打印机放置在平稳的桌面上,连接电源线和数据线。
打开电脑,插入打印机驱动程序光盘或下载驱动程序并安装。
•根据安装向导提示,完成打印机的安装和设置。
02030401设置建议在安装过程中,可以选择自定义设置,对打印机进行个性化配置。
爱普生SureColor P700 P900快速入门指南说明书
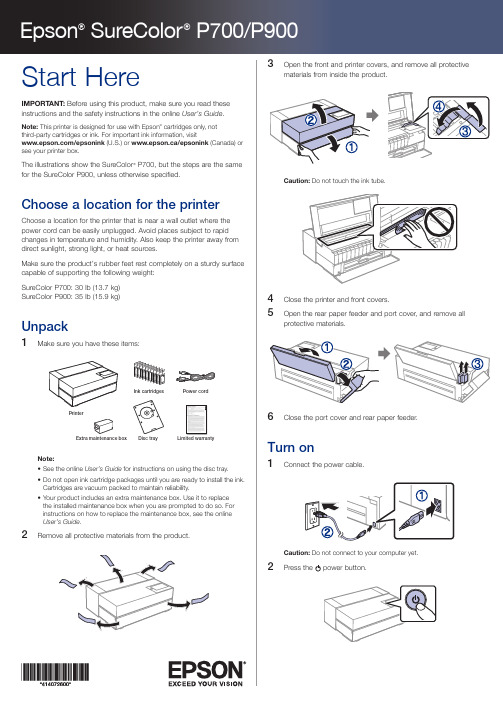
Limited warranty3Raise the control panel if necessary.4 Select your language, date, and time on the LCD screen.Note: You can change these settings later using the product’s controlpanel. For more information, see the online User’s Guide.Install ink cartridgesCaution: Keep the ink cartridges out of the reach of children and do not drink the ink.Note: The included initial cartridges are designed for reliable printer setup and cannot be used as replacement cartridges or resold. The ink supplied with your printer is used during initial setup. In order to produce the highest quality prints, the printer needs to be and will be fully charged with ink. After setup is complete, the ink remaining in the cartridges, and the service life of the maintenance box will be limited. Even if ink levels are low, or the service life of the maintenance box is nearing an end, you can continue to print until the printer displays replacement instructions. However, we recommend being prepared with replacement ink cartridges. An additional maintenance box is included with the printer.1 Open the front and printer covers.2 Shake the ink cartridges gently about 15 times, then unpack them.Caution: Do not touch the areas shown below. Doing so may preventnormal operation and printing.3 I4 C lose the front and printer covers.5 W hen you see a message to begin inkcharging on the LCD screen, select OK.The printer begins charging the ink delivery system. This takesabout 15 minutes. When you see a completion message on theLCD screen, charging is complete.Caution: Donʼt turn off the printer, load paper, or open any covers while the printer is charging or youʼll waste ink.Load paperSee the online Userʼs Guidefor information about loading capacity, available paper types and sizes, and using the disc tray.Rear paper feederYou can load plain paper, and most glossy and matte papers, in the rear paper feeder.1 Open and extend the rear paper feeder.SureColor P700SureColor P9002Slide the edge guides all the way out.3Insert paper, glossy or printable side up, and short edge first.Install softwareNote: An Internet connection is required to obtain the product software.Firmware Update Notice: The printer is designed to work only with genuine Epson-branded cartridges. Other brands of ink cartridges and ink supplies are not compatible and, even if described as compatible, may not function properly or at all. Epson periodically provides firmware updates to address issues of security, performance, minor bug fixes and ensure the printer functions as designed. These updates may affect the functionality of third-party ink. Non-Epson branded or altered Epson cartridges that functioned prior to a firmware update may not continue to function.1M ake sure the product is NOT CONNECTED to your computer.W indows ®: If you see a Found New Hardware screen, click Cancel and disconnect the USB cable.2D ownload and run your productʼs software package:SureColor P700/support/p700 (U.S.) www.epson.ca/support/p700 (Canada)SureColor P900/support/p900 (U.S.) www.epson.ca/support/p900 (Canada)3F ollow the instructions on the screen to run the setup program.4When you see the Select Your Connection screen, select one of the following:• W ireless connectionIn most cases, the software installer automatically attempts to set up your wireless connection. If setup is unsuccessful, you may need to enter your network name (SSID) and password.• D irect USB connectionM ake sure you have a USB 2.0 or 3.0 cable (not included).Note: If you do not use a USB 2.0 or 3.0 cable, print speed and performance may decline.• W ired network connectionM ake sure you have an Ethernet cable (not included).Epson Print LayoutEpson Print Layout makes it easy to print photos with a simple printprocess. Select your application, operating system, and printer driver settings within a single window and preview your changes in real time before you print. This free software is available for download from your productʼs support page as an Adobe ®Photoshop ®plug-in or as a standalone application. For more information, see /epsonprintlayout (U.S.) or www.epson.ca/epsonprintlayout (Canada).Using the LCD screen1234121110567891A ccesses printer settings 2D isplays your print history 3T urns on or off the printer’s interior light 4S witches the screen view to display additional informationSelect the media type you want to load.Follow the instructions on the LCD screen to load the paper.5D isplays maintenance settings6D isplays the network connection status7D isplays notifications8D isplays the printer’s status9D isplays the paper settings10D isplays ink and maintenance box levels11E jects loaded paper12Selects paper size and type settingsAny problems?Network setup was unsuccessful.P rint a network connection report to identify network problems and solutions. See your online Userʼs Guide for instructions.M ake sure you select the right network name (SSID).R estart your router (turn it off and then on), then try to connect to it again.I f you see a firewall alert message, click Unblock or Allow to let setup continue.I f your network has security enabled, make sure you enter your network password (WEP key or WPA passphrase) correctly. Be sure to enter your password in the correct case.Any questions?User’s GuideWindows: Click the icon on your desktop or Apps screen to access the online Userʼs Guide.Mac: Click the icon in Applications/Epson Software/Guide to access the online Userʼs Guide.If you donʼt have a Userʼs Guide icon, go to the Epson website, as described below.VideosVisit /support (U.S.) or www.epson.ca/support (Canada) and search for your product to view support videos. SupportVisit /support (U.S.) or www.epson.ca/support (Canada) and search for your product to download software and utilities, view manuals, get FAQs and troubleshooting advice, or contact Epson. Call (562) 276-7272 (U.S.) or (905) 709-2567 (Canada), 6 AM to 8 PM, Pacific Time, Monday through Friday, and 7 AM to 4 PM, Pacific Time, Saturday. Days and hours of support are subject to change without notice. Toll or long distance charges may apply.RecyclingEpson offers a recycling program for end-of-life hardware and ink cartridges. Please go to /recycle (U.S.) or www.epson.ca/recycle (Canada) for information on how to return your products for proper disposal.Need paper and ink?Ensure brilliant results with Epson specialty and plain papers, engineered specifically for Epson printers. Find Epson papers and Epson Genuine Ink at (U.S. sales) or www.epson.ca (Canadian sales) and at Epson authorized resellers. Call 800-GO-EPSON (800-463-7766).Genuine Epson paperEpson offers a variety of specialized papers to meet your needs.For more information on Signature Worthy® and Legacy Papers, visit /professional-imaging-media (U.S.) or www.epson.ca/professional-imaging-media (Canada).Signature Worthy PapersRepresenting the finest in color fidelity,smoothest tonal transitions, and exceptionalblack density and longevity, Signature WorthyPapers are developed and tested at thehighest levels to work collectively with Epsonʼsindustry-leading professional printers and inks.Legacy PapersDesigned for artists who intend to sell theirprints. Legacy Papers marry the artistry ofrevered European papermaking with the latestadvancements in inkjet coating technology.Epson SureColor P700/P900 replacement ink cartridgesColor SureColor P700 (25 ml)SureColor P900 (50 ml) Photo Black T7701T46Y1Cyan T7702T46Y2Vivid Magenta T7703T46Y3Yellow T7704T46Y4Light Cyan T7705T46Y5Vivid Light Magenta T7706T46Y6Gray T7707T46Y7Matte Black T7708T46Y8Light Gray T7709T46Y9Violet T7700T46YDEPSON, Signature Worthy, and SureColor are registered trademarks and EPSON Exceed Your Vision is a registered logomark of Seiko Epson Corporation.Windows is a registered trademark of Microsoft Corporation in the United States and/or other countries. Mac is a trademark of Apple Inc., registered in the U.S. and other countries.General Notice: Other product names used herein are for identification purposes only and may be trademarks of their respective owners. Epson disclaims any and all rights in those marks.This information is subject to change without notice.© 2020 Epson America, Inc., 9/20CPD-58608R1。
爱普生打印机说明
爱普生打印机说明LQ-630K/635K/730K新机使用指南目录2、新购买的打印机打印颜色浅如何解决?3、如何定义纸张?4、使用连续纸张打印时,打印完成后不能走到撕纸的位置上如何解决?(如何打开自动切纸功能?)二、新购买的打印机打印颜色浅如何解决?返回目录新购买的打印机,都有一个保护的泡沫塑料,这个泡沫塑料会将打印机的纸厚调节杆,抬到7 的位置,如图所示。
在打印单层纸张时就会造成打印的颜色比较浅。
取下泡沫塑料后,向下调整纸厚调节杆。
注:打开打印机上盖,在右手边位置可以看到纸厚调节杆在日常打印中请按如下方式调整纸调节杆的位置。
三、如何定义纸张?返回目录1、调出“服务器属性”界面点击“开始”—“设置”—“打印机”。
如图(1),点击“文件”,在下拉菜单中选择“服务器属性”。
2、创建并且保存自定义的纸张(1)在“服务器属性”窗口中,勾选“创建新格式”。
在“格式描述”中为自己新定义的纸张起一个名字,建议以英文和数字命名。
本文以“123”为例。
选择使用单位:“公制”以厘米为单位,“英制”以英寸为单位。
在“宽度”、“高度”中输入自定义纸张的大小(连续纸的高度是指两个撕纸位之间的长度)。
本文以15cm 宽、20cm 高的纸张为例。
打印机区域边距根据需要自行制定。
最后点击“保存格式”。
一个名叫“123”的格式就生成了。
其代表宽度15cm、高度20cm的纸张大小。
如图(2)。
注意:常见的纸张大小规格为:24.1*27.94cm、24.1*13.97cm、24.1*9.32cm 请按实际纸张的大小进行定义。
图(1)打开“服务器属性”3、在打印机驱动属性中选用自定义的纸张在“打印机和传真”中,鼠标右键点击所用打印机驱动图标,打开打印机属性,点击“打印首选项”,点击“高级”->“纸张大小”下拉菜单。
选择“123”纸张类型即可。
如图(3)。
图(2)创建新格式图(3)在驱动中选择自定义纸张注意:LQ-630K/635K/730K 纸张定义的范围是:宽度:7-25.7cm,高度:9-55.88cm,如果所定义的纸张过小或过大,超出进纸范围,这时在驱动属性里找不到自定义的纸型。
EPSON Pro7910新机安装、日常维护及一般故障处理 培训

图一
图二
第22页
4.打印头清洗
打印头全色清洗和逐色清洗
第23页
第三部分:一般故障处理
1、墨盒不识别如何对应 2、面板提示黑墨不匹配
第24页
1.墨盒不识别如何对应
(1)当墨盒出现下列两种问题时请参照下列方法解决
由于Pro7910/9910采 用了新的墨舱结构。 用户取出墨盒时,需 要首先往里推,然后 墨盒会自动弹出。避 免用户直接用力向外 拉的错误操作导致墨 舱内部触点或者 CSIC 芯片损坏。
图二
图三
第20页
2.光栅清洁
(1)将打印机前盖打开。 (2)用无纺布对尘土进行清洁。(参见图一) (3)如果光栅表面有墨滴或其它污物,请用纯净水将清洁棉签沾湿进行擦拭。(参见图二) (4)如光栅出现折损请进行更换。(参见图三)
图二
图三 图一
第21页
3.压纸轮及走纸通道清洁
(1)将打印机前盖打开。 (2)用无纺布沾清水擦拭压纸轮表面。(参见图一) 注:如用清水无法清洁掉污渍,请尝试用酒精进行清洁,清洁干净后用清水擦拭干净。 (3)用无纺布清洁走纸通道上的纸粉。如走纸通道上有墨渍,请用软布沾清水擦拭干净,在用干布擦净水渍。 (参见图二)
第5页
选择地点
第6页
清点物品
*专业版还有分光光度计组件
第7页
安装支架
注意方向标示
第8页
安装纸蓝
要特别注意和以前机型纸 蓝安装的不同之处:方形 和圆形支架。
第9页
去除保护材料
第10页
安装墨盒、充墨
如果语言不是中文: 切换显示语言。 (方法请参见后文)
第11页
装入卷纸
3 1 4
2
装卷纸时的一些注意点 和操作点。
EPSON 指导教程

• • • •
24
3.3、基本指令及运动控制
• Speed / Accel
•
• • • • •
通过Go、Jump、Pulse命令等设定、显示PTP动作的速度、加/减速度的百分比 (1~100%)。 格式: Speed 速度设定值, [保存速度], [接近速度] Speed s , a , b s 速度设定值 , a/b 第三轴上升下降的速度设定值 Accel 加速设定值、减速设定值 [保存加速设定值, 保存减速设定值, 接近加速 设定值, 接近减速设定值] Accel a,b,c,d,e,f a/b 加/减速设定值 ,c/d e/f 第三轴上升下降的加/减速 度设定值
• • • • •
2.1、机器人本体 2.2、控制器 2.3、常用机型 2.4、配件 2.5 、急停、I O接线
5
EPSON机器人的发展史
分类 : 单轴、四轴、六轴 机器人
只在大陆销售 四轴和六轴 机器人。
6
2.1本体
• 四轴
7
2.1本体
工作范围
本体电池
坐标系
8
2.1 本体 • 六轴
9
2.1本体 • 安装方式:
Speeds(max:2000) Accels(max: 25000) 注:以下任何一种情 况下,Speed、Accel、 Speeds、Accels的值 都会返回默认值。
• Speeds / Accels
•
• • •
• •
设定、显示Move 、Arc、Arc3、Jump3、Jump3CP等CP动作时的手臂速度 ; 进 行关于机械手直线动作或 CP动作的加/减速度设定。 格式: SpeedS 速度设定值, [保存速度], [接近速度] SpeedS值为指定机械手速度的值。指定的单位是 mm/sec。SpeedS的有效指 定值为 1到 1120。默认值因机械手的机种而异。关于 SpeedS 的默认值请参照各机械 手的机械手手册。控制器的电源打开时,此值通常自动设定。 AccelS 加速设定值, [,减速设定值], [保存加速设定值], [保存减速设定值], [接 近加速设定值], [接近减速设定值] 用 1到 5000的实数值指定直线动作或 CP动作时的加速度(单位: mm/sec2)。如果 省略减速设定值,加速设定值适用于加速时与减速时。
印刷厂新产品打样程序

印刷厂新产品打样程序XXX文件性质:二阶文件文件编号批准HY-COP-001生效日期审核制定新产品打样程序修订记录NO日期修订摘要页次版次变更登录者XXX新产品打样程序制订部门:工程部文件编号:HY-COP-001版次:A/1页数文件等级:二阶1.1为了更好的规范新产品打样流程,提高打样效率,为客户提供更好的服务,确保送样样品品质符合客户要求,特制定本办法。
2、适用范围2.1适用于本公司所有新产品打样作业。
3、定义3.1新产物定义:即客户提供全新产物或原有产物进行版面、笔墨、用料更改等。
3.2打样定义:全新产物或原有产物必须有色相、尺寸调整、图文更改在原版面更改40%以上。
4、职责4.1客服部4.1.1负责客户订单受理并与客户沟通,确认客户需求。
4.1.2负责组织相关部门人员进行订单评审并下发订单。
4.1.3负责印前的外发制作,并组织相关人员进行输出前确认。
4.1.4负责对进程首件确认,并将样品送给客户确认及结果反应等。
4.2品管部4.2.1负责进行相关指标检测分析。
4.2.2负责对稿件、印件及过程的首件确认。
4.2.3负责样品保管并建立内部标准样和档案等。
4.3技术工程部4.3.1负责用料、冲模等工艺标准制定及BOM清单编制。
4.3.2负责对稿件、印件及过程的首件确认。
4.3.3负责过程跟进并建立工艺资料库等。
4.4物控部4.4.1负责按用料标准按时、按质、按量的进行物料采购,并建立物料资料档案。
XXX新产物打样程序制订部门:工程部文件编号:HY-COP-001版次:A/1页数文件等级:二阶4.5.1负责打样计划指令的下发,并跟进打样进度。
4.6生产部门4.6.1负责进行产物的打样及打样进程跟进及结果反应等。
4.8厂务部4.8.1厂长负责订单评审表的审批。
5、流程内容5.1客户有新产物需求,客服获得客户信息并拿到相应的光盘、样稿、样箱或文档。
5.2品管部负责对客户提供的样品进行物理指标检测和用料分析,并填写《客户样品分析表》经部门经理签字确认后,送客服部和技术工程部做好评审前的筹办。
GMG操作流程-io(参考模板)
GMG操作流程一、软件简介1.软件组成(1) GMG Colorproof打印机配置,使用校准向导校准打印机,手动开始一个作业和热文件夹安装。
(2) GMG 色彩管理文件编辑器创建和编辑mx3, mx4 色彩管理文件测试图表的测量方法。
mx3 文件是校准文件,而mx4 文件描述的是特殊装置的特性。
(3) GMG 专色编辑器创建和编辑专色数据库。
(4) GMG Rip 服务器Colorproof 一样支持PS、PDF、EPS文件。
2.软件的结构文件(1) 打印机校准文件 *.mx3mx3 文件是一个用于校准颜色的三维色彩管理文件。
它为印刷设备定义了特殊的媒介/油墨的结合。
如果打印机属性出现了偏差,该定义好的色彩标准可以让您再次校准使用GMG Colorproof 的打印机,因此,您可以稳定重复的得到色彩准确的样张。
(2) 全范围文件(Gamut File) *.csc一个全范围文件描述了一台打印机的最大色彩容量。
当从对象值计算和从目标和当前设备值计算时需要全范围文件。
有两种不同类型的全范围文件:用于mx4 彩色profile 文件的“一般”全范围文件和用于打印机校准和特殊色彩的色彩管理文件的“完全全范围”文件。
全范围文件描述了打印机的整个的、无限制的色域空间,其能够满足打印机校准的需求。
用于打印机校准的简化色域空间常用于计算一个mx4/mx5 的色彩管理文件。
(3) 彩色色彩管理文件 *.mx4这是一个用于从CMYK 到CMYK 转换的四维与设备相关的色彩管理文件。
当打印连续调样张(用于印刷机的非模拟网点图案的色彩匹配样张)时使用该文件。
该色彩管理文件使用纸张、油墨和根据目标值校准的印刷机的特定组合(如胶印)模拟打样,描述打样机的输出特性。
(4) 模板文件 *.tpl模板文件是一个关于几何、排列以及为特殊的测量装置而配置的带有测试图表的色彩图解的记录文件。
(5) 控制条文件 *.tif, *.gmg控制条是TIFF 文件格式(二值和连续)的印刷工艺控制条,它可以随样张一起被打印出来。
【精编范文】爱普生打印机使用图解-范文word版 (2页)
【精编范文】爱普生打印机使用图解-范文word版
本文部分内容来自网络整理,本司不为其真实性负责,如有异议或侵权请及时联系,本司将立即删除!
== 本文为word格式,下载后可方便编辑和修改! ==
爱普生打印机使用图解
打印机(Printer) 是计算机的输出设备之一,用于将计算机处理结果打印在相关介质上。
下面是我为大家整理的爱普生打印机使用图解,希望对大家有所帮助。
爱普生打印机使用图解
1
拿出那张驱动光盘,插入电脑。
注意:本打印机支持Windows XP(SP1)、Windows 7、Windows 8、Windows Vista以及以上版本。
(360刚出的Windows 10也可以哦~)
2
然后您可以按照说明书上的详细说明去安装。
(因为太多了,抱歉您看一下说明书)
3
安装完后会有提示。
使用方法
1
点击开关键可以开启机器。
功率:
1.关机:0.3W
2.待机:1W
3.开机10W。
海德堡印刷机预放墨与预打墨曲线制作方法
海德堡印刷机预放墨与预打墨曲线制作⽅法海德堡印刷机预放墨与预打墨曲线制作⽅法试印前1周更换测试印刷⾊座的全新橡⽪布。
⽔墨辊清洁与调整。
⽔槽液温度与电导度检测。
建议更换全新墨⽃胶⽚。
印前输出条件标准化(Recorder + processor)。
输出175线 Linear color calibration test form印版检查以下状态是否在⼀般⽣产设定值:⽔墨混合/分离、Vario、墨辊冷却系统温度、横向串墨起始点与摆幅。
欲测试的四⾊油墨⼀种。
欲测试的纸张(1000mm X 700mm)(需为同⼀批纸,基重相同)。
⼚房温湿度控制。
满版浓度由客户提供或精印刷反差测试。
Pre-Inking 11、请客户将color calibration form制版并⽤cpc32转出PPF。
2、依据上述PCM规范完成印刷准备⼯作。
3、读取PPF油墨数据后,将Basic setting⾥Pre-inking 1 设定为墨25⽔3后执⾏Pre-inking 1,使⽤客户实际量产车速(约10000转),42%墨⽃辊转速,不调整墨键与墨⽃辊,将⽔减到最少。
油墨跑平后,印出约300张,每50张抽出⼀张。
4、将导表上量测区测量SID后,如果从50~300张浓度上升,表⽰⼀开始打墨不够,则需增加Pre-inking1的圈数。
如果从50~300张浓度下降,表⽰⼀开始打墨太多,则需减少Pre-inking1的圈数。
5、每次微调后洗车并重新读取⼯作,执⾏修改后的Pre-inking1,印出300张。
6、确认结果并微调,直到从100~300张浓度差距不超过0.15。
Pre-Inking 21、Pre-inking2使⽤时机为更换印件后(未换⾊洗车),若下⼀组印件油墨覆盖率明显较前⼀印件多时。
可使⽤Pre-inking2预打⼀些墨上墨辊,使浓度较快到达标准。
2、因为每组印件覆盖率并⽆法⼀致,所以⽆法针对Pre-inking2做很精确的测试,须由⼈员使⽤⼀段时间后依实际印件判断。
使用数码相机制作打印机icc曲线的基本方法
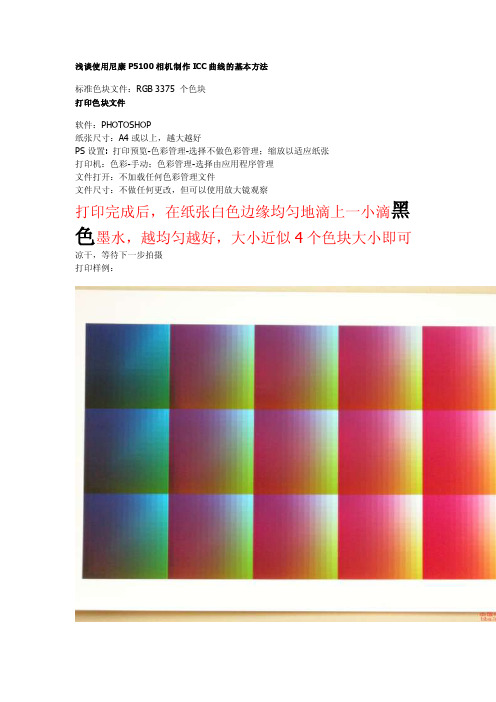
浅谈使用尼康P5100相机制作ICC曲线的基本方法标准色块文件:RGB 3375 个色块打印色块文件软件:PHOTOSHOP纸张尺寸:A4或以上,越大越好PS设置: 打印预览-色彩管理-选择不做色彩管理;缩放以适应纸张打印机:色彩-手动;色彩管理-选择由应用程序管理文件打开:不加载任何色彩管理文件文件尺寸:不做任何更改,但可以使用放大镜观察打印完成后,在纸张白色边缘均匀地滴上一小滴黑色墨水,越均匀越好,大小近似4个色块大小即可凉干,等待下一步拍摄打印样例:拍摄色卡打印件光线:自然光,斜射,无阴影相机设置:拍摄前进行白平衡预设曝光模式:手动模式成像质量:最佳文件大小:12M照相机位置:镜头平行于打印件,无倾斜,取景:尽可能利用照相机的感光板面积,图像与大越好,务必包含前一步骤里的黑色墨点镜头距离:在光学变焦范围内,尽可能远离打印件,但是不得使用数字变焦曝光:调节光圈和快门速度,避免曝光过度或曝光不足,拍摄若干张候选色块照片筛选软件:PS筛选标准:1)色块间目视可识别,重点是高光区,和深色区2)然后选择白色纸底色相对感觉最好的一张3)如果没有选择,可重新拍照视情调节白场或黑场软件: PS打开图片文件不加载任何色彩管理进入:图像-调整-曲线,进行调整,目的是消除照相机的感光误差黑场参考物:纸边上的黑色墨点白场参考物:白色纸边若无异常,则确认保存测量色块图片RGB值-接浅谈使用尼康P5100相机制作ICC曲线的基本方法前面步骤请参见/viewthread.php?tid=161572&extra=page%3D1 浅谈使用尼康P5100相机制作ICC曲线的基本方法该步骤有专用软件支持,也可用PS,但是辛苦到理论上不可行1)PS取样滴管读取色块RGB, 并记录2)将RGB值转换为Lab值,该值在专业设备上是直接由分光仪读取的3)依据Lab值,制作测量数据TXT文件使用ProfileMaker 制作ICC曲线加载ICC实验效果左侧无正确RCC,偏红,蓝色发紫右侧基本正常,色彩相对改变令人满意。
EPSON绘图仪打印机使用指南

POP打印机EPSON 7400/7450 打印机使用操作指南声明:其中涉及到一些对废墨仓、兼容墨盒的使用描述和故障解决办法,并不代表EPSON支持这种方式,EPSON推荐用户使用原装墨水及介质,这样可以保证机器的稳定使用及卓越的输出效果。
7450 面板显示7400 面板显示•打印机显示屏常见信息介绍:READY ——打印机准备打印数据。
PRINTING ——打印机正在处理数据。
PLEASE WAIT ——等待直到出现READY。
PAPER OUT ——未装入打印纸(装纸后按“暂停键”)PAUSE ——打印机暂停。
PRESS PAUSE BUTTON ——按下暂停按键。
RESET ——打印机正被重置复位。
POWER OFF ——打印机电源关闭。
CLEANING ——打印机正在清洗喷嘴。
MNT TK NEAR FULL ——废墨仓快满了(需要给废墨仓解码)INK LOW ——墨盒快到使用寿命(准备更换墨盒)INK OUT——墨尽(请更换新墨盒)INVALID INK CARTRIDGE——无效墨盒(检测墨盒是否装错顺序,按一下暂停键)INK CARTRIDGE ERROR CHECK CARTRDGE——墨盒错误,请更换墨盒INK CARTRIDGE ERROR REPLACE CARTRDGE——墨盒错误,请更换墨盒REPLACE INK CRTG ——墨盒已到使用寿命(更换墨盒或墨盒解码)MNT REQ nnnn ——打印机中的部件已经接近使用寿命。
“nnnn”代表部件代码,请联系EPSON工程师解决。
RELOAD PAPER ——打印机不能检测所装入的打印纸(有可能纸张有折痕或卷曲,可以把这张纸平整后重新放置或换纸)INK CARTRIDGENON-GENUINE CARTRIDGE!MAY NOT PERFORM AT OPTIMUM. CONTINUE? <YES NO> ——安装了非爱普生原装正品墨盒(装入解码后的墨盒会出现此提示,按左键选择YES)INK CARTRIDGEDAMAGE FROM CARTRIDGE IS NOT WARRANTED.DO YOU ACCEPT THIS?<ACPT. DECLINE>——安装了非爱普生原装正品墨盒。
数码打样大势所趋--EPSON STYLUS PRO 10000应用案例

数码打样大势所趋--EPSON STYLUS PRO 10000应用案例佚名
【期刊名称】《今日印刷》
【年(卷),期】2002(000)010
【摘要】本文列举两个爱普生数码打样产品的成功案例,旨在说明数码打样的优势与其发展趋势.
【总页数】2页(P51-52)
【正文语种】中文
【相关文献】
1.爱普生再献数码打样专家Epson Stylus Pro 7910/991 0重磅出击印刷市场 [J],
2.数码打样的专业输出利器——Epson Stylus Pro 9880C [J], 海天
3.爱普生再献数码打样专家——Epson Stylus Pro 7910/9910重磅出击印刷市场[J],
4.数码打样又现新星——Epson Stylus Pro 4000打样测试手记 [J],
5.大幅面打印机节省成本及时间—EPSON STYLUS PRO 10000应用案例 [J],
因版权原因,仅展示原文概要,查看原文内容请购买。
打印曲线色块方法

打印曲线色块方法
首先:
打开POTOSHOP软件,编辑→预设→颜色设置→色彩管理方案→全设为关。
如下图:
第一步OK
第二步:打开色块文件
找到所使用的打印机,打印机属性→选择手动颜色设置。
如下图
→选择颜色设置,选匹配→设为关闭。
如下图:
确定。
注意不要对色靶文件进行任何调整,包括图像缩放及颜色调整等
1.打印预览,“颜色处理”选择“无色彩管理”新版本驱动色调选无颜色校正。
2.选择打印机,进入“页面设置”选项,选择“打印机属性”,设置打印介质,打印精度及纸张大小。
并进入“颜色设置”选项。
在匹配标签中,“匹配方式”选择“关闭”。