大洋安装步骤说明
世界舰 2021 安装指南说明书
W orldShip® 2021Installation GuideAn easy guide to installing and upgrading WorldShip software.WorldShip 2021 pre-installation checklist1. C heck Compatibility:Y ou may have integrated WorldShip with a UPS-Ready®(or third-party) vendor application. Due to changes in the WorldShip database structure, these applications may not be compatible with WorldShip 2021.D o not upgrade until you contact the UPS Ready (or other third-party) vendor.2. C heck Operating System and Service Pack:T he WorldShip 2021 upgrade requires that you have Microsoft® Windows 8.1 or Windows 10 to begin installation.T o identify which Operating System and Service Pack you have (non-Windows 8 systems):■C lick Start on the Windows task bar, point toPrograms, Accessories and System Tools and selectSystem Information.■T he Operating System version and Service Pack willdisplay in the System Information window.M emory recommendations:■W indows 8.1 (1 GB – 32-bit and 2 GB – 64-bit)■W indows 10 (1 GB – 32-bit and 2 GB – 64-bit)C AUTION: Do not proceed if your system is not at the proper Operating System and Service Pack version.3. C heck for Administrative Rights:E nsure that the user account used to log in to Microsoft Windows operating systems has full PC administrative rights. If unsure, consult the computer technical support staff at your company. Due to security enhancements, Microsoft Windows 8.1/Windows 10 users may be required to authenticate with administrative rights during the installation process. The User Account Control (UAC) prompt may appear several times during installation asking you for permission to let WorldShip install its components. You must acknowledge the UAC prompt and allow the installation to continue.Also, if you need to access the WorldShip Support Utility for any reason, you must run this utility with administrative rights. To perform this task:■O n Windows 8.1: In the Start window, right-click theUPS WorldShip Support Utility tile and select Run as Administrator.■O n Windows 10, in the Start window, click All Apps,then UPS and then right-click UPS Support Utility and select Run as Administrator.4.A rchive WorldShip Shipping History to improve performance and improve processing:■S tart WorldShip.■O n the Home tab, select History.■O n the Home tab, select Archive/Restore and thenArchive Shipments.■I n the Archive Shipments window, select All Shipments, or specify a date range, and then click OK.■I n the Save As window, click Save.■C lick Yes in the confirmation window.N ot e: The last 14 days of history will not be deleted,and the history that is deleted may be restoredwhen needed.■C lick Done when 100% is reached in the ArchiveShipments window.■C lick Yes in the window that appears requesting thedatabase back-up to be performed.5.C heck for anti-spyware, anti-malware and virus scanner software:D isable anti-spyware, anti-malware and virus scanner software that may conflict with the WorldShip installation.6.S hut Down Open Applications:S hut down all other programs running on the task bar, including Microsoft Outlook®, Internet Explorer®, Excel®, etc.CAUTION: Microsoft Windows 8.1/Windows 10 users please read below.At the completion of the WorldShip installation process, your PC will be required to reboot. After reboot, Microsoft Windows 8.1/Windows 10 may prevent automatic launching of the WorldShip application. Please launch WorldShip using the icon on your desktop should this happen. If you chose not to place the WorldShip icon on your desktop, you may launch WorldShip as follows:■O n Windows 8.1: In the Start window, click the UPS WorldShip tile.■O n Windows 10: In the Start window, click All Apps, then UPS and then click the UPS WorldShip tile.UpgradingWorldShip 2021 may have different system requirements.A complete list can be found at (US only).Note:WorldShip 2021 will only upgrade WorldShip 2019 (v22) and WorldShip 2020 (v23).1.C omplete the End of Day process prior to upgrading(if needed). Restart WorldShip once End of Day has completed.2.D ownload and run the web install (https://www.ups. com/content/us/en/resources/techsupport/worldship/ downloads.html).3.O n the WorldShip Set-up screen, choose the following:■A pplication Language – Select the language in whichyou want WorldShip installed.■I nstall Location – This field is read-only.■C ountry/Territory of Installation – This field couldbe read-only.■W hen you have finished, click Next.4.O n the Licence Agreement screen, accept the UPS®Technology Agreement by selecting I Accept the Terms in the Licence Agreement and then click Install.5.W ait while the installation process upgrades WorldShip. At the end of a successful installation, you will be prompted to reboot your computer. If your PC requires a password, you will need to log in andenter the password.Auto download upgradingIf a WebInstall package is downloaded, WorldShip prompts you to upgrade now or later. If you do not upgrade now, an Install button is added to the custom toolbar for your use later.Note:WebInstall is available for all systems.InstallingYou can install WorldShip on a Single workstation oron a workstation that’s part of a Workgroup. WorldShip should not be installed on a server.Installing on a single workstation:1. D ownload and run the web install (https://www.ups. com/content/us/en/resources/techsupport/worldship/ downloads.html).2. O n the WorldShip Set-up screen, choose the following:■A pplication Language – Select the language in whichyou want WorldShip installed.■I nstallation Location – Optional: Click Options andthen select where you want WorldShip installed.WorldShip will create the folders \UPS\WSTD andplace them under the two locations you choose.N ote: The Install Location cannot be a network, DVD,RAM or virtual drive. While removable hard drivescan be used, they are not recommended.■C ountry/Territory of Installation – Select the country/ territory where WorldShip is to be installed.■S elect or clear the Add Shortcut to UPS WorldShip onDesktop checkbox as needed.■S elect the Finish Moving WorldShip Data checkboxto restore a previously backed up WorldShipdatabase.N ote: Only select this box when moving an existingWorldShip system from one PC to another PC.■W hen you have finished, click Next.3.I f you selected the Finish Moving WorldShip Data box, the Finish Moving WorldShip Data screen appears. Complete this window and click Next.4.O n the Licence Agreement screen, accept the UPS Technology Agreement by selecting I Accept the Terms in the Licence Agreement and then click Next.5.O n the Installation Type Selection screen, select Single Workstation and click Install.N ot e: This screen does not appear if you selected the Finish Moving WorldShip Data box.6.W ait while the installation process copies the files. At the end of a successful installation, you will be prompted to reboot your computer. If your PC requires a password, you will need to log in and enter the password.Installing in a Workgroup configuration:If you want to allow multiple shippers to process parcels using the same database, then you may install WorldShip in a Workgroup configuration grouping. Installing WorldShip in a Workgroup configuration requires that a single Workgroup Administrative workstation be installed first. After the Workgroup Administrative workstation has been installed, oneor many Workgroup Remote workstations maybe installed to share the database that is locatedon the Workgroup Administrative workstation. WorldShip is designed to have the database resideon the Workgroup Administrative workstation. WorldShip is not designed to have the database shared on a network file server. Additionally, a Workgroup configuration grouping requires that a‘shared network drive folder’ be defined. The shared network drive is the location for files (other than the database) that will need to be accessed by all of the workstations in the Workgroup configuration grouping. Note: You can configure the Task Scheduler in WorldShip to make daily back-ups of the database. Those back-ups could be stored on a server. For step-by-step instructions, select WorldShip on the Support tab and then UPS WorldShip Help; type Task Schedule Editor Procedures. Pre-installation instructions: Create a folder inwhich to install the shared WorldShip files. This folder must be a shared Microsoft® folder and can reside on either the Workgroup Administrative workstation oron any drive that is accessible from the Workgroup Administrative workstation as well as the Workgroup Remote workstations. These files should be installed in a different folder from the local files.Workgroup Administrative workstation:1. D ownload and run the web install (https://www.ups. com/content/us/en/resources/techsupport/worldship/ downloads.html).2.O n the WorldShip Set-up screen, choose the following:■A pplication Language – Select the language in whichyou want WorldShip installed.■I nstallation Location – Optional: Click Options andthen select where you want WorldShip installed.WorldShip will create the folders \UPS\WSTD andplace them under the two locations you choose.■C ountry/Territory of Installation – Select the country/ territory where WorldShip is to be installed.■S elect or clear the Add Shortcut to WorldShip onDesktop checkbox as needed.■W hen you have finished, click Next.3.O n the Licence Agreement screen, accept the UPS Technology Agreement by selecting I Accept the Terms in the Licence Agreement and then click Next.4.O n the Installation Type Selection screen, choose the following:■F or the desired installation type, select WorkgroupAdmin.■F or the location to install shared files by both the Admin and Remote, click Browse (…) and select the location in the Workgroup Admin Shared Location box.■W hen you have finished, click Install.5.W ait while the installation process copies the files. At the end of a successful installation, you will be prompted to reboot your computer. If your PC requires a password, you will need to log in and enter the password.Workgroup Remote workstation(s):By default, the Workgroup Remote workstationcan perform limited functionality. The Workgroup Administrator can configure remotes to perform additional WorldShip functions.Note: If you recently installed TCP/IP, you may see other windows or be asked for additional information. Installing from the web:1.D ownload and run the web install (https://www.ups. com/content/us/en/resources/techsupport/worldship/ downloads.html).2.O n the WorldShip Set-up screen, choose the following:■A pplication Language – Select the language in whichyou want WorldShip installed.■I nstallation Location – Optional: Click Options andthen select where you want WorldShip installed.WorldShip will create the folders \UPS\WSTD andplace them under the two locations you choose.■C ountry/Territory of Installation – Select the country/ territory where WorldShip is to be installed.■S elect or clear the Add Shortcut to WorldShip onDesktop checkbox as needed.■W hen you have finished, click Next.3.O n the Licence Agreement screen, accept the UPS Technology Agreement by selecting I Accept the Terms in the Licence Agreement and then click Next.4.O n the Installation Type Selection screen, choose the following:■F or the desired installation type, select WorkgroupRemote.■F or the location to install shared files that were installed by the Admin, click Browse (…) and select the locationin the Workgroup Admin Shared Location box.■W hen you have finished, click Install.5.W ait while the installation process copies the files. At the end of a successful installation, you will be prompted to reboot your computer. If your PC requires a password, you will need to log in and enter the password.Installing from a shared drive:You have the option of installing Workgroup Remote work s tations from install files stored on the shared drive (the shared drive location was designated during the installation of the Workgroup Administrative workstation). The install files can be found in the \UPS\ WSTD\Remote\Install\Disk1 subdirectory of the shared drive folder.1.O n the WorldShip Set-up screen, choose the following:■L ocal Destination Directory – Optional: Click Options and then select where you want WorldShip installed.WorldShip will create the folders \UPS\WSTD andplace them under the two locations you choose.■W orkgroup Administrator Shared Location – This field is read-only and displays the shared location that was set up by the Workgroup Administrator.■C ountry/Territory of Installation – Select the country/ territory where WorldShip is to be installed.■B y default, a shortcut to WorldShip will be created on your desktop.■W hen you have finished, click Next.2.O n the Licence Agreement screen, accept the UPS Technology Agreement by selecting I Accept the Terms in the Licence Agreement and then click Install.3.W ait while the installation process copies the files. At the end of a successful installation, you will be prompted to reboot your computer. If your PC requires a password, you will need to log in and enter the password.For US customers who want more detailed instructions, go to and click View Support Guides in the Guides section and then select Install on a Single or Workgroup Workstation.Setting up communicationsWorldShip requires electronic communications to transmit parcel and tracking information.For Direct Access: TCP/IP.Configuring communications:When you start WorldShip for the first time, you will see the Communications Set-up window. Select the Direct Access connection method and provide any necessary information to complete the connection set-up:■D irect Access: a direct or broadband connection to the Internet that does not require dialling, such as Local Area Network (LAN), Wide Area Network (WAN), Digital Subscriber Line (DSL) or cable. Direct Access generally offers the fastest connection.■Y ou may need to identify the proxy server with the URL address, port and authorisation information. If a proxy server is used, you must also use specific browser settings.Reconfiguring communications:You should reconfigure communications when your proxy server settings change.1.O n the Tools tab, select More Tools and then Communications Set-up.2.I n the Communications Set-up window, make the necessary changes and click Next.3. C ontinue making changes as needed. Click Finish to save your new configuration.You should reconfigure communications when any of the following situations occur:■ D irect access to the Internet becomes available.■Y ou change proxy server settings for Direct Access.■Y ou want to add or remove a connection method.Registering with UPS®Once the application is successfully installed, you must register with UPS in order to ship parcels using WorldShip. Before you begin the registration process, make sure a printer is connected to your computer and is operational.1.A fter the WorldShip installation is complete and you have set up communications, the Register With UPS window appears. Enter the information about your company, where your system is installed and your UPS account number, and then click Finish.2. I f the Authenticate Your Invoice Information screen appears, complete the required information and click Submit.3.W orldShip automatically connects to UPS and transmits your registration information. This may take three to five minutes. Please wait until the Shipping window appears. Congratulations! You are now a WorldShip customer and are ready to process parcels.Post-installation checklist1.I f you disabled any anti-spyware, anti-malware or virus scanner software, please enable it.2.I f you receive a message that WorldShip cannot communicate with UPS, consult the computer technical support staff at your company.3.F or WorldShip Workgroup Administrative Workstations: Be aware that the WorldShip database will be disconnected if your Workgroup Administrative workstation goes into sleep mode. You must close WorldShip on both the Workgroup Administrative and Remote workstations and relaunch the application to resolve this issue. If necessary, consult your computer technical support staff for questions about sleep mode and how to adjust this setting.4.I f you have a UPS-supplied printer, restart your printer prior to shipping by powering it off and then powering it back on. All printer drivers are pre-installed with WorldShip.Uninstall instructionsIf you uninstall WorldShip, do not delete any of its directories without first running the uninstall program. ■W hen running the uninstall program on Windows8.1, right-click the UPS WorldShip tile and select UPS WorldShip Uninstall.■W hen running the uninstall program on Windows 10, in the Start window, click All Apps, then UPS and then UPS WorldShip Uninstall.Support GuidesWorldShip provides a User Guide, Installation Guide and Shortcut and Navigation Guide in PDF format on ups. com.To view or print these documents, install the free Adobe® Reader® software from and then follow these steps:1.G o to /worldshipsupport.2.U nder Guides, select View User Guides.3.V iew and print the documents as needed.Microsoft, Windows, Outlook, Internet Explorer and Excel are trademarks of Microsoft Corporation. Adobe Reader is a registered trademark of Adobe Systems Incorporated. All rights reserved.Technical helpIf you have questions about WorldShip that cannot be answered by this guide or WorldShip Help, call the following numbers:Afghanistan ............................................................................................+93-79-3204045 / 9647814318252 Albania ...............................................................................................................................................+355682048904 Algeria ..............................................................................................................................................+49 69 66404364 Angola ..............................................................................................................................................+49 69 66404364 Argentina ............................................................................................................................................*********** Armenia ............................................................................................................................................10 3741 27 30 90 Australia ..................................................................................................................................................1800 148 934 Austria ....................................................................................................................................+43 (0) 1 50 15 96 002 Azerbaijan .................................................................................+10 99 412 493 39 91 / +994-12-490 6989,+994-12-493 3991 Bahamas...........................................................................................................................................1-888-960-2683 Bahrain ............................................................................................................................................+49 69 66404364 Bangladesh ....................................................................................................................................+49 69 66404364 Belarus ............................................................................................................................................375-17-227-2233 Belgium ........................................................................................................................................+32 (0) 22 56 66 19 Bermuda ...........................................................................................................................................1-888-960-2678 Bolivia..........................................................................................................................................................800 100 807 Bosnia .........................................................................................................................................................033 788 160 Brazil .............................................................................................................0800 8923328 or 55 11 569 46606 Bulgaria .......................................................................................................................................................0700 1 8877 Burundi ............................................................................................................................................+49 69 66404364 Bulgaria .......................................................................................................................................................0700 1 8877 Cameroon ......................................................................................................................................+49 69 66404364 Canada ........................................................................................................1-888-UPS-TECH (1-888-877-8324) Cayman Islands ..............................................................................................................................1-888-960-2686 Chile .............................................................................................................................................................800 835 682 China, People’s Republic of ............................................................................................................400 013 3023 Colombia ...........................................................................................................................................01800 752 2293 Congo, The Democratic Republic of ...................................................................................+49 69 66404364 Costa Rica ............................................................................................................................................0800 052 1591 Cyprus ............................................................................................................................................................77 77 7200 Czech Republic ..............................................................................................................................+42 023******* Denmark ......................................................................................................................................+45 (0) 35 25 65 04 Djibouti ...........................................................................................................................................+49 69 66404364 Dominican Republic ....................................................................................................................1-888-760-0095 Ecuador ...................................................................................................................................................1800 000 119 Egypt .................................................................................................................................................+49 69 66404364 El Salvador.......................................................................................................................................................800 6191 Estonia ....................................................................................................................................................372 666 47 00 Ethiopia ...........................................................................................................................................+49 69 66404364 Finland ....................................................................................................................................+358 (0) 923 11 34 07 France ............................................................................................................................................+33 (0) 157324060 Germany..............................................................................................................................+49 (0) 69 66 30 80 37 Ghana ...............................................................................................................................................+49 69 66404364 Gibraltar .............................................................................................................................................+350 200 42332 Greece ....................................................................................................................................................210-99 84 334 Guatemala ..........................................................................................................................................180****0384 Honduras ........................................................................................................................................................800-0123 Hong Kong ....................................................................................................................................................8206 2133 Hungary .........................................................................................................................................+36 (0) 17774820 India ...................................................................................91-22-2827-6111 / 00 0800 852 1113 (toll free) Indonesia.......................................................................................................................................001 803 852 3670 Ireland, Republic of .................................................................................................................+353 (0) 15245447 Israel .......................................................................................................................................00-972-(0) 35-770112 Italy.....................................................................................................................................................+39 024******* Ivory Coast .....................................................................................................................................+49 69 66404364 Japan .....................................................................................................................................................00531 85 0020 Jordan ..............................................................................................................................................+49 69 66404364 Kazakhstan .....................................................................................................................................+49 69 66404364 Kenya ................................................................................................................................................+49 69 66404364 Korea, South ..................................................................................................................................00798 8521 3669 Kosovo ..............................................................................................................................................+381 38 24 22 22Kuwait ..............................................................................................................................................+49 69 66404364 Kyrgyzstan ..........................................................................................+996 312 699 988 / +996-312-979713 Latvia (7805643)Lebanon ..........................................................................................................................................+49 69 66404364 Lithuania .............................................................................................................................................370-37-350505 Luxembourg ...........................................................................................................................FR 00 33 8050 10365 Malawi .............................................................................................................................................+49 69 66404364 Malaysia ..................................................................................................................................................1800 80 4709 Male ....................................................................................................................................................+223 2029 91 52 Mauritania ........................................................................................................................................+222 4529 28 89 Mauritius.........................................................................................................................................+49 69 66404364 Mexico ..............................................................................................................................................01 800 714 65 35 Moldova..........................................................................................................................................+373-22-403901 Monaco ........................................................................................................................................+33 (0) 157324060 Morocco ..........................................................................................................................................+49 69 66404364 Mozambique ................................................................................................................................+49 69 66404364 Netherlands ............................................................................................................................+31 (0) 20 50 40 602 New Zealand .........................................................................................................................................0800 443 785 Nicaragua ........................................................................................................................................001800 226 0452 Nigeria..............................................................................................................................................+49 69 66404364 Northern Ireland ...................................................................................................................+44 (0) 2079490192 Norway ..........................................................................................................................................+47 (0) 22 5777 34 Oman ...............................................................................................................................................+49 69 66404364 Pakistan ...........................................................................................................................................+49 69 66404364 Panama ..............................................................................................................................................00800 052 1414 Paraguay .........................................................................................................................................009800 521 0051 Peru ..............................................................................................................................................................0800 009 19 Philippines .................................................................................................1800 1855 0023 or 1800 765 2927 Poland ...........................................................................................................................................+48 (0) 222030321 Portugal ....................................................................................................................................+351 (0) 21 9407061 Puerto Rico ...............................................................................................1-888-UPS-TECH (1-888-877-8324) Qatar .................................................................................................................................................+49 69 66404364 Romania .............................................................................................................................................40 21 233 88 77 Russia ...................................................................................................................................................7 49 5961 2211 Rwanda ...........................................................................................................................................+49 69 66404364 Saudi Arabia ...................................................................................................................................+49 69 66404364 Scotland ................................................................................................................................... +44 (0) 2079490192 Senegal ...............................................................................................................................................221 33 8646042 Serbia ..............................................................................................................................................+381 11 2286 422 Singapore ...............................................................................................................................................800 852 3362 Slovakia ................................................................................................................................................. +421 2 16 877 Slovenia . (38642811224)South Africa ...................................................................................................................................+49 69 66404364 Spain ..............................................................................................................................................+34 (0) 917459877 Sri Lanka.........................................................................................................................................+49 69 66404364 Sweden .....................................................................................................................................+46 (0) 85 79 29 041 Switzerland .................................................................................................................................+41 (0) 442115700 Taiwan ...................................................................................................................................................00801 855 662 Tanzania...........................................................................................................................................+49 69 66404364 Thailand ........................................................................................................................................001 800 852 3658 Tunisia ..............................................................................................................................................+49 69 66404364 Turkey ..........................................................................................................................................0090-212-413 2222 United Arab Emirates .....................................................................................................800-4774 (Freephone) United Kingdom ....................................................................................................................+44 (0) 2079490192 United States........................................................................................................................................888-553-1118 Uruguay ............................................................................................................................................ 000 405 296 651 US Virgin Islands ...............................................................................................................................188****8324 Uzbekistan ..................................................................................................................................+998 (71) 1203838 Venezuela ............................................................................................................................................*********** Wales ..........................................................................................................................................+44 (0) 2079490192 Zambia .............................................................................................................................................+49 69 66404364 Zimbabwe ......................................................................................................................................+49 69 66404364。
大洋安装教程

.安装步骤说明SQL2000安装具体步骤:1.安装SQL2000,必须先将SQL2000文件夹复制到硬盘安装,否则安装中途会光盘写入出错,从而中止安装.2.双击AUTORUN.EXE,选择"安装SQL Server 2000简体中文开发版"3.点"安装SQL Server 2000组件"4.点"安装数据库服务器"5.点"下一步",选择"本地计算机"后,点下一步.选择"创建新的SQL Server实例,或安装客户端工具"后点"下一步.6.姓名USER,公司为空.点"下一步"7.协议选"是"8.选择"服务器和客户端工具"后,点击"下一步"9.选择"默认"后,点"下一步"10.选择"典型"默认安装目录后点"下一步"11.选择"对每个服务使用同一账户.自动启动SQL Server服务",再选择"使用本地系统账户"点"下一步"12.选择"混合模式"再选择"空密码"点"下一步",再点"下一步"后点击"完成"13.点"开始/程序/Microsoft SQL Server/服务管理器",选中"当启动OS时自动启动服务",再点"开始/继续"按钮,完成SQL2000安装和启动.大洋D3-EDIT安装.1.双击setup.exe,选择"自定义安装"2.勾选"大洋系统程序""安装数据库""基础程序"点"下一步" 重要注意:安装大洋D3-EDIT时,选择加密狗时端口时,一定要选择USB DogDriver,为以后破解准备.3.勾选"基础数据库"后点"下一步"再选择"user2(DV25)"后点"下一步"4.MDAC2.8,Directx9.0,Adobe acrobat6.0均可不勾选.点"下一步"5.默认用户名sa,密码空,点"下一步",安装自动完成. 破解步骤:1.安装D3-EDIT后,安装"大洋升级文件"2.升级完成后,双击Crack文件夹中的SPLlicensPro.exe3.锁类型:"SuperPro" 预置数据:"北京中科大洋科技发展有限公司"4.点击"安装"即可破解.5.不行的话,点击下方的"卸载",重新再来。
大洋eStudio金时全能机V20-安装手册

eStudio 大洋金时全能机系统安装手册北京中科大洋科技发展股份有限公司2017 年5 月版本说明版本创建时间版本号版本更新内容版本修改人2017 年5 月** 创建蒋晓丽2017 年7 月** 升级安装苏大林目录一、安装前准备 (4)1. 系统环境 (4)2. 软件运行环境 (4)操作系统: (4)BIOS 配置如下: (4)操作系统配置如下: (9)3. 安装 .net35 (15)4. 板卡驱动安装 (15)5. 板卡参数配置 (17)二、eStudio 软件安装及配置 (19)1. 安装eStudio V2.0 (19)2.启动eStudio 软件 (22)3.卸载eStudio 软件 (23)三、升级安装 (24)一、安装前准备1. 系统环境配件数量主机一台键盘一个鼠标一个电源线两根eStudio 微型加密狗一个eStudio 软件安装光盘一张(内含软件安装程序、板卡驱动、用户使用手册、系统安装手册)显示器(DVI-D接口)一台监视器、HDMI 接口显示器或液晶大屏一台蓝或绿色箱体/布景一个三基色或LED灯光(3200K或5600K 色温)若干(主持人面光、顶光、背景光等)2. 软件运行环境操作系统:windows10 Pro 64bitBIOS 配置如下:1、BIOS 设置:启用核显。
开机按Del 进入BIOS,按F7 进入高级设置,找到Advanced\System Agent (SA) Configuration\Graphics Configuration 。
设置Primary Display=PCIE ;iGPU Multi-Monitor=Enabled。
见下图2、BIOS 设置:更改启动类型(防止板卡驱动不识别)** 进入 BOOT 页签,如下图:* *进入S E C U R E 页签,如下图:* *更改O S T Y P E类型为o t h e r o s如下图:操作系统配置如下:1、激活windows操作系统2、关闭windows update** 打开操作系统的设备管理器** 点击“服务”** 找到 windows update 2.4 点击“停止”** 选择“禁用”** 确定,关闭页面。
全新安装大洋POSTPACK V 3.1.05.25非编软件

全新安装大洋POSTPACK V 3.1.05.25非编软件游动的山2013.04.30“全新安装”特指从未安装过大洋POSTPACK V 3.1.05.25非编软件的平台进行软件安装的过程。
请严格遵从以下操作步骤:一、准备工作1、以Administrator用户登陆到Windows7系统,关闭杀毒软件和电脑管家。
2、安装好SQL Server 2008数据库。
3、安装好最新版本的DirectX。
4、安装好PostPack应用环境程序:Setup-xp.msi、Setup1.msi 、Setup2.msi5、使用createdir.bat在E盘创建了Clip文件夹。
二、正式安装大洋POSTPACK V 3.1.05.25非编软件1、在Install_v3.1.05.25_3D_for_50i安装目录下Disk1里右键点击Setup.exe选择“以管理员身份运行”,经过短暂的等待后进入欢迎界面。
2、选择安装过程中显示告示板。
3、在安装类型的选择界面中,请选择“自定义安装”选项,点击“NEXT”进行下一步安装。
4、在“应用程序类型”的选择界面中,选中大洋系统程序,选中安装数据库,选择完之后,点击“NEXT”进行下一步安装。
5、在安装路径的选择界面中,请保持默认安装路径C:\DaYang,点击“下一步”。
6、一定要按照图示选择“安装加密狗”。
7、一定要保持默认的“DaYang”作为程序组文件夹名称。
8、数据库类型选择界面中,请选择默认的“基础数据库”选项。
9、选择“是”,安装一组全新数据库或覆盖已有同名的数据库文件。
10、开始安装,如果前面选择了自动创建数据库,安装完毕,数据库会自动创建完成。
全部安装大约需要8-12分钟时间,此期间请不要进行其它操作,耐心等待。
11、安装加密狗驱动。
12、选择“complete”进行完全安装。
13、点击Install,开始加密狗驱动安装。
14、点击Finish,完成加密狗驱动安装。
Z311S Wireless Motion Sensor 说明书

型号:Z311S Wireless Motion SensorWireless Motion Sensor说明书适用Firmware:V1.0适用Hardware:V0.1-V1.1目录一、声明 (3)二、实物外观 (3)三、简介 (4)四、产品特性 (5)五、操作说明(ZigBee控制部分) (5)1.上电 (5)2.Power on和power off模式 (5)3.加网 (5)4.自动与CIE匹配和登记 (6)5.触发 (6)6.产品Active状态 (7)7.恢复出厂设置 (8)8.低电压检测和告警功能 (8)9.heart beat功能 (8)10.指定CIE的功能 (8)11.设备睡眠功能 (8)12.ZigBee描述 (9)六、相关产品 (10)七、安装方法(四光束红外对射入侵探测器) (10)1型号及部件名称 (11)2.设置注意事项 (12)3.设置方法 (13)4.光轴调束 (14)5.遮光时间调整 (15)6.异常时的查找 (16)7.技术参数 (17)8.安装支架和实物外型尺寸 (17)9.红外对射受光器与ZigBee控制器的连接 (18)八、维护与保养 (18)一、声明在未经大洋事先书面许可的情况下,严禁以任何形式复制、传递、分发和存储本文档中的任何内容。
大洋遵循持续发展的策略。
因此,大洋保留在不预先通知的情况下,对本文档中描述的任何产品进行修改和改进的权利。
在任何情况下,大洋均不对任何数据或收入方面的损失,或任何特殊、偶然、附带或间接损失承担责任,无论该损失由何种原因引起。
本文档的内容按“现状”提供。
除非适用的法律另有规定,否则不对本文档的准确性、可靠性和内容做出任何类型的、明确或默许的保证,其中包括但不限于对适销性和对具体用途的适用性的保证。
大洋保留在不预先通知的情况下随时修订或收回本文档的权利。
二、实物外观三、简介NETVOX 的Z311S (Motion Sensor )在网络中作为终端设备(End device)使用,不允许其他设备做为其子设备。
大洋传感器 DYN-200 动态扭矩传感器 说明书
DYN-200动态扭矩传感器更为适用于组装入机器设备的小型设计——推进扭矩自动化管理的高速非接触式扭矩传感器采用大洋传感器独特检测方式的旋转式扭矩传感器DYN-200请于使用前务必详细阅读该说明书防止因操作不当造成传感器损坏阅读该说明书大约占用您6分钟该产品已取得发明专利该产品已取得外观实用新型专利该产品已审批《安徽省新产品》称号1.没有电刷等接触部分不需要定期维护和更换零件。
2.传感器自带OLED显示,分辨率为128*64。
3.实现了1/10000以上的分度,优秀的零点稳定性微小扭矩也能实现高精度测量。
4.启动扭矩非常小,只有0.00001Nm,从静态测量到高转速下的扭矩测量,均可实现精确测量。
5.支持RS485通信,支持主动上传协议,通信速率可达每秒500次或1000次。
6.无需外接电路,直接输出标准电压电流或RS485通信连接PLC或扭矩转速专用仪表。
产品参数产品自重产品尺寸1.键槽安装扭矩传感器,键槽连接如果掉落的话,会造成损坏和人员受伤,请采取安装防止脱落的销子等措施。
确认键槽无损伤并且牢固装配进扭矩传感器。
2.本产品的安装方法本产品可以在水平或垂直方向使用。
另外,线缆的方向没有限制。
向其他装置安装本产品时,请托住本产品的框体,防止框体转动,可选配底座。
产品安装①旋转轴驱动部分驱动部分的旋转轴,连接以键连接。
②液晶显示屏实时显示在测量时实时显示扭矩转速功率③框体传感器的主体部分,通过旋转固定孔以固定传感器。
④插头使用德国进口镀金防水插头,连接电源及信号线蚌埠大洋传感系统工程有限公司400-0552-91111。
安装和操作手册

NAVIGATOR R/C800帆船安装和操作手册警告信息由于船的速度和体积,一旦碰撞发生,很有可能会造成财产的损坏和严重的个人伤害。
请永远不要在游泳者面前或有可能与人或财物发生碰撞的地方让船行驶。
NAVIGATOR R/C800帆船由无线电信号控制,这种信号易受其它R/C发射机、传呼系统或其它电子噪声的干扰。
在打开你的发射机之前,确保在这个区域没有别的其他人在同一个频率(通道)操作发射机。
如果购买者不准备接受与这件产品使用相关的责任,建议购买者立即在模型崭新和未使用的条件下将其退回到购买处。
基本参数:船长:800mm船高:1520mm净重:1400g(50oz)帆面积:0.24cm2船体材料:全手工制作玻璃钢桅杆:高强度铝合金帆:涤纶纤维布]建议配置:1、2CH遥控器,接收机2、4节3AA镍氢电池3、标准舵机4、S3801收索机或S5801强力舵机(当然可以使用同样性能的舵机)注:船体内已按上述两款舵机预留安装位置感谢你购买BLUEARROW NAVIGATOR R/C800帆船。
我们可以理解当你拿到这条全新的无论是外表美观还是航行性能都是如此出色的R/C船模时是如何的激动和迫切想开始安装的心情。
但是在你试图开始操作你的模型之前,请你务必花一点时间仔细、完整地阅读一下操作指南。
这本手册包括了你安全装配、操作和维护你的遥控帆船的指导。
保证书BLUEARROW承诺在购买NAVIGATOR B/C800帆船之后90天内出现任何材料或人工制作上的损坏都给予赔偿。
BLUEARROW将免费进行维修或替换不合适的部分。
请一定要保留好你在经销商处购买模型时的收据或发票。
它是你购买的证据,我们必须在兑现保证之前看到。
出于任何理由,假如你认为这个模型不适合你,你可以立即把它退回到本地的经销商。
但是请注意:你的经销商是不会接受一个已经开始安装了的模型的退回。
修理服务修理服务在任何时间都是可以的。
在90天的保质期之后,你仍然可以通过支付一部分维修费使你的NAVIGATOR B/C800帆船得到经BLUEARROW授权的维修部门或寄予你购买的销售商,由他们转交我们的专家的进行维修。
大洋D3非编快速入门手册【直接下载打印】

D3-Edit快速入门手册关于本手册本手册适用于北京中科大洋科技发展股份有限公司的D3-Edit系列非线性编辑产品,如D3-Edit8000、D3-Edit6000、D3-Edit5000、D3-Ddit2000等。
第一章准备工作1.1 进入操作系统首先确认系统主机以及显示器已经正常连接电源。
请在连接电源之前务必确认当地电压与本产品包装以及机箱上的标称一致,否则会造成硬件毁坏;如果对此不确定,请联系系统管理员或其他专业人员。
在连接好电源后,按下主机前面板上的开关按钮。
如果系统能够正常运转,则显示器开始有字符显示,并开始开机自检过程。
经过短暂等待后,自动进入Windows 操作系统。
通常用户无需输入Windows的登录用户名和密码。
用户可在使用中自行设置登录Windows的用户名和密码,具体操作请参考WINDOWS操作手册或询问系统管理员。
本处所提到的Windows操作系统泛指Windows 2000或Windows XP。
1.2 连接视音频信号视音频的后期剪辑制作是一项系统工程,单单只用一台非线性编辑工作站无法完成视音频上载,监看回放和最后成片输出的工作。
要完成所有这些工作,就需要将非线性编辑系统与录像机,监视器等周边设备连接起来。
本节是针对D3-Edit专门说明视音频连接方法的,如果使用D3-Edit或其他无卡工作站,可以跳过此节不看。
D3-Edit提供齐全的视音频接口类型,可以兼容各种模拟或数字录像机。
为简单起见,在此以复合视频和模拟音频为例,讲解典型连线方式。
如果要了解所有信号连接方式,请参阅《D3-Edit系统安装手册》中的相关内容。
为了方便后续的工作,在此强烈建议连接422遥控线,即上图中红色箭头所标。
以便非编进行遥控上载和输出。
在实际工作中会有体会,这样能够大大提高工作效率。
1.3 首次启动D3-Edit软件双击桌面的D-Cube-Edit快捷图标,启动D3-Edit系统。
在“用户名”处输入“Administrator-DV”,然后单击“确定”即可进入D3-Edit系统。
海洋大陆及海洋大陆PLUS112型号电灯泡安装说明说明书
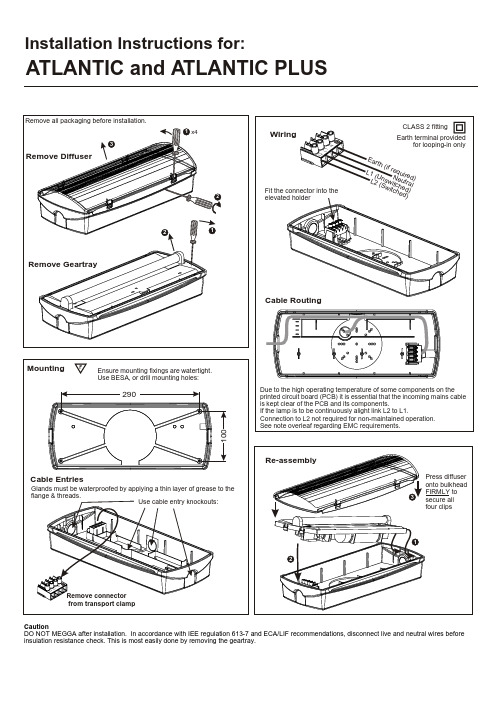
Installation Instructions for:ATLANTIC and ATLANTIC PLUSCautionDO NOT MEGGA after installation. In accordance with IEE regulation 613-7 and ECA/LIF recommendations, disconnect live and neutral wires before insulation resistance check. This is most easily done by removing the geartray.Mounting:f the product needs to meet IP65, use M20 cable glands se gasket for BESA mounting. Apply a thin layer of silicone grease to seal and insert into groove. Ensure mounting fixings & glands are waterproof.Drill out cable entry, screw bulkhead into position.Only use plastic cable glands. (M20 or PG16)WiringConnect the mains electrical supply: Not required (Earth T erminal Continuity Only)N Neutral L1Unswitched Live L2Switched LiveT Refit the geartray into the bulkhead and refit the diffuserNOTES: Due to the heat generating characteristics of the PCB components it is essential that when connecting the incoming mains cable to the luminaire the cable is kept clear of the PCB and its components.For continuous operation link terminals L1 & L2, the supply for self contained luminaires must be taken from the unswitched local light source. For maintained operation the supply must be taken from the same unswitched supply.Additional Notes On Installation For Electromagnetic CompatibilityThe intended use of this product is to supply rated illumination for its specified duration in the event of a failure of the mains supply. During normal mains healthy conditions its batteries are charged and in the case of maintained units the lamp may be operated from the 'L2' mains supply. When used as intended this product complies with EMC Directive (89/336/EEC) and the UK EMC regulations 1992 (SI 2372/1992) by meeting the limits set by the standards BS5406 Pt.s 2+3 1988, EN61547 1996 and EN55015 1992. The following installation guidelines must be followed:1:External cables must be connected using the cable entries or knockouts provided.2: When routing external cables inside the product they must be: a) kept as short as possible. b) routed close to the housing.c) kept as far as possible from the electronics.Any modifications other than those in the main installation leaflet, or any other use of the product may cause interference and is the responsibility of the user, who should ensure compliance with the EMC and Low Voltage Directives.Rated lumen outputRated minimum luminaire output in emergency mode in accordance with EN 60598-2-22.AT l uminaires: 70 l umens. ATP l uminaires: 180 l umens.These values are provided to permit checking of correct operation, determination of the lighting level on an escape route can only be made with full photometric data.Mount the bulkhead on a flat and solid surface, i for 7.5-10mm cable or 9.5-13.2 mm cable, u Take the connector out of the transport clamp and connect the wiring.he outer sleeve of the cable inside the luminaire should be completelyThe batteries are not charged at delivery.Date of CommissioningDate to be filled in on space provided on battery label by either installer or commissioning engineer.Battery ReplacementPerformance of the luminaire is dependent on the use of the correct type of high temperature nickel-cadmium battery.Battery life may be impaired if the luminaire is mounted in an ambient temperature of greater than 25°C. Store the luminaire or battery between 0°C and 25°C. Replace with high temperature nickel-cadmium battery to the manufacturer's recommended part number. Connect the red lead to + positive, the black lead to — negative. Take care not to damage the sleeving. The battery should be replaced when the rated duration is no longer achieved. Warning: When disposing of battery do not pierce, incinerate or short circuit. The battery contains cadmium and should therefore be disposed of in accordance with recognized disposal methods.Testing:The unit should be connected to an unswitched live supply which should be connected to the normal lighting sub-circuit in its location. The LEDindication should then be checked to ensure that it is illuminated which indicates that the batteries are charging. For maintained versions only check that the lamp illuminates when the switched live is turned ON.A short discharge should be performed to check that the units are operating correctly . This is done by interrupting the unswitched supply at the distribution board or by isolating the appropriate unswitched supply sub-circuit.The supply should then be restored and the LED indication checked.The testing regime as defined in BS 5266 should then be implemented. This is currently monthly as an operational test, twice annually extended tests for a third of the rated duration and after 3 years and subsequently annually a full rated discharge test. If any tests are not performed satisfactorily they should be repeated after a full 24 hour re-charge period.Cooper Lighting and Security LtdWheatley Hall Road, Doncaster, South Y orkshire, DN2 4NB, United Kingdom SalesTel: +44 (0)1302 303303Fax: +44 (0)1302 367155Email:*******************General+44 (0)1302 321541+44 (0)1302 303220***********************Major Projects London +44 (0)1992 787999+44 (0)1992 787222********************Export+44 (0)1302 303250+44 (0)1302 303251******************** Cooper Lighting and SecurityLIGHTING。
皮划艇组装操作方法步骤

皮划艇组装操作方法步骤
1. 准备工具和材料:组装皮划艇需要的工具包括扳手、螺丝刀、橡胶锤等,材料包括皮划艇主体、桨、座椅等部件。
2. 将皮划艇主体放置在平整的地面上,确保没有任何障碍物。
3. 根据说明书或图纸,先组装皮划艇的底座部分。
使用螺丝刀和扳手将底座部分与主体连接。
4. 组装好底座后,再组装桨和座椅等附件部件,确保连接牢固。
5. 检查皮划艇的所有连接部位,确保没有松动或缺失的部件。
6. 如有需要,进行最后的调整和检查,确保皮划艇组装完好并符合要求。
7. 完成组装后,进行一次简单的测试,确保皮划艇可以正常使用。
大洋eStudio金时全能机V20-使用手册

大洋金时全能机系统(简称eStudio)V2.0使用手册北京中科大洋科技发展股份有限公司2017年7月目录使用手册 (1)一、软件各个功能模块使用介绍 (4)1、监看区 (4)2、信号源监看区介绍 (4)二、切换区 (10)1、切换方式 (10)2、切换特技 (10)3、DSK(下游键) (11)三、播出单及播出控制 (14)1、资源管理器 (14)2、DDR本地素材播放器的使用 (14)3、CG 字幕的使用方法 (17)4、图文 (18)5、PPT的使用方法 (19)四、混和特技(M/E) (20)1、多视窗混合特效 (21)2、真三维虚拟演播室 (23)五、网络直播 (28)六、多通道录制 (28)七、热点功能操作介绍(注:热点功能只能在抠像下进行) (29)八、PTZ功能操作介绍 (32)九、外置切换台 (35)前言全能机是广电行业诞生发展了近十年的产品。
近几年,这种集演播室多通道信号导播切换、硬盘录制、虚拟、字幕、调音、编辑、流媒体发布等多种功能于一体的产品应用显著增长。
随着广电行业的新媒体转型,一机多能的全能机在节省资金人力、简化使用连接、方便移动录播、适应多种场景等方面表现出超卓的产品优势。
因而,全能机已经日益成为地市级广电、校园电视台、网络视频直播、个行业电教用户广泛使用的主流设备。
然而,全能机对硬件平台的技术先进性与软件视音频技术能力的要求都很高。
所以,尽管国内有多家企业打造了多年,仍然不能形成与国外同类产品抗衡的能力。
全能机的绝大部分市场份额始终被国外品牌垄断。
大洋公司是广电业内唯一一家拥有多年广播级视音频硬件和软件两方面研发、生产能力的企业。
大洋自主研发的视音频板卡——虹桥卡已经到了第六代,其核心的技术元素已经同步与世界顶尖水平。
大洋自主研发的多通道硬盘录、播出、虚拟演播室、字幕、非编、流媒体发布等产品已经在国内树立了主流、专业的品牌形象。
在这样的市场背景下,大洋公司在其第六代虹桥卡FPGA平台基础上,整合积累多年的软件模块,打造出了具备多通道导播切换、多路IP信号导播切换、多通道同步录制、播出、真三维虚拟演播室、字幕、图文包装、非编、调音台、流媒体发布等多种功能于一体的真正全能机产品——大洋金时全能机系统eStudio。
大洋eStudio金时全能机V2.0_发布说明
eStudio大洋金时全能机系统V2.0版本发布说明发布时间:2017年7月11日一、新增功能特性:1、热点识别+简单宏命令:通过识别画面中人物手势变化来触发执行某项功能。
例如挥挥手播放视频、切换播放内容、播字幕等等。
2、支持PTZ摄像机:通过网络或485协议,可控制4台云台摄像机推、拉、摇、移、zoom、色温等操作,支持4 *8机位预制位快速取景。
可用于教学录播、会议、活动等;后续会逐步实现自动跟踪录课。
3、增加音乐播放功能:可用于播放背景音乐;4、支持慢动作:可将录好的视频做成慢动作播出,也可以制作成慢动作集锦编单播出。
5、与第三方4G传输产品LiveU做对接:可在全能机中登录LiveU账号,实时查看账号下绑定设备及设备状态,一键开启直播,无需登录网页管理后台。
6、支持扩展屏多画面监看:通过HDMI外接显示器或液晶电视即可实现多画面监看。
可用于桌面监看也可以导播间上电视墙做信号源监看。
7、支持主屏和扩展屏布局切换、显示信号源切换;8、预制DSK画中画开窗模板:预制常用的上下左右居中6种画中画布局;9、增加DSK 主画面和窗口画面一键切换。
10、摄像机预监窗口无信号提示:图像提示未连接摄像机信号;11、增加推流时码显示;12、增加私有云服务:可实现通过局域网实现手机直播,推流信号不需要走公有云,省去云平台的成本。
13、支持从资源管理器拖拽到播出单。
二、解决问题:1.调音台支持ddr调音、ddr监听;2.ddr播出单中支持素材复制、粘贴;(用于同一条素材设置不用入出点)3.多视窗支持从模板库调入模板;4.检测PowerPoint是否安装5.滚屏内容显示不全和空格增多的问题6.推流信号输出卡顿7.减小动态缓存的内存占用8.过渡特技可能不正确的问题9.DDR拖拽或添加新条目时进度条可能为更新三、兼容性:1. 可以支持大洋非编的字幕(水晶包装除外)、字幕机模板,但需要安装选配的desinger软件做转存操作重新生成工程文件即可。
D-Cube-Edit_3_系统安装手册

前言
本手册作为 D -Edit 3 高标清非线性编辑系统的组成部分,所有高清非编整机出货产品
D-Cube-Edit 3 系统安装手册 3 / 36
3
北京中科大洋科技发展股份有限公司
桌面产品部
均配备此系统安装手册。本手册指导您如何正确安装和卸载 D -Edit 3 软件。 本手册的安装方法基于 D -Edit v3.2.1.2 for 50i 版本软件编写,适用于所有使用和 安装 D -Edit v3.2.1.2 for 50i 版本软件的 D -Edit 3 高标清非线性编辑系统。 感谢您使用大洋 D -Edit 3 高标清非线性编辑系统!
完成初稿
(A-添加,M-修改,D-删除)
D-Cube-Edit 3 系统安装手册 2 / 36
北京中科大洋科技发展股份有限公司
桌面产品部
目录
前言 .................................................................................................................................................. 3 第一部分 开机检测....................................................................................................................... 5 第二部分 D3-Edit 3 软件安装说明............................................................................................... 7 一.软件安装前的准备工作 ................................................................................................... 7 二.全新安装 D3-Edit 3 软件.................................................................................................. 7 第 1 步 运行软件安装程序 ............................................................................................. 7 第 2 步 选择安装过程中是否显示告示板 ..................................................................... 8 第 3 步 选择安装类型 ..................................................................................................... 8 第 4 步 选择安装路径 ..................................................................................................... 9 第 5 步 选择需要安装的应用程序 ................................................................................. 9 第 6 步 确定安装加密狗驱动 ....................................................................................... 10 第 7 步 选择程序组文件夹名称 ................................................................................... 10 第 8 步 安装 Post Pack 软件包程序 ........................................................................... 11 第 9 步 安装加密狗驱动 ............................................................................................... 11 第 10 步 安装 SQL Server 2008 .................................................................................. 14 第 11 步 安装软件的初始库文件 ................................................................................. 15 第 12 步 安装完成 ......................................................................................................... 16 三.D3-Edit 3 软件升级安装说明......................................................................................... 17 第 1 步 升级板卡驱动 ................................................................................................... 17 第 2 步 卸载旧版本软件 ............................................................................................... 17 第 3 步 修改 SQL Server 2008 设置 ........................................................................... 18 第 4 步 备份原有库文件 ............................................................................................... 27 第 5 步 安装新版本软件 ............................................................................................... 27 四.首次启动 D3-Edit 3 软件................................................................................................ 28 第 1 步 配置系统参数 ................................................................................................... 28 第 2 步 启动软件 ........................................................................................................... 29 附录 1 :基础程序的安装 ............................................................................................................ 30 第一节 DirectX 的安装与版本查看 ................................................................................... 30 1.1 安装 DirectX ............................................................................................................ 30 1.2 DirectX 版本查看 ..................................................................................................... 30 第二节 安装 Setup1 启动程序............................................................................................ 31 附录 2:RedBridge Ⅲ板卡安装 .................................................................................................. 32 第一节 新驱动安装说明 ..................................................................................................... 32 第二节 驱动版本查看及升级说明 ..................................................................................... 36
大洋非编系统操作使用培训教程
大洋非编系统操作使用培训教程1.登陆及退出非编系统1.1.登陆及退出系统大洋D3-Edit非编是一个基于用户管理的系统。
要登录D3-Edit,必须知道自己的用户名和密码。
如果没有特别的设定,系统在出厂时会自动分配一个用户名。
双击桌面的快捷方式图标,启动D3-Edit。
如果这是您首次启动D3-Edit,系统会自动帮你填好用户名,此时直接点击“确定”即可进入系统;如果您的系统管理员已经为您分配了专有的用户名,则需要输入正确的用户名和密码,点击确定,即可进入非编系统。
由于不同的用户在非编系统中可能拥有不同的操作和素材使用权限,因此在编辑过程中我们可能需要切换到其他用户,使用另一个用户名登录。
这时可从系统菜单中选择“重登陆”,保存好当前制作的故事板,在新的登陆窗中输入正确的用户名、密码,点击确定即可。
当我们需要退出非编系统时,可以单击界面右上角“关闭”按钮,也可选择文件菜单中的“退出”命令行,在弹出的提示窗中确认退出。
1.2.系统设置工具D3-Edit是一个多制式、多分辨率的编辑平台,允许用户设定并启用高、标清不同的编辑环境。
在不同环境下,板卡的工作模式、回显窗模式以及视频的像素处理都会截然不同。
高、标清环境的设置是在独立的“系统设置工具”中完成的,除非您使用默认的PAL制或者1080/50i高清制式,否则在首次登陆D3-Edit软件前,建议使用系统设置工具对您的编辑环境进行设置。
我们可以从“开始/程序/DAYANG/系统工具”中打开“系统设置工具”。
♦当您要进行PAL制标清节目制作时,视频画面比例和XCG画面比例全部设置为“4:3”,同时勾选上“PAL”制。
♦当您要进行1080/50i高清节目制作时,需要将视频画面比例和XCG画面比例全部设置为“16:9”,同时勾选上“HD 1080i25”和“HDV”。
点击“确定”后,以上设置即可生效。
这种设定只需要在首次登陆软件前进行一次,再次登陆无需重新设定,除非您想变更当前编辑制式。
DAURIC-Live Graphics II系统安装指南
DAURIC™
金典演播室图文包装系统
DAURIC-Live Graphics 系统安装指南
2012-11-25
第 1 页,共 73 页
DAURIC-Live Graphics 系统安装............................................................................................................................... 3 前言 .................................................................................................................................................. 4 关于本手册............................................................................................................................... 4 产品配件清单........................................................................................................................... 4 主机箱前面板功能................................................................................................................... 5 主机箱后面板接口................................................................................................................... 5 第一章 系统安装前的准备工作 ........................................................................................... 8 1.1 硬件检查及连线 ....................................................................................................... 8 1.2 开机登陆WIN 7 系统 .............................................................................................. 10 1.3 安装前软件确认 ..................................................................................................... 10 第二章 RedBridgeIII板卡安装 ............................................................................................. 11 第三章 SQL Server2008 Express安装 .................................................................................. 13 第四章 DAURIC软件安装 .................................................................................................... 22 第五章 数据库数据表及预制文件安装 ............................................................................. 35 5.1 database&template安装......................................................................................... 35 5.2 3ds模型安装 ........................................................................................................... 38 5.3 Demo安装 ............................................................................................................... 41 第六章 数据路径配置 ......................................................................................................... 44 6.1 数据库配置............................................................................................................. 44 6.2 用户管理配置 ......................................................................................................... 45 6.3 网络管理配置 ......................................................................................................... 46 第七章 启动DAURIC系统的各个软件模块 ........................................................................ 54 第八章 工作路径设置 ......................................................................................................... 56 第九章 卸载DAURIC系列软件 ............................................................................................ 57 附录一 RedBridgeIII板卡使用说明 ............................................................................................... 58 1.1 板卡设置................................................................................................................. 58 1.1.1 General ............................................................................................................ 58 1.1.2 Mixer Control .................................................................................................. 63 1.1.3 DualPlay ........................................................................................................... 65 1.1.4 Advance ........................................................................................................... 66 1.1.5 About ............................................................................................................... 68 1.2 更新firmware说明 .................................................................................................. 69 附录二 手动安装数据库 ............................................................................................................... 70 附录三 产品型号安装说明表 ....................................................................................................... 73
海洋平台工程安装方案

海洋平台工程安装方案一、前言海洋平台工程是指在海洋上开发和建设的一种工程项目,通常是用来进行海上石油、天然气、风能等能源资源的开发利用,也包括海洋科研、观测、旅游等领域。
海洋平台工程的安装是整个工程项目中最为关键且复杂的环节,需要经过严密的计划和精准的执行。
本方案对海洋平台工程的安装过程进行了详细的规划和设计,包括工程前期准备、安装方案制定、安装过程控制等内容。
通过全面的考虑和科学的安排,确保海洋平台工程的安装过程顺利、高效、安全。
二、工程前期准备1. 确定安装地点海洋平台工程的安装地点是整个工程的首要考虑因素。
需要进行综合考虑,包括海洋环境、地质条件、海底地形、水深、潮流等因素,选择合适的安装地点。
2. 海洋勘测在确定了安装地点后,需要进行海洋勘测,对海底地形、地质条件、水文环境等进行详细的调查和分析,为后续的安装工作提供准确的数据支持。
3. 安装设备采购根据工程需求,采购符合要求的安装设备和工具,包括起重设备、钢丝绳、安装船只等。
4. 安装人员选派针对海洋平台工程的特殊性,需要对安装人员进行专门的培训和选拔,确保其具备足够的技能和经验,能够应对复杂的海洋环境和安装条件。
5. 安全管理措施在工程前期准备阶段,要对安全管理进行详细规划,包括安装过程中可能出现的风险和应急预案,确保安装过程中的安全和稳定。
三、安装方案制定1. 安装工艺流程在海洋平台工程的安装过程中,通常分为海上组装、海上吊装和固定安装三个阶段。
要制定详细的工艺流程,包括安装的先后顺序、设备的使用方法、各个环节的质量控制点等。
2. 安装设备调试在进行实际的安装前,要对各项安装设备进行详细的检查和调试,确保其性能和质量符合要求。
3. 安装方案评审制定完安装方案后,需要进行评审和审核,对方案进行专业的评估和分析,确保其科学合理。
四、安装过程控制1. 安装现场管理在实际的安装过程中,需要对现场进行严格的管理,包括工作人员的携带物品、安全带使用情况、现场秩序等,确保安装过程中的秩序和安全。
Soundwork-快速入门手册

北京中科大洋科技发展股份有限公司
广电产品部
修改记录:
版本
1.1
日期
2012 年 9 月 29 日
AMD
A
说明
A 添加界面布局、音频处理 保存故事版、输出素材项 A 完成快速入门手册初稿。
1.0
2012 年 2 月 2 日
A
(A-添加,M-修改,D-删除)
版权说明
关于本手册的版权归属 本技术文档所有权利归北京中科大洋科技发展股份有限公司所有。 未经北京中科大洋科 技发展股份有限公司的书面许可, 任何其他个人或组织均不得以任何形式将本文档的详细数 据和说明转载、复制、编辑或发布使用于其他任何场合;也不得把其中任何形式的资讯散发 给其他方。 非本公司的, 其他第三方不可把这些信息在其他的服务器或文档中作镜像复制或 保存。 凡有意转载或使用本文档信息资料都属于违法行为, 中科大洋科技发展股份有限公司 有权追究其法律责任。 北京中科大洋科技发展股份有限公司
未经北京中科大洋科技发展股份有限公司的书面许可任何其他个人或组织均不得以任何形式将本文档的详细数据和说明转载复制编辑或发布使用于其他任何场合
大洋 Post Pack 系列手册
D3-Soundwork 2 快速入门手册
(v1.2)
二〇一二年九月 北京中科大洋科技发展股份有限公司 Dayang Technology Development Inc
D3-Soundwork 2 快速入门手册
北京中科大洋科技发展股份有限公司
广电产品部
目录
D -Soundwork 2 快速入门手册...................................................................................
大洋牌GPU-6.5HE 10HE 電熱水器產品說明書说明书

GPU-6.5HE GPU-10HE注意 ATTENTION !安裝此熱水器時,必須依照第6-7頁的「重要注意事項」及「安裝注意事項」。
*When installing this water heater, please observe WARNING and INSTALLATION REQUIREMENTS listed on P.6-7.! 特別注意! ATTENTION!!重要注意事項WARNING!儲水式電熱水器安裝並進行通水通電測試後,如果不是繼續使用,而是先擱置一段時間後再使用,測試完畢必需進行以下程序:After initial installation and water and electricity testings, if the storage water heater will not be put to use immediately, after testing is completed, make sure to follow these instructions:!!安裝注意事項INSTALLATION REQUIREMENT 1. 將電熱水器斷電斷水;2. 將電熱水器內測試的水排清;3. 當存放後需要正常使用前,必需將電熱水器 注滿水並確定滿水後,才可以通電加熱,進 入正常使用。
1. Disconnect water and power source to the water heater;2. Completely drain the residual water in the water heater;3. When the water heater is finally put to normal use, user MUST first completely fill up the water heater with water BEFORE reconnecting the power source and commencing heating.注意:對於水源是地下水以及(有可能海水倒灌的)河水地區的使用者,必需嚴格遵照上列程序,以確保熱水器正常運作。
全能机外置切换台使用说明

全能机外置控制面板使用手册北京中科大洋科技发展股份有限公司2017年7月版本说明目录一、产品简介 (4)二、主要流程 (4)三、切换台操作区域介绍 (4)四、安装、操作流程 (5)五、导播切换的使用方法: (9)六、外置控制面板尺寸图 (10)一、产品简介产品名称:大洋全能机外置切换台产品型号:ES-Switcher本产品通过USB或RS422与金时全能机主机进行控制通讯,支持双母线切换,快切、特技自动切、T杆切换方式。
支持DSK和字幕上下键,DDR、PPT、CG、图文播单播出控制。
支持真三维虚拟演播室的虚拟机位切换、轨迹、特技、摇臂等控制功能,以及对4路外来信号、网络、本地和PGM通道的调音功能。
可替代键鼠操作模式。
面板为水晶按键、RGB三色灯,金属面板、通讯接口USB、422,具有独立供电接口。
可嵌入桌面使用。
尺寸:长*宽*高(mm)415*173*高(最大53,最小35);桌面嵌入安装开口尺寸:长*宽*高(mm)383*146*40二、主要流程步骤1——先将切换台随机带的USB连接线与全能机连接。
步骤2——安装切换台驱动。
步骤3——在设备管理器下查看COM端口号。
步骤4——在全能机设置菜单下选择串口设置,选择相对应的COM端口。
步骤4——开始使用三、切换台操作区域介绍四、安装、操作流程1.将切换台USB线与全能机的USB2.0或3.0连接。
(如图)连线可使用USB2.0或3.0接口都可以。
远距离控制可以使用切换台上的422连接,注意采用此422连接要使用外接电源适配器供电。
2.打开“安装包下的\ftdi_ft232_drive文件夹”,点击打开“ft232r usb”文件夹,找到“CDM v2.08.30 WHQL Certified”安装程序。
(如图)3.点击“CDM v2.08.30 WHQL Certified”安装程序,安装切换台驱动。
(如图)4.在设备管理器下查看COM端口号。
(如下图本例为COM3)5.启动大洋全能机软件,在“设置”菜单下选择串口设置,选择相对应的COM端口。
Garmin Livescope Plus LVS34 艉舷安装套件安装说明说明书

LIVESCOPE™ PLUS LVS34 艉舷安装套件安装说明重要安全信息为避免可能的人身伤害,务必始终在钻孔、切割或研磨时戴上防护眼镜、护耳用具和防尘面具。
注意钻孔或切割时,请始终检查表面反面的情况以避免船舶受损。
该设备应该由合格的海事安装人员安装。
为获得最佳性能并避免损坏船只,您必须按照这些说明安装 Garmin®设备。
请阅读所有安装说明,然后继续安装。
如果您在安装时遇到困难,请联系 Garmin 产品支持。
操作注意事项了解周围环境并确保船只安全运行。
注意为了避免可能损坏换能器、支架和艉舷,您应该在浅水中或在未知深度或水下障碍物的区域缓慢操作您的船只。
艉舷安装支架并非设计成在撞击时脱落,撞击水下物体可能会损坏换能器、支架和船只的艉舷。
因撞击水下物体而对换能器、支架或船只造成的损坏不在保修范围之内。
当以高于 19 公里/小时(12 英里/小时)的速度操作时,换能器的性能受到限制,底部回波减弱,深度信息和警报可能不会针对潜在的浅层区域发出警告。
当换能器以较高的速度运行时,由于换能器在水中受到的阻力,可能会对船只的运行产生显著影响:•船只的最高速度可能低于未安装换能器时的航速。
•船只的转向可能会拉向安装换能器的一侧。
•船只的艉舷可能会在安装换能器的一侧升起。
软件更新在安装本设备时,您必须更新 Garmin 海图仪软件。
有关更新软件的说明,请访问并查看您的海图仪的用户手册。
安装支持视频安装此设备时,您可以在线观看视频以获得帮助。
您可以通过访问 Web 浏览器中的/videos/lvs34或使用智能手机扫描此二维码查看此视频。
所需工具•钻机和钻头•17 毫米(5/8英寸)扳手•具有 17 毫米(5/8英寸)套筒的扭力扳手•封口胶带• 2 号十字螺丝刀•海事密封剂安装注意事项•不得将换能器安装在推进器的路径上。
•对于装有舷外和船尾驱动发动机的船只,您应将换能器安装在推进器下行冲程的一侧,通常在右舷。
- 1、下载文档前请自行甄别文档内容的完整性,平台不提供额外的编辑、内容补充、找答案等附加服务。
- 2、"仅部分预览"的文档,不可在线预览部分如存在完整性等问题,可反馈申请退款(可完整预览的文档不适用该条件!)。
- 3、如文档侵犯您的权益,请联系客服反馈,我们会尽快为您处理(人工客服工作时间:9:00-18:30)。
10.选择"典型"默认安装目录后点"下一步"
11.选择"对每个服务使用同一账户.自动启动SQL Server服务",再选择"使用本地系统账户"点"下一步"
12.选择"混合模式"再选择"空密码"点"下一步",再点"下一步"后点击"完成"
13.点"开始/程序/MiБайду номын сангаасrosoft SQL Server/服务管理器",选中"当启动OS时自动启动服务",再点"开始/继续"按钮,完成SQL2000安装和启动.
3.点"安装SQL Server 2000组件"
4.点"安装数据库服务器"
5.点"下一步",选择"本地计算机"后,点下一步.选择"创建新的SQL Server实例,或安装客户端工具"后点"下一步.
6.姓名USER,公司为空.点"下一步"
7.协议选"是"
8.选择"服务器和客户端工具"后,点击"下一步"
5.默认用户名sa,密码空,点"下一步",安装自动完成.
重要注意:安装大洋D3-EDIT时,选择加密狗时端口时,一定要选择USB DogDriver,为以后破解准备.
破解步骤:
1.安装D3-EDIT后,安装"大洋升级文件"
2.升级完成后,双击Crack文件夹中的SPLlicensPro.exe
大洋D3-EDIT安装.
1.双击setup.exe,选择"自定义安装"
2.勾选"大洋系统程序""安装数据库""基础程序"点"下一步"
3.勾选"基础数据库"后点"下一步"再选择"user2(DV25)"后点"下一步"
4.MDAC2.8,Directx9.0,Adobe acrobat6.0均可不勾选.点"下一步"
注意:大洋非编只能安装在C盘,安装在其它盘可能会不好使。大洋非编需要SQL2000支持,请先安装SQL数据库程序。
SQL2000安装具体步骤:
1.安装SQL2000,必须先将SQL2000文件夹复制到硬盘安装,否则安装中途会光盘写入出错,从而中止安装.
2.双击AUTORUN.EXE,选择"安装SQL Server 2000简体中文开发版"
3.锁类型:"SuperPro" 预置数据:"北京中科大洋科技发展有限公司"
4.点击"安装"即可破解.
5.不行的话,点击下方的"卸载",重新再来。