霍尼韦尔视频监控 简易操作手册
霍尼韦尔楼宇自控操作说明_杭州
霍尼韦尔楼宇自控操作说明_杭州霍尼韦尔楼宇自控操作说明一、操作前须知本操作说明适用于霍尼韦尔楼宇自控系统的使用。
在操作前,请确保已经熟悉楼宇自控系统的基本功能和操作步骤,并且具备一定的电脑操作和网络使用知识。
同时,确保已经安装并正确连接了相关设备。
以下是具体的操作步骤。
二、登录系统1. 打开电脑,在桌面上找到楼宇自控系统的图标,双击打开系统页面。
2. 输入用户名和密码,点击“登录”按钮进入系统。
如果是首次登录,建议修改初始密码并妥善保管。
3. 系统登录成功后,进入系统主界面,可以看到各个功能模块的快捷入口。
三、楼宇设备监控1. 在系统主界面上,点击“设备监控”模块,进入设备监控页面。
2. 在设备监控页面,可以查看各个楼宇设备的实时状态和运行情况。
可以根据需要选择某一特定设备进行监控。
3. 鼠标点击相应设备,可以进一步查看设备的详细信息,包括设备运行状态、温度、湿度等参数。
四、楼宇能耗管理1. 在系统主界面上,点击“能耗管理”模块,进入能耗管理页面。
2. 在能耗管理页面,可以查看各个楼宇的能耗情况和节能效果。
可以根据需要选择某一特定楼宇进行查看。
3. 可以通过设置定时计划,管理设备的运行时间和能耗水平。
合理利用定时计划功能,可以有效降低能耗。
五、楼宇安防监控1. 在系统主界面上,点击“安防监控”模块,进入安防监控页面。
2. 在安防监控页面,可以查看楼宇各个区域的监控画面。
可以根据需要选择某一特定区域进行查看。
3. 可以设置安防设备的参数和功能,如报警触发条件、布防时间等。
在必要时,系统会自动触发警报,并通过手机等方式发送通知。
六、楼宇环境控制1. 在系统主界面上,点击“环境控制”模块,进入环境控制页面。
2. 在环境控制页面,可以对楼宇的温度、湿度等参数进行调节和控制。
可以根据需要选择某一特定区域进行控制。
3. 可以设置定时计划,自动控制空调、加湿器等设备的运行。
也可以手动调节设备的运行状态。
七、数据分析和报表1. 在系统主界面上,点击“数据分析”模块,进入数据分析页面。
honeywell面板操作手册

Dsadddddddddddd DsadaDsadaDsadadSadadsa DsadadaDsada键盘操作1.用户登录当用户需要操作矩阵时,首先要做的就是登录矩阵键盘。
按键盘上“29”(Login登录),输入ID(默认为1),按“17”(Ent确认键),输入密码(默认为0),按“17”(Ent确认键)。
此时已经登录到了矩阵键盘的操作界面,现在可以进行相应的操作。
2.摄像机切换操作操作员已经登录后,可以通过按下所需的模式功能键来更改运行模式。
Login (Logout)(登录(注销))Camera(摄像机)Monitor(监视器)先选择监视器,再选择摄像机。
当处于 "Camera"(摄像机)模式时,按下数字小键盘上的相应数字,然后按 Enter(回车)键来选择摄像机值。
所选择的摄像机值被切换为当前选择的监视器。
可使用“11键”(下一个)和“7键”(上一个)键在系统里各种摄像机之间前后移动,还可使用“23号键”旋转前后切换摄像机。
3.监视器切换操作当处于 " Monitor "(监视器)模式时,按下数字小键盘上的相应数字,然后按 Enter (回车)键来选择监视器值。
如果在该输入键后按下数字键、清除或后退,则在按下监视器键(输入监视器模式)后控制器将自动返回到摄像机模式下。
4.摄像机预置位定义和调用存储预置位如果 PTZ 装置配备了反馈系统,则可以存储并调用 PTZ 预设位置。
如要存储一个位置,则移动 PTZ 直至覆盖所需的镜头。
按下“9号键”或“Set5号键”,使用数字小键盘输入所需的预设编号,然后按下 "Enter"(回车)键来存储该编号的位置。
调用预置位如要调用先前存储的位置,则按下 "View13号键"按钮,使用数字小键盘输入所需的预设编号,然后按下 "Enter"(回车)键来调用预设项。
视频监控系统说明书

2012-5-20登录与退出双击桌面上的“客户端”图标或在“开始”菜单打开所有程序 Honeywell 霍尼韦尔安防集成平台 客户端 客户端。
打开客户端,显示如下登录画面:客户端登录界面输入正确的用户名和密码、选择站点名。
点击【确定】进入主界面:要退出客户端,选择菜单用户 退出或点击客户端主窗口右上角“”按钮实时视频管理在主界面的功能标签导航栏上点击“实时视频”标签页。
在“实时视频”标签页工作区中,可查看实时图像以及对设备进行设置。
“实时视频实时视频主界面设备导航右键菜单播放视频右键单击某个设备组或其子项中的视频通道,选择“播放视频”,则在视频窗口只放该设备组下的视频对象,选中根目录时不播放其子设备组中的视频对象。
右键单击个视频对象选择“播放视频”,则在当前指定视频窗口播放该视频图像。
拖拽视频鼠标左键点击右侧设备导航中的某个视频对象,直接拖拉到左侧某一个视频播放窗,则该路视频将在该窗口播放。
查找视频设备导航支持视频项的模糊查找功能。
在设备导航顶部的文本框里面输入需要查找频对象的信息,点击右边的“”开始查找。
支持循环查找,输入查找串后,多次点击“”,等同于查找下一个。
如果存在符条件的视频对象,则该路视频被标记为绿色,否则弹出窗口提示没有查找结果。
图5-21 视频查找实时监控实时监控主界面如下所示视频操作窗口间视频的拖拉交换:左键点击某一个视频窗口,并按住鼠标,将其拖动到另一个窗口,则这两个窗口间的视频将交换位置;从设备导航到播放窗口的视频拖拽:在设备导航上左键点击某一个视频对象,并按住鼠标,将其拖动到另一个窗口,则该视频对象将在该窗口播放;单窗口的全屏播放:左键双击任一个窗口,将只显示该窗口,同时隐藏其它的窗口;再次双击将复位。
多窗口的全屏播放:右键单击任一个窗口,选择“全屏”,则所有窗口视频将全屏播放;全屏以后,点击任一个窗口,选择“退出全屏”,将恢复正常的现实模式。
右键单击视频窗口区,出现如下视频操作菜单:菜单项功能描述参考下表(设备类型不同,可操作的菜单选项也会有所区别):视频播放窗口右键菜单主菜单功能属性设置提供视频参数、视频质量、字符叠加、DVR本地录像控制、OSD设置等相关参数设置。
霍尼韦尔 WEBs-N4 监控器 产品说明书
® U.S. Registered TrademarkCopyright © 2020 Honeywell Inc. • All Rights Reserved31-00263-02PRODUCT DEFINITIONThe WEBs-N4 Supervisor is part of the portfolio of Java-based controller/ server products, software applications and tools powered by the Niagara Framework®. Itprovides server-level functions for a network of WEBs, CIPer and other field device clients. The WEBs-N4 Supervisor serves real-time graphical information to standard web-browser clients and performs other functions like centralized data logging/trending, archiving to external databases, alarming,dashboarding, system navigation, master scheduling, database management and integration with other enterprise software applications through an XML interface (oBIX standard). It also provides acomprehensive graphical engineering toolset for application development.KEY FEATURES• Centralized system management• Utilize tags to quickly navigate to buildings, systems and equipment when diagnosing operational problems or emergencies • Compare data between buildings• Export system data to external databases • Integrate BAS to other enterprise applications • Integrate to other applications, such as work order management, analytics, etc. • Single tool used to program WEB and Edge controllers and Supervisor • Remotely back up WEB and Edge applications to Supervisor • Batch provisioning of WEB-8000 and CIPer Model 10 firmware upgrades, security credentials, applications, and commissioning options from Supervisor • Robust built-in analytic capabilities supported by standard Niagara components and visualizations • Includes Niagara Analytics, which features data source, functional and mathematical programming blocks that enable sophisticated analytic algorithms • Compatibility with WEBs Enterprise Security access control and security application. Allows integration of BAS and access control to save energy and optimize operations • Eligible for accreditation under the Federal Risk Management Framework (RMF) • FIPS 140-2 Level 1 conformance availableThe WEBs Niagara Supervisor allows the networking of multiple Niagara- based controllers like WEB-8000 and CIPer Model 10, CIPer Model 30 and CIPer Model 50. It enables the design, configuration and maintenance of a unified, real-time controls network.SPECIFICATIONSHTML5 and Java-enabled user interface (UI); JavaScript data interface library included (BajaScript)Supports an unlimited number of users over theinternet/intranet with a standard web browser (depending on the host PC resources)Optional enterprise-level data archival using SQL,MySQL or Oracle databases, and HTTP/HTML/ XML, CSV or text formats“Audit Trail” of database changes, database storage and backup, global time functions, calendar, centralscheduling, control and energy management routines Sophisticated alarm processing and routing, including email alarm acknowledgingAccess to alarms, logs, graphics, schedules and configuration data with a standard web browserNiagara follows industry best practices for cyber security, with support for features such as strong, hashed passwords, TLS for secure communications and certificate management tools for authentication. A built-in Security Dashboard provides a comprehensive and actionable view of the security posture of your Niagara deploymentHTML-based help system that includes comprehensive online system documentationSupports multiple Niagara-based stations connected to a local Ethernet network or the internetProvides online/offline use of the Niagara Framework® Workbench graphical configuration tool and a comprehensive Java Object LibraryOptional direct Ethernet-based driver support for most Open IP field bus protocols (see supported drivers document )WEBs-N4 SUPERVISOR – PRODUCT DATA31-00263-02 2SOFTWARE & DRIVERSEvery WEBs-N4 Supervisor comes with a Niagara 4 software license, along with multiple open-protocol IP drivers that are compatible with standard control networks. If required, other drivers can be purchase separately. For an up-to-date list of supported drivers, contact customer support.SOFTWARE MAINTENANCEPurchase of a Software Maintenance Agreement (SMA) is required with initial WEBs-N4 Supervisor licensing. The initial SMA is for 18 months, with extended agreements of 3 years and 5 years available for discounted rates. If a Software Maintenance Agreement is not in effect for any period, the price of maintenance for the next period for which it is purchased will be priced at a cost equal to the maintenance fee for the period(s) for whichmaintenance was not purchased, up to a maximum of 5 years, plus the maintenance fee for the next year.ORDERING INFORMATIONPart numberDescriptionWEB-S-0-N4 No Niagara network connections – Devices only. (18mo SMA required)SUP-0-SMA-INIT 18mo initial SMA required (3YR or 5YR can be substituted) WEB-S -1-N4 1 Niagara network connection* (18mo SMA required)SUP-1-SMA-INIT 18mo initial SMA required (3YR or 5YR can be substituted) WEB-S-2-N4 2 Niagara network connections* (18mo SMA required) SUP-2-SMA-INIT 18mo initial SMA required (3YR or 5YR can be substituted) WEB-S-3-N4 3 Niagara network connections* (18mo SMA required) SUP-3-SMA-INIT 18mo initial SMA required (3YR or 5YR can be substituted) WEB-S-10-N4 10 Niagara network connections* (18mo SMA required) SUP-10-SMA-INIT 18mo initial SMA required (3YR or 5YR can be substituted) WEB-S-100-N4 100 Niagara network connections* (18mo SMA required) SUP-100-SMA-INIT 18mo initial SMA required (3YR or 5YR can be substituted) WEB-S-UNL-N4 Unlimited Niagara network connections* (18mo SMA required) SUP-UNL-SMA-INIT 18mo initial SMA required (3YR or 5YR can be substituted) WEB-S-DEMO-N4 Niagara 4 Supervisor demoSUP-UP-1 Adds one additional Niagara connection to Supervisor SUP-UP-100Upgrades small Supervisor to 100 Niagara connectionsWEBs-N4 SUPERVISOR – PRODUCT DATA3 31-00263-02Part numberDescriptionSUP-UP-UNL Upgrades Supervisor 100 to unlimited Niagara connections SUP-DEVICE-10 10 device upgrade (standard drivers included) SUP-DEVICE-25 25 device upgrade (standard drivers included) SUP-DEVICE-50 50 device upgrade (standard drivers included) SUP-DEVICE-100 100 device upgrade (standard drivers included) SUP-DEVICE-200 200 device upgrade (standard drivers included) SUP-DEVICE-500 500 device upgrade (standard drivers included) SUP-DEVICE-1000 1000 device upgrade (standard drivers included)SUP-STATION-5UP Allows running multiple stations with 1 Niagara licenseEach instance of the part purchased increases the limit by 5 stations SP-S-FIPSProvides FIPS 140-2 Level 1 conformance for 4.6 and later SUP-[0-UNL]-SMA-[1,3,5]YRSupervisor [0-UNL] Maintenance – [1,3,5] YR extensions*CIPer Model 10 and the CIPer Model 30 with a 150 points or less based capacity license now count as a 1/10 of a standard Niagara Network connectionCOMPATIBILITYIn any given WEBs Niagara system, the WEBs-N4 Supervisor must be running the highest version of any WEBs-N4 instance in the architecture.When connecting to WEBs controllers that are running older versions of WEBs-N4, these compatibility guidelines apply:• WEBs-AX: WEBs-N4 Supervisors can connect to WEBs JACE running WEBs-AX versions 3.8 and higher.• R2: WEBs-N4 Supervisors can connect to WEBs JACE running R2 through the oBIX XML interface only.PLATFORM REQUIREMENTS FOR NIAGARA SUPERVISORWEBs-N4 Supervisors may run acceptably on lower-rated platforms, or may even require more powerful platforms,depending on the application, number of data points integrated, data poll rate, number of concurrent users, performance expectations, etc.• Processor: Intel® Xeon® CPU E5-2640 x64 (or better), compatible with dual- and quad-core processors• Operating System:o Windows 10 (64-bit) o Windows Server 2016 o Windows Server 2019o Red Hat Enterprise Linux 7.7/8.1 (64-bit)• Mobile operating system: iOS 12, iOS 13, Android 8 Oreo, Android 9 Pie, Android 10.0WEBs-N4 SUPERVISOR – PRODUCT DATAThe material in this document is for information purposes only. The content and the product described are subject to change without notice. Honeywell makes no representations or warranties with respect to this document. In no event shall Honeywell be liable for technical or editorial omissions or mistakes in this document, nor shall it be liable for any damages, direct or incidental, arising out of or related to the use of this document. No part of this document may be reproduced in any form or by any means without prior written permission from Honeywell.Honeywell Building Technologies1985 Douglas DriveGolden Valley MWFor more information:Honeywell Building Controls© 2020 Honeywell, Inc. 31-00263-02 |Rev. 07-21•Browser: Chrome, Firefox, Microsoft Edge•Mobile Browser: Safari on iOS, Chrome on Android•Database: MySQL 5.7, 8.0, 9.0; Oracle Express 11g; Oracle 12, 18, 19c; MSSQL 2012, 2016, 2017, 2019•Memory: 6 GB minimum, 8 GB or more recommended for larger systems•Hard Drive: 4 GB minimum, 10 GB recommended for any Supervisor•Display: Video card and monitor capable of displaying 1024 x 768-pixel resolution, 1080p (1920 x 1080) minimum resolution recommended•Network Support: Ethernet adapter (10/100 Mb with RJ-45 connector), 100 Mbit or 1 Gbit NIC(network interface card) with TCP/IP•Connectivity: Full-time high-speed ISP connection recommended for remote site access (i.e., T1, ADSL, cable modem) and IPv6 compliantPlatform requirements for older versions of WEBs Supervisors are included in the release notes for each particular version.。
霍尼韦尔矩阵VIDEOGUI操作手册
霍尼韦尔矩阵VIDEOGUI操作手册视频矩阵图形用户接口VideoGUI用户手册版本 1.01 – 22 July 19991. 概述 (3)2. 操作环境需求 (3)2.1.硬件需求 (3)2.2.软件要求 (3)3. 安装 (3)3.1.取得系统解锁密码 (4)3.2.设置操作参数 (4)4. 用户操作 (4)4.1.启动程序 (4)4.2.选择输出监视器 (4)4.3.选择摄像机视频输入 (4)4.4.控制云台摄像机 (4)4.5.控制VCR (5)4.6.控制矩阵 (5)4.7.打开新的显示区域/关闭显示区域 (5)4.8.打开/关闭显示站点 (5)4.9.设置操作参数 (5)5. 配置 (5)5.1.进入配置模式 (5)5.2.添加位图、媒体文件和图标 (5)5.3.修改图标参数 (6)5.4.添加区域 (6)5.5.添加站点 (6)1. 概述Betatech VideoGUI 软件可以让您在PC上以图形界面控制Betatech VideoBloX矩阵。
为适用不同的需求可以设置多种不同的显示。
2. 操作环境需求2.1. 硬件需求安装VideoGUI软件的PC硬件要求如下:2.2. 软件要求PC 上必须装有32位Windows操作系统,可以是 Windows 95, Windows 98 或者 Windows NT。
对于有多个GUI 工作站的系统,需通过网络操作,所以需要安装TCP/IP协议,网络系统同时需要Betatech CCTV Server 软件包。
软件可以适用不同的图形格式:.BMP、.WMF、Windows 增强媒体格式,最简单的作图工具是Windows本身附带的画笔工具,其他象Corel Photo Paint 或 Photo Express都可以用。
软件采用Paradox 7 数据库格式储存视区和站点的数据,进一步的数据库工作需要使用相应的数据库工具。
3. 安装在光驱里放入光盘,运行VideoGUI子目录中的“Setup.exe” 程序,若使用软盘装在软件,安装方法一样,只是要注意更换软盘。
霍尼韦尔HD-DVR 4.0 SC manual Rev F数字硬盘录像机操作手册
honeywell dvr说明书
.3 .
DVR 使用手册
第一章 技术指标及主要功能特性 1.1 技术指标
.4 .
.5 .
DVR 使用手册
1.2 产品主要功能特性
.6 .
第二章 硬盘录像机安装使用前期操作手册
第六章 串口操作 -------------------------------------------------------44 6.1 串口的连接与扩展方法-------------------------------------------44 6.1.1 控制键盘-------------------------------------------------44 6.1.2 矩阵连接-------------------------------------------------44
H 本手册适用于 Honeywell HD-4DVR,HD-8DVR 和 HD-16DVR H 此使用手册所有操作说明均以 HD-16DVR 产品离高温热源或场所; 1.2 避免阳光直接照射; 1.3 勿放在潮湿的场所; 1.4 录像机应水平安装; 1 .5 避免安装在剧烈震动的场所; 1.6 勿将其他设备放置于录像机上面; 1.7 录像机应安装在通风良好的场所,切勿堵塞设备的通风口。
第二章 硬盘录像机安装使用前期操作手册 ----------------------------------7 2.1 检查拆开包装的硬盘录像机 ---------------------------------------7 2.1.1 开箱检查 -------------------------------------------------7 2.1.2 有关前面板及后面板 ---------------------------------------7 2.1.3 打开机箱盖后应该检查 -------------------------------------7 2.2 硬盘录像机安装注意事项 -----------------------------------------7 2.2.1 安装硬盘 -------------------------------------------------7 2.2.2 外部电源的连接--------------------------------------------8 2.2.3 在机柜中安装硬盘录像机------------------------------------8 2.3 音视频输入输出连接 ---------------------------------------------9 2.3.1 视频输入的连接--------------------------------------------9 2.3.2 音频信号的输入--------------------------------------------9 2.3.3 视频输出设备的选择和连接----------------------------------9 2.3.4 音频输出-------------------------------------------------10 2.4 报警输入输出设备的连接-----------------------------------------10 2.4.1 报警输入端口说明-----------------------------------------11 2.4.2 报警输出端口说明-----------------------------------------11 2.4.3 报警输出端继电器参数-------------------------------------11 2.5 云台的连接 ----------------------------------------------------14 2.6 录像方式的选择和配置-------------------------------------------15 2.7 网络连接 ------------------------------------------------------15
Honeywell 室内半球摄像机使用手册
霍尼韦尔1902快速入门指南
霍尼韦尔1902快速入门指南霍尼韦尔是一家领先的全球高科技企业,提供了广泛的产品和解决方案,包括航空航天、建筑、化学、电子、能源等多个领域。
霍尼韦尔1902是一款集成了多项先进技术和功能的智能监控系统,本文将为您介绍霍尼韦尔1902系统的快速入门指南。
第一步:安装系统首先,确保你已经购买了霍尼韦尔1902系统,并且你已经具备了安装所需的硬件设备和软件。
接下来,按照霍尼韦尔提供的安装指南,使用提供的安装工具和材料,将系统安装到你想要监控的区域。
第二步:设置网络连接在完成系统安装后,你需要设置网络连接以确保系统正常工作。
将系统连接到可用的网络端口,并根据系统指南中提供的步骤,对系统进行网络配置。
这将包括为系统分配IP地址、设置网关和DNS服务器等。
第三步:配置系统参数一旦系统与网络连接成功,你需要配置系统参数以满足你的监控需求。
通过连接系统的终端设备,登录系统管理界面。
根据系统指南,使用提供的配置工具和页面设置系统的基本参数,如时间日期、地理位置、用户权限等。
第四步:添加监控设备在完成系统参数配置后,你需要添加监控设备到系统中。
这些设备可以包括摄像头、传感器、警报器等。
根据设备的型号和接口类型,选择正确的设备添加方式,并按照系统指南中提供的步骤进行连接和配置。
第五步:设置监控规则和警报第六步:查看和管理监控一旦你完成了所有的配置和设置,你可以通过系统管理界面查看和管理监控。
这包括实时监控视频、查看历史记录、导出报告等功能。
系统还提供了一些高级功能,如远程监控、云存储、智能分析等,你可以根据需要进一步配置和使用这些功能。
总结:霍尼韦尔1902是一款功能强大的智能监控系统,通过本文提供的快速入门指南,你可以快速掌握系统的安装、配置和使用方法。
但是请注意,由于系统功能和配置的复杂性,你可能需要进一步学习和了解系统,以便更有效地使用系统的各种功能和特性。
建议你参考系统提供的用户手册、在线文档和技术支持,以便更好地理解和使用霍尼韦尔1902系统。
霍尼韦尔HONEYWELL手机软件用户使用手册CAWDViewmanual

镜头
目录
设备
9
弹出添加目录、设备、镜头菜单选项 搜索本地镜头
修改连接参数
点击 图标,选择”修改连接参数”选项,进入“修改设备”对话框:
A)点击 图标,返回设备管理列表; B)点击 图标,保存当前配置;
修改名称
点击 对话框:
图标,选择”修改名称”选项,弹出“修改名称”或者“修改目录”
10
A)点击“确定”按钮,保存当前配置; B)点击“取消”按钮,取消修改
此功能!
找回密码
在登录界面中,点击“找回密码”按钮,跳转至“找回密码”界面:
22
输入用户名,点击“找回密码”按钮,如果所输入的用户名存在,并且用户 在注册时输入了邮箱地址,则会发送密码信息至邮箱地址。
如果忘记了邮箱地址,在输入用户名后,可以点击“找回邮箱”按钮,查看 邮箱地址。
2.2 实时预览
主菜单中,点击“实时预览”,进入实时预览界面后,再点击“收藏”图标, 可以跳转至“收藏夹”界面:
26
图标说明: 图标
返回主菜单
功能说明
点击弹出修改参数、名称等菜单选项
镜头
目录
27
设备 弹出添加目录、设备、镜头菜单选项 搜索本地镜头
修改连接参数
点击 图标,选择“修改连接参数”选项,进入“修改设备”对话框:
28
A)点击 图标,返回设备管理列表; B)点击 图标,保存当前配置;
修改名称
删除
点击 图标,选择”删除”选项,直接删除当前设备(目录或者镜头)。
添加目录
点击 图标,选择”添加目录”选项,弹出“添加目录”对话框:
A)点击“确定”按钮,保存当前配置,设备管理列表中显示当前添加的目录; B)点击“取消”按钮,取消目录添加
Honeywell HRXD DVR用户指南说明书
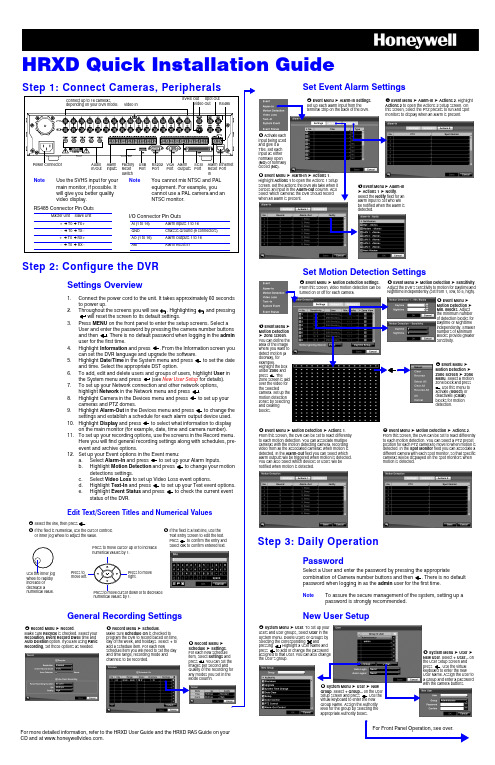
HRXD Quick Installation GuideFor Front Panel Operation, see over.For more detailed information, refer to the HRXD User Guide and the HRXD RAS Guide on your CD and at .Throughout the screens you will see . Highlighting and pressingwill reset the screen to its default settings.General Recording Settingsis checked to program the DVR to record based on time, day of the week, and holidays. Select + to # Record Menu ➤ Set Event Alarm SettingsSet Motion Detection SettingsStep 3: Daily OperationPasswordSelect a User and enter the password by pressing the appropriatepassword when logging in as the admin user for the first time.NoteTo assure the secure management of the system, setting up a password is strongly recommended.New User Setup! Event Menu ➤ Alarm-In Settings .Set up each alarm input from theterminal strip on the back of the DVR." Activate eachinput being used and give it a Title. Set each input as either normally open (NO ) or normally closed (NC ).# Event Menu ➤ Alarm-In ➤ Actions 1.Highlight Actions 1 to open the Actions 1 setup screen. Set the actions the DVR will take when it senses an input in the Alarm-Out column. Also select which cameras the DVR should record when an alarm is present.$ Event Menu ➤ Alarm-In➤ Actions 1 ➤ Notify .Select the Notify field for an alarm input to set who will be notified when the alarm is detected.% Event Menu ➤ Alarm-In ➤ Actions 2. HighlightActions 2 to open the Actions 2 setup screen. On this screen, select the PTZ presets to run and spot monitors to display when an alarm is present.➤ Sensitivity . # Event Menu ➤Motion Detection ➤ Min. Blocks . Adjust the minimum number of detection blocks for Daytime or Nighttime independently. Smaller numbers of Minimum Blocks provide greater sensitivity.$ Event Menu ➤Motion Detection ➤ Zone screen . You can define the area of the image where you want to detect motion (a doorway, for example).Zone screen is laid camera. Set up the zones by selecting %Event Menu ➤Motion Detection ➤ Zone Screen ➤ Zone Menu . Select a motion zone block and press Select ) or Clear ) & Event Menu ➤ Motion Detection ➤ Actions 1.From this screen, the DVR can be set to react differently to each motion detection. You can associate multiple cameras with the motion detecting camera, recording video from all the associated cameras when motion is detected. In the Alarm-Out field you can select which alarm outputs will be triggered when motion is detected. You can also select which devices or users will be notified when motion is detected.' Event Menu ➤ Motion Detection ➤ Actions 2. From this screen, the DVR can be set to react differently to each motion detection. You can select a PTZ preset position for each PTZ camera to move to when motion is detected. In the Spot Monitor field you can associate a different camera with each spot monitor, so that specific cameras will be displayed on the spot monitors when motion is detected.! System Menu ➤ User users and user groups, select System menu. Delete Users or Groups by selecting the corresponding andpressing . Highlight a User Name and assigned to that User. You can also change the User’s group."New User the User setup screen and press keyboard to enter the new User Name. Assign the User to a Group and enter a password with the camera buttons.System Menu ➤ User ➤ New. Select + Group... on the User setup screen and press . Use the virtual keyboard to enter the new Group Name. Assign the Authority level for the group by selecting the appropriate Authority boxes.HRXD Quick Installation Guide+TV (North America only)************************Specifications subject to change without notice.Imperial conversions are approximate.© 2007 Honeywell International Inc.Document 800-00280 – Rev A – 05/07to open the Search menu. Pick a search method to find an incident with:Date and Time Search1.Move the cursor over the date/time and press2.Move Left or Right to highlight the date/time value to change.e the Up and Down buttons to change the date/time value to the date/time that you want to search through.4.Once you have set the date and time you want, press5.Highlight6.The selected time and date will display. If no video was recorded in that time, a7.Use the playback controls to search through the video.Calendar SearchEvent Log SearchMotion SearchCopy Evidence to a CDClip-Copy ScreenReviewing Video ClipsYou do not need to install any special software on your personal computer to review the video clips. The copied video clips contain the Clip Player program.1.If you used a USB storage device, disconnect it from the DVR andconnect it to your PC. If you used a recordable CD, insert the CD into your computer’s CD drive.2.The Clip Player screen displays the clip images. Use the Clip Playercontrols to view the video.1.Days with recorded video display in white.2.3. A time bar displays at the bottom of the calendar. Hours with video recorded are highlighted orange.4.Select the time bar and select the time to search.5.If there is more than one video stream in the same time range, move to Select a Segment and select the video stream you want to search.6.Highlight Go 7.The selected time and date will display. Use the playback controls to search through the video.1.The DVR maintains a log of each time an Event occurs. The Event Log Search screen displays this list.2.Highlight the event that you want to view.3.image of the event.4.Press Search to return to live monitoring.5.You can narrow your event search by selecting Option... and setting up a new search condition. See the User Guide for more information.1.The Motion Search screen allows you to search for motion activity that occurred within the area of a configurable zone of interest.e the arrow buttons to highlight the event for which you want to view video and press3.The first image of the associated event video displays in the small search screen in the left pane of the screen.4.To view and play back the video in full screen, highlight Close5.You can narrow your event search by selecting Option... and setting up a new search condition. See the User Guide for more information.The Clip-Copy screen can be used to copy video clips to an internal CD-RW, or external USB drive.1.In Search mode, press and hold MENU for 2seconds to open the Clip-Copy screen.2.The Data Source (Record or Archive) isdisplayed.3.Set the start and stop times and dates.4.Select the cameras to include in your video clip.5.If necessary, enter a password that will have tobe entered when reviewing the video clips.6.In the box beside Dest., select the storagedevice you would like to record the video clip onto.7.Change the default File name , if necessary.8.Select Start Exits the Player programGo forward one framePlay the video clipGo back one framePlay in fast reverseGo to the beginning of the clipPlay in fast forwardGo to the end of the clipShow the previous pageCycle through screen layoutsShow the next pageSelect from Save, Print, Info, Image Processing and Video FormatSelect from Normal and Double screen viewsDisplay image full screen。
霍尼韦尔 视掉网络摄像机 HD55IP 说明书
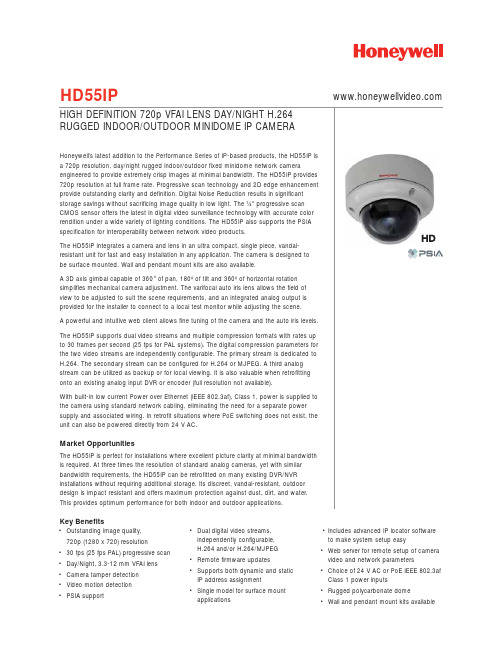
HD55IPKey Benefits•Outstanding image quality,720p (1280 x 720) resolution•30 fps (25 fps PAL) progressive scan •Day/Night, 3.3-12 mm VFAI lens •Camera tamper detection•Video motion detection•PSIA support •Dual digital video streams,independently configurable,H.264 and/or H.264/MJPEG•Remote firmware updates•Supports both dynamic and staticIP address assignment•Single model for surface mountapplications•Includes advanced IP locator softwareto make system setup easy•Web server for remote setup of cameravideo and network parameters•Choice of 24 V AC or PoE IEEE 802.3afClass 1 power inputs•Rugged polycarbonate dome•Wall and pendant mount kits availableSPECIFICATIONSLike all cameras in the Performance Series, the HD55IP network camera uses Honeywell technology for camera video motion detection, tamper detection, remote firmware updating and for secure storage of all camera settings. Video motion detection recognizes object motion within the field of view; then a simple on-screen notification alerts the user. Camera tamper detection notifies the user when a camera’s field of view is altered, blinded, or blurred. This ensures the video’s integrity and alerts the customer to either a live event or a system problem that is causing disruption to the video stream. Honeywell’s technology also allows users to remotely upload firmware to the camera. Setup is quick and easy and can be customized through a web client or from an NVR or DVR. The built-in web server provides password-protected access to the camera’s video and network setup.System DiagramSPECIFICATIONS*Actual bitrate is scene and motion dependent.SPECIFICATIONSAutomation and Control Solutions Honeywell Systems2700 Blankenbaker Pkwy, Suite 150Louisville, KY NOTE:Honeywell reserves the right, without notification, to make changes in product design or specifications.L/HD55IPD/D December 2012© 2011 Honeywell International Inc.HD4CHIP-PK Pendant MountHD4CHIP-WK Wall Mount。
HUS 网络视频录像服务器用户手册

i
Honeywell
1 前言
适用范围
本手册介绍霍尼韦尔数字安防集成平台 HUS 中的重要组件—网络视频录像服务器 (HUS-NVR)的功能、安装以及操作等信息,能帮助您快速了解并学会使用该产品。 本手册适用于 HUS 4.1.0 版本。
章节概述
本手册包含以下章节: 第一章:前言 《霍尼韦尔数字安防集成平台 HUS 网络视频录像服务器用户手册》概述。 第二章:产品简介 介绍霍尼韦尔数字安防集成平台 HUS 系统以及 HUS-NVR 网络视频录像服理工具中配置 HUS-NVR 网络视频录像服务器以及启动其服务。 第四章:功能介绍 介绍 HUS-NVR 网络视频录像服务器的详细功能说明和相关操作。
霍尼韦尔数字安防集成平台 HUS
网络视频录像服务器 用户手册
Honeywell
目录
1 前言 ............................................................................................................................ 1 适用范围 .................................................................................................................... 1 章节概述 .................................................................................................................... 1 特殊字体和符号说明 .................................................................................................. 2 使用说明 .................................................................................................................... 2 2 产品简介 ..................................................................................................................... 3 系统概述 .................................................................................................................... 3 产品特性 .................................................................................................................... 4 系统要求 .................................................................................................................... 5 软件要求 ................................................................................................................. 5 3 启动和配置服务 .......................................................................................................... 6 配置数据管理中心 ...................................................................................................... 6 配置视频流媒体服务 .................................................................................................. 9 配置 HUS-NVR 网络视频录像服务器服务属性 ....................................................... 9 配置视频流媒体服务 ............................................................................................. 12 时间同步服务 ........................................................................................................... 14 开启时间同步服务 ................................................................................................ 15 配置时间同步服务 ................................................................................................ 17 4 功能介绍 ................................................................................................................... 21 视频转发 .................................................................................................................. 21 视频存储 .................................................................................................................. 21 历史视频回放 ........................................................................................................... 23 视频文件下载 ........................................................................................................... 24 动态同步 .................................................................................................................. 24 预录 ......................................................................................................................... 25 设备重连 .................................................................................................................. 25 视频文件循环覆盖 .................................................................................................... 26 录像状态恢复 ........................................................................................................... 27 录像自动回导 ........................................................................................................... 27 视频分析 .................................................................................................................. 27
霍尼韦尔视频监控简易操作手册
霍尼韦尔视频监控简易操作⼿册视频监控系统使⽤⼿册1客户端1.1概述客户端集成了实时视频监控、历史视频回放、电⼦地图的编辑浏览以及对配置数据的管理功能。
⽤于对视频监控系统的集中和统⼀管理以及通过地图显⽰⽅式实现设备信息及报警事件的综合管理。
1.2登陆、退出1.2.1登录和管理站点双击桌⾯上的“客户端”图标或在“开始”菜单打开所有程序Honeywell HUS 客户端。
打开客户端,显⽰如下登录画⾯:输⼊⽤户名和密码。
点击【确定】开始加载数据,如下图所⽰:加载完成后,进⼊主界⾯1.2.2退出要退出客户端,有两种⽅式:在菜单栏选择⽤户退出。
点击客户端主界⾯右上⾓按钮。
1.3客户端主界⾯介绍客户端主界⾯如下:在客户端主界⾯“⼯作区”左侧“系统设备”⼦菜单⾥,能看到设备分类。
分别有“16屏视频”“诺⾦酒店”“谭阁美酒店”“⾸旅出租区”“系统设备”。
1.4本地实时视频播放选择“⼯具栏”最上⾯的图标选择“本地”切换到本地播放。
⼀窗⼝四窗⼝六窗⼝⼀当“显⽰模式”设置为“本地”时显⽰这些窗⼝布局选项。
点击六窗⼝⼆相应的按钮选择视频窗⼝布局。
⼋窗⼝九窗⼝⼗六窗⼝环绕视频把“系统设备”⾥⾯对应的摄像机拖动到窗⼝⾥⾯,就可以观看了。
1.5⼤屏实时视频播放1.5.1选择“⼯具栏”最上⾯的图标选择“⼤屏”切换到⼤屏播放。
选择“⼯具栏”图标选择对应的,“⼤屏布局”⽤⼤屏中间拼接屏播放视频选择“⼯具栏”布局对应“窗⼝布局”,拖动所需摄像机,到所对应的窗⼝,则对应的显⽰屏上显⽰出相应的图像。
1.6本地视频历史回放和下载1.6.1选择“功能标签导航栏”对应的“历史视频”⼀项根据条件进⾏查找历史录像播放历史视频按照如下两种⽅式中的⼀种播放历史视频:右键点击历史视频查询结果中的⼀条记录并选择“播放”或者直接双击该条记录。
选中查找到的历史视频,拖拽到⼀个视频播放窗⼝。
可在历史视频窗⼝进⾏相关播放窗⼝操作以及时间轴操作。
历史视频播放窗⼝操作在历史视频播放窗⼝,使⽤右键菜单可拍摄快照、全屏显⽰和停⽌视频,如下图所⽰:1.6.2也可以在“系统设备”⾥“诺⾦酒店”“谭阁美酒店”“⾸旅出租区”这⼏⼦项⾥对应摄像机上点击右键,点击“历史视频”也会切换到“历史视频”界⾯,这时直接选择时间段就可以查找到这个摄像机的历史视频了。
Honeywell 30 系列 摄像头产品说明书
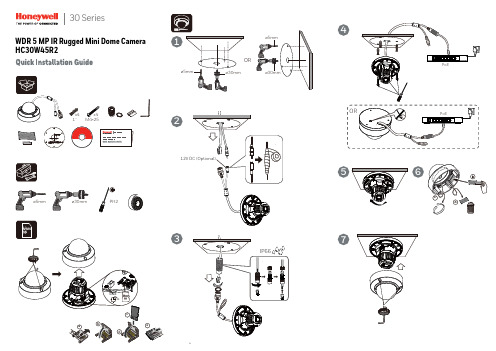
4756Logging On to the CameraIf logging on the camera remotely from a PC, install the Honeywell Config Tool from the software and documentation CD, find the camera on the network, and then open the web browser with the Honeywell Config Tool. The default user name is admin (case-sensitive) and the default password is 1234.Adjusting the Zoom and Focus Settings+1 800 323 4576 (North America only)© 2019 Honeywell International Inc. All rights reserved. No part of this publication may be reproduced by any means without written permission from Honeywell. The information in this publication is believed to be accurate in all respects. However, Honeywell cannot assumeresponsibility for any consequences resulting from the use thereof. The information contained herein is subject to change without notice. Revisions or new editions to this publication may be issued to incorporate such changes. For patent information, see /patent ./securityHoneywellAfter you have logged on to the camera, go to Camera Setup → Properties → Focusto fine-tune the camera’s zoom and focus settings.HC30W45R2Support BracketsHQA-BB2Junction Box Junction Box HQA-BB4HQA-PM2 with HQA-BB2/HQA-BB4Pole MountRegulatory StatementsFCC Statement of ComplianceManufacturer's Declaration of ConformanceWaste Electrical and Electronic Equipment (WEEE)Important SafeguardsWARNING Cautions and WarningsTo ensure compliance with electrical safety standards, CSA Certified/UL Listed LPS or Class 2 power adapters are required. Power over Ethernet (PoE) shall be provided by listed InformationTechnology Equipment meeting the IEEE 802.3af PoE standard. The PoE is not intended to be connected to exposed (outside plant) networks.THIS SYMBOL INDICATES THAT DANGEROUS VOLTAGE CONSTITUTING A RISK OFELECTRIC SHOCK IS PRESENT WITHIN THE UNIT.THIS SYMBOL INDICATES THAT IMPORTANT OPERATING AND MAINTENANCE INSTRUCTIONS ACCOMPANY THIS UNIT.CAUTION: TO REDUCE THE RISK OFELECTRIC SHOCK, DO NOT REMOVE COVER(OR BACK).NO USER SERVICEABLE PARTS INSIDE.REFER SERVICING TO QUALIFIED SERVICEPERSONNEL.Information to the User: This equipment has been tested and found to comply with the limits for a Class B digital device, pursuant to part 15 of the FCC Rules. These limits are designed to provide reasonable protection against harmful interference when theequipment is operated in a commercial environment. This equipment generates, uses, and can radiate radio frequency energy and, if not installed and used in accordance with the instruction manual, may cause harmful interference to radio communications. Operation of this equipment in a residential area is likely to cause harmful interference in which case the user will be required to correct the interference at his own expense.The manufacturer declares that the equipment supplied with this guide is compliant with the European Parliament and Council Directive on the Restrictions of the use of certain hazardous substances in electrical and electronic equipment (2011/65/EU), General Product Safety Directive (2001/95/EC), and the essential requirements of the EMC Directive (2014/30/EU), conforming to the requirements of standards EN 55032 for emissions, EN 50130-4 for immunity, and EN 62368-1 for electrical equipment safety.Note Changes or modifications not expressly approved by the party responsible for compliance could void the user's authority to operate the equipment.Correct Disposal of this Product (applicable in the European Union and other European countries with separate collection systems).This product should be disposed of, at the end of its useful life, as per applicable local laws, regulations, and procedures.Read and keep these instructions.Please ensure that your installation area can safely support the weight of the camera.Do not aim the camera toward a bright light source for extended periods to preventdamage to the imager. Avoid operating the unit under or close to unstable light sources (may cause flickering), or close to fluorescent lamps or objects reflecting light.Do not touch the camera lens.Do not drop the camera or subject it to physical shock.Do not use a strong or abrasive detergent when cleaning the camera.Avoid operating or storing the unit in extremely humid, dusty, hot/cold environments,where the operating temperature is outside the recommended range of -22°F to 140°F (-30°C to 60°C).Avoid operating the unit close to sources of powerful electromagnetic radiation, such as radio or TV transmitters.If powered by a power adapter, the adapter should be properly grounded.Consult Honeywell for the recommended adapter or check it in Honeywell DOC.NoteInternet Explorer 11 (or later) with ActiveX plug-in is supported.Chrome 71 (or later) is supported for H.264 video. Chrome is not supported for H.265 video.IP address of the device is assigned automatically by DHCP server. If the DHCP server is not available, the device will acquire 192.168.1.108 as the default IP address.Document 800-25040V1 – Rev A – 05/2019。
HUS 网络视频录像服务器用户手册

2
Honeywell
2 产品简介
系统概述
霍尼韦尔数字安防集成平台 HUS 的核心组件包括:管理服务器(HUS-VMS)、网络 视频录像服务器(HUS-NVR)、管理客户端(HUS Client)、数字视频解码单元(HUSD4)等,融合前端设备(高清/标清/百万像素网络摄像机、编解码器、DVR、矩阵)、网 络通讯设备、智能视频分析应用,集成安防常规子系统-防盗报警系统、门禁控制系统和 第三方应用系统信息,从而构建一个稳定可靠、高效便捷、数字高清、无缝集成的全数字 化安防系统整体解决方案(Honeywell IP Security Solution)。与前端安防设备一同组建 高效、可靠的 IP 视频安防监控系统。 图 2-1 霍尼韦尔数字安防集成平台 HUS 系统架构
霍尼韦尔数字安防集成平台 HUS
网络视频录像服务器 用户手册
Honeywell
目录
1 前言 ............................................................................................................................ 1 适用范围 .................................................................................................................... 1 章节概述 .................................................................................................................... 1 特殊字体和符号说明 .................................................................................................. 2 使用说明 .................................................................................................................... 2 2 产品简介 ..................................................................................................................... 3 系统概述 .................................................................................................................... 3 产品特性 .................................................................................................................... 4 系统要求 .................................................................................................................... 5 软件要求 ................................................................................................................. 5 3 启动和配置服务 .......................................................................................................... 6 配置数据管理中心 ...................................................................................................... 6 配置视频流媒体服务 .................................................................................................. 9 配置 HUS-NVR 网络视频录像服务器服务属性 ....................................................... 9 配置视频流媒体服务 ............................................................................................. 12 时间同步服务 ........................................................................................................... 14 开启时间同步服务 ................................................................................................ 15 配置时间同步服务 ................................................................................................ 17 4 功能介绍 ................................................................................................................... 21 视频转发 .................................................................................................................. 21 视频存储 .................................................................................................................. 21 历史视频回放 ........................................................................................................... 23 视频文件下载 ........................................................................................................... 24 动态同步 .................................................................................................................. 24 预录 ......................................................................................................................... 25 设备重连 .................................................................................................................. 25 视频文件循环覆盖 .................................................................................................... 26 录像状态恢复 ........................................................................................................... 27 录像自动回导 ........................................................................................................... 27 视频分析 .................................................................................................................. 27
Honeywell 30 Series IP摄像头用户手册说明书

30 SERIES IP CAMERASSecure channel video encryption thathelps you look over your business and protect buildings, data, and people.INTEGRATE SECURITY INTO YOUR BUSINESSMeet the Honeywell 30 Series IP cameras, an integrated video solution that empowers you to improve the safety and security of your buildingWith a 50 meter Smart IR LED range, a camera resolution of up to 5MP, and secure stream video encryption, the 30 Series offering suits allsmall-to-medium businesses (SMB) and entry-level enterprises that want to reduce their risk and their total cost of ownership – ensuring complete compliance with all industry standards and regulations. Honeywell Security supports easy multi-site management and access control integration with MAXPRO® Cloud and ADPRO® for head-end video analytic features that ensure a more efficient solution, with a unified graphical user interface that reduces training and installation time.ADVANCED MOTION PEOPLE DETECTION compared with traditional motion detection which only detects pixel changes and generally has a higher false alarm rate, is designed to detect people andwill only generate an alarm when the object is recognized as a person.MEET THEBENEFITSINDUSTRY-COMPLIANT SOLUTION SECURE STREAM VIDEO ENCRYPTIONENHANCED STORAGE SPACEVIDEO ANALYTICS FEATUREFIRST-CLASS IMAGE QUALITY* Ponemon Institute LLC, 2017** https:///security/data-breach*** https:///2015-wp/wp-content/uploads/2017/10/2017-Cybercrime-Report.pdfMORE STORAGE SPACE. MORE QUALITYWith a superior 5MP camera, the 30 Series IP cameras deliver crystal-clear images for both desktop and mobile view, and come with a user-friendly interface for reliable remote viewing. Easily store, watch, send, review, and search high-resolution video content.Images take up to 50% less storage space, thanks to the H.265 smart codec feature – enabling multitasking, bulk uploads, and significantly lower operating costs.The 30 Series IP cameras offer standardized installation software across all Honeywell Performance and 30-Series Videoproducts, following a ‘learn one, know all’ approach that works for every application. Use the IP Camera Configuration Tool to list, view, update, and seamlessly configure your Honeywell cameras simultaneously. Easily find all Honeywell cameras that are connected to your local area network (LAN) – quickly configuring and setting up network cameras and recorders.CUT INSTALLATION AND CONFIGURATION COSTSCOST-EFFECTIVE SURVEILLANCEWhen you choose the 30 Series IP cameras, you choose a competitively priced, compliant video solution.Enhance installer efficiency and save installation time for video solutions and learning time for new personnel – also benefiting from easy, customized integration with existing devices.The 30 Series cameras are designed to offer superb image quality andseamlessly integrate with MAXPRO NVRs, Performance Series and ADPRO solutions.WHAT DOES NDAA SECTION 889 MEAN?The John S. McCain National Defense Authorization Act FY 2019 (NDAA),Section 889, prohibits the US Government from procuring video and telecommunication equipment from certain companies and their subsidiaries. The Honeywell 30 Series IPcameras contain no content or material from any prohibited companies or their subsidiaries. END USERS CAN USE HONEYWELL 30 SERIES CAMERAS AS PART OF VIDEO SYSTEMS WHICH COMPLY WITH NDAA SECTION 889.HSV-HC30Series-02-US(0719)B-E © 2019 Honeywell International Inc.For More InformationHoneywell Commercial Security 715 Peachtree St. NE Atlanta, GA 303081.800.323.4576。
霍尼韦尔X4操作说明
引言:概述:霍尼韦尔X4是一款多功能设备,旨在提供高效、便捷的操作体验。
它具备多种功能,包括X、X、X等。
在正文中,我们将详细介绍如何使用这些功能,并提供相关注意事项。
正文内容:I.启动和关机1.按下电源按钮启动霍尼韦尔X4。
2.等待设备启动完成并显示主界面。
3.在主界面上,关机按钮以正确关机设备。
II.菜单导航1.使用触控屏幕上的手指滑动来浏览菜单选项。
2.菜单选项以打开相应的菜单。
3.在菜单内,使用手指滑动以查看更多选项。
4.返回按钮以返回上一级菜单。
III.功能使用1.X功能a.进入X菜单,相关选项。
b.遵循屏幕上的指示进行进一步操作。
c.在完成后,确认按钮以提交操作。
2.X功能a.进入X菜单,选择相关选项。
b.根据需要,设置相关参数。
c.开始按钮以启动X功能。
3.X功能a.进入X菜单,选择相关选项。
b.启动相关传感器并进行校准。
c.在完成后,确认按钮以提交操作。
4.X功能a.进入X菜单,选择相关选项。
b.设置相关参数并启动功能。
c.在完成后,确认按钮以提交操作。
5.X功能a.进入X菜单,选择相关选项。
b.按照屏幕上的指示进行相关操作。
c.在需要时,保存按钮以保存操作结果。
注意事项:1.在使用霍尼韦尔X4之前,确保已经详细阅读设备的用户手册,了解相关安全注意事项和操作指南。
2.在使用设备时,遵循所有操作规程和安全标准,以确保使用过程安全可靠。
3.在设备操作过程中,如遇到任何异常情况或故障,请立即停止使用,并联系专业维修人员进行处理。
4.定期对设备进行维护和保养,以保持其良好的性能和使用寿命。
5.避免在恶劣的环境条件下使用霍尼韦尔X4,避免水、泥浆等有害物质进入设备。
总结:。
Honeywell BW Solo 用户手册说明书
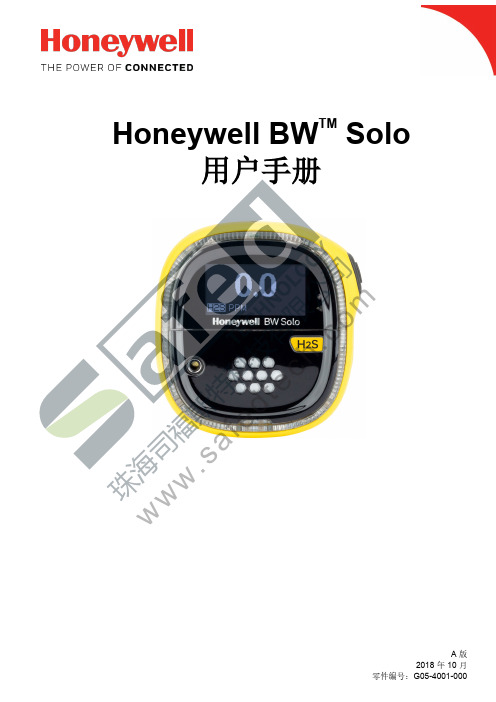
Honeywell BW Solo 用户手册Honeywell BW TMSolo用户手册珠海司福斯特科技有限w w w .s a f e d t e c h .c o m© 2018 Honeywell International.产品注册在线注册您的产品,请访问:https:///en/support/product-registration 通过注册您的产品,您可以: • 收到产品升级或增强功能的通知 • 获悉您所在地区的培训课程 • 充分利用特别优惠和促销活动重要事项!在每天使用之前,应对监控仪进行冲击测试在每天使用之前,应对每个气体探测监控仪进行冲击测试,通过使监控仪接触浓度超过低警 报设定值的目标气体的方式,确认所有传感器响应和所有警报启用。
如果监控仪经历过物理碰撞、液体浸泡、超限警报事件,或者监管权变更,或者监控仪的性能令人起疑的任何时候, 建议进行冲击测试。
为了确保最高程度的准确性和安全性,只能在新鲜空气环境中进行冲击测试和标定。
监控仪应该在每次未通过冲击测试时进行标定,但是频率不得低于每六个月一次,具体取决于使用和接触的气体与污染程度,以及其操作模式。
• 标定时间间隔和冲击测试规程可能因各国国家法规而有所不同。
• Honeywell 建议所用的标定气体钢瓶应含有适合您所用传感器的气体,并且达到正确的浓度。
珠海司福斯特科技有限w w w .s a f e d t e c h .c o m目录1. 标准物品清单 ......................................................................................................................................... 9 2. 一般信息 ................................................................................................................................................ 9 3. 用户界面和显示屏概览 ......................................................................................................................... 10 3.1. 开箱即用体验(仅适用于首次使用) ........................................................................................... 11 3.2. 状态指示符图标 ........................................................................................................................... 12 4. BLE (蓝牙低功耗)操作 ..................................................................................................................... 13 4.1. BLE 图标 ...................................................................................................................................... 13 4.2. 不合规 LED 指示灯 ...................................................................................................................... 13 4.3. 与智能手机进行配对 .................................................................................................................... 13 5. 电池...................................................................................................................................................... 16 5.1. 电池状态 ...................................................................................................................................... 16 5.2. 电池更换 ...................................................................................................................................... 17 6. 开启和关闭 Honeywell BW Solo .......................................................................................................... 19 6.1. 开启 Honeywell BW Solo ............................................................................................................. 19 6.2. 关闭 Honeywell BW Solo ............................................................................................................. 19 6.3. 标定状态 ...................................................................................................................................... 19 6.4. 冲击状态 ...................................................................................................................................... 19 6.5. ........................................................................................................................... 20 7. 导航...................................................................................................................................................... 21 7.1. ...................................................................................................................................... 21 7.2. 主界面导航................................................................................................................................... 22 8. 导航:信息菜单 ................................................................................................................................... 23 8.1. Event Log (事件日志)导航 ....................................................................................................... 24 9. 导航:Settings (设置) ...................................................................................................................... 25 9.1. 进入 Settings (设置)模式 .......................................................................................................... 25 9.2. 在 Settings (设置)模式中的菜单和子菜单 ................................................................................ 26 9.3. Language (语言) ...................................................................................................................... 27 9.4. Time (时间) .............................................................................................................................. 27 9.5. Date (日期)............................................................................................................................... 27 9.6. Units (单位) .............................................................................................................................. 27 9.7. Readings (读数) ....................................................................................................................... 27 9.8. Setpoints (设定值) ................................................................................................................... 27 9.9. Latching (锁定) ........................................................................................................................ 28 9.10. Reminders (提醒) ..................................................................................................................... 28 9.10.1. 强制启用或禁用冲击/标定 .. (28)9.10.1.1. Force Cal (强制标定) (28)9.10.1.2. Force Bump (强制冲击) (28)9.11. Data Logging (数据记录) ......................................................................................................... 29 9.12. BLE (蓝牙低功耗) .. (29)9.13. Assigned (分配) ....................................................................................................................... 29 9.14. Zone (区域) .............................................................................................................................. 29 9.15. IntelliFlash ................................................................................................................................... 29 9.16. 不合规 LED 指示灯 ...................................................................................................................... 30 9.17. Passcode (密码) . (30)珠海司福斯特科技有限w w w .s a f e d t e c h .c o mHoneywell BW Solo 用户手册9.18. Exit (退出) ................................................................................................................................ 30 10. 零点标定 .............................................................................................................................................. 31 11. 冲击测试 .............................................................................................................................................. 31 12. 标定...................................................................................................................................................... 33 13. 更换滤网和传感器 ................................................................................................................................ 34 13.1. 滤网颜色参照 ............................................................................................................................... 34 13.2. 取下盖板 ...................................................................................................................................... 34 13.3. 更换滤网 ...................................................................................................................................... 35 13.4. 更换传感器................................................................................................................................... 35 13.4.1. 4 系列传感器更换 .................................................................................................................. 36 13.4.2. 1 系列传感器更换 .................................................................................................................. 37 13.5. 重新安装盖板 ............................................................................................................................... 39 14. 维护...................................................................................................................................................... 40 14.1. 清洁 ............................................................................................................................................. 40 14.2. 更换鳄鱼夹................................................................................................................................... 40 14.3. 更换/检修其他零件 ....................................................................................................................... 40 15. 固件升级 . (40)16. 制造年份 .............................................................................................................................................. 40 17. 传感器和设置 ....................................................................................................................................... 41 18. 故障排除 .............................................................................................................................................. 43 19. 规格 ..................................................................................................................... 44 20. . (46)珠海司福斯特科技有限w w w .s a f e d t e c h .c o mHoneywell BW Solo 用户手册警告所有已经或将要负责使用、维护或检修此产品的人员都必须仔细阅读本《手册》。
霍尼韦尔HONEYWELL 手机软件用户使用手册(CAWDView manual)

5
1.2 实时预览
主菜单中,点击”实时预览“,然后点击“收藏”按钮,跳转至“收藏夹”
界面: 点击 图标,收藏列表变成编辑状态,点击 图标,即可删除收藏项。
在”直播列表“中任意选择一项设备,进入了视频预览界面:
6
图标
返回主菜单
此功能!
找回密码
在登录界面中,点击“找回密码”按钮,跳转至“找回密码”界面:
22
输入用户名,点击“找回密码”按钮,如果所输入的用户名存在,并且用户 在注册时输入了邮箱地址,则会发送密码信息至邮箱地址。
如果忘记了邮箱地址,在输入用户名后,可以点击“找回邮箱”按钮,查看 邮箱地址。
2.2 实时预览
主菜单中,点击“实时预览”,进入实时预览界面后,再点击“收藏”图标, 可以跳转至“收藏夹”界面:
2
该云服务平台为互联网时代最佳的手机视频监控解决方案,由前端采集设 备、平台服务器和远程观看端三部分构成
1、Android 系统
1.1登陆注册
用户登陆 打开软件,进入登录界面,输入用户名与密码,点击“登录”,即可登录软 件。
图标说明: 图标
功能说明
3
勾选后,再次登录将直接进入主菜单
注:点击“免登录”按钮,不用验证用户名与密码,直接进入系统。 登陆之前可以查看新手向导
19
1.8 修改密码
主菜单中,点击”修改密码“选项,进入如下界面:
点击 图标,保存当前修改的密码。
1.9 本地配置
主菜单中,点击”本地配置“选项,进入如下界面:
功能 云台步长 勿扰模式 报警声音
功能说明:
摄像机转动速率设置 报警信息提示开关 关闭报警声音
- 1、下载文档前请自行甄别文档内容的完整性,平台不提供额外的编辑、内容补充、找答案等附加服务。
- 2、"仅部分预览"的文档,不可在线预览部分如存在完整性等问题,可反馈申请退款(可完整预览的文档不适用该条件!)。
- 3、如文档侵犯您的权益,请联系客服反馈,我们会尽快为您处理(人工客服工作时间:9:00-18:30)。
播放历史视频
按照如下两种方式中的一种播放历史视频:
右键点击历史视频查询结果中的一条记录并选择“播放”或者直接双击该条记
录。
选中查找到的历史视频,拖拽到一个视频播放窗口。
可在历史视频窗口进行相关播放窗口操作以及时间轴操作。
历史视频播放窗口操作
在历史视频播放窗口,使用右键菜单可拍摄快照、全屏显示和停止视频,如下图所
视频监控系统使用手册
1客户端
1.1概述
客户端集成了实时视频监控、历史视频回放、电子地图的编辑浏览以及对配置数据的管理功能。用于对视频监控系统的集中和统一管理以及通过地图显示方式实现设备信息及报警事件的综合管理。
1.2登陆、退出
1.2.1登录和管理站点
双击桌面上的“客户端”图标或在“开始”菜单打开所有程序
1.8视频轮巡使用和设置说明
巡更
点击 进入配置巡更界面:
配置巡更
巡更配置
在“巡更”框下展开“本地巡更”和“大屏巡更”,查看全部巡更,
选择一个巡更,在“已选场景”框中显示该巡更所配置的场景,选择某一场景点击
下方的【新建】,弹出如下窗口,显示该场景的设置信息,包括窗口布局以及每个窗口的视频设备:
巡更场景配置
按下 键进入回放模式,此时大屏上选中的框就会变成黄色。
按下 用来切换NVR模式。
按下 键开启回放时间条,通过旋转摇杆来控制时间条的精度,通过移动摇杆,选择要回放的时间段。按键盘上的 键开始播放历史视频
用 按键来控制播放的速度。
按 键停止播放视到当前时间
按键盘上 键,进行倒放,也可以用 按键来控制播放速度
1.5.1选择“工具栏”最上面的图标 选择“大屏”切换到大屏播放。
选择“工具栏”图标 选择对应的,“大屏布局”用大屏中间拼接屏播放视频
选择“工具栏”布局对应“窗口布局”,拖动所需摄像机,到所对应的窗口,则对应的显示屏上显示出相应的图像。
1.6本地视频历史回放和下载
1.6.1选择“功能标签导航栏”对应的“历史视频”一项
HoneywellHUS客户端。打开客户端,显示如下登录画面:
输入用户名和密码。
点击【确定】开始加载数据,如下图所示:
加载完成后,进入主界面
1.2.2退出
要退出客户端,有两种方式:
在菜单栏选择用户退出。
点击客户端主界面右上角 按钮。
1.3客户端主界面介绍
客户端主界面如下:
在客户端主界面“工作区”左侧“系统设备”子菜单里,能看到设备分类。分别有“16屏视频”“诺金酒店”“谭阁美酒店”“首旅出租区”“系统设备”。
在键盘上选择监视器图标 ,然后在按数字键21,
最后在按 (ENT)键,监视器选择完成。
在键盘上选择摄像机图标 ,然后在按数字键006,
最后在按 (ENT)键,摄像机选择完成,
以上两步完成以后矩阵就会将006号摄像机切换到第21号监视器上,
同时键盘液晶显示器上也会出现Monitor D21——Camera S006
动巡视设定的监控点。场景 为在设定的窗口中播放巡视 设定监控点的视频画面。巡 更包
括两种类型:
本地巡更–在客户端播放巡更视频;
大屏巡更–在大屏上播放巡更视频
录像文件下载到了本地,在本地查找,存储路径里,选中这个路径就可以看到下载的录像文件了,可以进行拷贝。
1.7大屏历史视频回放
大屏历史回放采用键盘操作
1.4.2云台控制
将云台摄像机切换到相应的监视器上,然后控制摇杆 ,向下、向上、向左、向右,转动摇杆向右旋转拉近图像,向左旋转拉远图像。
1.4.3键盘状态查看
需要使用远程桌面登录到10.9.16.3系统服务器里面,键盘控制台,启动后在右下角任务栏隐藏。
1.5网络视频存储客户端NVRClient使用
双击桌面NVR客户端 打开后输入视频存储服务器的IP地址,
选择对应的窗口布局
选择对应的摄像机
选择创建好的场景到“已选场景”里,确定保存
点击大屏巡更
选择创建好的巡更,点击播放,就会按照已选场景里的顺序,按时间切换。
1.1客户端报警信息处理
1.2拷贝本地视频播放
1.3电子地图使用
1.4键盘使用以及键盘控台
1.4.1视频切换
如果你想让中间拼接大屏监视器(第21号显示器)“室外摄像机3”(006号)摄像机图像;请如下操作:
示:
1.6.2也可以在“系统设备”里“诺金酒店”“谭阁美酒店”“首旅出租区”这几子项里对应摄像机上点击右键,点击“历史视频”也会切换到“历史视频”界面,这时直接选择时间段就可以查找到这个摄像机的历史视频了。
1.6.3录像下载到客户端电脑
1.6.4录像拷贝到存储设备
巡更是在设定的窗口里面轮流播放场景视频的一种方式,系统按照一定时间间隔自
点击登录之后,查看视频存储服务器状态
1.4本地实时视频播放
选择“工具栏”最上面的图标 选择“本地”切换到本地播放。
一窗口
四窗口
六窗口一当“显示模式”设置为“本地”时显示这些窗口布局选项。点击
六窗口二 相应的按钮选择视频窗口布局。
八窗口
九窗口
十六窗口
环绕视频
把“系统设备”里面对应的摄像机拖动到窗口里面,就可以观看了。
1.5大屏实时视频播放
