歌美飒G58安全链
风机常识

风电基础知识——风机常识1、变浆矩风机的主制动方式是什么?答:空气制动。
2、偏航减速器一般采用何种机构?答:一般采用蜗轮、蜗杆传动机构。
3、偏航轴承普通采用何种机构?答:采用回转支撑结构。
4、风机塔架外观检查有何要求?答:外观应清洁,表面无龟裂、起泡、剥落、无油污。
5、风机塔架螺栓多长时间抽查一次?答:每半年抽查一次。
6、塔内电缆的种类?答:一种是动力电缆;一种是控制电缆;一种是通讯光缆。
7、风电机主轴的作用?答:是承担和接受轮毂处传来的各种负载并将动能传递到齿轮箱。
8、主轴的外观检查有何要求?答:无位移、无锈蚀、无油污。
9、主轴前、后轴承注油有何要求?答:使用规定的油脂加注,加注时主轴应低速匀速转动,以使整个油脂均匀润滑。
11、联轴器的主要功能是什么?答:是将齿轮箱输出的机械能传递给发电机。
12、动力电缆检查有何要求?答:引出线完好,线鼻处无发热现象,电缆固定牢靠,无破损现象。
13、风电机组液压系统外观检查有何要求?答:无渗漏,无裂纹,无油污,应及时清理其表面油污,确保表面干净。
14、歌美飒G58风机顶部电气控制柜检查要求?答:无灰尘,无潮湿现象,指示灯显示正常。
15、风杯式风速仪检查有何要求?答:无破损、接线无松动、转动灵活。
16、偏航计数器故障原因有哪些?答:联接螺栓松动;异物侵入;连接电缆损坏磨损。
17、在空间较小的工况下,使用何种扳手?答:套筒扳手。
18、滚动轴承注油过满时会有什么影响?答:影响轴承散热和增加轴承阻力。
19、风电机组发电机集电环接地相的作用?答:当三相电势不平衡时,将发电机大轴上产生感应电势,接地碳刷,用于将不平衡电势、电流泄放。
20、接地碳刷磨损为何能引起油温飙升?答:三相磁场不平衡后通过接地碳刷释放磁能,接地碳刷磨损后,释放不掉的磁能干扰温度模块。
21、液压系统单向阀的作用?答:使液压回路油循环沿着一个方向流动。
22、齿轮箱润滑方式?答:分为飞溅润滑和强制润滑,一般以强制润滑为主。
歌美飒风机 (2)

1.5
检查玻璃纤维的螺栓联接
2
叶片
2.1
检查叶片有无裂纹
2.2
将裂纹标记
2.3
给所有已发现的裂纹定位
2.4
检查平衡塞的位置与状态。
3
轮毂,叶片轴承
3.1
检查叶片轴承的外部唇式密封
注意:如果风机在多沙地区,为了防止叶片轴承渗漏,需要安装防护橡胶圈来保护。检查时应轻轻掀开保护圈,检查油脂泄露情况。掀动橡胶圈时,要小心,避免损坏它。
7.3
检查减震器轴
7.4
检查连接轴
8
压缩环
8.1
检查M27 10.9 Dacromet500A螺栓
扭矩设定1450+/-145 Nm
8.2
外部检查
9
齿轮箱
9.1
泄露检查
9.2
油位检查
油:详见G52/58润滑油表-ES300001
9.3
检查油状态
9.4
磁块检查
9.5
油样的抽取
9.7
检查空气过滤器
9.8
20.4
检查第三节塔筒与机舱之间的螺栓联接。参考EP009004文件设定扭矩扳手力矩值
20.5
检查梯子和与主机架之间的螺栓联接
20.6
检查门框上焊接的有无缺陷
20.7
检查基础部分与塔架底法兰的焊接情况
20.8
检查塔的表面处理情况
22
电缆外观检查
22.1
电缆正常
22.2
扎带正常
22.3
检查接地系统电缆的紧固度
G58, 50Hz: 38.5±0.5 bar.
15.9
S202压力开关动作
G52, 50Hz: 28±1 bar.
BOMAG BT58 操作手册说明书

DOWNLOAD BOMAG BT 58 MANUAL PDF EBOOK EPUB MOBIbomag bt 58 manualbomag bt 58 manual pdfbomag bt 58 manualBOMAG original maintenance parts Regular maintenance is essential to ensure your machine is reliable and permanently operational. We offer a wide range of BOMAG maintenance parts such as filters, belts and seals. These can be ordered individually or in the convenient package BOMAG Service Kit, which contains all the necessary maintenance parts.bomag bt 58 manual pdfGenuine Parts | BOMAGbomag bt 58 manualBOMAG Light Equipment PDF Spare parts Catalogs, Service and Operation Manuals ... BT 58 BOMAG Tamper BT58 -Spare parts catalog 1551104 BT 60 ... BOMAG Tamper BT60/4 - Spare parts catalog, Operation and maintenance manual 1551106 BT 65 BOMAG Tamper BT65 - Spare parts catalog, Operation and maintenance manual 1551107 BT 65/4 BOMAG Tamper BT65/4 ...Genuine Parts | BOMAGBOMAG light equipment Manuals & Parts Catalogsbomag bt 58 manualOperating instructions Maintenance instructions ... This manual was written for operators and mainte-nance personnel on construction sites. These operating and maintenance instructions are part of the machine. ... BT 60/4, BT 65/4 General This BOMAG machine has been built in com-BOMAG light equipment Manuals & Parts CatalogsOperating instructions Maintenance instructionsbomag bt 58 manualBomag Bmp 851 Parts PDF And Ebook Files - DocsFiles. Bomag Bt 58 Manual Bomag tamper parts - free eBooks download Bomag tamper parts download on free books and manuals search - ... . Related searches bomag bt58 bomag bt 58 bedienungsanleitung bomag bt 58 bomag bt 58 ersatzteile bomag bt 58 manualOperating instructions Maintenance instructionsManuals for Bomag+BT58+manual to downloadbomag bt 58 manualBOMAG Equipment Spare parts catalogs, Service & Operation Manuals in pdf format. Use the menu below to select the appropriate BOMAG Machinery. Please see the Home Page with explanation how to order and receive Manuals and Code Books.Manuals for Bomag+BT58+manual to downloadBOMAG equipment Manuals & Parts Catalogsbomag bt 58 manualEvery BOMAG machine incorporates the compaction experience of decades from tamper to multi-purpose compactors. Understanding customer requirements is an integral part of this process, which is why BOMAG is in constant dialogue with clients to develop ever better machines.BOMAG equipment Manuals & Parts CatalogsLight equipment | BOMAGbomag bt 58 manualTampers like BT 60 are used for soil and asphalt compaction, trenches and pipeline projects, backfill, ... A unique BOMAG lubrication system provides optimum oil supply in the crankcase at all angles. The engine is also protected by the automatic oil level check system. ... Product-Overview-Light-Equipment_PRE101012_1903.pdf Product-Overview ... Light equipment | BOMAGTamper BT 60 for soil and asphalt compaction - BOMAGbomag bt 58 manualBomag BW 211, 212 , 212 D-40 / PD-40 Single Drum Roller Service Repair Manual. Bomag BW 100 120 125 AC-4AD-4 Combination Roller (Tandem Vibratory) Service Repair Manual. Bomag BW 180 AD Tandem Vibratory Roller Service Repair Manual. Bomag BW 145 DH-3 / PDH-3 Single Drum Roller Service Repair ManualTamper BT 60 for soil and asphalt compaction - BOMAGBomag – Service Manual Downloadbomag bt 58 manualBOMAG has a worldwide dealer and service network, which enables you to quickly obtain the right spare parts for your machine. Take advantage of our international spare parts service and avoid costly downtimes. Your BOMAG sales partner will be happy to advise you.Bomag – Service Manual DownloadSpare parts service | BOMAGbomag bt 58 manualYou deliberately opted for a BOMAG when deciding on your machine. To ensure the long-term performance of your equipment, you can also rely on the tried and trusted quality of BOMAG’s services and genuine parts.Spare parts service | BOMAGServices | BOMAGbomag bt 58 manual PDF Ebook and Manual Reference Bomag Bt 58 Manual Printable_2020 Great ebook you want to read is Bomag Bt 58 Manual Printable_2020. I am promise you will like the Bomag Bt 58 ... Bomag Bt 58 Manual Printable_2020 is effective, because we could get a lot of information from the resources. Technologies have developed, and readingServices | BOMAG PDF Ebook and Manual Referencebomag bt 58 manualChoosing a Backup Generator Plus 3 LEGAL House Connection Options - Transfer Switch and More - Duration: 12:39. Bailey Line Road Recommended for you PDF Ebook and Manual ReferenceBomag Workshop Service Repair Manual Downloadbomag bt 58 manualThis manual was written for operators and mainte- ... from your BOMAG dealer by just stating the serial number of your machine. Information for the correct use of our machines in ... 6.1 General notes 58 6.2 Engine problems 59. Table of Contents 8 %20$* BPR 50/52 D3 - BPR 55/52 D-3.Bomag Workshop Service Repair Manual DownloadOperating instructions Maintenance instructionsbomag bt 58 manualBomag Bw120ad Parts Manual Our BOMAG Genuine Parts Kits offer you all the genuine parts you need in a practical set in proven BOMAG quality. BW 120 AD-4. BW 120 AD-5 (Please observe the information in your operating and maintenance manual). jkplus. in search results. BOMAG BT 50 VIBRATORY TAMPER SPARE PARTS CATALOG MANUAL BOMAG BW 100AD-2 BW120AD-2Operating instructions Maintenance instructionsBomag Bw120ad Parts Manual - bomag bt 58 manualBomag Bmp 851 Parts PDF And Ebook Files - DocsFiles. Bomag Bt 58 Manual Bomag tamper parts - free eBooks download Bomag tamper parts download on free books and manuals search - ... . Related searches bomag bt58 bomag bt 58 bedienungsanleitung bomag bt 58 bomag bt 58 ersatzteile bomag bt 58 manualBomag Bw120ad Parts Manual - Manuals for Bomag+BT58+download to downloadbomag bt 58 manualThis is the most complete Service Parts Manual for the Bomag BT65/4 Tamper .Service Repair Manual can come in handy especially when you have to do immediate repair to your Bomag BT65/4 Tamper . Parts Manual comes with comprehensive details regarding technical data. Diagrams a complete list of Bomag BT65/4 Tamper parts and is a must for the will not be dissatisfied.Manuals for Bomag+BT58+download to downloadBomag BT65/4 Tamper Parts Workshop Service Repair Manualbomag bt 58 manualFull version of Bomag 2010.. Heavy Technics. spare parts catalog, repair manual. Convenient way of payment. ... BT 50 BT 55 BT 58 BT 60 BT 60/4 BT 65 BT 65/4 BT 68 BT 70 BT 75 BT 80 Trench compactor BMP 851 BW 35 BW 85 BW 650 BW 850 ... Bomag MPH 362, MPH 364, MPH 454 Recycler & Stabilizer Parts Repair Manuals PDF; BomagBW156D-3/DH-3/PDH-3 ...Bomag BT65/4 Tamper Parts Workshop Service Repair ManualBomag 2010 - bomag bt 58 manualBomag BW100AD, BW100AC, BW120AD, BW120AC Drum Roller is the complete repair manual, which contains detailed information about the technical and maintenance, special repair manuals, instruction manuals, service manuals for maintenance of single drum rollers Bomag.Bomag 2010 - Bomag, Parts Catalog Repair Manual Bomagbomag bt 58 manualOur BT60/4 Bomag workshop manuals contain in-depth maintenance, service and repair information. Get your eManual now!Bomag, Parts Catalog Repair Manual BomagBomag | BT60/4 Service Repair Workshop Manualsbomag bt 58 manualTamper BOMAG BT 55 Spare parts catalog: BMG05-004: BT 58 : Tamper BOMAG BT 58 Spare parts catalog:BMG05-005: BT 60 : Tamper BOMAG BT 60 Spare parts catalog: BMG05-006: BT 60: Tamper BOMAG BT 60 Operation and maintenance manual: BMG05-007: BT 60/4 Tamper BOMAG BT 60/4 Spare parts catalog: BMG05-008: BT 60/4Bomag | BT60/4 Service Repair Workshop ManualsSpare parts catalog, operation and service manual for ROADbomag bt 58 manualTamper dissasembly / Stampfer zerlegen BOMAG worldwide. Loading... Unsubscribe from BOMAG worldwide? Cancel Unsubscribe. ... BOMAG BT 60 TRILSTAMPER - Duration: 0:51.Spare parts catalog, operation and service manual for ROADTamper dissasembly / Stampfer zerlegenbomag bt 58 manualVibratory Tamper BT60/4 BT65/4BT60/4 BT65/4 MODEL Compaction Output (cu. yd/h) at recommended soil layer/lift thickness. * Gravel, Sand Mixed Soils Silt, ClayTamper dissasembly / Stampfer zerlegenVibratory Tamper Distributed By: BT60/4 BT65/4BT60/4 BT65bomag bt 58 manualBomag BT65/4 Tamper Service Parts Catalogue Manual Instant Download SN101540491001-101540494831 This is the most complete Service Parts Manual for the Bomag BT65/4 Tamper .Service Repair Manual can come in handy especially when you have to do immediate repair to your Bomag BT65/4 Tamper .Vibratory Tamper Distributed By: BT60/4 BT65/4BT60/4 BT65Bomag BT65/4 Tamper Service Parts Catalogue Manual Instantbomag bt 58 manualGenuine spare parts and accessories for Bomag's popular BT60/4 four stroke Trench Rammer. Huge selection in stock available for next day delivery. Genuine spare parts and accessories for Bomag's popular BT60/4 four stroke Trench Rammer.Bomag BT65/4 Tamper Service Parts Catalogue Manual InstantBomag BT60/4 Rammer Parts | Trench Rammer Partsbomag bt 58 manualBomag Electronic Parts Catalogue 2013 DB-Version: 5.2 Viewer Version: 5.0.54.0p Size: 3,1Gb Language: English Type: pdf ... BT 58 BT 60 BT 60/4 BT 65 BT 65/4 BT 68 BT 70 BT 75 BT 80 Trench compactor BMP 851 BW 35 BW 85 BW 650 BW 850 ... Repair Manuals - Workshop Manuals - Repair Manuals Softwares - Diagnostics Softwares.Bomag BT60/4 Rammer Parts | Trench Rammer PartsFree Auto Repair Manual : Bomag Electronic Parts Cataloguebomag bt 58 manualBomag Bt 58 Manual Printable 2019 in simple step and you can download it now. Download Free: Bomag Bt 58 Manual Printable 2019 Read Online at ... there are several books being received by PDF format. Several websites for downloading free PDF books which you could acquire as much knowledge as you wish. Back to Top Free PDF ...Free Auto Repair Manual : Bomag Electronic Parts Catalogue Ebook and Manual Referencebomag bt 58 manualBomag Heavy and Light Machines 2016 spare parts catalog, parts book, parts manual for Bomag Tandem Rollers, Combination Rollers, Pneumatic Tyred Rollers, Cold Planer Finisher, Single Drum Rollers, Single Drum Rollers, Towed Rollers, Refuse Compactors, Soil Compactors, and etc. Ebook and Manual ReferenceBomag 2016 Heavy and Light Machines spare parts catalogbomag bt 58 manualOur Compactors Construction workshop manuals contain in-depth maintenance, service and repair information. Get your eManual now!Bomag 2016 Heavy and Light Machines spare parts catalogConstruction | Compactors Service Repair Workshop Manualsbomag bt 58 manualBomag BT58Construction | Compactors Service Repair Workshop ManualsBomag BT58bomag bt 58 manual Ebook and Manual Reference Bomag Bt55 Tamper Service Parts Catalogue Manual Instant Download ... there are lots of books getting into PDF format. Right here websites ... bomag, bt55, tamper, service, parts, catalogue, manual, instant, download, sn101540321001, 101540329999, printable, 2019,Free EbookDownload,Download Ebook Free ...Bomag BT58 Ebook and Manual Referencebomag bt 58 manual101 540 58 1001 - 101 540 58 9999 101 540 60 1001 - 101 540 60 9999 bvt 65 101 541 20 1001 - 101 541 20 9999 bt 80 d 101 540 47 1001 - 101 540 47 9999 ... bt 80 d bomag originalteile und kits | bomag genuine parts and kits 7 x 542 701 29 057 452 82 x x 058 242 10. Ebook and Manual Referencebomag bt 58 manualBomag MPH 362-364-454 Recycler & Stabilizer Parts Manual + Instructions for Repair PDF Parts Manual and Instructions are intended for Bomag Recyclers and Stabilizers MPH 362, MPH 364, MPH 454.These manuals contain technical information about ..BOMAG Parts Catalogue 2017 DOWNLOAD EPCbomag bt 58 manualREPAIR MANUAL As Pdf, BOMAG RECYCLER REPAIR MPH100R SERVICE MPH100S AND STABILIZER MANUAL As Docx, STABILIZER MPH100R RECYCLER MANUAL AND REPAIR MPH100S BOMAG SERVICE As Pptx BOMAG MPH100R MPH100S RECYCLER AND STABILIZER SERVICE REPAIR MANUAL How easy reading concept can improve to be an effective person? BOMAGBOMAG Parts Catalogue 2017 DOWNLOAD EPCREPAIR MANUAL As Pdf, BOMAG RECYCLER REPAIR MPH100R SERVICEbomag bt 58 manualBOMAG is the world market leader in road construction equipment and machinery for sealing. Compaction equipment from BOMAG is used for many applications, ranging from road construction to construction of complex hydraulic structures.BOMAG is the world leader in the segment of the monitoring, measurement, and optimization of the densification process, which positively affects the very technique ...REPAIR MANUAL As Pdf, BOMAG RECYCLER REPAIR MPH100R SERVICEBomag EPC [07.2017] Electronic Parts Cataloguebomag bt 58 manual PDF Ebook and Manual Reference Bomag Bt60 Tamper Service Parts Catalogue Manual Instant Sn101540351001 101540353695 Printable_2020 Bomag Bt60 Tamper Service Parts Catalogue Manual Instant Sn101540351001 101540353695 Printable_2020 is most popular ebook you must read.Bomag EPC [07.2017] Electronic Parts Catalogue PDF Ebook and Manual Referencebomag bt 58 manualBOMAG Electronic Parts Catalogue 2017 is an electronic database catalog of spare parts for construction equipment company BOMAG. In the present catalog contains technical information on spare parts and accessories for compact equipment BOMAG. PDF Ebook and Manual ReferenceBOMAG Electronic Spare Parts Catalogue 07/2017 Downloadbomag bt 58 manualHome / Heavy Technics + Repair / Bomag / Bomag 2010. 60-3 Tamper BT 50 BT 55 BT 58 BT 60 BT 60/4 BT 65 BT65/4 BT 68 BT 70 BT 75 BT 80. Free download bomag compactor operators manual PDF. 2014.09.13 92 KAWASAKI NINJA ZX6 REPAIR MANUAL. Bomag Bt 68 Manual Bomag Bt 68 Manual - Title Ebooks : Bomag Bt 68.BOMAG Electronic Spare Parts Catalogue 07/2017 DownloadBomag Bt 60/4 Repair Manual - groundmegazonebomag bt 58 manualPresented online catalog has detailed troubleshooting information, operating instructions, special instructions for step by step repair and maintenance, technical specifications, electrical circuits and diagrams, setting, service documentation, and other additional information for Hino Trucks 238, 258LP, 268, 338, 358 series 2011-2013 years.Bomag Bt 60/4 Repair Manual - groundmegazone – Automotive Parts Catalogs, Manualsbomag bt 58 manualBomag Vibratory tampers BT BT-58 Which oil should you use for your Bomag Vibratory tampers BT BT-58? Complete advice for all components, such as the engine, gearbox (transaxle), brake system, power steering system and cooling system. – Automotive Parts Catalogs, ManualsOil for Bomag Vibratory tampers BT BT-58. Which oil is thebomag bt 58 manualBomag BT68 Tamper Service Parts Catalogue Manual Instant Download SN101540140101-101540141580 This is the most complete Service Parts Manual for the Bomag BT68 Tamper .Service Repair Manual can come in handy especially when you have to do immediate repair to your Bomag BT68 Tamper .Oil for Bomag Vibratory tampers BT BT-58. Which oil is theBomag BT68 Tamper Service Parts Catalogue Manual Instantbomag bt 58 manualHome › Bomag Service Manuals. Bomag Service Manuals. Bomag Service Manuals Sort by. Filters. Bomag Asphalt Manager Tandem Roller Service Training Manual Download. 16 95 Save $18 00. Bomag BW 100 AC-4 Full Service Repair Manual. 18 99 Save $21 00. Bomag BW 100 AD,BW 100 AC,BW 120 AD,BW 120 AC Drum Roller Service Repair Workshop Manual DOWNLOAD ...Bomag BT68 Tamper Service Parts Catalogue Manual InstantRepair and Service Manuals for any Bomag category – Bestbomag bt 58 manualBomag Rollers Under 5 tonne. The world of compaction is changing and Bomag is at the heart of the process. Bomag continues to explore exciting new products and applications whilst continuing to improve existing products. Bomag are compaction specialists focused solely on compaction solutions for our customers.Repair and Service Manuals for any Bomag category – BestBomag Rollers Under 5 tonne | Tutt Bryant Equipmentbomag bt 58 manualPDF Service Manuals, Operation & Maintenance Manuals, Spare Parts Catalogs. Site Map. Contact / About. Write and **********************.HomeDieselsMachineryAuxiliaryFAQ.Farming,Construction,Earthmoving,Loadingand other Special Machines Spare parts catalogs, Service (workshop) & Operation Manuals in Pdf formatBomag Rollers Under 5 tonne | Tutt Bryant EquipmentMachinery PDF Manuals and Spare parts Catalogsbomag bt 58 manualDetailed list of parts and accessories for compact equipment BOMAG, you can find in the catalog of original spare parts BOMAG Electronic Parts Catalogue 2013. Electronic spare parts catalog provides full technical information about spareparts for compact equipment BOMAG.Machinery PDF Manuals and Spare parts Catalogs。
歌美飒G58-850风机变桨系统部件损坏预防措施与方案

歌美飒G58-850风机变桨系统部件损坏预防措施与方案针对歌美飒G58-850风机变桨空心轴与三角法兰连接螺栓折断,变桨空心轴与三角法兰脱离;三角法兰因磨损出现喇叭口;变桨油缸失效;液压站比例阀损坏等问题,特编制本措施及方案。
二、编制依据:Gamesa公司变桨距系统说明(代码:M5041001)Gamesa公司变桨距系统维护保养(代码:M5043001)三、适用范围:双辽风场及洮南风场G58-850风机四、变桨距系统原理在风机并网、离网、限电、故障时,根据YUN、READY、PAUSED、STOP、EMERGENCY等级,PLC按照内部设置程序对比例阀(Y800)、变桨+油缸前油室进排油电磁阀(D210C)、变桨油缸后油室进排油电磁阀(D210A、D210B)线圈激励,变桨油缸活塞在液压油的压力下,带动变桨杆向轮毂方向或反方向直线运动。
变桨杆与三角法兰连接,三角法兰与三支叶片根部连接,最终以凸轮形式带动叶片转动。
五、变桨距系统组成图1 变桨距系统的主要组成部件图2 变桨驱动杆和空心轴与三角法兰的连接六、空心轴受力分析F1:推力或者是拉力,由三角法兰施加;F2:扭力,由旋转的三角法兰施加;F3:支撑力:由三角法兰施加;F4:重力;F5:支撑力,由主轴内腔提供。
垂直方向,在任何工位,F3和F5的合力应与F4重力抵消。
水平方向,风机变桨过程中,变桨杆带动三角法兰前后运动,在三角法兰拉力或压力作用下,带动空心轴直线运动。
在旋转方向,由于叶轮转动,叶轮带动三角法兰旋转,三角法兰带动空心轴旋转,三角法兰对空心轴施加扭力。
以上受力分析,可以得出,正常情形下:1、空心轴受力是由三角法兰传递而来;2、空心轴不承担变桨中力的转换过程;3、增加空心轴,是为前部三角法兰等部件提供刚性支撑,从而为变桨杆提供保护。
七、原因分析1、风机并网、设备完好情况下,空心轴在运行工位0度左右工作,空心轴探出主轴25cm左右,这种位置由于空心轴大部在主轴腔内,是最稳定状态。
歌美飒G58

歌美飒G58风机答辩题库一、简述“Optitip”系统的特性1)如果风速低于额定风速,系统选择最佳的叶片受风角度。
这样,风机的电能输出在任何一个风速下都将达到最大。
这是通过变浆系统实现的。
这个系统我们叫做“Optitip”系统;2)当风速超过额定风速时,系统调节叶片的受风角度,使风机产生额定的发电功率。
二、简述“watchdog”的作用和工作原理作用:监测风机系统程序运转是否正常。
原理:当电路导通时,“watchdog”会激活计算机,计算机激活后会给“watchdog”一个连续的脉冲信号,此时“watchdog”工作正常;当系统软件出现故障导致脉冲信号丢失时,“watchdog”自动切断电源,15秒后重启计算机。
三、G58风机根据风速的不同,可以将控制分哪几个阶段:1)低风速,控制系统将发电机与电网断开;2)中等风速,发电机连接到电网,但是额定功率没有达到;3)高风速,风机发出额定功率的电;4)极高的风速(停止风速),发电机与电网断开,风机停止运转。
四、OVP系统的作用和工作原理作用:当系统过电压时,OVP对系统进行保护。
原理:当处理器检测到系统电压过高时,会激活OVP,OVP本体由多个晶闸管组成,通过晶闸管的高频通断,缓慢降低系统电压并缓慢提高系统电流。
五、简述Ingecon-W 控制系统组成及作用1)Ingecon-W控制系统由一台高效的异步电机和绕组转子,滑差线圈,以及两台4-象限转换器IGBT,接触器和保护构成。
2)Ingecon-W控制系统可以保证风机叶轮的速度和驱动扭矩总是将稳定和恒定的电能最终输送给电网。
3)Ingecon-W控制系统下的发电机是一台特殊的同步发电机,它可以在变化的速度下运转,速度范围900rpm-1900rpm,并且随时保持发电功率的稳定六、歌美飒G58风机要求的气象条件是?1)风机的设计运行环境温度为-20℃到+40℃的范围。
如果在这个温度范围之外,必须采取特殊的措施。
风场简介

5.方茴说:“那时候我们不说爱,爱是多么遥远、多么沉重的字眼啊。
我们只说喜欢,就算喜欢也是偷偷摸摸的。
”6.方茴说:“我觉得之所以说相见不如怀念,是因为相见只能让人在现实面前无奈地哀悼伤痛,而怀念却可以把已经注定的谎言变成童话。
”7.在村头有一截巨大的雷击木,直径十几米,此时主干上唯一的柳条已经在朝霞中掩去了莹光,变得普普通通了。
8.这些孩子都很活泼与好动,即便吃饭时也都不太老实,不少人抱着陶碗从自家出来,凑到了一起。
9.石村周围草木丰茂,猛兽众多,可守着大山,村人的食物相对来说却算不上丰盛,只是一些粗麦饼、野果以及孩子们碗中少量的肉食。
吉林龙源风力发电有限公司始建于2005年10月,由龙源电力集团股份有限公司控股,与龙源(通榆)风力发电有限公司、龙源(长岭)风力发电有限公司合署办公,下属同发风电场和长岭双龙风电场。
同发风电场位于吉林省通榆县西部约80公里处,地处科尔沁草原东陲,全场海拔170~220米左右,盛行西北风,总装机249.9MW,分三期建成。
一、二期属于国家特许权项目隶属于吉林龙源风力发电有限公司,三期隶属于龙源(通榆)风力发电有限公司。
同发风电场2006年4月开工建设,2009年6月全部投产。
一、二期各安装118台歌美飒G58-850风机,三期安装58台歌美飒G58-850风机,各配置1套监控系统。
与风机配套建设的有18回35kV线路,1座同发220kV升压站(与华能公用),升压站位于综合楼以南约5公里处,通过一条105.26公里的同洮线接入吉林省电网。
同发220kV升压站安装有7台主变,采用双母线接线方式,1-3号主变隶属于龙源,4-7号主变隶属于华能,35kV18回线路中L01-L04线接入1号主变(三期),L05-L11线接入2号主变(二期),L12-L18线接入3号主变(一期)。
长岭双龙风电场位于吉林省长岭县城南,距县城6公5.方茴说:“那时候我们不说爱,爱是多么遥远、多么沉重的字眼啊。
上汽大通汽车有限公司汽车产品使用手册说明书

普通钥匙 .............................................10 遥控钥匙 .............................................10 遥控钥匙的钥匙头(以下简称钥匙头)的伸/缩 .............11 更换遥控钥匙电池 .....................................12 车门和锁 ........................................... 13 防止车辆被盗 .........................................13 中控门锁系统 .........................................14
特别声明
《产品使用手册》与《用户保修保养手册》明确了本公司与用户之间就有关产品的质量保证责任、售后服务方面的权利与义务产生 和终止的约定。请务必在使用本公司产品之前认真阅读《产品使用手册》与《用户保修保养手册》。若您的汽车因为滥用、疏忽、 不正确使用或未经批准进行改装等而导致损失,用户将丧失提出索赔的权利,任何保修申请将被上汽大通汽车有限公司授权服务商 (以下简称“本公司授权服务商”)拒绝。 各个国家和地区对改装和加装都有严格限制。未经许可不得擅自改变车辆结构、车辆电路系统以及所有车辆零部件。私自改造或变 更这些系统或零部件,不仅会使相关部件和系统的性能降低或引起故障甚至可能引发火灾,严重时还会给驾乘人员带来伤害和生命 危险。 未经本公司许可授权,本出版物不得复制、存储在检索系统中,也不得以电子、机械记录或其它任何方式进行传播。
毒毒配件Winch fairlead座secure平台支架安装说明书

Winch FairleadMountIMPORTANT: Thank you for purchasing this Poison Spyder product. Please read through this entire document before proceeding with installation. If you are not confident in your mechanical skills, please seek the help of a professional to perform the installation. Check your packages immediately upon arrival to ensure that everything listed is included, and to check for damage during shipping. If anything is missing or damaged, or if you need technical assistance with any aspect of this installation, call Poison Spyder at (951) 849-5911 as soon as possible. This document last updated January 2016.APPLICATIONSThese installation instruc tions apply to the following PoisonSpyder products:45-57-010 Winch Fairlead MountPARTS LISTPlease c hec k your pac kages immediately upon arrival to ensure that everything listed is inc luded, and to c hec k for damage during shipping. If anything is missing or damaged, call Poison Spyder at (951) 849-5911 as soon as possible. (1) Winch Fairlead MountTOOLS NEEDED• Wrenches (to fit the existing hardware of your winch and fairlead)INSTALLATION NOTESVERY IMPORTANT: Read and follow your winch manufacturer’s Owners Manual and Operating Instructions prior to operating your winch. Follow all safety precautions during any operation of your winch.• Before you begin, park the vehicle in a suitable workspace and set the parking brake.• The Poison Spyder Customs Winch Fairlead Mount is designed to work with bumpers and winch mounts that do not already have an integrated fairlead mount.• The Winch Fairlead Mount comes powdercoated black. Be careful to protect the powdercoat finish during installation. If you wish to paint the mount a different color,scuff the powdercoat with sandpaper then apply primer followed by the color of your choice.• Install the Winch Fairlead Mount BETWEEN the winch and the bumper or winch plate. You may need longer bolts (not included) to secure the winch to the bumper or winch plate, to compensate for the thickness of the Winch Fairlead Mount.• The Winch Fairlead Mount is designed to fit the 10”x 4-1/2” bolt pattern common to most Warn winches except 8274. Many other winch brands use the same bolt pattern.• The Winch Fairlead Mount is designed to fit the winch rope slot and 10” bolt pattern of most Warn or common aftermarket roller or Hawse fairleads, including the Poison Spyder Aluminum Hawse Winch Fairlead (P/N 45-45-010). Install your fairlead according to the fairlead manufacturer’s instructions.• The winch bolt holes in the bottom plate of the Winch Fairlead Mount are slotted front-to-back to allow for adjustment of the fairlead and mount forward or backward. On some Poison Spyder bumpers with shackle tabs and brawler bars or stingers, it may be necessary to adjust the fairlead (and mount) further back in order to facilitate easily installing and removing recovery shackles from the shackle tabs. Test for this and make any necessary adjustments before final tightening of the winch mount bolts.©2016 POISON SPYDER CUSTOMS 951-849-5911 • 。
G58歌美飒风机故障处理手册

Gamesa (INGETEAM) G52 / G58所有的报警检查处理表故障检查处理原则1、故障检查处理必须严格贯彻“应修必修,修必修好”的原则,所有应急维修必须考虑安全因素,并及时做好彻底处理。
2、所有故障信号的外部检测点,包括相应的传感器、数字量输入模块、模拟量输入模块必须作为检查项目。
3、与故障信号有关的闭环控制元件列入检查项目,包括电气、液压执行元件,数字量输出模块、模拟量输出模块。
4、与故障有关的控制、反馈、测量、调节信号电缆列入检查项目,确保接线良好、正确,电缆无损伤。
5、发生过流、过压、漏电故障时,电气主回路电力电缆列入检查项目。
6、与故障有关的保护定值、自动装置停启定值列入检查项目,但不得随意修改。
重要保护定值如需修改必须由总工批准,并作好相关记录。
7、风力机系统作为一个整体,各部分相互影响。
电气、液压、机械等系统出现故障,检查内容不限于本系统。
8、稳定的电源是控制器正常工作的条件,与故障有关的传感器、控制模块电源列入检查项目。
9、发生人为故障,必须检查更换元件的安装工艺、接线是否正确。
10、为避免和减少火灾事故、及时发现渗漏油和机械部件裂纹等故障、缺陷,风力机内部卫生状况列入检查项目。
11、故障检查处理力求在保证安全可靠的前提下以最低的维修成本处理故障,创造最大的经济效益。
12、由于各生产现场有一定差异,本《报警故障检查处理表》仅做参考,检查处理内容不限于此。
所有报警检查处理表信号为低电平力机预留此故障检测点器编码脉冲错误在预定时间内PLC没有收到Yaw 脉冲信号时产生,或增量脉冲不正常时产生无异常后可以复位电机启动器跳开液压压力低BH2311(U13) ED6检测态故障处理后方可复位(远程)可复位温度传感器PT100、多路温度变送器检测的温度有关整报警点进行处理,但必须优先考虑安全因素,并进行处理自动复位1现场检查确定高可启动刹车片、刹车电机热保护示电机启动器FG418保护跳闸或人为断开试齿轮箱泵后方可启动状态面 通信故障和 BH2102之间无通讯。
GEMESA G58风机资料中文翻译

GAMESA EOLICA 公司技术文件(中文翻译) 风机型号:G58-850KW
如有翻译不准确之处,请参阅原文。并以原文为准
第 1 页 共 21页
PDF 文件使用 "pdfFactory Pro" 试用版本创建
发电机是一台高效率的,4 极,双馈发电机,带有绕组转子和滑差线圈。 风机的基本制动方法是全顺浆(full featheirng)制动。其他的制动是紧 急状态下的紧急制动,通过液压系统启动安装在齿轮箱高速主轴上的紧急盘 式制动器。 风机的功能全部通过几台微处理器构成的控制单元监控。控制系统安装 在机舱内。叶片的角度变化通过液压系统调节。这个调节控制系统可以使叶 片的转动角度从-5o 到+88o。这个系统同时也向制动系统供应压力。 转向系统由两台电机驱动的齿轮构成,由风机的控制器通过安装在机舱 顶部的风向仪提供的风向信息控制风机的转向。定向齿轮驱动定向齿轮条。 定向轴承是一个平面型轴承,有嵌入式摩擦和自锁定功能。 机舱的盖是由玻璃纤维强化的聚脂材料制成,可以保护机舱内部的设备, 防雨,雪,尘和阳光的照射。从塔架进入机舱是通过塔顶的一个中央开口。 机舱内还安装了一台 125 千克的维护吊车。 风机的塔架的高度有 3 种,44,55,和 65 米。塔架是钢结构的圆锥型筒 式塔体结构,可以由两段或三段构成。塔的外表刷了油漆以保护塔体不被腐 蚀。
2.2 变浆系统 风机运行时,变浆系统总是在工作:(1)如果风速低于额定风速,系统选择
最佳的叶片受风角度。这样,风机的电能输出在任何一个风速下都将达到最大。 这是通过变浆系统实现的。这个系统我们叫做“Optitip”系统;(2)当风速超过 额定风速时,系统调节叶片的受风角度,使风机产生额定的发电功率。
歌美飒 G9X 风机介绍 (D 课件)

核心价值
灵活性高,多功能性强; 高效度电成本。 完全符合电网规范和噪音法规。
G80 G87 G90 G97 G114**
80 87 90 97 114
IA IA*, IIA IIA, IIIA IIA, IIIA IIIA
2,000 kW 2,000 kW 2,000 kW 2,000 KW 2,000 kW
Gamesa G9X-2.0 MW平台介绍
歌美飒简介
具有最佳垂直整合的全球工业基地
欧洲、美洲和亚洲的生产中心
欧洲 22个生产中心
美国 2个生产中心
在过去的两年时间里, 歌美飒在风电领域最具 潜力的以下国家设立了 5个生产中心: 中国、印度和巴西
中国 6个生产中心+1个正 在建设中
5
印度 3个生产中心+1个正 在建设中 巴西 1个生产中心
首台G80 IA 在 Aguallal(西班牙)安装
首台G87 IIA在 Lubián(西班牙)安装
新的G9X制造厂在美国建立
首台G97 IIIA在 Alaiz(西班牙)安装
11
Gamesa G9X-2.0 MW平台介绍
Gamesa G9X-2.0 MW
业绩记录
12,522 MW*安装在世界上24个国家 按地理位置划分:西班牙占42%,西班牙以外地区占58%。
G97
扫掠面积增加38% AEP增加超过20%
G114 等级 IIIA
以前的G8X
2011年上市的G9X
2012年后将上市的G9X
Gamesa G9X-2.0 MW平台介绍
Gamesa G9X-2.0 MW
平台演变 - 低风地区
等级 IIIA
更大叶轮的演 变
风电场值长竞聘试题B卷(带答案)

风电场值长竞聘考试试题姓名:分数:说明:本试卷总分100分,单选题25分,判断题15分,多选题20分,简答题共40分,考试时间为2小时30分钟。
一、单选题(每题1分,共25分)1、安全生产管理坚持()的原则。
A 生产第一,综合治理;B 生产与安全并重;C 安全第一、预防为主与综合治理D 预防为主,安防结合2、雷雨天气,需要巡视室外高压设备时,应穿绝缘靴,并不得靠近()A.带电设备B.遮拦C.设备D.避雷器和避雷针3、操作中发生疑问时,应立即停止操作,并向()报告,待()再行许可后,可方进行操作。
A、上级领导B、发命人C、运行人员D、设备专责4、外单位承担或外来人员参与公司系统电气工作的工作人员应熟悉本规程、并经考试合格,经()认可,方可参加工作。
A、值长B、设备运行管理单位C、运行人员D、设备专责5、运行中的高压设备其中性点接地系统的中性点应视作带电体,在运行中若必须进行中性点接地点断开的工作时,应先()才可进行断开工作。
A、汇报上级领导B、建立有效的旁路接地C、填写工作票D、经过值长同意6、在寒冷和潮湿地区,停止运行()以上的风电机组在投运前应(检查绝缘),合格后才允许启动A、三天B、七天C、十天D、一个月7、()对于监视风电场安全稳定运行负有直接责任,因而应及时发现问题,查明原因,防止事故扩大,减少经济损失。
A、值长B、运行人员C、检修维护人员D、运行主管部门8、电气设备操作后的位置检查应以()为准。
A、计算机监控指示B、信号位置指示灯C、设备实际位置D、位置继电器9、停电操作应按照()的顺序依次操作。
A、断路器、负荷侧刀闸、电源测倒闸B、断路器、电源测倒闸、负荷侧刀闸C、负荷侧刀闸、电源测倒闸、断路器D、电源测倒闸、负荷侧刀闸、断路器10、检查检修设备有无突然来电的危险是()职责。
A、工作负责人B、工作班成员C、工作签发人D、工作许可人11、当事故发生在交接班过程中,应停止交接班,交班人员必须坚守岗位,处理事故。
歌美飒风机 (1)

个人安全
检查安全头盔、防护绳、吊钩和下降安全设备的工作状态以确保使用安全。
N°
描述
1
导流罩
1.1
检查轮毂罩支撑的螺栓M20 10.9。
参考EP009004文件设定扭矩扳手
1.5
检查玻璃纤维的螺栓
2
叶片
2.1
检查叶片有无裂纹
2.2
给裂纹标记
2.3
检查平衡塞的位置与状态。
如果(3)值10.3和10.6之间,则必须更换成10.3尺寸的径向滑板;
如果(3)值10.6和11mm之间,则必须更换成10.6尺寸的径向滑板;
如果(3)值大于11mm,则必须更换成11mm尺寸的径向滑板;
如果(3)值大于12mm,则必须尽快报告给Gamesa服务部门;
17.9
检查偏航刹车启动时油路是否有渗漏
检查齿轮箱输入轴与主轴轴套之间的空隙
9.17
检查齿轮箱放油塞,如果漏油,必须更换。检查油路分配器块的接头是否有漏油。
10
高速刹车
10.1
制动器回路放气,注意:不要重复使用放出来的油
10.2
测量制动片衬里的厚度
10.3
检查刹车钳
10.4
检查刹车盘状态
10.5
检查刹车盘的厚度
10.6
检查刹车盘是否有弯曲的现象
20.2
检查第一节塔筒与中间塔筒之间的螺栓联接。参考EP009004文件设定扭矩扳手力矩值
1472±150Nm(无额外油) DIN6914 M30 x 205-10.9
20.3
检查中间塔筒与第三节塔筒之间的螺栓联接。参考EP009004文件设定扭矩扳手力矩值
CAT2138G 钢琴电动吸引风机 操作说明书

Operating Instructions • Warning Information• Parts BreakdownSome dust created by power sanding, sawing, grinding, drilling, and other construction activities contains chemicals known to cause cancer, birth defects or other reproductive harm. Some crystalline silica from bricks and cement and other masonry arsenic and chromium from chemically-treated lumber.Your risk from these exposures varies, depending on how often you do this type of work. To reduce your exposure to these chemicals: work in a well ventilated area, and work with approved safety equipment, such as those dust masks that are specially designed Copyright © Professional Tool Products, 2017All rights reservedCAT2138G3/8" Dr. Mini Impact Wrench - Neon GreenFAILURE TO OBSERVE THESE WARNINGS COULD RE S ULT IN IN J U R Y.THIS IN STRUCTION MAN U A L CON T AIN SIM P OR T AN T SAFE T Y IN FORMATION.READ THIS IN S TRUC T ION MAN UAL CARE F UL L YAN D UN D ER S TAN D ALL IN F OR M A T ION BE F OREOP E R A T I N G THIS TOOL.• It is the responsibility of the owner to make sure allpersonnel read this manual prior to using this air tool.It is also the responsibility of the air tool owner to keepthis manual intact and in a convenient location for allto see and read. If the manual or product labels arelost or not legible, contact Cornwell for replacements.If the operator is not fluent in English, the product andsafety instructions shall be read to and discussedwith the operator in the operator's native language bythe purchaser/owner or his designee, making surethat the operator comprehends its contents.• Al w ays op e r a te, in s pect and main t ain this tool inac c or d ance with Amer i c an Na t ion a l Stan d ardsIn s ti t ute Safe t y Code of Por t a b le Air Tools (ANSIB186.1) and any oth e r ap p li c a b le safe t y codesand reg u l a t ions.• For safety, top per f or m ance and max i m um du r a b il i t y of parts, op e r a te this tool at 90 psig: 6.2 bar max air pres s ure with 3/8" di a m e t er air sup p ly hose.• Always wear im p act-re s is t ant eye pro t ec t ion when op e r a t i ng or per f orm i ng main t e n ance on this tool(users and bystanders).• Al w ays wear hear i ng pro t ec t ion when us i ng this tool (users and bystanders). High sound levels can cause per m a n ent hear i ng loss. Use hear i ng pro t ec t ion asrec o m m end e d by your em p loy e r or OSHA reg u l a t ion.• K eep the tool in ef f i c ient op e r a t i ng con d i t ion.• Operators and main t e n ance per s on n el must be phys i c al l y able to han d le the bulk, weight andpow e r of this tool.• Keep tool out of reach of children.Air un d er pres s ure can cause se v ere in j u r y. Nev e rdi r ect air at your s elf or oth e rs. Al w ays turn off theair sup p ly, drain hose of air pres s ure and de t achtool from air sup p ly be f ore in s tall i ng, re m ov i ng orad j ust i ng any ac c es s o r y on this tool, or be f oreper f orm i ng any main t e n ance on this tool. Fail u reto do so could re s ult in in j u r y. Whip hos e s can cause se r i o us in j u r y. Al w ays check for dam a ged, frayed or loose hos e s and fit t ings, and re p lace im m e d i a te l y. Do not use quick de t ach cou p lings at tool. Seein s truc t ions for cor r ect set-up on page 4.Air powered tools can vi b rate during use. Vi b ra t ion, re p et i t ive mo t ions or un c om f ort a ble po s i t ions overex t end e d pe r i o ds of time may be harm f ul to your hands and arms. Dis c on t in u e use of tool if dis c om f ort,tin g ling feel i ng or pain oc c urs. Seek med i c al ad v icebe f ore re s um i ng use.• Place the tool on the work before starting the tool.Do not point or indulge in any horseplay with this tool.• Note direction of rotation BEFORE operating this tool.• Slip p ing, tripping and/or falling while op e r a t i ng air tools can be a ma j or cause of se r i o us in j u r y or death. Be aware of ex c ess hose left on the walk i ng or work sur f ace.• Keep body work i ng stance bal a nced and firm. Do not over r each when op e r a t i ng the tool.• Anticipate and be alert for sud d en chang e s in mo t ion dur i ng start up and op e r a t ion of any pow e r tool.• Do not carry tool by the hose. Pro t ect the hose from sharp ob j ects and heat.• Tool shaft may continue to rotate briefly after throttle is released. Avoid direct contact with accessoriesduring and after use. Gloves will reduce the risk ofcuts or burns.• Keep away from rotating end of tool. Do not wear jewelry or loose clothing. Secure long hair. Scalpingcan occur if hair is not kept away from tool andaccessories. Choking can occur if neckwear is notkept away from tool and accessories.• Impact wrenches are not torque control devices.Fasteners with specific torque requirements mustbe checked with suitable torque measuringdevices after installation with an impact wrench.• Do not lu b ri c ate tools with flam m a b le or vol a t ile liq u ids such as ker o s ene, die s el or jet fuel.• This tool is not insulated against electric shock.• This tool must not be used in explosive atmospheres.• Do not force tool be y ond its rat e d capacity.•Use only impact sockets and accessories on this tool. Do not use hand sockets or accessories.• Use accessories recommended by Cornwell Tools.• Do not use (or modify) the tool for any otherpurpose than that for which it was designedwithout consulting the manufacturer's authorizedrepresentative.• Do not remove any labels. Re p lace any damaged la b els.• This product may contain one or more chemicals known to the State of California to cause cancerand birth defects or other reproductive harm.Wash hands thoroughly after handling.• Failure to heed these warnings may result in serious or fatal personal injury and/or property damage.PARTS BREAKDOWN - CAT2138G401412408413A414413409410411415420421416417418419403404405406407206103101A102101104308BBA307309306305304204303203302202301105106201CAIR SUPPLYTools operate on a wide range of air pressures. It is recommended that air pressure of these tools measures 90 psig at the tool with the trigger fully depressed and no load applied to the tool. Higher pressure (over 90 psig; 6.2 bar) raises performance beyond the rated capacity of the tool, which will shorten tool life and could cause injury.Always use clean, dry air. Dust, corrosive fumes and/or water in the air line will cause damage to the tool. Drain water from air lines and compressor prior to running tool. Clean the air inlet filter screen weekly. The recommended hookup procedure can be viewed in the above figure.The air inlet used for connecting air supply has standard 1/4" NPT. Line pressure should be increased to compensate for unusually long air hoses (over 25 feet). Minimum hose diameter should be 3/8" I.D. and fittings should have the same inside dimensions and be tightly secured.Ensure an accessible emergency shut off valve has been installed in the air supply line and make others aware of its location. LUBRICATIONLubricate the air motor daily with high quality air tool oil. If no air line oiler is used, run 1/2 oz. of oil through the tool. The oil can be squirted into the tool air inlet or into the hose at the nearest connection to the air supply, then run the tool. A rust inhibitive oil is acceptable for air tools.WARNING: After an air tool has been lubricated, oil will discharge through the exhaust port during the first few seconds of operation. The exhaust port must be covered with a towel before applying air pressure to prevent serious injury.OPERATIONThis tool is an impacting tool and not a torque meter. When specific torque is required, it must be checked with a torque meter after fitting the fastener with the impact. This impact wrench is rated at 3/8" SAE bolt size. Rating must be downgraded for spring U bolts, tie bolts, long cap screws, double depth nuts, badly rusted conditions and spring fastener, as they absorb much of the impact power. When possible, clamp or wedge the bolt to prevent spring back.Soak rusted nuts in penetrating oil and break rust seal before removing with impact wrench. If nut does not start to move in three to five seconds, use a larger size impact wrench. Do not use impact wrench beyond rated capacity as this will drastically reduce tool life. The reversing valve is used to change the direction of the tool. When the valve is out, the tool is in forward or right hand direction. When the valve is pushed in, the tool is in reverse or left hand direction.NOTE: Always turn off the air supply, drain hose of air pressure and detach tool from air supply before installing, removing or adjusting any accessory on this tool, or before performing any maintenance on this tool.NOTE: Actual torque on a fastener is directly related to joint hardness, tool speed, condition of socket and the time the tool is allowed to impact. Use the simplest possible tool to socket hook up. Every condition absorbs energy and reduces power.NOTE: During operation, safety goggles must always be worn to guard against flying debris (users and bystanders). TROUBLESHOOTINGOther factors outside the tool may cause loss of power or erratic action. Reduced compressor output, excessive drain on the air line, moisture or restrictions in air pipes or the use of hose connections of improper size or poor conditions may reduce air supply. Grit or gum deposits in the tool may cut power and may be corrected by cleaning the air strainer and flushing out the tool with gum solvent oil or an equal mixture of SAE #10 and kerosene. If outside conditions are in order, disconnect tool from hose and take tool to your nearest authorized service center.WARRANTYCornwell Quality Tools Company (“Cornwell”) warrants this product against defects in material and workmanship for a period of TWO (2) YEARS from the date of original retail purchase. Subject to the conditions and limitations set forth below, Cornwell will, at its option, either repair or replace any part of the product(s) that proves defective by reason of improper workmanship or materials.This warranty does not cover any damage to this product that results from accident, abuse, misuse, natural or personal disaster, or any unauthorized disassembly, repair, or modification. Repairs, disassembly and modification are only authorized to be made by Cornwell or a Cornwell Authorized Warranty Center.WARRANTY SERVICEIn order to have your tool repaired, return the tool to any Cornwell Au t ho r ized Warranty Center, freight pre p aid. Please include a copy of your proof of pur c hase and a brief de s crip t ion of the prob l em. The tool will be inspected and if any part or parts are found to be de f ec t ive in ma t e r i a l or work m an s hip, they will be re p aired free of charge, and the re p aired tool will be re t urned to you freight pre p aid.EXCLUSIONS AND LIMITATIONSTHIS WARRANTY AND THE REMEDIES SET FORTH ABOVE ARE EXCLUSIVE AND IN LIEU OF ALL OTHER WARRANTIES, REMEDIES AND CONDITIONS, WHETHER ORAL OR WRITTEN, EXPRESS OR IMPLIED. CORNWELL SPECIFICALLY DISCLAIMS ANY AND ALL IMPLIED WARRANTIES, INCLUDING, TO THE EXTENT PERMITTED BY APPLICABLE LAW, ANY WARRANTIES OF MERCHANTABILITY AND FITNESS FOR A PARTICULAR PURPOSE. IF CORNWELL CANNOT LAWFULLY DISCLAIM IMPLIED WARRANTIES UNDER THIS LIMITED WARRANTY, ALL SUCH IMPLIED WARRANTIES ARE LIMITED IN DURATION TO THE DURATION OF THIS WARRANTY.IN NO EVENT SHALL CORNWELL BE LIABLE TO THE PURCHASER OR TO THE USER OF A CORNWELL PRODUCT FOR ANY SPECIAL, INCIDENTAL OR CONSEQUENTIAL DAMAGES BASED UPON BREACH OF WARRANTY, BREACH OF CONTRACT, NEGLIGENCE, TORT, OR ANY OTHER LEGAL THEORY. SUCH DAMAGES INCLUDE, WITHOUT LIMITATION, EXPENSES, LOST REVENUES, LOST SAVINGS, LOST PROFITS, OR ANY OTHER INCIDENTAL OR CONSEQUENTIAL DAMAGES ARISING FROM THE PURCHASE, USE OR INABILITY TO USE THE CORNWELL PRODUCT.Some states do not allow the exclusion or limitation of incidental or consequential damages or exclusions or limitation on the duration of implied warranties or conditions, so the above limitations or exclusions may not apply to you. This warranty gives you specific legal rights, and you may also have other rights that vary by state.Repair kits and replacement parts are available for many Cornwell products, regardless of whether or not the product is still covered by a warranty plan.。
GemesaV52-850风机试题(完整版)

第五章GemesaV52-850风机试题一填空题1.G52 机组的额定功率( 850 )KW。
2.G52 机组功率调节方式。
(变桨调节)3.G52 机组登录服务菜单的密码( 2872)。
4.G52 机组叶轮的扫风面积( 5062 )m2。
5.G52 机组齿轮箱的传动比( 1:61 )。
6.偏航电机的额定工作电压是( 380 )VAC 额定转速是( 1350 )额定功率是( 2.2 )KW。
7.G52 机组运行最低温度( -30 )最高温度( 45 )。
8.G52 机组的生存风速( 50 )m/s。
9.G52 机组齿轮箱故障时温度值( 80 )℃。
10.G52 机组液压油故障时的温度值( 65 )℃。
11.G52 机组在油温低于( 10 )机组必须进行加热,油温达到( 55 )第一组风扇运行,油温达到( 60 )两组同时运行。
12.G52 机组发电机星接时最大功率( 500 )角接最小功率( 150 )。
13.G52 机组偏航最大角度( 1640 )最大偏航时间( 2h )。
14.G52 机组油滤的最大压力( 5 )bar 溢流阀的压力( 13 )bar。
15.G52 机组变桨蓄能器氮气压力( 80 )bar 刹车( 10 )bar 偏航( 10 )bar。
16.G52 机组紧急停机按钮的位置(底部控制柜)、(偏航段)、(顶部控制柜)、(主轴)。
17.G52 机组叶片轴承的结极特点( 4-点球式轴承)。
18.G52 机组主要电压等级( 690V、400V、230V、24V、5V、)。
19.G52 机组基础与塔架螺栓个数( 120 )中段( 108 )上段( 90 )与机舱连接螺栓个数( 82 )力矩( 450 )NM。
二、判断题(每题1 分,共计10 分)1.G52 风力机主传动装置(齿轮箱)的功能将力矩从叶轮传递到发电机。
(√)2.G52 风力机液压系统的功能一是使叶片沿轴线变桨,二是为齿轮箱高速轴的机械刹车提供压力,三是提供偏航刹车。
吉林省风电场信息表

I期:2005.12
II期:2007.12
66kV白大甲、乙线
同塔LGJ-240
37.1KM
白城变
6
白城富裕
风电场
45.00
富裕风力有限责任公司
I期:2005.12
II期:2006.7
III期:2009.4
承诺具备低电压穿越能力
15
大唐瑞丰风电场
850
歌美飒G58-850
58
不具备低电压穿越能力
1500
金风JF82-1500
33
承诺具备低电压穿越能力
16
大唐向阳风电
1500
明阳MY1.5se/1500
267
承诺具备低电压穿越能力
17
北正风场
1500
明阳MY1.5se/1500
66
承诺具备低电压穿越能力
3
通榆风电场
660
西班牙MADE AE-46
11
不具备低电压穿越能力
600
丹麦NORDEX N-43
13
不具备低电压穿越能力
1500
金风77-1500
5
不具备低电压穿越能力
1500
金风82-1500
5
不具备低电压穿越能力
4
查干浩特风电场
750
金风JF S50-750
40
不具备低电压穿越能力
1500
金风JF 82-1500
35
27
2
本科10人、大专21人
中专4人
14
长岭174风电场
运行由所属发电企业负责;升压站委托维护
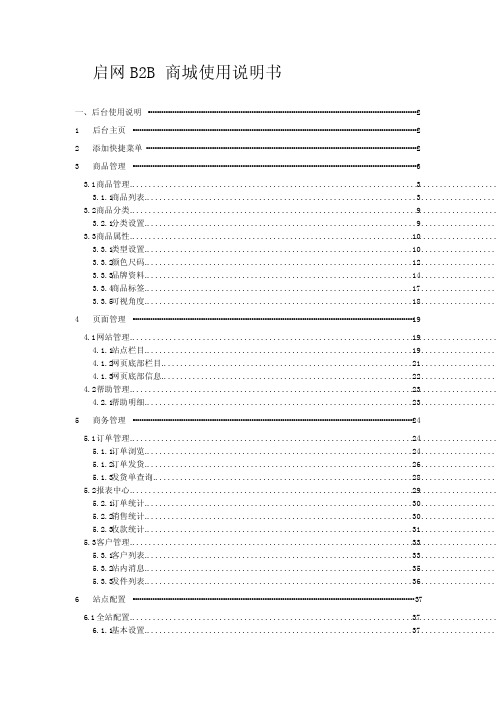
启网B2B电商平台使用说明
启网B2B商城使用说明书 (2)一、后台使用说明 · (2)1后台主页 ·2添加快捷菜单 (2) (3)3商品管理 ·33.1商品管理 .........................................................................................33.1.1商品列表 .....................................................................................93.2商品分类 .........................................................................................93.2.1分类设置 .....................................................................................103.3商品属性 .........................................................................................103.3.1类型设置 .....................................................................................3.3.2颜色尺码 .....................................................................................12143.3.3品牌资料 .....................................................................................173.3.4商品标签 .....................................................................................3.3.5可视角度 .....................................................................................18 (19)4页面管理 ·194.1网站管理 .........................................................................................194.1.1站点栏目 .....................................................................................214.1.2网页底部栏目 .................................................................................224.1.3网页底部信息 .................................................................................4.2帮助管理 .........................................................................................23234.2.1帮助明细 ..................................................................................... (24)5商务管理 ·245.1订单管理 .........................................................................................245.1.1订单浏览 .....................................................................................265.1.2订单发货 .....................................................................................285.1.3发货单查询 ...................................................................................295.2报表中心 .........................................................................................305.2.1订单统计 .....................................................................................305.2.2销售统计 .....................................................................................315.2.3收款统计 .....................................................................................335.3客户管理 .........................................................................................335.3.1客户列表 .....................................................................................355.3.2站内消息 .....................................................................................365.3.3发件列表 ..................................................................................... (37)6站点配置 ·376.1全站配置 .........................................................................................376.1.1基本设置 .....................................................................................6.1.2购物显示设置 .................................................................................38406.1.3商品图片设置 .................................................................................406.1.4在线客服设置 .................................................................................426.2支付管理 .........................................................................................426.2.1支付方式 .....................................................................................456.3管理员 ...........................................................................................6.3.1角色管理 .....................................................................................45476.3.2管理员列表 ...................................................................................486.4任务管理 .........................................................................................486.4.1任务列表 .....................................................................................496.5系统管理 .........................................................................................496.5.1图片管理 .....................................................................................6.5.2浏览错误日志 .................................................................................49 (50)二、前台使用说明 · (51)1网站首页 ·1.1服装行业商品列表显示 .............................................................................51541.2非服装行业商品列表显示 .........................................................................561.3在线客服 .........................................................................................561.4已选购功能 ....................................................................................... (58)2购物车页面 ·3填写订单信息页 (58)4个人后台页面 (60)604.1个人后台页面主页 .................................................................................604.2我的订单 .........................................................................................624.3支付欠款额 .......................................................................................4.4往来订单记录 .....................................................................................62644.5个人信息 .........................................................................................4.6修改密码 .........................................................................................65654.7收货地址 .........................................................................................664.8我的消息 .........................................................................................一、后台使用说明1 后台主页A.一级菜单选项卡;B.用户自定义快捷菜单栏;C.二级菜单;D.快速访问网站前台;2 添加快捷菜单点击“添加”按钮,弹出菜单层,网站管理员可以选择任意菜单加入到快捷菜单栏中。
- 1、下载文档前请自行甄别文档内容的完整性,平台不提供额外的编辑、内容补充、找答案等附加服务。
- 2、"仅部分预览"的文档,不可在线预览部分如存在完整性等问题,可反馈申请退款(可完整预览的文档不适用该条件!)。
- 3、如文档侵犯您的权益,请联系客服反馈,我们会尽快为您处理(人工客服工作时间:9:00-18:30)。
16底部急停按钮反馈 17急停继电器KR913反馈 KM052R230V供电 KM052E23OV供电
修改
日期
姓名
日期 2015/2/16 校对. STANDARD 审核 原始项目
EPLAN 带 IEC 标识结构的项目模板
替换 替换人
EPLAN Software & Service GmbH & Co. KG
S207 KR207
21 12
KR207
/1.9 刹车盘温度继电器 24
/1.4
CCU
顶部电机驱动线圈供电
FM011
急停ok:1 电源 急停ok:2
KR911
11 14 控制急停继电器 /1.8
KR210
/7 63 73
21
KR920
刹车盘温度
24 /1.4 83
TA10
11
KR8
12 11
/1.5
端子 位置
2.2
A1
A1
A1
A1
KR211
A2
KR210
A2
KR910
A2
KR911
A2
ED3输入 刹车电磁驱动 变桨急停
/1.9 /1.7
断开其中一个报900
no plc 急停 受控急停
14 11 /1.4 11 14 /1.3
安全链
顶部即停按钮反馈
OGS
14
KR910
/1.8 no plc 急停 11
KR913
/1.0 24
KR913
/1.0 34
S936
/1.1 11
KR913
/1.0 44 电源
KR919
KR921
KR919
24 /1.5 44
/1.5
-KR919 端子 位置 A1X9 CCU输出 端子 位置
17
A1X8
16
顶部 急停继电器
13 14 /1.4
23 24 /1.5
43 44 /1.6
0
1
2
3
4
5
6
7
8
9
TA3
24V
底部急停按钮 12 11 /1.2 21
-S936
-S933
/1.5 急停按钮 22 21
11
S935
/1.4 12 11 12 11 12 2.1
SD1
数字输出
5.1 6.1 5.4 6.4
-S934
/1.5 22
S934
/1.4
S933
/1.4 21
-S935
/1.5 22
63 64 /1.7
73 74 /1.8
83 84 /1.8
端子 位置
7.1
7.2 7.3
ED3输入
比例阀电源 电机线圈230供电
KR919失电后比例阀失电收桨
CCU输入
顶部KR919得电反馈,反馈错误报901 KR921接比例阀,模拟输出变桨
转子定子接触器24V 星角变换接触器线圈 预充电接触器线圈 顶部690供电KM4线圈
= +
IEC_tpl001 页数 页数 1 1
液控单向阀 快速变桨刹车
D210C
比例阀进油P
-D211
液压 高速刹车
断开报3415
电磁阀
TA3WF-2
TA3WF+7
底部柜230供电
TA10 12 13
顶部230V
TA012 VA+ 1 2 23 /1.3 43
23
33
12
43
KR913
/1.0 13
FM011
KR919得电条件
KR919
/1.5 14
KR919
/1.5 64
KR919
/1.5 74
KR919
/1.5 84
KR211
/1.7
KR913
底部 急停继电器 /1.7 /1.0 /1.1 /1.2 12 23 33 43 13 24 34 44
14
ccu复位 KR920 D210A 控制变桨 电源 TA3;24V/1.7 油液外控X
D210B