众兴m9u1word1&readingn
SANWA 三禾 M11说明书-1

最大的成功和乐趣。
特别提醒要注意发射机的细节介绍。
可以帮助您精确的操控各类遥控模型,如车、船等。
请完全阅读本说明书。
安全第一,注意人身安全和设备安全。
“安全第一”在遥控模型的操控上并不仅仅是一句口号,要随时记住提醒自己。
在场地或湖面要注意的事项:在场地、湖面或其他要操作遥控设备的地方,首先要确认是否有同频干扰,否则,千万不要打开发射机。
在同一场地,同一时间,同一频率只能供一人使用。
本设备使用的频率为FM27M,40M,只能用于操控地面设备,不能用来操控飞机。
记住:在确定没有同频干扰前不要操纵发射机。
将频率指示标记挂在发射机天线上。
在操纵过程中发现问题请立即停止并仔细检查,在没有解决问题前请不要再次操纵。
标题页次标题页次安全事项 1 副微调18使用前的准备工作 2 计时器19 NI-CD电池组 3 舵机反向22改变频带 4 启动位置22发射机特点和操控 5 油门锁定23键盘操作 6 刹车混控24功能页面 6 补偿混控25电池/操作时间计时器7 舵机27转向舵角比率8 设定27终点调整9 提示音28曲线11 开关/微调分配29比率调整控制12 用户名32速度13 直接舵机控制33防锁死刹车15 接收机连接和安装34起步控制16 故障现象和排除方法34模型171使用前的准备工作动作位置和弹簧紧度都可以进一步调整,最大限度适应您的手感。
转向轮紧度转向轮紧度可以用1.5mm的内六角扳手调整,如照片所示。
锁紧时弹簧紧度将增加。
注意:出厂设定弹簧紧度是在最低(软)的位置。
操控位置1.用3mm的内六角扳手取下二边的螺钉。
2.分开发射机的二部分,要小心操作,不要损坏它们之间连接的电线。
3.每边有4个螺钉安装,取下这些螺钉,换个孔重新按上,就可以改变操控位置。
这样设定可以提高显示屏部分的位置。
注意:出厂设定是在最低的地方。
4.重新设定好操控位置后,把二部分合在一起,用3mm的内六角扳手装上二边的螺钉。
油门紧度1.用3mm的内六角扳手取下二边的螺钉。
长虹46寸三星屏背光板原理与维修

三星46寸背光板原理与维修概述三星46寸0.0/0.1版液晶屏背光系统包含有左右两块背光板,一块是主板(Master)或叫A板,另一块是从板(Slave)或叫B板,工作时AB两块板以排线连接,实现同步和控制。
A板以背光控制集成电路MSC1691AI为核心,配以背光激励、输出和电流分配电路,B板只有背光激励、输出和电流分配电路。
每块板有2个升压变压器,每个升压变压器配有12个电流分配变压器和6个输出插座,驱动12支CCFL 灯管。
每个升压变压器和与其对应的激励IC(OZ9981GN)、4个MOSFET组成一个背光驱动通道,因此A板和B板共有4个背光驱动通道。
AB板的输入插座CN101/CN401的1~5脚和6~10脚向背光电路提供24V电源,但背光控制电平和亮度调节PWM信号,只输入至A板输入插座CN101的12和13脚。
三星46寸REV:0.0和REV:0.1两种版本电路结构完全相同,仅有的不同就是输出插座的形状,如下图所示。
左右两块背光板上下两端都有供级联排线连接的插座,实际使用时两条级联排线的连接如下:IS-D一、背光电流分配(平衡)LCD-TVLIPS拓扑电路介绍二、背光板IC介绍1、MSC1691AI(IC101)背光控制MSC1691是Microsemi公司的一个低成本、增强型、可直接驱动CCFL灯管的控制器,其内部转换器设计可以应用于任意的从手掌型的PDA到大屏幕的液晶电视的背光CCFL控制。
内置数字和模拟PWM亮度控制和过压过流保护电路。
MSC1691采用16脚TSSOP封装。
MSC1691AI内部框图MSC1691AI典型应用注意:测5/10/14脚电压时,灯管会熄灭。
MSC1691AI关键脚位描述16脚VDDP电源供电端由24V电源经稳压电路输出稳定的5V-VCC电压,向VDDP电源脚供电,其它芯片的供电如下图:2/3脚AOUT/BOUT激励脉冲输出端,该脚是IC内部振荡信号经过波形变换后,从两个不同的通道内的N沟道MOSFET输出激励脉冲,向后级提供激励信号。
中星9号升级破解46台软件工具讲解
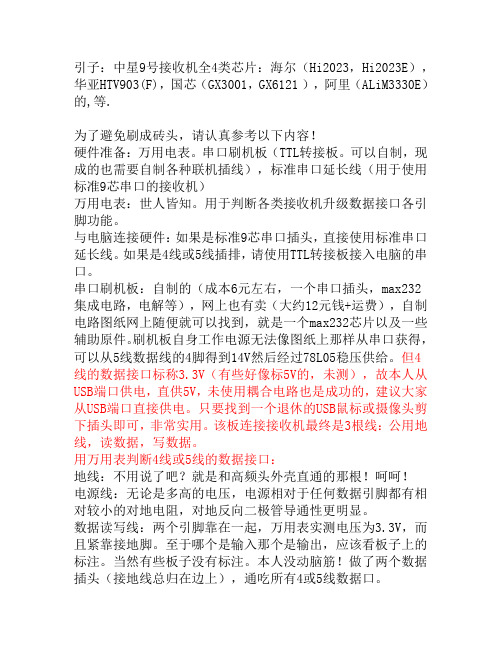
引子:中星9号接收机全4类芯片:海尔(Hi2023,Hi2023E),华亚HTV903(F),国芯(GX3001,GX6121 ),阿里(ALiM3330E)的,等.为了避免刷成砖头,请认真参考以下内容!硬件准备:万用电表。
串口刷机板(TTL转接板。
可以自制,现成的也需要自制各种联机插线),标准串口延长线(用于使用标准9芯串口的接收机)万用电表:世人皆知。
用于判断各类接收机升级数据接口各引脚功能。
与电脑连接硬件:如果是标准9芯串口插头,直接使用标准串口延长线。
如果是4线或5线插排,请使用TTL转接板接入电脑的串口。
串口刷机板:自制的(成本6元左右,一个串口插头,max232集成电路,电解等),网上也有卖(大约12元钱+运费),自制电路图纸网上随便就可以找到,就是一个max232芯片以及一些辅助原件。
刷机板自身工作电源无法像图纸上那样从串口获得,可以从5线数据线的4脚得到14V然后经过78L05稳压供给。
但4线的数据接口标称3.3V(有些好像标5V的,未测),故本人从USB端口供电,直供5V,未使用耦合电路也是成功的,建议大家从USB端口直接供电。
只要找到一个退休的USB鼠标或摄像头剪下插头即可,非常实用。
该板连接接收机最终是3根线:公用地线,读数据,写数据。
用万用表判断4线或5线的数据接口:地线:不用说了吧?就是和高频头外壳直通的那根!呵呵!电源线:无论是多高的电压,电源相对于任何数据引脚都有相对较小的对地电阻,对地反向二极管导通性更明显。
数据读写线:两个引脚靠在一起,万用表实测电压为3.3V,而且紧靠接地脚。
至于哪个是输入那个是输出,应该看板子上的标注。
当然有些板子没有标注。
本人没动脑筋!做了两个数据插头(接地线总归在边上),通吃所有4或5线数据口。
刷机工具软件:海尔芯片2023或2023E使用ABS_Flasher_V1.6。
HTV903芯片使用serial(备份使用serial_dump,升级使用serial_app)。
MLC 9000+ 说明书

保修
我们可以担保这些产品在出厂之前,在材料和工艺方面无任何功能缺陷,并且可以担保此类 产品在三年内符合相关说明手册资料中所提到的技术规范。 除此处及上述所提及的保修条例外,无任何其他明示或暗示保修。WEST 不会因任何特殊原 因对该产品的适销性和适用性做任何担保。
限制
对于任何意外损坏、后续损坏、特殊损坏或任何其他损坏,或者除上述所提及的任何维修或 更换之外的成本或费用,供应商概不承担责任。用户必须按照说明安装和维护产品。对于因 腐蚀性而造成的产品损坏,供应商没有保修责任。用户自己对于这些产品与其应用程序的适 用性负责。对于一个有效的保修声明,产品在保修期内进行返修必须向供应商支付运费。产 品必须进行适当包装,以免在运输过程中因静电放电或其他形式的危害导致产品受损。
MLC 9000+ 用户指南
MLC 9000+ 用户指南
59371-1
价格:
£11.00 €15.00 $15.00
ii
59327,第 1 期 – 2003 年 5 月 4 日
本安装、接线和操作手册中的信息可能会有所变动,恕不另行通知。 Copyright © 2004 年 5 月,Danaher ICG,保留所有权利。未经厂商书面许可,不得以任何 形式或通过任何方式在检索系统中复制、传播、改写或存储本出版物的任何部分,或者将本 出版物的任何部分翻译成任何其他语言。 注意:
ii
59327,第 1 期 – 2003 年 5 月 4 日
MLC 9000+ 用户指南
目录
目录
1 2 MLC 9000+ 系统概述 ................................................................................
蓝魔音悦汇W9拆解

带你一探讨竟!蓝魔音悦汇W9独家拆解2020年11月18日05:55 来源:泡泡网MID频道11月18日音悦汇W9是近期最值得关注的MID产品之一,W9采纳瑞芯处置器方案,支持Android 系统,这也是现时期中最引人注视的组合了,而今天咱们要做的确实是把W9拆开给大伙儿看,让咱们一探这款神秘的MID内部。
再看一眼完整的蓝魔W9拆开以后笔者可不敢保证还能再装归去找到了下手的裂缝拆机前笔者先询问了蓝魔官方人员,拆机的难度并非是很高,先是将正面板的金属拉丝边框揭下来,然后拧掉覆盖着的螺丝就能够够打开机械了。
小提示:不建议大伙儿自己拆机,正面金属拉丝边框为是一次性的,拿掉以后就会严峻变形,不能再安装上去。
咱们用小号的“一字”改锥就能够够轻松的伸进边框的裂缝中去,然后就能够够将边框翘起来。
敲的时候要用巧劲,不然很容易损坏边框和背壳,建议大伙儿在打开机械后再从里面拆卸边框。
从里面拆会加倍简单边框内部被许多咬合点牢牢的咬住明确咬合点的位置以后拆卸就简单了边框轻松取下机身细节赏析边框放在最后拆会更简单从边角能够掀开正面的金属拉丝边框正面板的金属拉丝变宽是一层薄金属材质,在咱们揭下来的时候会随着咱们的使劲发生变形,整体揭下以后变的超级不平整,因此大伙儿在拆之前必然要想好,那个部件是无法恢复的。
拿掉拉丝金属边框之后,屏幕的线条就更加明显了,屏幕周围是所料的边框固定支架,正面共有8颗螺丝需要拧掉。
顺利揭下金属拉丝边框以后能够很清楚的看到屏幕边缘边角细节特写下面的工作确实是用“十字”改锥拧掉所有的螺丝了屏幕的固定边框能够取下来了固定塑料边框很容易就取下来了,这时咱们就能够够看到袒露的屏幕,和屏幕下方盖着的主板了。
机械的要紧面积被屏幕占据着,打开以后映入眼帘的第一确实是7英寸的大液晶屏,屏幕左侧能够看到两个扬声器,右边是USB数据口、电源充电口、HDMI输出接口、音频接口。
屏幕占据了机身绝大部份的面积能够窥见屏幕下方的主板屏幕下方紧贴着的是锂电池一体式屏幕超级轻薄W9的7吋薄屏对照成效图其它厚屏对照成效图W9用的超薄7寸屏幕的特点:一、超薄设计,能够做到很薄的机身内,W9才能够做到如此薄和轻。
M9 维护与操作

SPECTROLAB 光谱仪操作指导书一、光谱仪结构简介光谱仪包括五个部分:光学系统、光源系统、电子读出系统、Ar气冲洗系统、N2气循环系统1、光学系统火花台(光)→通光孔→石英镜(UV光室没有)→快门(shutter)→方解石透镜→光纤(紫外光室没有)→入射狭缝→入射折射片(描迹)→光栅(分光)→出射折射片→出射狭缝→反射镜(光电管位置重叠时用)→光电倍增管(-1000VDC)光电转换→电子读出系统2、电子读出系统光电管→光电流线→EK8509积分板(在一定时间内取平均值)→EK9115(数模转换板)→(模拟信号转为数字信号)EK9809下级工控机→奔腾586计算机→查曲线→读出含量EK8864 15V AC EK8530→±12VDCEK1002→-1000VDC→光电倍增管220V 供UV光室高压(-1000VDC)(2A)5V电源→±5VDC仪器总保险:上为6.3A,下为6.3A(面向仪器背面)EK9115±5VDC 供给EK8509EK9809EK8808(SAFT板)±12VDC供给EK8864的white light3、SOURCE 3000光源系统包括点火系统EK9827、光源框架、SAFT系统。
(1)四个红灯:不激发并在‘READY’状态时,3、4灯亮。
①FR(freqnency):频率信号300HZ②PA(parameter):光源参数(预燃时间,曝光时间,冲洗时间,parameter)③ER(ERROR):光源错误④DO(安全信号):Door open(门开)Clamp up(夹子抬起),Argon low(Ar气低)(2)四根光纤①频率接收(F)(拔下此光纤,可以不激发并观察分析流程)②参数接收(P)③、④(T)UV室和空气室SAFT探测光纤(3)SAFT系统①EK8804(dummy短路板)②EK8807(SAFT放大板)③EK9127(SAFTΠ放大板)④EK8808(SAFT控制板)4. Ar气冲洗系统⑴Ar气阀体包括Ar气压力传感器,AF(分析流量)电磁阀、CF(常流量)电磁阀、快门(shutter)电磁阀,blende(与spark3、spark2有关、火花内档光板Mask)电磁阀,Ar气流量计(左边)(直接进入火花台)60 l/h,Ar气流量计(右边)(在紫外光室快门后面进入)100-160 l/h。
NEC UNIVERGE SV9500通信服务器说明书

Achieve the Smart EnterpriseThe Smart Enterprise innovates by leveraging the best and most current information technologies,tools, and products. With NEC’s UNIVERGE SV9500 Communications Server, smart enterprisesare empowered by technologies which optimize business practices, drive workforce engagement,and create a competitive advantage.®Power for Large BusinessesThe UNIVERGE SV9500 is a powerful communications solution that is designed toprovide competitive businesses with the high-e ciency, easy-to-deploy technology that they require. Reliable, scalable, adaptable, andeasy-to-manage, the SV9500 is built on cutting-edge technology that supports Voice, Uni ed Communications (UC)and Collaboration, Uni ed Messaging, and Mobility out-of-the-box, all the while remaining easy to manage.This robust, feature-rich system is ideal for geographically distributed businesses and enterprises.It is designed to help solve today’s communications challenges and o ers easy integration with NEC’s unique vertical solutions.®Communication ServerMG (SIP)UG50UNIVERGE SV9500® UNIVERGE SV9500,®UNIVERGE SV9500®IP PhoneSoft Phone DECT PhoneUC DesktopSmart DeviceThe UNIVERGE SV9500 o ers:Premier IP uni ed communicationsVoice/UC/UM delivered as an integrated solutionSimpli ed user licensingComprehensive contact center suiteBroad range of mobility applications and devicesVertical market-speci c solutionsWide-range of end-pointsSingle point con guration and managementMulti-Line SIP client, multi-carrier supportVirtualization supportDelivery on NEC’s green initiativesThailand Uni ed CommunicationsVendor of The Year 2015UNIVERGE ®SV9500 – Empowering the Smart WorkforceInnovation that Fits your IT ArchitectureMaintain IT more e cientlyThe user-friendly management interface streamlines system adminis-tration, giving your IT department one personalized portal to administer the entire communications system – Voice, Uni edCommunications, and Voicemail – all from one central location. The SV9300 meets all the needs of today’s IT manager for operational e ciency, security and IT governance.No one wants a communications system that’s di cult to use and even harder to maintain and protect. That’s why NEC’s SV9500 is one of the easiest to con gure Uni ed-Communications-capable systems on the market. The SV9500 easily integrates with existing IT technology as a fully interoperable digital or IP system.Working seamlessly in data centers and cloud environments, SV9500 aligns with IT strategies to virtualize communication and collaboration services - whether deployed in a data center, spread across an organiza-tion’s di erent sites or hosted in the cloud.Data Center readyVirtualize your environmentThe SV9500 gives you the option of a fully virtualized communica-tions solution. By doing so you can deploy applications faster,increase performance and availability, and automate operations — resulting in IT that’s easier to implement and less costly to own and maintain.Make collaborating easier with Uni ed CommunicationsNEC’s SV9500 UC suite of applications gives you the communication tools you need to streamline communications and information delivery. With this powerful, manageable solution, your information is centralized and messages uni ed,so your employees can e ciently manage day-to-day business and communications easily.Users are able to dictate and manage how, when, and where he/she wants to bereached via the desktop and mobile clients. And with the help and inclusion of single number reach, an integrated softphone, call forwarding,and voice/video conferencing and collabo-ration you can ensure that your customers are able to reach whomever they need to, when they need to. SV9500 UC provides you with the option of using the desktop client as a standalone application or integrated with your Microsoft® O ce Outlook® client.Your employees retain ownership of their communications. They set their schedule, and their phone rings accordingly.They launch a meeting or customer service session, and then manage it directly fromtheir desktop.Making Calling ExcitingFreedom of choice and personalization ensurea smart work environmentCall from your desk phoneFor those interested in keeping handsetsstationary: NEC’s innovative desktop endpoint design is intended to deliver maximumdeployment exibility, while a wide range of choices allow for multiple combinations that t any and all business niches or personaliza-tion requirements.UNIVERGE Desktop Telephones make o ce life better®Enabling communication and access to informationin real timeSP350 SoftPhone embeds voice communication into establishedbusiness processes to bring employees the instant communication and information they require. This versatile communications tool o ers an extensive array of high-quality video, audio, voice and text features.The SP350 SoftPhone is a multimedia IP phone installed on a personal computer or laptop. It delivers high-quality voice communication using a USB-connected headset/handset. Employees can use itas a primary desktop telephone, as a supplemental desktop telephone or as a remote/telecommuting device.UC for Enterprise Attendant &NEC’s UT880 takes it to the next levelBusinesses need a cost-e ective attendant console that makes their workers more e cient while improving their customer service. NEC’s UCE Attendant was designed speci cally to optimize business performance and boost abusiness’s standard of service.Optimal call management through a customizable, intuitive user interface Presence-enabled directorythat seamlessly integrates with corporate directory data Screen-pops provide valuable customer information even before a call is answeredSkills-based directory search to quickly nd the person most suitable to assist the callerA cost-e ective way to increase attendant productivity Intuitive on screen call control with exible routingSeamless integration of presence-enabled directory with click to call, e-mail, SMS and IMOptional threat recording, 911 alerts, on-call schedules, message taking and procedure managementIntegrates with popular contact and CRM applicationsas well as Microsoft Outlook®®Wide range of choices – choose from IP or digital, 2-line keys to32+ or DESI-less, grayscale, color or touch-screen display, custom keypads, plus moreCustomizable function keys – can be adapted to the exact individual requirements of your business User-friendly interface – little or no sta training requiredBluetooth connection adapter – enables users to receive and place calls through either theirsmart device or desktop telephoneA full seven-inch color display with four- nger multi-touch capabilitiesUNIVERGE Multi-Line client that emulates any NEC telephoneOpen interface for application development Supports SV9500 platform voice functionality and hands-free speakerphone Integrated Bluetooth capabilityBuilt-in camera for video conferencing Multiple login support USB portAdvanced FeaturesUNIVERGE Softphone : SP350®The SV9500 meets allyour communications needsBusiness boosting applications – Extend your communicationDECT Phone DT400 / DT800 : Digital Phone & IP PhoneNEC Corporation (Thailand) Ltd. (Head O ce)3 Rajnakarn Building, 22nd . and 29th .South Sathorn Road, Yannawa, Sathorn, Bangkok 10120https://Email:*************.th。
鼎智公司R、L平台丝印模板(中外文)23键

目录一、中文版本 (2)二、中文版本示例以及说明如下:(图一) (3)三、越南语键盘丝印 (3)四、英语键盘丝印 (4)五、阿拉伯语键盘丝印 (4)六、波斯语键盘丝印 (5)七、德语键盘丝印 (5)八、俄语键盘丝印 (6)九、法语键盘丝印 (6)十、马来语键盘丝印 (7)十一、葡萄牙语键盘丝印 (7)十二、泰语键盘丝印 (8)十三、土耳其语键盘丝印 (8)十四、乌尔都语键盘丝印 (9)十五、西班牙语键盘丝印 (9)十六、希腊语键盘丝印 (9)十七、匈牙利语键盘丝印 (10)十八、意大利语键盘丝印 (11)十九、印地语键盘丝印 (11)二十、印度尼西亚语键盘丝印 (11)二十一、繁体键盘丝印 (12)一、中文版本二、中文版本示例以及说明如下:(图一)三、越南语键盘丝印右功能键右附加键红键说明:数字按键1-9按上表中定义印,其他按键与“第一节中文版本”一致。
四、英语键盘丝印五、阿拉伯语键盘丝印说明:数字按键1-9按上表中定义印,其他按键与“第一节中文版本”一致。
六、波斯语键盘丝印说明:数字按键1-9按上表中定义印,其他按键与“第一节中文版本”一致。
七、德语键盘丝印八、俄语键盘丝印说明:数字按键1-9按上表中定义印,其他按键与“第一节中文版本”一致。
九、法语键盘丝印说明:数字按键1-9按上表中定义印,其他按键与“第一节中文版本”一致。
十、马来语键盘丝印说明:数字按键1-9按上表中定义印,其他按键与“第一节中文版本”一致。
十一、葡萄牙语键盘丝印说明:数字按键1-9按上表中定义印,其他按键与“第一节中文版本”一致。
十二、泰语键盘丝印说明:数字按键0-9按上表中定义印,其他按键与“第一节中文版本”一致。
十三、土耳其语键盘丝印十四、乌尔都语键盘丝印说明:数字按键1-9按上表中定义印,其他按键与“第一节中文版本”一致。
十五、西班牙语键盘丝印十六、希腊语键盘丝印说明:数字按键1-9按上表中定义印,其他按键与“第一节中文版本”一致。
数字卫星接收机解密大全

数字卫星接收机解密大全(续)2008年03月23日星期日下午 05:091.亚视达5288(海克威):( D, z% M; d2 x2 ~9 S* \' m7 H星友之家参数论坛(1)首先按遥控器“MENU”键进入系统设置,按“OK”进入。
6 k9 r) D0 M. @( F+ d. E(2)进入“系统设置”,选择“默认设置”。
- h& Z6 D+ {. s5 T- C# O3 Z) ]) g星友之家参数论坛(3)画面出现“恢复默认设置”框,先按遥控器静音键,再按遥控器方向“上”键,这时画面出现“请输入密码”框,输入密码1270即可。
: }3 ~9 c- A0 J2 e1 C+ m1 `, Z6 g+ A4 y2、亚视达2688:进入默认设置中,按静音键即可。
3 A& S# x0 @; Z星友之家参数论坛 3、卓异ZY5518Y(东方龙、小飞鸽、小孔雀、小帅哥等)盲扫功能:按遥控菜单键。
出现卓异主菜单时,虽然画面没有提示,便只要输入密码即可,可输入以下几组密码:309700、5168、1698、305518。
因不同批次的机器密码是不是同的,可以逐个一试。
如果正确,会有“出厂参数恢复,请稍等”的提示。
这步完成再按自动搜索,确认即可进入盲扫。
7 X; U- p3 h w星友之家参数论坛 4、卓异→飞天龙:密码1234。
5、通达:节目加→按音量减键4次→静音即可。
0 [5 F% g7 i# V: ~( 6、小神童、挑战者等:恢复出厂设置→确认,输入6678即可。
! Y/ ^) X% R' O) W3 ~& x7、经天、威乐士2288,年华、沧浪等:恢复出厂设置→确认→静音→节目7065即可。
星友之家参数论坛8 Q$ I4 l. K0 F& r) I8、跃佳航天等:恢复出厂设置→确认→静音→节目加→7065;菜单按静音键5秒钟→屏幕显示“数据存储中”即可。
Samsung电视用户操作手册说明书
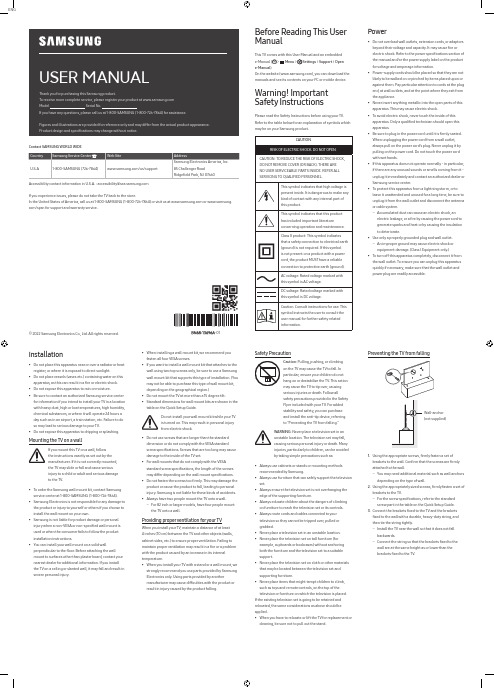
ENGUSER MANUALThank you for purchasing this Samsung product.To receive more complete service, please register your product at Model Serial No.If you have any questions, please call us at 1-800-SAMSUNG (1-800-726-7864) for assistance.Figures and illustrations are provided for reference only and may differ from the actual product appearance.Product design and specifications may change without notice.© 2022 Samsung Electronics Co., Ltd. All rights reserved.Before Reading This UserManualThis TV comes with this User Manual and an embeddede-Manual ( > Menu > Settings > Support > Opene-Manual).On the website (), you can download themanuals and see its contents on your PC or mobile device.Warning! ImportantSafety InstructionsPlease read the Safety Instructions before using your TV.Refer to the table below for an explanation of symbols whichmay be on your Samsung product.CAUTIONRISK OF ELECTRIC SHOCK. DO NOT OPEN.CAUTION: TO REDUCE THE RISK OF ELECTRIC SHOCK,DO NOT REMOVE COVER (OR BACK). THERE ARENO USER SERVICEABLE PARTS INSIDE. REFER ALLSERVICING TO QUALIFIED PERSONNEL.This symbol indicates that high voltage ispresent inside. It is dangerous to make anykind of contact with any internal part ofthis product.This symbol indicates that this producthas included important literatureconcerning operation and maintenance.Class II product: This symbol indicatesthat a safety connection to electrical earth(ground) is not required. If this symbolis not present on a product with a powercord, the product MUST have a reliableconnection to protective earth (ground).AC voltage: Rated voltage marked withthis symbol is AC voltage.DC voltage: Rated voltage marked withthis symbol is DC voltage.Caution. Consult instructions for use: Thissymbol instructs the user to consult theuser manual for further safety relatedinformation.Power•Do not overload wall outlets, extension cords, or adaptorsbeyond their voltage and capacity. It may cause fire orelectric shock. Refer to the power specifications section ofthe manual and/or the power supply label on the productfor voltage and amperage information.•Power-supply cords should be placed so that they are notlikely to be walked on or pinched by items placed upon oragainst them. Pay particular attention to cords at the plugend, at wall outlets, and at the point where they exit fromthe appliance.•Never insert anything metallic into the open parts of thisapparatus. This may cause electric shock.•To avoid electric shock, never touch the inside of thisapparatus. Only a qualified technician should open thisapparatus.•Be sure to plug in the power cord until it is firmly seated.When unplugging the power cord from a wall outlet,always pull on the power cord's plug. Never unplug it bypulling on the power cord. Do not touch the power cordwith wet hands.•If this apparatus does not operate normally - in particular,if there are any unusual sounds or smells coming from it -unplug it immediately and contact an authorized dealer orSamsung service center.•To protect this apparatus from a lightning storm, or toleave it unattended and unused for a long time, be sure tounplug it from the wall outlet and disconnect the antennaor cable system.–Accumulated dust can cause an electric shock, anelectric leakage, or a fire by causing the power cord togenerate sparks and heat or by causing the insulationto deteriorate.•Use only a properly grounded plug and wall outlet.–An improper ground may cause electric shock orequipment damage. (Class l Equipment only.)•To turn off this apparatus completely, disconnect it fromthe wall outlet. To ensure you can unplug this apparatusquickly if necessary, make sure that the wall outlet andpower plug are readily accessible.Installation•Do not place this apparatus near or over a radiator or heat register, or where it is exposed to direct sunlight.•Do not place vessels (vases etc.) containing water on this apparatus, as this can result in a fire or electric shock.•Do not expose this apparatus to rain or moisture.•Be sure to contact an authorized Samsung service center for information if you intend to install your TV in a location with heavy dust, high or low temperatures, high humidity, chemical substances, or where it will operate 24 hours a day such as in an airport, a train station, etc. Failure to do so may lead to serious damage to your TV.•Do not expose this apparatus to dripping or splashing. Mounting the TV on a wallIf you mount this TV on a wall, followthe instructions exactly as set out by themanufacturer. If it is not correctly mounted,the TV may slide or fall and cause seriousinjury to a child or adult and serious damageto the TV.•To order the Samsung wall mount kit, contact Samsung service center at 1-800-SAMSUNG (1-800-726-7864).•Samsung Electronics is not responsible for any damage to the product or injury to yourself or others if you choose to install the wall mount on your own.•Samsung is not liable for product damage or personal injury when a non-VESA or non-specified wall mount is used or when the consumer fails to follow the product installation instructions.•You can install your wall mount on a solid wall perpendicular to the floor. Before attaching the wall mount to surfaces other than plaster board, contact your nearest dealer for additional information. If you install the TV on a ceiling or slanted wall, it may fall and result in severe personal injury.Safety PrecautionCaution: Pulling, pushing, or climbingon the TV may cause the TV to fall. Inparticular, ensure your children do nothang on or destabilize the TV. This actionmay cause the TV to tip over, causingserious injuries or death. Follow allsafety precautions provided in the SafetyFlyer included with your TV. For addedstability and safety, you can purchaseand install the anti-tip device, referringto "Preventing the TV from falling."WARNING: Never place a television set in anunstable location. The television set may fall,causing serious personal injury or death. Manyinjuries, particularly to children, can be avoidedby taking simple precautions such as:•Always use cabinets or stands or mounting methodsrecommended by Samsung.•Always use furniture that can safely support the televisionset.•Always ensure the television set is not overhanging theedge of the supporting furniture.•Always educate children about the dangers of climbingon furniture to reach the television set or its controls.•Always route cords and cables connected to yourtelevision so they cannot be tripped over, pulled orgrabbed.•Never place a television set in an unstable location.•Never place the television set on tall furniture (forexample, cupboards or bookcases) without anchoringboth the furniture and the television set to a suitablesupport.•Never place the television set on cloth or other materialsthat may be located between the television set andsupporting furniture.•Never place items that might tempt children to climb,such as toys and remote controls, on the top of thetelevision or furniture on which the television is placed.If the existing television set is going to be retained andrelocated, the same considerations as above should beapplied.•When you have to relocate or lift the TV for replacement orcleaning, be sure not to pull out the stand.•When installing a wall mount kit, we recommend youfasten all four VESA screws.•If you want to install a wall mount kit that attaches to thewall using two top screws only, be sure to use a Samsungwall mount kit that supports this type of installation. (Youmay not be able to purchase this type of wall mount kit,depending on the geographical region.)•Do not mount the TV at more than a 15 degree tilt.•Standard dimensions for wall mount kits are shown in thetable on the Quick Setup Guide.Do not install your wall mount kit while your TVis turned on. This may result in personal injuryfrom electric shock.•Do not use screws that are longer than the standarddimension or do not comply with the VESA standardscrew specifications. Screws that are too long may causedamage to the inside of the TV set.•For wall mounts that do not comply with the VESAstandard screw specifications, the length of the screwsmay differ depending on the wall mount specifications.•Do not fasten the screws too firmly. This may damage theproduct or cause the product to fall, leading to personalinjury. Samsung is not liable for these kinds of accidents.•Always have two people mount the TV onto a wall.–For 82 inch or larger models, have four people mountthe TV onto a wall.Providing proper ventilation for your TVWhen you install your TV, maintain a distance of at least4 inches (10 cm) between the TV and other objects (walls,cabinet sides, etc.) to ensure proper ventilation. Failing tomaintain proper ventilation may result in a fire or a problemwith the product caused by an increase in its internaltemperature.•When you install your TV with a stand or a wall mount, westrongly recommend you use parts provided by SamsungElectronics only. Using parts provided by anothermanufacturer may cause difficulties with the product orresult in injury caused by the product falling.Preventing the TV from fallingWall-anchor(not supplied)1. Using the appropriate screws, firmly fasten a set ofbrackets to the wall. Confirm that the screws are firmlyattached to the wall.–You may need additional material such as wall anchorsdepending on the type of wall.2. Using the appropriately sized screws, firmly fasten a set ofbrackets to the TV.–For the screw specifications, refer to the standardscrew part in the table on the Quick Setup Guide.3. Connect the brackets fixed to the TV and the bracketsfixed to the wall with a durable, heavy-duty string, andthen tie the string tightly.–Install the TV near the wall so that it does not fallbackwards.–Connect the string so that the brackets fixed to thewall are at the same height as or lower than thebrackets fixed to the TV.Contact SAMSUNG WORLD WIDECountry Samsung Service Center Web Site AddressU.S.A1-800-SAMSUNG (726-7864)/us/support Samsung Electronics America, Inc.85 Challenger Road Ridgefield Park, NJ 07660Accessibility contact information in U.S.A. : accessibility@If you experience issues, please do not take the TV back to the store.In the United States of America, call us at 1-800-SAMSUNG (1-800-726-7864) or visit us at or www.samsung. com/spsn for support and warranty service.-01–If your access point or modem has a standby mode button, use it to disconnect your home network from the Internet when it is not in use.•Use strong passwords for all your Internet accounts (Netflix, Facebook, etc.).•If any unexpected messages appear on your TV screen requesting permission to link a device or enable a remote session, do NOT accept.•Do not visit suspicious web sites and do not install any suspicious programs. We recommend that users install only those authorized apps provided by Samsung through Samsung Smart Hub.Operation•This apparatus uses batteries. In your community, there might be environmental regulations that require you to dispose of these batteries properly. Please contact your local authorities for disposal or recycling information. •Store the accessories (remote control, or etc.) in a location safely out of the reach of children.•Do not drop or strike the product. If the product is damaged, disconnect the power cord and contact a Samsung service center.•Do not dispose of remote control or batteries in a fire. •Do not short-circuit, disassemble, or overheat the batteries.•CAUTION : There is danger of an explosion if you replace the batteries used in the remote with the wrong type of battery. Replace only with the same or equivalent type. •WARNING - TO PREVENT THE SPREAD OF FIRE, KEEP CANDLES AND OTHER ITEMS WITH OPEN FLAMES AWAY FROM THIS PRODUCT AT ALL TIMES.Caring for the TV•To clean this apparatus, unplug the power cord from the wall outlet and wipe the product with a soft, dry cloth. Do not use any chemicals such as wax, benzene, alcohol, thinners, insecticide, air fresheners, lubricants, or detergents. These chemicals can damage the appearance of the TV or erase the printing on the product.•The exterior and screen of the TV can get scratched during cleaning. Be sure to wipe the exterior and screen carefully using a soft cloth to prevent scratches.•Do not spray water or any liquid directly onto the TV. Any liquid that goes into the product may cause a failure, fire, or electric shock.01 Initial SetupWhen you turn on your TV for the first time, it immediately starts the Initial Setup. Follow the instructions displayed on the screen and configure the TV's basic settings to suit your viewing environment.Using the TV ControllerYou can turn on the TV with the TV Controller button at the bottom of the TV, and then use the Control menu . The Control menu appears when the TV Controller button is pressed while the TV is On.•The screen may dim if the protective film on the SAMSUNG logo or the bottom of the TV is not removed. Please remove the protective film.Control menuTV Controller button / Remote control sensor / Microphone switchHow to turn on and off the MicrophoneType AOn Off Type BOn OffYou can turn on or off the microphone by using the switch at the bottom of the TV. If microphone is turned off, All voice and sound features using microphone are not available. •This function is supported only in Q7*B/Q8*B/QN8*B/QN9*B Series.•The position and shape of the microphone switch may differ depending on the model.•During analysis using data from the microphone, the data is not saved.Internet securitySamsung takes a number of steps to protect its Internet-compatible Smart TVs against unauthorized incursions and hacking. For example, certain sensitive communications between the TV and the Internet servers are encrypted. In addition, the TV’s operating system has adopted controls to prevent the installation of unauthorized applications.Although we take steps to protect your Smart TV and personal information, no Internet-connected device or transmission is completely secure. We therefore encourage you to take additional steps to safeguard your TV, secure your Internet connection, and minimize the risk of unauthorized access. These steps are listed below:•When Samsung releases software updates to improve the security of your TV, you should promptly install these updates. To automatically receive these updates, turn on Auto Update in the TV's menu (>Menu >Settings > Support > Software Update > Auto Update ). When an update is available, a popup message appears on the TV screen. Accept the software download and update by selecting Yes when prompted. Take steps to secure your wireless access point and network. Your access point's manual should provide additional details about how to implement the following measures: –Secure your wireless access point's management settings with a unique password to prevent unauthorized changes to security related settings. –Implement standard encryption (e.g., WPA2 encryption) on your wireless access point to secure your wireless network signal.–Secure access to your wireless network with a hard-to-guess password.–Confirm your access point's firewall setting is enabled (if so equipped).–Make sure that all your Internet-connected devices are behind your network's firewall.02 Troubleshooting and MaintenanceTroubleshootingFor more information, refer to "Troubleshooting " or "FAQ " in the e-Manual. >Menu >Settings > Support > Open e-Manual >Troubleshooting or FAQIf none of the troubleshooting tips apply, please visit "" and click Support or contact the Samsung service center.•This TFT LED panel is made up of sub pixels which require sophisticated technology to produce. There may be, however, a few bright or dark pixels on the screen. These pixels will have no impact on the performance of the product.•To keep your TV in optimum condition, upgrade to the latest software. Use the Update Now or Auto Update functions on the TV's menu ( >Menu >Settings> Support > Software Update > Update Now or AutoUpdate ).The TV won’t turn on.•Make sure that the power cord is securely plugged in to the TV and the wall outlet.•Make sure that the wall outlet is working and the remote control sensor at the bottom of the TV is lit and glowing a solid red.•Try pressing the TV Controller button at the bottom of the TV to make sure that the problem is not with the remote control. If the TV turns on, refer to "The remote control does not work."03 Specifications and Other InformationSpecificationsDisplay Resolution3840 x 2160Sound (Output)Q6*B/Q7*B Series: 20 W Q8*B Series: 60 W (50": 40 W)QN85BA Series: 60 W QN85BD Series: 70 WQN90BA Series: 60 W (43": 20 W, 50": 40 W)QN90BD Series: 70 W (43": 20 W, 50": 40 W)Operating Temperature50 °F to 104 °F (10 °C to 40 °C)Operating Humidity10 % to 80 %, non-condensingStorage Temperature-4 °F to 113 °F (-20 °C to 45 °C)Storage Humidity5 % to 95 %, non-condensing Notes•This device is a Class B digital apparatus.•For information about the power supply, and more information about power consumption, refer to the information on the label attached to the product. –On most models, the label is attached to the back of the TV. (On some models, the label is inside the cover terminal.)•To connect a LAN cable, use a CAT 7 (*STP type) cable for the connection. (100/10 Mbps)* Shielded Twisted Pair•The images and specifications of the Quick Setup Guide may differ from the actual product.The remote control does not work.•Check if the remote control sensor at the bottom of the TV blinks when you press the button on the remotecontrol.–When the remote's battery is discharged, charge the battery using the USB charging port (C-type), or turn over the remote to expose the solar cell to light. •Try pointing the remote directly at the TV from 5 ft. to 6 ft. (1.5-1.8 m) away.•If your TV came with a Samsung Smart Remote (Bluetooth Remote), make sure to pair the remote to the TV. To pair a Samsung Smart Remote, press the andbuttonstogether for 3 seconds.Eco Sensor and screen brightnessEco Sensor adjusts the brightness of the TV automatically. This feature measures the light in your room and optimizes the brightness of the TV automatically to reduce power consumption. If you want to turn this off, go to >Menu>Settings > All Settings > General & Privacy > Power andEnergy Saving > Brightness Optimization .•The eco sensor is located at the bottom of the TV. Do not block the sensor with any object. This can decrease picture brightness.Decreasing power consumptionWhen you shut the TV off, it enters Standby mode. In Standby mode, it continues to draw a small amount of power. To decrease power consumption, unplug the power cord when you don't intend to use the TV for a long time.LicensesThe terms HDMI and HDMI High-Definition Multimedia Interface, and the HDMI Logo are trademarks or registered trademarks of HDMI Licensing Administrator, Inc. in the United States and other countries.。
十大触控一体机品牌技术参数
目录一、希沃 (1)70寸技术参数 (1)图片示例 (2)二、TCL (3)70寸技术参数 (3)图片示例 (4)65寸技术参数 (5)三、上海广电光显 (6)技术参数 (6)四、长虹 (7)65寸技术参数 (7)五、鸿合科技 (8)70寸技术参数 (8)六、创维光电 (8)70寸技术参数 (9)图片示例 (10)84寸技术参数 (11)65寸技术参数 (12)七、上海仙视 (12)70寸技术参数 (12)图片示例 (14)84寸技术参数 (15)八、夏普 (16)70寸技术参数 (16)80寸技术参数 (17)图片示例 (19)九、创显光电 (19)70寸技术参数 (20)84寸技术参数 (21)图片示例 (22)十、深圳中银科技 (23)70寸技术参数 (23)一、希沃70寸技术参数图片示例70寸图片165寸图片2二、TCL70寸技术参数图片示例70寸图片365寸图片465寸技术参数三、上海广电光显技术参数四、长虹65寸技术参数五、鸿合科技70寸技术参数产品规格:70英寸型号:HD-I7002E背光类型:LED显示比例:16:9可视角度:178°物理解析度:1920*1080Pixel图像制式/声音制式:PAL/DK,I3D功能:——工作电压:AC 90-265V,50/60Hz触摸表面材质:钢化玻璃感应方式:红外感应触摸技术特性:HID免驱触摸点数:多点触控,多点书写书写方式:手指或书写笔触摸分辨率:32767*32767通讯接口: USB存储温度/湿度:-20℃~60℃,10%~90% 工作温度/湿度:5℃~50℃,10%~90% 安装方式:壁挂或移动整机尺寸:1648.9*975.6*112.9mm重量:70KG六、创维光电70寸技术参数图片示例70寸图片565寸图片6七、上海仙视70寸技术参数图片示例八、夏普 70寸技术参数 电力消耗(W ) 230W 待机消耗功率(W ) 0.50电源要求 交流110-240V ,50Hz 屏幕显示语言 英文/中文(简体)/俄语 扬声器 (150mm×34mm )×2音频输出功率 10W×2(AV 输入,负载4欧姆,失真度为10%时) 电视调谐系统 自动预设99个频道视频彩色制式 PAL/SEAM/NTSC3.58/PAL60图像清晰度* RD 模拟信号:水平>=350,垂直>=400以上 SDTV :水平>=450,垂直>=450以上 背光源 LED 重量kg 57.5KG 外型尺寸(cm )宽×深×高 1.625 ×106 ×993mm液晶显示屏 X-GEN 面板分辨力1920(水平)×1080(垂直)下面-数字(天线输入)UHF/VHF 75q DIN 型插座下面-模拟(天线输UHF/VHF 75q DIN 型插座入)后面ー音频输入 HDMI2/电脑共用(直径3.5mm 插孔)RS-232C 9针D-sub 凸型插头电脑 15针小型D-sub,音频输入(与HDMI2共用)(直径3.5mm 插孔)后面—输入5 视频输入,音频输入后面—输入4色差输入(480I,576I,480P,576P,720P/50Hz,720P/60Hz, 1080I/50Hz,10080I/60Hz ),音频输入 后面-HDMI3HDMI(HDMI 输入)(480I,576I,480P,576P,720P/50Hz, 720P/60Hz,1080I50Hz,1080I/60Hz,1080P/50Hz, 1080P/60Hz,1080P/24Hz )侧面-HDMI2HDMI(HDMI 输入)(480I,576I,480P,576P,720P/50Hz720P/60Hz,1080I/50Hz,1080I/60Hz,1080P/50Hz,1080P/60Hz1080P/24Hz)音频输入(与电脑输入公用)(直径3.5mm 插孔))侧面-HDMI 1(ARC )HDMI(HDMI 输入)(480I,576I,480P,576P,720P/50Hz,720P/60Hz,1080I/50Hz,1080I/60Hz,1080P/50Hz,1080P/60Hz,1080P/24Hz ) 侧面-USB2(HDD ) USB2.0 前面 USB12.0侧面ー音频输出/耳机 直径3.5 插孔(音频输出)接收频道 VHF/UHF C1・C12・C13-C57 CATV SECAM/NTSC3.58/PAL60立体声/双语 丽音(NICAM )B/G ,I ,D/K A2 立体声:B/G 接收频率 模拟ATV 44.25-863.25MHz 数字DTV 55.25-863.25MHz电视制式 PAL :B/G,D/K ,I SECAM :B/G,D/K,K/K1 NTSC :M电源 由USB 提供操作系统 Win XP,Win CE,Vista,Win7,Linux,Mac,Android,Win8检测区域 153.9×86.6cmPC 连接器 USB (兼容1.1)书写方式 手指或非透明触控笔触摸定位精度 ± 2mm响应速度(单点连续) 4ms (典型值)触摸点数 6点检测方法 红外线阻隔检测方法80寸技术参数 基本规格电力消耗(W ) 260 待机消耗功率(W ) 0.50 能效指数(EEILCD ) 1.4分辨力1920(水平)×1080(垂直)外型尺寸(cm )宽×深×高 187.6×11.6×113.3液晶显示屏X超晶面板端子DVI-D 端口 1音频输出端子(HP) 1光纤数字音频输出 1Y,Pb,Pr输入端子 1USB端口 2RS-232C端口 1PC输入 1LAN(网络) 无HDMI端口 3复合视频输入端子 2声音声音输出(w) 10W+10W智能光控(opc) 有立体环绕SRS TruSurround HD图片示例九、创显光电图片示例十、深圳中银科技70寸技术参数。
华硕WSC1x-M9N DI-001-WSC1X-05A无线天线电源智能占据传感器说明书

Self-powered Wireless Ceiling Mounted Occupancy SensorCat. No. WSC1x-M9NDESCRIPTION:The ceiling-mounted Occupancy Sensor saves energy and adds convenience by accurately detecting when an area is occupied or vacant. It is wireless, solar-powered, and uses a passive infrared (PIR) sensor to detect motion. The occupancy sensor transmits RF signals that control lighting, HVAC and outlets to manage building energy consumption more efficiently.• S ends wireless signals to receiving devices whenever motion is detected.• H arvests indoor light to power the sensor and wireless communications.• W orks with other sensors for enhanced occupancy tracking.• B uilt-in tests to confirm operation at installed location.• S upplemental battery or alternative power supply options for extreme low-light conditions.If occupation is detected by the permanently active PIR sensor, a radio telegram indicating the occupied status will transmit immediately. An internal timer starts to run for 120 seconds. No radio telegrams will be sent out when the timer is counting down.After the timer has finished the countdown, the unit will transmit again if occupancy was detectedduring the countdown time period. If occupancy is not detected, the unit will transmit a heartbeat signal - sending the unoccupied status with a random timing of 2 to 12 minutes. There are two buttons which allow entrance to a “Walk” or “Light-level” test mode. These test modes are for installation purposes only and will be exited automatically after 3 minutes.PLANNINg:Take a moment to plan for the sensor’s successful operation and optimal communication with other system components. Remove the sensor from its packaging and place it under a bright light to provide the required startup charge. Optional: To quickly ensure the sensor energy storage is fully charged, insert a CR2032 battery for 5 minutes.• E nsure the location provides consistent and adequate light.• L ocate the sensor on the ceiling between 8 and 10 ft. (2.4 to 3 m) high with an unobstructed view of the space.• C onsider the area’s traffic patterns and principal use, for example, walking, lounging or sleeping.• P rovide a minimum clearance of 4 ft. (1.2 m) away from heat sources, light bulbs, forced air, or ventilation systems.• C onsider the construction materials (such as metal) in the space and obstacles that may interfere with RF signals.INSTALLATION:The occupancy sensor can be mounted on most ceilings with the provided screws, or mounted on dropped ceilings, using the provided wire bracket.NOTE: It is often easier to link the sensor before it is mounted on the ceiling. Refer to the "Programing and Activation" section.1. Decide where you want to install the occupancy sensor.2. R emove the mounting plate from the sensor.3. D ecide which of the two installation options is appropriate.A. Screw Mounting Plate to the Ceiling.i. Hold the mounting plate in place on the ceiling and use a pencil to lightly mark two small dots for the screw drill points.i i. Drill two holes with a 3/16" drill bit and insert the anchors. (see figure 1) I II. I nsert the first screw loosely and level the mounting plate. i v. I nsert the second screw then hand-tighten the first screw. B. Mount Using the Wire Bracket. (see figures 2 through 6)i. Remove the ceiling tile where you want to mount the sensor. i i. P lace the mounting plate squarely on the ceiling tile and use the wire to marktwo points for the holes.i ii. Punch two small holes through the ceiling tile at the marked pointsi v. Insert the wire bracket through the two holes in the mounting plate. Make sure the ends are roughly even.v . Feed the wires through the holes in the ceiling tile.vi. On the front of the ceiling tile, flatten the wire bracket so it is snug against the mounting plate.vii. On the back of the ceiling tile, twist the wires together to hold the mounting plate securely.4. A ttach the sensor to the mounting plate. With the 2-button interface facing you, slide the sensor to the left on the mounting plate until it snaps into place. (see figure 6) 5. C onfirm the sensor is properly positioned to detect motion and has sufficient light to operate, seethe Walk Test and Light Test sections.PROgRAMMINg AND ACTIvATION:Two or more compatible devices can be linked and configured to provide the desired control. There are two basic types of devices in the system; transmitters and transceivers.• T ransmit-only: Transmitters are simple energy-harvesting devices that send RF messages to communicate a condition, level, or state. Transmitters can only be linked to transceivers. Examples > Self-powered Light Switches, Occupancy Sensors.• T ransmit & Receive: Transceivers are controlling devices that send as well as receive RF messages. They also process relevant control logic, and actuate the appropriate outputs(switching a light on or off for example). Transceivers can be associated with transmitters as well as other transceivers. A transceiver can have up to 30 devices associated to it. Examples > Relays, GatewaysThe Occupancy Sensor is a Transmit-only Device. To associate the occupancy sensor to a transceiver; the transceiver must first be powered, within wireless range, and set to accepts associations. Next, the desired transmitter, or another transceiver, is triggered to send a special association/programming message. The awaiting transceiver receives and stores the association permanently so the devices can interact to provide a variety of intelligent control options.To associate or disassociate an Occupancy Sensor:1. S et the desired transceiver to accept an association (refer to that device’s installation guide).2. C lick the Menu button on the side of the sensor once. This sends a associate/disassociate radio telegram (see figure 7). NOTE: The button interface on the sensor is used for associating and testing only. The occupancy timer settings are configured on the transceiver to which the sensor is associated.Refer to the “Programming and Activation” section of the transceiver/controller installation guides to complete the linking process.TESTINg:Before starting a test, ensure the sensor’s energy storage is fully charged by placing it under bright light (at least 500 lux) for 20 minutes, or insert a battery for 5 minutes.If a battery is used to charge the sensor for a light test, ensure it is removed to get an accurate light measurement.A test mode will stay active for 3 minutes. To exit a test and resume normal operation, press and hold the Menu button for 5 seconds.Walk TestUse the walk test to confirm that motion is within the sensor’s range.1. P ress and hold the Set button for 5 seconds.- Red LED will blink to confirm that a walk test is active.2. M ove in and out of the sensor‘s range to determine its coverage area. - Sensor will blink when it detects motion.3. M ake small hand movements just inside the limit of the sensor‘s range to see if the motion triggers a response.Light TestUse the light test to measure real-time light levels and confirm whether the occupancy sensor has sufficient light.1. C reate a realistic lighting condition (the test measures the real-time light level).2. P ress and hold the Set button for 10 seconds.- R ed & green LEDs will blink to confirm light test is active.3. W atch the LED blink rate to determine the light strength.- T he highest is 5 blinks which indicates very good light (200 lux or more). 1 blink indicates minimum light (25 lux).NOTE : If there is no blink rate, consider relocating the sensor or installing a battery to providesupplemental power. If the sensor does not have a sufficient charge, it cannot enter the test modes. No LED light or 1 red blink when the set button is pressed indicates insufficient charge.INSTALLINg SUPPLEMENTAL BATTERy (OPTIONAL):If light levels are very low where the sensor is installed, auxiliary battery power (CR2032) can be used to supplement the solar energy harvester.1. R emove the sensor from the mounting plate.2. I dentify the battery holder on the circuit board.3. I nsert the battery under the clip with the positive pole (+) up and press it in place (see figure 8).4. R eplace cover and remount the sensor on the wall.TROUBLEShOOTINg:Sensor does not generate a wireless message:• V erify the LED blinks when motion is detected during a walk test.• V erify the solar cell is charged properly.Sensor is activated when there is nothing to detect:• V erify there is 4 ft. (1.2 m) clearance from heat sources that may disturb sensing.• R educe sensitivity setting by moving the PIR sensitivity switch on the back to low (the left-hand position).Linked device does not respond to wireless messages:• C heck for environment or range issues.• V erify the device is linked.• C heck the transceiver connection and the wiring for errors.• C heck if appropriate devices are linked according to good system planning.Explanation of Occupied & Heartbeat Message Data Telegrams:• Data Byte 3: Super Capacitor Voltage, 0-250 (0-5V).• D ata Byte 2: Solar Panel Current, 0-127 microA .• D ata Byte 1: 0xFF (occupied) or 0x00 (unoccupied).• D ata Byte 0: 0x09 (wall sensor) 0x0B (ceiling sensor).WARNINgS AND CAUTIONS:• T O BE INSTALLED AND/OR USED IN ACCORDANCE WITH ELECTRICAL CODES AND REGULATIONS.• Y OU ARE NOT SURE ABOUT ANY PART OF THESE INSTRUCTIONS, CONSULT AN ELECTRICIAN.• F OR INDOOR USE ONLY .EqUIPMENT NEEDED fOR INSTALLATION:• Power drill, 3/16” bit • Screwdriver • Leveling tool • Light meter• Battery (CR2032) for testingCOMPATIBLE DEvICES:This product is compatible with LevNet RF Advanced Wireless Wall Switches only. Reference the following catalog numbers:• W SS10-0UZ • WSS10-GUZ • W SS10-AUZ • WSS10-UAZNOTE: This product will not work with LevNet RF Basic Wireless Wall Switches.for Technical Assistance Call: 1-800-824-3005 (U.S.A. Only)FOR CANADA ONLYFor warranty information and/or product returns, residents of Canada should contact Leviton in writing at Leviton Manufacturing of Canada Ltd to the attention of the Quality Assurance Department, 165 Hymus Blvd, Pointe-Claire (Quebec), Canada H9R 1E9 or by telephone at 1 800 405-5320.DI-001-WSC1X-05A© 2014 Leviton Mfg. Co., Inc. Rev.1Figure 7。
优瑞咖啡机说明书

1 水箱
2 3
电源线(咖啡机后部) 奶管
4 5
粉废水渣盘盒
6 咖啡豆槽盖
7 8
热水喷嘴 可调节高度的咖啡喷嘴
9 咖啡杯托盘(废水盘盖)
7
ENA Micro 9 One Touch
1 咖啡粉槽盖
2 咖啡粉槽
3 显示屏
4c 5 6 7
保卡养布键基诺键 拿铁玛琪雅朵键 旋钮状态显示
8
5
符号含义
警告
J 注意
请严格遵守注意与警告事项:
注意 警告
– –
有可能造成轻度伤害 有可能造成重大伤害
注 意 请注意所述环境因素会导致机器损伤
符号 ► 请立即执行所述操作
E 帮助您使用机器的提示
显示屏 ESPRESSO
ENA Micro 9 One Touch
6
ENA Micro 9 One Touch
■ 使用过程中,请勿将手或电源线接触被加热的部件
■ 请勿使用去污粉或利器擦拭机器
请勿
■ 请勿在磨豆器或粉槽中加入速溶咖啡及其他混有如可可粉等的混合
物,会导致咖啡机冲煮系统损坏
■ 请勿在豆槽中加入经过特殊处理的(如加味、加糖)的咖啡豆,如有
疑问请致电当地经销商
■ 豆槽中只可加入咖啡豆,切勿加入其它如:巧克力豆、大米、坚果、
2 制作咖啡 ……………………………………………………………………………………………………………………… 12
意式,美式咖啡 ………………………………………………………………………………………………………………… 13 拿铁玛琪雅朵,卡布基诺 ………………………………………………………………………………………………… 13 预设咖啡水量 …………………………………………………………………………………………………………………… 13 用咖啡粉做咖啡 ……………………………………………………………………………………………………………… 14 热水 ……………………………………………………………………………………………………………………………… 14
众音指纹锁说明书;;ML101多功能型指纹锁

ML101多功能型指纹锁使用说明书请在使用设备前先阅读本说明书目录结构说明……………………………功能代码说明………………………管理模式使用方法………………….录入管理员……………………删除管理员……………………录入用户………………………删除用户………………………录入临时用户…………………删除临时用户…………………录入TM卡用户………………删除TM卡用户…………………录入密码用户…………………删除密码用户…………………全清操作………………………开启关闭语音…………………指纹开门………………………………密码开门……………………………… TM卡开门………………………………应急开门………………………………注意事项………………………………技术指标………………………………特性与优点……………………………安装说明………………………………用户登记表……………………………上海众音电子科技有限公司SHANGHAI MYLARES ELECTRONIC TECHNOLOGY CO., LTD. ML101指纹锁结构说明- 3 -注意:拆卸电池仓盖时应按下按钮使仓盖与按钮分离,然后向上轻拿即可将电池仓盖取下。
使用说明特别提示:语音功能为可选功能,本说明中所有的语音提示均指带有语音功能的型号。
在正式使用指纹锁时必须先录入管理者指纹,防止非授权人员操作管理系统。
电池盒安装好电池并上电1— LED 显示窗;2— 键盘;3— 指纹采集窗;4— TM 卡触点5— 9V 应急电源触点;6— 锁把手; 7— 应急钥匙孔/USB 数据接口; 8— 电池仓开关按钮; 9— 电池仓盖; 10—反锁钮; 11—固定螺丝上海众音电子科技有限公司SHANGHAI MYLARES ELECTRONIC TECHNOLOGY CO., LTD.- 5 -时,指纹锁语音提示“欢迎使用众音指纹锁!”,在用户录入指纹前请先做代码“20”全清操作,防止锁内有安装人员或其他人员的指纹。
Midmark M9和M11 UltraClave 自动蒸汽蒸汽蒸汽器说明书

M9&M11U L T R A C L A V E®W H A T D O Y O U W A N T I N A S T E R I L I Z E R?n Fast and easy use for efficient instrument processingn Reliability and effectiveness for infection control assurancen Patented automatic opening door for efficient instrument dryingn Maximum space utilization and a complementary designfor your sterilization areaOur full line of sterilizers addresses all of your critical sterilizationneeds. In fact, we’re sure you’ll find a Midmark sterilizer that’s justright for your practice.R E L I A B L EThe Midmark M9 and M11 UltraClave® AutomaticSterilizers make sterilization reliable and efficient.T oday, more than ever, you need reliable and easy to useproducts from a trusted partner who understands yoursterilization needs. The Midmark M9 and M11 UltraClave®Automatic Sterilizers are specifically designed andengineered to meet those needs. The intuitive display andsimple prompts help you easily select the cycle you needwhether it is for unwrapped items, pouches, packs orhandpieces. Once the sterilization process is complete,the door conveniently opens automatically and quietly todissipate steam and provide fast and efficient drying ofyour instruments.Create peace of mind by making the dental market’s leadingsterilizers – the Midmark M9 and M11 UltraClave® – yourpreferred office choice.NOTE: Cycle times are approximate and may vary depending on instrument loads.Preset drying is 30 minutes but can be programmed from 0 to 60 minutes.Pouch RackM9 - 1 pouch rackM11 - 2 pouch racksVertical Cassette Rack(M11 only)Holds four 8" x 11" and four3" x 8" cassettes.Horizontal Cassette Rack(M11 only)Holds four 8" x 11" and four3" x 8" cassettes.Pulse-air Removal T echnologyThe Steam-Flush Pressure-Pulse Air Removal System is soefficient that it can pass the air removal tests required on morecomplex vacuum steam sterilizer systems, ensuring good steampenetration for those challenging loads. Plus, less complexitymeans better reliability and a cost effective solution for yoursterilization needs.Convenience at a GlanceThe LCD display indicates cycle selected, cycle temperature andexposure time. When the cycle enters sterilization mode, thetemperature, pressure and the remaining cycle time is displayed.Remaining cycle time is also displayed in the dry mode.Note: Temperature & pressure are not displayed during dry mode.No More Wet InstrumentsOnce sterilization is complete, the door opens automatically andquietly to dissipate steam and dry your instruments. You’ll havedry, sterile instruments every time.Safety FeaturesIf the door is not closed completely or the reservoir water levelis low, the LCD display will provide the appropriate message.In either case, sterilization will not continue until you’veattended to the unit.Ease of Draining & FillingFor ease of draining and filling, both the M9 and M11’sreservoir fill port and drain tube are in the front of the unit,not on top or in back.Optional Printer AccessoryThe M9 and M11 printer accessory provides a permanentrecord of cycle times, temperatures and pressures duringa cycle.Self Program ControlsProgrammable controls allowfor creation of different cycleparameters. Programmablebuttons allow you to changethe following: Exposure Time(3 to 90 minutes), T emperature(230 to 275º F), Dry Time (0to 60 minutes) and Vent (slowor fast). The #1 and #2 buttonsallow you to store the changeif desired.Pre-Programmed ControlsFour pre-programmedsterilization cycle controls:Unwrapped (132º C or 270º Ffor 3 minutes), Pouches (132ºC or 270º F for 5 minutes),Packs (121º C or 250º F for30 minutes), Handpieces(unwrapped and pouched)(132º C or 270º F for6 minutes).LCD DisplayIndicates cycle selected,temperature and exposuretime. During the cycle,the display shows messagesdescribing status of cycle.When the cycle enterssterilization mode, remainingtime is displayed as well astemperature and pressure.Cycle Start ButtonInitiates selected cycleManual Stop ButtonT erminates selected cycleor functionMidmark is an ISO 13485 and ISO 9001 Certified Company.For more information or a demonstration, contact your Midmark dealer or call: 1-800-MIDMARK Fax: 1-877-725-6495Outside the U.S.A. call: 1-937-526-3662 Fax: 1-937-526-8214 or visit our website at © 2007 Midmark Corporation60 Vista Drive P .O. Box 286 Versailles, Ohio 45380-0286 Products subject to improvement changes without notice Litho in U.S.A. 007-0640-00 Rev. E1 (8/13)SpecificationsM3 UltraFast® Automatic SterilizerThe Midmark M3 UltraFast ® Automatic Sterilizer is everything you need in an autoclave. Sterilize unwrapped instruments in 6 minutes, pouched instruments in just over 10, with the touch of a button. The M3 is easy to use with a one-step loading operation, push-button cycle selection and automatic door. Most importantly, your instruments are dry and ready to use at the end of every complete cycle.。
MSI MS-98N9 V1.0工业级电脑板说明书

Industrial Computer Boardi1Thank you for choosing the MS-98N9 V1.0, an excellent industrialcomputer board.Based on the innovative 10th Gen Intel®Comet Lake Processor, theMS-98N9 V1.0 is engineered to provide reliable performance for a widevariety of industrial applications.1-1-1S/PDIF Header PS/2 Header AT/ATX JumperPCIe Slots PCI Slots Front AudioHeaderPCI IO Power Select JumperDisplayPortLine-OutLayout - Q470E SKUCPU PowerRear PanelCPU FanPanelConnectorUSB 3.2 Gen1USB 2.0 VerticalType-A ConnectorHeaderIntrusionHeader2C BoxD-SUB (VGA)GbERJ45LANGbERJ45LANUSB 3.2Gen 2USB 3.2Gen 2USB 3.2Gen 2USB 2.0DisplayPort Line-OutMic-InHDMICOM1PCIE Configure2This chapter provides you with the information about hardwaresetup procedures. While doing the installation, be careful in holdingthe components and follow the installation procedures. For somecomponents, if you install in the wrong orientation, the components willnot work properly.Use a grounded wrist strap before handling computer components. Staticelectricity may damage the components.2-2-12-2MS-98N9 V1.02-4MS-98N9 V1.02-6DisplayPort Line-Out DisplayPort Line-Out15 69MS-98N9 V1.02-18MS-98N9 V1.02-20MS-98N9 V1.02-22MS-98N9 V1.03This chapter provides information on the BIOS Setup program and allowsusers to configure the system for optimal use.Users may need to run the Setup program when:■An error message appears on the screen at system startup and requests users to run SETUP.■Users want to change the default settings for customized features.Important• Please note that BIOS update assumes technician-level experience.• As the system BIOS is under continuous update for better system performance, the illustrations in this chapter should be held forreference only.2-3-13-2MainUse this menu for basic system configurations, such as time, date, etc. AdvancedUse this menu to set up the items of special enhanced features.BootUse this menu to specify the priority of boot devices.SecurityUse this menu to set supervisor and user passwords.ChipsetThis menu controls the advanced features of the onboard chipsets.PowerUse this menu to specify your settings for power management.Save & ExitThis menu allows you to load the BIOS default values or factory default settings into the BIOS and exit the BIOS setup utility with or without changes.System DateThis setting allows you to set the system date. The date format is <Day>, <Month> <Date> <Year>.System Timesetting allows you to set the system time. The time format is <Hour> <Minute> <Second>.SATA Mode SelectionThis setting specifies the SATA controller mode.PCIe Storage DeviceThis setting controls the Intel® RST (Rapid Storage Technology) support for PCIe storage devices. Setting to RST Controlled will enable Intel® Optane™ Memory. Since PCIe storage devices can’t be recognized by Intel® RST in AHCI mode, please set SATA Mode Selection to RAID to enable RST support for storage devices.Full Screen Logo DisplayThis BIOS feature determines if the BIOS should hide the normal POST messages with the motherboard or system manufacturer’s full-screen logo.When it is enabled, the BIOS will display the full-screen logo during the boot-up sequence, hiding normal POST messages.When it is disabled, the BIOS will display the normal POST messages, instead of the full-screen logo.Please note that enabling this BIOS feature often adds 2-3 seconds of delay to the booting sequence. This delay ensures that the logo is displayed for a sufficient amount of time. Therefore, it is recommended that you disable this BIOS feature for a faster boot-up time.Bootup NumLock StateThis setting is to set the Num Lock status when the system is powered on. Setting to [On] will turn on the Num Lock key when the system is powered on. Setting to [Off] will allow users to use the arrow keys on the numeric keypad.Option ROM Messagesitem is used to determine the display mode when an optional ROM initialized during POST. When set to [Force BIOS], the display mode used AMI BIOS is used. Select [Keep Current] if you want to use the display mode ofIntel Virtualization TechnologyVirtualization enhanced by Intel Virtualization Technology will allow a platform to run multiple operating systems and applications in independent partitions.virtualization, one computer system can function asActive Processor CoresThis setting specifies the number of active processor cores.Hyper-Threading (ALL)The processor uses Hyper-Threading technology to increase transaction rates and reduces end-user response times. The technology treats the two cores inside the processor as two logical processors that can execute instructions simultaneously. In this way, the system performance is highlyyou disable the function, the processor will use only one core to execute the instructions. Please disable this item if your operating system doesn’t support HT Function, or unreliability and instability may occur.Intel(R) SpeedStep(tm)(Enhanced Intel SpeedStep Technology) allows the systemadjust processor voltage and core frequency, which can result in decreasedSerial Port 1 ~ Serial Port 10This setting enables/disables the specified serial port.Change SettingsThis setting is used to change the address & IRQ settings of the specified Mode SelectSelect an operation mode for the specified serial port.Parallel PortThis setting enables/disables the parallel port.Change SettingsThis setting is used to change the address & IRQ settings of the parallelSmart Fan ConfigurationCPUFAN1, SYSFAN1 ~ SYSFAN3enables/disables the Smart Fan function. Smartexcellent feature which will adjust the CPU/system fan speed automatically depending on the current CPU/system temperature, avoiding the overheating to damage your system.Network StackThis menu provides Network Stack settings for users to enable network boot (PXE) from BIOS.Ipv4 PXE SupportSelect Enabled to enable IPv4 PXE boot support. The options are Disabled Ipv4 HTTP SupportSelect Enabled to enable IPv4 HTTP boot support. The options are Disabled and Enabled.Legacy USB SupportSet to [Enabled] if you need to use any USB 1.1/2.0 device in the operating system that does not support or have any USB 1.1/2.0 driver installed, such as DOS and SCO Unix.Audio ControllerThis setting enables/disables the onboard audio controller.Launch OnBoard LAN OpROMsettings enable/disable the initialization of the onboard/onchip GPO0 ~ GPO7These settings control the operation mode of the specified GPIO.CSM Supportsetting enables/disables the support for Compatibility Support Module, part of the Intel Platform Innovation Framework for EFI providing the capability to support legacy BIOS interfaces.Boot Option Prioritiessetting allows users to set the sequence of boot devices where attempts to load the disk operating system.。
NICE900 门机一体化驱动器 说明书

NICE系列 门机专用
结构号
电机功率 0P2 200W 0P4 400W 0P7 750W
电压等级 S 单相220V
系统型号
NICE-D-A-S0P2 NICE-D-A-S0P4 NICE-D-A-S0P7
输入电压
单相220V -15%~20%
2.1.2 铭牌
♦♦ 本使用说明书中的图例仅为了说明,可能会与您订购的产品有所利性和准确性,本说明书的内容会及 时进行变更。
♦♦ 由于损坏或遗失而需要订购使用说明书时,请与本公司各区域代理商联系,或直接与本公 司客户服务中心联系。
如果您使用中仍有一些使用问题不明,请与本公司客户服务中心联系。
电源容量 (kVA)
0.5 1.0 1.5
输入电流 (A) 2.7 5.4 8.2
图2-1 命名规则
输出电流 (A) 1.3 2.3 4.0
适配电机 (W) 200 400 750
MODEL POWER INPUT OUTPUT S/N
NICE-D-A-S0P2 200W 1PH AC220V 2.7A 50Hz/60Hz 3PH AC0V~220V 1.3A 0Hz~99Hz
图2-2 铭牌
- 10 -
NICE900门机一体化驱动器用户手册
产品信息
2.2 技术指标
表2-1 技术指标
6.10 F9组 输入输出功能参数 ………………………………………………………………… 52 6.11 FA组 显示与故障参数 ……………………………………………………………………… 54 6.12 FP组 用户参数……………………………………………………………………………… 57 第七章 应用与调试 ……………………………………………………………………………… 59 7.1 门机控制器调试 …………………………………………………………………………… 59 7.2 典型应用 …………………………………………………………………………………… 63 第八章 故障诊断及对策 ………………………………………………………………………… 66 第九章 ISMD1-5B0180A-I120X永磁同步电动机规格 ………………………………………… 69 9.1 电机参数及规格尺寸 ………………………………………………………………………… 69 9.2 编码器参数 …………………………………………………………………………………… 69 9.3 电机转矩计算及电机选型指导 ……………………………………………………………… 70
- 1、下载文档前请自行甄别文档内容的完整性,平台不提供额外的编辑、内容补充、找答案等附加服务。
- 2、"仅部分预览"的文档,不可在线预览部分如存在完整性等问题,可反馈申请退款(可完整预览的文档不适用该条件!)。
- 3、如文档侵犯您的权益,请联系客服反馈,我们会尽快为您处理(人工客服工作时间:9:00-18:30)。
班级:小组:姓名:评价:The process of learning一.【预习检测】1)waste(v)__________→ (n) __________ →(pl.)____________2)count(v)__________→ (adj)___________3) freeze (v) _________→ (adj)_________→(adj)冷冻的________4)seem (v)_________→ (adj)__________→(adv)___________5)cover (v)__________→(n)__________→ (adj)____________6)hunt (v)→ (n)_______→(n) 狩猎______________7)culture(n)→ (adj)________ → (多元文化的)_________8) mix (v)→ (n)_________ 9) upwards (adv)→(opposite)________10) circle(v)→(n)________ →(半圆)__________________11) awful (adj)→(同义词)_________ 12 )approximate (adj)→ (adv)_______ 13) settle(v)→(n)__________ 14)temporary(adj)→ (opposite)_________15) enthusiasm (n)→ (adj)___________ →(n)爱好者__________________16).create (v)→____________(v再创造) --____________(n ①再创造②娱乐)17) immigrate(v)→___________(n) 18) rub (v)→_________(n)19) expect(v)→__________(n)→_________(adj)→_____________(opposite adj)20) flex (v)弯曲→___________(adj) 21) occupy(v)→____________(n)22) observe(v)→ ___________(n)→___________(n) 观察者23) prefer(v)→_______________(n)二.【课堂互动探究与练习】1.minusprep.减Ten minus six is/leaves/equals four.adj. 负的 a ~number 负数劣于,低于A minus __________2.defend vi., defence/ defense: n.防卫,防卫设备,[律] (被告的)答辩,辩护n., defendant n. 被告defend myself from/against______________ 为了保卫,辩护______________________ Offense is the best defense.__________________________3.waste n.& vt. wasteful adj, 浪费的,不经济的a waste of time/money to do sth;~time(___) doing sth. / _____ sth. 浪费时间做4.freezing adj. 极冷的,严寒的,冷冻用的;(态度)非常冷淡 e.g. freezing cold; The temperature remained below freezing all day. 温度整天都在冰点以下frozen adj. 冰冻的冰冻食品__________________The road is ~hard.路上的冻结得很硬。
The seedling was frozen to death. ______________5.abundant a. 丰富的,充裕的abundantly: adv. 丰富地be abundant in =___________=be high in 在---方面丰富The country is abundant in natural resources 这个国家天然资源丰富。
abundance n. a year of abundance 丰年an ~of + n.[C / U] 大量的,多的in~丰富的,充裕的6.locate verb位于;.找到..的位置;确定…的地点或范围;使---坐落于________n) be located in/near/on/etc.: to be in a particular place: 位于=___________________________________Our school is _______________________________(位于众兴镇西北部)南京位于长江边上________________________________________________【走近高考】¬_______in the center of the city, the bookstore attracted many visitors.A. LocatingB. LocateC. LocatedD. To locate7.short 缩写,简称;不足的,缺乏的,达不到要求的in short =__________________________________________short for常与be一起构成系表结构,意为―_______________(简称)‖。
for short是固定搭配,意为―____________‖,常放在句末。
be short of _ __________________The shopkeeper gave us _____weight: we got 9 kilos instead of 10 kilos.A. scarceB. shortC. lightD. slight8.be home to…所在地=_______________home 常用短语:be/feel at home :__________________make yourself at home______________________________【巩固练习】—Can I look at the menu for a few more minutes before I decide?—Of course. _______ sir.A. Make yourself at homeB. Enjoy yourselfC. It doesn't matterD. Take your time10.preference n 偏爱,优先,优先权have a preference for_____________ prefer sth喜欢.prefer to do sth. prefer doing sth/sth ---to doing sth/sthprefer sb. to do sth. prefer to do sth rather than (to)do sth.prefer that在that宾语从句中,我们应当用虚拟语气"should+动词原形",其中的should可以省略示―宁愿做……而不愿做……‖1)He said he would prefer _ ___ others rather than ____ by others.A to help; to helpB to help; be helpedC helping; helpedD helping; to be helped2)The young lady prefer dressing up for a party __ __ by others.A to being noticedB to be noticedC rather than to be noticedD rather than be noticed3)Though, life should be colorful, I prefer devoting all my energies to my studies _ ____ more professional knowledge.A to getB to gettingC rather than getD rather than to get4)He preferred staying at home __ ____ to the cinema.A to watching TV to goB to watching TV to goingC to watch TV to goingD to watch TV to go11.occupy (v)His speech occupied only 3 minutes. 他的演讲仅占用了三分钟。
occupy oneself ( in doing sth. / with sth.)be occupied __________( do) sth. be occupied _______ (prep.) sth.他在忙于写一本小说。
__________________________________________归纳:忙于……,专心于……__________________________________________12 compromise with sb. on sth. __________________make a compromise with sb. on sth. ___________reach /arrive at/come to a compromise ______________________13. cater to 迎合,满足14.owing to 由于,因为;归功于=______________________________________________________________________________ 欠某人一块钱owe many thanks to sb. _______________________________________________________把成功归功于运气15. be bound to do sth.____________________________16.put aside ________________________put away __________________________________三.【课后作业】Read the words and expressions and try to remember them..班级:小组:姓名:评价:The process of learning一【预习与检测】(一)预习指导阅读文章Canada—land of the maple tree,了解加拿大及其特征。