SAN Client备份设置
NBU备份一体机技术解决方案

Symantec NBU备份一体机技术建议书2017.2.9目录1概述 (4)1.1备份现状分析 (4)1.2备份系统设计原则 (5)1.3备份新架构和技术选择 (6)1.3.1全新磁盘备份一体机-NBU5230 (6)1.3.2NBU Appliance 5230所带来的改变 (7)1.4NBU备份一体机设计方案 (8)1.4.1总体架构 (8)1.4.2架构详解 (8)1.4.3架构优势 (10)1.5备份方案优点 (10)1.6方案说明 (11)1.6.1备份软件的版本 (11)1.6.2备份Oracle数据 (12)1.6.3备份数据的离线出库 (12)1.6.3.1Vault对磁带的管理 (12)1.6.3.2应急恢复 (14)1.6.4操作系统备份 (14)1.6.5数据复制和远程出库 (16)2NBU备份一体机实施方案 (17)2.1实施计划 (17)2.2具体工作安排 (17)2.3项目里程碑 (18)2.4提交的文档列表 (19)2.5用户方的配合工作 (20)2.6项目实施规范 (21)2.6.1备份策略规范 (21)2.6.2备份策略初步设计 (21)2.6.3备份策略命名规范 (21)2.6.4备份脚本规则 (23)2.6.5备份窗口规划 (24)2.6.6设备管理 (25)2.6.6.1存储单元命名规范 (25)2.6.6.2磁带介质集使用规则 (25)2.6.7catalog 备份 (26)3人员培训计划 (27)3.1现场培训 (27)3.2原厂学习 (27)1 概述企业最为宝贵的财富就是数据,要保证企业业务持续的运做和成功,就要保护基于计算机的信息。
人为的错误,硬盘的损毁、电脑病毒、自然灾难等等都有可能造成数据的丢失,给企业造成无可估量的损失。
对于任何核心业务系统,业务数据丢失更是一场大灾难,会导致系统文件、客户资料、业务数据的丢失,业务将难以正常进行。
这时,最关键的问题在于如何尽快恢复计算机系统,使其能正常运行。
基于SAN的数据集中存储与备份
基于S A N的数据集中存储与备份1引言随着企业信息系统的不断应用和发展, 信息系统已涉及管理、自动化处理的各个方面, 积累了大量包括文件、档案、业务数据、统计资料等的基础数据, 并且由于业务处理的流程化、公文流转的无纸化, 还产生了大量的过程性数据, 这些数据已成为重要的信息资源, 其价值可能已超出信息系统本身. 因此, 对数据进行安全有效地管理已成为一项重要而迫切的任务。
2SAN的发展调查结果显示, 具备计算机网络的公司有2/3遭遇过数据丢失的情况,数据丢失大多由以下原因造成:1.硬盘驱动器毁坏. 由于一个系统或电器的物理损坏使你的文件丢失。
2.人为错误. 你偶然地删除一个文件或重新格式化一个磁盘。
3.黑客. 有人在你的计算机上远程侵入并损害信息。
4.病毒. 你的硬盘驱动器或磁盘被感染。
5.盗窃. 有人从你的计算机上复制或删除信息或侵占整个数据系统。
6.自然灾害. 火灾或洪水破坏你的计算机和硬盘驱动器。
7.电源浪涌. 一个瞬间过载电功率损害在你的硬盘驱动器上的文件。
8.磁干扰. 你的软盘接触到有磁性的物质。
正因为此,存储区域网SAN(Storage Area Network)技术在近年来发展非常迅速,广泛用于数据共享、数据交换、数据备份、磁盘镜像、数据保护和灾难恢复等领域。
由于SAN网络一般采用存储域专用接口FC、ESCON、FICON等,在传统的SDH设备上较难实现。
而波分复用的业务透明性使得存储域网SAN在发达国家已成为重要信息存储的一种关键应用。
尤其是在美国“911”事件发生后,各国政府的明确要求和企业自身安全意识的提高,使SAN网络的建设步伐进一步加速。
存储区域网SAN指的是通过一个单独的网络(通常是高速光纤网络)把存储设备和挂在TCP/IP局域网上的服务器群相连。
当有海量数据的存取需求时,数据可以通过存储区域网在相关服务器和后台存储设备之间高速传输。
SAN以光纤通道(FC)为基础,实现了存储设备的共享;突破现有的距离限制和容量限制;服务器通过存储网络直接同存储设备交换数据,释放了应用服务的LAN网络资源。
NBU5220安装配置截图
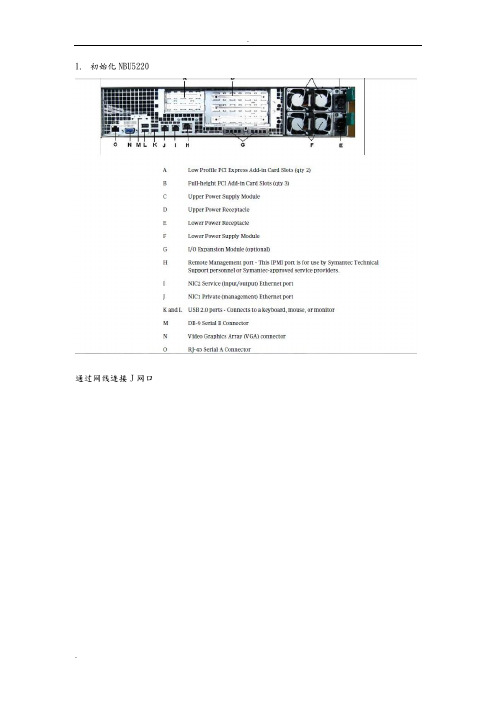
1.初始化NBU5220通过网线连接J网口添加备份服务器IP及gatewayDNS :10.50.159.190 Domain name suffix:localhost.localdomain search domain:backup-server2.配置FT media serverbackup-server.Settings> FibreTransport SANClient Enable如下插槽的光纤卡表示其他SAN client可发现光纤口backup-server.FC> showFC HBA card(s) are configured correctly.**** FC HBA Cards ****05:00.0 Fibre Channel: QLogic Corp. ISP2532-based 8Gb Fibre Channel to PCI ExpressHBA (rev 02)05:00.1 Fibre Channel: QLogic Corp. ISP2532-based 8Gb Fibre Channel to PCI ExpressHBA (rev 02)06:00.0 Fibre Channel: QLogic Corp. ISP2532-based 8Gb Fibre Channel to PCI ExpressHBA (rev 02)06:00.1 Fibre Channel: QLogic Corp. ISP2532-based 8Gb Fibre Channel to PCI ExpressHBA (rev 02)0a:00.0 Fibre Channel: QLogic Corp. ISP2532-based 8Gb Fibre Channel to PCI ExpressHBA (rev 02)0a:00.1 Fibre Channel: QLogic Corp. ISP2532-based 8Gb Fibre Channel to PCI ExpressHBA (rev 02)**** Drivers ****qla2xxx is loadedwindrvr6 is loaded**** Ports ****Bus ID Slot Port WWN Status Mode Speed RemotePorts05:00.0 Slot3 21:00:00:24:FF:47:1A:44 Linkdown Initiator 8 gbit/s 05:00.1 Slot3 21:00:00:24:FF:47:1A:45 Linkdown Initiator 8 gbit/s 06:00.0 Slot4 21:00:00:24:FF:47:26:3C Disconnected Target 8 gbit/s 06:00.1 Slot4 21:00:00:24:FF:47:26:3D Linkdown Initiator 8 gbit/s 0a:00.0 Slot2 21:00:00:24:FF:48:D4:9E Fabric Target 4 gbit/s 0a:00.1 Slot2 21:00:00:24:FF:48:D4:9F Linkdown Initiator 8 gbit/s*** Devices ****Device Vendor Host Type RemotePort*** VLAN ****Please scan for VLAN hosts first*** Notes ****(NOTE: Ports in mode "Initiator*" are configured for target mode when SAN ClientFT MediaServer is active, however, are currently running in initiator mode, i.e. SANClientis disabled or inactive.)backup-server.FC>如下进程代表FT media server 服务开启backup-server.Processes> NetBackupShow Start Stopbackup-server.Processes> NetBackup ShowNB Processes------------root 8745 1 0 16:10 ? 00:00:03 /usr/openv/netbackup/bin/nbftsrvrroot 9852 1 0 16:10 ? 00:00:00 /usr/openv/netbackup/bin/vnetd -standaloneroot 9855 1 0 16:10 ? 00:00:00 /usr/openv/netbackup/bin/bpcd -standaloneroot 9928 1 0 16:10 ? 00:00:03 /usr/openv/db//bin/NB_dbsrv /usr/openv/var/global/server.conf /usr/openv/var/global/databases.conf -hn 7root 9987 1 0 16:10 ? 00:00:00 /usr/openv/netbackup/bin/nbevtmgrroot 9993 1 0 16:10 ? 00:00:00 /usr/openv/netbackup/bin/nbaudit root 10168 1 0 16:10 ? 00:00:00 /usr/openv/pdde/pdcr/bin/spad -q pddb 10358 1 0 16:10 ? 00:00:00 /usr/openv/pdde/pddb/bin/postmaster -D /disk/databases/pddb/data -N 512 -B 1024 -i -p10085root 10493 1 0 16:10 ? 00:00:02 /usr/openv/netbackup/bin/nbemm root 10501 1 0 16:10 ? 00:00:01 /usr/openv/pdde/pdcr/bin/spoold -qroot 10515 1 0 16:10 ? 00:00:00 /usr/openv/netbackup/bin/nbrb root 10606 1 0 16:10 ? 00:00:00 /usr/openv/netbackup/bin/bprd root 10611 1 0 16:10 ? 00:00:00 /usr/openv/netbackup/bin/bpcompatdroot 10620 1 0 16:10 ? 00:00:00 /usr/openv/netbackup/bin/nbjm root 10626 1 0 16:10 ? 00:00:00 /usr/openv/netbackup/bin/bpdbm root 10627 10626 0 16:10 ? 00:00:00 /usr/openv/netbackup/bin/bpjobd root 10629 1 0 16:10 ? 00:00:00 /usr/openv/netbackup/bin/nbpem root 10637 1 0 16:10 ? 00:00:00 /usr/openv/netbackup/bin/nbstservroot 10644 1 0 16:10 ? 00:00:00 /usr/openv/netbackup/bin/nbim root 10651 1 0 16:10 ? 00:00:00 /usr/openv/netbackup/bin/nbrmms root 10678 1 0 16:10 ? 00:00:00 /usr/openv/netbackup/bin/nbsl root 10705 1 0 16:10 ? 00:00:00 /usr/openv/netbackup/bin/nbars root 10741 1 0 16:10 ? 00:00:00 /usr/openv/netbackup/bin/nbcssc -a NetBackuproot 10753 1 0 16:10 ? 00:00:00 /usr/openv/netbackup/bin/nbsvcmonroot 10832 8745 0 16:10 ? 00:00:00 /usr/openv/netbackup/bin/nbfdrv64 -m=0x50009 -v=5 -s=256Kroot 10979 10629 0 16:10 ? 00:00:00 /usr/openv/netbackup/bin/nbproxydblib nbpemroot 11514 10620 0 16:13 ? 00:00:00 /usr/openv/netbackup/bin/nbproxy dblib nbjmroot 13943 10651 0 16:25 ? 00:00:00 /usr/openv/netbackup/bin/admincmd/bpstsinfo -DPSPROXYroot 13944 10651 0 16:25 ? 00:00:00 /usr/openv/netbackup/bin/admincmd/bpstsinfo -DPSPROXYroot 15490 1 0 16:30 ? 00:00:00 /usr/openv/netbackup/bin/bpjava-susvc admin -1 -1 zh_CN.gb2312 /usr/openv/java/auth.conf 1 -1 15486 noUserCredentialsFileroot 15492 15490 0 16:30 ? 00:00:00 /usr/openv/netbackup/bin/bpjava-susvc admin -1 -1 zh_CN.gb2312 /usr/openv/java/auth.conf 1 -1 15486 noUserCredentialsFileroot 15494 15490 0 16:30 ? 00:00:00 /usr/openv/netbackup/bin/bpjava-susvc admin -1 -1 zh_CN.gb2312 /usr/openv/java/auth.conf 1 -1 15486 noUserCredentialsFileroot 15561 10629 0 16:31 ? 00:00:00 /usr/openv/netbackup/bin/nbproxy dblib nbpem_cleanup3.客户端配置信息# ./bpclntcmd -sanclient 1# ./bp.kill_allLooking for NetBackup processes that need to be terminated.Looking for more NetBackup processes that need to be terminated.Stopping bpcd...Stopping vnetd...# ./bp.start_allStarting vnetd...Starting bpcd...Starting nbftclnt...Starting bmrbd...# bpps -xksh: bpps: not found.# ./bpps -xNB Processes------------root 6750216 1 0 18:10:01 - 0:00 /usr/openv/netbackup/bin/vnetd -standaloneroot 7012594 1 0 18:10:02 - 0:00 /usr/openv/netbackup/bin/nbftclntroot 7405816 1 0 18:10:01 - 0:00 /usr/openv/netbackup/bin/bpcd -standaloneroot 8323072 1 0 18:10:02 - 0:00 /usr/openv/netbackup/bin/bmrbdAIX Client配置:执行/usr/openv/netbackup/bin/bpclntcmd –sanclient 1启用SAN Client执行/usr/openv/netbackup/bin/bp.kill_all停止服务执行/usr/openv/netbackup/bin/bp.start_all启动NBU服务执行/usr/openv/netbackup/bin/bpps -x确认 nbftclnt服务是否正常启动。
SAN存储基础知识及配置规范

SAN存储基础知识传统计算机存储系统的问题CPU硬盘RAMServer计算机存储系统传统计算机存储系统的局限性:硬盘成为整个系统的性能瓶颈有限的硬盘槽位,难满足大容量需求单个硬盘存放数据,数据可靠性难以保证存储空间利用率低本地存储,数据分散外部磁盘阵列的产生CPUCPU 硬盘硬盘RAMRAM Server早期外部存储系统SCSI 卡SCSI 卡SCSI 电缆SCSI 电缆JBOD(Just Bound Of Disk)传统计算机存储系统的局限性: 硬盘成为整个系统的性能瓶颈 有限的硬盘槽位,难满足大容量需求 单个硬盘存放数据,数据可靠性难以保证 存储空间利用率低 本地存储,数据分散RAID 功能RAID 功能RAID (Redundant Arrays of Inexpensive Disks)RAID (Redundant Arrays of Inexpensive Disks)CPUCPU 硬盘硬盘RAMRAM ServerSCSI 卡SCSI卡控制器控制器 SCSI 电缆SCSI 电缆控制器中包含RAID功能、大容量Cache,同时使得磁盘阵列具有多种实用的功能,配置专用管理软件进行配置管理传统计算机存储系统的局限性:硬盘成为整个系统的性能瓶颈 有限的硬盘槽位,难满足大容量需求 单个硬盘存放数据,数据可靠性难以保证 存储空间利用率低 本地存储,数据分散智能磁盘阵列的产生存储网络的产生SCSI电缆最长支持25米FC光纤连接距离可达10公里至100公里Infiniband线缆ServerHBA 卡HBA 卡传统计算机存储系统的局限性: 硬盘成为整个系统的性能瓶颈有限的硬盘槽位,难满足大容量需求 单个硬盘存放数据,数据可靠性难以保证 存储空间利用率低本地存储,数据分散SAN(Storage Area Network)•一种高可用性,高性能的专用存储网络,用于安全的连接服务器和存储设备并具备灵活性和可扩展性;SAN对于数据库环境、数据备份和恢复存在巨大的优势;SAN是一种非常安全的,快速传输、存储、保护、共享和恢复数据的方法。
SAN-Client备份设置

SAN-Client备份设置概述在进行数据备份时,我们经常会使用到SAN(Storage Area Network)技术来提高数据传输和备份速度。
SAN-Client备份是一种常见的备份方式,可以实现对SAN存储设备上存储的数据进行备份,并且在需要恢复数据时可以快速地进行恢复。
在备份和恢复的过程中,设置正确的备份策略和参数非常重要,本文将介绍如何设置SAN-Client备份参数。
SAN-Client备份参数设置1. 配置备份目录在备份SAN存储设备上的数据时,首先需要配置备份目录。
目录的设置需要根据实际情况进行调整。
为了保证备份数据的安全性和完整性,最好将备份目录设置到独立的磁盘或存储设备中,避免与其他数据混淆。
备份目录可以通过如下命令设置:nbemmcmd -h SAN_client_hostname -u nbu -p password -setconfig -type SAN_CLIENT -SAN_CLIENT_DEST backup_dir -SAN_CLIENT_SOURCETYPE sso_host-SAN_CLIENT_SOURCENAME sso_name其中,SAN_client_hostname表示SAN-Client主机的主机名,backup_dir表示备份目标目录的路径,sso_host和sso_name分别表示需要备份数据的SAN设备的主机名和设备名。
2. 配置备份类型根据备份数据的重要性和容量大小,可以选择完全备份或增量备份。
完全备份会备份所有的数据,而增量备份仅会备份上次备份之后发生变化的数据。
在设置备份类型时,需要考虑数据重要性、网络带宽和备份时间等实际情况,选择合适的备份类型。
备份类型可以通过如下命令设置:nbemmcmd -h SAN_client_hostname -u nbu -p password -setconfig -type SAN_CLIENT -SAN_CLIENT_BACKUPTYPE [full|incremental]其中,SAN_client_hostname表示SAN-Client主机的主机名,full表示完全备份,incremental表示增量备份。
LAN 备份、LAN Free备份和SAN Server
LAN 备份、LAN Free备份和SAN Server-Free备份三种。
LAN 备份针对所有存储类型都可以使用,LAN Free备份和SAN Server-Free备份只能针对SAN架构的存储。
基于LAN备份传统备份需要在每台主机上安装磁带机备份本机系统,采用LAN备份策略,在数据量不是很大时候,可采用集中备份。
一台中央备份服务器将会安装在LAN 中,然后将应用服务器和工作站配置为备份服务器的客户端。
中央备份服务器接受运行在客户机上的备份代理程序的请求,将数据通过LAN 传递到它所管理的、与其连接的本地磁带机资源上。
这一方式提供了一种集中的、易于管理的备份方案,并通过在网络中共享磁带机资源提高了效率。
LAN-Free备份由于数据通过LAN传播,当需要备份的数据量较大,备份时间窗口紧张时,网络容易发生堵塞。
在SAN环境下,可采用存储网络的LAN-Free备份,需要备份的服务器通过SAN连接到磁带机上,在LAN-Free备份客户端软件的触发下,读取需要备份的数据,通过SAN备份到共享的磁带机。
这种独立网络不仅可以使LAN 流量得以转移,而且它的运转所需的CPU 资源低于LAN 方式,这是因为光纤通道连接不需要经过服务器的TCP/IP 栈,而且某些层的错误检查可以由光纤通道内部的硬件完成。
在许多解决方案中需要一台主机来管理共享的存储设备以及用于查找和恢复数据的备份数据库。
SAN Server-Free备份LAN Free 备份对需要占用备份主机的CPU资源,如果备份过程能够在SAN内部完成,而大量数据流无需流过服务器,则可以极大降低备份操作对生产系统的影响。
SAN Server-Free备份就是这样的技术。
必要性编辑对数据的威胁通常比较难于防范,这些威胁一旦变为现实,不仅会毁坏数据,也会毁坏访问数据的系统。
造成数据丢失和毁坏的原因主要如下几个方面。
1、数据处理和访问软件平台故障。
2、操作系统的设计漏洞或设计者出于不可告人的目的而人为预置的“黑洞”。
清华大学SAN网络集中存储备份系统方案

清华大学SAN网络集中存储备份系统方案一、清华大学集中存储建设目标在新的以信息为核心的时代,如何更有效的管理、保护和共享企业信息已为各行业的发展提出了新的挑战。
尤其在新兴信息行业领域,更是面临着前所未有的巨大挑战。
在传统的分布式处理模式下,所有的信息分散在内部各个服务器上,信息的管理,信息的可用性受到了很大的限制,不能充分发挥应有的作用,而且系统的升级和新业务的开发部署也都不能及时响应技术和市场快速变化的要求,在这种情形下,以信息为中心的集中处理模式应时代的需要再次走上了历史舞台,而构建企业信息基础设施则更是集中处理模式的重中之重。
数字信息作为清华大学图书馆的基本资产,会越来越成为企业的命脉,存储系统显得越来越重要,建设一个大容量、高可靠性、易管理的存储系统将会成为重点之一,也是将来投资的重点。
根据系统的特点、需求,在整个系统方案设计时重点考虑以下几方面:高可靠性与可用性对于关键性应用,如果发生故障或发生宕机现象,会造成严重的后果。
所以,在结构设计中要采用相应的、恰当的技术手段以保障服务可用性。
在考虑技术先进性的同时,还应从系统结构、技术措施、设备性能、系统管理等方面着手,确保系统运行的可靠和稳定,达到最大的平均无故障时间。
计算机设备厂商所强调的RAS(可靠、可用、可维护)特性,是系统选型考虑的重点。
高度安全性IT 系统的普及使用户对数据的依赖性逐步提高,因而数据的安全性显得尤为重要。
在系统设计中,既要考虑信息资源的充分共享,还要特别注意信息的保护和隔离,因此系统应分别针对不同的应用和不同的网络通信环境,采取不同的措施,包括系统安全机制,数据存取的权限控制等等。
可伸缩能力由于技术和应用模式不断地变化,资源的不可预测性因素成为系统设计面临的最大挑战,很难用传统经验来预测用户的应用需求。
因此,在继续追求系统的响应速度、服务的可靠性、可用性和安全性的前提下,增加系统缩放性与灵活性就显得尤为重要。
良好的伸缩能力不仅意味着系统的持续性和稳定性,而且也是满足未来服务、应用增长需要的必备条件。
SANClient备份设置
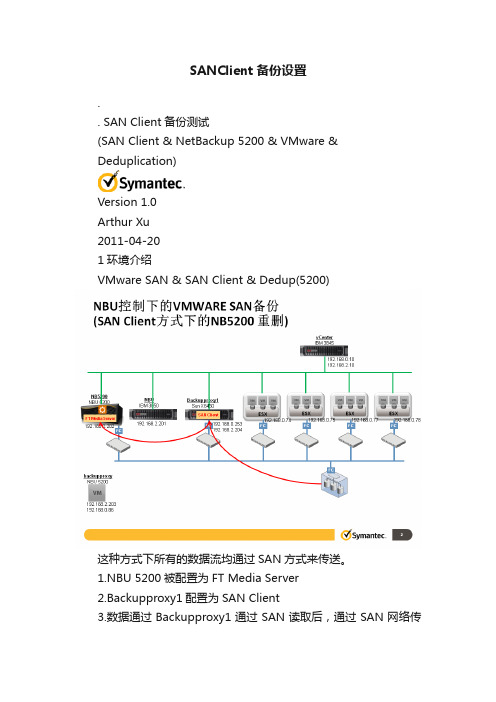
SANClient备份设置.. SAN Client备份测试(SAN Client & NetBackup 5200 & VMware & Deduplication)Version 1.0Arthur Xu2011-04-201环境介绍VMware SAN & SAN Client & Dedup(5200)这种方式下所有的数据流均通过SAN方式来传送。
1.NBU 5200被配置为FT Media Server2.Backupproxy1配置为SAN Client3.数据通过Backupproxy1通过SAN读取后,通过SAN网络传送到NBU52004.NBU5200上实现重复数据删除5.目前NBU5200已经可以通过手工方式开启SAN Client支持a)NBU5200近期将实现SAN Client官方支持(GUI界面?)SAN Client方式传输有如下特点:1.SAN Client广泛支持各种类型的OS。
2.SAN Client方式下,只能支持Media Server端重复数据删除。
1.1NBU 5200上手工开启FT Media Server方法1.1.1卸载HBA卡驱动[root@netbackup7 ~]# /usr/openv/netbackup/bin/admincmd/nbftsrv_config -nbhba Installing nbhba driver. Uninstalled WinDriver for FT Server mode. It may be necessary to temporarily unload your QLogic drivers to free up the ports for the nbhba drivers.This is an optional step. If you choose not to do this, the nbhba drivers may not have access to the HBA ports until a subsequent reboot.Would you like to unload and reload your native QLogic drivers now? [y,n] (y) Are you sure you want to unload QLogic driver: qla2xxx? [y,n] (y) Removing qla2xxx.Cannot continue since qla2xxx is in use and cannot be removed. Please release references to qla2xxx before trying the install again.该步骤可能不成功,主要是qla2xxx驱动绑定到内核中了。
veritas NBU备份系统AIX客户端安装手册

XXX NBU客户端安装配置手册AIX安装版XXX2017年11月文档属性文档变更目录一、安装环境 (4)二、客户端安装需求 (4)三、客户端安装 (4)四、设置SAN Client模式 (12)五、检查备份客户端是否安装成功 (13)一、安装环境二、客户端安装需求1.确认/usr/openv文件系统有大于10G空间,默认安装目录/usr/openv2.使用root用户登录系统3.上传客户端安装包AIX.tar到/software目录下4.AIX.tar AIX安装包文件大小约3G,解压后占用空间大于6G。
三、客户端安装1.Master Server (182.180.154.238和182.180.154.239) 端/etc/hosts加入客户端的解析。
2.在数据库备份客户端/etc/hosts加入Master Server的解析3.上传数据库客户端安装包AIX.tar到数据库服务器端的/software目录上传方法:1)ftp 182.180.16.1252)输入FTP服务器账号和密码账号:lixin密码:1234563)ls AIX.tar 确认安装文件是否存在4)bin //ftp通过二进制传输5)get AIX.tar6)quit退出ftp4.解压客户端安装文件在/software目录下解压安装包,并进入解压目录5.开始安装1)提示是否继续,直接回车或输入y2)提示是否安装netbackup 客户端,直接回车或输入y3)输入指定的master server 名称,及确认客户端名称4)开始安装5)设置bp.conf配置文件,添加SERVER = veritas-5240-jj四、设置SAN Client模式1.在客户端上运行命令bpclntcmd -sanclient 1设置SAN Client模式,查看bp.conf设置是否生效,会增加SANCLIENT = 12.重启备份客户端软件的进程五、检查备份客户端是否安装成功1.确认5个进程是否运行(nbftclnt;nbdisco;bpcd;vnetd;pbx_exchange)2.检查客户端1556和13724端口通讯3.确认客户端自启动项是否加入备份服务设置确认客户端/etc下是否存在backup.aix文件,确认/etc/inittab里面是否有备份服务启动项会增加netbackup:2:wait:/etc/backup.aix start客户端安装结束。
如何对SAN进行实时备份防止数据丢失
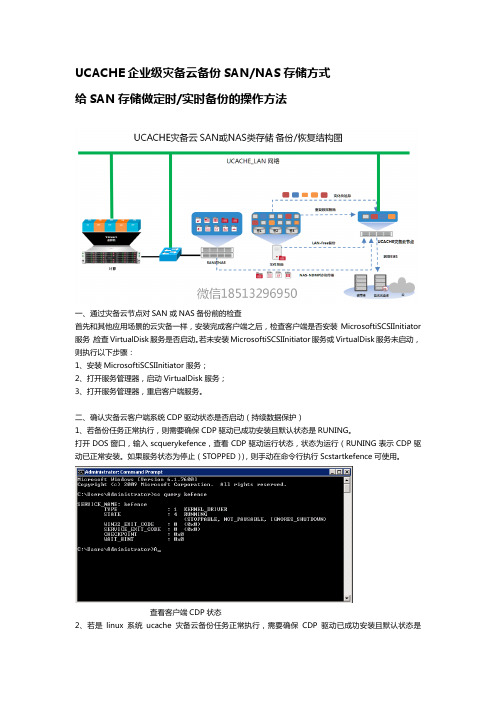
UCACHE企业级灾备云备份SAN/NAS存储方式给SAN存储做定时/实时备份的操作方法一、通过灾备云节点对SAN或NAS备份前的检查首先和其他应用场景的云灾备一样,安装完成客户端之后,检查客户端是否安装MicrosoftiSCSIInitiator 服务,检查VirtualDisk服务是否启动。
若未安装MicrosoftiSCSIInitiator服务或VirtualDisk服务未启动,则执行以下步骤:1、安装MicrosoftiSCSIInitiator服务;2、打开服务管理器,启动VirtualDisk服务;3、打开服务管理器,重启客户端服务。
二、确认灾备云客户端系统CDP驱动状态是否启动(持续数据保护)1、若备份任务正常执行,则需要确保CDP驱动已成功安装且默认状态是RUNING。
打开DOS窗口,输入scquerykefence,查看CDP驱动运行状态,状态为运行(RUNING表示CDP驱动已正常安装。
如果服务状态为停止(STOPPED)),则手动在命令行执行Scstartkefence可使用。
查看客户端CDP状态2、若是linux系统ucache灾备云备份任务正常执行,需要确保CDP驱动已成功安装且默认状态是RUNING。
查看方法:root用户下执行命令,lsmod|grepio_filter。
三、通过灾备云节点对SAN或NAS备份方法以下以Linux客户端为例Windows卷级备份任务创建任务步骤相同。
1、新建任务登录UCACHE灾备云SAAS云控制台(目前企业可以申请免费授权容量),点击【定时数据保护】【数据备份】,点击【新建】按钮请选要保护的对象选择【客户端】选中对应的客户端选择【卷】,点击【下一步】按钮;点击““++”号展开数据源(如下图)卷级备份任务,SAAS云平台支持自动发现数据源的功能,浏览到系统的卷后,此时点击““++”号,可以正常展开数据源,在卷前的方框处点击,勾选数据源选择完要备份的卷之后(首先确认NAS或SAN已经挂载到该客户端主机),然后点击下一步,可以看到备份介质和选项备份介质,必填项,默认项OFS,在选项中,勾选需要开启的高级功能选项,各个选项说明如下:【永久增量备份】开启了永久增量备份,每一次增量备份都会进行一次时间点合成,形成新的一个永久增量时间点,等效于完备时间点。
星风虚拟SAN版本配置3节点HA共享存储以用于vSphere的文档说明书

This document refers to the previous StarWind Virtual SAN version. To view the document for the current version, please follow this link.TRADEMARKS“StarWind”, “StarWind Software” and the StarWind and the StarWind Software logos are trademarks of StarWind Software which may be registered in some jurisdictions. All other trademarks are owned by their respective owners.CHANGESThe material in this document is for information only and is subject to change without notice. While reasonable efforts have been made in the preparation of this document to assure its accuracy, StarWind Software assumes no liability resulting from errors or omissions in this document, or from the use of the information contained herein. StarWind Software reserves the right to make changes in the product design without reservation and without notification to its users.TECHNICAL SUPPORT AND SERVICESIf you have questions about installing or using this software, check this and other documents first - you will find answers to most of your questions on the Technical Papers webpage or in StarWind Forum. If you need further assistance, please contact us.Copyright ©2009-2012 StarWind Software Inc.No part of this publication may be reproduced, stored in a retrieval system, or transmitted in any form or by any means, electronic, mechanical, photocopying, recording or otherwise, without the prior written consent of StarWind Software.CONTENTSINTRODUCTION (4)CREATING AN HA DEVICE (5)CONFIGURING ESX SEVERS (11)CONFIGURING AN ISCSI INITIATOR (19)SETTING UP A DATASTORE (21)CONTACTS (27)INTRODUCTIONCREATING AN HA DEVICEThis technical paper describes only creation of the first disk, since the procedure of creating the second one is alike.1.Open a StarWind configuration file.Note: The default path is C:\Program Files\StarWind Software\StarWind\StarWind.cfg2.Find the string "<!--<iScsiDiscoveryListInterfaces value="1"/> -->" and uncomment it (should lookas follows: <iScsiDiscoveryListInterfaces value="1"/>).3.Restart StarWind Service and repeat the same procedure on other StarWind HA nodes.unch StarWind Management Console: Start -> All Programs -> StarWind Software -> StarWind.Note: The StarWind Console icon appears in the system tray when the Console is running. To open StarWind Management Console,double-click the icon or right-click it and then select Start Management Console from the shortcut menu.5.Select the server you want to provide with the iSCSI target device from the Console tree. Double-click the host to connect.Note:If you are prompted to enter login and password, specify “root” and “starwind”, relatively.These are the default login and password, but you can always change them later.6.After connecting to StarWind Service, you can create devices and targets on the server. Open AddDevice Wizard by one of the following ways:∙Select Add Device from the Target menu.∙Select Add Device from the Devices shortcut menu (right-click to open it).7.Add Device Wizard appears. Please, follow the wizard's steps to complete creation of a new HAdevice.8.Select High Availability Device.9.Click Next to continue.10.Click Add to add a new host. Enter authentication and host information in the Specify Host dialog.11.Click Next to continue.12.Specify corresponding information in the Target Alias and Target Name text fields.Note:The name must be unique. Under this name the device is declared to the iSCSI initiators connecting to the StarWind Service over an IP-network.13.Click to specify the name and location of an HA virtual disk on the server. If you need to createnew virtual disks, select the Create New checkbox.14. Click Next to continue.15.Configure data synchronization and Heartbeat channel parameters.16.Click Next to continue.17.Specify cache parameters of the HA device.18.Click Next to continue.19.Select an initialization method of the HA device.Note: It is recommended to use the Clear virtual disk option.20.Click Next to continue.21.Check whether device parameters are correct. Click Back to make any changes.22.Click Next to continue.23.Click Finish to close the wizard.Follow the similar procedure to create the second HA device.CONFIGURING ESX SEVERS1. Launch VMware vSphere Client: Start -> All Programs -> VMware -> VMware vSphere Client.2. Specify IP-address of the VMware vCenter Server, enter login and password.3. Click Login to enter.4. Click the Hosts and Clusters icon from the Inventory panel of the vSphere Client window.5. Right-click an existing datacenter and select New Cluster. If needed, click New Datacenter to first createa new datacenter.6. The New Cluster Wizard appears. Specify a name of the cluster.7. Click Next until the wizard is closed.8. Right-click the cluster to add a host. Select Add Host.9. Add Host Wizard appears. Specify a host name or IP address, enter username and password.10. Click Next to continue.11. Check whether the specified information is correct and click Next to continue.12. Assign the license key to the host.13. Click Next to continue.14. Click Finish to close the wizard.15. Follow the same procedure for another host.16. Select a host.17. Select the Configuration tab and choose the Networking item from the Hardware pane.18. Click Add Networking.19.The Add Network Wizard appears. Click the VMkernel option button.20. Click Next to continue.21. Click the Create a vSphere standard switch option and select the appropriate network card checkbox.22. Click Next to continue.23. Select the Use this port group for vMotion and Use this port group for management traffic checkboxes.24. Click Next to continue.25. Specify IP settings in the relative text fields.26. Click Next.27. Click Finish to close the wizard.28. Follow the same procedure to create the second VMkernel of the third vSwitch.29. Follow the same procedure for another host in the cluster.Configuring an iSCSI Initiator1. Select a host.2. Click the Configuration tab and select the Storage Adapters item from the Hardware pane.3. Click Add and select Add software iSCSI Adapter. Click OK.4. The list of the available storage adapters appears. Select iSCSI Software Adapter.5. Click the Properties link.6. Switch to the Dynamic Discovery tab.7. Add each of the StarWind servers by clicking Add and specifying a server IP-address.8. Click Close. Click Yes to rescan for new iSCSI LUNs.9. Follow the same procedure for another cluster host.Setting up a Datastore1. Select a host from the Console tree.2. Click the Configuration tab and select the Storage item from the Hardware pane.3. Click Add Storage.4. The Add Storage window appears. Select Disk/LUN option.5. Click Next to continue.6. Select the device.7. Click Next to continue.8. Review the current disk layout.9. Click Next to continue.10. Enter a datastore name in the appropriate text field.11. Click Next to continue.12. Set the Disk/LUN formatting options.13. Click Next to continue.14. Check the device parameters and click Back to make any changes.15. Click Finish to close the wizard. A new datastore appears.16. Check another host for a new datastore. If a new datastore is not listed among the existing datastores, click Rescan All.17. Follow the same procedure for another storage device. A new datastore appears.18. To add the HA feature right-click the cluster and select Edit Settings.19. In the Cluster Settings window select the Turn on vSphere HA checkbox.22. Click OK.CONTACTSCustomer Support Portal: /support Support Forum: /forums Sales: **************************General Information: *************************US HeadquartersPhone: 1-617-449-7717Fax: 1-617-507-5845EMEA and APACPhone: +44-0-2071936727+44-0-2071936350+33-0-977197857 (French)Voice Mail: 1-866-790-2646StarWind Software Inc.40 Mall Rd., Burlington,MA 01803, USA。
基于SAN的企业云存储及备份方案设计
第36卷第2期 唐山师范学院学报 2014年3月 Vol.36 No.2 Journal of Tangshan Teachers College Mar. 2014──────────基金项目:福州市科技计划项目(2013-G-96) 收稿日期:2013-10-02作者简介:杨柳青(1959-),男,福建福州人,副教授、高级工程师,研究方向为计算机网络与安全。
-59-计算机与自动化技术研究基于SAN 的企业云存储及备份方案设计杨柳青,陈 翔,黄伟民(福州职业技术学院 计算机系,福建 福州 350008)摘 要:随着企业业务与资源量的迅速增长,数据资料也呈迅猛增长之势;企业对业务数据的安全性及高效性等提出了比以往更加严格的要求。
保证安全、可靠、完整地保存宝贵的数据资料已成为企业信息化建设的当务之急。
介绍了基于SAN 的企业存储及备份方案的设计,应用云存储满足文件、数据库、业务管理等多个应用系统的共同需求,实现资源共享的统一分配和管理。
关键词:SAN ;存储;备份;IOPS 中图分类号:TP393文献标识码:A 文章编号:1009-9115(2014)02-0059-04DOI :10.3969/j.issn.1009-9115.2014.02.017The Enterprise Data Storage and Backup Solution Based on SANYANG Liu-qing, CHEN Xiang, HUANG Wei-min(Department of Computer, Fuzhou Polytechnic, Fuzhou 350008, China)Abstract: With the rapid growth of enterprise teaching affairs and resources, the amounts of data also grow rapidly. The data requirement is stricter than ever on the data security and efficiency. So it has become the top priority of enterprise information-building department to keep the valuable data safe, reliable and integrity. The design of enterprise storage and backup solutions based on SAN is described to meet the common needs of multiple applications in the files, databases, business management by cloud storage, to achieve the unified allocation and management of the resource sharing.Key Words: SAN; storage; backup; system1 需求与设计原则SAN 网络存储能安全、可靠、完整地保存宝贵的数据,将网络中大量各种不同类型的数据存储设备通过应用软件集合起来,减轻系统管理员的负担,有效地保护宝贵的数据及人力资源。
NBU 7.5 SAN Client 实施文档
NBU 7.5 SAN Client 实施文档1 安装前环境准备准备NBU SAN Client功能是NBU 6.5时候推出的,主要是减轻LAN-Free 备份中客户端的压力的一种方式。
在实施之前需要对FT Meida server 和SAN Client 做规划。
首先看上图,FT Meidia server 中需要两块支持特定功能的HBA卡,相关HBA卡型号可以在NBU的兼容性列表中找到。
FT Meida Server 中一块HBA卡修改为target 模式,目的是模拟虚拟的类似驱动器资源,这样SAN Client端就能够识别到类似Tape Drive资源,FT Meida server中另一块HBA卡initiator 模式保持不变,这块HBA卡可以连接VTL,PTL或者DISK。
最终达到的目的是备份数据流从SAN Client 端传送到target 模式的HBA卡传送到FT Meida server ,然后通过另一块HBA卡传送到备份目标端,达到LAN -Free备份的目的。
下面是典型的SAN Client环境系统拓扑图:推荐的方式是FT Media Server 不要和Master Server是同一台机器。
实施SAN Cleint的客户端的用于备份的HBA卡和FT Meida Server中target模式的HBA 卡在一个SAN Switchzone 里面。
FTMeida Server 中initiator 模式的HBA和备份目标端的Disk或者VTL 或者PTL在同一个Zone中。
NBU 7.5中支持的FT Media Server的系统版本是Novell SuSE Enterprise Linux 10 on x86-64 SP2/SP3; Red Hat Enterprise Linux 4 on x86-64 Update 3/Update 5; Red Hat Enterprise Linux 5 on x86-64 GA/Update 2/ Update 3; Red Hat Enterprise Linux 5 on x86-64 Update 4/Update 5/ Update 6/ Update7; Red Hat Enterprise Linux 6 on x86-64 GA/Update 1.只有这些系统版本才支持FT Media Server.2 实施过程2.1系统环境:Master Server :redhat 5.8 X64 also Opscenter serverFT Meida Server:redhat 5.4 X64 2 qlogic 2560 HBA cardClients : AIX 5300-10;redhat 5.6 X64;redhat 4.6 X64Master Server Netbackup Version 7.5.0.3FT Meida Server FT Netbackup Version 7.5.0.3Client AIX Netbackup Version 7.5.0.3Client redhat 5.4 Netbackup Version 7.5.0.3Client redhat 4.6 Netbackup Version 7.1.0.4VTL :suresave VTL5000 :虚拟出来STKL40PTL:Dell PTLDisk:10T disk pool2.2安装过程:2.2.3系统环境Master Server 安装nbu 7.5并打补丁到7.5.0.3FT Meida Server安装nbu 7.5并打补丁到7.5.0.3AIX 客户端安装nbu 7.5客户端并打补丁到7.5.0.3Redhat 5.4客户端安装nbu 7.5客户端并打补丁到7.5.0.3 Redhat 4.6客户端安装nbu 7.1客户端并打补丁到7.1.0.42.2.4 SAN Client 配置过程:2.2.4.1 在FT Media Server上启动nbhba 模式:# cd /usr/openv/openv/netbackup/bin/admincmd/./nbftsrv_config –nbhbaInstalling nbhba driver.Uninstalled WinDriver for FT Server mode.It may be necessary to temporarily unload your QLogic driversto free up the ports for the nbhbadrivers.This is an optional step. If you choose not to do this, thenbhba drivers may not have access to the HBA ports until asubsequent reboot.Would you like to unload and reload your native QLogic drivers now? [y,n] (y) yAre you sure you want to unload QLogic driver: qla2xxx? [y,n] (y) yRemoving qla2xxx.Installed driver for nbhba mode.2.2.4.2 查看HBA模式状态# ./nbhba -L4 ports recognized; 0 target mode ports; mode : driver in nbhba modeHBA Index #1Device ID = 2432World Wide Name = XX:XX:XX:XX:XX:XX:XX:XXModel Name = "QLE2462 "Port = 0Mode = initiator (designated for other use)(138)HBA Index #2Device ID = 2432World Wide Name = XX:XX:XX:XX:XX:XX:XX:XXModel Name = "QLE2462 "Port = 1Mode = initiator (designated for other use)(138)HBA Index #3Device ID = 2432World Wide Name = XX:XX:XX:XX:XX:XX:XX:XXModel Name = "QLE2462 "Port = 0Mode = initiator (designated for other use)(138)HBA Index #4Device ID = 2432World Wide Name = XX:XX:XX:XX:XX:XX:XX:XXModel Name = "QLE2462 "Port = 1Mode = initiator (designated for other use)(138)2.2.4.3 修改HBA模式Command: nbhba –modify –wwn <HBA WWPN> -mode target[root@ admincmd]# ./nbhba -modify -wwn 21:00:00:E0:8B:9B:96:F0 -mode targetModified port with WWN 21:00:00:E0:8B:9B:96:F0Modified port with WWN 21:01:00:E0:8B:BB:96:F0注意:这里改模式的时候,会同时更改同一块HBA上的多个端口。
SAN解决方案
SAN解决方案SAN(Storage Area Network,存储区域网络)解决方案是一种用于集中存储和管理数据的技术。
它通过将存储设备连接到网络,提供高效的数据传输和存储管理功能。
本文将介绍SAN解决方案的定义、优势、主要组成部份、应用领域和未来发展趋势。
一、SAN解决方案的定义SAN解决方案是一种基于网络的存储架构,它将存储设备(如磁盘阵列)与服务器通过高速网络连接起来,形成一个独立的存储网络。
SAN解决方案通过提供高带宽、低延迟的数据传输通道,实现了存储资源的集中管理和共享,提高了数据存储和访问的效率。
1.1 存储资源的集中管理SAN解决方案通过将存储设备连接到网络,实现了存储资源的集中管理。
管理员可以通过集中的管理软件对存储设备进行监控、配置和管理,实现对存储资源的统一管理。
这样可以提高存储资源的利用率,降低管理成本。
1.2 高带宽、低延迟的数据传输SAN解决方案采用高速网络连接存储设备和服务器,提供了高带宽、低延迟的数据传输通道。
这样可以实现快速的数据传输和访问,提高了系统的响应速度和性能。
1.3 数据的共享和备份SAN解决方案可以实现存储资源的共享和备份。
多台服务器可以通过SAN网络同时访问存储设备上的数据,实现数据的共享。
同时,通过SAN解决方案可以实现数据的备份和恢复,提高了数据的安全性和可靠性。
二、SAN解决方案的优势SAN解决方案相比于传统的直连存储方式具有以下优势:2.1 高性能和可扩展性SAN解决方案采用高速网络连接存储设备和服务器,提供了高性能的数据传输通道。
同时,SAN解决方案具有良好的可扩展性,可以根据需求增加存储设备和服务器,满足不断增长的存储需求。
2.2 高可靠性和可用性SAN解决方案采用冗余的网络和存储设备,提供了高可靠性和可用性。
当一个存储设备或者网络组件发生故障时,系统可以自动切换到备用设备,保证数据的连续性和可用性。
2.3 简化管理和降低成本SAN解决方案通过集中管理存储资源,简化了存储管理的工作。
爱数备份方案

爱数备份方案在当今数据爆炸式增长的时代,数据备份的重要性不可忽视。
为了保障重要数据的安全,并能够快速恢复,爱数公司特别设计了一套全面有效的备份方案。
本文将详细介绍爱数备份方案的特点和操作流程。
一、备份方案的特点1.1 多层次备份爱数备份方案采用多层次备份策略,包括本地备份和云端备份。
本地备份能够满足用户快速恢复数据的需求,而云端备份则提供了数据长期存储和跨地域灾备的功能,确保数据的安全可靠。
1.2 定制化设置爱数备份方案支持定制化设置,用户可以根据自身需求灵活选择备份数据的类型、频率和存储位置,实现个性化备份策略。
1.3 自动化运维爱数备份方案通过智能化管理平台,实现备份任务的自动化运维。
用户只需设置好备份策略,系统将自动执行备份和恢复操作,无需人工干预,大大提高了工作效率。
二、备份操作流程2.1 设置备份策略用户首先需要登录爱数备份管理平台,根据自身需求设置备份策略。
用户可以选择完全备份还是增量备份,设置备份频率和备份源,还可以指定备份存储位置。
2.2 执行备份任务系统根据用户设置的策略自动执行备份任务。
在备份过程中,系统会对文件进行压缩和加密,确保数据的完整性和安全性。
备份任务完成后,用户可以在备份管理平台上查看备份结果。
2.3 数据恢复当用户需要恢复备份数据时,只需在备份管理平台上选择相应的备份版本,并指定恢复目标。
系统将自动解压和解密备份文件,并将数据恢复到指定位置,确保数据的完整性和可用性。
三、总结爱数备份方案基于多层次备份策略,提供了全面、灵活和安全的数据保护解决方案。
通过定制化设置和自动化运维,用户可以轻松实现数据备份和恢复操作。
在数据安全备份方面,爱数备份方案将为用户提供全面的保障。
通过以上介绍,我们可以看出爱数备份方案具有以下特点:多层次备份、定制化设置和自动化运维。
在实际应用中,爱数备份方案将大大降低数据丢失和恢复困难的风险,为用户提供可靠的数据保护服务。
无论是个人用户还是企业客户,都可以信赖爱数备份方案,将数据安全放在首要位置。
SAN Client备份设置
SANClient备份测试(SANClient&NetBackup5200&VMware&Deduplication)Version1.0ArthurXu2011-04-20环境介绍VMwareSAN&SANClient&Dedup(5200)这种方式下所有的数据流均通过SAN方式来传送。
1.NBU5200被配置为FTMediaServer2.Backupproxy1配置为SANClient3.数据通过Backupproxy1通过SAN读取后,通过SAN网络传送到NBU52004.NBU5200上实现重复数据删除5.目前NBU5200已经可以通过手工方式开启SANClient支持a)NBU5200近期将实现SANClient官方支持(GUI界面)SANClient方式传输有如下特点:1.SANClient广泛支持各种类型的OS。
2.SANClient方式下,只能支持MediaServer端重复数据删除。
NBU5200上手工开启FTMediaServer方法卸载HBA卡驱动[root@netbackup7~]#/usr/openv/netbackup/bin/admincmd/nbftsrv_config-nbhba Installingnbhbadriver.UninstalledWinDriverforFTServermode.Itmaybenecessaryto temporarilyunloadyourQLogicdriverstofreeuptheportsforthenbhbadrivers. Thisisanoptionalstep.Ifyouchoosenottodothis,thenbhbadriversmaynothaveaccesst otheHBAportsuntilasubsequentreboot. WouldyouliketounloadandreloadyournativeQLogicdriversnow[y,n](y)Areyousureyou wanttounloadQLogicdriver:qla2xxx[y,n](y)Removingqla2xxx. Cannotcontinuesinceqla2xxxisinuseandcannotberemoved.Pleasereleasereferencest oqla2xxxbeforetryingtheinstallagain.该步骤可能不成功,主要是qla2xxx驱动绑定到内核中了。
DELL SAN存储使用说明

1. 存储技术简介 (2)1.1 主要存储方式介绍 (2)1.1.1 直连存储(DAS) (2)1.1.2 网络直连存储(NAS) (2)1.1.3 存储区域网络(SAN) (2)2. DELL EqualLogic (3)2.1 访问配置DELL SAN (3)2.1.1 通过IE访问 (3)2.1.2 基本设置 (4)2.2 访问存储阵列 (4)2.2.1 创建Volume (4)2.2.2 访问volume (7)2.3 快照管理 (9)2.3.1 快照恢复 (9)2.4 自动快照 (11)3. ASM/ME工具管理 (12)3.1 设置VSS路径 (12)3.2 ASM/ME管理数据库 (13)3.2.1 数据库快照 (14)3.2.2 数据库Schedule及Collection (17)3.3 ASM/ME管理磁盘 (21)1.存储技术简介1.1 主要存储方式介绍1.1.1 直连存储(DAS)DAS是一种将存储介质直接安装在服务器上或者服务器外的存储方式。
这种存储方式在磁盘系统和服务器之间具有很快的传输速度。
缺点是必须经常面对存储空间问题(最大支持2T的设备),而且需要管理几乎所有的基于服务器的DAS系统,即需要有一个监控服务器来监控每个磁盘的使用率。
如果存储系统需要快速访问,而且对成本比较敏感,那么DAS是理想的选择。
优点:成本低,访问速度快。
缺点:无扩展性,共享受限。
1.1.2 网络直连存储(NAS)网络直接存储是将存储空间放在网络上,可供很多用户随时访问。
和DAS相比,NAS 可以扩展存储空间(最大200T容量)。
但是,NAS不适合于数据库存储及Exchange存储。
而且,如果想高速的访问存储空间,NAS就不是很好的选择。
因为所有的数据都需要转移至网络,访问速度会受网速的限制。
优点:访问方便,扩展性好。
缺点:对于同样的存储空间,成本比DAS高很多,不支持块级访问,受网络限制。
1.1.3 存储区域网络(SAN)存储区域网络是通过光纤集线器、光纤路由器、光纤交换机等设备将磁盘阵列、磁带等存储设备与相关服务器连接起来的高速专用子网。
- 1、下载文档前请自行甄别文档内容的完整性,平台不提供额外的编辑、内容补充、找答案等附加服务。
- 2、"仅部分预览"的文档,不可在线预览部分如存在完整性等问题,可反馈申请退款(可完整预览的文档不适用该条件!)。
- 3、如文档侵犯您的权益,请联系客服反馈,我们会尽快为您处理(人工客服工作时间:9:00-18:30)。
SAN Client备份测试(SAN Client & NetBackup 5200 & VMware & Deduplication)Version 1.0Arthur Xu2011-04-201环境介绍VMware SAN & SAN Client & Dedup(5200)这种方式下所有的数据流均通过SAN方式来传送。
1. NBU 5200被配置为FT Media Server2. Backupproxy1配置为SAN Client3. 数据通过Backupproxy1通过SAN读取后,通过SAN网络传送到NBU52004. NBU5200上实现重复数据删除5. 目前NBU5200已经可以通过手工方式开启SAN Client支持a) NBU5200近期将实现SAN Client官方支持(GUI界面?)SAN Client方式传输有如下特点:1. SAN Client广泛支持各种类型的OS。
2. SAN Client方式下,只能支持Media Server端重复数据删除。
1.1NBU 5200上手工开启FT Media Server方法1.1.1卸载HBA卡驱动[root@netbackup7 ~]# /usr/openv/netbackup/bin/admincmd/nbftsrv_config -nbhbaInstalling nbhba driver. Uninstalled WinDriver for FT Server mode. It may be necessary to temporarily unload your QLogic drivers to free up the ports for the nbhba drivers.This is an optional step. If you choose not to do this, the nbhba drivers may not have access to the HBA ports until a subsequent reboot.Would you like to unload and reload your native QLogic drivers now? [y,n] (y) Are you sure you want to unload QLogic driver: qla2xxx? [y,n] (y) Removing qla2xxx.Cannot continue since qla2xxx is in use and cannot be removed. Please release references to qla2xxx before trying the install again.该步骤可能不成功,主要是qla2xxx驱动绑定到内核中了。
编辑/etc/modprobe.conf 注释掉qla2xxx 模块[root@netbackup7 boot]# cat /etc/modprobe.confalias eth0 forcedethalias eth1 forcedethalias eth2 forcedethalias eth3 forcedethalias scsi_hostadapter mptbasealias scsi_hostadapter1 mptsas#alias scsi_hostadapter2 qla2xxxalias scsi_hostadapter3 usb-storage编辑/etc/modprobe.d/blacklist文件,在文件尾添加"blacklist qla2xxx"重启机器并再次运行nbftsrv_config -nbhba命令检查是否成功[root@netbackup7 ~]# /usr/openv/netbackup/bin/admincmd/nbftsrv_config -mode nbhba installed1.1.2获得对应的HBA卡WWN号[root@netbackup7 ~]# /usr/openv/netbackup/bin/admincmd/nbhba -l1 2432 21:00:00:1B:32:91:E0:F9 "QLE2462 " 0 0 1432 2432 21:01:00:1B:32:B1:E0:F9 "QLE2462 " 1 0 143[root@netbackup7 ~]# /usr/openv/netbackup/bin/admincmd/nbhba -LCard #1HBA Index #1Device ID = 2432World Wide Name = 21:00:00:1B:32:91:E0:F9Model Name = "QLE2462 "Port = 0Mode = initiator (designated for other use)(143)HBA Index #2Device ID = 2432World Wide Name = 21:01:00:1B:32:B1:E0:F9Model Name = "QLE2462 "Port = 1Mode = initiator (designated for other use)(143)1.1.3设置对应的HBA卡工作在Target方式[root@netbackup7 ~]# /usr/openv/netbackup/bin/admincmd/nbhba -modify -wwn 21:00:00:1B:32:91:E0:F9 -mode targetModified port with WWN 21:00:00:1B:32:91:E0:F9通过命令检查[root@netbackup7 ~]# /usr/openv/netbackup/bin/admincmd/nbhba -LCard #1HBA Index #1Device ID = 2432World Wide Name = 21:00:00:1B:32:91:E0:F9Model Name = "QLE2462 "Port = 0Mode = target (designated for FT Server)(8142)HBA Index #2Device ID = 2432World Wide Name = 21:01:00:1B:32:B1:E0:F9Model Name = "QLE2462 "Port = 1Mode = initiator (designated for other use)(142)1.1.4完成配置工作[root@netbackup7 ~]# /usr/openv/netbackup/bin/admincmd/nbftsrv_configInstalling the Jungo WinDriver and Fibre Transport Server.Uninstalled WinDriver for FT Server mode.Removing ql2300_stub.The following automatic startup and shutdown scripts (respectively) have been installed. They will cause the NetBackup Fibre Transport Server daemon to be automatically shut down and restarted each time the system boots./etc/rc.d/rc2.d/S21nbftserver/etc/rc.d/rc3.d/S21nbftserver/etc/rc.d/rc5.d/S21nbftserver/etc/rc.d/rc0.d/K03nbftserver/etc/rc.d/rc1.d/K03nbftserver/etc/rc.d/rc6.d/K03nbftserverInstalled driver for FT Server mode./etc/udev/rules.d/50-windrvr.rules does not exist, creating.../etc/udev/rules.d/50-windrvr.rules updated with Jungo WinDriver permissions. Installed WinDriver for FT Server mode.NetBackup Fibre Transport Server started.Would you like to make these changes persist after a reboot? [y,n] (y)Running mkinitrd. Previous initrd image is saved at/boot/initrd-2.6.18-128.el5.img.08-11-10.11:29:34.删除原来对/etc/modprobe.conf的qla2xxx的注释删除对/etc/modprobe.d/blacklist中添加的"blacklist qla2xxx"重新启动检查FT服务是否启动[root@netbackup7 ~]# /usr/openv/netbackup/bin/admincmd/nbftsrv_config -mode Fibre Transport server installed and running.1.2SAN Client配置1.2.1发现FT设备NBU Media Server NB5200上显示Fiber Transport Device客户端发现对应设备1.2.2配置Service手工启动SAN Client FT Service1.2.3NBU中配置检查SAN Clients中列出对应的服务器1.3配置SAN Client 传输SAN Client配置Master服务器配置1.4备份速度和NBU5200 Dedup性能备份速度为135M,接近所用存储的最高性能NBU 5200 CPU利用率2总结2.1强大的FT / SAN Client 方式备份和恢复SAN 客户端是一种NetBackup 高级功能,可完成NetBackup 客户端的高速备份和还原。
