gridview 编辑,删除,更新的用法
关于GridView使用学习总结

GridView使用学习总结关于GridView使用学习总结由于视频比较旧,涉及到的数据绑定控件DataGrid在VS2012中已经没有了,取而代之的是GridView。
开始觉得视频中的例子没法实现了,其实不然,DataGrid里面的功能GridView里一样都不少,只是形式变化了一下,仔细研究一下发现它们是换汤不换药啊。
(一)DataKeyName属性(1)DataKeyNames一般都是用来对当前行做唯一标示的,所以一般为数据库的ID。
(2)GridView.DataKeys[e.RowIndex],e.RowIndex是获取事件对应的行,GridView.DataKeys[e.RowIndex]就是获取对应行的唯一标示也就是DataKeyNames所指定列的值。
(3)DataList和Repeater是没有的该属性的。
在代码中这样使用:(定义的`该函数在下面都需要调用)/// 实现数据绑定功能 ///private void BindToDataGird() { SqlConnection con = DB.CreateCon(); SqlDataAdapter sda = new SqlDataAdapter(); sda.SelectCommand = new SqlCommand("select employeeID,FirstName,LastName,Title,BirthDate from employees ", con); DataSet ds = new DataSet(); sda.Fill(ds, "emp"); //将查询到的数据添加到DataSet中。
this.GridView1.DataKeyNames =new string[]{ "employeeID"}; //DataKeyNames的使用this.GridView1.DataSource = ds.Tables["emp"]; this.DataBind(); }如何取值?DataKey key = GridView1.DataKeys[e.RowIndex];//其中e为GridViewDelete(或者Edit)EventArgs e string empID = key[0].ToString();(二)分页由于GridView中封装了分页的功能。
Gridview用法大总结(全程图解珍藏版)
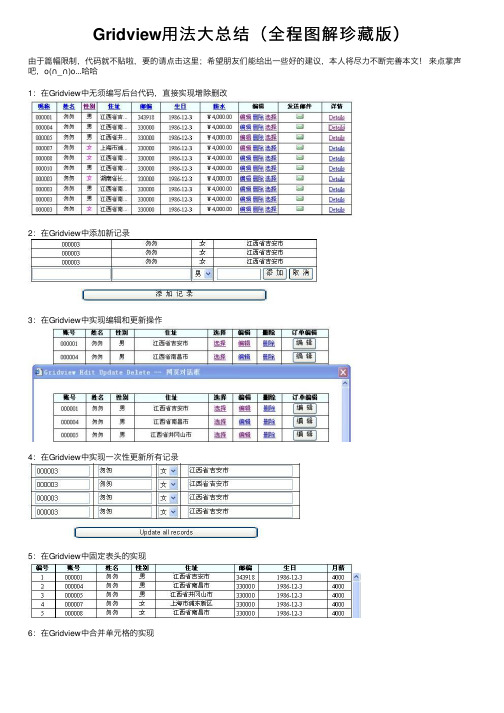
Gridview⽤法⼤总结(全程图解珍藏版)
由于篇幅限制,代码就不贴啦,要的请点击这⾥;希望朋友们能给出⼀些好的建议,本⼈将尽⼒不断完善本⽂!来点掌声吧,o(∩_∩)o...哈哈
1:在Gridview中⽆须编写后台代码,直接实现增除删改
2:在Gridview中添加新记录
3:在Gridview中实现编辑和更新操作
4:在Gridview中实现⼀次性更新所有记录
5:在Gridview中固定表头的实现
6:在Gridview中合并单元格的实现
7:在Gridview中将数据操作结果显⽰在Footer中
8:在Gridview中添加表头
9:在Gridview中将数据导出
10:在Gridview中实现数据导⼊
11:在Gridview中实现嵌套功能
12:在Gridview中实现多层嵌套
13:在Gridview中实现排序
14:在Gridview中实现分页
15:Gridivew结合CheckBox控件的使⽤
16:Gridview结合DropDownList控件的使⽤
17:Gridview结合RadioButtom的使⽤
18:Gridview内嵌DropDownList控件
19:Gridview结合JS,在客户端结合CheckBox的使⽤
20:在Gridview中设置数据⾏的背景颜⾊
21:在Gridview中设置数据⾏的事件
22:在Gridview中设置数据⾏的其他属性
23:在Gridview中索引主键的使⽤。
gridview数据编辑和删除实现说明

1,首先在gridview的属性中加入以下代码OnRowCancelingEdit="gv_RowCancelingEdit" OnRowEditing="gv_RowEditing" OnRowUpdating="gv_RowUpdating" OnRowDeleting="gv_RowDeleting"其中gv为gridview的id名称;并在最后一行加入<asp:CommandField ShowEditButton="True" ShowDeleteButton="True" HeaderText="操作"/>2,在不需要编辑的字段属性加ReadOnly="True"如:<asp:BoundField DataField="PRE_MTRL_ID" HeaderText="物资编号" ReadOnly="True" SortExpression="PRE_MTRL_ID" />3,将需要编辑的字段设置成textbox如:<asp:TemplateField HeaderText="合同物资单价" HeaderStyle-Font-Size=12px><ItemTemplate><%# Eval("CON_PMTRL_PRICE")%></ItemTemplate><EditItemTemplate><asp:TextBox ID="PPrice" Text='<%# Eval("CON_PMTRL_PRICE") %>' runat="server" Width="90px" /></EditItemTemplate><ItemStyle Width="100px" /></asp:TemplateField>其中CON_PMTRL_PRICE为字段4,在后台中加入以下代码protected void Page_Load(object sender, EventArgs e){if (!IsPostBack){GridViewBind();}}private void GridViewBind(){string SqlStr = "select CON_NO,cscc_function.get_con_name_abbr(con_no) as con_name_abbr,cscc_function.get_contractor(con_no) as contractor,PRE_MTRL_ID,cscc_function.get_mtrl_name(pre_mtrl_id) as PRE_MTRL_NAME,con_pmtrl_price,con_PTRANS_PRICE FROM CON_PMTRL_PRICE_TAB "; 选择gridview所有字段DataSet ds = new DataSet();string tab = "table";try{OracleConnection occ = dbc.getCon();if (occ.State.ToString() == "Closed") occ.Open();OracleDataAdapter oda = new OracleDataAdapter(SqlStr, occ);oda.Fill(ds, tab);if (occ.State.ToString() == "Open") occ.Close();gv.DataSource = ds.Tables[0].DefaultView;gv.DataBind();}catch (Exception ex){Response.Write("数据库错误,错误原因:" + ex.Message);Response.End();}}protected void gv_RowEditing(object sender, GridViewEditEventArgs e){gv.EditIndex = e.NewEditIndex;GridViewBind();}protected void gv_RowCancelingEdit(object sender, GridViewCancelEditEventArgs e){gv.EditIndex = -1;GridViewBind();}protected void gv_RowUpdating(object sender, GridViewUpdateEventArgs e){string id = gv.DataKeys[e.RowIndex].Values[1].ToString();string conid = gv.DataKeys[e.RowIndex].Values[0].ToString();//如果关键字在gridview中,则在gridview属性中加上DataKeyNames="CON_NO,PRE_MTRL_ID"然后用上面两条语句读出string rmtrlprice = ((TextBox)gv.Rows[e.RowIndex].FindControl("PPrice")).Text;string transprice = ((TextBox)gv.Rows[e.RowIndex].FindControl("TPrice")).Text;//以上两条取得textbox中的数据,用于更改数据库//请万分注意:如果gridview中没有关键字要加上如:<asp:BoundField HeaderText="需求计划编号" DataField="RMTRL_DEM_PLAN_ID" SortExpression="RMTRL_DEM_PLAN_ID" ReadOnly="True" Visible="False" > </asp:BoundField> RMTRL_DEM_PLAN_ID为数据源表的关键字string SqlStr = "update CON_PMTRL_PRICE_TAB set con_pmtrl_price='" + rmtrlprice + "',CON_PTRANS_PRICE='" + transprice + "' where pre_mtrl_id='" + id + "'and con_no ='" + conid + "'"; //更新数据语句try{OracleConnection conn = dbc.getCon();if (conn.State.ToString() == "Closed") conn.Open();OracleCommand comm = new OracleCommand(SqlStr, conn);comm.ExecuteNonQuery();comm.Dispose();if (conn.State.ToString() == "Open") conn.Close();gv.EditIndex = -1;GridViewBind();}catch (Exception ex){Response.Write("数据库错误,错误原因:" + ex.Message);Response.End();}}protected void gv_RowDeleting(object sender, GridViewDeleteEventArgs e){string CON_Id = gv.DataKeys[e.RowIndex].Values[0].ToString();string SqlStr = "delete from con_pmtrl_price_tab where con_no = '" + CON_Id + "'"; //raw_mtrl_id = '" + rmtrl_id + "'andtry{OracleConnection con = dbc.getCon();if (con.State.ToString() == "Closed") con.Open();OracleCommand com = new OracleCommand(SqlStr, con);com.ExecuteNonQuery();com.Dispose();if (con.State.ToString() == "Open") con.Close();gv.EditIndex = -1;GridViewBind();}catch (Exception ex){Response.Write("数据库错误,错误原因:" + ex.Message);Response.End();}}其中加上公共代码 DBClass dbc = new DBClass();OraConn orc = new OraConn();。
c#gridview控件中添、删、改、查数据
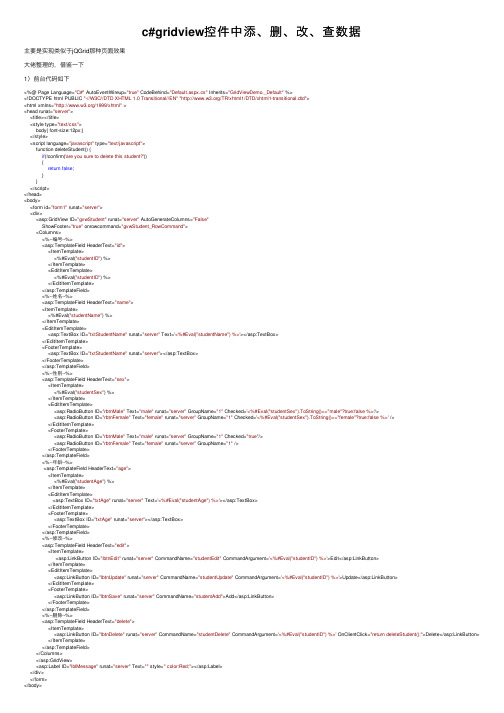
c#gridview控件中添、删、改、查数据主要是实现类似于jQGrid那种页⾯效果⼤佬整理的,借鉴⼀下1)前台代码如下<%@ Page Language="C#" AutoEventWireup="true" CodeBehind="Default.aspx.cs" Inherits="GridViewDemo._Default" %><!DOCTYPE html PUBLIC "-//W3C//DTD XHTML 1.0 Transitional//EN""/TR/xhtml1/DTD/xhtml1-transitional.dtd"><html xmlns="/1999/xhtml" ><head runat="server"><title></title><style type="text/css">body{ font-size:12px;}</style><script language="javascript" type="text/javascript">function deleteStudent() {if(!confirm('are you sure to delete this student?')){return false;}}</script></head><body><form id="form1" runat="server"><div><asp:GridView ID="gvwStudent" runat="server" AutoGenerateColumns="False"ShowFooter="true" onrowcommand="gvwStudent_RowCommand"><Columns><%--编号--%><asp:TemplateField HeaderText="id"><ItemTemplate><%#Eval("studentID") %></ItemTemplate><EditItemTemplate><%#Eval("studentID") %></EditItemTemplate></asp:TemplateField><%--姓名--%><asp:TemplateField HeaderText="name"><ItemTemplate><%#Eval("studentName") %></ItemTemplate><EditItemTemplate><asp:TextBox ID="txtStudentName" runat="server" Text='<%#Eval("studentName") %>'></asp:TextBox></EditItemTemplate><FooterTemplate><asp:TextBox ID="txtStudentName" runat="server"></asp:TextBox></FooterTemplate></asp:TemplateField><%--性别--%><asp:TemplateField HeaderText="sex"><ItemTemplate><%#Eval("studentSex") %></ItemTemplate><EditItemTemplate><asp:RadioButton ID="rbtnMale" Text="male" runat="server" GroupName="1" Checked='<%#Eval("studentSex").ToString()=="male"?true:false %>'/><asp:RadioButton ID="rbtnFemale" Text="female" runat="server" GroupName="1" Checked='<%#Eval("studentSex").ToString()=="female"?true:false %>' /></EditItemTemplate><FooterTemplate><asp:RadioButton ID="rbtnMale" Text="male" runat="server" GroupName="1" Checked="true"/><asp:RadioButton ID="rbtnFemale" Text="female" runat="server" GroupName="1" /></FooterTemplate></asp:TemplateField><%--年龄--%><asp:TemplateField HeaderText="age"><ItemTemplate><%#Eval("studentAge") %></ItemTemplate><EditItemTemplate><asp:TextBox ID="txtAge" runat="server" Text='<%#Eval("studentAge") %>'></asp:TextBox></EditItemTemplate><FooterTemplate><asp:TextBox ID="txtAge" runat="server"></asp:TextBox></FooterTemplate></asp:TemplateField><%--修改--%><asp:TemplateField HeaderText="edit"><ItemTemplate><asp:LinkButton ID="lbtnEdit" runat="server" CommandName="studentEdit" CommandArgument='<%#Eval("studentID") %>'>Edit</asp:LinkButton></ItemTemplate><EditItemTemplate><asp:LinkButton ID="lbtnUpdate" runat="server" CommandName="studentUpdate" CommandArgument='<%#Eval("studentID") %>'>Update</asp:LinkButton></EditItemTemplate><FooterTemplate><asp:LinkButton ID="lbtnSave" runat="server" CommandName="studentAdd">Add</asp:LinkButton></FooterTemplate></asp:TemplateField><%--删除--%><asp:TemplateField HeaderText="delete"><ItemTemplate><asp:LinkButton ID="lbtnDelete" runat="server" CommandName="studentDelete" CommandArgument='<%#Eval("studentID") %>' OnClientClick="return deleteStudent();">Delete</asp:LinkButton> </ItemTemplate></asp:TemplateField></Columns></asp:GridView><asp:Label ID="lblMessage" runat="server" Text="" style=" color:Red;"></asp:Label></div></form></body></html>2)后台代码如下using System;using System.Collections.Generic;using System.Linq;using System.Web;using System.Web.UI;using System.Web.UI.WebControls;using System.Data.Linq;using System.Data;namespace WebApplication7{public partial class _Default : System.Web.UI.Page{string nodata = "no data!";StudentClassesDataContext scdc = new StudentClassesDataContext(@"server=.\sqlexpress;database=School;uid=sa;pwd=1");protected void Page_Load(object sender, EventArgs e){if (!IsPostBack){BindStudent();}else//防⽌PostBack时页⾯显⽰变化{if (gvwStudent.Rows.Count == 1 && gvwStudent.Rows[0].Cells[0].Text == nodata){int columnCount = gvwStudent.Columns.Count;gvwStudent.Rows[0].Cells.Clear();gvwStudent.Rows[0].Cells.Add(new TableCell());gvwStudent.Rows[0].Cells[0].ColumnSpan = columnCount;gvwStudent.Rows[0].Cells[0].Text = nodata;gvwStudent.Rows[0].Cells[0].Style.Add("text-align", "center");}}}///<summary>/// bind student///</summary>private void BindStudent(){Table<Student> students = scdc.GetTable<Student>();//gvwStudent.DataSource = from student in students where student.studentSex == "male" select student;if (students.Count() > 0){gvwStudent.DataSource = students;gvwStudent.DataBind();}else//增加空⾏来显⽰GridView的结构{DataTable dtStudent = new DataTable();dtStudent.Columns.Add(new DataColumn("studentID"));dtStudent.Columns.Add(new DataColumn("studentName"));dtStudent.Columns.Add(new DataColumn("studentSex"));dtStudent.Columns.Add(new DataColumn("studentAge"));if (dtStudent.Rows.Count == 0){dtStudent.Rows.Add(dtStudent.NewRow());}gvwStudent.DataSource = dtStudent;gvwStudent.DataBind();int columnCount = gvwStudent.Columns.Count;gvwStudent.Rows[0].Cells.Clear();gvwStudent.Rows[0].Cells.Add(new TableCell());gvwStudent.Rows[0].Cells[0].ColumnSpan = columnCount;gvwStudent.Rows[0].Cells[0].Text = nodata;gvwStudent.Rows[0].Cells[0].Style.Add("text-align", "center");}}protected void gvwStudent_RowCommand(object sender, GridViewCommandEventArgs e){switch (mandName){case"studentAdd"://添加{//获取选中⾏GridViewRow gridViewRow = (GridViewRow)((LinkButton)mandSource).NamingContainer;//姓名TextBox txtStudentName = (TextBox)gridViewRow.FindControl("txtStudentName");string studentName = txtStudentName.Text.Trim();if (studentName == "") { lblMessage.Text = "please input student name!"; return; }//性别RadioButton rbtnMale = (RadioButton)gridViewRow.FindControl("rbtnMale");string studentSex = rbtnMale.Checked ? rbtnMale.Text : ((RadioButton)gridViewRow.FindControl("rbtnFemale")).Text;//年龄TextBox txtAge = (TextBox)gridViewRow.FindControl("txtAge");string age = txtAge.Text.Trim();int studentAge = 0;if (!Int32.TryParse(age, out studentAge)) { lblMessage.Text = "please input currect student age!"; return; }Student item = new Student();item.studentName = studentName;item.studentSex = studentSex;item.studentAge = studentAge;if (AddStudent(item)){lblMessage.Text = "add student success!";BindStudent();}else{lblMessage.Text = "add student failure!";}}break;case"studentDelete"://删除{int studentID = 0;if (!Int32.TryParse(mandArgument.ToString(), out studentID)) { lblMessage.Text = "student's id is error"; }if (DeleteStudent(studentID)){lblMessage.Text = "delete student success!";BindStudent();}else{lblMessage.Text = "delete student failure!";}}break;case"studentEdit"://修改{GridViewRow gridViewRow = (GridViewRow)((LinkButton)mandSource).NamingContainer;int index = gridViewRow.RowIndex;gvwStudent.EditIndex = index;BindStudent();break;}case"studentUpdate"://更新{int studentID = 0;if (!Int32.TryParse(mandArgument.ToString(), out studentID)) { lblMessage.Text = "student's id is error"; }Student item = GetStudent(studentID);//获取选中⾏GridViewRow gridViewRow = (GridViewRow)((LinkButton)mandSource).NamingContainer;//姓名TextBox txtStudentName = (TextBox)gridViewRow.FindControl("txtStudentName");string studentName = txtStudentName.Text.Trim();if (studentName == "") { lblMessage.Text = "please input student name!"; return; }//性别RadioButton rbtnMale = (RadioButton)gridViewRow.FindControl("rbtnMale");string studentSex = rbtnMale.Checked ? rbtnMale.Text : ((RadioButton)gridViewRow.FindControl("rbtnFemale")).Text;//年龄TextBox txtAge = (TextBox)gridViewRow.FindControl("txtAge");string age = txtAge.Text.Trim();int studentAge = 0;if (!Int32.TryParse(age, out studentAge)) { lblMessage.Text = "please input currect student age!"; return; }item.studentName = studentName;item.studentSex = studentSex;item.studentAge = studentAge;if (UpdateStudent(item)){lblMessage.Text = "update student success!";gvwStudent.EditIndex = -1;BindStudent();}else{lblMessage.Text = "update student failure!";}}break;default:break;}}///<summary>///更新///</summary>///<param name="item"></param>///<returns></returns>private bool UpdateStudent(Student item){bool flag = false;try{scdc.SubmitChanges();flag = true;}catch (Exception ex){flag = false;}return flag;}///<summary>///获取学⽣///</summary>///<param name="studentID"></param>///<returns></returns>private Student GetStudent(int studentID){Student item = new Student();item = scdc.Student.SingleOrDefault(s => s.studentID == studentID);return item;}///<summary>///删除///</summary>///<param name="studentID"></param>///<returns></returns>private bool DeleteStudent(int studentID){bool flag = false;try{Student item = scdc.Student.SingleOrDefault(s => s.studentID == studentID);scdc.Student.DeleteOnSubmit(item);scdc.SubmitChanges();flag = true;}catch (Exception ex){flag = false;}return flag;}///<summary>///添加///</summary>///<param name="item"></param>///<returns></returns>private bool AddStudent(Student item){bool flag = false;try{scdc.Student.InsertOnSubmit(item); scdc.SubmitChanges();flag = true;}catch (Exception ex){flag = false;}return flag;}}}。
Gridview用法(个人总结)202X803
Gridview用法(个人总结)202X803Gridview用法(个人总结)202*0803Gridview的一些操作:1、添加删除列:直接使用Gridview的删除事件:1)选择Gridview的右上角任务栏,打开之后选择编辑列,然后选择CommandFiled,打开CommandFiled选择删除,然后选择添加,设置HeadText为删除。
2)打开Gridview控件的属性对话框,在事件中双击RowDeleting,然后添加删除事件代码:protectedvoidGridView1_RowDeleting(objectsender,GridViewDelete EventArgse){StringBuildersb=newStringBuilder();sb.AppendFormat(@"DELETEFRO MSUPPLIERSWHEREID="+Convert.ToInt32(GridView1.DataKeys[e.RowIndex] .Value));SQLHelperhelper=newSQLHelper();helper.ExecuteSql(sb.ToStr ing());Bindon();}不使用Gridview的删除事件:使用添加LinkButton的方法实现删除选定行1)选择Gridview的右上角任务栏,打开之后选择编辑列,然后选择TemplateField,设置HeadText为删除,然后在脚本中添加下面代码:2)打开Gridview控件的属性对话框,在事件中双击RowDataBound,添加如下代码://获取删除行的IDif(e.Row.RowType==DataControlRowType.DataRow){stringid=GridVie w1.DataKeys[e.Row.RowIndex].Value.ToString();//得到idLinkButtonibtnDel=(LinkButton)e.Row.FindControl("delet");//实例化LinButton按钮控件mandArgument=id;//指定删除按钮的关联参数ibtnDel.Attributes.Add("onclick","returnconfirm("确定要删除吗?");");}3)打开Gridview控件的属性对话框,在事件中双击RowCommand,添加如下代码:if(mandName=="del"){stringid=mandArgument.ToString();//获得IDStringBuildersb=newStringBuilder();sb.AppendFormat(@"DELETEFROMSUPPLIERSWHEREID="+id);SQLHelperhe lper=newSQLHelper();helper.ExecuteSql(sb.ToString());Bindon();}即可。
GridView的各种用法

GridView的各种用法(1)快速预览:GridView无代码分页排序GridView选中,编辑,取消,删除GridView正反双向排序GridView和下拉菜单DropDownList结合GridView和CheckBox结合鼠标移到GridView某一行时改变该行的背景色方法一鼠标移到GridView某一行时改变该行的背景色方法二GridView实现删除时弹出确认对话框GridView实现自动编号GridView实现自定义时间货币等字符串格式GridView实现用“...”代替超长字符串GridView一般换行与强制换行GridView显示隐藏某一列GridView弹出新页面/弹出新窗口GridView固定表头(不用javascript只用CSS,2行代码,很好用)GridView合并表头多重表头无错完美版(以合并3列3行举例)GridView突出显示某一单元格(例如金额低于多少,分数不及格等)GridView加入自动求和求平均值小计GridView数据导入Excel/Excel数据读入GridView1.GridView无代码分页排序:效果图:1.AllowSorting设为True,aspx代码中是AllowSorting="True";2.默认1页10条,如果要修改每页条数,修改PageSize即可,在aspx代码中是PageSize="12"。
3.默认的是单向排序的,右击GridView弹出“属性”,选择AllowSorting为True即可。
2.GridView选中,编辑,取消,删除:后台代码:你可以使用sqlhelper,本文没用。
代码如下:using System;using System.Data;using System.Configuration;using System.Web;using System.Web.Security;using System.Web.UI;using System.Web.UI.WebControls;using System.Web.UI.WebControls.WebParts;using System.Web.UI.HtmlControls;using System.Data.SqlClient;public partial class _Default : System.Web.UI.Page{//清清月儿/21aspnetSqlConnection sqlcon;SqlCommand sqlcom;string strCon = "Data Source=(local);Database=数据库名;Uid=帐号;Pwd=密码";protected void Page_Load(object sender, EventArgs e){if (!IsPostBack){bind();}}protected void GridView1_RowEditing(object sender, GridViewEditEventArgs e) {GridView1.EditIndex = e.NewEditIndex;bind();}protected void GridView1_RowDeleting(object sender, GridViewDeleteEventArgs e){string sqlstr = "delete from 表where id='" +GridView1.DataKeys[e.RowIndex].Value.ToString() + "'";sqlcon = new SqlConnection(strCon);sqlcom = new SqlCommand(sqlstr,sqlcon);sqlcon.Open();sqlcom.ExecuteNonQuery();sqlcon.Close();bind();}//更新protected void GridView1_RowUpdating(object sender, GridViewUpdateEventArgs e){sqlcon = new SqlConnection(strCon);string sqlstr = "update 表set 字段1='"+((TextBox)(GridView1.Rows[e.RowIndex].Cells[1].Controls[0])).Text.ToString().T rim() + "',字段2='"+((TextBox)(GridView1.Rows[e.RowIndex].Cells[2].Controls[0])).Text.ToString().T rim() + "',字段3='"+((TextBox)(GridView1.Rows[e.RowIndex].Cells[3].Controls[0])).Text.ToString().T rim() + "' where id='"+ GridView1.DataKeys[e.RowIndex].Value.ToString() + "'";sqlcom=new SqlCommand(sqlstr,sqlcon);sqlcon.Open();sqlcom.ExecuteNonQuery();sqlcon.Close();GridView1.EditIndex = -1;bind();}//取消protected void GridView1_RowCancelingEdit(object sender, GridViewCancelEditEventArgs e){GridView1.EditIndex = -1;bind();}public void bind(){string sqlstr = "select * from 表";sqlcon = new SqlConnection(strCon);SqlDataAdapter myda = new SqlDataAdapter(sqlstr, sqlcon);DataSet myds = new DataSet();sqlcon.Open();myda.Fill(myds, "表");GridView1.DataSource = myds;GridView1.DataKeyNames = new string[] { "id" };//主键GridView1.DataBind();sqlcon.Close();}}前台主要代码:... ...<asp:GridView ID="GridView1" runat="server" AutoGenerateColumns="False" CellPadding="4"ForeColor="#333333" GridLines="None"OnRowDeleting="GridView1_RowDeleting"OnRowEditing="GridView1_RowEditing"OnRowUpdating="GridView1_RowUpdating" OnRowCancelingEdit="GridView1_RowCancelingEdit"><FooterStyle BackColor="#990000" Font-Bold="True" ForeColor="White" /><Columns><asp:BoundField DataField="身份证号码" HeaderText="用户ID" ReadOnly="True" /><asp:BoundField DataField="姓名" HeaderText="用户姓名" /><asp:BoundField DataField="员工性别" HeaderText="性别" /><asp:BoundField DataField="家庭住址" HeaderText="家庭住址" /><asp:CommandField HeaderText="选择"ShowSelectButton="True" /><asp:CommandField HeaderText="编辑"ShowEditButton="True" /><asp:CommandField HeaderText="删除"ShowDeleteButton="True" /></Columns><RowStyle ForeColor="#000066" /><SelectedRowStyle BackColor="#669999" Font-Bold="True" ForeColor="White" /><PagerStyle BackColor="White" ForeColor="#000066" HorizontalAlign="Left" /><HeaderStyle BackColor="#006699" Font-Bold="True" ForeColor="White" /></asp:GridView>3.GridView正反双向排序:效果图:点姓名各2次的排序,点其他也一样可以。
GridView编辑删除操作
GridView编辑删除操作第⼀种:使⽤DataSource数据源中⾃带的编辑删除⽅法,这种不常⽤,在这⾥就不加说明了。
第⼆种:使⽤GridView的三种事件:GridView1_RowEditing(编辑)、GridView1_RowUpdating(更新)、GridView1_RowCancelingEdit(取消编辑)。
GridView1属性中将DataKeyNames的值设置为主键名,否则找不到索引,这个很重要哦。
该⽅法有2种操作,⼀种是不对绑定列转换为模板列,另外⼀种是转换为模板列。
这⾥先说不转换为模板列的情况;⾸先;先对GridView进⾏数据绑定,不管⽤代码绑定还是DataSource绑定都可以。
绑定好后,对GridView添加绑定列和编辑列(注意这⾥,添加好后不做任何改动,千万不要将它们转换为模板列),添加好后,将所要绑定的数据库表字段填⼊属性中。
然后,分别激活上述提到的三种事件,然后添加代码:protected void GridView1_RowDeleting(object sender, GridViewDeleteEventArgs e){ //执⾏删除string str = "delete from tb_hby where id='"+GridView1.DataKeys[e.RowIndex].Value.ToString()+"'";db.Delete(str); //db是操作类的实例,Delete是删除数据的⽅法this.GridView1.DataBind();}protected void GridView1_RowUpdating(object sender, GridViewUpdateEventArgs e){//执⾏更新string cell1 = ((TextBox)(GridView1.Rows[e.RowIndex].Cells[1].Controls[0])).Text.ToString().Trim();//第⼀列注意这种写法很重要string cell2 = ((TextBox)(GridView1.Rows[e.RowIndex].Cells[2].Controls[0])).Text.ToString().Trim();//第⼆列注意这种写法很重要string str = "update tb_hby set hby_title='" + cell1 + "',hby_Datetime='" + cell2 + "' where id='" +GridView1.DataKeys[e.RowIndex].Value.ToString() + "'";db.Update(str);//db是操作类的实例,Update是更新数据的⽅法GridView1.EditIndex = -1;GView();}protected void GridView1_RowEditing(object sender, GridViewEditEventArgs e){//激活编辑按钮的事件this.GridView1.EditIndex = e.NewEditIndex;GView();}protected void GridView1_RowCancelingEdit(object sender, GridViewCancelEditEventArgs e){//取消编辑状态的事件GridView1.EditIndex = -1;GView();}说明:此⽅法中,如果要求某个绑定列不做编辑,则在它的前台代码中加⼊ReadOnly=”true”即可。
gridview 编辑,删除,更新的用法
/blog/article.asp?id=585/liping13599168/archive/2007/12/16/996526.ht ml<%@ Page Language="C#" AutoEventWireup="true" CodeFile="GridViewUp.aspx.cs" Inherits="gridview_GridViewUp" %><!DOCTYPE html PUBLIC "-//W3C//DTD XHTML 1.0 Transitional//EN" "/TR/xhtml1/DTD/xhtml1-transitional.dtd"><html xmlns="/1999/xhtml"><head runat="server"><title>ÎÞ±êÌâÒ³</title></head><body><form id="form1" runat="server"><div><table cellpadding="0" cellspacing="0" border="0" width="80%" style="font-size: 11px"><tr><td align="center"><asp:GridView ID="GridView1" runat="server" Width="100%" CellPadding="4" ForeColor="#333333"AutoGenerateColumns="False"AllowPaging="True" PageSize="12" OnRowCancelingEdit="GridView1_RowCancelingEdit"OnRowEditing="GridView1_RowEditing" OnRowUpdating="GridView1_RowUpdating"OnRowDeleting="GridView1_RowDeleting"DataKeyNames="id,name"OnPageIndexChanging="GridView1_PageIndexChanging"DataMember="card,price" OnRowDataBound="GridView1_RowDataBound" GridLines="None"><Columns><asp:BoundField HeaderText="Éí·ÝÖ¤ºÅ" DataField="card" Visible=false /><asp:BoundField HeaderText="±àºÅ" DataField="id" ReadOnly="True" /><asp:BoundField DataField="name" HeaderText="ÐÕÃû" ReadOnly="True" /><asp:TemplateFieldHeaderText="Éí·ÝÖ¤ºÅ"><ItemTemplate><%# Eval("card") %></ItemTemplate><EditItemTemplate><asp:TextBox ID="TBCard" Text='<%# Eval("card") %>' runat="server" Width="140px" /></EditItemTemplate><ItemStyle Width="150px" /></asp:TemplateField><asp:TemplateField HeaderText="ѧÀú"><ItemTemplate><%# Eval("description")%></ItemTemplate><EditItemTemplate><asp:HiddenField ID="HDFXueli" runat="server" Value='<%# Eval("xueli") %>' /><asp:DropDownList ID="DDLXueli" runat="server" Width="90px" /></EditItemTemplate><ItemStyle Width="100px" /></asp:TemplateField><asp:TemplateField HeaderText="¼Û¸ñ"><ItemTemplate><%# Eval("price") %></ItemTemplate><EditItemTemplate><asp:TextBox ID="TBPrice" Text='<%# Eval("price") %>' runat="server" Width="90px" /></EditItemTemplate><ItemStyle Width="100px" /></asp:TemplateField><asp:BoundField HeaderText="½¨Á¢Ê±¼ä" DataField="createdate" ReadOnly="True" /><asp:CommandFieldShowDeleteButton="True" ShowEditButton="True" HeaderText="²Ù×÷" /> </Columns><PagerSettings FirstPageText="" LastPageText="" NextPageText="" PreviousPageText="" /><RowStyle Height="20px" BackColor="#F7F6F3" ForeColor="#333333" /><FooterStyle BackColor="#5D7B9D" Font-Bold="True" ForeColor="White" /><EditRowStyle BackColor="#999999" /><SelectedRowStyle BackColor="#E2DED6" Font-Bold="True" ForeColor="#333333" /><PagerStyle BackColor="#284775" ForeColor="White" HorizontalAlign="Center" /><HeaderStyle BackColor="#5D7B9D"Font-Bold="True" ForeColor="White" /><AlternatingRowStyle BackColor="White" ForeColor="#284775" /></asp:GridView></td></tr></table></div></form></body></html>GridViewUp.aspx.csÎļþ´úÂ룺using System;using System.Data;using System.Configuration;using System.Collections;using System.Web;using System.Web.Security;using System.Web.UI;using System.Web.UI.WebControls;using System.Web.UI.WebControls.WebParts;using System.Web.UI.HtmlControls;using System.Data.SqlClient;public partial class gridview_GridViewUp : System.Web.UI.Page{protected void Page_Load(object sender, EventArgs e){if (!IsPostBack){GridViewBind();}}protected void GridView1_PageIndexChanging(object sender, GridViewPageEventArgs e){GridView1.PageIndex = e.NewPageIndex;GridViewBind();}private void GridViewBind(){string connStr = ConfigurationManager.ConnectionStrings["ConnString"].ConnectionStr ing;string SqlStr = "Select a.*,b.description FROM test01 a,xueli b where a.xueli=b.code and a.id<1000 and a.id>200";DataSet ds = new DataSet();try{SqlConnection conn = new SqlConnection(connStr);if (conn.State.ToString() == "Closed") conn.Open();SqlDataAdapter da = new SqlDataAdapter(SqlStr, conn);da.Fill(ds, "test01");if (conn.State.ToString() == "Open") conn.Close();GridView1.DataSource = ds.Tables[0].DefaultView;GridView1.DataBind();}catch (Exception ex){Response.Write("Êý¾Ý¿â´íÎ󣬴íÎóÔ-Òò£º" + ex.Message);Response.End();}}protected void GridView1_RowDataBound(object sender, GridViewRowEventArgs e){if (((DropDownList)e.Row.FindControl("DDLXueli")) != null){DropDownList ddlxueli = (DropDownList)e.Row.FindControl("DDLXueli");// Éú³É DropDownList µÄÖµ£¬°ó¶¨Êý¾Ýstring connStr = ConfigurationManager.ConnectionStrings["ConnString"].ConnectionStr ing;string SqlStr = "Select * from xueli";DataSet ds = new DataSet();SqlConnection conn = new SqlConnection(connStr);if (conn.State.ToString() == "Closed") conn.Open();SqlDataAdapter da = new SqlDataAdapter(SqlStr, conn);da.Fill(ds, "xueli");if (conn.State.ToString() == "Open") conn.Close();ddlxueli.DataSource = ds.Tables[0].DefaultView;ddlxueli.DataTextField = "description";ddlxueli.DataValueField = "code";ddlxueli.DataBind();//// Ñ¡ÖÐ DropDownListddlxueli.SelectedValue = ((HiddenField)e.Row.FindControl("HDFXueli")).Value;//}}protected void GridView1_RowEditing(object sender, GridViewEditEventArgs e){GridView1.EditIndex = e.NewEditIndex;GridViewBind();}protected void GridView1_RowCancelingEdit(object sender, GridViewCancelEditEventArgs e){GridView1.EditIndex = -1;GridViewBind();}protected void GridView1_RowUpdating(object sender, GridViewUpdateEventArgs e){string id = GridView1.DataKeys[e.RowIndex].Values[0].ToString();string card = ((TextBox)GridView1.Rows[e.RowIndex].FindControl("TBCard")).Text; string xueli = ((DropDownList)GridView1.Rows[e.RowIndex].FindControl("DDLXueli")) .SelectedValue;string price = ((TextBox)GridView1.Rows[e.RowIndex].FindControl("TBPrice")).Text;string connStr = ConfigurationManager.ConnectionStrings["ConnString"].ConnectionStr ing;。
Gridview删除、更新语句设置

使用SqlDataSource插入、更新以及删除数据分类:DOTNET 2009-05-19 15:34 2126人阅读评论(1) 收藏举报在概述插入、更新和删除数据中我们讨论过,GridView控件提供了内建的更新与删除功能,而DetailsView和FormView控件除了这些之外还拥有插入功能。
这些数据修改功能可以直接接入到数据源控件中而不需要编写任何代码。
概述插入、更新和删除数据讲解了如何使用ObjectDataSource来帮助GridView、DetailsView以及FormView控件完成插入、更新以及删除操作。
ObjectDataSource能工作的地方,SqlDataSource也行。
回忆一下,要使ObjectDataSource支持插入、更新和删除功能,我们需要定义一些用以执行插入、更新和删除动作的对象层方法。
而在SqlDataSource中,我们则需要提供INSERT、UPDATE以及DELETE语句(或存储过程)。
正如我们将要在本节教程中看到的那样,这些语句可以手工创建,也可以通过SqlDataSource的“配置数据源”向导自动生成。
注意:由于我们已经讨论过了GridView、DetailsView以及FormView控件的插入、编辑和删除功能,本教程中我们将重点讨论如何配置SqlDataSource以使其支持这些操作。
如果你需要温习一下如何在GridView、DetailsView以及FormView中实现这个功能,请回到“编辑插入和删除数据”的章节,从概述插入、更新和删除数据开始。
第一步:指定INSERT、UPDATE以及DELETE语句就像我们在上两节教程中看到的那样,要从SqlDataSource控件中获取数据,我们需要设置两个属性:1. ConnectionString,它指定了查询应该发送到的那个数据库;2. SelectCommand,它指定了用于返回记录的SQL语句或存储过程。
GridView1 删除、修改(字段类型全而且用GridView集成处理)
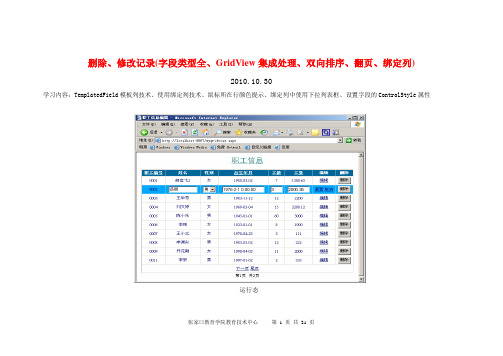
张家口教育学院教育技术中心 第 1 页 共 21 页删除、修改记录(字段类型全、GridView 集成处理、双向排序、翻页、绑定列)2010.10.30学习内容:TemplatedField 模板列技术、使用绑定列技术、鼠标所在行颜色提示、绑定列中使用下拉列表框、设置字段的ControlStyle 属性运行态1. 在VS2008中建立Web项目。
2. 在Windows环境下将数据库jyxystu.mdf(命名含义为教育学院学生)和jyxystu.ldf拷贝到项目的App_Data目录下,并在VS中添加的项目中。
张家口教育学院教育技术中心第2 页共21 页3. 在SQL Server 2000中附加数据库jyxystu.mdf。
4. 在数据库中建立一个表:tb_zg(命名含义为职工表,以tb开头意思是本对象是一个表),表结构如下:5. 录入若干条记录(为了看出效果,记录数至少20条)6. 修改web.config文件,(1) 删除</configSections>下方的<appSettings/>(2) 在</configSections>位置下增加:张家口教育学院教育技术中心第3 页共21 页<appSettings><add key="ConnStr" value="Server=localhost;uid=sa;pwd=;database=jyxystu"></add>7. 在项目中添加Web窗体mygridview.aspx(文件名含义为按类查询)8. 布局控件如下:一个GridView,在GridView下方有两个label,准备显示第x页共y页。
ID属性分别是Label1和Label2。
GridView1自动套用格式为"雪松"。
AutoGenerateColumns="False"AllowSorting="True"AllowPaging="True"PageSize="10"因为要采用分页技术所以需要再设置PagerSettings属性FirstPageText="首页"LastPageText="尾页"NextPageText="下一页"PreviousPageText="上一页"Mode="NextPreviousFirstLast"把GridView中的FontSize设为small。
gridview控件编辑删除数据
GridView 控件的使用(数据管理)利用GridView 控件管理后台数据库数据,编辑数据记录和删除数据记录。
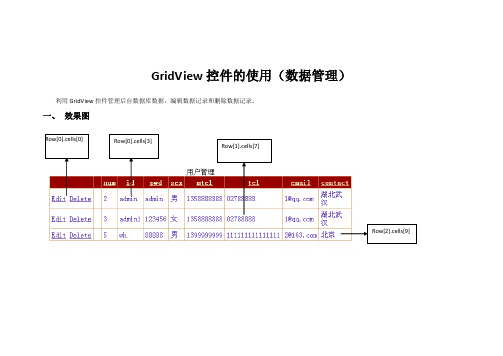
一、 效果图Row[0].cells[0] Row[0].cells[3]Row[1].cells[7]Row[2].cells[9]二、实现步骤1、新建数据表user1,有如下字段。
num id pwd sex mtel tel email contact 含义 用户编号 用户名 密码 性别 手机号码 固定电话 电子邮箱 联系地址 类型(长度)int char (10)char (10)char (1)char (15)char (15)char (30)char (100)说明 主键,从1开始自动递增2、在页面上添加控件GridView ,id 为GridView1. 属性说明:AutoGenerateDeleteButton :True ; AutoGenerateEditButton :True ; AutoGenerateColums :true ; AllowPaging :True ;3、编写自定义方法bindgrid (),代码见第三部分,将GridView1控件和数据源绑定。
当换页、编辑、取消编辑、删除执行后需要调用该方法重新绑定数据源更新GridView1控件显示的记录。
字 段 名 属性三、关键代码using System;using System.Collections.Generic;using System.Linq;using System.Web;using System.Web.UI;using System.Web.UI.WebControls;using System.Data;using System.Data.SqlClient;using System.Configuration;namespace WebApplication1{public partial class UserCenter1 : System.Web.UI.Page{protected void Page_Load(object sender, EventArgs e){if(!IsPostBack){bindgrid();}}string constr = ConfigurationManager.ConnectionStrings["ApplicationServices"].ConnectionString;//定义在外面,本文件中只需定义一次。
关于C# -WINFORM-DataGridView的更新、删除
关于C# -WINFORM-DataGridView的更新、删除一、DataGridView绑定数据库之后直接对其进行操作:1.在按钮添加更新操作代码(只需一行):this.tbTableAdapter.Update(this.abcDataSet2.tb);其中abc为数据库名,tb为表名2.在按钮添加删除操作代码:DialogResult dlResult = MessageBox.Show(this, "要删除这些记录吗?", "请确认",MessageBoxButtons.YesNo,MessageBoxIcon.Question,MessageBoxDefaultButton.Button1,MessageBoxOptions.RightAlign);if (dlResult == DialogResult.Yes){int j = dataGridView1.SelectedRows.Count;int[] l = new int[j];int i;for (i = 0; i < j; i++){l[i] = dataGridView1.SelectedRows[i].Index;}int k = 0;while (k < j){this.abcDataSet2.tb.Rows[l[k]].Delete();k++;}二、DataGridView绑定数据库,把查询结果进行更新、删除操作后保存到数据库:1.在按钮添加更新操作代码:if (MessageBox.Show("确实要修改数据库吗?", "决策提示", MessageBoxButtons.OKCancel, MessageBoxIcon.Question) ==DialogResult.OK){DataTable dt = dataGridView1.DataSource as DataTable; if (dt != null){try{using (SqlConnection con = newSqlConnection("data source=ksig;initial catalog=AMDMS;userid=sa;pwd=123;")){SqlDataAdapter da = newSqlDataAdapter("select * from account", con);SqlCommandBuilder scb = new SqlCommandBuilder(da);DataSet ds = new DataSet();da.Fill(ds, "account");da.Update(dt);}}catch (DataException de){//}}MessageBox.Show("成功修改数据库!", "恭喜");}else{MessageBox.Show("放弃修改数据库!", "系统提示");}2.在按钮添加删除操作代码://在DataGridView1界面上进行可视化删除dataGridView1.Rows.Remove(dataGridView1.Rows[dataGridView 1.CurrentCell.RowIndex]);//把删除后的DataGridView1的结果更新到数据库中DataTable dt = dataGridView1.DataSource as DataTable;if (dt != null){try{using (SqlConnection con = new SqlConnection("datasource=ksig;initial catalog=AMDMS;user id=sa;pwd=123;")){SqlDataAdapter da = new SqlDataAdapter("select * from account", con);SqlCommandBuilder scb = new SqlCommandBuilder(da);DataSet ds = new DataSet();da.Fill(ds, "account");da.Update(dt);}}catch (DataException de){//}}。
GridView增删查改
GridView增删查改<%@ Page Language="C#" AutoEventWireup="true" CodeFile="Default.aspx.cs" Inherits="_Default" %><!DOCTYPE html PUBLIC "-//W3C//DTD XHTML 1.0 Transitional//EN" "/TR/xhtml1/DTD/xhtml1-transitional.dtd"><html xmlns="/1999/xhtml" ><head runat="server"><title>GridView_Demo</title></head><body><form id="form1" runat="server"><div><asp:GridView ID="myGrid" runat="server" ></asp:GridView></div></form></body></html>====================================using System;using System.Data;using System.Configuration;using System.Web;using System.Web.Security;using System.Web.UI;using System.Web.UI.WebControls;using System.Web.UI.WebControls.WebParts;using System.Web.UI.HtmlControls;//myselfusing System.Drawing;public partial class _Default : System.Web.UI.Page{private Employees.Employees_BLL bll = new Employees.Employees_BLL();protected void Page_Load(object sender, EventArgs e){if (!IsPostBack)//设置GridView外观样式setGridViewStyle();//创建及设置Fields字段setFields();//设置GridView 数据源绑定GridBind();}//以后台的方式添加GridView 的各类事件myGrid.RowEditing += new GridViewEditEventHandler(myGrid_RowEditing);myGrid.RowUpdating += new GridViewUpdateEventHandler(myGrid_RowUpdating);myGrid.RowCancelingEdit += new GridViewCancelEditEventHandler(myGrid_RowCancelingEdit);myGrid.RowDeleting += new GridViewDeleteEventHandler(myGrid_RowDeleting);}方法#region 方法//设置GridView外观样式private void setGridViewStyle(){myGrid.AutoGenerateColumns = false;//设置Row的键值组成,具有唯一性string[] KeyNames = new string[] { "EmployeeID" };myGrid.DataKeyNames = KeyNames;//设置GridView属性myGrid.AllowPaging = true; //设置分页myGrid.AllowSorting = true; //设置排序myGrid.Font.Size = 10; //设置字号大小myGrid.GridLines = GridLines.Both; //设置网格线myGrid.PageSize = 15; //分页大小myGrid.PagerSettings.Position = PagerPosition.TopAndBottom; //分页位置myGrid.PagerStyle.HorizontalAlign = HorizontalAlign.Center; //分页对齐myGrid.HeaderStyle.BackColor = Color.Tan;myGrid.RowStyle.BackColor = Color.LightGoldenrodYellow;myGrid.AlternatingRowStyle.BackColor = Color.PaleGoldenrod;myGrid.HeaderStyle.ForeColor = Color.Black;myGrid.PagerStyle.BackColor = Color.Goldenrod;myGrid.SelectedRowStyle.BackColor = Color.LightBlue; //设置选择行背景颜色//myGrid.ShowFooter = true;//创建及设置Fields字段private void setFields(){//创建"编辑"命令字段CommandField editField = new CommandField();editField.ButtonType = ButtonType.Button;editField.ShowEditButton = true; //显示"编辑"按钮editField.ShowCancelButton = true; //显示"取消"按钮editField.EditText = "编辑";editField.UpdateText = "更新";editField.CancelText = "取消";editField.ControlStyle.BackColor = Color.LightPink; editField.ItemStyle.Wrap = false;//创建"删除"命令字段CommandField deleteField = new CommandField(); deleteField.ButtonType = ButtonType.Button;deleteField.ShowDeleteButton = true; //显示"删除"按钮deleteField.DeleteText = "删除";deleteField.ControlStyle.BackColor = Color.LightPink; deleteField.ItemStyle.Wrap = false;//创建数据绑定字段BoundField employeeidField = new BoundField(); BoundField lastnameField = new BoundField();BoundField firstnameField = new BoundField();BoundField titleField = new BoundField();BoundField addressField = new BoundField();BoundField cityField = new BoundField();employeeidField.DataField = "EmployeeID";//指定数据源字段employeeidField.HeaderText = "员工代号"; //设置字段头名称employeeidField.ItemStyle.Wrap = false; //设置字段不换行employeeidField.ReadOnly = true; //只读,编辑模式不能修改lastnameField.DataField = "LastName";lastnameField.HeaderText = "名字";lastnameField.ItemStyle.Wrap = false;lastnameField.ReadOnly = true; //只读,编辑模式不能修改firstnameField.DataField = "FirstName"; firstnameField.HeaderText = "姓氏";firstnameField.ItemStyle.Wrap = false;//firstnameField.ReadOnly = true;titleField.DataField = "Title";titleField.HeaderText = "职称";titleField.ItemStyle.Wrap = false;addressField.DataField = "Address";addressField.HeaderText = "地址";addressField.ItemStyle.Wrap = false;cityField.DataField = "City";cityField.HeaderText = "城市";cityField.ItemStyle.Wrap = false;//将字段添加到GridViewmyGrid.Columns.Add(editField); //编辑myGrid.Columns.Add(deleteField);//删除myGrid.Columns.Add(employeeidField);myGrid.Columns.Add(lastnameField);myGrid.Columns.Add(firstnameField);myGrid.Columns.Add(titleField);myGrid.Columns.Add(addressField);myGrid.Columns.Add(cityField);}//设置GridView 数据源绑定public void GridBind(){//bll = new Employees.Employees_BLL();myGrid.DataSource = bll.GetAllList();myGrid.DataBind();}#endregion 方法// GridView 编辑操作protected void myGrid_RowEditing(object sender, GridViewEditEventArgs e) {//设置编辑行的索引myGrid.EditIndex = e.NewEditIndex;//设置更新与取消按钮之背景颜色myGrid.Columns[0].ControlStyle.BackColor = Color.LightSteelBlue;myGrid.Columns[1].ControlStyle.BackColor = Color.LightSteelBlue;myGrid.ShowFooter = true;//设置GridView在编辑模式时,TextBox字段宽度及背景颜色//EmployeeID字段myGrid.Columns[2].ControlStyle.Width = 80;myGrid.Columns[2].ControlStyle.BackColor = Color.LightBlue;myGrid.Columns[2].FooterText = "不可编辑";myGrid.Columns[2].FooterStyle.BackColor = Color.Red;//LastName字段myGrid.Columns[3].ControlStyle.Width = 80;myGrid.Columns[3].ControlStyle.BackColor = Color.LightBlue;myGrid.Columns[3].FooterText = "不可编辑";myGrid.Columns[3].FooterStyle.BackColor = Color.Red;//FirstName字段myGrid.Columns[4].ControlStyle.Width = 80;myGrid.Columns[4].ControlStyle.BackColor = Color.LightBlue;myGrid.Columns[4].FooterText = "可编辑";myGrid.Columns[4].FooterStyle.BackColor = Color.Red;//Title字段myGrid.Columns[5].ControlStyle.Width = 100;myGrid.Columns[5].ControlStyle.BackColor = Color.LightPink;myGrid.Columns[5].FooterText = "可编辑";myGrid.Columns[5].FooterStyle.BackColor = Color.Red;//Address字段myGrid.Columns[6].ControlStyle.Width = 120;myGrid.Columns[6].ControlStyle.BackColor = Color.LightPink;myGrid.Columns[6].FooterText = "可编辑";myGrid.Columns[6].FooterStyle.BackColor = Color.Red;//City字段myGrid.Columns[7].ControlStyle.Width = 80;myGrid.Columns[7].ControlStyle.BackColor = Color.LightGreen;myGrid.Columns[7].FooterText = "可编辑";myGrid.Columns[7].FooterStyle.BackColor = Color.Red;GridBind();}// GridView 更新操作protected void myGrid_RowUpdating(object sender, GridViewUpdateEventArgs e){if (e.NewValues != e.OldValues){Employees.Employees_Model model = new Employees.Employees_Model();model.EmployeeID = Convert.ToInt32(myGrid.Rows[e.RowIndex].Cells[2].Text.Trim());//Employees_DAL 中的where 条件为EmployeeID and LastName, 所以LastName不能更改stName = myGrid.Rows[e.RowIndex].Cells[3].Text.ToString();model.FirstName = ((TextBox)myGrid.Rows[e.RowIndex].Cells[4].Controls[0]).Text.ToString();model.Title = ((TextBox)myGrid.Rows[e.RowIndex].Cells[5].Controls[0]).Text.ToString();model.Address = ((TextBox)myGrid.Rows[e.RowIndex].Cells[6].Controls[0]).Text.ToString();model.City = ((TextBox)myGrid.Rows[e.RowIndex].Cells[7].Controls[0]).Text.ToString();//Employees.BLL.Employees_Model bll = new Employees.BLL.Employees_Model();bll.Update(model);//取消编辑时隐藏FootermyGrid.ShowFooter = false;//设置"编辑"和"删除"按钮还原为系统定义的颜色myGrid.Columns[0].ControlStyle.BackColor = Color.LightPink;myGrid.Columns[1].ControlStyle.BackColor = Color.LightPink;myGrid.EditIndex = -1;GridBind();}}// GridView 取消事件protected void myGrid_RowCancelingEdit(object sender, GridViewCancelEditEventArgs e) {//取消编辑时隐藏FootermyGrid.ShowFooter = false;//设置"编辑"和"删除"按钮还原为系统定义的颜色myGrid.Columns[0].ControlStyle.BackColor = Color.LightPink;myGrid.Columns[1].ControlStyle.BackColor = Color.LightPink;myGrid.EditIndex = -1; //取消编辑状态GridBind();}// GridView 删除操作protected void myGrid_RowDeleting(object sender, GridViewDeleteEventArgs e){//设置更新与取消按钮之背景颜色myGrid.Columns[0].ControlStyle.BackColor = Color.LightSteelBlue;myGrid.Columns[1].ControlStyle.BackColor = Color.LightSteelBlue;// 获取Employees_DAL 中的where 条件: EmployeeID and LastNameint strEmployeeID = Convert.ToInt32(myGrid.DataKeys[e.RowIndex].Values[0]);string strLastName = myGrid.Rows[e.RowIndex].Cells[3].Text.ToString();bll.Delete(strEmployeeID, strLastName); //删除GridBind();}。
三层架构下的GridView的增删改

1 新建一个数据库test,新建一个表Users,表中有如下字段(ID,username,password)。
其中ID为表示字段。
结构如下图:2 新建三个类库DiaryBLL(业务逻辑层),DiaryDAL(数据访问层),DiaryModel(业务实体层),将上述三个类库放至解决方案DiaryPro中,然后在新建一个网站DiaryWeb。
然后右键单击网站,设为启动项目,结构图如下:3 添加类库的引用关系DiaryBLL添加DiaryDAL和DiaryModel,如下图所示:DiaryDAL添加DiaryModel,如下图所示:表示层Web添加上述三个,如下图所示:4 类库中类的编写1)DiaryModel(业务实体层),新建一个User类代码如下:using System;using System.Collections.Generic;using System.Text;namespace DiaryModel{[Serializable] //序列化public class Users{int _UserID;string _UserName;string _Password;public int UserID{get { return _UserID; }set { _UserID = value; }}///<summary>///用户名///</summary>public string UserName{get { return _UserName; }set { _UserName = value; }}///<summary>///密码///</summary>public string Password{get { return _Password; }set { _Password = value; }}}}该类可以获得User类的各个字段。
ListView“表格编写”与“增,删,改”功能解析。
ListView“表格编写”与“增,删,改”功能解析。
DataGridView控件功能十分强大,显示表格也方便,但性能就没有那么高;ListView控件功能没那么强大,显示表格也要多写代码,但性能相对高一些。
以下我总结出一系列对于ListView表格的详细代码解析:1.首先我们需要先创建一个ListView表格必备的属性设定。
this.ListView.GridLines = true; //显示表格线this.ListView.View = View.Details;//表格在窗体显示细节的格式,如果做成表格,这个视图必须选择Detailsthis.ListView.Scrollable = true;//滚动条this.ListView.HeaderStyle = ColumnHeaderStyle.Clickable//表头样式this.ListView.FullRowSelect = true;//表示在控件上,是否可以选择一整行基本以上属性更改后,形成一个基本完整的表格控件。
在针对自己不同的需求可以在设置以下不同功能的属性。
belEdit = true;//是否可编辑,ListView只可编辑第一列。
this.ListView.MultiSelect = true;//是否可以选择多个项。
this.ListView.HotTracking = true;/*当鼠标指针经过某个项或者子项的文本时,文本的外观是否变成超链接形式。
当选择此属性时则**HoverSelection**自动为true和**Activation**属性为oneClick*/this.ListView.HoverSelection = true;//该鼠标指针在该项停留几秒后自动选中。
this.ListView.Activation = ItemActivation.Standard;//激活某一项时,必须执行的操作是(如:双击项或者单击项)2.基本的表格属性设置完成后,首先要创建表头,即使每一列的列标题名称。
- 1、下载文档前请自行甄别文档内容的完整性,平台不提供额外的编辑、内容补充、找答案等附加服务。
- 2、"仅部分预览"的文档,不可在线预览部分如存在完整性等问题,可反馈申请退款(可完整预览的文档不适用该条件!)。
- 3、如文档侵犯您的权益,请联系客服反馈,我们会尽快为您处理(人工客服工作时间:9:00-18:30)。
<title>无标题页</title>
</head>
<body>
<form id="form1" runat="server">
<div>
<table cellpadding="0" cellspacing="0" border="0" width="80%" style="font-size: 11px">
</tr>
</table>
</div>
</form>
</body>
</html>
GridViewUp.aspx.cs文件代码:
using System;
using System.Data;
using System.Configuration;
<ItemTemplate>
<%# Eval("price") %>
</ItemTemplate>
gridview 编辑,删除,更新的用法.txtゅ你不用一上线看见莪在线,就急着隐身,放心。莪不会去缠你。说好的不离不弃 现在反而自己却做不到╮ gridview 编辑,删除,更新的用法.txt如果我能够看到自己的影子,我想它一定很忧伤,因为我把快乐都留在了前面。容易伤害别人和自己的人,总是对距离的边缘模糊不清的人。/blog/article.asp?id=585
<PagerStyle BackColor="#284775" ForeColor="White" HorizontalAlign="Center" />
<HeaderStyle BackColor="#5D7B9D" Font-Bold="True" ForeColor="White" />
<!DOCTYPE html PUBLIC "-//W3C//DTD XHTML 1.0 Transitional//EN" "/TR/xhtml1/DTD/xhtml1-transitional.dtd">
<html xmlns="/1999/xhtml">
<tr>
<td align="center">
<asp:GridView ID="GridView1" runat="server" Width="100%" CellPadding="4" ForeColor="#333333"
<EditItemTemplate>
<asp:TextBox ID="TBCard" Text='<%# Eval("card") %>' runat="server" Width="140px" />
<RowStyle Height="20px" BackColor="#F7F6F3" ForeColor="#333333" />
<FooterStyle BackColor="#5D7B9D" Font-Bold="True" ForeColor="White" />
<ItemTemplate>
<%# Eval("card") %>
</ItemTemplate>
using System.Collections;
using System.Web;
using System.Web.Security;
using System.Web.UI;
using System.Web.UI.WebControls;
using System.Web.UI.WebControls.WebParts;
/liping13599168/archive/2007/12/16/996526.html
<%@ Page Language="C#" AutoEventWireup="true" CodeFile="GridViewUp.aspx.cs" Inherits="gridview_GridViewUp" %>
</EditItemTemplate>
<ItemStyle Width="100px" />
</asp:TemplateField>
<Columns>
<asp:BoundField HeaderText="身份证号" DataField="card" Visible=false />
<asp:BoundField HeaderText="编号" DataField="id" ReadOnly="True" />
<AlternatingRowStyle BackColor="White" ForeColor="#284775" />
</asp:GridVoundField HeaderText="建立时间" DataField="createdate" ReadOnly="True" />
<asp:CommandField ShowDeleteButton="True" ShowEditButton="True" HeaderText="操作" />
<asp:TemplateField HeaderText="学历">
<ItemTemplate>
<%# Eval("description")%>
</Columns>
<PagerSettings FirstPageText="" LastPageText="" NextPageText="" PreviousPageText="" />
DataKeyNames="id,name" OnPageIndexChanging="GridView1_PageIndexChanging" DataMember="card,price" OnRowDataBound="GridView1_RowDataBound" GridLines="None">
<asp:DropDownList ID="DDLXueli" runat="server" Width="90px" />
</EditItemTemplate>
<ItemStyle Width="100px" />
</asp:TemplateField>
<asp:TemplateField HeaderText="价格">
<asp:BoundField DataField="name" HeaderText="姓名" ReadOnly="True" />
<asp:TemplateField HeaderText="身份证号">
<EditItemTemplate>
<asp:TextBox ID="TBPrice" Text='<%# Eval("price") %>' runat="server" Width="90px" />
<EditRowStyle BackColor="#999999" />
<SelectedRowStyle BackColor="#E2DED6" Font-Bold="True" ForeColor="#333333" />
</EditItemTemplate>
<ItemStyle Width="150px" />
</asp:TemplateField>
AutoGenerateColumns="False" AllowPaging="True" PageSize="12" OnRowCancelingEdit="GridView1_RowCancelingEdit"
OnRowEditing="GridView1_RowEditing" OnRowUpdating="GridView1_RowUpdating" OnRowDeleting="GridView1_RowDeleting"
