Epson陀螺仪应用手册
爱普生BT40使用说明书

图片显示在智能设备上时,将投影眼镜的 USB Type-C 接口连接到智能设备。
将市售耳机连接至耳机插孔。
• 我们建议使用符合 CTIA 标准的耳机。
如使用 3 针耳机,麦 克风功能将无法正常使用。
在播放期间连接或断开耳机或 USB Type-C 接口连接时会产生噪音,请务必在连接或断开连接之前取下耳机。
• 在使用具有通话功能的应用程序时,即使连接耳机,智能设备也可能发出通话音。
如需在显示图像时接听电话,请提前进行确认。
• 本产品通过智能设备中的电池供电。
使用本产品时,请留意智能设备的电池电量。
• 您需要自行提供支持 USB Type-C DP Alt 模式的智能设备。
随附物品和配件名称选配件提供以下选配件。
以下选配件自 2020 年 7 月起开始供货。
各地区的供货和零件编号有所不同,如有变更,恕不另行通知。
佩戴投影眼镜和耳机,调整投影眼镜的位置以便观看图像。
• 打开镜腿时,请勿过度用力。
• 您可以使用卡夹将耳机插孔夹在衣物上。
注意,此卡夹可能损坏某些衣物。
• 向一侧转动智能设备的屏幕以全屏显示图像。
- 启动智能设备的屏幕旋转功能。
• 若无法查看图像,请检查以下事项。
- USB Type-C 接口已正确连接(确保将其牢固地连接到接口)。
- 智能设备已开启且未处于睡眠模式。
- 智能设备支持 USB Type-C DP Alt 模式下的视频输出。
如果您使用的是 Android 设备,可使用 MOVERIO Link 应用程序调节投影眼镜屏幕的亮度以及其他参数。
您可从 爱普生(中国)官方网站 下载 MOVERIO Link 。
下文介绍了该应用程序的主要功能。
• 投影眼镜屏幕亮度调整• 省电模式(智能设备和投影眼镜上) • 智能设备屏幕锁定(避免意外操作)调节智能设备的音量。
• 智能眼镜计算终端 BO-IC300 • 遮光板选件包 BO-SP300• 鼻托选件包 BO-NP350 • 鼻托选件包 BO-NP300安全使用须知遮光板使用说明书(此文档) USB Type-C 接口环境光传感器卡夹镜片鼻托传感器耳机插孔镜腿智能眼镜BT-40 投影眼镜规格型号 BT-40 (H969A) 显示方式 Si-OLED面板尺寸 0.453" 宽面板 (16:9) 分辨率 1920 x 1080 视角 约 34 度(对角)虚拟屏幕尺寸 60" 支持(虚拟观看距离 2.5 m [8.2 英尺 ]) 色彩重现 24 位色(约 16,770,000 色)接口USB Type-C ,4 针微型插孔(带有 CTIA 标准麦克风的耳机)*1 外部尺寸(宽 x 深 x 高)194 × 164 × 41 mm (7.6 × 6.5 × 1.6 英寸)(不含遮光板) 质量约 165 g (5.8 盎司) 不含遮光板、线缆等约 95 g (3.4 盎司)耳机输出 最大电压为 150 mVrms 或更高具有宽带特性的电压为 75 mVrms 或更高传感器磁力计 / 加速计传感器 / 陀螺传感器 / 环境光传感器 运行温度 / 湿度 5 至 35° C (41 至 95° F ),湿度为 20 到 80%(无凝水) 保存温度 / 湿度 -10 至 60° C (14 至 140° F ),湿度为 10 到 90%(无凝水) 防水 IPX2(USB 端口除外)可靠性使用寿命20,000 小时(基于我们的评估条件 *2。
Epson产品使用说明书
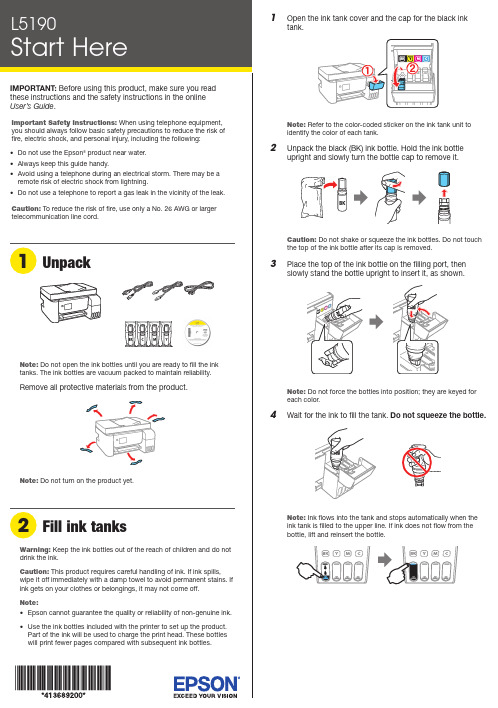
Do not open the ink bottles until you are ready to fill the ink tanks. The ink bottles are vacuum packed to maintain reliability.emove all protective materials from the product.11 Select your language, country, date, and time.Note: You can change these settings later using the product’scontrol panel. For more information see the online User’s Guide.12 W hen instructed to see the Start Here sheet, press andhold the help button for 5 seconds.13 P ress the start button to start ink charging.Note: Ink charging takes about 10 minutes. When the power light stops flashing, ink charging is complete. Once initial setup of the printer is complete, you can top off the ink tanks with any remaining ink. See the online User’s Guidefor instructions.C aution: Do not unplug or turn off the product, or open theinner cover while the product is charging or you’ll waste ink. 14 PressSee the online User’s Guide for information about loading capacity and available paper types and sizes.1 M ake sure the product is not charging ink. Then raise thepaper support and tilt it backwards slightly.2 Slide the edge guides all the way out.Note: If you are using a Mac or your computer does not have aCD/DVD drive, an Internet connection is required to obtain the product software.To print from a Chromebook™, go to.jm/support/gcp for instructions.1 M ake sure the product is NOT CONNECTED to yourcomputer.Windows ®: If you see a Found New Hardware screen, clickCancel and disconnect the USB cable.2I nsert the product CD (Windows only) or download andrun your product’s software package. For the latest software, visit .jm/support/L5190.3 F ollow the instructions on the computer screen to run the setup program.4 W hen you see the Select Your Connection screen, selectone of the following:• Wireless connectionIn most cases, the software installer automatically attempts to set up your wireless connection. If setup is unsuccessful, you may need to enter your network name (SSID) and password.• Direct USB connectionMake sure you have the USB cable ready.• Wired network connectionMake sure you have an Ethernet cable (not included).Mobile printingConnect wirelessly from your smartphone, tablet, or computer. Print documents and photos from across the room or around the world:• Print directly from your iOS device. Simply connect your printer and device to the same network and tap the action icon to select the print option.• Use Epson Print Enabler (free from Google Play™) with Android™ devices (v4.4 or later). Then connect your printer and device to the same network and tap the menu icon to select the print option.• Print remotely with Epson Connect™ and Google Cloud Print™. See your online User’s Guide for instructions or learn more at .jm/connect .3 L oad A4- or letter-size paper, glossy or printable side upand short edge first, in the middle of the rear paper feedslot.Note:guides.4 S lide the edge guides against the paper, but not tootightly.5 P6 W hen prompted, use the arrow and OK buttons to selectAdjust to adjust print quality now, or select Adjust Laterto do so at another time.For instructions on loading envelopes or legal-size paper, see the online User’s Guide.1 C onnect the phone cord to a telephone wall jack andto the LINE port on your product. See the online User’sGuidefor more information.2 P ress the OK button to set up the fax, or press the #pound button to set it up later.EPSON is a registered trademark, EPSON Exceed Your Vision is a registered logomark, and Epson Connect is a trademark of Seiko Epson Corporation.Designed for Excellence is a trademark of Epson America, Inc.Mac is a trademark of Apple Inc., registered in the U.S. and other countries.Windows is a registered trademark of Microsoft Corporation in the United States and/or other countries.Android, Google Cloud Print, Chromebook, and Google Play are trademarks of Google LLC.General Notice: Other product names used herein are for identification purposes only and may be trademarks of their respective owners. Epson disclaims any and all rights in those marks.This information is subject to change without notice. © 2018 Epson America, Inc., 10/18CPD-56090Technical supportVisit .jm/support/L5190 to download drivers, view manuals, get FAQs, or contact Epson.You can also speak to a service technician by calling one of these numbers:Argentina(54 11) 5167-0300 Guatemala * 1-800-835-03580800-288-37766Mexico 01-800-087-1080Bolivia * 800-100-116 Mexico City (52 55) 1323-2052Chile (56 2) 2484-3400 Nicaragua * 00-1-800-226-0368Colombia 018000-915235 Panama * 00-800-052-1376Bogota (57 1) 592-2200 Paraguay 009-800-521-0019Costa Rica 800-377-6627 Peru 0800-10-126DominicanLima (51 1) 418-0210 Republic * 1-888-760-0068 Uruguay 00040-5210067Ecuador * 1-800-000-044 Venezuela (58 212) 240-1111El Salvador * 800-6570* C ontact your local phone company to call this toll-free number from a mobile phone.If your country does not appear on the list, contact your nearest Epson sales office. Toll or long distance charges may apply.Need paper and ink?Ensure brilliant results with Epson specialty papers, engineered specifically for Epson printers. You can purchase them from an Epson authorized reseller. To findthe nearest one, visit .jm or contact Epson as described in “Any questions?” on this sheet.L5190 replacement inks。
陀螺仪说明书
采用了数字的陀螺仪和加速度传感器6轴传感器。这个飞控设置很简单,可调左右平衡增益、前后平衡增益,飞行方向增益这3个电位器。
4个通道输入(1:副翼通道:2:升降通道:3:方向通道:4:飞行方式选择通道)
飞行方式选择通道:
无GPS时三档开关选择:平衡模式、3D模式(可实现稳定的倒飞、吊机)、手控模式
尺寸很小,2.5CM * 4.5CM * 1CM 和一般接收机差不多
4: 支持外接爆闪灯,可以夜空中显示飞机位置。
有GPS时三档开关选择:平衡模式、定高定向模式(由平衡模式切至中间位置)、定高模式(由返航模式切至中间位置)、自动返航模式
摇杆打满对应锁角40度,摇杆松开飞机锁定平飞,而非单纯陀螺增稳。
在平衡模式时,松开控制杆,飞机自动水平飞行。不带姿态系统、仅带陀螺增稳功能的陀螺仪,(功能是保持当前姿态),摇杆松开,还继续保持当前姿态,就会炸机)
3D模式,可以实现各种姿态稳定飞行。
GPS模式下有4种飞行方式:
Байду номын сангаас
1:平衡飞行模式
2:定高定向模式(高度,飞行方向锁定,但目的高度和飞行方向均可以微调,此模式在FPV中非常方便)
3:定高模式(高度锁定,副翼控制参照平衡模式,目的高度可以可以微调)
4:自动返航模式(完全由GPS控制,返回“家”的位置)
陀螺仪的使用方法
陀螺仪,也被称为角速度传感器,是一种用于测量和控制物体在相对惯性空间中的角运动的惯检测性器件。
它的基本操作方法包括:
1. 放置和安装:将陀螺仪放置在稳定的平台上,按照指南进行正确的安装。
2. 连接电源:根据陀螺仪的型号和使用说明,将其连接到适当的电源。
3. 校准:初次使用或长时间未使用后,需要进行校准以确保测量结果的准确性。
4. 启动和停止测量:在准备好后,可以启动陀螺仪进行测量;在测量完成后,记得停止测量以保护设备。
5. 数据处理和分析:收集的数据需要经过处理和分析才能得到有用的信息。
正确操作和使用陀螺仪可以保证其测量结果的准确性和稳定性。
具体的操作步骤和注意事项应根据陀螺仪的型号和使用说明来确定。
此外,要注意的是,陀螺仪的使用并不复杂,但是需要一些基本的理解和维护知识。
G20锁尾陀螺仪使用手册

螺仪上。
强烈建议使用附带的不锈钢减震片,可有效过滤震动保障飞行品质!旋翼长度大于300mm的直升机,以及所有油动直升机。
典型450级。
旋翼长度小于300mm的小型直升机。
典型200,250级。
强烈建议使用速度快于0.1s/60°的数码舵机。
启动状态上电后陀螺仪进入启动过程,过程中会保持机身静止,且方向舵需保持中立位置R5闪烁: 正在识别方向舵中立位置,持R4闪烁: 正在预热和校准传感器,持若R4常亮请保持机身静止。
飞行状态进入设置状态:设置状态在飞行状态的锁尾模式设置状态。
进入设置状态的方向舵进行,无需携带左侧的L ED表示设置左侧L ED闪烁表示正在选择设置项和调整参数值:菜单中前一个设置项后一个设置项设置项中前一个值/值-1后一个值/值+1进入和离开设置项:2秒将进入或离开设置即开始为某一设置项调整参数返回设置项菜单。
设置项时将保存设置。
电则放弃设置。
离开设置状态:3秒将离开设置状态并状态。
项中或在菜单中都可直接离设置状态。
设置状态时将自动保存设置。
电则放弃设置。
1.切换到非锁尾模式,保持发射机方向舵(需要重新安装舵臂固定螺丝)。
2.连接舵机与连杆。
调整连杆长度或舵机位置,使有大约有10°夹角。
简易安装也可使尾滑块3.设置陀螺的L imit以及调整舵臂长度,使尾舵故障排除飞机不受控的快速交替摆动(追尾,金鱼尾)。
尽可能减少机械虚位和松动:确保尾保尾连杆不弯曲。
尝试逐步降低发射机上的感度设置,直至飞机无规律的摆动。
尽可能减少飞机的震动:确保主轴、确保尾旋翼不缺损。
使用附带的滤震钢片和海绵胶安装。
若降低陀螺仪R sps设置项的值。
无法离地,飞机完全不受控的逆时针旋转。
调整陀螺仪Dir设置项。
飞机缓慢而持续的往一个方向转动。
确保发射机的TR IM设置为0。
确保陀螺仪启动时飞机静止不动。
爱普生(EPSON)陀螺仪传感器XV7001BB

请不要将产品(以及任何情况下提供任何的技术信息)用于开发或制造大规模杀伤性武器或其他军事用途。还要求,不要将产品提供给任何 将产品用于此类违禁用途的第三方。 ·此类产品是基于在一般电子机械内使用而设计开发的,如将产品应用于需要极高可靠性的特定用途,必须实现得到弊公司的事前许可。若 无许可弊公司将不负任何责任。
ISO/TS16949 是一项国际标准,是在 ISO9001 的基础上增 加了对汽车工业的特殊要求部分。
关于在目录内使用的记号
●无铅。
●符合欧盟 RoHS 指令。 欧盟 RoHS 指令免检的含铅产品。 (密封玻璃、高温熔化性焊料或其他材料中包含铅。)
●为汽车方面的应用,如汽车多媒体、车身电子、遥控无钥门锁等。
±5 % 0.9 mA Typ. 160 µA Typ.
3 µA Typ. 0.003 (º/s)/√Hz
º
16bit, Ta=+25 °C Ta=+25 °C
脚aº=º+待我º Cº º Ta=+25 °C Ta=+25 °C
at 10Hz
XV700 1 B B * * *
商
噪
商度条螺 噪
待
商滤条º联系的尺的 C噪
º
º商
噪º
XV7001BB
•联系的º尺º的待Cº
•
(16bit)
•
•
º
•
º
•
态
•
业应
型的待C-滤us 符X系º联em陶速on部u速tors
SPEKTRUM DX8 简体中文版手册
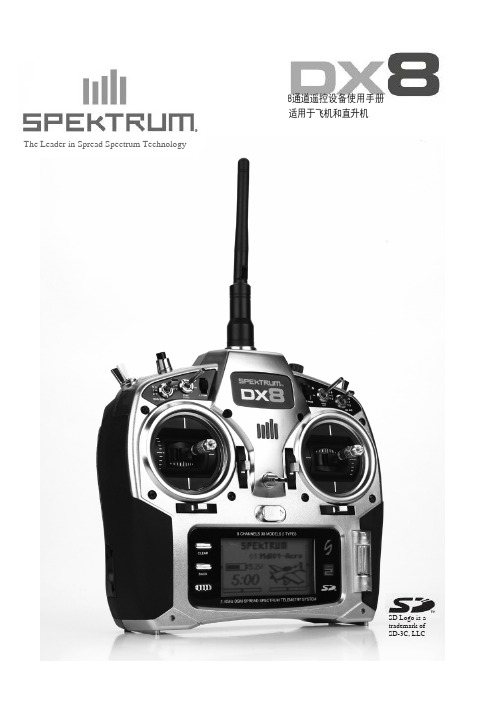
控制开关的识别和位置-模式 2
注意:请参照 39 页了解如何变更遥控器模式
警告: 为确保天线的安全 请勿尝试用天线钩取任何重物'、抓住天线拿 起遥控器、或是将天线以任何方式弯折。若
遥控器天线或是相关零件损伤,讯号输出强 度可能会受到严重阻扰,而造成摔机、对人 伤害以及财产的损失。
Antenna 天线
Rudder D/R 方向舵双重比率
Speaker 扬声器
Display Screen 显示屏
Power Switch 电源开关
Aileron D/R 副翼双重比率
Aileron/Elevat or
Stick 副翼/升降舵摇
杆
Charge Jack 充电插槽
Elevator Trim 升降舵微调
Aileron Trim 副翼微调
飞机………………34
尾舵曲线
直升机……………35
混控
直升机……………36
陀螺仪
直升机……………38
监控
飞机/直升机……41
DX8 維修指南………………………………1
一般说明……………………………………42
一般附注……………………………………42
安全使用注意事項…………………………42
安全使用注意事項…………………………42
电池与充电注意事项………………………5
控制开关的识别和位置-模式 2……………7
控制开关的识别和位置-模式 1……………8
按键与屏幕功能……………………………9
数字微调……………………………………9
无动作警示…………………………………9
电池警示及屏幕……………………………9
编程警示…பைடு நூலகம்………………………………9
Epson陀螺仪应用手册

ASIA EPSON (CHINA) CO., LTD. 23F, Beijing Silver Tower 2# North RD DongSangHuan ChaoYang District, Beijing, China Phone: (86) 10-6410-6655 Shinghai Branch High-Tech Building,900 Yishan Road Shanghai 200233,China Phone: (86) 21-5423-5577 Fax: (86) 21-5423-4677 EPSON HONG KONG LTD. 20/F., Harbour Centre, 25 Harbour Road, Wanchai, Hong kong Phone: (852) 2585-4600 Fax: (852) 2827-2152 EPSON ELECTRONIC TECHNOLOGY DEVELOPMENT (SHENZHEN )CO., LTD. 12/F, Dawning Mansion,#12 Keji South Road, Hi-Tech Park, Shenzhen, China Phone: (86) 755-26993828 Fax: (86) 755-26993838 EPSON TAIWAN TECHNOLOGY & TRADING LTD. 14F, No.7, Song Ren Road, Taipei 110 Phone: (886) 2-8786-6688 Fax: (886)2-8786-6660 EPSON SINGAPORE PTE. LTD. 401, Commonwealth Drive, #07-01 Haw Par Technocentre Singapore 149598 Phone: (65) 6-586-3100 Fax: (65) 6-472-4291 .sg SEIKO EPSON CORPORATION KOREA Office 50F, KLI 63 Building,60 Yoido-dong, Youngdeungpo-Ku, Seoul, 150-763, Korea Phone: (82) 2-784-6027 Fax: (82) 2-767-3677 http://www.epson-device.co.kr Gumi Branch Office 2F, Grand Blde,457-4, Songjeong-dong Gumi-City, Gyongsangbuk-Do, 730-090, Korea Phone: (82) 54-454-6027 Fax: (82) 54-454-6093 Fax: (86) 10-6410-7319
Epson Moverio BT-40S用户手册说明书

Earphone jackUSB Type-C connectorTemplesLensNose padAmbient light sensorSensorsShadeClipUser's Guide (this document)Safety InstructionsIncluded Items and Headset Part NamesOptional ItemsThe following optional items are available. These optional items are available as of July 2020. Availability and part numbers vary by region and are subject to change without notice.• Intelligent Controller BO-IC400*• Shade Pack BO-SP400• Nose Pad Pack BO-NP350• Nose Pad Pack BO-NP300*Supplied with the BT-40S.• This product is powered using the battery in your smart device or the Intelligent Controller (hereinafter, these are collectively referred to as the "connected device"). While using the product, keep an eye on the battery level of your connected device.• The BT-40 does not come with an Intelligent Controller. You need to provide a smart device that supports USB Type-C DisplayPort Alternate Mode.While the image is displayed on your connected device, connect theheadset's USB Type-C connector to the connected device.Connect commercially available earphones to the earphone jack.• We recommend using earphones that comply with CTIA standards.Also, when using 3-pin earphones, the microphone functiondoes not work. You may hear some noise when connecting ordisconnecting the earphones or USB Type-C connector duringcontent playback, so be sure to take off your earphones first.• When using apps with a call function, phone calls may be audiblefrom the smart device even if earphones are connected. Werecommend checking in advance what happens when you receivea phone call while images are displayed.Put on the headset and earphones, and then adjust the position ofthe headset so that you can see the image.• Do not apply excessive force when opening the temples.• You can clip the earphone jack to your clothes using the clip. Notethat some clothes may be damaged by the clip.• Turn the screen of your connected device sideways to display theimage at full screen size.-Turn on the screen rotation feature for the connected device.• Check the following points if you cannot see the image.-The USB Type-C connector is connected correctly (make sureyou connect it securely to the connector).-The connected device is on, not in sleep mode.-Your smart device supports images output in USB Type-CDisplayPort Alternate Mode.If you are using an Android device, you can adjust the brightness of the headset's screen as well as other parameters by using the dedicated app.BT-40: Install the app "MOVERIO Link" on your smart device using Google Play.BT-40S: Use "MOVERIO Link Pro" from the app list screen of the Intelligent Controller BO-IC400.The following outlines the main features of the app.• Headset screen brightness adjustment• Power saving mode (on the connected device and the headset)• Screen lock for the connected devices (to prevent accidental operations)Adjust the volume on your connected device.BT-40/BT-40S Headset Specifications<For customers who have purchased the BT-40S>*1 Restrictions in operation may occur, such as buttons not operating, even when using a compliant plug.*2 The screen brightness was set to the default value of 12/20, and the evaluation movie with an average gradation of 98/255 was displayed continuously in an environment of 25°C. If the screen brightness (brightness setting and display gradation) is brighter than the evaluation conditions, the life span will be reduced.Notes on Water ResistanceThis product is IPX2-compliant with daily water resistance performance based on the IEC60529 standard. However, this does not include the USB Type-C connector. (This is not based on an evaluation by a third-party evaluator)<Water resistance level compliant with IPX2>If the product is subjected to a dripping water test at a rate of 3 mm/minute for up to 10 minutes while the product is at an angle of 15 degrees, water does not enter the product and it can be operated normally.• The water resistance feature does not guarantee protection against damage or malfunctions under all conditions. The warranty is invalid if mal-functions are determined to have occurred due to incorrect handling of the product by the user.• When connecting or disconnecting the product's USB Type-C connector with a connected device, do not touch it with wet hands and do not expose it to water or dust. If small debris such as hair or sand gets caught in the ports, the water resistance performance of the product will be compromised.• Do not allow other liquids (such as organic solvents, soapy water, hot spring water, and seawater) to splash onto the product.• Do not leave the product in locations subject to humidity such as bathrooms.• If rain or water splashes onto the product, wipe it with a dry cloth as soon as possible.Trademarks"EPSON" is a registered trademark of the Seiko Epson Corporation."EXCEED YOUR VISION" is a registered trademark or a trademark of the Seiko Epson Corporation.Windows is a registered trademark of the Microsoft Corporation in the USA and other countries.USB Type-C TM is a trademark of the USB Implementers Forum.Android and Google Play are trademarks of Google LLC.Other product names used herein are also for identification purposes only and may be trademarks of their respective owners. Epsondisclaims any and all rights in those marks.。
2024版EPSON指导教程

01
设置打印参数,如打印份数、打印范围、打印质量等。
02
点击“确定”按钮,开始打印。
功能介绍
03
12
打印操作及功能介绍
2024/1/30
01
EPSON打印机支持多种打印功能,如双面打印、多 页合并打印等。
02
通过打印机驱动程序,可以实现更多高级功能,如 水印打印、海报打印等。
03
EPSON打印机还支持无线打印和移动打印功能,方 便用户随时随地进行打印操作。
3
将投影仪放置在稳定、水平的表面上,调整投影 仪的角度,使其与投影面垂直。
2024/1/30
22
投影仪安装与调试步骤
• 连接电源线和信号线,确保连接牢固。
2024/1/30
23
投影仪安装与调试步骤
2024/1/30
调试步骤
打开投影仪,进入主界面。
调整投影仪的焦距和投影大小,使其适应投影 面。
24
EPSON还生产销售包括液晶显示器、智能手 表、机器人等在内的多种电子产品。
2024/1/30
5
EPSON市场地位与竞争优势
市场地位
EPSON作为全球知名的电子产品制造商, 在打印机、投影仪等领域占据重要地位,
产品畅销全球多个国家和地区。
品质保证
EPSON注重产品品质和用户体验,通过严 格的生产管理和质量控制确保产品的稳定
03
建议将打印机设置为默认打印机,方便日 后使用。
04
根据需要,可以设置打印机的打印质量、 纸张类型等参数。
1文件”菜单下的“打印”选项。
在弹出的打印对话框中,选择已安装的EPSON打印机。
2024/1/30
11
打印操作及功能介绍
EPSON 用户指南(Perfection V33 和 Perfection V330 )
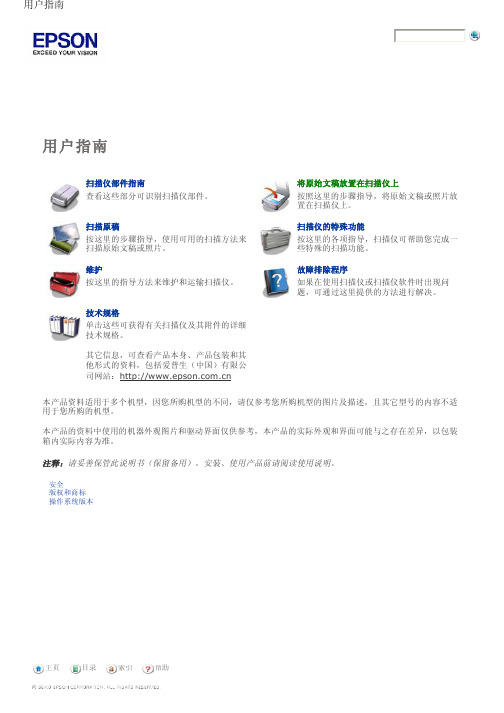
回到顶部
指示灯和按键
按钮
使用扫描仪按钮之前,确保您已安装Epson Scan和Epson Event Manager。
按钮
电源/ 钮
启动按
电源
复印 E-mail PDF
参见使用扫描仪按钮。
启动
功能 如果按下一次可打开扫描仪电源。 当扫描仪电源打开时,按下此按钮3秒钟可关闭扫描仪。 (当扫描 软件正在运行时,您不能关闭扫描仪。) Epson Scan启动。
注释: 有关详细信息请参见Epson Scan帮助。 如果清除下一次扫描前显示此对话框复选框,Epson Scan立即启动扫描无需显示此屏幕。 要返回到此屏幕,在扫描时单击扫描对话框中的取消。
对于胶片或幻灯片注释说明: 在全自动模式下,仅可以扫描35毫米的彩色胶片或彩色正片幻灯片。 要扫描其他类型的胶片,使 用家庭模式或专业模式。 要更改扫描模式,请参见选择Epson Scan模式。
进行图像类型设置。 进行文稿来源设置。 选择原始文稿的尺寸作为尺寸设置。 为您的原稿选择一个合适的分辨率作为分辨率设置。 单击预览可预览您的图像。 预览窗口出现并显示图像。 有关详细信息,请参见预览和调整扫描区域。 按需要指定图像质量。 有关详细信息,请参见调整颜色和其它图像设置。 单击扫描。 您扫描的图像在文件保存设置窗口中按您选择的文件格式和位置保存。 如果您没有在文件保存设置窗口中选 择任何设置,它将以JPEG文件保存在Pictures或My Pictures文件夹中。
ArcSoft Scan-n-Stitch Deluxe (仅Windows): 从选择扫描仪中选择您的扫描仪, 然后单击扫描页。
Presto! PageManager: 打开文件菜单,选择选择来源,然后选择您的扫描仪。
EPSON机器人产品说明书
EPSON RC+ 7.0 SPEL +语言参考Rev.4 C1M218S4861FVer.7.5EPSON RC+ 7.0 (Ver.7.5) SPEL+语言参考Rev.4EPSON RC+ 7.0 (Ver.7.5)SPEL+语言参考Rev.4Copyright 2012-2021 SEIKO EPSON CORPORATION. All rights reserved. EPSON RC+ 7.0 (Ver.7.5) SPEL+ 语言参考 Rev.4i前言感谢您购买本公司的机器人产品。
本手册记载了正确使用 EPSON RC+7.0 软件所需的事项。
请阅读本手册及相关手册后正确使用系统。
阅读之后,请妥善保管,以便随时取阅。
本公司的产品均通过严格的测试和检查,以确保机器人系统的性能符合本公司的标准。
但是如果在超出本手册所描述的环境中使用本产品,则可能会影响产品的基本性能。
本手册阐述了本公司可以预见的危险和问题。
请务必遵守本手册中的安全注意事项,安全正确地使用机器人系统。
商标Microsoft、Windows、Windows 标识、Visual Basic、Visual C++ 为美国MicrosoftCorporation 在美国及其它国家的注册商标或商标。
Pentium为美国英特尔公司的商标。
其它公司名称、商标名称、产品名称均为各公司的注册商标或商标。
关于标记Microsoft® Windows® 8 Operating systemMicrosoft® Windows® 10 Operating system在整个手册中,Windows 8以及Windows 10分别指上述相应的操作系统。
在某些情况下,Windows泛指Windows 8和Windows 10。
注意事项禁止擅自复印或转载本手册的部分或全部内容。
本手册记载的内容将来可能会随时变更,恕不事先通告。
飞机爱好者A3 EVO 6 轴陀螺仪使用说明书
中文使用说明书版本:V1.0 2021/10感谢您购买和使用我们的产品。
A3 EVO是一款专门为遥控固定翼模型飞行设计的高性能、功能强大的6轴陀螺仪产品。
为了让您更好地了解和使用本产品和安全飞行,请认真阅读本说明书并按说明书的要求进行相关设置。
注意事项•遥控飞机模型不是玩具!螺旋桨高速旋转带来的潜在风险相当高,它们可能会导致严重的伤害,一切的使用要符合并遵守共同的安全规则和相关法规。
我们建议您在第一次使用我们的陀螺仪进行飞行时,寻求具有丰富飞行经验的玩家的指导和帮助;•A3 EVO在通电后需要进行精确的陀螺仪校准,所以,在接通飞机电源后,请保持飞机静止,等待蓝灯闪烁若干秒完成校准后,才能开始飞行,如果在这个阶段陀螺仪检测到有轻微的移动,蓝灯会一直保持常亮,直至飞机不再移动才重新开始校准过程,尽管如此,开机初始化阶段只需要保持静止即可,并不需要将飞机水平放置;•A3 EVO在通电后还需要进行摇杆中位校准,所以,通电前,先把发射机的所有摇杆放在中间位置,油门摇杆放在最低,打开发射机电源,然后再接通飞机电源,在初始化过程中不要移动任何摇杆直至初始化完成;•安装完成后请务必逐一检查副翼、升降、方向三个通道的陀螺仪修正方向是否正确!并且养成在每次起飞前都检查确认陀螺仪方向的习惯,错误的陀螺仪方向将会导致失控甚至坠机!•安装陀螺仪后,由于舵机的修正动作明显增加,将导致工作电流增大,请务必确保UBEC或电调的内置BEC能够提供足够的输出电流,否则可能造成电压不稳定,对飞行带来安全隐患。
为了获得更加稳定的电压,建议将配送的大电容插在陀螺仪或接收机的任意一个空闲的接口上。
使用一片附带的双面胶将陀螺仪牢固地安装在机身内部,安装时应尽量靠近飞机的重心位置,使陀螺仪外壳的三条边与飞机的三个旋转轴完全平行,并且保持陀螺仪与安装平面平行,尽量减小安装角度的误差,这样可以更好地发挥陀螺仪的性能。
A3 EVO可以水平或垂直安装,但无论是哪种安装方式,都要保证带按钮的一侧短边正对机头方向,即飞行的前进方向,排针指向后方,否则自动平衡模式和自动吊机模式将不能正常工作。
Epson Projector 安装和连接指南说明书

Quick SetupBefore using the projector, make sure you read the safety instructions in the online User’s Guide .ContentsMake sure your projector box included all of these parts:Installation optionsYou can install your projector in the following ways:•M ounted on a wall or ceiling using the direct mount (included) • Mounted on a lighting track using the optional lighting track mount (ELPMB54)•M ounted on a table or floor using the optional floor stand (ELPMB55)Note: To purchase optional mounts or other accessories, see “Optional accessories.” For more information about the mounts, see the Installation Manual that came with the mount or the online User’s Guide .Connect the projectorChoose from the following connections. See the sections below or the online User’s Guide for details.Wired networkConnect the projector to your network using an Ethernet cable. See “Settingup a wired connection” for more information.Connect one end of an HDMI cable to the projector’s HDMI port and the otherend to an HDMI port on your computer or video device.External speakersConnect one end of a 3.5 mm stereo mini-jack audio cable to the projector’s Audio Outport and the other end to your powered external speakers.Install the batteries as shown (two AA batteries).and offAccess projector menusDisplay a test pattern SD cardChange image shape and colorNavigate projector menusAccess playlists you assigned to each of the numeric buttons (1 to 9)Adjust projector focus Control projector volumeSwitch to spotlight mode Select a playlist on SD cardFor more information on using the remote control, see the online User’s Guide.Turn on your equipmentNote: Your connection method may vary depending on your setup.1C onnect your computer, video equipment, or insert an SD card.2Make sure the power cord is connected and plugged into an electrical outlet.3P ress the power button on the projector or remote control. The Status light flashes blue and then stays on.Note: To shut down the projector, press the power button twice.4If you don’t see an image, press one of the input source buttons on the Note:5Icontrol.6TExtended and press . Select your Setting up a wireless connectionFollow these steps to set up the projector for a wireless network connection.Note: For more information about using the projector on a network, see the online User’s Guide .1 P ress the Menubutton on the remote control, select the Network menu,then press.2S elect On as the Wireless LAN Power setting.3 Select Network Configuration and press .4S elect the Basic menu and press.5S elect the basic options as necessary and press .6S elect the Wireless LAN menu and press.7S elect one of the following as the Connection Mode setting: •Quick for a direct connection to a computer, tablet, or smartphone.•A dvanced to connect your projector to a wireless router or access point.8Select any other settings on the Wireless LAN menu as necessary. See the online User’s Guide for details.9When you are finished, select Complete and press , then pressagain to save your settings.10 P ress the Menu button to exit the menu system.Install the optional softwareDownload and install optional software to perform various tasks wirelessly, such as uploading content, monitoring or controlling your projector, and projecting from multiple computers.You can download the optional software and its manuals from the Epson website, as described in “Where to get help.”Setting up a wiredconnectionFollow these steps to set up the projector for a wired network connection.Note: For more information about using the projector on a network, see the online User’s Guide .1 P ress the Menu button on the remote control, select the Networkmenu, then press.2 S elect Network Configuration and press .3S elect the Basic menu and press.4S elect the basic options as necessary and press .5S elect the Wired LAN menu and press.6 C hoose IP Settings and press .7If your network assigns addresses automatically, make sure the DHCP setting is on. If not, make sure DHCP is off and enter the projector’s IP Address , Subnet Mask , and Gateway Address , as needed. Then press Esc .8 To prevent the IP address from appearing on the network standby screen, set the IP Address Display setting to Off .9When you are finished, select Complete and press , then pressagain to save your settings.10 P ress the Menu button to exit the menu system.Using web remoteYou can use a standard web browser to control the projector through thenetwork. A virtual remote control on your computer screen lets you perform many of the same functions as you can with the physical remote control.1Open your web browser and enter the IP address of the projector you want to monitor in the browser’s address box.If you’re not sure what the IP address of the projector is, turn the projector on and select Net. Info. - Wired LAN or Net. Info. -Wireless LAN from the Network menu to display the IP address of the projector. (Do not enter the leading zeroes.)2E nter EPSONWEB as the user name and admin as the password, then click OK . The Epson ®Web Control menu opens.3Select Remote . Use the on-screen buttons to operate the projector, asyou would using the remote control.Select image sourceAdjust volume Add overlay effect to imageTurn off pictureand sound Select a savedplaylistUsing the Epson iProjection appYou can project wirelessly from a mobile device (iOS or Android™) using the Epson iProjection™ app and a QR code.1U se the following QR code to download and install the Epson iProjection app.2 Connect your mobile device to the same wireless network your projector is connected to.3 Press the Menubutton on the remote control, select the Network menu,and select Display the QR Code to display a QR code.4S tart Epson iProjection on your mobile device.5U se the QR code reader feature to read the QR code displayed.6F ollow the app instructions to connect your device to the projector.For more information on setting up and using this app, visit/projectorapp (U.S.) or www.epson.ca/projectorapp (Canada).Managing contentYou can manage content from your computer using the Epson Projector Content Manager software (Windows ®), or over the network using a web browser (Epson Web Control) or the Epson iProjection app.Note: An SD card is required for managing content.Epson Projector Content ManagerWeb Browser/Epson iProjectionCreate and edit playlists and apply effects and filters√√Create custom filters √Create and edit timetable √Save project on an SD card √Convert video files √Upload video and picture files over a network √Control projector over a network√Using the Content Manager softwareThe Epson Projector Content Manager software allows you to add images and movies to playlists and save them directly to an SD card. You can easily projectyour playlist content by inserting the SD card into your projector’s card slot.Note:information, see the online Epson Projector Content Manager Operation Guide or the online User’s Guide .TroubleshootingIf you see a blank screen or the No signal message after turning on yourcomputer or video device, check the following:•M ake sure the Status light on the projector is blue and not flashing.•M ake sure all necessary cables are securely connected, or that the SD cardis inserted correctly, and the power is on for the projector and connectedvideo sources.•P ress one of the source buttons (Spotlight, HDMI, LAN, or SD) on theremote control to switch to the correct image source, if necessary.•P ress the A/V Mute button on the remote control to see if the image wastemporarily turned off.•M ake sure the image being projected is not completely black (only whenprojecting computer images).•F or images projected with Windows Media Center, reduce the screen sizefrom full screen mode.•F or images projected from applications using Microsoft® DirectX®, turn offDirectX functions.•O n Windows 7 or later, hold down the Windows key and press P at thesame time, then click Duplicate.•I f you’re using a Windows laptop, press the function key on your keyboardthat lets you display on an external monitor. It may be labeled CRT/LCD orhave an icon such as . You may have to hold down the Fn key whilepressing it (such as Fn + F7). Wait a moment for the display to appear.•I f you’re using a Mac laptop, open System Preferences and selectDisplays. Click the Arrangement tab and select the Mirror Displayscheckbox.Where to get helpManualsFor more information about using the projector, see the online manuals. Youcan view or download the manuals from the Epson website, as described below.Internet support servicesVisit /support (U.S.) or www.epson.ca/support (Canada)and search for your product to download software and utilities, view manuals,get FAQs and troubleshooting advice, or contact Epson.Telephone supportTo use the Epson PrivateLine® Support service, call (800) 637-7661. This serviceis available for the duration of your warranty period. You may also speak witha support specialist by calling (562) 276-4394 (U.S.) or (905) 709-3839 (Canada).Support hours are 6 am to 8 pm, Pacific Time, Monday through Friday, and7 am to 4 pm, Pacific Time, Saturday. Days and hours of support are subject tochange without notice. Toll or long distance charges may apply.RegistrationRegister today to get product updates and exclusive offers. You can registeronline at /webreg.Optional accessoriesFor a list of optional accessories, see the online User’s Guide.You can purchase screens or other accessories from an Epson authorized reseller.To find the nearest reseller, call 800-GO-EPSON (800-463-7766). Or you canpurchase online at (U.S. sales) orwww.epsonstore.ca (Canadian sales).EPSON is a registered trademark, EPSON Exceed Your Vision is a registered logomark, and Epson iProjection is atrademark of Seiko Epson Corporation. PrivateLine is a registered trademark of Epson America, Inc.Mac and OS X are trademarks of Apple Inc., registered in the U.S. and other countries.Android is a trademark of Google Inc.General Notice: Other product names used herein are for identification purposes only and may be trademarks oftheir respective owners. Epson disclaims any and all rights in those marks.This information is subject to change without notice.© 2018 Epson America, Inc., 3/18CPD-55365。
EPSON EMP-TW20 说明书
更換消耗品 .................................. 42
• 更換空氣過濾器 .....................................................................42
索引 .................................... 51
看了指示燈仍不明白時 ....................... 34
• 與映像有關的問題................................................................. 34 • 投影開始時的問題................................................................. 38 • 其他問題.................................................................................. 38
遙控器 ...................................... 7 後面 ........................................ 8 底座 ........................................ 8
外觀 ..................................... 9
操
作
映 像 質 量 調 節
配 置 選 單 列 表
故 障 追 尋
附 錄
3
本機的特點
可以選擇映像的外觀以匹配投影環境 (顏色模式)
高級顏色調節
4
配備廣角鏡頭移動功能
Ex3500陀螺仪使用手册
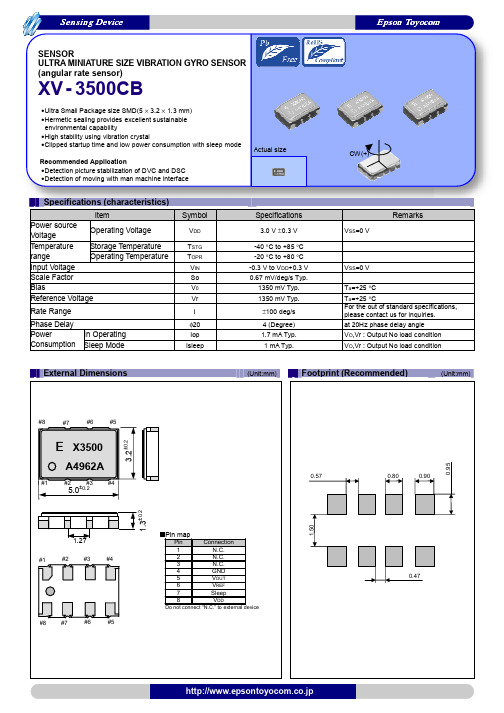
-40 °C to +85 °C -20 °C to +80 °C -0.3 V to VDD+0.3 V 0.67 mV/deg/s Typ.
1350 mV Typ. 1350 mV Typ.
±100 deg/s 4 (Degree) 1.7 mA Typ. 1 mA Typ.
Sensing Device
Epson ห้องสมุดไป่ตู้oyocom
SENSOR ULTRA MINIATURE SIZE VIBRATION GYRO SENSOR (angular rate sensor)
XV - 3500CB
•Ultra Small Package size SMD(5 × 3.2 × 1.3 mm) •Hermetic sealing provides excellent sustainable
any liability for the occurrence of infringing on any patent or copyright of a third party. This material does not authorize the licensing on for any patent or intellectual copyrights. ●Any product described in this material may contain technology or the subject relating to strategic products under the control of the Foreign
ISO 14000 is an international standard for environmental management that was established by the International Standards Organization in 1996 against the background of growing concern regarding global warming, destruction of the ozone layer, and global deforestation.
G3陀螺仪 说明书

G3 陀螺仪采用全数字化的参数设定方式,避免了因电位器机械磨损所造成的工作不稳 定现象。
【规格】
1. 外形尺寸:26mm*24mm*9mm
2. 重量:12g
3. 工作电压和电流:DC 4.5-6.5V,工作电流≈50mA,最大电流<100mA
4. 适用舵机:模拟舵机(频率 50Hz)、数码舵机(频率 333Hz),舵机中点 1520us
【免责声明】 模型运动本身具有一定的风险,该运动要求玩家具有一定的专业知识和技能。本产品在
设计时已经采取多重安全保护措施,但设备的工作环境和条件差别很大,无法完全预计。我 们强烈建议您尽可能为设备提供良好的安装和运行条件, 确保供电以及控制信号的稳定可 靠, 确认飞行场地的安全。 本公司不承担因使用陀螺仪而造成的直接及间接损失。本产品 一经拆封使用,视同您已认可以上全部条款。
爱普生晶振XV4001BD汽车应用陀螺仪规格书
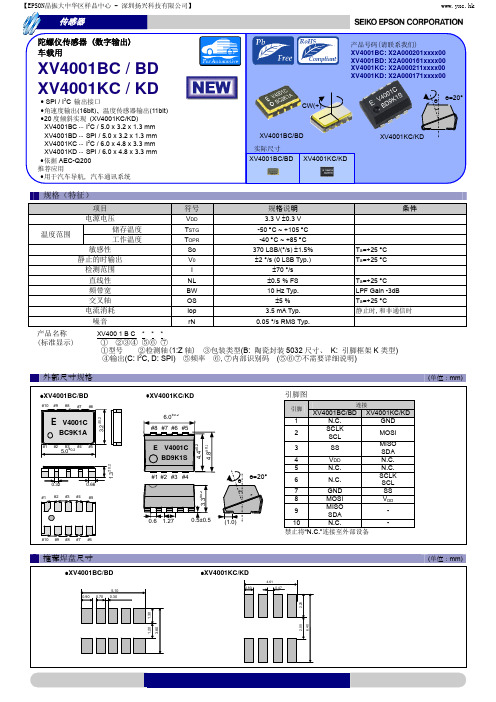
5.0
E
±0.2
V4001C BD9K1S
3 4 5 ө ө=20° 6 7 8
1.3
#1 #2 #3 #4 3.3±0.2
0.32
#1 #2 #3 #4
0.66
#5
1.27
#10 #9 #8 #7 #6
0.5±0.5
(1.0)
GND MOSI MISO 9 SDA 10 N.C. 禁止将“N.C.”连接至外部设备
符号
VDD TSTG TOPR So V0 I NL BW OS Iop rN
规格说明
3.3 V 0.3 V -50 C ~ +105 C -40 C ~ +85 C 370 LSB/(°/s) 1.5% 2 °/s (0 LSB Typ.) 70 °/s 0.5 % FS 10 Hz Typ. 5 % 3.5 mA Typ. 0.05 °/s RMS Typ. Ta=+25 C LPF Gain -3dB Ta=+25 C Ta=+25 C Ta=+25 C
追求高品质
Seiko Epson 为了向顾客提供高品质、卓越信赖性的产品、服务,迅 速着手通过 ISO 9000 系列资格认证的工作,其日本和海外工厂也在通 过 ISO 9001 认证。 同时, 也在通过大型汽车制造厂商要求规格的 ISO/TS 16949 认证。 ISO/TS16949 是一项国际标准,是在 ISO9001 的基础上增 加了对汽车工业的特殊要求部分。
【EPSON晶振大中华区样品中心 - 深圳扬兴科技有限公司】
www.yxc.hk
传感器
陀螺仪传感器 (数字输出) 车载用
产品号码(请联系我们) XV4001BC: X2A000201xxxx00 XV4001BD: X2A000161xxxx00 XV4001KC: X2A000211xxxx00 XV4001KD: X2A000171xxxx00 ө=20°
Epson Moverio BT-350用户手册说明书
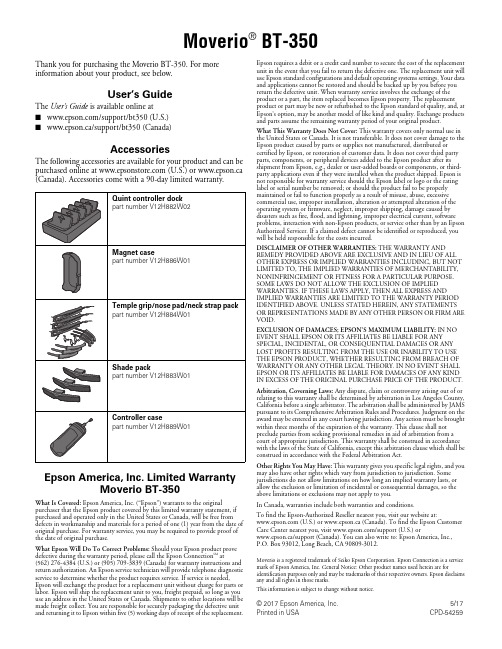
Moverio® BT-350Thank you for purchasing the Moverio BT-350. For more information about your product, see below.User’s GuideThe User’s Guide is available online at■/support/bt350 (U.S.)■www.epson.ca/support/bt350 (Canada)AccessoriesThe following accessories are available for your product and can be purchased online at (U.S.) or www.epson.ca (Canada). Accessories come with a 90-day limited warranty.Epson America, Inc. Limited WarrantyMoverio BT-350What Is Covered: Epson America, Inc. (“Epson”) warrants to the original purchaser that the Epson product covered by this limited warranty statement, if purchased and operated only in the United States or Canada, will be free from defects in workmanship and materials for a period of one (1) year from the date of original purchase. For warranty service, you may be required to provide proof of the date of original purchase.What Epson Will Do To Correct Problems: Should your Epson product prove defective during the warranty period, please call the Epson Connection SM at (562)276-4384 (U.S.) or (905) 709-3839 (Canada) for warranty instructions and return authorization. An Epson service technician will provide telephone diagnostic service to determine whether the product requires service. If service is needed, Epson will exchange the product for a replacement unit without charge for parts or labor. Epson will ship the replacement unit to you, freight prepaid, so long as you use an address in the United States or Canada. Shipments to other locations will be made freight collect. You are responsible for securely packaging the defective unit and returning it to Epson within five (5) working days of receipt of the replacement. Epson requires a debit or a credit card number to secure the cost of the replacement unit in the event that you fail to return the defective one. The replacement unit will use Epson standard configurations and default operating systems settings. Your data and applications cannot be restored and should be backed up by you before you return the defective unit. When warranty service involves the exchange of the product or a part, the item replaced becomes Epson property. The replacement product or part may be new or refurbished to the Epson standard of quality, and, at Epson’s option, may be another model of like kind and quality. Exchange products and parts assume the remaining warranty period of your original product.What This Warranty Does Not Cover: This warranty covers only normal use in the United States or Canada. It is not transferable. It does not cover damage to the Epson product caused by parts or supplies not manufactured, distributed or certified by Epson, or restoration of customer data. It does not cover third party parts, components, or peripheral devices added to the Epson product after its shipment from Epson, e.g., dealer or user-added boards or components, or third-party applications even if they were installed when the product shipped. Epson is not responsible for warranty service should the Epson label or logo or the rating label or serial number be removed; or should the product fail to be properly maintained or fail to function properly as a result of misuse, abuse, excessive commercial use, improper installation, alteration or attempted alteration of the operating system or firmware, neglect, improper shipping, damage caused by disasters such as fire, flood, and lightning, improper electrical current, software problems, interaction with non-Epson products, or service other than by an Epson Authorized Servicer. If a claimed defect cannot be identified or reproduced, you will be held responsible for the costs incurred.DISCLAIMER OF OTHER WARRANTIES: THE WARRANTY AND REMEDY PROVIDED ABOVE ARE EXCLUSIVE AND IN LIEU OF ALL OTHER EXPRESS OR IMPLIED WARRANTIES INCLUDING, BUT NOT LIMITED TO, THE IMPLIED WARRANTIES OF MERCHANTABILITY, NONINFRINGEMENT OR FITNESS FOR A PARTICULAR PURPOSE. SOME LAWS DO NOT ALLOW THE EXCLUSION OF IMPLIED WARRANTIES. IF THESE LAWS APPLY, THEN ALL EXPRESS AND IMPLIED WARRANTIES ARE LIMITED TO THE WARRANTY PERIOD IDENTIFIED ABOVE. UNLESS STATED HEREIN, ANY STATEMENTS OR REPRESENTATIONS MADE BY ANY OTHER PERSON OR FIRM ARE VOID.EXCLUSION OF DAMAGES; EPSON’S MAXIMUM LIABILITY: IN NO EVENT SHALL EPSON OR ITS AFFILIATES BE LIABLE FOR ANY SPECIAL, INCIDENTAL, OR CONSEQUENTIAL DAMAGES OR ANY LOST PROFITS RESULTING FROM THE USE OR INABILITY TO USE THE EPSON PRODUCT, WHETHER RESULTING FROM BREACH OF WARRANTY OR ANY OTHER LEGAL THEORY. IN NO EVENT SHALL EPSON OR ITS AFFILIATES BE LIABLE FOR DAMAGES OF ANY KIND IN EXCESS OF THE ORIGINAL PURCHASE PRICE OF THE PRODUCT. Arbitration, Governing Laws: Any dispute, claim or controversy arising out of or relating to this warranty shall be determined by arbitration in Los Angeles County, California before a single arbitrator. The arbitration shall be administered by JAMS pursuant to its Comprehensive Arbitration Rules and Procedures. Judgment on the award may be entered in any court having jurisdiction. Any action must be brought within three months of the expiration of the warranty. This clause shall not preclude parties from seeking provisional remedies in aid of arbitration from a court of appropriate jurisdiction. This warranty shall be construed in accordance with the laws of the State of California, except this arbitration clause which shall be construed in accordance with the Federal Arbitration Act.Other Rights You May Have: This warranty gives you specific legal rights, and you may also have other rights which vary from jurisdiction to jurisdiction. Some jurisdictions do not allow limitations on how long an implied warranty lasts, or allow the exclusion or limitation of incidental or consequential damages, so the above limitations or exclusions may not apply to you.In Canada, warranties include both warranties and conditions.To find the Epson-Authorized Reseller nearest you, visit our website at: (U.S.) or www.epson.ca (Canada). To find the Epson Customer Care Center nearest you, visit /support (U.S.) orwww.epson.ca/support (Canada). You can also write to: Epson America, Inc., P.O.Box 93012, Long Beach, CA 90809-3012.Moverio is a registered trademark of Seiko Epson Corporation. Epson Connection is a service mark of Epson America, Inc. General Notice: Other product names used herein are for identification purposes only and may be trademarks of their respective owners. Epson disclaims any and all rights in those marks.This information is subject to change without notice.© 2017 Epson America, Inc.5/17 Printed in USA CPD-54259。
- 1、下载文档前请自行甄别文档内容的完整性,平台不提供额外的编辑、内容补充、找答案等附加服务。
- 2、"仅部分预览"的文档,不可在线预览部分如存在完整性等问题,可反馈申请退款(可完整预览的文档不适用该条件!)。
- 3、如文档侵犯您的权益,请联系客服反馈,我们会尽快为您处理(人工客服工作时间:9:00-18:30)。
Contact Us
AMERICA EPSON ELECTRONICS AMERICA, INC. HEADQUARTER 150 River Oaks Parkway, San Jose, CA 95134, U.S.A. Phone: (1)800-228-3964 (Toll free) : (1)408-922-0200 (Main) Atlanta Office 3010 Royal Blvd. South, Ste. 170, Alpharetta, GA 30005, U.S.A. Phone: (1)877-332-0020 (Toll free) : (1)770-777-2078 (Main) Boston Office Fax: (1)770-777-2637 Fax: (1)408-922-0238
ASIA EPSON (CHINA) CO., LTD. 23F, Beijing Silver Tower 2# North RD DongSangHuan ChaoYang District, Beijing, China Phone: (86) 10-6410-6655 Shinghai Branch High-Tech Building,900 Yishan Road Shanghai 200233,China Phone: (86) 21-5423-5577 Fax: (86) 21-5423-4677 EPSON HONG KONG LTD. 20/F., Harbour Centre, 25 Harbour Road, Wanchai, Hong kong Phone: (852) 2585-4600 Fax: (852) 2827-2152 EPSON ELECTRONIC TECHNOLOGY DEVELOPMENT (SHENZHEN )CO., LTD. 12/F, Dawning Mansion,#12 Keji South Road, Hi-Tech Park, Shenzhen, China Phone: (86) 755-26993828 Fax: (86) 755-26993838 EPSON TAIWAN TECHNOLOGY & TRADING LTD. 14F, No.7, Song Ren Road, Taipei 110 Phone: (886) 2-8786-6688 Fax: (886)2-8786-6660 EPSON SINGAPORE PTE. LTD. 401, Commonwealth Drive, #07-01 Haw Par Technocentre Singapore 149598 Phone: (65) 6-586-3100 Fax: (65) 6-472-4291 .sg SEIKO EPSON CORPORATION KOREA Office 50F, KLI 63 Building,60 Yoido-dong, Youngdeungpo-Ku, Seoul, 150-763, Korea Phone: (82) 2-784-6027 Fax: (82) 2-767-3677 http://www.epson-device.co.kr Gumi Branch Office 2F, Grand Blde,457-4, Songjeong-dong Gumi-City, Gyongsangbuk-Do, 730-090, Korea Phone: (82) 54-454-6027 Fax: (82) 54-454-6093 Fax: (86) 10-6410-7319
1960 E. Grand Ave., 2nd Floor, El Segundo, CA 90245, U.S.A. Phone: (1)800-249-7730 (Toll free) : (1)310-955-5300 (Main) Fax: (1)310-955-5400
CONFIDENTIAL
2
EUROPE EPSON EUROPE ELECTRONICS GmbH HEADQUARTER Riesstrasse 15, 80992 Munich, Germany Phone: (49)-(0)89-14005-0 Fax: (49)-(0)89-14005-110
http://www.epson-electronics.de Düsseldorf Branch Office Altstadtstrasse 176, 51379 Leverkusen, Germany Phone: (49)-(0)2171-5045-0 Fax: (49)-(0)2171-5045-10
E .E .G .
E .C .C . E .H .K . S .Z .E . E .K .O . E .T .T . E.P .P .I . E.P.M . E .S .P . E .E.A.
Se n da i H ino -sh i,T o kyo Na g oya O s aka
In a P la nt
UK & Ireland Branch Office Unit 2.4, Doncastle House, Doncastle Road, Bracknell, Berkshire RG12 8PE, England Phone: (44)-(0)1344-381700 French Branch Office Fax: (44)-(0)1344-381701
101 Virginia St., Ste. 290, Crystal Lake, IL 60014, U.S.A. Phone: (1)800-853-3588 (Toll free) : (1)815-455-7630 (Main) Fax: (1)815-455-7633
El Segundo Office
CONFIDENTIAL
3
XV-3500CB Specifications
- Best suited detect level and sensitivity for picture stabilize. - 2.7V to 3.3V operating voltage. - High stability detect angler rate with using quartz crystal vibration. - Ultra small package with detection axis perpendicular to a mounting side. - Excel in sustainable environmental capability with hermetic sealing. - Easily mount with no external parts. - Easily mount with small package. - Low power consumption. - Good drop shock resistance. 1) Absolute maximum rating
LP 915 Les Conquérants, 1 Avenue de l' Atlantique, Z.A. de Courtaboeuf 291976 Les Ulis Cedex, France Phone: (33)-(0)1-64862350 Fax: 050002_3
Gyro Sensor XV-3500CB Application manual
2006/6/20 EPSON TOYOCOM Corporation Design Dept. Device engineering team
CONFIDENTIAL
1
Notice The material is subject to change without notice. Any part of this material may not be reproduced or duplicated in any form or any means without the written permission of Seiko Epson. The information, applied circuit, program, usage etc., written in this material is just for reference. Seiko Epson does not assume any liability for the occurrence of infringing any patent or copyright of third party. This material does not authorize the license for any patent or intellectual copy rights. Any product described in this material may contain technology or the subject relating to strategic products under the control of the Foreign Exchange and Foreign Trade Law of Japan and may require an export license from the Ministry of International Trade and industry or other approval from another government agency. The products (except for some product for automotive applications) listed in this catalog are designed to be used with ordinary electronic equipment (OA equipment, AV equipment, communications equipment, measuring instruments etc). Seiko Epson does not assume any liability in case of products used in applications requiring high reliability or extreme safety conditions (such as aerospace equipment etc). When intending to use any of our products in automotive applications or applications other than ordinary electronic equipments as above, please contact our sales representatives in advance. Business area
