WNDR4300_快速安装指南(中文版)
NETGEAR 无线宽带路由器快速安装手册
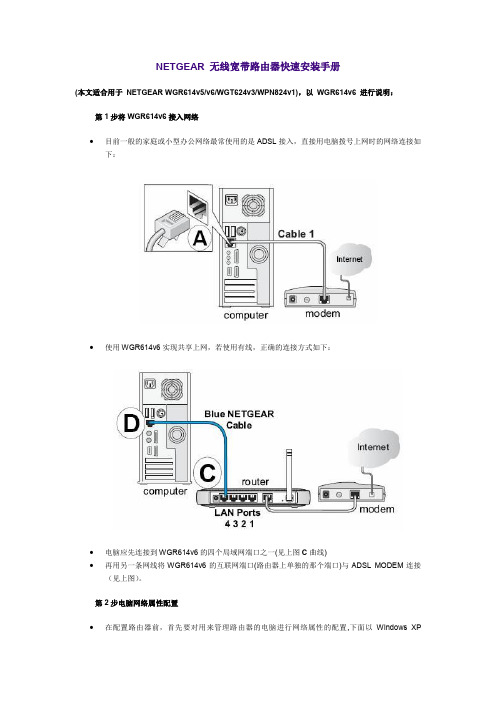
NETGEAR 无线宽带路由器快速安装手册(本文适合用于NETGEAR WGR614v5/v6/WGT624v3/WPN824v1),以WGR614v6 进行说明:第1步将WGR614v6接入网络∙目前一般的家庭或小型办公网络最常使用的是ADSL接入,直接用电脑拨号上网时的网络连接如下:∙使用WGR614v6实现共享上网,若使用有线,正确的连接方式如下:∙电脑应先连接到WGR614v6的四个局域网端口之一(见上图C曲线)∙再用另一条网线将WGR614v6的互联网端口(路由器上单独的那个端口)与ADSL MODEM连接(见上图)。
第2步电脑网络属性配置∙在配置路由器前,首先要对用来管理路由器的电脑进行网络属性的配置,下面以Windows XPHome Edition Service Pack 2为例来说明电脑的配置过程:2.1. 启动电脑,右键单击桌面或“开始”中的“网上邻居”选“属性”,右键单击“本地连接”选“属性”,选中“Internet协议(TCP/IP)”,点击“属性”:2.2. 将电脑设为“自动获得IP地址”,“自动获得DNS服务器地址”点击“确定”:第3步登录路由器3.1. 确保电脑已按照第一步所述通过有线连接到路由器的四个LAN口之一,启动路由器。
3.2. 打开电脑的Internet Explorer或者Netscape Navigator等其他浏览器,在浏览器的地址栏键入http://192.168.1.1/basicsetting.htm后回车:『注』初次设置路由器须按以上步骤,以后管理路由器或者更改配置,只需要在IE浏览器中输入192.168.1.1,此时路由器会要求提供用户名和密码。
登录路由器用户名:admin,密码:password,都是小写:默认进入的页面是”基本设置”页面,如图:『注意』无论您的宽带采用何种接入方式,都须先通过有线方式连接到路由器,在基本设置页面中进行相应的设置,完成后无线收发功能才会开启,才可使用无线连接。
网件WNDR4300如何更新固件.doc
网件WNDR4300如何更新固件,固件不可混用。
如WGR614v9不可使用WGR614v10的固件进行升级,请务必确认设备的型号及硬件版本号,选择正确的固件。
第二步、登录到设置界面(1)、打开电脑上的浏览器,在地址栏中输入:或 然后回车。
浏览器中输入设置地址(2)、在弹出的对话框中,用户名输入:admin;密码输入:password点击确定输入用户名和密码登录到NETGEAR设置界面第三步、查看当前NETGEAR路由器的固件版本在路由器管理界面查询当前固件版本,以确认或制定您的固件升级计划。
NETGEAR的固件编号往往是升序的,对同一款硬件设备来说,其固件的数字标号越大,表示固件越新,例如对于R6300这款路由器来说,固件V1.0.2.38要新于V1.0.2.26。
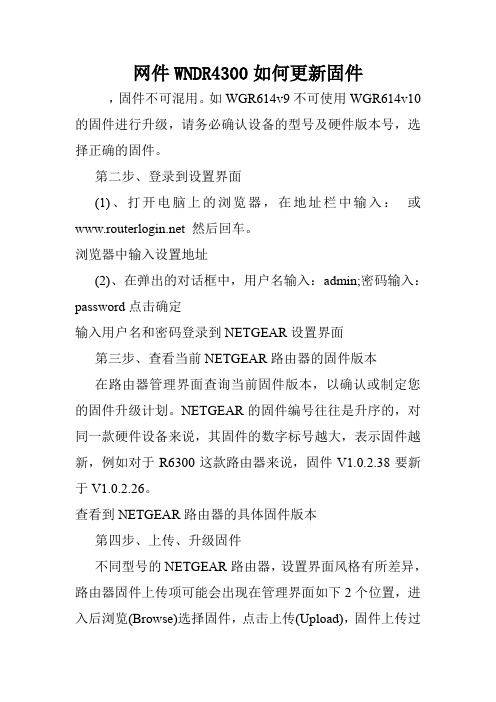
查看到NETGEAR路由器的具体固件版本第四步、上传、升级固件不同型号的NETGEAR路由器,设置界面风格有所差异,路由器固件上传项可能会出现在管理界面如下2个位置,进入后浏览(Browse)选择固件,点击上传(Upload),固件上传过程大约1-3分钟,待进度条完成,重新查看固件版本,如果当前固件版本与计划升级固件版本一致即表示固件上传成功。
1、维护路由器升级(MaintenanceRouter Upgrade)在维护路由器升级选项下,上传NETGEAR路由器固件,进行升级2、高级管理路由器升级(ADV ANCEDAdministrationRouter Update)在高级管理路由器升级选项下,上传NETGEAR路由器固件,进行升级注意问题:(1)、一定要用网线连接电脑与NETGEAR路由器,千万不要使用笔记本,在用wifi连接到NETGEAR路由器的情况下来升级。
(2)、升级过程中请耐心等待、切勿擅自中断!(3)、大部分型号的NETGEAR路由器的固件升级,这个过程是可逆的,使用新版固件设备亦可通过同种方式降级到较低版本。
但也有少数设备或固件的升级过程是单向的,请仔细阅读固件说明。
4300用户手册

多功能打印机
用户指南
想象无穷,可能无限
感谢您购买 Samsung 产品。要享受更完善的服务,请在
/global/register
上注册您的产品。
© 2008 Samsung Electronics Co., Ltd. 保留所有权利。 本手册仅用于提供信息。本手册中的信息如有变更,恕不另行通知。 Samsung Electronics 对因本手册的使用引起的、或与本手册的使用相关的变更不负任何责任(无论 是直接的还是间接的) 。 • SCX-4300 是 Samsung Electronics Co., Ltd. 的型号名称。 • Samsung 和 Samsung 徽标是 Samsung Electronics Co., Ltd. 的商标。 • IBM 和 IBM PC 是国际商用机器公司的注册商标。 • PCL 和 PCL 6 是 Hewlett-Packard company 的商标。 • Microsoft、 Windows、 Windows 2000、 Windows XP 和 Windows Vista 是 Microsoft Corporation 的注册商标。 • TrueType、 LaserWriter 和 Macintosh 是 Apple Computer, Inc 的商标。 • 所有其他品牌和产品名称均为其各自所属公司和组织的商标。
目录
1. 介绍
特殊功能 ............................................................................................................................................................... 1.1 了解组件位置 ........................................................................................................................................................ 1.2
NETGEAR 智能交换机安装指南说明书
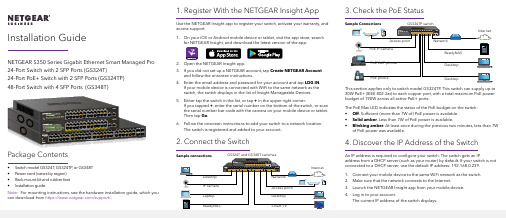
1. Register With the NETGEAR Insight AppUse the NETGEAR Insight app to register your switch, activate your warranty, and access support.1. On your iOS or Android mobile device or tablet, visit the app store, searchfor NETGEAR Insight, and download the latest version of the app.2. Open the NETGEAR Insight app.3. If you did not set up a NETGEAR account, tap Create NETGEAR Accountand follow the onscreen instructions.4. Enter the email address and password for your account and tap LOG IN .24-Port Switch with 2 SFP Ports (GS324T)24-Port PoE+ Switch with 2 SFP Ports (GS324TP) 3. Check the PoE StatusNETGEAR, Inc.350 East Plumeria DriveSan Jose, CA 95134, USA NETGEAR INTL LTDBuilding 3, University Technology Centre Curraheen Road, Cork, Ireland© NETGEAR, Inc., NETGEAR and the NETGEAR Logo are trademarks of NETGEAR, Inc. Any non‑NETGEAR trademarks are used for reference purposes only.SupportThank you for purchasing this NETGEAR product. You can visithttps:///support/ to register your product, get help, access the latest downloads and user manuals, and join our community. We recommend that you use only official NETGEAR support resources.Si ce produit est vendu au Canada, vous pouvez accéder à ce document en français canadien à https:///support/download/.(If this product is sold in Canada, you can access this document in Canadian French at https:///support/download/.)For regulatory compliance information including the EU Declaration of Conformity, visit https:///about/regulatory/.See the regulatory compliance document before connecting the power supply.Do not use this device outdoors. If you connect cables or devices that are outdoors to this device, see https:///000057103 for safety and warranty information.November 20185. Configure the SwitchWe recommend that you use a web browser on a computer or tablet to configure the switch.Note: If your computer is a Mac, use the NETGEAR Switch Discovery Tool, as described in the following section.1. Open a web browser from a computer or tablet connected to the samenetwork as your switch.You can use a WiFi or wired connection. 2. Enter the IP address of the switch.3. Enter the password.The default password is password . We recommend that you change the password to a more secure password.4. Click the Login button.Other Discovery and Configuration MethodsThe NETGEAR Switch Discovery Tool and the Smart Control Center Utility let you discover the IP address and configure the switch. •NETGEAR Switch Discovery Tool . You can use a Mac or a 64-bit Windows-based computer that is on the same network as the switch. You can use a WiFi or wired connection. When you discover the switch, this tool provides access to the local browser interface to c onfigure the switch. To download the NETGEAR Switch Discovery Tool, visit/support/product/netgear-switch-discovery-tool.aspx .•Smart Control Center Utility . You can use a Windows-based computer that is on the same network as the switch. This utility requires Adobe Air. If Adobe Air is not detected during Smart Control Center Utility installation, you are prompted to allow Adobe Air to be installed. To download this utility, visit /support/product/SCC .Note: If you cannot discover or configure the switch, you might need totemporarily disable the firewall, Internet security, or antivirus programs. Make sure to reenable these security services after you discover and configure the switch.PoE ConsiderationsThe PoE and PoE+ power supplied by the GS324TP switch is prioritized inascending port order (from port 1 to port 24), with a total power budget of 190 watts. If the power requirements for the attached powered devices (PDs) exceed the total power budget of the switch, the PD on the highest-numbered port is disabled to make sure that the PDs that are connected to the higher-priority, lower-numbered ports are supported first.The following table describes the PoE classes and switch allocations.Device ClassStandard ClassDescriptionPowerReserved by the DevicePower Delivered to the Device*0PoE and PoE+Default power (full)15.4W 0.44W–12.95W 1PoE and PoE+Very low power 4.0W 0.44W–3.84W 2PoE and PoE+Low power 7.0W 3.84W–6.49W 3PoE and PoE+Mid power 15.4W 6.49W–12.95W 4PoE+ onlyHigh power30.0W12.95W–25.5W* Calculated with the maximum cable length of 328 feet (100 meters). Shorter cable lengths will provide power closer to the power reserved by the switch.。
N750 WiFi 路由器模拟 WNDR4300v2 1 初始设置指南说明书

N750 WiFi Router1. Attach the router stand tothe router.Orient the router vertically.Insert the tabs of the stand into the slots on the bottom of your router.2. Prepare and connect yourmodem.Unplug your modem’s power. If your modem uses a battery backup, remove the battery.Plug in your modem. If your modem uses a battery backup, put the battery back in. Then4. Connect a device.Use an Ethernet cable to connect your computer to a LAN port on the router.You can also use WiFi to connect your WiFi device to the router. To connect with WiFi, use the WiFi network 5. Log in to the router.Launch a web browser.NETGEAR genie displays.If you do not see genie, enter in the address field of the web browser. When prompted, enter admin for the user name and password for the password.Follow the genie steps to connect to the Internet.6. Get the genie app.Download the free genie app from /genie.Easily share media, files, and printers on the network from your smartphone, tablet, or laptop.3. Power on the router .Wait for the Power LEDto light solid green. If the Power LED does not light, press the Power On/Off button.Wait for the 2.4 GHz LEDto light solid green.Modem(varies by region)RouterPower adapterRouter standOctober 2014NETGEAR, Inc.350 East Plumeria Drive San Jose, CA 95134, USANETGEAR, the NETGEAR logo, and Connect with Innovation are trademarks and/or registered trademarks of NETGEAR, Inc. and/or its subsidiaries in the United States and/or other countries.Information is subject to change without notice. © NETGEAR, Inc. All rights reserved.WiFi Network Name and PasswordThe preset WiFi network name (SSID) and password (network key) are unique to your router, like a serial number. Because the router automatically uses WiFi security, you don’t need to set it up. The WiFi settings are on theproduct label.NETGEAR recommends that you use the preset WiFi settings because you can check the label if you forget them. NETGEAR genie lets you change these settings. If you do so, write down the new WiFi settings and store them in a safe place.Find the preset WiFi settings on your router and record them here:WiFi network name (SSID)Network key (password)If you change the WiFi settings, write the new settings here for easy reference and store this booklet in a safe place.WiFi network name (SSID)Network key (password)Join the WiFi NetworkTo connect your computer or WiFi device (such as a smartphone or gaming device) to your router’s WiFi network, you can use either the manual method or the Wi-Fi Protected Setup (WPS) method.Manual Method1. Open the software utility that manages your WiFi connections on thecomputer or WiFi device that you want to connect to your router.This utility scans for all wireless networks in your area.2. Find and select your router’s WiFi network name (SSID).The SSID is on the product label.3. Enter the router’s password (or your custom password if you changedit) and click the Connect button.The password is on the product label.4. Repeat Step 1 through Step 3 to add other computers or WiFi devices.WPS MethodIf your computer or WiFi device supports WPS, you can use WPS to join the modem router’s WiFi network. For help with the WPS button on your computer or WiFi device, check the instructions or online help that came with that computer or WiFi device. Some older equipment cannot use WPS.Note: WPS does not support WEP security. If you are using WEP security, use the manual method.1. Press the WPS button2. Within two minutes, on your computer or WiFi device, press its WPSbutton or click its onscreen WPS button.The computer or WiFi device connects to your router’s WiFi network.3. Repeat this process to add other computers or WiFi devices to thenetwork.SupportThank you for purchasing this NETGEAR product.After installing your device, locate the serial number on the label of your product and use it to register your product at https:// . You must register your product before you can use NETGEAR telephonesupport. NETGEAR recommends registering your product through the NETGEAR website. For product updates and web support, visit .NETGEAR recommends that you use only the official NETGEAR support resources.You can get the user manual online at or through a link in the product’s user interface.For the current EU Declaration of Conformity, visit/app/answers/detail/a_id/11621/.For regulatory compliance information, visit /about/regulatory/.See the regulatory compliance document before connecting the power supply.。
NETGEAR ProSAFE Managed Switches M4300 Series安装指南说

InstallationNETGEAR ProSAFE Managed Switches M4300 Series• If the Power LED does not light at all, check to see that the power cable is plugged in correctly and that the power source is functioning.If this action does not resolve the problem, see the troubleshootingsection of the hardware installation guide for more information.3. Connect devices to the switch.We recommend using the following cables and SFP modules:• Use a Category 5e (Cat 5e) cable for a copper port at 1 Gbps and a Category 6a (Cat 6a) cable for a copper port at 10 Gbps.• Use a NETGEAR AGM734 for a copper port at 1 Gbps.• Use a NETGEAR AGM731F or AGM732F for a fiber port at 1 Gbps.• Use a NETGEAR AXM761, AXM762, or AXM764 for a fiber port at10 Gbps.• Use a NETGEAR AXC761 (1 m) or AXC763 (3 m) cable for a fiber port. Note: If purchased, SFP modules and cables are shipped separately. For more information about installing an SFP module, see the hardware installation guide. Perform the Initial ConfigurationYou can access the switch through the out-of-band (OOB) port (which is also referred to as the service port), through a console port, or through any Ethernet network port. By default, the switch functions as a DHCP client. To configure the IP address of the switch, use one of the following methods:• Web management interface. Use the web management interface through the OOB port or any Ethernet network port (see Use the Web Management Interface for Initial Configuration).• CLI. Use the CLI through the mini USB console port or RJ-45 RS232 console port. You can configure the IP address manually or use theezconfig utility (see Use the CLI for Initial Configuration).• DHCP server. Connect a DHCP server through the OOB port or through any Ethernet network port and find the assigned IP address(see Find the IP Address Assigned by a DHCP Server).Set Up the SwitchPrepare the installation site so that mounting, access, power source, and environmental requirements are met. For more information about these requirements, see the hardware installation guide on the resource CD.¾To set up the switch:1. Install the switch using one of the following methods:• On a flat surface. Attach one of the rubber footpads that came with the switch on each of the four concave spaces on the bottomof the switch.• In a rack. Use the rack-mount kit that is supplied with your switch, following the installation instructions in the hardware installationguide.2. Apply AC power.The Power LED lights solid yellow while the switch conducts a power-on self-test (POST). After the switch passes the POST, the Power LED lights solid green, and the switch is functional. If the Power LED does not light green, see the following troubleshooting tips:• If the POST fails, the Power LED remains solid yellow. See the troubleshooting section of the hardware installation guide for moreinformation.After you configure or find the IP address of the switch, you can configure the features of the switch through the web management interface or the CLI. Note: For more information about the tasks that are described in this installation guide, see the software setup manual on the resource CD.Use the Web Management Interface for Initial Configuration You can use a computer that functions in the same subnet as the switch to access the web management interface over the switch’s default IP address and assign another static IP address to the switch.¾To access the web management interface over the switch’s default IP address:1. Configure your computer with a static IP address:• For access over an Ethernet network port, use an IP address in the 169.254.100.0 subnet. For example, use 169.254.100.201.• For access over the OOB port, use an IP address in the 169.254.101.0 subnet. For example, use 169.254.101.201.2. Connect an Ethernet cable from an Ethernet port on your computer to anEthernet network port on the switch or to the OOB port on the switch.3. Launch a web browser such as Google Chrome, Mozilla Firefox, or MicrosoftInternet Explorer.4. Enter the default IP address of the switch in the web browser address field:• For access over an Ethernet network port, enter 169.254.100.100.• For access over the OOB port, enter 169.254.101.100.A login window displays.5. Enter admin for the user name, leave the password field blank, and click theLOGIN button. The System Information page displays.6. To configure the IP address of the switch, management interface, and OOBport, select System > Management, and select an option from the menu on the left.For information about using the web management interface, see the software administration manual and the web management user manual on the resource CD.January 2016NETGEAR, Inc.350 East Plumeria DriveSan Jose, CA 95134, USA© NETGEAR, Inc., NETGEAR and the NETGEAR Logo are trademarks of NETGEAR, Inc. Any non‑NETGEARtrademarks are used for reference purposes only.Use the CLI for Initial ConfigurationTo use the CLI for initial configuration and assign a static or dynamic IP address to the switch, connect a computer or VT100/ANSI terminal to one of the console ports on the switch.¾To configure the IP address manually or use the ezconfig utility: 1. Depending on the connector type at your computer or terminal and theport that you are using on the switch, use one of the following cables, both of which are included in the product package:• USB console cable for use with the mini USB console portNote: To use the mini USB port, you must install the USB driver onthe computer. (The Windows USB driver is on the resource CD.)• Console cable for use with the RJ-45 RS232 console port2. Connect one end of the cable to the appropriate port on the switch andconnect the other end to your computer or terminal.3. If you connect a computer to a console port on the switch, start aterminal emulation program:• On a computer with a Windows operating system, you can use HyperTerminal or Tera Term.• On a computer with a MAC operating system, you can use ZTerm.• On a computer with a Linux operating system, you can use TIP.4. If you connect a computer to a console port on the switch, configurethe terminal emulation program to use the following settings: baud rate, 115,200 bps; data bits, 8; parity, none; stop bit, 1; flow control, none.5. At the user prompt, log in to the switch using the user name admin andpress Enter. At the password prompt, do not type a password but press Enter.You can now use the CLI to manually configure the IP address of theswitch or continue with the next step and start the ezconfig utility.Note: For information about CLI management, see the CLI reference manual and the software administration manual on the resource CD.6. At the next command prompt, type ezconfig and press Enter.The ezconfig utility is now running on the switch.Netgear Switch) #ezconfigEZ Configuration Utility--------------------------------Hello and Welcome!This utility will walk you thru assigning the IP addressfor the switch management CPU. It will allow you tosave the changes at the end. After the session, simplyuse the newly assigned IP address to access the Web GUIusing any public domain Web browser.Admin password is not defined.Do you want to assign the admin password (passwordlength must be in range of 8 - 64 characters) (Y/N/Q)? yEnter new password:********Confirm new password:********7. Using ezconfig, set up the basic switch configuration, including a staticIP address and subnet mask.8. Use the switch IP address that is set up by ezconfig to log in to theswitch’s web management interface.Find the IP Address Assigned by a DHCP ServerBy default, the switch is configured as a DHCP client to obtain its IP addressfrom a DHCP server in the connected network. To find the assigned IPaddress of the switch’s management interface or OOB port, connect acomputer or VT100/ANSI terminal to one of the console ports on the switch.¾To find the IP address that is assigned by a DHCP server:1. Make sure that the switch is connected to a DHCP server.2. Set up a console connection with the switch.For information about setting up a console connection, see Steps 1through 5 in Use the CLI for Initial Configuration. After you are logged inand at the CLI command prompt, continue with the next step.3. At the command prompt, type one of the following commands:• To find the IP address of the management interface, enter theshow ip management command, and press Enter.• To find the IP address of the OOB port (which is also referred to as theservice port), enter the show serviceport command, and press Enter.The active IP address displays.4. Use either the management interface IP address or the OOB port IP addressto log in to the switch’s web management interface.Log In to the Web Management InterfaceManage the features of your switch through the web management interfacewith the appropriate IP address for your configuration.¾To log in to the switch’s web management interface:1. Enter http://<ipaddress> in the web browser address field.A login window displays.2. Enter admin for the user name, leave the password field blank, and click theLOGIN button.The System Information page displays. You can now navigate from this pageto other pages and configure your switch.For information about using the web management interface, see the softwareadministration manual and the web management user manual on the resource CD.SupportThank you for purchasing this NETGEAR product. You can visit/support to register your product, get help, access the latestdownloads and user manuals, and join our community. We recommend that you use onlyofficial NETGEAR support resources.For the current EU Declaration of Conformity, visit/app/answers/detail/a_id/11621/.For regulatory compliance information, visit/about/regulatory/.See the regulatory compliance document before connecting the power supply.。
NETGEAR M4300 智能边缘系列全网管可堆叠交换机安装指南说明书

安装指南3. 连接设备到交换机。
我们建议使用以下线缆和 SFP 模块(如果适用):• 对于 1 Gbps 的铜制端口,请使用超五类 (Cat 5e) 线缆;对于 10 Gbps 的铜制端口,请使用超五类或更高等级(Cat 5e、Cat 6、Cat 6a 或 Cat 7)线缆。
• 对于 1 Gbps 的铜制端口,请使用 NETGEAR AGM734。
• 对于 1 Gbps 的光纤端口,请使用 NETGEAR AGM731F 或 AGM732F。
• 对于 10 Gbps 的光纤端口,请使用 NETGEAR AXM761、AXM762 或AXM764。
• 对于光纤端口,请使用 NETGEAR AXC761(1 米)、AXC763(3 米)、AXC765(5 米)AXC767(7 米)、AXC7610(10 米)、AXC7615(15 米)或 AXC7620(20 米)线缆。
注意:如已购买,SFP 模块和线缆会单独发货。
有关安装 SFP 模块的更多信息,请参见硬件安装指南。
2. 配置交换机的 IP 地址可以通过带外 (OOB) 端口(也称为服务端口)、控制端口或以太网网络端口访问交换机。
默认情况下,交换机作为 DHCP 客户端工作。
要配置交换机的 IP 地址,请使用以下方法之一:• 基于本地浏览器的管理界面。
使用本地浏览器界面通过 OOB 端口或任何以太网网络端口(请参见使用本地浏览器界面配置 IP 地址)。
• CLI。
通过 mini USB 控制端口或 RJ-45 RS232 控制端口使用命令行界面 (CLI)。
您可以手动配置 IP 地址或使用 ezconfig 实用程序(请参阅使用 CLI 配置 IP 地址)。
注意:DHCP 服务器。
通过 OOB 端口或任何以太网网络端口连接 DHCP 服务器,然后查找分配的 IP 地址(请参阅查找 DHCP 服务器分配的 IP 地址)。
配置或找到交换机的 IP 地址后,可以通过本地浏览器管理界面或 CLI 配置交换机的功能。
wndr4300从dd-wrt刷回原厂固件的方法
Wndr4300 从dd-wrt刷回原厂固件的方法
1.下载ubuntu,使用虚拟机或U盘制作引导系统,进入ubuntu,选择使用ubuntu。
2.运行terminal,安装tftp,命令是:sudo apt-get install tftp-hpa 或者在软件中心搜索tftp,安装tftp-hpa。
3.固件保存在home下;
4.路由器接通电源,进入tftp模式:接通电源后,一直按reset按钮,直到绿灯闪烁。
5.网络disable无线,打开有线。
6.终端terminal依次输入
sudo ifconfig eth0 192.168.1.2
sudo arp -s 192.168.11.1 02:AA:BB:CC:DD:20 #必需是这个mac地址,可加冒号也可不加。
cd到固件的目录,如在home下,则是cd /home/ubuntu
继续输入tftp 192.168.1.1
进入tftp模式
依次输入
tftp> verbose
tftp> binary
tftp> trace
tftp> rexmt 1
tftp> timeout 60
tftp> connect 192.168.1.1
tftp> put xxxx.bin #xxxx表示固件名称。
然后传输完毕等待重启即可。
NETGEARWNR3500快速安装指南.

NETGEARWNR3500迅速安装指南感谢您选择NETGEAR企业的11n系列路由器WNR3500,以下将介绍该路由器的安装使用方法。
共包括两部分:基本的上网设置和无线安全设置及连结。
第1部分基本的上网设置1.1WNR3500的指示灯及接口说明电源灯WAN口指示灯无线指示灯LAN口指示灯WPS按键电源接口WAN口LAN口复位键顶部无线灯开关指示灯状态描绘绿色电源已接通电源灯不亮未接电源;适配器也许路由器破坏绿色连结到宽带,并获得到IP地址WAN口指示灯橙色连结到宽带,没获得到IP地址不亮未连结到宽带蓝色无线功能已启用无线指示灯不亮无线功能未开启绿色连结到1000Mbps的终端LAN口指示灯橙色连结到100/10Mbps的终端(数字1.2.3.4)不亮未连结任何设施WPS按键用于无线的WPS连结接口描绘电源接口连结电源(输出12V,1.5A),为路由器供电WAN口(黄色口)连结ADSLModem或其他宽带LAN口(橙色口)连结电脑等终端设施复位键按住复位键15s,清空路由器设置,恢复到出厂值(红色圆形小孔)无线开关翻开/封闭路由器顶部的8个无线指示灯1.2将WNR3500接入网络①若您的宽带是ADSL/CableModem接入,连结方式以以下列图:②若您的宽带是直接入户,没有Modem,则计算机连结到路由器的LAN口后,本来营运商供给的连结计算机的网线应直接连结到路由器的WAN口。
【注】:完成上述连结并启动Modem及路由器后,请检查路由器面板的指示灯。
若正确连结,电源指示灯、WAN口指示灯、无线指示灯及对应的LAN口指示灯均发亮。
.3计算机设置WNR3500是鉴于阅读器管理的设施,计算机可经过阅读器进入路由器的管理界面对其进行配置管理,但第一计算机的有关设置必定正确。
下面以WindowsXPServicePack2为例来说明计算机的配置过程:1)电脑当地连结配置:启动计算机,右键单击“网上邻居”“属性”(可在桌面或开始菜单中找到网上邻居),右键单击“当地连结”“属性”,选中“Internet协议(TCP/IP)”“属性”;将计算机设为“自动获得IP地址”,“自动获得DNS服务器地址”,点击“确定”。
PT-R8600及4300操作规范
PT-R8600/4300操作规范PT-R8600/4300环境要求环境要求:21度-25度,最佳温度为 23度相对湿度:50%-70%封闭环境:无粉尘环境空间:450-500mm(宽)、650-700mm(长),空间不宜过大,过大空间温度难以控制。
(建议)电压要求:220V 32A不间断电源(UPS):必须配件 UPS 10KV网屏PT-R8600/4300为精密电脑制版设备,对环境要求比较高,温度过高、及粉尘过大,对激光的影响非常大,直接会影响到激光的使用寿命。
请各位网屏用户一定要注意环境要求的控制。
建议:1.客户机房安装一个温湿度计,随时监控室内温度及湿度。
2.建议客户CTP制版设备+冲版设备单独放置一个空间,并且空间密封。
可以有效的控制室内温度及防止小动进入损坏机器。
3.为防止小动物(如老鼠)进入机器损坏设备,建议要做好防止小动物进入装置。
4.建议客户为防止粉尘,机房内尽可能不要太多人进出,并且能用专用鞋子,以免外人进入鞋底带入粉尘。
5.网屏CTP为精密直接制版设备,需要定期进行保养,如清理激光光路(需专业工程师处理),定期检查各运作功能,检查及调校滚轴压力,滚轴齿轮及轴承清洁及加油等。
注明:环境的好坏直接影响机器使用的寿命,请各位CTP设备用户一定要注重设备的使用环境一、PT-R8600/4300主机保养A开机操作1.开启空调,确认温度在23度。
2.开启电闸总开关,开启并确认UPS输出电压稳定于220V。
3.开启CTP的电源的开关。
此时PT-R8600/4300显示屏上显示“START”,点按“START”,进入ONELINE状态。
4.开启DELL服务器,开机完成。
5.开启冲版机总电源,待温度达到后,再进行出版。
B、关机操作6.出版完成后,到ONLINE状态下关掉PT-R8600SL电源开关7.关掉PT-R8600/4300总闸,关闭冲版机及冲版机总闸。
8.关闭服务器,关机完成。
C、保养1.上版平台皮带和不锈钢台面清洁2.下版平台和不锈钢台面清洁3.拆开下版平台,底下两条胶棍轴清洁和检查有无版边位置的磨损。
NETGEAR路由器设置以和快速安装的指南(超详细)

NETGEAR路由器设置以及快速安装指南第一章将MR814接入网络产品图示MR81411M无线宽带路由器与Cable/DSL连接图示与Cable/DSL连接图示TOP第二章进入 MR814 的配置界面在完成了MR814与电脑的连接后.开始进行MR814的配置.首先要通过与MR814连接的电脑进入MR814。
下面首先配置与MR814连接的电脑,使其与MR814相连的网卡配置为自动获取IP地址。
以下以windows XP 操作系统为例来说明电脑的配置过程:A.单击“网络邻居”按右键.在弹出的菜单中选“属性”.单击“本地连接”按右键.在弹出的菜单中选“属性”.然后在“此连接使用下列项目”中选中“Internet协议(TCP/IP)”.最后点击“属性”。
如图:图2-1连接属性B.在新弹出的框图中将电脑的IP地址设为“自动获得IP地址”.然后“确定”.如下图:图2-2自动获得IP地址C.在Internet Explorer或者Netscape Navigator浏览器的地址栏键入http://192.168.0.1以连接路由器(MR814出厂IP地址是192.168.0.1):图2-3 输入MR814管理IP地址D.出于安全需要.路由器有自己的用户名和密码。
一旦连接成功会弹出如下登录提示.输入路由器用户名:admin.以及密码:password.都是小写:图2-4 登录MR814这里特别要说明的是.在实际操作中.往往会出现这种情况——在IE中输入了路由器的IP并回车后没有路由器的登录提示(图2-3 登录MR814)弹出。
出现这一现象极有可能是您的电脑没有获得与路由器在同一网段的IP地址。
因为MR814具有给连接到它的LAN口的电脑自动分配IP的功能.前面的将您的电脑设置为自动获得IP的目的即在于让它从路由器那里得到一个与路由器同一网段的IP地址.以便电脑能访问路由器。
您可以通过以下的操作确认电脑是否获得了IP.并可了解到如果没有获得IP该如何解决这一问题。
RDG8600智慧路灯边缘计算网关产品使用说明书

产品使用说明书产品名称:RDG8600智慧路灯边缘计算网关文件编号:2021-5-25版本编号:V1.0.1目录第一章产品简介 (4)1.1产品概述 (4)第二章安装 (5)2.1概述 (5)2.2 装箱清单 (5)2.3安装与电缆连接 (5)2.4电源说明 (9)2.5指示灯说明 (10)2.6复位按钮说明 (10)第三章参数配置 (11)3.1 配置连接图 (11)3.2 登录到配置页面 (11)3.2.1 PC机IP地址设置(两种方式) (11)3.2.2登入到配置页面 (12)3.3 管理和配置 (14)3.3.1设置 (14)3.3.1.1基本设置 (14)3.3.1.2动态DNS(DDNS) (19)3.3.1.3MAC地址克隆 (20)3.3.1.4高级路由 (20)3.3.1.5VLANs (22)3.3.1.6网络 (23)3.3.2无线 (25)3.3.2.1基本配置 (25)3.3.2.2无线安全 (28)3.3.3服务 (30)3.3.3.1服务 (30)3.3.4VPN (32)3.3.4.1PPTP (32)3.3.4.2L2TP (33)3.3.4.3OPENVPN (34)3.3.4.4IPSEC (39)3.3.4.5GRE (41)3.3.5安全 (42)3.3.5.1防火墙 (42)3.3.6访问限制 (44)3.3.6.1WAN访问 (44)3.3.6.2URL过滤 (47)3.3.6.3数据流过滤 (47)3.3.7NA T (48)3.3.7.1端口转发 (48)3.3.7.2端口范围转发 (49)3.3.7.3DMZ (49)3.3.8QoS设置 (50)3.3.8.1基本 (50)3.3.8.2分类 (50)3.3.9应用 (51)3.3.9.1通信网关应用 (51)3.3.10管理 (54)3.3.10.1管理 (54)3.3.10.2保持活动 (55)3.3.10.3命令 (56)3.3.10.4出厂默认 (56)3.3.10.5固件升级 (57)3.3.10.6备份 (57)3.3.11状态 (58)3.3.11.1智能网关 (58)3.3.11.2WAN (59)3.3.11.3LAN (62)3.3.11.4无线 (64)3.3.11.5宽带 (66)3.3.11.6系统信息 (67)附录 (70)第一章产品简介1.1产品概述RDG8600智慧路灯边缘计算网关是一种物联网无线智能网关,利用公用无线网络为用户提供协议集成和无线长距离数据传输功能。
网件快速导览手册说明书

USER’S MANUAL快速導覽手冊NEXT GENERATION NETWORK━IP PHONEz網路線一條z電話線一條 (MODEM機型才提供)。
z說明書一本安裝示意圖步驟1:取出 IP PHONE話筒與機身,然後將話筒線連接至話機左方插孔。
若使用乙太網路上網,請取出網路線連至話機之網路(WAN)接孔與家中上網設備(如:NAT、HUB、ADSL、CABLE)。
步驟2:若使用內建之數據機撥接上網(MODEM機型才提供此功能),則將電話線接到電話插孔。
步驟3:將包裝物所含之變壓器接上電源,然後將變壓器接上話機之電源接口。
檢查IP Phone之LCD螢幕,首先顯示“Starting……."字樣,約莫3秒後就會進入Hi (XXX)畫面。
1.燈號振鈴時同時亮起。
2.LCD面板螢幕顯示。
3.UP、DOWN瀏覽功能。
4.✚OUT VOL━調整發出音量。
5.✚IN VOL━調整接收音量。
6.SPEAKER 免持撥號。
7.HOLD 通話保留鍵。
8. NET 查看網路狀況。
9.MESSAGE 預留為升級用。
10.MENU/OK 進入功能目錄,選取選項。
11.CANCEL 在MENU下,按此鍵可回上一層。
12.TXT⇔NUM 文字與數字切換鍵。
13.TRANSFER 通話中轉接。
14.RE/DIAL(MODEM) 重撥上次號碼或作為撥號完成後之發送鍵。
此鍵也是MODEM機型系列內建數據機撥接上網用之撥接鍵。
(MODEM機型才提供此功能)。
15.10組快速撥號快速撥號。
16.PhoneBook PhoneBook快速鍵(含快速撥號共50組)。
Modem On 使用IP PHONE內建式撥接數據機撥號連線(MODEM機型才提供此功能)。
Configure ►輸入密碼:135 ► Network ► (Yes/No) Modem Onz使用此方式時,(Yes/No) Modem On請設定為Yes。
z Dial Number 輸入撥接電話號碼。
Netgear Smart Switch 系列快速安装指南说明书
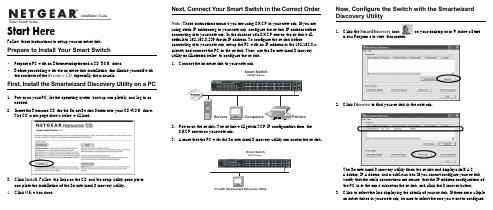
Follow these instructions to set up your smart switch. Prepare to Install Your Smart Switch•Prepare a PC with an Ethernet adapter and a CD ROM drive.•Before proceeding with the smart switch installation, familiarize yourself with the contents of the Resource CD, especially the manuals.First, Install the Smartwizard Discovery Utility on a PC 1.Power on your PC, let the operating system boot up completely, and log in asneeded.2.Insert the Resource CD for the Smart Switch Series into your CD-ROM drive.The CD main page shown below will load.3.Click Install. Follow the links on the CD and the setup utility prompts tocomplete the installation of the Smartwizard Discovery utility.4.Click OK when done. Next, Connect Your Smart Switch in the Correct OrderNote: These instructions assume you are using DHCP in your network. If you areusing static IP addressing in your network, configure the switch IP address beforeconnecting it to your network. In the absence of a DHCP server, the switch willdefault to 192.168.0.239 for its IP address. To configure the switch beforeconnecting it to your network, set up the PC with an IP address in the 192.168.0.xsubnet, and connect the PC to the switch. Then, use the Smartwizard Discoveryutility as illustrated below to configure the switch.1.2.Power on the switch. The switch will get its TCP/IP configuration from theDHCP server on your network.3. Assure that the PC with the Smartwizard Discovery utility can a cc ess the switch.Now, Configure the Switch with the SmartwizardDiscovery Utility1.Click the SmartDiscovery icon on your desktop or in Windows Startmenu Programs to view this screen.2.Click Discover to find your switch in the network.The Smartwizard Discovery utility finds the switch and displays its MACAddress, IP Address, and model number. If you cannot configure your switch,verify that the cable connections are secure, that the IP address configuration ofthe PC is in the same subnet as the switch, and click the Discover button.3.Click to select the line displaying the details of your switch. If there are multiplesmart switches in your network, be sure to select the one you want to configure.August 2004。
HP xw4300 工作站 说明书

HP推荐企业使用Microsoft® Windows® XP Professional。
外形可转换(立式或桌面)、可机架安装的微塔式预装操作系统Microsoft® Windows® XP Professional x64 Edition(64 位)Microsoft® Windows® XP Professional SP2(32 位)或 Red Hat Enterprise Linux 工作站(仅限 64 位)i或 HP Installer Kit for Linuxi (包含用于Red Hat Enterprise Linux 3 的 32 位与 64 位版操作系统的驱动程序)驱动器英特尔®奔腾® 4 处理器 521ii / 2.80 GHz,1 MB,800 MHz FSB,EM64T i英特尔奔腾 4 处理器 531ii / 3.00 GHz,1 MB,800 MHz FSB,EM64T i英特尔奔腾 4 处理器 640ii / 3.20 GHz,2 MB,800 MHz FSB,EM64T i英特尔奔腾 4 处理器 650ii / 3.40 GHz,2 MB,800 MHz FSB,EM64T i英特尔奔腾 4 处理器 660ii / 3.60 GHz,2 MB,800 MHz FSB,EM64T i英特尔奔腾 4 处理器 670ii / 3.80 GHz,2 MB,800 MHz FSB,EM64T i双核心英特尔奔腾 D 处理器 840i / 3.2 GHz,2 MB 高速缓存(每个核心为 1 MB),800 MHz FSB,EM64T i仅上表中的单核心英特尔奔腾 4 处理器支持超线程技术iv前端总线1066 MHz芯片组英特尔 955X Express内存高达8 GB,DDR-2 533 MHz ECC(在05年下半年有2 GB DIMM模块可用)、DDR-2 667 MHz ECC(最大为4 GB)或 DDR-2 533MHz 非 ECC(最大为1 GB)扩展托架 3 个外置 5.25 英寸托架*,1 个外置 3.5 英寸托架,2 个内置 3.5 英寸托架* 第三个外置 5.25 英寸托架非全高驱动器控制器带 RAID 的集成 4 通道 SATA 3 Gb/s 控制器,可选的 Ultra320 SCSI 控制器/驱动器。
NETGEAR M5300 Router Setup Instructions说明书

If you still cannot connect to the router, verify your computer networking setup. It should be set to obtain both IP and DNS server addresses automatically, which isusually so. For help with this,please see the Reference Manual or animated tutorials.Then, when prompted, enter for the password, both in lower case letters.Netgear Product Registration, Support, and Documentation After completing the Smart Wizard configuration assistant, register your product at. Registration is required before you can use our Product updates and web support are always via a link in the router menu, and at:/products/WGR614v5.asp, via a link in the router menu, and at /documentation/WGR614v5.aspNow, Set Up a Computer for Wireless ConnectivityYou are now connected to the Internet and the wireless feature of the router is enabled!©2004 NETGEAR, Inc. NETGEAR, the Netgear logo, Auto Uplink, ProSafe and Everybody's connecting are trademarks or registered trademarks of Netgear, Inc. in the United States and/or other countries. Microsoft and Windows are registered trademarks of Microsoft Corporation in the United States and/or other countries. Other brand and product names are trademarks or registered trademarks of their respective holders. Information is subject to change without notice. All rights reserved.Make sure the network settings of the computer are correct•Ethernet cable and wirelessly connected computers must be configured to obtain IP and DNS addresses automatically via DHCP . For help with this, please see the animated tutorials on the Resource CD or the Reference Manual Appendix C on the Resource CD .•Some cable modem ISPs require you to use the MAC address of the computer registered on the account. If so, in the Router MAC Address section of theBasic Settings menu, select, “Use this Computer’s MAC Address.” The router will then capture and use the MAC address of the computer that you are now using. You must be using the computer that is registered with the ISP . Click Apply to save your settings. Restart the network in the correct sequence.Check the router status lights to verify correct router operation• If the Power light does not turn solid green within 2 minutes after turning the router on,reset the router according to the instructions in the Reference Manual on the Resource CD .•If the Wireless light does not come on, verify that the wireless feature is turned on according to the instructions in the Reference Manual on the Resource CD .Technical SupportPLEASE REFER TO THE SUPPORT INFORMATION CARD THAT SHIPPED WITH YOUR PRODUCT.By registering your product at /register , we can provide you with faster expert technical support and timely notices of product and software upgrades.。
WNDR4300_快速安装指南(中文版)

c. 设置完成后,点击画面上方的 应用保留您的设置。
若可以成功上网,请进行第四步 “ 预设无 线密码 ”。
若设置完毕,仍旧无法上网,请再次确认 所填信息是否准确无误。
2012 年 11 月
3. 采用动态 IP 地址上网的配置 方式
如果您直接使用电脑上网时,电脑 TCP/IP 设置 为自动获得 IP 和 DNS,且无需运行任何拨号或 连接程序,那么您就属于这种接入方式了。有 线电视(Cable)和部分小区宽带采用此种连接 方式,如:上海有线通、广州珠江宽频、深圳 天威视讯等。
第四步 预设无线密码
为了进一步确保无线网络的安全性,WNDR4300 在出厂时已随机预设了无线网络标识 (SSID) 及无 线密码,每台设备各不相同,具有唯一性。您可以不做任何改动、直接使用预设密码进行无线连 接,该信息请查看路由器背部的标签处,如下图所示:
标签中的 “SSID” 为 2.4GHz 无线网络标识,5GHz 无线网络标识默认在其后加 “-5G”,无线密码均 为标签所示。
IP 地址
211.100.28.181
子网掩码
255.255.255.0
网关地址
211.100.28.1
主域名服务器
202.96.128.86
从域名服务器
61.144.56.101
注意:IP 地址等信息必须由宽带运营商提供,表格中的地址仅为举例所用,用户设置时不可照此填写!
a. 选择菜单基本→因特网设置 b. 请按照如右示意图进行设置,
WNDR4300 ᘛ䙏ᆹ㻵ᤷই
感谢您选择 NETGEAR 公司的 N750 系列双频千兆无线路由器 WNDR4300,以下将介绍该路由器 的安装使用方法。只需 5 步即可完成全部设置,让您享受上网冲浪的乐趣。
第1章快速安装指南

第1章 快速安装指南1.1 快速安装指南1.1.1 管理软件配置本产品提供了管理软件,该软件将通过简单的步骤指导您快速完成新路由器的配置。
1. 双击EasySetupAssistant.exe,将出现下图1-1所示欢迎界面。
图1-1 欢迎界面2. 单击开始按钮,请根据提示安装路由器。
a. 连接路由器和电脑。
图1-2 连接路由器和电脑b. 单击下一步,连接路由器到互联网。
图1-3 连接路由器到互联网c. 单击下一步,连接电源。
图1-4 连接电源d. 单击下一步,请检查指示灯状态是否正常。
图1-5 LED指示灯描述☞注意:对照图1-5表中的指示灯状态,若指示灯状态显示正确,请单击下一步继续;否则,请检查您的路由器硬件连接是否正确。
e. 单击下一步,管理软件将帮助您检测路由器的连接。
图1-6 检测路由器的连接☞注意:这一步可能需要花费几分钟时间,请耐心等待。
f. 检测成功后,将出现如图1-7界面,单击下一步配置路由器。
图1-7 检测成功3. 配置路由器界面如图1-8所示,请根据提示配置您的路由器。
图1-8 选择上网方式a. 在图1-8中选择上网方式。
动态IP如果ISP(网络运营商)未提供任何IP网络参数,不用路由器时可直接上网,计算机不需要做任何设置,则选择动态IP。
路由器将从ISP服务器自动获取IP地址。
单击下一步,在图1-11中进行MAC地址克隆。
静态IP如果ISP(网络运营商)提供了固定IP地址、子网掩码、网关及DNS服务器,则选择静态IP。
单击下一步,在图1-9中输入IP地址、子网掩码、默认网关以及DNS服务器地址。
图1-9 静态IP参数配置IP地址:本路由器对广域网的IP地址,即ISP提供的IP地址,不清楚可以向ISP询问。
子网掩码:本路由器对广域网的子网掩码,即ISP提供的子网掩码,一般为255.255.255.0。
网关:填入ISP提供的网关参数,不清楚可以向ISP询问。
首选/备选DNS:填入ISP提供的DNS服务器地址,不清楚可以向ISP询问。
- 1、下载文档前请自行甄别文档内容的完整性,平台不提供额外的编辑、内容补充、找答案等附加服务。
- 2、"仅部分预览"的文档,不可在线预览部分如存在完整性等问题,可反馈申请退款(可完整预览的文档不适用该条件!)。
- 3、如文档侵犯您的权益,请联系客服反馈,我们会尽快为您处理(人工客服工作时间:9:00-18:30)。
首先找到复位按钮 (在路由器下盖底部红色圆孔中) ,然后将路由器接上电源并打开电源开关, 保持路由器在通电状态,用曲别针或其他尖状物按住复位按钮,持续约 5 秒钟,看到电源灯闪烁 再松手,待路由器面板的电源灯由橘红色变为绿色即可。 注意:该操作会将路由器现有的配置清空,完全恢复到出厂状态。请谨慎操作!
并将运营商提供的 IP 地址、子 网掩码等信息输入,如右图。
c. 设置完成后,点击画面上方的 应用保留您的设置。
若可以成功上网,请进行第四步 “ 预设无 线密码 ”。
若设置完毕,仍旧无法上网,请再次确认 所填信息是否准确无误。
2012 年 11 月
3. 采用动态 IP 地址上网的配置 方式
如果您直接使用电脑上网时,电脑 TCP/IP 设置 为自动获得 IP 和 DNS,且无需运行任何拨号或 连接程序,那么您就属于这种接入方式了。有 线电视(Cable)和部分小区宽带采用此种连接 方式,如:上海有线通、广州珠江宽频、深圳 天威视讯等。
2. Windows 7 系统下,连接无线网络: a. 打开 “ 控制面板 ” ; b. 点击 “ 网络和共享中心 ” ; c. 点击 “ 连接到网络 ”,即可弹出对话框,显示周围环境中所有无线网络; d. 找到您的无线网络标识 (为该路由器预设的无线网络标识,若已做修改,则显示您更改 后的标识),点击 “ 连接 ” ; e. 输入您的无线密码 (为该路由器预设的无线密码,若已做修改,则输入您更改后的无线 密码)。 成功连接后,如下图所示:
常连接到 10/100Mbps 设备时,呈橘色 6. USB 设备状态指示灯,当前连接的 USB 设备可以正常工作时,呈绿色;无 USB 设备连接、
或当前 USB 设备可被安全移除时,熄灭 7. 无线开关,按下 2 秒钟即可开启 / 关闭路由器无线功能,同时控制 2.4GHz 和 5GHz 8. 一键加密按钮,按下按钮,路由器进入 WPS 搜索模式,持续闪烁约 2 分钟;无线加密之后,
技术支持
感谢您选择 NETGEAR! 建议用户从 NETGEAR 官方渠道获取技术支持。 美国网件公司中文网址 技术支持热线 400-830-3815 技术支持邮箱 4008303815@
请查看设备背部标签中的预设信息,填写在这里: 无线网络标识 (SSID):________________________________ 无线密码: ____________________________________________
如果修改了无线网络标识及无线密码,请将修改后的信息填写在这里: 无线网络标识 (SSID):________________________________ 无线密码: ____________________________________________
例 :某电信 ADSL 用户,电信提供的相关信息如下:
宽带用户名
gzDSL1234@163.gd
密码
gz12345678
a. 选择菜单基本→因特网设置 b. 请按照如下示意图进行设置,并在登录名和密码后面的空白栏中分别输入宽带帐号和宽
带密码 (注意区分字母大小写)。
注意:宽带无限时上网的用户,请将 “ 连 接模式 ” 设置为 “ 一直连接 ” ;宽带限时 的用户,请选择 “ 按需连接 ”、闲置超时 5 分钟,则不使用宽带 5 分钟后,路由器 自动断开因特网连接;
WNDR4300 ᘛ䙏ᆹ㻵ᤷই
感谢您选择 NETGEAR 公司的 N750 系列双频千兆无线路由器 WNDR4300,以下将介绍该路由器 的安装使用方法。只需 5 步即可完成全部设置,让您享受上网冲浪的乐趣。
包装内容
2. 若宽带网线到户,没有 Modem,连接方式如下:
使用一条网线将计算机连接到路由器的局域网端口,运营商提供的宽带线或宽带接口,直接 连接到路由器的因特网端口 (黄色标识)。
IP 地址
211.100.28.181
子网掩码
255.255.255.0
网关地址
211.100.28.1
主域名服务器
202.96.128.86
从域名服务器
61.144.56.101
注意:IP 地址等信息必须由宽带运营商提供,表格中的地址仅为举例所用,用户设置时不可照此填写!
a. 选择菜单基本→因特网设置 b. 请按照如右示意图进行设置,
c. 设置完成后,点击画面上方的 应用保留您的设置。
如要确定是否成功连上因特网,请按如下操作: a. 选择菜单高级 b. 查看路由器与因特网的连接情况,如下图,
因特网端口中显示 IP 地址和域名服务器均已成功获取,说明路由器与 Internet 连接成功,请 进入第四步 “ 预设无线密码 ”。 如若获取不成功,则 IP 地址是 0.0.0.0,请检查基本→因特网设置中输入的宽带账号名、密码 信息是否正确,或与您的宽带运营商进行联系。
第三步 将路由器连上因特网
最常见的宽带类型有三种:PPPoE、固定 IP 或动态 IP。设置方法分别如下 (如果您不确定自己 所用的宽带属于哪种类型,请首先向宽带运营商进行咨询):
1. 采用 PPPOE 拨号上网的配置方式
每次连接因特网时都需要用户名和密码进行登录,或者 ISP 提供给您的是 PPPoE 帐户,均在此列。例如:中国 电信和中国联通 ADSL 宽带业务通常采用此连接类型,部分小区宽带也会采用这种方式。
第四步 预设无线密码
为了进一步确保无线网络的安全性,WNDR4300 在出厂时已随机预设了无线网络标识 (SSID) 及无 线密码,每台设备各不相同,具有唯一性。您可以不做任何改动、直接使用预设密码进行无线连 接,该信息请查看路由器背部的标签处,如下图所示:
标签中的 “SSID” 为 2.4GHz 无线网络标识,5GHz 无线网络标识默认在其后加 “-5G”,无线密码均 为标签所示。
注意:路由器设置成功后,不必再运行右图所示的宽带连接进行认 证。直接打开网页即可上网冲浪!
2. 采用固定 IP 地址上网的配置方式
商务光纤等专线接入通常会采用此种连接类型。宽带服务商会向用户提供 IP 地址,子网掩码,网关和 DNS 等详 细参数。
例 :某运营商的固定 IP 地址用户,运营商提供的相关信息如下:
如需修改预设信息,请登录路由器管理界面 (参考第二步) ,选择菜单基本→无线设置,可以设 置无线网络的标识和无线密码。
第五步 计算机成功连接无线网络
1. Windows XP 系统下,连接无线网络 (以 Windows XP Service Pack 3 为例): a. 鼠标右键单击 “ 网上邻居 ”,选 “ 属性 ” ; b. 鼠标右键单击 “ 无线网络连接 ”,选 “ 查看可用的无线连接 ”,弹出 “ 无线网络连接 ” 的 对话框,显示您周围存在的无线网络,包括无线网络标识及安全认证; c. 找到您的无线网络标识 (为 该路由器预设的无线网络标 识,若已做修改,则显示您更 改后的标识),点击 “ 连接 ”。 d. 输入您的无线密码 (为路由 器预设的无线密码,若已做 修改,则输入您更改后的无 线密码)。 稍等片刻,当右上角显示 “ 已连接 ” 时,表明无线网络连接成功。
第一步 将 WNDR4300 接入网络
1. ADSL/ Cable Modem 接入,连接方式如下: 使用一条网线将 Modem 连接到路由器的因特网端口(黄色标识),使用另一条网线将一台计 算机连接到路由器的局域网端口。
注意:路由器指示灯说明,详见本文附录一。
第二步 登录路由器管理界面
启动 Internet Explorer 或者其他浏览器,打开一个网页, 在网页的地址栏中输入 htபைடு நூலகம்p:// 或 然后回车: 通常情况下,浏览器会弹出如右登录框,要求 输入用户名和密码,默认如下: 用户名:admin 密码:password (字母均为小写) 注意:初次设置时,精灵设置向导自动出现, 询问 “ 需要 NETGEAR 精灵为您提供帮助 吗? ” 请选择 “ 不需要,我想自己配置因特网 连接 ”,点击 “ 下一步 ”、再点击 “ 确定 ” ;有 的用户或许会看到写有 “ 重要的更新 ” 的提 示,请点击继续。
a. 选择菜单基本→因特网设置: b. 保持默认设置,无需做任何改
动,如右图,直接点击画面上 方的应用。
如要确定是否成功连上因特网,请按如下操作: a. 选择菜单高级 b. 查看路由器与因特网的连接情况,如下图,
因特网端口中显示 IP 地址和域名服务器均已成功获取,说明路由器与 Internet 连接成功,请 进入第四步 “ 预设无线密码 ”。 如若获取不成功,则 IP 地址是 0.0.0.0,请与您的宽带提供商或网络管理员进行联系。
WPS 灯常亮
1. USB 接口,用于连接 USB 移动存储设备,兼容 USB1.0/1.1 2. 局域网端口 (LAN 口), 4 个 10/100/1000Mbps 自适应以太网口,用于连接 4 台有线设备 3. 因特网端口 (WAN 口),用于连接 ADSL/ Cable Modem 或以太网线缆,黄色标识 4. 电源接口,用于连接电源,为路由器供电 5. 电源开关
注意 :如果右侧显示 “ 区域中找不到无线网络 ”,请联系您的笔记本厂家咨询如何开启笔记本无线 开关;如果右侧显示 “Windows 无法配置此无线连接 ”,请联系您的笔记本厂家咨询无线网卡的配 置与使用。
附录一:WNDR4300 的指示灯及端口介绍
1. 电源指示灯,通电启动时呈橘色,稳定运行时呈绿色 2. 因特网端口 (WAN 口)指示灯,正常连接时,呈绿色 3. 2.4GHz 无线指示灯,启用 2.4GHz 无线模式时,呈绿色 4. 5GHz 无线指示灯,启用 5GHz 无线模式时,呈蓝色 5. LAN1/2/3/4— 局域网端口 (LAN 口)指示灯 ,正常连接到 1000Mbps 设备时,呈绿色;正
