VCP6中文培训资料-M12_InstallvSphereComponents
VMware VCP 培训笔记

[转载] VMware VCP 培训笔记VMware, VCP, 培训1 VMWare的突出优点:(1) 孤立: isolation (2) 封装: Encapsulation (3) 兼容性: Compatibility (4) 硬件独立: Hardware每个VMWare物理服务器支持的CPU: 16个socket, 32个Processor, 128个virtual processors(同时), 64G内存每个VMWare支持1-2-4 CPU2 虚拟机的三种应用环境(1) applicationlifecyclemanagement应用开发测试, 应用的支持(Multiple development Enviroments, VM Library for Support, Snapshot)(2) datacenteroperations减少物理服务器的增生, 有效利用硬件, 快速交付系统in OS(3) filedoperations培训, 安全的桌面3 VMWare Infrastructure 3ESX Server 3.0, 可选Virtual SMPVC 2.0VMotionVM HAVM DRSVMWare Consolidated Backup VCB其中VM Virtual Desktop Infrastructure (RDP, Vitrual Network Computer) 是VMWare Infrastructure 3的应用案例,简称为VDI4 VMWare Convertor3.0 = VMWare Importer + P2VMigratorWMWare Convertor 3.0(1)P to V 不停机,同时运行多个转换,集中管理, 克隆物理主机(2)V to V:Workstation 4.x, 5.x ESX Server 2.5.x(在VC2.x管理下的), ESX server 3.x, GSX Server 3.x, VMWare server 1.x, VC2.x(3)BESR(upto 10d, .v2i or .sv2i), StorageCraft ShadowProtect Inmages, Virtual PC 7, Virtual Server any version <ALL in windows OS>5 VMWare Lab manager:(1) Lab Manager Server (web, soap), 提供对一组被管理服务器的配置管理和部署.(2) Lab Manager Managed Server is an EXS server (+ Managed Server Software)(3) Lab Manager storage server(4) client user (Web Console,or SOAP API)6 VMWare Workstation 6guest and host: (1) windows, 包括vista (2) linuxguest Only:novell, Solaris(x86)支持usb2.0 (高速存储和ipod), 现在ESX Server不支持USB2.02-way SMP提供convertor, 支持从物理硬盘转换虚拟机。
VCP培训教材-1

VMware Infrastructure 3:安装和配置版本3.5 修订版A 版权所有©2008 VMware, Inc. 保留所有权利。
VMware Infrastructure 3:安装和配置v3.51-1VMware Infrastructure 3:安装和配置版本3.5 修订版A 版权所有©2008 VMware, Inc. 保留所有权利。
重要性和单元目标•重要性•本单元旨在设定课程目标及提供课程概览•为学员制定的目标•定义虚拟基础架构和VMware Infrastructure •了解教学目标•了解课程目标•熟悉课程概要1-2VMware Infrastructure 3:安装和配置版本3.5 修订版A 版权所有©2008 VMware, Inc. 保留所有权利。
什么是虚拟基础架构?虚拟基础架构是一种可将计算资源、存储资源以及网络资源动态映射到业务应用程序的基础架构1-31-4VMware Infrastructure 3:安装和配置版本3.5 修订版A 版权所有©2008 VMware, Inc. 保留所有权利。
VMware Infrastructure 3•此软件套件通过虚拟化技术来优化和管理IT 环境,其中包含以下软件•VMware ESX Server 或ESX Server 3i •VMware Virtual SMP•VMware High Availability (HA )•VMware VMotion•VMware Distributed Resource Scheduler (DRS )•VMware VMFS•VMware Consolidated Backup (VCB )•VMware Update Manager •VMware Storage VMotion•VMware VirtualCenter•可部署、监视及管理虚拟化的IT 环境VMware Infrastructure 3 is VMware’s product family designed for building and managing virtual infrastructures. It is a VMware Infrastructure 3 consists of the following products:VMware ESX Server 3: Platform on which virtual machines runVMware ESX Server 3i: Alternate platform on which virtual machines run VMware Virtual SMP: Multi-processor support (up to 4) for virtual machines VMware VMFS: Filesystem optimized to hold virtual machinesVMware DRS: VirtualCenter's feature for dynamic balancing and allocation of resources for virtual machines VMware HA: VirtualCenter's high availability feature for virtual machinesVMware Consolidated Backup: Centralized backup software for virtual machines VMware VMotion: Migration of virtual machines while they are powered onVMware Infrastructure 3:安装和配置版本3.5 修订版A 版权所有©2008 VMware, Inc. 保留所有权利。
VSICM55_M11_InstallvSphereComponents VMware VCP550 中文培训教材 第11单元 安装VMware vSphere 组件

IP 地址
子网掩码
可选
可选
DHCP
根据 IP 地址计算
网关
Primary DNS (主 DNS)
可选
可选
基于 IP 地址和子网掩码
基于 IP 地址和子网掩码
Root 密码
可选
无
必须包含 6-64 个字符
VMware vSphere:安装、配置和管理
13-7
© 2013 VMware Inc. 保留所有权利
VMware vSphere:安装、配置和管理
13-12
© 2013 VMware Inc. 保留所有权利
单服务器解决方案或分布式解决方案
虚拟机
虚拟机
虚拟机 vCenter Server
Single Sign On 服务器 Single Sign On 服务器 虚拟机 Inventory Service Single Sign-On 服务器
虚拟机 Inventory Service 虚拟机
数据库服务器 Inventory Service vCenter Server vSphere Web Client vCenter Server vSphere Web Client VMware vSphere® Web Client VMware vSphere® Update Manager™ 虚拟机 虚拟机 虚拟机 数据库服务器 数据库服务器 vSphere Update Manager vSphere Update Manager
13-2
© 2013 VMware Inc. 保留所有权利
本单元课时
第 1 课: 安装 ESXi
第 2 课:
安装 vCenter Server
VSICM51_M12_HostScalability(vmware vsphere5.1 VCP培训教材,英文,pdf)
Use for multi–virtual machine systems where performance benefits virtual machines communicating heavily with one another. Use for multi–virtual machine systems that load-balance or require high availability.
Data Protection Access and Authentication Control Resource Management and Monitoring High Availability and Fault Tolerance Host Scalability Patch Management Installing VMware vSphere Components
VMware vSphere: Install, Configure, Manage – Revision A
12-11
© 2012 VMware Inc. All rights reserved
DRS Cluster Settings: Affinity Rules for Virtual Machines
• •
Use Intel CPUs with Core 2 micro architecture and newer Use AMD first-generation Opteron CPUs and newer
Run ESXi 3.5 Update 2 or later Be connected to vCenter Server Be enabled for hardware virtualization (AMD-V or Intel VT) Be enabled for execution-disable technology (AMD No eXecute (NX) or Intel eXecute Disable (XD)) Be configured for vMotion migration
VCP6中文培训资料-M03_VirtualMachines
VMware vSphere:安装、配置和管理
3-10
虚拟磁盘
虚拟磁盘定义样例:
虚拟磁盘大小: 数据存储: 虚拟磁盘节点: 虚拟存储适配器: 虚拟磁盘文件: 默认磁盘模式: 可选磁盘模式: 磁盘调配策略: 4 GB MyVMFS 0:0 LSI Logic SAS Server1.vmdk 和 Server1-flat.vmdk 允许创建快照 独立模式 – 永久或非永久模式 厚配置延迟清零、厚配置立即清零或精简配置
VMware vSphere:安装、配置和管理
3-2
重要信息
虚拟机是一个可在其上运行受支持的客户操作系统和应用的虚拟硬件集。 创建虚拟机的方法有很多种。选择正确的方法可以帮您节省时间,并能 使部署过程变得可管理和可扩展。
VMware vSphere:安装、配置和管理
3-3
本单元课时
第 1 课: 第 2 课: 虚拟机的概念 创建虚拟机
最多 4 TB RAM 最多 128 个虚拟 CPU
VMware vSphere:安装、配置和管理 3-8
每个适配器 15 个设备
虚拟硬件版本
虚拟硬件版本具有以下特性: 规定了虚拟机支持的操作系统功能 不能高于 VMware 产品支持的版本
产品版本
VMware ESXi™ 6 及以后
硬件版本
VMware vSphere:安装、配置和管理
3-6
组成虚拟机的文件
配置文件
交换文件 BIOS 文件 日志文件 模板文件 原始设备映射文件 磁盘描述符文件 磁盘数据文件 挂起状态文件 快照数据文件 快照状态文件 快照磁盘文件
VCP6中文培训资料-M01_CourseIntro

VMware vCenter 套件 VMware vSphere Enterprise
应用 服务
可用性 - VMware vSphere® vMotion® - VMware vSphere® Storage vMotion® - vMotion(无共享存储) - vSphere HA - vSphere Fault Tolerance - Data Recovery - Data Protection - VMware vCloud® Connector™ - VMware® Tools™:零停机升级 计算 安全性 可扩展性
有关 VMware® 认证的详细信息,请访问:
/portals/certification
要查看最新的 VCP6-DCV 考试蓝本和信息,请访问: https:///mgrReg/plan.cfm? plan=64180&ui=www_cert
- VMware® vShield 组件
- DRS - 热添加
基础架构 服务
存储 - VMFS - Thin Provisioning - Storage I/O Control - Storage DRS - 配置文件驱动的存储 - 存储回收
网络 - 增强的分布式 交换机 - Network I/O Control - SR-IOV 支持
VMware vSphere:安装、配置和管理
1-2
学员的学习目标
本课程结束后,您应能够做到以下几点: 配置和管理 ESXi 网络连接和存储 创建、配置、迁移、管理和监控虚拟机及虚拟设备 管理用户对虚拟基础架构的访问 使用 vCenter Server 监控资源使用情况 扩展 vSphere 虚拟基础架构 规划业务连续性解决方案 管理 vSphere 环境的变更 安装和配置 ESXi 和 vCenter Server
VCP6培训资料-M06_Storage
VMware vSphere: Install, Configure, Manage
Hale Waihona Puke 6-4Lesson 1: Storage Concepts
6-5
Learner Objectives
By the end of this lesson, you should be able to meet the following objectives:
Host
Host
good for storing small files: the subblock size is 8 KB.
• Provides on-disk, block-level
locking.
VMFS Datastore
VMware vSphere: Install, Configure, Manage
6-6
Basic Storage Overview
ESXi Hosts
Datastore Types
VMFS
NFS
File System
Storage Technologies
Direct Attached
Fibre Channel
FCoE
iSCSI
NAS
VMware vSphere: Install, Configure, Manage
Host
Host
Datastores are used to hold virtual machine files, templates, and ISO images.
Datastore
VMware vSphere: Install, Configure, Manage 6-9
VCP6中文培训资料-M10_HostScalability

主机可扩展性
VMware vSphere:安装、配置和管理
11-2
重要信息
扩展 VMware vSphere® 环境时,您必须了解哪些 vSphere 功能特性可 以帮助您管理环境中的主机。
VMware vSphere:安装、配置和管理
11-3
学员的学习目标
本单元结束后,您应能够做到以下几点: 介绍 VMware vSphere® Distributed Resource Scheduler™ (DRS) 集群的功能 阐述 Enhanced vMotion Compatibility (EVC) 的优势 创建 DRS 集群 查看有关 DRS 集群的信息 从 DRS 集群中移除主机
用于性能会对虚拟机之间的通信能力产生极大影响的 多虚拟机系统。
反关联性规则:
用于负载平are vSphere:安装、配置和管理
11-11
DRS 集群设置:DRS 组
关于 DRS 组:
一组虚拟机 一组主机
一个虚拟机可以属于多个虚拟 机 DRS 组。 一台主机可以属于多个主机 DRS 组。
基准就是集群中每台主机 均支持的一个 CPU 功能集。 CPU 基准功能集
CPUID
CPUID
CPUID
CPUID
X……
X……
X……
K……
启用了 EVC 功能的集群
VMware vSphere:安装、配置和管理
11-8
EVC 集群要求
集群中的所有主机必须满足以下要求: 使用来自同一供应商(Intel 或 AMD)的 CPU
11-10
DRS 集群设置:针对虚拟机关联性的 DRS 规则
DRS 的关联性规则用于 指定应将选定的虚拟机 放置在相同主机上(关 联性)还是放在不同主 机上(反关联性)。
vSphere6(vSAN)安装

vSphere 6.0安装过程vSphere 6.0安装过程vSphere 6.0的软件包请到给服务器厂商下载,我这里用的是Dell的R920,所以上Dell官网,搜索vmware exsi 6.0,可以获得如下安装文件VMware‐VMvisor‐Installer‐6.0.0‐2494585.x86_64‐Dell_Customized‐A00.isovSphere 6.0的安装过程与5.1相差不大,安装完毕后需要配置网络、网关、DNS和Hostname。
可能还需要重新设置管理网口硬件,服务器上的网口编号与EXSi系统中的编号可能会不一致。
vCenter安装过程(Linux)1,登陆vSphere 6.0文档中心2,获取安装包VMware‐VCSA‐all‐6.0.0‐2562643.iso,解压缩3,执行vcsa目录下的VMware‐ClientIntegrationPlugin‐6.0.0.exe4,双击vcsa‐setup.html文件,点击安装5,按下面的截图开始安装协议点击同意选择EXSi主机小型VMWare中心,选择合设这个是SSO的用户和密码要牢记,SSO的域名和站点名也要牢记,登陆时要用。
登陆时管理员账户administrator@vsphere6.local选择100台主机选择本地存储,精简模式选择嵌入式数据库选择oracle数据库,需要提供相关字段失败。
如果不确定,请使用IP地址。
完成系统自动安装,不用我们劳心劳力。
安装完毕vSAN安装过程请参考/view/2e541063be23482fb4da4cc3本地需要有3块磁盘,一块安装EXSi系统,一块是SSD,一块是普通数据磁盘。
测试时3块盘分别是600G,100G,50G。
第一步,主机上把普通SAS盘设置成SSD盘第二步,输入license,建vSAN集群,绑定license。
第三步,打开集群vSAN开关,把磁盘加入到vSAN磁盘组中检查一下,总容量为150G第四步,需要给这个磁盘组绑定一个存储策略,默认是可以宕机1台,我只有3台所以无法模拟更多存储策略,按默认规则测试。
Visual Components产品家的安装与许可指南说明书
User Guide Installation and Licensing Visual Components Product FamilyContentsIntroduction (3)System requirements (3)Installation Requirements (3)Installation (3)Installing Visual Components (3)Uninstalling Visual Components (6)Licensing (8)Evaluation license (8)Commercial license (10)Standalone product key (10)Online Activation (10)Offline Manual Activation (13)KUKA OLP Activation (14)Register Product Key (18)Updating Registration Information (21)Online Deactivation (22)Offline Manual Deactivation (24)Deactivation limit/Transfer limit (24)Activation renewal (26)Network License (27)Online Activation (27)Using a Network License Key (28)Manual Activation (29)Deactivation (29)Activation renewal (29)Upgrade License (30)Command line deployment (31)Installation/Uninstallation (31)Frequently Asked Questions (32)IntroductionThis User Guide has been designed to assist users who are installing and activating software license keys for a Visual Components product. Should any user still require assistance, then please contact Visual Components Support via email at **************************** System requirementsThe updated system requirements for using a Visual Components product can be found at: https:///system-requirements/Installation RequirementsFor a successful installation you will need:•Visual Components product installer•Software license keyA software license key can only be activated for a specified product and version. We recommend that prior to installation, you confirm for which product and version your license key is intended. InstallationTo install Visual Components, you will first need to download an installer from the website. Installing Visual Components1.Begin by visiting the downloads page to download the Installer for your Visual Componentsproduct and run the installer.2.On the Welcome dialog, click Next.3.On the License Agreement dialog, read and accept the agreement, and then click Next.4.Review the Privacy Policy and click Next.5.On the Installation Folder dialog, accept or change the location for storing your VisualComponents program files, and then click Next.6.Then click Finish.Uninstalling Visual Components1.Depending on your device and version of Windows, use the Control Panel to access theUninstall a program screen.2.In the Uninstall or change a program panel find and select the Visual Components productyou wish to remove, and then click Uninstall.3.On the Uninstall Visual Components product dialog, click Next.4.On the License Deactivation dialog, choose whether you wish to deactivate any standalonelicenses that are currently active on your device, and then click Next.5.On the Uninstallation Successful dialog, click Finish.Important: We recommend deactivation of a product key during uninstallation to avoid possible future issues when re-installing the software on a different computer.LicensingThe first time you run a Visual Components application you will be prompted to provide either a standalone software license key or the address to a Visual Components Network License Server. Refer to the Commercial License section for more information.Important: Your computer and network must allow traffic from Visual Components software, so you may need to modify your firewall settings. For more information, refer to the FAQ section. Evaluation licenseEvaluation licenses are software license keys with a specific number of activation days. Once activated on a standalone computer system, they cannot be deactivated, nor can they be transferred to another system.The activation of the evaluation license will expire automatically after the specified number of days. After the evaluation period, the user is required to purchase a Commercial License to continue using the Visual Components product.1.To start your evaluation period, download and install your Visual Components applicationand activate your evaluation license key.2.When starting your application, from the Evaluation License dialog, you can eitherUpgrade or continue to Evaluate the software.NOTE! You can use this dialog to track how many days remain of your evaluation period.3.Selecting the Evaluate option allows you to continue using the software within theevaluation period.4.To upgrade during the evaluation period, select the FILE tab to access the Backstage view,then select Info and License.5.And from the Application License tab click Upgrade.Commercial licenseA commercial license is either a time limited or perpetual license key that can be found in your shipping note.Standalone product keyOnline ActivationTo use your commercial product key to activate a Visual Components product, follow these steps:1.Run your Visual Components application.2.On the Welcome dialog, click Next.3.On the License type dialog, select I have a standalone product key, and then click Next.4.On the Standalone license dialog, enter your 16-digit product key, and then click Next.5.If there is an error or issue with the license, contact Visual Components licensing supportvia email at ******************************.6.Following product activation, use the Registration dialog to create a licensing accountusing an email address and password. Or you can select Skip and register an account later, using the steps outlined in the Register Product Key section.NOTE! Registration requires an active Internet connection and the password you create must be at least eight characters in length, and include the following:•At least one lower case letter.•At least one upper case letter.•At least one special character.•At least one number.7.Once you have registered your product you can use the account to manage your softwarelicenses online in the Customer Portal at and requestCustomer Support at .8.Click Finish to complete licensing.Offline Manual ActivationFor detailed information on how to manually activate your copy of Visual Components, please use this link Manually Activate a Standalone License to view a detailed video guide on the Visual Components Academy.KUKA OLP ActivationThe KUKA OLP Add On is available for users of Visual Components Premium. To activate the Add On follow these steps:1.Start your Visual Components Premium application.2.Select the FILE tab to access the Backstage view, then select Options and Add On.3.From the View and mange Add-Ons section for KUKA OLP click Enable.4.On the KUKA OLP panel, select your license type Standalone license, and then click Next.5.Then enter your KUKA OLP License key and click Activate.6.Once the KUKA OLP Add On has been enabled, the status will change toKUKA OLP – restart required, so then click OK below.7.Then select the FILE tab to access the Backstage view and use Exit to close the application.8.Then restart the application and your KUKA OLP add on will be enabled.NOTE: To manage or check the status of the Add On, use the FILE tab to access theBackstage view, then select Options and Add On. And under View and mange Add-Ons, refer to the KUKA Option packages section.9.To check the status of your KUKA OLP Add On license, use the FILE tab to access theBackstage view, then select Info and License and the Add-On Licenses tab.NOTE: Should you ever need to transfer your software licenses to another VisualComponents Customer Account, any Add-On Licenses you have activated will also be transferred. For more information refer to the Updating Registration Information section.Register Product KeyIf you skipped the product Registration option while activating your software license key, you can register using the following options:1.Select the FILE tab to access the Backstage view, then select Info and License. And underRegistration Information click Register.2.You can then Register by either selecting Yes, I have an account and signing in using theemail and password for an existing account. Or create a new account by choosingNo, create one for me now.3.And to create a new account complete the registration form.NOTE! The password you create must be at least eight characters in length, and include the following:•At least one lower case letter.•At least one upper case letter.•At least one special character.•At least one number.4.Then once your account has been added, your account details will appear underRegistration Information in the License section of the Backstage view.5.Once the product key has been registered, you can check the activation history of yoursoftware license keys online in the Customer Portal at .NOTE: Network License keys are not visible through the Customer Portal.Updating Registration InformationShould you ever need to update your registered user information or transfer your product licenses to another account, visit the Registration Information section, enter your account password, and click Change registration.And then use either the Transfer to another account or Update current user information options.NOTE: Transferring your product licenses will also include any currently activated Add-On Licenses e.g. KUKA OLP Add On.Online DeactivationYou can deactivate a standalone license for use on a different machine. For more information, refer to the Deactivation limit/Transfer limit section below.1.Select the FILE tab to access the Backstage view, then select Info and License. And underProject License Settings click Deactivate.2.In the Deactivate dialog, click Deactivate.3.If your license was successfully deactivated, on the Deactivation status dialog, do one ofthe following:•To complete deactivation, click Close.•To configure a new license, click Configure.4.To configure a new license refer to the Online Activation section of this document.Offline Manual DeactivationFor detailed information on how to manually deactivate your copy of Visual Components, please use this link Manually Deactivate a Standalone License to view a detailed video guide on the Visual Components Academy.Deactivation limit/Transfer limitA perpetual standalone software license key can be activated and deactivated up to 3 times during a 30-day period. This transfer limit is defined in our End User License Agreement (EULA). Once this limit is reached, the date on which the next transfer is possible will be displayed in an error message.If there is a requirement to transfer a key more than 3 times in a month, you will need to upgrade to a Network License. Contact your Sales Representative to upgrade from a standalone to a Network License Key.If you have Registered your product key, you can check the activation history of your software licenses online in the Customer Portal at .1.To view the activation history of an individual license, from the My Product Keys page clickon the Product Key link.2.Then in the Details page for that specific Product Key, you can examine its Activationhistory.NOTE: Network License keys are not visible through the Customer Portal.Activation renewal• A standalone license is activated for example, for 90 days.•Upon expiration of the current activation period, the product key will attempt to automatically re-activate when you launch the application.•This requires your computer to be connected to the internet.•If online renewal fails, you will receive a notification that asks you to renew the license manually.To view the renewal date of your active License, select the FILE tab to access the Backstage view, then select Info and License. And under Project License Settings refer to the Online renewal date.Network LicenseManagement of Network License keys for Visual Components is managed by the Visual Components License Server Management Console that is installed on a centralized server PC inside an organization’s network. And a client PC needs to be inside the same network to access a Visual Components product using a Network License key.To download the Visual Components License Server Management Console and the User Guide visit the Network License Server section of the Visual Components downloads page.Online ActivationTo activate a Network License, your License Admin should already have setup a Network License Server.NOTE: For information on setting up your License Admin, refer to the Upgrade License section below•To install the Network License Server application, download the installer from the downloads page here.•To manage Network Licenses refer to the Network License Server User Guide available from the downloads page here.•To configure your network to support a Network License Server refer to the FAQ section of this document.Using a Network License KeyTo use your Network License key to activate a Visual Components product follow these steps:1.Run your Visual Components application.2.On the Welcome dialog, click Next.3.On the License type dialog, select My organization is using network floating licenseserver, and then click Next.4.On the Floating license server settings dialog, type in your Floating network license serverhost name or IP address and keep the Floating network license server port number as 5093 (if not modified in the Network License), and then click Next.5.Click Finish to complete the Network license setup.Manual ActivationFor instructions on how to manually activate your Network License, refer to page 14 of the Network License Server User Guide available here.DeactivationTo deactivate a Network License refer to pages 15 and 16 of the Network License Server User Guide available here.Activation renewalTo renew a Network License refer to page 17 of the Network License Server User Guide available here.Upgrade LicenseSoftware license upgrades requires a designated License Admin User. The License Admin is a first point of contact and the only person in your organization entitled to request version upgrades.•You only need to register a License Admin once.•Only one License Admin User per company can be registered.•You must provide a valid email address for the License Admin.•To register a License Admin User, please submit a request at/license-managementWhen upgrading your software license(s) please note the following:• A new software license key is required to install and activate Visual Components 4.7. And you can upgrade your current license free of charge, if you have a valid maintenancecontract.• A Visual Components product key can only be used for the specified version. For example, a4.7 Premium product key can be used only for Visual Components Premium 4.7. Therefore,every version needs a separate product key.•Users with valid maintenance, can upgrade to the latest version for free, for example VC Product1 4.0/4.1/4.2 to VC Product 4.7.•To request an upgrade your License Admin should submit a request at/upgrade-license/•Upgrade requests are validated and upgraded keys will be delivered to the registered License Admin User only.•Requests will be answered within 2 working days.•Please note when upgrading to the new version, your old perpetual keys will become inactive after 90 days, and time-limited keys will become inactive after 30 days.•Before upgrading license keys, the Admin User should check that their Network License Server installation is up to date. To install the latest version of the Network License Server application, visit the Network License Server section of the Visual Components download page.1 VC Product refers to Visual Components Essentials/Visual Components Professional/Visual Components Premium application.Command line deploymentA command line interface can be used to deploy Visual Components product.Installation/UninstallationName Parameters DescriptionNormal Mode None The installer interacts with the user and installs3rd-party libraries (.NET, DirectX and SQL Server)if required on the machine.Example:<Installer Name>.exeSilent Mode Silent Similar to Normal and Auto Update modeswithout requiring interactions from user. AnyVisual Components 4.7 version running on adevice will be terminated silently. Duringinstallation, a standard dialog box will bedisplayed, thereby allowing a user to cancelsetup.Example:<Installer Name>.exe Silent Silent Mode with config file /S,[IniFile] Similar to Silent mode but no screens or dialogsare shown to user.Example:<Installer Name>.exe /SAn INI file can be passed as an optional argumentfor implementing custom configurations. Youmust give the absolute path of the INI file, andthe file should be formatted as follows:[SetupValues]%AppFolder%=C:\Program Files\<Product Name>Example:C:\<Installer Name>.exe /S:"C:\setupvars.ini"Note: /S accepts absolute paths only.Uninstall Silent Mode /U, /S Uninstalls Visual Components 4.7 silently from adevice in which the /U parameter is responsiblefor passing the absolute path to the uninstall.xmlfile located in program's Uninstall folder.Example:C:\Program Files\<Company Name>\<ProductName>\uninstall.exe /U:"C:\ProgramFiles\<Company Name>\<ProductName>\Uninstall\uninstall.xml" /SFrequently Asked Questions•Do I need to configure a firewall on my network to access Visual Components Network License Server?work Access: Firewall needs to be configured to allow UDP traffic on the chosenport (default is 5093).b.Internet Access: Access to the Internet (HTTPS) is required on the server for automaticlicense activation.Additionally:c.Every client needs to be able to access the local network server through the definedaccess point to use Visual Components products with network licenses.d.Distributing network licenses over the Internet is explicitly not supported by thenetwork license server as stated in the End User License Agreement (EULA) for VisualComponents products.•How do I create a Visual Components Customer Account that I can use to register my software license keys?a.You can create a Customer Account using Visual Components software, refer to theRegister Product Key section.b.Or you can create a Customer Account online through the Visual Components CustomerPortal at .。
VMware VCP6原厂培训5

Insert Course Title Here – Prerelease
Virtual Switch
Virtual Switch
Insert Course Title Here – Prerelease
© 2015 VMware Inc. All rights reserved.
?-8
Types of Virtual Switches
A virtual network supports these types of virtual switches:
Insert Course Title Here – Prerelease
© 2015 VMware Inc. All rights reserved.
?-9
Standard Switch Components
A standard switch provides connections for virtual machines to communicate with one another, whether they are on the same host or a different host.
VM 1
VNIC
VM 2
VNIC
VM 3
VNIC VNIC
IP storage
Management Network
VMkernel
Test VLAN Production VLAN IP Storage VLAN Management VLAN
101 102 103 104
Insert Course Title Here – Prerelease ?-10
© 2015 VMware Inc. All rights reserved.
Oracle P6-Pro用户中文培训手册(P6R15)_TP01_精简版(OS)_v1.4-20160913
VCP6中文培训资料-M07_VMManagement

VMware vSphere:安装、配置和管理
7-2
重要信息
使用物理机时必须执行许多繁琐的任务。例如,必须在存储阵列之间移动 服务器存储、部署具有相同配置的服务器以及动态添加资源。
通过使用模板克隆和部署虚拟机,您可以捕获故障虚拟机的状态,或者 采用预配置的标准来部署虚拟机。
借助 VMware vSphere®,您可以在虚拟机运行期间在 VMware ESXi™ 主机之间迁移虚拟机和虚拟机磁盘。
VMware vSphere:安装、配置和管理
7-19制器、以太网适配器和硬盘 设备。 此外,您也可以在虚拟机处于 开启状态时添加 CPU 和内存。
VMware vSphere:安装、配置和管理
7-20
创建 RDM
创建 RDM 时要定义的项目: 目标 LUN:RDM 将要映射到的 LUN 映射的数据存储:将 RDM 文件存储在虚拟机中或其他数据存储上。 兼容模式 虚拟设备节点
VMware vSphere:安装、配置和管理
7-13
跨数据中心部署虚拟机
允许跨数据中心部署虚拟机。 将虚拟机从一个数据 中心克隆到另一个数据 中心。 通过一个数据中心的 模板在另一个数据中心 内部署虚拟机。
VMware vSphere:安装、配置和管理
7-14
练习 12:使用模板和克隆
VMware vSphere:安装、配置和管理
7-3
本单元课时
第 1 课: 第 2 课: 创建模板和克隆 修改虚拟机
第 3 课:
第 4 课: 第 5 课:
迁移虚拟机
创建虚拟机快照 创建 vApp
第 6 课:
管理内容库
VMware vSphere:安装、配置和管理
Vsphere培训

Vsphere培训1、VMware产品组成有三部分:服务器(平台)+管理+桌面,1)服务器(平台)又由基础架构服务和应用程序服务组成,i.基础架构服务又包括Vcomputer、Vstorage、Vnetwork三部分内容A.Vcomputer主要涉及到DRS和DPM两块内容,DRS是动态分配和平衡虚拟机对资源的最优访问。
DPM持续监控VMware DRS集群中的资源需求。
B.Vstorage主要包括VMFS和Thin Provisioning两项内容,其中VMFS主要指用于ESX虚拟机之间的高性能集群文件系统。
Thin Provisioning通过分配比实际购买容量更多的存储量,来实现更高的存储利用率。
C.Vnetwork主要包含一项内容,这是在Vsphere4.0里面新增加的分布式网络交换机(实际上就是将原来的虚拟交换机的控制板单独提出来增加到Vnetwork中,而I/O板的内容仍然保留在ESX的隐藏虚拟主机中,以后再配置的过程中是看不到这一部分的配置内容),其主要功能是为数据中心级别的迅即网络连接提供一个中央控制点。
ii.应用程序服务又由可用性、安全性和可管理性组成A.应用程序服务的可用性包含六项主要内容:VMware HA、VMware FaultTolerance(FT)、VMware Data Recovery、Vstorage API、Site RecoveryManager和Storage VMotion。
a)VMware HA为OS中运行的所有应用程序提供经济高效的高可用性,同时不受APP或底层硬件配置的限制;b)VMware FT为应用程序提供持续可用性,防止因服务器故障导致的停机和数据丢失;c)Vstorage API为供应商提供的编程界面。
由原来的VMwareConsolidated Backup(VCB)演化而来的新一代产品,以后VMware将取消VCB的功能,将为备份厂商提供API接口,由备份厂商来完成这部分工作;d)VMware Data Recovery基于磁盘的备份和恢复解决方案,可为虚拟机提供数据保护(优势:它是基于磁盘的无代理备份和恢复,OS或文件级别的还原,集中管理,经济高效的存储管理方式);e)Site Recovery Manager与VMware Infrastructure紧密配合以管理和自动执行虚拟环境的灾难恢复过程;f)Storage Vmotion可以在存储阵列内以及多个存储阵列之间,实时迁移正在运行的虚拟机磁盘文件。
VMware vSphere 6.0 教程 (学习笔记)
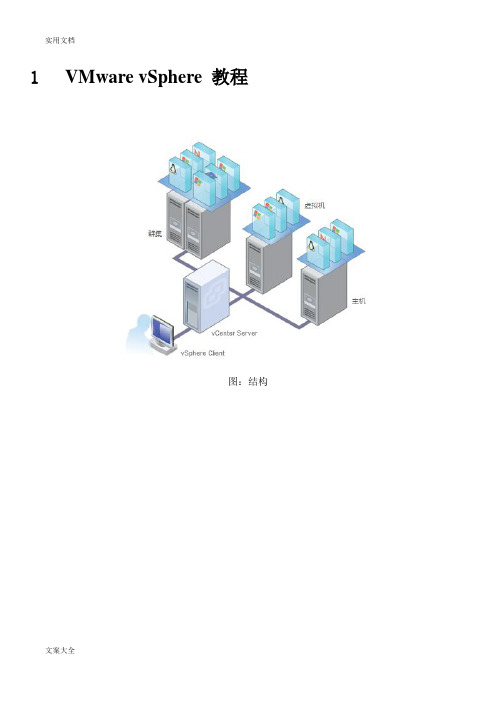
1 VMware vSphere 教程图:结构1.1 什么是虚拟化1.1.1 物理机与虚拟机1.1.2 虚拟机的优点1.1.3 vSphere的工作原理是什么?1.1.3.1 什么是vCenter Server1.1.3.2 什么是vSphere Client1.1.3.3 vSphere中的网络1.1.3.3.1 什么是vSphere Distributed Switch架构?1.1.3.3.2 什么是vSphere标准交换机架构?1.1.3.4 vSphere中的存储1.1.3.5 什么是清单视图四种清单视图分别为:主机和群集、虚拟机和模版、网络、数据存储和数据存储群集。
1.1.3.6 什么是整合1.2 浏览清单1.2.1 什么是数据中心?1.2.2 什么是主机1.2.3 什么是虚拟机1.2.4 什么是模版1.2.5 什么是文件夹1.2.6 什么是群集?1.2.7 什么是资源池?1.2.8 什么是数据存储?1.2.9 什么是数据存储群集?1.3 使用vSphere1.3.1 创建数据中心1.3.2 添加主机1.3.3 创建虚拟机1.3.3.2 克隆1.3.3.4 转换将物理机转换成虚拟机。
从模版部署虚拟机。
1.3.4 创建模版将虚拟机转换成模版将虚拟机克隆为模版克隆现有模版1.3.5 使用虚拟机1.3.5.1 虚拟机电源状态1.3.5.2 添加虚拟硬件1.3.5.3 编辑虚拟机设置1.3.5.4 迁移虚拟机1.3.6 使用文件夹可以使用文件夹对以下清单对象进行分组:数据中心虚拟机和模版主机和集群数据存储和数据存储群集网络对象1.3.7 创建群集1.3.8 创建资源池1.3.9 整合企业2 原教程路径。
- 1、下载文档前请自行甄别文档内容的完整性,平台不提供额外的编辑、内容补充、找答案等附加服务。
- 2、"仅部分预览"的文档,不可在线预览部分如存在完整性等问题,可反馈申请退款(可完整预览的文档不适用该条件!)。
- 3、如文档侵犯您的权益,请联系客服反馈,我们会尽快为您处理(人工客服工作时间:9:00-18:30)。
13-11
学员的学习目标
本课时结束后,您应能够做到以下几点: 指出安装 vCenter Server 的系统要求 在受支持的 Windows 操作系统上安装 vCenter Server
VMware vSphere:安装、配置和管理
13-12
VMware Platform Services Controller
主机可扩展性
VMware vSphere:安装、配置和管理
13-2
重要信息
通过了解 VMware® vCenter Server™ 和 VMware ESXi™ 主机的部署选 项,用户可以根据企业情况选择最适合的部署选项。
VMware vSphere:安装、配置和管理
13-3
本单元课时
第 1 课: 第 2 课: 安装 ESXi 安装 vCenter Server
VMware vSphere:安装、配置和管理
13-4
第 1 课: 安装 ESXi
VMware vSphere:安装、配置和管理
13-5
学员的学习目标
本课时结束后,您应能够做到以下几点: 介绍如何以交互方式安装 ESXi 确定 SAN 引导配置的基本要求
VMware vSphere:安装、配置和管理
13-6
ESXi 需满足的硬件前提条件
处理器:64 位 x86 CPU
要求至少双核
ESXi 支持范围广泛的一系列 x64 多核处理器
内存:至少 4 GB RAM 一个或多个以太网控制器: 支持千兆位、10 千兆位和 40 千兆位以太网控制器。
为实现最佳性能和安全性,请对管理网络和虚拟机网络分别使用不同的以太网控 制器。
13-8
从 SAN 引导
ESXi 可从 SAN 引导: 支持光纤通道 SAN 在使用特定的限定存储适配器时支持 iSCSI 和基 于以太网的光纤通道 除非阵列已通过直连认证,否则必须通过交换拓扑建 立 SAN 连接。
ESXi
ESXi 主机必须能够以独占方式访问自己的引导 LUN。
对 VMFS 数据存储和引导分区使用不同的 LUN。
安装 VMware vSphere 组件
第 12 单元
您的进度
课程简介 资源管理和监控 软件定义的数据中心 创建虚拟机 VMware vCenter Server 配置和管理虚拟网络 vSphere Update Manager 和主机维护 配置和管理虚拟存储 虚拟机管理 安装 vSphere 组件 High Availability 和 Fault Tolerance
Virtual Machine or Physical Platform Services Controller vCenter Server
VMware vSphere:安装、配置和管理
13-13
பைடு நூலகம் 配置
部署vCenter前需要考虑的是: 单服务器或分布式解决方案 Windows 或vCenter Server Appliance 嵌入式或外部数据库 物理/虚拟服务器
VMware vSphere:安装、配置和管理
13-14
单服务器解决方案或分布式解决方案
单服务器(嵌入式安装) 虚拟机 虚拟机 易于安装 Single Sign On 服务器 Single Sign On 服务器 易于管理 Inventory Service 嵌入式安装 分布式解决方案 (外部安装) 虚拟机 不同的组件安装在不同的服务器 虚拟机 高承载 Inventory Service vCenter Server vSphere Web Client
SCSI 适配器、光纤通道适配器、聚合网络适配器、iSCSI 适配器或内部 RAID 控制器 SCSI 磁盘、光纤通道逻辑单元号 (LUN)、iSCSI 磁盘或含有未分区空间的 RAID LUN:SATA、SCSI 或串行连接 SCSI
磁盘存储:
VMware vSphere:安装、配置和管理
13-7
vCenter Server包括了VMware Platform Service Controller. VMware Platform Service Controller 包括以下服务:
VMware vCenter™ Single Sign-On™ VMware License Server Lookup Service Certificate Authority Certificate Store
安装 ESXi
必须具有包含 ESXi ISO 文件的 CD、DVD 或 USB 闪存驱动器介质。 从介质引导以启动 ESXi 安装程序。 确保选择未使用 VMware vSphere® VMFS 进行格式化的磁盘。
选择未使用 VMFS 进行格式化的卷。
VMware vSphere:安装、配置和管理
虚拟机 vCenter Server
虚拟机 vSphere Web Client
虚拟机
虚拟机
虚拟机
数据库服务器 数据库服务器 vSphere Update Manager vSphere Update Manager 单一 vCenter Server 5.1 解决方案 解决方案 分布式 vCenter Server
VMware vSphere:安装、配置和管理 13-15
嵌入式安装
(可选)其他嵌入式服务器
物理/虚拟机 Platform Services Controller vCenter Server
VMDir Replication
物理/虚拟机 Platform Services Controller
vCenter Server
引导 LUN
VMware vSphere:安装、配置和管理 13-9
回顾学员的学习目标
您应能够做到以下几点: 介绍如何以交互方式安装 ESXi 确定 SAN 引导配置的基本要求
VMware vSphere:安装、配置和管理
13-10
第 2 课: 安装 vCenter Server
VMware vSphere:安装、配置和管理
VMware vSphere:安装、配置和管理
13-16
分布式安装
