Setup Smith V3.10
Windows 10 Setup安装命令大全
▼Win10系统安装程序Setup.exe命令行参数详解:命令1:/auto• 可用参数:Upgrade;DataOnly;Clean• 作用:自动安装部署和迁移,安装过程以及交互界面仍然会显示,但是会自动进行设置。
该参数也将自动应用以下默认设置:自动接受EULA协议、安装更新默认启用、遥测数据收集与上传默认开启、OOBE 交互界面会直接被跳过、硬盘分区引导记录会被升级或创建。
• 示例:setup.exe /auto upgrade 自动升级安装。
命令2:/quiet• 可用参数:无• 作用:该命令将隐藏掉所有的安装交互界面,也包括失败后的回滚界面。
• 示例:setup.exe /auto upgrade /quiet 静默自动升级安装。
命令3:/pkey• 可用参数:产品序列号• 作用:使用特定的产品序列号安装Win10系统。
• 示例:setup.exe /auto upgrade /pkey ABC12-DEF34-GHI56-JKL78-MNP90 自动升级安装并使用如下序列号命令4:/showoobe• 可用参数:Full;None• 作用:当使用了Full参数后,用户必须手动完成整个OOBE设置界面,既系统安装完成后的设置流程;当使用了None参数时,OOBE设置过程将会被直接跳过,并全部设定为默认设置。
• 示例:setup.exe /auto upgrade /showoobe none 自动升级安装,不显示OOBE交互界面。
命令5:/noreboot• 可用参数:无• 作用:在当前系统下完成操作后,安装程序将会自动重启电脑进入接下来的安装过程,添加该命令后,电脑将不会自动重启。
下次电脑重启时,安装程序将会自动开始。
• 示例:setup.exe /auto upgrade /noreboot自动升级安装,但不自动重启电脑。
命令6:/DynamicUpdate• 可用参数:Enable;Disable• 作用:设置安装程序在安装过程中,是否执行自动搜索、并下载安装最新更新。
SonicMQ V3.0 产品更新公告说明书
Product Update Bulletin:SonicMQ Version3.0This bulletin documents new and changed features for the Version3.0release and includes the following sections:n“New Features in Version3.0”on page2describes the new features in Version3.0.n“Features Changed Since Version2000.1”on page7describes the features that have changed since Version2000.1.n“Migration from Version2000or2000.1”on page10provides information on migrating to Version3.0.NoteNew Features in Version3.0New Features in Version3.0Table1shows the new features for this release and where you can find moreinformation about them.Table1.New Features in the Version3.0Release2Product Update Bulletin:SonicMQ V3.0New Features in Version3.0 Table1.New Features in the Version3.0Release(continued)Product Update Bulletin:SonicMQ V3.0New Features in Version3.0Table1.New Features in the Version3.0Release(continued)4Product Update Bulletin:SonicMQ V3.0New Features in Version3.0 Table1.New Features in the Version3.0Release(continued)Product Update Bulletin:SonicMQ V3.0New Features in Version3.0Table1.New Features in the Version3.0Release(continued)6Product Update Bulletin:SonicMQ V3.0Features Changed Since Version2000.1Features Changed Since Version2000.1This section describes changes that might effect existing code or the way inwhich you use the product.Table2shows the changed features for this releaseand where you can find more information about them.Table2.Features Changed Since Version2000.1Product Update Bulletin:SonicMQ V3.0Features Changed Since Version2000.1Table2.Features Changed Since Version2000.1(continued)8Product Update Bulletin:SonicMQ V3.0Features Changed Since Version2000.1 Table2.Features Changed Since Version2000.1(continued)Product Update Bulletin:SonicMQ V3.0Migration from Version 2000or 2000.110Product Update Bulletin:SonicMQ V3.0Migration from Version 2000or 2000.1If you currently have Version 2000or 2000.1installed and want to run an existing SonicMQ deployment under Version 3.0,you must run a migration utility to move the deployment to Version 3.0.This utility will be made available at a date to be announced.For more information on migration utility availability,contact SonicMQ Technical Support or visit the SonicMQ Web site at .Until then,you can prepare for Version 3.0migration.When you install Version 3.0,make sure that you install it in a configuration that does not replace or otherwise corrupt any existing Version 2000or 2000.1deployment that you want to maintain or migrate later.In addition,you can prepare by completing these tasks for each deployment that you plan to migrate:n Version 3.0does not allow overlapping clusters.If your deployment has more than one cluster,make sure that each message server is a member ofone and only one cluster at a time.n Version 3.0reserves the username AUTHENTICATED .Make sure that you do not have any SonicMQ user defined with the name AUTHENTICATED .nVersion 3.0places additional restrictions on queue and topic names.Make sure that you have no queue or topic names that:–Start with the case-sensitive string,“SonicMQ.”,for example:SonicMQ.UrgentMessages You might rename this to MySonicMQ.UrgentMessages .–Contain a double quote (::),for example:Sales::UrgentMessagesYou might rename this to Sales_UrgentMessages .Note that,in Version 3.0,you cannot delete any queues or topics with names that begin with “SonicMQ.”because this are considered system queues and topics.。
测试操作软件中英文对照

测试操作软件中英文对照目录:1 Satcon电源逆变系统操作主界面---------------------------------------------------------------------------------------------------------- 32 写入界面/ writer -------------------------------------------------------------------------------------------------------------------------- 52.1 控制/Control ---------------------------------------------------------------------------------------------------------------------------- 52.2 测试/Test ----------------------------------------------------------------------------------------------------------------------------------- 52.3 功能/Feature ----------------------------------------------------------------------------------------------------------------------------- 62.4 光伏/PV ------------------------------------------------------------------------------------------------------------------------------------- 62.5 组件/Components ------------------------------------------------------------------------------------------------------------------------ 72.6 额定值/Ratings ---------------------------------------------------------------------------------------------------------------------------- 82.7 直流电压保护/Vdc Prot ------------------------------------------------------------------------------------------------------ 82.8 直流电流保护/Idc Prot -------------------------------------------------------------------------------------------------------------- 92.9 交流电压保护/Vac Prot ------------------------------------------------------------------------------------------------------------- 102.10 交流电压保护2/Vac Prot 2 ------------------------------------------------------------------------------------------------------- 102.11 交流电流保护/Iac Prot ------------------------------------------------------------------------------------------------------------ 112.12 交流电流保护2/Iac2 Prot -------------------------------------------------------------------------------------------------------- 112.13 接地保护/Gnd Prot ---------------------------------------------------------------------------------------------------------------- 122.14 接地保护2/Gnd Prot 2 ------------------------------------------------------------------------------------------------------------ 122.15 频率保护/Frequency Prot -------------------------------------------------------------------------------------------------------- 132.16 寄存器/Regs ---------------------------------------------------------------------------------------------------------------------- 132.17 寄存器2/Regs 2 -------------------------------------------------------------------------------------------------------------------- 142.18 电压比例/V Scaling ---------------------------------------------------------------------------------------------------------------142.19 电流比例/I Scaling ----------------------------------------------------------------------------------------------------------------- 152.20 其他比例/Misc.Scaling ------------------------------------------------------------------------------------------------------------152.21 校准/Calibrate ---------------------------------------------------------------------------------------------------------------------- 162.22 温度/Thermal ------------------------------------------------------------------------------------------------------------------------ 162.23 温度2/Thermal 2 ------------------------------------------------------------------------------------------------------------------- 172.24 modbus通讯/Modbus -------------------------------------------------------------------------------------------------------------- 172.25 系列号/Serial ------------------------------------------------------------------------------------------------------------------------- 182.26 外部控制/Ext control --------------------------------------------------------------------------------------------------------------- 183 读取界面/reader ----------------------------------------------------------------------------------------------------------------------------193.1 测量/Meters ----------------------------------------------------------------------------------------------------------------------------- 203.2 相/Phases -------------------------------------------------------------------------------------------------------------------------------- 203.3 每个机器/Per Unit -------------------------------------------------------------------------------------------------------------------- 213.4 电流调节/I Regs ---------------------------------------------------------------------------------------------------------------------- 213.5 电压调节/V Regs --------------------------------------------------------------------------------------------------------------------223.6 软件/Software ------------------------------------------------------------------------------------------------------------------------- 223.7 计时器/Timers ------------------------------------------------------------------------------------------------------------------------ 233.8 温度/Thermal ------------------------------------------------------------------------------------------------------------------------- 233.9 直流输入路数1/String 1 ----------------------------------------------------------------------------------------------------------- 243.10 直流输入路数2/String 2 ---------------------------------------------------------------------------------------------------------- 24 3.11 直流输入每路千瓦时1/String kWHr 1 --------------------------------------------------------------------------------------- 25 3.12 直流输入每路千瓦时2/String kWHr 2 --------------------------------------------------------------------------------------- 25 3.13 数字信号输入/DIN ---------------------------------------------------------------------------------------------------------------25 3.14 数字信号输出/DOUT ------------------------------------------------------------------------------------------------------------263.15 模拟信号输入/AIN --------------------------------------------------------------------------------------------------------------264 点阵显示/Bit Show ---------------------------------------------------------------------------------------------------------------------- 27 4.1 状态/Status --------------------------------------------------------------------------------------------------------------------------- 27 4.2 现场可编程门阵列/FPGA --------------------------------------------------------------------------------------------------------27 4.3 输入/输出/INPUTS/OUTPUTS -------------------------------------------------------------------------------------------------- 28 4.4 故障1-3/Fault 1-3 ------------------------------------------------------------------------------------------------------------------- 29 4.5 故障4-6/Fault 4-6 ------------------------------------------------------------------------------------------------------------------- 30 4.6 故障7/Fault7 ------------------------------------------------------------------------------------------------------------------------ 30 4.7 比例/CAL ----------------------------------------------------------------------------------------------------------------------------- 31 4.8 点阵显示8/BitShow 8 -------------------------------------------------------------------------------------------------------------- 311 Satcon 电源逆变系统操作主界面简写注释:PCS : power conditioning system 电源逆变系统 PLL :phase locked loop 锁相环路 volts : voltages 做名称是电压 做单位是伏特 amps : amperes 安培 rdy : ready 准备 pwr :power 功率操作Satcon 电源逆变系统操作软件点阵显示写入界面读取界面其他窗口停机 重启 启动 停止 转到本地控制 转到远程控制 唤醒待机 直流输入电压 直流连接电流 没有故障 锁相环路失效 输入功率锁相环路没锁定输出电流输出视在功率输出有功功率功率因素直流输入没准备好输出电网端没准备好 没准备好CR1开路CR2开路 无功率输出门极关闭AC 断路器断开PI (Kp ,Ti ): P=proportional 比例 对应参数为Kp , I=intergral 积分 对应参数为Ti DSP :Digital Signal Processor 数字信号处理器停机 重启 启动 停止连接电源逆变系统 断开电源逆变系统 电源逆变系统通讯设置用户级别服务端级别系统级别 退出软件比例积分调节(Kp ,Ti ) 设置与DSP 通讯的参数从DSP 上传设置到电脑从电脑下载设置到DSP2 写入界面/ writer 2.1 控制/Controlcmd : command 指令,控制 2.2 测试/Test功率控制模式指令单位详细步骤保存运行使能无功功率控制模式 有功功率控制 功率因素控制无功功率控制 直流电压控制最大dq 电流 出厂默认100%有功功率升降速度无功功率升降速度保存所有设置到电脑和DSP 从电脑读取设置 从DSP 读取设置 清除设置测试模式选择闭合输出门极测试_选择 外部输入掩码开环测试中电压控制 闭环测试中电压控制风扇转速测试有功电流控制cct : circuit 电路open cct test 开环测试 short cct test 闭环测试 ext :external 外部 2.3 功能/featurebw :bandwidth 带宽estop :emergency stop 紧急停止 2.4 光伏电压/PV急停_重置自动重置间隔时间锁相环路带宽自动重置最大尝试次数自动重置锁死时间输出接触器断开延时 保存参数 初始化指令重新接入电网延时min :minimum 最小值,最小 PV :photovoltage 光电压 光伏mppt :maximum power point tracking 最大功率点跟踪 2.5 组件/components直流输入门槛电压 超过门槛电压后直流输入延时低功率限定 低功率延时预充电电压最小值 功率最小改变值直流电压操作每步间隔时间 功率改变延时Mppt 中直流电压改变最小值 Mppt 中直流电压改变最大值风扇转速可(1)否(0)调节 逆变桥数IGBT 开关频率死区时间输出滤波电感值输出滤波电容大小有(0)无(1)变压器三角型电压反馈1/星型接0直流输入路数freq:frequency 频率cap:capacity电容容量num:number 数量2.6 额定值/ratings额定输出功率额定输出频率额定输出电压额定逆变器输出电压欧洲机型CE 1,UL 0 变压器电压抽头比例语言接地类型:1接地,0 浮地inv:inverter 逆变器这里指逆变模块IGBTIGBT:Insulated Gate Bipolar Transistor 绝缘栅双极型晶体管euro:europe 欧洲2.7 直流电压保护/Vdc Protvolt :voltage 电压inst :instantaneous 瞬间,即刻的 Prot :protection 保护 2.8 直流电流保护/Idc Prot直流输入电压过压保护直流输入过压保护延时直流输入电压欠压保护门限直流输入欠压保护延时直流过压保护门限 直流过压保护延时直流欠压保护门限直流欠压保护延时直流过压瞬间保护门限直流欠压瞬间保护下限直流输入过流保护门限 直流输入过流保护延时直流输入瞬间过流保护门限2.9 交流电压保护/Vac Prot2.10 交流电压保护2/Vac Prot 2输出电压瞬间过压保护门限输出电压过压快速保护门限 输出电压过压快速保护延时输出过压慢速保护门限输出过压慢速保护延时输出欠压快速保护下限 输出欠压快速保护延时输出欠压慢速保护下限 输出欠压慢速保护延时输出电压不平衡保护门限 输出电压不平衡保护延时2.11 交流电流保护/Iac Prot2.12 交流电流保护2/Iav2 ProtUL :Underwriters Laboratories 美国保险商实验室 说这个机器是UL 的是说这个机器要符合UL 认证标准 同理CE 的是欧盟标准输出过流保护门限 输出过流保护延时中线过流保护门限 中线过流保护延时电流不平衡保护门限电流不平衡保护延时IGBT 过流保护门限 IGBT 过流保护延时UL 型号触发保护最小输出功率UL 型号触发保护的电流不平衡百分比值IGBT 硬件过流(短路)保护门限2.13 对地保护/Gnd ProtGFDI :2.14 对地保护2/Gnd Prot 2漏电流快速保护门限漏电流快速保护延时漏电流慢速保护门限 漏电流慢速保护延时接地直流保险保护动作电压 接地直流保险保护动作延时对地阻抗保护门限阻值 对地阻抗保护触发延时接地漏电流保护门限电流接地漏电流保护触发延时浮地阻抗测量传感器失效判定门限值Gnd:ground 地,接地Max:maximum 最大值2.15 频率保护/Frequency Prot超频保护门限超频保护延时欠频保护门限低频保护延时频率瞬间变动保护限定频率瞬间变动保护时间限定lmt:limit 限制限定tmlmt:time limit 时间限定2.16 寄存器/Regs(一般不用动)直流输入电压调节器增益直流输入电压调节器时间常量输出线电流调节器增益输出线电流调节器时间常量抗孤岛效应增益系数直流电流正反馈系数IGBT电流调节器增益IGBT电流调节器时间常量Reg:regulator 调节器应该指的是运放Cur:current 电流2.17 调节2/Regs 2(一般不用动)temp :temperature 温度 2.18 电压比例/V Scalingfdbk :feedback 反馈 2.19 电流比例/I Scaling功率调节器比例增益 功率调节器积分增益散热片温度调节器比例增益 散热片温度调节器积分增益散热片过温调节器比例增益 散热片温度调节器积分增益直流输入电压反馈串联电阻 IGBT 电压反馈串联电阻 输出电压反馈串联电阻IGBT 电压反馈比率输出电压反馈比率输出电压反馈并联电阻IGBT 电压反馈并联电阻直流输入电压反馈并联电阻2.20 其他比例/Misc.ScalingMisc.: miscellaneous 其他,各式各样 2.21 校准/Calibrate接地电流LEM 反馈比率 接地电流LEM 反馈负载电阻直流电流LEM 反馈比直流电流反馈负载电阻IGBT 电流LEM 反馈比IGBT 电流反馈负载电阻输出电流CT 反馈比率 中线电流CT 反馈比率 输出电流反馈负载电阻中线电流反馈负载电阻温度反馈串联电阻 温度反馈并联电阻直流输入路数电流LEM 反馈比率 直流输入路数电流反馈负载电阻Vdgim 浮地阻抗取样反馈串联电阻 Vdgim 反馈并联电阻接地保险电压取样串联电阻 接地保险电压取样并联电阻第二浮地阻抗取样反馈串联电阻 第二浮地阻抗取样反馈并联电阻2.22 温度/Thermal2.23 温度2/Thermal 2校准反馈 实际测量到的IGBT 的电压 实际测量到的直流输入电压 实际测量到的A 相电压实际测量到的B 相电压实际测量到的C 相电压温度过低保护门限风扇空气温度过低保护门限 散热片温度过低保护门限 风扇停止温度设定温度反馈路数温度过高保护门限风扇空气温度过高保护门限散热片温度过高保护门限风扇运转温度设定风扇最小转速PWR: power 功率FANON:fan on 风扇运转2.24 Modbus通讯/Modbus 2.25 系列号/serial 100%功率下风扇运转温度5%功率下风扇运转温度Modbus传输波特率Modbus访问代码Modbus数据位访问代码1 Modbus奇偶校验Modbus停止位从站地址nv: nonvolatile 非易失性 chksum :checksum 校验和 prgm: program 程序 2.26 外部控制/Ext control系列号1输出频率跟踪 允许非易失性写入F206 校验和保存 程序校验和保存模拟功率因素控制1:外部继电器和4-20ma 功率因素控制 0:禁止外部控制最大功率因数范围功率控制开关1 功率控制开关2功率控制开关3功率控制开关4Ext: external 外部的 PF: power factor 功率因素 rng:range 范围 SW: switch 开关3 读取界面(只读参数)3.1 测量/meters3.2 相/Phases直流输入电压 直流连接电压 直流连接电流 输入功率IGBT 电压 IGBT 电流 输出线电压 输出线电流输出有功功率 输出无功功率 总兆瓦小时 输出视在功率 功率因素总千瓦小时 总瓦小时 直流输入准备时间中线电流 直流对地电流 对地阻抗 交流侧准备时间操作状态 电脑指令 远程指令 接地保险电压IGBT a相电流IGBT b相电流IGBT c相电流风扇转速2组IGBT a相电流2组IGBT b相电流2组IGBT c相电流输出线电流a相输出线电流c相输出线电流b相电流不平衡输出电压a相输出电压b相输出电压c相电压不平衡ab相之间输出电压bc相之间输出电压ca相之间输出电压锁相环路错误锁相环路频率3.3 每个机器/Per Unit平均直流输入电压平均直流电压平均直流电流平均IGBT电压平均IGBT电流d轴平均IGBT电流q轴平均IGBT电流平均输出电压平均输出电流d轴平均输出电流q轴平均输出电流平均输入功率平均输出功率平均无功功率平均视在功率平均输出频率平均频率错误平均中线电流功率因素d轴平均IGBT电压q轴平均IGBT电压简写注释avg: average 平均值err :error 错误3.4 电流调节/I Regs3.5 电压调节/V RegsRef :reference 参考 3.6 软件/Softwared 轴输出电流指令 d 轴输出电流错误 d 轴输出电流反馈 d 轴d 轴输出维持电流 d 轴电压控制 q 轴输出电流指令 q 轴输出电流指令q 轴输出电流错误 q 轴 q 轴输出维持电流 q 轴电压控制d 轴IGBT 电流错误 d 轴IGBT 平均电流 d 轴IGBT 电流错误 d 轴IGBTd 轴IGBT 维持电流 d 轴 q 轴IGBT 控制 q 轴IGBT 平均电流q 轴IGBT 电流错误 q 轴IGBT q 轴IGBT 维持电流 q 轴参考电压 反馈电压 错误电压 维持电压瞬间电压 直流参考电流d 轴输出电压控制q 轴输出电压控制 平均输入功率平均输出功率直流电压最低值 直流电压最高值REV :revision 版本 param :parameter 参数 calc :calculation 计算 ini :initial 初始化3.7 计时器/Timersecs: seconds 秒 cntr: control 控制FPGA 版本 F206版本 F240版本程序校验和计算 206程序校验和计算 参数校验和计算 数据校验和计算程序校验和保F206校验和保存参数校验和读取数据校验和读取最大dq 电流 仪表校验和保存 参数校验和保存d 轴电流升降速度控制 数据库初始化OK1数据库初始化OK2千瓦时控制AC 侧准备时间 直流输入准备时间 时间控制 尝试次数锁定标记 校验和错误 故障总和计时器1 风扇重置计时器 串行通讯接口校验和错误错误5 PWM 载波计数Modbus 超时 0功率时间限制串行通讯接口超时sci :Serial Communications Interface 串行通讯接口 pwm :Pulse Width Modulation 脉宽调制 3.8 温度/Thermalcab :cabinet 箱,橱柜3.9 输入路数1/Strings 13.10 输入路数2/Strings 2风扇室空气温度 控制箱温度 散热片温度1风扇空气温度信号电压控制箱温度信号电压散热片温度信号电压1散热片最大温度 风扇转速 温度限定直流输入第一路电流直流输入所有路数平均电流直流输入第17路电流直流输入所有路数平均电流3.11路数千瓦小时1/String kWHr 1第一路千瓦时3.12 路数千瓦小时2/String kWHr 23.13 数字信号输入/DINDIN :digital signal in 数字信号输入 DS :disconnector 断路器 CR :contactor 接触器 STAT :status 状态LAC :AC reactor 交流电抗器 TX: transformer 变压器 CB :AC breaker 交流断路器 TSW :temperature switch 温度开关 SURGE: surge suppressor 浪涌抑制 3.14数字信号输出/DOUT直流断路器 门开关或急停 直流接触器输入 接地保护监测风扇2状态 电抗器1温度开关 变压器温度开关 1组IGBT 保险2组IGBT 保险 交流接触器 电抗器2温度开关 交流断路器风扇状态 急停 1组逆变模块温度开关 1组逆变模块温度开关直流浪涌抑制器交流浪涌抑制器 操作开关选择 风扇1温度开关风扇2温度开关数字信号输入功率 数字信号输入功率因素DOUT: digital signal out 数字信号输出 3.15 模拟信号输入/AINAIN: analog signal in 模拟信号输入 NEUT: neutral 中线4 点阵显示界面4.1状态/Status数字信号输出1A 相输出电压模拟信号 A 相输出电流模拟信号IGBT 输入电压模拟信号 A 相输入电流模拟信号对地漏电流模拟信号 中线电流模拟信号 直流侧火线电流模拟信号直流输入电压浮地阻抗电压直流连接电压 路数1路数2 温度测量电压测试10:没有初始化1 :锁相环路被禁止2 :锁相环路没锁定3:正序(逆变发电)4 :输出端没有准备好5 :直流输入没有准备好6:没有准备好7:没有故障8:没有停机9 :没有运行10 :无功率输出11 :没有接入电网12:门极信号测试关闭13 :开环测试模式关闭14 :闭环测试模式关闭15:无参数4.2 现场可编程门阵列/FPGA0:IGBT光纤驱动信号反馈11:IGBT光纤驱动信号反馈22:IGBT光纤驱动信号反馈33:IGBT光纤驱动信号反馈4 4 :IGBT光纤驱动信号反馈5 5:IGBT光纤驱动信号反馈620:直流电源OK 21:硬件过流1 OK 22:硬件过流2 OK23:24:IGBT 光纤驱动信号A25:IGBT光纤驱动信号B 26:IGBT光纤驱动信号C 27:IGBT光纤驱动信号A2 28:IGBT光纤驱动信号B2 29:IGBT光纤驱动信号C232:重启33:门极信号允许34:门极测试35:运行指示灯36:故障指示灯37:38:逆变模块2错误掩码39:逆变器模块2允许简写注释:HW: hardware 硬件OC:over current 过流en: enable 使能flt: fault 故障,错误msk:mask 掩码4.3 输入/输出/INPUTS/OUTPUTS0:直流断路器断开1:门打开2: 直流接触器断开3:GFDI接地错误4:风扇2 OK 5:电抗器温度过高6:隔离变压器温度过高7:逆变模块1烧保险8:逆变模块2烧保险9:交流接触器断开10:电抗器2温度过高11:电路切断器12:风扇1 OK 13:急停14:逆变模块1温度过高15:逆变模块2温度过高16:直流浪涌抑制器17:交流浪涌抑制器18:操作选择开关19:风扇1温度开关20:风扇2温度开关32:门极信号复位指令33:断开交流接触器指令34:断开预充电回路指令35:断开直流接触器指令36:没有发电37:故障38:切断电路保护指令39:GFDI复位信号40:风扇继电器41:风扇2脉宽调制42:门极信号关闭43:辅助多路传输144:辅助多路传输245:多路模拟开关3 46:多路模拟开关4 47:风扇1脉宽调制简写注释:xfmr:transformer 变压器brbk:breaker 断路器SS:surge suppressor 浪涌抑制器Prechg:precharge 预充电Amux:auxiliary multiplex 多路复用4.4 故障1-3/Fault 1-30:直流输入没准备好1:联网输出端没有准备好2:停止指令3:停机指令4:急停5:供电电源太低被停止6:电流太小被停止7:保护延时故障8:门被打开9:直流断路器断开10:电路切断器断开11:DPCB板故障12:硬件故障13:IGBT故障14:温度故障16:直流输入过压17:直流输入欠压18:直流过压19:直流欠压20:直流输入接地故障21:联网输出端慢速过压22:联网输出端快速过压23:联网输出端慢速欠压24:联网输出端快速欠压25:电压不平衡26:频率过高27:频率慢速过低28:频率快速过低29:中线过流30:联网输出端瞬间过压32:程序校验和33:fpga版本34:数据拷贝135:数据拷贝2 36:参数A拷贝1 37:参数A拷贝2 38:参数A拷贝239:参数B拷贝240:电压反馈比例41:电流反馈比例42:IGBT电流反馈43:额定值改变44:F206版本45:f206校验和46:非易失性ram故障47 :fpga故障简写注释:OV:over voltage 过压UV: under voltage 欠压4.5 故障4-6/Fault 4-60:+5V隔离电源1: +5V DPCB板电源2:+15V DPCB板电源3:-15V DPCB板电源4:看门狗5:浪涌抑制器6:1组逆变模块保险7:2组逆变模块保险8:1组逆变模块温度9:2组逆变模块温度10:变压器温度11:电抗器温度12:预充电故障13:测试模式14:开环测试15:闭环测试16:A相门极信号反馈17:B相门极信号反馈18:C相门极信号反馈19:A2相门极信号反馈20:B2相门极信号反馈21:C2相门极信号反馈22:直流输入过流23:直流输入瞬间过流24:直流瞬间欠压25:直流瞬间过压26:IGBT软件过流27:1组IGBT硬件过流28:2组IGBT硬件过流29:联网输出端过流30:电流不平衡32:控制箱温度过高33:风扇室空气温度过高34:散热片1温度过高35:散热片2温度过高36:散热片3温度过高37:散热片4温度过高38:散热片5温度过高39:散热片6温度过高40:控制箱温度过低41:风扇空气温度过低42:散热片1温度过低43:散热片2温度过低44:散热片3温度过低45:散热片4温度过低46:散热片5温度过低47:散热片6温度过低简写注释:iso:insolated power 隔离电源DPCB:digital power control board 数字电源控制板SW: software软件hi:high 高htsnk:heatsink散热片lo:low 低4.6 故障7/Fault 70:风扇1故障1:风扇2故障2:直流接触器没有断开3:直流接触器没有闭合4:交流接触器没有断开5:交流接触器没有闭合7:8:4.7 比例/CAL0:A相输出感应电压和实际测量电压相差过大1:IGBT电压检测相位错误2:输出电流检测CT相位错误3:IGBT电流检测LEM相位错误9:B相输出感应电压和实际测量电压相差过大10:C相输出感应电压和实际测量电压相差过大11:IGBT感应电压和实际测量电压相差过大12:直流感应电压和实际测量电压相差过大13:直流输入感应电压和实际测量电压相差过大4.8 点阵显示8/Bit Show 80:功率因素0 1:功率因素12:功率因素2 3:功率因素34:功率控制指令0 5:功率控制指令1 6:功率控制指令2 7:功率控制指令3简写注释:PF: power factor 功率因素Pcmd:power command 功率控制。
SupportAssist for Home PCs 版本 3.10 用户指南说明书

SupportAssist for Home PCs 版本 3.10用户指南7 2021注意、小心和警告:“注意”表示帮助您更好地使用该产品的重要信息。
:“小心”表示可能会损坏硬件或导致数据丢失,并告诉您如何避免此类问题。
:“警告”表示可能会导致财产损失、人身伤害甚至死亡。
© 2021 Dell Inc. 或其子公司。
保留所有权利。
Dell、EMC 和其他商标是 Dell Inc. 或其附属机构的商标。
其他商标可能是其各自所有者的商标。
章 1: 简介 (5)主要功能 (5)文档用途 (5)目标受众 (5)新功能和增强功能 (5)支持的 PC (6)SupportAssist 功能与戴尔服务计划 (6)其他服务选项 (8)章 2: 开始使用 SupportAssist for Home PCs (9)最低 PC 要求 (9)适用于家用 PC 的 Dell SupportAssist (10)SupportAssist 用户界面 (10)更改语言设置 (11)创建 SupportAssist 配置文件 (11)创建“我的戴尔帐户” (12)使用社交媒体帐户登录 (12)更新联系人信息和发货信息 (12)使用不同的 SupportAssist 配置文件 (12)配置互联网设置 (13)计划的扫描和优化 (13)计划自动扫描和优化 (13)手动升级 SupportAssist (14)通知 (14)SupportAssist 用户界面上的通知 (14)Windows 操作中心内的通知 (15)SupportAssist 主页横幅 (16)禁用 SupportAssist 通知 (16)卸载 SupportAssist (17)章 3: 系统重设和修复概述 (18)将您的 PC 重设为出厂设置 (18)重置 PC 并更新操作系统 (19)配置系统修复设置 (19)修复您的 PC (19)章 4: Dell Migrate 概览 (20)将数据从旧 PC 迁移到新 PC (21)擦除并重置旧 PC (22)章 5: 驱动程序和下载概览 (23)驱动程序的严重性类别 (23)安装驱动程序更新 (23)卸载驱动程序更新 (24)目录3“获取驱动程序和下载”磁贴通知 (24)章 6: 扫描 PC 硬件 (25)扫描特定硬件组件 (25)运行快速硬件扫描 (26)运行压力测试 (26)章 7: 优化您的 PC (27)清理文件 (27)调整 PC 性能 (27)优化网络 (27)删除病毒和恶意软件 (28)删除可能不需要的程序 (28)运行所有 PC 扫描和优化 (29)章 8: 虚拟助手概览 (30)章 9: 创建支持请求 (31)为通过扫描检测到的问题创建支持请求 (31)手动创建支持请求 (31)问题详细信息页面 (32)问题摘要页面 (32)可派发部件 (33)章 10: 故障处理概览 (34)章 11: 历史记录概览 (35)章 12: 获得支持 (36)发送文件至戴尔技术支持人员 (36)发送日志文件至戴尔技术支持人员 (37)远程故障处理 (37)通过使用 RemoteAssist 允许远程故障处理 (37)允许通过使用远程帮助进行远程故障处理 (37)章 13: 提供反馈 (39)章 14: 常见问题 (40)章 15: SupportAssist for Home PCs 资源 (42)章 16: 联系 Dell (43)4目录简介Dell SupportAssist 通过主动预测式地发现您的PC 上的软硬件问题,自动为您提供支持。
西门子技术问题总汇

文档标题
如何设置模拟量输入模板 SM 431-7KF00的温度补偿? 如何解决 SIMATIC BATCH 的 IL43基本设备上 hotfix 安装的问题? 如果通过 PCS7 V6.1 SP1 DVD 单独安装 SIMATIC BATCH Report 需要注意哪些设置? 为什么冗余模拟量输出模块的每个通道只有一半电流输出? 使用WinCC/Web Navigator V6.1 SP1需要什么样的操作系统和软件? 是否 COM PROFIBUS 可以使用所有版本的 GSD 文件? 如何在 WinCC flexible 中组态与S7 控制器的 Profinet 连接? 如何在操作面板上设定定时器时间, 同时如何输出定时器的剩余时间? 数据块初始值与实际值的含义 如何通过窗口对象滚动条步进调节过程值参数? 使用 SINAUT ST7 向电子邮箱接受方发送文本信息 SMS 需要做何设置? 可以使用CPU317-2PN/DP替代在iMap中组态的CPU315-2PN/DP吗? 什么情况下插入C-PLUG卡或者C-PLUG有什么作用? 通过一台PC,可以使用哪种方式访问与IWLAN/PB link PNIO或IE/PB link PNIO连接的PROFIBUS设备? 当在SINAUT网络中使用4线变压器应该注意哪些设置? 在 SINAUT 网络中,使用MD3拨号调制解调器作为专线调制解调器时,要进行哪些设置? 如何安装 DCF77 天线, 当选择 DCF77 天线时需要注意什么? 使用SINAUT ST7向传真机发送文本信息时,需要进行哪些设置? 在 SINAUT 项目中发送短消息必须进行哪些特殊服务的设置? 如何在S7-300 PN CPU和CP343-1之间建立一个open TCP 通讯连接,以及如何进行数据交换? 如何在两个S7-300 PN CPU之间建立一个open TCP 通讯连接,以及如何进行数据交换? 哪些控制系统可以成功与SINAUT ST7一起使用? 使用“零-Modem”电缆连接 TIM 模块应该注意什么? 当用 SINAUT 诊断工具的ST1协议进行诊断时,为什么TIM的状态不能显示? TIM 3V-IE 和 TIM 3V-IE Advanced 模块在以太网上通信时使用哪个端口号? 如何对没有接入网络的S7-200CPU编程? 掉电后,LOGO!的程序会丢失吗? 从 PCS7 V6.1 起,为什么没有分配任何 hierarchy (PH) 的 测量点(变量)通过编译不能在OS中自动创建相应的变量? 在SFC中,如何实现从一个 Sequencer 跳出后回到另一个 Sequencer 的某个固定位置并继续执行? 如何实现过程变量的平均值归档? 存储文件的目标路径和备份可选路径有何作用? WinCC变量归档中如何实现采集周期小于500ms的变量归档? 为什么在 OS 上会显示如下信息“时间跳变通知-永久切换为从站模式”? 在西门子A&D产品支持网站是否可以下载关于ET200M的手册? 在S7-400上怎样安装冗余电源? UDT改变后怎样更新使用UDT产生的数据块。 为什么在FB块中使用OUT变量赋值被调用FB块的IN变量时出现错误信息34:4469? 如何查看4-mation导入-导出错误 不能正确引导8212-1QU IBM/Lenovo M52 ThinkCentre 实时趋势更新缓慢的原因 如何保存变量名字典CSV文件的格式
家用电脑专用的 SupportAssist 3.10 版 用户指南说明书

家用電腦專用的 SupportAssist 3.10 版使用者指南7 2021註、警示與警告:「註」表示可以幫助您更有效地使用產品的重要資訊。
:「警示」表示有可能會損壞硬體或導致資料遺失,並告訴您如何避免發生此類問題。
:「警告」表示可能的財產損失、人身傷害或死亡。
© 2021 Dell Inc. 或其子公司。
版權所有,翻印必究。
Dell、EMC 與其他商標均為 Dell Inc.或其子公司的商標。
其他商標可能為其各自擁有者的商標。
章1: 簡介 (5)重要功能 (5)文件用途 (5)對象 (5)新功能和增強功能 (6)支援的電腦 (6)SupportAssist 功能與 Dell 服務方案 (6)其他服務方案 (8)章2: 開始使用家用電腦專用 SupportAssist (9)最低電腦需求 (9)安裝家用電腦專用的 SupportAssist (10)SupportAssist 使用者介面 (10)變更語言設定 (11)建立 SupportAssist 設定檔 (11)建立「我的 Dell 帳戶」 (12)以社交媒體帳戶登入 (12)更新連絡與送貨資訊 (12)使用不同的 SupportAssist 設定檔 (12)進行網際網路設定 (13)排程掃描和最佳化 (13)排程自動掃描和最佳化 (13)手動升級 SupportAssist (14)通知 (14)SupportAssist 使用者介面上的通知 (14)Windows 控制中心內的通知 (15)SupportAssist 首頁上的橫幅 (16)停用 SupportAssist 通知 (16)解除安裝 SupportAssist (17)章3: 系統重設和修復概觀 (18)將電腦重設為原廠設定 (18)重設您的電腦並更新作業系統 (19)設定系統修復設定 (19)修復您的電腦 (19)章4: Dell Migrate 概觀 (20)從舊電腦將資料遷移至新電腦 (21)清除和重設舊電腦 (22)章5: 驅動程式與下載概觀 (23)更新的嚴重性分類 (23)安裝驅動程式更新 (23)解除安裝驅動程式更新 (24)目錄3「取得驅動程式與下載」磚通知 (24)章6: 掃描電腦硬體 (25)掃描特定的硬體元件 (25)執行快速硬體掃描 (26)執行壓力測試 (26)章7: 最佳化電腦 (27)清除檔案 (27)調整電腦效能 (27)最佳化網路 (27)移除病毒和惡意軟體 (28)移除可能不需要的程式 (28)執行所有電腦掃描及最佳化 (29)章8: 虛擬助理概觀 (30)章9: 建立支援要求 (31)為掃描偵測到的問題建立支援要求 (31)手動建立支援要求 (31)問題詳細資訊頁面 (32)問題摘要頁面 (32)可分派零件 (33)章10: 故障診斷概覽 (34)章11: 歷程記錄概觀 (35)章12: 取得支援 (36)將檔案傳送給 Dell 技術支援部門 (36)傳送記錄檔給 Dell 技術支援部門 (37)遠端故障診斷 (37)允許透過 RemoteAssist 進行遠端故障診斷 (37)允許透過遠端協助進行遠端故障診斷 (37)章13: 提供意見回饋 (39)章14: 常見問題集 (40)章15: 適用於家用電腦的 SupportAssist 資源 (42)章16: 聯絡 Dell (43)4目錄簡介SupportAssist 會主動預先識別電腦上的硬體和軟體問題,並自動提供 Dell 的支援。
Visual Studio 2010 测试管理解决方案

ӄMicrosoft Testing SolutionMicrosoft Testing Solution 微软测试解决方案Microsoft Visual Studio 2010 带来了全新的软件测试解决方案,并使其整合在整个应用生命周期管理体系(ALM)之中。
作为应用生命周期最重要的环节,软件质量保证历来是软件企业最迫切期望得到改善和提高的部分。
微软测试解决方案包括快速进行有关测试的实际与开发、测试用例管理,与Visual Studio Team Foundation Server 集成的测试计划,以确保所有变更和迭代都被正确的测试和覆盖。
这些功能贯穿于整个测试周期:测试计划、测试执行、进度跟踪和结果分析。
Microsoft Visual Studio 2010 测试工具集可以用于创建测试计划、管理测试用例、运行测试用例、管理和分析测试结果,以及与微软新一代开发测试云集成等特性。
微软测试解决方案真正做到了和开发团队的有效协作,是目前最流行的敏捷方法 Agile/Scrum 的最佳实践。
Microsoft Visual Studio 2010 测试框架Microsoft T est Manager 微软测试管理解决方案微软测试管理框架Microsoft Visual Studio 2010 测试管理包含架构设计、项目模板、测试管理、项目门户等;对于MS Project 、SharePoint 、Hyper-v 虚拟化平台及云计算平台进行了全面的集成。
可以大幅提升软件质量,集成的测试工具集提供了完整的”计划-测试-跟踪” 工作流。
使用丰富的诊断工具为开发人员归档大量bug 。
充分利用以人物为导向的用户界面和手动测试快进等功能, 可以获得所有团队角色之间的上下文协作, 大大增加了对整个项目的可视性, 同时提供了对用户需求的完整可跟踪性、进度报告和实施质量度量。
有助于您做出明智、及时的决策, 并降低与软件发布相关的风险。
WOSA/XFS_3.10_中文版-第1部分(应用程序编程接口(API)- 服务提供程序接口(SPI))

4.1 XFS管理器 ........................................................................................................................ 17 4.2 服务提供程序 ...........................................................................................ห้องสมุดไป่ตู้....................... 18
管理中心地址:布鲁塞尔斯达沙特街 36 B-1050(rue de Stassart, 36 B-1050 Brussels) 版权所有 © 2008欧洲标准化委员会,为欧洲标准化委员会会员国在 全球范围 内保留以任何形 式和方 法进行利用 的所有权利 。
参考号:CWA 15748-1:2008 D/E/F
第2页 CWA 15748-1:2008
目录
前言 .................................................................................................................... 5 1. 颁布3.10版本的背景 ....................................................................................... 8 2. 参考资料 ....................................................................................................... 9 3. 金融服务扩展(XFS)概述 ......................................................................... 10
新声卡kx驱动包插件中英文对照
新声卡kx驱动包插件中英文对照新声卡kx驱动包插件中英文对照硬件设备菜单1 FXBus 路由器2 FXBus2 路由器3 FXBus32 路由器4 epiloglt_k1终解程序5 epiloglt_k2终解程序6 p16v 2496解码器7 prolog 初构程序8 prologlt9 xrouting基本处理器菜单1 FXMix 多路路由器2 FXMix2 多路路由器3 Mono Mix 单声混合器4 Pan 声道控制5 Pan x2 声道控制6 Peak 相位7 Phase8 St Vol 音量控制9 Stereo Mix 立体声混音器10 Stereo Mix +Gain 立体声加强混音器11 Summ 萨姆12 Vol 音量13 Vol+DC 麦克增益14 crossfade 淡出器15 div416 gain 放大器17 gainHQ 音量控制18 x4x4 放大4倍19 xSumm_x萨姆20 xor 异或E-MU APS菜单(电子亩接入点)1 APS AutoWah 自动哇音2 APS Compressor 压限器3 APS Compressor+ 压限增益4 APS Everb5 APS Expander 扩展器(扩张器、膨胀器)6 APS Expander+ 扩展增益7 APS Flanger 凸缘器(镶边)8 APS Fuzz 微噪音9 APS Pitch 音调器(变声插件)Creative LiveWare菜单(创新器件)1 CL Reverb 混音器2 CLEAX3Reverb3 CLEAX4Reverb环绕声处理器菜单1 3D Sound Gen 3D环绕2 HPhSp 重低音3 Pos3DFX 3D环绕路由4 Prologica 音效连接器5 Surrounder+ 环绕混音加强6 cnv51to207 downmix 低音混合8 encode4 解码器9 surrounderlt 环绕混音均衡器和滤波器菜单1 EQ Bandpass 滤波转换器(均衡带通)2 EQ G10 图示均衡器(十段均衡器)3 EQ Highpass 低切(高通)4 EQ Highshelf 高架5 EQ Lowpass 高切(低通)6 EQ Lowshelf 低架7 EQ Notch 断口器8 EQ P1 波段器(小一均衡器)9 EQ P1 (Mono) 单声道波段器(单声道小一均衡器)10 EQ P5 五段均衡器11 EQ P5 (Mono) 单声道五段12 EQ peaking 波段调峰13 Freq Splitter 频率分离器14 phat EQ Mono 单声均衡15 Phat EQ Stereo 混合均衡(单声道立体声)16 Timbre 音色调节直通菜单1 ac3passthrough 交流穿透器2 b2b 优质ProFX菜单1 proFx:ADC 麦克风输入插件2 proFx:ASIO 低延时器(音频流输入输出接口)3 proFx:MX6 六路调音台4 proFx:Src 系统音源输入插件5 proFx:kXLt 总音频输出插件旧版本插件菜单1 16to322 Delay Old3 Dynamics Processor 动态压缩器4 FXBusX 路由器5 Overdrive6 Overdrive27 RingMod8 Wave Generator9 Wave Generator 2.010 ac3passthru_old11 ac3passthru_x12 b2b_old13 xrouting_old 调音台EF-X菜单(英法X的)1 EFX Oscilloscope 示波器2 EFX ReverbStation 混响器3 EFX TubeDrive 吉他效果器2nd order crossover 第二路交叉4nd order crossover 第四路交叉Booble Gum 气泡Chorus 和声(合唱)Crossover-2 二路交叉Crossover-4 四路交叉Delay A 延迟Delay B 延迟Dynamics Processor 动态效果器(闪避效果器) FxRouter 外汇路由器GainX 放大器HarmonicsGen 谐频Info 域名(信息)Loudness Comensator 响度补偿Mixy 4x2 四路混合台Mixy 8x2 八路混合台Mono Vocoder 单声码器Noise Gate 2T 噪声门Noise Gate 2Ts 噪声门PeakX 限制器Phaser 相位器ProFx:MX8 八路调音台ProFx:NoiseGate 噪音门ProFx:NoiseGateST 噪音门ProFxeak4 四路限制器ProFx:Peak6 六路限制器ProFx:Peak8 八路限制器Reverb Lite 精简效果器Reverb R 效果器Stereo Chorus 混合和声器Stereo Decimator 混响抽取器(立体声降频)Streo Vocoder 单声道混合器Surrounder 镶边TheDelay 替换延迟TheSmallDelay 小延迟TimeBalanceV2 时间平衡TubeSound 声音传导Wave Generator 3.0 波形震荡器epilogepilog_oldprolog_oldroutingvibrato 颤音roPhaser 相位器putnik 普特呢克真人发音器ibrato 震动器remolo 颤音调和器。
MineSet 3.0 企业版 安装说明

MineSet 3.0 企業版安裝說明......................................................................................................................................................................此 CD 包含用於 Windows (客戶端和伺服器) 的 MineSet 3.0 企業版軟體,或用於 IRIX 的 MineSet 3.0 企業版伺服器軟體。
用於 Windows 的版本包括︰• 程式檔案 (可執行檔案及 DLL)• 範例• 樣本 (包括電影)格式的文件 (使用者指南、參考指南、介面指南和教學課程)• PDFIRIX 的版本包括︰單線程解析程式• MineSet多線程解析程式• MineSet• 用於 Oracle、INFORMIX 和 Sybase 的 MineSet 資料㆖載腳本1007-4007-001CHT此版本的新功能MineSet 的這㆒版本具有 MineSet 2.6 for IRIX 的功能以及對 Microsoft Windows 的附加支援。
它具有將執行在 Windows ㆖的 MineSet 客戶端程式與在 IRIX 或 Windows NT ㆖執行的 MineSet 伺服器程式連接起來的能力。
MineSet 3.0 企業版的新功能包括︰• 在 IRIX 和 Windows NT ㆖的 MineSet 伺服器程式• 在 Windows NT、Windows 95 和 Windows 98 ㆖的 MineSet 客戶端程式• 將 MineSet Windows 客戶端程式與 Windows NT 或 IRIX 執行的MineSet 伺服器程式相連接的能力連接提供了對 Microsoft SQL Server、Oracle、IBM DB2 及其• ODBC它 ODBC 相容資料庫的訪問• OLEDB支援 SQL Server可視化組件• ActiveX• 插件功能、轉換及建模工具有關「新功能」的完整清單,請拜訪 MineSet 首頁,位於/software/mineset.2支援的平台此版本的 MineSet 3.0 包含用於 Windows 的 MineSet 客戶端和伺服器軟體,或用於 IRIX 的 MineSet 伺服器軟體。
如何在安装有SoMachine V3.0的计算机上安装SoMachine V3.1的操作步骤

如何在安装有SoMachine V3.0的计算机上安装SoMachine V3.1的操作步骤IS OEM NC SAE 李振SoMachine V3.1支持的操作系统如下:Microsoft Windows XP Professional Edition 32 Bits Service Pack 3 Microsoft Windows 7 Professional Edition 32 BitsMicrosoft Windows 7 Professional Edition 64 BitsSoMachine V3.0的卸载过程1、卸载SoMachine M218插件2、卸载SoMachine卸载过程中,勾选同时下载的选项,如Vijeo Designer等3、卸载SoMachine相关的其他软件4、修改注册表在运行对话框中输入“regedit”展开“SOFTWARE”项,并打开“Schneider Electric”项如果在卸载完成后,上面的文件夹仍然存在,则右单击删除该文件夹SoMachine V3.1的安装过程1、安装之前需要做的事情关闭计算机的Windows防火墙关闭360安全卫士,关闭计算机的杀毒软件2、安装SoMachine V3.1点击“setup”启动安装,在安装过程中,选择“典型安装”,安装完成后,按照操作提示重启计算机3、SoMachine V3.1授权4、安装SoMachine 库更新程序如果需要则安装,不需要则跳至下一步5、安装Lexium23 Plus库更新程序如果需要则安装,不需要则跳至下一步6、安装Vijeo Designer SP2.1更新程序只执行Vijeo_Designer_SP2.1程序即可如果需要则安装,不需要则跳至下一步7、安装GXO与OT系列HMI的更新程序如果需要则安装,不需要则跳至下一步8、安装M218的更新程序如果需要则安装,不需要则跳至下一步9、安装Solution Extension更新程序如果需要则安装,不需要则跳至下一步10、安装SoMachine V3.1 Service Pack 111、在360安全卫士中将整个Schineider Electric安装目录文件夹添加至信任区12、如果计算机Windows系统为Win 7时,进行以下步骤将SoMachine V3.1的“属性”—“兼容性”—“权限”里的“以管理员权限运行”选上。
Smith V3.1 软件的使用方法
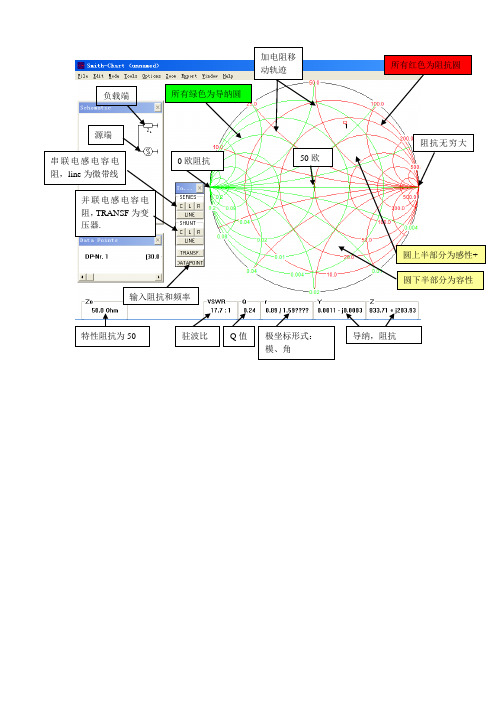
0欧阻抗50欧阻抗无穷大所有绿色为导纳圆所有红色为阻抗圆串联电感电容电阻,line 为微带线并联电感电容电阻,TRANSF 为变压器.圆下半部分为容性-圆上半部分为感性+ 输入阻抗和频率负载端源端特性阻抗为50 驻波比Q 值极坐标形式: 模、角导纳,阻抗加电阻移动轨迹1. 一开始选Keyboard :2.例子, 一个40+80J 的电路要匹配到50欧,在2.4G 的时候.1. 点击DATSPUN ,选择Keyboard 键盘输入2. 输入40和80和2.4GHZ输入的为阻抗阻抗实部阻抗虚部频率笛卡尔坐标 极坐标反射系数 导纳(单位:S 西门子)3.点击串联电容C, 点1开始往下转,在点2处单击左键停止.4.点击并联电容C, 点2开始往点3跑,在点3(点3为50欧)点击左键,即完成匹配。
点击串C5. 匹配电路为:40+80j欧50欧一个电路为负载40+80j阻抗经过串联一个1.1PF的电容,和并联一个660Ff=0.66PF的电容。
达到了L型匹配。
(此图651.2fF和660.8fF有点误差,没有关系的,是一样的。
那是因为鼠标没有点准)要领:1.smith史密斯图用于阻抗匹配2.圆上的任何点都是阻抗.3.红色是阻抗圆,绿色是导纳圆。
4.圆心是50欧,最左是0欧,最右是无穷大电阻。
5.圆的上半部分是感抗(比如5-6j)下半部分是容抗.(比如3+2j)6.加电感向上转,加电容向下转.(加电阻沿着电阻线跑,一般用不着电阻)7. 串联沿着红色圆(阻抗圆)移动,并联沿着绿色圆(导纳圆)移动.8.阻抗有几种数学表示方法,一个是复数的形式,比如40+80J, 一个是极坐标的形式.9.一般每次都要转到和50阻抗圆或0.02导纳圆处,再换下一个元件.第9条的解析,一般要移动到0.02或50这个圆上,然后再换元件.。
施耐德 ION set up 配置软件 PowerLogic 数据表
Product data sheet
Characteristics
主要信息
产品系列 产品系列 产品类型 格式 软件类型 授权类型 产品商标 软件版本 操作系统
补充信息
Subscription type 软件功能 系统需要
包装单位
Unit Type of Package 1 Number of Units in Package 1
合同保修
保修单
Product Life Status :
ION-SETUP
ION set up 配置软件
PowerLogic PowerLogic 软件 Download 配置软件 免费许可证 施耐德电气 V3.0 Windows 7 Windows 8 Windows 8.1 Windows 10 Windows2008 R2服务器版 Windows Server 2012 Windows2012 R2服务器版 Windows Server 2016
Free 设备设置 32 bit processor 1 GB RAM 1 GHz or higher clock frequency
PCE 1
18 个月
Commercialisedn provided in this documentation contains general descriptions and/or technical characteristics of the performance of the products contained herein. This documentation is not intended as a substitute for and is not to be used for determining suitability or reliability of these products for specific user applications. It is the duty of any such user or integrator to perform the appropriate and complete risk analysis, evaluation and testing of the products with respect to the relevant specific application or use thereof. Neither Schneider Electric Industries SAS nor any of its affiliates or subsidiaries shall be responsible or liable for misuse of the information contained herein.
米洛斯徽标系统2021年1季XProtect屏幕录制器管理员用户手册说明书
2021ContentsCopyright,trademarks,and disclaimer3 Overview4 Introduction4 How XProtect Screen Recorder works4 Licensing5 Licensing5 Installation6 Installing and configuring on computer6 Set password7 Set port number7 Set MAC address8 Configuration10 Configuring after installing on computer10 Change password10 Change port number10 Change MAC address10 Installing on recording server11 Set frames per second/live frame rate11 Set quality11 Set capture mode11 Optimization13 Security13 Maintenance14 Uninstalling from computer14 Troubleshooting15 Troubleshooting15Copyright,trademarks,and disclaimerCopyright©2021Milestone Systems A/STrademarksXProtect is a registered trademark of Milestone Systems A/S.Microsoft and Windows are registered trademarks of Microsoft Corporation.App Store is a service mark of Apple Inc.Android is a trademark of Google Inc.All other trademarks mentioned in this document are trademarks of their respective owners.DisclaimerThis text is intended for general information purposes only,and due care has been taken in its preparation. Any risk arising from the use of this information rests with the recipient,and nothing herein should be construed as constituting any kind of warranty.Milestone Systems A/S reserves the right to make adjustments without prior notification.All names of people and organizations used in the examples in this text are fictitious.Any resemblance to any actual organization or person,living or dead,is purely coincidental and unintended.This product may make use of third-party software for which specific terms and conditions may apply.When that is the case,you can find more information in the file3rd_party_software_terms_and_conditions.txt located in your Milestone system installation folder.OverviewIntroductionThis manual describes the Milestone XProtect Screen Recorder feature.It allows a Windows computer to act as an IP video camera,sending the contents of its desktop to the recording server it is connected to.The XProtect Screen Recorder feature is a small application to be installed on one or more Windows computers where you want to record desktop contents,and a camera driver included in XProtect Device Pack6.0and later versions. XProtect Screen Recorder works with all XProtect products on the following Windows platforms in both32-and 64-bit versions:l Client operating systems:Microsoft Windows8.1or newerl Server operating systems:Microsoft Windows Server2008R2or newerIn this document,when the term"recording server"is used,it refers to XProtect recording servers.How XProtect Screen Recorder worksOnce installed,XProtect Screen Recorder is automatically controlled from the startup menu of the computer where it is installed and runs in the context of the user logged into this computer.This means that XProtect Screen Recorder automatically and invisibly starts up every time the user logs in to the computer and closes down every time the user closes down.If online user-switching is done via Window's Fast User Switching feature,the XProtect Screen Recorder will continue to record in the context of the new user,however any other type of user-switching/-logging in or out will result in discontinuation of the feature.Read more about switching users without logging off onhttps:///windows-10-enable-or-disable-fast-user-switching/.This is possible because it is a service running in the background,capturing the computer’s screen at a set frame rate.It is also this service that provides the interface that your XProtect surveillance system can connect to and retrieve images from similarly as any other camera.LicensingLicensingWhen you add a screen recorder device in Management Client,you need a device license,just like with any other device.However,downloading and installing the XProtect Screen Recorder software is free of charge and you can install it as many times as required.XProtect Screen Recorder can and may only be used with Milestone software.InstallationInstalling and configuring on computerBefore you can start using the XProtect Screen Recorder feature,you must first download and install it on one or more Windows computer(s)where you want to receive desktop images.The application part of XProtect Screen Recorder consists of a Windows service and a desktop capture process. When installing the feature,you must have administrator rights to the computer you are using.Uninstalling or stopping the Windows service also requires administrator rights.Locate the file(https:///downloads/)named MilestoneXProtectScreenRecorderInstaller.exe and follow the download and installation procedure.When complete,the computer will work as an IP camera.From Management Client,you can add the XProtect Screen Recorder device,similar to adding a camera,to connect to it.Towards the end of the installation,the Milestone XProtect Screen Recorder-Administrator window appears. Address the configuration parameters below and click OK to save and finish the installation process.Set passwordIt is important that only the relevant recording server connects to and request video from a computer with XProtect Screen Recorder installed.You do this by entering a password of your choice in the text fields displayed in the illustration below.Milestone recommends that you fill in the password fields.In addition,there is no way to be reminded of the password,so it is important to remember the password.You must enter the password in Management Client on the recording server side.Set port numberFor the relevant recording server to connect to a computer with XProtect Screen Recorder installed,you must specify a Transmission Control Protocol(TCP)port.TCP ports are identified by their number.The default number is52111.If this port is already in use by another program,change it.Make sure that the selected port is open on your firewall so the recording server canconnect to it.Set MAC addressFor licensing purposes,you must also select a MAC address.You can choose between all MAC addresses available on the computer with XProtect Screen Recorder installed.1.Make a selection in the MAC address available list.2.Click Set.3.The selected MAC address is displayed in the MAC address used field.When you configure the screen recorder device in Management Client,you must provide a license key that matches the selected MAC address.ConfigurationConfiguring after installing on computerAfter installing,it possible to change all XProtect Screen Recorder configurations.This is done from the Milestone XProtect Screen Recorder-Administrator’s window which can be reached in the following way:1.Open Windows’Start menu.2.Click Milestone XProtect Screen Recorder Administrator.3.Confirm that the XProtect Screen Recorder is allowed to make changes to your hard drive.Next,theXProtect Screen Recorder-Administrator’s window will open.4.From the left-hand menu of the window,click Password,Port Number or MAC Address(depending onwhat you want to do).Change password1.In the Administrator’s window,on the Password tab,move focus to either text field to clear them both.2.Next,click OK to delete the old password(you will be presented with a warning).3.Enter a new password and click OK.This saves changes and restarts the XProtect Screen Recorder.4.Close the window.Change port number1.In the Administrator’s window,go to the Port Number tab.2.Fill in the port number(see Set port number on page7).3.When done,click OK.This saves changes and restarts the XProtect Screen Recorder.4.Close the window.Change MAC addressMAC addresses relate to hardware.If you change your network adapter,the selected MAC address may no longer be available.You must then select another valid address.This also requires that you enter a new license on the recording server side.1.In the Administrator’s window,go to the MAC Address tab.2.Set the MAC addresses(see Set MAC address on page8).3.When done,click OK.This saves changes and restarts the XProtect Screen Recorder.4.Close the window.Installing on recording serverIn Management Client,you must add a screen recorder device that connects to the XProtect Screen Recorder service.It is added and configured like any other IP video camera(see relevant documentation of your surveillance system for details on how to add and configure a camera).When you add a screen recorder device,the user name must be videoos and the device type Screen Recorder.A screen recorder device has the following configurable parameters:l Frames per second/live frame ratel Qualityl Capture modeWhen adding a screen recorder device,you must provide the IP address of the device.Inthis case,the device is a computer.But when adding a device of the Screen Recorder type,you may be in a situation where the computer does not have a permanent IP address.Inthat case,you can use the Domain Name System(DNS)name of the computer.Set frames per second/live frame rateFrames per second in XProtect Corporate/Live frame rate in other Milestone surveillance products.A low frame rate is recommended because high frame rates may cause heavy CPU usage on the computer with XProtect Screen Recorder installed.For this reason,the XProtect Screen Recorder feature never yields more than4frames per second.Two frames per second offers a nice impression of screen activity and causesapproximately5-8%extra CPU usage on an average Windows7computer anno2010.Thus,2or3frames per second is the recommended daily setting.Set qualityVideo frames are sent to the recording server as a series of JPEGs.It is possible to lower network and storage consumption by configuring a lower quality.However,this will result in a more blurred image.The effective valid range is0(poorest quality)to100(best quality).Default is75,which reduces the amount of data nicely without reducing the visual quality too much.However,the JPEG algorithm is not optimized for computer images with many rectangles.So even with a high quality you will still observe glitches around straight lines.Set capture modeWith regards to capture mode,there is a choice of:l Primary screen only:the primary screen onlyl All screens(if there is more than one screen):a mosaic of all screens setup for the computer in question l Screen1,Screen2,etc.(if there is more than one screen):The selected screen onlyOptimizationSecurityAs mentioned earlier,XProtect Screen Recorder’s recording process is controlled from the computer startup menu and runs in the context of the logged in user.This means that the user can use the Windows Task Manager to shut down the process.To prevent that,Windows must be configured so that the user has no access to Windows Task Manager or other programs with similar capabilities.Disabling XProtect Screen Recorder results in the device connecting to the XProtect Screen Recorder service showing a red screen with a cross over it.The TCP based protocol used between the recording server and the computer withXProtect Screen Recorder installed utilizes Digest Authentication(RFC7616)with SHA256as a hashing algorithm.The risk of other products intercepting a desktop is thereforeminimal,but you are urged to define a password in the Milestone XProtect ScreenRecorder-Administrator’s window.MaintenanceUninstalling from computerThe following procedure describes standard system component removal in recentWindows versions;the procedure may be slightly different in older Windows versions.1.In Windows'Start menu,select Control Panel,and:l If using Category view,find the Programs category,and click Uninstall a programl If using Small icons or Large icons view,select Programs and Features2.In the list of currently installed programs,right-click the required Milestone program or service.3.Select Uninstall if you wish to uninstall all components.Select Change if you only wish to uninstall somecomponents.4.Follow the removal instructions.TroubleshootingTroubleshootingA problem which may occur with XProtect Screen Recorder is that the recording server and the computer with XProtect Screen Recorder installed cannot connect.These are probable causes:l The configured TCP port is not open on the firewall that the XProtect Screen Recorder is installed on.Or if communication runs through a router,the router may also have a firewall that causes problemsl The IP address defined on the recording server is different from the IP address on the computer withXProtect Screen Recorder installedl The IP port defined on the recording server is different from the one configured on the computer with XProtect Screen Recorder installedl The password defined on the recording server is different from the one configured on the computer with XProtect Screen Recorder installedl The Device Pack and XProtect Screen Recorder versions are incompatibleXProtect2019R3includes Device Pack10.5.Connection will fail if you are runningDevice Pack10.4(or earlier)and using the XProtect Screen Recorder version2019R3(or later).To investigate other problem scenarios,you can enable the tracing of relevant desktop recordings:1.In Windows Explorer,in the directory:%PROGRAMFILES%\Milestone\XProtect Screen Recorder,locate thefile:ScreenRecorderService.exe.config.ing an editor,for example,Microsoft©Notepad,change the value of the attribute"Log"to"yes"asillustrated below:<?xml version="1.0"?><configuration><startup><supportedRuntime version="v2.0.50727"/></startup><appSettings><add key="Log"value="yes"/></appSettings></configuration>4.Save the file under the same name and in the same location.5.Start Milestone XProtect Screen Recorder Administrator(see Configuring after installing on computer onpage10).6.Click OK to restart XProtect Screen Recorder.Logging is now enabled.7.In the AllUsers ProgramData folder,in the subdirectory:Milestone\XProtect Screen Recorder,two logfiles are now available:Servicelog.txt and Desktoplog.txt.l Servicelog.txt is a log of all network traffic and communication between the recording server andthe computer with XProtect Screen Recorder installedl Desktoplog.txt is a log of the process running on the computer with XProtect Screen Recorderinstalled,capturing desktop images and sending them to the Windows service as JPEG images 8.To avoid that the two log files grow extensively,it is important to reset the"Log"attribute to"no"whendone.See step2.9.Restart Milestone XProtect Screen Recorder Administrator(see Configuring after installing on computeron page10).open platform video management software;technology that helps assets and increase business estone Systemscollaboration and innovation in the development and use of scalable solutions that are proven in more than 150,000sitesis a stand-alone company in the Canon Group.For more *************************。
MSI SteelSeries Engine 3 更新历史和安装指南说明书
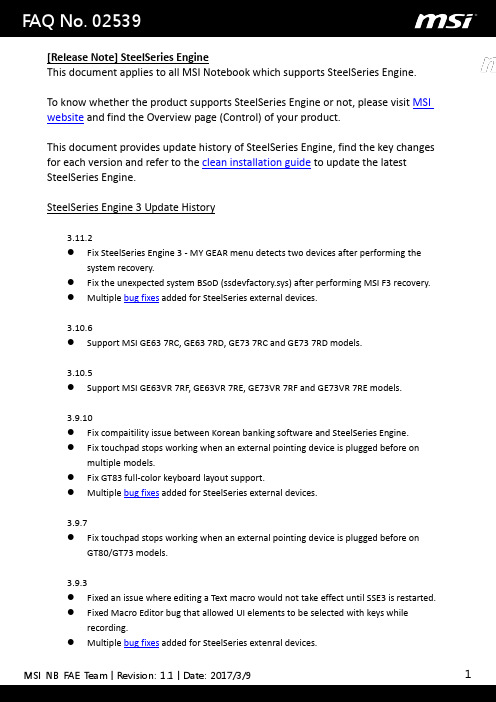
[Release Note] SteelSeries EngineThis document applies to all MSI Notebook which supports SteelSeries Engine.To know whether the product supports SteelSeries Engine or not, please visit MSI website and find the Overview page (Control) of your product.This document provides update history of SteelSeries Engine, find the key changes for each version and refer to the clean installation guide to update the latest SteelSeries Engine.SteelSeries Engine 3 Update History3.11.2●Fix SteelSeries Engine 3 - MY GEAR menu detects two devices after performing thesystem recovery.●Fix the unexpected system BSoD (ssdevfactory.sys) after performing MSI F3 recovery.●Multiple bug fixes added for SteelSeries external devices.3.10.6●Support MSI GE63 7RC, GE63 7RD, GE73 7RC and GE73 7RD models.3.10.5●Support MSI GE63VR 7RF, GE63VR 7RE, GE73VR 7RF and GE73VR 7RE models.3.9.10●Fix compaitility issue between Korean banking software and SteelSeries Engine.●Fix touchpad stops working when an external pointing device is plugged before onmultiple models.●Fix GT83 full-color keyboard layout support.●Multiple bug fixes added for SteelSeries external devices.3.9.7●Fix touchpad stops working when an external pointing device is plugged before onGT80/GT73 models.3.9.3●Fixed an issue where editing a Text macro would not take effect until SSE3 is restarted.●Fixed Macro Editor bug that allowed UI elements to be selected with keys whilerecording.●Multiple bug fixes added for SteelSeries extenral devices.3.8.5●GS series model will disable the touchpad when the option “Disable internal pointingdevice when external USB pointing device is attached” is selected.●New feature support for other SteelSeries products.3.8.1●Support MSI GS43VR 6RE, GT73VR 6RE, GT73VR 6RF notebook models.●Fixed a bug where some tactile GameSense events still activated after being disabled.3.8.0●Supports new feature of custom colorshift patterns and breathe patterns for thekeyboard backlight.●Supports online update. (SteelSeries Engine 3 now can download the latest update fileand install it automatically.)●Fixed a bug where SteelSeries Engine would not start properly if you pinned theapplication to your taskbar and launched it from there.●Fixed a setting where SteelSeries Engine could use more power than normal onnotebooks.●Fixed an issue affecting some devices not fully working properly after sleep or hibernate.3.6.5.1●Support MSI GS40 6QD, GS63VR 6RF, GT72 6QD, GT72 6QE, GT72S 6QD, GT72S 6QE,GT72S 6QF, GT72 6QD Tobii, GT72 6QE Tobii, GT72S 6QD Tobii and GT72S 6QE Tobiinotebook models.●Other bug fixes for other SteelSeries devices.3.5.1●Several new features and fixes added for other SteelSeries devices.3.4.4.1●Support MSI GT80S 6QF, GT80S 6QE and GT80S 6QD notebook models.●GameSense now works with the new Dota 2 Reborn update.3.4.3●Support MSI GS40 6QE, GE62 6QF, GE62 6QE, GE62 6QD and GE72 6QF notebookmodels.●Scripts such as .bat and .sh can be assigned with the ‘Launch Application’ feature.●GameSense no longer turns on if you are just spectating in Dota 2.●Keeping SteelSeries Engine 3’s main window open won’t prevent the computer fromgoing to sleep anymore.●Fixed an issue where certain keys on non-US layout keyboards would not be recordedproperly when recording macros.3.3.7.1●New feature“Stratus XL for Windows and Android” supports configuration setup forgame controllers.3.3.6.1●Multiple new features are implemented.⏹Supports Text Macros in the Macro Editor.⏹Supports Live Record macros.⏹Macros live recording can be monitored by flashing keyboard backlight with thecolor red.⏹Supports Keypress Macros up to 250 events.3.3.3.383●Fix SSE 3 not responding when trying to setup or change some configurations.●The keyboard backlight brightness now can be displayed accurately.3.3.3●Support MSI GE62 2QF, GE62 2QE, GE62 2QD, GE72 2QF, GE72 2QE, GT80 2QE, GT802QD and GT80 2QC notebook models.●Fix the blur text on the user interface when having the display language set to“Traditional Chinese”.●Fix SSE 3 crashes with an error message “Caught node.js error” when trying to setup orchange some conifgurations.。
联想一键拯求3.0安装
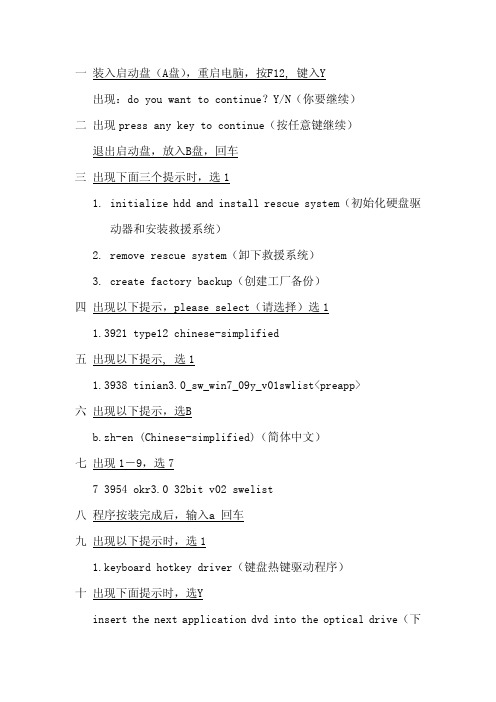
四 出现以下提示,please select(请选择)选 1 1.3921 type12 chinese-simplified
五 出现以下提示, 选 1 1.3938 tinian3.0_sw_win7_09y_v01swli示,选B b.zh-en (Chinese-simplified)(简体中文)
七 出现 1-9,选 7 7 3954 okr3.0 32bit v02 swelist
八 程序按装完成后,输入a 回车 九 出现以下提示时,选 1
1.keyboard hotkey driver(键盘热键驱动程序) 十 出现下面提示时,选Y
insert the next application dvd into the optical drive(下
一个应用程序 DVD 插入光盘驱动器) press 'y' key to continue,press 'n' key to skip(按“Y” 键继续,按“N”键跳过) 十一 放入联想电脑随机驱动安装盘,回车(备注:此项可以省略, 直接进行下一步) 十二 安装完出现以下提示,按任意键继续 press any key to continue(按任意键继续) 十三 放入 windows xp,安装 windows xp 十四 安完 XP 后,重起电脑按 F2,选择安装驱动/软件安装,根据 提示完成安装 十五 安装完成后,根据提示进入一键恢复,备份用户操作系统。
一 装入启动盘(A盘),重启电脑,按F12, 键入Y 出现:do you want to continue?Y/N(你要继续)
二 出现 press any key to continue(按任意键继续) 退出启动盘,放入B盘,回车
三 出现下面三个提示时,选 1 1. initialize hdd and install rescue system(初始化硬盘驱 动器和安装救援系统) 2. remove rescue system(卸下救援系统) 3. create factory backup(创建工厂备份)
- 1、下载文档前请自行甄别文档内容的完整性,平台不提供额外的编辑、内容补充、找答案等附加服务。
- 2、"仅部分预览"的文档,不可在线预览部分如存在完整性等问题,可反馈申请退款(可完整预览的文档不适用该条件!)。
- 3、如文档侵犯您的权益,请联系客服反馈,我们会尽快为您处理(人工客服工作时间:9:00-18:30)。
After invoke of a sweep, edit element values to watch changes of swept points.
Datapoint sweep
Example: An antenna has different impedances at different frequencies. This datapoints are loaded from a S11-file. S11 fil Match M h the h antenna at 1.9 1 9 GHz GH to 50 using i a 50 transmission i i li line and da parallel capacitor. Use a datapoint sweep to find out the matching performance (VSWR) for this network for all datapoints.
Before doing a sweep design a network starting from one datapoint. datapoint For datapoint sweep all datapoints must be input before starting a sweep.
S-Plot
New Gain and Return Loss graphs with linear or logarithmic frequency axis and cursor readout:
License, License , Demoversion and Contact
The unlicensed Demoversion allows 5 elements and 5 datapoints only. Save project j t and d save netlist tli t are disabled. di bl d If you are interested in a licensed version with full capabilities send an e-mail to fritz.dellsperger@bfh.ch p g @ or fritz@ Commercial C i l li licenses are priced i dt to US$ 100 Licenses for universities, students and Ham’s with callsign are priced to US$ 70 Demoversion and additional documents related to the Smith-Chart can be downloaded at Bern University of Applied Sciences Engineering and Information Technology Electrical- and Communication Technology Jlcoweg 1 CH-3400 Burgdorf g Switzerland http://www.ti.bfh.ch/en
After invoke of a sweep, edit element values to watch changes of swept points.
Serial transmission line with loss
Example: An antenna has an impedance of (10-j35) at 450 MHz. What impedance do you see, if you connect the h antenna with i h a coaxial i l cable bl that h has h an electrical l i l length l h of f 2.8 2 8and d an attenuation of 1 dB/m?
Export circles
G1;input plane const. gain circle;12.94;12.94;0.12;-149.00;0.11;59.40;3.76;78.90;0.41;-54.50;2.0GHz; G2;input plane const. gain circle;12.50;12.94;0.12;-149.00;0.11;59.40;3.76;78.90;0.41;-54.50;2.0GHz; G3;input plane const. gain circle;12.00;12.94;0.12;-149.00;0.11;59.40;3.76;78.90;0.41;-54.50;2.0GHz; N1;3.60;3.60;0.42;39.10;0.98;2.0GHz; N2;3.70;3.60;0.42;39.10;0.98;2.0GHz; N3;3.80;3.60;0.42;39.10;0.98;2.0GHz; N4;3.90;3.60;0.42;39.10;0.98;2.0GHz; N5;4.00;3.60;0.42;39.10;0.98;2.0GHz; S1;Input plane stability circle;stable outside;1.17;0.12;-149.00;0.11;59.40;3.76;78.90;0.41;-54.50;2.0GHz; S2;Output plane stability circle;stable outside;1 outside;1.17;0.12;-149.00;0.11;59.40;3.76;78.90;0.41;-54.50;2.0GHz; 17;0 12; 149 00;0 11;59 40;3 76;78 90;0 41; 54 50;2 0GHz;
Select “Export” in menu “File”.
Data file examples: Export datpoints
Start DP true; false; false; false; false; false; false; Point R[Ohm] 1; 2; 3; 4; 5; 6; 7; X[Ohm] Q 20.000; 20.000; 27.180; 27.180; 36.855; 36.855; 49.695; Frequency[Hz] -12.000; 12.033; 0.602; 1.281; 0.047; 16.280; 0.599; 1.679; 0.046; 21.754; 0.590; 0.006; 0.000; 0.600; 450000000.000 450000000.000 450000000.000 450000000.000 450000000.000 450000000.000 450000000.000
Export data
Export datapoints or circle data to an ASCII-file for post-processing in spreadsheets or math software. Delimiter format: None, semicolon or comma.
System requirements: Windows XP, Windows Vista, Windows 7 .NET Framework 3.5
Sweeps
There are two possibilities to sweep a network: Frequency sweep Datapoint Sweep Use menu “Extras”, “Sweep” (“Remove Sweep”) or button in toolbox to invoke or clear a sweep.
What’s What s New
May 2010 Smith V3.10
Smith-Chart New Features: Sweep versus frequency or datapoints Serial transmission line with loss Export datapoint and circle info to ASCII ASCII-file file for post-processing in spreadsheets or math software S-Plot New Features: Linear or logarithmic frequency axis cursor readout at gain and return loss graphs.
For meaning of values see window “Circles” Circles
S-Plot
New Gain and Return Loss graphs
S-Plot
The selected line in window “Gain table” highlights the corresponding datapoint in all graphs.
Frequency sweep
Example: At 400 MHz match 25 to 50 using a 6 element lowpass. Use a frequency sweep from 300 MHz MH to 800 MH MHz to fi find d out the h matching hi performance f (VSWR) for f this hi network k versus the frequency range from 300 MHz to 800 MHz.