Smart 2006 用户手册(中文)
Packet_Sniffer_用户手册(中文)

Packet Sniffer
1 介绍
SmartRF™数据包嗅探器是一个PC应用软件,用于显示和存储通过射频硬件节点侦听而 捕获的射频数据包。支持多种射频协议。数据包嗅探器对数据包进行过滤和解码,最后用一 种简洁的方法显示出来。过滤包含几种选项,以二进制文件格式储存。
安装Packet Sniffer时与SmartRF® Studio分开,而且必须在Texas Instruments网站下载. 安装完成后,支持信令协议的所有快捷键被显示在"Start menu"窗口下 注意: 选择“IEEE802.15.4/ZigBee (CC2420)” 协议后启动的Packet Sniffer是独特的.最突出的不 同点是: 数据包只储存在RAM 缓存区里. 欲了解Packet Sniffer CC2420的更多细节请参阅 CC2420的用户手册. 1.1 硬件平台
SmartRF™ Packet Sniffer 用户手册 Rev. 1.10
Packet Sniffer
Packet Sniffer
目录
1 介绍 .........................................................................................................................................3 1.1 硬件平台....................................................................................................................................3 1.2 协议......................................................................................................................................................7 1.3 数据流程......................................................................................................................................................9 1.4 软件 .......................................................................................................................................................9 2 用户界面 ....................................................................................................................................10 2.1 启动窗口. .........................................................................................................................................10 2.2 PACKET SNIFFER WINDOW OF AN ACTIVE SESSION. ........................................................................................10 2.3 菜单与工具栏 .................................................................................................................................12 2.4 安装.............................................................................................................................................................13 2.5 可选区域 ............................................................................................................................. ..................14 2.6 数据包细节 ............................................................................................................................................15 2.7 地址区 ..............................................................................................................................................16 2.8 显示器 .............................................................................................................................................17 2.9 时间轴.......................................................................................................................................................19 2.10 无线设置.............................................................................................................................................19
Smart3D实景建模大师用户手册
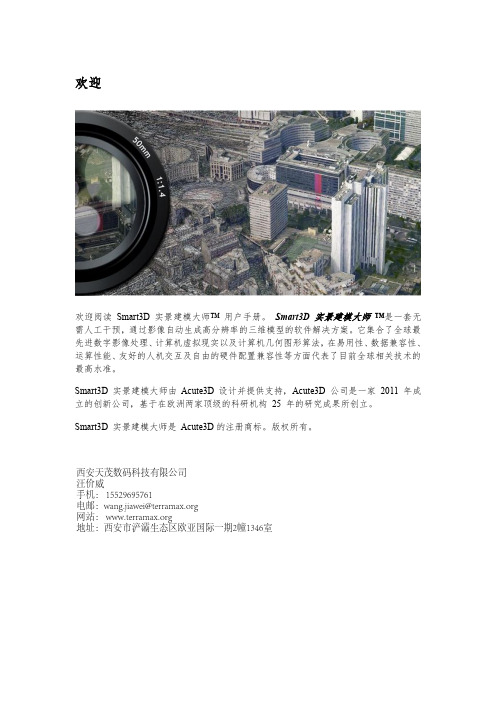
当 Smart3D 实景建模大师引擎端 运行时软件不支持切换 Windows 用户,这将会引 起运行计算失败。因为硬件加速在当用户未连接时不可用。
关于非 ASCII 字符的路径
Smart3D 实景建模大师 目前版本还不支持非 ASCII 字符的路径。因此,所有指定
的输入与输出文件的路径必须使用 ASCII 字符(即暂不支持中文文件名和目录名)。
软件版本
Smart3D 实景建模大师具有几个独立的软件版本。
Smart3D 实景建模大师 Scanner 版本已经由 Expert 版本取代,Mapper 版本由 Ultimate 版本取代。 Smart3D 实景建模大师 Advanced Smart3D 实景建模大师 Advanced 可以从最高可达 100 亿像素的影像数据集中自动重建 独立物体,建筑,人工或自然地标。本版本最适用但不限于无人机监视系统,能生产高 精度的三维模型、数字地标模型(DSM)和真正射影像。 Smart3D 实景建模大师 Expert(前 Scanner) Smart3D 实景建模大师 Expert 在 Advanced 版本基础上将影像数据集大小增大到 300 亿 像素,并新增了通过任务序列分批处理的功能。Smart3D 实景建模大师 Expert 可为测 绘项目和精度要求高的三维扫描提供完美的解决方案。
模型修饰
在绝大多数情景下, 自动生成的三维模型可以直接使用。但是对于一些特定应用 ,用户 可能需要使用某些第三方软件对自动生成的三维模型的局部几何模型误差进行修饰,并 通过 Smart3D 实景建模大师主控台 将这些修饰后的三维模型重新导入,并提交新的 三维重建任务使修改后的模型重新通过自动纹理映射获得正确的贴图以完成三维模型 更新。
2006 Samsung SCX-6345N 使用手冊说明书

© 2006 Samsung Electronics Co., Ltd. 版權所有。
此使用手冊僅供參考。
手冊中的所有資訊如果變更,恕不另行通知。
Samsung Electronics 不對因使用本使用手冊導致的任何直接或間接損失承擔任何責任。
• SCX-6345N 是 Samsung Electronics Co., Ltd. 的型號名稱。
• Samsung 與 Samsung 標誌為 Samsung Electronics Co., Ltd. 的商標。
• PCL 和 PCL 6 為 Hewlett-Packard 公司的商標。
• Microsoft、Windows、Windows 98、Windows Me、Windows 2000、Windows NT4.0、Windows XP 與 Windows2003 為 Microsoft Corporation 的註冊商標。
• PostScript 3 為 Adobe System, Inc. 的商標。
• UFST® 與 MicroType™ 為 Monotype Imaging Inc. 的註冊商標。
• TrueType、LaserWriter 和 Macintosh 為 Apple Computer, Inc. 的商標。
• 所有其他品牌或產品名稱均為其各自公司或組織的商標。
contact SAMSUNG worldwideIf you have any comments or questions regarding Samsung products, contact the Samsung customer care center.COUNTRY CUSTOMER CARE CENTER WEB SITE/arAUSTRALIA1300 362 /auAUSTRIA0800-SAMSUNG (726-7864)/atBELGIUM02 201 /beBRAZIL0800-124-4214004-0000/brCANADA1-800-SAMSUNG (726-7864)/caCHILE800-SAMSUNG (726-7864)/clCHINA800-810-5858400-810-5858************/cn.coCOSTA /latinCZECH REPUBLIC 800-726-786 (800 -SAMSUNG)/czSamsung Zrt., česká organizační složka, Oasis Florenc, Sokolovská394/17, 180 00, Praha 8DENMARK70 70 19 /dk /latinEL SALVADOR /latinESTONIA800-7267www.samsung.ee /kz_ru KYRGYZSTAN00-800-500-55-500FINLAND030-6227 /fi FRANCE3260 SAMSUNG08 25 08 65 65 (€ 0,15/min)/frGERMANY01805 - SAMSUNG (726-7864 € 0,14/min)www.samsung.de/latin/latinHONG KONG3698 /hkHUNGARY06-80-SAMSUNG (726-7864)/huINDIA3030 82821800 1100111-800-3000-8282/in/idITALIA800-SAMSUNG(726-7864)/it/latin/jp/lv/ltLUXEMBURG02 261 03 /lu/myMEXICO01-800-SAMSUNG (726-7864)/mxNETHERLANDS0900 SAMSUNG(726-7864€ 0,10/min)/nlNEWZEALAND0800 SAMSUNG (0800 726786)/nz/latinNORWAY815-56 /no/latinPHILIPPINES1800-10-SAMSUNG (726-7864)/phPOLAND0 801 801 881022-607-93-33/plPORTUGAL80820-SAMSUNG (726-7864)/ptPUERTO /latinREP.DOMINICA/latinEIRE0818 717 /ieRUSSIA8-800-555-55-55www.samsung.ruSINGAPORE1800-SAMSUNG (726-7864)/sgSLOVAKIA0800-SAMSUNG (726-7864)/skSOUTHAFRICA0860 SAMSUNG (724-7864)/zaCOUNTRY CUSTOMER CARE CENTER WEB SITESPAIN902-1-SAMSU(72678)/es SWEDEN0771-400 /seSWITZERLAN D 0800-SAMSUNG (726-7864)/chTADJIKISTAN8-10-800-500-55-500/tw THAILAND1800-29-323202-689-3232/thTRINIDAD & TOBAGO 1-800-SAMSUNG (726-7864)/latinTURKEY444 77 /tr U.A.E800-SAMSUNG (726-7864)8000-4726/aeU.K0845 SAMSUNG (726-7864)/ukU.S.A1-800-SAMSUNG (726-7864)/us UKRAINE8-800-502-0000www.samsung.ua/kz_ru/latinVIETNAM 1 800 588 /vn COUNTRY CUSTOMER CARE CENTER WEB SITE內容關於此使用手冊 (i)搜尋更多資訊 (i)安全和法規資訊 (ii)1.簡介特殊功能 .................................................................................................................................................................. 1.1機器總覽 .................................................................................................................................................................. 1.2正視圖 ................................................................................................................................................................. 1.2後視圖 ................................................................................................................................................................. 1.3控制面板總覽 ........................................................................................................................................................... 1.4觸控式螢幕與有用按鈕簡介 ..................................................................................................................................... 1.5觸控式螢幕 .......................................................................................................................................................... 1.5機器設定按鈕 ...................................................................................................................................................... 1.5工作狀態按鈕 ...................................................................................................................................................... 1.5省電按鈕 ............................................................................................................................................................. 1.5中斷按鈕 ............................................................................................................................................................. 1.5瞭解狀態 LED .......................................................................................................................................................... 1.6狀態 ..................................................................................................................................................................... 1.6功能表地圖 .............................................................................................................................................................. 1.6主畫面 ................................................................................................................................................................. 1.6機器設定按鈕 ...................................................................................................................................................... 1.7工作狀態按鈕 ...................................................................................................................................................... 1.72.軟體總覽隨附的軟體 .............................................................................................................................................................. 2.1印表機驅動程式功能 ................................................................................................................................................ 2.2系統需求 .................................................................................................................................................................. 2.23.開始使用設定硬體 .................................................................................................................................................................. 3.1設定網路 .................................................................................................................................................................. 3.1支援的作業系統 ................................................................................................................................................... 3.2透過機器設定網路協定 ........................................................................................................................................ 3.2安裝軟體 .................................................................................................................................................................. 3.2機器的基本設定 ....................................................................................................................................................... 3.3設定驗證密碼 ...................................................................................................................................................... 3.3設定日期和時間 ................................................................................................................................................... 3.4變更螢幕語言 ...................................................................................................................................................... 3.4設定工作逾時 ...................................................................................................................................................... 3.4使用省能源功能 ................................................................................................................................................... 3.4設定預設紙匣和紙張 ........................................................................................................................................... 3.4變更預設設定 ...................................................................................................................................................... 3.5瞭解鍵盤 .................................................................................................................................................................. 3.54.載入原稿與列印紙材載入原稿 .................................................................................................................................................................. 4.1在掃描器玻璃上 ................................................................................................................................................... 4.1在 DADF 中 ......................................................................................................................................................... 4.1每種模式下支援的紙材大小 ................................................................................................................................. 4.4選取與存放列印紙材規定 .................................................................................................................................... 4.4載入紙張 .................................................................................................................................................................. 4.5紙匣 1 中 ............................................................................................................................................................. 4.5使用多功能紙匣 ................................................................................................................................................... 4.6設定紙張大小與類型 ................................................................................................................................................ 4.75.影印瞭解Copy畫面 ........................................................................................................................................................ 5.1 Basic標籤 ........................................................................................................................................................... 5.1 Advanced 標籤 .................................................................................................................................................... 5.1 Image 標籤 .......................................................................................................................................................... 5.1影印原稿 .................................................................................................................................................................. 5.2變更每次影印的設定 ................................................................................................................................................ 5.2變更原稿的大小 ................................................................................................................................................... 5.2縮小或放大影印 ................................................................................................................................................... 5.2原稿雙面影印(Duplex) ........................................................................................................................................ 5.3決定影印輸出格式(Collated/Staple) ................................................................................................................... 5.3選取原稿的類型(Text/Photo) .............................................................................................................................. 5.3變更濃度 ............................................................................................................................................................. 5.3使用特殊影印功能 ................................................................................................................................................... 5.4 ID 卡片影印 ......................................................................................................................................................... 5.42 頁或 4 頁影印(N 頁) ....................................................................................................................................... 5.4海報影印 ............................................................................................................................................................. 5.4複製影印 ............................................................................................................................................................. 5.5書籍影印 ............................................................................................................................................................. 5.5手冊影印 ............................................................................................................................................................. 5.5封面影印 ............................................................................................................................................................. 5.6投影片影印 .......................................................................................................................................................... 5.6消除邊緣 ............................................................................................................................................................. 5.6消除背景影像 ...................................................................................................................................................... 5.6移動邊界 ............................................................................................................................................................. 5.7 6.傳真(可選)準備傳真 .................................................................................................................................................................. 6.1瞭解Fax畫面 .......................................................................................................................................................... 6.1 Basic 標籤 ........................................................................................................................................................... 6.1 Advanced 標籤 .................................................................................................................................................... 6.1 Image 標籤 .......................................................................................................................................................... 6.2傳送傳真 .................................................................................................................................................................. 6.2設定傳真標頭 ...................................................................................................................................................... 6.2傳送傳真 ............................................................................................................................................................. 6.2手動傳送傳真(免持聽筒撥號) ......................................................................................................................... 6.3自動重新傳送 ...................................................................................................................................................... 6.3重撥上次撥叫的號碼 ........................................................................................................................................... 6.3延遲傳真傳輸 ...................................................................................................................................................... 6.3傳送優先傳真 ...................................................................................................................................................... 6.4接收傳真 .................................................................................................................................................................. 6.4變更接收模式 ...................................................................................................................................................... 6.4在電話模式中手動接收 ........................................................................................................................................ 6.4在答錄機/傳真模式中自動接收 .......................................................................................................................... 6.4使用分機手動接收傳真 ........................................................................................................................................ 6.4在安全接收模式中接收 ........................................................................................................................................ 6.4在紙張雙面列印收到的傳真 ................................................................................................................................. 6.5將收到的傳真儲存在記憶體中 ............................................................................................................................. 6.5Resolution ........................................................................................................................................................... 6.5 Original Type ...................................................................................................................................................... 6.5 Darkness ............................................................................................................................................................. 6.5 Erase Background .............................................................................................................................................. 6.5 Color Mode ......................................................................................................................................................... 6.5設定傳真電話簿 ....................................................................................................................................................... 6.6儲存個別傳真號碼(Speed Dial No.) ................................................................................................................... 6.6儲存群組傳真號碼(Group No.) ........................................................................................................................... 6.6使用 SyncThru Web Service 設定傳真電話簿 ..................................................................................................... 6.7使用輪詢選項 ........................................................................................................................................................... 6.7儲存原稿進行輪詢 ............................................................................................................................................... 6.7列印(刪除)輪詢文件 ....................................................................................................................................... 6.7輪詢遠端傳真 ...................................................................................................................................................... 6.7從遠端 Mailbox 輪詢 ........................................................................................................................................... 6.8使用 Mailbox ............................................................................................................................................................ 6.8建立 Mailbox ....................................................................................................................................................... 6.8在 Mailbox 中儲存原稿 ........................................................................................................................................ 6.8傳真至遠端 Mailbox ............................................................................................................................................ 6.9傳送傳真後列印報告 ................................................................................................................................................ 6.9在通話優惠時段傳送傳真 ......................................................................................................................................... 6.9新增文件到預定的延遲傳真工作 ............................................................................................................................ 6.10將收到的傳真轉寄到其他目的地 ............................................................................................................................ 6.10透過傳真的方式將寄出的傳真轉寄到其他目的地 .............................................................................................. 6.10透過傳真的方式將收到的傳真轉寄到其他目的地 .............................................................................................. 6.10透過寄送電子郵件的方式將寄出的傳真轉寄到其他目的地 ................................................................................ 6.10透過寄送電子郵件的方式將收到的傳真轉寄到其他目的地 ................................................................................ 6.10 7.掃描瞭解 Scan 畫面 ........................................................................................................................................................ 7.1 Basic 標籤 ........................................................................................................................................................... 7.1 Advanced標籤 .................................................................................................................................................... 7.2 Image標籤 .......................................................................................................................................................... 7.2 Output 標籤 ......................................................................................................................................................... 7.2掃描原稿並透過電子郵件傳送(Scan to Email) ........................................................................................................ 7.3將掃描的影像當成電子郵件附件傳給數個目的地 ................................................................................................ 7.3儲存電子郵件位址 ............................................................................................................................................... 7.3按通訊錄輸入電子郵件位址 ................................................................................................................................. 7.4在鍵盤輸入電子郵件位址 .................................................................................................................................... 7.4掃描原稿,並透過 Samsung 網路掃描管理程式傳送 (NetScan) ............................................................................. 7.4準備網路掃描 ...................................................................................................................................................... 7.4透過 NetScan 掃描與傳送 ................................................................................................................................... 7.5掃描原稿並透過 SMB/FTP 傳送(Scan to Server) ................................................................................................... 7.5準備掃描至 SMB/FTP ......................................................................................................................................... 7.5掃描並傳送到 SMB/FTP 伺服器 .......................................................................................................................... 7.5變更掃描功能設定 ................................................................................................................................................... 7.6 Duplex ................................................................................................................................................................. 7.6 Resolution ........................................................................................................................................................... 7.6 Original Size ....................................................................................................................................................... 7.6 Original Type ...................................................................................................................................................... 7.6 Color Mode ......................................................................................................................................................... 7.7 Darkness ............................................................................................................................................................. 7.7 Erase Background .............................................................................................................................................. 7.7 Scan to Edge ...................................................................................................................................................... 7.7 Quality ................................................................................................................................................................. 7.7 File Format .......................................................................................................................................................... 7.7 Scan Preset ........................................................................................................................................................ 7.88.基本列印列印文件 .................................................................................................................................................................. 8.1取消列印工作 ........................................................................................................................................................... 8.19.機器狀態與進階設定機器設定 .................................................................................................................................................................. 9.1 Machine Status 畫面 ........................................................................................................................................... 9.1 Admin Setting 畫面 ............................................................................................................................................. 9.1瀏覽機器的狀態 ....................................................................................................................................................... 9.1一般設定 .................................................................................................................................................................. 9.2 Copy Setup ............................................................................................................................................................. 9.3 Fax Setup ................................................................................................................................................................ 9.3網路設定 .................................................................................................................................................................. 9.4 Authentication ......................................................................................................................................................... 9.4 Optional Service ...................................................................................................................................................... 9.5遠端服務 .................................................................................................................................................................. 9.5列印報告 .................................................................................................................................................................. 9.610. 維護列印機器報告 ......................................................................................................................................................... 10.1監視耗材壽命 ......................................................................................................................................................... 10.1尋找序號 ................................................................................................................................................................ 10.1傳送碳粉重新訂購通知 .......................................................................................................................................... 10.1傳送感光鼓重新訂購通知 ....................................................................................................................................... 10.1檢查 Stored Documents ........................................................................................................................................ 10.2清潔機器 ................................................................................................................................................................ 10.2清潔外部 ........................................................................................................................................................... 10.2清潔內部 ........................................................................................................................................................... 10.2清潔傳送單元 .................................................................................................................................................... 10.2清潔掃描單元 .................................................................................................................................................... 10.2維護碳粉匣 ............................................................................................................................................................ 10.3更換碳粉匣 ........................................................................................................................................................ 10.3更換感光鼓匣 .................................................................................................................................................... 10.4維護零件 ................................................................................................................................................................ 10.6從網站管理機器 ..................................................................................................................................................... 10.611. 故障排除清除文件卡紙 ......................................................................................................................................................... 11.1輸出卡紙 ........................................................................................................................................................... 11.1滾輪卡紙 ........................................................................................................................................................... 11.2清除卡紙 ................................................................................................................................................................ 11.2在紙匣1 中 ....................................................................................................................................................... 11.2在選購紙匣中 .................................................................................................................................................... 11.3在多功能紙匣中 ................................................................................................................................................. 11.4在加熱器區域或碳粉匣附近 ............................................................................................................................... 11.5在出紙區域中 .................................................................................................................................................... 11.5在雙面列印單元區域中 ...................................................................................................................................... 11.6在堆疊器(完稿器)中 ..................................................................................................................................... 11.6避免卡紙的秘訣 ................................................................................................................................................. 11.7瞭解螢幕訊息 ......................................................................................................................................................... 11.8解決其他問題 ....................................................................................................................................................... 11.12觸控式螢幕問題 ............................................................................................................................................... 11.12進紙問題 ......................................................................................................................................................... 11.12列印問題 ......................................................................................................................................................... 11.12。
SEM水分分析仪 Smart操作手册(中文版)

注意:编辑任何参数时按参数相对应的数字键进行编辑,用数 字键输入新的参数,然后按“ENTER ”键确认。 6. 用数字键输入 delte 重量(.1-.9),通常选择 0.2-0.5mg。 7. 按“ENTER ”键确认。
8. 按“3”键选择并进入 delte 时间设置。 9. 用数字键输入 delte 时间(1-60 秒) ,通常选择 10-15 秒 作为时间间隔。 10. 按“ENTER ”键确认。
采样
采样是准确进行样品水分/固含量分析的关键步骤。选择代表性的样品才能保证批次样品测 试结果可靠。 有许多标准程序可供参考,例如 AOAC 、USDA 、ASTM 等。对于特殊样品必须严格进行操 作。 正确处理和保存样品对获得准确分析结果也很关键, 样品不能长时间暴露在空气中, 正确的 储存样品可以可保证样品水分不损失。
20. 按“7”键选择并进入最大称重量设置。 如果用默认值 4.00g,则省略掉第 21 步。 21. 22. 用数字键输入最大称重量(0-50g) 。 按“ENTER ”键确认。
注意:重量补偿用于在加热时产生浮性效果的样 品。它适用于样品如:牛奶,人造黄油,调味品 等,这些样品在最后称量时通常比开始测量时温 度要高。 23. 按“8”键开启或关闭重量补偿。 注意:编辑任何参数时,按参数相对应的数字键 进入编辑,再用数字键输入新的参数,然后按 “ENTER ”键。 24. 按“READY ”键开始分析。 注意:快速测试屏幕显示功率、温度和时间指示。 注意:按“EDIT ”操作键回到快速测试参数界面 进行方法参数的编辑。 25. 如果“自动跟踪”关闭,需要进行样品标识。 按“ID”操作键。
注
意
使用 SMART System 5™前必须热机至少 45 分钟。 注意:如果需要移动天平支架,必须将天平支架取出。
东微SMART处理器使用说明书(1)

重要的安全事项(针对火灾、电击或伤害人体的指示)注意-使用该电器产品时,有以下基本的预防措施:1.使用该产品前请详细阅读全部的安全事项;2.本产品应当接地,如果出现故障时,电流经最小的接地电阻流入大地,以减小电击;本产品的电源线和电源插头都配备安全接地,电源插头应当牢固插入适当的电源座,此电源座应当完全按当地的条例来安装和接地。
警告-接地装置连接不当会导致电击;如果你对产品是否正确接地存在疑问,请委托合格电工或维修人员检查;请不要尝试私自更改产品的电源插头,如果不适合电源插座,可委托合格电工安装适当的电源插座;3. 为了减小伤害的风险,当产品在小孩附近使用时,要严密监管;4. 请勿在湿度很大的地方使用机器,例如靠近浴缸、洗面盆、厨房水槽、湿度大的地下室或者靠近游泳池和湖泊;5. 该产品应当安装与通风良好的地方;6. 该产品必须远离热源,例如电暖炉、电热毯或者其他产生热量的产品;7. 该产品的电源类型必须符合操作知识或者产品上标明的类型;8. 该产品要配备一条两端的电源线(一段的插片长过另一端)。
这是安全装置。
如果你无法把电源插头插入电源插座,请联系电工来更换旧插座。
9. 长时间不使用时,请把电源线从电源插座中拔出,从电源插座拔出电源线时,请勿拉扯电源线,应当抓住电源插头将其拔出;10. 细心护理,请勿让杂物或者液体从其缝隙掉进机器内;11. 当有下列情况时,应委托合格维修人员修理:A.电源线或电源插头已被损坏B.杂物或者液体已掉进机内C.产品已被雨淋D.产品已不能正常操作或在演出中出现明显变化E.产品已跌坏或外观损坏12. 当出现在用户维修指南中没有描述的情况时,请勿尝试私自修理,应当委托合格的维修人员修理;13. 警告-勿让重物积压或踩踏电源线,切忌拉、拔或强力扭曲电源线。
请勿滥用电源线,不合格的电源线可能导致火灾或对人构成伤害。
目录重要的安全事项(针对火灾、电击或伤害人体的指示) (1)目录 (2)说明 (3)一、设备架构 (4)二、软件操作说明 (5)2.1 菜单栏和工具栏 (5)2.1.1文件 (5)2.1.2本地设置 (6)2.1.3设备设置 (6)1)用户管理 (6)2)场景管理 (7)3)网络设置 (7)4)串口设置 (7)5)语音跟踪 (7)6)GPIO (8)7)设备升级 (13)2.2 电平显示 (13)2.3 音频输入模块 (13)2.3.1输入源 (14)2.3.2扩展器 (15)2.3.3均衡器 (16)2.3.4压缩器 (16)2.3.5自动增益 (17)2.4场景管理和GPIO (17)2.5自动混音器 (18)2.5闪避器 (19)2.6 SPL控制(自动噪音消除) (20)2.7 混音器 (22)2.8 输出混音器 (22)2.9电话控制 (22)2.10 音频输出模块 (23)2.10.1音箱管理 (24)2.10.2反馈消除器 (25)2.10.3 限幅器 (25)三、技术指标 (26)四、常见问题 (27)说明该系列一共16个型号,各型号功能如下所示:型号输入通道输出通道基本功能反馈消除回声消除电话自动混音440/S 4 4 √880/S 8 8 √1208/S 12 8 √√1212/S 12 12 √√440/A 4 4 √√880/A 8 8 √√1208/A 12 8 √√√1212/A 12 12 √√√440/C 4 4 √√√880/C 8 8 √√√1208/C 12 8 √√√√S1212/C 12 12 √√√√440/TC 4 4 √√√√880/TC 8 8 √√√√1208/TC 12 8 √√√√√1212/TC 12 12 √√√√√注:说明书中的图片和功能说明是按照1212/TC系列,其他型号稍有差异。
SEM水分分析仪 Smart操作手册(中文版)

样品分析
正确的样品预处理对准确的测试数据非常关键。 每个样品都有自己的组成, 因此每个样品可 能需要不同的处理分析方法。 采样——选择有代表性样品。 � � 预处理——均质样品能获得更精确的结果。 � 称重——CEM 推荐使用 2-5g 分析样品,强调样品必须均匀。 � � � � � 支架——玻璃纤维垫可用于大部分样品分析。 应用——大部分样品必须均匀铺展,避免成块或不均状。 干燥时间——根据样品类型和特性确定干燥时间。 称重允许样品达到一个恒重值, 设定 时间则可以进行样品分析控制。 红外温度——红外温度测量可以标准或者真空炉程序中使用。 微波功率——根据样品成分确定微波功率。 在不燃烧和降解样品的情况下尽量使用更高 的功率。
警
8. 9. 10. 11. 12. 13. 14. 15.
告
如果检查到损坏痕迹,禁止对仪器进行操作。 如果仪器损坏,请和运送公司联系,并通知 CEM 服务部门。 检查所有附件是否齐全。 打开仪器顶盖,安装天平支架和天平托盘。 正确选择仪器电压选项开关。 如果需要,安装排气管。 连接电源线。 打开电源开关。 使用一把小平头改锥,拆开打印机,安装打印纸。重新安装打印机盖子,按 PRINT 键。 按操作提示进纸。
操 作 手 册
微波技术创 始者
REV 1.0
2005.1
操作注意事项
� � � � � � � 不要损坏仪器安全自锁装置。 SMART System 5 配置了 3 安全自锁开关以避免在打开仪 器顶盖时微波泄漏。 经常清除在微波腔和顶盖密封处的沉积灰尘。 如果仪器出现故障禁止再继续使用。 仪器维修应该由专业人员操作。 依照说明书进行操作能够将电磁干扰降低到最小。 仪器不能放置在一个易受电磁干扰的地方。 并建议用户在仪器醒目处标明仪器正在操作 中。 微波泄漏限制值应该小于 5mW/cm2。
Sagitar_2006_保养手册
5 速腾 2006 文件盒 2.1,手册 20.1,版本: 04.2009
更换制动液 . . . . . . . . . . . . . . . . . . . . . . . . . . . . . . . . . . . . . . . . . . . . . . . . . . . . . . . . . . . . . . . . 27 电动车窗升降器:检查定位情况 . . . . . . . . . . . . . . . . . . . . . . . . . . . . . . . . . . . . . . . . . . . . . . . . . 32 底部保护层:目测是否有损坏 . . . . . . . . . . . . . . . . . . . . . . . . . . . . . . . . . . . . . . . . . . . . . . . . . . 65 多楔带:检查状态 . . . . . . . . . . . . . . . . . . . . . . . . . . . . . . . . . . . . . . . . . . . . . . . . . . . . . . . . . . . 34 检查轮胎:状态、轮胎胎面、充气压力、胎纹深度 . . . . . . . . . . . . . . . . . . . . . . . . . . . . . . . . . . . 24 检查安全带 . . . . . . . . . . . . . . . . . . . . . . . . . . . . . . . . . . . . . . . . . . . . . . . . . . . . . . . . . . . . . . . . 50 进行试车 . . . . . . . . . . . . . . . . . . . . . . . . . . . . . . . . . . . . . . . . . . . . . . . . . . . . . . . . . . . . . . . . . . 46 冷却系统:检查防冻剂和冷却液液位 . . . . . . . . . . . . . . . . . . . . . . . . . . . . . . . . . . . . . . . . . . . . . 35 主销:目检 . . . . . . . . . . . . . . . . . . . . . . . . . . . . . . . . . . . . . . . . . . . . . . . . . . . . . . . . . . . . . . . . 21 直接换档变速箱 (DSG)02E - 6 档位:更换机油和机油过滤器 ......................... 22 制动液液位:检查 . . . . . . . . . . . . . . . . . . . . . . . . . . . . . . . . . . . . . . . . . . . . . . . . . . . . . . . . . . . 29 制动装置:目测是否泄漏和损坏 . . . . . . . . . . . . . . . . . . . . . . . . . . . . . . . . . . . . . . . . . . . . . . . . . 30 7 档双离合器变速箱 0AM:更换变速箱油 . . . . . . . . . . . . . . . . . . . . . . . . . . . . . . . . . . . . . . . . . . 22 滑动天窗:检查功能,清洁导轨并涂油脂 . . . . . . . . . . . . . . . . . . . . . . . . . . . . . . . . . . . . . . . . . . 58 火花塞:更换 . . . . . . . . . . . . . . . . . . . . . . . . . . . . . . . . . . . . . . . . . . . . . . . . . . . . . . . . . . . . . . 66 CLimatronic 自动空调:将温度设置为 22°C . . . . . . . . . . . . . . . . . . . . . . . . . . . . . . . . . . . . . . . 32 目视检查前排安全气囊 . . . . . . . . . . . . . . . . . . . . . . . . . . . . . . . . . . . . . . . . . . . . . . . . . . . . . . . 51 目视检查排气系统是否有泄漏和损坏 . . . . . . . . . . . . . . . . . . . . . . . . . . . . . . . . . . . . . . . . . . . . . 46 万向节保护套:目测 . . . . . . . . . . . . . . . . . . . . . . . . . . . . . . . . . . . . . . . . . . . . . . . . . . . . . . . . . 33 空气滤清器:清洁外壳,更换滤芯 . . . . . . . . . . . . . . . . . . . . . . . . . . . . . . . . . . . . . . . . . . . . . . . 38 拆卸和安装发动机下舱盖板 (隔音垫) ........................................... 42 车窗玻璃刮水 / 清洗装置和大灯清洗装置:检查功能 . . . . . . . . . . . . . . . . . . . . . . . . . . . . . . . . 58 车窗玻璃刮水片:检查极限位置 . . . . . . . . . . . . . . . . . . . . . . . . . . . . . . . . . . . . . . . . . . . . . . . . . 61 车轮紧固螺栓:用规定拧紧力矩拧紧 . . . . . . . . . . . . . . . . . . . . . . . . . . . . . . . . . . . . . . . . . . . . . 47 车门止动器:润滑 . . . . . . . . . . . . . . . . . . . . . . . . . . . . . . . . . . . . . . . . . . . . . . . . . . . . . . . . . . . 62 汽车系统测试:进行 . . . . . . . . . . . . . . . . . . . . . . . . . . . . . . . . . . . . . . . . . . . . . . . . . . . . . . . . . 32 收音机 / 导航系统:激活防盗密码 . . . . . . . . . . . . . . . . . . . . . . . . . . . . . . . . . . . . . . . . . . . . . . 49 时钟:调整 . . . . . . . . . . . . . . . . . . . . . . . . . . . . . . . . . . . . . . . . . . . . . . . . . . . . . . . . . . . . . . . . 65 手动变速箱:检查手动变速箱齿轮油油位,必要时添加 . . . . . . . . . . . . . . . . . . . . . . . . . . . . . . . 22 自动变速箱:检查自动变速箱油液位,必要时添加 (09G - 变速箱) ..................... 22 转向横拉杆球头:检查间隙,固定装置和防尘罩 . . . . . . . . . . . . . . . . . . . . . . . . . . . . . . . . . . . . . 62 组合仪表:设置相应的菜单语言项 . . . . . . . . . . . . . . . . . . . . . . . . . . . . . . . . . . . . . . . . . . . . . . . 34 5 废气检测 .................................................................. 73 对于汽油发动机的废气检查 . . . . . . . . . . . . . . . . . . . . . . . . . . . . . . . . . . . . . . . . . . . . . . . . . . . . 73 柴油发动机废气检测 . . . . . . . . . . . . . . . . . . . . . . . . . . . . . . . . . . . . . . . . . . . . . . . . . . . . . . . . . 79
SmartMoto手机软件工具刷机修复使用手册(中文版)
9 F0 _) Q, q1 o/ t2 k. f3、连接电源适配器到Smart盒子并将手机开机。
: Y. `! N$ t. V. C2 l* X T4、运行SmartMoto1 o4 U# W" w0 C+ u+ L! G* M# H/ m: u
- X |) A3 |! M4 N. ?9 S/ c
Skip fireware mismatch confirmation
% f4 M8 k% p2 i, F8 H& M- a U该选项允许用户刷入一下更高版本的语言包。(强烈建议仅高手使用)
. Y, K# F6 \2 H2 S2 L9 w+ [% S# F
9、直到下方出现“file.mbk saved”消息便备份成功。0 H' m/ o( d* t- h0 p- W; q" g
! p0 H$ E$ e5 Y; }7 J手机也可以写入同型号其它机器备份的全字库文件,加密区数据会在写入前自动备份,写入后需要恢复加密区数据。7 C, q1 i6 O- ?1 v s
/ [4 B4 j; O9 F! o; P, H1 D如果您要在windows2000或xp上运行或升级SmartMoto,请运行它,然后打开左边的“Smart-Clip”标签,在右方勾选“Disable OS parallel port polling(requires reboot)”。意思是关闭系统打印端口缓冲池。当然,之后您需要按系统提示重新启动计算机。
其实哪一行想干好都不容易,我自认为计算机英语略知一二,将此说明书译给各位同行,节省大家宝贵的时间。译文中我尽量从技术角度进行了完善与推敲,但是错误之处限于本人水平在所难免,又急于贴到网上,恳请各位批评指正。
16f630中文数据手册【Word版】9p (2)

P I C16F630/676数据手册14 引脚闪存8 位CMOS 单片机2004 Microchip Technology Inc.DS40039C_CN请注意以下有关 Microchip 器件代码保护功能的要点:· · · Microchip 的产品均达到 Microchip 数据手册中所述的技术指标。
Microchip 确信:在正常使用的情况下, Microchip 系列产品是当今市场上同类产品中最安全的产品之一。
目前,仍存在着恶意、甚至是非法破坏代码保护功能的行为。
就我们所知,所有这些行为都不是以 Microchip 数据手册中规定的操 代码保护功能处于持续发展中。
Microchip 承诺将不断改进产品的代码保护功能。
任何试图破坏 Microchip 代码保护功能的行为均可视 为违反了《数字器件千年版权法案(Digital Millennium Copyright Act )》。
如果这种行为导致他人在未经授权的情况下,能访问您的软 件或其它受版权保护的成果,您有权依据该法案提起诉讼,从而制止这种行为。
本出版物中所述的器件应用信息及其它类似内容仅为您提供便 利,它们可能由更新之信息所替代。
确保应用符合技术规范, 是您自身应负的责任。
Microchip 对这些信息不作任何明示或 暗示、书面或口头的声明或担保,包括但不限于针对其使用情况、质量、性能、适销性或特定用途的适用性的声明或担保。
Microchip 对因这些信息及使用这些信息而引起的后果不承担任何责任。
未经 Microchip 书面批准,不得将 Microchip 的产品用作生命维持系统中的关键组件。
在 Microchip 知识产权保护下,不得暗中或以其它方式转让任何许可证。
DS40039C_CN 第 ii 页商标 Microchip 的名称和徽标组合、 Microchip 徽标、 Accuron 、 dsPIC 、 KL 、 microID 、 MPLAB 、 PIC 、 PICmicro 、PICSTART 、 PRO MATE 、 PowerSmart 、 rfPIC 和SmartShunt 均为Microchip Technology Inc .在美国和其它国家或地区的注册商标。
SMART指南说明书

SMART‘Save Money and Reduce Tax’As a member of Leonardo FuturePlanner you have two ways of making contributions to the plan:•via deduction from your pensionable pay; or•via salary sacrifice. This option is known as SMART, which stands for ‘Save Money and Reduce Tax’.This Guide explains how SMART works. If you have any questions after reading this guide, please get in touch with XPS Administration. Their contact details are given at the back of this document.Most employees will be better off as a result of paying their contributions through SMART however a small number of members may not benefit or may be worse off. Please read the Questions & Answers section for further information.Please understand that, by law, XPS Administration cannot give you financial advice. If you want help in deciding whether SMART benefits you, please consider talking to an Independent Financial Adviser.How SMART worksSMART is a way of contributing towards your pension benefits which reduces the amount of National Insurance that you and your Employer have to pay. It can increase your take-home pay, and it saves your Employer money. Participating in SMART involves a change to your terms and conditions of employment.Here is how it works.•Members do not make pension contributions.•Instead your salary goes down by an amount equal to your pension contributions (salary sacrifice).•Your Employer pays an amount, equal to your pension contributions directly into FuturePlanner.•As a result of this, you and your Employer pay no National Insurance on your contributions. Your take-home pay may be higher, and the Employer also saves money.Your salary before the SMART deduction is made is known as your ‘reference salary’ and will be used to work out your FuturePlanner benefits (for example the matching Employer contributions and the death in service lump sum) other Employer benefits (including bonuses, overtime and maternity pay) and for any salary reviews.Your Employer intends to operate SMART as long as the savings on National Insurance continue to be available. However, if the rules on tax or National Insurance change, or there is some other reason that prevents your Employer from continuing with the arrangement, it will stop.If this happens, your salary will be increased back up to its pre-SMART level and you must pay pension contributions by deduction from salary. Your take-home pay may go down because you are no longer making savings on National Insurance. You will not have to pay back any of the savings you made while SMART was operating.Questions and AnswersHow much will I save through SMART?Employee NI is 12% of a band of earnings. So, with the tax relief and the SMART saving, the take-home pay impact of each £1 of employee contribution can be only 68p.If you earn more than the Upper Earnings Limit for National Insurance the NI is 2%. So with the tax relief and the SMART saving, the take-home pay impact of each £1 of employee contribution can be only 68p? This may different if you are a Scottish tax payer.Please visit the two-for-one calculator on the FuturePlanner website, which will enable you to enter your earnings and will show you how little it cost you by participating in SMART. Note, if you live in Scotland your tax savings may differ to those of England and Wales.Please note that all the amounts quoted on the modeller are estimates only using the current tax year figures. These may change in the future if pension, tax or National Insurance laws change.I’m not paying my contributions through SMART – how can I join?You are able to opt in to SMART at anytime. This also applies if you are in SMART and wish to opt out (subject to one month’s notice for payroll deadlines).You can find the SMART option form in the Library section of the website.Is Leonardo the only company doing this?No, many other large organisations allow their employees to make pension contributions through similar arrangements, delivering savings to their employees and the business.Does SMART affect my tax position?No. Your pension contributions are free of tax. The reduction in your gross taxable pay is equal to the pension contributions you would have made. SMART only affects National Insurance contributions.Are voluntary savings included in SMART?Yes since 1 July 2013 your voluntary savings (i.e., those above 5%) are included in SMARTWill my pension reduce?No. Your pensionable salary is not affected by SMART so your benefits remain the same. Benefits that are linked to contributions paid will be calculated as if you had not participated in SMART.Does SMART affect my other employment benefits?It does not affect the following benefits: pension; overtime; bonuses; salary supplements; shift premium; holiday pay; sick pay; maternity pay, adoption pay and paternity pay. This is because benefits are based on your reference salary – which is your salary before SMART. Salary reviews are also based on reference salary.Does SMART affect the amount of mortgage I can apply for?For any mortgage or other loan references that we provide, we will disclose your reference salary.What happens if my salary goes below the National Living Wage?The payroll system will automatically take you out of SMART if your salary would be less than the National Living Wage which is approximately £18,100 (this changes each year). If your salary then increases above the National Living Wage the payroll system will put you back into SMART.Does SMART affect my State benefits?Your National Insurance contributions count towards State benefits, so it is possible that participation in SMART could affect some of these benefits. This generally depends on the amount you earn.Some State benefits are not affected by SMART as long as you pay at least the minimum level of National Insurance. For example:•Basic State pension•Statutory sick pay•Incapacity benefit•Jobseeker’s allowanceYour entitlement to these benefits will not change as long as you earn more each year than the Lower Earnings Limit before SMART. If your earnings are currently below this figure, it is possible that SMART could affect your entitlement to some State benefits. Please note however that as set out above, if your salary would be less than the National Living Wage payroll will automatically take you out of SMART.Some employees may receive other benefits such as income support and housing benefit. These benefits are typically means tested and assessed on your overall financial position. You may need to consider whether the increase in net pay that arises as a result of participation in SMART would impact on the level of these benefits.SMART does not affect any income tax credits you may receive.SMART could reduce the amount of statutory entitlement to maternity, paternity and adoption payments. However, Leonardo ensures that employees are no worse off by adjusting the amount paid by your Employer.Members should also consider the effect on other State benefits. For example, Working Tax Credits and Child Tax Credits may increase due to the reduction in an employee’s taxable earnings, thus increasing the overall net saving. The overall impact for each employee is highly dependent on individual circumstances.Any more questions?If you have any questions about SMART or your benefits that are not answered here, please get in touch with XPS Administration either by:•Calling 0118 467 5900; or•Emailing **************************Please understand that XPS Administration cannot give you financial advice. If you are unsure about whether SMART is beneficial to you, you may want to consider consulting an Independent Financial Adviser (IFA). An organisation called IFA Promotion can provide contact details for IFAs in your area – you can visit their website at .DisclaimerThe purpose of this guide is to provide you with information about SMART and is not financial advice. Illustrations are indicative of savings you may make. The actual amounts may vary from those shown depending on your circumstances. The rules of the Scheme govern how the Trustee must act and if the rules are inconsistent with the information in this guide, the rules will prevail.。
Smart型号产品使用指南说明书

Smart. Clear. Connected. Manual Cleaning InsightsOnline Dashboard (sample screens)Enlarged section showing a cleaning and disinfection process reportCapture what you’ve been missingIt’s smart. Manual cleaning is vital to your plant’s food safety and quality, but not knowing which parameters to measure or verify can expose your plant to production delays, recalls or worse. It’s clear. Ecolab Manual Cleaning Insights (MCI) digitally tracks and measures manual cleaning activities to provide straightforward insights that ensure controlled, dependable results.You’re connected. You have simple access to data and insights that prove compliance of critical parameters, improve efficiency and verify results. Smart. Clear. Connected.Make sure it’s clean from start to finish. Ecolab MCI gives you 24/7 visibility into the cleaning and sanitizing process, helping you:V erify cleaning and disinfection activitiesS ave money by reducing re-cleaning to promote on-time production startsI mprove efficiency by identifying suboptimal resource usageS ave time by standardizing and verifying proceduresEnsure your hygiene controls and prerequisite program are compliant with regulatory requirements and GFSI audit schemes.How MCI works to verify your cleaning process3SensorsSensors on cleaning stations capture critical data, including water temperature, air and water pressure and chemistry flow.1MCI ControllerMain and remote controllers gather and transmit the sensors’ data.Ecolab Proprietary2Microsoft Azure Cloud Encrypted data is securely transmitted, stored and analyzed to enable MCI to provide you with actionable insights.MCI does not require access to your internal network.Cellular Network MCI Online DashboardData on critical cleaning and sanitation activities is readily available to help you monitor and optimize resource use and activity duration in your cleaning process.Ecolab Proprietary4Better cleaning insights mean better cleaning outcomesFood safety and brand reputation•M aintain food quality and integrity with verifiable cleaning processesthat help prevent microbiological and chemical contamination•E nable correlation of cleaning and disinfection data to food safetyand quality issues to improve product shelf life and reduce recalled orscrapped productProductivity•M onitors and verifies phases in the cleaning process to reducerecleans and increase on-time production starts•I mproves efficiency by providing data that lets you identify trainingopportunities and ensure your team’s timely completion of tasksResource optimization and data capture•M onitors resource usage and compares it to benchmarks to help avoidunder- or over-usage and optimize total cost of operations• A utomatically captures, stores and analyzes data to improve insights,identify root causes and reduce time needed to prepare data for auditsSustainability• Sets limits and exceptions to help reduce water consumption, energycosts, optimize the cleaning process and preserve equipment asset life• Helps reduce food scrapping and waste• Helps minimize burden on effluent by optimizing chemistry usagePartner with Ecolab to solve your toughest manual cleaning challenges. Our completeprogram delivers peace of mind by combining powerful chemistry with smart technology and world-class service. Visit /MCI.©2022 Ecolab Inc. All rights reserved. 57926/0300/1021。
smart中文说明书
1.除去压力调节器的运输包装。
使用前必须除去位于调节器黑色的可拆卸的上盖下面的泡沫塑料。
检查标气及过程气是否连接紧固,安装位置是否准确。
检查运载气的连接及所有用于双量程的所有连接。
检查标气的质量,并在菜单中输入正确的值。
只有在已知标气的气体成分时,才能根据标气中的每个气体成分计算出正确的华白指数。
推荐使用推销商提供的有检定值的气瓶。
打开设备电源,将自动进行点火,这些只有在关门的情况下才可进行。
设备开始运转,预热时间过后(20-30分钟,第一次试运转是从冷状态开始的)将会得到过程气的正确热值。
CW2000内的计算机程序已在工厂中完成预设定(见与设备一起提供的数据清单),测量范围及所有其他特别选项都已考虑进去了。
设备开始运转后,燃气的压力将显示为4mbar,冷空气的压差也将是4mbar。
升温时间过后,仪表将在显示器上显示热值、华白指数及比重。
在图形界面上将开始显示在线测量值的走势趋势。
在工厂中软件的缺省设置为产生这种可视的走势图。
2.软件软件由许多菜单级组成,并可通过薄膜键盘进入。
所有相似的操作可进入一系列菜单中完成。
一个菜单条位于显示器的底部,菜单键相应的功能拟态地显示在屏幕的底边上。
菜单按钮(1)区是用于连接到下一个更高的菜单级。
菜单按钮(5)是无论在任何菜单级都返回到开始菜单。
处理器实现的功能都是辅助的,在通过菜单完成功能时应考虑到这点。
3.显示器布置图图1:显示器1 主菜单键 6 启动/停止键2 历史趋势图键7 输入数据键3 数据显示区8 燃烧器窗口4 信息区9 状态显示灯5 返回主菜单键10 位置键4.标定标定就是输入华白指数和比重。
在标准配置时,该设备含有一个测量范围及一种标气。
对于双量程需要一种或两种标气,应根据两个量程的重叠范围,如果重叠范围较大,一种标气就足够了,这将根据工厂具体的最终标定情况来决定。
标定数据输入华白指数及比重。
如果标气供应商仅提供气体成分的百分数,那么这两个值必须根据标气的成分来计算。
2006 S2000 车主指南说明书

2006 S2000 Online Reference Owner's ManualUse these links (and links throughout this manual) to navigate through this reference.For a printed owner's manual, click on authorized manuals or go to .ContentsOwner's Identification FormIntroduction (i)A Few Words About Safety (ii)Your Vehicle at a Glance (3)Driver and Passenger Safety (5)Proper use and care of your vehicle's seat belts, and Supplemental Restraint System.Instruments and Controls (43)Instrume nt panel indicator and gauge, and how to use dashboard and steering column controls.Comfort and Convenience Features (81)How to operate the climate control system, the audio system, and other convenience features.Before Driving (107)What gasoline to use, how to break-in your new vehicle, and how to load luggage and other cargo.Driving (119)The proper way to start the engine, shift the transmission, and park, plus towing a trailer. Maintenance (131)The Maintenance Schedule shows you when you need to take your vehicle to the dealer.Taking Care of the Unexpected (169)This section covers several problems motorists sometimes experience, and how to handle them.Technical Information (193)ID numbers, dimensions, capacities, and technical information.Warranty and Customer Relations (U.S. and Canada) (205)A summary of the warranties covering your new Acura, and how to contact us.Authorized Manuals (U.S. only) (209)How to order manuals and other technical literature. Index (I)Service Information SummaryA summary of information you need when you pull up to the fuel pump.。
S006 基本使用手册说明书

All mentions of "the S006" in this manual refer to "Cyber-shot™for at least one second.(out of range When the standby screen is displayed, hold down F forL anguage You can switch the display language for function namesWhen the standby screen is displayed, press c(Func/Settings)[Select]).The date and time are set automatically. However, auto time adjustment is invalid when mode. Set the date and time manually under M551 •Infrared Comm Infrared Comm Infrared CommCamera Data Folder Camera Camera Data Folder Tools Video Viewer Video Viewer Video Viewer Video Viewer LISMO Tools LISMO LISMO ToolsCamera Data Folder CameraVideo Viewer LISMO Data Folder LISMOGlobal Function Func/Settings Tools Tools PC Site Viewer Data Folder microSD microSD microSD Func/Settings Func/Settings Infrared Comm Func/Settings Func/Settings Global Function EZ FeliCa Global Function microSD microSD PlayNow EZ FeliCaPC Site Viewer PlayNow Kisekae Infrared CommMissed Call NotificationIf you did not answer a call, andto let you know that you missed a call. To check the caller's phone number, useOne-ring Indicatorindicator (red) on the Incoming History screen indicates you have received a one-ring call (a call rang for threeseconds or shorter). Be careful when you return a call to an , the standby screen. This also turns on Answer memo, on the standby screen.Turning Off Manner ModeTurning off manner mode causes , and from the standby screen. Answer memo is also turned off, disappearing from the standby Original(Select).to adjust the volume and then pressTat least one second. The answer memo is turned off and disappears from the standby screen.The cell phone can record a maximum of ten•Enter a name and then pressUse j to selectpress (Select).Enter a phone number and then press to select(Select).Enter an e-mail address and then pressSend).: Indicates a read message.: Indicates an unread message. Usepress: Indicates a read message.: Indicates an unread message.UsepressQuote Adrs BookThe EZ News EX information is updated at regular time intervals. appears while receiving information..Thedisplays the current map in real time.3D NaviShows a 3D view at guidance points and around the destination area.Use xiting the au Media Tuner Press F , use (YES) and then press c (OK).TV operation screenData operation screenIs (out of range indicator) displayed?Move to a location where (out of range indicator) is no longer displayed, and tryArea SettingIs (out of range indicator) displayed?Move to a location where (out of range indicator) is no longer displayed. AlsoIs (out of range indicator) displayed? Or are you in a location where the signal is too weak?Move to a location where (out of range indicator) is no longer displayed. AlsoIs (ring tone off indicator) displayed? Is the battery pack installed properly?。
2006年年型Navigon GPS导航系统用户手册说明书

How does the Navigation System Work?
The navigation system uses an on-board computer that interacts with the GPS (Global Positioning System) satellites, vehicle sensors and the Map Database to give you the precise location of your vehicle and guide you to your destination. Vehicle location is gathered by a combination of 3 navigation calculations: GPS signal, dead-reckoning and map-matching.
Map-Matching Refers to the process of comparing the vehicle’s position, heading, distance, and speed data produced by the vehicle sensors against the map data from the map database, to determine the most likely location of the vehicle relative to the map.
Dead Reckoning Allows the navigation system to accurately predict the vehicles position despite the degradation or loss of a GPS signal. A speed sensor on the wheels of your car, and a internal gyroscope provide the navigation system with distance and direction data respectively, that is then used to store a highly accurate image of the path your vehicle has traveled. This information, used in conjunction with map-matching, enables the system to provide precise guidance advice despite the temporarily loss of a GPS signal.
Smart说明书

Smart一键通交易系统操作指南第一部分:登陆部分一、登录交易系统Smart一键通交易系统在登录时只需要输入资金账号和密码就可以同时登陆交易服务器和行情服务器。
提示:首次登陆时需要对交易服务器和行情服务器进行配置。
为减少丢包率,建议选择同网服务器登录:即网通宽带用户登陆网通服务器;电信宽带用户登陆电信服务器。
二、退出交易系统操作方法:在电脑托盘右键单击图标,点击“退出”即可退出交易系统提示:点击下图位置的“X”,并非退出交易系统,而是最小化在托盘第二部分:交易部分Smart一键通交易系统的下单界面分为传统下单和波动炒单。
一、传统下单界面(一)、如何开仓使用方法:1、在文华的报价列表中鼠标左键单击准备开仓的合约或单击该合约的技术分析图表;2、交易界面的“合约号”将自动变为您鼠标点击的合约,选择买卖方向,设置下单价格。
3、点击“下单”按钮开仓。
提示:1、传统下单界面支持类金士达操作热键:键盘“↑”“↓”按键移动鼠标焦点;焦点在“买/卖”位置时,小键盘数字“1”键为买入,数字“3”键为卖出;焦点在“开/平”位置时,小键盘数字“1”键为开仓,数字“2”键为平今,数字“3”键为平仓。
焦点在手数和价格位置时,按“←”“→”键调整手数和价格;按数字键也可直接输入委托手数和委托价格;2、鼠标点击报价列表或者技术分析图表的时候,“开平”位置默认为开仓;鼠标点击持仓的时候,“开平”位置默认为平仓;3、“手数”框中的下单手数,可以在“参数设置”的“下单手数”中设置。
鼠标点击合约后,该栏显示手数为事先设置的默认手数。
4、跟盘价:买入操作时跟盘价代表市场上该合约当前的卖价;卖出时跟盘价代表该合约当前的买价。
5、指定价:在价格输入框手动输入您指定的价格,然后点击下单即可。
(二)、如何平仓使用方法:1、在“持仓”栏中鼠标左键单击想平仓的合约,则右侧区域会自动默认显示该合约名称、买卖方向以及开平仓的方向,选择平仓手数以及平仓价格(跟盘价/指定价)。
Smarts使用手册

Smarts使用手册目录1引言 (4)1.1编写目的 (4)1.2参考资料 (5)2Smarts管理概述 (6)2.1Smarts 体系架构图 (6)2.2主机配置 (6)2.2.1SAM硬件 (6)2.2.2IPTR硬件 (6)3Smarts使用 (8)3.1打开UI地址 (8)3.2输入用户名和密码 (9)3.3查看错误事件日志 (9)3.3.1右键点击事件,查看containment(该设备所包含的部件), (9)3.3.2查看所包含的cards (10)3.3.3查看电源风扇 (11)3.3.4查看网络适配器 (11)3.3.5查看所列出的IP地址 (12)3.3.6查看故障属性 (13)3.3.7查看故障概况 (13)3.3.8查看故障所影响其它设备 (14)3.3.9查看故障的详细信息 (14)3.3.10在Map中显示出错的设备 (15)3.3.11在MAP中显示LSP (16)3.3.12显示IP Network连接 (16)3.3.13显示物理连接 (17)3.3.14显示路由器所包含的对象 (18)3.3.15Attach Domain Manager (18)3.3.16显示交换机的IP Network连接 (20)3.3.17显示交换机的详细SNMP信息 (21)4ITPR使用 (22)4.1IE打开UI地址 (22)4.2输入用户密码 (23)4.3ITPR导航显示 (24)4.4ITPR管理 (24)4.4.1设置ITPR 数据保留期限 (25)4.4.2查看网络历史故障告警 (26)4.5创建报告模扳 (27)4.5.1选择设备类型 (27)4.5.2选择报告策略 (29)4.5.3选择报告相关用户 (30)4.5.4选择报告接收用户 (31)4.5.5预览报告配置 (32)4.6查看资源情况 (33)5Smart和ITPR维护 (35)5.1Mail Checks (35)5.2Log file Maintenance (35)5.3Archive file Maintenance (35)5.4Audit file Maintenance (35)5.5Backup (35)5.5.1Export System configuration (for SAM) (35)1引言1.1 编写目的本报告描述了:1.Smarts管理环概述2.EMC Smarts使用3.ITPR使用4.Smarts和ITPR维护理1.2 参考资料“EMC Smarts Certified Device List.xls”“EMC Smarts IP Manager Administrator.pdf”“IT Performance Reporter—Network Edition Administration Guide”“SAM Administration Guide”2Smarts管理概述2.1 Smarts 体系架构图2.2 主机配置2.2.1 SAM硬件Host Name Model CPU Memory Host ID10.21.234.5 DELL 44E4241/Xeonx3 8 GB 001A64DB66AC2.2.2 IPTR硬件Host Name Model CPU Memory Host ID10.21.234.4 DELL 7120M(3.0MHz)×2 4 GB 002219B9B6A23Smarts使用3.1 打开UI地址系统弹出Manager Login窗口3.2 输入用户名和密码3.3 查看错误事件日志3.3.1 右键点击事件,查看containment(该设备所包含的部件),3.3.2 查看所包含的cards3.3.3 查看电源风扇3.3.4 查看网络适配器3.3.5 查看所列出的IP地址3.3.6 查看故障属性3.3.7 查看故障概况3.3.8 查看故障所影响其它设备3.3.9 查看故障的详细信息3.3.10 在Map中显示出错的设备3.3.11 在MAP中显示LSP3.3.12 显示IP Network连接3.3.13 显示物理连接3.3.14 显示路由器所包含的对象3.3.15 Attach Domain Manager3.3.16 显示交换机的IP Network连接3.3.17 显示交换机的详细SNMP信息4ITPR使用4.1 IE打开UI地址4.2 输入用户密码4.3 ITPR导航显示4.4 ITPR管理4.4.1 设置ITPR 数据保留期限4.4.2 查看网络历史故障告警4.5 创建报告模扳4.5.1 选择设备类型4.5.2 选择报告策略4.5.3 选择报告相关用户4.5.4 选择报告接收用户4.5.5 预览报告配置4.6 查看资源情况5Smart和ITPR维护5.1 Mail ChecksEmail from root might get messages about the behaviour of Smarts crontabentries. These need to be checked regularly and after system reboot.5.2 Log file MaintenanceAll Log files are created under SMHOME\logs or SMHOME\local\logs. In order to prevent files, which might grow too big, they need to be managed.5.3 Archive file MaintenanceAll Archive files are created SMHOME\local\logs. In order to prevent files, which might grow too big, they need to be managed.5.4 Audit file MaintenanceAll Audit files are created SMHOME\local\logs. In order to prevent files, which might grow too big, they need to be managed.5.5 BackupThe following Backup policies should be applied on persistent storage using the companies' own backup strategy and procedures:(BASEDIR:C:\InCharge8\SAM\smarts\local orC:\InCharge7\IP\smarts\local )Every six hours• BASEDIR\smarts\local\reposRegularly (suggestion, every day) for SAM• BASEDIR\smarts\localOnce and after changes (like applying patches, enhancements, etc.)• BASEDIR\smartsEmergency backups for AM might be created using5.5.1 Export System configuration (for SAM)Good practice: execute sm_config export and store the output in a save place.This enables you to import changes to a fresh server without manuallyconfiguring every change again.The export should go to: <domain_name>.conf.xmlAnd will be stored in: …\local\conf\ics\ics should be replaced with the configuration directory used for this domain (ifdifferent).。
- 1、下载文档前请自行甄别文档内容的完整性,平台不提供额外的编辑、内容补充、找答案等附加服务。
- 2、"仅部分预览"的文档,不可在线预览部分如存在完整性等问题,可反馈申请退款(可完整预览的文档不适用该条件!)。
- 3、如文档侵犯您的权益,请联系客服反馈,我们会尽快为您处理(人工客服工作时间:9:00-18:30)。
热值仪概况:图1:Smart 2006 柜内详细元件图:1热电堆(mV 华白指数)输出2热电堆定位螺钉3PT100 温度校正热电阻4PT100 温差校正热电阻5PT100 温差校正热电阻6冷风口差压“-”7冷风口差压“+”8空气差压传感器9点火电极10吹扫孔11燃烧器12点火变送器13点火变送器线性滤波器14风机15风机电源16风机电源线性滤波器17电源端子模块18电源电缆19电缆信号20电缆信号21电缆信号22电缆信号23电缆信号24外部数字量与模拟量输出信号板(D/A板)25点火变送器门安全开关26PT100 箱内温度热电阻27电子内部A/D转换器及电磁阀控制(A/D板)28华白喷嘴差压29华白喷嘴旋钮30精密压力调节器31气体压力变送器32S.G.单元(比重)差压喷嘴33气体压力调节器34S.G比重单元35过程气体电磁阀36标准气体电磁阀37废气手册19页图图2:主门背面内部图1电源2接口3风扇电源4主板5ETX板6风扇ETX板7键盘背面手册20页图3 正面图1电缆信号2电缆信号3电缆信号4电源电缆信号M20 5地电缆信号M166过滤器罩7开关(ON/OFF)8门锁9废气10显示器11模拟信号盖资料21页图4 左视图1电缆信号2电缆电源3电缆信号4电缆信号5电缆信号6USB接口7人机界面接口8快速回路9负载气体(SV.X11/3-4)*10标准气体(SV.X14/3-4)*11标准气体(SV.X14/1-2)12过程气体(SV.X11/1-2)上图显示了标准仪表或配备1到2个标准气体或负载气体的仪表。
具有两个过程气体配件的仪表具有不同的入口,并会标示在仪表上。
带有“*”标记的项目可作为订货配件,标准仪表上不提供。
3.1规格尺寸与重量资料22页图5:外壳尺寸长:1020mm 40.2 inches宽:720mm 28.3 inches厚:337mm 13.2 inches质量:50.5kg 111 lbs防护等级:IP 54 NEMA 12该分析仪提供墙式安装,包含托架。
所有气体连接点都位于装臵的左边。
安装时,具有足够的空间将门打开,同时解决其他相关问题。
3.2 气体连接点采样管连接点在装臵左边,采用1/4”管径(6mm)及接头。
过程气体与标准气体分开安装。
如果需要较短的响应时间,根据样气,也可使用直径为1/8”(4mm)的管道,但确保气压降不能过大。
该仪表的输入压力必须在20~40mbar(2~4KPa)之间。
较低热值气体(1000kcal)需要40~60mbar(4~6kpa)的压力。
如果输入气压过低,需要用样气泵提升气压。
泵可以作为选装设备,并安装在压力计量表和预压调节器的盘面上。
过程气体需要样气过滤器,可由制造厂选择或客户提供来订购。
一个小容量过滤器足够满足天然气,因为该样气通常是纯净的。
大容量过滤器用于含尘气体,如鼓风炉气和焦炉气。
过滤器的容积会影响响应时间,并且该过滤器部件具有较大活动表面的保护区和较小的静容量。
如果过程气体比周围环境温度略高,且湿度高,必须避免当水遇到较低温度环境,在样气管里发生凝结。
3.3 气体损耗D为华白喷嘴直径,以mm为单位比重=过程气密度/空气密度例1华白喷嘴尺寸:0.55S.G.天然气:0.642天然气损耗反映的华白指数的范围是:14000 Wobbe(kcal/Nm3)或60000 Wobbe(kcal/Nm3)18.1 liter/h计量单位使用BTU(英制热量单位)和立方英尺:0-1450 Wobbe(Btu/ft.3)0.64 ft3/hour例2华白喷嘴尺寸:0.85S.G.天然气:0.422焦炉气损耗反映的华白指数的范围是:6000 Wobbe(kcal/Nm3)或25000 Wobbe(kcal/Nm3)53.22 liter/h计量单位使用BTU(英制热量单位)和立方英尺:0-630 Wobbe(Btu/ft.3)1.89 ft3/hour例3华白喷嘴尺寸:1.85S.G.天然气:1.032鼓风炉气/焦炉气损耗反映的华白指数的范围是:1400 Wobbe(kcal/Nm3)或6000 Wobbe(kcal/Nm3)18.1 liter/h计量单位使用BTU(英制热量单位)和立方英尺:0-150 Wobbe(Btu/ft.3)5.41 ft3/hour3.4 电源SMART 2006 能耗如下:230 伏50/60Hz 250V A115 (110) 伏50/60Hz 250V A仪器运作需用230或115V。
用户需要可将电压从230V转为115V:点火变压器和转换继电器必须正确地换成适合115 伏的设备。
3.5 测量范围根据气体成分,可利用的测量范围可以从满量程的20%~100%。
典型的范围是从45%~100%。
气体中的氢气成分增加测量范围区域而惰性气体如N2、O2或CO2减少了流动速度和测量范围。
4 安装资料27页图6 :排气系统1固定元件2配套绝缘罩3通风制动器4SMART 2006排放口5固定托架SMART 2006 以墙式安装为宜,并具有专门的墙上插座或提供了托架,并提供了四个标记“Z”的连接点。
在插槽中的加固点安装在悬挂部件的外壳背面。
部件也可安装在独立的机架上,可用不锈钢支架。
4.4电源连接电源的电气连接点与外壳底部的终端模块连接。
见图1和图8。
检查电压源是否与分析仪额定电压匹配。
资料30页图7:连接模块组件1 用户供电端2 主开关:仪表开/关3 柜门安全开关4 线性滤波器5 电源6 点火变压器7 柜门开关信号8 点火脉冲9 风机电源4.5气体连接点所有气体连接点在使用前应该防漏测试。
如果规定了所有选项包括过程气体、2个标准气体、负载气体和快速回路,那么通常提供的管道卡套式接头可能多达5个。
4.5.1过程气体过滤器以下介绍了两种气体过滤器。
天然气和其它纯净气体只需内部容积较小的过滤器。
过滤器元件需要偶尔更换并使用压力表检查过滤器的“反馈压力”。
在过滤器维护期间,在热值仪能够提供一个连续输出信号之前激活mA保持功能。
并确保在正常之后删除存储器保持。
图8:小型过滤器1带1/4”(6mm)接头的输入2带1/4”(6mm)接头的输出3可移动的元件保护套4过滤器本体316SS5过滤器20-30 um含尘气体需要体积较大的过滤器并引起了延迟时间的增加。
图9:带排水管接头的过滤器1过滤器入口2过滤器路径3带1/4”(6mm)接头的输入4带1/4”(6mm)接头的输出50.1um过滤网孔径,能过滤99.8%的过滤器6过滤器保护罩7过滤器外壳316SS(7) 过滤器容积:23 cm3 (0.00081 ft3 1.4 cu.inches)4.5.2压力调节器良好的压力调节器对于测量稳定性非常重要。
接下来的一章介绍了3种不同应用的(市场的)压力调节器。
根据型号出口压力范围在20mbar~55mbar(10”~24”H2O)。
高于6bar 的气压需要一次调节器来降低压力到预压调节器的入口压力。
标准的分析仪由一个过程气体入口和标准气体入口组成,两个入口都需配备预压调节器,连接点单位为mm或英寸。
调准过程气体和标准气体输出压力来观察压力是否相同,这对于测量的稳定性十分重要。
第一个预压调节器< 6 bar (90 PSI )具有锌压铸外壳,内部部件由钢和橡胶组成。
具有2个控制弹簧。
12~25 mbar.(10” H2O) 橙色30 mbar.(20” H2O) 蓝色资料32页图10:Fisher 912 预压调节器<6 bars (90 PSI)1 带1/4”(6mm)接头的输入管2 带1/4”(6mm)接头的输出管3 控制弹簧4 通气口第二个预压调节器< 250 bar (3600 PSI )GO PR1 型具有316 SS外壳和计量器。
输出压力(2)可调范围为0-3.4 bar 。
仍然需要预压力调节器作用在对于CWD2006第二等级的输入压力控制。
资料33页图11:高压调节器GO PR1 < 250 bar(3600PSI)1带1/4”(6mm)接头的输入管2带1/4”(6mm)接头的输出管3高压计量表4计量表,低压5压力控制转轮最后一种预压调节器< 250 bar (3600 PSI )具有316 SS外壳和计量器。
输出压力可调范围为0-3.4bar ,可连接气瓶CGA。
碳氢化合物W 21.8×1/4”DIN 477 Nr.1 或CGA 配件混合气体M19×1.5 LH DIN 477 Nr.14 或CGA 配件资料33页图12:高压调节器GO PR1 < 250 bar(3600PSI)1 配气瓶的输入接头2 带1/4”(6mm)接头的输出管3 高压计量表4 计量表,低压5 压力控制转轮4.5.3样气泵如果过程气体输入压力低于参考值,那么应该安装样气泵来提升气体压力。
调节较高压力使得入口处的气压可维持在参考值上。
(见3.2章)为了不同区域级别的安装,气泵必须满足一些需求,详见11章。
4.6接口这个分析仪能使用鼠标及标准PC键盘,接口为PS2。
图13:面板的左手侧的接口连接B接口2.VGA显示3.鼠标接口4.标准PC键盘接口5.并行口5 投运当所有电子元器件和气体连接都已经完成并测试后,这个设备可以上电了。
当试运行时,需要执行以下工作。
从比重单元移除紧固带和螺丝,单元必须安装在弹簧上并且不允许与托架周围接触。
移除螺丝并保存,下图解释了该过程。
图14:比重单元显示在锁定位臵图15:比重单元显示在运行位臵从气压调节器移除填料,泡沫塑料位于更换的调节器外壳的底下,并在使用前移除。
检查工艺、标准气体连接点紧固和正确。
检查所提供的任一负载气体或第二种标准气体连接点。
打开电源开关。
在短时间延迟之后,装臵启动,主屏幕显示。
右上角的信息栏显示状态。
在短时间吹扫后,气阀打开且点火装臵自动启动。
(注意:只可能在门关闭时点火,作为安全阀而在门开时禁止点火)。
一旦开始燃烧,在没有灭火条件下门可被打开。
设备将启动,在较短的暖启动期间(从冷态开始投运阶段运行20-30分钟)将达到正确的过程气体热值。
所有软件,测量范围与其它特殊选项在工厂预设臵(见装臵提供的数据单和存盘)。
启动后,屏幕上显示的气体压力在4 mbar。
冷空气差压柱(蓝色)也显示为4 mbar。
如果气压需要,可通过调节器上的质量增减来调整,空气压力不能人工控制,而是由变速风机来控制。
检测屏幕上显示的比重差压读数为4 mbar 并作必要的调整,详细见9.2.4章节。
在暖启动阶段之后,仪表将显示热值、华白指数和比重值,在显示器上显示数字值和趋势图。
菜单系统在第6章描述,该章描述了用户如何在不同的菜单中进入他们需要的特定值。
