spring jdbc配置文件进行加密解密
jdbc修改密码方法
jdbc修改密码方法JDBC(Java Database Connectivity,Java数据库连接)是Java中用于连接和操作数据库的一种技术。
在日常开发中,我们可能会遇到需要修改数据库用户密码的情况。
本文将详细介绍如何在JDBC中实现修改密码的方法。
1.JDBC简介JDBC是一种用于执行SQL语句的Java API,它提供了一种与数据库进行交互的方式。
通过JDBC,我们可以方便地在Java程序中操作数据库,进行数据的增、删、改、查等操作。
2.修改密码方法的需求在实际项目中,为了保证数据安全,我们可能会需要修改数据库用户的密码。
这时,我们可以使用JDBC提供的修改密码方法来实现。
3.修改密码的步骤和方法要修改数据库用户的密码,首先需要建立与数据库的连接,然后使用Connection对象的setPassword方法设置新密码。
以下是详细的步骤:(1)加载并注册JDBC驱动```javaClass.forName("com.mysql.jdbc.Driver");```(2)建立与数据库的连接```javaString url = "jdbc:mysql://localhost:3306/数据库名?serverTimezone=UTC&useSSL=false";Connection connection = DriverManager.getConnection(url, "用户名", "旧密码");```(3)修改密码```javaconnection.setPassword("新密码");```(4)关闭连接```javaconnection.close();```4.代码示例以下是一个简单的修改密码的代码示例:```javaimport java.sql.Connection;import java.sql.DriverManager;import java.sql.SQLException;public class ModifyPassword {public static void main(String[] args) {String url ="jdbc:mysql://localhost:3306/test?serverTimezone=UTC&useSSL=false";String username = "root";String oldPassword = "old_password";String newPassword = "new_password";try {Class.forName("com.mysql.jdbc.Driver");Connection connection = DriverManager.getConnection(url, username, oldPassword);connection.setPassword(newPassword);System.out.println("密码修改成功!");} catch (ClassNotFoundException e) {System.out.println("找不到JDBC驱动类");} catch (SQLException e) {System.out.println("数据库操作错误:" + e.getMessage());}}}```5.注意事项在实际操作中,需要注意以下几点:(1)确保JDBC驱动的正确加载。
Spring配置加密方案
Spring 配置加密方案赵海滨北京北科博研科技有限公司序言随着信息化的发展,加密便成了信息保护的手段。
对于那些重要的数据信息(密码)或配置信息(数据连接配置)我们要进行一定程度的加密处理,防止其以明文形式公开给程序。
接下来将介绍Spring2.5配置文件加密的方案之一。
方案原理:通过先加密 *.property属性文件中变量值,再Spring读取并解密属性文件中变量值。
从而将解密后正确的配置在程序运行之前完整的加载到内存之中,供程序正常的运行。
话不多说,接下来就开始我们方案配置吧。
本次演示如何对系统邮件服务器配置信息进行加密。
一、新建属性文件mail.properties内容如下:#邮箱配置mail.host=mail. ***.comername=abc@***.commail.password=YH4pn5nEJsOOkJRKWVTzDg==#公用设置mail.send=true目前,只对 mail.password 属性进行加密处理。
二、配置加密工具类本人自己编写,适合本人项目。
大家也可因自己需求进行修改。
1.加密解密类(EncryptPropertyFile.java),有这个类我们可以生成我们想要的密文“YH4pn5nEJsOOkJRKWVTzDg==”import java.security.Key;import java.security.SecureRandom;import javax.crypto.Cipher;import javax.crypto.KeyGenerator;import sun.misc.BASE64Decoder;import sun.misc.BASE64Encoder;public class EncryptPropertyFile {private Key key; // 密钥public static String GENERATE_KEY_STR ="ABCDEFGHIGKLMNOPQRSTUVWXYZ0123456789abcdefghijklmnopqrstuvwxyz";// 密文很重要,可以设置自己的private String encryptAlgorithm = "DES";public void initKey(String strKey) {try {KeyGenerator _generator =KeyGenerator.getInstance(encryptAlgorithm);_generator.init(new SecureRandom(strKey.getBytes()));this.key = _generator.generateKey();_generator = null;} catch (Exception e) {e.printStackTrace();}}public String getEncString(String strMing) {byte[] byteMi = null;byte[] byteMing = null;String strMi = "";BASE64Encoder base64en = new BASE64Encoder();try {byteMing = strMing.getBytes("UTF-8");byteMi = this.getEncCode(byteMing);strMi = base64en.encode(byteMi);} catch (Exception e) {e.printStackTrace();} finally {base64en = null;byteMing = null;byteMi = null;}return strMi;}public String getDesString(String strMi) {BASE64Decoder base64De = new BASE64Decoder();byte[] byteMing = null;byte[] byteMi = null;String strMing = "";try {byteMi = base64De.decodeBuffer(strMi);byteMing = this.getDesCode(byteMi);strMing = new String(byteMing, "UTF-8");} catch (Exception e) {e.printStackTrace();} finally {base64De = null;byteMing = null;byteMi = null;}return strMing;}private byte[] getEncCode(byte[] byteS) {byte[] byteFina = null;Cipher cipher;try {cipher = Cipher.getInstance(encryptAlgorithm);cipher.init(Cipher.ENCRYPT_MODE, key);byteFina = cipher.doFinal(byteS);} catch (Exception e) {e.printStackTrace();} finally {cipher = null;}return byteFina;}private byte[] getDesCode(byte[] byteD) {Cipher cipher;byte[] byteFina = null;try {cipher = Cipher.getInstance(encryptAlgorithm);cipher.init(Cipher.DECRYPT_MODE, key);byteFina = cipher.doFinal(byteD);} catch (Exception e) {e.printStackTrace();} finally {cipher = null;}return byteFina;}public static void main(String[] args) {String encryStr = "bkhrms";//需要加密的明文EncryptPropertyFile des = new EncryptPropertyFile(); // 实例化一个对像des.initKey(EncryptPropertyFile.GENERATE_KEY_STR);String strEnc = des.getEncString(encryStr);// 加密字符串,返回String的密文System.out.println(strEnc);String strDes = des.getDesString(strEnc);// 把String 类型的密文解密System.out.println(strDes);}}2.配置加密类(PropertiesFileConfiger.java)import java.util.HashSet;import java.util.Properties;import java.util.Set;import org.springframework.beans.BeansException;importorg.springframework.beans.factory.config.ConfigurableListableBeanFactory; importorg.springframework.beans.factory.config.PropertyPlaceholderConfigurer;//ZhaoHb2013.07.12public class PropertiesFileConfiger extends PropertyPlaceholderConfigurer{private String encryptKey = null;private Set<String> encryptSet = null;private EncryptPropertyFile encryptFile = new EncryptPropertyFile();private Properties props = null;@Overrideprotected void processProperties(ConfigurableListableBeanFactory beanFactory, Properties props)throws BeansException {if(encryptSet==null){if(encryptKey!=null){String[] keys = encryptKey.split(";");if(keys != null){encryptSet = new HashSet<String>();for(String key:keys){encryptSet.add(key);}}encryptFile.initKey(EncryptPropertyFile.GENERATE_KEY_STR);}}if(encryptSet!=null){String pvalue = null,tvalue=null;for(String key:encryptSet){pvalue = props.getProperty(key);if (pvalue != null) {//解密,并重新设置tvalue = encryptFile.getDesString(pvalue);props.setProperty(key, tvalue);//System.out.println("KEY:"+key+",Value:"+tvalue);}}}this.props = props;super.processProperties(beanFactory, props);}public String getEncryptKey() {return encryptKey;}public void setEncryptKey(String encryptKey) {this.encryptKey = encryptKey;}public Properties getProps() {return props;}public void setProps(Properties props) {this.props = props;}}三、Spring配置如下<!-- 加载Properties文件--><bean id="configurer"class="com.xxx.PropertiesFileConfiger"><property name="encryptKey"value="mail.password"/><property name="locations"><list><value>classpath:/mail.properties</value></list></property></bean><!-- 申明JavaMailSenderImpl对象--><bean id="mailSender"class="org.springframework.mail.javamail.JavaMailSenderImpl"> <property name="defaultEncoding"value="UTF-8"/><property name="host"value="${mail.host}"/><property name="username"value="${ername}"/><property name="password"value="${mail.password}"/><property name="javaMailProperties"><props><!-- 设置认证开关--><prop key="mail.smtp.auth">true</prop><!-- 启动调试开关--><prop key="mail.debug">false</prop></props></property></bean>Configurer Bean配置是关键,encryptKey 代表需要加密处理的属性变量.结束语赠人玫瑰,手留余香。
spring jdbc配置文件进行加密解密

Linux主要shell命令详解shell是用户和Linux操作系统之间的接口。
Linux中有多种shell,其中缺省使用的是Bash。
本章讲述了shell的工作原理,shell的种类,shell的一般操作及Bash的特性。
什么是shellLinux系统的shell作为操作系统的外壳,为用户提供使用操作系统的接口。
它是命令语言、命令解释程序及程序设计语言的统称。
shell是用户和Linux内核之间的接口程序,如果把Linux内核想象成一个球体的中心,shell就是围绕内核的外层。
当从shell或其他程序向Linux传递命令时,内核会做出相应的反应。
shell是一个命令语言解释器,它拥有自己内建的shell命令集,shell也能被系统中其他应用程序所调用。
用户在提示符下输入的命令都由shell先解释然后传给Linux核心。
有一些命令,比如改变工作目录命令cd,是包含在shell内部的。
还有一些命令,例如拷贝命令cp和移动命令rm,是存在于文件系统中某个目录下的单独的程序。
对用户而言,不必关心一个命令是建立在shell内部还是一个单独的程序。
shell首先检查命令是否是内部命令,若不是再检查是否是一个应用程序(这里的应用程序可以是Linux本身的实用程序,如ls和rm,也可以是购买的商业程序,如xv,或者是自由软件,如emacs)。
然后shell在搜索路径里寻找这些应用程序(搜索路径就是一个能找到可执行程序的目录列表)。
如果键入的命令不是一个内部命令并且在路径里没有找到这个可执行文件,将会显示一条错误信息。
如果能够成功找到命令,该内部命令或应用程序将被分解为系统调用并传给Linux内核。
shell的另一个重要特性是它自身就是一个解释型的程序设计语言,shell程序设计语言支持绝大多数在高级语言中能见到的程序元素,如函数、变量、数组和程序控制结构。
shell编程语言简单易学,任何在提示符中能键入的命令都能放到一个可执行的shell程序中。
spring jdbc配置文件进行加密解密

最近做一个项目,安全上有点要求,就是要对数据库相关的配置进行加密,配置文件如下:#加密前#datasource.type=mysql#datasource.driverClassName=com.mysql.jdbc.Driver#datasource.url=jdbc:mysql://localhost:3306/yjj?useUnicode=true&characterEncoding=utf8#ername=root#datasource.password=root#加密后datasource.type=2DF0ADA00FAA99D2datasource.driverClassName=DFB084E48D901F55B4765B6B6DEEEA685621CEAB85E65590datasource.url=CD1E7D3A7DEED845CC284EB8AB50F88E171BEAD6E699A4B2E87A3F36434640EA07523DB201ACF 884EF00CBBAD67FB52A04960D6C3E91E3EABF370CE3E6FACD06915D92108869CBB9ername=63AEB7FA5F01BC70datasource.password=63AEB7FA5F01BC70<!-- 对JDBC配置进行解密--><bean id="propertyConfigurer"class="xxx.security.EncryptablePropertyPlaceholderConfigurer"><property name="locations"><list><value>classpath:conf/jdbc.properties</value><value>classpath:conf/memcache.properties</value></list></property></bean><bean id="dataSource" class="boPooledDataSource"destroy-method="close"><property name="driverClass"><value>${datasource.driverClassName}</value></property><property name="jdbcUrl"><value>${datasource.url}</value></property><property name="user"><value>${ername}</value></property><property name="password"><value>${datasource.password}</value></property><property name="minPoolSize"><value>${datasource.c3p0.minPoolSize}</value></property><property name="maxPoolSize"><value>${datasource.c3p0.maxPoolSize}</value></property><property name="maxIdleTime"><value>${datasource.c3p0.maxIdleTime}</value></property><property name="acquireIncrement"><value>${datasource.c3p0.acquireIncrement}</value></property><property name="maxStatements"><value>${datasource.c3p0.maxStatements}</value></property><property name="initialPoolSize"><value>${datasource.c3p0.initialPoolSize}</value></property><property name="idleConnectionTestPeriod"><value>${datasource.c3p0.idleConnectionTestPeriod}</value> </property><property name="numHelperThreads"><value>${datasource.c3p0.numHelperThreads}</value></property><property name="acquireRetryAttempts"><value>${datasource.c3p0.acquireRetryAttempts}</value></property><property name="breakAfterAcquireFailure"><value>${datasource.c3p0.breakAfterAcquireFailure}</value> </property><property name="testConnectionOnCheckout"><value>${datasource.c3p0.testConnectionOnCheckout}</value> </property></bean>JAVA加密,解密类如下:import java.util.Properties;import org.springframework.beans.BeansException;import org.springframework.beans.factory.BeanInitializationException;import org.springframework.beans.factory.config.ConfigurableListableBeanFactory;import org.springframework.beans.factory.config.PropertyPlaceholderConfigurer;import mon.utils.DesEncrypt;import mon.utils.MyWebConstant;public class EncryptablePropertyPlaceholderConfigurer extends PropertyPlaceholderConfigurer { private static final String key = MyWebConstant.JDBC_DESC_KEY;protected void processProperties(ConfigurableListableBeanFactory beanFactory, Properties props)throws BeansException {try {// DesEncrypt des = new DesEncrypt();String username =props.getProperty(MyWebConstant.JDBC_DATASOURCE_USERNAME_KEY);if (username != null) {props.setProperty(MyWebConstant.JDBC_DATASOURCE_USERNAME_KEY, DesEncrypt.Decrypt(username, DesEncrypt.hex2byte(key)));}String password =props.getProperty(MyWebConstant.JDBC_DATASOURCE_PASSWORD_KEY);if (password != null) {props.setProperty(MyWebConstant.JDBC_DATASOURCE_PASSWORD_KEY, DesEncrypt.Decrypt(password, DesEncrypt.hex2byte(key)));}String url = props.getProperty(MyWebConstant.JDBC_DATASOURCE_URL_KEY);if (url != null) {props.setProperty(MyWebConstant.JDBC_DATASOURCE_URL_KEY,DesEncrypt.Decrypt(url, DesEncrypt.hex2byte(key)));}String driverClassName =props.getProperty(MyWebConstant.JDBC_DATASOURCE_DRIVERCLASSNAME_KEY);if(driverClassName != null){props.setProperty(MyWebConstant.JDBC_DATASOURCE_DRIVERCLASSNAME_KEY, DesEncrypt.Decrypt(driverClassName, DesEncrypt.hex2byte(key)));}String dbtype = props.getProperty(MyWebConstant.JDBC_DATASOURCE_TYPE_KEY);if(dbtype != null){props.setProperty(MyWebConstant.JDBC_DATASOURCE_TYPE_KEY, DesEncrypt.Decrypt(dbtype, DesEncrypt.hex2byte(key)));}super.processProperties(beanFactory, props);} catch (Exception e) {e.printStackTrace();throw new BeanInitializationException(e.getMessage());}}}/******************************JDBC相关BEGIN***************************************/ public static final String JDBC_DESC_KEY = "0001000200030004";/**数据库类型**/public static final String JDBC_DATASOURCE_TYPE_KEY = "datasource.type";public static final String JDBC_DATASOURCE_DRIVERCLASSNAME_KEY ="datasource.driverClassName";public static final String JDBC_DATASOURCE_URL_KEY = "datasource.url";public static final String JDBC_DATASOURCE_USERNAME_KEY = "ername";public static final String JDBC_DATASOURCE_PASSWORD_KEY = "datasource.password";/******************************JDBC相关END***************************************/。
SpringBoot配置文件密码加密两种方案

SpringBoot配置⽂件密码加密两种⽅案Spring Boot 配置⽂件密码加密两种⽅案jasypt 加解密jasypt 是⼀个简单易⽤的加解密Java库,可以快速集成到 Spring 项⽬中。
可以快速集成到 Spring Boot 项⽬中,并提供了⾃动配置,使⽤⾮常简单。
jasypt 库已上传到 Maven 中央仓库, 。
先看⽤法有多简单,以springboot为例:1. Application.java上增加注解@EnableEncryptableProperties(jasypt-spring-boot-starter包不需要该配置);2. 增加配置⽂件jasypt.encryptor.password = Afei@2018,这是加密的秘钥;3. 所有明⽂密码替换为ENC(加密字符串),例如ENC(XW2daxuaTftQ+F2iYPQu0g==);4. 引⼊⼀个MAVEN依赖;maven坐标如下:<dependency><groupId>com.github.ulisesbocchio</groupId><artifactId>jasypt-spring-boot</artifactId><version>2.0.0</version></dependency>第三步的加密字符串的⽣成⽅式为:java -cp jasypt-1.9.2.jar org.jasypt.intf.cli.JasyptPBEStringEncryptionCLI input="123456" password=Afei@2018 algorithm=PBEWithMD5AndDES其中:input的值就是原密码。
password的值就是参数jasypt.encryptor.password指定的值,即秘钥。
使用jasypt-1.5加密Spring的db属性文件

•使用jasypt-1.5加密Spring的db属性文件 (如db.properties)工具包准备:/index.html/maven2/org/jasypt/jasypt/1.5//encrypting-configuration.html下载工具包后,会用到几个jar:jasypt-1.5.jaricu4j-3.8.jar可另外下载commons-lang-2.1.jarcommons-codec-1.1.jarjasypt-cli-bundle.jar配置环境变量:∙JASYPT_HOME=C:\Java\jasypt-1.5∙ 2.JASYPT_CLASSPATH=.;%JASYPT_HOME%\bin\jasypt-cli-bundle.jar;%JASYPT_HOME%\lib\commons-codec-1.1.jar;%JASYPT_HOME%\lib\commons-lang-2.1.jar;%JASYPT_HOME%\lib\icu4j-3.8.jar;%JASYPT_HOME%\lib\jasypt-1.5.jar∙.在path下添加JASYPT_HOME\bin加密公式:明文(可以是要加密的密码) + 密钥 =Jasypt默认算法=> 密文使用命令生成密文:可以写成bat文件加密:@ECHO OFF%JASYPT_HOME%\bin\encrypt.bat input="E8iptsi855" password="PTSPASSWORD" verbose=false > .\passwd.txt生成的密文wASjSlTjsgYFLyVswElJ4S7yjOcGnABF解密:$ ./decrypt.shinput="k1AwOd5XuW4VfPQtEXEdVlMnaNn19hivMbn1G4JQgq/jArjtKqryXksYX4Hl6A0e " password=MYPAS_WORD具体可参见官方网站:Encrypting from the command line: Jasypt CLI Tools/cli.html二个文件:db.propertiesdatasource.driver=com.mysql.jdbc.Driverdatasource.url=jdbc:mysql://localhost/reportsdbername=reportsUserdatasource.password=ENC(G6N718UuyPE5bHyWKyuLQSm02auQPUtm)db.xml----- Xml代码<property name="connection.provider_class">jasypt.hibernate.connectionprovider.EncryptedPasswordDriverManagerConnectionProvider</property><property name="connection.password">ENC(G6N718UuyPE5bHyWKyuLQSm02auQPUtm)</property>applicationContext.xml<bean id="environmentVariablesConfiguration"class="org.jasypt.encryption.pbe.config.EnvironmentStringPBEConfig"><!――指定加密算法:PBEWithMD5AndDES――><property name="algorithm" value="PBEWithMD5AndDES" /><!――指定密钥:PTSPASSWORD――><property name="password"value="PTSPASSWORD" /></bean><!――指定加密类: StandardPBEStringEncryptor――><bean id="configurationEncryptor"class="org.jasypt.encryption.pbe.StandardPBEStringEncryptor"><property name="config" ref="environmentVariablesConfiguration" /> </bean><!――指定要已被加密的属性文件db.properties Jasypt集成了对spring的属性文件解密――><bean id="propertyConfigurer"class="org.jasypt.spring.properties.EncryptablePropertyPlaceholderConfigu rer"><constructor-arg ref="configurationEncryptor" /><property name="locations"><list><value>classpath:db.properties</value></list></property></bean><!――原Spring读取属性文件db.properties――><!-- <bean id="propertyConfigurer"class="org.springframework.beans.factory.config.PropertyPlaceholderConfig urer"><property name="locations"><list><value>classpath:db.properties</value></list></property></bean>--><!――配置数据数――><bean id="dataSource"class="mons.dbcp.BasicDataSource"destroy-method="close"><property name="driverClassName"value="${pts4.jdbc.driverClassName}" /><property name="url" value="${pts4.jdbc.url}" /><property name="username" value="${ername}" /><property name="password" value="${pts4.jdbc.password}" /><property name="maxActive" value="${pts4.jdbc.maxActive}"/><property name="maxIdle" value="${pts4.jdbc.Idle}" /><property name="maxWait" value="${pts4.jdbc.maxWait}" /><property name="defaultAutoCommit"value="${pts4.jdbc.defaultAutoCommit}" /><property name="removeAbandoned" value="true" /><property name="removeAbandonedTimeout"value="${pts4.jdbc.removeAbandonedTimeout}" /></bean><bean id="jdbcTemplate"class="org.springframework.jdbc.core.JdbcTemplate"><constructor-arg><ref bean="dataSource" /></constructor-arg></bean><bean id="CatagorySearchDao"class="com.example.booksearch.server.BookSearchDaoImpl"><property name="jdbcTemplate"><ref bean="jdbcTemplate" /></property></bean>学习相关网址:/news/456/blog/284689。
springboot应用配置文件中密码加密

springboot应⽤配置⽂件中密码加密数据库密码直接明⽂写在配置中,对安全来说,是⼀个很⼤的挑战。
⼀旦密码泄漏,将会带来很⼤的安全隐患。
尤其在⼀些企业对安全性要求很⾼,因此我们就考虑如何对密码进⾏加密。
本⽂着重介绍Jasypt对SpringBoot配置⽂件加密。
引⼊依赖:<dependency><groupId>com.github.ulisesbocchio</groupId><artifactId>jasypt-spring-boot-starter</artifactId><version>3.0.3</version></dependency>⽣成密⽂:public static void main(String[] args) {BasicTextEncryptor textEncryptor = new BasicTextEncryptor();//加密所需的salt(盐)textEncryptor.setPassword("Bt%XJ^n1j8mz");//要加密的数据(数据库的⽤户名或密码)String username = textEncryptor.encrypt("toutou");String password = textEncryptor.encrypt("demo123456");System.out.println("username:"+username);System.out.println("password:"+password);}将配置⽂件中数据库的密码替换成 ENC(密⽂):# 加密所需的salt(盐)#jasypt.encryptor.password=Bt%XJ^n1j8mz# 默认加密⽅式PBEWithMD5AndDES,可以更改为PBEWithMD5AndTripleDES#jasypt.encryptor.algorithm=PBEWithMD5AndDESername=ENC(d/qt1SXvttpkiugIzTYkxg==)spring.datasource.password=ENC(rhT6VNpoRUkQYYOHAQ58V4/+fkj9CWfT)盐也在配置⽂件中,现在做到了⼀眼看不出明⽂,但是拿到盐 再通过相同的算法还是可以解密的,毕竟算法都是依赖中的那⼀套。
springboot数据库密码加密

springboot数据库密码加密
由于系统安全的考虑,配置⽂件中不能出现明⽂密码的问题,下来我简单整理⼀下。
第⼀步:在pom中引⼊相关依赖
第⼆步。
在jar包位置⽣成密钥
java -cp jasypt-1.9.2.jar org.jasypt.intf.cli.JasyptPBEStringEncryptionCLI input="真实密码" password=⾃定义的私钥 algorithm=PBEWithMD5AndDES 注意:其中input为你的明⽂密码,password为你的私钥,algorithm这个是⼀个规则(建议不要改)执⾏后如下图:
第三步:springboot配置⽂件如下“
这⾥我⽤的是application.yml⽂件,application.properties⽂件写成这样:jasypt.encryptor.password=test。
说明:上图第⼀个password对应第⼆步中ARGUEMENTS中的password,第⼆个password对应第⼆步中OUTPUT中的结果,形式⼀定要加上ENC(you password),如图所⽰
第四步:解密
java -cp jasypt-1.9.2.jar org.jasypt.intf.cli.JasyptPBEStringDecryptionCLI input="加密后的密码" password=私钥 algorithm=PBEWithMD5AndDES
到这,数据库的加解密已经整合到⼀块了。
SpringBoot加密配置属性

SpringBoot加密配置属性⼀、背景在系统中的运⾏过程中,存在很多的配置属性,⽐如:数据库配置、阿⾥云配置等等,这些配置有些属性是⽐较敏感的,是不应直接以明⽂的⽅式出现在配置⽂件中,因此对于这些配置我们就需要加密来处理。
⼆、需求先如今我们系统中存在如下数据库配置,其中数据库的密码和数据库的url属于敏感配置,在配置⽂件中需要加密展⽰,⽽不应该使⽤明⽂展⽰. # 此属性的值需要加密展⽰spring.datasource.url=jdbc:mysql://127.0.0.1:3306/seata_account?useUnicode=true&characterEncoding=utf8&autoReconnectForPools=true&useSSL=falsespring.datasource.driver-class-name=com.mysql.cj.jdbc.Driverername=root# 此属性的值需要加密展⽰spring.datasource.password=root三、实现步骤1、引⼊jar包<!-- 配置加密(start) --><dependency><groupId>com.github.ulisesbocchio</groupId><artifactId>jasypt-spring-boot-starter</artifactId><version>3.0.4</version></dependency><!-- 配置加密(end) -->2、配置加密配置vi application.properties# 加密的密钥,这个值特别重要,建议做成系统的环境变量或通过jar启动的时候传递进去jasypt.encryptor.password=123456789jasypt.encryptor.property.prefix=ENC(jasypt.encryptor.property.suffix=)jasypt.encryptor.string-output-type=base64注意:上⽅有⼀个jasypt.encryptor.password配置属性,这个属性的值建议通过 jar包启动的时候通过-D参数执⾏,⽽不要写在配置⽂件中。
关于Springboot数据库配置文件明文密码加密解密的问题

关于Springboot数据库配置⽂件明⽂密码加密解密的问题有时候因为安全问题,需要把配置⽂件的中数据库⽤户名密码由明⽂改成密⽂,⼤多数其实是为了应付甲⽅⽽已。
1.pom.xml引⼊依赖<dependency><groupId>com.github.ulisesbocchio</groupId><artifactId>jasypt-spring-boot-starter</artifactId><version>2.1.0</version></dependency>2.⾃⼰想⼀个秘钥,然后弄⼀个main⽅法来测试和⽣成加密串,下⾯例⼦把“password”当做秘钥,加密 xiaoming 字符串。
同样可以把加密的打印出来,放到解密⾥⾯去验证⼀下//给配置⽂件加密public static void main(String[] args) {// 加密BasicTextEncryptor textEncryptor = new BasicTextEncryptor();//⾃⼰设置的秘钥textEncryptor.setPassword("password");String userName = textEncryptor.encrypt("xiaoming");System.out.println(userName);// 解密BasicTextEncryptor textEncryptor2 = new BasicTextEncryptor();textEncryptor2.setPassword("password");String oldPassword = textEncryptor2.decrypt("avU0Q/XfNMXcgOgowdcfLfB1FDdApc292pzeq8/uvrllChedBJvj4A==");System.out.println(oldPassword);System.out.println("--------------------------");}3.springboot配置⽂件 application.properties中添加配置jasypt.encryptor.password=passwordspring.datasource.driver-class-name=oracle.jdbc.OracleDriverspring.datasource.url=jdbc:oracle:thin:@192.168.100.123:7029:baseername=ENC(c31B0jWJp3EGFwqSkrUzhY//4CY/sO)spring.datasource.password=ENC(+KUeW5dB03CxJYz9oVV2flbYW5xs1+)要先声明秘钥,然后把刚main⽅法中加密出来的字符串替换原来的,注意⼀定要⽤ENC()把字符串包住才⾏。
Springboot-配置文件加密

Springboot-配置⽂件加密⼀、PBEWithMD5AndDES加密算法⼆、springboot集成jasyptpom<!--配置⽂件加密--><dependency><groupId>com.github.ulisesbocchio</groupId><artifactId>jasypt-spring-boot-starter</artifactId><version>2.1.0</version></dependency>配置密钥配置⽂件添加jasypt.encryptor.password: demo获取密⽂//如果有多个配置⽂件,可⽤通过ActiveProfiles来指定配置⽂件;将匹配到配置⽂件:application-18011.properties @ActiveProfiles("18011")@SpringBootTest(classes = DemoApplication.class)public class PigAdminApplicationTest {//从spring环境中获取bean,这个bean是从哪⾥来的呢?jasypt的starter@Autowiredprivate StringEncryptor stringEncryptor;@Testpublic void testEnvironmentProperties() {//将明⽂加密System.out.println(stringEncryptor.encrypt("root"));System.out.println(stringEncryptor.encrypt("123456"));//解密System.out.println(stringEncryptor.decrypt("bsK6LoI1XJrAFvynypY2Og=="));}}在配置⽂件中使⽤ername=ENC(PquhbjSL8UlUCK91LvuJNg==)spring.datasource.password=ENC(8r2VooGyAOd+Q2+FpgHu8Q==)springboot启动时,⼏经通过密钥将密⽂解密,所以密钥将称为破译关键,所以需要:java -jar xxx.jar --jasypt.encryptor.password=xxx将密钥从项⽬中移除更安全⽅案1.拥有⼀个配置中⼼2.配置中⼼有⾼度保密的配置⽂件3.各项⽬向中⼼注册公钥,加密传输4。
springMVCweb项目对访问数据库的用户名密码进行加密解密

springMVCweb项⽬对访问数据库的⽤户名密码进⾏加密解密在使⽤springMVC开发web项⽬中,数据库的⽤户名,密码⼀般都是配置在.properties⽂件中然后在通过.xml配置⽂件引⼊.properties的变量,例如在config.properties⽂件中,配置如下变量,变量值配置在pom.xml的profile标签下,在此就不再赘述jdbc.driverClassName=com.mysql.jdbc.Driverjdbc.url=jdbc\:mysql\://${p.jdbc.url}/${p.jdbc.dbname}?useUnicode\=true&characterEncoding\=UTF-8&zeroDateTimeBehavior\=convertToNull&rewriteBatchedStatements\=true ername=${ername}jdbc.password=${p.jdbc.password}在applicationContext.xml中,通过如下标签引⼊这些变量值<!-- 将多个配置⽂件读取到容器中,交给Spring管理 --><bean id="propertyConfigurer"class="org.springframework.beans.factory.config.PropertyPlaceholderConfigurer"><property name="locations"><list><value>classpath:/properties/*.properties</value></list></property></bean>这样对于是明⽂的帐号,密码,是没有问题的。
SpringBoot中使用jasypt加解密配置文件
SpringBoot中使⽤jasypt加解密配置⽂件SpringBoot中使⽤jasypt加解密配置⽂件在我们的服务中不可避免的需要使⽤到⼀些秘钥(数据库、redis等)开发和测试环境还好,但⽣产如果采⽤明⽂配置讲会有安全问题,jasypt是⼀个通⽤的加解密库1、POM依赖<dependency><groupId>com.github.ulisesbocchio</groupId><artifactId>jasypt-spring-boot-starter</artifactId><version>3.0.2</version></dependency>2、加解密配置⽂件@Configurationpublic class EncryptorConfig {@Beanpublic static EnvironmentStringPBEConfig config() {EnvironmentStringPBEConfig config = new EnvironmentStringPBEConfig();config.setPasswordEnvName("APP_ENCRYPTION_PASSWORD");config.setAlgorithm("PBEWithMD5AndDES");config.setKeyObtentionIterations("1000");config.setPoolSize("1");config.setProviderName("SunJCE");config.setPassword("test@salt");config.setSaltGeneratorClassName("org.jasypt.salt.RandomSaltGenerator");config.setStringOutputType("base64");return config;}@Beanpublic static PooledPBEStringEncryptor encryptor() {PooledPBEStringEncryptor encryptor = new PooledPBEStringEncryptor();encryptor.setConfig(config());return encryptor;}}3、项⽬配置⽂件application.yamlspring:datasource:# MySQL 驱动driver-class-name: com.mysql.jdbc.Driver# 阿⾥ Druid 数据源连接池type: com.alibaba.druid.pool.DruidDataSourceurl: jdbc:mysql://127.0.0.1:3306/test_db?useSSL=false&useUnicode=true&characeterEncoding=utf8# 数据库账号-密⽂配置将秘闻包裹在 ENC() 内, 如何获取密⽂请看下⽂username: ENC(EPJY8wqIzdyXELQGx7QvLQ==)# 数据库密码-密⽂配置将秘闻包裹在 ENC() 内, 如何获取密⽂请看下⽂password: ENC(14f8yv1Xe1ZqwxaFw4pRwftLl/1fLaCx)以上配置完成后项⽬启动时就会⾃动读取配置⽂件中的密⽂账号和密码⾃动解密。
使用springboot完成密码的加密解密
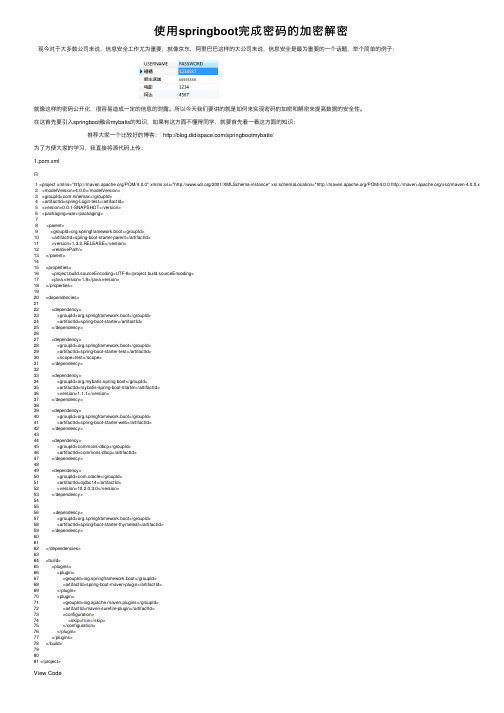
使⽤springboot完成密码的加密解密现今对于⼤多数公司来说,信息安全⼯作尤为重要,就像京东,阿⾥巴巴这样的⼤公司来说,信息安全是最为重要的⼀个话题,举个简单的例⼦:就像这样的密码公开化,很容易造成⼀定的信息的泄露。
所以今天我们要讲的就是如何来实现密码的加密和解密来提⾼数据的安全性。
在这⾸先要引⼊springboot融合mybatis的知识,如果有这⽅⾯不懂得同学,就要⾸先看⼀看这⽅⾯的知识:推荐⼤家⼀个⽐较好的博客: /springbootmybatis/为了⽅便⼤家的学习,我直接将源代码上传:1.pom.xml1 <project xmlns="/POM/4.0.0" xmlns:xsi="/2001/XMLSchema-instance" xsi:schemaLocation="/POM/4.0.0 /xsd/maven-4.0.0.xsd">2 <modelVersion>4.0.0</modelVersion>3 <groupId>com.ninemax</groupId>4 <artifactId>spring-Login-test</artifactId>5 <version>0.0.1-SNAPSHOT</version>6 <packaging>war</packaging>78 <parent>9 <groupId>org.springframework.boot</groupId>10 <artifactId>spring-boot-starter-parent</artifactId>11 <version>1.3.2.RELEASE</version>12 <relativePath/>13 </parent>1415 <properties>16 <project.build.sourceEncoding>UTF-8</project.build.sourceEncoding>17 <java.version>1.8</java.version>18 </properties>1920 <dependencies>2122 <dependency>23 <groupId>org.springframework.boot</groupId>24 <artifactId>spring-boot-starter</artifactId>25 </dependency>2627 <dependency>28 <groupId>org.springframework.boot</groupId>29 <artifactId>spring-boot-starter-test</artifactId>30 <scope>test</scope>31 </dependency>3233 <dependency>34 <groupId>org.mybatis.spring.boot</groupId>35 <artifactId>mybatis-spring-boot-starter</artifactId>36 <version>1.1.1</version>37 </dependency>3839 <dependency>40 <groupId>org.springframework.boot</groupId>41 <artifactId>spring-boot-starter-web</artifactId>42 </dependency>4344 <dependency>45 <groupId>commons-dbcp</groupId>46 <artifactId>commons-dbcp</artifactId>47 </dependency>4849 <dependency>50 <groupId>com.oracle</groupId>51 <artifactId>ojdbc14</artifactId>52 <version>10.2.0.3.0</version>53 </dependency>545556 <dependency>57 <groupId>org.springframework.boot</groupId>58 <artifactId>spring-boot-starter-thymeleaf</artifactId>59 </dependency>606162 </dependencies>6364 <build>65 <plugins>66 <plugin>67 <groupId>org.springframework.boot</groupId>68 <artifactId>spring-boot-maven-plugin</artifactId>69 </plugin>70 <plugin>71 <groupId>org.apache.maven.plugins</groupId>72 <artifactId>maven-surefire-plugin</artifactId>73 <configuration>74 <skip>true</skip>75 </configuration>76 </plugin>77 </plugins>78 </build>798081 </project>View Code2. AppTest.javapackage com;import org.springframework.boot.SpringApplication;import org.springframework.boot.autoconfigure.SpringBootApplication;@SpringBootApplicationpublic class AppTest {public static void main(String[] args) {SpringApplication.run(AppTest.class, args);}}View Codeer.javapackage com.entity;public class User {private String username;private String password;public String getUsername() {return username;}public void setUsername(String username) {ername = username;}public String getPassword() {return password;}public void setPassword(String password) {this.password = password;}@Overridepublic String toString() {return "User [username=" + username + ", password=" + password + "]"; }}View CodeerController.javapackage com.controller;import java.security.SecureRandom;import javax.crypto.Cipher;import javax.crypto.SecretKey;import javax.crypto.SecretKeyFactory;import javax.crypto.spec.DESKeySpec;import javax.servlet.http.HttpServletRequest;import org.springframework.beans.factory.annotation.Autowired;import org.springframework.stereotype.Controller;import org.springframework.web.bind.annotation.RequestMapping;import erDao;import er;@Controllerpublic class UserController {@Autowiredprivate UserDao userDao;@RequestMapping("/regist")public String regist() {return "regist";}@RequestMapping("/login")public String login() {return "login";}@RequestMapping("/success")public String success(HttpServletRequest request) {String username = request.getParameter("username");String password = request.getParameter("password");userDao.save(username, password);return "success";}@RequestMapping("/Loginsuccess")public String successLogin(HttpServletRequest request) {String username = request.getParameter("username");String password = request.getParameter("password"); ///123456User user = userDao.findByUname(username);if(user.getPassword().equals(password)) {return "successLogin";return "failure";}}View CodeerDao.javapackage com.dao;import org.apache.ibatis.annotations.Insert;import org.apache.ibatis.annotations.Mapper;import org.apache.ibatis.annotations.Param;import org.apache.ibatis.annotations.Select;import er;@Mapperpublic interface UserDao {@Insert("INSERT INTO LOGIN_NINE VALUES(#{username}, #{password})") void save(@Param("username")String username,@Param("password")String password); @Select("SELECT * FROM LOGIN_NINE WHERE username= #{username}")User findByUname(@Param("username")String username);}View Code6.application.propertiesspring.datasource.url=jdbc:oracle:thin:@10.236.4.251:1521:orclername=hellospring.datasource.password=lisaspring.datasource.driver-class-name=oracle.jdbc.driver.OracleDriverapplication.properties7.还有⼀些静态HTML(1.)regist.html<!DOCTYPE html><html xmlns:th=""><head><meta http-equiv="Content-Type" content="text/html; charset=UTF-8"/><title>注册</title><style type="text/css">h1 {text-align:center;font-size:35px;color:red;}div {text-align:center;}div input {margin:10px;}</style></head><body><h1>注册账号</h1><div><form action="success" method="post">⽤户名<input type="text" name="username"/><br/>密码<input type="password" name = "password"/><br/> <input type="submit" value="提交"/> <input type="reset"/></form></div></body></html>View Code(2.)login.html<!DOCTYPE html><html xmlns:th=""><head><meta http-equiv="Content-Type" content="text/html; charset=UTF-8"/><title>登录</title><style type="text/css">h1 {text-align:center;font-size:35px;color:red;}div {text-align:center;}div input {margin:10px;}</head><body><h1>欢迎登录</h1><div><form action="Loginsuccess" method="post">请输⼊⽤户名<input type="text" name="username"/><br/>请输⼊密码<input type="password" name = "password"/><br/> <input type="submit" value="提交"/> <input type="reset"/><br/><a href="/regist">注册账号</a></form></div></body></html>View Code(3.)success.html<!DOCTYPE html><html xmlns:th=""><head><meta http-equiv="Content-Type" content="text/html; charset=UTF-8"/><title>注册成功</title><style type="text/css">h1 {text-align:center;font-size:60px;color:green;}span {font-size:30px;color:green;}</style></head><body><h1>注册成功</h1><a href="/login">返回登录</a></body></html>View Code(4.)failure.html<!DOCTYPE html><html xmlns:th=""><head><meta http-equiv="Content-Type" content="text/html; charset=UTF-8"/><title>登录失败</title></head><body>登录失败</body></html>View Code(5.)successLogin.html<!DOCTYPE html><html xmlns:th=""><head><meta http-equiv="Content-Type" content="text/html; charset=UTF-8"/><title>成功</title></head><body>success</body></html>View Code代码的格式如下:完成了这⼀步的话⾸先运⾏⼀下AppTest看是否出错,如果有错,⾃⼰找原因,这⾥就不和⼤家讨论了,写了这么多,才要要进⼊正题了本⽂采取的是EDS的加密解密⽅法,⽅法也很简单,不⽤添加额外的jar包,只需要在UserController上做出简单的修改就可以了:*****UserController.javapackage com.controller;import java.security.SecureRandom;import javax.crypto.Cipher;import javax.crypto.SecretKey;import javax.crypto.SecretKeyFactory;import javax.crypto.spec.DESKeySpec;import javax.servlet.http.HttpServletRequest;import org.springframework.beans.factory.annotation.Autowired;import org.springframework.stereotype.Controller;import org.springframework.web.bind.annotation.RequestMapping;import erDao;import er;@Controllerpublic class UserController {@Autowiredprivate UserDao userDao;@RequestMapping("/regist")public String regist() {return "regist";}@RequestMapping("/login")public String login() {return "login";}/*** EDS的加密解密代码*/private static final byte[] DES_KEY = { 21, 1, -110, 82, -32, -85, -128, -65 };@SuppressWarnings("restriction")public static String encryptBasedDes(String data) {String encryptedData = null;try {// DES算法要求有⼀个可信任的随机数源SecureRandom sr = new SecureRandom();DESKeySpec deskey = new DESKeySpec(DES_KEY);// 创建⼀个密匙⼯⼚,然后⽤它把DESKeySpec转换成⼀个SecretKey对象SecretKeyFactory keyFactory = SecretKeyFactory.getInstance("DES");SecretKey key = keyFactory.generateSecret(deskey);// 加密对象Cipher cipher = Cipher.getInstance("DES");cipher.init(Cipher.ENCRYPT_MODE, key, sr);// 加密,并把字节数组编码成字符串encryptedData = new sun.misc.BASE64Encoder().encode(cipher.doFinal(data.getBytes()));} catch (Exception e) {// log.error("加密错误,错误信息:", e);throw new RuntimeException("加密错误,错误信息:", e);}return encryptedData;}@SuppressWarnings("restriction")public static String decryptBasedDes(String cryptData) {String decryptedData = null;try {// DES算法要求有⼀个可信任的随机数源SecureRandom sr = new SecureRandom();DESKeySpec deskey = new DESKeySpec(DES_KEY);SecretKeyFactory keyFactory = SecretKeyFactory.getInstance("DES");SecretKey key = keyFactory.generateSecret(deskey);// 解密对象Cipher cipher = Cipher.getInstance("DES");cipher.init(Cipher.DECRYPT_MODE, key, sr);// 把字符串进⾏解码,解码为为字节数组,并解密decryptedData = new String(cipher.doFinal(new sun.misc.BASE64Decoder().decodeBuffer(cryptData)));} catch (Exception e) {throw new RuntimeException("解密错误,错误信息:", e);}return decryptedData;}@RequestMapping("/success")public String success(HttpServletRequest request) {String username = request.getParameter("username");String password = request.getParameter("password");String s1 = encryptBasedDes(password);userDao.save(username, s1);return "success";}@RequestMapping("/Loginsuccess")public String successLogin(HttpServletRequest request) {String username = request.getParameter("username");String password = request.getParameter("password"); ///123456User user = userDao.findByUname(username);if(decryptBasedDes(user.getPassword()).equals(password)) {return "successLogin";}return "failure";}}View Code此时,直接运⾏Apptest.java,然后在浏览器输⼊地址:localhost:8080/regist 注册新的账号(我输⼊的是⽤户名:⼩明密码:123456),如图此时查看数据库信息你就会发现密码实现了加密当然,下次登陆的时候直接输⼊相应的账号和密码即可完成登录,实现了解码的过程不知道⼤家完成的怎么样了,如果出现问题,可以在下⾯进⾏留⾔,我会为⼤家进⾏解答.。
springboot数据库密码加密-使用自定义加密算法

springboot数据库密码加密-使⽤⾃定义加密算法jasypt是⼀个简单⽅便的第三⽅加解密库,可以快速的集成到springboot环境中,在3.x之后默认基于的是PBEWITHHMACSHA512ANDAES_256加密算法;如果需要⾃定义加密算法可以参考下⾯的⽅式,参考:1. 引⼊依赖<!-- 数据库加密 --><dependency><groupId>com.github.ulisesbocchio</groupId><artifactId>jasypt-spring-boot-starter</artifactId><version>3.0.2</version></dependency><!-- 如果要使⽤SM4加密,就需要引⼊下⾯的jar --><dependency><groupId>org.bouncycastle</groupId><artifactId>bcpkix-jdk15on</artifactId><version>1.60</version></dependency><!-- hutool的⼯具包 --><dependency><groupId>cn.hutool</groupId><artifactId>hutool-all</artifactId><version>5.5.9</version></dependency>2. 编写⾃定义的加解密⼯具类(这⾥使⽤SM4加密算法,引⽤的是hutool的⼯具类)import org.jasypt.encryption.StringEncryptor;import org.springframework.beans.factory.annotation.Value;import ponent;import cn.hutool.core.util.CharsetUtil;import cn.hutool.crypto.SmUtil;import cn.hutool.crypto.symmetric.SymmetricCrypto;/*** jasypt ⾃定义数据库密码加密器 - SM4加密算法** @author jiaqiankun*/@Component("customStringEncryptor")public class CustomStringEncryptor implements StringEncryptor {@Value("${jasypt.encryptor.salt}")private String salt;@Overridepublic String encrypt(String message) {SymmetricCrypto sm4 = SmUtil.sm4(salt.getBytes());String encryptHex = sm4.encryptHex(message);return encryptHex;}@Overridepublic String decrypt(String encryptedMessage) {SymmetricCrypto sm41 = SmUtil.sm4(salt.getBytes());String decryptStr = sm41.decryptStr(encryptedMessage, CharsetUtil.CHARSET_UTF_8);return decryptStr;}}3. 在配置⽂件中指定⾃定义的加密器并定义⼀个salt#密码spring: datasource: url: jdbc:mysql://localhost:3306/fmbs?characterEncoding=utf8&useSSL=trueusername: root#ENC是⼀个标识,可以在下⽅通过jasypt.encryptor.property.prefix#和jasypt.encryptor.property.suffix进⾏指定,默认是enc(密⽂)password: ENC(a44625760f8fc68e8d3c6e3f18f898cd)#属性⽂件加密jasypt:encryptor: #salt必须为16位字符串,如果使⽤默认算法,此处的salt应该改为password,⾃定义随意命名,#在customStringEncryptor中注⼊正确即可 salt: ya024uspkidtclu3bean: customStringEncryptor。
JDBC用户信息加密方案

JDBC用户信息加密方案北京华晨阳一、方案概述在我公司的实际开发中,数据库的JDBC连接信息都是使用明文的,需要进行加密处理。
由于程序太多,我把需要加密处理的场景大概归纳为有以下四种,分别是:1.JDBC连接信息直接写在JAVA文件中(普通JAVA项目)2.JDBC连接信息写在PROPERTIES配置文件中(SSH/SSM项目)3.JDBC连接信息写在XML配置文件中(SSH/SSM项目)4.JDBC连接信息写在YAML配置文件中(SpringBoot项目)二、直接写在JAVA文件中的加密方案1.修改JDBC连接配置方式为从PROPERTIES文件获取修改连接程序添加jdbc.properties文件添加获取properties配置的方法2.添加加密解密JAVA工具类,对PROPERTIES文件中的值进行加密添加加密工具类AESUtil.java,包含了加密和解密方法,其中有两个盐值,可自行修改A ESU t i l.j ava加密解密工具类附件:对PROPERTIES文件中的值进行加密输出结果修改PROPERTIES文件3.修改JDBC连接配置代码,使用解密方法获取文件中的JDBC连接信息D em o.zi p4.示例代码:三、直接写在PROPERTIES文件中的加密方案1.添加加密解密JAVA工具类,对PROPERTIES文件中的值进行加密添加加密工具类AESUtil.java,包含了加密和解密方法,其中有两个盐值,可自行修改A ESU t i l.j ava加密解密工具类附件:对PROPERTIES文件中的值进行加密输出结果修改PROPERTIES文件2.重写BasicDataSource中的set方法,对加密值进行解密C ust o mD at aSo urce.j ava附件:3.修改配置数据源XML配置文件ssm.zi p示例代码:四、直接写在XML文件中的加密方案基本与第三部分相同,只需把JDBC配置信息提取到PROPERTIES文件中即可。
SpringBoot初级入门教程(二十一)——配置文件密码信息ENC()加密(附源码)

SpringBoot初级⼊门教程(⼆⼗⼀)——配置⽂件密码信息ENC()加密(附源码)在上⼀篇⽂章《》中,简要介绍了如果通过⾃定义算法,加密配置⽂件中的密码,这篇来说说密码加密的另外⼀种实现⽅式。
第⼀步,添加依赖<dependency><groupId>com.github.ulisesbocchio</groupId><artifactId>jasypt-spring-boot</artifactId><version>1.18</version></dependency>第⼆步,修改配置⽂件修改配置⽂件 application.properties,添加加密字段配置。
################################### 加密配置## java –cp jar包所在路径\jar包 org.jasypt.intf.cli.JasyptPBEStringEncryptionCLI input=”数据库密码” password=加密字段,随意设置algorithm=默认PBEWithMD5AndDES加密## 参数说明:## input =数据库链接密码## password=加密字段,随意设置(配置⽂件中需要添加此密码,相当于约定密码)## algorithm= 算法,默认PBEWithMD5AndDES## cmd执⾏:java -cp D:\mavenRepository\org\jasypt\jasypt\1.9.2\jasypt-1.9.2.jar org.jasypt.intf.cli# .JasyptPBEStringEncryptionCLI input="123456" password=testpassword algorithm=PBEWithMD5AndDES################################## 配置加密字段jasypt.encryptor.password=testpassword第三步,⽣成加密密码通过 jar 提供的⼯具类,⽣成明⽂对应的密⽂密码,命令如下:java -cp D:\mavenRepository\org\jasypt\jasypt\1.9.2\jasypt-1.9.2.jar org.jasypt.intf.cli.JasyptPBEStringEncryptionCLI input="123456" password=testpassword algorithm=PBEWithMD5AndDES 运⾏结果如下:⽤⽣成的密⽂密码,替换掉原来的明⽂密码:特别注意:⽤ ENC() 把密⽂密码包起来。
SpringBoot在启动时进行配置文件加解密

SpringBoot在启动时进行配置文件加解密Spring Boot Application 事件和监听器•寻找到application.yml的读取的操作。
•从spring.factories 中查看到# Application Listenersorg.springframework.context.ApplicationListener=org.sprin gframework.boot.context.config.ConfigFileApplicationListener,复制代码•ConfigFileApplicationListener 该对象对application.yml进行读取操作•ConfigFileApplicationListener 事件的监听器,继承了SmartApplicationListener接口•SmartApplicationListener 接口继承了ApplicationListener 和Ordered接口,能够实现有序监听。
一、SmartApplicationListener介绍•Spring ApplicationEvent以及对应的Listener提供了一个事件监听、发布订阅的实现,内部实现方式是观察者模式,可以解耦业务系统之间的业务,提供系统的可拓展性、复用性以及可维护性。
•在application.yml文件读取完会触发一个事件ConfigFileApplicationListener 该监听器实现文件的读取。
•SmartApplicationListener是高级监听器,是ApplicationListener的子类,能够实现有序监听•SmartApplicationListener提供了两个方法:/*** 指定支持哪些类型的事件*/boolean supportsEventType(Class<? extends ApplicationEvent> var1);* 指定支持发生事件所在的类型*/boolean supportsSourceType(Class<?> var1);复制代码如何在 SmartApplicationListener 实现监听解耦•1、我们只需在加载完成之后去加入一个监听器。
SpringBoot对properties文件进行加密解密
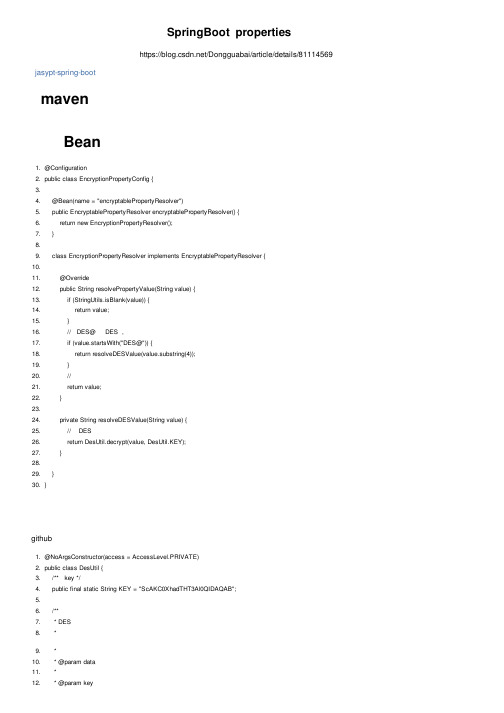
57.
cipher.init(Cipher.DECRYPT_MODE, secretKey, sr);
58.
//
59.
decryptedData = new String(cipher.doFinal(new sun.misc.BASE64Decoder().decodeBuffer(cryptData)));
github
1. @NoArgsConstructor(access = AccessLevel.PRIVATE) 2. public class DesUtil { 3. /** key */ 4. public final static String KEY = "ScAKC0XhadTHT3Al0QIDAQAB"; 5. 6. /** 7. * DES 8. *
47.
String decryptedData = null;
48.
try {
49.
// DES
50.
SecureRandom sr = new SecureRandom();
51.
DESKeySpec deskey = new DESKeySpec(key.getBytes());
52.
//
DESKeySpec SecretKey
13.
if (StringUtils.isBlank(value)) {
14.
return value;
15.
}
16.
// DES@ DES ,
17.
if (value.startsWith("DES@")) {
18.
return resolveDESValue(value.substring(4));
- 1、下载文档前请自行甄别文档内容的完整性,平台不提供额外的编辑、内容补充、找答案等附加服务。
- 2、"仅部分预览"的文档,不可在线预览部分如存在完整性等问题,可反馈申请退款(可完整预览的文档不适用该条件!)。
- 3、如文档侵犯您的权益,请联系客服反馈,我们会尽快为您处理(人工客服工作时间:9:00-18:30)。
package mons.util;002003import java.io.ByteArrayInputStream;004import java.io.ByteArrayOutputStream;005import java.io.File;006import java.io.FileInputStream;007import java.io.FileOutputStream;008import java.io.InputStream;009import java.io.ObjectInputStream;010import java.io.ObjectOutputStream;011import java.security.Key;012import java.security.NoSuchAlgorithmException; 013import java.security.SecureRandom;014import java.security.Security;015import javax.crypto.Cipher;017import javax.crypto.KeyGenerator;018019/**020* <ul>021* <li>Title:[DESEncryptUtil]</li>022* <li>Description: [加密码解密类]</li>023* <li>Copyright 2009 RoadWay Co., Ltd.</li> 024* <li>All right reserved.</li>025* <li>Created by [Huyvanpull] [Jul 19, 2010]</li> 026* <li>Midified by [修改人] [修改时间]</li>027* </ul>028*029* @version 1.0030031public class DESEncryptUtil032{033public static void main(String[] args) throws Exception034{035/** 生成KEY */036String operatorType = "key";037String keyFilePath = "D:/key.k";038DESEncryptUtil.test(keyFilePath, null, operatorType);039040/** 加密 */041operatorType = "encrypt";042String sourceFilePath = "D:/jdbc_official.properties";043DESEncryptUtil.test(keyFilePath, sourceFilePath, operatorType); 044/** 解密 */046operatorType = "decrypt";047sourceFilePath = "D:/en_jdbc_official.properties";048DESEncryptUtil.test(keyFilePath, sourceFilePath, operatorType); 049}050/**051* <ul>052* <li>Description:[创建一个密钥]</li>053* <li>Created by [Huyvanpull] [Jul 19, 2010]</li>054* <li>Midified by [修改人] [修改时间]</li>055* </ul>056*057* @return058* @throws NoSuchAlgorithmException059060public static Key createKey() throws NoSuchAlgorithmException061{062Security.insertProviderAt(new com.sun.crypto.provider.SunJCE(), 1); 063KeyGenerator generator = KeyGenerator.getInstance("DES");064generator.init(new SecureRandom());065Key key = generator.generateKey();066return key;067}068069/**070* <ul>071* <li>Description:[根据流得到密钥]</li>072* <li>Created by [Huyvanpull] [Jul 19, 2010]</li>073* <li>Midified by [修改人] [修改时间]</li>* </ul>075*076* @param is077* @return078*/079public static Key getKey(InputStream is)080{081try082{083ObjectInputStream ois = new ObjectInputStream(is); 084return (Key) ois.readObject();085}086catch (Exception e)087{088e.printStackTrace();throw new RuntimeException(e);090}091}092093/**094* <ul>095* <li>Description:[对数据进行加密]</li>096* <li>Created by [Huyvanpull] [Jul 19, 2010]</li> 097* <li>Midified by [修改人] [修改时间]</li>098* </ul>099*100* @param key101* @param data102* @return103104private static byte[] doEncrypt(Key key, byte[] data)105{106try107{108Cipher cipher = Cipher.getInstance("DES/ECB/PKCS5Padding"); 109cipher.init(Cipher.ENCRYPT_MODE, key);110byte[] raw = cipher.doFinal(data);111return raw;112}113catch (Exception e)114{115e.printStackTrace();116throw new RuntimeException(e);117}118119120/**121* <ul>122* <li>Description:[对数据进行解密]</li>123* <li>Created by [Huyvanpull] [Jul 19, 2010]</li>124* <li>Midified by [修改人] [修改时间]</li>125* </ul>126*127* @param key128* @param in129* @return130*/131public static InputStream doDecrypt(Key key, InputStream in) 132{try134{135Cipher cipher = Cipher.getInstance("DES/ECB/PKCS5Padding"); 136cipher.init(Cipher.DECRYPT_MODE, key);137ByteArrayOutputStream bout = new ByteArrayOutputStream(); 138byte[] tmpbuf = new byte[1024];139int count = 0;140while ((count = in.read(tmpbuf)) != -1)141{142bout.write(tmpbuf, 0, count);143tmpbuf = new byte[1024];144}145in.close();146byte[] orgData = bout.toByteArray();147byte[] raw = cipher.doFinal(orgData);ByteArrayInputStream bin = new ByteArrayInputStream(raw); 149return bin;150}151catch (Exception e)152{153e.printStackTrace();154throw new RuntimeException(e);155}156}157158private static void test(String keyFilePath, String sourceFilePath, 159String operatorType) throws Exception160{161// 提供了Java命令使用该工具的功能162if (operatorType.equalsIgnoreCase("key")){164// 生成密钥文件165Key key = DESEncryptUtil.createKey();166ObjectOutputStream oos = new ObjectOutputStream(new FileOutputStream(keyFilePath));167oos.writeObject(key);168oos.close();169System.out.println("成功生成密钥文件" + keyFilePath);170}171else if (operatorType.equalsIgnoreCase("encrypt"))172{173// 对文件进行加密174File file = new File(sourceFilePath);175FileInputStream in = new FileInputStream(file);176ByteArrayOutputStream bout = new ByteArrayOutputStream(); 177byte[] tmpbuf = new byte[1024];178int count = 0;179while ((count = in.read(tmpbuf)) != -1)180{181bout.write(tmpbuf, 0, count);182tmpbuf = new byte[1024];183}184in.close();185byte[] orgData = bout.toByteArray();186Key key = getKey(new FileInputStream(keyFilePath));187byte[] raw = DESEncryptUtil.doEncrypt(key, orgData); 188file = new File(file.getParent() + "\\en_" + file.getName()); 189FileOutputStream out = new FileOutputStream(file);190out.write(raw);191out.close();192System.out.println("成功加密,加密文件位于:" + file.getAbsolutePath()); 193}194else if (operatorType.equalsIgnoreCase("decrypt"))195{196// 对文件进行解密197File file = new File(sourceFilePath);198FileInputStream fis = new FileInputStream(file);199200Key key = getKey(new FileInputStream(keyFilePath));201InputStream raw = DESEncryptUtil.doDecrypt(key, fis);202ByteArrayOutputStream bout = new ByteArrayOutputStream();203byte[] tmpbuf = new byte[1024];204int count = 0;205while ((count = raw.read(tmpbuf)) != -1)206{bout.write(tmpbuf, 0, count);208tmpbuf = new byte[1024];209}210raw.close();211byte[] orgData = bout.toByteArray();212file = new File(file.getParent() + "\\rs_" + file.getName());213FileOutputStream fos = new FileOutputStream(file);214fos.write(orgData);215System.out.println("成功解密,解密文件位于:" + file.getAbsolutePath()); 216}217}218}DecryptPropertyPlaceholderConfigurer.java01package com.framework.spring;0203import java.io.IOException;04import java.io.InputStream;05import java.io.InputStreamReader;06import java.security.Key;07import java.util.Properties;0809import org.springframework.beans.factory.config.PropertyPlaceholderConfigurer;10import org.springframework.core.io.Resource;11import org.springframework.util.DefaultPropertiesPersister;12import org.springframework.util.PropertiesPersister;1314import mons.util.DESEncryptUtil;1516public class DecryptPropertyPlaceholderConfigurer extends17PropertyPlaceholderConfigurer18{19private Resource[] locations;2021private Resource keyLocation;2223private String fileEncoding;2425public void setKeyLocation(Resource keyLocation) 26{27this.keyLocation = keyLocation;28}2930public void setLocations(Resource[] locations)31{32this.locations = locations;33}3435public void loadProperties(Properties props) throws IOException36{37if (this.locations != null)38{39PropertiesPersister propertiesPersister = new DefaultPropertiesPersister();40for (int i = 0; i < this.locations.length; i++)41{42Resource location = this.locations[i];43if (logger.isInfoEnabled())44{45("Loading properties file from " + location);46}47InputStream is = null;48try49{50is = location.getInputStream();51Key key = DESEncryptUtil.getKey(keyLocation.getInputStream());52is = DESEncryptUtil.doDecrypt(key, is);53if (fileEncoding != null)54{55propertiesPersister.load(props, new InputStreamReader(56is, fileEncoding));57}58else59{60propertiesPersister.load(props, is);61}62}63finally64{65if (is != null) 66{67is.close();68}69}70}71}72}73}配置文件:view sourceprint?1<!-- 加密码属性文件 -->2<bean id="myPropertyConfigurer"3class="com.framework.spring.DecryptPropertyPlaceholderConfigurer">4<property name="locations">5<list><value>classpath*:spring_config/jdbc_official.databaseinfo</value></list> 6</property>7<property name="fileEncoding" value="UTF-8"/>8<property name="keyLocation" value="classpath:spring_config/key.key" /> 9</bean>。
