如何在交换机(cisco6509、4006、2950....)和pc间导入导出配置文件
思科模拟器交换机的使用教程详解

思科模拟器交换机的使用教程详解
思科模拟器是网络工程师经常使用的网络实验模拟软件,它可以很快捷的模拟网络中的各种设备(交换机、路由器、台式电脑、笔记本电脑、服务器、网络云),搭建各种网络环境,模拟网络拓扑结构等。
下面是小编整理的思科模拟器交换机使用教程,供您参考。
思科模拟器交换机使用教程
打开Cisco Packet Tracer,点击【交换机】,选择2960交换机,按住鼠标左键拖动到工作区。
这里有很多类型的交换机,其它类型的天使以后慢慢和大家讲解。
用同样的方法,拖动几台主机到工作区,如图所示,具体操作方法不再赘述
选择直通线,连接电脑和交换机的快速以太网端口
同理,依次连接电脑和交换机,刚连接交换机一侧节点是橘红色的,表示不通,稍等片刻,加载线缆之后就会变为绿色
直接点击主机名字,修改主机名字直接为IP地址。
这是一个很好的习惯,以后网络环境越来越复杂,像这样做可以更加清晰知道计算机所处状态
直接双击主机,依次设置每台主机的IP地址,这里都将它们设置在同一个网段
打开任意主机的【任务提示符】输入:ping 192.168.1.2,测试网络联通情况,发现无需其它配置网络已经可以互相通讯了
不落泪的天使1原创整理,请尊重小编的辛苦耕耘。
思科交换机的相关文章:
1.cisco交换机设置
2.cisco交换机时间设置时间
3.思科cisco怎么配置WEB网管
4.Cisco常用的路由器交换机配置命令。
实训二Cisco2900交换机基本配置命令

实训二Cisco2900交换机基本配置命令一、1、掌握交换机的功能、特点、工作原理。
2、了解交换机的启动过程。
3、掌握交换机的基本配置命令。
4、掌握Boson Netsim软件的使用方法。
, 观察交换机的启动过程。
, 启动Boson Netsim软件,进行交换机基本配置命令练习。
1、观察交换机的前、后面板,明确每一个按钮和指示灯的功能。
2、启动交换机前确认正确的连接了线缆和控制线。
3、接通交换机电源。
4、观察交换机的启动顺序,包括面板上的指示灯LEDs和Cisco IOS输出到控制台上的内容。
5、交换机各种模式的进入和退出命令。
Switch> ………………………… ; 用户模式;从用户模式进入特Switch>enable ………………………… 权模式,也作en Switch# ………………………… ;特权模式;从特权模式退出到Switch#disable ………………………… 用户模式,也作dis; 从特权模式进入Switch#vlan database ………………………… VLAN配置模式Switch(vlan)# …………………………;VL AN 配置模式;从VLAN配置模式退Switch(vlan)#exit ………………………… 出到特权模式;从特权模式进入全Switch#config terminal …………………………局配置模式,也作conf t Switch(config)# …………………………; 全局配置模式Switch(config)#exit …………………………; 从全局配置模式退出到特权模式 Switch(config)#interface ;从全局配置模式进………………………… [端口类型/端口号] 入端口配置模式 Switch(config-if)# …………………………; 端口配置模式;从端口配置模式退Switch(config-if)#exit ………………………… 出到全局配置模式 Switch(config)#line ;从全局配置模式进………………………… console 0 入命令行配置模式 Switch(config-line)# …………………………; 命令行配置模式;从命令行配置模式Switch(config-line)#exit ………………………… 退出到全局配置模式注:从VLAN配置模式、全局配置模式、端口配置模式、命令行配置模式都可以键入end,从而直接退出到特权模式。
如何从一个设备复制系统镜像到另一个-Cisco

如何从一个设备复制系统镜像到另一个ContentsIntroductionPrerequisitesRequirementsComponents UsedConventions复制从设备到设备在同一路由器里面命令汇总复制从一个路由器到另一个Related InformationIntroduction本文档说明了如何在同一个路由器内以及不同路由器之间将系统镜像从一个设备复制到另一个设备。
PrerequisitesRequirementsThere are no specific requirements for this document.Components UsedThis document is not restricted to specific software and hardware versions.为本文的目的使用的平台是思科2500系列路由器和Cisco 3600系列路由器。
ConventionsRefer to Cisco Technical Tips Conventions for more information on document conventions.复制从设备到设备在同一路由器里面复制的系统镜像表下面的提供options命令从一个设备到另一个(方法根据另外平台变化) :命令汇总表下面的列表您能从TFTP server复制镜像的多种位置。
这些选项根据另外平台变化。
请参见使用URL前缀欲知更多信息和为了得知更多这些选项中的每一个。
Router#copy tftp ?语法说明Bootflash :复制到Bootflash :文件系统disk0:复制到disk0 :文件系统disk1 :复制到disk1 :文件系统闪存:复制闪动:文件系统flh :复制到flh :文件系统ftp :复制到ftp :文件系统lex :复制到lex :文件系统零位:复制使无效:文件系统nvram :复制到nvram :文件系统rcp :复制到rcp :文件系统running-config更新(合并与)当前系统配置slot0 :复制到slot0 :文件系统slot1 :复制到slot1 :文件系统startup-config复制到启动配置系统:复制到系统:文件系统tftp :复制到tftp :文件系统镜像复制使用的三个最普通的命令是:copy tftp flashqcopy rcp flashq复制slot0 :slot1 :q下面的示例说明程序为复制系统镜像跟随从一个设备到另一个(例如,从一张slot/磁盘到另一张slot/磁盘)在Cisco 3600系列路由器。
思科交换机6509配置实例(双机热备)

CISCO 6509配置手册1.设置时间switch#config tswitch(config)# clock timezone GMT 8 ;配置时区switch(config)# clock set 13:30:21 31 JAN 2004 ;配置交换机时间2.设置主机名及密码Switch#congfig tSwitch(config)#hostname 6509a //配置交换机名称6509a(config)#enable password cisco //配置用户密码6509a (config)#enable secret cisco //配置安全密码6509a (config-line)#line vty 0 15 //配置远程访问密码6509a (config-line)#login6509a (config-line)#password cisco6509a (config-line)#login6509a (config-line)#^z6509a #show running-config //查看配置信息6509a #copy running-config startup-config6509a #show startup-config6509a #show bootvar6509a #dir bootflash:6509a #copy system:running-config nvram:startup-config6509a #show fabric status6509a #show hardware3.配置vlan6509a #config t6509a (config)#vlan 3016509a (config-vlan)# name hexinxitong6509a (config)#vlan 3026509a (config-vlan)# name callcenter6509a (config)#vlan 3036509a (config-vlan)# name kuaijicaiwu6509a (config)#vlan 3046509a (config-vlan)# name guojiyewu6509a (config)#vlan 3056509a (config-vlan)# name guanlixitong6509a (config)#vlan 3066509a (config-vlan)# name ceshihuanjing6509a (config)#vlan 3076509a (config-vlan)# name wangluoguanli6509a (config-vlan)#exit6509a (config)#exit6509a #show vlan6509a (config)#interface range giga 2/1 – 8 //配置端口信息6509a (config-if-range)#switchport //二层交换模式6509a (config-if-range)#switchport mode access6509a (config-if-range)#switchport access vlan 3016509a (config-if-range)#exit6509a (config)#interface range giga 2/9– 146509a (config-if-range)#switchport mode access6509a (config-if-range)#switchport access vlan 3026509a (config-if-range)#exit6509a (config)#interface range giga 2/15 – 176509a (config-if-range)#switchport mode access6509a (config-if-range)#switchport access vlan 3036509a (config-if-range)#exit6509a (config)#interface range giga 2/18 – 226509a (config-if-range)#switchport mode access6509a (config-if-range)#switchport access vlan 3046509a (config)#interface range giga 2/23 – 266509a (config-if-range)#switchport mode access6509a (config-if-range)#switchport access vlan 3056509a (config-if-range)#exit6509a (config)#interface range giga 2/27 – 336509a (config-if-range)#switchport mode access6509a (config-if-range)#switchport access vlan 3066509a (config-if-range)#exit6509a (config)#interface range giga 2/34 – 396509a (config-if-range)#switchport mode access6509a (config-if-range)#switchport access vlan 3076509a (config-if-range)#exit6509a (config)#interface giga 2/486509a (config-if)#ip address 12.10.254.2 255.255.255.0 6509a (config-if)#no shut6509a (config)#exit6509a #show vlan4.配置trunk6509a(config)#int giga 5/16509a(config-if)#shut down6509a(config-if)#switchport6509a(config-if)#switchport trunk enca dot1q6509a(config-if)#switchport mode trunk6509a #show int giga 2/48 trunk6509a #show vtp counters6509a #show vtp status6509a(config)#int giga 6/16509a(config-if)#shut down6509a(config-if)#switchport6509a(config-if)#switchport trunk enca dot1q6509a(config-if)#switchport mode trunk6509a(config-if)#no shut down5.设置vlan地址及HSRP6509a #config t6509a(config) #int vlan 3016509a(config-if) #ip address 192.1.2.2 255.255.255.0 6509a(config-if) #no ip redirects6509a(config-if) #standby 1 ip 192.1.2.16509a(config-if) #standby 1 priority 1056509a(config-if) #standby 1 preempt6509a(config-if) #standby 1 track giga 1/486509a(config-if) #no shutdown6509a(config-if) #exit6509a(config) #exit6509a#show ip interface brief6509a #config t6509a(config) #int vlan 3026509a(config-if) #ip address 192.100.4.2 255.255.255.06509a(config-if) #no ip redirects6509a(config-if) #standby 2 ip 192.100.4.16509a(config-if) #standby 2 priority 1056509a(config-if) #standby 2 preempt6509a(config-if) #standby 2 track giga 1/486509a(config-if) #no shutdown6509a(config-if) #exit6509a(config) #exit6509a#show ip interface brief6509a #config t6509a(config) #int vlan 3036509a(config-if) #ip address 192.100.5.2 255.255.255.0 6509a(config-if) #no ip redirects6509a(config-if) #standby 3 ip 192.100.5.16509a(config-if) #standby 3 priority 1056509a(config-if) #standby 3 preempt6509a(config-if) #standby 3 track giga 1/486509a(config-if) #no shutdown6509a(config-if) #exit6509a(config) #exit6509a#show ip interface brief6509a #config t6509a(config) #int vlan 3046509a(config-if) #ip address 192.100.6.2 255.255.255.0 6509a(config-if) #no ip redirects6509a(config-if) #standby 4 ip 192.100.6.16509a(config-if) #standby 4 priority 1056509a(config-if) #standby 4 preempt6509a(config-if) #standby 4 track giga 1/486509a(config-if) #no shutdown6509a(config-if) #exit6509a(config) #exit6509a#show ip interface brief6509a #config t6509a(config) #int vlan 3056509a(config-if) #ip address 192.100.7.2 255.255.255.0 6509a(config-if) #no ip redirects6509a(config-if) #standby 5 ip 192.100.7.16509a(config-if) #standby 5 preempt6509a(config-if) #no shutdown6509a(config-if) #exit6509a(config) #exit6509a#show ip interface brief6509a #config t6509a(config) #int vlan 3066509a(config-if) #ip address 192.100.8.2 255.255.255.0 6509a(config-if) #no ip redirects6509a(config-if) #standby 6 ip 192.100.8.16509a(config-if) #standby 6 preempt6509a(config-if) #no shutdown6509a(config-if) #exit6509a(config) #exit6509a#show ip interface brief6509a #config t6509a(config) #int vlan 3076509a(config-if) #ip address 192.100.9.2 255.255.255.0 6509a(config-if) #no ip redirects6509a(config-if) #standby 7 ip 192.100.9.16509a(config-if) #standby 7 preempt6509a(config-if) #no shutdown6509a(config-if) #exit6509a(config) #exit6509a#show ip interface brief6.配置EIGRP6509a #config t6509a(config) #ip routing eigrp 1006509a(config) #router eigrp 1006509a(config-router) #network 192.1.2.06509a(config-router) #network 192.100.0 .0 255.255.0.0 6509a(config-router) #network 12.0.0.06509a(config-router) #network 192.254.253.06509a(config-router) #no auto-summary6509a(config-router) #^z6509a #show ip proto6509a #show ip route。
cisco 6509交换机Native和Hybrid版本互换步骤(修订本)

CaOS to CISCO IOS(即Hybrid版本转Native版本)详细步骤:1)建立一个到SP(交换处理器)的CONSOLE连接,打开日志将所有操作过程记入文本。
2)备份当前Hybrid版本的配置文件,便于以后恢复。
命令>copy config tftp3)如果没有PFC和MSFC将不能运行Native版本。
命令>show module确定是否存在。
Console> (enable) show modMod Slot Ports Module-Type Model Sub Status--- ---- ----- ------------------------- ------------------- --- --------1 12 1000BaseX Supervisor WS-X6K-S2U-MSFC2 yes ok15 1 1 Multilayer Switch Feature WS-F6K-MSFC2 no ok!--- The SP in slot 1 is a Supervisor 2 in this case!--- with an RP or MSFC 2.3 3 48 10/100BaseTX Ethernet WS-X6548-RJ-45 no ok5 5 0 Switch Fabric Module 2 WS-X6500-SFM2 no okMod Module-Name Serial-Num--- -------------------- -----------1 SAD060302XM15 SAD060102KP3 SAL0701B2S05 SAD061506MDMod MAC-Address(es) Hw Fw Sw--- -------------------------------------- ------ ---------- -----------------1 00-01-c9-da-ee-d2 to 00-01-c9-da-ee-d3 3.5 7.1(1) 8.1(1)!--- This is the current CatOS software version running on the SP.00-01-c9-da-ee-d0 to 00-01-c9-da-ee-d100-04-9b-bd-c0-00 to 00-04-9b-bd-c3-ff15 00-08-7c-a1-cf-80 to 00-08-7c-a1-cf-bf 1.3 12.1(19)E1 12.1(19)E1a!--- This is the current Cisco IOS software version running on the RP.3 00-09-11-f3-88-48 to 00-09-11-f3-88-77 5.1 6.3(1) 8.1(1)5 00-01-00-02-00-03 1.2 6.1(3) 8.1(1)Mod Sub-Type Sub-Model Sub-Serial Sub-Hw Sub-Sw--- ----------------------- ------------------- ----------- ------ ------1 L3 Switching Engine II WS-F6K-PFC2 SAD054104B3 3.0!--- A PFC 2 is installed in the switch in this case.Console> (enable)4)命令>dir bootflash:和>dir slot0:确定Native版本文件的位置;如果文件存在跳到第6步,不存在继续下一步。
交换机TFTP快速导入配置备份cisco 2960参考
交換機TFTP快速導入配置備份cisco2960參考
一.導入前準備
1.PC、cisco2960交換機一台串口線網線,并在PC機上裝一個CRT的軟件(自己使用
的習慣),也可以用電腦自帶的超級終端,下面是按CRT軟件模式演示的。
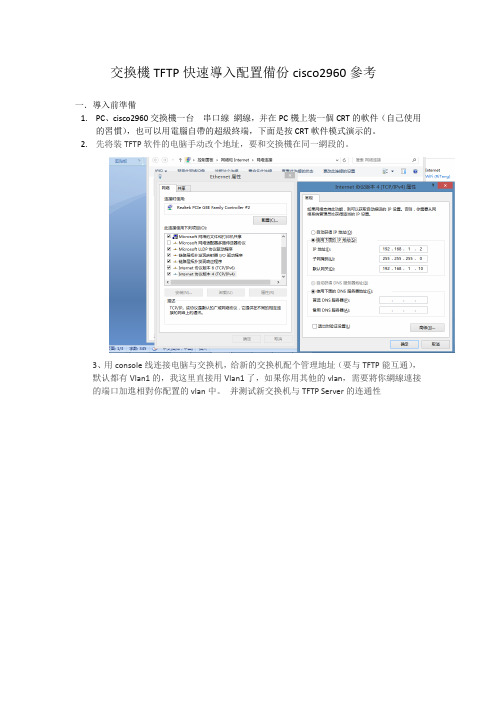
2.先将装TFTP软件的电脑手动改个地址,要和交換機在同一網段的。
3、用console线连接电脑与交换机,给新的交换机配个管理地址(要与TFTP能互通),
默认都有Vlan1的,我这里直接用Vlan1了,如果你用其他的vlan,需要將你網線連接的端口加進相對你配置的vlan中。
并测试新交换机与TFTP Server的连通性
4、打開tftp server服務器,將要還原的備份文件放在tftp的目錄文件下面,(文件的存放目錄名稱必須是英文的)可以用命令:copy tftp startup-config还原了
6、保存配置信息,再重启交换机就好了
7、重啟之後備份已經恢復完成
完2013/8/12夏世滿。
思科交换机的基本配置命令

思科交换机的基本配置命令网络技术知识其实也是弱电里面的一个难点,这个一般是在大学课程里面才能详细的学习,今天小编带来的是交换机的基本配置命令。
一、基本配置命令switch>用户模式1:进入特权模式enableswitch>enableswitch#2:进入全局配置模式configureterminalswitch>enableswitch#configureterminalswitch(conf)#3:交换机命名hostnameaptech2950以aptech2950为例switch>enableswitch#configureterminalswitch(conf)#hostnameaptch-2950aptech2950(conf)#4:配置使能口令enablepasswordcisco以cisco为例switch>enableswitch#configureterminalswitch(conf)#hostnameaptch2950aptech2950(conf)#enablepasswordcisco5:配置使能密码enablesecretciscolab以cicsolab为例switch>enableswitch#configureterminalswitch(conf)#hostnameaptch2950aptech2950(conf)#enablesecretciscolab6:设置虚拟局域网vlan1interfacevlan1switch>enableswitch#configureterminalswitch(conf)#hostnameaptch2950aptech2950(conf)#interfacevlan1aptech2950(conf-if)#ipaddress192.168.1.1255.255.255.0配置交换机端口ip和子网掩码aptech2950(conf-if)#noshut是配置处于运行中aptech2950(conf-if)#exitaptech2950(conf)#ipdefault-gateway192.168.254设置网关地址7:进入交换机某一端口interfacefasteher0/17以17端口为例switch>enableswitch#configureterminalswitch(conf)#hostnameaptch2950aptech2950(conf)#interfacefasteher0/17aptech2950(conf-if)#8:查看命令showswitch>enableswitch#showversion察看系统中的所有版本信息showinterfacevlan1查看交换机有关ip协议的配置信息showrunning-configure查看交换机当前起作用的配置信息showinterfacefastether0/1察看交换机1接口具体配置和统计信息showmac-address-table查看mac地址表showmac-address-tableaging-time查看mac地址表自动老化时间9:交换机恢复出厂默认恢复命令switch>enableswitch#erasestartup-configureswitch#reload10:双工模式设置switch>enableswitch#configureterminalswitch2950(conf)#hostnameaptch-2950aptech2950(conf)#interfacefasteher0/17以17端口为例aptech2950(conf-if)#duplexfull/half/auto有full,half,auto三个可选项11:cdp相关命令switch>enableswitch#showcdp查看设备的cdp全局配置信息showcdpinterfacefastether0/17查看17端口的cdp配置信息showcdptraffic查看有关cdp包的统计信息showcdpnerghbors列出与设备相连的cisco设备12:csico2950的密码恢复拔下交换机电源线。
计算机网络实验报告

计算机网络实验报告计算机网络实验报告1一、实验目的1. 掌握几种常用的网络命令,通过使用这些命令能检测常见网络故障2. 理解各命令的含义,并能解释其显示内容的意义二、实验内容1. 运行 Windows 常用的网络命令,ipconfig、ping、netstat、nbtstat、arp、route、 net、tracert2. 利用子网掩码、实现子网的划分3. 了解 VRP 的各种视图及各视图下的常用命令三、实验原理、方法、手段该实验通过执行一些常用的网络命令,来了解网络的状况、性能,并对一些网络协议能更好的理解。
下面介绍一下实验中用到的网络命令:1. ipconfig 命令该命令显示IP 协议的具体配置信息,命令可以显示网络适配器的物理地址、主机的IP 地址、子网掩码以及默认网关等,还可以查看主机名、DNS 服务器、节点类型等相关信息。
2. ping 命令该命令用于测试网络联接状况以及信息发送和接收状况。
3. netstat 命令该命令用于检验网络连接情况,它可以显示当前正在活动的网络连接的详细信息。
4. nbtstat 命令该命令用于查看本地计算机或远程计算机上的NetBIOS 的统计数据,显示协议统计情况以及当前TCP/IP 的连接所使用NETBIOS 情况,运用NETBIOS,可以查看本地计算机或远程计算机上的NETBIOS 名字列表。
5. arp 命令使用ARP 命令,你能够查看本地计算机或另一台计算机的ARP 高速缓存中的当前内容,也可以用人工方式输入静态的网卡物理地址/IP 地址对,使用这种方式为缺省网关和本地服务器等常用主机进行这项操作,有助于减少网络上的信息量。
6. route 命令ROUTE 命令用于显示、人工添加和修改路由表项目。
7. net 命令net 命令是WIN 系列里面最有用的网络方面的命令之一,它不是一个命令,而是一组命令。
8. tracert 命令Tracert 使用很简单,只需要在tracert 后面跟一个IP 地址或URL,tracert 会在进行相应的域名转换的。
Cisco交换机详细配置及命令说明

Cisco交换机的概述交换机根据OSI层次通常可分为第2层交换机和多层交换机。
通常所说的交换机指第2层交换机也叫LAN交换机(第二层MAC地址进行交换);多层交换机与第2层交换机工作方式类似,除了使用第二层MAC地址进行交换之外,还使用第3层网络地址。
交换机的基本配置3、电缆连接及终端配置如图11-8所示,接好PC机和交换机各自的电源线,在未开机的条件下,把PC机的串口1(COM1)通过控制台电缆线与交换机的Console端口相连,即完成设备连接工作。
交换机Console端口的默认参数如下:端口速率:9600b/s;数据位:8;奇偶校验:无;停止位:1;流控:无。
3、交换机的启动启动过程未用户提供了丰富的信息,我们可以对交换机的硬件结构和软件加载过程有直观的认识,这些信息对我们了解该交换机以及对她做相应的配置很有帮助,另外部件号、序列号、版本号等信息再产品验货时都是非常重要的信息。
3、交换机的基本配置在默认情况下,所有接口处于可用状态并且都属于VLAN1,这种情况下交换机就可用正常工作了,为了方便管理和使用,首先应对交换机做基本的配置,最基本的配置可以通过启动时的对话框配置模式完成,也可以在交换机启动后再进行配置。
(1)配置Enable口令和主机名。
在交换机中可以配置使能口令(Enable password)和使能密码(Enable secret),一般情况下只需配置一个就可以,当两者同时配置时,后者生效。
这两者的区别是使能口令以明文显示而使能密码以密文形式显示。
Switch> (用户执行模式提示符)Switch>enable (进入特权模式)Switch # (特权模式提示符)Switch # config termianal (进入配置模式)Switch (config) # (配置模式提示符)Switch (config) # enable password cisco 设置enable password 为cisco)Switch (config) # enable secret cisco1 (设置enable secret 为cisco1)Switch (config) # hostname C2950 (设置主机名为C2950)C2950 (config) # end (退回到特权模式)C2950 #(2)配置交换机IP地址、默认网关、域名、域名服务器。
Cisco 6509配置手册

Catalyst 6509 交换机配置手册version 1。
0。
0中望商业机器有限公司© 1995, 2001 Chinaweal Business Machinery CO。
LTDAll Rights Reserve目录1基础配置11.1建立到控制台的连接11。
2配置交换机的地址11。
3配置Ethernet 口31。
4配置交换机的全局参数31.5测试网络的连通性42其它参数的配置52.1配置Login Banner52。
2配置DNS62.3配置CDP协议73VLAN的配置83.1配置VTP协议(VLAN Trunk Protocol)83.2配置VLAN93.2。
1创建VLAN93.3将交换端口配置到VLAN中103。
4配置VLAN Trunks113.5在MSFC上配置IP InterVLAN路由123。
5。
1从Console口进入MSFC123。
5。
2通过Telnet Session 进入MSFC 模块133。
5.3在MSFC上配置IP InterVLAN路由133.6配置HSRP协议143.7配置以太通道161 基础配置1.1 建立到控制台的连接在进行配置和将交换机接入网络前必须通过控制台来进入交换机的CLI,对交换机进行配置。
在进入CLI后,通过命令enable进入到privileged 模式。
通过以下步骤将终端连接到交换机的控制口例如:〈... output truncated ..。
〉Cisco Systems ConsoleEnter password:Console〉enableEnter password:Console> (enable)1.2 配置交换机的地址在远程登录交换机前你必须为交换机配置地址,掩码和网关等信息- 1 -在你第一次配置交换机时,将sc0口配置到default VLAN,即VLAN 1中,在你配置了其他VLAN以后,你可以将sc0口配置到其他VLAN中,但是sc0口的地址和网关必须与所在的VLAN的网段对应.配置IP地址和网关的步骤如下例如:Console〉 (enable) set interface sc0 10.1。
思科交换配置实验报告
思科交换配置实验报告实验内容本次实验的目标是使用思科交换机进行基本的配置。
我们将进行以下操作步骤:1. 连接思科交换机2. 进入全局配置模式3. 配置交换机主机名和域名4. 配置交换机端口5. 配置交换机VLAN6. 配置交换机端口安全实验步骤1. 连接思科交换机首先,我们使用合适的网线将电脑与思科交换机连接。
确保连接稳定,并确认电脑可以与交换机成功通信。
2. 进入全局配置模式使用终端软件(如PuTTY)登录交换机,并进入管理模式。
输入命令`enable`,进入特权模式,然后输入`configure terminal`,进入全局配置模式。
3. 配置交换机主机名和域名在全局配置模式下,我们可以设置交换机的主机名和域名。
输入命令`hostname <hostname>`,将`<hostname>`替换为你想要设置的主机名。
接着,使用命令`ip domain-name <domain-name>`,将`<domain-name>`替换为你的域名。
4. 配置交换机端口在全局配置模式下,我们可以配置交换机的端口。
首先,使用命令`interface <interface>`,将`<interface>`替换为你要配置的端口编号。
然后,配置端口模式。
可以选择不同的模式(如访问模式、Trunk模式)来适应不同的网络需求。
5. 配置交换机VLANVLAN(Virtual Local Area Network)是一种虚拟局域网技术,可以在一个物理网络中划分多个逻辑网络。
在全局配置模式下,我们可以创建和配置VLAN。
使用命令`vlan <vlan-id>`,将`<vlan-id>`替换为你要配置的VLAN编号。
然后,通过命令`name <vlan-name>`,将`<vlan-name>`替换为你的VLAN名称。
cisco6509配置手册

cisco6509配置手册cisco 6509交换机配置手册一个经典配置包括Catalyst6509 4006交换机配置方案拓扑图如下:一、 Catalyst 6509交换机配置方案1.1、配置6509二层交换Console> (enable) set system name bg-sw-01 /设备名称Bg-sw-01> (enable) set passwordEnter old password:Enter new password: test /设备口令Retype new password: testBg-sw-01> (enable) set enablepassEnter old password:Enter new password: test /设备口令Retype new password: testBg-sw-01> (enable) set banner motd % Welcome to the c6509 in the office % /提示文本Bg-sw-01> (enable) set interface sc0 10.234.180.21 255.255.255.0 /设置管理接口#sh intBg-sw-01> (enable) set ip route default 10.234.180.234 /设置默认网关 #sh iprouteBg-sw-01> (enable) set vtp mode server /设置VTP模式 #sh vtpdomainBg-sw-01> (enable) set vtp domain Core_Net /设置VTP域名Bg-sw-01> (enable) set vlan 31 name ZhongSanLu /创建VLAN #sh vlan Bg-sw-01> (enable) set vlan 32 name YiYang Bg-sw-01> (enable) set vlan 33 name JianXiuBg-sw-01> (enable) set vlan 34 name RaoDianBg-sw-01> (enable) set vlan 35 name JinSanLouBg-sw-01> (enable) set vlan 36 name WuZiBg-sw-01> (enable) set port channel 1/1-2 on /设置Channel #shport channelBg-sw-01> (enable) set trunk 1/1 on dot1q 1-1005Bg-sw-01> (enable) set trunk 2/2 on dot1q 1-1005 /设置trunk口 #sh trunk # Bg-sw-01> (enable) set trunk 2/3 on dot1q 1-1005Bg-sw-01> (enable) set trunk 2/4 on dot1q 1-1005Bg-sw-01> (enable) set trunk 2/5 on dot1q 1-1005Bg-sw-01> (enable) set trunk 2/6 on dot1q 1-1005Bg-sw-01> (enable) set trunk 2/7 on dot1q 1-1005Bg-sw-01> (enable) set spantree root 1-40 dia 4 /设为spantree的根#sh spantree Bg-sw-01> (enable) set spantree portfast 1/1-2 enable /设spantree端口快速启用Bg-sw-01> (enable) set spantree portfast 2/1-8 enable Bg-sw-01> (enable) set spantree uplinkfast enable /设spantree端口快速切换Bg-sw-01> (enable) set spantree backbonefast enable /设spantree端口快速定位根1.2、配置路由Console> (enable) session 15 /进入路由子卡Router(config)# hostname c6509-msfc /设备名c6509-msfc (config)# enable password test /设口令c6509-msfc (config)# enable secret testC6509-msfc(config)# banner motd % Welcome to the c6509-msfc in the Office % /设提示文本c6509-msfc (config)# line vty 0 4 / 进入VTY模式c6509-msfc (config-line)#login / 登入提示c6509-msfc (config-line)#password test / 设用户级口令c6509-msfc (config-line)# endC6509-msfc#configure terminal / 进入全局模式Enter configuration commands, one per line. End with CNTL/Z.C6509-msfc(config)# interface vlan 1 /进入虚子接口C6509-msfc(config-if)# ip address 10.234.180.232 255.255.255.0 /加ip 地址C6509-msfc(config-if)# no shutdown /开启端口C6509-msfc(config-if)# standby 1 ip 10.234.180.234 /建HSRP组并设虚IP地址C6509-msfc(config-if)# standby 1 priority 110 /设优先级C6509-msfc(config-if)# standby 1 preempt /设切换许可C6509-msfc(config-if)# interface vlan 31C6509-msfc(config-if)# ip address 10.234.181.60 255.255.255.192C6509-msfc(config-if)# no shutdownC6509-msfc(config-if)# standby 31 ip 10.234.181.62C6509-msfc(config-if)# standby 31 priority 110C6509-msfc(config-if)# standby 31 preemptC6509-msfc(config-if)# interfacevlan 32C6509-msfc(config-if)# ip address 10.234.181.124 255.255.255.192C6509-msfc(config-if)# no shutdownC6509-msfc(config-if)# standby 32 ip 10.234.181.126C6509-msfc(config-if)# standby 32 priority 110C6509-msfc(config-if)# standby 32 preemptC6509-msfc(config-if)# interface vlan 33C6509-msfc(config-if)# ip address 10.234.181.188 255.255.255.192 C6509-msfc(config-if)# no shutdown C6509-msfc(config-if)# standby 33 ip 10.234.181.190 C6509-msfc(config-if)# standby 33 priority 110C6509-msfc(config-if)# standby 33 preemptC6509-msfc(config-if)# interface vlan 34C6509-msfc(config-if)# ip address 10.234.181.220 255.255.255.224 C6509-msfc(config-if)# no shutdown C6509-msfc(config-if)# standby 34 ip 10.234.181.222 C6509-msfc(config-if)# standby 34 priority 110C6509-msfc(config-if)# standby 34 preemptC6509-msfc(config-if)# interface vlan 35C6509-msfc(config-if)# ip address 10.234.181.254 252.255.255.224 C6509-msfc(config-if)# no shutdown C6509-msfc(config-if)# standby 35 ip 10.234.181.254 C6509-msfc(config-if)# standby 35 priority 110C6509-msfc(config-if)# standby 35 preemptC6509-msfc(config-if)# interface vlan 36C6509-msfc(config-if)# ip address 10.234.182.28 255.255.255.224 C6509-msfc(config-if)# no shutdown C6509-msfc(config-if)# standby 36 ip 10.234.182.30C6509-msfc(config-if)# standby 36 priority 110C6509-msfc(config-if)# standby 36 preemptC6509-msfc(config-if)# exitC6509-msfc #copy running config[page]二、Catalyst 4006交换机配置方案2.1、配置4006二层交换(三层交换模块安置在第二个槽)Console> (enable) set system name bg-sw-02 /设备名称Bg-sw-02> (enable) set passwordEnter old password:Enter new password: test /设备口令Retype new password: testBg-sw-02> (enable) set enablepassEnter old password:Enter new password: test /设备口令Retype new password: testBg-sw-02> (enable) set banner motd % Welcome to the c4006 in the office % /提示文本Bg-sw-02> (enable) set interface sc0 10.234.180.22 255.255.255.0 /设置管理接口 #shintBg-sw-02> (enable) set ip route default 10.234.180.234 /设置默认网关 #sh ip routeBg-sw-02> (enable) set vtp mode server /设置VTP模式 #sh vtp domain Bg-sw-02> (enable) set vtp domain Core_Net /设置VTP域名Bg-sw-02> (enable) set vlan 31 name ZhongSanLu /创建VLAN #sh vlanBg-sw-02> (enable) set vlan 32 name YiYangBg-sw-02> (enable) set vlan 33 name JianXiuBg-sw-02> (enable) set vlan 34 name RaoDianBg-sw-02> (enable) set vlan 35 name JinSanLouBg-sw-02> (enable) set vlan 36 name WuZiBg-sw-02> (enable) set port channel 1/1-2 on /设置Channel #sh port channel Bg-sw-02> (enable) set trunk 1/1 on dot1q 1-1005 Bg-sw-02> (enable) set port channel 2/1-2 on /设置Channel #sh port channelBg-sw-02> (enable) set trunk 2/1 on dot1q 1-1005Bg-sw-02> (enable) set trunk 4/1 on dot1q 1-1005 /设置trunk口 #sh trunk # Bg-sw-02> (enable) set trunk 4/3 on dot1q 1-1005Bg-sw-02> (enable) set trunk 4/4 on dot1q 1-1005Bg-sw-02> (enable) set spantree root secondary 1-40 dia 4 Bg-sw-02> (enable) set spantree portfast 1/1-2 enable /设spantree端口快速启用Bg-sw-02> (enable) set spantree portfast 2/1-34 enableBg-sw-02> (enable) set spantree portfast 3/1-32 enableBg-sw-02> (enable) set spantree portfast 4/1-6 enableBg-sw-02> (enable) set spantree uplinkfast enable /设spantree端口快速切换Bg-sw-02> (enable) set spantree backbonefast enable /设spantree端口快速定位根2.1、配置三层交换模块(三层交换模块安置在第二)Console> (enable) session 2 /进入路由子卡Router(config)# hostname c4006-L3 /设备名c4006-L3 (config)# enable password test /设口令c4006-L3 (config)# enable secret testc4006-L3(config)# banner motd % Welcome to the c4006-l3 in the Office % /设提示文本c4006-L3 (config)# line vty 0 4 / 进入VTY模式c4006-L3 (config-line)#login / 登入提示c4006-L3 (config-line)#password test / 设用户级口令c4006-L3 (config-line)# endC4006-L3#configure terminalEnter configuration commands, one per line. End with CNTL/Z.C4006-L3(config)# interface port-channel 1 /建内部虚端口C4006-L3(config)# interface g3 /进入接口模式C4006-L3(config-if)# channel-group 1 / 加入到channel组中C4006-L3(config-if)# exitC4006-L3(config)# interface g4 /进入接口模式C4006-L3(config-if)# channel-group 1 / 加入到channel组中C4006-L3(config-if)# exitC4006-L3(config)# interface port-channel 1.1 /进入子接口模式C4006-L3(config-if)# encapsulation dot1q 1 native / 封装trunk C4006-L3(config-if)# ip address 10.234.180.233 255.255.255.0 /加ip地址C4006-L3(config-if)# no shutdown /开启端口C4006-L3(config-if)# standby 1 ip 10.234.180.234 /建HSRP组并设虚IP 地址C4006-L3(config-if)# standby 1 priority 100 /设优先级C4006-L3(config-if)# standby 1 preempt /设切换许可C4006-L3(config-if)# interface port-channel 1.31C4006-L3(config-if)# encapsulation dot1q 31C4006-L3(config-if)# ip address 10.234.181.61 255.255.255.192C4006-L3(config-if)# no shutdownC4006-L3(config-if)# standby 31 ip 10.234.181.62C4006-L3(config-if)# standby 31 priority 100C4006-L3(config-if)# standby 31 preemptC4006-L3(config-if)# interface port-channel 1.32C4006-L3(config-if)# encapsulation dot1q 32C4006-L3(config-if)# ip address 10.234.181.125 255.255.255.192C4006-L3(config-if)# no shutdownC4006-L3(config-if)# standby 32 ip 10.234.181.126C4006-L3(config-if)# standby 32 priority 100C4006-L3(config-if)# standby 32 preemptC4006-L3(config-if)# interface port-channel 1.33C4006-L3(config-if)# encapsulation dot1q 33C4006-L3(config-if)# ip address 10.234.181.189 255.255.255.192C4006-L3(config-if)# no shutdownC4006-L3(config-if)# standby 33 ip 10.234.181.190C4006-L3(config-if)# standby 33 priority 100C4006-L3(config-if)# standby 33 preemptC4006-L3(config-if)# interface port-channel 1.34C4006-L3(config-if)# encapsulation dot1q 34C4006-L3(config-if)# ip address 10.234.181.221 255.255.255.224 C4006-L3(config-if)# no shutdownC4006-L3(config-if)# standby 34 ip 10.234.181.222 C4006-L3(config-if)# standby 34 priority 100C4006-L3(config-if)# standby 34 preemptC4006-L3(config-if)# interface port-channel 1.35C4006-L3(config-if)# encapsulation dot1q 35C4006-L3(config-if)# ip address 10.234.181.253 255.255.255.224 C4006-L3(config-if)# no shutdownC4006-L3(config-if)# standby 35 ip 10.234.181.254 C4006-L3(config-if)# standby 35 priority 100C4006-L3(config-if)# standby 35 preemptC4006-L3(config-if)# interface port-channel 1.36C4006-L3(config-if)# encapsulation dot1q 36C4006-L3(config-if)# ip address 10.234.182.29 255.255.255.224 C4006-L3(config-if)# no shutdownC4006-L3(config-if)# standby 36 ip 10.234.182.30C4006-L3(config-if)# standby 36 priority 100C4006-L3(config-if)# standby 36 preemptC4006-L3(config-if)# exitC4006-L3#copy running config[page]三、Catalyst 3500XL交换机配置方案3.1、办公楼Catalyst 3500XL交换机配置方案第一台Catalyst 3548switch#configure terminalEnter configuration commands, one per line. End with CNTL/Z.switch(config)#hostname bg-sw-03 /设备名bg-sw-03(config)#enable password test /设口令bg-sw-03(config)#enable secret testbg-sw-03(config)#banner motd % Welcome to the C3548 in the Office % /提示文本bg-sw-03(config)#line vty 0 4 / 进入VTY 模式bg-sw-03(config.line)#login / 登入提示bg-sw-03(config.line)#password test / 设用户级口令bg-sw-03(config.line)#exitbg-sw-03 (config)#int vlan 1 / 进入内部管理接口bg-sw-03 (config-if)#ip address 10.234.180.23 255.255.255.0 /加入IP地址bg-sw-03(config-if)#exitbg-sw-03(config)#ip default.gateway 10.234.180.234 /设网关bg-sw-03(config)#endbg-sw-03#vlan database / 进入vtp数据库bg-sw-03(vlan)#vtp domain Corp_Net /设vtp域bg-sw-03(vlan)#vtp client /设定vtp模式bg-sw-03(vlan)#exitbg-sw-03(config)#spantree uplinkfast /设定端口快速上连bg-sw-03(config)#int g0/1 /进入接口模式bg-sw-03(config-if)#switchport mode trunk /设为trunk模式bg-sw-03(config-if)#switchport trunk encapsulation dot1q /设定封装模式bg-sw-03(config-if)#switchport trunk allowed vlan all /设定trunk许可vlanbg-sw-03(config-if)#spanning-tree portfast /设定端口快速启用bg-sw-03(config-if)#int g0/2 /进入接口模式bg-sw-03(config-if)#switchport mode trunk /设为trunk模式bg-sw-03(config-if)#switchport trunk encapsulation dot1q /设定封装模式bg-sw-03(config-if)#switchport trunk allowed vlan all /设定trunk许可vlanbg-sw-03(config-if)#spanning-tree portfast /设定端口快速启用bg-sw-03(config-if)#exitbg-sw-03#write memory第二台Catalyst 3548switch#configure terminalEnter configuration commands, one per line. End with CNTL/Z.switch(config)#hostname bg-sw-04 /设备名bg-sw-04(config)#enable password test /设口令bg-sw-04(config)#enable secret testbg-sw-04(config)#banner motd % Welcome to the C3548 in the Office % /提示文本bg-sw-04(config)#line vty 0 4 / 进入VTY 模式bg-sw-04(config.line)#login / 登入提示bg-sw-04(config.line)#password test / 设用户级口令bg-sw-04(config.line)#exit / 进入内部管理接口bg-sw-04(config)#int vlan 1bg-sw-04(config-if)#ip address 10.234.180.24 255.255.255.0 bg-sw-04(config-if)#exitbg-sw-04(config)#ip default.gateway 10.234.180.234bg-sw-04(config)#endbg-sw-04#vlan databasebg-sw-04(vlan)#vtp domain Corp_Netbg-sw-04(vlan)#vtp clientbg-sw-04(vlan)#exitbg-sw-04(config)#spantree uplinkfastbg-sw-04(config)#int g0/1bg-sw-04(config-if)#switchport mode trunkbg-sw-04(config-if)#switchport trunk encapsulation dot1q bg-sw-04(config-if)#switchport trunk allowed vlan allbd-sw-03 (config-if)# spanning-tree portfastbg-sw-04(config-if)#exitbg-sw-04(config)#int g0/2bg-sw-04(config-if)#switchport mode trunkbg-sw-04(config-if)#switchport trunk encapsulation dot1q bg-sw-04(config-if)#switchport trunk allowed vlan allbg-sw-04(config-if)#spanning-tree portfastbg-sw-04(config-if)#exitbg-sw-04#write memory3.2 办公楼Catalyst 3548XL交换机配置方案switch#configure terminalEnter configuration commands, one per line. End with CNTL/Z.switch(config)#hostname zsr-sw-01zsr-sw-01(config)#enable password testzsr-sw-01(config)#enable secret testzsr-sw-01(config)#banner motd % Welcome to the C3548 in the Zhong San Lu ban GongLou %zsr-sw-01(config)#line vty 0 4zsr-sw-01(config.line)#loginzsr-sw-01(config.line)#password testzsr-sw-01(config.line)#exitzsr-sw-01(config)#int vlan 1zsr-sw-01(config-if)#ip address 10.234.180.25 255.255.255.0 zsr-sw-01(config-if)#exitzsr-sw-01(config)#ip default.gateway 10.234.180.234zsr-sw-01(config)#endzsr-sw-01#vlan databasezsr-sw-01(vlan)#vtp domain Corp_Netzsr-sw-01(vlan)#vtp clientzsr-sw-01(vlan)#exitzsr-sw-1#configure terminalzsr-sw-1(config)#int f0/1zsr-sw-1(config-if)#switchport mode accesszsr-sw-1(config-if)#switchport access vlan 31zsr-sw-1(config-if)#exitzsr-sw-1(config)#int f0/2。
思科配置交换机并在pc上通过telnet管理
思科配置交换机并在pc上通过telnet管理想在思科配置交换机并在pc 上通过telnet 管理,那么如何思科配置交换机并在 pc 上通过 telnet 管理呢?下面是店铺收集整理的思科配置交换机并在 pc 上通过 telnet 管理,希望对大家有帮助~~思科配置交换机并在 pc 上通过 telnet 管理工具/原料电脑一台思科模拟器一个方法/步骤添加一个交换机和一台PC,用直通线构建拓扑,确保设备已经正确运行(其实就是线变成绿色的啦)现在开始配置交换机。
单击交换机,出现swich0的界面,选择左上角的命令行按一下enter键,输入Switch >enable,从用户执行模式切换到特权执行模式Switch #configure terminal,从特权执行模式切换到全局配置模式Switch(config)#hostname ipdata,配置交换机名称,比如ipdataipdata(config)#interface vlan 1,进入 Vlan1 接口配置模式ipdata(config-if)#ip address 10.10.10.1 255.255.255.0,配置交换机管理 ip 地址 10.10.10.1ipdata(config-if)#no shutdown,激活 Vlan1ipdata(config-if)#exitipdata(config)#line vty 0 15,进入虚拟终端线路配置模式ipdata(config-line)#password ipdataccna,;配置虚拟终端密码ipdata(config-line)#login,设置登录密码校验模式ipdata(config-line)#exitipdata(config)#enable secret 0 ipdataccna,配置 enable 特权密码如ipdataccnaipdata(config)#exitipdata#write保存配置,如图就配置好了最后,设置PC ip地址为10.10.10.2,在命令提示符里ping交换机的ip10.10.10.1,如图所示,就说明配置OK网联通了思科配置交换机并在 pc 上通过 telnet 管理。
思科交换机双机热备模式怎么使用

思科交换机双机热备模式怎么使用交换机除了能够连接同种类型的网络之外,还可以在不同类型的网络(如以太网和快速以太网)之间起到互连作用。
为了防止核心交换机出现故障就会导致全网瘫痪,我们可以采用双机热备模式,下面我们就来看看详细的教程,需要的朋友可以参考下方法步骤1、打开Cisco Packet Tracer,点击【交换机】,选择2960交换机,按住鼠标左键拖动到工作区。
这里有很多类型的交换机,其它类型的天使以后慢慢和大家讲解。
2、我们选择【终端设备】拖动两台台式机到工作区,用于测试通信3、最后用直通线连接交换机和电脑,对核心交换机进行双冗余设计4、分别设置两台主机的IP地址,主机0为:192.168.1.1;主机1为:192.168.1.25、在主机1上进行Ping测试,ping 192.168.1.1,发现是连通的6、假如现在我们核心交换机坏了一个,我们交换机双机热备,数据包可以走另外一个交换机,两台客户机没有受到任何的干扰7、我们假设核心交换机0坏了,就相当于所有连接核心交换机的线路都断了,这时任然不影响主机之间的通信相关阅读:交换机工作原理过程交换机工作于OSI参考模型的第二层,即数据链路层。
交换机内部的CPU会在每个端口成功连接时,通过将MAC地址和端口对应,形成一张MAC表。
在今后的通讯中,发往该MAC地址的数据包将仅送往其对应的端口,而不是所有的端口。
因此,交换机可用于划分数据链路层广播,即冲突域;但它不能划分网络层广播,即广播域。
交换机拥有一条很高带宽的背部总线和内部交换矩阵。
交换机的所有的端口都挂接在这条背部总线上,控制电路收到数据包以后,处理端口会查找内存中的地址对照表以确定目的MAC(网卡的硬件地址)的NIC(网卡)挂接在哪个端口上,通过内部交换矩阵迅速将数据包传送到目的端口,目的MAC若不存在,广播到所有的端口,接收端口回应后交换机会“学习”新的MAC地址,并把它添加入内部MAC地址表中。
CISCO交换机(路由器)导入配置文件方法

CISCO交换机(路由器)导入配置文件方法luckyxh@ 2012/1/181、交换机加电启动2、交换机未初始化配置时(如交换机已初始化,可跳过此步),通过putty (或超级终端)串口登录交换机(串口配置参数:速率9600、数据位8、停止位1、奇偶校验位无):笔记本通过串口线连接交换机console口。
Continue with configuration dialog? [yes/no]: no 输入no,取消配置对话cisco-2960g-new> 进入用户模式状态cisco-2960g-new>enable输入enablePassword: <- - 此处输入特权模式密码(新机器为空,不用输;已初始化机器默认为chlink)cisco-2960g-new# 进入特权模式模式态cisco-2960g-new#configure terminal <- 输入configure terminalcisco-2960g-new (config)# 进入全局配置模式cisco-2960g-new (config)# interface vlan 1 <- 输入interface vlan 1cisco-2960g-new (config-if)# ip address 192.168.0.1 255.255.255.0<- 配置vlan 1端口地址cisco-2960g-new (config-if)# no shutdow n 输入命令激活vlan 1端口cisco-2960g-new (config-if) )#exit 输入exit命令,退回上一级cisco-2960g-new (config) )#exit 输入exit命令,退回上一级cisco-2960g-new#write 输入write保存配置3、通过TELNET 登录交换机:配置笔记网卡地址(如192.168.0.111),使之可以直连或路由到交换机端口地址,用网线(直通线)连接笔记本网卡及交换机vlan端口(默认选第一个以太网口)telnet 192.168.0.1(在DOS 命令提示符下输入telnet 命令或通过putty选择telnet类型登录;192.168.0.1对应的是交换机机端口地址)User Access VerificationPassword: <- - 此处输入VTY密码,默认为chlinkcisco-2960g-new> 进入用户模式状态cisco-2960g-new>enable输入enablePassword: <- - 此处输入特权模式密码,默认为chlinkcisco-2960g-new# 进入特权模式状态4、COPY配置文件启动tftp32软件,将原先备份的配置文件拷贝到tftp32运行文件夹(默认在同级目录,也可能为自定义目录)在前面的登录窗口下cisco-2960g-new#copy tftp startup <- -输入copy命令Address or name of remote host []?192.168.0.111 <- -输入笔记本网卡地址Source filename []?cisco-2960g-new-confg <- -输入配置文件名5、重启设备cisco-2960g-new#reload <- -输入reload命令重启设备,注意不要保存配置,以免startup配置文件被当前运行的running文件所覆盖。
思科交换机6509的配置方法
清除vlanzhaozhou-6006 (enable) clear vlan 400This command will deactivate all ports on vlan 400in the entire management domainDo you want to continue(y/n) [n]?yVlan 400 deletedzhaozhou-6006 (enable)保存配置zhaozhou-6006 (enable) copy config 2Upload configuration to bootflash:211395136 bytes available on device bootflash, proceed (y/n) [n]? y.................................................Configuration has been copied successfully.zhaozhou-6006 (enable) sh flash-#- ED --type-- --crc--- -seek-- nlen -length- -----date/time------ name1 .. ffffffff 671e2eaa 49e1e4 25 4579681 Dec 02 1999 19:44:41 cat6000-sup.5-3-2-CSX.bin2 .. ffffffff 8bce2df9 4a1f40 6 15578 Oct 22 2001 17:54:41 zz60063 .. ffffffff bbf1e548 4a7c94 1 23762 Apr 05 2006 10:19:22 211371372 bytes available (4619412 bytes used)zhaozhou-6006 (enable) copy config flashFlash device [bootflash]?Name of copy to []? dqtvnet2006Upload configuration to bootflash:dqtvnet200611371244 bytes available on device bootflash, proceed (y/n) [n]? y.................................................Configuration has been copied successfully.zhaozhou-6006 (enable)删除带有名字的vlanzhaozhou-6006 (enable) copy config 2Upload configuration to bootflash:211395136 bytes available on device bootflash, proceed (y/n) [n]? y.................................................Configuration has been copied successfully.zhaozhou-6006 (enable) sh flash-#- ED --type-- --crc--- -seek-- nlen -length- -----date/time------ name1 .. ffffffff 671e2eaa 49e1e4 25 4579681 Dec 02 1999 19:44:41 cat6000-sup.5-3-2-CSX.bin2 .. ffffffff 8bce2df9 4a1f40 6 15578 Oct 22 2001 17:54:41 zz60063 .. ffffffff bbf1e548 4a7c94 1 23762 Apr 05 2006 10:19:22 211371372 bytes available (4619412 bytes used)zhaozhou-6006 (enable) copy config flashFlash device [bootflash]?Name of copy to []? dqtvnet2006Upload configuration to bootflash:dqtvnet200611371244 bytes available on device bootflash, proceed (y/n) [n]? y.................................................Configuration has been copied successfully.zhaozhou-6006 (enable)查看端口命令zhaozhou-6006 (enable) sh intsl0: flags=51<UP,POINTOPOINT,RUNNING>slip 0.0.0.0 dest 0.0.0.0sc0: flags=63<UP,BROADCAST,RUNNING>vlan 100 inet 221.209.150.82 netmask 255.255.255.248 broadcast 221.209.150.87 zhaozhou-6006 (enable)通过命令设置多个端口vlanzhaozhou-6006 (enable) set vlan 1 2/1-48VLAN 1 modified.VLAN 100 modified.VLAN Mod/Ports---- -----------------------1 2/1-485/1-48zhaozhou-6006 (enable)vtp清除#vtpset vtp domain zxstkset vtp mode serverset vtp v2 disableset vtp pruning disableset vtp pruneeligible 2-1000clear vtp pruneeligible 1001-1005set vlan 1 name default type ethernet mtu 1500 said 100001 state activeset vlan 1002 name fddi-default type fddi mtu 1500 said 101002 state activeset vlan 1004 name fddinet-default type fddinet mtu 1500 said 101004 state active bridge 0x0 stp ieeeset vlan 1005 name trnet-default type trbrf mtu 1500 said 101005 state active bridge 0x0 stp ibm set vlan 1003 name token-ring-default type trcrf mtu 1500 said 101003 state active parent 0 ring 0x0 mode srb aremaxhop 0 stemaxhop 0!#ipset interface sc0 100 221.209.150.82/255.255.255.248 221.209.150.87set interface sc0 upzhaozhou-6006 (enable) clear vtp domain zxstkUsage: clear vtp statisticsclear vtp pruneeligible <vlans..>(vlans: 1..1005An example of vlans is 2-10,1005)zhaozhou-6006 (enable) clear vtp pruneeligible 2-1000Vlans 1-1005 will not be pruned on this device.VTP domain zxstk modified.zhaozhou-6006 (enable)设置vtp模式透明zhaozhou-6006 (enable) set vtp mode ?Usage: set vtp [domain <name>] [mode <mode>] [passwd <passwd>][pruning <enable|disable>] [v2 <enable|disable>(mode = client|server|transparentUse passwd '0' to clear vtp password)Usage: set vtp pruneeligible <vlans>(vlans = 2..1000An example of vlans is 2-10,1000)zhaozhou-6006 (enable) set vtp mode transparentVTP domain zxstk modifiedzhaozhou-6006 (enable)设置端口汇聚zhaozhou-6006 (enable) set trunk ?Usage: set trunk <mod_num/port_num> [on|off|desirable|auto|nonegotiate] [vlans] [trunk_type] (vlans = 1..1005An example of vlans is 2-10,1005)(trunk_type = isl,dot1q,dot10,lane,negotiate)zhaozhou-6006 (enable) set trunk 2/3 on 1-400Adding vlans 1-400 to allowed list.Please use the 'clear trunk' command to remove vlans from allowed list.Port(s) 2/3 allowed vlans modified to 1-1005.Failed to set port 2/3 to trunk mode on.Trunk mode 'on' not allowed with trunk encapsulation type 'negotiate'.zhaozhou-6006 (enable) set trunk 2/3 on 1-400 dot1qAdding vlans 1-400 to allowed list.Please use the 'clear trunk' command to remove vlans from allowed list.Port(s) 2/3 allowed vlans modified to 1-1005.Port(s) 2/3 trunk mode set to on.Port(s) 2/3 trunk type set to dot1q.zhaozhou-6006 (enable)。
思科交换机与PC机物理连接和操作

408网络异构实训室思科交换机与PC机物理连接和操作刘祥荣目录一、前言 ................................. - 1 -二、工作准备 ............................. - 2 -三、操作步骤 ............................. - 3 -四、注意事项 ............................ - 11 -五、延伸 ................................ - 12 -一、前言在网络如此发达的时代,交换机起着重要的作用:学习、转发数据包、清除第二层环路。
傻瓜式交换机只能满足小型公司、家庭用户的需求。
傻瓜式的交换机功能少,不能进行手工的配置,满足不了大型公司流量需求。
本文主要介绍思科交换机和PC机之间的物理连接方法以及操作。
二、工作准备1、Console线(反转线rollover):用于连接思科交换机和PC机。
2、超级终端(Hyper Terminal)或者Secure CRT:这些软件用来进行配置交换机。
(本文用Secure CRT操作)3、网线(直通线)三、操作步骤第一步:将console线的RJ-45端口插入思科交换机的Console端口;第二步:将console线的另一端插入PC的COM 口;第三步:插入思科交换机的电源线,并通电。
第四步:双击打开Secure CRT软件,按【文件】-【快速连接】第五步:在协议一栏,点击黑色下三角▼,选择【Serial】设置相关参数:端口选择【COM1】(至于是COM1还是COM2,要视具体情况而定,这里选择COM1);波特率选择【9600】(因为这是串口的最高通信速率);数据位为【8】;奇偶校验【None】;停止位【1】。
最后按【确定】如下图所示,则表示连接成功。
第六步:把网线的一端插入交换机的下行接口,另一端插入桌面的B端口;其他主机的网线都要插进桌面的B端口。
思科交换机本地导配置的方法
思科交换机本地连接导出配置的方法
一、准备工作
1、电脑一台,最好是笔记本电脑,因为方便携带。
并且,在电脑中装有软件,并且,
安装USB转串口的驱动。
2、准备一根console线
二、链接需要导出配置的思科交换机
1、将console线的USB口插到电脑上,将另一端插到交换机的console口上,这样,物理
连接就已经完成。
2、物理连接完成时,电脑上就会提示安装驱动程序,将USB转串口的安装即可,在此就不
细说安装此驱动的具体步骤。
3、驱动安装完成以后,查看对应的端口是多少,并且记住端口号。
4、打开,(注意,软件要是第一次在此电脑上使用,有些新手会不明白此时的状况,因
为此时你可能没有将软件完全安装成功,只要在安装软件的文本文档中找到相应的秘钥按提示安装即可。
)
5、打开软件以后点击图标,也就是工具上的第二个图标,就会提示,此
时选择protocol为serial即为本地连接;选择port为前面安装驱动时电脑的端口号,一定要对应此端口,否则电脑和交换机之间是无法连接的;baud rate为9600;RTS/CTS前面的沟去掉,其它的为默认即可,点击connect连接即可。
三、导出配置
1、此时出现页面,点击“file”选择“log session”就会让我们选择文件的名称,和保存的
路径在哪。
2、回到界面上点击回车,输入“show runn”点击空格键,直到所有的配置显示完毕。
3、关闭软件时,打开保存的文件夹就会有刚刚导出的配置。
6509 VLAN配置

cisco6509系列交换机配置1. 6509介绍Cisco Catalyst 6500系列交换机提供3插槽、6插槽、9插槽和13插槽的机箱,以及多种集成式服务模块,包括数千兆位网络安全性、内容交换、语音和网络分析模块。
Catalyst 6500系列中的所有型号都使用了统一的模块和操作系统软件,形成了能够适应未来发展的体系结构,由于能提供操作一致性,因而能提高IT基础设施的利用率,并增加投资回报。
从48端口到576端口的10/100/1000以太网布线室到能够支持192个1Gbps或32个10Gbps骨干端口,提供每秒数亿个数据包处理能力的网络核心,Cisco Catalyst6500系列能够借助冗余路由与转发引擎之间的故障切换功能提高网络正常运行时间。
提高网络正常运行时间,提高网络弹性。
提供数据包丢失保护,能够从网络故障中快速恢复。
能够在冗余控制引擎间实现快速的1~3秒状态故障切换。
提供可选的高性能Cisco Catalyst 6500系列Supervisor Engine 720、无源背板、多引擎的冗余;并可利用CiscoEtherChannel?技术、IEEE 802.3ad链路汇聚、IEEE802.1s/w和热备份路由器协议/虚拟路由器冗余协议(HSRP/VRRP)达到高可用性不需要部署外部设备,直接在6500机箱内部署集成式的千兆位的网络服务模块,以简化网络管理,降低网络的总体成本。
这些网络服务模块包括:l 千兆位防火墙模块--提供接入保护l 高性能入侵检测系统(IDS)模块--提供入侵检测保护l 千兆位网络分析模块--提供可管理性更高的基础设施和全面的远程超级(RMON)支持l 高性能SSL模块--提供安全的高性能电子商务流量l 千兆位VPN和基于标准的IP Security(IPSec)模块--降低的互联网和内部专网的连接成本。
集成式内容交换模块(CSM)能够为Cisco Catalyst 6500系列提供功能丰富的高性能的服务器和防火墙网络负载平衡连接,以提高网络基础设施的安全性、可管理性和强大控制基于网络的应用识别(NBAR)等软件特性可提供增强网络管理和QoS控制机制。
- 1、下载文档前请自行甄别文档内容的完整性,平台不提供额外的编辑、内容补充、找答案等附加服务。
- 2、"仅部分预览"的文档,不可在线预览部分如存在完整性等问题,可反馈申请退款(可完整预览的文档不适用该条件!)。
- 3、如文档侵犯您的权益,请联系客服反馈,我们会尽快为您处理(人工客服工作时间:9:00-18:30)。
为了:
1。
配置好一台后,可以把相同的配置复制到其他交换机中。
2。
以后交换机出问题,可以轻松恢复
使用tftp软件:以思科为例:
一.启动TFTP服务器
Win 95/98环境下启动TFTP Serve r的方法很简单,只要执行TFTP
二.备份路由器用户配置
在路由器主控终端上执行copy running-config tftp命令,并按系统提示逐步输入有关信息,具体操作步骤如下:
1.执行命令:
route#copy runni ng-config tftp (把路由器当时运行的配置文件写到TFTP Serve r上)
2.系统提示:Remote host []?
输入:11.66.81.88 (TFTP Serve r的IP地址或主机名)
3.系统提示:Name of configuration file to write [route-config]?
输入:ciscoconf (备份用户配置文件的文件名,此处也可直接回车,即使用缺省的route-confi g作为用户配置的文件名) 4.系统提示:Write file conf-ciscoconf on host 11.66.81.88? [confirm]
这一步是让用户确认主机名或主机的IP地址是否正确。
如显示信息正确则直接回车,这时系统开始备份用户配置文件并显示如下信息:
Building configuration...
Writing route-config !!![OK]
此处需要强调的是,在执行备份的过程中,认真观察路由器的备份过程,必须保证每个包都成功保存,即Writing route-config 与[OK]之间必须都是“!”号,否则最好重写一次。
另外,在备份结束后,最好用文本编辑软件打开备份文件,确认备份是否成功。
配置恢复的方法与备份的方法基本相同,只是恢复的命令不同,配置恢复的命令如下:
route#copy tftp startup-config
直接的方法就是直接拷贝就行啦!把他粘贴在记事本也可以~!如果是配置同样的路由的话:只要把刚才粘贴好的拷贝到配置终端就OK!。
