Masterflex 4折页
四折页设计模板

四折页设计模板四折页设计模板是一种常用的宣传工具,适用于各种场合,如企业宣传、产品介绍、活动推广等。
它的设计灵活多样,可以根据需求进行个性化定制,同时也能够有效地传达信息,吸引读者的注意力。
下面将介绍一种常见的四折页设计模板。
首先,四折页设计模板通常采用A4纸张大小,折叠成八个等分的小格子。
每个小格子都有自己的内容,可以根据需要进行排版和设计。
在设计模板时,可以将整个四折页分为四个主要部分:封面、目录、内容和背面。
封面是四折页的第一页,它需要吸引读者的眼球,激发他们的兴趣。
可以在封面上使用醒目的标题和图片,突出宣传的主题。
同时,还可以在封面上添加企业或品牌的Logo,增加宣传的专业性和可信度。
目录是四折页的第二页,它可以帮助读者快速了解整个内容结构。
在目录中,可以列出各个小格子的标题和页码,方便读者查找感兴趣的内容。
同时,还可以在目录中添加一些简短的介绍,引导读者进一步阅读。
内容是四折页的核心部分,它包含了详细的信息和宣传内容。
每个小格子都可以用来展示一个主题或一个产品。
在设计内容时,可以使用图文并茂的方式,结合文字和图片,使得信息更加生动有趣。
同时,还可以使用不同的字体、颜色和排版方式,突出重点和层次感。
背面是四折页的最后一页,它可以用来总结和强调宣传的重点。
在背面上,可以再次使用企业或品牌的Logo,以及联系方式,方便读者与企业进行进一步的沟通和合作。
同时,还可以添加一些宣传语或口号,增加宣传的记忆度和影响力。
在使用四折页设计模板时,需要注意以下几点。
首先,要保持整体的统一性和一致性,包括颜色、字体、排版等方面。
其次,要注意信息的简洁明了,避免过多的文字和图片,以免造成信息过载。
最后,要注意版面的布局和比例,使得整个四折页看起来美观大方。
总之,四折页设计模板是一种简单实用的宣传工具,可以帮助企业和个人有效地传达信息和推广产品。
通过合理的设计和排版,可以吸引读者的注意力,提高宣传的效果。
希望以上介绍的四折页设计模板能够对您有所帮助。
设计尺寸
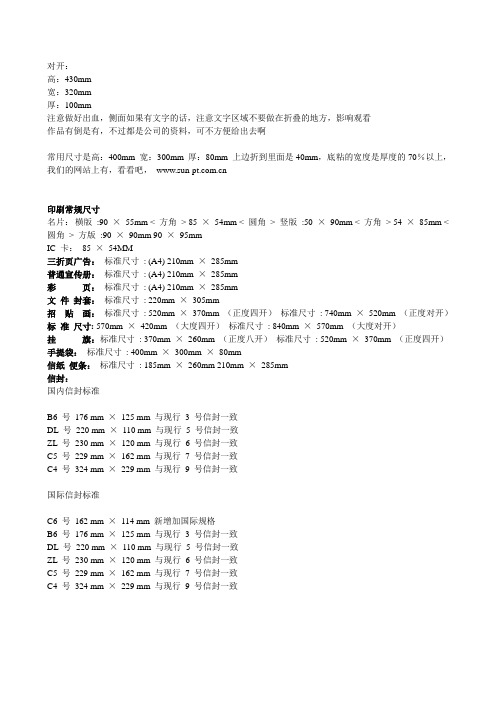
对开:高:430mm宽:320mm厚:100mm注意做好出血,侧面如果有文字的话,注意文字区域不要做在折叠的地方,影响观看作品有倒是有,不过都是公司的资料,可不方便给出去啊常用尺寸是高:400mm 宽:300mm 厚:80mm 上边折到里面是40mm,底粘的宽度是厚度的70%以上,我们的网站上有,看看吧,印刷常规尺寸名片:横版:90 ×55mm < 方角> 85 ×54mm < 圆角> 竖版:50 ×90mm < 方角> 54 ×85mm < 圆角> 方版:90 ×90mm 90 ×95mmIC 卡:85 ×54MM三折页广告:标准尺寸: (A4) 210mm ×285mm普通宣传册:标准尺寸: (A4) 210mm ×285mm彩页:标准尺寸: (A4) 210mm ×285mm文件封套:标准尺寸: 220mm ×305mm招贴画:标准尺寸: 520mm ×370mm (正度四开)标准尺寸: 740mm ×520mm (正度对开)标准尺寸: 570mm ×420mm (大度四开)标准尺寸: 840mm ×570mm (大度对开)挂旗:标准尺寸: 370mm ×260mm (正度八开)标准尺寸: 520mm ×370mm (正度四开)手提袋:标准尺寸: 400mm ×300mm ×80mm信纸便条:标准尺寸: 185mm ×260mm 210mm ×285mm信封:国内信封标准B6 号176 mm ×125 mm 与现行3 号信封一致DL 号220 mm ×110 mm 与现行5 号信封一致ZL 号230 mm ×120 mm 与现行6 号信封一致C5 号229 mm ×162 mm 与现行7 号信封一致C4 号324 mm ×229 mm 与现行9 号信封一致国际信封标准C6 号162 mm ×114 mm 新增加国际规格B6 号176 mm ×125 mm 与现行3 号信封一致DL 号220 mm ×110 mm 与现行5 号信封一致ZL 号230 mm ×120 mm 与现行6 号信封一致C5 号229 mm ×162 mm 与现行7 号信封一致C4 号324 mm ×229 mm 与现行9 号信封一致本文主要偏向于平面设计方向,总结设计、平面设计的知识结构,平面设计的技巧,平面设计的设计元素,平面设计的手法,平面设计的风格等等。
画册报价表
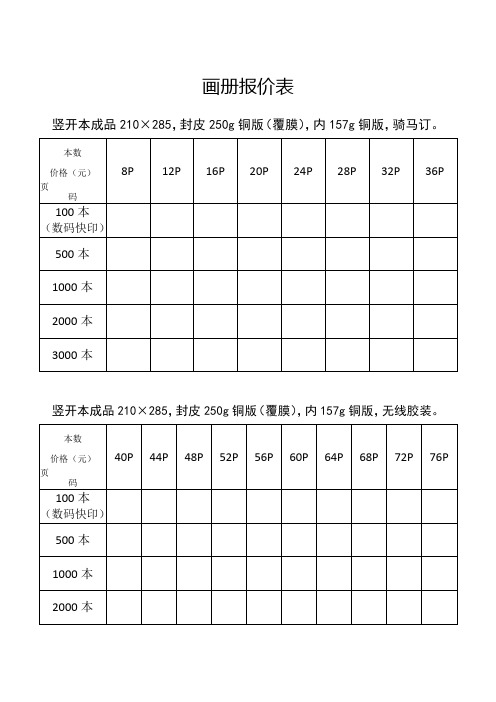
画册报价表竖开本成品210×285,封皮250g铜版(覆膜),内157g铜版,骑马订。
竖开本成品210×285,封皮250g铜版(覆膜),内157g铜版,无线胶装。
骑马钉画册价格表胶装画册价格表单黑白画册价格表精装书价格表精装书价格表钉装菜谱、照片书价格表打码点线价格表门票、折扣券、代金券、优惠券、入场券、抵用券(多款模板供您选择)彩页价格表二折页/三折页,每张加折页费0.008元,起价30元(110克/130克/157克纸张)海报价格表全张海报860×1180,单面印刷,纸张是标准足克重纸张。
正度四开520×370,单面印刷,纸张标准足重纸张。
大度四开570×420,单面印刷,纸张是标准足克重纸张。
正度对开760×520,单面印刷,纸张是标准足克重纸张。
大度对开860×570,单面印刷,纸张是标准足克重纸张。
稿纸、便签本80克双胶纸/单面印/彩色/短边刷透明胶/100张每本。
装纸箱注:不刷胶也是此价格。
如需封皮:每本另加0.4元,50元起。
封皮默认157克铜版纸/单面印/单面亚膜或高膜,如需塑封:每本另加0.2元,50元起。
名片超厚铜版纸名片价格彩色名片价格(普通铜版纸张)带后工名片价格=正常名片价格+名片后工加工费价格更多工艺名片咨询接单员精品名片价格表PVC类价格表设计尺寸:88.5×57mm02 0.76磁条卡条列03 0.76会员卡系列04 0.76会员卡全新系列05 机器和软件价格06 0.84芯片卡系列07 0.84全新料系列08 胸牌系列09 接比镭射金箔名片系列10 金属卡系列以下工艺需另外加价:1、腐蚀号码加收0.2/张(中间可以缺号,往后延号)。
2、正反面颜色4色以上,每超一色加收0.2/张。
3、大面积印油卡加0.2/面,印到边加0.7/面。
4、磁条卡加0.5元/张。
5、条码卡、刮刮码加0.5元/张。
印刷专业用语 中英
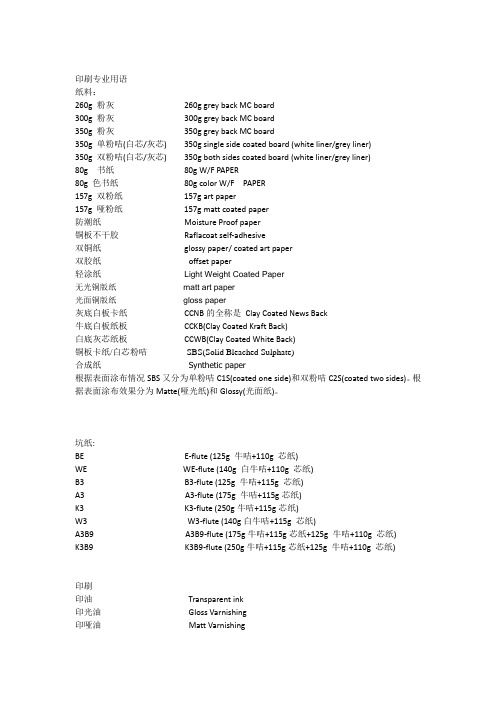
印刷专业用语纸料:260g 粉灰260g grey back MC board300g 粉灰300g grey back MC board350g 粉灰350g grey back MC board350g 单粉咭(白芯/灰芯) 350g single side coated board (white liner/grey liner)350g 双粉咭(白芯/灰芯) 350g both sides coated board (white liner/grey liner)80g 书纸80g W/F PAPER80g 色书纸80g color W/F PAPER157g 双粉纸157g art paper157g 哑粉纸157g matt coated paper防潮纸Moisture Proof paper铜板不干胶Raflacoat self-adhesive双铜纸glossy paper/ coated art paper双胶纸offset paper轻涂纸Light Weight Coated Paper无光铜版纸matt art paper光面铜版纸gloss paper灰底白板卡纸CCNB的全称是Clay Coated News Back牛底白板纸板CCKB(Clay Coated Kraft Back)白底灰芯纸板CCWB(Clay Coated White Back)铜板卡纸/白芯粉咭SBS(Solid Bleached Sulphate)合成纸Synthetic paper根据表面涂布情况SBS又分为单粉咭C1S(coated one side)和双粉咭C2S(coated two sides)。
根据表面涂布效果分为Matte(哑光纸)和Glossy(光面纸)。
坑纸:BE E-flute (125g 牛咭+110g 芯纸)WE WE-flute (140g 白牛咭+110g 芯纸)B3 B3-flute (125g 牛咭+115g 芯纸)A3 A3-flute (175g 牛咭+115g芯纸)K3 K3-flute (250g牛咭+115g芯纸)W3 W3-flute (140g白牛咭+115g 芯纸)A3B9 A3B9-flute (175g牛咭+115g芯纸+125g 牛咭+110g 芯纸)K3B9 K3B9-flute (250g牛咭+115g芯纸+125g 牛咭+110g 芯纸)印刷印油Transparent ink印光油Gloss Varnishing印哑油Matt Varnishing印专色Printed in spot color表面处理磨光Calendaring磨光吸塑油Blister-calendaring varnish过光油Varnishing过水油Aqueous coating水性磨光油Water Based calendaring水溶性光油Water based varnishing过双面光油Double sides varnishing过UV UV-coating局部UV Spot UV-coating过胶PP lamination过光胶Gloss lamination过哑胶Matt PP lamination双面过胶PP lamination on both sides水性光油(环保材料)satin aqueous裱纸裱Laminated对裱Laminated 2 in 1啤工啤Die cutting啤针线Perforation击凸Emblossing/High Frequency Gold Blocking 烫金Hot stamping (Gold in color)烫银Hot stamping (silver in color)烫哑银Matt silver hot stamping埋口粘Gluing钉Stapling粘驳Jointed 2 in 1 by gluing钉驳Jointed 2 in 1 by stapling粘窗Window size ? x ? mounted with PVC#制本穿线Looped with string胶装Thermoplastic binding= Perfect bound骑钉Saddle- wire stitching折Folding风琴折Zigzag folding涂信封胶水Envelope keeping其它挂钩Pothook丝印Silk-screen钻孔Drilling表面处理光漆处理Aqueous Coating压纹, 轧花, 压花Embossing柔性版印刷Flexo Printinggravure printing: 凹版印刷| 腐蚀凹版印刷| 凸版印刷| 凹板印花gravure intaglio printing: 凹版印刷gravure offset printing press: 凹版胶印机Hot Stamping 烫印Offset Printing 胶版印刷,平板印刷Screen Printing 丝网印刷Varnishing 淋膜封口方式和提手类型Shoulder Length Handle 手提,手挽Heat Seal (塑料薄膜袋)热封(口), 熔接, 熔焊Patch Handle 补丁袋(就是袋子中间有个长椭圆孔,没有手腕带的)Self Adhesive Seal 自密封胶Spout Top 顶喷Vest Handle (胶袋那种手挽方式)Zipper Top 拉链包装材料类: Packaging Materials -Kraft liner(KL): 纯牛卡,100%纯木桨组成,耐破,环压性能优秀,而且耐潮性极佳,一般用于瓦楞纸板面纸。
【Formlabs打印机使用绝招】解决翘边问题,拉丝问题

【Formlabs打印机使用绝招】解决翘边问题,拉丝问题3D打印时最头痛的两大问题,第一就是平台不平或轴微微弯曲,这样照成料与地板不容易粘合,第一层总是无法打印,或打印几层后发现翘边现象。
第二打印时,如果物件与物件的间隙很近的话,比如1MM-50MM的空隙间,那两个物件连接处有很多丝,很难看,事后需要用刀处理。
这两个问题困扰我很长时间,本人尝试了各种方法,发现最好的两种方法与广大3D 打印爱好者分享。
先说第一个问题,防止翘边或第一层不粘和问题,
一种方法是在市场上买一种叫190光油的东西,我买时9块钱一瓶,是自喷漆那种。
不要直接喷到平台上,要买一块透明的玻璃,喷完之后的效果
第二种方法是,直接买一块磨砂玻璃,要求3MM厚度最好,如果2MM和5MM都因为太薄和太厚受热不均而炸掉,我的大小是260*360.用夹子固定在平台上。
最好与平台
一样大小。
打印时如果平台带加热功能,建议用磨砂玻璃,温度加热到70度使用,效果非常完美。
如果喷嘴与平台间距不均匀,时大时小,那就用最小间距,可以喷嘴与平台贴上没关系,因为是玻璃的,不会坏,也不影响打印粘合等。
如果平台不带加热功能,建议用190光油,喷到透明玻璃上,等干后使用。
第一问题完毕。
第二解决物件间的拉丝问题。
其中两点需要解决,第一把送料管的距离缩短,如果送料器在边缘,请挪到中间去。
用手钻给金属或木质箱体打螺丝孔
之后再市场上找那种内径为3.3MM的塑料管,一般是液压设备那会卖。
之后要处理的尽量短一些。
PowerFlex 750-Series 板子替换套件指南说明书

Installation InstructionsPowerFlex 750-Series Board Replacement KitsFrames 6 and 7These installation instructions support the following board replacement kits.Board Type Drive Frame Voltage Cat. No.PageAC Precharge6400/480SK-R9-PCG1-DF62600/690SK-R9-PCG1-FF657400/480SK-R9-PCG1-DF79600/690SK-R9-PCG1-FF713DC Precharge6400/480SK-R9-PCG2-DF62600/690SK-R9-PCG2-FF657400/480SK-R9-PCG2-DF79600/690SK-R9-PCG2-FF713Power Interface6400/480SK-R9-PINT1-CF6A2SK-R9-PINT1-CF6BSK-R9-PINT1-CF6CSK-R9-PINT1-CF6DSK-R9-PINT1-DF6ASK-R9-PINT1-DF6BSK-R9-PINT1-DF6CSK-R9-PINT1-DF6D600SK-R9-PINT1-EF6A5SK-R9-PINT1-EF6BSK-R9-PINT1-EF6CSK-R9-PINT1-EF6DSK-R9-PINT1-EF6ESK-R9-PINT1-EF6FSK-R9-PINT1-EF6GSK-R9-PINT1-EF6HSK-R9-PINT1-EF6JSK-R9-PINT1-EF6KSK-R9-PINT1-EF6MSK-R9-PINT1-EF6NSK-R9-PINT1-EF6P690SK-R9-PINT1-FF6A5SK-R9-PINT1-FF6BSK-R9-PINT1-FF6CSK-R9-PINT1-FF6DSK-R9-PINT1-FF6ESK-R9-PINT1-FF6FSK-R9-PINT1-FF6GSK-R9-PINT1-FF6HSK-R9-PINT1-FF6JSK-R9-PINT1-FF6KSK-R9-PINT1-FF6LSK-R9-PINT1-FF6MSK-R9-PINT1-FF6N7400/480SK-R9-PINT1-CF7A9SK-R9-PINT1-CF7BSK-R9-PINT1-CF7CSK-R9-PINT1-DF7ASK-R9-PINT1-DF7BSK-R9-PINT1-DF7C600SK-R9-PINT1-EF7A13SK-R9-PINT1-EF7BSK-R9-PINT1-EF7C690SK-R9-PINT1-FF7A13SK-R9-PINT1-FF7BSK-R9-PINT1-FF7C2PowerFlex 750-Series Board Replacement KitsPowerFlex 750-Series Board Replacement Kits3 400/480V Frame 6 Drives – AC and DC Precharge BoardsSK-R9-PCG1-DF6, SK-R9-PCG2-DF6ATTENTION: Hazard of equipment damage exists if any board connector is not in full contact with its correspondingsocket when power is applied. When installing the replacement board, carefully align and fully seat the pin connector(s),plug in the control cable, be sure the PE-A jumper wire is properly terminated (AC Precharge Boards only), and install allfasteners and torque as indicated.4PowerFlex 750-Series Board Replacement Kits400/480V Frame 6 Drives – Power Interface Board400V: SK-R9-PINT1-CF6A, -CF6B, -CF6C, -CF6D / 480V: SK-R9PINT1-DF6A,-DF6B, -DF6C, -DF6DATTENTION: Replacing the Power Interface Board will result in the loss of drive data including elapsed powerconsumption, elapsed run times, and preventive maintenance data.ATTENTION: Hazard of equipment damage exists if any board connector is not in full contact with its correspondingsocket when power is applied. When installing the replacement board, be sure the pin connector is aligned, all plugs arefully seated, the PE-B jumper wire is properly terminated, and all fasteners are installed and torqued as indicated.PowerFlex 750-Series Board Replacement Kits56PowerFlex 750-Series Board Replacement Kits600/690V Frame 6 Drives – AC and DC Precharge BoardsSK-R9-PCG1-FF6, SK-R9-PCG2-FF6page5.ATTENTION: Hazard of equipment damage exists if any board connector is not in full contact with its correspondingsocket when power is applied. When installing the replacement board, carefully align and fully seat the pin connector(s),plug in the control cable, be sure the PE-A jumper wire is properly terminated (AC Precharge Boards only), and install allfasteners and torque as indicated.PowerFlex 750-Series Board Replacement Kits7 600/690V Frame 6 Drives – Power Interface Boards600V: SK-R9-PINT1-EF6A, -EF6B, -EF6C, -EF6D, -EF6E, -EF6F, -EF6G, -EF6H, -EF6J, -EF6K, -EF6M, -EF6N, -EF6P690V: SK-R9-PINT1-FF6A, -FF6B, -FF6C, -FF6D, -FF6E, -FF6F, -FF6G, -FF6H, -FF6J, -FF6K, -FF6L, -FF6M, -FF6NATTENTION: Hazard of equipment damage exists if any board connector is not in full contact with its correspondingsocket when power is applied. When installing the replacement board, be sure the pin connector is aligned and all plugsare fully seated.8PowerFlex 750-Series Board Replacement Kits600/690V Frame 6 Drives – Power Interface Boards (Continued)ATTENTION: Replacing the Power Interface Boards will result in the loss of drive data including elapsed powerconsumption, elapsed run times, and preventive maintenance data.ATTENTION: Hazard of equipment damage exists if any board connector is not in full contact with its correspondingsocket when power is applied. When installing the replacement board, be sure the pin connector is aligned, all plugs arefully seated, the PE-B jumper wire is properly terminated, and all fasteners are installed and torqued as indicated.PowerFlex 750-Series Board Replacement Kits910PowerFlex 750-Series Board Replacement Kits400/480V Frame 7 Drives – AC and DC Precharge Boards SK-R9-PCG1-DF7, SK-R9-PCG2-DF7PowerFlex 750-Series Board Replacement Kits11 400/480V Frame 7 Drives – AC and DC Precharge Boards (Continued)board.ATTENTION: Hazard of equipment damage exists if any board connector is not in full contact with its correspondingsocket when power is applied. When installing the replacement board, carefully align and fully seat the pin connector(s),plug in the control cable, be sure the PE-A jumper wire is properly terminated (AC Precharge Boards only), and install allfasteners and torque as indicated.12PowerFlex 750-Series Board Replacement Kits400/480V Frame 7 Drives – Power Interface Board400V: SK-R9-PINT1-CF7A, -CF7B, -CF7C480V: SK-R9-PINT1-DF7A, -DF7B, -DF7CATTENTION: Replacing the Power Interface Board will result in the loss of drive data including elapsed powerconsumption, elapsed run times, and preventive maintenance data.ATTENTION: Hazard of equipment damage exists if any board connector is not in full contact with its correspondingsocket when power is applied. When installing the replacement board, be sure the pin connector is aligned, all plugs arefully seated, the PE-B jumper wire is properly terminated, and all fasteners are installed and torqued as indicated.PowerFlex 750-Series Board Replacement Kits 13IMPORTANT : Power Jumpers may need to be removed during this procedure. Note where the PE-A and PE-B jumper wires are terminated before disassembly. Use the same position when installing the replacement board.14PowerFlex 750-Series Board Replacement Kits600/690V Frame 7 Drives (Continued)Precharge Board replacement go to Step 3 on page15.Power Interface Board replacement go to Step 3 on page17.PowerFlex 750-Series Board Replacement Kits15 600/690V Frame 7 Drives – AC and DC Precharge Board16PowerFlex 750-Series Board Replacement Kits600/690V Frame 7 Drives – AC and DC Precharge Board (Continued)board.ATTENTION: Hazard of equipment damage exists if any board connector is not in full contact with its correspondingsocket when power is applied. When installing the replacement board, carefully align and fully seat the pin connector(s),plug in the control cable, be sure the PE-A jumper wire is properly terminated (AC Precharge Boards only), and install allfasteners and torque as indicated.PowerFlex 750-Series Board Replacement Kits17 600/690V Frame 7 – Power Interface Board600V: SK-R9-PINT1-EF7A, -EF7B, -EF7C690V: SK-R9-PINT1-FF7A, -FF7B, -FF7CATTENTION: Replacing the Power Interface Board will result in the loss of drive data including elapsed powerconsumption, elapsed run times, and preventive maintenance data.ATTENTION: Hazard of equipment damage exists if any board connector is not in full contact with its correspondingsocket when power is applied. When installing the replacement board, be sure the pin connector is aligned, all plugs arefully seated, the PE-B jumper wire is properly terminated, and all fasteners are installed and torqued as indicated.*PN-316636*PN-316636Rockwell Automation Publication RA-IN028D-EN-P - June 2015Rockwell Automation SupportRockwell Automation provides technical information on the Web to assist you in using its products.At /support you can find technical and application notes, sample code, and links to software service packs. Y ou can also visit our Support Center at https:/// for software updates, support chats and forums, technical information, FAQs, and to sign up for product notification updates.In addition, we offer multiple support programs for installation, configuration, and troubleshooting. For more information, contact your local distributor or Rockwell Automation representative, or visit /services/online-phone .Installation AssistanceIf you experience a problem within the first 24 hours of installation, review the information that is contained in this manual. You can contact Customer Support for initial help in getting your product up and running.New Product Satisfaction ReturnRockwell Automation tests all of its products to help ensure that they are fully operational when shipped from the manufacturing facility. However, if your product is not functioning and needs to be returned, follow these procedures.Documentation FeedbackY our comments will help us serve your documentation needs better. If you have any suggestions on how to improve this document, complete this form, publication RA-DU002, available at /literature/.United States or Canada 1.440.646.3434Outside United States or CanadaUse the Worldwide Locator at /rockwellautomation/support/overview.page , or contact your local Rockwell Automation representative.United States Contact your distributor. You must provide a Customer Support case number (call the phone number above to obtain one) to your distributor to complete the return process.Outside United StatesPlease contact your local Rockwell Automation representative for the return procedure.Rockwell Otomasyon Ticaret A.Ş., Kar Plaza İş Merkezi E Blok Kat:6 34752 İçerenköy, İstanbul, T el: +90 (216) 5698400Rockwell Automation maintains current product environmental information on its website at/rockwellautomation/about-us/sustainability-ethics/product-environmental-compliance.page .。
印刷专业用语中英

印刷专业用语纸料:260g 粉灰 260g grey back MC board300g 粉灰 300g grey back MC board350g 粉灰 350g grey back MC board350g 单粉咭(白芯/灰芯) 350g single side coated board (white liner/grey liner) 350g 双粉咭(白芯/灰芯) 350g both sides coated board (white liner/grey liner) 80g 书纸 80g W/F PAPER80g 色书纸 80g color W/F PAPER157g 双粉纸 157g art paper157g 哑粉纸 157g matt coated paper防潮纸 Moisture Proof paper铜板不干胶 Raflacoat self-adhesive双铜纸 glossy paper/ coated art paper双胶纸 offset paper轻涂纸Light Weight Coated Paper无光铜版纸matt art paper光面铜版纸gloss paper灰底白板卡纸 CCNB的全称是 Clay Coated News Back牛底白板纸板 CCKB(Clay Coated Kraft Back)白底灰芯纸板 CCWB(Clay Coated White Back)铜板卡纸/白芯粉咭SBS(Solid Bleached Sulphate)合成纸Synthetic paper根据表面涂布情况SBS又分为单粉咭C1S(coated one side)和双粉咭C2S(coated two sides)。
根据表面涂布效果分为Matte(哑光纸)和Glossy(光面纸)。
坑纸:BE E-flute (125g 牛咭+110g 芯纸)WE WE-flute (140g 白牛咭+110g 芯纸)B3 B3-flute (125g 牛咭+115g 芯纸)A3 A3-flute (175g 牛咭+115g芯纸)K3 K3-flute (250g牛咭+115g芯纸)W3 W3-flute (140g白牛咭+115g 芯纸)A3B9 A3B9-flute (175g牛咭+115g芯纸+125g 牛咭+110g 芯纸)K3B9 K3B9-flute (250g牛咭+115g芯纸+125g 牛咭+110g 芯纸)印刷印油 Transparent ink印光油 Gloss Varnishing印哑油 Matt Varnishing印专色 Printed in spot color表面处理磨光 Calendaring磨光吸塑油 Blister-calendaring varnish过光油 Varnishing过水油 Aqueous coating水性磨光油 Water Based calendaring水溶性光油 Water based varnishing过双面光油 Double sides varnishing过UV UV-coating局部UV Spot UV-coating过胶 PP lamination过光胶 Gloss lamination过哑胶 Matt PP lamination双面过胶 PP lamination on both sides水性光油(环保材料) satin aqueous裱纸裱 Laminated对裱 Laminated 2 in 1啤工啤 Die cutting啤针线 Perforation击凸 Emblossing/High Frequency Gold Blocking 烫金 Hot stamping (Gold in color)烫银 Hot stamping (silver in color)烫哑银 Matt silver hot stamping埋口粘 Gluing钉 Stapling粘驳 Jointed 2 in 1 by gluing钉驳 Jointed 2 in 1 by stapling粘窗 Window size ? x ? mounted with PVC#制本穿线 Looped with string胶装 Thermoplastic binding= Perfect bound骑钉 Saddle- wire stitching折 Folding风琴折 Zigzag folding涂信封胶水 Envelope keeping其它挂钩 Pothook丝印 Silk-screen钻孔 Drilling表面处理光漆处理 Aqueous Coating压纹, 轧花, 压花 Embossing柔性版印刷 Flexo Printinggravure printing: 凹版印刷 | 腐蚀凹版印刷 | 凸版印刷 | 凹板印花gravure intaglio printing: 凹版印刷gravure offset printing press: 凹版胶印机Hot Stamping 烫印Offset Printing 胶版印刷,平板印刷Screen Printing 丝网印刷Varnishing 淋膜封口方式和提手类型Shoulder Length Handle 手提,手挽Heat Seal (塑料薄膜袋)热封(口), 熔接, 熔焊Patch Handle 补丁袋(就是袋子中间有个长椭圆孔,没有手腕带的)Self Adhesive Seal 自密封胶Spout Top 顶喷Vest Handle (胶袋那种手挽方式)Zipper Top 拉链包装材料类: Packaging Materials -Kraft liner(KL): 纯牛卡,100%纯木桨组成,耐破,环压性能优秀,而且耐潮性极佳,一般用于瓦楞纸板面纸。
4折页标准尺寸

4折页标准尺寸摘要:本文介绍了4折页的标准尺寸,包括常见的A4折页和信纸折页的尺寸规格。
对于设计师和印刷商来说,了解4折页的标准尺寸十分重要,因为这能够确保设计作品在印刷过程中的顺利进行,并达到预期效果。
1. 引言4折页是一种常见的折叠页式样,常被应用在宣传册、折页、手册以及宣传单等印刷品中。
在进行设计和印刷这类折页时,了解标准尺寸是至关重要的。
本文将介绍4折页的标准尺寸,并对A4折页和信纸折页的尺寸规格进行详细讨论。
2. 4折页的标准尺寸4折页的标准尺寸有很多种选择,但最常见的两种是A4折页和信纸折页。
以下是这两种类型折页的常用尺寸。
2.1 A4折页A4折页是最常用的4折页样式之一,尤其适用于宣传册和折页等类型的印刷品。
A4折页的标准尺寸为210mm × 297mm,这是一个国际标准尺寸。
设计师在进行A4折页的设计时,通常会将A4的纸张按照准确的比例分割成不同的板块,以确保在印刷和折叠过程中不会出现尺寸偏差。
在印刷A4折页之前,还需要考虑页眉和页脚的位置,以确保在折叠后这些页面上的内容能够正确地展示出来。
通常情况下,设计师会在A4纸的长边上添加一个均匀的留白,在这个留白上放置页眉和页脚。
2.2 信纸折页信纸折页是另一种常见的4折页样式,在一些商业应用中广泛使用。
信纸折页的标准尺寸为8.5英寸× 11英寸,相当于216mm ×279mm。
这个尺寸在美国和加拿大比较常见,也被称为美式信纸。
设计师需要按比例将信纸纸张分割成四个板块,以确保在印刷和折叠过程中保持准确的尺寸。
与A4折页一样,设计师在进行信纸折页的设计时,同样需要考虑页眉和页脚位置的放置,以确保这些内容能够在折叠后正确展示。
3. 制作4折页的注意事项在进行4折页的设计和印刷过程中,设计师和印刷商需要注意一些细节,以确保最终的效果符合预期。
首先,设计师需要在计划和设计阶段仔细考虑折叠和展开的顺序,以确保折页在正常使用时能够呈现出正确的信息和布局。
印刷专业用语[中英]
![印刷专业用语[中英]](https://img.taocdn.com/s3/m/b6f1f7095727a5e9856a61f1.png)
印刷专业用语纸料:260g 粉灰 260g grey back MC board300g 粉灰 300g grey back MC board350g 粉灰 350g grey back MC board350g 单粉咭(白芯/灰芯) 350g single side coated board (white liner/grey liner) 350g 双粉咭(白芯/灰芯) 350g both sides coated board (white liner/grey liner) 80g 书纸 80g W/F PAPER80g 色书纸 80g color W/F PAPER157g 双粉纸 157g art paper157g 哑粉纸 157g matt coated paper防潮纸 Moisture Proof paper铜板不干胶 Raflacoat self-adhesive双铜纸 glossy paper/ coated art paper双胶纸 offset paper轻涂纸Light Weight Coated Paper无光铜版纸 matt art paper光面铜版纸 gloss paper灰底白板卡纸 CCNB的全称是 Clay Coated News Back牛底白板纸板 CCKB(Clay Coated Kraft Back)白底灰芯纸板 CCWB(Clay Coated White Back)铜板卡纸/白芯粉咭 SBS(Solid Bleached Sulphate)合成纸Synthetic paper根据表面涂布情况SBS又分为单粉咭C1S(coated one side)和双粉咭C2S(coated two sides)。
根据表面涂布效果分为Matte(哑光纸)和Glossy(光面纸)。
坑纸:BE E-flute (125g 牛咭+110g 芯纸)WE WE-flute (140g 白牛咭+110g 芯纸)B3 B3-flute (125g 牛咭+115g 芯纸)A3 A3-flute (175g 牛咭+115g芯纸)K3 K3-flute (250g牛咭+115g芯纸)W3 W3-flute (140g白牛咭+115g 芯纸)A3B9 A3B9-flute (175g牛咭+115g芯纸+125g 牛咭+110g 芯纸)K3B9 K3B9-flute (250g牛咭+115g芯纸+125g 牛咭+110g 芯纸)印刷印油 Transparent ink印光油 Gloss Varnishing印哑油 Matt Varnishing印专色 Printed in spot color表面处理磨光 Calendaring磨光吸塑油 Blister-calendaring varnish过光油 Varnishing过水油 Aqueous coating水性磨光油 Water Based calendaring水溶性光油 Water based varnishing过双面光油 Double sides varnishing过UV UV-coating局部UV Spot UV-coating过胶 PP lamination过光胶 Gloss lamination过哑胶 Matt PP lamination双面过胶 PP lamination on both sides水性光油(环保材料) satin aqueous裱纸裱 Laminated对裱 Laminated 2 in 1啤工啤 Die cutting啤针线 Perforation击凸 Emblossing/High Frequency Gold Blocking 烫金 Hot stamping (Gold in color)烫银 Hot stamping (silver in color)烫哑银 Matt silver hot stamping埋口粘 Gluing钉 Stapling粘驳 Jointed 2 in 1 by gluing钉驳 Jointed 2 in 1 by stapling粘窗 Window size ? x ? mounted with PVC#制本穿线 Looped with string胶装 Thermoplastic binding= Perfect bound骑钉 Saddle- wire stitching折 Folding风琴折 Zigzag folding涂信封胶水 Envelope keeping其它挂钩 Pothook丝印 Silk-screen钻孔 Drilling表面处理光漆处理 Aqueous Coating压纹, 轧花, 压花 Embossing柔性版印刷 Flexo Printinggravure printing: 凹版印刷 | 腐蚀凹版印刷 | 凸版印刷 | 凹板印花gravure intaglio printing: 凹版印刷gravure offset printing press: 凹版胶印机Hot Stamping 烫印Offset Printing 胶版印刷,平板印刷Screen Printing 丝网印刷Varnishing 淋膜封口方式和提手类型Shoulder Length Handle 手提,手挽Heat Seal (塑料薄膜袋)热封(口), 熔接, 熔焊Patch Handle 补丁袋(就是袋子中间有个长椭圆孔,没有手腕带的)Self Adhesive Seal 自密封胶Spout Top 顶喷Vest Handle (胶袋那种手挽方式)Zipper Top 拉链包装材料类: Packaging Materials -Kraft liner(KL): 纯牛卡,100%纯木桨组成,耐破,环压性能优秀,而且耐潮性极佳,一般用于瓦楞纸板面纸。
CoreIDRAW x4 排版技法

CoreIDRAW x4-页面版样的设定CoreIDRAW x4-单页面版样的设定招贴广告(海报)、传单、折页等⒈新建一个页面— Ctrl+N⒉设置页面⑴ 双击页面阴影部分——打开页面设置对话框⑵ 确定页面方向——根据页面设置要求,点选“纵向”或“横向”(方型页面除外)。
⑶ 确定页面形态:再纸张栏选择“自定义”或所需的预设式样。
⑷ 设定页面尺寸:高度(W),宽度(E),单位为“毫米mm ”。
⑸ 出血栏设置为:3mm⑹ 如果页面是常用的形态,按“存储自定义页面(C)”——在对话框中输入一个文件名进行存储,文件名应尽量短小、明确、完整。
⑺ 按“新增页面框架(A)”,屏幕显示新增页面形态。
⒊设置版面⑴ 双击左面对话栏中的:页——版面,右面出现“版面”对话框。
⑵ 在“版面(I)”栏中选择“全页面”并点选“对页”选项。
⑶ 双击左面对话栏中的:导线,右面出现“导线”对话框。
⑷ 点选“显示导线”及“贴齐导线”。
⑸更改“预设导线色彩(G)”,将色彩改为所需的颜色。
一般情况下设置为K40或兰色。
⑹ 更改“预设的预设效果导线色彩”,将其改为红色。
因预设的预设效果导线是页面实际尺寸的边线,故应醒目。
⒋预设效果的设置⑴ 双击左面对话栏中的:预设效果,右面出现“预设效果”对话框。
⑵ 点选“出血区域”及“页面框线”。
⑶ 根据需要点选其他项目。
⑷ 按“应用预设效果”⒌导线的设置分别双击左面对话栏中的:导线——水平的、垂直的,根据需要设置页面辅助导线。
⑴ 出血线⑵ 版心线⑶ 栏线、页眉位置、页码位置等⑷ 其它相关的辅助线⒍确定CoreIDRAW x4 -- 连续页面版样的设定书籍、杂志、册页等⒈新建一个页面— Ctrl+ N⒉设置页面⑴ 双击页面阴影部分——打开页面设置对话框⑵ 确定页面方向——根据页面设置要求,点选“纵向”或“横向”(方型页面除外)。
⑶ 确定页面形态:在纸张栏选择“自定义”或所需的预设式样。
⑷ 设定页面尺寸:页面为实际尺寸。
Endress+Hauser Fieldgate FXA42 产品说明书

Products Solutions ServicesBrief Operating Instructions Fieldgate FXA42System ProductsKA01246S/00/EN/02.1771368872Fieldgate FXA422Endress+HauserFieldgate FXA42Table of contentsEndress+Hauser3Table of contents1About this document (3)1.1Document conventions ..................................................................31.2Registered trademarks (5)2Basic safety instructions (5)2.1Product safety (5)3Product description (6)3.1Product design ........................................................................63.2Accessories (7)4Incoming acceptance and product identification (7)4.1Incoming acceptance ....................................................................74.2Product identification ...................................................................74.3Scope of delivery .......................................................................84.4Manufacturer address ...................................................................85Mounting (9)5.1Installation conditions ...................................................................95.2Dimensions ...........................................................................95.3Mounting procedure ...................................................................105.4Antenna ............................................................................105.5Post-installation check (11)6Electrical connection (12)6.1Supply voltage .......................................................................126.2RS485 serial interface (Modbus)..........................................................126.3Terminal assignment (12)7Commissioning (15)7.1Display elements (device status indicator / LED)...............................................157.2Preparatory steps .....................................................................167.3Establishing the data connection ..........................................................177.4Installing the latest firmware from a microSD card ............................................197.5Configuration examples ................................................................191About this document1.1Document conventions1.1.1Safety symbolsAbout this document Fieldgate FXA421.1.2 Electrical symbols1.1.3 Tool symbols1.1.4 Communication specific symbols4Endress+HauserFieldgate FXA42Basic safety instructionsEndress+Hauser51.1.5 Symbols for certain types of information1.1.6 Symbols at the device1.2 Registered trademarksModbus ®Registered trademark of SCHNEIDER AUTOMATION, INC.Microsoft ®Registered trademark of the MICROSOFT CORPORATION.2Basic safety instructions2.1Product safetyThis device is designed in accordance with good engineering practice to meet state-of-the-art safety requirements, has been tested, and left the factory in a condition in which it is safe to operate.It meets general safety standards and legal requirements. It also complies with the EUdirectives listed in the device-specific EU Declaration of Conformity. Endress+Hauser confirms this by affixing the CE mark to the device.Product description Fieldgate FXA426Endress+Hauser3Product description3.1Product designThree versions of the Fieldgate FXA42 are available. These versions differ in terms of device features and data transmission technology.1Fieldgate FXA42 designA FXA42 EthernetB FXA42 Ethernet and WLANC FXA42 Ethernet and 2G/3G1Slot for memory card, microSD format 2Status LED for modem / WLAN / Ethernet 3Status LED for supply voltage4, 5Input modules with analog input, digital input, current source and reference potential → 126Status LED for network 7Status LED for Web PLC 8, 9Ethernet connections 10Reset button11Power supply for Fieldgate FXA42, power supply for digital outputs, digital outputs → 1212RS-485 serial interface → 1213Connection for antenna (only WLAN and 2G/3G versions)14Slot for memory card, SIM format (only 2G/3G version)Fieldgate FXA42Incoming acceptance and product identificationEndress+Hauser 73.2 AccessoriesThese components are available as accessories:•Power unit for power supplyFor information on the power supply, see also → 12.•Antenna with SMA connection for UMTS (2G/3G) or WLAN operation For information on the antenna, see also → 10.•microSD card4Incoming acceptance and product identification4.1Incoming acceptanceCheck the following during incoming acceptance:•Are the order codes on the delivery note and the product sticker identical?•Are the goods undamaged?•Do the nameplate data match the ordering information on the delivery note?If one of these conditions is not met, please contact your Endress+Hauser sales office.4.2 Product identificationThe following options are available for identifying the gateway:•Nameplate specifications•Order code with breakdown of the device features on the delivery note •Enter the serial number on the nameplate into W@M Device Viewer(/deviceviewer ): all the information about the gateway is displayed.•Enter the serial number on the nameplate into the Endress+Hauser Operations App or scan the 2-D matrix code (QR code) on the nameplate with the Endress+Hauser Operations App :all the information about the gateway is displayed.Incoming acceptance and product identification Fieldgate FXA428Endress+Hauser4.2.1 Nameplate1Order code2Serial number (ser. no.)4.3 Scope of delivery•Fieldgate FXA42 for DIN rail mounting •microSD card, 1 GB•Hard copy of Brief Operating InstructionsPlease note the device accessories in the "Accessories" section of the Operating Instructions.4.4 Manufacturer addressEndress+Hauser SE+Co. KG Hauptstraße 179689 Maulburg, GermanyAddress of the manufacturing plant: See nameplate.Fieldgate FXA42Mounting 5 Mounting5.1 Installation conditions5.1.1 Temperature and humidityNormal operation (EN 60068-2-14; Nb; 0.5 K/min): –20 to 60 °C (–4 to 140 °F)Side by side installation: –20 to 50 °C (–4 to 122 °F)Avoid condensation.Humidity (EN 60068-2-30; Db; 0.5 K/min): 5 to 85%; non-condensing5.1.2 OrientationVertical or horizontal on DIN rail (HT 35 as per EN 60715).5.2 Dimensions2Dimensions in mm (in)Endress+Hauser9Mounting Fieldgate FXA4210Endress+Hauser5.3 Mounting procedure1.Slide the upper DIN rail clip upwards and the lower clip downwards until they click into place.2.Fit the device on the DIN rail from the front.3.Slide the two DIN rail clips back together until they click into place.To disassemble the device, push the DIN rail clips up or down (see 1.) and remove the device from the rail. It also suffices to open just one of the DIN rail clips and then tilt the device to remove it from the rail.5.4 AntennaThe Fieldgates FXA42 require an external antenna for wireless communication via UMTS (2G/3G) and WLAN. The antenna can be purchased as an accessory from Endress+Hauser.The antenna cable is screwed onto the connection on the front of the Fieldgate. The antenna must be mounted outside the cabinet or field housing. In areas with weak UMTS (2G/3G) or WLAN reception, it is advisable to first check the communication before securing the antenna permanently.Connection: SMA connection.Fieldgate FXA42MountingEndress+Hauser 111UMTS (2G/3G) network2Antenna for Fieldgate FXA423SMA connection4Fieldgate FXA42 Ethernet and 2G/3G 5Control cabinet1WLAN receivers2Uplink to Internet or LAN via router 3Antenna for Fieldgate FXA424SMA connection5Fieldgate FXA42 Ethernet and WLAN 6Control cabinet5.5Post-installation check•Is the DIN rail clip clicked into place?•Is the device securely seated on the DIN rail?•Are all plug-in terminals securely engaged?•Are the temperature limits observed at the mounting location?Electrical connection Fieldgate FXA4212Endress+Hauser6 Electrical connectionL WARNINGHazardous electric voltageRisk of electric shock and injury from startle response.‣De-energize all power sources before connecting.‣Before commissioning the device, measure the supply voltage and compare it with the voltage specifications on the nameplate. Only connect the device if the supply voltage measured matches the specifications.6.1 Supply voltageThe supply voltage is 24 V DC (±20%). You may only use power units that ensure safeelectrical isolation according to DIN VDE 0570-2-6 and EN61558-2-6 (SELV / PELV or NEC Class 2) and that are designed as limited-energy circuits.6.2 RS485 serial interface (Modbus)Internal resistance: 96 kΩProtocol: Modbus RTUExternal termination required ( 120 Ω)6.3 Terminal assignmentFieldgate FXA42Electrical connectionEndress+Hauser 131)You may only use power units that ensure safe electrical isolation according to DIN VDE 0570-2-6 and EN61558-2-6 (SELV / PELV or NEC Class 2) and that are designed as limited-energy circuits.Electrical connection Fieldgate FXA4214Endress+HauserFieldgate FXA42Commissioning 7 CommissioningEndress+Hauser15Commissioning Fieldgate FXA4216Endress+Hauser7.2Preparatory steps1.Check that the gateway is securely seated on the DIN rail and that the cable connections are correctly secured at the terminals and the antenna.2.1SIM card 2microSD cardInsert microSD card.3.Fieldgate FXA42 UMTS: insert SIM card.4.Switch on supply voltage.Fieldgate FXA42CommissioningEndress+Hauser 177.3 Establishing the data connectionDefault settings for the data connection:•IP address: http://192.168.252.1•User name for the administrator: super •Password for the administrator: super•Users who do not wish to configure the Fieldgate FXA42 or who do not have the necessary authorization can log on with the following default login data. User name: eh ; password: eh 1.Connect the Fieldgate FXA42 directly to a PC or laptop using an Ethernet cable.2.Assign the computer an IP address that is in the same subnet as that into which the Fieldgate FXA42 is to be integrated. The IP address of the computer and that of the FXA42 may not be identical.3.Microsoft Windows: Open the Start menu, select the Control Panel menu item, select the Network Connections menu item and select the Ethernet connection to which the Fieldgate FXA42 is connected.4.Right-click with the mouse button to open the context menu. Select the Properties menu item.Commissioning Fieldgate FXA4218Endress+Hauser5.Select the Use the Following IP Address option and enter an IP address. Example of an IP address: 192.168.252.26.Subnet mask enter 255.255.255.0 and press OK to confirm your entry.7.Open an Internet browser and enter the preconfigured IP address 192.168.252.1 in the address line of the browser.8.Enter the user name and password. Press OK to confirm your entry.The connection is now established and the Fieldgate FXA42 welcome screen isdisplayed.The display changes automatically after a few seconds and the home screen to access the configuration menus appears.To change the language: open the drop-down menu on the top right and select the language.Fieldgate FXA42CommissioningEndress+Hauser1921A00305471Selecting the language 2Opening the HelpYou can now access the functions of the Fieldgate FXA42. If you are logged on as the administrator, you can change the settings.7.4 Installing the latest firmware from a microSD card See the Operating Instructions.7.5Configuration examplesSee the Operating Instructions.*71368872*71368872。
画册报价表

画册报价表竖开本成品210×285,封皮250g铜版(覆膜),内157g铜版,骑马订。
竖开本成品210×285,封皮250g铜版(覆膜),内157g铜版,无线胶装。
骑马钉画册价格表胶装画册价格表单黑白画册价格表精装书价格表精装书价格表钉装菜谱、照片书价格表打码点线价格表门票、折扣券、代金券、优惠券、入场券、抵用券(多款模板供您选择)彩页价格表二折页/三折页,每张加折页费0.008元,起价30元(110克/130克/157克纸张)海报价格表全张海报860×1180,单面印刷,纸张是标准足克重纸张。
正度四开520×370,单面印刷,纸张标准足重纸张。
大度四开570×420,单面印刷,纸张是标准足克重纸张。
正度对开760×520,单面印刷,纸张是标准足克重纸张。
大度对开860×570,单面印刷,纸张是标准足克重纸张。
稿纸、便签本80克双胶纸/单面印/彩色/短边刷透明胶/100张每本。
装纸箱注:不刷胶也是此价格。
如需封皮:每本另加0.4元,50元起。
封皮默认157克铜版纸/单面印/单面亚膜或高膜,如需塑封:每本另加0.2元,50元起。
名片超厚铜版纸名片价格彩色名片价格(普通铜版纸张)带后工名片价格=正常名片价格+名片后工加工费价格更多工艺名片咨询接单员精品名片价格表PVC类价格表设计尺寸:88.5×57mm02 0.76磁条卡条列03 0.76会员卡系列04 0.76会员卡全新系列05 机器和软件价格06 0.84芯片卡系列07 0.84全新料系列08 胸牌系列09 接比镭射金箔名片系列10 金属卡系列以下工艺需另外加价:1、腐蚀号码加收0.2/张(中间可以缺号,往后延号)。
2、正反面颜色4色以上,每超一色加收0.2/张。
3、大面积印油卡加0.2/面,印到边加0.7/面。
4、磁条卡加0.5元/张。
5、条码卡、刮刮码加0.5元/张。
台历制作的常用尺寸
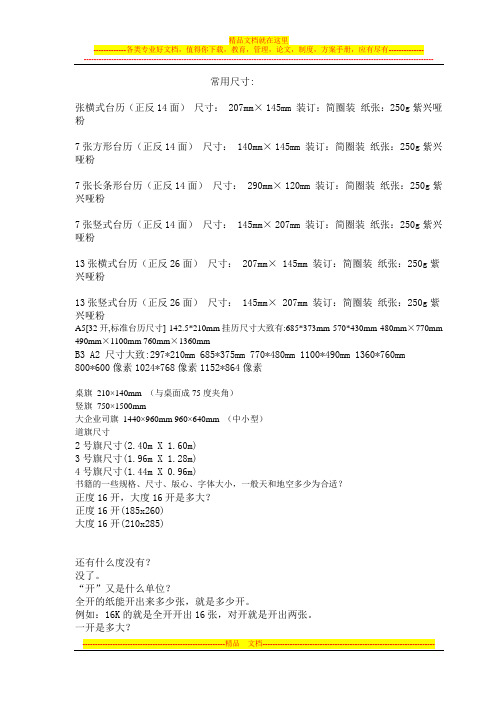
常用尺寸:张横式台历(正反14面)尺寸:207mm× 145mm 装订:简圈装纸张:250g紫兴哑粉7张方形台历(正反14面)尺寸:140mm× 145mm 装订:简圈装纸张:250g紫兴哑粉7张长条形台历(正反14面)尺寸:290mm× 120mm 装订:简圈装纸张:250g紫兴哑粉7张竖式台历(正反14面)尺寸:145mm× 207mm 装订:简圈装纸张:250g紫兴哑粉13张横式台历(正反26面)尺寸:207mm× 145mm 装订:简圈装纸张:250g紫兴哑粉13张竖式台历(正反26面)尺寸:145mm× 207mm 装订:简圈装纸张:250g紫兴哑粉A5[32开,标准台历尺寸] 142.5*210mm挂历尺寸大致有:685*373mm 570*430mm 480mm×770mm 490mm×1100mm 760mm×1360mmB3 A2 尺寸大致:297*210mm 685*375mm 770*480mm 1100*490mm 1360*760mm800*600像素1024*768像素1152*864像素桌旗210×140mm (与桌面成75度夹角)竖旗750×1500mm大企业司旗1440×960mm 960×640mm (中小型)道旗尺寸2号旗尺寸(2.40m X 1.60m)3号旗尺寸(1.96m X 1.28m)4号旗尺寸(1.44m X 0.96m)书籍的一些规格、尺寸、版心、字体大小,一般天和地空多少为合适?正度16开,大度16开是多大?正度16开(185x260)大度16开(210x285)还有什么度没有?没了。
“开”又是什么单位?全开的纸能开出来多少张,就是多少开。
例如:16K的就是全开开出16张,对开就是开出两张。
一开是多大?全开正度:780 x1080大度:880 x1180印刷纸张规格所谓开数就切成几份的意思,例如8开的纸就是全开的1/8大(对切三次)。
泽斯(GE)Monogram 48英寸建造在内的双柜冰箱说明书

OVERALL DIMENSIONS** Allow (10.2) min clearance to a wall for 90˚door swing** Allow (10.2) min clearance to a wall for 90˚door swing** These refrigerators are equipped with a 2-position door stop. The factory-set 130° door swing can be adjusted to 90° if clearances to adjacent cabinets or walls is restricted. Allow full 130° door swings for pan removal. If the 90° door stop position is used, pan access is maintained, but pan removal is restricted.ATTENTION ELECTRICIAN:A 115 volt 60Hz., 15 or 20 amp power supply is required. An inidividual properly groundedbranch circuit or circuit breaker is recommended. Install a properly grounded 3-prong electrical receptacle recessed into the back wall.SPECIFICATIONSOverall Width 48" (121.92 cm)Overall Height 84" (213.36 cm)Overall Depth 25 3/8" (64.45 cm)Door Clearance28 5/8" (72.1 cm)Cutout Width 47 1/2" (120.7 cm)Cutout Height 83 1/2" - 84 1/2" (212.1 - 214.6 cm)Cutout Depth24" (61 cm)Plumbing Requirements1/4" OD copper tubing or GE SmartConnect kitShipping Weight775 lbDimensions in parentheses are in centimeters unless otherwise noted. Actual product dimension may vary due to manufacturing tolerances.(8.9)SIDE VIEW* Shipping height. Use leveling legs and wheels for maximum 1" height adjustment from shipping height.STANDARD INSTALLATIONANTI-TIp BRAckETSIDE VIEW(8.3)(1.1)(8.9)ZIS480NXSIDE VIEW INSTALLEDUNDER SOFFITSIDE VIEW INSTALLED WITH WOODEN WALL STUDSAND NO SOFFIT FRONT VIEW INSTALLED WITH METAL WALL STUDSAND NO SOFFITThe refrigerator will project forward, slightly beyond adjacent cabinetry.cUSTOM SIDE pANELS ArrayFFEATURES AND BENEFITSHalogen Light columns - Located in the freezer and fresh food compartments, extend the full length of the interior compartments providing brilliant, all-level illuminationLED Lighting - Located at the top of the fresh food compartment, and inside the vegetable and climate-control drawers, illuminates contents without compromising spaceAdvanced Temperature Management System with Multi-Shelf Air Tower - Provides even distribution of air throughout the refrigerator climate-control Drawer - Allows you to express-chill beverages, express-thaw meats and select specific temperatures for perishable foods Filter-change Indicator Light - Located on the upfront control panel, provides a visual reminder when it's time to replace the filter for the water dispenserGE ® Water Filter - Has been moved from the fresh food compartment to the overhead cabinet, where it is discreetly out of sightDairy Bin with center Divider - Has a unique magnetic seal that locks in freshnessAdjustable Deli Drawer on Full-Extension Slides - Keeps meats, cheeses and other everyday foods within easy reachDrop-Down Shelf - Provides additional space for a casserole dish or pizza box。
FlexMaster介绍

FlexMaster介绍Ruckus无线公司的FlexMaster管理系统提供了对Ruckus无线ZoneFlex AP的配置、故障、性能、报告等系列的管理功能。
ZoneFlex AP可以安装在不同的应用场景:从咖啡店、热点、酒店旅馆到可管理的家庭无线路由器。
如此分布广泛的安装场景,需要一个集中的网络管理系统来提高无线网络管理的有效性。
FlexMaster可以自动发现已安装在网络上的AP,降低业主的总体成本。
FlexMaster 网管软件产品可以安装在各种硬件平台上,初始可以小规模管理100台AP,随无线网络的不断扩大,通过增加软件的许可证,可以在一个分布环境下很方便地扩展到管理上万台AP。
FlexMaster符合TR-069标准,通过工业标准SOAP/HTTPS/XML协议和ZoneFlex AP通信。
FlexMaster网管软件利用SOAP/HTTPS/XML协议在FlexMaster服务器和被管理的AP设备之间建立一条安全可靠的链路。
这个协议允许已安装的AP设备在加电初始化时自动访问汇报FlexMaster服务器并随后进入自动配置阶段。
网管工作人员也可以通过FlexMaster和AP进行即时通信或设定AP在某个合适的时间按计划执行一个任务。
由于TR-069基于标准HTTP或HTTPS,协议消息可以穿透互联网上的防火墙,允许FlexMaster远程管理任何安装在互联网上的Ruckus无线公司的AP。
AP和FlexMaster 服务器之间异步通信的方法保证了通信可以通过NAT转换点,这对于其它通用的网络管理协议是难以做到的。
部署场景当运营商在许多地方部署ZoneFlex AP,提供产生运营收入的应用时,无线网络的网络质量和网络可靠性就成了能否成功的关键因素。
FlexMaster提供了配置、故障、稽核和性能管理等完整解决方案。
FlexMaster提供用户最佳的使用经验,最大限度地提高无线网络地运行效率。
FH34SRJ低档连接器说明书
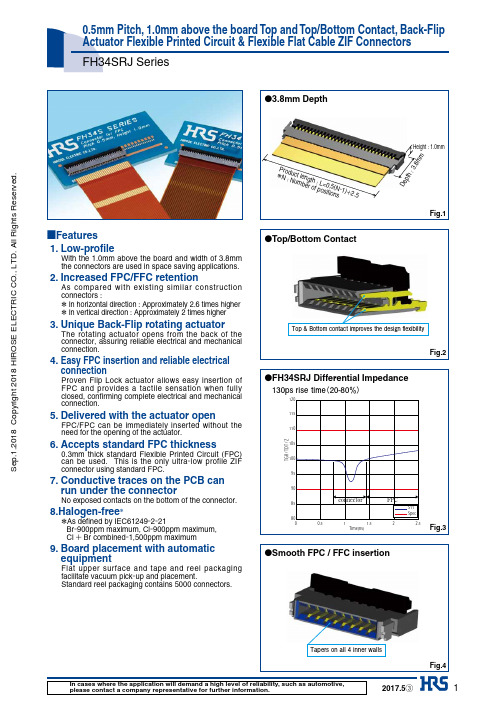
1P r o du c t l e ng t h : L =0.5(N -1)+2.5*N : N um b e r o f p o s i t i o n sD ep t h: 3■Features1. Low-profileWith the 1.0mm above the board and width of 3.8mm the connectors are used in space saving applications. 2. Increased FPC/FFC retentionAs compared with existing similar construction connectors :* In horizontal direction : Approximately 2.6 times higher * In vertical direction : Approximately 2 times higher 3. Unique Back-Flip rotating actuatorThe rotating actuator opens from the back of the connector, assuring reliable electrical and mechanical connection.4. Easy FPC insertion and reliable electrical connectionProven Flip Lock actuator allows easy insertion of FPC and provides a tactile sensation when fully closed, confirming complete electrical and mechanical connection.5. Delivered with the actuator openFPC/FPC can be immediately inserted without the need for the opening of the actuator.6. Accepts standard FPC thickness.3mm thick standard Flexible Printed Circuit (FPC) can be used. This is the only ultra-low profile ZI F connector using standard FPC.7. C onductive traces on the PCB canrun under the connectorN o exposed contacts on the bottom of the connector. 8.Halogen-free **As defined by IEC61249-2-21B r-900ppm maximum, Cl-900ppm maximum, Cl + Br combined-1,500ppm maximum9. Board placement with automatic equipmentFlat upper surface and tape and reel packaging facilitate vacuum pick-up and placement.Standard reel packaging contains 5000 connectors.0.5mm Pitch, 1.0mm above the board Top and Top/Bottom Contact, Back-Flip Actuator Flexible Printed Circuit & Flexible Flat Cable ZIF ConnectorsFH34SRJ SeriesS e p .1.2018 C o p y r i g h t 2018 H I R O S E E L E C T R I C C O ., L T D . A l l R i g h t s R e s e r v e d .2■Product SpecificationsNote1 : When passing the current through all of the contacts, use 70% of the rated current.Note2 : Includes temperature rise caused by current flow. Note3 : T he term "storage" refers to products stored for a long period prior to mounting and use.The operating temperature and humidity range covers the non-conducting condition of installed connectors in storage, shipment or during transportation after board mounting.■Materials / Finish■Product Number StructureRefer to the chart below when determining the product specifications from the product number.Please select from the product numbers listed in this catalog when placing orders.FH34SRJ −30S−0.5SH(50)Series name : FHContact pitch : 0.5mm Series No. : 34S Termination typeSH : SMT horizontal mounting typeRJ T op and Bottom contact, halogen-free(Flame retardance UL94V-0). Specifications (50)… S tandard product 5,000 pcs/reel (99)… 500 pcs/reelNumber of Contacts : 4 to 50S e p .1.2018 C o p y r i g h t 2018 H I R O S E E L E C T R I C C O ., L T D . A l l R i g h t s R e s e r v e d .3×Number of contactsContact No.1Polarization MarkCav No.HRS markLot No.■Connector DimensionsTape and reel packaging.Order by number of reels.Note 2 : Packaged on tape and reel only. Check packaging specification.Note 3 : Slight variations in color of the plastic compounds do not affect form, fit or function of the connector.Note 4 : After reflow, the terminal plating may change color, however this does not represent a quality issue.S e p .1.2018 C o p y r i g h t 2018 H I R O S E E L E C T R I C C O ., L T D . A l l R i g h t s R e s e r v e d .4Recommended PCB Mounting PatternBX 0.3±0.050.065nX X 0.1Contact No.1Connector image : underside0.250.25 2.90.15 0.150.1850.5E±0.10.8±0.050.8±0.053.3±0.05F±0.1Recommended FPC/FFC DimensionsContact No.1(Top contact)(U n c o v e r e d a r e a )B0.5±0.07G±0.050.5±0.07R 0.2±0.10.50.3±0.03Z Contact No.1(Bottom contact)1.5±0.32.5±0.3(S t i f f e n e r )PnX PCB mounting pattern image0.25±0.030.65±0.033.3±0.030.8±0.03E±0.03F±0.030.5BY Y0.03Recommended Stencil Pattern (Recommended StencilThickness : t=0.1mm)Note 1 : D imension P shall be 0.5mm min.Note 2 : T he recommended FPC pattern above has been designed only for FH34SRJ series.When using the FPC for FH19SC series (lower contact), uncoverd area shall be 2.5±0.3mm and stiffener shall be 3.5mm min.S e p .1.2018 C o p y r i g h t 2018 H I R O S E E L E C T R I C C O ., L T D . A l l R i g h t s R e s e r v e d .5Recommended FPC construction1. This specification is a recommendation for the construction of the FH34SRJ Series FPC and FFC (t=0.3 ± 0.03).2. For details about the construction, please contact the FPC/FFC manufacturers.sided FPC with copper foil on the back side is not recommended.Contact FPC manufacturer for specific details.S e p .1.2018 C o p y r i g h t 2018 H I R O S E E L E C T R I C C O ., L T D . A l l R i g h t s R e s e r v e d .6400mm MIN(Leader)100mm MIN(Empty)1600mm MIN(Trailer Empty)Embossed carrier tape Top cover tapeDirection of unreeling(L : Inside)Ø13(M : Outside)Ø380 Ø8024mm MAXDirection of unreeling4±0.11.958±0.1Ø1.5+0.101.75±0.1J ±0.1H ±0.320.332mm MIN4±0.18±0.1Ø1.5+0.101.7+0.1502 0.31.951.75±0.1J ±0.1K ±0.1H ±0.3Direction of unreeling1.5+0.1Packaging SpecificationReel DimensionsEmbossed Carrier Tape Dimensions(Tape width 24mm max.)Embossed Carrier Tape Dimensions(Tape width 32mm min.)S e p .1.2018 C o p y r i g h t 2018 H I R O S E E L E C T R I C C O ., L T D . A l l R i g h t s R e s e r v e d .7StartT e m p e r a t u r e (ç)Time (Seconds)HRS test condition Solder method : R eflow, IR/hot air Environment: Room airSolder composition : P aste, 96.5%Sn/3.0%Ag/0.5%Cu(Senju Metal Industry, Co., Ltd.'s Part Number:M705-221CM5-42-10.5)Test board : G lass epoxy18.3mm∞32.85mm∞0.8mm thick Land dimensions : 0.3mm∞0.8mm Metal mask: 0.25∞0.65∞0.1mm thickThe temperature profiles shown are based on the above conditions.In individual applications the actual temperature may vary, depending on solder paste type, volume / thickness and board size / thickness. Consult your solder paste and equipment manufacturer for specific recommendations.Temperature ProfileS e p .1.2018 C o p y r i g h t 2018 H I R O S E E L E C T R I C C O ., L T D . A l l R i g h t s R e s e r v e d .8Actuator openActuator closePCB PCBFPCFPC3. FPC/FFC insertion (The top contact specification)Be sure that the FPC is parallel to the surface of the PCB, then completely insert into the connector. f the actuator is closed and if the FPC is twisted during insertion, it can cause contact deformation and / or contact failure.Proper insertion Skewed insertion Shallow insertionAlign the FPC/FFC straight with the connector and insert it firmly all the way.The actuator packaged in the open condition.Boundary of FPC patternEdge of housing openingS e p .1.2018 C o p y r i g h t 2018 H I R O S E E L E C T R I C C O ., L T D . A l l R i g h t s R e s e r v e d .9Do not press down on the actuator or housingLift at the centerDo not rotate the actuator by the endsFlip actuator up to openDo not apply force to the actuator in the direction shown when it is fully open.Opening to an angle greater than 90°C will break or damage the connector.Lift at the centerDo not rotate the actuator by the endshis connector uses a back flip type structure. The insert direction of the FPC and the actuator are different from front flip type connectors.RotateS e p .1.2018 C o p y r i g h t 2018 H I R O S E E L E C T R I C C O ., L T D . A l l R i g h t s R e s e r v e d .10FPCStiffener filmPCBo not place or mount any parts that will interfere with the FPC routing.e FPC routing.S e p .1.2018 C o p y r i g h t 2018 H I R O S E E L E C T R I C C O ., L T D . A l l R i g h t s R e s e r v e d .11Operation and PrecautionsS e p .1.2018 C o p y r i g h t 2018 H I R O S E E L E C T R I C C O ., L T D . A l l R i g h t s R e s e r v e d .12The characteristics and the specifications contained herein are for reference purpose. Please refer to the latest customer drawings prior to use.The contents of this catalog are current as of date of 05/2017. Contents are subject to change without notice for the purpose of improvements.2-6-3,Nakagawa Chuoh,Tsuzuki-Ku,Yokohama-Shi 224-8540,JAPAN TEL: +81-45-620-3526 Fax: +81-45-591-3726USA:HIROSE ELECTRIC (U.S.A.), INC. SAN JOSE OFFICE 2841 Junction Ave, Suite 200San Jose, CA. 95134Phone : +1-408-253-9640Fax : +1-408-253-9641/us/USA:HIROSE ELECTRIC (U.S.A.), INC. DETROIT OFFICE (AUTOMOTIVE)17197 N. Laurel Park Drive, Suite 253, Livonia, MI 48152Phone : +1-734-542-9963Fax : +1-734-542-9964/us/USA:HIROSE ELECTRIC (U.S.A.), INC. BOSTON OFFICE 300 Brickstone Square Suite 201, Andover, MA 01810Phone : +1-978-662-5255USA:HIROSE ELECTRIC (U.S.A.), INC. HEADQUARTERS CHICAGO OFFICE 2300 Warrenville Road, Suite 150, Downers Grove, IL 60515Phone : +1-630-282-6700/us/CHINA:HIROSE ELECTRIC TECHNOLOGIES (SHENZHEN) CO., LTD.Room 09-13, 19/F, Office Tower Shun Hing Square, Di Wang Commercial Centre, 5002 Shen Nan Dong Road, Shenzhen City, Guangdong Province, 518008Phone : +86-755-8207-0851Fax : +86-755-8207-0873/cn/KOREA:HIROSE KOREA CO.,LTD.250, Huimanggongwon-ro, Siheung-si,Gyeonggi-do, Korea, 15083Phone : +82-31-496-7000 or 7124Fax : +82-31-496-7100http://www.hirose.co.kr/GERMANY:HIROSE ELECTRIC EUROPE B.V. NUREMBERG OFFICE Neumeyerstrasse 22-26, 90411 Nurnberg Phone : +49-911 32 68 89 63Fax : +49-911 32 68 89 69/eu/GERMANY:HIROSE ELECTRIC EUROPE B.V. HANOVER OFFICE Bayernstr. 3, Haus C 30855 Langenhagen, Germany Phone : +49-511 97 82 61 30Fax : +49-511 97 82 61 35/eu/GERMANY:HIROSE ELECTRIC EUROPE B.V. GERMAN BRANCH Schoenbergstr. 20, 73760 ostfildern Phone : +49-711-456002-1Fax : +49-711-456002-299/eu/FRANCE:HIROSE ELECTRIC EUROPE B.V. PARIS OFFICE Regus La Garenne Colombes,Place de La Belgique, 71 Boulevard National La Garenne Colombes, 92250, France Phone : +33 (0) 1 7082 3170Fax : +33 (1) 7082 3101/eu/THE NETHERLANDS:HIROSE ELECTRIC EUROPE B.V.Hogehillweg #8 1101 CC Amsterdam Z-O Phone : +31-20-6557460 Fax : +31-20-6557469/eu/UNITED KINGDOM:HIROSE ELECTRIC EUROPE BV (UK BRANCH)4 Newton Court, Kelvin Drive, Knowlhill, Milton Keynes, MK5 8NH Phone : +44-1908 202050Fax : +44-1908 202058/eu/CHINA:HIROSE ELECTRIC (SHANGHAI) CO., LTD.18, Enterprise Center Tower 2, 209# Gong He Road, Jing’an District, Shanghai, CHINA 200070Phone : +86-21-6391-3355Fax : +86-21-6391-3335 /cn/CHINA:HIROSE ELECTRIC (SHANGHAI) CO.,LTD. BEIJING BRANCH A1001, Ocean International Center, Building 56# East 4th Ring Middle Road, ChaoYang District, Beijing, 100025Phone : +86-10-5165-9332Fax : +86-10-5908-1381/cn/TAIWAN:HIROSE ELECTRIC TAIWAN CO., LTD.103 8F, No.87, Zhengzhou Rd., Taipei Phone : +886-2-2555-7377Fax : +886-2-2555-7350 /tw/HONG KONG:HIROSE ELECTRIC HONGKONG TRADING CO., LTD.Room 1001, West Wing, Tsim Sha Tsui Centre, 66 Mody Road, Tsim Sha Tsui East, Kowloon, Hong Kong Phone : +852-2803-5338 Fax : +852-2591-6560/hk/INDIA:HIROSE ELECTRIC SINGAPORE PTE. LTD. DELHI LIAISON OFFICE Office NO.552, Regus-Green Boulevard, Level5, Tower C, Sec62, Plot B-9A, Block B, Noida, 201301, Uttar Pradesh, India Phone : +91-12-660-8018Fax : +91-120-4804949/sg/SINGAPORE:HIROSE ELECTRIC SINGAPORE PTE. LTD.10 Anson Road #26-16, International Plaza 079903, SingaporePhone : +65-6324-6113 Fax : +65-6324-6123/sg/INDIA:HIROSE ELECTRIC SINGAPORE PTE. LTD. BANGALORE LIAISON OFFICE Unit No-403, 4th Floor, No-84, Barton Centre, Mahatma Gandhi (MG) Road, Bangalore 560 001, Karnataka, India Phone : +91-80-4120 1907Fax : +91-80-4120 9908/sg/MALAYSIA:PENANG REPRESENTATIVE OFFICE1-21-01, Suntech @ Penang Cybercity (1164), Lintang Mayang Pasir 3,11950, Bayan Baru, Penang, Malaysia.Phone : +604-619-2564 Fax : +604-619-2574/sg/THAILAND:BANGKOK OFFICE (REPRESENTATIVE OFFICE)Unit 4703, 47th FL., 1 Empire Tower, South Sathorn Road, Yannawa, Sathorn, Bangkok 10120 Thailand Phone : +66-2-686-1255Fax : +66-2-686-3433/sg/S e p .1.2018 C o p y r i g h t 2018 H I R O S E E L E C T R I C C O ., L T D . A l l R i g h t s R e s e r v e d .。
线下活动物料印刷手册

若是在对接物料印刷时焦头烂额,读完文档,面对这一问题就轻松多了。
选择装订方式企业最常用的宣传资料有折页、手册等。
我们需要根据不同宣传资料内容的多少来选择不同的装订方式。
1.骑马钉这种装订一般只用于小本的书本装订,而且次序很重要。
最外一张是第一页的最后一页,以此类推。
选择这种装订方式页码必须要被4整除,一般为8页、16页、最多不要超过64页。
页码超过32页要注意爬移量。
骑马订的装订方式骑马订的装订方式2.胶装在书脊背位置刷胶水,再把封面粘合上,最后按照成品尺寸裁切即可,胶装分为有线胶装和无线胶装。
封面和封底需单独存储文档,并留出一般5~10mm的脊背宽度。
胶装装订方式3.线装线装是采用两张与书页大小相同的书皮,书册上面一张,下面一张,与书背戳齐,然后打眼订线。
线装装订方式4.文件夹(插卡式)刀模的尺寸一定要注意。
文件夹装订方式5.折页最后要讲一下折页,折页就是将印张按照页码顺序折叠成书刊开本尺寸的书贴,或将大幅面印张按照要求折成一定规格幅面的工作过程。
折页都是双数页面,两折页对应四面,三折页是六面。
注:折页一定要标注好每一面的阅读顺序以及每一面对应的背面。
折页装订方式出血印刷中的出血指的是加大产品外尺寸的图案,在栽切位加一些图案的延伸,专门给各生产工序在其工艺公差范围内使用,不能在啤线(压线)位加,简单的说就是给裁切留下的边界。
1.精装书外封,海报等纸张印刷出血需在1cm以上,具体数值以实际情况为准,适当调整。
2.手册,折页,单页一般需要留出3mm的出血,一般设计师会在图片裁切位的四周加上2-4毫米预留位置“出血”来确保成品效果的一致。
甲方将文件交给印刷厂之前需要仔细检查3.出血的预留需要印刷页面中心内容及所有非白色内容延伸至出血线上,包括图片,背景色等。
注:黑色线框以里为画板区域,红色线框里、黑色线框外为出血区域文件格式1.非矢量文件需要用PSD、PDF格式作为印刷文件格式。
2.矢量文件则要用AI格式来作为印刷文件格式。
说明书拼版手册

说明书拼版手册16开拼版示意图1-1骑马订—平张机印刷—16P齐头拼版示意图开纸宽度:W=4w+2l+b 开纸高度:H=2h+b+g+x成品宽度:w 成品高度:h叼口位g:11~12mm 拖稍位x:5mm<x≤g出血位b:b=3mm+3mm 拉规位l:l=3mm+(5~7mm)折页方式:垂直三折应用的纸张:定量在128g/㎡以下厚度的各类铜版纸、无光铜版纸和胶版纸张。
1-3无线胶订—平张机印刷—16P齐头拼版示意图开纸宽度:W=4w+2l+b+2r 开纸高度:H=2h+b+g+x成品宽度:w 成品高度:h叼口位g:11~12mm 拖稍位x:5mm<x≤g出血位b:b=3mm+3mm 拉规位l:l≥5mm铣背位r:2mm+2mm折页方式:垂直三折应用的纸张:定量在128g/㎡以下厚度的各类铜版纸和胶版纸张。
注意:一本书的首P与末P订口处留5~6mm的白位。
1-5锁线订—平张机印刷—16P套16P(外帖)齐头拼版示意图开纸宽度:W=4w+2l+b 开纸高度:H=2h+b+g+x成品宽度:w 成品高度:h叼口位g:11~12mm 拖稍位x:5mm<x≤g出血位b:b=3mm+3mm 拉规位l:l=3mm+(5~7mm)折页方式:垂直三折 注意:开纸宽W较小时可采用反拉规印刷方式应用的纸张:定量在50~105g/㎡以下厚度的各类铜版纸和胶版纸张。
1-6锁线订—平张机印刷—16P套16P(内帖)齐头拼版示意图开纸宽度:W=4w+2l+b 开纸高度:H=2h+b+g+x成品宽度:w 成品高度:h叼口位g:11~12mm 拖稍位x:5mm<x≤g出血位b:b=3mm+3mm 拉规位l:l=3mm+(5~7mm)折页方式:垂直三折 注意:开纸宽W较小时可采用反拉规印刷方式应用的纸张:定量在50~105g/㎡以下厚度的各类铜版纸和胶版纸张。
1-7骑马订—平张机印刷—8P自翻版齐头拼版示意图开纸宽度:W=4w+2l+b 开纸高度:H=2h+b+g+x成品宽度:w 成品高度:h叼口位g:11~12mm 拖稍位x:≥5mm<x≤g出血位b:b=3mm+3mm 拉规位l:l=3mm+(5~7mm)折页方式:垂直二折应用的纸张:定量在200g/㎡以下厚度的各类铜版纸和胶版纸张。
