add-in插件培训
QTP基础教程

QTP基础知识培训
目录
QTP工具历史、简介 QTP自动化测试流程 QTP工具基础(重点讲解) QTP支持的脚本语言VBS 正则表达式 自动化常见问题(脚本编写、执行中断、测试结果常见错误)
QTP工具历史、简介
历史
➢ QuickTest Professional 1.0发行于1998年05月,取名为Astra QuickTest仅支持WEB, 它是一种基于图标的功能测试工具,主要用于电子商务领域,可以记录用户动作来简 化并加速测试过程,标价4000美元每个license;
从认识Add-in Manager开始
QTP Add-in即为QTP插件。就是QTP识别不同控件 对象类型的一套标准。
当我们在启动QTP时,QTP会首先弹出一个AddinManager窗口,这个窗口主要提供给自动化测 试人员选择相应的插件。
1、插件的类型: • Web • ActiveX • VB • .Net • WPF •… 2、如何选择插件: • 首先确定被测控件对象类型,然后选择相应的
运行时对象即是被测应用程序中真实存在的控件对象,动态的;
➢ QTP对象识别原理:
• 预期测试对象的识别属性 • 实际运行时对象的识别属性 • 对比预期与实际是否一致 • 若是对比之后可唯一匹配,那么对象即识别成功;反之,则失败。
ADDIE五步循环培训法

※Gagne的学习结果分类体系※
智力技能类别的关系图解
高级规则的应用 (解决问题)
使用规则 形成概念 形成概念 形成概念
使用规则 形成概念
辨别 技能
辨别 技能
辨别 技能
辨别 技能
辨别 技能
辨别 技能
辨别 技能
辨别 技能
※Gagne的学习结果分类体系※
智力技能的层次与累积学习层次对应关系
理解
应用
分类、叙述、解释、鉴别、选择、转换、区别、估计、引申、 归纳、举例说明、猜测、摘要、改写 运用、计算、示范、改变、阐述、解释、说明、修改、订计 划、制定……方案、解答 分析、分类、比较、对照、图示、区别、检查、指出、评析
分析
综合
编写、写作、创造、设计、提出、组织、计划、综合、归纳、 总结
评价
※Gagne的学习结果分类体系※
S
短时感觉
定向刺激 和 其他输入 存储 编码
短时
记忆 (STM)
工作
记忆 (WM) 复述
长时
记忆 (LTM)
物理 输入 (STSS) 注意
编码
R
反应 O
遗忘
遗忘
学习与记忆的信息加工模式
※Gagne的学习结果分类体系※
认知学习有三个层次(P87): 元认知
(metacongnition)
开发教学材料
实施工作环 境特点评估
详细描述教学策略
实施岗位、 工作和内容 分析 撰写教学木目 标陈述
对教学目标进行 优先排序 制定教学衡量标准
教学过程设计模式
1.概念规则…
教学内 容分析 修改
4.媒体制作
信息融入
Add-in学习
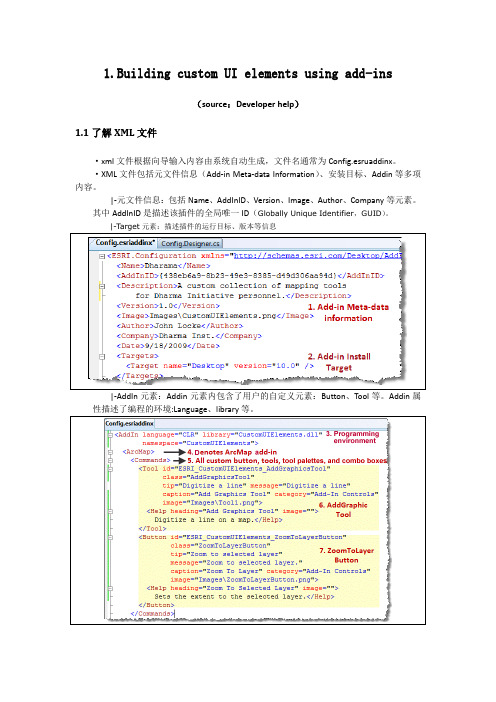
1.Building custom UI elements using add-ins(source:Developer help)1.1了解XML文件·xml文件根据向导输入内容由系统自动生成,文件名通常为Config.esruaddinx。
·XML文件包括元文件信息(Add-in Meta-data Information)、安装目标、Addin等多项内容。
|-T arget元素:描述插件的运行目标、版本等信息|-AddIn元素:Addin元素内包含了用户的自定义元素:Button、Tool等。
Addin属性描述了编程的环境:Language、library等。
1.2向Button对象类插入ZoomToLayer功能·Button类继承于ESRI.ArcGIS.Desktop.AddIns.Button抽象类;内部包含OnClick、Onupdate 两种重要的方法,并且这两个方法必须被重写(Protected override)。
|-OnClick:在ArcMap中的Click事件触发|-OnUpdate·要完成Zoomtolayer功能,可使用ArcGIS Snippet Finder tool,搜索ZoomToLayer,得Dockablewindowmanager、Document等三个常用的属性需要注意。
1.3 用户自定义Tool实现Adding AddGraphics功能·Tool提供OnMouseDown()和OnMouseUp()事件捕获用户操作,同样需要重写这1.4 combo boxcmbox提供Add() and Remove() 方法添加或删除对象类。
该方法必须被Override。
The ComboBox class provides several event handlers, such as OnSelChange() and OnEditChange(),public Combo1(){//Add two items to the combo box.Point o1 = new Point();o1.PutCoords(0, 0);int c1 = this.Add("Item1", o1);Point o2 = new Point();o2.PutCoords(1, 1);int c2 = this.Add("Item2", o2);//Add the application's caption.ESRI.ArcGIS.Framework.IApplication app = this.Hook as ESRI.ArcGIS.Framework.IApplication;this.Add(app.Caption);//Add one item then removeint c3 = this.Add("Item3");this.Remove(c3);//Select the second item.this.Select(c2);}Protectedoverridevoid OnSelChange(int cookie){//选项发生改变时触发事件if (cookie == -1)return;//Get the associated object.Point tag = this.GetItem(cookie).Tag as Point;if (tag != null){System.Windows.Forms.MessageBox.Show(tag.X + ", " + tag.Y);}}Protectedoverridevoid OnEnter(){//Loop through the item collection.foreach(boBox.Item item inthis.items){if (this.Value == item.Caption)return;}this.Add(this.Value);}Protectedoverridevoid OnEditChange(string editString){if (pare(editString, "ABC", true) == 0){System.Windows.Forms.MessageBox.Show("editString is " + this.Value); }}Protectedoverridevoid OnFocus(bool set){if (set)System.Diagnostics.Debug.WriteLine("Get focus.");if (!set)System.Diagnostics.Debug.WriteLine("Lose focus.");}Protectedoverridevoid OnUpdate(){this.Enabled = ArcMap.Application != null;}}1.5 Tool BarToolbar相当于一个容器,任何Button、Command都可以转入。
Platts Excel Add-In 安装指南说明书
Platts Market DataPlatts™Excel®Add-In installation guideApril 2018Applies to Version 4.0.0.0Table of contentsIntroduction (3)Prerequisites (3)Installation (4)Signing in (5)Uninstalling (6)Troubleshooting (6)Silent Installation (7)IntroductionPlatts intuitive Excel Add-In functionality gives our clients the ability to access and interpret Platts Assessment Data and eWindow Market Data with ease.This document provides users with a simple step-by-step guide to installing the Platts™ Excel® Add-In. PrerequisitesWindows Versions: Windows 7, Windows 8 and Windows 10.Microsoft Excel Versions: 2010, 2013 and 2016 (both 32 bit and 64 bit are supported).Office Runtime (VSTO) with Microsoft Visual Studio 20xx Tools installed (administrator rights and a build version higher than 10.0.50903 required). This can be checked via the Windows Control Panel.- Microsoft .Net framework 4.5.2 or greater. This can be checked via the Windows Control Panel.- An active internet broadband connection with a bandwidth of at least 5 mbps.- The user performing the installation will need Administrator privileges.31. Go to /software-user-manuals todownload the installation Zip file.Note: If you have version 3.0.6.0 or above, you can download the latest version of the Add-In using the Update Available option in the User Profile dropdown.2. Extract the Zip file “platts-excel-add-in-vX.X.X.X”3. Run the installer “Platts Excel Add-InvX.X.X.X.exe”From Platts ™ Excel ®Add-In version4.0.0.0 onwards, the installer automatically detects and installs the correct version according to the Excel bitness on your machine.4. Click ‘Install’6. After the installation is complete, you now have theoption of Launching Excel, or opening our User Guide5. After reading the Platts™ Excel ® Add-In License Agreement, accept the terms by selecting the checkbox and click ‘Install’.Installation44. Enter your registered email address and passwordand click ‘Sign in’.6. Once the initialization is complete, the below message is displayed.7. After all Connections are established, the Ribbon bar is enabled, and the Add-In is now ready for use5. The first time you Sign in, the Add-In may take a few seconds to initialize along with a message on thelower right corner of your screen.1. Open Excel.2. Select the new ribbon bar entry called ‘Platts’ in Excel.3. Click ‘Sign in’Signing in5UninstallingTroubleshootingIf a previous version of the Excel Add-In has already been installed, you can uninstall the previous version of the Platts Excel Add-In by following these simple steps:1. Open the ‘Windows Control Panel’ and select ‘Programs and Features’2. Select ‘Platts Market Data Direct’ or Platts™ Excel® Add-In and click ‘Uninstall’.3. Then click ‘Close’.IssueAction to be takenEnsure all prerequisites are installed on the machine.In case one or more of these prerequisites are missing, please download and install them from the Microsoft website.Note: Microsoft Excel 2007 is not supported with version 4.0.0.0 and above.If a version has been previously installed by a System Administrator, uninstallation of the Add-In will berequired by a System Administrator before a Standard user can proceed with the installation.Prerequisites not Installed.Unable to install due to previously installed version by a System Administrator.6Silent InstallationSilent Installation is a convenient way to streamline the installation process of the Platts Excel Add-In to a User Group. You can use the below commands to perform the silent installation on a machine.Note: These commands must be performed by a System Administrator only.Command“Platts Excel Add-In vX.X.X.X.exe” /passive PerMachine=1 SilentInstall=YES“Platts Excel Add-In vX.X.X.X.exe” /passive PerMachine=0 SilentInstall=YES“Platts Excel Add-In vX.X.X.X.exe” /passive /uninstall UsageInstalls the Add-In for all users on the MachineInstalls the Add-In for the current User only Uninstalls the Add-In from the Machine.7|******************For more information, please contact the Platts office nearest you:North AmericaNew York2 Penn Plaza, 25th FloorNew York, NY 10121-2298, USAP: +1-800-PLATTS8 (toll-free)P: +1-212-904-3070 (direct) Boston225 Franklin Street, 14th Floor Boston, MA 02110 USAP: +1 800-752-8878P: +1 617-530-8300Denver1800 Larimer Street, Suite 2000 Denver, CO 80202, USAP: +1-720-264-6600Hightstown148 Princeton-Hightstown Road Hightstown, NJ 80021, USAP: +1-800-PLATTS8 (toll-free) HoustonHeritage Plaza1111 Bagby Street, Suite 2200 Houston, TX 77002, USAP: +1-800-PLATTS8 (toll-free) Pittsburgh424 South 27th Street, Suite 306 Pittsburgh, PA 15203, USAP: +1-412-431-4370 Washington, D.C.1200 G Street NW, Suite 1000 Washington, DC 20005, USAP: +1-212-904-3070Latin AmericaBuenos AiresTte. Gral. Juan D. Perón 346, 6th Floor(C1038AAH) Buenos Aires, Argentina P: +54-11-4121-4810São PauloAv Brigadeiro Faria Lima201 21st floorSão Paulo – SP Brasil – 05626-100 BrazilP: +55-11-3818-4100Europe, Middle East andAfricaLondon20 Canada Square12th Floor, Canary WharfLondon E14 5LH, UKP: +44-20-7176-6111DubaiDIFC, The Gate PrecinctBuilding 1, Level 05P.O. Box 506650Dubai, UAEP: +971-4-372-7100MoscowBusiness CenterMokhovaya4/7 Vozdvizhenka StreetBuilding 2, 7th Floor, 125009Moscow, RussiaP: +7-495-783-4141StavangerØvre Holmegate 14006 StavangerNorwayP: +47-51-89-06-66Asia-PacificSingapore12 Marina Boulevard#23-01 Marina BayFinancial Centre Tower 3Singapore 018982P: +65-6532-2800BeijingSuite 1601, 16/F Tower DBeijing CITCA6 Jianguo Menwai AvenueChaoyang DistrictBeijing 100022, ChinaP: +86-10-6569-2929Hong KongUnit 6901, Level 69International Commerce Centre1 Austin Road WestKowloon, Hong KongP: +852-2841-1035Shanghai33/F Shanghai Plaza138 Huaihai Road (M)Shanghai 200021, ChinaP: +86-21-5110-5488TokyoMarunouchi KitaguchiBuilding, 28th Floor1-6-5 MarunouchiTokyo 100-0005, JapanP: +81-3-4550-8300MelbourneLevel 45, 120 Collins StreetMelbourneVIC 3000, AustraliaP: +61-3-9631-2000© 2018 S&P Global Platts, a division of S&P Global. All rights reserved. ACBRApril 26, 2018 10:41 AM。
Autodesk Revit 插件开发者指南说明书
In it for the Long HaulTips for Serious Autodesk® Revit® Add-In Developers Joel SpahnSenior Software Developer, Lighting Analysts, Inc.Your Story Raise Your Hand Point this way if… Currently building or improving a new or existing Revit add-in Will be continuously improving a Revit add-in Thinking about it and know it will take stamina and commitmentYour Revit add-ins are basically inmaintenance modeProbably won’t ever build anotherRevit add-inFriend or colleague forced you tocome to this classPoint this way if…Learning Objectives▪Elegantly handle database transactions when implementing commands,updaters, and the like.▪Employ techniques to persist, validate, and upgrade data while staying out of the way when the add-in is unnecessary or unavailable.▪Understand the potential complications which can arise when handling even a single element.▪Apply good software development principles (e.g. Don’t Repeat Yourself) by wrapping and extending existing API functionality.Agenda▪Command Strategy▪Database Transactions ▪Data Storage▪Handling Elements▪Worksharing▪QuestionsCommand StrategyCommand Strategy▪Reuse Code –Don’t Repeat Yourself▪Know Your Place▪Stay Out of the Way▪Be Professional – Handle Your Own Business ▪Database Transaction Power & FlexibilityCodeCode samples are available on the AU website.Document Initialization & ValidationValidation Tasks▪Check if the document utilizes your add-in (store add-in version)▪Initialize, validate, upgrade the document▪Manage Shared Parameters▪Register document updaters▪EtcPerform initial validation when the user runs a command▪Not every document wants your add-in!Perform subsequent validation in the Document Opened event ▪Only if the document already utilizes your add-in!Base CommandBy Command AvailabilityBy KindImplementations Abstract Concrete AbstractAbstractExample Command Inheritance HierarchyCommand Strategy – Base Command ▪Set up exception handling▪Initialize command data▪Wrap the command in a Transaction Group▪Perform pre-command operations▪Execute the command▪Perform post-command operationsProject DocumentFamilyDocumentNoDocumentLicensed UnlicensedBase CommandBy Command AvailabilityExample Command Inheritance HierarchyCodeCode samples are available on the AU website.Database TransactionsDatabase Transactions See AU 2012 class:CP3426Core Autodesk Revit API Explained Arnošt LöbelCommand Transaction ModesAutomatic▪Not recommended▪Command is already wrapped in a TransactionManual▪Full control of Transaction Groups, Transactions, and SubTransactions ▪Can manage Undo/Redo detailsRead-Only▪Prevents the document from being modified during the commandTransaction Group▪Groups a set of one or more Transactions to behave atomically ▪Can only be started when there is no active Transaction▪Assimilate vs Commit – affects Undo/RedoTransaction▪Where all the magic happens (only way to modify a document) ▪Only one Transaction can be active at any time▪Affects Undo/Redo▪Document regeneration▪Failure Handling (modeless)SubTransaction▪Can only be started within an active Transaction▪Groups a set of document changes to behave atomically ▪Protects parent Transaction from volatile changes▪Does not have a name▪Does not regenerate the document▪Does not work with Failure HandlingNesting▪Transaction Groups –Yes▪Transactions –No▪SubTransactions –Yes▪All “transaction forms” must be entirely contained (opened & closed) within their parentDatabase Transactions – Potential Complications Commands –Not wrapped in a Transaction (manual mode)Events –Not wrapped in a Transaction▪Some events won’t allow TransactionsUpdaters – Already wrapped in a Transaction▪Can use SubTransactionsWhat if you want to perform the same operation from all of the above?“Best” Practices▪Divorce document changes from transactional structure▪Encapsulate document changes into small pieces▪Not always possibleConsistency – What do you want to happen:▪When your code throws an unexpected exception?▪When Revit throws an unexpected exception?▪With the Undo/Redo experience?If your needs are diverse, this may not be the “best” solution for youFictional Goal – Large exterior walls should be room bounding!▪Wrap the wall instances in a custom class▪Test the wall to see if it is exterior▪Test the wall to see if it is large (area > 100 or length > 10)▪Change the wall to be room bounding▪This requires a database transaction!CodeCode samples are available on the AU website.Thrive –Don’t Get Eaten AliveCustom Data StorageShared Parameters▪Visible to the user (Hidden →use Extensible Storage instead) ▪Can be scheduled▪Data structure is limited to parameter “shapes”Extensible Storage▪Hidden from user▪Cannot be scheduled▪Flexible data structuresCustom Data Storage – UpgradingShared Parameters▪Add/Remove parameters as necessaryExtensible Storage▪Read old data entity using old schema▪Convert old data to new data▪Save new data entity with new schema▪Optionally delete old data entity & schemaFinding ElementsLinked Models▪The elements you are looking for might exist in a linked model.▪Which one? Who knows…Better query them all. ☹▪Knowing the ElementId is not enough – You must know the document to which the ElementId belongs!▪If not performance intensive, expand from ElementId to Element and use Element.Document property.Consuming Elements – Filtered Element Collector Phase Status (and user context)Design Options (and user context)Pinned, grouped, hidden in a specific viewShared (child) family instanceEtcWorksharing▪Elements may be locked (checked out by another user)▪Elements may not be up to date▪Elements you change become locked (cannot be edited by other users) View Specific Queries –“Not Visible” does not mean “Does Not Exist”Worksharing – In DepthSee AU 2013 class:DV1888Facing the Elephant in the Room:Making Autodesk® Revit® Add-ins That Cooperate with Worksharing Scott ConoverWorksharing▪Don’t store project level data on the Project Info element.▪Use a DataStorage element with Extensible Storage.▪Store different data on different Data Storage elements to minimize checkout conflicts.▪Updaters cause “system changes” instead of “user changes” and do not block changed elements from being checked out by other users. ▪However, there can be conflicting user changes (from other users) can override the system changes caused by the updater.AdviceKeep going back to the documentation.Keep learning Revit.Consult API support team in all phases of project.Autodesk is a registered trademark of Autodesk, Inc., and/or its subsidiaries and/or affiliates in the USA and/or other countries. All other brand names, product names, or trademarks belong to their respective holders. Autodesk reserves the right to alter product and services offerings, and specifications and pricing at any time without notice, and is not responsible for typographical or graphical errors that may appear in this document. © 2013 Autodesk, Inc. All rights reserved.。
插件岗位多能工培训计划
插件岗位多能工培训计划一、培训目的插件岗位多能工是指具备技术综合能力,能够在多个领域灵活工作的技术人员。
在当前技术日新月异的背景下,企业对于插件岗位多能工的需求日益增加。
为了提高员工的技术综合能力,满足企业插件岗位多能工的需求,特制定本培训计划。
二、培训对象本培训计划面向企业插件岗位多能工,包括软件开发、测试、运维等技术人员。
三、培训内容1. 技术知识培训2. 技术实践培训3. 项目管理培训4. 团队合作培训5. 问题解决能力培训6. 沟通能力培训7. 情商培训四、培训方式1. 线上培训2. 线下培训3. 实践演练4. 培训讲座五、培训周期本培训计划为期半年,共计180个工作日。
每周工作日为5天,每天工作日为8小时。
六、培训计划1. 第一阶段:技术知识培训(30天)主要内容:熟悉IT基础知识,包括操作系统、网络、数据库等基础知识,了解主流技术平台和开发工具。
2. 第二阶段:技术实践培训(30天)主要内容:应用所学知识进行实际项目实践,学习并掌握常见的软件开发、测试、运维等技术实践。
3. 第三阶段:项目管理培训(20天)主要内容:学习项目管理知识,了解项目规划、进度管理、风险管理等知识,培养项目管理能力。
4. 第四阶段:团队合作培训(20天)主要内容:学习团队合作和协作技巧,培养团队合作精神和团队领导能力。
5. 第五阶段:问题解决能力培训(20天)主要内容:学习解决问题的方法和技巧,提高问题分析和解决能力。
6. 第六阶段:沟通能力培训(20天)主要内容:学习有效沟通和表达技巧,提高沟通和协调能力。
7. 第七阶段:情商培训(20天)主要内容:学习情商管理知识,了解情商的重要性,提高情商管理能力。
七、培训评估1. 知识考核每个阶段结束后进行相应的知识考核。
2. 实践评估参与实践项目,实际应用所学知识进行评估。
3. 团队合作评估参与团队合作项目,展示团队合作能力进行评估。
4. 问题解决能力评估参与问题解决案例,解决实际问题进行评估。
插件机培训资料

插件机培训资料第一部分:介绍什么是插件机插件机是一种能够扩展、增强软件功能的技术。
它是一种独立的模块,可以在软件中添加额外功能,而不需要修改原有代码。
插件机可以提供一种灵活的方式来定制软件以满足特定需求,并且可以随时添加或删除插件。
插件机的设计使得软件的功能模块化,提高了软件的扩展性和可维护性。
第二部分:插件机的优势和应用场景插件机的优势在于它可以使软件具有更强大的功能,同时也使软件更加灵活。
以下是插件机的几个优势:1. 模块化:插件机允许将软件分割成独立的模块,每个模块负责一个特定的功能。
这样可以提高代码的可读性和维护性。
2. 扩展性:通过添加插件,可以随时增加软件的功能,而不需要修改原有的代码。
这样可以快速响应用户需求,并且减少了因功能修改而导致的风险。
3. 定制化:插件机可以根据不同用户的需求提供不同的功能。
用户可以根据自己的需要选择、安装和使用插件,从而定制出符合自己需求的软件。
根据上述优势,插件机适用于各种应用场景。
下面是几个常见的应用场景:1. 浏览器插件:浏览器插件是最常见的插件机应用之一。
通过安装不同的插件,用户可以扩展浏览器的功能,比如广告拦截、翻译、下载管理等。
2. 图形编辑器插件:图形编辑器通常提供基本的功能,但是用户可能有其他特定需求,比如绘制特殊图形、增加滤镜效果等。
通过安装插件,用户可以添加这些额外的功能。
3. 操作系统插件:操作系统也可以支持插件机。
用户可以通过安装插件来增强操作系统的功能,比如增加一个新的快速启动菜单、更换桌面壁纸等。
第三部分:插件机的实现原理插件机的实现原理可以归纳为以下几个步骤:1. 插件加载:插件机首先需要加载插件。
插件可以通过文件、目录、网络等方式进行加载。
加载插件的过程中,插件机会解析插件的元数据,包括插件名称、版本、作者等信息。
2. 插件注册:一旦插件被加载,插件机会将其注册到系统中。
注册插件的过程中,插件机会将插件暴露出来的功能与系统现有的功能进行关联。
3_ArcGIS Desktop Add-in插件开发
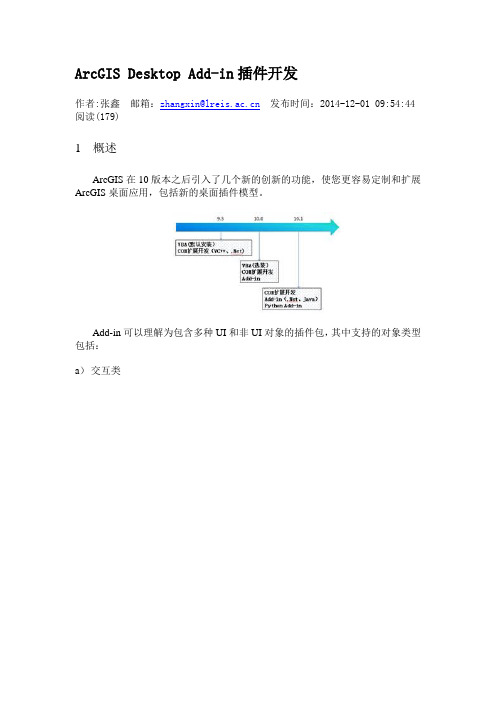
ArcGIS Desktop Add-in插件开发作者:张鑫邮箱:zhangxin@发布时间:2014-12-01 09:54:44 阅读(179)1概述ArcGIS在10版本之后引入了几个新的创新的功能,使您更容易定制和扩展ArcGIS桌面应用,包括新的桌面插件模型。
Add-in可以理解为包含多种UI和非UI对象的插件包,其中支持的对象类型包括:a)交互类1)按钮按钮是一种简单的控制,可以出现在工具栏上。
2)工具工具也是一种简单的控制,可以出现在工具栏上或菜单中。
3)组合框组合框提供了一个项目的下拉列表,可以选择提供一个可编辑的输入区域。
4)多项目多项目是在运行时动态创建菜单项的集合。
5)应用程序扩展应用程序扩展用于组件之间的协调活动,如按钮、工具和停靠窗口。
应用程序扩展经常用于侦听和响应由宿主应用程序公开的各种活动。
应用程序扩展,可配置为自动加载或在加载它们的相关的应用程序时自动启动,也可以出现在标准ArcGIS的扩展对话框。
6)编辑器扩展编辑器扩展可以通过插入框架直接进入编辑工作流程。
相对于应用程序扩展,编辑器扩展加载项被加载编辑会话时需要开始编辑。
你也可以通过创建编辑器扩展自定义编辑会话的行为7)可停靠窗口在ArcGIS桌面应用程序的显示中,可停靠窗口是浮动或停靠的窗口。
在可停靠窗口中你可以填充的内容分为:图表、幻灯片、视频、地图或包括Esri自定义对话框控件。
b)容器类1)工具栏工具栏可以承载按钮、工具、菜单、工具栏和组合框。
2)工具盘工具盘提供了一种紧凑的方式将一组相关的工具集。
3)菜单菜单提供了一个菜单项的下拉列表。
4)右键菜单右键菜单提供了一个右键弹出的菜单项的下拉列表。
2开发流程2.1 开发环境ArcGISAdd-in的开发环境为VS2010+ArcGIS Desktop10.1+ArcGIS Engine 10.1+Win 7 64bit。
2.2开发步骤2.2.1项目需求查找出面积小于给定值的地块,并合并到相邻的地块中最大的地块。
VB下插件(Add-Ins)编程
摘要:本文从一个具体例子出发阐述了在Visual Basic 5.0环境下进行外接程序(Add-Ins)开发的原理、关键技术和注意事项,并对其相关技术,如ActiveX、多态性与接口、事件变量等VB5新引进的编程概念也做了必要的分析和描述。
关键词:外接程序(Add-Ins),ActiveX,接口,多态,事件变量一、概述Visual Basic下的Add-Ins,即外接程序,是扩展VB编程环境的非常有用的工具。
作为一个开发者,我们发现在使用Visual Basic集成开发环境(IDE)时经常需要重复地干同一件简单的工作,如设置所有或一类控件的字体,前景及背景颜色,改变控件的Tab次序等。
这些简单、单调而重复性的劳动如果由程序自动完成,将变得非常方便,而Add-Ins正为实现这一功能提供了可能。
与Visual Basic 的早期版本不同,Visual Basic5.0下的Add-Ins是一种模块化的ActiveX部件,可以作为ActiveX DLL 或EXE文件进行编译。
另外,跟以前的版本相比,VB5下Add-Ins无论从编程思想还是从其扩展模型的对象与结构来说,变化都比较大,因此VB5下编写Add-Ins程序与早期版本将会有很大不同。
在这篇文章中,我们将从一个具体例子出发,阐述VB5下Add-Ins的编程。
二、问题的提出在Visual Basic下进行窗体设计时,我们一般希望自己的程序具有风格一致的界面,如同类控件具有相同的外观、相同的字体等。
另外,我们在设计时还应该考虑到屏幕分辨率的变化对程序的影响,例如我们经常发现出现这样的问题:即在某一分辨率(如800*600)下看起来比较好的字体,当在另一分辨率下(如640*480)运行时将变得非常难看;或者在中文环境下看起来比较舒服,但在英文环境下却很不清晰。
这种种原因都使得我们必须调整窗体控件的字体,以达到最佳效果。
但如果表单或控件比较多时,手工调整将会非常繁琐,而且容易出错,因此编写一个Add-Ins以实现字体的自动调整将会非常实用。
FactSet Office Lite Add-in 安装指南说明书
FactSet Office Lite Add-in: Installation GuideContentsFactSet Office Lite Add-in: Installation Guide (2)Introduction (3)Support (3)Download Website (3)PC Software Requirements / Compatibility (4)Technical Requirements (4)Connectivity Requirements (5)CRL & OCSP (5)Installing the FactSet Office Lite Add-in (6)Important Notes (6)Packaging / Repackaging (7)Installation Options (7)Unattended or Silent Installations (7)FactSet Transform File (8)Public Properties (8)IntroductionThe FactSet Office Lite Add-in Installation Guide is aimed at individuals wishing to install or upgrade the FactSet Office Lite Add-in, and IT professionals looking to package and deploy the FactSet Office Lite Add-in to desktop or server environments. FactSet provides a single MSI which installs the FactSet Office Lite Add-in.For more information about FactSet and our products, please see https:///about-our-company. SupportIf you have any questions on how to install, package, or deploy the FactSet Office Lite Add-in, please contact Technology Solutions Engineering.Email: ***********************If you have questions or require assistance using the FactSet Office Lite Add-in application, please contact the FactSet Support Desk.Email: *******************For a list of regional and country specific contact phone numbers, please visit:https:///support-numbersDownload WebsiteThe FactSet download website contains the latest FactSet technical documentation as well as the FactSet Office Lite Add-in installation files.https:///downloadFactSet Office Lite Add-in General Release installer.FactSet Office Lite Add-in General Release 64-bitThe FactSet Technology Overview Guide details FactSet’s software suite, networking configuration, security, and desktop deployment fundamentals.FactSet Technology Overview GuideThe FactSet Allow List provides FactSet folders, processes, and connectivity requirements that need to be added to any allow list for optimal performance.FactSet Allow ListPC Software Requirements / CompatibilityThe FactSet Compatibility Table can be downloaded from the FactSet download website. https:///documents/workstation/FactSet_Compatibility_Table.pdf Technical RequirementsFactSet recommends the setup listed below for best performance.Technical RequirementsHardware / Software Recommended PC SpecsCPU Dual-Core + processor or 2 vCPU*Memory 16 GB +HDD 1 GB +Operating System Windows 10 or Windows Server 2019 64-bitOffice Versions 2016 or 365 (Semi-Annual) both 32-bit or 64bitInternet Explorer 11*RISC (e.g., ARM64) based processors are not supported by the FactSet Office Lite Add-in. *https://* must be added to Trusted sites within the Internet Options Security tab.Connectivity RequirementsThe FactSet Office Lite Add-in is designed for FactSet Web clients and uses two separate connections, DF (Real Time Exchange Data Feed) and HS (HTTPS Services). DF connectivity requires outbound-initiated connections via on TCP port 6681*. HS connectivity must be able to communicate with https://* on TCP 443. Both DF and HS connectivity is required for the FactSet Office Lite Add-in to function correctly. *Not web proxy aware and will need to be allowed on your edge firewall.The following IPs, subnets, and domains must be added to the allow list on all HTTPS inspection points, such asfirewalls, web proxies, and VPN concentrators for optimal performance and to avoid FactSet traffic from being decrypted, scanned, or denied.). All traffic is outbound-initiated.FactSet recommends companies with Palo Alto Next Ge neration Firewalls to enable the “FactSet” App -ID to allow FactSet traffic. Palo Alto Networks Applipedia (App-ID database): https:///FactSet Real Time Exchange DF – TCP 6681 All FactSet HTTPS domains use the followingSubnets/URLsCRL & OCSPSecurity certificates are used to secure both the integrity of the installed files and to encrypt FactSet’s HTTPS traffic. Windows periodically confirms the authenticity of all certificates by completing CRL (Certificate Revocation List) and OCSP (Online Certificate Status Protocol) checks. If these requests are denied or delayed it will result in unnecessary delay or failure while using FactSet. For this reason, the below list of OCSP and CRL URLs should be added to the allow list on all HTTPS inspection points, such as firewalls, web proxies, and VPN concentrators.Please note that DigiCert recommends using wildcards for their CRL and OCSP URLs. These URLs are outside of FactSet’s control and as such can and will change without notice. Please contact *********************** for further information.CRL & OCSP URLs URLs http://*URLsSubnet Subnet Mask Port 164.55.240.0 255.255.240.0 6681 192.234.235.0 255.255.255.0 6681 64.209.89.0255.255.255.06681URLs Subnet Subnet Mask164.55.224.0255.255.224.0https://* 192.234.235.0 255.255.255.0Installing the FactSet Office Lite Add-inThe FactSet Office Lite Add-in is contained in a single MSI which typically takes a few seconds to install. FactSet Folder Defaults / RecommendationsFactSet Folder Name Default Folder Location RecommendationApplication Folder FdsAppDir %ProgramFiles(x86)%\FactSetExcelAddin\ Contains FactSet Office Lite Add-in’sinstalled application files. The ApplicationFolder should reside on a local fixeddriveUser Data Folder FdsUserDataDir %LOCALAPPDATA%\FactSetExcelAddin\UserData\ Individual user credentials andconfiguration files. In Multi-Server, Multi-VM, and non-persistent environments,this location should reside on a remotedrive, unique to each user, such as aremote HOMESHARE or HOMEDRIVE.Cache Folder FdsCacheDir %LOCALAPPDATA%\FactSetExcelAddin\Cache\ Contains FactSet diagnostic report. Fixedlocal drive recommend for optimalperformance and persistence is notrequired.Logs Folder FdsLogsDir %LOCALAPPDATA%\FactSetExcelAddin\Logs\ Contains FactSet logs and crash dumpfiles. Fixed local drive recommend foroptimal performance and persistence isnot required.FactSet recommends that the FactSet folders and files are added to the allow list on all endpoint security protection and user virtualization solutions for optimal performance and to avoid FactSet folders, processes, or traffic from being hook injected, decrypted, scanned, denied, quarantined, or deleted. Please see the FactSet Allow List(https:///allowlist/) for more information.Important NotesTo ensure all users that access a machine can use the add-in, it is recommended that an administrator account be usedto install the FactSet Office Lite Add-in. Unattended or silent installs of the FactSet Office Lite Add-in require the ALLUSERS=1 Public Property be set to ensure the FactSet Office Lite Add-in is installed in a per-machine context. Seethe Packaging / Repackaging section for more information.The FactSet Office Lite Add-in leverages two authentication schemes:• Interactive FactSet Web Authentication and SSO− It is highly recommended to federate with FactSet to minimize the number of times a user must login. Pleasereview the Overview and Section 1 of FactSet Single Sign On and Views API for more information on how tofederate with FactSet. Please contact *********************** or your FactSet Account team for furtherinformation if you have any questions.• Local one-time authentication where subsequent logins leverage tokens in the User Data folder to seamlessly authenticate to the FactSet DF (Real Time Exchange Data Feed).FactSet Workstation cannot be installed on the same device as FactSet Office Lite Add-in (which is designed for FactSet Web clients only). You will first need to uninstall FactSet Workstation before installing FactSet Office Lite Add-in.Packaging / RepackagingFactSet Office Lite Add-in software is available in .MSI format for of deployment ease. FactSet offers a variety of MSI Public Properties to create and modify common deployment options and settings. When additional customizations are required, a Microsoft Transform (.MST) is recommended.Installation OptionsMsiexec.exe is the Windows install engine for the installation, maintenance, and removal of applications on Microsoft Windows devices.Msiexec.exe can be executed in a variety of ways:• Script or Batch file: This is often desirable for clients who deploy software via logon script, Microsoft System Center Configuration Manager, or similar deployment tools.• Command line: This method usually applies in environments where IT staff manually runs the FactSet installation on users’ machines.Here are some common examples using msiexec.exe.• msiexec.exe /i "FactSet_Office_Lite_Addin_x.x.x.xxx_x64.msi" ALLUSERS=1• msiexec.exe /i "FactSet_Office_Lite_Addin_x.x.x.xxx_x64.msi" FDSIDPID=<idpid> ALLUSERS=1Unattended or Silent InstallationsUnattended or silent installations of FactSet Office Lite Add-in, using SCCM or similar deployment tools, must include the ALLUSERS=1 Public Property to ensure FactSet is installed in a per-machine context.• msiexec.exe /q /i “FactSet_Office_Lite_Addin_x.x.x.xxx_x64.msi” ALLUSERS=1Public Properties can be defined in a variety of ways:• Transform file: FactSet recommends the use of a transform file (.MST) which can be created using an MSI editor. For instructions on how to create a transform file, please see the following FactSet Transform File section.• Command line properties: Defines the Public Properties on the command line.• Modify the MSI directly: We do not recommend modifying the provided MSI as this may complicate any future support troubleshooting.The Public Properties section contains the available MSI Public Properties for the FactSet Office Lite Add-in installation.FactSet Transform FileThis section contains generic instructions on how to create a transform file (.MST) that defines a firms IDP ID to configure Single-Sign On (SSO) within the FactSet Office Lite Add-in (public property = FDSIDPID).1. Within your chosen MSI editor, create a transform file.2. Navigate to the Property table within the MSI.3. Add a new row within the Property table called FDSIDPID.4. Configure the value of the FDSIDPID property to the firm’s IDP ID which is provided by FactSet.5. Ensure the transform containing the above change is saved.An example of the syntax used to install the FactSet Office Lite Add-in using the generated transform file would be: msiexec.exe /i FactSet_Office_Lite_Addin_x.x.x.xxx.msi /qn TRANSFORMS=”<path to the transform file .mst>”/i = installs or configures a product/qn = Quiet mode with no User InteractionPublic PropertiesPublic PropertiesPublic Property Name DescriptionALLUSERS=1 Specifies installer to perform a per-machine context installation for all Windowsaccounts. When not defined, the installer will perform a per-user context installation forjust the Windows account executing the installation.FDSAPPDIR=”<path>”Specifies the FactSet Office Lite Add-in application folder location. FDSUSERDATADIR=”<path>”Specifies the FactSet Office Lite Add-in User Data folder location.FDSCACHEDIR=”<path>”Specifies the FactSet Office Lite Add-in Cache folder location.FDSLOGSDIR=”<path>”Specifies the FactSet Office Lite Add-in Logs folder location.FDSIDPID=<idpid> Enables SSO by configuring Office Lite Add-in to use the defined IdPid for yourfederation with FactSet.If you have any questions about the use of these Public Properties, please contact Technology Solutions Engineering ***********************.。
Office Add-ins使用教程:使用Office系列软件中的Add-ins定制自己的用户体验

Office Add-ins使用教程:使用Office系列软件中的Add-ins定制自己的用户体验Office Add-ins使用教程随着数字化时代的到来,Office系列软件已经成为许多人日常工作中必不可少的工具。
而随着人们对于工作效率的要求不断提高,Office系列软件也正在不断地进行更新和升级,以满足人们的需求。
其中,Office Add-ins就是一个可以帮助用户定制自己的用户体验的好工具。
一、什么是Office Add-insOffice Add-ins是Office平台上一种众多的插件程序,可以直接在Office软件内部集成运行,以增强其功能。
这些插件是由Microsoft或其他第三方开发者制作的,可以扩展Office软件的功能,使其更加贴合用户的需求。
Office Add-ins主要分为三种:Excel、Word和PowerPoint插件,分别适用于不同的用户需求。
它们可以像普通软件一样操作,安装和卸载都非常方便。
用户可以在安装插件时打开自己的Office文档,然后将插件安装在已经打开的文档中,也可以在安装之后在Office菜单栏中查看和使用它们。
二、Office Add-ins的使用1、Excel插件Excel插件可以让您更方便地分析和处理数据。
使用Office Excel插件,您可以将Excel文件转换为PDF文件,并为您的数据模型添加图表、图像和其他实用的功能。
您还可以使用Excel插件使合并单元格更容易,使筛选更高效,并享受许多其他方便的功能。
例如,您可以使用PowerPivot插件来创建复杂的数据模型,以便更深入地了解您的数据。
Power Query插件可以帮助您从不同的数据源(如云服务和数据库)中获取并合并数据,然后将这些数据转换为Excel格式,方便您的工作。
2、Word插件Word插件可以让您更加高效地编写和编辑文档。
它们可以让您快速地添加内容、格式化文本,并添加图表、图像和其他对象。
solidworksaddinprogram 用法 -回复

solidworksaddinprogram 用法-回复关于SolidWorks Add-in程序的用法SolidWorks是一款十分强大的三维建模软件,它提供了许多易于使用的工具和功能,可帮助工程师和设计师创建各种复杂的产品设计。
除了其强大的功能外,SolidWorks还支持自定义插件程序的使用,这些插件被称为Add-in程序。
这篇文章将详细介绍SolidWorks Add-in程序的用法,并提供一步一步的指导。
第一步:创建一个SolidWorks Add-in要创建一个SolidWorks Add-in,首先需要打开SolidWorks并选择“新建”菜单下的“项目”选项。
在弹出窗口中,选择“”或“C#”模板,并命名您的插件。
点击“确定”按钮后,Visual Studio将自动为您生成一个空白的插件项目。
第二步:配置插件的属性要配置插件的属性,先右键单击项目,在弹出菜单中选择“属性”。
在属性窗口中,您可以设置插件的名称、说明、版本号等信息。
还可以设置插件所需的SolidWorks版本和.NET框架版本等。
完成配置后,保存项目设置。
第三步:编写插件代码在插件项目中,可以添加Class模块,然后开始编写插件代码。
您可以使用SolidWorks提供的API来访问和操作SolidWorks软件的各种功能和对象。
例如,您可以使用API创建零件、装配体或绘图等。
您还可以为插件添加自定义的工具栏按钮、菜单和快捷键等,以便用户可以方便地调用插件功能。
第四步:调试和测试插件完成插件代码编写后,您可以使用Visual Studio的调试功能进行调试和测试。
在“调试”菜单下,您可以选择“开始调试”或“开始无调试”选项来运行SolidWorks,并加载您的插件。
在运行过程中,您可以使用Visual Studio的调试工具监视变量、设置断点等,以便定位和修复可能的错误或问题。
第五步:编译和发布插件当插件开发工作完成后,您可以将插件项目编译为可执行文件。
关于DLG与DOM套合差检查的Add-in插件式开发

差。 并 最终 输 出精 度 报 告 。 关键词 : DOM ; DL G; 套合差检查 ; 平 面位 置 中误 差 ( 4 ) 鼠标双击事件。 使用 O n D o u b l e C l i c k 方法结束画线 , 并保存线要 1棚谜 数字线划图( D L G) 与正射影像图( D O M) 的套合差检查是指利用已 素。( 5 ) 设定键盘输人 蝴 。使用 O n K e y D o w n 方法判断键盘的输入 , 有的矢量与栅格数据进行叠加 , 分别找到同名点, 并根据坐标计算 中误 若为 E s c 键取? 肖据精度的参考依据。根据以往的检查流程 , 检查人员找 3 . 3计算 中误差
科 技 论 坛
・ l 0 7 ・
关于 DL G与 DOM 套合差检查的 A d d - i n插件式开发
阿依努尔古丽 ・ 阿不都尼亚孜 ( 新疆维吾 尔自治区第一测绘院 , 新疆 昌吉 8 3 1 1 0 0 ) 摘 要: 为保障各 类数据质 量检 查工作的规范性与可靠性 , 促进测绘成 果质 量水平的提 高 , 通过程序 检查数据质量是越 来越重要 的 种技 术手段 本文 简要 介绍 了通过 A d d — i n插件 式开发 实现数 字线 划图与正射影像 图的套 合差检查 , 通过绘制 图 中同名点 , 计算 中误
计报 告 。 4 . 1信息设置。用户需设定 中误差计算公式 、 输出格式 、 图号 、 误差 2技 术 流程 允许值及检查结果输 出路径等基本信息 ,若是后期需要进一步修改或 A d d — i n简介及部署方式" . A d d — i n是 A mG I S 1 0 . 0 更新后 E S R I 主
到同名点后 , 通过 人工统计坐标值并带人公式计算出中误差。 此种检查 根据公式计算中误差,当绘制的位移差线段数量小于 2 0个时, 用 方式存在工作量大 、 作业效率低等缺陷, 耗时较长, 影响项 目周期 。 针对 算术平均值替代中误差 ; 若数量不小于 2 O 个, 按中误差统计。 存在的问题和不足 ,本文提出通过程序实现 DL G与 D O M的套合差检 查, 利用 V i s u a l S t u d i o 2 0 1 0开发环境 , 选用 A r c G I S 1 0 . 1 f o r D e s k t o p 高 精 度 检 测 时 , 中 误 差 计 算 公 式 为 : … 犀 结合 c #语 言进行 A d d — i n插件式 开发 。在 A r c M a p中加载 D L G与 同精度检测时 , 中误差计算公式为: 一1 旨 D O M, 利用特制的画笔工具分别勾绘矢量与影像的同名点 , 用线段标识 其 中, M为成果中误差 , n为绘制的位移差线段数量 , △ 为较差日 o 出两者之间存在的位移差 ,对超过—倍及两倍中误差允许值的位移差 要素用星号进行标记 , 计算 出最大、 最小误差及 中误差 , 并输 出精度统 4 功能 展示
插件基础知识培训电子

特殊元件 引脚旳电 气保护
不可接受
可接受: 保护套可 起到预防短路作用, 引脚上无保护套时, 引脚所跨过旳导体 之间旳距离 B≥0.5mm。
保护套损坏或 A>2.0mm时, 不能起 到预防短路作用或引 脚上无保护套时, 或 引脚所跨过旳导体之 间距离B<0.5mm。
插件类型 接受等级 图示和阐明
机构元件 浮件
不可接受
机构元件 外观
原则
四、插件检验原则
4.1元器件插件检验原则
插件类型 接受等级 图示和阐明
可接受
机构元件 外观
不可接受
四、插件检验原则
4.1元器件插件检验原则
插件类型 接受等级 图示和阐明
原则
元件脚与 线路间距
可接受
四、插件检验原则
4.1元器件插件检验原则
四、插件检验原则
4.1元器件插件检验原则
插件类型 接受等级 图示和阐明
原则
元件间旳 距离
可接受
最佳: 在PCBA板上, 两个或以上踝露金属 元件间旳距离要 D≥2.0mm。
可接受: 在PCBA板 上, 两个或以上踝 露金属元件旳距离最 小D≥1.6mm。
四、插件检验原则
4.1元器件插件检验原则
插件类型 接受等级 图示和阐明
拒收: 元件体与其在 基板上两插孔位构成 旳连线或元件体在基 上旳边框线斜度 >1.0mm。
四、插件检验原则
4.1元器件插件检验原则
插件类型 接受等级 图示和阐明
原则 立式元件 本体斜度
可接受
最佳: 元件引脚与元 件体主轴之间夹角为 0°(即引脚与元件主 轴平行, 垂直于PCB 板面。
可接受: 元件引 脚与元件体主轴 袒闪角Q<15°。
EPM系统插件add-in安装

EPM系统插件Add-in安装说明:Add-in为依附在excel上的一个直接访问EPM系统essbase数据库的小插件。
本文档分“安装前提”、“安装”、“测试”三个部分,在安装步骤完成之后,请将测试步骤进行到第3步或以上,以确定安装成功。
安装时,所使用OS帐号需要有计算机或域的管理员权限,否则可能会出现修改注册表或文件失败的问题。
另外第10、11步请按照文档说明选择。
用户有关如何检索到有效数据的相关问题,请用户自行联系各厂财务组同事,或者总部财企同事。
安装前提:计算机上请先安装Excel 2003 (2007可能会有问题)安装:1、将文件安装文件“essbase client.zip”解压缩,2、双击运行“setup.exe”;3、等待几秒之后出现下图;(1)4、点下拉列表,选择简体中文;(2)5、点击“确定”后出现如下界面,再点“下一步”;(3)6、这里的国家地区不用选择,直接点“下一步”;(4)7、选择“我同意”,点“下一步”;(5)8、选择安装路径点“下一步”,只要硬盘空间够大话,建议使用默认路径,本次安装大约需要90m空间。
(6)9、产品主目录选择。
默认路径,点“下一步”。
(7)10、注意,这里一定要选择“定制”,然后点“下一步”;(8)11、这里同样要注意,如图将“运行时客户端”和“Hyperion Essbase API”前面的勾去掉,之保留安装“Excel电子表格插件”;12、如图,语言环境选择“简体中文(MS936)”,点“下一步”;13、点“下一步”;14、点“下一步”;15、正在安装;16、安装已完成,继续点“下一步”;17、选“否,将稍后重新启动系统”,点“完成”;(建议安装完成之后,重启一次计算机)测试:1、打开excel;在打开excel的过程中,通常会出现一个加载essbase宏的画面;2、Excel菜单项中有一个“Essbase”菜单,点击展开,点“连接”;3、此时如果能看到弹出窗口,基本上表示essbase安装成功,并且应该能正常使用。
实战ExcelAdd-in的三种玩法

实战ExcelAdd-in的三种玩法作者:陈希章发表于 2017年11⽉26⽇前⾔这个系列⽂章应该有⼀阵⼦没有更新了,原因是⼀如既往的多,但是根本所在是我对于某些章节其实还没有完全想好怎么写,尤其是对于Office Add-in这块 —— 到底是要每个都去单独写⼀遍,还是有其他什么好的写法会对读者更有帮助?正如我在分享的⼀些关于写作的个⼈经验那样,我为此颇费了⼀些⼼思琢磨,直到最近才做出了⼀个选择:我将不拘泥于每个应⽤都写⼀次,⽽是尝试总结⼀些共性的操作指南。
本⽂将是⼀个尝试,以我对于Office Add-in开发的了解,Excel所占的⽐重相对较⾼(根据不完全统计,在应⽤商店所有Office Add-in 中,Excel占到40%左右),所以我希望⽤本⽂的Excel Add-in的实际案例,给⼴⼤的Office Add-in开发⼈员直观地了解三种不同的开发技术是如何过渡和共存的,以帮助⼤家做出⾃⼰的选择。
本⽂所提到的三种玩法,是指最早的VBA技术,后来的VSTO技术,以及现在更推荐的Web Add-in的技术。
如果⼤家对于这些基本概念以及Office 365的开发还不太熟悉,欢迎阅读我此前写好的 Office 365开发概述和⽣态环境介绍:,案例介绍我⼀向⿎励在实践中学习。
为了演⽰如何⾃定义开发,并且⽐对不同的技术下⾯实现⽅式的差异,本⽂将以下⾯的⼀个需求作为案例展开。
假设我们需要为Excel增加⼀项功能,⽤户点击⼀个菜单或者按钮后,可以动态⽣成⼀些统计数据,并且根据这些数据⽣成⼀个柱状图。
VBA —— ⼀曲肝肠断,天涯何处觅知⾳VBA 是我们最早的⼀个⽤来扩展Office 应⽤程序的技术,由于其简单易⽤且功能强⼤,在全世界范围内拥有数以亿计的⽤户。
实现上⾯提到的这样的需求,其实是VBA很擅长的,尤其是数据如果本⾝就来⾃于Excel内部的话。
学习VBA的⼀个最好起点就是⽤录制宏。
以本案例⽽⾔,即便你是VBA的新⼿,也可以尝试⼀步⼀步地输⼊数据并且⽣成图表,然后将⽣成的代码稍作整理和修改后,可能就是下⾯这样⼦的。
ADDIE课程开发模型介绍与应用说课讲解-2022年学习资料

开发-培训策略设计:-培训活动程序设计-开场后有一个破冰活动,小到一个与主题相关的幽默小故事分享,打-到一 动手完成一个五分钟左右的游戏,一边拉近距离,提高培训者-的兴趣,提高投入度-正式讲解课程内容,过程中培训师 当亲切幽默,适时采用互动、引-导思考等手段,让员工积极参与培训-培训授课方法设计-面授、游戏体验、-案例分 -培训教学组织形式设计-采用分组教学形式,每小组五人,选拔组长一名,以便开展各类课堂
解析-ADDIE的基-ADDIE的目得-ADDIE的特-·对工作和人员-。}-提高墙训效寧-系统性-所微的 分-满足组织发展-针对性-需求
意义-将A、D、D、I、E五个步骤综合起来考虑,形成系统从而:-避免了培训的片面性,针对培训需求来设计和开 培训项目;-避免了培训的盲目性;-其质量的保障是对各个环节能进行及时有效的评估。-在ADDIE五个阶段中, 析与设计属前提,开发与实施是核心,评估为保证,-三者互为联系,密不可分
ADDIE课程开发模型介绍与应-用
什么是ADDIE课程开发模型
定义-ADDIE是指一套有系统地发展教学的方法。主要包含了:-要学什么?(学习目标的制定:-如何去学?(学 策略的运用;-如何判断学习者已到达学习成效?(学习评量的实施。
简介-ADDIE五个字母分别表示:-Analysis一分析。-对教学所要达到的行为目标、任务、受众、环境、 效目标等等进行一系列的分析。-Design-一设计。-对将要进行的教学活动进行课程设计。-Developm nt-一开发。-针对已经设计好的框架、评估手段等,进行相应的课程内容撰写、页面设计、测试等。-Implem nt-实施。-对已经开发的课程进行教学实施,同时进行实施支持。-Evaluation一评估。-对已经完成的 学课程及受众学习效果进行评估。
- 1、下载文档前请自行甄别文档内容的完整性,平台不提供额外的编辑、内容补充、找答案等附加服务。
- 2、"仅部分预览"的文档,不可在线预览部分如存在完整性等问题,可反馈申请退款(可完整预览的文档不适用该条件!)。
- 3、如文档侵犯您的权益,请联系客服反馈,我们会尽快为您处理(人工客服工作时间:9:00-18:30)。
Add-in插件使用培训
一、安装add-in插件及常见问题处理
1、add-in插件安装,参照“中国粮油运营报告信息系
统操作手册V2[1]”中的说明。
需要说明的一点:在有些情况下excel会禁用项目,如果该禁用项目于excel的add-in有关,可以点击excel选项-加载项-管理-禁用项目启用禁用项目。
如果一次不能成功安装,可以重新安装一次。
2、安装成功后菜单栏中会出现“加载项”(刷数点击:
加载项-essbase-检索)
3、有时候加载项下会出现多个Essbase,要去掉多余的,
可以点击电脑开始-所有程序-”Hyperion system 9 BI+”-“Unregister Spreadsheet Add-in”。
如果所有的Essbase 都被去掉了,则可以点击“Register Spreadsheet Add-in”加载上。
二、刷数操作
1、安装成功后打开excel点击:加载项-essbase-检索
设置服务器登录地址10.6.10.103。
2、安装成功后打开excel,点击:加载项-Essbase-检索,
出现如下表格,即为刷数起点:
维度:具有相同属性成员的集合,比如组织、年、Period(月)。
维度的成员:是指某一维度具体选定的值,比如维度,融氏、武汉等就是组织维度的成员。
某一维度只有在选定成员后系统才能知道我们需要抓取什么数据。
分别解释各维度含义。
值:选原值/或者抵消值,一般刷原值数
数据视点:选期间数/发生数,或者累计数
Period:选月份
组织:选企业
自定义维度一:包含3类:1)与存货跌价准备有关的项;
2)与应收账款逾期期限有关的项目3)资本性支出口径(支付、入账)。
只有刷与以上3类有关的数才需要选定“自定义维度一”的成员,否则不用动。
自定义维度二:资本性支出,如果要刷资本性支出的数据,需要将这个维度选择到具体值,如果刷数与资本性支出无关,则这个维度不用动。
自定义维度三:选产品和原料等
年:选择年份
场景:四个选项:实际、预算、滚动预测、本年预计,用的比较多的是实际、预算
版本:用当前版
科目:会计科目
如查询衡水公司2014年1-5月份F55的销售收入,如下:
复杂查询规则:
上述简单的查询规则显然不能满足我们工作需要,我们可能一次需要查询多个数据,比如1-5月分月销售收入,或者F55、F42、淀粉的销售收入。
在进行复杂查询时,需要遵循如下规则:
A、第一行可以放置多个维度,但是仅限维度的一个成员。
维度的顺序可以随便调整。
B、其他行只能有一个维度,但可以放该维度的多个成员。
C、从左至右,每一列只能放一个维度,但可以放该维度的多个成员。
如:
第二行为年维度,第三行为“自定义维度三”
第一列为科目维度,第二列为Period维度。
(注:不要管第
一行)。
