Visual studio 2010 MASM环境设置
微软Visual Studio Lab Management 2010说明书

Virtual Testing, Real Quality.Microsoft® Visual Studio® Lab Management 2010 is an integrated development and testing platform that provides end-to-end support for virtual lab management. Reduce costs associated with setup, tear down and restoration of complex virtual environments to a known state for build automation, test execution and build deployment. Eliminate waste across the entire application lifecycle by allowing development and QA to work together to effectively optimize the build process and minimize regression testing efforts. Easily file rich bugs with links to environment snapshots that developers can use to recreate the tester’s environments. Lab Management 2010 increases the predictability of build-deploy-test workflows to reduce overall risk and accelerate your time to market.MicrosoftVisual Studio L ab Management 2010Creativity UnleashedSimplify virtual lab configuration and management with Microsoft T est Manager 20101, a light-weight and streamlined application that was developed with the self-service user in mind. Now you can administer your labs through intuitive wizards and utilize existing virtual machines to build a Golden Virtual Machine Library for future uses.Simplicity Through IntegrationBuilt on the powerful Windows Server Hyper-V™ platform, Lab Management 2010 offers seamless integration with test and build processes through T eam Foundation Server 20102. This integrated toolset serves a key role in facilitating build automation, application deployment to test environments, and test automationQuality Code EnsuredT ake quality to the next level by benefiting from virtualized test labs. T est applications early and often against production-like environments and release software in a shorter time frame. Lab Management 2010 delivers a predictable build-deploy-test workflow and enables development teams to find quality defects faster.Deploy to a Known ConfigurationLab Management 2010 provides development and test teams with unlimited and instantly-provisioned virtual environments for testing. Within each virtual machine environment, you can explicitly target a particular lab configuration – for example, an application running on a web server that accesses a database server, as shown. Now you can deploy to a knownconfiguration predictably and consistently.T op ten benefits● Increase Operations Efficiency Across the Entire Application LifecycleA powerful virtual lab management technology, LabManagement 2010 streamlines connections and overcomes key barriers across the three pillars of IT: development, QA, and operations. It is deeply integrated with the rest of the Visual Studio development and testing platform to allow for a more efficient build-deploy-test workflow and a more effective application lifecycle management strategy.● Improved Regression TestingDon’t let fixes destroy your previously verified code base. Lab Management 2010 automates and streamlines tedious regression and smoke tests through its ability to automatically restore exact configurations to a known state and re-runpredefined tests. This significantly reduces the effort and time associated with setting up and running regression tests.● Role-Based Virtual Lab AdministrationUse Lab Management permissions to create role-based self-service groups of team members, who can create, deploy and manage virtual environments without requiring system administrator privileges. These permissions are integrated with Visual Studio T eam Foundation Server permissions to let you meet the specific requirements of your organization.● Deploy to A Known ConfigurationProject build-scripts can explicitly target a particular lab configuration, allowing multiple environments to be fullyprovisioned and readied for testing at build time. These images reside in the Golden Virtual Machine Library and ensure teams start from a clean set of virtual machines. Additionally, the build process can include the initial run of core build verification test suites that include unit tests, load tests and automated UI tests. ● Collect Rich Diagnostic DataT est Agents within each virtual environment let you collect rich diagnostic data. Configure the Diagnostic Data Adapter (DDA) to collect IntelliTrace™3 logs which contain specific diagnostic trace information to help isolate bugs that are difficult to reproduce. Unlock the power of IntelliTrace to enrich the context behind each bug you file.● See What Testers SeeNow developers can reproduce a bug in the exact same environment that the tester used to discover it. T esters can take a full server-side environmental snapshot during any testing activity and attach it to the bugs they file. From the bug form inside the Visual Studio IDE, developers connect to the environment directly. This lets developers see exactly what the tester saw and more easily identify the root cause of the problem. ● Build OptimizationStreamline your build process to continuously integrate, build, and verify changes. With Lab Management 2010, development and QA teams work closely together to schedule builds and plan for the tests required to verify a build. This optimized build process gives QA the visibility and stability it needs with each build.● Self-Servicing Lab ManagementRegardless of your role, self-service virtual labs are at yourfingertips. Virtual environments can be easily accessed through Microsoft T est Manager 2010, including viewing, stopping and restarting of environments from the Environment Viewer. You can also mark them as “in-use” to ensure visibility. ● Cloning with Network IsolationNetwork isolation enables multiple copies of a lab environment to run at the same time without causing network conflicts, such as conflicts due to computer names and Domain Name System (DNS) registration. Now you can enable multiple complex test configurations for testing without any re-configuration of your multi-tier application.● Reduce Hardware Costs With Windows Server Hyper-V™ The Hyper-V platform provides a reliable and optimized virtualization solution that lets you improve serverutilization and reduce costs. It provides a small footprint with minimal overhead and easily plugs into your existing IT environments. Lab configurations from Lab Management 2010 are stored as Hyper-V virtual images, allowing them to be used as both physical and virtual images.1. T o use Microsoft Visual Studio Lab Management 2010 you need T eam Foundation Server 2010 (licensed separately).2. Microsoft T est Manager 2010 is available with Visual Studio Ultimate 2010 or Visual Studio T est Professional 2010, both licensed separately3. IntelliTrace, available with Microsoft Visual Studio 2010 Ultimate, allows you to look back at a past state of your application with debugging information. Events of interest can be recorded through the IDE or Microsoft Visual Studio T est Manager 2010, available with Test Professional 2010 or Visual Studio 2010 Ultimate.The Environment ViewerView, stop, restart an environment with a single click as well as manage snapshots easily.Ultimate Premium Professional 2010 Development Platform Support Windows, Web and Cloud Development ● ● ● Office and SharePoint Development ● ● ● Architecture and ModelingArchitecture Explorer, Layer Diagram and Dependency Validation ● Read-only diagrams (UML, Layer, DGML Graphs) ● ● Database DevelopmentDeployment, Change Management, Test Data Generation, Unit Testing ● ● Debugging, Diagnostics and TestingIntelliTrace™ (Historical Debugging), Web Performance Testing, Load Testing 1 ●Static Code Analysis, Code Metrics, Profiling, Code Coverage, Test Impact Analysis, Coded UI Test ● ●Unit Testing● ● ● Test and Lab ManagementMicrosoft® Test Manager 2010, Test Case Management, Manual Test Execution, Fast Forward for Manual Testing, Rich Actionable Bug Filing●●Virtual environment setup & tear down, Provision environment from template, Checkpointenvironment through Test Manager 2010 (Visual Studio Lab Management 2010 required)2● ●Team Foundation ServerVersion Control, Work Item Tracking, Build Automation, Team Portal, Reporting & Business Intelligence, Agile Planning Workbook, Team Explorer ● ● ● ●MSDN Subscription benefitsPriority support in MSDN Forums, MSDN Magazine, Flash newsletter, Online Concierge ● ● ● ●Technical support incidents4 4 2 2Microsoft® e-learning collections (typically 10 courses or 20 hours) 2 2 1 1Windows® Azure™ Platform●† ●† ●† MSDN Subscription - Software for Production UseMicrosoft® Visual Studio® Team Foundation Server 2010 plus one CAL ● ● ●●Microsoft® Office Professional Plus 2010, Project Professional 2010, Visio® Premium 2010, Expression Studio 3● ● MSDN Subscription - Software for Development and Test Use 3 Windows (client and server operating systems), Microsoft® SQL Server®, Toolkits, Software Development Kits, Driver Development Kits● ● ●●Microsoft® Office, Dynamics®, All other Servers, Windows Embedded ●●Visual Studio 2010 Feature Comparisonwith MSDN with MSDN with MSDNVisual Studio T est Professional with MSDNVisual Studio 2010。
vs2010 解决方案配置
vs2010 解决方案配置
《使用VS2010解决方案配置进行快速开发》
Visual Studio 2010是微软推出的一款集成开发环境,为开发人员提供了丰富的工具和功能。
在使用VS2010进行软件开发时,解决方案配置是非常重要的一环。
通过正确的配置,开发人员可以更快速地搭建项目结构,调试代码并进行部署。
首先,通过解决方案资源管理器可以创建、添加、删除项目和解决方案的组织结构。
在解决方案资源管理器中,开发人员可以方便地对项目进行管理,包括设置编译属性、引用引用项、以及调整项目的层次结构。
其次,解决方案配置可以用于设置编译时的参数和选项。
在项目属性中,开发人员可以设置编译器参数、链接器参数、预处理器参数等,以便在编译时对代码进行优化、调试和部署。
另外,在解决方案配置中也可以对调试器进行配置。
开发人员可以设置断点、查看变量、监视表达式等,来帮助调试和排错。
此外,还可以设置远程调试、内存管理选项等高级调试功能。
最后,解决方案配置还可以用于发布项目。
通过发布管理器,开发人员可以创建发布文件、设置发布路径、以及对发布项目进行各种属性设置,以实现项目的快速部署。
总的来说,通过合理的解决方案配置,开发人员可以更快速地搭建项目结构、调试代码和部署项目。
VS2010提供了丰富的
解决方案配置选项,使开发人员能够更加高效地进行软件开发工作。
vs2010下调用matlab2012b调试方法

vs2010下调用matlab2012b调试方法配置环境:vs2010+matlab2012b+win7 64位说明:以安装路径“E:\Program Files\MATLAB\R2012b\”为例MATLAB外部支持文件夹:E:\Program Files\MATLAB\R2012b\externmatlab自带的c例程:E:\ProgramFiles\MATLAB\R2012b\extern\examples\eng_matengine.h的位置:E:\Program Files\MATLAB\R2012b\extern\include各种lib的位置:E:\Program Files\MATLAB\R2012b\extern\lib\win64\microsoft 在matlab帮助中输入“C language”即可找到有关MATLAB Engine的一个页面。
从这个页面开始,学习各种关键词,就能够找到一切你需要的资料。
使用MATLAB Engine一般用两套函数就可以了。
1.engXXXX,关于Engine本身的操作,包括打开/关闭,设置/取得变量,执行语句等等。
2.mxXXXX,关于数据类型mxArray的操作,与MATLAB 交互的左右类型全部为mxArray。
搭建过程:1.先在VC6的tools->options->directories里添加相关目录include files:E:\Program Files\MATLAB\R2012b\extern\includeE:\ProgramFiles\MATLAB\R2012b\extern\include\win64library files:E:\ProgramFiles\MATLAB\R2012b\extern\lib\win64\microsoft2 点击LInker input 将libmx.lib;libmex.lib;libeng.lib;加入到Additional Dependencies或者用#pragma comment (lib, "libeng.lib")#pragma comment (lib, "libmx.lib")#pragma comment (lib, "libmex.lib") 语句3 环境变量加上E:\ProgramFiles\MATLAB\R2012b\bin\win64 否则编译成功运行时会显示缺少dll4包含头文件engine.h5这就可以去调用engine里的一些引擎函数了做好这些后,如果我们环境一样,下面的代码应该能够编通并且正常执行,其中包含了常用的一些函数,一般来说使用Engine的时候也就用这些了。
用VS2010构建MASM的编程环境
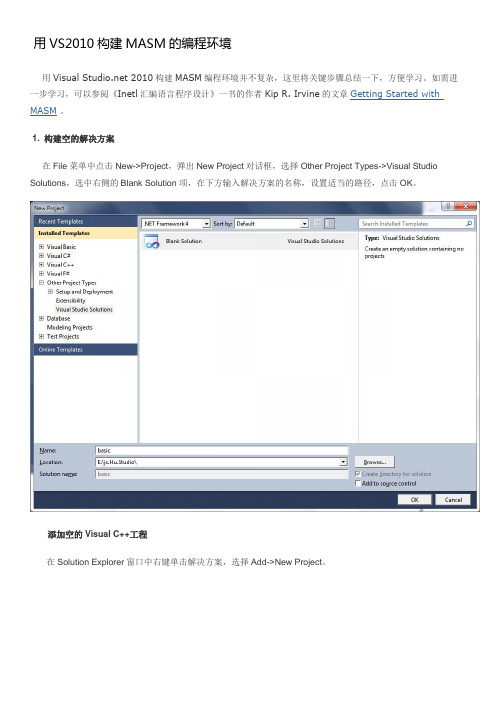
用VS2010构建MASM的编程环境用Visual 2010构建MASM编程环境并不复杂,这里将关键步骤总结一下,方便学习。
如需进一1. 构建空的解决方案在File菜单中点击New->Project,弹出New Project对话框,选择Other Project Types->Visual Studio Solutions,选中右侧的Blank Solution项,在下方输入解决方案的名称,设置适当的路径,点击OK。
添加空的Visual C++工程在Solution Explorer窗口中右键单击解决方案,选择Add->New Project。
在New Project对话框中,选则Visual C++,在右侧选中Empty Project,在下方输入项目名称。
2.定制Visual C++工程的构建规则这一步非常重要,必须在添加源文件之前设置,否则在后续的项目属性设置对话框中将看不到MASM的设置选项。
在Solution Explorer窗口中右键单击Visual C++项目,选择Build Customizations…项,弹出Visual C++ Build Customization FIles对话框,勾选masm项,点击OK。
3.设置项目输出选择Configuration Property->Linker->System,在右侧SubSystem栏中选择Console (/SUBSYSTEM:CONSOLE),是项目输出到命令行窗口。
4. 添加源文件在Solution Explorer窗口中右键单击Source Files,选择Add->New Item项,打开Add New Item对话框。
在Add New Item对话框中,选中C++ Files(.cpp),在下方输入源文件名称,使用.asm后缀。
如addsub.asm。
VS2010中Win32汇编环境的架设

1.为什么要用VS
界面相当友好
有些人说VS没语法高亮,看起来很不爽,其实这是可以通过载入语法高亮文件来实现。
有些人说VS没有自动填充,这个倒是真的。
不过这真的不是问题。
2.环境架设过程
1)安装MASM32。
/masmdl.htm MASM32似乎只能装在根目录下。
2)打开VS2010,建立一个blank solution。
如下图
3)在blank solution下新建一个empty project(Visual C++)。
4)在Solution Explorer中选择这个project,右键Build Customizations,选择masm项。
5)在project下新建一个.cpp文件,但是在下方扩展名改为asm。
6)在Solution Explorer中对project右键,properties,如下图设置:
注:我的MASM32是安装在D盘的根目录。
3.语法高亮的设置
1)下载usertype.dat。
把它放在xxxx\Microsoft Visual Studio 10.0\Common7\IDE文件夹中。
就是你的VS2010的安装目录中的相应位置。
2)在VS2010中,选Tools->Option->Text Editor,选中File Extension,在右边如下设置,选择ADD。
3)重启VS2010。
现在,在刚才设置的工程下,可以开始写Win32汇编了。
最终截图如下:
工程的设置还是比较麻烦的,不过,
如果你爱VS爱得够深,这些都不是问题。
Visual Studio 2010 测试管理解决方案

ӄMicrosoft Testing SolutionMicrosoft Testing Solution 微软测试解决方案Microsoft Visual Studio 2010 带来了全新的软件测试解决方案,并使其整合在整个应用生命周期管理体系(ALM)之中。
作为应用生命周期最重要的环节,软件质量保证历来是软件企业最迫切期望得到改善和提高的部分。
微软测试解决方案包括快速进行有关测试的实际与开发、测试用例管理,与Visual Studio Team Foundation Server 集成的测试计划,以确保所有变更和迭代都被正确的测试和覆盖。
这些功能贯穿于整个测试周期:测试计划、测试执行、进度跟踪和结果分析。
Microsoft Visual Studio 2010 测试工具集可以用于创建测试计划、管理测试用例、运行测试用例、管理和分析测试结果,以及与微软新一代开发测试云集成等特性。
微软测试解决方案真正做到了和开发团队的有效协作,是目前最流行的敏捷方法 Agile/Scrum 的最佳实践。
Microsoft Visual Studio 2010 测试框架Microsoft T est Manager 微软测试管理解决方案微软测试管理框架Microsoft Visual Studio 2010 测试管理包含架构设计、项目模板、测试管理、项目门户等;对于MS Project 、SharePoint 、Hyper-v 虚拟化平台及云计算平台进行了全面的集成。
可以大幅提升软件质量,集成的测试工具集提供了完整的”计划-测试-跟踪” 工作流。
使用丰富的诊断工具为开发人员归档大量bug 。
充分利用以人物为导向的用户界面和手动测试快进等功能, 可以获得所有团队角色之间的上下文协作, 大大增加了对整个项目的可视性, 同时提供了对用户需求的完整可跟踪性、进度报告和实施质量度量。
有助于您做出明智、及时的决策, 并降低与软件发布相关的风险。
Microsoft Visual Studio 2010下编辑汇编语言方法

32位Windows7 +Microsoft Visual Studio 2010+MASM32
1,安装Microsoft Visual Studio 2010(安装过程省略);
2.安装masm32,(安装过程省略);
3.开始配置汇编语言的运行环境:
(1)建立项目,在已安装的模版中选择“VisualC++”右边的选项中选择“空项目”,然后点击“确定”,具体如下图所示:
(2)在解决方案管理器中,点击项目名称,选择“生成自定义”,选择“masm”;然
后点击确定;
(3)点击项目,在“添加“中选择添加”添加新项“,接下来选择C++文件(.CPP),为新建的项取名,重要的是必须以.asm作为后缀名。
(4)选择项目的”属性”,在“配置属性”中,选择“链接器”,在”附加库目录”中,添加你所安装的masm32的“lib”库的路径;
(5)选择项目的属性,在“配置属性”中,选择“Microsoft Access”,再选“Gennel”,在右边的“Include Paths”添加你所安装的masm32的“include”的路径;
(5)选择项目的“属性”,在配置属性中,选择“链接器”,选中下边的“系统”在右边的“子系统”中,选择Windows(/SUBSSYSTEM:WINDOWS);
(7)在资源管理器中选择wj.asm,打开编辑代码;。
vs2010解决方案配置

vs2010解决方案配置
《VS2010解决方案配置》
在使用Visual Studio 2010进行开发时,配置解决方案是非常重要的一步。
解决方案配置包括对项目的设置、调试选项、编译选项等内容进行配置,确保项目可以正常运行并且满足开发需求。
首先,在Visual Studio 2010中打开解决方案后,我们可以在“解决方案资源管理器”中右键点击解决方案,选择“属性”来对解决方案进行配置。
在弹出的窗口中,我们可以设置不同项目的属性,包括调试、编译、链接、部署等选项。
在调试选项中,我们可以配置启动项目、启动动作、命令行参数、工作目录等内容。
这些设置可以帮助我们在调试时更方便地运行程序并查看运行结果。
在编译选项中,我们可以配置输出路径、生成XML文档、优化选项等内容。
根据项目的具体需求,我们可以对编译选项进行不同的配置,以满足项目的性能和可维护性要求。
另外,在“属性管理器”中,我们还可以对解决方案进行更细致的管理,包括添加不同的配置(Debug、Release等)以及针对不同的平台(x86、x64等)进行配置。
总之,对解决方案进行正确配置是项目开发的重要一步,可以帮助我们更高效地开发和调试代码。
在使用Visual Studio 2010
进行开发时,我们要熟练掌握解决方案配置的方法,以便更好地完成项目开发任务。
Vs2010 环境配置和测试

解压OpenCv和DiectShow
编译好的Debug和Release文件夹拷贝到 F:\Program Files\DxShow\Samples\C++\DirectShow\Ba seClasses目录下
VS2008开发环境的配置
OpenCV在VS2008中的配置
在“工具”-“选项”-“项目和解决方案”- “VC++目录”-“包含文件”中,添加:
第一个例子程序
该程序的效果是,从硬盘中加载指定的图 像文件,并在窗口中显示出来。如下图所 示:
第一个例子程序
第二个例子程序
下面将通过第二个简单的例子程序,介绍 如何编写基于对话框的MFC程序。
(1)打开VS2008编程环境。选择“文件”->“新建”->“项 目”,在弹出的“新建项目”对话框中,展开左侧树形列 表“项目类型”->“Visual C++”->“MFC”,在右侧的“Visual Studio 已安装的模板”栏中选择“MFC 应用程序”。填写 项目名称,这里为Test2。点击“确定”按钮;见下图:
精选课件14vs2010开发环境的配置新建工程时新建win32consoleapplication然后去掉预编译头选项然后在新建的工程那里最下面找到propertymanager然后再选择microsoftcppwin32user这一项debug或release的都行出来的框内选择vcdirectories然后在includedirectories和librarydirectories中添加你的依赖文件和库文件路径
2、减少开发的复杂度:确保您能更加轻松发布基于 Framework 的解决 方案,包括 Windows、Web、移动和基 于 Office 的应用。
使用VS2010调用matlab的mat格式文件

使用VS2010调用matlab的mat格式文件做实验需要将matlab实现的meanshift的结果中的region 的Iabels矩阵,需要把labels.mat读入VS2010中,实现功能,在此把实现过程记录下来:C++读取mat文件:1. vs2010的配置新建一个工程,在属性管理器中选择工程->属性->VC++目录。
设置包含目录为:D:\MATLAB\R2010a\extern\include(我的matlab装在D盘);设置库目录为:D:\MATLAB\R2010a\extern\lib\win32\microsoft。
2.设置环境变量path计算机->属性->高级系统设置->高级->环境变量在Path中已经存在D:\MATLAB_2011a\R2011a\bin\,但是D:\MATLAB_2011a\R2011a\bin\win32下有个重要的libmat.dll。
如果不把d:\MATLAB\R2010a\bin\改为D:\MATLAB_2011a\R2011a\bin\win32 程序将无法运行。
理论上D:\MATLAB_2011a\R2011a\bin\应该会向深一步检索到libmat.dll。
坑爹的windows这一步并没有去做。
这步设置完后要重启(环境配置完毕)。
3.3.使用MATLAB 提供的MAT 文件接口函数在C/C++程序中有两种方式可以读取MAT文件数据。
利用MATLAB提供的有关MAT文件的编程接口函数。
MATLAB的库函数中包含了MAT文件接口函数库,其中有各种对MAT文件进行读写的函数,都是以mat开头的函数。
如表1所示。
表1 C语言中的MAT文件读写函数MAT 函数功能matOpen打开MAT 文件matClose关闭MAT 文件matGetDir从MAT 文件中获得MATLAB 阵列的列表matGetFp获得一个指向MAT 文件的ANSI C 文件指针matGetVariable从MAT文件中读取MATLAB阵列matPutVariable写MATLAB阵列到MAT文件matGetNextVariable从MAT文件中读取下一个MATLAB阵列matDeleteVariable从MAT文件中删去下一个MATLAB阵列matPutVariableAsGlobal从MATLAB阵列写入到MAT文件中matGetVariableInfo从MAT文件中读取MATLAB阵列头信息matGetNextVariableInfo从MAT文件中读取下一个MATLAB阵列头信息4.程序举例:读取.mat文件,并把mat内容存储在图像中并显示。
详解VS2010如何搭配汇编程序开发环境的图解教程

详解VS2010如何搭配汇编程序开发环境的图解教程本文和大家分享一下如何搭配汇编程序开发环境的图解教程,非常不错的文章哦。
引子由于这些日子一直都在研究底层的技术,从Windows 驱动程序,到Windows 内核等等技术的学习,让我对底层的技术越发有兴趣了,而刚好,在研究WRK 时,对内存管理,寄存器,地址总线,数据总线,控制总线等的理解不够透彻,所以越发的想学习汇编程序设计来提升功力,而由于近来在公司里一直都有项目压着,所以在公司里也实在不好拿本汇编程序设计看,所以只好晚上回来学习了,汇编看了几个晚上,也算是蛮有感觉的。
今天就先来搭个开发环境再说吧。
开发环境搭配我介绍四种开发汇编程序的方式:第一种:直接在Dos 环境下使用Edit 命令调出源码编辑框,生成源码后,可以使用由微软提供的masm 汇编编译器来对源码进行编译,编译完后再使用Linker 连接器即可得到可执行文件,这种方式现在几乎被灭绝了(当然使用masm 汇编编译器还是很普遍的),除非你真要在DOS 环境下运行汇编程序;第二种:通过简化第一种方式而来;第三种:直接使用Masm for Windows 集成实验环境,这个开发环境呢,非常适合汇编语言的初学者,因为这个IDE 本身就是由一些从事汇编程序教学的大学老师开发的出来用于汇编初学者进行学习和实验的,所以使用简单,方便,这里可以对这个IDE 稍加推荐;第四种:则是通过Visual Studio 这个强大的IDE 来实现汇编程序的编译,运行和调试,至于Visual Studio 就不多做介绍了,.Net 用了这么多年,这东西强大到什么程度那是总所周知的;第一种方式:使用Edit + MASM 5.0 编译器+ Linker 连接器其实这种方式是很简单的,只是很麻烦,因为简单而且麻烦,所以我采用尽可能的将截图传上来,然后稍加注解的方式进行介绍,软件准备:需要MASM 5.0 或者以上的汇编编译器首先,是要编辑汇编源代码:其实对于源码的编辑根本不需要向如下这么麻烦,直接拿个记事本就OK 了运行cmd 命令输入Edit 命令从而弹出汇编源码编辑框在源码输入框中输入汇编源码将编辑好的汇编源码保存到xx.asm 文件中然后就是要编译编辑好的汇编源代码在Dos 环境下进入到MASM 5.0 汇编编译器所在的目录然后运行masm.exe可以从上面的截图中看到[. ASM] 的标记,这个标记代表的是需要在这里输入要编译的源程序文件名,这里有一点特别的是,由于默认的文件扩展名为 .asm ,所以在编译 .asm 的汇编源程序时可以不用指定源程序所在文件的扩展名。
visual studio 2010和sql server 2008 management配置教程
visual studio 2010和sql server 2008 management配置教程VS2010和SSMSEE2008的搭配可谓是天衣无缝,但是初学者对于二者的配置依然不是很熟练,笔者就自己的经验写下这篇说明,希望能帮到大家。
一、vs2010的安装首先下载vs2010,可以在官网下载分割压缩包:/downloads/en/details.aspx?displaylang= en&FamilyID=06a32b1c-80e9-41df-ba0c-79d56cb823f7或者,iso镜像:/download/2/4/7/24733615-AA11-42 E9-8883-E28CDCA88ED5/X16-42552VS2010UltimTrial1.iso下载后可用虚拟光驱加载(虚拟光驱使用方法略)镜像,开始安装根据提示完成安装,安装完成后提示选择第一个选项,如图所示:输入验证码YCFHQ-9DWCY-DKV88-T2TMH-G7BHP点激活,至此vs安装完成。
这篇博客详细介绍了vs2010的破解方法,大家可以参考一下:/liunx/archive/2010/04/15/1712477.html二、Microsoft SQL Server 2008 Management Studio Express 首先说明一个问题,vs2010自带着sqlserver 2008 express,也就是一个express版的sqlserver2008,它比正式版的sqlserver2008要小而且免费,不过对于一般初学者来说已经够用了。
那么Microsoft SQL Server 2008 Management Studio Express (简称SSMSE)是什么呢?他是管理sqlserver2008的工具,并不是数据库,类似于以前的mssql 2000里的企业管理器和查询管理器等的综合体。
用户可以通过它对数据库进行各种操作,好了废话不多说,下面介绍它的用法。
C# 设置Visual Studio2010开发环境
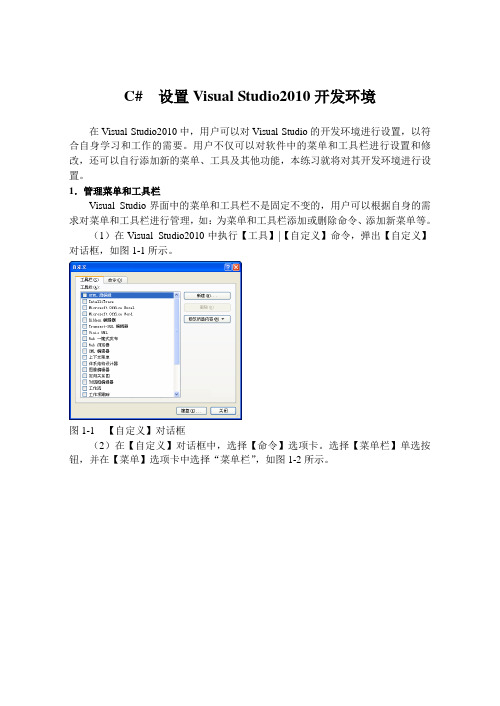
C# 设置Visual Studio2010开发环境在Visual Studio2010中,用户可以对Visual Studio的开发环境进行设置,以符合自身学习和工作的需要。
用户不仅可以对软件中的菜单和工具栏进行设置和修改,还可以自行添加新的菜单、工具及其他功能,本练习就将对其开发环境进行设置。
1.管理菜单和工具栏Visual Studio界面中的菜单和工具栏不是固定不变的,用户可以根据自身的需求对菜单和工具栏进行管理,如:为菜单和工具栏添加或删除命令、添加新菜单等。
(1)在Visual Studio2010中执行【工具】|【自定义】命令,弹出【自定义】对话框,如图1-1所示。
图1-1 【自定义】对话框(2)在【自定义】对话框中,选择【命令】选项卡。
选择【菜单栏】单选按钮,并在【菜单】选项卡中选择“菜单栏”,如图1-2所示。
图1-2 【命令】选项卡(3)然后,单击【添加命令】按钮,为所选菜单添加命令。
并在弹出的【添加命令】对话框中,选择需要添加的命令,单击【确定】按钮即可完成命令的添加,如图1-3所示。
图1-3 添加命令(4)返回【命令】选项卡,单击【添加新菜单】按钮,【控件】列表框中就会显示名为【新菜单】的菜单。
然后,再单击【修改所选内容】按钮,在【名称】文本框中为新添加的菜单设置名称,如图1-4所示。
图1-4 添加新菜单(5)在【控件】列表框中,选择某一菜单或工具后,还可以单击【上移】或【下移】按钮对菜单或工具栏的顺序进行调整,如图1-5所示。
图1-5 调整菜单或工具栏顺序(6)选择【工具栏】选项卡,单击【新建】按钮,在弹出的【新建工具栏】对话框中输入工具栏名称,添加新工具栏,如图1-6所示。
图1-6 新建工具栏(7)然后,选择名为【自定义1】的工具栏,单击【修改所选内容】按钮,设置所选工具栏的名称或停靠位置,如图1-7所示。
图1-7 修改工具栏2.添加和使用外部工具在Visual Studio2010中还允许用户添加外部工具,极大的方便了用户的操作,也使得Visual Studio的功能更加完善。
详解汇编语言开发环境搭建方法
于这些日子一直都在研究底层的技术,从 Windows 驱动程序,到 Windows 内核等等技术的学习,让我对底层的技术越发有兴趣了,而刚好,在研究 WRK 时,对内存管理,寄存器,地址总线,数据总线,控制总线等的理解不够透彻,所以越发的想学习汇编程序设计来提升功力,而由于近来在公司里一直都有项目压着,所以在公司里也实在不好拿本汇编程序设计看,所以只好晚上回来学习了,汇编看了几个晚上,也算是蛮有感觉的。
今天就先来搭个开发环境再说吧。
开发环境搭配我介绍四种开发汇编程序的方式:第一种:直接在 Dos 环境下使用 Edit 命令调出源码编辑框,生成源码后,可以使用由微软提供的 masm 汇编编译器来对源码进行编译,编译完后再使用 Linker 连接器即可得到可执行文件,这种方式现在几乎被灭绝了(当然使用 masm 汇编编译器还是很普遍的),除非你真要在 DOS 环境下运行汇编程序;第二种:通过简化第一种方式而来;第三种:直接使用 Masm for Windows 集成实验环境,这个开发环境呢,非常适合汇编语言的初学者,因为这个 IDE 本身就是由一些从事汇编程序教学的大学老师开发的出来用于汇编初学者进行学习和实验的,所以使用简单,方便,这里可以对这个 IDE 稍加推荐;第四种:则是通过 Visual Studio 这个强大的 IDE 来实现汇编程序的编译,运行和调试,至于 Visual Studio 就不多做介绍了,.Net 用了这么多年,这东西强大到什么程度那是总所周知的;第一种方式:使用 Edit + MASM 5.0 编译器 + Linker 连接器其实这种方式是很简单的,只是很麻烦,因为简单而且麻烦,所以我采用尽可能的将截图传上来,然后稍加注解的方式进行介绍,软件准备:需要 MASM 5.0 或者以上的汇编编译器首先,是要编辑汇编源代码:其实对于源码的编辑根本不需要向如下这么麻烦,直接拿个记事本就 OK 了运行 cmd 命令输入 Edit 命令从而弹出汇编源码编辑框在源码输入框中输入汇编源码将编辑好的汇编源码保存到 xx.asm 文件中然后就是要编译编辑好的汇编源代码在 Dos 环境下进入到 MASM 5.0 汇编编译器所在的目录然后运行 masm.exe可以从上面的截图中看到 [. ASM] 的标记,这个标记代表的是需要在这里输入要编译的源程序文件名,这里有一点特别的是,由于默认的文件扩展名为 .asm ,所以在编译 .asm 的汇编源程序时可以不用指定源程序所在文件的扩展名。
Visual studio 2010 MASM环境设置

MASM in Visual Studio 2010First step:Create an empty project in Visual C++:Second, right-click project in solution explorer, Build customizations, tick "masm",Then tap the right of mouse, select AddNow, select C++ File(.cpp), enter the source file name with .asm as extend file name.Tap right of mouse, choose Properties:Expand the entry under Configuration Properties. Then expand the entry named Microsoft Macro Assembler.Notice that the Include Paths option has been set to the x:\file directory\include directory.In this example, include directory is c:\Irvine.Next, select the Listing File entry, also in the Microsoft Macro Assembler group. Notice that the Assembled Code Listing File entry (shown below) has been assigned a macro name (starting with $) that identifies the name of the source input file, with a file extension of .lst. So, if your program were named main.asm, the listing file would be named main.lst:Find the Linker entry under Configuration Properties. Select the Input entry, and notice that two filenames have been added to the Additional Dependencies entry. The user32.lib file is a standard MS-Windows file. The irvine32.lib file is the link library file supplied with this book. There must be at least one space separating the file names:Next, select Linker under Configuration Properties, and then select General. The Additional Library Directories option equals c:\Irvine, so the linker can find theIrvine32.lib library file:the Generate Debug Info option is set to Yes:to Console:We use the Console setting because it is easy for assembly language programs to write output to a text console (Command) window. This is the window you see when running cmd.exe from the Start > Run menu in Windows.Click the OK button to close the Project Property Pages window.。
VS2010调用Matlab2012b引擎的设置方法
VS2010调用Matlab2012b引擎最近需要把matlab和VS结合起来使用,初来乍到出现了很多的麻烦,网上的资料大都也是matlab较低一些版本的,经过多方查找资料后,得以成功,现在总结出来,以方便读者们,避免走些弯路。
大家一起进步本人的平台是:win7旗舰版x64+VS2010(中文版)+Matlab2012b操作流程:1添加系统环境变量Win7的方法是在计算机中右击属性,然后选择左边的高级系统设置然后接着找到环境变量,设置系统环境变量,在系统环境变量中选择编辑,保持原有的内容不变,把光变移动到最后面,把matlab的地址写进去。
例如本人的安装目录是:D:\Program Files(86)\MATLAB\R2012b\bin\win64;,具体的位置由安装位置决定。
然后重新启动一下电脑,让刚刚设置的环境变量生效。
2在VS中新建一个编译平台(1)进入“配置管理器”由于本人的笔记本是64位的,所以不能用32位的系统编译平台,这点倒是废了很大的功夫,终于在网上找到了方法,再次表示感谢。
链接为/view/f87eee58804d2b160b4ec05b.html。
或者直接从工具栏平台的下拉箭头下进入:(2)增加x64平台确定,得到如下结果。
3添加头文件和库文件剩下的就是很常规的了,右击项目---属性---项目属性——》VC++目录,如图:包含目录增加:D:\Program Files(x86)\MATLAB\R2012b\extern\include库目录增加:d:\Program Files(x86)\MATLAB\R2012b\extern\lib\win64\microsoft 4. 此时还剩下最后一项设置,首先打开菜单项目->项目属性页选择配置属性->链接器->调试->生成调试信息改为是。
然后重新运行即可!!下面就可以编辑代码好好加油啦。
VS2010 开发环境设置
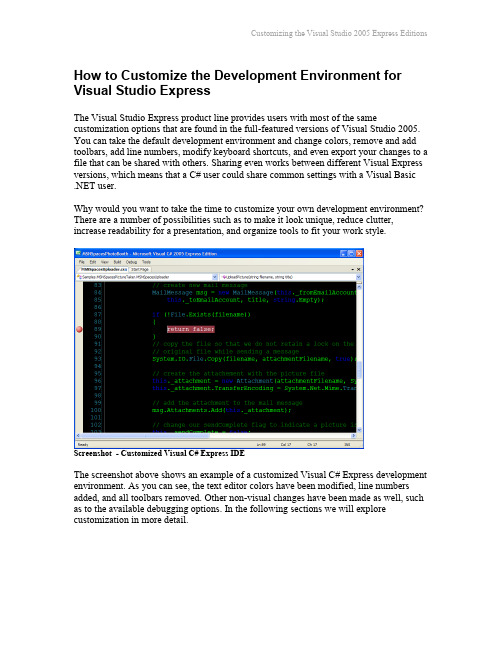
How to Customize the Development Environment for Visual Studio ExpressThe Visual Studio Express product line provides users with most of the same customization options that are found in the full-featured versions of Visual Studio 2005. You can take the default development environment and change colors, remove and add toolbars, add line numbers, modify keyboard shortcuts, and even export your changes to a file that can be shared with others. Sharing even works between different Visual Express versions, which means that a C# user could share common settings with a Visual Basic .NET user.Why would you want to take the time to customize your own development environment? There are a number of possibilities such as to make it look unique, reduce clutter, increase readability for a presentation, and organize tools to fit your work style.Screenshot - Customized Visual C# Express IDEThe screenshot above shows an example of a customized Visual C# Express development environment. As you can see, the text editor colors have been modified, line numbers added, and all toolbars removed. Other non-visual changes have been made as well, such as to the available debugging options. In the following sections we will explore customization in more detail.ContentsCustomizing optionsCustomizing Toolbars and CommandsKeyboard shortcutsImporting and exporting settingsHow to reset settings from the command lineAdditional resourcesCustomizing optionsOptions can be viewed and modified in any Express product by selecting Tools | Options from the main menu. The Express product line provides a streamlined view of options by default, with some differences between each version.Although each version of Visual Studio Express has some variation in the default options, layout, and toolbars, there are still many similarities. To see all of the available options, select the Show All Settings checkbox at the bottom of the Options window.Screenshot - Options window for Visual Basic Express showing all options and settingsHere is a table of some select settings that can be modified using the Options window:Customizing Toolbars and CommandsNow let’s take a look at how you can customize the toolbars, menus, and commands that are made available within the development environment. Available commands can be placed in a menu, a toolbar, or even both at the same time. To start customizing, select Tools | Customize from the main menu. Alternatively, you can select View | Toolbars | Customize from the main menu.Screenshot - Customize window allows you to customize Toolbars and CommandsOnce the Customize window is open, tabs for customizing Toolbars and Commands are made available. In addition, the actual toolbars and main menu are now in a design mode that allows adding and deleting commands, moving commands, changing command images, and more. For example, the screenshot below shows that I can delete the Properties Window command from the View menu by simply right-clicking on it andselecting Delete from the context menu that appears.Screenshot - Deleting a command from a menuThe Toolbars tab of the Customize window allows you to enable or disable any of the default toolbars by selecting or de-selecting the associated checkbox. Keep in mind that toolbar changes take effect immediately. You can even create your own toolbar and put only the commands that you want on it.The Commands tab of the Customize window lists all available commands for categories such as Build, Data, Debug, Tools, and so on. This tab is your toolbox for customizing your main menu or toolbars. To add a command to the menu or a toolbar, simply drag the command to the desire location.Keyboard shortcutsShortcuts exist to make your development life easier and more productive. Most would associate keyboard shortcuts with experienced users, but even beginners can benefit from learning the shortcuts to commonly used commands.Every command that is available to Visual Studio can be assigned a shortcut. To view and/or change these shortcuts, select Tools | Options from the main menu and navigateto Environment | Keyboard.Screenshot - Options window provides access Keyboard shortcut settingsIn the screenshot above, you can see that the Community.CodezoneCommunity command has been selected and that Ctrl+Alt+H has been assigned as the shortcut key combination. By default, new shortcuts will work in a global context, but it is possible to make them only work in a specific context such as in the Windows Forms Designer. If the shortcut keys that you select are already in use an additional drop-down box will become active and show you the conflicting command.Importing and exporting settingsEach version of Express corresponds to a specific language and includes default settings for its integrated development environment (IDE). Visual Studio settings include window layout, fonts and colors, keyboard shortcuts, debugging options, text editing options, and more. Virtually anything that is customizable within the IDE is saved to the current settings file for the current Windows user. For example, the current settings for VB Express would be saved to a file named CurrentSettings.vssettings within your My Documents\Visual Studio 2005\Settings\VB Express folder.Visual Studio makes it very easy to import and export your settings file for backup and sharing purposes by providing a wizard. Start the Import and Export Settings wizard by selecting Tools | Import and Export Settings from the main menu.The Settings wizard allows you to do a number of tasks, including the following: ∙Export selected settings.∙Import selected settings.∙Reset settings to their original version.Having the ability to import or export selected settings enables a number of useful scenarios. For example, let’s say that you have customized the color scheme for your text editor and wish to share if with your friends. Using the settings wizard, you can exportjust the settings that modify the text editor and post them on your website or blog.Screenshot - You can choose which settings you want to exportWhen other developers import your custom settings file, only the settings that youoriginally exported can be transferred to their Express installation. Even if you had donea wholesale export of all settings, the import process would still prompt the user to selectwhich settings they want to import, preventing an automatic overwrite of settings that the user does not wish to change.How to reset settings from the command lineIf you get yourself into a big mess or simply want to return to a default state quickly, select Tools | Import and Export Settings from the main menu. Next, select Reset all Settings from the wizard and click the Next button. You will be prompted to save your current settings by default, but you can also choose to abandon all current changes and select the Next button once again. After the reset has completed, restart the IDE. Alternatively, you can also perform a reset via the command line using the“/resetsettings” command line switch. For a default installation of Visual Basic Express, the full command would be:C:\Program Files\Microsoft Visual Studio 8\Common7\IDE>VBExpress /resetsettingsAdditional resourcesMSDN Visual C# 2005 Express Tour - Customization/vstudio/express/visualcsharp/features/customize/default.aspx MSDN - Customizing the Development Environment/en-us/library/hthab0h8.aspxShared Visual St udio Settings Files @ Scott Hanselman’s Blog/blog/ChangingYourColorsInVisualStudioNETBlackVersus White.aspxNote: see the comments at the bottom of the page.。
VisualStudio2010中文版开发MASM工程项目

VisualStudio2010中文版开发MASM工程项目先说一点:Visual Studio是微软家的集成开发工具,主要用来开发windows平台上的应用软件,主要有的语言有VC++,VC#,VB…不知道哪位大神发现Visual Studio也可以开发MASM项目。
打开IDE,你发现其实根本不能直接创建ASM。
为什么微软不在VS里面添加开发ASM 项目的模板呢?仔细思考并不难推敲:第一,ASM作为一个低级语言根本无法适应现在windows平台项目快速开发的需求。
第二,如果你想在高级语言(VC++)中嵌入汇编指令可以直接使用“__asm”指令来嵌入。
第三,如果你要开发ASM项目,微软有专门的开发工具就是发布版的MASM,目前最新版是MASM8.0版本。
用Visual Studio开发ASM项目优点是不言而喻的,不管是开发环境优雅,集成性,调试方面都十分卓越,所以有人才会想到用VS去开发ASM。
事实上,VS不能直接开发ASM的但是由于ASM与VC的千丝万缕的联系,使得开发从原理上来说行得通。
(比如,从语言的发展方面来看,汇编中宏或多或少存在着高级语言的影子。
以及它们都使用ML.exe编译器等等)开始正题1.创建ASM项目打开VS2010,选择新建一个VC++项目。
选择“空项目”,输入项目名称,点确定。
你会发现没有任何更多设置就直接完成了。
(这确实是个空项目,什么设置都没有配置)。
在“源文件”文件夹新建“.asm”类型的源文件就像这样。
其实你会发现根本没有“.asm”类型的文件让你新建,你可以选择“C++文件,.cpp”然后在文件结尾加上拓展名.asm就行了。
现在项目和源文件都有了,但是这毕竟是个VC++的空项目,VC++项目在默认情况下是不会编译.asm类型的源文件的。
所以你点击“生成解决方案”发现根本什么都没有生成,Debug 文件夹是空的,就会出现这样的现象。
要经过下面两步设置。
第一步,右击解决方案选择“生成自定义”,然后把“MASM”那项勾上,确定。
MSComm控件使用VisualStudio2010
hexdata.Add(0x03);
hexdata.Add(0x01);
hexdata.Add(0x00);
hexdata.Add(0x00);
hexdata.Add(0x30);
m_mscomm.put_OutBufferCount(0);//清空发送缓冲区
m_mscomm.put_Output(COleVariant(hexdata));//发送十六进制数据
m_EditSend.Empty(); //发送后清空输入框
UpdateData(false); //更新编辑框内容
}
4
void CCommTestDlg::OnBnClickedButtonSixteen()
{
// TODO:在此添加控件通知处理程序代码
CByteArray hexdata;//发送的数据
AfxMessageBox(_T("串口1已关闭"));
}
3
void CCommTestDlg::OnBnClickedButtonSend()
{
// TODO:在此添加控件通知处理程序代码
UpdateData(true); //读取编辑框内容
m_mscomm.put_Output(COleVariant(m_EditSend));//发送数据
{
// TODO:在此添加控件通知处理程序代码
}
void CCommTestDlg::OnBnClickedButtonClose()
{
// TODO:在此添加控件通知处理程序代码
}
void CCommTestDlg::OnBnClickedButtonSixteen()
- 1、下载文档前请自行甄别文档内容的完整性,平台不提供额外的编辑、内容补充、找答案等附加服务。
- 2、"仅部分预览"的文档,不可在线预览部分如存在完整性等问题,可反馈申请退款(可完整预览的文档不适用该条件!)。
- 3、如文档侵犯您的权益,请联系客服反馈,我们会尽快为您处理(人工客服工作时间:9:00-18:30)。
MASM in Visual Studio 2010
First step:
Create an empty project in Visual C++:
Second, right-click project in solution explorer, Build customizations, tick "masm",
Then tap the right of mouse, select Add
Now, select C++ File(.cpp), enter the source file name with .asm as extend file name.
Tap right of mouse, choose Properties:
Expand the entry under Configuration Properties. Then expand the entry named Microsoft Macro Assembler.
Notice that the Include Paths option has been set to the x:\file directory\include directory.
In this example, include directory is c:\Irvine.
Next, select the Listing File entry, also in the Microsoft Macro Assembler group. Notice that the Assembled Code Listing File entry (shown below) has been assigned a macro name (starting with $) that identifies the name of the source input file, with a file extension of .lst. So, if your program were named main.asm, the listing file would be named main.lst:
Find the Linker entry under Configuration Properties. Select the Input entry, and notice that two filenames have been added to the Additional Dependencies entry. The user32.lib file is a standard MS-Windows file. The irvine32.lib file is the link library file supplied with this book. There must be at least one space separating the file names:
Next, select Linker under Configuration Properties, and then select General. The Additional Library Directories option equals c:\Irvine, so the linker can find the
Irvine32.lib library file:
the Generate Debug Info option is set to Yes:
to Console:
We use the Console setting because it is easy for assembly language programs to write output to a text console (Command) window. This is the window you see when running cmd.exe from the Start > Run menu in Windows.
Click the OK button to close the Project Property Pages window.。
