NEC数字话机使用说明
NEC DT300数字话机说明书
NEC DT300数字话机说明书NECDT300数字话机是一款全功能数字通信终端,是专为企业客户和消费者打造的智能型移动通信终端。
它集成了NEC领先的移动通信技术与数字通信技术、先进的语音处理技术和优质的多媒体通讯技术。
可提供多种增值业务: IP电话、手机拨打、短信、即时通讯、数码相机以及数字座机等。
功能: NECDT300数字话机支持呼叫中心管理,支持自动呼叫计划模式和无呼叫模式(带呼叫中心自动录音功能)、呼叫保护模式、电话显示/提醒模式、语音/数据广播模式、呼叫记录和查询模式等。
该产品具有优秀的质量、完善的功能以及良好的价格低廉等特点。
1.本机使用说明书主要介绍了产品的基本构造和特点,用户需要了解的功能以及使用方法。
通过一键拨号按键或语音键拨号键盘,将该设备接入座机或手机。
输入法选择标准键盘输入法:单击屏幕上的["选择键值"]键或按#键,进入该界面选择["自动呼叫计划"]或["自动录音"]方式可实现自动语音计划;如果您希望语音与数据同时进行,则需要设置(如"语音"/"数据"等)和语音/数据广播时长。
通过数字键盘上的["数字电话"/"短信"或"即时通讯"按钮,可以实现数据广播及通话记录存储;在您希望显示本机或电话号码时,需将数字键盘上的["数字电话"/"短信"]按键设为最大显示字数可显示5字节;可以在呼叫记录表中记录号码查询信息;对于用户比较关心或需要详细了解信息方面可通过按键提示进行;当用户拨打1、2、3、4等键仍无法接听挂机电话时,可以通过点击["呼叫保护"]键将呼叫记录恢复并将其发送到指定邮箱。
2.用户需要按下开关机键,选择拨号方式;3.确认号码后,点击发送按钮。
拨号成功后(请确认拨到手机号)将会提示输入电话号码。
NEC DT800系列电话用户手册说明书

VOICEMAIL ACCESS
INTERNALLY: Dial 8000 (or) press the the Enter key (14) then press “2” on the dial pad
-Press the Feature button, then press the Blank Line key, then enter the desired number by pressing the digits on the Dial Pad, and then press the Feature button. -The LCD Display will display the SPD Set. -Note: For internal numbers, enter the desired 4-digit number; for external numbers, enter the access code of “88” followed by the 10-digit (local) or 11-digit (long distance) number. -To dial the number being programmed press the desired programmed Blank Line key and it will dial the desired Speed Dial number. NAMING A SPEED DIAL - Press the Feature button, then press the Name soft key. - Press the line key being labeled - Use the key pad to enter the label DIRECTORY TO SEARCH A NAME IN THE DIRECTORY -Press Menu and select option 2 -Use Cursor keys to select speed dial number
NEC SV8100电话系统用户指南说明书
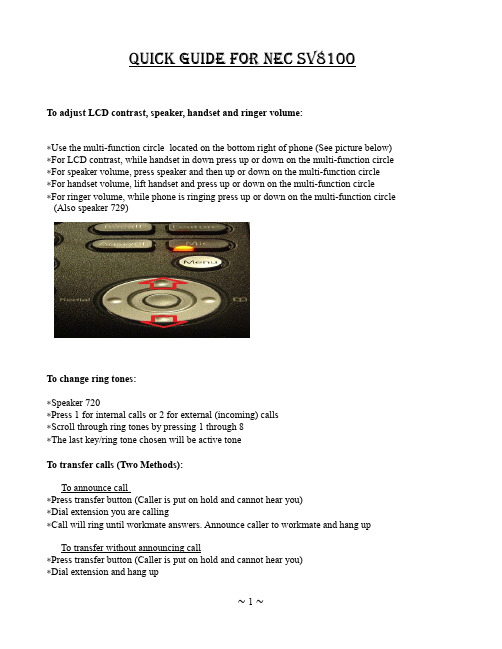
To program a speed dial button:∗Speaker 751∗Press button you wish to program∗Press 01 to define button as DSS/One touch button∗Enter the extension number for an internal number∗For an external number press 9 then the number (9XXX-XXX-XXXX)*∗Press Hold key to save changes∗For a long distance number enter 9 then 1 and number (91XXX-XXX-XXXX)To delete a programmed speed dial button:∗Speaker 751∗Press key you wish to delete∗Press 00 and you will hear a beep∗Hang upTo enter a station speed dial:ØPress speaker 755ØEnter speed dial destination you want to program (From 1-10)ØEnter telephone number you want to program (eg. 1 800 555 1234)ØPress holdØEnter name by using keypad (If needed use # key to advance to next letter)ØPress holdØEnter another speed dial destination or hang up* To clear a station speed dial press the help key after you have selected a speed dial numberTo check Last Number Redial or Caller ID:∗Press List key∗Choose the key for either Redial or Caller ID (CID)∗Use the up/down arrows to scroll through the numbers∗When you reach desired number simply pick up handset or press speaker∗A line is automatically selected and the number is calledTo put phone on Do Not Disturb:∗Press the key below the down arrow on the display∗Press Prog key∗Press the DND key∗Press the Set key∗Press the All key∗Display will say DND ALL and will take a few seconds to take effect∗To remove DND follow the steps 1-4 and hit Cncl instead of SetTo enter a directory speed dial:∗Press speaker 753∗Enter speed dial destination you want to program (minimum of 3 numbers eg. 001)∗Enter telephone number you want to program (eg. 1 800 555 1234)∗Press hold∗Enter name by using keypad (If needed use # key to advance to next letter)∗Press hold∗Enter another speed dial destination or hang upTo dial from directory speed dial:∗Lift handset or press speaker∗Press #2 and directory speed dial number∗Number will be automatically dialledTo record your voice mail greeting:∗Press the VMsg key∗Press the Greet key∗Press the Gr1 key∗Lift handset and press the Rec key∗Wait to speak until after the beep and then press the # key when complete∗To review recorded greeting press the Lstn key∗To record greeting again press the Rec key, the system will record over previous greeting ∗When complete hang up handsetTo record your name:∗Press the VMsg key∗Using keypad press 76∗Lift handset and press the Rec key∗Wait to speak until after the beep and then press the # key when complete∗To review recorded greeting hit the Lstn key∗To record greeting again press the Rec key, the system will record over previous name∗When complete hang up handsetTo set a mail box security code:∗Press the VMsg key∗Using keypad, press 0 to enter main menu features∗Using keypad, press 67 to enter mailbox options menu∗Using keypad, press 7∗Enter a 4 digit security code∗Press 7 so that security code is required in order to access voice mail∗Hang upTo set up message notification:∗Press VMsg key and enter your security code∗Press more button∗Press the Setup key∗Press the Notfy key∗Press the Phone key∗Follow prompts and enter time frame you want to be notified between∗Enter the extension or telephone number you wish to be notified at (613-XXX-XXX)To check messages from outside the building:∗Dial your main phone number∗If live answered ask to be transferred to your voice mail and press the # key. Otherwise press # when the auto attendant answers and enter your extension∗Enter security code and follow prompts to listen to messagesTo call forward your phone:∗Speaker 741∗Press 1 to set and enter either extension or 9 and then number (613-XXX-XXX)∗Press speaker to exit∗To cancel call forward press speaker 741, then 0 for cancel and speaker to exit。
nec-sv8000-9000-basic-feature-guide-user-说明书
SV8000 – 900n American Technologies (718) 937-3600
Page 1
NEC SV8000 - 9000 Basic Feature Guide
To allow others in the room to hear your caller with still talking on the handset, press SPEAKER twice during the call. Press SPEAKER again to turn off this feature Handset / Speakerphone mute Press MIC to mute the handset during a call (A confirmation tone is heard) Red light will be off when muted Press MIC again to turn off mute (Red light will be on when microphone is on) Call Pickup To answer a call ringing on any phone pickup phone and dial *# To answer a call ringing at a specific extension dial **plus the extension number Programming One-Touch Keys Press SPEAKER and dial 751 Press Function Key to be programmed Dial 01 plus any additional data (“ext #” or “9+outside #) Press HOLD Press SPEAKER Do Not Disturb To Set DND – Press SPEAKER 7473 To Cancel DND – Press SPEAKER 7470 Conference Calls With the first call in progress (internal and external) press the Conf softkey Dial the second party phone # either external or internal Press Add softkey (after they answer) Press the Begin softkey to connect all parties together You may add more parties (intenal or external) by pressing the Conf softkey again Missed Calls (Icon will be located in the upper left of the display) Select the Enter Cursor Key Select Option 1 Missed Calls Use the Up or Down Cursor to scroll through the missed call list The icon will turn off once all missed calls have been viewed Voicemail Features Setting up your voicemail Greeting
NEC SL1000专用话机快速参考手册
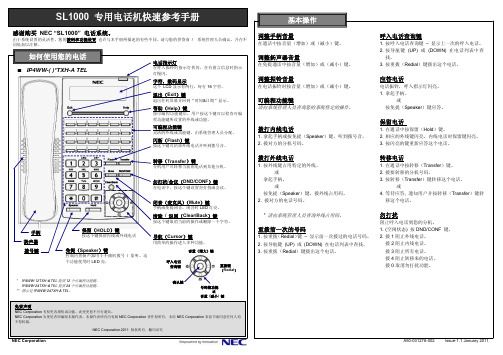
感谢购买 NEC “SL1000” 电话系统。
由于系统设置的灵活性,您的拨码和功能设置 也许与本手册所描述的有些不同。请与您的供货商 / 同处加以注解。 . 系统管理人员确认,并在不
基本操作
调整手柄音量
在通话中按音量(增加)或(减小)键。
呼入电话查询键
1. 按呼入电话查询键 – 显示上一次的呼入电话。 2. 按导航键 (UP) 或 (DOWN) 在电话列表中查 找。 3. 按重拨(Redial)键拨出这个电话。
退出(Exit)键
退出任何屏幕并回到“时间&日期”显示。
可编程功能键
请向系统管理人员查询您的系统特定的操作。
帮助(Help)键
按可编程功能键后,用户按这个键可以检查可编 程功能键所设置的外线或功能。
可编程功能键
灵活的外线或功能键,由系统管理人员分配。
保留电话 拨打内线电话
1. 拿起手柄或按免提(Speaker)键,听到拨号音。 2. 拨对方的分机号码。 1. 在通话中按保留(Hold)键。 2. 相应的外线键闪亮,内线电话时保留键闪亮。 3. 按闪亮的键重新应答这个电话。
勿打扰/会议(DND/CONF)键
在电话中,按这个键设置勿打扰或会议。
闭音(麦克风) (Mute)键
手柄或免提闭音。闭音时 LED 灯亮。
清除 / 返回(Clear/Back)键
按这个键取消当前的操作或删除一个字符。
勿打扰
阻止呼入电话到您的分机。 1. (空闲状态) 按 DND/CONF 键。 2. 拨 1 阻止外线电话。 拨 2 阻止内线电话。 拨 3 阻止所有电话。 拨 4 阻止转移来的电话。 拨 0 取消勿打扰功能。
NEC Aspila EX 专用电话用户指南

指示灯
当信息等待时,绿灯闪亮,当 电话振铃时,红灯闪亮。
内线键 (CALL1/CALL2)
用于内线呼出和应答。如果已 占用了一个内线 – 可以使用 另一个。
拨号键
按 CALL1 键和 DIAL 键,拨存储 码用于缩位拨号。
暂断键
在通话中,按 FLASH 键挂机或 暂断。
勿打扰键
当您的工作不想被打断时,勿 打扰功能锁断您的电话。当呼 叫前转时,该键也闪亮。
3
简便应用
可编程功能键
可以设置可编程功能键为“中继线”键和 / 或其他功能键。不用拨服务码,您只需要按功能键就可以激活设置的 功能。
CALL 1
功能键
服务码 + 附加数据
SPK
851
??
?
852
功能键分为两种。(一般功能键:用 851 设置,线路键:用 852 设置)。 线路键具有优先权。可以将一般功能键改为线路键。 如果要将线路键改为一般功能键,在设置一般功能键之前,您必须先拨“852 + 000”删除线路键。 在缺省设置中,可编程功能键 No. 1 到 12 是“中继线”键。如果您要将无用的中继线键改为功能键(一般), 必须先用“852 + 000”删除这个无用的中继线键。 可编程功能键可以用服务码“852 + 000”或“851 + 00”删除。
综合通信系统
专用电话机 快速参考指南
使用电话机之前…
感谢您购买 NEC Infrontia “Aspila EX” 集团电话系统
由于灵活的系统设置,您的拨码和功能可能与本手册有所不同。请与您的供货商或系统管理人员联系,注 明不同的部分。
使用电话机 <专用电话机>
NEC 988J 全中文双频移动电话 说明书

全中文双频移动电话用户手册版权声明版权所有C2000 NEC Corporation没有NECCorporation的书面许可机械光学人工等的任何形式复印转录本手册系操作指导书NEC中原移动通信有限公司保留对本手册中的打印错误软件升级及产品改进等随时进行改动的权利直接编入新版手册中 SIM选项 请遵守各地使用移动电话的相关法规 驾驶车辆时最好先停车以避免干扰机上电子系统而引发飞行事故 登机前请关掉您的移动电话 加油站 化学工厂 医疗器材心律调整器 电子防侧滑煞车系统的影响)请参考以下步骤拨出您的第一个电话 安装SIM卡因此在安装时请特别注意不要刮伤SIM卡您需要SIM卡 (用户识别卡 Subscriber Identification Module)来激活您的移动电话及连接网络系统您的移动电话需使用小型SIM卡以及如网络系统存取用户个人识别号码)信息以及各种服务等重要信息若不慎遗失将手机翻至背面请依照以下步骤来安装SIM卡然后将SIM卡固定片向上滑动以固定SIM卡将电池的底端卡入手机背面下部的凹槽在压入后卡表示已固定妥当将旅行用充电器的充电接头插入位于手机底部的充电插座请注意充电插头的方向每次充饱标准电池所需的时间约160分钟左右在插入充电插头后 充电完成后然后久按 键开启手机电源您依然可以打开手机电源并正常使用手机此面向上 键 通话之后 键结束完成后 键PIN (Personal Identification Number有了此组密码若不小心输入错误的号码键加以消除将使SIM卡失效天线听筒LCD显示屏电源开关键清除键英文请见按键说明您可按音量键直接进入筒配件液 晶 显 示 屏液晶显示屏上会显示几个常见的符号 (请见下图)信号强度通话中通话时间语音信息新短信息短信息来电转接使用中号码振动模式直条纹愈多手机通话时即出现刚收到语音信息时此符号会出现语音信息当您正要读取短信息之前此图像亦会出现收件箱当短信息储存内存不足详情请见3.2短信息当转接语音来电功能开启时此符号会出现在待机状态显示屏上方来电转接详情请见3.3通话服务出现时表示有来电时手机会以振动方式通知您电池状态显示电池的电力强度电力越强当电池充饱时数据电话出现时详情请见3.3通话服务传真电话出现时详情请见3.3通话服务漫游当您在漫游(非原属网络)时键盘锁定出现时详情请见3.4手机设定按 键手机的按键有两类手机的按键有两种按法某键表示; 而某键则表示约经过两秒钟后再放开在待机状态下显示屏的背光会自动开启详情请见3.4手机设定功能键共有4种电源开关键按下此键可以取消并回到上一层选单整行输入的字符选择键子功能或设定按此选择键后即可进入菜单选单英文/数字键共有12个英文/数字键若有错误可使用 键来移动光标的位置下列为按下各按键后会出现在显示屏上的符号与字符0+ * / =# P例如£®À中 文 输 入以下介绍各输入法的使用方法若要输入两字电键由于 及 键移动光标至第二页电因此按 键输入该字电其它可能与出现的相关字会出现在显示屏下方您可以按 键移动光标至所要的字再按 输入若所需的字不在本层选单中典碘踮电佃甸梯缆话脑灯影电手机内建的常用语句如下表新时间地点11大塞车先走了13最新环境如何请回复15立即回电16有急事01-05条是由您自定义的语句选择常用短语久按 键 PIN接受之后并进入待机状态 在这待机模式下并按 发送该通电话若网络支持若收到非原属网络系统之讯号但此时仅可拨紧急电话在通话中用各种通话中的功能1.4结束通话通话完毕后详情请见3.4手机设定 如果要拒绝接听该通来电 键您可按电话左侧的音量控制键来调整听筒音量而按下方的音量键可以减低音量增大音量 减低音量2.1单键拨号在待机状态下您有两种单键速拨方式久按 键* 第二种您可以速拨在电话簿中储存的前九组电话号码如果某号码的储存的纪录号码是5在发话时关于如何储存电话簿号码详情请见3.1电话簿久按 键* 再输入该受话方的国家码请省略区域码的第一个零最后按 键送出拨号2.4听取语音信箱留言久按 键直接拨号到您的语音信箱详情请见3.2短信息信息设定之语音信箱将显现在显示屏上直接回复未接听来电的方式为 键读取最近一个未接听的电话号码后再按 即可直接回拨该号码详情请见3.1电话簿2.6快速拨号输入纪录号码 (即电话号码的纪录在电话簿中的位置) 键找到欲拨号码时 键即可发送按音量控制键可直接进入电话簿并浏览电话簿中之纪录 键选择欲拨的号码 键即可直接拨出例如若某人的姓名以 "K" 开头然后按 键您可以使用 键卷动资料键拨出 表示电话号码储存于SIM卡电话簿内存 表示电话号码储存于手机电话簿内存选择电话簿您可直接输入欲新增至电话簿的号码 键号码 (显示屏上会出现您已经输入的电话号码)输入完成后 键即可则显示屏上会询问您是否置换请按 键确认请按 键2.9重拨号码* 重拨最近一个拨出的电话按 键读取并拨出最近一个拨出的电话号码2.11分机速拨在输入电话号码后 键P此时您可键入分机号码欲拨出 (02)1234-5678分机32时久按 键P输入32 键确认拨出即可您可以按 键进入操作选项下列部分标示 * 之功能静音若您在通话时不想让对方听见任何声音多方通话 *结束通话 您可以在多方通话的状态下 *切换通话 当您线上同时有通话中及保留中的电话时并切换至原本保留中的电话只要重复此一功能即可又想再拨一个电话出去再拨另一个电话出去显示屏上该保留电话左边会出现 " 当另一个电话接通后 1" 代表保留 "hold" 代表通话中 "active" *恢复通话 接续前面保留通话功能并恢复原本那个电话 *多方会议通话 此项功能能让您进行多方会议通话想单独和其中某位参会者谈话21短信息利用此功能您可以读取或写入短信息电话簿选择此项后电话簿详情请见3.1电话簿详述各功能及子目录的功能和操作说明在进入菜单后就能快速直接达到所需的功能项目改变语言设定手机设定 键 键数次回到待机模式即完成3.1电话簿 (1)电话簿菜单可供您设定自己的电话簿也可以选择将号码储存在SIM卡或手机中收话记录以及未接听来电的记录通话记录 (1-1)各种情况的最后通话记录都可以在这项目录中找到以下各节中即为该功能之功能码操作方式操作方式确定删除增加号码 (1-3)您可以在此项中新增电话簿的资料选择功能之后输入姓名后按 键如果要输入分机号码 键约一秒P再输入分机号码即可按 键按 键以确认位置资料已存若需要储存更多的记录26您的手机内存可供您储存100笔电话簿资料操作方式全部删除 (1-4-2)删除在电话簿中的所有资料按 键进入此项后删除所有数据 键则电话簿中的所有资料将被删除您的手机提供两种选项操作方式 键进入此项后SIM手机若选择将资料储存至SIM卡 键选取 键请按 键选择 键即可本机号码 (1-6)设定或显示本机的SIM卡号码进入此项后显示屏会显示输入资料3.2短信息 (2) 以下短信息功能皆需配合网络供应商所提供的服务项目使用收信箱 (2-1)若有新的文字信息送达时图标 会与"读信息?" 三字同时出现在待机模式显示屏中央 也会在显示屏上方出现 读取此一最新的信息 键选择要阅读的信息 键阅读信号会出现在显示屏上您可以选择以下选项以处理该信息在阅读短信息后 键您可以按 键进入各选项28操作方式写简讯 (2-2)您可以使用这项功能输入简单的文字信息按 键选取此项后然后按 键拨号储存 拨号发信箱 (2-4)您可以使用这项功能读取先前储存的信息按 键读取一则信息后 键 删除 删除所选定的信息操作方式符号出现在待机状态的显示屏上方若出现 表示有人在手机号码2信箱留言如何指定手机使用号码详情请见3.3通话服务并选择喜欢的主题和语言 (请参考网络供应商所提供的使用说明)按 键后接收广播 (2-6-1)选择接收或不接收网络供应商所提供的信息广播按 键进入 键选择或 键确定即可操作方式 键进入后显示屏会提示您输入标题按 键确定您可按 键进入选择或以新增标题或删除标题按 键确定即可操作方式 键后按 键选择欲接收信息所使用的语言 键确定即可此菜单包含了信息设定的各个选项按 键后供您选择您所发送的信息系经由此信息中心送至受话号码按 键后输入后3.2短信息: 语音信息以拨出此号码再按 键确定即可操作方式 键后 键选择或 键确定即可网络供应商会回报给您开启关闭操作方式 键后 键选择或 键确定即可开启此功能后手机会有警示声提醒开启关闭操作方式详情请见3.2短信息操作方式 键后删除所有数据请按 键请按 键 此菜单下包含许多您可以向网络供应商申请使用的通话服务在不需要下列转接功能时操作方式 键后转接语音来电 (3-1-1)开启此功能后当您激活转接功能后 或 的符号则符号会出现注: 1.转接图标需要网络供应商的支持才会出现使用号码选择按 键后 启动服务忙线时转接 (3-1-2)当忙线时操作方式 键后 启动服务 键后输 入完成后 键 取消服务 键后 查询状态 键后无回复时转接 (3-1-3)当电话无人回复时操作方式 键后 启动服务 键后输 入完成后 键 取消服务 键后 查询状态 键后未接通时转接 (3-1-4)若您的手机不在网络系统服务范围内或关机而未接通时操作方式 键后 启动服务 键后输 入完成后 键 取消服务 键后 查询状态无法接通时 (3-1-5)开启此功能后没有回复或不在网络系统服务范围内以及因为关机而未接通时操作方式 键后 启动服务 键后输 入完成后 键即可激活此功能按 键后转接数据来电 (3-1-6)开启此功能后操作方式 键后 启动服务 键后输 入完成后 键 取消服务 键后 查询状态 键后转接传真来电 (3-1-7)开启此功能后操作方式 键后 启动服务 键后输 入完成后 键 取消服务 键后 查询状态 键后全部取消 (3-1-8)取消所有的转接功能按 键后全部取消按 键限制通话 (3-2)您可使用此功能来设定限制拨出或接收的电话操作方式所有拨出电话 (3-2-1)限制所有拨出的电话按 键后 启动服务 键后输入完成后 键即可激活按 键后 查询状态 键后拨出国际电话 (3-2-2)限制所有国际电话的拨出按 键后 启动服务 键后输入完成后 键即可激活按 键后 查询状态 键后本国外电话 (3-2-3)除了拨至本国的电话外操作方式 键后 启动服务 键后输入完成后 键即可激活按 键后 查询状态 键后所有来电 (3-2-4)限制所有来电按 键后 启动服务漫游时来电 (3-2-5)限制漫游时的所有来电按 键后 启动服务 键后输入完成后 键即可激活按 键后 查询状态 键后全部取消 (3-2-6)取消所有的禁拨限制设定按 键进入后 键即可当通话时又有另一个电话打进来在此您可激活或取消此功能并察看状态按 键进入后启动服务 (3-3-1)激活话中插接功能按 键后取消服务 (3-3-2)取消话中插接功能操作方式查询状态 (3-3-3)查询话中插接功能的使用状态按 键后通话记录 (3-4)此功能可纪录您通话的时间操作方式 键后上次通话 (3-4-1)您可按 键进入选择以下各选项按 键后分通话费用 (3-4-1-2)操作方式 键后通话时间 (3-4-2-1)操作方式 键后分通话费用 (3-4-2-2)操作方式 键后所有通话费率的总金额 (此功能须网络供应商配合提供)按 键在归所有通话 (3-4-2)您可按 键进入选择以下各选项按 键即可将时间归零 计费单位 (3-4-3-2) 操作方式 键后话费限额 (3-4-4)您可输入通话费用的限额若额度已满在开启后操作方式 键开启 (3-4-4-1)操作方式 键开启后开启时需要输入PIN2选择此项后按 键关闭时需要输入PIN2您可指定其中一个号码来拨出电话而不必使用两台手机 (此功能只有在您的网络供应商提供此项服务时方能使用)按 键进入此功能选项后 键以选择号码 (号码1或号码2) 键确定在待机模式下。
NEC UNIVERGE 桌面电话产品说明书
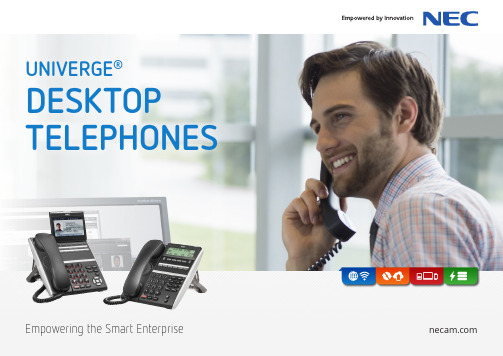
UNIVERGE®DESKTOP TELEPHONEStelephones, you increase feature functionality through applications support and personalization of your phone. Our wide assortment allows you to choose the telephone that best fits each employee’s role. Whether he or she needs a basic single line telephone or one with a 60-line console attached, NEC offers a telephone to meet each of your employee’s individual needs.Choice of IP or Digital TelephonesNEC provides a full line of telephones that can accommodate your needs, regardless of whether your business communications are pure IP or any combination of IP and digital. The user interface and the terminal functionality remain the same across telephones, so a mix of models can be used without extra training >Will support a wide-range of applications which can help improve overall employee efficiency and productivity>Deliver maximum deployment flexibility and investment protection>Come as either IP or digital telephones>Supports XML open interface (on IP telephones)>Have an easy to use intuitive interface and an interactive user manual>Are Bluetooth capable, enabling users to receive and place calls through either their smart device or desktop telephone>Comes standard with features for the visually impaired such as audio key action feedback and large character displayThe promise of theSmart Enterprise!3NEC UNIVERGE® Desktop TelephonesElegantly Designed & Feature PackedTime & Date, Extension Name and numberXML capabilities/application information when not in a call4UNIVERGE IP and Digital Desktop TelephonesA premium desk phone for every member of your organizationDT830DG & DT830CG IP Desktop Telephones>12, 24 or 32 programmable keys (Modular support)>8LD/DESI-less with Backlit LCD (Fixed Terminal)>Backlit keypad & Line keys>Hands-free, full duplex>Headset support, Optional support for EHS>Soft keys/LCD prompts>Navigation cursor & Directory dial key>Call history>Network support 10/100/1000 Ethernet>USB Port – Smartphone charging, downloadingimages for display (Except on DESI-less model)>Bluetooth support (BCA-Z)>Wall mountable>XML open interface capabilities>VoIP encryptionDT830CG IP Desktop Telephone above features plus>Full color backlit LCD screenDT430 Digital Desktop Telephones>12, 24 or 32 programmable keys (fixed terminals)>8LD/DESI-less with Backlit LCD (Fixed Terminal)>Backlit keypad>Backlit Line keys>Hands-free, full duplex>Headset support, optional support for EHS>Soft keys/LCD prompts>Directory dial key: Navigation cursor>Call history>Optional Bluetooth Connection Adapter (BCA-Z) support>Wall mountableDT830 IP Desktop Telephone - same as DT430 plus>Network support 10/100 Ethernet>Backlit LCD screen>XML open interface capabilities>VoIP encryptionDT410 Digital Desktop Telephone>2 key non-display or 6 key display>Entry level phone>Hands-free, Half Duplex>Soft keys / LCD prompts>Directory dial key: 10 Feature Key support>Wall mountable>Message waiting indicator60-line DSS Console8-line Key ModuleDT410DT430 & DT830DT430 & DT830 Display DT830CG Color Display5NEC UNIVERGE® Desktop TelephonesSupply Freedom of Choice Personalization is important to the creation of motivated personnelRunning your business on an outdated system or forcing employees to use olddevices that are ill equipped to handle their multi-faceted communications needs isbad for business. To facilitate smarter work environments, NEC has developed thenext generation of desktop telephones; the DT800/DT400 Series, which are supportedon the UNIVERGE SV9000 and SV8000 Series platforms.Call from your Desk PhoneNEC’s innovative desktop endpoint design is intended to deliver maximumdeployment flexibility. A wide range of choices allow for multiple desk phonecombinations that fit any and all business niches or personalization requirements.Our UNIVERGE Desktop Telephones and the full-feature set of applications that they support provide your business with the right communications, tools, and a premier multimedia user experience.Personal, system and corporate directoriesUNIVERGE Desktop Telephones come with corporate directory functionality. There’s no need to waste time looking up phone numbers. Each entry in the directory issearchable, and a call can be placed from a searched entry. When a call is received and if the Caller-ID matches a registered phone number within the directory, the name of the entry is displayed on the LCD.XML open interface support on IP terminalsNEC’s IP telephones provide XML open interface support so your developers can create displayable and accessible applications designed specifically for your business. The XML interface provides the user with a way to integrate additional productivity tools such as calendar links, wallboard functionality, call directories, and more, which are displayed on the telephone’s LCD.Advanced applicationsAdvanced desktop applications enable staff to work more efficiently and improve customer service. Voicemail, ACD, and customer information integration help minimize operator and other overhead costs. Users can log on to any IP telephone anywhere on the business’s network. Each user profile and settings are immediately available, without the need for extra programming.Additional Features>Call History - Incoming, outgoing and missed calls are logged and are accessibleto the user. Call history can be used to make call backs, and the numbers can be added to the directory>Wideband CODEC - utilizes wideband CODECs for the truest possible speech reproduction—resulting in crystal clear audio>Information Protection Mode - IP telephones offer multiple levels of protection. This protection allows users to guard personal data, corporate data and directories, and even lock their device to keep calls from being placed, ensuring privacy and security on each telephone>Customizable Ring Tones - Different ring tones can be programmed and assigned to unique telephone numbers in the telephone’s directory. Additional ringtones can be downloaded from the web>Internal Zone Paging - Users have the option of sending announcements by paging either one person or an entire zone group through the telephone’s speakerAchieve a Premier Multimedia ExperienceEasy access to information and people is imperative to empowering employeesand improving overall efficiency7For further information please contact your local NEC representative or:。
NEC简单操作

NEC话务台操作和交换机简易操作NEC NEAX7400 M100 619话务台操作一、应答进线电话:1、听到振铃声按ANSWER键2、在显示屏上显示租户号码路由号码和中继号码3、拨对方所要的分机号码4、如果分机号码拨错了,按CANCEL键取消,重新拨正确号码5、按RELEASE键释放此次呼叫A:交替通话①、当你希望先于被叫分机通话,由被叫分机确定是否与对方通话时,先不要按RELEASE键,等被叫分机接通后再作决定。
②、当被叫分机希望与对方通话时,你可以按下RELEASE键,释放此次呼叫。
③、当被叫分机不希望与对方通话时,你可以按下CANCEL键取消,然后再与主叫方通话。
B:当被叫分机忙时,而对方又要求转其他分机时①、按CANCEL键②、按新的分机号码③、按RELEASE键C:当被叫分机无人应答时①、RING环路灯闪烁②、按相关联的环路键,应答1、如果对方愿意等待,按RESLEASE键2、如果对方希望转到另外的分机Ⅰ、按DEST键Ⅱ、按CANCEL键Ⅲ、拨新的分机号码Ⅳ、按RELEASE键3、如果对方不愿意等待Ⅰ、按DEST键Ⅱ、按CANCEL键两次二、出局呼叫1、按空闲的LOOP键2、拨出局代码(例:拨9)3、拨电话号码4、按RELEASE三、送拨号音给分机,如果不能拨打外线1、分机拨号给话务台2、按ANSWER键3、拨出局代码4、按RELEASE键四、内部呼叫六、强插功能1、按空闲的LOOP键1、按空闲的LOOP键2、拨你希望的分机号码2、拨你所插的分机号码3、按RELEASE键3、听到忙音后按BV键五、夜间模式4、按RELEASE键1、设置:按NITE键2、取消:按NITE键(完)NEC NEAX7400 程控交换机操作手册1、拨打外线数字话机:按“SPKR”+“9”模拟话机:拿听筒+“9”2、打内线数字话机:按“SPKR”+分机号码模拟话机:拿听筒+分机号码3、直接代接数字话机:按“SPKR”+代码+振铃的分机号码模拟话机:拿听筒+代码+振铃的分机号码4、组内代接数字话机:按“SPKR”+代码模拟话机:拿听筒+代码5、重拨数字话机:按“LNR/SPD”+“#”模拟话机:拿听筒+代码6、全部呼叫转移数字话机(设置):按“SPKR”+“代码”+分机号码(转移的目的分机)取消:按“SPKR”+“代码”模拟话机:(设置):拿听筒+“代码”+分机号码(转移的目的分机)取消:拿听筒+“代码”7、无应答呼叫转移数字话机(设置):按“SPKR”+“代码”+分机号码(转移的目的分机)取消:按“SPKR”+“代码”8、遇忙呼叫转移数字话机(设置):按“SPKR”+“代码”+分机号码(转移的目的分机)取消:按“SPKR”+“代码”模拟话机(设置):拿听筒+“代码”+分机号码(转移的目的分机)取消:拿听筒+“代码”9、遇忙回叫数字话机:按“SPKR”+分机号码(听到忙音)+代码+“SRKR”模拟话机:拿听筒+分机号码(听到忙音)+代码+挂机11、密码呼叫长途数字话机:按“SPKR”+代码+密码+“9”+对方电话号码模拟话机:拿听筒+代码+密码+“9”+对方电话号码12、设定缩位拨号数字话机:按“FNC”+“LNR/SPD”+缩位号码+电话号码+“FNC”模拟话机:拿听筒+代码+缩位号码+挂机13、拨打缩位号码数字话机:按“LAR/SPD”+缩位号码模拟话机:拿听筒+代码+缩位号码14、三方会议数字话机:A与B已经通话+“TRF”+拨C的电话号码(通话)+“CNF”模拟话机:A与B已经通话+“FLASH”+拨C的电话号码(通话)+“FLASH”15、免提开关数字话机(设置):“FNC”+“1”取消:“FNC”+“1”(完)。
NEC程控电话交换机SL1000交换机说明书 NEC SL1000集团电话编程 NEC SL1000安装手册
NEC程控电话交换机SL1000交换机说明书 NEC SL1000集团电话编程 NEC SL1000安装手册NEC程控电话交换机SL1000专用话机进入和退出系统编程:进入: SPK→#*#*→12345678(密码)→HOLD →显示 Program mode退出:按DC键返回直到显示Program mode 时按SPK键退出并保存所设置的数据,屏幕上会显示saving system data1.分机的外线权设置:14-07-01 中继线分配图设置15-06-01 分机对应的中继线分配图2 外线直接到一个分机振铃(直入线)呼入中继线类型设置22-02-01 Trunk -----指定中继线model TRK Type= 4 DIL呼入中继线的目标分机或部门组22-07-01 Trunk----指定中继线model1 NO = 指定的分机号码如果DIL振铃的分机没有应答可以转到振铃组内它的分机振铃无应答回叫时间22-01-04 (0-64800) DIL呼入电话在编程设置的目标分机上振铃时间.超过这个时间间隔DID电话被转移到预设的振铃组无应答转移目标 DIL/IRG22-08-01 Trunk---- 指定中继线 Mode1 IRG------ X3. 外线分组:14-05-01 中继线组14-06-01 中继线路由21-02-01 分机的中继线组4. 第二中继出局码设置:11-01-01 创建第二中继出局码11-09-02 输入第二中继码21-15-01 分机的第二中继组路由用专用话机进入和退出系统编程:1. 进入: SPK→#*#*→12345678(密码)→HOLD →显示 Program mode退出:按DC键返回直到显示Program mode 时按SPK键退出并保存所设置的数据,屏幕上会显示saving system data3.更改分机号码的相关编程:11-01-01:系统号码计划11-02-01:分机号码的设置和更改15-01-01:分机名称设置(一般在装机时最好删除所有分机名称),专用话机编程时用CLEAR键清除92-02-01:删除所有分机号码,只保留第一端口的分机号码。
NEC IPK PBX功能设置
NEC IPK PBX功能设置1.勿打扰[Do Not Disturb]功能说明:此功能将拒绝所有进入此分机的来电。
使用说明:设置勿打扰(数字电话机):1.按Feature键。
2.拨勿打扰设置码60。
3.按Feature键。
取消勿打扰(数字电话机):1.按Feature键。
2.拨勿打扰取消码69。
3.按Feature键。
设置勿打扰(任意电话机):1.按Speaker键。
2.拨勿打扰设置码40。
3.按Speaker键。
取消勿打扰(任意电话机):1.按Speaker键。
2.拨勿打扰取消码42。
3.按Speaker键。
2.呼叫前转-全部[Call Forward-All Call]功能说明:此功能允许将所有来电转接至其它分机、总机、语音信箱等,可应用于离开位置时将电话转接至另一位置,并可由目标分机设定或解除,总机亦可解除此功能。
使用说明:在前转分机上设置:1.按Feature键。
2.拨呼叫前转设置码60。
3.拨目标分机号码。
4.按Feature键。
取消呼叫前转:2.拨呼叫前转设置码69。
3.按Feature键。
在普通电话机或数字电话机上设置:1.摘机或按Speaker键。
2.拨呼叫前转设置码41。
3.拨目标分机号码或寻线组号码。
4.等待确认音,挂机或按Speaker键。
Feature灯闪亮表明分机是在呼叫转移模式。
在普通电话机或数字电话机取消呼叫前转:1.摘机或按Speaker键。
2.拨呼叫前转设置码42。
3.等待确认音,挂机或按Speaker键。
在目标电话机上设置(仅话务台位置):1.摘机或按Speaker键。
2.拨呼叫前转设置码47。
3.拨自己的分机号码,然后拨目标分机号码。
4.等待确认音,挂机或者按Speaker键。
取消呼叫前转(仅话务台位置):1.摘机或按Speaker键。
2.拨呼叫前转取消码48。
3.拨自己的分机号码。
4.等待确认音,挂机或按Speaker键。
3.呼叫前转–遇忙/无应答[Call Forward–Busy/No Answer]功能说明:此功能允许当该分机忙线或未应答时将来电转接至其它分机、总机、语音信箱等,也可由目标分机设定或解除,总机亦可解除此功能。
NEC SL1100 多线终端用户手册说明书
Multi-Line TerminalUser GuidePlease read this manual carefully before operating this product and save this manual for future use.Thank you for purchasing NEC SL1100 system.Due to the flexibility built into the system, yourDialing Codes and Feature Capacities may differ from those in this guide. Check with your NEC Authorized Supplier / System Administrator and make a note of any differences.When installing the handset :1. Make sure the handset cord is plugged into the handset jack on the telephone base.2. The line cord routes through the channel on the telephone base.3. Alternatively the line cord can route through the channel on the telephone legs.Handset CordCord can be installedeither wayTo set the low viewing angle position:1. Fold the legs all the way back.To set the high viewing angle position:1. Flip up the two leg supports.2. Fold the legs back until the supports contact the base.Handsfree Options- Handsfree lets you place and answer calls by pressing “Speaker” instead of using the handset.- With Automatic Handsfree, you can press a Speaker Key without lifting the handset. Normally, you have Automatic Handsfree.- Use Handsfree Answerback to answer a voice-announced Intercom call by speaking toward your phone without lifting the handset.Dial Keys HOLD KeyPress this key to place an internal or external call on hold.Speaker KeyControls the built-in speaker, which can be used for Handsfree dialing/ monitoring. LED on key lights when key is active.Enter KeyRedial KeyVolume (UP) KeyIncoming Call History Key* 12 Programmable Function Keys are available for IP4WW-12TXH-B TEL. 24 Programmable Function Keys are available for IP4WW-24TXH-B TEL. ** The illustration shows IP4WW-24TXH-B TEL.Directory FunctionsorVolume (DOWN) KeySpeakerCall Indicator LampThis lamp flashes fast when a call is ringing and flashes slower when a message has been left.Alphanumeric DisplayThe LCD has 3 lines, 24 characters with backlight.Soft KeysThe Soft Keys show the available features for your current activity. Any feature shown at the bottom of the LCD is available.Help KeyThe user can press this key followed by a programmable key to check what Line or Programmable Feature is assigned on the key.Programmable Function KeysFlexible Line keys or Feature Keys assigned by the System Administrator.Flash KeyPress key to finish an outside call and hear the dial tone.Transfer KeyAllows the extension user to transfer established calls to another extension.DND Key (Do Not Disturb)Setup a Do Not Disturb if pressed during a call. Mute (Microphone) KeyMute handset or Handsfree Microphone. LED lights when microphone is muted.Clear/Back KeyPress this key to cancel the current action or delete a character.Cursor KeyAccess various features with simple operation.⏹ Programmable Function KeysProgrammable Function Keys can be assigned as “Trunk” Key and/or other Function Keys. You can just press the function key to activate the assigned function without dialing the Service Code.•There are 2 levels of Function Keys. (General Keys : assigned by 751, Appearance Keys : assigned by 752)•Appearance Keys have priority. You can overwrite the Appearance Key at the General Key.•If you want to overwrite the General Key at the Appearance Key, you have to erase the Appearance Key by dialing “752 + 000” before General Key assignment.•In the default setting, Programmable Function Key No. 1 to 12 is assigned as “Trunk” Key. If you want to assign Function Keys (General) at the unused Trunk Keys, these unused keys should be erased by dialing “752 + 000”.•Programmable Function Keys can be erased by dialing “752 + 000” or “751 + 00”.•Programmable Function Keys can be assigned by Soft Key operation as well.⏹ DSS / One-Touch KeysProgrammable Function Keys can be assigned as DSS (Direct Station Selection) or One-Touch Keys. You can place an Outside / Intercom Call by just pressing this key without dialing the number.•To change the Trunk Access Code, ask your NEC Authorized Supplier for the details.•In the default setting, Programmable Function Key No. 1 to 12 is assigned as “Trunk” Key. If you want to assign DSS Keys to the unused Trunk Keys, these unused keys should be erased by dialing “752 + 000”before performing the above operation.•For the DSS Key, the extension status can be indicated on the BLF. (idle : extinguished, Busy : lit)•When you register a telephone number, the Trunk Access Code should be added in front of the number.•Up to 36 dialing digits can be registered, but the name can not be registered.•If you want to continue the operation, press Programmable Function Key instead of Speaker Key to finish.•One-Touch Keys can be assigned using Soft Key operation.⏹ Abbreviated Dial (Speed Dial) Registration• The number of digits dialed for Bin No. depends on the system setting (0-9<Only Group ABB> / 00-99 / 000-999).• System setting is necessary for Group ABB function. Ask your NEC Authorized Supplier for the details. • Name can be entered by Dial Pad Keys. (See below)• Up to 36 dialing digits can be registered, and up to 12 characters can be registered as name. • If you want to continue the operation, dial Bin No. instead of Speaker Key to finish. • You can skip to enter the name. (No enter any character, then press “Hold” Key).• You can erase the registered number & name by pressing “Exit” Key after dialing Bin No.. • Common Abbreviated Dial can be registered using Soft Key / Cursor Key operations.ÔÕúåäæöüαεθβ> ?πΣσΩ∞¢£When you enter a name, use Dial Pad Keys to enter letters as below. For example, press “2” key once for “A”, twice for “B”, etc.#Accepts a character and moves the cursor one place to the right. Press twice to insert a “space”. Clears the character entry to the left, one character at a time. (Backspace)Clear/Back⏹ Entering Alphanumeric Characters⏹ Place an Outside Call <Quick Access>•Listen to the Dial Tone before dialing a Telephone Number.•You can have function keys for Trunks or Trunk Groups. Ask your NEC Authorized Supplier for the details.⏹ Place an Outside Call <Access by Code>•To change the Trunk Access Code, ask your NEC Authorized Supplier for the details.•Listen to the Dial Tone before dialing a Telephone Number.•If the Trunk Group number is greater than 10, you should enter 2 digits (e.g. 11 : Group 11) after dialing “704”. Ask your NEC Authorized Supplier for the details.•Ask your NEC Authorized Supplier for the Trunk Number dialing digits.⏹ Place an Intercom Call <Dial Access>•Your call will ring or voice-announce. If you hear ringing, wait for an answer. If you hear a beep, begin speaking. Dialing “1” changes voice/ring mode (if the destination is Multi-line Terminal).⏹ Directory Dialing•After searching the desired destination, press “Enter” Key to confirm the telephone number before lifting the handset, if necessary.•You can enter more characters (up to 12) to make desired destination’s search even more specific.•You can also search the desired destination without entering the characters (press Cursor Keys only).•To cancel the Directory Dialing operation, press “Clear/Back” Key.•Directory Dialing can be activated using Soft Key operation.⏹ Last Number DialingRedial ListOn-HookConditionQuick Redial•The system retains the last 10 numbers dialed, which can be reviewed and redialed.•To cancel the Redial List operation, press “Clear/Back” Key.⏹ Callback by Received NumberReceived Call 01/108175556000DEC TUE 22 04:31PMOn-HookCondition•Caller-ID function is required to use this operation for outside calls. Ask your NEC Authorized Supplier for more details.•To cancel the Callback operation, press “Clear/Back” Key.⏹ Abbreviated (Speed) Dialing <for Outside>Common ABBGroup ABB• The digit of Bin No. depends on the system setting (0-9 <Only Group ABB> / 00-99 / 000-999). • Telephone Numbers are pre-registered to the system.• System setting is necessary for Group ABB function. Ask your NEC Authorized Supplier for the details.• When you assign the Common ABB Key on the Programmable Function Key, “Press HOLD” is required after dialing the Function Code 27.⏹ One-Touch / DSS CallOne-Touch / DSS Key• Telephone / Extension number should be pre-registered to a One-Touch / DSS Key. • Trunk Access Code should be added in front of the Telephone Number.On-Hook Condition⏹Set Camp On / Callback• Camp OnIntercom Call - When you hear ringing, wait for the called party to answer. Outside Call - When you hear Dial Tone, begin telephone number dialing.• Callback Intercom Call - When your terminal starts the ringing, lift handset and wait for the called partyto answer.Outside Call - When your terminal starts the ringing, lift handset, hear Dial Tone, and begin telephone number dialing.• This function is applicable in case all trunks are busy condition (not applicable for dialed outside party busy). ⏹ Cancel Camp On / Callback⏹ Repeat Dialing <Outside Call Only>• When the Repeat Dialing is set, Repeat Dial Key flashes and the system automatically and periodically redials a call. Repeat duration is programmable. Ask your NEC Authorized Supplier for the details. • You should lift the handset when the called party answers. • Press flashing Repeat Dial Key to cancel.⏹Set a Message Waiting⏹ Cancel Message Waiting Individual Cancel(originated extension)All Cancel(at any extension)• When you set a MW, the called party’s Indicator starts to flash, and your Indicator is lit Red.⏹ Answer a Message Waiting (Your terminal’s Indicator is flashing Red)Check & AnswerQuick Answer• When you answer a MW, the Indicator automatically goes off when the called party answers.• If multiple message are in queue, you can select the desired party by pressing Up key after dialing ” , 0”.⏹ Answering an Outside Call⏹ Picking up a Call for other ExtensionsIn same GroupIn other GroupSpecified Extension9Extension Number?• System setting is necessary to create a Call Pickup Group. Ask your NEC Authorized Supplier for the details.• Call Pickup operations are available using Soft Key operation.Ringing ExtensionNon-Ringing Extension• Confirm the status of Mute Key if you want to answer by Handsfree (Mute On : LED On, Mute Off : LED Off).⏹ Answering an Intercom CallSignal Mode ExtensionVoice Mode Extension• Intercom Call Mode (Signal or Voice) can be set at your terminal by : “Signal” : Speaker -> 723 “Voice” : Speaker -> 721• Confirm the status of Mute Key if you want to answer by Handsfree. (Mute On : LED On, Mute Off : LED Off)Call Pickup Key(SC751+24)Call Pickup for otherGroup Key(SC751+25)⏹ Holding a Call / Retrieving a Held CallTalkingHoldRetrieve• When on an Intercom, the call is held as “Exclusive Hold” on your terminal.• This operation puts your outside call on System Hold. Other extension users can take the call off Hold.⏹ Retrieve a Held Outside CallTrunk Number you want to retrieve?? • Ask your NEC Authorized Supplier for the details about your Trunk Number dialing digits.⏹ Transferring a Call to the other ExtensionExtension Number⏹ Holding a Call ExclusivelyTalkingHoldRetrieve• This operation puts your outside call on Exclusive Hold. Other extension users can not take the call off Hold.Speaker• If your terminal has DSS/One-Touch key, just press it instead of “HOLD” and “Extension Number” dialing.⏹ Do Not Disturb (DND)•When you set DND function, DND Key is lit and the Internal Dial Tone pattern changes.⏹ Conference•You can repeat this operation to add more parties.•You may be able to have up to 16 parties (including your terminal). You may need to adjust the volume level due to the environment where calls are placed. Ask your NEC Authorized Supplier for the details.Call Forwarding / Follow MeWhen you set Call Forward / Follow Me, the destination extension is displayed on the LCD and the Internal Dial Tone pattern is changed. (Call Forward / Follow Me can be set using a Soft Key).Call Forwarding / Follow Me (Cont’d)“Menu” Soft Key⏹ “Dir” Soft Key⏹ “VM” Soft Key (Option)“CL” Soft Key⏹ Soft Key Operations during Off-Hook condition⏹ Soft Key Operations during Intercom Calling⏹ Soft Key Operations after establishing an Intercom Call⏹ Soft Key Operations during Outside CallMenu Structure when PRG15-02-60 is set to Advanced Mode 1111 -11x :Missed Call Data 211 -21x :Name Started from A-Z 131 -13x :Dialed Call Data121 -12x :Received Call Data Back to the previous menu. Clear/BackExitExit from this menu mode.Optional hardware and System setting is necessary to use In-Mail (Voice Mail) feature. Ask your NEC Authorized Supplier for the details.Log-On to the In-MailCall Forward to Voice Mail⏹ Mailbox Greeting•Selected Greeting (one of three) becomes active.⏹ Mailbox Security Code•Dialed Security Code can be canceled by pressing “4” instead of “2 (Accept)”.•In case the “In-Mail Advanced Features License (SL-VM-ADVANCE LIC)” is provided, or during Free Trial period (60 days after new installation), the type of Security Code can be assigned as below.- Dial 4 digits Security Code followed by “7” : Security Code for all log-on- Dial 4 digits Security Code followed by “6” : Security Code for remote log-on only•System Administrator can delete a Mailbox Security Code.Listen to Left Messages in your MailboxMulti-Line TerminalUser GuideNEC CorporationA50-031929-004 AU Issue 1.0 July 2012。
NEC话机使用指南
NEC话机使用指南电话使用说明一、功能话机使用说明1)如何拨打外线电话?数字话机:按SPK或提机或按CALL1键—拨9–拨打外线号码。
普通话机:SPK或提机—拨9–拨打外线号码。
2)如何打内线分机?数字话机:按SPK或提机或按CALL1键—拨分机号码。
NEC-ATIIIC普通话机:SPK或提机—拨分机号码。
3)如何查询自己的分机号码:数字话机方法:直接查看本机的屏幕第二行,显示的三位数字就是你的分机号(如200);普通分机:提机拨打200,在200分机上显示的分机号就是你的分机号码;4)如何转接电话?数字话机:摘机–通话–“TRFR”键–拨要转接的分机号–挂机。
普通话机:摘机–通话–“FLASH”键(或轻点叉簧)–拨要转接的分机号–挂机。
5)如何调节振铃音量?数字话机:在电话振铃后按音量键调节,就可根据自己需要调节铃声大小6)如何调节通话音量大小?数字话机:在通话过程中按音量键调节,就可根据自己需要调节音量大小7)如何设置呼叫遇忙或无应答转移?数字话机:SPK-844-1-需转移的分机号码-SPK普通话机:SPK-844-1-需转移的分机号码-SPK如何取消所有呼叫转移?数字话机和普通话机全部按SPK-844-0-SPK8)如何代接其他分机电话?直接代接:听到分机振铃无人接,且不知振铃分机号时按867-通话指定分机代接:听到分机振铃无人接,且知道振铃分机号时按SPK-715 –振铃分机号-通话备注:数字话机和普通话机使用方法一样。
9) 录制语音话机摘机拨716—7—001英语听完DU~DU~两声后开始录制接待语完成后按#键结束话机摘机拨716—7—002英语听完DU~DU~两声后开始录制忙线提示语完成后按#键结束话机摘机拨716—7—003英语听完DU~DU~两声后开始录制无人接听提示语完成后按#键结束。
NEC交换机EDK21交换机说明书,NECIPK交换机说明书,NDK9000说明书
RECALL -----------在系统编程中用来翻页。
NEC EDK-21
FEATURE -----------在系统编程中用来返回前一页。
CONF SPEAKER
-----------每按一次该键,存储模块项目变化如下: a). 分组占用模式中,组号增 1 b). 市话/专线模式中,线号增 1 c). 话机模式中,电话端口号增 1
LK6 话务台 LK7 外接扬声器/门铃对讲机 LK8 多频接收器/其它项
LK9 DISA
LK2 分组占用模式 LK3 市话/专线模式
LK4 话机模式
LK6 复制模式 2.3 写入系统参数
LK3 外线 LK4 话机
系统上电后,接于端口 1 的多功能话机(必须在空闲状态)可用来对系统参数进行
编程。虽然这时其它话机和话务台可正常使用,一部分参数编程后立即写入内存,
5. 中继组模式. 6. 复制模式. 7. 扩容模式. 8. 特殊模式.
CIVING TECH Serivce Hotline:+8620-33388115 E-mail:civing@
B、 系统编程
NEC EDK-21
2.1 特点: 1) 系统上电后以默认程序运行,所以只须对有变化的参数进行编程。
LK1(市话线) LK2(内线) LK3(单线话机) LK4(转接/A.A) LK5(计费) LK6(话务台) LK7(扬声器/门铃对讲机) LK8(多频接收器/其它) LK9(DISA)
LK2(分组占用模式) LK3(市话/专线模式) LK4(话机模式) LK6(复制模式) LK2(组模式复制) LK6(复制模式) LK3(市话线模式复制) LK6(复制模式) LK4(话机模式复制)
通过拨号盘输入代码、功能代码按 TRANSFER 键 将参数写入,当代码##输入后按 TRANSFER 键将 参数写入并跳至存储块 1-1-48(代码(三位) 定义)
NEC快速设置方法

NEC SL1000/8100/9100快速设置方法:NEC SL1000 开关90-03-60改为1可以用TOPAZ 2型数字话机1、网关:192.168.0.10(172.16.0.10)用户名:tech/ASPIRE密码:12345678更改IP地址:10-12-012、更改编程密码:90-02-023、20-03-04 必改为14、20-02-12 必改为1(内线呼叫方式)响铃5、转接键时间:(更改些项后要重启交换机)82-04-04 改为13*582-04-07 改为17*582-04-08 改为100*56、来电显示设置:14-02-10 改为1(外线来电显示开关)14-02-16 来电显示制式,1为DTMF,0为FSK15-03-09 改为1(内线来电显示开关)7、设置振铃组:11-07-01 (设置分机组号)16-02-01 (设置分机组成员)16-01-02 (设1为轮循,0为排队)16-01-03/04(设1为)22-02-01 (设为4—DIL每个外线)22-07-01 (Mode1/Mode2 都设为11-07-01中的组号)8、日/夜服手动转换:20-07-01 (设为1打开人工日/夜服转换)22-02-01 (设为4—DIL每个外线)22-07-01 Mode1为白天分机,Mode2为夜服分机专用话机定义白天键/夜报键851+目标键+09(1为白天,2为夜服健)9、IP缩位拔号14-01-23 每个外线都江更为126-01-04 改为126-02-01 改为026-02-06 上行为1,下行输入226-05-02 上行改为2,下行输入IP接入号10、PRI/DID接入设置10-03-03 将PRIT CRC4关闭11-02-01 更改内线分机号22-02-01 更改为DID呼入模式22-13-01 输入分机DID8位呼出号22-11-01 输入呼入外线号22-11-02 输入呼入响铃分机11、PRI接入内置话务员设置22-11-01 输入呼入外线中继号码22-11-04 输入为322-11-05 改为501(501指的是话务员)12、分机等级设置21-05-0821-06-0721-04-01(等级)13、NEC 随身密码设定21-14-01 (设6位密码,可设500组)21-14-02 (疫定密码的服务等级)使用方法:763+ 密码+9+外线号码)14、内置话务员设定22-02-01 每个外线的Mode1与Mode2 都改为140-10-08 改为2(BUSY)40-10-09 改为3(NO Answer)25-07-02/24-02-03 改无人应答时间25秒左右25-06-02 总机设定/快速拔号设定40-07-01 系统提示音(1为英语,8/15为中文)25-02-01 Mode1/Mode2改1-(为VRS)DATA1/DATA2改1-(为播放的录音段落)录制方法:716+7+01/001回放方法:716+5+01/001删除方法:716+3+01/00115、呼叫转移至手机14-01-13 每个外线都改为114-02-09 每个外线都改为120-02-09 每个外线都改为120-11-12 改为121-03-01 每个外线都改为125-07-07 每个外线都改为1TOPAZ使用方法:SPK713+6+9+号码+HOLD取消方法:SPK713+6+HOLDSL1000使用方法:SPK848+1+9+号码+HOLD取消方法:SPK848+0+HOLD16、计费软件设定(TOPAZ/EX COM口计费设定)35-01-01 改为1 COM 输出10-21-02 改为2 波特率1920014-01-06 每个外线改为1(外线计费开关)14-02-08 改为1为延时计费,0为反极计费35-01-04 改为0,消除隐藏位35-01-08 改为0计费输出20位号,1输出15位号码电缆线的制作方法:1/9为空,2连3,3连2,4连6,6连4,5连5,7连8,8连717、计费软件设定(SL1000/SV8100 LAN口计费设定)35-01-01 改为3 LAN口输出话单10-20-01 选择5 SMDR OUTPUT 改为3000或10000 14-01-06 每个外线改为1(外线计费开关)14-02-08 改为1为延时计费,0为反极计费35-01-04 改为0,消除隐藏位35-01-08 改为0计费输出20位号,1输出15位号码35-02-14 改为1------必改此项18、中继分组14-05-01 将外线端口分别分组14-06-01 将R-TBL2中的Order改为1,Data为221-02-01 将分机设定需要的外线路由出局TBL2 19、设定第二出局码11-01-01 将出局码字头改为(类型为4,号长1)11-09-02 添加出局码14-05-01 将出局的外线设定为214-06-01 将TBL2设为221-15-01 将分机Mod1与Mod2设定为TBL220、TOPAZ/EX/SL1000/8100 拔9出局改0出局11-01-01 将0 TYPE 改为311-09-01 将9改为0。
NEC 程控电话设置

NEC 程控电话设置全国免费电话电话820- 800-1131一、进入编程SPK+#*#*+12345678+Hold二、编程项目1、将语音应答改成振铃应答20-02-12 改成12、将储存拨号改为直接拨号20-03-03 改为13、R键设置(相对于西门子话机100ms)82-04-04 改为13 (不能设置为其它值)82-04-07 改为1082-04-08 改为15 (拍叉会断线,避免回铃)4、保持电话强制解除(避免回铃)14-01-16 改为124-01-05 改为855、呼入立即振铃(如果正常响铃,不需要设置)改为122-04-01 将需要响铃的分机放入,最多32台7、限制中继呼出(未用的中继线要设置)〕14-01-07 未用的中继号改为08、分机号设置(1)、位数设置11-01-01 将需要的分机号字头位数改成2位(默认3位)1X 将3改成2 2X 将3改成215-01-01 将分机名称改成对应的分机号码20-17-01 设为功能话机的分机号如果不设置,拨0则不起作用10、来电显示设置(注意一定要接好地)14-02-10 将需要的外线改成114-02-16 更改来显制式0:FSK 1:DTMF 1 20-09-02 分机是否来电显示改成115-03-09 普通分机来电显示改成115-03-11 普通分机来显制式0:FSK 1:DTM11.最经济路由LCR设置:14-01-23 TRUNK(N) 改1;26-01-04 改1;26-02-01 TBL1内设0;26-02-06 TBL1 对应TBL2;26-05-02 TBL2内设17908+P(需要空开语音的加P,一个P 3秒,)12.设置外置话务员22-04-01 在呼入振铃组中设置话务员分机号码.22-05-01 在振铃组中设置话务员的振铃组即可13.计费: 35-01-01 1:COM 口3:LAN 口35-01-04 取消隐藏位数10-21-02 波特率更改(COM口线序如下:LAN口:交叉线序三、编程按键说明HOLD 保存DC 编程项目后退FLASH 在项目间的细项移动LND 光标左移OPAC 光标右移SPK 退出编程(需要用DC键退出到初始编程状态)VOL 在同一项目内的数据进行翻转(如中继1、2…,分机号200、201…等)此操作会自动保存已经更改的数据CONF 左进删除键CLEAR 删除键上面说的不错,不过有一点更正,那个是ARS,不是最经济路由LCR;真正的LCR是1,14-01-23 TRUNK(N)改1;2,26-01-04改1;3,26-02-01 TBL1内设0;4,26-02-06 TBL1 对应TBL2; 5,26-05-02 TBL2内设17908+P(需要空开语音的加P,一个P 3秒)A、选择计费端口:35-01-01 1:COM 3:LANB、取消隐藏位数:35-01-04 1改成0C、修改COM波特率:10-21-02 默认:9600长途限制等级设置:A、21-05-08:定义每个等级可以使用的限制表如:第一等级限制国际,设1等级为使用,在下一项(21-06-07对应的表)里设置限制00和1790900即可其它以此类推,可以灵活分配的,切记与下一项配合,四个表已经够用啦B、21-06-07:可以设置四个表,对应前一项的设置,可以设置1-200个数据,每一个数据最大12位一般在这里设置即可,其它可以不用管它C、21-04-01:分配每个分机对应的等级D、随身密码设置: 221-14-01:设置密码,固定六位,不可更改位数21-14-02:设置密码等级注:如果你限制国际只需要限制00,可以用21-05-01设置,对应21-06-01,因为只可以设置4位数,所以用处不大其它允许表,自己看着需要做设置吧,都在21-05和21-06里,注意对应关系就可以啦!4、语音信箱和VRS的设置及使用语音信箱及VRS的设置及使用-A1是必须的硬件,安装在底板上1、VRS设置:22-02-01 改成125-02-01 改成1 按HOLD后把数据也改成120-07-13、14、15 就按需要设置吧,这里指的是可以录音的分机具有的等级25-06-02 设置按0的时候转到那一个分机,注意要在0的提示项里面设置2、语音信箱设置:40-01-01 改成140-02-01 在这里面设置你需要用到的信箱号码,最好现分机号相同40-02-02 设置每个信箱的密码,按需设置吧VRS必须录音才能有提示音的,在具体权限的分机上按716就可以啦!四、语音信箱的使用如果是功能话机,就设置一个语音信箱键吧,内容是:67+信箱号如果是分机:提机+884+67+信箱号+#,会有语音提示的,按服务码操作(具体看手册吧)注意:个人问候语在32#里面录音,进入语音信箱以后可以按0#听到帮助的! 3普通分机只支持一种自动总机功能,即无条件转移到语音信箱!要在62#里面设置其它的就慢慢摸索吧!5、话务员设置只要在22--04-01里设置语务员的分机端口就可以了,,然后在话务员里设置个总机,,转接时间就OK了对NEC Aspila 内置VRS 的小改造第一个问题,内置VRS 转分机后,当分机没人接听,只有两种选择:挂断、转话务员,没有无应答提示。
NEC快速设置方法

NEC快速设置方法NEC SL1000/8100/9100快速设置方法:NEC SL1000 开关90-03-60改为1可以用TOPAZ 2型数字话机1、网关:用户名:tech/ASPIRE密码:更改IP地址:10-12-012、更改编程密码:90-02-023、20-03-04 必改为14、20-02-12 必改为1(内线呼叫方式)响铃5、转接键时间:(更改些项后要重启交换机)82-04-04 改为13*582-04-07 改为17*582-04-08 改为100*56、来电显示设置:14-02-10 改为1(外线来电显示开关)14-02-16 来电显示制式,1为DTMF,0为FSK15-03-09 改为1(内线来电显示开关)7、设置振铃组:11-07-01 (设置分机组号)16-02-01 (设置分机组成员)16-01-02 (设1为轮循,0为排队)16-01-03/04(设1为)22-02-01 (设为4—DIL每个外线)22-07-01 (Mode1/Mode2 都设为11-07-01中的组号)8、日/夜服手动转换:20-07-01 (设为1打开人工日/夜服转换)22-02-01 (设为4—DIL每个外线)22-07-01 Mode1为白天分机,Mode2为夜服分机专用话机定义白天键/夜报键851+目标键+09(1为白天,2为夜服健)9、IP缩位拔号14-01-23 每个外线都江更为126-01-04 改为126-02-01 改为026-02-06 上行为1,下行输入226-05-02 上行改为2,下行输入IP接入号10、PRI/DID接入设置10-03-03 将PRIT CRC4关闭11-02-01 更改内线分机号22-02-01 更改为DID呼入模式22-13-01 输入分机DID8位呼出号22-11-01 输入呼入外线号22-11-02 输入呼入响铃分机11、PRI接入内置话务员设置22-11-01 输入呼入外线中继号码22-11-04 输入为322-11-05 改为501(501指的是话务员)12、分机等级设置21-05-0821-06-0721-04-01(等级)13、NEC 随身密码设定21-14-01 (设6位密码,可设500组)21-14-02 (疫定密码的服务等级)使用方法:763+ 密码+9+外线号码)14、内置话务员设定22-02-01 每个外线的Mode1与Mode2 都改为1 40-10-08 改为2(BUSY)40-10-09 改为3(NO Answer)25-07-02/24-02-03 改无人应答时间 25秒左右25-06-02 总机设定/快速拔号设定40-07-01 系统提示音(1为英语,8/15为中文)25-02-01 Mode1/Mode2改1-(为 VRS)DATA1/DATA2改1-(为播放的录音段落)录制方法:716+7+01/001回放方法:716+5+01/001删除方法:716+3+01/00115、呼叫转移至手机14-01-13 每个外线都改为114-02-09 每个外线都改为120-02-09 每个外线都改为120-11-12 改为121-03-01 每个外线都改为125-07-07 每个外线都改为1TOPAZ使用方法:SPK713+6+9+号码+HOLD取消方法:SPK713+6+HOLDSL1000使用方法:SPK848+1+9+号码+HOLD取消方法:SPK848+0+HOLD16、计费软件设定(TOPAZ/EX COM口计费设定)35-01-01 改为1 COM 输出10-21-02 改为2 波特率1920014-01-06 每个外线改为1(外线计费开关)14-02-08 改为1为延时计费,0为反极计费35-01-04 改为0,消除隐藏位35-01-08 改为0计费输出20位号,1输出15位号码电缆线的制作方法:1/9为空,2连3,3连2,4连6,6连4,5连5,7连8,8连717、计费软件设定(SL1000/SV8100 LAN口计费设定)35-01-01 改为3 LAN口输出话单10-20-01 选择5 SMDR OUTPUT 改为3000或10000 14-01-06 每个外线改为1(外线计费开关)14-02-08 改为1为延时计费,0为反极计费35-01-04 改为0,消除隐藏位35-01-08 改为0计费输出20位号,1输出15位号码35-02-14 改为1------必改此项18、中继分组14-05-01 将外线端口分别分组14-06-01 将R-TBL2中的Order改为1,Data为2 21-02-01 将分机设定需要的外线路由出局TBL219、设定第二出局码11-01-01 将出局码字头改为(类型为4,号长1)11-09-02 添加出局码14-05-01 将出局的外线设定为214-06-01 将TBL2设为221-15-01 将分机Mod1与Mod2设定为TBL220、TOPAZ/EX/SL1000/8100 拔9出局改0出局11-01-01 将0 TYPE 改为311-09-01 将9改为0。
NEC-数字话机产品功能参数介绍资料讲解

NEC数字话机产品介绍一、语音终端.........................................错误!未指定书签。
1、语音终端介绍:...................................错误!未指定书签。
2、DT400系列数字话机................................错误!未指定书签。
DTZ-8LD桌面数字话机..........................错误!未指定书签。
DTZ-12D/24D桌面数字话机......................错误!未指定书签。
DTZ-6DE桌面数字话机..........................错误!未指定书签。
DTZ-2E桌面数字话机...........................错误!未指定书签。
数字话务台....................................错误!未指定书签。
3、DT800系列IP话机.................................错误!未指定书签。
ITZ-12CG/24CG彩屏IP话机.....................错误!未指定书签。
ITZ-8LD/8LDGIP话机...........................错误!未指定书签。
ITZ-12DG/24DGIP话机..........................错误!未指定书签。
ITZ-12D/24DIP话机............................错误!未指定书签。
4、DT400/DT800系列话机常用功能键....................错误!未指定书签。
5、话机总结.........................................错误!未指定书签。
一、语音终端1、语音终端介绍:数字话机是NEC专门为商业通讯环境而设计,适合使用在对语音及其他辅助相关功能要求较高,通过2线铜缆与语音系统连接,由媒体网关集中为终端供电的环境。
NEC数字话机介绍
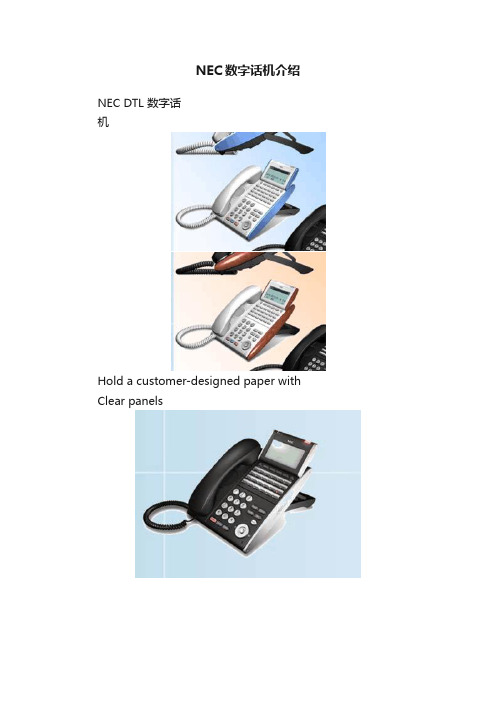
NEC数字话机介绍NEC DTL 数字话机Hold a customer-designed paper with Clear panelsPrint the Company Logo Free Design ClearSilve rRedBlueWood(initiallyattached)DTL-32D-1数字话机话机面板设置:显示屏幕(LCD): 168X55不带夜光式点矩阵可编程键:32(24D+8LK)软功能键:有LED讯息指示灯:有(3色)免提:全免提夜光拨号盘:有客制化侧盖:支持角度调节:4级调节(基座)LCD可动DTL-32D-1数字话机DTL-12P(BK)TEL数字话机话机面板设置:显示屏幕(LCD): 168X55不带夜光式点矩阵可编程键:12软功能键:有LED讯息指示灯:有(3色)免提:全免提夜光拨号盘:有客制化侧盖:支持角度调节:4级调节(基座)LCD可动DTL-12P(BK)TEL数字话机DTL-6P(BK)TEL数字话机话机面板设置:显示屏幕(LCD): 168X30不带夜光式点矩阵可编程键: 6软功能键:有LED讯息指示灯:有(3色)免提:全免提夜光拨号盘:有客制化侧盖:支持角度调节:不可调节(基座)LCD不可动DTL-6P(BK)TEL数字话机NEC DTL系列键数字电话终端配置了多个专用功能键,可编程线路/功能键(每个键带有双色LED指示灯),内置的扬声器,内置耳机接口,音量/LCD显示屏亮度控制键,多个功能软键和1个LED来电和信息指示灯。
可编程线路/功能键可以灵活地被设置为外线中继,内线分机或系统功能键。
NEC DTL数字话机通过智能地使用NEC系统功能,建立了更为复杂的电话技术。
这通过DTL数字话机的智能用户界面实现。
DTL数字话机LCD 可在呼叫的各个阶段向用户提示该阶段的可用功能。
这就不再需要记住复杂的功能代码或为常用电话功能分配按键。
因此,任何用户可在任何位置通过分机用户界面来使用DTL数字话机的电话功能。
- 1、下载文档前请自行甄别文档内容的完整性,平台不提供额外的编辑、内容补充、找答案等附加服务。
- 2、"仅部分预览"的文档,不可在线预览部分如存在完整性等问题,可反馈申请退款(可完整预览的文档不适用该条件!)。
- 3、如文档侵犯您的权益,请联系客服反馈,我们会尽快为您处理(人工客服工作时间:9:00-18:30)。
NECM100数字话机简单操作说明
总机数字电话操作说明:
一、分机呼叫
提机(听拨号音)→拨分机号
二、打外线
提机(听拨号音)→拨9(听外线拨号音)→拨外线号码
三、电话呼入
分机呼入:显示:分机号码
外线呼入:显示:DIT DDDXXXX(外线中继号) 红灯闪动
四、电话转接
1、正常转接:按TRF键(听到特殊拨号音)→目标分机号码(号码闪
动显示) →挂机
2、转接遇忙线分机:按TRF键(听到特殊拨号音)→目标分机号码
(显示BSY xxxxx)→再按一次TRF键取回忙线(如
挂机会马上回铃)
3、转接遇空号:按TRF键拨号码后会听到特殊提示音,再按一次
TRF键取回线路
4、转错号码:按TRF键(听到特殊拨号音)→目标分机号码(号码闪
动显示)《只要没有挂机都可再按一次TRF键取回线
路重新转接》
5、电话无人接听:返回电话显示 RCL XXXXX(分机号码) +中继号
码(绿灯闪动)。
