关于TRACE32使用说明
TRACE32 iAMP 双核调试应用说明书

Application Note for iAMP Debugging Release 09.2023TRACE32 Online HelpTRACE32 DirectoryTRACE32 IndexTRACE32 Documents ...................................................................................................................... Multicore Debugging ..................................................................................................................... Application Note for iAMP Debugging . (1)SMP, iAMP or AMP? (3)iAMP Setup (7)Example iAMP Setup10Version 09-Oct-2023 11-Nov-2021New manual.SMP, iAMP or AMP?TRACE32 offers various configuration possibilities for debugging multi-core target systems. This chapter explains the basic differences between:•SMP (Symmetrical MultiProcessig)•iAMP (integrated Asymmetrical MultiProcessing)•AMP (Asymmetrical MultiProcessig)This application note focuses on iAMP. It gives you a basic overview of the iAMP concept and helps you to choose the right configuration for your setup. For further details about iAMP and the commands used here, you can also see the “General Reference Guide” (general_ref_<x>.pdf) or contact**********************.If you want to create a new TRACE32 setup for any multicore system, one of the very first decisions you have to make is “AMP or SMP or iAMP?”. In some cases, only one of the possibilities is supported by TRACE32, for example: if you have several cores of different architectures (like one Arm core, one Xtensa core and one RISC-V core), then AMP is the only possible option. But in many cases, you have a choice.Let’s first take a look at the key properties of the three concepts:•All cores have the same instruction set.•All cores use the same instance of an OS (when not bare-metal and unless you are using a hypervisor (“Hypervisor Debugging User Guide” (hypervisor_user.pdf)).•All cores use the same memory model and same address translations (unless you are using a hypervisor).•All cores share the same physical and logical address space.•All cores share the same debug symbols (typically the same elf file).•All cores are debugged from a single TRACE32 PowerView instance. Y ou can have up to 1024cores.•TRACE32 starts and stops all cores simultaneously (even though you can temporarily single out one core for independent start/stop).iAMP (integrated asymmetrical multiprocessing):•All cores have the same instruction set.•There are typically multiple OS instances (if not bare metal).•There is just one global physical address space but each OS maintains its own set of virtual address spaces.•All cores are debugged from a single TRACE32 PowerView GUI. The number of cores is limited just by the core architecture used and can be very high.•TRACE32 allows to group cores logically into machines; this grouping depends on the logical structure of the system under debug - each machine consists of one or more cores. Up to30machines are possible.•Each machine has its own OS instance (if not bare metal).•Each machine has its own memory model, address translations and debug symbols.•TRACE32 starts and stops all cores simultaneously (even though you can temporarily single out one core for independent start/stop).•AMP can bundle single cores, as well as SMP and iAMP subsystems.•Mixing of different core architectures with different instruction sets is possible.•Each core/subsystem has its own TRACE32 PowerView GUI.•Each core/subsystem has its own (different) memory models, address translations, elf files and debug symbols.•Each core/subsystem can have its own physical address space.•Each core/subsystem has its own logical address spaces.•Each core/subsystem starts and stops independently but can also be synchronized.•AMP is limited to 16 TRACE32 PowerView GUIs.An example of an AMP system that bundles single cores, an SMP and an iAMP subsystem can be found on page10.The most important questions for the decision are:•Do all my cores use the same instruction set?If not, it is definitely AMP.•Do all my cores of the same instruction set run a single instance of OS?If yes, these cores form an SMP (sub)system.•Are there SMP subsystems and single cores of the same instruction set? Does it make sense to configure them as an iAMP system and debug them from a single TRACE32PowerView instance?Y es, if they are all using a global physical address space.Y es, if they logically belong together; that means they work together or in parallel on the same tasks.Y es, if you want or need to reduce the number of TRACE32 PowerView instances.The following table provides a systematic overview:SMP AMP iAMP Homogeneous cores (cores of the same instruction set)✓✓✓Heterogeneous cores✓Single TRACE32 instance/GUI✓✓Multiple TRACE32 instances/GUIs 16Hypervisor with statically assigned guests (core identity)✓✓✓Hypervisor with dynamic core assignment (core sharing)✓SMP OS (a single OS managing multiple cores)✓Multiple OSes without hypervisor✓Synchronous run✓✓✓Asynchronous run✓iAMP is available for selected core architectures like Arm, Hexagon and T riCore. If you need iAMP and your platform does not support it yet, please contact your local Lauterbach representative or**********************.Some of the decision criteria are easy to evaluate (like more than 16 CPUs) but some of them are quite fuzzy - talking to Lauterbach representative or Lauterbach support might help you with the decision.iAMP SetupThe basis for an iAMP system is that cores are grouped into machines.The SYStem.Option.MACHINESPACES ON command creates the basis for this.All cores that use the same instance of an OS (when not bare-metal) can be grouped and assigned to a machine by the TASK.Create.MACHINE command.Example :This will create two machines, each of them with two cores. Their setup can be then displayed using the commandTASK.List.MACHINES :The columns name and cores in the screenshot are self-explaining, ‘mid’ displays the machine ID, other columns are not relevant for our example.It may be necessary to use the CORE.ASSIGN command beforehand to assign the physical cores to the logical cores of the iAMP system.Use the command CORE.select <logical_core> to switch to the core of interest and the TRACE32PowerView GUI will display the system information from the perspective of the selected core. T o understand how this works, think that “the machine is never selected directly but always follows selected core”.By default, all cores are started and stopped simultaneously , but you can single out a single core for independent start/stop by using the CORE.SINGLE <logical_core> command.The CORE.select command without an argument can be used to reverse this selection after the core is stopped.It is imperative to ensure that the symbols loaded by any of the Data.LOAD.* commands will be added to the right machine space. When loading executables and symbol information, the safest way is to explicitly select the core to which the executable belongs – it then explicitly defines both the core and machine. One of the reasons is that registers like PC might be pre-initialized during Data.LOAD so by selecting the correct core it becomes clear where the register(s) are to be set:TASK.Create.MACHINE , 0. "main0" /CORE 0. 1.TASK.Create.MACHINE , 1. "main1" /CORE 2. 3.CORE.select 0.Data.LOAD.Elf application_subsystem0.elf CORE.select 2.Data.LOAD.Elf application_subsystem1.elf /NoClearOn the other hand, when you load only symbol information and no register content, it is sufficient to specify only the machine; knowledge of the specific core is not required. T o specify only the machine, use theloading offset parameter to Data.LOAD.* where this offset contains the machine number. In most cases you use zero as offset (unless you need to shift the data to another base address).Loading symbols using the machine ID makes them machine aware as can be seen in the image below.The machine name can be explicitly specified in a symbol name using triple-backslash (“\\\”) syntax.Example :This command will show the source of the symbol start from the module Global on the machine named main1.The general format for symbol names becomes:[\\\<machine_name>]\\[<program_name>]\[<module_name>]\<symbol_name>Both <program_name> and <module_name> may be omitted if there is no ambiguity with another symbol but the appropriate backslashes must remain to indicate where they were, for example:\\\<machine_name>\\\<symbol_name>So, our example of \\\main1\\Global\start now becomes \\\main1\\\\startWhen you activate the iAMP mode, the behavior of many commands changes. The commands now also consider the correct machine scope, for example:Data.LOAD.Elf application_subsystem0.elf 0x0:::0 /NoCODE /NoRegData.LOAD.Elf application_subsystem1.elf 0x1:::0 /NoClear /NoCODE /NoRegNOTE:This concept is extended to allow you to access a logical address on any machine and works like this:[<access_class>:][<machine_id>:::]<address_offset> Example:P:1:::0x1234000 means program address P:0x1234000 on machine 1.R:0:::0x81021864 means AArch32 Arm code at address R:0x81021864 on machine 0.List.Asm \\\main1\\\Global\startNormally, MMU.DUMP.TLB shows the only TLB in the system (where available). With iAMP, the contents displayed by MMU.DUMP.TLB will update after every change of machine and always show the TLB of the currently selected machine.The program counter is now shown everywhere with the machine number included - like in this CORE.List window:The machine number is also included in many other outputs and windows, almost everywhere where you see an address. The screenshot below shows the sYmbol.List.SECtion window. It can be seen that sections from all machines and all addresses include the machine number.Example iAMP SetupAssume the following system, based on a TDA4VM chip from T exas Instruments:•Four Cortex-R5 cores, grouped in two core pairs, called “main0” and “main1”. These four cores form our example iAMP system.Each core pair has its own symbols and ELF file (app_ddr.elf and app_sram.elf ).Both core pairs use logical memory but have their own translations.•In addition to that, there is also a Cortex-M3 core (“master”), Cortex-R5 (“mcu”) based SMP subsystem and a TI C71x (“dsp”) on the chip, which all need to be debugged as well.Four TRACE32 PowerView GUIs are needed to debug this AMP system:1.GUI to control the Cortex-R5 based iAMP subsystem 2.GUI to control a single Cortex-M33.GUI to control the Cortex-R5 based SMP subsystem4.GUI to control a single C71x DSPTRACE32 PowerDebugDebug Port®iAMP main0 + main1Cortex-M3masterSMP 2x Cortex-R5mcuC71x dspApplication Note for iAMP Debugging | 11©1989-2023 L auterbach So, let's focus on the iAMP subsystem - we want to preload all elf files, execute all startups immediately after loading, and then start the execution of all cores/machines from the symbol main simultaneously. For this setup, the following script can be used:The other subsystems of SoC are initialized as usual with their own scripts.The structure of the whole system can be then displayed via the command TargetSystem ALL .sYmbol.RESetSYStem.Option.MACHINESPACES ONTASK.CREATE.MACHINE , 0. "main0" /CORE 0. 1.TASK.CREATE.MACHINE , 1. "main1" /CORE 2. 3.CORE.select 0.Data.LOAD.Elf app_ddr.elfCORE.select 2.Data.LOAD.Elf app_ram.elf /NoClearCORE.SINGLE 0. ; enter single core execution mode Go mainWAIT !STATE.RUN()CORE.SINGLE 2. ; enter single core execution mode Go mainWAIT !STATE.RUN()CORE.select 0. ; leaving single core execution mode PRINT "Now we are ready to debug from main"。
Android_trace32_Kernel_Debug

如何用trace32调试native和kernel异常---------- for Android System Debug众所周知gdb功能强大,但相对于gdb的指令式调试,trace32的图形界面要更方便易上手,而且不用查记那些繁复的指令,虽然效率上不及gdb,但对于新手而言,使用trace32要比gdb 快捷。
下面就介绍如何使用trace32加载symbol文件。
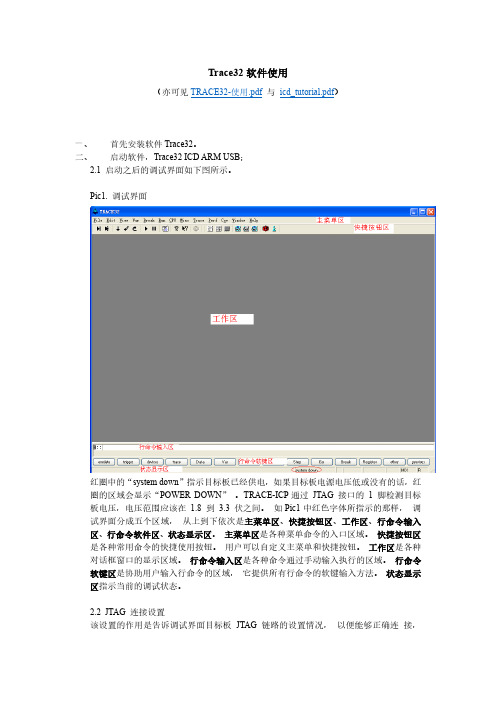
1.启动trace32默认安装好trace32后,在开始菜单中选择“Trace32 Simulator for ARM”,如图1图12.启动模拟器在CPU菜单中选择“System Settings…”,如图2,图2在弹出窗口中的CPU框选择对应的CPU,如图3,对于MT6589平台选择CortexA9MPCore,图3然后点击UP即可启动模拟器,右下角会显示“system ready”,如图4。
图43.加载symbol文件加载的指令为“data.load.elf <symbol路径> <加载地址> /gnu /noclear /nocode”,symbol 文件可以是boot、lk等的elf文件,kernel的vmlinux,native so的symbol库;加载地址是可选项,可从PROCESS_MAP获取,也可从问题log获取。
加载完成后点击工具条上的蓝色感叹号就会显示出该symbol文件所对应的symbol,如图5,双击symbol符号可进入该symbol的具体内容。
图54.设置资源路径symbol文件加载完了,但对应的内容是十分难读的汇编语言,如图6,图6不过不用担心trace32支持symbol与code映射,可以将symbol与代码对应起来,在图6界面滑动鼠标滚轮,在命令框下方会提示该段symbol所对应的文件,如图7,图7将与symbol文件对应的同一版本的代码放到提示的路径下,在View菜单选择“Symbols”-> “Source Search Paths”,如图8,图8在弹出的对话框中点击“Add Dir…”按钮将路径设置到代码路径,然后点击“Reload”按钮,如图9,图9回到刚才symbol 界面,汇编语言就变成对应的代码了,如图10,图10点击 “Mode ” 按钮可切换到纯代码模式,如图11。
Trace32-ICD使用说明
Trace32-ICD使用说明作者:***日期:2008-8-11版本:V-1.0一、编写目的通过对该文档的阅读,能够掌握Trace32-ICD的软、硬件安装,使用Trace32-ICD进行flash擦除,程序下载,并熟悉在线调试。
二、T RACE32硬件的连接Trace32的硬件连接如下图所示:图2.1注意事项:电源打开/关闭时的正确顺序:打开:先调试器,再目标机。
关闭:先目标机,再调试器。
三、TRACE32软件的安装3.1 TRACE32-ICD软件包安装1、首先获取安装软件包,包括:Trace32安装包和USB Driver。
2、安装Trace软件包,运行..\ trace32\setup.bat批处理文件或..\trace32\bin\setup\setup.exe文件,系统自动安装,在安装过程中进行如下选择。
图 3.1 图3.2图3.3其他选项基本默认。
3.2 USB驱动安装正确连接Trace后,系统会自动提示发现硬件需要进行驱动。
此时选择驱动程序所在目录。
路径为..\ trace32\bin。
如图3.4所示。
图3.4四、Flash的擦除与下载程序由于手机在下载版本过程中死机或掉电造成手机无法正常启动,并且使用我们单位的ZXPST与QPST都无法进行版本下载,并且QXDM和ZXPST通过COM1接口也无法找到手机,于是无法下载。
在这种情况下我们可以使用Trace32-ICD进行Flash的擦除和程序下载。
4.1 设置环境CPU环境设置在SYStem窗口,SYStem窗口提供所有CPU特定的设置。
使用CPU菜单中的System Settings…打开SYStem窗口如图4.1所示。
需要配置主要包括CPU、时钟和UP加电,CPU选择ARM926EJ,时钟JtagClock选择Ttck,然后进行加电UP,如果连接一切都正常,设置这几项就可以了。
如图4.1所示:图4.1注意事项:如果UP不上出现如下错误emulation debug port fail,说明硬件连接不正确。
trace32使用手册
打开后的程序列表窗口可以有下面几种形式。 Pic24. 找不到源文件的程序列表窗口
对于上图所示的情形,需要用 Y.SPATH 命令指定源程序路径。如下图所示。 Pic25. 指定源程序路径(其一) Pic26. 带源程序的混合显示程序列表窗口(其二)
通过点击程序列表窗口上的“Mode”按钮可以切换混合和源码显示方式。 Pic27. 带源程序的源码程序列表窗口(其三)
这些设置主要包括: 1、 选择要调试的处理器型号。 2、 是否有多个器件串联在同一个 JTAG 链路里,连接顺序如何,每个器件的 JTAG IR
寄存器的宽度是多少。 (情况一) 3、 JTAG 时钟使用 TCK 还是 RTCK。TCK 由 TRACE-ICP 提供,一般情况下选用
10MHz。RTCK 是 TRACE-ICP 的 TCK 进入目标 JTAG 链路之后,从目标 JTAG 链路返回的时钟,它与目标处理器的时钟同步。一般情况下,具有睡眠模式的处理 器多选用 RTCK 作 JTAG 时钟, 如 ARM926EJ-S。 (情况二) 4、 通过 JTAG 与目标连接时,是否要先复位目标板。JTAG 口上的 SRST 信号产生复 位信号。 (情况三) 5、 通过 JTAG 与目标连接时,是否要停止目标处理器运行。 (情况四) 从主菜单“CPU”中选择“System Settings…” ,打开如下图所示对话框。从“CPU” 下拉菜单里选择要调试的处理器。 Pic2. System Settings 对话框
Pic29 中红框内的单选钮 IMASKASM 和 IMASKHLL 选择之后,单步时就会屏蔽中断。 用户也可以通过命令 sys.o imaskasm on 和 sys.o imaskhll on 来设置这两个选项。
十、 设置软件断点 设置软件断点可以在命令行输入命令 break.set <address> /soft 来实现,在命令中的 <address>代表程序地址,可以是程序中的函数名等符号。如下图所示。 Pic30. 用命令设置软件断点
Trace32 PXROS用户手册和版本帮助(MANUAL)说明书

OS Awareness Manual PXROS Release 09.2023TRACE32 Online HelpTRACE32 DirectoryTRACE32 IndexTRACE32 Documents ......................................................................................................................OS Awareness Manuals ................................................................................................................OS Awareness Manual PXROS (1)History (3)Overview (3)Brief Overview of Documents for New Users4 Supported Versions4Configuration (5)Quick Configuration Guide5 Hooks & Internals in PXROS6Debug Features (7)Display of Kernel Resources7 Task Stack Coverage7 Task-Related Breakpoints8 Task Context Display9 SMP Support9 Dynamic Task Performance Measurement10 PXROS Specific Menu11Trace Features (12)Task Runtime Statistics12 Function Runtime Statistics13 CPU Load Analysis15 PXROS Specific Menu for Tracing16PXROS Commands (17)TASK.ListmbX Display mailboxes17 TASK.ListObject List objects17 TASK.ListObj.DeLaY Display delay objects18 TASK.ListObj.MailBoX Display mailboxes18 TASK.ListObj.MemClass Display memory classes19 TASK.ListObj.MeSsaGe Display message objects19 TASK.ListObj.OPool Display object pools20 TASK.ListTask Display task table20Version 09-Oct-2023 History08-Oct-19Added support for PXROS v7.OverviewThe OS Awareness for PXROS contains special extensions to the TRACE32 Debugger. This manual describes the additional features, such as additional commands and statistic evaluations.Brief Overview of Documents for New UsersArchitecture-independent information:•“Training Basic Debugging” (training_debugger.pdf): Get familiar with the basic features of a TRACE32 debugger.•“T32Start” (app_t32start.pdf): T32Start assists you in starting TRACE32 PowerView instances for different configurations of the debugger. T32Start is only available for Windows.•“General Commands” (general_ref_<x>.pdf): Alphabetic list of debug commands.Architecture-specific information:•“Processor Architecture Manuals”: These manuals describe commands that are specific for the processor architecture supported by your Debug Cable. T o access the manual for your processorarchitecture, proceed as follows:-Choose Help menu > Processor Architecture Manual.•“OS Awareness Manuals” (rtos_<os>.pdf): TRACE32 PowerView can be extended for operating system-aware debugging. The appropriate OS Awareness manual informs you how to enable theOS-aware debugging.Supported VersionsCurrently PXROS is supported for the following versions:•PXROS 4.x on C166/C167, PowerPC and T riCore•PXROS 5.x, 6.x, 7.x and 8.x on TriCoreConfigurationThe TASK.CONFIG command loads an extension definition file called “pxros.t32” (directory“~~/demo/<arch>/kernel/pxros”). It contains all necessary extensions.TASK.CONFIG ~~/demo/<arch>/kernel/pxros/pxros.t32 [<magic_address>[<args>]]<magic_address>Specifies a memory location that contains the current running task. Thisaddress can be found at “...”.<args>The configuration requires additional arguments, that are:•<sleep>: Currently not used, specify “0”•<dpp>: (only on C166) The first argument configures the datapage settings of the application. Specify a long word which leastsignificant byte is the dpp0 content and which most significant byteis the dpp3 content. E.g. '03060500' means dpp0=0, dpp1=5,dpp2=6 and dpp3=3. If you don't know the dpp settings of yourapplication, just start it for a while and check in the 'register' com-mand the dpp's. Note that the dpp settings must be adapted to everysingle application.•<internal>: The next three arguments are PXROS internal struc-tures. Specify “__PxTasklist __PxTaskRdyFromRdy__PxUsedObjs”.Without any parameters, the debugger tries to locate the internals of PXROS automatically. For this purpose, the kernel symbols must be loaded and accessible at any time the OS Awareness is used (see also “Hooks & Internals”).If you want to display the OS objects “On The Fly” while the target is running, you need to have access to memory while the target is running. In case of ICD, you have to enable SYStem.MemAccess orSYStem.CpuAccess (CPU dependent).Quick Configuration GuideExample scripts are provided in ~~/demo/<arch>/kernel/pxros. It is recommended to take one of these as a starting point and modify it to suit your target and setup.If you already have a setup/configuration script which configures the target and loads the application code and/or symbols, you can add the following lines to your script after the symbols have been loaded: TASK.CONFIG ~~/demo/<arch>/kernel/pxros/pxros.t32MENU.ReProgram ~~/demo/<arch>/kernel/pxros/pxros.menThese lines will automatically configure the awareness and add a custom menu that provides access to many of the features.Hooks & Internals in PXROSNo hooks are used in the kernel.T o retrieve information on the kernel data and structures, the OS Awareness uses the global kernel symbols and structure definitions. Ensure that access to those structures is possible every time when features of the OS Awareness are used.Be sure that your application is compiled and linked with debugging symbols switched on.Debug FeaturesThe OS Awareness for PXROS supports the following debug features.Display of Kernel ResourcesThe extension defines new commands to display various kernel resources. Information on the following PXROS components can be displayed:TASK.ListObject.DeLaY Delay objectsTASK.ListObject.MailBoX or TASK.ListmbX MailboxesTASK.ListObject.MemClass Memory classesTASK.ListObject.MeSsaGe Message objectsTASK.ListObject.OPool Object poolsTASK.ListTask TasksFor a description of the commands, refer to chapter “PXROS Commands”.If your hardware allows memory access while the target is running, these resources can be displayed “On The Fly”, i.e. while the application is running, without any intrusion to the application.Without this capability, the information will only be displayed if the target application is stopped.Task Stack CoverageFor stack usage coverage of tasks, you can use the TASK.STacK command. Without any parameter, this command will open a window displaying with all active tasks. If you specify only a task magic number as parameter, the stack area of this task will be automatically calculated.T o use the calculation of the maximum stack usage, a stack pattern must be defined with the command TASK.STacK.PATtern (default value is zero).T o add/remove one task to/from the task stack coverage, you can either call the TASK.STacK.ADD or TASK.STacK.ReMove commands with the task magic number as the parameter, or omit the parameter and select the task from the TASK.STacK.* window.It is recommended to display only the tasks you are interested in because the evaluation of the used stack space is very time consuming and slows down the debugger display.Task-Related BreakpointsAny breakpoint set in the debugger can be restricted to fire only if a specific task hits that breakpoint. This is especially useful when debugging code which is shared between several tasks. T o set a task-relatedbreakpoint, use the command:Break.Set<address>|<range>[/<option>] /TASK <task>Set task-related breakpoint.•Use a magic number, task ID, or task name for <task>. For information about the parameters, see “What to know about the Task Parameters” (general_ref_t.pdf).•For a general description of the Break.Set command, please see its documentation.By default, the task-related breakpoint will be implemented by a conditional breakpoint inside the debugger.This means that the target will always halt at that breakpoint, but the debugger immediately resumesexecution if the current running task is not equal to the specified task.NOTE:T ask-related breakpoints impact the real-time behavior of the application.On some architectures, however, it is possible to set a task-related breakpoint with on-chip debug logic that is less intrusive. T o do this, include the option /Onchip in the Break.Set command. The debugger then uses the on-chip resources to reduce the number of breaks to the minimum by pre-filtering the tasks.For example, on ARM architectures: If the RTOS serves the Context ID register at task switches, and if the debug logic provides the Context ID comparison, you may use Context ID register for less intrusive task-related breakpoints:eContextID ON Enables the comparison to the whole Context ID register.Break.CONFIG.MatchASID ON Enables the comparison to the ASID part only.TASK.List.tasks If TASK.List.tasks provides a trace ID (traceid column), thedebugger will use this ID for comparison. Without the trace ID,it uses the magic number (magic column) for comparison.When single stepping, the debugger halts at the next instruction, regardless of which task hits thisbreakpoint. When debugging shared code, stepping over an OS function may cause a task switch and coming back to the same place - but with a different task. If you want to restrict debugging to the current task,you can set up the debugger with SETUP .StepWithinTask ON to use task-related breakpoints for single stepping. In this case, single stepping will always stay within the current task. Other tasks using the same code will not be halted on these breakpoints.If you want to halt program execution as soon as a specific task is scheduled to run by the OS, you can use the Break.SetTask command.Task Context DisplayY ou can switch the whole viewing context to a task that is currently not being executed. This means that all register and stack-related information displayed, e.g. in Register , Data.List , Frame etc. windows, will refer to this task. Be aware that this is only for displaying information. When you continue debugging the application (Step or Go ), the debugger will switch back to the current context.T o display a specific task context, use the command:•Use a magic number, task ID, or task name for <task>. For information about the parameters, see “What to know about the Task Parameters” (general_ref_t.pdf).•To switch back to the current context, omit all parameters.T o display the call stack of a specific task, use the following command:If you’d like to see the application code where the task was preempted, then take these steps:1.Open the Frame /Caller /Task <task> window. 2.Double-click the line showing the OS service call.SMP SupportThe OS Awareness supports symmetric multiprocessing (SMP).Frame.TASK [<task>] Display task context.Frame /Task <task>Display call stack of a task.An SMP system consists of multiple similar CPU cores. The operating system schedules the threads that are ready to execute on any of the available cores, so that several threads may execute in parallel.Consequently an application may run on any available core. Moreover, the core at which the application runs may change over time.T o support such SMP systems, the debugger allows a “system view”, where one TRACE32 PowerView GUI is used for the whole system, i.e. for all cores that are used by the SMP OS. For information about how to set up the debugger with SMP support, please refer to the Processor Architecture Manuals.All core relevant windows (e.g. Register.view) show the information of the current core. The state line of the debugger indicates the current core. Y ou can switch the core view with the CORE.select command.T arget breaks, be they manual breaks or halting at a breakpoint, halt all cores synchronously. Similarly, a Go command starts all cores synchronously. When halting at a breakpoint, the debugger automatically switches the view to the core that hit the breakpoint.Because it is undetermined, at which core an application runs, breakpoints are set on all coressimultaneously. This means, the breakpoint will always hit independently on which core the application actually runs.Dynamic Task Performance MeasurementThe debugger can execute a dynamic performance measurement by evaluating the current running task in changing time intervals. Start the measurement with the commands PERF.Mode TASK and PERF.Arm, and view the contents with PERF.ListTASK. The evaluation is done by reading the ‘magic’ location (= current running task) in memory. This memory read may be non-intrusive or intrusive, depending on the PERF.METHOD used.If PERF collects the PC for function profiling of processes in MMU-based operating systems(SYStem.Option.MMUSPACES ON), then you need to set PERF.MMUSPACES, too.For a general description of the PERF command group, refer to “General Commands Reference Guide P” (general_ref_p.pdf).PXROS Specific MenuThe menu file “pxros.men” contains a menu with PXROS specific menu items. Load this menu with the MENU.ReProgram command.Y ou will find a new menu called PXROS.•The Display menu items launch the kernel resource display windows.•The Stack Coverage submenu starts and resets the PXROS specific stack coverage and provides an easy way to add or remove tasks from the stack coverage window.In addition, the menu file (*.men) modifies these menus on the TRACE32 main menu bar:•The Trace, List menu is extended.-“Task Switches” shows a trace list window with only task switches (if any)-“Default and T asks” shows switches together with the default display.•The Perf menu contains additional submenus-“Task Runtime” enables and shows the task runtime analysis-“Task Function Runtime” enables and shows the function runtime statistics based on tasks-“CPU Load” enables and shows the CPU load analysisTrace FeaturesThe OS Awareness for PXROS supports the following trace features.Task Runtime StatisticsNOTE:This feature is only available, if your debug environment is able to trace taskswitches (program flow trace is not sufficient). It requires either an on-chip tracelogic that is able to generate task information (eg. data trace), or a softwareinstrumentation feeding one of TRACE32 software based traces (e.g. FDX orLogger). For details, refer to “OS-aware Tracing” (glossary.pdf).Based on the recordings made by the Trace (if available), the debugger is able to evaluate the time spent ina task and display it statistically and graphically.T o evaluate the contents of the trace buffer, use these commands:Trace.List List.TASK DEFault Display trace buffer and task switchesTrace.STATistic.TASK Display task runtime statistic evaluationTrace.Chart.TASK Display task runtime timechartTrace.PROfileSTATistic.TASK Display task runtime within fixed time intervalsstatisticallyTrace.PROfileChart.TASK Display task runtime within fixed time intervals ascolored graphTrace.FindAll Address TASK.CONFIG(magic) Display all data access records to the “magic”locationTrace.FindAll CYcle owner OR CYcle context Display all context ID records The start of the recording time, when the calculation doesn’t know which task is running, is calculated as “(unknown)”.Function Runtime StatisticsAll function-related statistic and time chart evaluations can be used with task-specific information. Thefunction timings will be calculated dependent on the task that called this function. T o do this, in addition to the function entries and exits, the task switches must be recorded.T o do a selective recording on task-related function runtimes based on the data accesses, use the following command:NOTE:This feature is onlyavailable, if your debug environment is able to trace task switches (program flow trace is not sufficient). It requires either an on-chip tracelogic that is able to generate task information (eg. data trace), or a software instrumentation feeding one of TRACE32 software based traces (e.g. FDXor Logger ). For details, refer to “OS-aware Tracing” (glossary.pdf).; Enable flow trace and accesses to the magic location Break.Set TASK.CONFIG(magic) /TraceDataT o do a selective recording on task-related function runtimes, based on the Arm Context ID, use the following command:T o evaluate the contents of the trace buffer, use these commands: The start of the recording time, when the calculation doesn’t know which task is running, is calculated as “(unknown)”.; Enable flow trace with Arm Context ID (e.g. 32bit)ETM.ContextID 32Trace.ListNesting Display function nestingTrace.STATistic.FuncDisplay function runtime statistic Trace.STATistic.TREEDisplay functions as call tree Trace.STATistic.sYmbol /SplitTASK Display flat runtime analysis Trace.Chart.FuncDisplay function timechart Trace.Chart.sYmbol /SplitTASKDisplay flat runtime timechartCPU Load AnalysisNOTE:This feature is only available, if your debug environment is able to trace taskswitches (program flow trace is not sufficient). It requires either an on-chip tracelogic that is able to generate task information (eg. data trace), or a softwareinstrumentation feeding one of TRACE32 software based traces (e.g. FDX orLogger). For details, refer to “OS-aware Tracing” (glossary.pdf).Based on the recordings made by the Trace (if available), the debugger is able to evaluate the CPU load.The CPU load is calculated by comparing the time spent in all tasks against the time spent in the idle task.The measurement is done by using the GROUP command to group all idle tasks and calculating the time spent in all other tasks.Example: T wo idle tasks named “IdleT ask1” and “IdleT ask2”:; Create a group called "idle" with the idle tasksGROUP.CreateTASK "idle" "IdleTask1"GROUP.CreateTASK "idle" "IdleTask2"; Unmark “idle” and mark all others in redGROUP.COLOR "idle" NONEGROUP.COLOR "other" RED; Merge idle tasks and other tasksGROUP.MERGE "idle"GROUP.MERGE "other"T o evaluate the contents of the trace buffer, use these commands:Trace.STATistic.TASK Display CPU load statistic evaluationTrace.PROfileChart.TASK Display CPU load as colored graph The start of the recording time, when the calculation doesn’t know which task is running, is calculated as “(unknown)”.When CPU load analysis is no longer needed, or if a detailed Task Runtime Statistic is needed, disable the grouping of the tasks with:;commentsGROUP.SEParate "idle"GROUP.SEParate "other"PXROS Specific Menu for TracingThe menu entries specific to tracing are already described in the menu for debug features.PXROS CommandsTASK.ListmbXDisplay mailboxesThis command is just an alias for Task.ListObj.MailBoX. See there for a description.TASK.ListObjectList objectsList PXROS objects. See detailed descriptions below.Format:TASK.ListmbX <mbx_id >Format:TASK.ListObject.[<object>]<object >:MeSsaGe | DeLaY | OPool | MemClass | MailBoXTASK.ListObj.DeLaYDisplay delay objectsDisplays a table of the delay objects in the system.TASK.ListObj.MailBoXDisplay mailboxesWithout any argument, this command displays all system and private mailboxes.With a mailbox a mailbox id as an argument, it shows the specified mailbox with it's pending messages and waiting tasks.Format:TASK.ListObj.DeLaYFormat:TASK.ListObj.MailBoX <mbx_id >TASK.ListObj.MemClass Display memory classes Format:TASK.ListObj.MemClassDisplays a table of the memory classes.The 'type' field contains the memory class type. If this is fixed, the 'blksize' field contains the block size.'fbytes' and 'fblks' contain the free bytes and free blocks in that mc.TASK.ListObj.MeSsaGe Display message objects Format:TASK.ListObj.MeSsaGeDisplays a table of the message objects in the system.The 'data' field shows the pointer to the message data.The 'size' field specifies the message size, while 'buff' is the siye of the entire data area.The 'type' is either 'Req' for 'PxMsgRequest' or Env for 'PxMsgEnvelop'.TASK.ListObj.OPoolDisplay object poolsDisplays a table of the object pools.The 'wait' column contains the number of waiting tasks.TASK.ListTaskDisplay task tableWithout any argument this command displays a list of tasks. For an explanation of the mode bits check the PXmon manual.With an ID or a task name as an argument, you get a detailed description of that task.Format:TASK.ListObj.OpoolFormat:TASK.ListTask <task >。
TRACE32 调试器使用指南 TRACE32 Trace Tutorial说明书
T race T utorial Release 02.2023TRACE32 Online HelpTRACE32 DirectoryTRACE32 IndexTRACE32 Debugger Getting Started ..............................................................................................Trace Tutorial (1)History (3)About the Tutorial (3)What is Trace? (3)Trace Use Cases4Trace Methods (5)Simulator Demo (6)Trace Configuration (7)Trace Recording (8)Displaying the Trace Results (10)Trace List10 Displaying Function Run-Times13 Graphical Charts13 Numerical Statistics and Function Tree14 Duration Analysis15 Distance Analysis16 Variable Display17 Track Option18Searching Trace Results (19)Trace Save and Load (20)Version 10-Feb-2023 History18-Jun-21New manual.About the TutorialThis tutorial is an introduction to the trace functionality in TRACE32. It shows how to perform a tracerecording and how to display the recorded trace information.For simplicity, we use in this tutorial a TRACE32 Instruction Set Simulator, which offers a full tracesimulation. The steps and features described in this document are however valid for all TRACE32 products with trace support.The tutorial assumes that the TRACE32 software is already installed. Please refer to “TRACE32Installation Guide” (installation.pdf) for information about the installation process.Please refer to “ICD Tutorial” (icd_tutorial.pdf) for an introduction to debugging in TRACE32 PowerView. What is Trace?T race is the continuous recording of runtime information for later analysis. In this tutorial, we use the term trace synonymously with core trace. A core trace generates information about program execution on a core,i.e. program flow and data trace. The TRACE32 Instruction Set Simulator used in this tutorial supports a fulltrace simulation including the full program flow as well as all read and write data accesses to the memory. A real core may not support all types of trace information. Please refer to your Processor Architecture Manual for more information.Trace Use CasesT race is mainly used in the following cases:1.Understand the program execution in detail in order to find complex runtime errors more quickly.2.Analysis of the code performance of the target code3.Verification of real-time requirements4.Code-coverage measurementsTrace MethodsTRACE32 supports various trace methods. The trace method can be selected in the Trace configuration window, which can be opened from the menu Trace > Configuration…If a trace method is not supported by the current hardware/software setup, it is greyed out in the trace configuration window. NONE means that no trace method is selected.We use in this tutorial the trace method Analyzer. Please refer to the description of the commandTrace.METHOD for more information about the different trace methods.Simulator DemoWe use in this tutorial a TRACE32 Simulator for Arm. The described steps are however valid for the TRACE32 Simulator for other core architectures.T o load a demo on the simulator, follow these steps:1.Start the script search dialog from the menu File > Search for scripts…2.Enter in the search field “compiler demo”3.Select a demo from the list with a double click, a PSTEP window will appear. Press the“Continue” button.We will use here the demo “GNU C Example for SRAM”.Trace ConfigurationIn order to set up the trace, follow these steps:1.Open the menu Trace > Configuration… The trace method Analyzer [A] should be selected perdefault. If this is not the case, select this trace method2.Clear the contents of the trace buffer by pressing the Init button [B].3.Select the trace operation mode [C].In mode Fifo , new trace records will overwrite older records. The trace buffer includes thus always the last trace cycles before stopping the recording.In Mode Stack , the recording is stopped if the trace buffer is full. The trace buffer always includes in this case the first cycles after starting the recording.Mode Leash is similar to mode Stack , the program execution is however stopped when the trace buffer is nearly full.TRACE32 supports other trace modes. Some of these modes depend on the core architecture. Please refer to the documentation of the command Trace.Mode for more information. We will keep here the default trace mode selection, which is Fifo .4.The SIZE field [D] indicates the size of the trace buffer. As we are using a TRACE32 Simulator, the trace buffer is reserved by the TRACE32 PowerView application on the host. It is thuspossible to increase the size of this buffer. If a TRACE32 trace hardware is used with a real chip, the size of the trace buffer is limited by the size of the memory available on the trace tool.In order to have a longer trace recording, we will set the trace buffer size to 10000000.BACDThe same configuration steps can be performed using the following PRACTICE script:Trace RecordingPress the Go button to start the program execution.The trace recording is automatically started with the program execution. The state in the Trace window changes from OFF to Arm [A]. The used field displays the fill state of the trace buffer [B].In order to stop the trace recording, stop the program execution with the Break button. The state in the trace window changes to OFF .Trace.METHOD Analyzer Trace.InitTrace.Mode FifoTrace.SIZE 10000000.BACThe trace recording is automatically started and stopped when starting and stopping the program execution because of the AutoArm[C] setting in the Trace window, which is per default enabled. The trace recording can also be started/stopped manually while the program execution is running using the radio buttons Armand OFF of the Trace window [A].Displaying the Trace ResultsTRACE32 offers different view for displaying the trace results. This document shows some examples.Please note that the trace results can only be displayed if the trace state in the Trace window is OFF. It is not possible to display the trace results while recording.The caption of a TRACE32 window includes the TRACE32 command that can be executed in the TRACE32 command line or in a PRACTICE script to open this window, e.g. here Trace.ListTrace ListA list view of the trace results can be opened from the menu T race > List > Default. The same window canbe opened from the Trace configuration window by pressing the List button.The Trace.List window displays the recorded trace packets together with the corresponding assembler and source code.In our case, trace packets are program fetches (cycle fetch) or data accesses (e.g. wr-long and rd-long for 32bit write and read accesses). Each trace packet has a record number displayed in the record column. The record number is a negative index for Fifo mode.As we are using a Simulator, each assembly instruction has an own trace packet. This is not the case with a real hardware trace.The displayed information can be reduced using the Less button. By pressing Less three times, only the high-level source code is displayed. This can be reverted using the More button.A double click on a line with an assembly instruction or high-level source code opens a List window showing the corresponding line in the code.Using the TRACE32 menu Trace > List > Tracing with Source , you get a Trace.List and a List /Track window. When doing a simple click on a line in the Trace.List window, the List window will automaticallydisplay the corresponding code line.The timing information (see ti.back column) is generated in this case by the TRACE32 Instruction Set Simulator. With a real core trace, timestamps are either generated by the TRACE32 trace hardware or by the onchip trace module.Double clickSimpleclickDisplaying Function Run-TimesTRACE32 supports nested and flat function run-time analysis based on the trace results. Please refer to the video “Flat vs. Nesting Function Runtime Analysis” for an introduction to function run-time analysis inTRACE32:/tut_profiling.htmlGraphical ChartsBy selecting the menu Trace > Chart > Symbols, you can get a graphical chart that shows the distribution of program execution time at different symbols. The displayed results are based on a flat analysis:The corresponding nesting analysis can be displayed using the menu Perf > Function Runtime > Show as Timing.The In and Out buttons can be used to zoom in/out. Alternatively, you can select a position in the window and then use the mouse wheel to zoom in/out.Numerical Statistics and Function TreeThe menu entry Perf > Function Runtime >Show Numerical displays numerical statistics for each function with various information as total run-time, minimum, maximum and average run-times, ratio, and number of function calls.ABParents [A] displays for example a caller tree for the selected function. By doing a right mouse click on func1 and selecting Parents, we see the run-times of the functions func2 and func9, which have called func1 in thetrace recording.Children [B] displays the run-times of the functions called by the selected function, for example here the function subst called by the function encode.A function call tree view of all function recorded in the trace can be displayed using the menu entries Perf >Function Runtime > Show as Tree or Perf > Function Runtime > Show Detailed Tree.Duration AnalysisBy doing a right mouse click on a function in the numerical statistics window (Trace.STATistic.Func) then selecting Duration Analysis, you get an analysis of the function run-times between function entry and exit including the time spent in called subroutines, e.g. here for the function subst (P:0x114C corresponds to the start address of the subst function):The time interval can be changed using the Zoom buttons.Distance AnalysisBy doing a right mouse click on a function in the numerical statistics window (Trace.STATistic.Func) then selecting Distance Analysis, you can get run-times between two consecutive calls of the selected function,e.g. here for the function subst (P:0x114C corresponds to the start address of the subst function):Variable DisplayThe Trace.ListVar command allows to list recorded variables in the trace. If the command is used without parameters all recorded variables are displayed:Y ou can optionally add one or multiple variables as parameters.Example: display all accesses to the variables plot1 and plot2The Draw button can then be used to plot the displayed variables graphically against time. This corresponds to the following TRACE32 command:Please refer for more information about the Trace.DRAW command to “Application Note forTrace.DRAW” (app_trace_draw.pdf).Trace.ListVar Trace.ListVar %DEFault plot1 plot2Trace.DRAW.Var %DEFault plot1 plot2Track OptionThe /Track options allows to track windows that display the trace results. Y ou just need to add the /Track option after the command that opens a trace window, e.g.Trace.List /TrackThe cursor will then follow the movement in other trace windows, e.g. Trace.Chart.Func. Default is time tracking. If no time information is available, tracking to record number is performed.TRACE32 windows that displays the trace results graphically, e.g. Trace.Chart.Func, additionally accept the /ZoomTrack option. If the tracking is performed with another graphical window, the same zoom factor is used in this case.Trace.Chart.Func /ZoomTrackSearching Trace ResultsThe Find button allows to search for specific information in the trace results.Example 1: find the first call of function func21.Enter “func2” under address / expression2.Select Program under cycle3.Press the Find First button. The next entries to func2 in the trace can then be found using theNext buttonExample 2: Find all write accesses to the variable mstatic1 with the value 0x01.Enter “mstatic1” under address / expression2.Select Write under cycle3.Enter 0x0 under Data4.Press the Find All buttonPlease refer to “Application Note for Trace.Find” (app_trace_find.pdf) for more information about Trace.Find.Trace Save and LoadThe recorded trace can be stored in a file using the command Trace.SAVE , e.g.The saved file can then be loaded in TRACE32 PowerView using the command Trace.LOADThe TRACE32 trace display windows will show in this case a LOAD message in the low left cornerPlease note that TRACE32 additionally allows to export/import the trace results in different formats. Refer to the documentation of the command groups Trace.EXPORT and Trace.IMPORT for more information. Trace.SAVE file.adTrace.LOAD file.ad。
TRACE32 异常控制系统文档说明书
FEATURE OVERVIEWUsing TRACE32 for IEC 62304TRACE32 for IEC 62304 at a Glance• TRACE32 Tool Qualification Support-Kit streamlines TRACE32 tool qualification effort and costs.• TRACE32 TQSK is fully featured, field proven and ready to cover new use casesand requirements.• TRACE32 TQSK Customer Interface provides full support and service around tool qualification.• All test suites run in the target environment and are fully multicore aware.• Test Suite Coverage includes statement, decision, condition, function and call coverage, as well as MC/DC.• TRACE32 Instruction Simulator, TRACE32 Debug and Trace Tools, USB Debug and Trace provide comprehensive tool support throughout all project phases.Website-LinksTRACE32 Trusted Tools for Functional Safety /trusted_tools.htmlTQSK Customer Portal /register_tqsk.htmlTRACE32 Code Coverage /coverage.htmlTRACE32 Instruction Set Simulator /sim.htmlThe TRACE32 Tool Qualification Support-Kit (TQSK) provides everything needed to qualify use in safety-related software projects.Figure 1: The 2-stage qualification processCertification ArtifactsDocumentsTest SuiteTool Verification and Validation Supplement for Integration toOperational EnvironmentTest Suite DocumentsTest ReportTesting in Operational EnvironmentTest Report Testing inTSSTCTest Suite Simulator TriCore(paid)DSMDeveloper SafetyManualTSCTest Suite Coverage(free)TSDTest Suite Debug(free)$$TSSATest Suite Simulator Arm(paid)Test Suite SimulatorUpon customer request, Lauterbach also provides test suites for its Arm and TriCore Instruction Set Simulators. A qualified instruction set simulator is an accepted test environment in the software module testing phase of the project (see also figure 3) and offers the following advantages:• Product software qualification can start before product hardware is available.• The qualification of the product software can be well organized even in a distributed team, becauseeverything necessary is purely software-based.• If bottlenecks occur during this phase due to a lack of development hardware or debug/trace tools, additional test benches can be easily equipped with simulators.Test Suite DebugThe Test Suite Debug includes all basic debugging functionality such as target configuration, programming onchip and NOR flashes, loading programs, setting breakpoints and reading/writing of memory and variables.Figure 3: TRACE32 tool use in code coverage qualification。
TRACE32梯度32在线帮助应用程序说明书
Application Note for t32cast Release 09.2023TRACE32 Online HelpTRACE32 DirectoryTRACE32 IndexTRACE32 Documents ......................................................................................................................Source Level Debugging ..............................................................................................................Application Note for t32cast (1)History (3)Introduction (4)Intended Audience4 Prerequisites5 Related Documents5 Restrictions5Installation (6)System Requirements6 License Requirements6 Installing t32cast6Command Line Parameters of t32cast (7)t32cast Usage (9)Version 09-Oct-2023 History18-Apr-23Added commands for source code instrumentation.11-Jun-18Initial version.IntroductionThere are TRACE32 features which require additional source code details that are not included in the debug infromation generated by the compiler. For example, several coverage metrics such as MC/DC or decision coverage need information about the locations of decisions and function calls in the source code.The task of the command line tool t32cast is to generate all the additional information. It analyzes the C/C++ source code and generates an Extended Code Analysis data file (.eca) per source file.The .eca files have to be loaded into TRACE32 if needed. The source code file and the .eca file must be located in the same directory. In this way, the assignment is simple and unambiguous.t32cast can be started via a PRACTICE script or a batch job. But to ensure that the .eca files always match the source code files, it is recommended to integrate their generation into the build process.Intended Audience•Developers who want to use one of the TRACE32 code coverage metrics that require additional details about the source code.•Persons in charge of the build system who want to integrate t32cast into their build process.PrerequisitesWindows users will need to ensure that the Microsoft Visual C++ Redistributable package is installed on their system. The latest one is always available as a free-of-charge download from the Microsoft download center.Linux users will need at least libncurses-5 or libncurses-compat. Depending upon the distribution used, other dependencies may be needed. Generally, running the t32cast tool will highlight any missingcomponents.Related Documents•“Application Note for Trace-Based Code Coverage” (app_code_coverage.pdf).•The description of the sYmbol.ECA command group in “General Commands Reference Guide S” (general_ref_s.pdf).RestrictionsCurrently, t32cast does not parse decisions within macros within macros correctly. The source file must be pre-processed by the compiler to expand these before running it against t32cast.InstallationSystem Requirements•64-bit Windows or Linux host computer.•The sYmbol.ECA command group was supported for the first time with TRACE32 build of 95748 (March 2018). The version of TRACE32 can be verified with the VERSION.SOFTWAREcommand.License RequirementsThe use of t32cast requires no additional licenses.Installing t32castThe command line tool t32cast is located under ~~/bin/<host_os>. An installation is not necessary.If you receive an error message about a missing *.dll, then install the Microsoft Visual C++ Redistributable package. See “Prerequisites”, page 5.Command Line Parameters of t32castThe command line tool t32cast is designed to be included as part of the build process.The examples below show how you can quickly display the help message (--help) and the version information (--version). They are independent of the t32cast integration into the build process.t32cast [subcommand] [options] <input>Available subcommands:eca Generate data for extended code analysis in TRACE32.This command generates additional information about theC/C++ code which is usually not included in the debugsymbols. The data includes the position of decisions,function calls and comments.instrument Instrument source file for MC/DC or Decision coveragemeasurement with TRACE32. Depending on the target andcompiler the source file may be partially or fullyinstrumented. Refer to “Application Note for Trace-BasedCode Coverage” (app_code_coverage.pdf) for moreinformation.vectors Generate MC/DC test vectors.This command will output all decisions together with testvectors to achieve full MC/DC coverage. The results may beused for developing test cases. They are not for use withTRACE32.Available options:--help Display the help message and exit.--version Display version information and exit.-o <output>Write output to file <output>.--comments List comments in output.-I <dir>Add directory to include search path.-D <macro[=value]>Define a macro.-imacros <file>Define macros from file before parsing.-m32Preprocess source code for 32-bit target.-m64Preprocess source code for 64-bit target.<input>Read input from file.-x <language>Set the language as which the file as parsed. The optionsare C and C++.--show-warnings Show additional warnings when parsing the C or C++ code --stop-on-error Stop on Clang parser errors--strict-mode Abort the parsing process on any warning--parse-const-expr Exports decisions where the expression can already beevaluated during compile-time--mode <value>Specify instrumentation mode.Allowed values:•MCDC--filter <file>Specify filter file for partial instrumentation--extra-arg=<string>Additional argument to append to the t32cast parseroptions. All options available to the Clang compiler areavailable.--extra-arg-before=<string>Additional argument to prepend to the t32cast parseroptions. All options available to the Clang compiler areavailable.The t32cast utility requires the output from the compiler’s pre-processing step. Most compilers generate these intermediary files but automatically remove them as part of the normal build process. These files contain the full source code, any included files and all compiler macros have been replaced or expanded. Please refer to your toolchain documentation to configure your compiler to generate and keep these files.The t32cast tool will generate an Extended Code Analysis (ECA) data file. These should be loaded into TRACE32 to be able to calculate coverage data for several coverage metrics.Examples for Arm and PowerArchitecture can be found under ~~/demo/t32cast/eca/ppc or~~/demo/t32cast/eca/arm. These contain a complete build environment showing how to adapt a Makefile for GNU make and GCC.t32cast UsageExamplesExample 1: This PRACTICE script (*.cmm) shows how to start t32cast from within TRACE32 and display the help message.OS.screen cmd /C c:/t32/demo/t32cast/bin/win-x64/t32cast.exe --help && pauseExample 2: This batch script (*.bat) displays the version number of t32cast in a shell window.@echo offC:cd c:\t32\demo\t32cast\bin\win-x64\t32cast.exe --version && pause。
TRACE32的一些常用命令
TRACE32的一些常用命令我们使用Trace32最主要用途有两个:程序下载和程序调试。
下载目前各个项目都有相应的.cmm文件(类似于批处理文件.bat),在此文件中,Trace32把对FLASH擦除/编程的插件下载到手机的SRAM中,然后把控制权交给此插件,详细过程就不在此叙述,这里主要是介绍一些我们在程序调试过程中常用的一些命令。
1.把调试用的.elf文件下载到目标板中命令:d.load.elf *.elf 或者直接输入elf文件路径:d.load.elf d:\p200\surfcr.elf说明:此命令把.elf文件中的调试符号信息下载到Trace32中,二进制代码下载到目标板中的代码段存储区域。
如果代码段对应的存储体是SRAM,那么代码能够真实的下载到SRAM中(最常见的就是EVB板条死)。
如果存储体是FLASH,由于FLASH程序的擦写需要特殊的命令序列,所以执行完下载命令后,虽然Trace32没有报错,但实际上代码没有下载进去。
这个时候需要用cmm文件把代码下载到FLASH中去。
2.elf文件下载进去后,在调试之前还需要做一些准备工作a.map.bonchip 0x0—0x3ffff(FLASH的地址范围)如果程序下载到SRAM中,此命令不用执行,如果是FLASH,一般情况下都需要执行此条命令,否则无法设置断点,目前大多数CPU在ICD调试模式下只支持两个硬件断点。
b.y.spath + 路径(eg: y.spath d:\z2100\qct)支持所加路径的C源码以及汇编代码显示。
3.以上工作做完后,就可以利用Trace32强大的调试功能来调试程序了(可惜到现在我们只是用到了其中的一部分)。
a.查看ARM寄存器。
一般使用在调试/查看汇编代码的情况下使用。
b.查看存储器单元以及存储器映射的寄存器内容。
注意:MSM5105的寄存器具有只读和只写属性(SoftWare Interface中有描述),对于只写属性的寄存器,虽然能够看到寄存器的内容,但不可信。
TRACE32系统:OSEK实时任务调试器及功能介绍说明书
R TO S -O S E KT e c h n i c a l I n f o r m a t i o n13.03.19RTOS-OSEKRTOS Debugger for Freescale OSEK■Real time, non-intrusive display of OSEK system resources■OSEK specific display of analyzer listing■Statistic evaluation and graphic display of task run times■Statistic evaluation and graphic display of service run times■Task related evaluation of function run times ■Task stack coverage■PRACTICE functions for OS data ■OSEK related pull-down menuThe TRACE32 System includes a multitask debugger to provide symbolic debugging in real time operating sys-tems. Our software pack-age contains a ready-to-run con-figuration for the OSEK/VDX conform Real Time Kernel OSEK from Freescale.Based on the ORTI (OSEK Runtime Interface) all informa-tions of the OSEK RTOS and its configuration can be explored. This leaflet will guide you through the additional implemented features in TRACE32, to do an effective debugging on OSEK systems.PowerPC 55568HC12Multitask Debugging on TRACE32 with Motorola OSEKReal time, non-intrusive display of Motorola OSEK sys-tem resourcesThe TRACE32 multitask debugger for OSEK provides special display func-tions. The system resources such as task list, messages, counters, alarms, stacks and resources can be displayed. In addition, by using the emulatorsdual-port memory, the display of all these regions can be viewed non-intru-sively in real time. The tables are updated permanently (“On The Fly”),without affecting the application at all.Task list window, message window and alarm windowConfiguration of OSEK operating system windowMotorola OSEK specific display of analyzer listingStatistic evaluation and graphic display of task run timesThe analyzer can calculate statistic tables of task run times and task switches. A graphical diagram shows which task was active at a specific time, giving a clearview of the behaviour of the system.Analyzer listing, task selective recording, display of taskswitches and assembler mne-monicsThe data recorded in the ana-lyzer can be displayed and interpreted specific to the oper-ating system. T ask switchesare displayed symbolicallyStatistics and flow of tasksStatistic evaluation and graphic display of service run timesThe statistic and graphic evaluation of service calls and service run times can be done . This is necessary, if one ser-vice need much time and is called very often the performance of the operatingsystem goes down..Statistics and flow of servicesTask related evaluation of function run timesThe statistic and graphic evaluation of function calls and function run times can be done dependant to the actual running task. This is necessary, if dif-ferent tasks call one single function at the same time, or if a task switchoccurs in between the function.Analyzer listing, function call hierarchy and process switchesStatistics on function hierarchy, process relatedTask Stack CoverageIn real time systems it is quite impor-tant to know, how much stack space each task consumes. For this purpose a special window shows the current and the maximum usage of each seperate task.PRACTICE functions for OS data The support includes extended PRAC-TICE functions for process specificdata. E.g. the function “TASK.CON-FIG(magic)” returns the address of theso called magic value.Process stack coverage windowMotorola OSEK related pull-down menuBecause the menu bar of theTRACE32 user interface can be fully customized, you can create a new pull down menu, including operating sys-tem specific commands. We deliver OSEK support with an example for such specific menues, which providesfast access to the OSEK features.TRACE32 with OSEK menuContactInternational RepresentativeArgentinaAnacom Eletronica Ltda.Mr. Rafael SoriceRua Nazareth, 807, BarcelonaBR-09551-200 São Caetano do Sul, SP Phone: +55 11 3422 4200FAX: +55 11 3422 4242EMAIL:******************.br AustraliaEmbedded Logic Solutions P/LMr. Ramzi KattanSuite 2, Level 3144 Marsden StreetParramatta NSW 2150Phone: +61 2 9687 1880FAX: +61 2 9687 1881EMAIL:*****************.au AustriaLauterbach GmbHAltlaufstr. 40D-85635 Höhenkirchen-Siegertsbrunn Phone: +49 8102 9876 190FAX: +49 8102 9876 187EMAIL:******************** BelgiumTritec Benelux B.V.Mr. Robbert de VoogtStationspark 550NL-3364 DA SliedrechtPhone: +31 184 41 41 31FAX: +31 184 42 36 11EMAIL:******************BrazilAnacom Eletronica Ltda.Mr. Rafael SoriceRua Nazareth, 807, BarcelonaBR-09551-200 São Caetano do Sul, SP Phone: +55 11 3422 4200FAX: +55 11 3422 4242EMAIL:******************.br CanadaLauterbach Inc.Mr. Udo Zoettler4 Mount Royal Ave.USA-Marlborough, MA 01752 Phone: +1 508 303 6812FAX: +1 508 303 6813EMAIL:********************** China BeijingLauterbach Technologies Co., LtdMr. Linglin HeBeijing OfficeA3,South Lishi Road, XiCheng District Beijing 100037, P.R. ChinaPhone: +86 10 68023502FAX: +86 10 68023523EMAIL:************************* China ShenzhenLauterbach Technologies Co., Ltd1406/E Xihaimingzhu BuildingNo.1 Taoyuan Road, Nanshan District Shenzhen 518052, P.R. China Phone: +86 755 8621 0671FAX: +86 755 8621 0675EMAIL:**************************China SuzhouLauterbach Technologies Co., Ltd Mr. Linglin HeHengyu Square, Rm 709No. 188, Xing Hai StreetSuzhou, 215021 P.R. of China Phone: +86 512 6265 8030FAX: +86 512 6265 8032EMAIL:********************** Czech. RepublicLauterbach GmbHAltlaufstr. 40D-85635 Höhenkirchen-Siegertsbrunn Phone: +49 8102 9876 130FAX: +49 8102 9876 187EMAIL:******************** DenmarkNohau Danmark A/SMr. Flemming JensenHørkær 26, Plan 4DK-2730 HerlevPhone: +45 44 52 16 50FAX: +45 44 52 26 55EMAIL:*************EgyptLauterbach GmbHAltlaufstr. 40D-85635 Höhenkirchen-Siegertsbrunn Phone: +49 8102 9876 130FAX: +49 8102 9876 187EMAIL:******************** FinlandNohau Solutions FinlandMr. Martti ViljainenTekniikantie 14FI-02150 EspooPhone: +358 40 546 0142FAX: +358 9 2517 8101EMAIL:**************FranceLauterbach S.A.R.L.Mr. Jean-Pierre ParadisoEuroparc - Le Hameau B135 Chemin Des BassinsF-94035 Créteil CedexPhone: +33 1 49 56 20 30FAX: +33 1 49 56 20 39EMAIL:********************** GermanyLauterbach GmbHSales Team GermanyAltlaufstr. 40D-85635 Höhenkirchen-Siegertsbrunn Phone: +49 8102 9876 190FAX: +49 8102 9876 187EMAIL:******************** GreeceLauterbach GmbHAltlaufstr. 40D-85635 Höhenkirchen-Siegertsbrunn Phone: +49 8102 9876 190FAX: +49 8102 9876 187EMAIL:******************** HungaryLauterbach GmbHAltlaufstr. 40D-85635 Höhenkirchen-Siegertsbrunn Phone: +49 8102 9876 190FAX: +49 8102 9876 187EMAIL:********************India-BangaloreElectro Systems Associates Pvt. Ltd. Mr. G. V. GurunathamS-606, World Trade CenterMalleswaram West, No.26/1, Dr. Rajkumar RoadIndia - Bangalore 560055Phone: +91 80 67648888FAX: +91 80 23475615EMAIL:************************* India-ChennaiElectro Systems Associates Pvt. Ltd. Mr. D. KannanNo.109 /59A , Ground FloorIV Avenue, Ashok NagarIndia - Chennai - 600 083 Tamilnadu Phone: +91 044-24715750FAX: ++91 44 24715750EMAIL:********************India-DelhiElectro Systems Associates Pvt. Ltd. Mr. R.K. BhandariNo. 705, 7th Floor, Laxmi Deep ShivajinagarIndia - Delhi - 110 092Phone: +91 11-22549351FAX:EMAIL:******************India-HyderabadElectro Systems Associates Pvt. Ltd. Mr. C.V.M. Sri Ram MurthyShop No. 14, "Global Enclave" Bhagyanagar Colony, Kukat pallyIndia - Hyderabad 500 072Phone: +91 40-23063346FAX: +91 40-23063346EMAIL:**********************India-KolkataElectro Systems Associates Pvt. Ltd. Mr. Arun RoyIndia - KolkataPhone: +91 98305 78843FAX:EMAIL:********************India-PuneElectro Systems Associates Pvt. Ltd. Mr. R K BhandariShriram Complex,1126/1, Model Colony ShivajinagarIndia - Pune - 411 016Phone: +91 20 - 30462035 / 25663FAX: +91 20-25677202EMAIL:*****************IrelandLauterbach Ltd.Mr. Richard Copeman11 Basepoint Enterprise Centre Stroudley RoadBasingstoke, Hants RG24 8UPPhone: 0044-118 328 3334FAX:EMAIL:**********************IsraelItec Ltd.Mr. Mauri GottliebP.O.Box 10002IL-Tel Aviv 61100Phone: +972 3 6491202FAX: +972 3 6497661EMAIL:***************.ilItalyLauterbach SrlMr. Maurizio MenegottoVia Enzo Ferrieri 12I-20153 MilanoPhone: +39 02 45490282FAX: +39 02 45490428EMAIL:**********************JapanLauterbach Japan, Ltd.Mr. Kenji Furukawa3-8-8 ShinyokohamaKouhoku-ku, Nisso 16th BuildingY okohama-shi, Japan 222-0033 Phone: +81 45 477 4511FAX: +81 45 477 4519EMAIL:******************.jp LuxembourgTritec Benelux B.V.Mr. Robbert de VoogtStationspark 550NL-3364 DA SliedrechtPhone: +31 184 41 41 31FAX: +31 184 42 36 11EMAIL:****************** MalaysiaFlash TechnologyMr. Teo Kian HockNo 61, # 04-15 Kaki Bukit Av 1Shun Li Industrial ParkSGP-Singapore 417943Phone: +65 6749 6168FAX: +65 6749 6138EMAIL:*******************.sg MexicoLauterbach Inc.Mr. Udo Zoettler4 Mount Royal Ave.USA-Marlborough, MA 01752 Phone: +1 508 303 6812FAX: +1 508 303 6813EMAIL:********************** NetherlandsTritec Benelux B.V.Mr. Robbert de VoogtStationspark 550NL-3364 DA SliedrechtPhone: +31 184 41 41 31FAX: +31 184 42 36 11EMAIL:******************New ZealandEmbedded Logic Solutions P/LMr. Ramzi KattanSuite 2, Level 3144 Marsden StreetParramatta NSW 2150Phone: +61 2 9687 1880FAX: +61 2 9687 1881EMAIL:*****************.au NorwayNohau Solutions ABMr. Jörgen NilssonDerbyvägen 6DSE-21235 MalmoePhone: +46 40 592 206FAX: +46-40 592 229EMAIL:*********************** PolandQUANTUM Sp. z o.o.Mr. Aleksander Bilul. Jeleniogorska 654-056 WroclawPhone: +48 71 362 6356FAX: +48 71 362 6357EMAIL:****************.pl PortugalCaptura Electronica,SCCLMr. Juan Martinezc/Duero, 40E-08031 BarcelonaPhone: +34 93 429 5730FAX: +34 93 407 0778EMAIL:******************* RomaniaLauterbach GmbHAltlaufstr. 40D-85635 Höhenkirchen-Siegertsbrunn Phone: +49 8102 9876 130FAX: +49 8102 9876 187EMAIL:********************RussiaRTSoftMr. Alexey IsaevNikitinskaya 3RUS-105037 MoscowPhone: +7 495 742 6828FAX: +7 495 742 6829EMAIL:****************.ruSingaporeFlash TechnologyMr. Teo Kian HockNo 61, # 04-15 Kaki Bukit Av 1Shun Li Industrial ParkSGP-Singapore 417943Phone: +65 6749 6168FAX: +65 6749 6138EMAIL:*******************.sgSouth Korea, PangyoHancom MDS Inc.Mr. Dongwook Jun3FL. Hancom Tower49, Daewangpangyo-ro 644, Bundang-gu Seongnam-si, Gyeonggi-do, 463-400, ROK Phone: +82-31-627-3000FAX: +82-31-627-3100EMAIL:*********************SpainCaptura Electronica,SCCLMr. Juan Martinezc/Duero, 40E-08031 BarcelonaPhone: +34 93 429 5730FAX: +34 93 407 0778EMAIL:*******************SwedenNohau Solutions ABMr. Jörgen NilssonDerbyvägen 6DSE-21235 MalmoePhone: +46 40 592 206FAX: +46 40 592 229EMAIL:*********************** SwitzerlandJDT Jberg DatenTechnikMr. Andreas JbergZimmereistrasse 2CH-5734 Reinach AGPhone: +41 62 7710 886FAX:EMAIL:********************TaiwanSuperlink Technology Corp.Mr. Sulin Huang3F-8,No.77,Sec.1,Xintaiwu Rd.,Xizhi District, New Taipei City 22101, Taiwan, R.O.C. Phone: +886 2 26983456FAX: +886 2 26983535EMAIL:**********************.tw TunisiaLauterbach Consulting S.A.R.L.Mr. Khaled JmalRoute El Ain Km 3.5TN-3062 SfaxPhone: +216-31361061FAX: +216-74611723EMAIL:********************** Turkey-1Tektronik Muh. ve Tic. A.S.Mr. Hakan Y avuzCyberPlaza B-Blok, 702BBilkent06800 AnkaraPhone: +90 312 437 3000FAX: +90 312 437 1616EMAIL:******************.tr Turkey-2G3TEK Embedded Technologies Ltd. Mr. Celal AygunIlkyerlesim Mah. 445.Sok. No: 4806370 Batikent/AnkaraPhone: +90 312 3324769FAX: +90 312 3324769EMAIL:**************UKLauterbach GmbHMr. Richard CopemanAltlaufstr. 40D-85635 Höhenkirchen-Siegertsbrunn Phone: +49 8102 9876 190FAX: +49 8102 9876 187EMAIL:******************** USA EastLauterbach Inc.Mr. Udo Zoettler4 Mount Royal Ave.USA-Marlborough, MA 01752 Phone: +1 508 303 6812FAX: +1 508 303 6813EMAIL:********************** USA WestLauterbach Inc.Mr. Bob Kupyn1111 Main Street, Suite 620USA-Vancouver, WA. 98660 Phone: +1 503 524 2222FAX: +1 503 524 2223EMAIL:************************11 Additional InformationLauterbach GmbHAltlaufstr. 40D-85635 Höhenkirchen-SiegertsbrunnTel. ++49 8102 9876-0 FAX -999*******************uterbach.deLauterbach Inc.4 Mount Royal Ave.Marlboro MA 01752Phone (508) 303 6812 FAX (508) 303 6813 ********************** Lauterbach Ltd.11 Basepoint Enterprise Ctre Stroudley Road Basingstoke, Hants RG24 8UPPhone ++44-1256-333-690 FAX -661**********************http:/Lauterbach S.A.R.L.135 Chemin Des BassinsF-94035 Créteil CedexPhone ++33-149-562-030FAX ++33-149-562-039**********************http:/uterbach.fr Lauterbach Japan, Ltd.3-9-5 Shinyokohama Kouhoku-kuY okohama-shi Japan 222-0033Phone ++81-45-477-4511 FAX -4519*********************uterbach.co.jp Lauterbach s.r.l.Lauterbach s.r.l.Via Enzo Ferrieri 12I-20153 MilanoPhone ++39 02 45490282FAX ++39 02 45490428*********************uterbach.itSuzhou Lauterbach Consulting Co.,Ltd.Room 1605, Xing Hai International Square No.200, Xing Hai StreetSuzhou, 215021 PR of ChinaPhone: 0086-512 6265 8030FAX: 0086-512 6265 8032*********************DisclaimerThe information presented is intended to give overview information only.Changes and technical enhancements or modifications can be made with-out notice.。
TRACE32使用
• 6.4)查看CPU寄存器:
Thank You!
由于th100使用的那根小线fpc很容易受到干扰如果出现连接不成功的情况建议使用防干扰的fpc线或更换testboard试试不用怀疑跳线问题
TRACE32 使用
刘小春 2009-05-26
1,TRACE32作用:
在线实时仿真 • 设置实时地址和数据断点、单步执行、对 ARM内核完全存取和控制。 • 跟踪调试程序异常原因。
2,硬件连接
• • TH100连接Trace32及开发板跳线方法: 1.1)下图为TH100,TRACE32和开发板 连接方法:
TRACE32,手机,开发板连接图:
• 1.2)下图适用于TH100接开发板跳线方法。 • J14和J13两个跳线帽放到左边 ,J7在右边
• •
•
1.3)TH100连接Trace32注意事项: 图中的开发板的版本是 “TG100_TESTBOARD_V2.10_PCB(07 0619)”,请尽量使用此版本的Test Board。 由于TH100使用的那根小线(FPC)很容易 受到干扰,如果出现连接不成功的情况, 建议使用防干扰的FPC线或更换Test Board试试,不用怀疑跳线问题。
TRACE32运行截图:
7,TRACE32调试
• • • • • • 6.1)断点 最多可设置两个硬件断点。 可设置条件断点。 6.2)单步跟踪,跳转 6.3)查看堆栈,变量和内存 当TRACE停在断点上,或者处于break状态下执 行view—stackframe查看堆栈中函数调用关系。 • 查看变量和读取制定内存接好TRACE32,手 机和开发板。 • 5.2)运行TRACE32程序,选择脚本 “file—open batch file…— js_it_debug.cmm”。 • 5.3)长按手机开机键,执行 js_it_debug.cmm脚本开机,如下图所示:
TRACE32测试软件及操作说明书
T raining Simulator and Demo SoftwareRelease 09.2023TRACE32 Online HelpTRACE32 DirectoryTRACE32 IndexTRACE32 Training ............................................................................................................................Training Simulator and Demo Software (1)About the Demo (3)Starting the TRACE32 Simulator (3)User Interface - TRACE32 PowerView (4)TRACE32 Command Line and Softkeys6 Window Captions - What Makes Them Special in TRACE327Debugging the Program (8)Basic Debug Commands8 Debug Modes9 Displaying the Stack Frame11Breakpoints (12)Setting Breakpoints12 Listing all Breakpoints13 Setting Read/Write Breakpoints14Variables (15)Displaying Variables15 Displaying Variables of the Current Program Context16 Using the Symbol Browser16 Formatting Variables17 Modifying Variables18Memory (19)Displaying Memory19 Modifying Memory20Version 10-Oct-2023About the DemoWhat is this? This is a guided tour through TRACE32 - a tutorial. We use a simple program example in C to illustrate the most important debug features, and give lots of helpful tips & tricks for everyday use.How long does this tutorial take? 0.5 to 1 hrs.How can I learn most from this tutorial? Work completely through all chapters in sequence and then do the quiz at the end.Where can I download the TRACE32 Simulator for the hands-on debug session? From:https:///download.html . You do not need any hardware for this tutorial.Starting the TRACE32 Simulator1.Unzip the downloaded file. Y ou do not need to install the TRACE32 Simulator.2.Double-click the t32m <architecture>.exe file (e.g. t32m arm .exe ) to start the demo debug session. When the TRACE32 Instruction Set Simulator starts, a start-up PRACTICE script that sets up a debug session is automatically executed.Y ou can manually execute the same start-up PRACTICE script by choosing File menu > Run Script .PRACTICE, the Lauterbach script language, is used for automating tests, configuring the TRACE32 PowerView GUI and your debug environment.For our demo debug session, the PRACTICE start-up script armc.cmm loads the application program armle.axf and generates a TRACE32 internal symbol database out of the loaded information.By default, TRACE32 executes the autostart.cmm script on start-up.User Interface - TRACE32 PowerViewThe graphical user interface (GUI) of TRACE32 is called TRACE32 PowerView.The following screen shot presents the main components of the user interface.We’ll briefly explain the GUI using the List command and List window as an example.A video tutorial about the TRACE32 PowerView GUI is available here:/kb/articles/introduction-to-trace32-gui Do one of the following to open the List window:•Choose View menu > List Source•or, at the TRACE32 command line, type: List (or L )Main Menu Bar Main Tool BarC o n t e x t M e n uLocal ButtonsMessage Line SoftkeyLine State LineWindow AreaCommand LineThe List window displays the code in assembler mnemonic and HLL (HLL stands for High-Level Language and means the programming language of your source code).In the List window, the gray bar indicates the position of the program counter (PC). Right now, it is located on the symbolic address of the label main .A video tutorial about the source code display in TRACE32 is available here:/kb/articles/displaying-the-source-codeT o summarize it, you can execute commands in TRACE32 PowerView via the usual suspects:1.Menus on the menu bar2.Buttons on the main toolbar and the buttons on the toolbars of TRACE32 windows3.Context menus in TRACE32 windowsAdditionally in TRACE32, you can execute commands via the TRACE32 command line.Opens the List windowProgram counter (PC)TRACE32 Command Line and SoftkeysTRACE32 commands are not case sensitive: register.view is the same as Register.view UPPER CASE letters indicate the short forms of commands and must not be omitted. All lower case letters can be omitted. This makes short forms an efficient time saver when you are entering frequently-used commands in the command line. Examples:•Instead of the long form Register.view type just the short form r or R •Instead of the long form List type just the short form l or LThe softkeys are below the command line. The camel casing (i.e. upper and lower case letters) on any softkey tells you the long form of a command. The softkeys guide you through the command input, displaying all possible commands and parameters.Example - To assemble the Data.dump command using the softkeys:1.Click Data .2.Click dump .3.Type the <range> or <address> you want to dump. For example, 0x1000--0x20004.Click [ok] to execute the command. The Data.dumpwindow opens.SoftkeysCommand lineWindow Captions - What Makes Them Special in TRACE32The command with which you open a window will be shown as the window caption. The parameters and options are also included in the window caption.You can re-insert a command from a window caption (a) into the command line (b) in order to modify the command. Let’s do this with the Register window.1.Choose View menu > Register . 2.Right-click the window caption (a).3.Modify the command, e.g. by adding the /SpotLight option: It will highlight changed registers.4.Click [ok] to execute the modified command.5.Click Single Step on the TRACE32 toolbar. Changed registers are highlighted immediately.(a)(b)Debugging the ProgramBasic Debug CommandsThe basic debug commands are available via the Run menu, the toolbar of the List window, the main toolbar, and via the TRACE32 command line.Single steppingis one of the basic debug commands.TRACE32 provides also more complex debug control commands. Y ou can step until an expression changes or becomes true.Example: Var.Step.Till i>11. single-steps the program until the variable i becomes greater than 11. Please note that TRACE32 uses a dot to denote decimal numbers.Step over function calls or subroutinesGo to the next code line written in the program listing Go Return / Go to the last instruction of the current functionUseful e.g. to leave loopsSingle StepStop the program executionGo / Start program executionGo Up / return to the caller functionStep till next unreached lineDebug ModesT ake a look at the state line at the bottom of the TRACE32 main window:6.On the toolbar of the Listwindow, clickMode to toggle the debug mode to HLL .The state line tells you:A The (symbolic) address of the current cursor position.The program counter (PC) is highlighted in gray.B The state of the debugger: stopped means program execution is stopped. Y ou can now, for example, inspect or change memory.C The state line displays the currently selected debug mode: The code display will beHLL (High Level Language) or ASM (assembler) or a MIX ed mode with HLL and its corre-sponding assembler mnemonic.AB CDebug mode HLLDebug mode MIXStep.7.ClickThe step you are taking is debug mode HLL goes to the next source code line.8.ClickMode again to toggle the debug mode to MIX.Step.9.ClickThis time, the step executes one assembler line.10.Right-click a code line, and then select Go Till.The program execution starts. It stops when the program reaches the selected code line.Displaying the Stack FrameFor the following example, let’s assume we have the following call hierarchy: main() calls func2() and func2() calls func1():Choose Show Stack in the Var menu. The Frame.view window displays the call hierarchy.•The /Locals option shows the local variables of each function.•The /Caller option shows a few source code lines to indicate where the function was called.This screenshot corresponds to the calling hierarchy shown above.BreakpointsVideo tutorials about breakpoints in TRACE32 are available here:/kb/articles/using-breakpoints-in-trace32Setting BreakpointsLet’s set a breakpoint to the instruction prime = i + i + 3 and the instruction k += prime1.Double-click a code line to set a program breakpoint.2.Make sure to click the white space in the code line, and not the code literal.All code lines with a program breakpoint are marked with a red vertical bar.T o set a breakpoint to an instruction that is not in the focus of the current source listing1.Choose Var menu > Show Function.The sYmbol.Browse.Function window opens.2.Select the function you are interested in e.g. sieve.The List window opens, displaying this function. This window is now fixed to the start address ofthe function sieve and does not move with the program counter cursor.Listing all Breakpoints1.Choose Break menu > List to list all breakpoints.The Break.List window opens, providing an overview of the set breakpoints.2.On the toolbar, clickGoto start the program execution. 3.When the program execution stops at a breakpoint, it is highlighted in the Break.List window.A Address of the breakpoint.B Breakpoint type.C Breakpoint method: SOFTware, ONCHIP or DISABLED.D Symbolic address of the breakpoint. Example:•sieve\11 means source code line 11 in function sieve .AB C DSetting Read/Write BreakpointsY ou can set a breakpoint that stops the program execution at a read or write access to a memory location(e.g. global variable). T o set a breakpoint on the array flags for instance, do a right mouse click on thearray name in the List window then select Breakpoints > Write.VariablesVideo tutorials about variable display in TRACE32 are available here:/kb/articles/variable-logging-and-monitoring-in-trace32Displaying VariablesLet’s display the variables flags, def, and ast.1.Choose Var menu > Watch...The Var.AddWatch window opens, displaying the variables known to the symbol database.2.Double-click the variable flags.The Var.Watch window opens, displaying the selected variable.steps:3. Alternative-In the Var.Watch window, click Watch, and then double-click the variables def and ast to add them to the Var.Watch window.-From a List window, drag and drop any variable you want into the Var.Watch window.-In a List window, right-click any variable, and then select Add to Watch window from the context menu.-If you want to display a more complex structure or an array in a separate window, choose Var menu >View.Displaying Variables of the Current Program Context1.Set the program counter (PC) to sieve() by typing at the TRACE32 command line:2.Choose Var menu > Show Current Vars .The Var.REF window opens, displaying all variables accessed by the current program context.3.Click Step on the TRACE32 toolbar to execute a few single steps. TheVar.REFwindow is updated automatically.Using the Symbol BrowserThe symbol browser provides an overview of the variables, functions, and modules currently stored in the symbol database.1.ChooseVar menu > Watch...The Var.AddWatch window lets you browse through the contents of the symbol database. Global variables are displayed in black and functions in gray. By double-clicking a function, its local variables are displayed.2.In the Var.AddWatch window, double-click func2.Register.Set PC sieve ;The command short form is: r.s pc sieveTo format the display of variables - global settings:1.Choose Var menu > Format.2.In the SETUP.Var window, make your settings. Decimal and Hex are useful global settings.TRACE32 applies your settings to all Var.view windows that you open afterwards.To format the display of an individual variable:1.At the command line, type: Var.view ast (The variable ast is included in this demo.)2.In the Var.view window, right-click ast, and then click Format.The Change Variable Format dialog opens.3.Select the Type check box to display the variable ast with the complete type information.4.Click Apply. The format of ast in the Var.view window is updated immediately.5.For more complex variable select TREE in the Change Variable Format dialog box.Click + and - to expandand collapse the tree.1.Double-click the variable value to modify the value. The Var.set command will be displayed in thecommand line. The short form of the command is V or v2.Enter the new value directly after the equal sign and confirm with [ok].MemoryDisplaying Memory1.To display a memory dump in a Data.dump window, do one of the following:-Choose View menu > Dump,-or click Memory Dump on the toolbar,-or, at the TRACE32 command line, type: Data.dumpY ou can also specify an address or symbol directly, e.g.: Data.dump flags2.In the Data.dump dialog, enter the data item, e.g. flags-Alternatively click to browse through the symbol database.3.In the Browse Symbols window, double-click the symbol flags to select it, and then click OK.Double-click flags.In the following screenshot, theData.dump window is called via the TRACE32 command line.There are different ways to define an address range:•<start_address>--<end_address> (SD is an access class)•<start_address>++<offset>Modifying Memory1.In a Data.dumpwindow, double-click the value you want to modify.A Data.Set command for the selected address is displayed in the command line. The short form of the command isD.S or d.s2.Enter the new value directly after %LE , and then confirm with [ok].(%LE stands for Little Endian).Data.dump SD:0x5530--SD:0x554FData.dump cstr1++0x1f /Byte ;start at cstr1 plus the next 0x1f bytesAccess Class + AddressHEX ASCIITraining Simulator and Demo Software | 21©1989-2023 L auterbach。
TRACE32 用户手册说明书
Support Addresses Release 02.2022TRACE32 Online HelpTRACE32 DirectoryTRACE32 IndexTRACE32 Technical Support ........................................................................................................... Support Addresses .. (1)Addresses of Reps and Subsidaries (3)Version 09-Mar-2022 Addresses of Reps and SubsidariesArgentinaAnacom Eletronica Ltda.Mr. Rafael SoriceRua Nazareth, 807, BarcelonaBR-09551-200 São Caetano do Sul, SPPhone: +55 11 3422 4200FAX: +55 11 3422 4242EMAIL:******************.brAustraliaEmbedded Logic Solutions P/LMr. Ramzi KattanSuite 2, Level 3144 Marsden StreetParramatta NSW 2150Phone: +61 2 9687 1880FAX: +61 2 9687 1881EMAIL:*******************.auAustriaLauterbach GmbHAltlaufstr. 40D-85635 Höhenkirchen-SiegertsbrunnPhone: +49 8102 9876 190FAX: +49 8102 9876 187EMAIL:**********************BelgiumT ritec Benelux B.V.Mr. Robbert de VoogtStationspark 550NL-3364 DA SliedrechtPhone: +31 184 41 41 31FAX: +31 184 42 36 11EMAIL:******************BrazilAnacom Eletronica Ltda.Mr. Rafael SoriceRua Nazareth, 807, BarcelonaBR-09551-200 São Caetano do Sul, SPPhone: +55 11 3422 4200FAX: +55 11 3422 4242EMAIL:******************.brCanadaLauterbach Inc.Mr. Udo Zoettler4 Mount Royal Ave.USA-Marlborough, MA 01752Phone: +1 508 303 6812FAX: +1 508 303 6813EMAIL:*************************BeijingChinaLauterbach Technologies Co., LtdMr. Linglin HeBeijing OfficeA3,South Lishi Road, XiCheng DistrictBeijing 100037, P.R. ChinaPhone: +86 10 68023502FAX: +86 10 68023523EMAIL:*************************ShenzhenChinaLauterbach Technologies Co., Ltd1406/E Xihaimingzhu BuildingNo.1 Taoyuan Road, Nanshan DistrictShenzhen 518052, P.R. ChinaPhone: +86 755 8621 0671FAX: +86 755 8621 0675EMAIL:*************************SuzhouChinaLauterbach Technologies Co., LtdMr. Linglin HeHengyu Square, Rm 1207No. 188, Xing Hai StreetSuzhou, 215021 P.R. of ChinaPhone: +86 512 6265 8030FAX: +86 512 6265 8032EMAIL:*************************Czech.RepublicLauterbach GmbHAltlaufstr. 40D-85635 Höhenkirchen-SiegertsbrunnPhone: +49 8102 9876 130FAX: +49 8102 9876 187EMAIL:**********************DenmarkNohau Danmark A/SMr. Flemming JensenHørkær 18, 3. SalDK-2730 HerlevPhone: +45 44 52 16 50FAX: +45 44 52 26 55EMAIL:****************EgyptLauterbach GmbHAltlaufstr. 40D-85635 Höhenkirchen-SiegertsbrunnPhone: +49 8102 9876 130FAX: +49 8102 9876 187EMAIL:**********************FinlandNohau Solutions FinlandMr. Marko RepoT ekniikantie 14FI-02150 EspooPhone: +358 40 546 0142FAX: +358 9 2517 8101EMAIL:****************FranceLauterbach S.A.R.L.Mr. Soufian ElmajdoubEuroparc - Le Hameau B135 Chemin Des BassinsF-94035 Créteil CedexPhone: +33 1 49 56 20 30FAX: +33 1 49 56 20 39EMAIL:*************************GermanyLauterbach GmbHSales T eam GermanyAltlaufstr. 40D-85635 Höhenkirchen-SiegertsbrunnPhone: +49 8102 9876 190FAX: +49 8102 9876 187EMAIL:**********************GreeceLauterbach GmbHAltlaufstr. 40D-85635 Höhenkirchen-SiegertsbrunnPhone: +49 8102 9876 190FAX: +49 8102 9876 187EMAIL:**********************HungaryLauterbach GmbHAltlaufstr. 40D-85635 Höhenkirchen-SiegertsbrunnPhone: +49 8102 9876 190FAX: +49 8102 9876 187EMAIL:**********************India-BangaloreElectro Systems Associates Pvt. Ltd.Mr. G. V. GurunathamS-606, World Trade CenterMalleswaram West, No.26/1, Dr. Rajkumar Road India - Bangalore 560055Phone: +91 80 67648888FAX:EMAIL:***************************India-ChennaiElectro Systems Associates Pvt. Ltd.Mr. D. KannanNo.109 /59A , Ground FloorIV Avenue, Ashok NagarIndia - Chennai - 600 083 T amilnaduPhone: +91 98410 53251FAX:EMAIL:***************************India-DelhiElectro Systems Associates Pvt. Ltd.Mr. Arun RoyIndia - DelhiPhone: +91 98305 78843FAX:EMAIL:***************************India-HyderabadElectro Systems Associates Pvt. Ltd.Mr. C.V.M. Sri Ram MurthyManasa Ap./Flat No 3, Plot 533/3,No 3-5-7Vivekanandanagar Colony, KukatpallyIndia - Hyderabad 500 072Phone: +91 90084 76566FAX:EMAIL:***************************India-KolkataElectro Systems Associates Pvt. Ltd.Mr. Arun RoyIndia - KolkataPhone: +91 98305 78843FAX:EMAIL:***************************India-PuneElectro Systems Associates Pvt. Ltd.Mr. M. S. Vijendra KumarIndia - Pune - 411 016Phone: +91 98451 49926FAX:EMAIL:***************************IrelandLauterbach Ltd.Mr. Richard CopemanPhone: +44-118 328 3334FAX:EMAIL:*************************Itec Ltd.Mr. Mauri GottliebP.O.Box 10002IL-Tel Aviv 61100Phone: +972 3 6491202FAX: +972 3 6497661EMAIL:***************.ilItalyLauterbach S.r.l.Mr. Maurizio MenegottoRegus EasyPoint (Building F) 1st floorVia Caldera 21I-20153 MilanoPhone: +39 02 45490282FAX: +39 02 45490428EMAIL:************************JapanLauterbach Japan, Ltd.Mr. Yuji Mori3-8-8 ShinyokohamaKouhoku-ku, Nisso 16th BuildingY okohama-shi, Japan 222-0033Phone: +81 45 477 4511FAX: +81 45 477 4519EMAIL:*********************.jpLuxembourgT ritec Benelux B.V.Mr. Robbert de VoogtStationspark 550NL-3364 DA SliedrechtPhone: +31 184 41 41 31FAX: +31 184 42 36 11EMAIL:******************MalaysiaFlash TechnologyMr. Teo Kian HockNo 61, # 04-15 Kaki Bukit Av 1Shun Li Industrial ParkSGP-Singapore 417943Phone: +65 6749 6168FAX: +65 6749 6138EMAIL:***********************.sgLauterbach Inc.Mr. Udo Zoettler4 Mount Royal Ave.USA-Marlborough, MA 01752Phone: +1 508 303 6812FAX: +1 508 303 6813EMAIL:************************* NetherlandsT ritec Benelux B.V.Mr. Robbert de VoogtStationspark 550NL-3364 DA SliedrechtPhone: +31 184 41 41 31FAX: +31 184 42 36 11EMAIL:******************ZealandNewEmbedded Logic Solutions P/LMr. Ramzi KattanSuite 2, Level 3144 Marsden StreetParramatta NSW 2150Phone: +61 2 9687 1880FAX: +61 2 9687 1881EMAIL:*******************.auNorwayNohau Solutions ABMr. Jörgen NilssonDerbyvägen 6DSE-21235 MalmoePhone: +46 40 592 206FAX: +46-40 592 229EMAIL:****************PolandQUANTUM Sp. z o.o.Mr. Aleksander Bilul. Jeleniogórska 654-056 WroclawPhone: +48 71 362 6356FAX: +48 71 362 6357EMAIL:****************.plPortugalCaptura Electronica SCCLMr. Juan Martinezc/Duero, 40 bajosE-08031 BarcelonaPhone: +34 93 429 57 30FAX:EMAIL:**********************RomaniaLauterbach GmbHAltlaufstr. 40D-85635 Höhenkirchen-SiegertsbrunnPhone: +49 8102 9876 130FAX: +49 8102 9876 187EMAIL:**********************RussiaRTSoftMr. Alexey IsaevNikitinskaya 3RUS-105037 MoscowPhone: +7 495 967 1505FAX: +7 495 742 6829EMAIL:******************.ruSingaporeFlash TechnologyMr. Teo Kian HockNo 61, # 04-15 Kaki Bukit Av 1Shun Li Industrial ParkSGP-Singapore 417943Phone: +65 6749 6168FAX: +65 6749 6138EMAIL:*******************.sgSouth Korea, Rep. of KoreaHancom MDS Inc.Mr. Chang Y oul Lee4FL. Hancom Tower49, Daewangpangyo-ro 644, Beon-gil,Bundang-gu Seongnam-si, Gyeonggi-do, 13493, ROKPhone: +82-31-627-3000FAX: +82-31-627-3100EMAIL:*********************Captura Electronica SCCLMr. Wenceslao Rodríguezc/Duero, 40 bajosE-08031 BarcelonaPhone: +34 93 429 57 30FAX:EMAIL:**********************SwedenNohau Solutions ABMr. Jörgen NilssonDerbyvägen 6DSE-21235 MalmoePhone: +46 40 592 206FAX: +46 40 592 229EMAIL:****************SwitzerlandJDT Jberg DatenT echnikMr. Andreas JbergZimmereistrasse 2CH-5734 Reinach AGPhone: +41 62 7710 886FAX:EMAIL:********************TaiwanSuperlink Technology Corp.Mr. Sulin Huang3F-8,No.77,Sec.1,Xintaiwu Rd.,Xizhi District, New Taipei City 22101, T aiwan, R.O.C.Phone: +886 2 26983456FAX: +886 2 26983535EMAIL:************************.twTunisiaLauterbach Consulting S.A.R.L.Mr. Khaled JmalRoute El Ain Km 3.5TN-3062 SfaxPhone: +216-31361061FAX: +216-74611723EMAIL:**********************T ektronik Muh. ve Tic. A.S.Mr. Hakan Y avuzCyberPlaza B-Blok, 702BBilkent06800 AnkaraPhone: +90 312 437 3000FAX: +90 312 437 1616EMAIL:*************************.tr UKLauterbach Ltd.Mr. Richard CopemanPhone: +44-118 328 3334FAX:EMAIL:*************************EastUSALauterbach Inc.Mr. Udo Zoettler4 Mount Royal Ave.USA-Marlborough, MA 01752Phone: +1 508 303 6812FAX: +1 508 303 6813EMAIL:************************* W estUSALauterbach Inc.Mr. Bob Kupyn1111 Main Street, Suite 620USA-Vancouver, WA. 98660Phone: +1 503 524 2222FAX: +1 503 524 2223EMAIL:******************************。
TRACE32直接目录说明书
TRACE32 Online HelpTRACE32 DirectoryTRACE32 IndexTRACE32 Documents ......................................................................................................................3rd-Party Tool Integrations ..........................................................................................................Integration with OSE Illuminator (1)Requirements (3)Brief Overview of Documents for New Users (3)Operation Theory (4)Restrictions to the functionality of OSE Illuminator (4)Installation (5)Startup Sequence (5)Menu Commands (WINDOWS) (6)Connect to Illuminator6 Disconnect to Illuminator6 Configuration6Commands (UNIX) (7)Working with the OSE Illuminator extension (8)Troubleshooting (8)Known Bugs (8)Version 30-Apr-2021 06-Jul-20This manual will be removed with the date of publication from DVD 02/2021.The manufacturer of Illuminator stopped support a long time ago andLauterbach will stop support for the integration with DVD 02/2021.RequirementsThis interface integrates the OSE Illuminator (Enea OSE Systems AB) and TRACE32. Current supported is: OSE Illuminator version 2.1.7 or laterCPUs: PowerPC 860RTOS: OSE DeltaHosts: Windows95, Windows NT, UNIXBrief Overview of Documents for New UsersArchitecture-independent information:•“Debugger Basics - Training” (training_debugger.pdf): Get familiar with the basic features of a TRACE32 debugger.•“T32Start” (app_t32start.pdf): T32Start assists you in starting TRACE32 PowerView instances for different configurations of the debugger. T32Start is only available for Windows.•“General Commands” (general_ref_<x>.pdf): Alphabetic list of debug commands.Architecture-specific information:•“Processor Architecture Manuals”: These manuals describe commands that are specific for the processor architecture supported by your debug cable. T o access the manual for your processorarchitecture, proceed as follows:-Choose Help menu > Processor Architecture Manual.•“OS Awareness Manuals” (rtos_<os>.pdf): TRACE32 PowerView can be extended for operating system-aware debugging. The appropriate OS Awareness manual informs you how to enable theOS-aware debugging.Operation TheoryThe interface consists of an additional application. It translates the communication between the TRACE32 API Interface and the OSE KAP Interface which communicates with the OSE Illuminator. Requests to TRACE32 are sent via sockets. The OSE Illuminator also sends and reseives its requests via sockets. Therefore WINSOCK or BSD socket (UNIX) has to be installed. Restrictions to the functionality of OSE IlluminatorWhen using the integration to the OSE Illuminator debugging of the system is only possible in freeze mode. Freeze mode means that interaction between TRACE32 and the OSE Illuminator can only take place when the system is completely halted. The OSE Illuminator handles the freeze mode target as it handles an ordinary run mode target and you are free to mix run mode targets with freeze mode targets. But there are some limitations when running the OSE Illuminator in freeze mode:•The event-action system is not supported.•CPU profiling is not supported.•Processes or Blocks can not be started, killed or stopped.NOTE:This integration uses internally the TRACE32 Remote API .The Remote API has restrictions if TRACE32 runs in demo mode.Please see there for further details.OSE Illuminator TRACE32IntegrationApplicationOSEKAPAPIoseillu.exe(WIN)oseillu (UNIX)InstallationFollow these steps to configure the OSE Illuminator extension for TRACE32:1.For TRACE32:Close TRACE32.Edit your "config.t32" file: Add between two empty lines the line "RCL=NETASSIST", if not alreadythere.Start TRACE32 again.2.For OSE Illuminator:Start OSE Illuminator.In the OSE Illuminator select File > Preferences and open the Connection tab.Check Broadcast Enable.Set Broadcast Port to 50000 (default).Set Interface IP Address to Default.3.Copy the Integration Application oseillu.exe(WIN) or oseillu (UNIX) into the system directory ofTRACE32.Startup SequenceKeep to the following startup sequence to secure the correct setup of the OSE Illuminator integration:1.Switch on power on TRACE32 and your target.2.Start the TRACE32 display driver.3.Load your application into TRACE32.4.Run until the OSE Delta Kernel is initialized.5.Start the OSE Illuminator.6.Open a System Browser window in OSE Illuminator.7.Start the Integration Application and a node should pop up in the System Browser window of theOSE Illuminator.8.Connect to TRACE32 by expanding the node of target<user_name>@<pc_name>.<domain_name>:trace32(<id>)in OSE Illuminator.9.After the node has expanded (Connected) try to open the block node to see the tasks.10.Do run and break in TRACE32 and update the OSE Illuminator window to see what haschanged.Menu Commands (WINDOWS)The oseillu.exe is normally just a backround application for translating the messages from OSE Illuminator to TRACE32 commands. For the handling of the TCP/IP connection to OSE Illuminator there is also a menu Control Illuminator. This chapter describes the menu items.Connect to IlluminatorThis command connects the TRACE32 to the OSE Illuminator.Normally the OSE Illuminator connection is established when starting the oseillu.exe. But for some reason it could be possible that during the work the connection gets lost. Connect again to the OSE Illuminator by using this menu item and the …trace32(<id>) target will pop up again in the OSE Illuminator. If not please see Troubleshooting.Disconnect to IlluminatorThis function terminates the connection to the OSE Illuminator.When closing the Integration Application this is done automatically. If you want to load a different application into TRACE32 you have to disconnect the old application from the OSE Illuminator first. Afterwards you will connect to OSE Illuminator again.ConfigurationSet the port number for the connection to the OSE Illuminator.If the default port number (50000) is already used by a different application for communication you have to select a different port number for the Illuminator connection. In this example we use 60000 as new port number:For OSE Illuminator:In the OSE Illuminator disconnect all targets, select File > Preferences and open the Connection tab.Set Broadcast Port to 60000.Press the Apply button and close the window.For the Integration Application:Select Configuration and set Broadcast Port to 60000.Press the OK button and do Connect to Illuminator to reconnect to OSE Illuminator.Commands (UNIX)The oseillu is just a backround application for translating the messages from OSE Illuminator to TRACE32 commands. For the handling of the TCP/IP connection to OSE Illuminator there are some options to configure the connection correctly .Use the options the following way:Format:oseillu [-t32d 1] [-t32n <node>] [-t32i <port_number>]-t32d 1Switch on the debug output.-t32n <node>Configure the host node where TRACE32 application is running.e. g. oseillu -t32n sun2If you don’t use this option the default ist localhost . That meansTRACE32 application is running on the same machine as the OSEIlluminator.-t32i <port_number>Configure the port on the host where OSE Illuminator expects aconnection.The default port is 50000.TRACE32SUN2OSE Illuminator WINPC1Working with the OSE Illuminator extensionOSE Illuminator integration tracks the current situation of the emulator. It does not recognize any action done in the display driver. That means: If you perform actions in the display driver OSE Illuminator will show you the situation when you last synchronized the view. Performing an Update in OSE Illuminator will get you back to the current view.If you are resetting and reloading your target in TRACE32 you have to do an Update to see the correct current situation of the emulator in OSE Illuminator.If you quit the Integration Application the target will automatically get to “Not Connected” state. After a while it will also disappear in the symbol browser window of OSE Illuminator.Use OSE Illuminator and TRACE32 as usual.TroubleshootingIntegration application can not connect to TRACE32Does the config.t32 file hold the line RCL=NETASSIST?Is Winsocket installed?Is TRACE32 open?New Target does not pop up in OSE IlluminatorDoes the OSE Illuminator use the same port number as the Integration Application?Have you set Broadcast enable in OSE Illuminator?Is another target with the same name of your user already open in OSE Illuminator?Known BugsIf for any reason the connection from OSE Illuminator to the Integration Application is broken the target stays in the OSE Illuminator with state “Not Connected”. It takes a while till the OSE Illuminator updates its display and takes this target out of its target list. Within the same session of the Integration Application the Connect to Illuminator will not work until the old target is out of the list. Speed up the taking out of the target throught choosing Update or Disconnect Target in the OSE Illuminator.Sometimes Update or Disconnect Target does not work for taking a “Not Connected” target out of the list in OSE Illuminator. T o refresh the target list close OSE Illuminator and start it again.。
trace32 cmm 语法
trace32 cmm 语法Trace32 CMM(Component Measurement Microcontroller)是一个基于组件的测量控制器,用于对电子组件进行自动测试和测量。
它使用一种类似于C语言的编程语言来编写测试程序。
以下是Trace32 CMM的一些基本语法:1. 注释:使用"//"或"/* */"来添加注释。
c// 这是一条注释/* 这是一个多行注释 */2. 变量声明:使用"var"关键字来声明变量。
cvar ledPin: uint; // 声明一个LED引脚变量var buttonPin: input; // 声明一个按钮引脚变量3. 赋值语句:使用"="运算符来给变量赋值。
cledPin = 1; // 将ledPin变量赋值为1buttonPin = input; // 将buttonPin变量赋值为输入引脚类型4. 条件语句:使用"if"关键字来执行条件语句。
cif (buttonPin == 0) then // 如果按钮按下{// 执行一些操作}5. 循环语句:使用"for"或"while"关键字来执行循环语句。
cfor i = 0 to 10 do // 从0到10循环执行以下语句块{// 执行一些操作}6. 函数声明:使用"function"关键字来声明函数。
cfunction myFunction(param1: int; param2: string): int; // 声明一个返回整型值的函数,接受两个参数,一个是整型,另一个是字符串类型7. 函数调用:使用函数名和参数列表来调用函数。
cresult = myFunction(10, "hello"); // 调用myFunction函数,并传递参数10和"hello",将返回值存储在result变量中。
Trace32_基础配置与调试
Confidential Documents
17
临时文件夹设置
2013-10-16
Lauterbach Academy
Confidential Documents
18
调试环境字体大小
2013-10-16
Lauterbach Academy
Confidential Documents
19
显示语言的选择
Confidential Documents
9
输入license key
2013-10-16
Lauterbach Academy
Confidential Documents
10
选择主机OS
2013-10-16
Lauterbach Academy
Confidential Documents
11
选择目标平台CPU类型
2013-10-16
Lauterbach Academy
Confidential Documents
56
Go
执行应用程序,直到碰到用户设置的 断点才停下来。
2013-10-16
Lauterbach Academy
Confidential Documents
28
各类转换接口
Adaption for Arm Adaption for CEVA-X Preprocessor Adaption for ARM ETM Preprocessor MIPI-60 ARM Converter ARM-20 to/from ARM-14 Debugger Adaption for Intel® Atom™/x86 JTAG Connector for PowerPC440
trace32 cmm 语法

trace32 cmm 语法摘要:一、引言二、trace32 cmm 语法简介1.trace32 cmm 概述2.语法结构三、trace32 cmm 语法详解1.命令行参数2.关键字3.表达式四、trace32 cmm 语法应用实例1.实例12.实例2五、总结正文:trace32 cmm 是一种用于调试程序的语言,它允许程序员在运行时控制程序的执行,并观察程序的内部状态。
这种语言的语法相对简单,易于学习和使用。
一、引言在本篇文章中,我们将详细介绍trace32 cmm 的语法,包括其命令行参数、关键字和表达式等。
通过学习trace32 cmm 语法,你将能够更好地理解和使用trace32 cmm,从而更有效地进行程序调试。
二、trace32 cmm 语法简介2.1 trace32 cmm 概述trace32 cmm 是德国SEI 公司开发的一款软件调试工具,它支持多种编程语言,包括C、C++、Java 等。
使用trace32 cmm,程序员可以在运行时观察程序的内部状态,如变量值、函数调用栈等,从而帮助程序员发现和修复程序中的错误。
2.2 语法结构trace32 cmm 的语法主要包括命令行参数、关键字和表达式等。
这些语法元素共同构成了trace32 cmm 的语句,用于控制程序的执行和获取程序状态信息。
三、trace32 cmm 语法详解3.1 命令行参数在trace32 cmm 中,命令行参数用于指定要调试的程序及其运行参数。
例如:```trace32 cmm my_program.exe arg1 arg2```其中,`my_program.exe` 是待调试的程序,`arg1` 和`arg2` 是传递给程序的参数。
3.2 关键字trace32 cmm 的关键字是具有特定意义的单词,用于表示调试命令。
例如:```breakcontinuestepextreturn```这些关键字可以组合成各种调试命令,如`break` 和`continue` 可以组成`break continue`,表示在遇到断点时继续执行程序。
trace32使用手册-图文
trace32使用手册-图文Trace32是一款功能强大的实时调试和跟踪工具,它支持多种处理器和微控制器的开发和调试。
它具有丰富的调试功能和直观的图形用户界面,可帮助开发人员快速定位和解决软件缺陷。
本文将详细介绍Trace32的使用方法,包括环境配置、调试基本操作以及常用命令。
一、环境配置在开始使用Trace32之前,我们需要进行一些环境配置。
首先,我们需要将Trace32安装到开发计算机上。
在安装完成后,我们需要配置Trace32与目标设备的连接。
具体步骤如下:1. 连接目标设备的调试接口和开发计算机的引导接口。
这样,我们就可以通过Trace32连接到目标设备。
2. 启动Trace32,并选择"Connect"选项。
然后,选择适配器和目标设备的连接方式。
3.配置连接选项,包括目标设备的型号和调试接口。
4. 完成连接配置后,点击"Connect"按钮,Trace32将尝试与目标设备建立连接。
二、调试基本操作Trace32提供了一系列的调试工具和选项,可以帮助开发人员定位和修复软件错误。
下面是一些常见的调试操作:2. 设置断点。
Trace32允许我们在软件的特定位置设置断点,以便在执行到断点位置时暂停软件运行。
我们可以通过命令行或图形界面设置断点,以及设置条件断点和硬件断点。
3.单步调试。
当软件执行到断点或者处于暂停状态时,我们可以使用单步调试功能,逐条指令地执行软件。
这样,我们可以更加详细地了解软件的执行过程,并分析软件的状态和变量值。
4. 查看寄存器和变量值。
Trace32允许我们查看目标设备上的寄存器和变量的值。
我们可以通过Trace32的寄存器窗口或变量窗口查看这些值,并在调试过程中对这些值进行修改。
5. 追踪函数调用和函数返回。
Trace32可以追踪函数的调用和返回过程,以帮助开发人员理解软件的执行流程和函数调用关系。
6. 监视程序性能。
Trace32可以监视程序的性能指标,如执行时间、内存占用等。
- 1、下载文档前请自行甄别文档内容的完整性,平台不提供额外的编辑、内容补充、找答案等附加服务。
- 2、"仅部分预览"的文档,不可在线预览部分如存在完整性等问题,可反馈申请退款(可完整预览的文档不适用该条件!)。
- 3、如文档侵犯您的权益,请联系客服反馈,我们会尽快为您处理(人工客服工作时间:9:00-18:30)。
目录1.系统组成1.1硬件1.1.1主机1.1.2调试电缆1.1.3通过USB与PC连接1.1.4通过JTAG与目标连接1.1.5对PC硬件的要求1.1.6对目标板硬件的要求1.1.7加电1.2软件1.2.1驱动程序的安装2.PowerView调试界面的使用3.1 打开调试界面3.2 JTAG连接设置3.3 运行脚本文件3.4 观察/修改寄存器3.5 观察/修改存储器3.6 下载程序3.7 观察符号表3.8 打开程序列表窗口3.9 单步执行程序3.10 设置软件断点3.11 设置Onchip硬件断点3.12 设置数据观察断点3.13 全速运行程序3.14 停止运行程序3.15 观察变量3.16 观察堆栈3.17 在线Flash编程1.系统组成TRACE-ICP调试系统由硬件和软件两部分组成,硬件是自行研发的,软件是第三方的。
下面分成硬件和软件两部分来介绍。
1.1硬件TRACE-ICP的硬件设计采用模块化的结构,分为主机和调试电缆两部分。
1.1.1主机下面三张照片是TRACE-ICP主机的顶视图和前视图以及后视图。
图一、TRACE-ICP顶视图图二、TRACE-ICP前视图图三、TRACE-ICP后视图在图二中的连接器是标准DB25/M连接器,用于连接调试电缆。
在图三中,有两个连接器和一个LED指示灯。
左边的连接器是USB接口,用于通过USB电缆和PC连接。
右边的连接器是TRACE-ICP的外接5VDC电源接口。
TRACE-ICP可以通过USB供电,在USB供电不足的情况下,使用外接电源。
LED指示灯是TRACE-ICP的电源指示灯。
1.1.2调试电缆下图是TRACE-ICP的调试电缆的照片。
图四、TRACE-ICP的调试电缆TRACE-ICP的调试电缆有两个连接端,一个是标准的DB25/F连接器,用于和TRACE-ICP主机相连,另一个是针距为2.54毫米的标准IDC20连接器,用于和目标板连接。
这个IDC20接口通常称为JTAG接口,因为这个接口是与目标板上的ARM处理器的JTAG信号连接的。
图中的20针扁平电缆可以通过拔插的方式更换。
1.1.3通过USB与PC连接USB电缆按照接头连接器的口径来分,有一大一小。
大的一端连接PC机,小的一端连接TRACE-ICP主机。
下面的图五和图六说明了这两种连接情况。
图五、USB线与PC连接图六、USB线与TRACE-ICP连接1.1.4通过JTAG与目标连接目标板上的JTAG调试接口的信号定义如下图所示。
图七、JTAG调试接口的信号定义目标板上的JTAG调试接口使用针距为2.54毫米的IDC20连接器。
调试电缆上的IDC20连接器的上面有一个三角印记,该印记所对应的引脚连接目标板JTAG接口的1脚。
TRACE-ICP与目标板的连接情况如下图所示。
图八、TRACE-ICP与目标板的连接1.1.5对PC硬件的要求要求连接TRACE-ICP的PC能够提供标准的USB接口。
1.1.6对目标板硬件的要求目标处理器基于ARM7/9内核,处理器I/O引脚电源电压为1.8到3.3伏。
1.1.7加电首先通过JTAG接口将TRACE-ICP和目标板连接,注意目标板的JTAG接口信号要与TRACE-ICP的调试电缆的信号一一对应,图七所示是TRACE-ICP的调试电缆的JTAG接口信号的线序。
先给TRACE-ICP加电,再给目标板加电。
TRACE-ICP的加电就是通过USB线与已上电的PC连接。
如果TRACE-ICP是通过USB HUB与PC连接,而USB HUB的供电能力又不足,可以选择一个接头为内正外负的5VDC电源通过TRACE-ICP后面的外接电源接口给TRACE-ICP供电。
1.2软件TRACE-ICP能够使用德国Lauterbach公司的PowerView调试软件,能够使用GDB调试软件。
1.2.1 驱动程序的安装当第一次将TRACE-ICP通过USB线与PC连接的时候,如果是在Windows操作系统下,系统将会提示安装设备驱动程序。
驱动程序在安装盘的”bin”目录下,文件名是t32usb.inf和t32usbxp.sys。
建议客户以手动方式安装驱动程序,速度快。
安装步骤如下几幅图所示。
图九、选择手动安装驱动程序图十、选择驱动程序图十一、安装驱动程序图十二、驱动程序安装完成1.2.2 PowerView调试界面的安装运行安装盘根目录下的setup.bat文件。
在安装过程中,做下面的几个图示中的选择,就可以正确地安装好调试界面软件。
图十三、选择ICD安装当出现图十三所示的界面时,选择红色圆圈中的按钮。
图十四、选择USB接口安装当出现图十四所示的界面时,选择“USB Interface”。
图十五、选择不需要License安装当出现图十五所示的界面时,选择“License Key not necessary”。
图十六、选择安装目录当出现图十六所示的界面时,选择红色圆圈中的按钮,打开安装目录选择对话框,选择将要安装到的目录。
图十七、选择安装的处理器当出现图十七所示的界面时,选择图中蓝色条所示的处理器列表。
图十八、选择不注册当出现图十八所示的界面时,选择“Register later”,接下来,按照提示完成安装。
3.PowerView调试界面的使用3.1 打开调试界面从Windows开始—〉所有程序—〉TRACE32—〉Trace32 ICD ARM USB启动调试界面,如下图所示。
图二十一、启动调试界面启动之后的调试界面如下图所示。
图二十二、调试界面在图二十二中的红圈中的“system down”指示目标板已经供电,如果目标板电源电压低或没有的话,红圈的区域会显示“POWER DOWN”。
TRACE-ICP通过JTAG接口的1脚检测目标板电压,电压范围应该在1.8到3.3伏之间。
如图二十二中红色字体所指示的那样,调试界面分成五个区域,从上到下依次是主菜单区、快捷按钮区、工作区、行命令输入区、行命令软件区、状态显示区。
主菜单区是各种菜单命令的入口区域。
快捷按钮区是各种常用命令的快捷使用按钮。
用户可以自定义主菜单和快捷按钮。
工作区是各种对话框窗口的显示区域。
行命令输入区是各种命令通过手动输入执行的区域。
行命令软键区是协助用户输入行命令的区域,它提供所有行命令的软键输入方法。
状态显示区指示当前的调试状态。
3.2 JTAG连接设置该设置的作用是告诉调试界面目标板JTAG链路的设置情况,以便能够正确连接,这些设置主要包括:1、选择要调试的处理器型号。
2、是否有多个器件串联在同一个JTAG链路里,连接顺序如何,每个器件的JTAG IR寄存器的宽度是多少。
(情况一)3、JTAG时钟使用TCK还是RTCK。
TCK由TRACE-ICP提供,一般情况下选用10MHz。
RTCK是TRACE-ICP的TCK进入目标JTAG链路之后,从目标JTAG链路返回的时钟,它与目标处理器的时钟同步。
一般情况下,具有睡眠模式的处理器多选用RTCK作JTAG时钟,如ARM926EJ-S。
(情况二)4、通过JTAG与目标连接时,是否要先复位目标板。
JTAG口上的SRST信号产生复位信号。
(情况三)5、通过JTAG与目标连接时,是否要停止目标处理器运行。
(情况四)从主菜单“CPU”中选择“System Settings…”,打开如下图所示对话框。
从“CPU”下拉菜单里选择要调试的处理器。
图二十三、System Settings对话框对于前面描述的第一种情况,多个器件串联在同一个JTAG链上,用户需要在图二十三所示的对话框中选择“MultiCore”,打开MultiCore对话窗口,如下图所示。
图二十四、MultiCore对话框在图二十四中,最上方的红框中的部分描述多个器件在一个 JTAG 链上的位置。
所谓“JTAG串联”,就是一个器件的TDI和另一个器件的TDO相连,没有连接的TDI与JTAG口的TDI连接,没有连接的TDO与JTAG口的TDO 连接。
图二十四中的红框中的图形形象地描述了这种连接。
在图形中,“core”表示被调试的处理器,如ARM926EJ-S,“IRPOST”表示连接在JTAG TDI和“core”的TDI之间的器件的JTAG IR寄存器长度的和,在“IRPOST”下方的编辑框内要填入这个和的值,“DRPOST”表示连接在JTAG TDI和“core”的TDI之间的器件的数目,在“DRPOST”下方的编辑框内填入这个数目值,“IRPRE”表示连接在JTAG TDO和“core”的TDO之间的器件的JTAG IR 寄存器长度的和,在“IRPRE”下方的编辑框内要填入这个和的值,“DRPRE”表示连接在JTAG TDO和“core”的TDO之间的器件的数目,在“DRPRE”下方的编辑框内填入这个数目值。
填入上面四个值,就完成了JTAG MultCore 的设置。
对前面描述的第二种情况,JTAG时钟的选择,可以通过System Settings对话框上的JtagClock列表框来实现,如下图所示。
图二十五、JtagClock列表框图二十五中的红框中的部分就是JtagClock列表框,通过这个列表框用户可以选择JTAG时钟是TCK或RTCK,选择TCK的时候,顺便选择它的频率,5MHz 或10MHz或25MHz,也可以手动在编辑框中输入频率值,如1MHz。
对前面描述的第三种情况,通过JTAG与目标连接时,是否要先复位目标板,用户可以通过下图中红框中的单选钮进行选择。
图二十六、系统复位选择在图二十六中,红框中的“EnReset”单选钮如果在前面打勾(选择),表示在TRACE-ICP做JTAG连接时会做系统复位。
通过前面三种情况,用户完成了在JTAG连接动作之前的设置工作,接下来,用户就可以连接目标了。
这个连接通过下图中的红框中的“Up”或“Attach”单选钮来完成。
图二十七、JTAG连接在图二十七中,选择红框中的“Up”单选钮,JTAG通讯连接之后,目标处理器会停止执行,选择红框中的“Attach”单选钮,JTAG通讯连接之后,目标处理器处于它在JTAG通讯之前的状态,原来是运行的,那么,它现在仍然保持运行状态,这就是我们前面描述的第四种情况,如果用户在选择“Up”或“Attach”单选钮之后,在“Up”前面的小园框中有一个绿色园点,表明JTAG 通讯已经连接成功。
如下图所示。
图二十八、JTAG UP连接成功如果选择“Attach”按钮并且目标处理器正在运行的话,在界面的状态显示区会有一个绿色的“Running”条显示,如下图所示。
图二十九、JTAG Attach连接成功在图二十九中,用户可以通过点击红圈中的按钮停止程序执行,以便观察程序当前的处理器执行状态。