android之DatePicker时间控件使用举例
android实现双日期选择控件(可隐藏日,只显示年月)
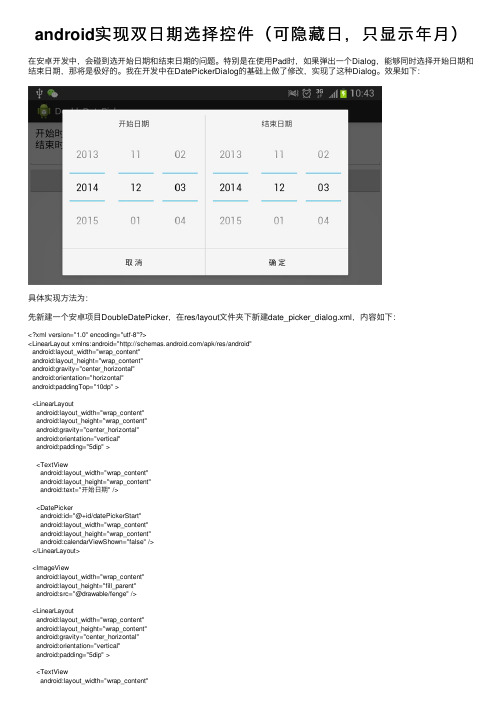
android实现双⽇期选择控件(可隐藏⽇,只显⽰年⽉)在安卓开发中,会碰到选开始⽇期和结束⽇期的问题。
特别是在使⽤Pad时,如果弹出⼀个Dialog,能够同时选择开始⽇期和结束⽇期,那将是极好的。
我在开发中在DatePickerDialog的基础上做了修改,实现了这种Dialog。
效果如下:具体实现⽅法为:先新建⼀个安卓项⽬DoubleDatePicker,在res/layout⽂件夹下新建date_picker_dialog.xml,内容如下:<?xml version="1.0" encoding="utf-8"?><LinearLayout xmlns:android="/apk/res/android"android:layout_width="wrap_content"android:layout_height="wrap_content"android:gravity="center_horizontal"android:orientation="horizontal"android:paddingTop="10dp" ><LinearLayoutandroid:layout_width="wrap_content"android:layout_height="wrap_content"android:gravity="center_horizontal"android:orientation="vertical"android:padding="5dip" ><TextViewandroid:layout_width="wrap_content"android:layout_height="wrap_content"android:text="开始⽇期" /><DatePickerandroid:id="@+id/datePickerStart"android:layout_width="wrap_content"android:layout_height="wrap_content"android:calendarViewShown="false" /></LinearLayout><ImageViewandroid:layout_width="wrap_content"android:layout_height="fill_parent"android:src="@drawable/fenge" /><LinearLayoutandroid:layout_width="wrap_content"android:layout_height="wrap_content"android:gravity="center_horizontal"android:orientation="vertical"android:padding="5dip" ><TextViewandroid:layout_width="wrap_content"android:layout_height="wrap_content"android:text="结束⽇期" /><DatePickerandroid:id="@+id/datePickerEnd"android:layout_width="wrap_content"android:layout_height="wrap_content"android:calendarViewShown="false" /></LinearLayout></LinearLayout>然后,在src的默认包下新建⽂件DoubleDatePickerDialog.java,内容如下:/** Copyright (C) 2007 The Android Open Source Project** Licensed under the Apache License, Version 2.0 (the "License");* you may not use this file except in compliance with the License.* You may obtain a copy of the License at*** Unless required by applicable law or agreed to in writing, software* distributed under the License is distributed on an "AS IS" BASIS,* WITHOUT WARRANTIES OR CONDITIONS OF ANY KIND, either express or implied.* See the License for the specific language governing permissions and* limitations under the License.*/package com.example.doubledatepicker;import ng.reflect.Field;import android.app.AlertDialog;import android.content.Context;import android.content.DialogInterface;import android.content.DialogInterface.OnClickListener;import android.os.Bundle;import youtInflater;import android.view.View;import android.widget.DatePicker;import android.widget.DatePicker.OnDateChangedListener;/*** A simple dialog containing an {@link android.widget.DatePicker}.** <p>* See the <a href="{@docRoot}guide/topics/ui/controls/pickers.html">Pickers</a>* guide.* </p>*/public class DoubleDatePickerDialog extends AlertDialog implements OnClickListener, OnDateChangedListener { private static final String START_YEAR = "start_year";private static final String END_YEAR = "end_year";private static final String START_MONTH = "start_month";private static final String END_MONTH = "end_month";private static final String START_DAY = "start_day";private static final String END_DAY = "end_day";private final DatePicker mDatePicker_start;private final DatePicker mDatePicker_end;private final OnDateSetListener mCallBack;/*** The callback used to indicate the user is done filling in the date.*/public interface OnDateSetListener {/*** @param view* The view associated with this listener.* @param year* The year that was set.* @param monthOfYear* The month that was set (0-11) for compatibility with* {@link java.util.Calendar}.* @param dayOfMonth* The day of the month that was set.*/void onDateSet(DatePicker startDatePicker, int startYear, int startMonthOfYear, int startDayOfMonth,DatePicker endDatePicker, int endYear, int endMonthOfYear, int endDayOfMonth);}/*** @param context* The context the dialog is to run in.* @param callBack* How the parent is notified that the date is set.* @param year* The initial year of the dialog.* @param monthOfYear* The initial month of the dialog.* @param dayOfMonth* The initial day of the dialog.*/public DoubleDatePickerDialog(Context context, OnDateSetListener callBack, int year, int monthOfYear, int dayOfMonth) { this(context, 0, callBack, year, monthOfYear, dayOfMonth);}public DoubleDatePickerDialog(Context context, int theme, OnDateSetListener callBack, int year, int monthOfYear,int dayOfMonth) {this(context, 0, callBack, year, monthOfYear, dayOfMonth, true);}/*** @param context* The context the dialog is to run in.* @param theme* the theme to apply to this dialog* @param callBack* How the parent is notified that the date is set.* @param year* The initial year of the dialog.* @param monthOfYear* The initial month of the dialog.* @param dayOfMonth* The initial day of the dialog.*/public DoubleDatePickerDialog(Context context, int theme, OnDateSetListener callBack, int year, int monthOfYear,int dayOfMonth, boolean isDayVisible) {super(context, theme);mCallBack = callBack;Context themeContext = getContext();setButton(BUTTON_POSITIVE, "确定", this);setButton(BUTTON_NEGATIVE, "取消", this);// setButton(BUTTON_POSITIVE,// themeContext.getText(android.R.string.date_time_done), this);setIcon(0);LayoutInflater inflater = (LayoutInflater) themeContext.getSystemService(YOUT_INFLATER_SERVICE);View view = inflater.inflate(yout.date_picker_dialog, null);setView(view);mDatePicker_start = (DatePicker) view.findViewById(R.id.datePickerStart);mDatePicker_end = (DatePicker) view.findViewById(R.id.datePickerEnd);mDatePicker_start.init(year, monthOfYear, dayOfMonth, this);mDatePicker_end.init(year, monthOfYear, dayOfMonth, this);// updateTitle(year, monthOfYear, dayOfMonth);// 如果要隐藏当前⽇期,则使⽤下⾯⽅法。
datetimepicker 用法

DateTimePicker 控件是一个用户界面控件,它允许用户以可视化的方式选择日期和时间。
以下是DateTimePicker 控件的一些用法:
1. 下拉日历模式和时间格式模式:DateTimePicker 控件有两种模式,分别是下拉日历模式和时间格式模式。
在默认情况下,它处于下拉日历模式,此时用户可以通过点击控件来选择日期。
如果需要显示时间,可以切换到时间格式模式,此时用户可以通过点击控件来选择日期和时间。
2. 设置日期和时间的值:可以通过Value 属性来设置DateTimePicker 控件当前选中的日期和时间。
例如,可以在设计时或Form_Load 事件中设置Value 属性来决定控件初始选中的日期和时间。
3. 回调函数:DateTimePicker 控件支持回调函数,当用户选择一个日期或时间后,会自动触发回调函数,并传递一个Date 类型的参数,该参数表示用户选择的日期和时间。
可以在回调函数中编写逻辑来处理用户选择的日期和时间。
4. 自定义样式:DateTimePicker 控件还支持自定义样式,可以根据实际需求对控件的外观进行自定义设置。
例如,可以设置控件的背景色、前景色、边框样式等。
5. 其他选项:DateTimePicker 控件还提供了其他一些选项,例如设置日期的最小值和最大值、设置日期和时间的格式等。
可以根据实际需求来选择使用这些选项。
总之,DateTimePicker 控件是一个功能强大的用户界面控件,可以方便地实现日期和时间的可视化选择,并且可以根据实际需求进行自定义设置。
Android日期时间选择器实现以及自定义大小

Android⽇期时间选择器实现以及⾃定义⼤⼩本⽂主要讲两个内容:1.如何将DatePicker和TimePicker放在⼀个dialog⾥⾯;2.改变他们的宽度;问题1:其实现思路就是⾃定义⼀个Dialog,然后往⾥⾯同时放⼊DatePicker和TimePicker,直接贴代码:date_time_picker.xml:<LinearLayout xmlns:android="/apk/res/android"xmlns:tools="/tools"android:layout_width="wrap_content"android:layout_height="wrap_content"android:gravity="center"android:orientation="horizontal" ><!-- <DatePickerandroid:id="@+id/new_act_date_picker"android:layout_width="0dip"android:layout_height="wrap_content"android:layout_weight="0.6"android:calendarViewShown="false" /><TimePickerandroid:id="@+id/new_act_time_picker"android:layout_width="0dip"android:layout_height="wrap_content"android:layout_weight="0.3"/> --><DatePickerandroid:id="@+id/new_act_date_picker"android:layout_width="wrap_content"android:layout_height="wrap_content"android:calendarViewShown="false" /><TimePickerandroid:id="@+id/new_act_time_picker"android:layout_width="wrap_content"android:layout_height="wrap_content"/></LinearLayout>然后在需要显⽰⽇期时间选择器的地⽅(⼀般是⼀个onClickListener中)实例化dialog:DemoActivity.javaarriveAtBtn.setOnClickListener(new View.OnClickListener(){@SuppressLint("NewApi")@Overridepublic void onClick(View v) {View view = View.inflate(getApplicationContext(), yout.date_time_picker, null);final DatePicker datePicker = (DatePicker)view.findViewById(R.id.new_act_date_picker);final TimePicker timePicker = (TimePicker)view.findViewById(R.id.new_act_time_picker);// Init DatePickerint year;int month;int day;if (StringUtils.isEmpty(arriveDateBtn.getText().toString())) {// Use the current date as the default date in the pickerfinal Calendar c = Calendar.getInstance();year = c.get(Calendar.YEAR);month = c.get(Calendar.MONTH);day = c.get(Calendar.DAY_OF_MONTH);} else {year = NewActActivity.arrive_year;month = NewActActivity.arrive_month;day = NewActActivity.arrive_day;}datePicker.init(year, month, day, null);// Init TimePickerint hour;int minute;if (StringUtils.isEmpty(arriveTimeBtn.getText().toString())) {// Use the current time as the default values for the pickerfinal Calendar c = Calendar.getInstance();hour = c.get(Calendar.HOUR_OF_DAY);minute = c.get(Calendar.MINUTE);} else {hour = NewActActivity.arrive_hour;minute = NewActActivity.arrive_min;}timePicker.setIs24HourView(true);timePicker.setCurrentHour(hour);timePicker.setCurrentMinute(minute);// Build DateTimeDialogAlertDialog.Builder builder = new AlertDialog.Builder(NewActActivity.this);builder.setView(view);builder.setTitle(R.string.new_act_date_time_picker_title);builder.setPositiveButton(android.R.string.ok, new DialogInterface.OnClickListener() {@Overridepublic void onClick(DialogInterface dialog, int which) {arrive_year = datePicker.getYear();arrive_month = datePicker.getMonth();arrive_day = datePicker.getDayOfMonth();String dateStr = DateUtil.formatDate(arrive_year, arrive_month, arrive_day);arriveDateBtn.setText(dateStr);arrive_hour = timePicker.getCurrentHour();arrive_min = timePicker.getCurrentMinute();String timeStr = DateUtil.formatTime(arrive_hour, arrive_min);arriveTimeBtn.setText(timeStr);}});builder.show();}});这样就可以实现⽇期时间选择器了,这⾥就有点layout上的⼩问题,你是需要datepicker和timepicker⽔平排列还是竖直排列,竖直排列是没问题的:下⾯给出两个数值排列的效果图:(1)DatePicker控件中设置android:calendarViewShown="false" 时的效果图:(2)(1)DatePicker控件中设置android:spinnersShown="false" 时的效果图:当然,如果你android:calendarViewShown和android:spinnersShown都不设置为false的话,会同时显⽰⽇历和滚动条样式,我想⼀般不会有⼈想要这样的视图吧。
DatePicker,TimePicker时间日期选择器
DatePicker,TimePicker时间日期选择器DatePicker,TimePicker时间日期选择器❖日期和时间选择器都派出自FrmaeLayout。
❖DatePicker❖TimePicker布局文件:1.<?xml version="1.0" encoding="utf-8"?>2.<LinearLayout xmlns:android="/apk/res/android"3.android:orientation="vertical"4.android:layout_width="fill_parent"5.android:layout_height="fill_parent"6.>7.<TextView8.android:layout_width="fill_parent"9.android:layout_height="wrap_content"10.android:text="选择一个时间"/>11.<!-- 定义一个日期选择器 -->12.<DatePicker13.android:id="@+id/datepicker"14.android:layout_width="wrap_content"15.android:layout_height="wrap_content"16.android:layout_gravity="center_horizontal"/>17.<!-- 定义一个时间选择器 -->18.<TimePicker19.android:id="@+id/timepicker"20.android:layout_width="wrap_content"21.android:layout_height="wrap_content"22.android:layout_gravity="center_horizontal"/>23.<!-- 显示用户选择日期时间24.android:enabled 不可编辑25.android:cursorVisible 不显示光标-->26.<EditText27.android:id="@+id/pickershow"28.android:layout_width="fill_parent"29.android:layout_height="wrap_content"30.android:enabled="false"31.android:cursorVisible="false"/>32.</LinearLayout>修改的时间显示到textview中:1.import java.util.Calendar;2.import android.app.Activity;3.import android.os.Bundle;4.import android.widget.DatePicker;5.import android.widget.EditText;6.import android.widget.TimePicker;7.8.public class AndroidtestActivity11 extends Activity {9.//定义5个记录当前时间的变量10.private int year;11.private int month;12.private int day;13.private int hour;14.private int minute;15.@Override16.public void onCreate(Bundle savedInstanceState)17.{18.super.onCreate(savedInstanceState);19.setContentView(yout.main11);20.DatePicker datePicker = (DatePicker)findViewById (R.id.datepicker);21.TimePicker timePicker = (TimePicker)findViewById (R.id.timepicker);22.//获取当前的年、月、日、小时、分钟23.Calendar c = Calendar.getInstance();24.year = c.get(Calendar.YEAR);25.month = c.get(Calendar.MONTH);26.day = c.get(Calendar.DAY_OF_MONTH);27.hour = c.get(Calendar.HOUR);28.minute = c.get(Calendar.MINUTE);29.showDate(year, month, day, hour, minute);30.//初始化DatePicker组件,初始化时指定监听器31.datePicker.init(year , month ,day, new DatePicker. OnDateChangedListener()32.{33.public void onDateChanged(DatePicker arg0, int y ear, int month, int day)34.{35.AndroidtestActivity11.this.year = year;36.AndroidtestActivity11.this.month = month;37.AndroidtestActivity11.this.day = day;38.//显示当前日期、时间39.showDate(year, month , day , hour, minute);40.}41.});42.//为TimePicker指定监听器43.timePicker.setOnTimeChangedListener(new TimeP icker.OnTimeChangedListener()44.{45.public void onTimeChanged(TimePicker arg0, int hour, int minute)46.{47.AndroidtestActivity11.this.hour = hour;48.AndroidtestActivity11.this.minute = minute;49.//显示当前日期、时间50.showDate(year, month , day , hour, minute);51.}52.});53.}54.//定义在EditText中显示当前日期、时间的方法55.private void showDate(int year, int month , int day , int hour , int minute)56.{57.month+=1;//month从0开始,所以需要加158.EditText show = (EditText)findViewById(R.id.picker show);59.show.setT ext("日期为:" + year + "年" + month + "月" + day + "日 " + hour + "时" + minute + "分");60.}61.}。
Android自定义控件之日期选择控件使用详解
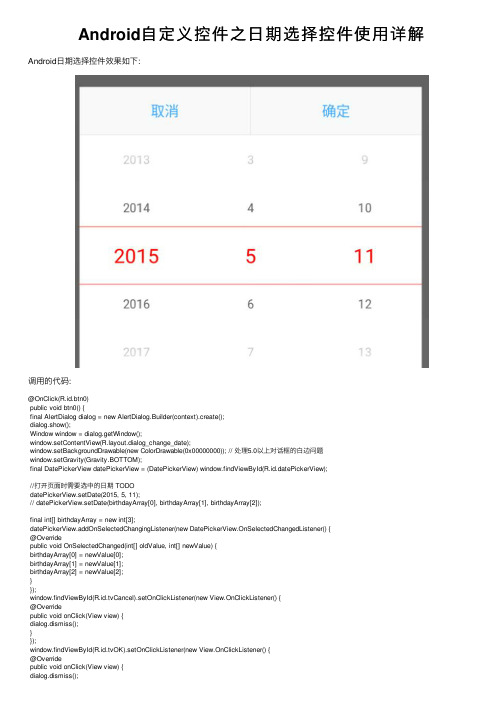
Android⾃定义控件之⽇期选择控件使⽤详解Android⽇期选择控件效果如下:调⽤的代码:@OnClick(R.id.btn0)public void btn0() {final AlertDialog dialog = new AlertDialog.Builder(context).create();dialog.show();Window window = dialog.getWindow();window.setContentView(yout.dialog_change_date);window.setBackgroundDrawable(new ColorDrawable(0x00000000)); // 处理5.0以上对话框的⽩边问题window.setGravity(Gravity.BOTTOM);final DatePickerView datePickerView = (DatePickerView) window.findViewById(R.id.datePickerView);//打开页⾯时需要选中的⽇期 TODOdatePickerView.setDate(2015, 5, 11);// datePickerView.setDate(birthdayArray[0], birthdayArray[1], birthdayArray[2]);final int[] birthdayArray = new int[3];datePickerView.addOnSelectedChangingListener(new DatePickerView.OnSelectedChangedListener() {@Overridepublic void OnSelectedChanged(int[] oldValue, int[] newValue) {birthdayArray[0] = newValue[0];birthdayArray[1] = newValue[1];birthdayArray[2] = newValue[2];}});window.findViewById(Cancel).setOnClickListener(new View.OnClickListener() {@Overridepublic void onClick(View view) {dialog.dismiss();}});window.findViewById(OK).setOnClickListener(new View.OnClickListener() {@Overridepublic void onClick(View view) {dialog.dismiss();btn0.setText(birthdayArray[0] + "年" + birthdayArray[1] + "⽉" + birthdayArray[2] + "⽇"); }});}1.WheelView 源码(有修改)2.xml布局⽂件<?xml version="1.0" encoding="utf-8"?><!--widget_date_picker.xml--><!--注意修改页⾯⾃定义控件的包名--><LinearLayout xmlns:android="/apk/res/android"android:layout_width="match_parent"android:layout_height="wrap_content"android:orientation="horizontal"><de.bvb.rxdemo.widget.DateSelectWidget.wheelview.WheelViewandroid:id="@+id/wheelViewYear"android:layout_width="0dp"android:layout_height="match_parent"android:layout_gravity="center"android:layout_weight="1"/><de.bvb.rxdemo.widget.DateSelectWidget.wheelview.WheelViewandroid:id="@+id/wheelViewMonth"android:layout_width="0dp"android:layout_height="match_parent"android:layout_gravity="center"android:layout_weight="1"/><de.bvb.rxdemo.widget.DateSelectWidget.wheelview.WheelViewandroid:id="@+id/wheelViewDay"android:layout_width="0dp"android:layout_height="match_parent"android:layout_gravity="center"android:layout_weight="1"/></LinearLayout><?xml version="1.0" encoding="utf-8"?><!--dialog_change_date.xml--><!--注意修改页⾯⾃定义控件的包名--><LinearLayout xmlns:android="/apk/res/android"android:layout_width="match_parent"android:layout_height="match_parent"android:background="@android:color/transparent"android:gravity="bottom"android:orientation="vertical"><LinearLayoutandroid:layout_width="match_parent"android:layout_height="wrap_content"android:background="@android:color/white"android:orientation="vertical"><LinearLayoutandroid:layout_width="match_parent"android:layout_height="48dp"android:orientation="horizontal"><TextViewandroid:id="@+id/tvCancel"android:layout_width="0dp"android:layout_height="match_parent"android:layout_weight="1"android:background="#F9F9F9"android:gravity="center"android:text="取消"android:textColor="#43AAFC"/><Viewandroid:layout_width="1px"android:layout_height="match_parent"android:background="#D7D7D7"/><TextViewandroid:id="@+id/tvOK"android:layout_width="0dp"android:layout_height="match_parent"android:layout_weight="1"android:background="#F9F9F9"android:gravity="center"android:text="确定"android:textColor="#43AAFC"/></LinearLayout><Viewandroid:layout_width="match_parent"android:layout_height="1px"android:background="#D7D7D7"/><de.bvb.rxdemo.widget.DateSelectWidget.DatePickerViewandroid:id="@+id/datePickerView"android:layout_width="match_parent"android:layout_height="wrap_content"/></LinearLayout></LinearLayout>3.java⽂件package de.bvb.rxdemo.widget.DateSelectWidget;import android.content.Context;import android.util.AttributeSet;import youtInflater;import android.view.View;import android.widget.LinearLayout;import android.widget.TextView;import java.util.ArrayList;import de.bvb.rxdemo.R;import de.bvb.rxdemo.widget.DateSelectWidget.wheelview.OnWheelChangedListener;import de.bvb.rxdemo.widget.DateSelectWidget.wheelview.OnWheelScrollListener;import de.bvb.rxdemo.widget.DateSelectWidget.wheelview.WheelView;import de.bvb.rxdemo.widget.DateSelectWidget.wheelview.adapter.AbstractWheelTextAdapter1; public class DatePickerView extends LinearLayout {private static final int YEAR_MIN = 1950;private static final int YEAR_MAX = 2020;private int year = YEAR_MIN;private int month = 1;private int day = 1;private ArrayList<Integer> yearList = new ArrayList<>(YEAR_MAX - YEAR_MIN + 1);private ArrayList<Integer> monthList = new ArrayList<>(12);private ArrayList<Integer> dayList = new ArrayList<>(31);private DateTextAdapter yearAdapter;private DateTextAdapter monthAdapter;private DateTextAdapter dayAdapter;private Context context;private WheelView wheelViewYear;private WheelView wheelViewMonth;private WheelView wheelViewDay;public DatePickerView(Context context) {this(context, null);}public DatePickerView(Context context, AttributeSet attrs) {this(context, attrs, 0);}public DatePickerView(Context context, AttributeSet attrs, int defStyleAttr) {super(context, attrs, defStyleAttr);this.context = context;init();}private void init() {for (int i = YEAR_MIN; i < YEAR_MAX + 1; i++) {yearList.add(i);}for (int i = 1; i < 13; i++) {monthList.add(i);}for (int i = 1; i < 32; i++) {dayList.add(i);}LayoutInflater.from(context).inflate(yout.widget_date_picker, this);// View.inflate(context, yout.widget_date_picker, this);wheelViewYear = (WheelView) findViewById(R.id.wheelViewYear);wheelViewMonth = (WheelView) findViewById(R.id.wheelViewMonth);wheelViewDay = (WheelView) findViewById(R.id.wheelViewDay);wheelViewYear.setCyclic(true);// 可循环滚动wheelViewMonth.setCyclic(true);// 可循环滚动wheelViewDay.setCyclic(true);// 可循环滚动yearAdapter = new DateTextAdapter(context);monthAdapter = new DateTextAdapter(context);dayAdapter = new DateTextAdapter(context);yearAdapter.setList(yearList);monthAdapter.setList(monthList);dayAdapter.setList(dayList);wheelViewYear.setViewAdapter(yearAdapter);wheelViewMonth.setViewAdapter(monthAdapter);wheelViewDay.setViewAdapter(dayAdapter);wheelViewYear.addChangingListener(new OnWheelChangedListener() {@Overridepublic void onChanged(WheelView wheel, int oldValue, int newValue) {year = YEAR_MIN + newValue;int days = calcDay(year, month); // days=28dayList = getDayList(days);dayAdapter.setList(dayList);if (day > days) {dayAdapter.currentIndex = days - 1;wheelViewDay.setCurrentItem(dayAdapter.currentIndex);} else {dayAdapter.currentIndex = day - 1; // day = 30}if (onSelectedChangedListener != null) {onSelectedChangedListener.OnSelectedChanged(parseInt2Array(YEAR_MIN + oldValue, month, day), getSelectDate()); }}});wheelViewMonth.addChangingListener(new OnWheelChangedListener() {@Overridepublic void onChanged(WheelView wheel, int oldValue, int newValue) {month = 1 + newValue;int days = calcDay(year, month); // days=28dayList = getDayList(days);dayAdapter.setList(dayList);if (day > days) {dayAdapter.currentIndex = days - 1;wheelViewDay.setCurrentItem(dayAdapter.currentIndex);} else {dayAdapter.currentIndex = day - 1; // day = 30}if (onSelectedChangedListener != null) {onSelectedChangedListener.OnSelectedChanged(parseInt2Array(year, 1 + oldValue, day), getSelectDate()); }}});wheelViewDay.addChangingListener(new OnWheelChangedListener() {@Overridepublic void onChanged(WheelView wheel, int oldValue, int newValue) {day = 1 + newValue;if (onSelectedChangedListener != null) {onSelectedChangedListener.OnSelectedChanged(parseInt2Array(year, month, oldValue + 1), getSelectDate()); }}});wheelViewYear.addScrollingListener(onWheelScrollListener);wheelViewMonth.addScrollingListener(onWheelScrollListener);wheelViewDay.addScrollingListener(onWheelScrollListener);}OnWheelScrollListener onWheelScrollListener = new OnWheelScrollListener() {@Overridepublic void onScrollingStarted(WheelView wheel) {}@Overridepublic void onScrollingFinished(WheelView wheel) {setTextViewStyle();}};private void setTextViewStyle() {setTextViewSize(year + "", yearAdapter);setTextViewSize(month + "", monthAdapter);setTextViewSize(day + "", dayAdapter);}private void setTextViewSize(String currentItemText, AbstractWheelTextAdapter1 adapter) {ArrayList<View> arrayList = adapter.getTextViews();int size = arrayList.size();String currentText;TextView textView;boolean current;for (int i = 0; i < size; i++) {textView = (TextView) arrayList.get(i);currentText = textView.getText().toString();current = currentItemText.equals(currentText);textView.setTextColor(current ? adapter.selected_text_color : adapter.un_selected_text_color);textView.setTextSize(current ? adapter.selected_text_size : adapter.un_selected_text_size);}}/*** 设置控件的初始值** @param year* @param month* @param day*/public void setDate(int year, int month, int day) {//验证合法性if (year > YEAR_MAX || year < YEAR_MIN) {year = YEAR_MIN;// throw new RuntimeException("年份必须在[" + YEAR_MIN + "," + YEAR_MAX + "]之间");}if (month > 12 || month < 1) {month = 1;// throw new RuntimeException("⽉份份必须在[" + 1 + "," + 12 + "]之间");}final int days = calcDay(year, month);if (day > days || day < 1) {day = 1;// throw new RuntimeException("⽇期份必须在[" + 1 + "," + days + "]之间");}this.year = year;this.month = month;this.day = day;yearAdapter.currentIndex = DatePickerView.this.year - YEAR_MIN;monthAdapter.currentIndex = DatePickerView.this.month - 1;dayAdapter.currentIndex = DatePickerView.this.day - 1;wheelViewYear.setCurrentItem(yearAdapter.currentIndex);wheelViewMonth.setCurrentItem(monthAdapter.currentIndex);wheelViewDay.setCurrentItem(dayAdapter.currentIndex);}public void addOnSelectedChangingListener(OnSelectedChangedListener onSelectedChangedListener) { this.onSelectedChangedListener = onSelectedChangedListener;}private OnSelectedChangedListener onSelectedChangedListener;public interface OnSelectedChangedListener {void OnSelectedChanged(int[] oldValue, int[] newValue);}private int[] parseInt2Array(int year, int month, int day) {return new int[]{year, month, day};}private int[] getSelectDate() {return new int[]{year, month, day};}private ArrayList<Integer> getDayList(int days) {if (days <= 0) {return null;}ArrayList<Integer> list = new ArrayList(days);for (int i = 1; i < days + 1; i++) {list.add(i);}return list;}private int calcDay(int year, int month) {int days = 0;switch (month) {case 1:case 3:case 5:case 7:case 8:case 10:case 12:days = 31;break;case 4:case 6:case 9:case 11:days = 30;break;case 2:days = (year % 400 == 0 || (year % 100 != 0 && year % 4 == 0)) ? 29 : 28;break;}return days;}private class DateTextAdapter extends AbstractWheelTextAdapter1 {ArrayList<Integer> list;public DateTextAdapter(Context context) {super(context, yout.simple_list_item_1);// super(context, yout.item_birth_year);// setItemTextResource(R.id.tempValue);// item_birth_year.xml 内容如下// <?xml version="1.0" encoding="utf-8"?>// <LinearLayout xmlns:android="/apk/res/android"// android:layout_width="match_parent"// android:layout_height="35dip"// android:gravity="center"// android:orientation="horizontal">// <TextView// android:id="@+id/tempValue"// android:layout_width="match_parent"// android:layout_height="match_parent"// android:gravity="center"// android:textColor="#ffff0000"/>// </LinearLayout>}public void setList(ArrayList<Integer> list) {this.list = list;notifyDataChangedEvent();}@Overrideprotected CharSequence getItemText(int index) {return list == null ? "" : String.valueOf(list.get(index));}@Overridepublic int getItemsCount() {return list == null ? 0 : list.size();}}}以上就是本⽂的全部内容,希望对⼤家的学习有所帮助,也希望⼤家多多⽀持。
Android常用控件开发详解
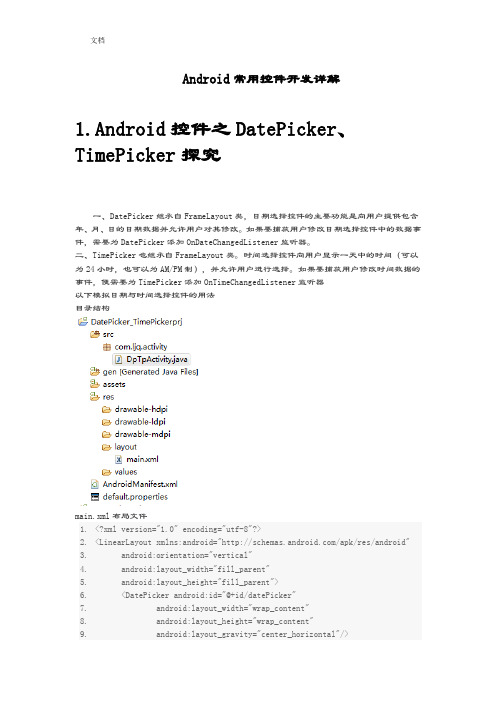
Android常用控件开发详解1.Android控件之DatePicker、TimePicker探究一、DatePicker继承自FrameLayout类,日期选择控件的主要功能是向用户提供包含年、月、日的日期数据并允许用户对其修改。
如果要捕获用户修改日期选择控件中的数据事件,需要为DatePicker添加OnDateChangedListener监听器。
二、TimePicker也继承自FrameLayout类。
时间选择控件向用户显示一天中的时间(可以为24小时,也可以为AM/PM制),并允许用户进行选择。
如果要捕获用户修改时间数据的事件,便需要为TimePicker添加OnTimeChangedListener监听器以下模拟日期与时间选择控件的用法目录结构main.xml布局文件1.<?xml version="1.0" encoding="utf-8"?>2.<LinearLayout xmlns:android="/apk/res/android"3. android:orientation="vertical"4. android:layout_width="fill_parent"5. android:layout_height="fill_parent">6. <DatePicker android:id="@+id/datePicker"7.android:layout_width="wrap_content"8.android:layout_height="wrap_content"9.android:layout_gravity="center_horizontal"/>10. <EditText android:id="@+id/dateEt"11.android:layout_width="fill_parent"12.android:layout_height="wrap_content"13.android:cursorVisible="false"14.android:editable="false"/>15. <TimePicker android:id="@+id/timePicker"16.android:layout_width="wrap_content"17.android:layout_height="wrap_content"18.android:layout_gravity="center_horizontal"/>19. <EditText android:id="@+id/timeEt"20.android:layout_width="fill_parent"21.android:layout_height="wrap_content"22.android:cursorVisible="false"23.android:editable="false"/>24.</LinearLayout>复制代码DpTpActivity类1.package com.ljq.activity;2.3.import java.util.Calendar;4.5.import android.app.Activity;6.import android.os.Bundle;7.import android.widget.DatePicker;8.import android.widget.EditText;9.import android.widget.TimePicker;10.import android.widget.DatePicker.OnDateChangedListener;11.import android.widget.TimePicker.OnTimeChangedListener;12.13.public class DpTpActivity extends Activity {14. private EditText dateEt=null;15. private EditText timeEt=null;16.17. @Override18. public void onCreate(Bundle savedInstanceState) {19.super.onCreate(savedInstanceState);20.setContentView(yout.main);21.dateEt=(EditText)findViewById(R.id.dateEt);22.timeEt=(EditText)findViewById(R.id.timeEt);23.DatePickerdatePicker=(DatePicker)findViewById(R.id.datePicker);24.TimePickertimePicker=(TimePicker)findViewById(R.id.timePicker);25.26.Calendar calendar=Calendar.getInstance();27.int year=calendar.get(Calendar.YEAR);28.int monthOfYear=calendar.get(Calendar.MONTH);29.int dayOfMonth=calendar.get(Calendar.DAY_OF_MONTH);30.datePicker.init(year, monthOfYear, dayOfMonth, newOnDateChangedListener(){31.32.public void onDateChanged(DatePicker view, int year,33.int monthOfYear, int dayOfMonth) {34. dateEt.setText("您选择的日期是:"+year+"年"+(monthOfYear+1)+"月"+dayOfMonth+"日。
androidtimepicker组件的用法
androidtimepicker组件的用法Android的TimePicker组件是用来选择时间的UI组件,它允许用户通过滚动选择小时和分钟。
在本文中,我将介绍TimePicker的用法,并提供一些示例代码来说明其具体实现。
1. 添加TimePicker到布局文件中要在布局文件中使用TimePicker,可以将以下代码添加到XML布局文件中:```xml<TimePicker/>```2. 在Activity中获取TimePicker实例并设置监听器要获取TimePicker实例,可以使用findViewById(方法。
然后,可以通过调用setOnTimeChangedListener(方法来设置时间变化的监听器。
以下是在Activity中设置TimePicker监听器的代码示例:```javapublic void onTimeChanged(TimePicker view, int hourOfDay, int minute)//处理时间变化事件}```在上述代码中,onTimeChanged(方法会在时间发生变化时被调用,你可以在该方法中编写处理变化事件的代码。
3.获取选中的时间值要获取用户选择的时间值,可以通过调用getHour(和getMinute(方法来获取小时和分钟值。
以下是获取选中时间值的示例代码:```java```4.设置初始时间值要设置TimePicker的初始时间值,可以调用setHour(和setMinute(方法,并传入所需的小时和分钟值。
以下是设置初始时间值的示例代码:```java```5.设置时间选择范围你还可以使用setMinHour(、setMaxHour(、setMinMinute(和setMaxMinute(方法来限制用户可以选择的时间范围。
以下是设置时间选择范围的示例代码:```java在上述代码中,用户只能在早上9点到晚上6点之间选择时间。
android开发时间选择器TimePicker的使用
android开发时间选择器TimePicker的使⽤前⾔ 我知道现在github上有很多功能强⼤的各⾊选择器,但是Android其实是⾃带⼀些时间选择器的。
在不需要太复杂的ui开发下可以选择使⽤这些系统⾃带的。
android系统⾃带时间控件:DatePicker ⽇期显⽰控件DatePickerDialog ⽇期对话框控件TimePicker 时间显⽰控件TimePickerDialog 时间对话框控件讲解TimePicker选择器的⼀些⾃定义设置⾸先是布局的创建:<TimePickerandroid:id="@+id/timepicker"android:layout_width="0dp"android:layout_height="wrap_content"android:layout_weight="1"android:background="#ffffff"/>设置TimePicker选择器风格TimePicker 本⾝⾃带两种风格,都可以在xml中设置,⼀种是android:timePickerMode="clock"另⼀种是:android:timePickerMode="spinner"TimePicker的显⽰规模⼤⼩设置android:scaleX="2"android:scaleY="2"效果:TimePicker的数据回调mTimepicker = (TimePicker) inflate.findViewById(R.id.timepicker);mTimepicker.setDescendantFocusability(TimePicker.FOCUS_BLOCK_DESCENDANTS); //设置点击事件不弹键盘mTimepicker.setIs24HourView(true); //设置时间显⽰为24⼩时mTimepicker.setHour(8); //设置当前⼩时mTimepicker.setMinute(10); //设置当前分(0-59)mTimepicker.setOnTimeChangedListener(new TimePicker.OnTimeChangedListener() { //获取当前选择的时间@Overridepublic void onTimeChanged(TimePicker view, int hourOfDay, int minute) {}});利⽤反射修改⼀些选择器的字体效果与背景颜⾊需要⽤到反射的⽅法了,⽐如更改分割线的样式,设置起始截⽌时间等:⾸先我们要通过反射获取TimePicker源码⾥hour和minute的id:Resources systemResources = Resources.getSystem();int hourNumberPickerId = systemResources.getIdentifier("hour", "id", "android");int minuteNumberPickerId = systemResources.getIdentifier("minute", "id", "android");然后⽤我们定义的TimePicker来获取这个id并转换成hour和minute对应的NumberPicker: NumberPicker hourNumberPicker = (NumberPicker) mTimepicker.findViewById(hourNumberPickerId); NumberPicker minuteNumberPicker = (NumberPicker) mTimepicker.findViewById(minuteNumberPickerId);通过获取到的hourNumberPicker和minuteNumberPicker我们可以先进⾏TimePicker的时间限制:hourNumberPicker.setMinValue(8); //设置最⼩hourhourNumberPicker.setMaxValue(12); //设置最⼤hourminuteNumberPicker .setMinValue(0); //设置最⼩minuteminuteNumberPicker .setMaxValue(30); //设置最⼤minute修改滚动条背景颜⾊hourNumberPicker.setBackgroundColor(getResources().getColor(R.color.colorBlue));// 修改背景颜⾊效果图:隐藏冒号⽤最暴⼒的⽅式隐藏滚动条的冒号,就是直接找ChildAtViewGroup view = (ViewGroup) mTimepicker.getChildAt(0);ViewGroup view2 = (ViewGroup) view.getChildAt(1);view2.getChildAt(1).setVisibility(View.GONE);禁⽌键盘输⼊mTimePicker.setDescendantFocusability(TimePicker.FOCUS_BLOCK_DESCENDANTS);TimePicker分割线的颜⾊和⾼度private void setNumberPickerDivider(NumberPicker numberPicker) {NumberPicker picker = numberPicker;Field[] pickerFields = NumberPicker.class.getDeclaredFields();for (Field pf : pickerFields) {if (pf.getName().equals("mSelectionDivider")) { //设置颜⾊pf.setAccessible(true);ColorDrawable colorDrawable = new ColorDrawable(ContextCompat.getColor(this, R.color.colortime)); //选择⾃⼰喜欢的颜⾊try {pf.set(numberPicker, colorDrawable);} catch (IllegalAccessException e) {e.printStackTrace();}}if (pf.getName().equals("mSelectionDividerHeight")) { //设置⾼度pf.setAccessible(true);try {int result = 3; //要设置的⾼度pf.set(picker, result);} catch (Exception e) {e.printStackTrace();}break;}picker.invalidate();}}。
datepicker的参数使用详解
jQuery-ui日期插件datepicker的参数使用详解·概述日期选择插件是一个配置灵活的插件,你可以定义它的展示方式,包括日期格式、语言、限制选择日期范围、添加相关按钮以及其它导航等。
同时,你还可以通过键盘控制它:page up/down - 上一月、下一月ctrl+page up/down - 上一年、下一年ctrl+home - 当前月或最后一次打开的日期ctrl+left/right - 上一天、下一天ctrl+up/down - 上一周、下一周enter - 确定选择日期ctrl+end - 关闭并清除已选择的日期escape - 关闭并取消选择实用功能:$.datepicker.setDefaults( settings ) - 全局设置日期选择插件的参数.$.datepicker.formatDate( format, date, settings ) - 格式化显示的日期字符串$.datepicker.iso8601Week( date ) - 给出一个日期,确实他是一年中的第几周$.datepicker.parseDate( format, value, settings ) - 按照指定格式获取日期字符串日期格式:d - 每月的第几天(没有前导零)dd - 每月的第几天(两位数字)o - 一年中的第几天(没有前导零)oo - 一年中的第几天(三位数字)D - day name shortDD - day name longm - 月份(没有前导零)mm - 月份(两位数字)M - month name shortMM - month name longy - 年份(两位数字)yy - 年份(四位数字)@ - Unix 时间戳(从01/01/1970 开始)'...' - 文本'' - 单引号(其它)- 文本其它标准日期格式:ATOM - 'yy-mm-dd' (Same as RFC 3339/ISO 8601)COOKIE - 'D, dd M yy'ISO_8601 - 'yy-mm-dd'RFC_822 - 'D, d M y'RFC_850 - 'DD, dd-M-y'RFC_1036 - 'D, d M yRFC_1123 - 'D, d M yy'RFC_2822 - 'D, d M yy'RSS - 'D, d M y'TIMESTAMP - '@'W3C - 'yy-mm-dd'·参数(参数名: 参数类型: 默认值)altField : String : ''将选择的日期同步到另一个域中,配合altFormat可以显示不同格式的日期字符串。
datepicker的用法

datepicker的用法日期选择器(datepicker)是一种用于输入日期的用户界面元素。
它可以使用户在日历中选择特定的日期,而不必手动输入日期格式。
日期选择器可以应用于很多地方,如表单,计划,报告等。
它可以帮助用户轻松地输入正确的日期,并减少错误概率。
使用日期选择器的过程是相当简单的:1、首先,点击日期选择器上的日期字段,将会弹出一个小窗口,里面是一个日历。
2、然后,在日历中选择你想要的日期。
对于更精确的选择,你可以使用日期选择器上的月份和年份字段来选择特定的月份或年份。
3、最后,点击“确定”按钮,日期就会显示在日期字段中。
日期选择器有多种类型,可以满足不同类型的应用需求,如日期和时间选择器,只有日期选择器,或者只有时间选择器等等。
日期选择器一般由三部分组成:第一部分通常是一个文本框,用户可以在里面输入日期。
第二部分是一个图标,点击它可以弹出日期选择器,用户可以在日历上选择日期。
第三部分是一个“确定”按钮,点击它可以将用户选择的日期显示到文本框中。
日期选择器也可以设置一些限制,如可以设置可选日期的范围,以及可以限制用户可以选择的日期类型(例如:仅可以选择周六或周日)。
日期选择器可以用于多种类型的网站和应用,包括商业网站,旅游网站,表单,社交网络,日历,计划等。
日期选择器的好处在于它可以帮助用户轻松地输入正确的日期,并减少错误概率。
它还可以节省用户的时间,因为用户不再需要记住每一个日期的格式。
日期选择器的应用非常广泛,它可以帮助用户轻松快捷地输入日期,而不必手动输入日期格式。
它可以应用于任何需要输入日期的应用程序,如表单,计划,报告等。
Android日期选择控件DatePicker用法
Android⽇期选择控件DatePicker⽤法本例通过点击button显⽰DatePicker对话框先看截图布局⽂件很简单,只是⼀个Button⾸先获取系统时间private int mYear;private int mMonth;private int mDay;private Calendar calendar;calendar = Calendar.getInstance();mYear = calendar.get(Calendar.YEAR);mMonth = calendar.get(Calendar.MONTH);mDay = calendar.get(Calendar.DAY_OF_MONTH);下⾯来看⼀下如何显⽰DatePicker有两种⽅法:⼀、直接new⼀个DialogmBtnBirthday.setOnClickListener(new View.OnClickListener() {@Overridepublic void onClick(View v) {//mDateSetListener监听⽤户选择//mYear, mMonth, mDay当前⽇期new DatePickerDialog(SettingsEditUserInfo.this,mDateSetListener, mYear, mMonth, mDay).show();}});⼆、使⽤showDialog显⽰private static final int DATE_DIALOG_ID = 1;showDialog(DATE_DIALOG_ID);/*** 当显⽰时间窗⼝被创建时调⽤*/@Overrideprotected Dialog onCreateDialog(int id) {switch (id) {case DATE_DIALOG_ID:return new DatePickerDialog(this, mDateSetListener, mYear, mMonth,mDay);}return null;}@Overrideprotected void onPrepareDialog(int id, Dialog dialog) {switch (id) {case DATE_DIALOG_ID:((DatePickerDialog) dialog).updateDate(mYear, mMonth, mDay);break;default:break;}}设置显⽰当前⽇期/*** 设置⽇期*/private void setDateTime() {final Calendar c = Calendar.getInstance();mYear = c.get(Calendar.YEAR);mMonth = c.get(Calendar.MONTH);mDay =c.get(Calendar.DAY_OF_MONTH);//更新Button上显⽰的⽇期updateDateDisplay(); }监听事件/*** 监听⽇期变化*/private DatePickerDialog.OnDateSetListener mDateSetListener = new DatePickerDialog.OnDateSetListener() { @Overridepublic void onDateSet(DatePicker view, int year, int monthOfYear,int dayOfMonth) {mYear = year;mMonth = monthOfYear;mDay = dayOfMonth;//更新Button上显⽰的⽇期updateDateDisplay();}};/*** 更新⽇期显⽰(记得month要+1,因为DatePicker索引是0-11)*/private void updateDateDisplay() {mBtnBirthday.setText(new StringBuilder().append(mYear).append("-").append(mMonth + 1).append("-").append(mDay));}over。
android datepicker用法

android datepicker用法Android DatePicker 是一个用于选择日期的控件,它可以让用户选择日期和时间。
以下是 DatePicker 的使用方法:1. 在布局文件中添加 DatePicker 控件:```xml<DatePickerandroid:id="@+id/datePicker"android:layout_width="wrap_content"android:layout_height="wrap_content"android:layout_gravity="center_horizontal" />```2. 在 Java 代码中获取 DatePicker 实例:```javaDatePicker date = (DatePicker) findViewById(R.id.datePicker);```3. 设置当前日期:```javaCalendar ca = Calendar.getInstance();year = ca.get(Calendar.YEAR);month = ca.get(Calendar.MONTH);day = ca.get(Calendar.DAY_OF_MONTH);```4. 初始化 DatePicker:```javadate.init(year, month, day, new OnDateChangedListener() {@Overridepublic void onDateChanged(DatePicker arg0, int year, int month, int day) {AndroidDemo5Activity.this.year = year;AndroidDemo5Activity.this.month = month;AndroidDemo5Activity.this.day = day;showDate(year, month, day, hour, minute);}});```5. 设置时间改变监听器:```javatime.setOnTimeChangedListener(new OnTimeChangedListener() {@Overridepublic void onTimeChanged(TimePicker arg0, int hour, int minute) {AndroidDemo5Activity.this.hour = hour;AndroidDemo5Activity.this.minute = minute;}});```6. 显示日期和时间:```javaprotected void showDate(int year2, int month2, int day2, int hour2, int minute2) {EditText text = (EditText) findViewById(R.id.show);text.setText("您的购买时间为:" + year2。
Android 控件之DatePicker,TimePicker,Calender
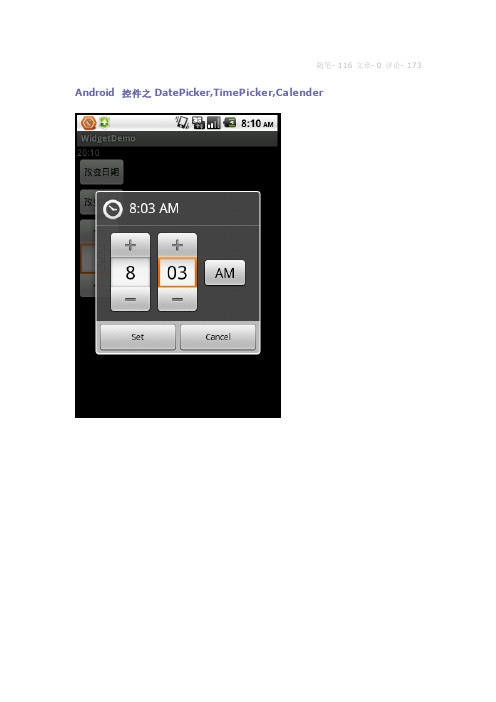
随笔- 116 文章- 0 评论- 173 Android 控件之DatePicker,TimePicker,Calender在Android中关于日期时间的类有TimePicker、DatePicker、TimePickerDialog、DatePickerDialog、Calendar。
其中TimePickerDialog、DatePickerDialog是对话框形式。
一、TimePicker查看一个在24小时或上午/下午模式下一天的时间。
1.重要方法setCurrentMinute(Integer currentMinute)设置当前时间的分钟getCurrentMinute()获取当前时间的分钟setEnabled(boolean enabled)设置当前视图是否可以编辑。
setOnTimeChangedListener(TimePicker.OnTimeChangedListener onTi meChangedListener)当时间改变时调用2.实例:timePicker=(TimePicker)findViewById(R.id.timePicker);timePicker.setCurrentHour(16);timePicker.setCurrentMinute(10);updateDisplay(16,10);timePicker.setOnTimeChangedListener(this);二、DatePicker1.重要方法getDayOfMonth():获取当前DaygetMonth():获取当前月getYear()获取当前年updateDate(int year, int monthOfYear, int dayOfMonth):更新日期三、TimePickerDialog、DatePickerDialog以对话框形式显示日期时间视图四、Calendar日历是设定年度日期对象和一个整数字段之间转换的抽象基类,如,月,日,小时等。
android materialdatepicker 用法

android materialdatepicker 用法AndroidMaterialDatePicker是AndroidMaterialComponentsLibrary中的一部分,提供了一个易于使用的日期选择器。
它可以在任何支持Material Design的应用程序中使用。
在本文中,我们将介绍如何使用Android MaterialDatePicker。
首先,您需要在build.gradle文件中添加以下依赖项:```implementation'com.google.android.material:material:1.3.0'```接下来,在要使用DatePicker的Activity或Fragment中,您需要创建一个MaterialDatePicker.Builder实例。
```MaterialDatePicker.Builder builder = MaterialDatePicker.Builder.datePicker();```您还可以设置日期的默认值,例如:```Calendar calendar = Calendar.getInstance();calendar.set(2021, Calendar.JANUARY, 1);long defaultDate = calendar.getTimeInMillis();MaterialDatePicker.Builder builder = MaterialDatePicker.Builder.datePicker();builder.setSelection(defaultDate);```接下来,您需要创建一个MaterialDatePicker实例并设置监听器以处理日期选择:```MaterialDatePicker datePicker = builder.build();datePicker.addOnPositiveButtonClickListener(new MaterialPickerOnPositiveButtonClickListener() {@Overridepublic void onPositiveButtonClick(Object selection) { // 处理选定的日期Long selectedDate = (Long) selection;Calendar calendar = Calendar.getInstance();calendar.setTimeInMillis(selectedDate);int year = calendar.get(Calendar.YEAR);int month = calendar.get(Calendar.MONTH) + 1;int dayOfMonth = calendar.get(Calendar.DAY_OF_MONTH); // TODO: 处理选定的日期}});```最后,您可以在Activity或Fragment中使用show()方法启动DatePicker:```datePicker.show(getSupportFragmentManager(),'DATE_PICKER');```这就是使用Android MaterialDatePicker的基本步骤。
kivy 的 datepicker用法
kivy 的datepicker用法Kivy 是一个开源的Python 库,用于开发多触摸应用程序。
它非常适合为Android、iOS、Linux/OS X、Windows 等平台创建应用程序。
Kivy 提供了一个名为DatePicker 的控件,允许用户从日历中选择日期。
以下是DatePicker 控件的基本用法:导入必要的模块:pythonfrom kivy.app import Appfrom kivy.uix.datepicker import DatePickerfrom kivy.uix.boxlayout import BoxLayoutfrom kivy.uix.button import Button创建布局和控件:你可以使用BoxLayout 或其他布局来放置DatePicker 和其他控件。
pythonclass MyBoxLayout(BoxLayout):def __init__(self, **kwargs):super(MyBoxLayout, self).__init__(**kwargs)self.date_picker = DatePicker()self.add_widget(self.date_picker)self.btn = Button(text="Get Date", size_hint_y=None, height=30) self.btn.bind(on_release=self.get_date)self.add_widget(self.btn)def get_date(self, instance):print(self.date_picker.date)创建应用:创建一个继承自App 的类,并在其中返回你的布局。
pythonclass MyApp(App):def build(self):return MyBoxLayout()if __name__ == '__main__':MyApp().run()运行应用:当你运行上面的代码时,它会显示一个包含日期选择器和一个按钮的界面。
AndroidDatePickerDialog和TimePickerDialog显示样式

AndroidDatePickerDialog和TimePickerDialog显⽰样式 可以⽤DatePickerDialog显⽰选取⽇期的对话框。
可以设置显⽰的样式1、通过构造⽅法设置显⽰样式。
可以通过DatePickerDialog(Context context, int theme, DatePickerDialog.OnDateSetListener callBack, int year, int monthOfYear, int dayOfMonth)这个构造⽅法的第⼆个参数来设置显⽰样式。
这个theme参数对应的值,可以使⽤AlertDialog中的theme值。
AlertDialog.THEME_TRADITIONAL AlertDialog.THEME_HOLO_DARK AlertDialog.THEME_HOLO_LIGHT AlertDialog.THEME_DEVICE_DEFAULT_DARK AlertDialog.THEME_DEVICE_DEFAULT_LIGHT2、通过DatePicker设置显⽰样式 ⾸先获取DatePicker,然后使⽤DatePicker.setCalendarViewShow(boolean)和DatePicker.setSpinnersShow(boolean)来设置。
CalendarView和Spinners的值分别为true和false CalendarView和Spinners的值分别为false和true CalendarView和Spinners的值都是false CalendarView和Spinners的值都是true对于TimePickerDialog⽽⾔,它的样式设置,只有构造函数⼀种⽅式,对应的theme参数和DatePickerDialog相同。
它内部定义了⼀个TimePicker,但是没有提供获取的⽅式。
- 1、下载文档前请自行甄别文档内容的完整性,平台不提供额外的编辑、内容补充、找答案等附加服务。
- 2、"仅部分预览"的文档,不可在线预览部分如存在完整性等问题,可反馈申请退款(可完整预览的文档不适用该条件!)。
- 3、如文档侵犯您的权益,请联系客服反馈,我们会尽快为您处理(人工客服工作时间:9:00-18:30)。
public void onDateSet(DatePicker view, int year, int monthOfYear, int dayOfMonth)
{
mYear = year;
mMonth = monthOfYear;
mDay = dayOfMonth;
showDate(mYear, mMonth, mDay);
}
};
/*
* 获取当前的年、月、日、小时、分钟
*/
private void initView()
{
final Calendar c = Calendar.getInstance();
mYear = c.get(Calendar.YEAR);
{
switch (id)
{
case DATE_DIALOG_ID:
initView();
return new DatePickerDialog(this, mDateSetListener, mYear, mMonth, mDay);
}
return null;
import android.widget.Toast;
public class MainActivity extends Activity
{
protected static final int DATE_DIALOG_ID = 0;
/*
* 定义好一个时间控件
*/
private DatePicker dataPicker = null;
}
});
dataPicker.init(mYear, mMonth, mDay, new OnDateChangedListener()
{
@Override
public void onDateChanged(DatePicker view, int year, int monthOfYear, int dayOfMonth)
{
@Override
public void onClick(View v)
{
/*
* 通过ID判断输入的为那个对话框,调用方法onCreateDialog(int id)
*/
showDialog(DATE_DIALOG_ID);
*/
private Button pickDate;
private TextView dateDisplay;
protected void onCreate(Bundle savedInstanceState)
{
super.onCreate(savedInstanceState);
}
}
dateDisplay = (TextView) findViewById(R.id.dateDisplay);
/*
* 注意使用的是View.OnClickListener()
*/
pickDate.setOnClickListener(new View.OnClickListener()
setContentView(yout.activity_main);
dataPicker = (DatePicker) findViewById(R.id.datePicker);
pickDate = (Button) findViewById(R.id.pickDate);
mMonth = c.get(Calendar.MONTH);
mDay = c.get(Calendar.DATE);
// mHour = c.get(Calendar.HOUR);
// mMinute = c.get(Calendar.MINUTE);
showDate(mYear, mMonth, mDay);
/*
* 定义5个记录当前时间的变量
*/
private int mYear;
private int mMonth;
private int mDay;
// private int mHour;
// private int mMinute;
/*
* 定义设置时间按钮和获取到设置的的时间
}
private void showDate(int mYear2, int mMonth2, int mDay2)
{
// Month is 0 based so add 1
dateDisplay.setText(new StringBuilder()
.append("时间:").append(mYear).append("-").append(mMonth + 1).append("-").append(mDay));
}
/*
* the callback received when the user "sets" the date in the dialog
*/
private DatePickerDialog.OnDateSetListener mDateSetListener = new DatePickerDialog.OnDateSetListener()
import java.util.Calendar;
import android.app.Activity;
import android.app.DatePickerDialog;
import android.app.Dialog;
import android.os.Bundle;
import android.view.View;
import android.widget.Button;
import android.widget.DatePicker;
import android.widget.DatePicker.OnDateChangedListener;
import android.widget.TextView;
/*DatePicker是一个日期选择控件,它继承自FrameLayout类,用来实现的主要功能是使用护可以方便选择日期。如果要捕获用户修改DataPicker控件中的数据改变事件,需要为DatePicker添加OnDateChangedListener监听器。
*/
package com.wencool.datepickerdialog;
{
initView();
Toast.makeText(MainActivity.this, year+"-"+monthOfYear+"-"+dayow();
}
});
}
@Override
protected Dialog onCreateDialog(int id)
