PADS2005的详细安装方法--100%原创
《pads讲义资料》word版
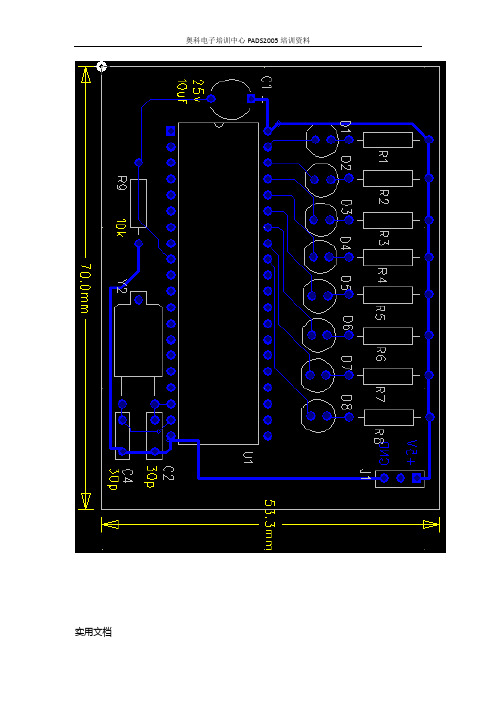
实用文档第一讲:介面介绍无模式命令:G 修改设计栅格:G:修改设计栅格和过孔栅格GR:只修改设直栅格GV:只修改过孔栅格GD:修改可视栅格GP:打开/关闭极坐标:板层:PADS默认的层面有30层。
电路板的层面指的是电气:从Top——Bottom层。
L21——L30层为系统指定的,包括阻焊、丝印等。
修改板层:设置——板层定义。
无模式命令:L1或Ltop :格式:L <名称>|<编号>:查询(Ctrl+Q) :打开对应对象的属性,相当双击左键。
:循环选择(Tab):用于重叠对象的切换:选择需要与右键的过滤功能配合使用。
实用文档实用文档一个网络(net )是由一个或多个管脚对(pair )构成。
管脚对:从一个脚到另外一个脚。
Anything:任意Components:元件Unions:结合体Clusters:簇Nets:网络 Pin Pairs:管脚对Traces:导线Unroutes:未布通连线 Pins:管脚 Vias:过孔 Shapes:整体外形 Documentation:文档(字符)Board Outline:电路板边框在Anything 任意项下:先点中一段导线,再按住shift 键,单击相同的一段导线,就选择了网络。
按住shift 键,单击导线,就会选择管脚对。
:绘图工具盒:设计工具盒:尺寸标注工具盒:ECO(电气工程修改)工具盒包括:增加、删除元件,增加、删除连线,更改元件编号,更改网络名称。
:BGA工具盒:撤消:(Ctrl+Z) 无模式命令:un<n> n :表示撤消的次数:重复:撤消撤消的操作。
与撤消相反:缩放左键放大,右键缩小缩放:12 pg up 放大pg dn 缩小3 用滚轮:按下滚轮向左上:放大右下:缩小4 可view 下的zoom:显示整个电路板(ctrl+B):刷新(ctrl+D)或(End)画面控制一、用小键盘控制:数字键打开:1,刷新2,6,4,8方向3,缩小9,放大7,显示整块电路5, 启动中心放大 . , 边缘放大实用文档数字键关闭2,4,6,8 移动光标二、用三键鼠标控制1,滚轮上下移动:使屏幕上下移动2,按Shift+滚轮:使屏幕左右移动3,单击滚轮移动画面,将单击的位置显示在屏幕中间4,按下滚轮向左上角移动可以放大,向右下角移动可以缩小。
Pads PCB 2005多层板删层方法
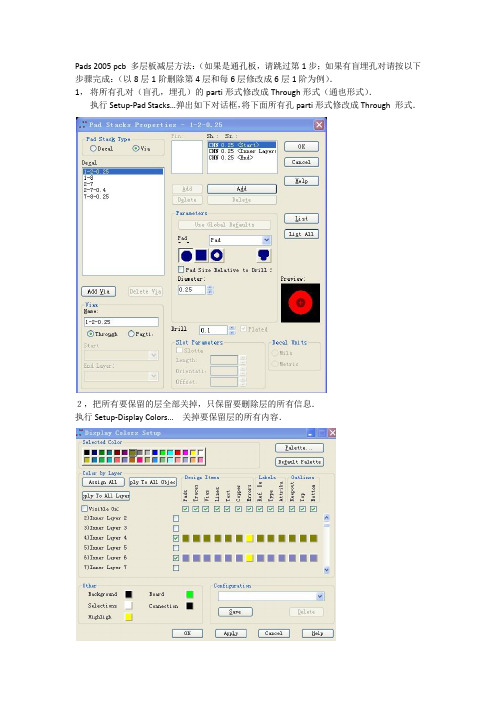
Pads 2005 pcb 多层板减层方法:(如果是通孔板,请跳过第1步;如果有盲埋孔对请按以下步骤完成:(以8层1阶删除第4层和每6层修改成6层1阶为例).1,将所有孔对(盲孔,埋孔)的parti形式修改成Through形式(通也形式).执行Setup-Pad Stacks…弹出如下对话框,将下面所有孔parti形式修改成Through 形式.2,把所有要保留的层全部关掉,只保留要删除层的所有信息.执行Setup-Display Colors…关掉要保留层的所有内容.3,删除这两层中所有的(非固定)内容,如shapes,traces,keepout等.注:千万不要在这两层中删除net,这样会把其它层相关联的网络删掉.确认要删除的内容执行删除命令.执行Setup-Layer Definition…点Reassign…按钮弹出如下对话框:观察要删除层(4和6)的对应的信息是否有Yes 变成了No..若已经变成了No证明这两层内的内容已经删除干净了.可进行下一步操作.4,Setup-Layer Definition…点Modify…按钮弹出如下对话框,将上面对话框内的10修改成6 点OK.弹出如下对话框.点ok返回到以下窗口:再点OK 会弹出如下对话框:点是删层完成5,更改减层后的层对应关系:Setup-Layer Definition…弹出以下对话框,在Name:内将层信息修改成同实际层相同的名字.修改后:6,Setup-Drill Pairs…弹出如下对话框,并修改钻孔对的层对应关系:(修改后)点OK.6,更改钻孔类型(将应该修改的Through 形式修改回parti形式)和修改相对应的钻孔名,完全完成删层工作.并另存为文件.Setup-Pad Stacks…修改后:。
pads 教程
pads 教程Pads教程:基本操作入门Pads是一款常用的电子设计自动化(EDA)工具,用于电路设计、仿真和布局。
下面是Pads的基本操作入门教程。
步骤1:创建新项目首先,打开Pads软件并点击“文件”菜单中的“新建项目”。
在弹出的对话框中输入项目名称,并选择存储项目的目录。
然后,点击“确定”按钮。
步骤2:添加原理图在新建项目中,右键点击“设计文件”文件夹,并选择“添加新文件”。
选择创建原理图文件,并命名为“schematic”。
然后,进入原理图编辑器。
步骤3:绘制电路图在原理图编辑器中,使用工具栏上的元件库选择所需的元件,如电阻、电容、晶体管等。
将这些元件拖拽到画布上,并使用连接线连接它们。
步骤4:添加零件属性在绘制电路图时,需要为每个元件添加属性。
选中元件,右键点击并选择“属性”。
然后,填写元件的参数,如阻值、容值等。
步骤5:进行仿真完成电路图的绘制后,可以进行仿真以验证电路设计的正确性。
点击“工具”菜单中的“仿真”选项,并选择相应的仿真工具。
配置仿真参数后,运行仿真。
步骤6:完成布局设计在验证电路设计无误后,可以进行布局设计。
在Pads中,可以通过将原理图导入布局编辑器来完成布局设计。
点击“文件”菜单中的“导入”选项,并选择原理图文件。
步骤7:布局布线在布局编辑器中,使用工具栏上的布线工具将元件进行布线。
确保布局符合电路设计的要求,并注意避免干扰和干扰源的位置。
步骤8:进行设计规则检查完成布线后,进行设计规则检查以确保布局符合规范。
点击“工具”菜单中的“设计规则检查”选项。
根据检查结果进行必要的修正。
步骤9:生成制造文件最后,生成制造文件以供PCB(印刷电路板)制造商使用。
点击“文件”菜单中的“生成制造文件”选项,并选择所需的制造文件格式。
这就是Pads的基本操作入门教程。
通过学习这些步骤,您可以开始在Pads中进行电路设计、仿真和布局。
希望本教程能对您有所帮助!。
PADS常见问题
PADS常见问题Pads layout中的一些操作问题1.Pad和Via有什么区别?PAD是焊盘,VIA是过孔,通孔焊盘和过孔都会打穿板子。
PCB 实物做出来焊盘那个孔周围是没有阻焊层的,可以焊锡在上面,而过孔则没有。
通孔焊盘和VIA都必须设置25 layer,且Drill Size(钻孔大小)与其他层一致,但Diameter(焊盘大小)要比其他层大20mil(0.5mm)以上。
焊盘外径D一般不小于(d+1.2)mm,高密度数字电路的D最小可到(d+1.0)mm,其中d 为钻孔直径。
1-1.请问PowerPCB如何设置才能在走线打孔的时候信号线自动用小孔,电源线用大孔?先在PAD STACKS中将你要用的VIA式样定制好,然后到Desing Ruels中先定义Default Routing Rules使用小的VIA,再到Net Ruels选中电源的Net,在Routing中定义成大的VIA。
如不行,可以敲入“VA”,将VIAMode设成Automatic,它就会按规则来了。
【不同网络设置线宽】在PowerPCB中是否有对不同网络分别进行线宽的设置吗?可以的!design rules->default-》Clearance-》Trace Width设置缺省值。
design rules->Class (或Net)中选中网络-》Clearance-》Trace Width 生成新的条件规则则实线不同网络不同走线宽度OK!1-2. 测点优先级:Ⅰ. 表贴焊盘(Test pad) Ⅱ. 零件脚(Component lead) Ⅲ. 贯穿孔(Via hole)1.如何添加和自定义过孔或盲孔?Setup ---> Design ---> Rules---> Default---> Routing 中Vias 的Availabe和Selected匀为空白,请问怎样设置过孔?那你就新建一个VIA类型SETUP->PAD STACKS->在PAD STACK TYPE中选VIA->ADD VIA……然后Setup --->Design --->Rules---> Default---> Routing 中,把新建的VIA 添加到SELECT VIA!1-3.怎么加测试点?【SCH上手动增加测试点】原理图中就增加测试点符号,并PCB库中做好对应测试点的封装(表贴封装、via封装),然后在layout中导入网表即可----------------------------------【PCB上直接手动加测试点】1) 连线时,点鼠标右键在end via mode 中选择end test point2) 选中一个网络的某段走线,右键-Add testpoint(只能加Via测试点)或Add Via,选中Via 或Pad修改属性为TestPoint3)将焊盘(表贴封装、via封装)做成一个部件,在ECO模式下用添加Component的方式增加进来,并修改属性为测试点--------------------------------【自动增加针床测试用的测试点】在PADS Layout中有专门加入测试点的方法。
PADS2005系列教程
香港:00852-26371886 sales@
3
PADS Router 教程
第一节:PADS Router 操作界面(User Interface)
PADS Router 的操作界面注重易用和实效性。当你使用 PADS Router 进行设 计时,操作界面与其他的 Windows 应用程序相似,尤其是 PADS Layout。同样你 可以通过界面下的工具栏、菜单、热键等命令进行相应的操作。
深圳:0755-83689810 szkgs@
上海:021-62725136 shkgs@
北京:010-82561903 bjkgs@
香港:00852-26371886 sales@
6
PADS Router 教程
选中需要操作的工作区域,按 F5 在导航窗中放大该区域,按 F6 按比例缩 小显示。
取景(Panning) 1、选中要查看的区域。 2、不要移动鼠标,按下键盘区 Insert 键,光标将会自动确定到工作区域的 中心位置。 3、点击 OK 按钮完成操作。
比思电子有限公司(KGS Technology Ltd.)
在该课程中,你将学习到: ·工具条 ·实时坐标显示 ·撤消指令 ·快捷菜单 ·取景,缩放,拖动 ·选取对象 启动 PADS Router,在 PADS Projects\Samples 文件夹中打开 preview.pcb。
打开文件后,整个工作界面如下,根据你的配置,打开时可能会有很多个小 窗口,如 Project Explorer 窗口、Navigation Window、Command Window 等等。 可以根据你的布线需要,随时关闭或打开这些子窗口。
香港:00852-26371886 sales@
PADS 2005 Spac2交流
11
点击选择(Design)工具盒
该工具盒包含工具条:
复 删 制 除
增 加 元 件
增 加 连 接
增 加 总 线
增 加 文 本
创 建 二 维 图 线
修 改 二 维 图 线
2012-2-7
12
2、生成原理图报表
完成原理图绘制后,需要对当前设计产生各种报表 Unused:未使用项目的报表 Part Statistics: 元件统计报表 Net Statistics: 网络统计报表 Limits:资源限制报表 Connectivity:连接性报表 Bill of Material:物料清单报表
2012-2-7
52
单击
画出不覆铜的边框,如图1所示, 选中边框
使用Setup/Drill Pairs打开
公司不推荐使用埋孔。因此一般不用设置
2012-2-7
32
层设置
使用Setup/Layer打开
2012-2-7
33
2012-2-7
34
2012-2-7
35
4、设计规则
PADS优点是能把Logic中定义的规则直接输入到Layout中,当然, 也可以选择直接在Layout中定义设计规则。
2012-2-7 14
三、PADS Layout介绍 PADS Layout界面
2012-2-7
15
1、PADS Layout工具条
2012-2-7
16
2012-2-7
17
2012-2-7
18
选 对 水 择 任 平 意 方 方 向 向 的 的 尺 直 寸 线 标 标 注 注 尺 寸
垂 直 方 向 的 尺 寸 标 注
2012-2-7
Pads铺铜设置方法和常见问题

PADS铺铜属性使用技巧PADS铺铜属性使用技巧在PCB 设计上,铺铜是相当必要的动作,而PADS 提供了三种铺铜方法,可让使用者在Copper Properties 中方便的切换,以下就为各位介绍三种铺铜切换使用方式与Properties 的内容说明。
一. 如何呼叫Copper Properties 窗口在PCB 中绘制好铜箔,选取铜箔后再使用右键功能选单即可二. 使用Copper Properties(1) 可利用Type 下拉选单切换所需要的铜箔模式( Plane Area 在复合层面方可使用)(2) 利用铜箔线宽与格点的数值差异,可控制为网铜或实心铜(3) 可调整铜箔所在层面与指定铜箔导通NET三. 范例利用Copper pour 来完成大铜包小铜,并为一网铜一实心铜(1) 将铺铜格点设定为0(2) 绘制Copper pour 后呼叫Properties,并使用Options(3) 设定铺铜优先级与网铜格点(4) 利用铺铜控制器即可完成四. 结论PADS 中提供多功能的铜箔给使用者应用,若是能熟悉Copper Properties 操作,不仅是在铜箔使用类型切换上可更快速,在应用于是否为网铜或大铜包小铜等等进阶使用的操作上可更加的顺手与方便。
PADS铺铜设置一些常见问题问1。
使用POWER PCB 画图,在PCB 板上铺铜时,铜块的query/modify drafting 中有一个width 设置,有何意义?2。
如果我想在铺铜位置均匀的放置一些小过孔,要怎么设置?3。
在大面积铺铜时,网格状和全部铺满相比各有何优劣;如果全部铺满,是否必须增加一些小过孔;而铺成网格状的时候,这些小过孔是否还有必要?谢谢!!答 1:小说几句一、你提到的WIDTH 的设定是关于组成铺铜块的线径,设小了,就形成网格,设大了就铺满。
二、想加过孔最简单的办法是加一个焊盘。
正常是在走线上右键ADD VIA。
三、随你的高兴,想怎么样就怎么样。
PADS学习方法
1. pads学习方法交流有很多初学者由于学习方法不对,导致学习慢学习吃力,原因就是方法不对和没有坚持不断地学习直到学会为止。
以下是个人的学习pads的经验,仅供大家参考。
希望对初学者有帮助。
首先要了解用pads画原理图和pcb的流程,有很多人不了解流程,不知道从何开始学习,流程大慨为:画封装,画原理图符号,建元件,建元件库,画原理图,导入生成pcb,画外形边框,布局,布线,设计检验,生成gerber. 2.3. 了解了流程后就要开始看资料或者看视频讲解一步一步的按照流程中需要掌握的学习,把流程走一遍。
找一块完整的简单项目从头到尾地按照流程画一块完整的pcb。
在画的过程中,你会碰到很多问题,这时需要不断的问或者查资料看教程来解决在画的过程中碰到的问题,直到项目画完。
4.5.6.7.8. 总结在画的过程中慢的地方,找到最快的操作方法和技巧,学会总结一些快捷键。
经常练习,给自己规定一个时间在时间内完成,提高自己的速度和熟练程度。
学习一些布线规则和一些生产工艺,以确保画出来的pcb无论是性能还是工艺最好。
建立积累自己的元件库,为后续画其他的pcb板做准备,可以避免再去重新做元件而浪费时间。
介绍一个学习pads的网址给大家,里面有很多好的学习资料,尤其是一些视频讲解资料和pads的技巧,和大家分享,希望对大家有帮助。
下载方法,点击电信下载后进入另外一个页面,再点击下载,下载的为exe文件,再在电脑上运行安装此文件就会自动将资料下载到电脑上。
篇二:pads学习学会orcad和pads layout软件的基本使用步骤,orcad(找元件,定参数,添加库,生成链接文件,放大缩小、删除等基本操作等等),pads layout( 导入链接文件、设置各种规则,布局、布线、检查等等) 利用上面学到的完整的画一个简单的电路图。
先把整个流程过一遍。
pads logic,是设计电子电路图,原理图的工具,pads layout是设计pcb,pcb布局,布局,到gerber file,pads router是自动布线工具,附助pcb layout布线的工具。
PADS概述

PADS概述1.1 什么是PADSPADS是Mentor Graphics公司旗下的印制电路板(PCB)设计工具软件套装,本书以PADS 9.5为蓝本写作,目前最新版本为PADS VX,提供中文、英文、日文、巴西葡萄牙语4种语言版本。
大名鼎鼎的Power PCB是PADS的前身。
PADS功能强大,涵盖了电子产品从原理图设计、性能仿真,直至印制电路板设计实现整个流程的各个环节。
通俗地讲,学会使用PADS就具备了使用计算机辅助设计电子产品的原理图和电路板的能力。
对于PADS初学者,通常会把PADS的模块名称及其具体功能混淆。
Mentor Graphics为了满足电子行业中各类设计工作的需求,将PADS 的众多功能模块整合为3 个套件,即PADS DS Suite、PADS LS Suite、PADS ES Suite,为方便大家记忆,表1-1-1列出了PADS套件及模块清单。
表1-1-1 PADS套件及模块清单由于本书篇幅有限,内容仅涉及PADS Logic、Layout、Router模块。
1.2 安装、启动PADS在安装之前,需要准备一台符合表1-2-1所示配置的个人计算机。
当然,更高配置的个人计算机有助于提高软件运行速度和提升设计效率。
表1-2-1 运行PADS 9.5 PC硬件配置要求将PADS安装光盘放入计算机的光驱后,按照如图1-2-1所示的14个步骤,即可完成PADS评估版软件的安装。
图1-2-1 安装PADS图1-2-1 安装PADS (续)如同其他的应用软件一样,在Windows操作系统的程序菜单中可以找到如图1-2-2所示的程序菜单及快捷方式。
找到图1-2-2 所示的PADS Logic、Layout、Router快捷命令后,就可以启动相应的程序。
除了安装随书赠送的PADS 光盘外,还可以通过访问Mentor Graphics PADS 官方网站获得最新版本的PADS试用。
图1-2-2 PADS Logic、Layout、Router程序快捷方式所处位置1.3 查看已安装的选项根据表1-1-1所示,PADS的套件配置配备的模块数量有所不同,用户可以根据自身的需求选择合适的组件。
PCB设计之PADS2005的REUSE功能
PADS2005的REUSE功能
3. 选中另一块电路的件(只选件)。这块电路必需与REUSE块的拓扑结 构一样,件的数量、封装一样,网络数量一样。
4. 按设计工具条上的“Make Like Reuse”按钮,这块电路的布局布线 就完成了,并被抓在鼠标上。
5. 选择一个合适的位置将电路块放下即可。
相同的电路都可以这样设计(只布局也可以),效果如下图:
PADS2005的REUSE功能
PADS2005的REUSE功能
张明龙
PADS2005的REUSE功能
PADS2005的REUSE功能
先前,我们只是用该功能将一个PCB中的走线复制到另一个PCB 中。其实,它可以用来完成同一个PCB中相同结构的块的布局布线, 介绍如下:
1. 先完成一块电路的布局布线,如图: 2. 选中这块电路中的件、走线、过孔, 设置一个块参考点,生成一个Rro类似功能 比较:有一点不匹配 就不能使用,没有 Allegro灵活。
PADS快捷键
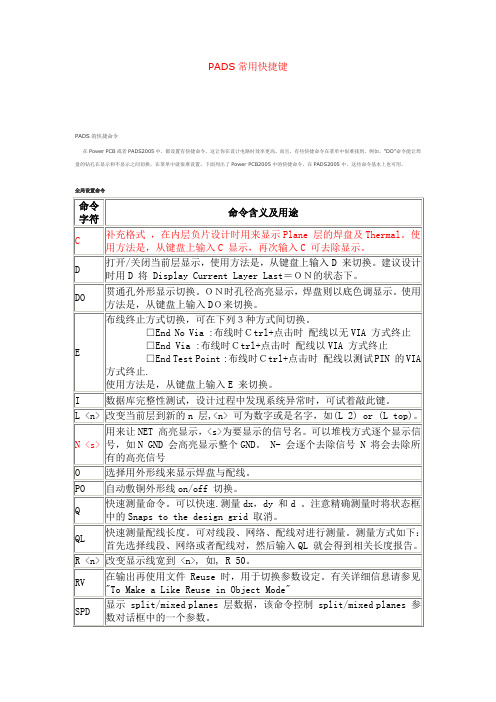
PADS常用快捷键PADS的快捷命令在Power PCB或者PADS2005中,都设置有快捷命令,这让你在设计电路时效率更高。
而且,有些快捷命令在菜单中很难找到,例如,"DO"命令能让焊盘的钻孔在显示和不显示之间切换,在菜单中就很难设置。
下面列出了Power PCB2005中的快捷命令,在PADS2005中,这些命令基本上也可用。
全局设置命令Grid 命令检索命令角度命令(drafting 时的快速设定)设计规则检查命令Design Rule Checking (DRC)布线命令绘图相关命令Drafting Objects与鼠标动作相关的命令其它命令Z+1 显示的为第一层Z+2 显示的为第二层依次类推。
Z+o 显示外层,即首层Z(n-M)即显示第几层到第几层。
Z*. 显示所有层.ZT 显示顶层ZB 显示底层ZSMZ B 显示底层Z C 显示当前层Z D 显示所有文档层.Z E 显示所有电气层.Z I 显示内层.Z O 显示板的外层,就是顶层和底层. Z T 显示底层Z PMB 显示助焊底层Z PMT 显示助焊顶层Z SMB 显示阻焊底层Z SMT 显示阻焊顶层Z SSB 显示丝印底层Z SST 显示丝印顶层PADS快捷键设置通孔显示模式:D+O设置铜只显示外框形式:P+O打开铺铜显示:SPD,关闭铺铜显示:SPO改变当前层:L(如改当前层为第二层,为L2)测量:从当前位置开始测量:Q改变线宽:W设置栅格:G对找元件管脚或元件:S寻找绝对坐标点:S(n)(n)改变走线角度:AA任意角,AD斜角,AO直角取消当前操作:UN,如UN(1)为取消前一个操作重复多次操作:RE设计规则检查:打开:DRP,关闭:DRO,忽略设计规则:DRI,以无过孔形式暂停走线:E锁定当前操作层对:PL(n)(n)选择当前过孔使用模式:自动过孔选择:V A埋孔或盲孔:VP通孔模式:VT保存:CTRL+S打开:CTRL+O新建:CTRL+N选择全部:CTRL+A全屏显示:CTRL+W移动:CTRL+E翻转:CTRL+F任意角度翻转:CTRL+I高亮:CTRL+H查询与修改:CTRL+Q45度翻转:CTRL+R增加走线:F2锁定层对:F4选择网络:F6选择管脚对:F5全局设置命令命令字符命令含义及用途C 补充格式,在内层负片设计时用来显示Plane 层的焊盘及Thermal。
PADS2005(PowerPCB)教程实例之高级应用(每日更新)
PADS2005(Power PCB)教程实例之高级应用(每日更新)PADS2005(Power PCB)教程实例之高级应用(每日更新)将下面的问题进行讨论1. 设计复用2. IC扇出3. 蛇行布线4. 差分对布线5. 等长布线6. 多层板层叠分析7. 信号完整性分析8. 电磁兼容分析9. 串扰分析10. 多板分析11. 可测试性设计12. 可制造性设计13. Pro/ENGINEER 链接... ...Power PCB 设计复用(以PADS 2005为例)建立一个设计复用(*.reu文件)1.选择要设计的对象。
2.右键,弹出菜单中选Make Reuse,可以看后面的选择和未选择报告(Selection deselection)3.输入Reuse的文件名4.选取Save to file5.保存该文件到文件夹以备后用。
在以下学习中,所有的应用环境必须在ECO下,关闭设计规则检查(可用DRO命令),下次再续... ...增加一个设计复用1.在菜单中单击Add Reuse,弹出对话框。
2.选择要增加的复用文件,弹出“Reuse Properties 对话框。
点击浏览该文件3.如已经存在一个复用文件,则弹出一个提示,“确定”增加一个副本,“否则”取消。
4.. “Reuse Properties 对话框中,点”Net Properties”看是否有网络冲突,如果有需要合并的网络,必须在ECO下手动合并。
点击浏览该文件5. 如果没有错误,将出现一个如下提示对话框.点击浏览该文件6.完成增加设计复用。
编辑设计复用1.打开要编辑的设计复用(文件类型选*.reu),根椐需要编辑它或者在右键弹出菜单中选择Break Reuse取消设计复用。
2.编辑完成后,将选择类型定为“select Reuse”,右键,Save to file,覆盖掉以前的文件,提示:是否覆盖XXX文件,选“Yes",完成~比如有些成熟的黄金电路,能够在设计中重复使用,省去许多时间,你可以把它当成元件库存在库里。
联想乐pad S2005颠覆传统思维
联想乐pad S2005颠覆传统思维
佚名
【期刊名称】《《中国高新技术企业》》
【年(卷),期】2012(000)010
【摘要】近日,联想乐padS2005颠覆传统思维,以其5英寸屏幕超薄机身引领新一轮的13袋平板“轻”时尚。
199g的轻巧机身和9.95mm的超薄设计,使乐PadS2005可一手舒适掌握,也可以像手机一样轻松装进衣服的口袋。
极大的提高了平板电脑的移动性。
乐PadS2005屏幕采用了800‘480分辨率的LTPS 炫美屏,具有170度的广阔视角,支持1080P、720P视频播放,即使在阳光下也能呈现清晰优质的完美画面。
【总页数】1页(PI0003-I0003)
【正文语种】中文
【中图分类】TP368.3
【相关文献】
1.【妈妈的2005】 Lenovo 乐Pad S2005 [J], 王欣
2.披着乐Pad的马甲联想ideapad K1 [J], 无
3.乐派来乐联想乐Pad平板电脑正式上市 [J],
4.是平板,非手机?联想乐Pad S2005 [J],
5.是平板,非手机?联想乐Pad S2005 [J], 3号
因版权原因,仅展示原文概要,查看原文内容请购买。
PADS-经验总结
PADS经验总结1.输入网表:在PADS layout中,输入网表有两种方法,一种是使用logic中的同步器;另一情况是当你用其它软件(如ORCAD)绘制原理图,而需要用layout来布PCB时,可以通过: File/Import将网表输入2. PADS库文件介绍:*.pt4 元件类型库(Part Type)*.pd4 PCB封装库(PCB Decal)*.ld4 逻辑封装库(logic Decal)*.ln4 线型库(Lines) 主要用于绘制原理图的背景版图3.电路模块的拷贝Copy to file 将原理图拷贝到*.grp文件,可以由此建立一个常用的电路模块库可以通过Paste from file来由库文件中调用电路模块。
Copy as bitmap 将原理图中的电路模块或接口转成BMP文件,复制到剪切板中。
可以用于作设计说明文档。
具体步骤为:先选edit/copy as bitmap,然后在原理图中选择你要复制的范围电路,可以将该部分电路位置作个调整,以便更好的选择。
如果有文档背景要求,可以先作个单色过彩色的颜色方案(如把背景色调成白色,以适应文档背景色)4. PADS layout中,Preferences/Design选项卡中,Stretch Traces During Component Move选项的作用:选择该选项后,在交换元件管脚或门时,走线将重新布置,即依然保持走线连接关系;不选择该选项,在移动元件时,系统将以鼠线连接走线、管脚和门,而原先已走的线将保持不动。
5. PADS layout中,Preferences/Drafting...,"Min. Hatch Area"(最小铜皮区)设置最小铺铜区的面积,单位为当前设计单位的平方。
"Smoothing Radius"(圆滑半径):设置铺铜拐角处的圆角半径,一个较大的圆滑半径会得到一个更圆滑的圆角。
本人安装PADS2005SP2的经验(页 1) - PowerPCB - 电子开发论坛 - powered by Discu
电子开发论坛 » PowerPCB » 本人安装PADS2005SP2的经验2006-9-29 11:57nobody本人安装PADS2005SP2的经验PADS2005的安装方法比POWERPCB5.0简单的,下面是本人前几天安PADS2005SP2的过程:<br/>1 开始的时候在破解文件中生成一个KEAY文件,后缀是DAT或是TXT之类,然后开始安装,在系统让选择KEY文件的时候,把刚才生成的文件选上,就可以继续安了.不过,安完以后没有成功.<br/>2 这时也不用急,不要卸载也不用重装,在PADS2005的菜单目录中有个安装KEY的程序,运行它,然后把KEY装上就行.运行PADS2005SP2后,不再是DEMO 了.<br/>附:后来回想第一次选KEY没成功的原因是KEY放在了有汉字命名的文件路径中,后来我把KEY直接放在了C:\中,再按照2的方法就安成了<br/>2006-11-17 20:37mmiliang168说的不错的,我顶2006-12-8 00:01yees哎呀,老大,你真是厉害,我被这个问题给缠绕了很久都不得其法,后来没办法只得在网上找破解,谢谢,谢谢,小弟真是感激涕淋啊。
2006-12-8 10:48hydefee我东西啊下了再说2006-12-8 13:58mead谢谢您的分享!!!!2006-12-21 18:05yxxiao非常多谢,多谢啦2007-1-9 19:17forevercgh其实这种中文路径不能识别的问题是许多软件中都会遇到的问题!大家遇到类似的情况也可以考虑是否是路径的原因。
2007-2-2 21:10cccfeb不一定,我第一次没有安装好,第二次是DEMO.是不是还有其它原因,如SECURITE页: [1]查看完整版本: 本人安装PADS2005SP2的经验Powered by Discuz! Archiver5.0.0 © 2001-2006 Comsenz Inc.。
PADS2005软件界面翻译
MentorGraphics--PADSPADSlogic:一Setup1、sheets图页设置⑴分页设计⑵层次性设计◆自上而下◆自下而上2、Preferences优先设置⑴global◆Displaycaching位图设置◆Keepviewonwindowresize当调整查看窗口时,系统维持在窗口中的屏幕比例◆Realtimeredraw实时刷新◆DisplayOLEobjects显示链接与嵌入的对象◆Updateonredraw刷新更新数据◆Drawbackground描绘背景⑵Design◆TieDot连接点直径设置◆BusAngle总线拐角◆PreserveReferenceDesignatorsOnPaste粘贴时维持元件参考符二元件库管理1、逻辑封装(LogicDecal或CAEDecal):*.LD42、PCB封装(PCBDecal):*.PD43、元件类型(PartType):*.PT44、线(Lines):*.LN4三网表输出1、利用OLE输出网表◆Selection表示当前在原理图上选择的元件的参考标号,其中选项ReceiveSelection表示从PowerPCB上选择元件的时候,在原理图上是否接受这个选择◆Document用户可以选择新建或改变和当前原理图链接的PCB文件◆Preference选择是否忽略无用的管脚上的网络,是否包含元件和网络的属性,是否比较PCB封装◆ECONames用于比较PowerPCB和PowerLogic中ECO的名称2、通过网表文件输出网表PADSPCB:一Setup1、Preference优先设置⑴global◆PickRadius捕捉半径◆KeepSameViewonWindowResize设计环境窗口变化是否保持同一视图◆ActiveLayerComestoFront激活的曾显示在最上面层◆MinimumDisplayWidth最小显示线宽,如果当前PCB板中有小于这个值的线宽时,则此线不以其真实线宽显示而只显示其中心线◆Dragandattach附属拖动◆Draganddrop放下拖动对象就可完成移动◆NoDragMove禁止采用拖取移动方式⑵Design◆StretchTraceDuringComponentMove移动元件时保持走线链接◆Miter倒角◆KeepSignalandPartName保持信号和元件名称◆IncludeTracesnotAttached定义一个区域时,内部包含的和块内没有相同网络的连接也作为块的一部分◆Line/TraceAngle2D和走线的角度◆Drilloversize对沉铜进行全景补偿⑶Routing◆GenerateTeardrops产生泪滴◆ShowGuardBand显示保护带,如果违反了操作,会在违规的临界点上用一个八边形来阻止用户的操作,可通过On-LineDRC设置◆HighlightCurrentNet当前选中的或正在操作的网络是否要高亮显示◆ShowDrillsHoles是否显示钻孔◆ShowTracks是否显示Tack,Tack是一种错误标志,当在层定义里定义的走线方向和实际的走向不一致时,就会有这种菱形的标记出现◆ShowProtection显示保护线◆ShowTestPoints显示测试点,如果关闭此选项,测试点和过孔就表现为相同的形式了◆ShowTraceLength显示线长,实时地显示走线的长度和已布线的总长度◆Centering-MaximumChannel设置最大的通道长度◆UnroutedPathDoubleClick用鼠标双击未连接的飞线,通过设置可以产生两种结果,一种是自动连线(DynamicRoute),一种是手动连线(AddRoute),如果是自动连线,最好打开在线检查设计规则On-LineDRC◆AutoProtectTraces自动保护走线,保护一个网络的走线,包括长度受控的网络和走线末端的过孔◆EnableBusRouteSmoothing使总线圆滑,当完成总线布线后,进行一个圆滑的动作,这个设置只在总线布线模式下有效,它的优先级高于全局优化的优先级◆GuidePadEntry允许连线以任何角度和焊盘连接◆SmoothPadEntry/Exit允许对和焊盘成90°的连线进行优化,优化为45°的连线◆MinimumAmplitude(TimesTraceWidth)蛇形走线的高度,这个高度是按照线宽的整数倍来设置的◆MinimumGap(TimesTracetoTraceClearance)蛇形走线时GAP的宽度,这个宽度是按照垂直线之间距离的整数倍来设置的◆Thermals热焊盘在电源和地层也称为花孔,为了对电路板进行好的屏蔽,通常会在顶层和底层甚至中间层铺大量的铜皮,并将其与地网络连接在一起,铜皮与地网络连接的过孔或焊盘称为热焊盘,通常分为两种:通孔热焊盘(DrilledThermals)和表面贴装的热焊盘(Non-drilledThermals)·Width热焊盘连接线的线宽·Min.Spoke最少连接线,一个热焊盘上至少有几根连接线·PadShape焊盘形状·Floodover填满,创建完全连接的热焊盘·Orthogonal正交,连线和焊盘的连接角度为正交·NoConnect不形成热焊盘·RoutedPadThermals元件的焊盘也可以形成热焊盘·ShowGenernalPlaneIndicators是否显示内层的热焊盘,关闭这个选项,热焊盘就表现为通常的焊盘了·RemoveIsolatedCopper移除孤立的铜皮·RemoveviolatingThermalSpokes移除冲突的热焊盘连接,违反规则的连接线应该被移除◆AutoDimensioning自动尺寸标注·GeneralSettings通用设置·Draw1st起点标注线·Draw2nd终点标注线·PickGap测量点到尺寸标注线一端之间的距离·CircleDimension圆弧测量·AlignmentandArrow校准直线和标注箭头·Alignmenttool校直工具·Text尺寸标注值文字·OmitText不需要尺寸标注文字◆Teardrops泪滴·AutoAdjust允许在设计过程中根据不同的要求来自动调整泪滴◆Drafting·Boardcomponentheightrestriction板上元件高度限制·Seethrough将铜皮显示成一些Hatch平行线·Min.hatch最小铜皮面积·Smoothing铜皮在拐角处的平滑度·Pouroutline显示整块铜皮的外框·Hatchoutline显示铜皮(Pour)中每一个Hatch的外框◆Grids·FanoutGrid扇出栅格,仅用于BlazeRouter·RadialMoveSetup径向移动·InnerRadius靠近原点的第一个圆环跟原点的径向距离·DeltaRadius除第一个圆环外,其他各圆环之间的径向距离·SitesPerRing在移动角度范围内最小移动角度的个数·AutoRotate移动元件时自动调整元件状态·Disperse移动元件时自动疏散元件·UseDiscreteRadius移动元件时可以在径向上进行不连续地移动元件·Initial使用最初的·LetmeSpecify极的方向由自己设置◆Split/MixedPlane混合分割层·PlanePolygonOutline只显示分割层的外框·PlaneThermalIndicators除了显示分割层以外还要显示热焊盘·GeneratedPlaneDate显示分割层上的所有数据·SmoothingRadius设置分割层的铜皮的平滑度·AutoSeparateGap设置分割的各个平面之间的距离·UseDesignRulesforThermalsandAntipads对花孔和反焊盘使用设计规则·Diecomponent模具元件2、LayerDefinition叠层设置◆NoPlane布线层◆CAMPlane整个的平面层,比如电源和地层等◆Split/MixedPlane分割后的平面层,比如存在多种电源和地的平面层3、PadStacks焊盘叠设置4、DrillPairs钻孔层对设置5、Jumpers跳线设置6、ECO(EngineeringChangeOrder)工程变更设置◆WriteECOfiles记录ECO文件◆Appendtofiles追加到文件中◆WriteECOfileaftercloseECOtoolbox在关闭ECO工具盒或者退出ECO模式时,更新ECO文件数据7、DesignRules设计规则设置设计规则优先级:(低)Default->Layer->Class->Net->Group->Pinpairs(高)◆Default默认设置·DrilltoDrill钻孔之间·BodytoBody元件体之间·Clearance-Pad(通孔焊盘)、SMD(表贴焊盘)、Board(板框)·Protected不对飞线进行优化·Minimized采用网络的所有管脚对的连接最短的规则来产生飞线·SerialSource对ECL电路适用,多个驱动源串在一起·ParallelSource对ECL电路适用,多个驱动源并在一起·Mid-driven这个规则适用于高速电路和ECL电路,最小化网络中所有管脚对的距离,中间驱动意味着网络可以尽量短,如果是一个源两个接收端的话,那么这个拓扑表现为源在中间接收端在两边,并且源到两个接收端等长·Coppersharing铜皮共享一via过孔的铜皮共享·AutoRoute自动布线器可以自动对网络布线·AllowRipup自动布线器在布一个已经布过的网络时,允许删除现有的走线·AllowShove自动推挤功能,可以对一个已布的网络进行推挤和重布·AllowShoveProtected自动布线器可以对一个已布的并且受保护的网络进行推挤和重布·LayerBiasing设置约束生效的层·Vias选择定义的过孔·Parallelism平行长度·Tandem纵向平行度·Aggressor此网络是否是干扰源,可以定义电流较大和速率较高的信号为干扰源·Shielding使用屏蔽功能,减少外界的干扰,通常用平面层作屏蔽信号·Gap网络同屏蔽网络走线之间的距离·UseNet屏蔽的网络·Stub走线中出现分支会难以控制匹配和端接,较长的分支会引起反射以及过冲,所以要加以约束·MatchLength要求长度匹配·FanoutLength扇出的长度·Nets扇出的类型·PadEntryQuality焊盘引入的质量控制,在BlazeRouter中有效·ViaatSMD焊盘下放置过孔◆Class类设置◆Net网络设置◆Group组设置◆PinPairs管脚对设置◆Decal封装设置◆Component元件设置◆ConditionalRules条件规则设置◆DifferentiaPairs差分对设置◆Report报表设置二Tools工具设置1、AutomaticClusterPlacement簇的自动布局◆BuildClusters创建簇·Min.TopLevelCount最小的顶层簇的数量·UngluedPartsNumber当前没有被锁定的元件的数目·BuildMode创建模式,簇分为open簇和close簇,其区别在于是否在Query/Modify窗口选中了close选项,在选择创建模式的时候,Rebuildopenclusters指open的簇可以拆开重建MaintainOpenClusters 指要保留open属性的簇◆PlaceClusters放置簇·BoardOutlineClearance簇到板框的最小间距·PercentPartExpansion簇之间的距离·Efforts布局的努力程度·NumberofIterations簇布局的次数·AttempsPerIterations每次布局的尝试·%FromPartSwappling元件、簇或组合交换的频率·CreatePass大范围的布局·RefinePass小范围的微调◆PlaceParts放置元件·EliminateOverlaps是否要消除元件重叠的情况·Min%ExpansionAllowed最小的元件空间扩展的比例·AlignParts布局微调时,相邻的元件是否要对齐·OnlyifNoOverlaps相邻的元件要对齐的前提是没有元件叠加的情况2、DisperseComponets打散元件3、LengthMinimization长度最小化4、ClusterManager簇管理器5、AutoNudge自动推挤6、Specctra是Cadence公司的自动布线器7、DX-Designer反标注8、BoardSim板级防真9、BlazeRouter自动布线器10、CAM350菲林输出11、PourManager灌铜管理器12、AssemblyOptions装配选项13、VerifyDesign验证设计14、CompareTestPoints比较测试点15、Compare/ECOTools比较网络表16、DFTAudit(DesignForTest)自动为设计插入测试点三布局通常布局要考虑以下因素:1、板子的尺寸和外形2、板子的禁布区3、定位孔和接口4、整体美观,注重内在质量,兼顾整体的美观5、元件的布局要求要均衡,疏密有序,不能头重脚轻或一头沉6、印制板尺寸是否与加工图纸尺寸相符,能否符合PCB制造工艺要求,有无定位标记,元件在高度上是否空间受限7、需经常更换的元件能否方便地更换,插件板插入设备是否方便8、热敏元件与发热元件之间是否有适当的距离,模拟和数字单元是否有交叉9、调整可调元件是否方便,板子如何进行散热,空气是否流通布局的方式分两种:①交互式布局②自动布局(组合方式、阵列方式、簇方式)四布线1、机械手工布线◆AddRoute增加布线◆DynamicRoute动态布线◆SketchRoute草图布线◆AutoRoute自动布线◆BusRoute总线式布线2、智能化布线◆BlazeRouter全自动布线器五铺铜六设计验证七CAM输出。
DxDesigner for PADS v2005.3 to v2007 Migration Guide
DxDesigner for PADS v2005.3 to v2007Migration GuideSoftware Version PADS 9.0.1© 2007 - 2009 Mentor Graphics CorporationAll rights reserved.This document contains information that is proprietary to Mentor Graphics Corporation.The original recipient of this document may duplicate this document in whole or in part for internal business purposes only,provided that this entire notice appears in all copies.In duplicating any part of this document,the recipient agrees to make every reasonableThis document is for information and instruction purposes. Mentor Graphics reserves the right to make changes in specifications and other information contained in this publication without prior notice,and the reader should, in all cases, consult Mentor Graphics to determine whether any changes have been made.The terms and conditions governing the sale and licensing of Mentor Graphics products are set forth in written agreements between Mentor Graphics and its customers. No representation or other affirmation of fact contained in this publication shall be deemed to be a warranty or give rise to any liability of Mentor Graphics whatsoever.MENTOR GRAPHICS MAKES NO WARRANTY OF ANY KIND WITH REGARD TO THIS MATERIAL INCLUDING, BUT NOT LIMITED TO, THE IMPLIED WARRANTIES OF MERCHANTABILITY AND FITNESS FOR A PARTICULAR PURPOSE.MENTOR GRAPHICS SHALL NOT BE LIABLE FOR ANY INCIDENTAL, INDIRECT, SPECIAL, OR CONSEQUENTIAL DAMAGES WHATSOEVER(INCLUDING BUT NOT LIMITED TO LOST PROFITS) ARISING OUT OF OR RELATED TO THIS PUBLICATION OR THE INFORMATION CONTAINED IN IT, EVEN IF MENTOR GRAPHICS CORPORATION HAS BEEN ADVISED OF THE POSSIBILITY OF SUCH DAMAGES.RESTRICTED RIGHTS LEGEND 03/97ernment Restricted Rights.The SOFTWARE and documentation have been developed entirely at private expense and are commercial computer software provided with restricted rights. Use, duplication or disclosure by the U.S. Government or a U.S. Government subcontractor is subject to the restrictions set forth in the license agreement provided with the software pursuant to DFARS 227.7202-3(a) or as set forth in subparagraph (c)(1) and (2) of the Commercial Computer Software - Restricted Rights clause at FAR 52.227-19, as applicable.Contractor/manufacturer is:Mentor Graphics Corporation8005 S.W. Boeckman Road, Wilsonville, Oregon 97070-7777.Telephone: 503.685.7000Toll-Free Telephone: 800.592.2210Website:SupportNet: /Send Feedback on Documentation:/user/feedback_form.cfm TRADEMARKS: The trademarks, logos and service marks ("Marks") used herein are the property of Mentor Graphics Corporation or other third parties. No one is permitted to use these Marks without the prior written consent of Mentor Graphics or the respective third-party owner. The use herein of a third-party Mark is not an attempt to indicate Mentor Graphics as a source of a product, but is intended to indicate a product from, or associated with, a particular third party. A current list of Mentor Graphics’trademarks may be viewed at:/terms_conditions/trademarks.cfm.Table of ContentsDesign Migration. . . . . . . . . . . . . . . . . . . . . . . . . . . . . . . . . . . . . . . . . . . . . . . . . . . . . . . . . . .5 Introduction . . . . . . . . . . . . . . . . . . . . . . . . . . . . . . . . . . . . . . . . . . . . . . . . . . . . . . . . . . . . . .5 Additional Reading. . . . . . . . . . . . . . . . . . . . . . . . . . . . . . . . . . . . . . . . . . . . . . . . . . . . . . .5 Summary of Changes. . . . . . . . . . . . . . . . . . . . . . . . . . . . . . . . . . . . . . . . . . . . . . . . . . . . . . .5 Network Infrastructure Changes . . . . . . . . . . . . . . . . . . . . . . . . . . . . . . . . . . . . . . . . . . . . . .5 Services. . . . . . . . . . . . . . . . . . . . . . . . . . . . . . . . . . . . . . . . . . . . . . . . . . . . . . . . . . . . . . . .6 Environment . . . . . . . . . . . . . . . . . . . . . . . . . . . . . . . . . . . . . . . . . . . . . . . . . . . . . . . . . . . .6 Remote Server Configuration Manager (RSCM). . . . . . . . . . . . . . . . . . . . . . . . . . . . . . . .6 Design Database Changes . . . . . . . . . . . . . . . . . . . . . . . . . . . . . . . . . . . . . . . . . . . . . . . . . . .7 Restricted Operations . . . . . . . . . . . . . . . . . . . . . . . . . . . . . . . . . . . . . . . . . . . . . . . . . . . . .7 Forward/Backward Compatibility . . . . . . . . . . . . . . . . . . . . . . . . . . . . . . . . . . . . . . . . . . .8 The Update Process . . . . . . . . . . . . . . . . . . . . . . . . . . . . . . . . . . . . . . . . . . . . . . . . . . . . . . . .8 Preparing your design in V2005.3 . . . . . . . . . . . . . . . . . . . . . . . . . . . . . . . . . . . . . . . . . . .8 Converting DxDesigner Attributes to Properties . . . . . . . . . . . . . . . . . . . . . . . . . . . . . . . .8 Converting DxDatabook Attribute-Based Configurations. . . . . . . . . . . . . . . . . . . . . . . .9 Updating a v2005.3 Project to v2007 . . . . . . . . . . . . . . . . . . . . . . . . . . . . . . . . . . . . . . . . . .10 End-User License AgreementTable of ContentsDesign MigrationIntroductionNote- Be sure to read this Guide before you open a project with PADS 9.0 software.- You cannot migrate projects created with v2004 or earlier.This DxDesigner Migration Guide provides you with the information you need to migrate projects from DxDesigner for PADS v2005.3 to DxDesigner FOR PADS v2007. It highlights differences and new features you need to know about when making this transition. It also focuses on the details of the migration process,emphasizing advance preparation.This guide is intended for use by anyone who has System Administrator, Librarian, or Schematic Designer responsibilities. The guide contains the following sections:•Summary of Changes•The Update ProcessAdditional ReadingTo learn more about specific topics covered in this Guide, refer to the Also See and Related Topics sections.To learn more about DxDesigner v2007, click Help > Documentation in InfoHub. Information can be found in the Help and Manuals and System Admin tabs.Summary of ChangesMigrating your DxDesigner projects from v2005.3 to v2007 affects the following areas:•Network Infrastructure Changes•Design Database ChangesNetwork Infrastructure ChangesUnderstanding the v2007 network infrastructure will help you to configure your network for optimal efficiency and throughput, and to avoid possible loss of data and data corruption while working in the concurrent design environment.Network infrastructure changes affect the following areas:Design MigrationNetwork Infrastructure Changes•Services•Environment•Remote Server Configuration Manager (RSCM)ServicesWhenever you open a project in v2007 DxDesigner, the following two system processes are started automatically:•iCDBNetServer - The first service is the iCDBNetServer service which manages transactions between the applications and the iCDB server.•xprobSvr-The second service is the Cross-probe server,which manages cross-probing between the various applications.The first DxDesigner application to open the project starts the services. Each application that subsequently opens the project utilizes these same services. The services do not stop until the last client disconnects from the database by closing its application.EnvironmentHow you configure an optimal design environment depends on whether or not projects are shared by design teams.•If you are a single user working either standalone or networked to a server that hosts your data, then there are no particular requirements for configuring your system. Whenyou open a design, the processes will start on your system for your exclusive use.•If you are part of a workgroup or enterprise and projects are shared by more than one user, you must configure a client-server environment. This enables databases andservices to be hosted by dedicated servers that are available to all users.You must install and use the Remote Server Configuration Manager(RSCM)to manage the processes for the databases.Remote Server Configuration Manager(RSCM)RSCM provides access to the iCDBNetServer and xprobSvr processes for each project and each client that connects to the project. Once a client opens a project, processes for this project are started on the Server, and any other client opening the project will use the shared processes. This ensures that the service continues to run for any connected client, even if another client disconnects and shuts down.Restricted OperationsAlthough a client-server configuration managed by the RSCM minimizes the chances of data loss or corruption, keeping the following in mind will further ensure data integrity:Design MigrationDesign Database Changes•Never kill the iCDBNetServer process through Task Manager.•Avoid accidentally disconnecting the server that hosts the iCDBNetServer process or disconnecting the server that hosts the project database.Related Topics•Overview in the Remote Server Configuration Manager and Server Manager Administrator’s Guide•Recommended Practices for Concurrent Design in the Remote Server Configuration Manager and Server Manager Administrator’s Guide•Preparing your Environment for Project Development in the DxDesignerAdministrator’s GuideDesign Database ChangesIn order to deliver a multi-user concurrent environment, the new design database infrastructure supports multiple data transactions in real-time. This database structure affects your workflow in the following ways:•Because changes are committed to the database, and seen by all users in real-time, you no longer need to save your work.•Although it consists of what appears to be a traditional file system folder structure, design data is stored in a binary database rather than in ASCII files.The database cannotbe edited like an ASCII file.Restricted OperationsDo not perform the following operations on the database when it is opened in a multi-user concurrent design environment:•Copy a design database through the file system.•Edit files in the database folder tree using text editors or other editors.•Remove files from the database folder tree via the file system.•Add files to the folders in the database folder tree via the file system.•Archive designs using any method (i.e. WinZip or file copy,) except the Tools > Archive command (DxArchiver). Failure to do so may result in loss of design dataintegrity.Design MigrationThe Update ProcessForward/Backward CompatibilityCautionThe v2007 database structure is fundamentally different from that in v2005 and earlierversions, so the new database is not backward compatible with earlier versions ofsoftware.Design databases are forward compatible between the incremental versions of 2007, and are automatically updated when you open of a design project. The databases are notbackward compatible between these incremental releases due to enhancements made to the database format.The Update ProcessTake the following steps to update your design from v2005.3 to v 2007.Preparing your design in V2005.3Confirm that the following prerequisites have been met.•Confirm that the pointers to libraries in the v2005.3.dproj file and the pointers to the symbols in the v2005.3 viewdraw.ini files point to the correct locations.•Confirm that the project contains up to date WIR files using the following steps:a.Within the file structure of the project you are migrating, delete all WIR files.b.Click Start > Programs > Mentor Graphics SDD > Design Entry > DxDesignerto start DxDesigner v2005.3.c.From the File menu, click Save + Check.•If you have not already done so,add user-specified attributes to common properties, &define your attribute to property mapping as described in Converting DxDesignerAttributes to Properties.Note: If you do not convert user-specified attributes before you update, the update willbe successful, but the properties will not be editable. (change frozen). Converting DxDesigner Attributes to PropertiesBeginning with v2007, DxDesigner attributes are replaced by properties. Property to attribute conversion is handled by two files. The netlist.prp file (also called the common properties file) lists the properties that convert automatically during project migration. The mapnl.cfg file contains mapping information between attributes and properties. and is shipped in theSDD_HOME\standard directory of your PADS9.0install.Although attributes not found in theDesign MigrationThe Update Process netlist.prp file convert to;properties,they are frozen in the schematic.They cannot be modified until they are added to the(.prp)file via the Property Definition dialog,and to the mapnl.cfg file using a text editor.Upon completion of the conversion, results appear in the Output window and also in the migration.log file located in the project folder. Any frozen property (an attribute without an equivalent property in the.prp file)is written to the migration.log file with the following syntax.$$notcommonproperty_<ATTRIBUTENAME>After you have used the migration.log file to determine which properties were not converted, you add the missing properties,and map them to the unconverted attributes using the following steps:To add missing properties:1.In DxDesigner, click Tools > Property Definition Editor.2.Create the property to which you will map the attribute.Also See:Property Definition Editor Dialog in the DxDesigner Reference ManualTo map the added properties to unconverted attributes:1.Open the mapnl.cfg file for editing.2.Add a line for each attribute you want to convert using the following syntax:ATTRIBUTENAME \= \<Property Name>îWhere:•ATTRIBUTENAME is the v2005 attribute you want to map to the newproperty.•Property Name is the name of the v2007property you created with the Property Definition Editor.Converting DxDatabook Attribute-Based ConfigurationsUse dbctool and a mapnl.cfg file to convert the contents of a DxDataBook database configuration file (*.dbc). You can use either the mapnl.cfg installed with the product, or a custom map.cfg placed in the location you specify with the/mapfile argument on the command line. To do this, you must know the following:•The path to dbctool.exe is:SDD_HOME\dx\win32\bin\dbctool.exe•The path to the installed version of the mapnl.cfg file:(SDD_HOME\standard\mapnl.cfg)To migrate a DxDataBook configuration (.dbc)file:Design MigrationUpdating a v2005.3 Project to v2007•Enter the following command in the DxDesigner command line:dbctool /in=[attrbased].dbc /out=[propbased].dbc/convertattrs/mapfile=[mapfile].cfgNotes:•The /convertattrs argument creates a new common properties file,[propbased].db c, based on the contents of the [attrbased].dbc file.•The /mapfile <mapfile> argument points to the map.cfg used by the/convertattrs argument. If this argument is not set, dbctool uses the map.cfgfrom the SDD_HOME\standard folderUpdating a v2005.3Project to v2007To update the project:1.In DxDesigner v2007, open the project you want to update by doing one of thefollowing:•Click File > Open Project and select the projectname.dproj you want to update.•In your file system, navigate to the projectname.dproj file and double-click it.Result: After warning you that the update cannot be undone, and if no fatal migration issues are detected, DxDesigner updates and opens the project.Note: If fatal issues are detected and the migration fails, errors appear in the Outputwindow and the migration.log.Correct the errors and repeat this procedure.2.Click Setup > Settings, review setup preferences, and optionally change them. Related Topics•Project Settings in the DxDesigner Reference ManualEnd-User License AgreementThe latest version of the End-User License Agreement is available on-line at:/terms_conditions/enduserEND-USER LICENSE AGREEMENT (“Agreement”)This is a legal agreement concerning the use of Software (as defined in Section 2)between the company acquiring the license (“Customer”),and the Mentor Graphics entity that issued the corresponding quotation or,if no quotation was issued,the applicable local Mentor Graphics entity (“Mentor Graphics”).Except for license agreements related to the subject matter of this license agreement which are physically signed by Customer and an authorized representative of Mentor Graphics,this Agreement and the applicable quotation contain the parties'entire understanding relating to the subject matter and supersede all prior or contemporaneous agreements.If Customer does not agree to these terms and conditions,promptly return or,if received electronically,certify destruction of Software and all accompanying items within five days after receipt of Software and receive a full refund of any license fee paid.1.ORDERS, FEES AND PAYMENT.1.1.To the extent Customer (or if and as agreed by Mentor Graphics,Customer’s appointed third party buying agent)places and Mentor Graphics accepts purchase orders pursuant to this Agreement (“Order(s)”),each Order will constitute a contract between Customer and Mentor Graphics,which shall be governed solely and exclusively by the terms and conditions of this Agreement,any applicable addenda and the applicable quotation,whether or not these documents are referenced on the Order.Any additional or conflicting terms and conditions appearing on an Order will not be effective unless agreed in writing by an authorized representative of Customer and Mentor Graphics.1.2.Amounts invoiced will be paid,in the currency specified on the applicable invoice,within 30days from the date of such invoice.Any past due invoices will be subject to the imposition of interest charges in the amount of one and one-half percent per month or the applicable legal rate currently in effect,whichever is lower.Prices do not include freight,insurance,customs duties,taxes or other similar charges,which Mentor Graphics will invoice separately.Unless provided with a certificate of exemption,Mentor Graphics will invoice Customer for all applicable taxes.Customer will make all payments free and clear of,and without reduction for,any withholding or other taxes;any such taxes imposed on payments by Customer hereunder will be Customer’s sole responsibility.Notwithstanding anything to the contrary,if Customer appoints a third party to place purchase orders and/or make payments on Customer’s behalf,Customer shall be liable for payment under such orders in the event of default by the third party.1.3.All products are delivered FCA factory (Incoterms 2000)except Software delivered electronically,which shall be deemed delivered when made available to Customer for download.Mentor Graphics retains a security interest in all products delivered under this Agreement,to secure payment of the purchase price of such products,and Customer agrees to sign any documents that Mentor Graphics determines to be necessary or convenient for use in filing or perfecting such security interest.Mentor Graphics’delivery of Software by electronic means is subject to Customer’s provision of both a primary and an alternate e-mail address.2.GRANT OF LICENSE.The software installed,downloaded,or otherwise acquired by Customer under this Agreement,including any updates,modifications,revisions,copies,documentation and design data (“Software”)are copyrighted,trade secret and confidential information of Mentor Graphics or its licensors,who maintain exclusive title to all Software and retain all rights not expressly granted by this Agreement.Mentor Graphics grants to Customer,subject to payment of applicable license fees,a nontransferable,nonexclusive license to use Software solely:(a)in machine-readable,object-code form;(b)for Customer’s internal business purposes;(c)for the term;and (d)on the computer hardware and at the site authorized by Mentor Graphics.A site is restricted to a one-half mile (800meter)radius.Customer may have Software temporarily used by an employee for telecommuting purposes from locations other than a Customer office,such as the employee's residence,an airport or hotel,provided that such employee's primary place of employment is the site where the Software is authorized for use.Mentor Graphics’standard policies and programs,which vary depending on Software,license fees paid or services purchased,apply to the following:(a)relocation of Software;(b)use of Software,which may be limited,for example,to execution of a single session by a single user on the authorized hardware or for a restricted period of time (such limitations may be technically implemented through the use of authorization codes or similar devices);and (c)support services provided,including eligibility to receive telephone support,updates,modifications,and revisions.For the avoidance of doubt,if Customer requests any change or enhancement to Software,whether in the course of receiving support or consulting services,evaluating Software or IMPORTANT INFORMATIONUSE OF THIS SOFTWARE IS SUBJECT TO LICENSE RESTRICTIONS. CAREFULLY READ THIS LICENSE AGREEMENT BEFORE USING THE SOFTWARE. USE OF SOFTWARE INDICATES YOUR COMPLETE AND UNCONDITIONAL ACCEPTANCE OF THE TERMS AND CONDITIONS SET FORTH IN THIS AGREEMENT.ANY ADDITIONAL OR DIFFERENT PURCHASE ORDER TERMS AND CONDITIONS SHALL NOT APPLY.otherwise,any inventions,product improvements,modifications or developments made by Mentor Graphics(at Mentor Graphics’ sole discretion) will be the exclusive property of Mentor Graphics.3.ESC SOFTWARE.If Customer purchases a license to use development or prototyping tools of Mentor Graphics’EmbeddedSoftware Channel(“ESC”),Mentor Graphics grants to Customer a nontransferable,nonexclusive license to reproduce and distribute executable files created using ESC compilers,including the ESC run-time libraries distributed with ESC C and C++ compiler Software that are linked into a composite program as an integral part of Customer’s compiled computer program, provided that Customer distributes these files only in conjunction with Customer’s compiled computer program.Mentor Graphics does NOT grant Customer any right to duplicate,incorporate or embed copies of Mentor Graphics’real-time operating systems or other embedded software products into Customer’s products or applications without first signing or otherwise agreeing to a separate agreement with Mentor Graphics for such purpose.4.BETA CODE.4.1.Portions or all of certain Software may contain code for experimental testing and evaluation(“Beta Code”),which may notbe used without Mentor Graphics’explicit authorization.Upon Mentor Graphics’authorization,Mentor Graphics grants to Customer a temporary,nontransferable,nonexclusive license for experimental use to test and evaluate the Beta Code without charge for a limited period of time specified by Mentor Graphics.This grant and Customer’s use of the Beta Code shall not be construed as marketing or offering to sell a license to the Beta Code,which Mentor Graphics may choose not to release commercially in any form.4.2.If Mentor Graphics authorizes Customer to use the Beta Code,Customer agrees to evaluate and test the Beta Code undernormal conditions as directed by Mentor Graphics.Customer will contact Mentor Graphics periodically during Customer’s use of the Beta Code to discuss any malfunctions or suggested improvements.Upon completion of Customer’s evaluation and testing,Customer will send to Mentor Graphics a written evaluation of the Beta Code,including its strengths, weaknesses and recommended improvements.4.3.Customer agrees that any written evaluations and all inventions,product improvements,modifications or developments thatMentor Graphics conceived or made during or subsequent to this Agreement,including those based partly or wholly on Customer’s feedback,will be the exclusive property of Mentor Graphics.Mentor Graphics will have exclusive rights,title and interest in all such property. The provisions of this Subsection 4.3 shall survive termination of this Agreement.5.RESTRICTIONS ON USE.5.1.Customer may copy Software only as reasonably necessary to support the authorized use.Each copy must include allnotices and legends embedded in Software and affixed to its medium and container as received from Mentor Graphics.All copies shall remain the property of Mentor Graphics or its licensors.Customer shall maintain a record of the number and primary location of all copies of Software,including copies merged with other software,and shall make those records available to Mentor Graphics upon request.Customer shall not make Software available in any form to any person other than Customer’s employees and on-site contractors,excluding Mentor Graphics competitors,whose job performance requires access and who are under obligations of confidentiality.Customer shall take appropriate action to protect the confidentiality of Software and ensure that any person permitted access does not disclose or use it except as permitted by this Agreement.Log files,data files,rule files and script files generated by or for the Software(collectively“Files”) constitute and/or include confidential information of Mentor Graphics.Customer may share Files with third parties excluding Mentor Graphics competitors provided that the confidentiality of such Files is protected by written agreement at least as well as Customer protects other information of a similar nature or importance,but in any case with at least reasonable care.Standard Verification Rule Format(“SVRF”)and Tcl Verification Format(“TVF”)mean Mentor Graphics’proprietary syntaxes for expressing process rules.Customer may use Files containing SVRF or TVF only with Mentor Graphics products.Under no circumstances shall Customer use Software or allow its use for the purpose of developing,enhancing or marketing any product that is in any way competitive with Software,or disclose to any third party the results of,or information pertaining to,any benchmark.Except as otherwise permitted for purposes of interoperability as specified by applicable and mandatory local law,Customer shall not reverse-assemble,reverse-compile,reverse-engineer or in any way derive from Software any source code.5.2.Customer may not sublicense,assign or otherwise transfer Software,this Agreement or the rights under it,whether byoperation of law or otherwise(“attempted transfer”),without Mentor Graphics’prior written consent and payment of Mentor Graphics’then-current applicable transfer charges.Any attempted transfer without Mentor Graphics’prior written consent shall be a material breach of this Agreement and may,at Mentor Graphics’option,result in the immediate termination of the Agreement and licenses granted under this Agreement.The terms of this Agreement,including without limitation the licensing and assignment provisions,shall be binding upon Customer’s permitted successors in interest and assigns.5.3.The provisions of this Section 5 shall survive the termination of this Agreement.6.SUPPORT SERVICES.To the extent Customer purchases support services for Software,Mentor Graphics will provideCustomer with available updates and technical support for the Software which are made generally available by Mentor Graphics as part of such services in accordance with Mentor Graphics’then current End-User Software Support Terms located at /about/legal/.7.LIMITED WARRANTY.7.1.Mentor Graphics warrants that during the warranty period its standard,generally supported Software,when properlyinstalled,will substantially conform to the functional specifications set forth in the applicable user manual.Mentor Graphics does not warrant that Software will meet Customer’s requirements or that operation of Software will be uninterrupted or error free.The warranty period is90days starting on the15th day after delivery or upon installation, whichever first occurs.Customer must notify Mentor Graphics in writing of any nonconformity within the warranty period.For the avoidance of doubt,this warranty applies only to the initial shipment of Software under the applicable Order and does not renew or reset,by way of example,with the delivery of(a)Software updates or(b)authorization codes or alternate Software under a transaction involving Software re-mix.This warranty shall not be valid if Software has been subject to misuse,unauthorized modification or improper installation.MENTOR GRAPHICS’ENTIRE LIABILITY AND CUSTOMER’S EXCLUSIVE REMEDY SHALL BE,AT MENTOR GRAPHICS’OPTION,EITHER(A)REFUND OF THE PRICE PAID UPON RETURN OF SOFTWARE TO MENTOR GRAPHICS OR(B)MODIFICATION OR REPLACEMENT OF SOFTWARE THAT DOES NOT MEET THIS LIMITED WARRANTY,PROVIDED CUSTOMER HAS OTHERWISE COMPLIED WITH THIS AGREEMENT.MENTOR GRAPHICS MAKES NO WARRANTIES WITH RESPECT TO:(A)SERVICES;(B)SOFTWARE WHICH IS LICENSED AT NO COST;OR(C) BETA CODE; ALL OF WHICH ARE PROVIDED “AS IS.”7.2.THE WARRANTIES SET FORTH IN THIS SECTION7ARE EXCLUSIVE.NEITHER MENTOR GRAPHICS NORITS LICENSORS MAKE ANY OTHER WARRANTIES EXPRESS,IMPLIED OR STATUTORY,WITH RESPECT TO SOFTWARE OR OTHER MATERIAL PROVIDED UNDER THIS AGREEMENT.MENTOR GRAPHICS AND ITS LICENSORS SPECIFICALLY DISCLAIM ALL IMPLIED WARRANTIES OF MERCHANTABILITY,FITNESS FORA PARTICULAR PURPOSE AND NON-INFRINGEMENT OF INTELLECTUAL PROPERTY.8.LIMITATION OF LIABILITY.EXCEPT WHERE THIS EXCLUSION OR RESTRICTION OF LIABILITY WOULD BEVOID OR INEFFECTIVE UNDER APPLICABLE LAW,IN NO EVENT SHALL MENTOR GRAPHICS OR ITS LICENSORS BE LIABLE FOR INDIRECT,SPECIAL,INCIDENTAL,OR CONSEQUENTIAL DAMAGES(INCLUDING LOST PROFITS OR SAVINGS)WHETHER BASED ON CONTRACT,TORT OR ANY OTHER LEGAL THEORY,EVEN IF MENTOR GRAPHICS OR ITS LICENSORS HAVE BEEN ADVISED OF THE POSSIBILITY OF SUCH DAMAGES.IN NO EVENT SHALL MENTOR GRAPHICS’OR ITS LICENSORS’LIABILITY UNDER THIS AGREEMENT EXCEED THE AMOUNT PAID BY CUSTOMER FOR THE SOFTWARE OR SERVICE GIVING RISE TO THE CLAIM.IN THE CASE WHERE NO AMOUNT WAS PAID,MENTOR GRAPHICS AND ITS LICENSORS SHALL HAVE NO LIABILITY FOR ANY DAMAGES WHATSOEVER.THE PROVISIONS OF THIS SECTION8SHALL SURVIVE THE TERMINATION OF THIS AGREEMENT.9.LIFE ENDANGERING APPLICATIONS.NEITHER MENTOR GRAPHICS NOR ITS LICENSORS SHALL BE LIABLEFOR ANY DAMAGES RESULTING FROM OR IN CONNECTION WITH THE USE OF SOFTWARE IN ANY APPLICATION WHERE THE FAILURE OR INACCURACY OF THE SOFTWARE MIGHT RESULT IN DEATH OR PERSONAL INJURY.THE PROVISIONS OF THIS SECTION9SHALL SURVIVE THE TERMINATION OF THIS AGREEMENT.10.INDEMNIFICATION.CUSTOMER AGREES TO INDEMNIFY AND HOLD HARMLESS MENTOR GRAPHICS ANDITS LICENSORS FROM ANY CLAIMS,LOSS,COST,DAMAGE,EXPENSE OR LIABILITY,INCLUDING ATTORNEYS’FEES,ARISING OUT OF OR IN CONNECTION WITH CUSTOMER’S USE OF SOFTWARE AS DESCRIBED IN SECTION9.THE PROVISIONS OF THIS SECTION10SHALL SURVIVE THE TERMINATION OF THIS AGREEMENT.11.INFRINGEMENT.11.1.Mentor Graphics will defend or settle,at its option and expense,any action brought against Customer in the United States,Canada,Japan,or member state of the European Union which alleges that any standard,generally supported Software product infringes a patent or copyright or misappropriates a trade secret in such jurisdiction.Mentor Graphics will pay any costs and damages finally awarded against Customer that are attributable to the action.Customer understands and agrees that as conditions to Mentor Graphics’obligations under this section Customer must:(a)notify Mentor Graphics promptly in writing of the action;(b)provide Mentor Graphics all reasonable information and assistance to settle or defend the action; and (c)grant Mentor Graphics sole authority and control of the defense or settlement of the action.11.2.If a claim is made under Subsection11.1Mentor Graphics may,at its option and expense,(a)replace or modify Software sothat it becomes noninfringing,or(b)procure for Customer the right to continue using Software,or(c)require the return of Software and refund to Customer any license fee paid, less a reasonable allowance for use.11.3.Mentor Graphics has no liability to Customer if the claim is based upon:(a)the combination of Software with any productnot furnished by Mentor Graphics;(b)the modification of Software other than by Mentor Graphics;(c)the use of other thana current unaltered release of Software;(d)the use of Software as part of an infringing process;(e)a product that Customermakes,uses,or sells;(f)any Beta Code;(g)any Software provided by Mentor Graphics’licensors who do not provide such indemnification to Mentor Graphics’customers;or(h)infringement by Customer that is deemed willful.In the case of(h), Customer shall reimburse Mentor Graphics for its reasonable attorney fees and other costs related to the action.11.4.THIS SECTION IS SUBJECT TO SECTION8ABOVE AND STATES THE ENTIRE LIABILITY OF MENTORGRAPHICS AND ITS LICENSORS AND CUSTOMER’S SOLE AND EXCLUSIVE REMEDY WITH RESPECT TO ANY ALLEGED PATENT OR COPYRIGHT INFRINGEMENT OR TRADE SECRET MISAPPROPRIATION BY ANY SOFTWARE LICENSED UNDER THIS AGREEMENT.。
- 1、下载文档前请自行甄别文档内容的完整性,平台不提供额外的编辑、内容补充、找答案等附加服务。
- 2、"仅部分预览"的文档,不可在线预览部分如存在完整性等问题,可反馈申请退款(可完整预览的文档不适用该条件!)。
- 3、如文档侵犯您的权益,请联系客服反馈,我们会尽快为您处理(人工客服工作时间:9:00-18:30)。
PADS2005sp2安装方法
一、第一步:下载(下面的地址可以直接复制到地址栏打开网页)
1、到迅雷网站下载《PADS2005完整版》,下载地址是(大小:557.53MB):
http://58.251.57.206/down?cid=DBCDD6DC647C31BA6411259E5E90C7C1641 7FBE4&t=2&fmt=&usrinput=PADS2005&dt=2006000&ps=0_0&rt=0kbs&plt=0& spd=9
2、到迅雷网站下载《PADS2007破解》,下载地址是:
http://58.251.57.206/down?cid=FB07562129F14EEF59B922914D2D0258647 BBAEC&t=2&fmt=&usrinput=pads2007&dt=2002000&ps=0_0&rt=0kbs&plt=0& spd=9
二、第二步:安装破解文件:
1、将前面下载的《PADS2005完整版》压缩包文件解压出来,首先的说明的是:PADS2005是英文软件,这个软件不允许在安装路径上存在任何中文,所以解压完毕后必须将“PADS2005完整版”中的汉字“完整版”去掉,将文件夹名字最好改成“PADS2005sp2”;如下图所示:
检查路径是否有中文
把“PADS2005完整版”改成“PADS2005sp2”
2、将解压出来的PADS2007的破解文件解压出来会有一个叫做“Crack”的文件夹,这个文件夹要放在“PADS2005sp2”文件夹里面。
打开“Crack”文件夹。
如下图所示:
图3
3、删除“Crack”文件夹里面的“LICENSE.TXT”文件,删除完毕后双击“Crack”文件夹里面的“MentorKG.exe”图标,这个时候电脑会重新生成一个名字叫做“LICENSE.TXT”文件,这个文件就是密钥(它就是和电脑网卡物理地址进行绑定的,所以不同的电脑物理地址是不一样的,不同的电脑上安装PADS密钥是要重新生成的)
4、安装破解文件:首先打开“PADS2005sp2”文件夹中的“security”文件夹,如下图所示:可以看到里面有一个“SETUP.EXE”图标,双击它进入破解文件安装,慢慢点下一步,注意会到一个图5所示的 ,这个时候要点第一个电脑图标,此时会弹出对话框,你再找到刚刚生成的那个“LICENSE.TXT”文件。
再慢慢下一步,直到结束。
图4
图5
三、安装PADS2005主体软件:
1、找到前面的“PADS2005sp2”文件夹,里面有一个叫做“msi_setup.exe”的图标,如下图所示:
双击“msi_setup.exe”图标,进入安装画面,安装整个过程大概10分钟,所以要耐心等待。
如下图所示:
“Select a source location”是源文件路径(就是PADS2005sp2文件夹所在的路径,路径不能有中文)默认是正确的,不需要修改这项;
“Select a target location”选择目标文件路径,这个也一般默认到C盘。
不要修改。
这个是选择PADS2005里面的组件,我们不需要很多,只要在PADS Layout、PADS Logic、PADS Libranes、PADS Router的前面打勾,其他的都不需要。
PADS Layout是画PCB的模块,PADS Logic是画原理图的模块,PADS Libranes是系统模块的元件库文件,PADS Router是自动布线器模块
下面是安装完成之后的图标(因为我公司有元件库,所谓我只安装了了三个组件):。
