人像证件卡排版软件Badge Studio软件的使用指南2015版
照片处理工具使用说明
照片处理工具使用说明第一部分:介绍第二部分:安装与启动2.安装:按照向导逐步完成安装操作,选择安装位置及其他选项。
3.启动:在桌面上找到照片处理工具的图标,双击打开软件。
第三部分:界面与功能4.属性面板:属性面板显示当前进行操作的工具或选项的相关属性和设置,用户可以根据需要进行调整。
5.滚动条:纵横滚动条用于调整画布显示的位置和大小。
第四部分:基本操作1.打开照片:点击菜单栏的“文件”,选择“打开”来导入照片,或直接拖动照片到画布区域。
2.剪裁照片:选择剪裁工具,根据需要调整剪裁框的大小和位置,并点击确认按钮进行剪裁。
3.调整亮度和对比度:选择调色工具,通过移动滑块调整亮度和对比度,直到达到满意的效果。
4.修复照片瑕疵:选择修复工具,用鼠标在画布上修复照片上的瑕疵,例如划痕、污渍等。
5.添加滤镜效果:选择滤镜工具,点击下拉菜单选择相应滤镜效果,并调整滑块来控制效果的强度。
6.添加文字和贴纸:选择文字工具或贴纸工具,在画布上点击并输入文字或选择贴纸,可以调整大小、颜色、位置等。
第五部分:高级操作1.图层管理:点击菜单栏的“窗口”,选择“图层”来显示图层面板,可以添加、删除、复制、合并图层等操作。
4.调色板:点击菜单栏的“窗口”,选择“调色板”来显示颜色调整面板,可以自定义颜色或选择预设的颜色样式。
5.滤镜效果:点击菜单栏的“滤镜”,选择相应的滤镜来为照片添加特殊效果,如模糊、马赛克、油画等。
第六部分:保存与导出2.导出:点击菜单栏的“文件”,选择“导出”来导出照片为其他格式,如JPEG、PNG、TIFF等。
第七部分:常见问题与故障排除1.无法打开照片:检查照片格式是否支持,并尝试重新打开照片。
2.软件无响应:尝试关闭其他占用系统资源的程序,重新启动照片处理工具。
3.工具异常:确保软件是最新版本,可以尝试重新安装软件来修复问题。
第八部分:注意事项2.在使用照片处理工具进行商业用途时,应遵守版权相关法律法规。
PhotoStudio 5.5 QSG
PhotoStudio Manualfor WindowsArcSoft, Inc.索引2简介在这里将为您介绍一些基础应用知识,帮助您使用前了解本产品。
工具板44快捷使用栏在这里将为您介绍打开和保存图片,以及其他一些基本功能的快捷使用方式。
12工具板程序的核心部分——将为详细您介绍创建和处理图片的工具。
22工具选项板将为您介绍各不同编辑工具的多种选项设置。
22图层工具板将为您介绍如何通过堆迭照片组件和添加文字来创建出精彩图像。
在这里,您可以学到所有有关图层处理的方法。
24导航工具板将为您介绍当遇到图像过大,以至于无法与您的屏幕相匹配时,如何来进行某特定区域的单独处理。
24状态栏当您在各操作命令上移动鼠标时,可以看到各类图像信息以及各命令的使用提示。
25浏览器 & ArcSoft相册便捷地获取储存在您的系统中或是您的ArcSoft相册中的文件。
菜单28将为您详细介绍各式各样命令,功能以及程序选项。
提示 & 技巧37将为您介绍一些帮助您解决问题的一些指导性提示和技巧。
简介欢迎使用PhotoStudio!PhotoStudio是一个强大的图像编辑程序。
这听起来似乎很专业,但是,不用紧张——其实这个软件是专门为像您这样的普通用户所设计的。
使用这个软件,不需要您是专业制图人士,也可以随心所欲地处理和精制图像。
只要在您使用这个软件的同时,认真学习这个手册中所涉及的知识,您就能渐渐掌握运用这个软件了。
手册中所涵盖的知识比较深刻,因此,如果您能在使用软件的同时,摸索运用这些所学的知识,那么,将会有最佳的学习效果。
而且,这样的话,寓教于乐,使您得到更大的乐趣。
此手册是基于用户了解基础的Windows命令与使用方法而写的,不过您还是用不着害怕,如果您是一个刚刚开始使用电脑地新手,或者对于一些“文件”、“文件夹”、“右击”、“目录”和“保存文件”等用语也不是很了解的话,也不要着急。
查看、调整和共享数码照片这些用法也并不仅仅是智能电脑所专有的,任何人认真学习的话,都可以很好地运用。
证照之星图片编辑软件操作手册
纵向:纵向排列每张照片。
横向:横向排列每张照片。
证件号码打印设置
在照片下边打印证件号码:通过在复选框中选择或取消选择该项来决定是否打印证件号码,证件号码分为两种类型:
条形码类型:打印出来的证件号码为条形码形式。
字符形式:打印出来的证件号码为字符形式。
照片间距设置
横向:单位:毫米,设置横向照片之间的距离,通过点击右边的向上或向下箭头来增加或减少横向照片之间的距离。
第一步:安装驱动程序,相机一般都自带了驱动光盘,直接安装就可以了。同时也可以去相机官方网站上去下载对应的驱动及联机拍摄程序安装。
第二部:调用驱动程序:
在证照之星的安装目录下我们会看到这样一个可执行程序CallRemoteCapture.exe,该程序用于调用相机的驱动程序来进行拍摄。
双击运行这个可执行文件,弹出如下窗口。
自定义起始坐标:单位:毫米,包括左边距设置和顶边距设置。
左边距:设置照片到纸张左边缘的距离。
顶边距:设置照片到纸张顶部边缘的距离。
重命名:重新命名当前规格已保存的打印设置的名称。
新建:新建打印设置,首先选择打印类型为本机打印或送至冲印,然后通过设置纸张名称、长度、宽度、分辨率等来设置打印类型。
保存:保存所做的打印设置,并为该打印设置输入名称。
1.3
曝光补偿
曝光补偿是一种曝光控制方式,一般常见在±2-3EV左右,如果环境光源偏暗,即可增加曝光值(如调整为+1EV、+2EV)以突显画面的清晰度。曝光补偿就是有意识地变更相机自动演算出的“合适”曝光参数,让照片更明亮或者更昏暗的拍摄手法。
清度
清晰度指影像上各细部影纹及其边界的清晰程度。清晰度,一般是从录像机角度出发,通过看重放图像的清晰程度来比较图像质量,所以常用清晰度一词。
pidcad使用手册

深圳市维远泰克科技有限公司 版权所有 严禁非法复制
PIDCAD 用户手册
目录
概 述 .............................................................................4
第一章 PIDCAD 软件特点 ..............................................................5
第六章 工具条使用说明.............................................................. 14
一. 打开工具条 ................................................................................................................................... 14 二. 关闭工具条 ................................................................................................................................... 14 三. 移动工具条 .................................................................................................. 14
第七章 PIDCAD 菜单介绍 .............................................................15
zint barcode studio用法
zint barcode studio用法
ZintBarcodeStudio是一款开源软件,用于创建、打印和导出各种条形码和二维码。
它支持多种格式,包括EAN-13、Code 128、QR Code 等,可以在Windows、Linux和Mac OS X等操作系统上运行。
使用Zint Barcode Studio非常简单,只需按照以下步骤操作:
1. 下载并安装Zint Barcode Studio软件。
2. 打开软件并选择所需的条形码或二维码格式。
3. 输入所需的数据,例如产品名称、价格、条形码编号等。
4. 在设计界面中调整条形码的大小、颜色、字体等样式。
5. 点击“保存”按钮,将条形码保存为图片格式,例如PNG、JPG等。
6. 使用打印机打印条形码,或者将其导出为PDF、SVG等格式。
总之,Zint Barcode Studio是一款功能强大且易于使用的条形码和二维码生成软件,适用于各种行业和应用场景。
- 1 -。
Odyssey CLX 操作指南1
导入图片 ........................................................................................................................... 18 泳道设置 ........................................................................................................................... 19 设定 Marker....................................................................................................................... 20 创建新 marker ................................................................................................................... 20 自动识别条带 ................................................................................................................... 21 手动编辑条带 ................................................................................................................... 21 单通道信号归一化 ..............................................................................................................21 查看表格 ........................................................................................................................... 22
Geomagicstudio软件操作指南
Geomagicstudio软件操作指南目录AA004XNCEY软件介绍 (1)公司及其主要产品 (1)软件的使用范围 (1)软件的主要功能 (1)软件的优势 (1)计算机要求 (2)2.软件安装 (3)3.软件功能介绍 (10)软件及流程简介 (10)中鼠标控制和主要快捷键 (11)软件的基本模块 (11)4.点阶段 (15)点阶段主要操作命令列表 (15)实验 (15)5.多边形阶段 (25)多边形阶段主要操作命令列表 (25)实验 (26) (26)实验二:建筑物单面墙体建模 (39)6.精确曲面阶段 (46)精确曲面阶段主要命令列表 (46)实验 (47)1软件介绍公司及其主要产品Geomagic是一家世界级的软件及服务公司,在众多工业领域如汽车、航空、医疗设备和消费产品得到广泛应用。
公司旗下主要产品为GeomagicStudio、GeomagicQualify和GeomagicPiano。
其中GeomagicStudio是被广泛应用的逆向工程软件,可以帮助用户从数据中创建优化的多边形网格、表面或CAD模型。
GeomagicQualify则建立了CAD和CAM之间所缺乏的重要联系纽带,允许在CAD模型与实际构造部件之间进行快速、明了的图形比较,并可自动生成报告;而?Piano是专门针对牙科应用的逆向软件。
本项目所使用的主要是GeomagicStudio软件。
软件的使用范围:(1)零部件的设计;(2)文物及艺术品的修复;(3)人体骨骼及义肢的制造;(4)特种设备的制造;(5)体积及面积的计算,特别是不规则物体。
软件的主要功能:(1)点云数据预处理,包括去噪、采样等;(2)自动将点云数据转换为多边形(Polygons);(3)多边形阶段处理,主要有删除钉状物、补洞、边界修补、重叠三角形清理等;(4)把多边形转换为NURBS曲面;(5)纹理贴图(6)输出与CAD/CAM/CAE匹配的文件格式(IGES,STL,DXF等)。
证件照处理工具使用指导
证件照处理工具使用指导一、简介二、安装和启动2.按照安装提示,选择安装路径和其他设置,完成安装。
3.在开始菜单或桌面上找到软件图标,双击启动证件照处理工具。
三、主要功能介绍1.裁剪:选择“裁剪”功能,鼠标手势可以调整裁剪区域大小和位置,选中合适区域后点击确定,完成裁剪操作。
2.亮度和对比度调整:选择“亮度/对比度”功能,拖动滑块可以调整照片的亮度和对比度。
根据实际需要进行调整,点击确认应用修改。
3.红眼消除:选择“红眼消除”功能,鼠标手势在红眼区域进行点击,可以自动消除照片中的红眼现象。
4.瑕疵修复:选择“瑕疵修复”功能,鼠标手势在瑕疵区域进行点击,软件会自动尝试修复该处的瑕疵,让照片更加完美。
5.变换和特效:选择“变换和特效”功能,可以对照片进行旋转、翻转、缩放等操作,也可以添加滤镜、边框、水印等特效,让照片更有个性。
四、操作步骤1.打开证件照处理工具,点击“打开”按钮,选择要处理的照片文件。
2.在工具栏中选择需要的功能,如裁剪、亮度/对比度、红眼消除等。
3.根据需要进行具体的操作,如调整裁剪区域大小和位置、拖动滑块调整亮度和对比度、点击红眼区域消除红眼等。
4.点击“应用”或“确认”按钮,完成操作。
5.可以选择保存修改后的照片,也可以选择撤销修改,返回原始状态。
五、注意事项1.在进行操作之前,最好先备份一份原始照片,以防误操作导致照片损坏或不可恢复。
2.在调整亮度和对比度时,要注意不要过度调整,以免照片失真或变得不真实。
3.在消除瑕疵时,要注意不要涂抹到正确的部分,以免破坏照片的真实性。
4.在使用变换和特效时,要选择适合的样式和程度,以免照片变得过于夸张或失真。
六、总结证件照处理工具是一种相对简单易用的软件,通过裁剪、亮度和对比度调整、红眼消除、瑕疵修复以及变换和特效等功能,可以对证件照进行各种优化和修复操作,使照片更加美观和真实。
在使用过程中,要注意谨慎操作,避免照片损坏或不可逆操作。
ace studio使用手册
尊敬的用户:欢迎您使用Ace Studio!Ace Studio 是一款功能强大的视频剪辑和编辑软件,拥有丰富的编辑功能和用户友好的界面设计,能够帮助您轻松制作出优质的视频作品。
本手册将为您详细介绍 Ace Studio 的使用方法和注意事项,帮助您快速上手并发挥其最大潜力。
一、安装与注册1. 下载 Ace Studio 安装包,并双击运行安装程序。
2. 在安装过程中,根据提示完成软件的安装。
3. 安装完成后,通过输入注册码的方式完成软件的注册。
二、界面介绍1. 主界面:包括视频素材导入区、时间轴区、预览区等功能区域,同时提供了丰富的工具和效果菜单。
2. 资源管理器:可以对导入的视频素材进行管理和组织。
3. 时间轴:可以对视频素材进行编辑和剪辑。
4. 预览区:可实时预览视频效果。
三、基本操作1. 导入素材:将素材文件拖拽至素材导入区,或在资源管理器中选择素材后拖拽至时间轴。
2. 剪辑素材:在时间轴中对素材进行剪辑、裁剪、合并等操作。
3. 添加特效:在特效菜单中选择适合的特效并拖拽至时间轴中的素材。
4. 调整音频:可以对素材中的音频进行调整,包括音量、淡入淡出等操作。
四、高级功能1. 色彩校正:通过色彩校正工具,可以调整视频的色调、饱和度、对比度等参数,使画面更加生动。
2. 特效添加:除了基本特效外,还可以添加转场特效、文字特效、滤镜特效等,使视频更加丰富多彩。
3. 图像处理:可以对视频中的图像进行修饰和处理,包括裁剪、调整大小、旋转等操作。
五、导出与共享1. 导出视频:点击导出按钮,选择合适的导出格式和参数,即可导出制作完成的视频作品。
2. 共享:支持将导出的视频作品直接共享至社交评台,与他人共享创作成果。
六、注意事项1. 确保在进行操作前对素材进行备份,以免操作失误导致素材丢失。
2. 在使用特效时,可以先预览效果,确保效果符合预期再进行最终渲染。
3. 确保电脑硬件性能足够支撑软件运行,避免卡顿或崩溃。
imadio插件安装教程
imadio插件安装教程imadio插件安装教程介绍本教程将详细介绍imadio插件的安装和使用方法。
imadio插件是一款功能强大的图像处理工具,可以帮助用户快速优化和编辑图片。
安装步骤1.在浏览器中打开imadio官方网站。
2.导航到插件下载页面。
3.确定你的浏览器类型和版本。
4.点击适用于你的浏览器的下载链接。
5.等待下载完成。
插件安装对于Chrome浏览器1.打开Chrome浏览器。
2.导航到浏览器设置。
3.在设置页面中,找到插件选项。
4.点击打开插件选项页面。
5.在插件选项页面中,找到“加载已解压的扩展程序”按钮。
6.点击按钮选择已下载的imadio插件文件夹。
7.确认安装。
对于Firefox浏览器1.打开Firefox浏览器。
2.导航到浏览器扩展页面。
3.点击“扩展”标签。
4.在扩展页面中,找到“安装扩展”按钮。
5.点击安装扩展按钮。
6.选择已下载的imadio插件文件。
7.确认安装。
对于其他浏览器由于不同浏览器的安装过程可能会有所不同,建议参考浏览器官方文档或寻求进一步的帮助。
使用imadio插件1.打开任意一个网页,确保已经安装并启用imadio插件。
2.在图片上右键单击,选择“使用imadio插件”。
3.在imadio插件弹出窗口中,选择你想要的图像处理效果。
4.在设置选项中调整参数。
5.点击“应用”按钮,等待图像处理完成。
6.即可在右侧预览窗口中查看处理后的图片。
7.确认满意后,点击“保存”按钮,将图像保存到本地。
注意事项•请确保下载的插件文件与您使用的浏览器兼容。
•如果插件安装后无法正常使用,请尝试重新安装或寻求官方支持。
•使用插件时,请遵循相关法律法规,不要违反他人的合法权益。
以上就是imadio插件的安装教程,希望对您有帮助!如有更多问题,请查阅相关文档或咨询官方支持。
更新插件如果你已经安装了imadio插件,但希望升级到最新版本,可以按照以下步骤进行更新:1.打开浏览器并导航到插件管理页面。
人像证件卡排版软件BadgeStudio软件的使用指南20(精)
III.打印 2. 打印 1. 2. 选定打印机(文件>“打印设置”)之后就可以进行打印了。
Badge Studio+(数据库)可进行多个设置帮助选择要打印的记录/证卡:• “打印所选”选项允许选择您想要打印的卡片• “在查找窗口中选择的记录”选项可以让您从“浏览记录”视图中勾选要打印的记录。
• “打印条件”选项允许您打印符合一定标准的证卡,您可以对相关标准进行设置。
如有必要,您可以在“高级选项”中定义打印机的高级属性。
3. 选择待打印记录时的设置 21
技术支持• • • 有关使用 Badge Studio 软件的更多信息,请参阅“帮助>目录”菜单中的帮助。
关于技术问题,请参阅网站 上的“技术支持”部分更新:我们建议定期更新软件,以获得最新的修正和改进。
访问网站
以检查可用的更新。
更新是免费的。
22。
Geomagic studio软件操作指南

Geomagic studio 软件操作指南目录AA004XNCEY软件介绍 (1)1.1 Geomagic公司及其主要产品 (1)1.2 Geomagic Studio软件的使用范围 (1)1.3 Geomagic Studio软件的主要功能 (1)1.4 Geomagic Studio软件的优势 (1)1.5 计算机要求 (2)2. 软件安装 (3)3. 软件功能介绍 (10)3.1 Geomagic studio软件及流程简介 (10)3.2 Geomagic Studio 中鼠标控制和主要快捷键 (11)3.3 Geomagic Studio 软件的基本模块 (11)4.点阶段 (15)4.1 点阶段主要操作命令列表 (15)4.2 实验 (15)5.多边形阶段 (25)5.1多边形阶段主要操作命令列表 (25)5.2实验 (26)5.2.1实验一:毛泽东塑像建模 (26)5.2.2 实验二:建筑物单面墙体建模 (39)6.精确曲面阶段 (46)6.1 精确曲面阶段主要命令列表 (46)6.2 实验 (47)1软件介绍1.1 Geomagic公司及其主要产品Geomagic是一家世界级的软件及服务公司,在众多工业领域如汽车、航空、医疗设备和消费产品得到广泛应用。
公司旗下主要产品为Geomagic Studio、Geomagic Qualify和Geomagic Piano。
其中Geomagic Studio是被广泛应用的逆向工程软件,可以帮助用户从数据中创建优化的多边形网格、表面或CAD模型。
Geomagic Qualify 则建立了CAD和CAM之间所缺乏的重要联系纽带,允许在CAD 模型与实际构造部件之间进行快速、明了的图形比较,并可自动生成报告;而Piano是专门针对牙科应用的逆向软件。
本项目所使用的主要是Geomagic Studio软件。
1.2 Geomagic Studio软件的使用范围:(1)零部件的设计;(2)文物及艺术品的修复;(3)人体骨骼及义肢的制造;(4)特种设备的制造;(5)体积及面积的计算,特别是不规则物体。
Adobe FrameMaker发布服务器2015版本入门指南说明书
Getting Started With Adobe FrameMaker PublishingServer(2015 release)iTable of ContentsFrameMaker Publishing Server . . . . . . . . . . . . . . . . . . . . . . . . . . . . . . . . . . . . . . . . . . . . . . . 1Product overview (1)A brand new interface (2)Your automated, multidevice publishing solution (3)Reusable publishing through templates and presets .............................................................................................6Publish bidirectional content across formats and devices . . . . . . . . . . . . . . . . . . . . .13Bidirectional language publishing (13)Mobile app output (14)Personalized dynamic content (15)New HTML5 layout (16)Embed custom fonts in EPUB output (18)Attractive customizable Responsive HTML5 layouts and WebHelp skins (19)Reference page image publishing (20)SVG support in HTML5 output (20)Reuse of Adobe RoboHelp style mappings (21)Reusable publishing elements (21)HTML page template support ...............................................................................................................................................21Integrate with your CMS . . . . . . . . . . . . . . . . . . . . . . . . . . . . . . . . . . . . . . . . . . . . . . . . . . . . .23Integration with DITA Exchange CMS ............................................................................................................................23Additional resources . . . . . . . . . . . . . . . . . . . . . . . . . . . . . . . . . . . . . . . . . . . . . . . . . . . . . . . . .25Product page (25)User guides and Help hub pages ........................................................................................................................................25Legal notices . . . . . . . . . . . . . . . . . . . . . . . . . . . . . . . . . . . . . . . . . . . . . . . . . . . . . . . . . . . . . . . .27iiFrameMaker Publishing ServerFrameMaker Publishing ServerProduct overviewPublish faster and to multiple outputs with FrameMakerPublishing Server (FMPS). Access FMPS from anywhere overthe web to schedule publishing tasks. Work with your teamand access FMPS at the same time and create templates andpresets to be reused later on in developing publishing tasks.FrameMaker Publishing Server allows you and your team towork collaboratively and maintain consistency across theboard.Features include the ability to:Create templatesSave time by incorporating publishing configurations intotemplates.Streamline publishing toolsThe new Dashboard keeps your publishing tools in one cen-tralized location and at your fingertips.View Dashboard notificationsLet the Dashboard notifications keep you informed on pending jobs as you turn your attentionto other tasks.FrameMaker Publishing ServerHow to get Adobe FrameMaker Publishing Server (2015 release)2Specify output settings from the DashboardAdjust settings directly from the Dashboard to customize your outputs.Schedule publishing tasksPublish content at off-peak times and on a regular schedule to ensure that published content is always current.Create a consistent look across multiple outputsUse templates to maintain a consistent brand image even when the source files and output types vary.Save time by configuring publishing settings onceConfigure your settings, and then reuse the same settings for future publications.Publish from anywhere and at any timePublish remotely from a server without having FrameMaker installed on your local machine. Web publishing allows you to publish content whenever you need to, even if you aren’t in the office.Publish from your Content Management System interfaceSet up integration services to publish through FrameMaker directly from your CMS.How to get Adobe FrameMaker Publishing Server (2015 release)To try FrameMaker Publishing Server before buying, download a fully functional, 30-day com-plimentary trial version.You can buy Adobe FrameMaker Publishing Server (2015 release) through the online Adobe Store or by calling 800-585-0774. Learn about other ways to buy FrameMaker Publishing Server (2015 release), including buying through authorized resellers or purchasing with education or government discounts.FrameMaker Publishing ServerA brand new interface3If you already have a license for an earlier version of FrameMaker Publishing Server, see the fol-lowing table for special pricing.Subscription pricing: US $499 per month for an annual plan.Note: Prices listed are the Adobe direct store prices. Reseller prices may vary. Prices do not include tax or shipping and handling.The following sections walk you through the exciting features in FrameMaker Publishing Server and how to use these features.A brand new interfaceThe publishing Dashboard is a new interface that centralizes publishing tasks and displays the information in a web-based environment — the status of publishing tasks, logs, and outputs can now be found in one place.Visually identify exactly what is happening on the serverPublishing task status is updated in real time and with color coding to identify publishing tasks that are running (orange), have failed (red), or have successfully executed (green) making it easy to know where any publishing task stands.If you haveUpgrade to Adobe FrameMaker Publishing Server (2015 release)USD EUR AUD YEN AdobeFrameMakerServer 12$5,999 €5,999$5,999¥790,000AdobeFrameMakerServer 11$8,999€8,999$8,999¥1,185,000AdobeFrameMakerServer 10 orearlier $14,999€14,999$14,999¥1,975,000FrameMaker Publishing ServerA brand new interface 4Set up the Dashboard the way you want to workThe new Dashboard keeps your publishing tools in one place. Adjust the Dashboard settings to customize outputs for your specific needs.Do more in less time by connecting from anywhere, anytimePublish remotely using web-based access and review the active list to see what’s been pub-lished and what hasn’t. Keep content flowing by taking advantage of the fact that multiple users can access the publishing server simultaneously.Schedule publishing tasks to run remotely on a defined schedulePublish at off-peak times and on a regular schedule to ensure that published content is always current. Let Dashboard notifications keep you informed about pending jobs as you turn your attention to other publishing tasks.Use the following procedures to display the output information.Display last run information1.Under Last Run click on a date and time.2.Review the Log information.Display output information1.Under Last Run click on a generated (successfully or without success) output.2.Review the Output information.FrameMaker Publishing ServerYour automated, multidevice publishing solution5Your automated, multidevice publishing solu-tionFrameMaker Publishing Server services are now accessible remotely, and do not require access to the desktop application, letting you publish content from any machine, anywhere, at any time. Publishing tasks can also be automated and run based on a schedule.Multiple users can connect and publish from anywhere at any timePublish content from any machine — even if FrameMaker isn’t installed locally. Web publishing support lets multiple users connect from any location at any time in order to publish content remotely.Automate the publishing processConfigure scheduling to automatically produce weekly or monthly output, or set up a single job in advance. Automate your timeline to prevent missed deadlines and set up the software to notify you after your work has been published.Publish content stored in your CMSPublish content from Microsoft SharePoint, EMC Documentum, or Adobe Experience Manager out of the box. Using Web APIs almost any CMS can be configured to work with FrameMaker Publishing Server.Use the following procedure to create a publishing task.FrameMaker Publishing ServerYour automated, multidevice publishing solution 6Create a publishing task1.Click Add New Task.The Task dialog appears.2.Enter a publishing task name.3.Select an input source.4.If the input source is a book, configure any book settings.5.Configure output settings.6.Specify any pre- or post-publish scripts.7.Set up any required scheduling.8.Specify an email address to send a log to.FrameMaker Publishing Server9.Configure any log file settings.10.Click Save.Reusable publishing through templates and presetsFrameMaker Publishing Server presets and templates are reusable settings files that can be applied across multiple output types, letting you set up your ideal output and use the same configuration for future publications.Work with PDF and RoboHelp presetsCreate a PDF or RoboHelp configuration that can be used by multiple templates and multiple publishing tasks ensuring content is published exactly as needed, every time.Increase productivity by configuring settings onceSave time by configuring output settings and reusing them for future publications.Create a consistent look across multiple outputsCreate and use templates to maintain a consistent brand image even when source files and output types vary.Out-of-the-box support for Microsoft SharePoint, EMC Documentum, and Adobe Experience ManagerPublish content from Microsoft SharePoint, EMC Documentum, or Adobe Experience Manager out of the box. Using Web APIs almost any CMS can be configured to work with FrameMaker Publishing Server.Use the following procedures to get started with presets.FrameMaker Publishing ServerCreate a PDF preset1.Click the Preset tab.2.Click Add New PDF Preset.The PDF Preset dialog appears.3.Configure options as needed.4.Click Save.FrameMaker Publishing ServerCreate a RoboHelp presetNote: RoboHelp Presets are used to publish non-PDF supported output formats.1.Click the Preset tab.2.Click the Add New PDF Preset drop-down arrow, and choose Add New RoboHelp Preset.The RoboHelp Preset dialog appears.3.Configure options as needed.RoboHelp Import Settings File This is a RoboHelp settings file which contains the style map-pings for the content. This file can be created while youimport a FrameMaker template into RoboHelp. In the work-flow, you get an option to define the style mappings and youcan export that mapping as an ISF file which can be reusedhere.FrameMaker Publishing Server4.Click Save.Modify a preset1.Click the Preset tab.2.Click an existing preset.3.Modify the preset as needed.RoboHelp Project Template This is a RoboHelp template, which is basically an emptyRoboHelp project. In this project, all the output SSLs such asWebhelp, CHM, HTML5, EPUB etc. are configured (for exam-ple, the Webhelp skin, the cover page for EPUB, layouts forHTML5 output etc.). FMPS publishes the output with thesame settings as defined in this template.Application Settings File This setting is required to create native mobile app. You needto configure the settings.xml file in FrameMaker's Installdirectory at \fminit\RH_DEFAULT_PROJECT and spec-ify this settings file in the dialog.Validate EPUBThis is used to validate the EPUB output.FrameMaker Publishing ServerCreate a template1.Click the Template tab.2.Click Add New Template.The Template dialog appears.3.Enter a template name.4.Configure any book settings.5.Configure output settings.6.Specify any pre- or post-publish scripts.7.Specify an email address to send a log to.8.Configure any log file settings.9.If required, select Shared.10.Click Save.FrameMaker Publishing ServerRun a template1.Click the Template tab.2.Select an existing template.3.Click the Run icon.4.Select an input file.5.Click Run.Modify a template1.Click the Template tab.2.Click an existing preset.3.Modify the preset as needed.Create a publishing task based on a template1.Click the Template tab.2.Select a template.3.Under Add New Template select Create Task from Template.4.Select an input source.5.Develop the publishing task by assigning any template overrides, if needed.6.Click Save.In the following sections we will see the new features that have been introduced inFrameMaker Publishing Server (2015 release).Publish bidirectional content across formats and devicesBidirectional language publishing Publish documents with bidirectional content, including XML/DITA content, from within FrameMaker in multiple formats: PDF, Responsive HTML5, Web-Help, CHM, EPUB, KF8, MOBI, and as mobile apps. Optionally, flip the HTML5 layout or use the new responsive RTL WebHelp layout so that the navigationpane appears on the right for RTL content, and render smoothly on anydevice - desktop, table, or a mobile.• Publish bidirectional content in seven new formats - HTML5, Web-Help, CHM, EPUB, KF8, MOBI, and as standalone mobile app for iOS and Android devicesPublish bidirectional content across formats and devicesMobile app outputEnsure wider distribution and consumption of content with a sim-plified mobile app generation workflow and native integration withAdobe PhoneGap Build. With the licensed version of AdobePhoneGap Build, easily publish and then distribute your content asan installable app on major mobile platforms including, iOS andAndroid with just one click. Once the app is generated, you can share the QR code or the appURL with your users to download the app from the PhoneGapserver. Alternatively, you can also publish the app from PhoneGap on to Google Play store or Apple’s App Store.Manage the branding and design standards of the mobile layout with new easy-to-use respon-sive layout editor. Leverage the power of the Responsive HTML5 layout that comes with the new dynamic content filtering feature that lets your users self-select the content most relevant to them.Deliver Help content for the audiences that are on the go.• Native integration with Adobe PhoneGap Build • Publish content as standalone mobile apps • Easily download the mobile app by scanning the QR codePublish bidirectional content across formats and devicesPersonalized dynamic contentEmpower users to find relevant content faster in the document, TOC, and index in the final Responsive HTML5 or mobile app output. Leverage exist-ing conditional tags and expressions to enable end users to dynamically fil-ter content in the final HTML5 output, thereby delivering personalized helpexperiences.Simply assign names for existing conditional tags or expressions, categorize them under any Group you want (such as region, audience, market segment etc.), enable single or multiple selections within a Group, and then display this two-level hierarchy as content filter criteria inthe final output.• Easily create content filter crite-ria using existing conditional tags and expressions • Users self-select what they want to see in final HTML5 outputPublish bidirectional content across formats and devicesNew HTML5 layoutUse the customizable Responsive HTML5 layouts to deliver an amazing content consumption experience. With more powerful search options, configure search to appear on the content or topic panes, and show informative context and breadcrumbs in the results. This helps your readers identify the best choice among results. You can also customize the search context message foreach topic.• Convert layout to RTL language in a single step • Easily customize layout to meet exact branding standardsPublish bidirectional content across formats and devicesNew HTML5 layout17The search results can also be configured to appear on the left pane.Publish bidirectional content across formats and devicesEmbed custom fonts in EPUB output 18Easily show or hide widgets such as glossary, TOC, index, and filters. Convert the layout to right-to-left languages (Arabic and Hebrew) to meet the needs of a global audience, just by changing one property. Also add Facebook and Twitter widgets to your pages to allow users to share the content that they are reading – with a single click!Provide your users with a different experience for the device (desktop, tablet, and mobile) that they use by customizing the function bar, side bar, and TOC in the output.Along with all these customizations, now you can also create frame-less output, which does not contain any widgets, function bar, or side bar as shown below.Embed custom fonts in EPUB outputEmbed custom fonts in your EPUB output and ensure that your users see high-quality typography exactly as you intended, whether or not they have the font installed on their device.This feature is especially useful if you are using fonts that may not be readilyavailable to your end users. Use embedded fonts to enhance the brandingstandard set by your design style guides.Note: You must have distribution rights for the embedded font.• Use embedded custom fonts for eBook publishing without worry-ing about its availability at end user’s devicePublish bidirectional content across formats and devicesAttractive customizable Responsive HTML5 layouts and WebHelp skins19Attractive customizable Responsive HTML5 layouts and WebHelp skinsGive your WebHelp content a new look by choosing from a wide variety of skins from the Web-Help gallery.And a powerful, yet easy-to-use WebHelp skin editor lets you customize not only your content, but also the appearance of buttons, labels, fonts, background color, search boxes, and mostcomponents of your online content.Publish bidirectional content across formats and devicesReference page image publishing 20Reference page image publishingNow, publish reference pages content such as images, headers and footers, and logos, in all output formats supported by FrameMaker Publishing Server.SVG support in HTML5 outputLet your end users see top quality images regardless of the screen size and resolution of the device on which they are being viewed. This because FrameMaker Publishing Server nowembeds the entire SVG code in the final responsive HTML5 output.Publish bidirectional content across formats and devicesReuse of Adobe RoboHelp style mappings21Reuse of Adobe RoboHelp style mappingsWork more efficiently by reusing style mappings that you have already configured in Robo- Help or Adobe Technical Communication Suite in the native multidevice publishing workflow of Adobe FrameMaker Publishing Server.Reusable publishing elementsReuse elements easily with the enhanced multidevice publishing settings file. Create elements, such as responsive HTML5 layouts, WebHelp skins, CSS, and HTML page templates, just once. Then import or export the setting files for use across different books and documents.HTML page template supportNow improve the usability of your output by adding mini-TOCs, breadcrumbs, and headers and footers. Configure the output settings just once and then easily reuse these across all outputs togive your users a uniform experience.Publish bidirectional content across formats and devicesHTML page template support22Integrate with your CMSIntegrate with your CMSIntegration with DITA Exchange CMSLeverage the new built-in connector to the DITA Exchange CMS to manage your DITA content easily. Use the Repository view to check-out files, manage dependencies, version management and perform search. Use the advanced metadata-based filter to quickly browse and find rele-vant topics, DITA maps, or graphics in a large volume of content.Integrate with your CMSIntegration with DITA Exchange CMS24Additional resourcesAdditional resourcesMore information on the full Adobe Technical Communication Suite and the tools it provides can be found online.Version comparison chartWant to compare the latest version of Adobe FrameMaker Publishing Server with the earlier version(s), click here .Product page•Adobe Technical Communications homepage•Adobe FrameMaker Publishing Server homepage•Adobe FrameMaker homepage•Adobe RoboHelp homepage•Adobe FrameMaker XML Author homepageUser guides and Help hub pages•Adobe FrameMaker Publishing Server (2015 release) User Guide•Adobe FrameMaker Publishing Server Help Hub•Adobe FrameMaker (2015 release) User Guide•Adobe FrameMaker Help HubAdditional resourcesUser guides and Help hub pages 26•Adobe RoboHelp (2015 release) User Guide•Adobe RoboHelp Help Hub•Adobe FrameMaker XML Author (2015 release) User Guide •Adobe FrameMaker XML Author Help HubLegal noticesLegal notices Follow this link: Legal NoticesLegal notices28。
Evolis名牌卡片设计软件快速启动指南说明书
EVOLIS BADGE STUDIOQUICK START GUIDEContentsIntroduction (3)Installation on Windows (4)Installation on Mac OS (5)Getting started with BadgeStudio (6)1.General use (6)a.Interface (6)b.Home page (7)2.Creating a badge using the "Templates" icon (8)3.Creating a badge using the "Wizard" icon (8)4.Creating a badge from a blank document (11)Database (13)1.Creating an internal database (13)2.Importing your database (16)3.Displaying database fields on your badge (18)Other features....................................................................................................... .. (19)ing the Line tool (19)ing the Shapes tool (19)3.Photo acquisition (19)Printing (20)1.Print settings (20)2.Printing (21)INTRODUCTIONEvolis Badge Studio is a card designer software package.It's easy to get started and allows you to create badges to meet all your needs:•Employee ID badges•Business cards•School ID cards•Membership cards•Loyalty cards•InvitationsAnd much more...GLOSSARY:Templates: refers to cards available in our card template library. These cards have a background and various fields (texts,images, logos, barcodes, etc.) which can be changed to adapt the cards to your needs.Background: Refers to the backdrop of a plain badge. The background is the visual which covers the base of the card. It can be anINSTALLATION ON WINDOWS1.Welcome:Select the language.2.Installation:Select installation options and click "Next."3.Finish installation.4.Accept the general terms and conditions of use.5.Installation is complete.INSTALLATION ON MAC OS1.Open the file in .dmg. format.2.Accept the general terms and conditions of use.3.Drag the Badge Studio file into the Applications folder.4.Installation is complete.You can launch Badge Studio from the available icon in the"Applications" folder.1.GENERAL USEa) I nterface 1.Document toolbar: Create, Open, Save, or Delete your card. 2.View and print toolbar: Orientation, Browse Records, Print, Zoom. 3.Database toolbar: Create, Disconnect, Import, Refresh, Go from one Record to Another, Add, Delete a Record (only available in Badge Studio+). 4.Insert objects toolbar: Add text, shapes, barcodes, images, and more. 5.Properties Window: brings together all the features linked to the object added to the badge. I. GETTING STARTED WITH BADGE STUDIO4 5 1 2 3I. GETTING STARTED WITH BADGE STUDIOBadge Studio was developed to help you design your badges, regardless of your level of knowledge in the subject.Several menus are available on the home page. They help you to create your card designs, depending on your needs:Using one of the various cardmodels Using the creation wizardCreating from a blank document Opening your last saved documents1.GENERAL USEb)Home page2.CREATING A BADGE USING THE "TEMPLATES" ICON1.Click on the "Templates" icon. 2.Select your preferred model and click "Next." 3.The model selected opens in Evolis Badge Studio. 4.Each item can be changed and moved, to adapt to your needs.I. GETTING STARTED WITH BADGE STUDIO3.CREATING A BADGE WITH THE "WIZARD" ICON1.Select the orientation of your card.2.Select a background.3.Choose the images you would like to add to your card (images, logos, etc.).4.Select the number of text fields.Your card now appears on the screen. Now all you need to do is customize the items by double-clicking on them and moving them as you want.I. GETTING STARTED WITH BADGE STUDIO123NB: In Badge Studio+, you can add fields which will be used to build your internal database.To do this, in step 4 of the wizard, select the box "Use the database" in the bottom left of the window. An internal database is created automatically in the software.Refer to the chapter on the database for more information. Set the type of fields featuredin your columns (texts, dates,etc.)I. GETTING STARTED WITH BADGE STUDIO4.CREATING A BADGE FROM A BLANK DOCUMENT1.Select the orientation of your badge. A blank document appears on the screen.2.Add a background: in the right-hand window you can select one of the backgroundsavailable by default. You can also import your own image.3.Click on the "Add an Image" button, and draw the area where your image or your photowill go on your badge.4.Once the area has been created, Navigate to your documents, select your image.5.The photo editor opens automatically. You can change your image (change colors, shape, etc.). Once the changes have been made, click on "Validate".I. GETTING STARTED WITH BADGE STUDIO2 3 56.You can add text using the "Text" tool. •First draw your text field, then edit it by double-clicking. •To the right of your screen, click on the "Font" tab to select the font, size, and color of your text. 7.If necessary, you can add other items, such as barcodes, logos, etc. 8.Your badge is ready to be printed.I. GETTING STARTED WITH BADGE STUDIOII. DATABASE•The "database" function lets you create an internal database in the software, or to import your data. It is only available in the Badge Studio+ edition. •The database allows you to add variable fields from one badge to the other (such as "First name/Surname",identity photos, etc.), enabling you to print your badges in batches automatically, without having to change each one separately.Note: When you create a database with Badge Studio+, the data is stored in the badge (in a ".card" file format). The more records you create (with variable fields, photos, etc.), the larger the .card file.GLOSSARY: Record : A record is a copy of a badge and includes 1 or more variable fields. For example, the database above has 5 records. Variable data/variable field: Badge data which is changed from one record to another, such as the first name, surname, or the identity photo of an employee.1.CREATING AN INTERNAL DATABASE1.In the "Menus" section of Badge Studio, select"Database," then "Create."2.The database window appears. Select the button"Edit records."3.You can start to edit records.4.To add a variable field, select the button to add columns (see the next page)5.Configure your column: Name it and choose the type of data (text, number, image, etc.).6.Once your columns have been configured, you can start to fill in your information. To do this, clickon the "Add a Record" button. Each record must be validated to be taken into account.7.Once you have finished editing your records, return to "Browse Records" to view your database. II. DATABASEII. DATABASEAdd, delete, or validate a recordIf you have configured a photo field, double-Add columns2.IMPORTING YOUR DATABASE1.The import function enables you to import yourdatabase into Badge Studio+ from a .csv, .txt, orMicrosoft Excel file.2.Select the type of file you want to import, then click"Next."3.Select your database file on your computer.4.You can configure your fields (text, photo, barcodes,etc.).Click on "Next."ing the screen opposite, you can select yourdatabase's columns that you want to display inBadge Studio+.Click on "Next."II. DATABASE7.Your database has now been imported. 8.To access it, click on the "Window" menu, and select "database", or directly from the available icon in the top bar. 9.To return to the editing window for your badge, click on the corresponding icon above.II. DATABASEReturn tobadge/orientation"Database"buttonII. DATABASE3.DISPLAYING DATABASE FIELDS ON YOUR BADGE1.To display "Database" properties on the right of your screen, click on the gray area around yourbadge.2.From the "Database" pane to the right, use your mouse to "drag and drop" the items to appearon your badge.3.To switch from one record to another, use the navigation arrows at the top of the screen.4.If you add text, the font can be changed using the "font" pane.This will appear automatically when you select text on your badge.III. OTHER FEATURESING THE "LINE" TOOL1.To draw a line, select the "Line" tool and draw on the badge.2.The thickness, color, and line style can be changed using theright-hand window.ING THE "SHAPES" TOOL1.Select the "Shapes" tool, and then draw your shape on the badge.2.The shape is a black rectangle by default. The right-hand windowallows you to change the shape style, color, contours, size, etc..3.PHOTO ACQUISITION1.Click on the Photo Acquisition button.2.Draw the field where your photo will be positioned on the badge.If a camera is installed on your computer, it will openautomatically.3.Validate the photo taken.III. PRINTING1.PRINT SETTINGS1.Open the print settings window ("File > Print Settings").2.Select your printer.3.You can also choose the format of your card and the orientation of your badge.4.The "Print Options" and "Advanced Options" sections allow you to make more advancedadjustments (expert users).2.PRINTING 1.Once your printer has been selected (File > "Print Settings"), you can print. 2.With Badge Studio+ (database), various settings are available to help you select the records/badges to print: •The "Print Selection" option lets you choose the cards you want to print •The "Records Selected in the Search Window" option lets you mark the records to print from the "Browse Records" view. •The "Printing Condition" option lets you print the badges which meet certain criteria which you can define. 3.In "Advanced Options," you can define the advanced properties of the printer if necessary.III. PRINTING Settings for selecting the records to printSUPPORT•For more information on the use of the Badge Studio software, refer to the available help in "Help > Index."•For any technical questions, please refer to the "Technical Support" section on the website •Updates:We recommend that you update the software regularly, so you can benefit from the latest corrections and improvements.Visit the website to view the updates available.Updates are free.。
cardfive使用说明书
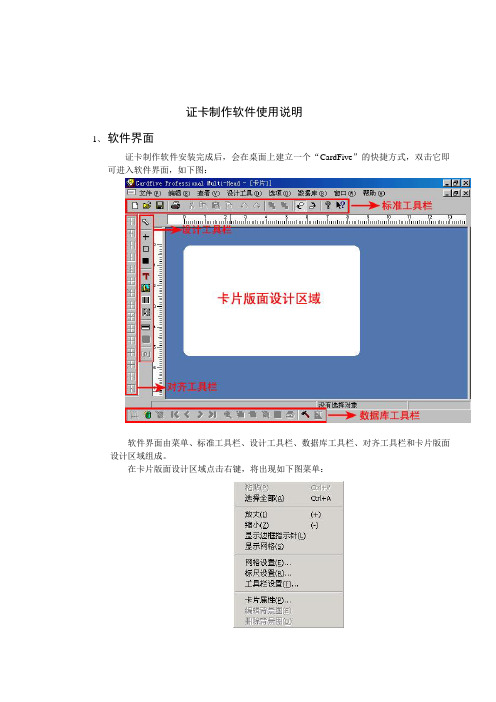
证卡制作软件使用说明1、软件界面证卡制作软件安装完成后,会在桌面上建立一个“CardFive”的快捷方式,双击它即可进入软件界面,如下图:软件界面由菜单、标准工具栏、设计工具栏、数据库工具栏、对齐工具栏和卡片版面设计区域组成。
在卡片版面设计区域点击右键,将出现如下图菜单:您可对软件进行一些简单的设置,如隐藏网格显示、标尺和工具栏的显示等一些设置,您可根据您的喜好来设定。
现在以下面两张卡为例来说明怎样设计制作单张卡片和利用数据库进行成批处理。
说明:以上两张卡片主要由相片和一些文字组成,是比较典型的卡片。
有些卡片还需要设计打印条形码、二维码和一些标志LOGO等,软件本身带有丰富的设计工具,如有条形码、矩形、实心矩形、线条、二维码等,这些都可以根据您的实际需要来设计。
单张卡片设计制作和打印:①首先在卡片版面上插入文字“广州盛泰科技有限公司”。
插入方法:点击“设计工具栏”上的“文本”设计工具,如下图:②选择“文本”设计工具后,将鼠标移到卡片版面设计区域,左键点击鼠标在您要插入文字的位置轻轻画一下,如下图:③轻轻画一下后,将弹出一个窗口,请在默认文本框内输入目标文字“广州盛泰科技有限公司”,如下图:④文本输入完成后,请点击“选择”按钮来设置相应的字体及字体大小,设置完毕后点击“确定”,如下图:⑤字体设置完成后,点击“确定”,文字就这样插入到卡面上来了。
如下图:⑥此时您可以看到文本有一个虚线框包围着,您可右键点击文本,将出现一个右键菜单,然后点击弹出菜单的“调整到实际大小”,把虚线框调整到正好文本大小,如下图:按照同样的方法插入其它的文本,并设置相应的字体及字体大小。
⑦插入相片。
可利用设计工具栏的“图像”工具来插入您准备好的相片文件,如下图:先在设计工具栏上选择“图像”工具⑧选择好“图像”工具后,将鼠标移到卡片版面设计区域,左键点击鼠标在您要插入相片的位置轻轻画一下,如下图:⑨轻轻画一下后,将弹出如下图对话框,点击“打开文件”,选择您的插入的相片文件:⑩选择您要插入的相片文件后,然后点击“打开”,如下图:⑾点击“打开”后,将返回到如下图对话框。
医学影像处理工具使用方法总结

医学影像处理工具使用方法总结医学影像处理工具是医学领域中广泛使用的一类软件工具,能够处理和分析各种医学图像数据,如X射线、CT、MRI等,为医生和研究人员提供辅助诊断和分析的功能。
本文将总结医学影像处理工具的使用方法,以帮助读者更好地利用这些工具进行医学图像的处理和分析。
首先,医学影像处理工具的安装和配置是使用这些工具的第一步。
大多数医学影像处理工具都提供了Windows和Mac等操作系统的版本,用户可以根据自己的系统选择相应的版本进行安装。
安装过程一般比较简单,按照提示进行即可完成。
安装完成后,有些工具需要进行简单的配置,比如设置存储路径、选择默认参数等。
接下来,我们将重点介绍医学影像处理工具的图像导入和导出功能。
首先是图像导入功能,一般来说,医学影像处理工具支持多种常见的图像格式,如DICOM、NIfTI、JPEG等。
用户可以选择将本地图像文件导入到软件中,也可以通过连接医学影像设备,如CT扫描仪或MRI设备,实时接收图像数据。
在导入图像时,用户还可以选择是否对图像进行预处理,如去除噪声、裁剪图像等操作。
图像导出功能可以将处理后的图像保存为用户指定的格式。
常见的保存格式包括DICOM、NIfTI、JPEG、PNG等。
用户可以根据自己的需求选择合适的格式进行保存,并设置保存的路径和文件名。
医学影像处理工具通常提供了丰富的图像处理和分析功能,下面将介绍其中一些常见的功能。
第一是图像增强功能。
医学图像往往受到噪声、低对比度等因素的影响,影像增强功能可以帮助用户改善图像质量。
医学影像处理工具通常提供了各种图像增强算法,如直方图均衡化、滤波器、锐化等。
用户可以根据具体情况选择合适的增强算法,并进行参数调整。
第二是图像配准功能。
医学图像常常需要进行配准,将不同时间或不同模态获得的图像对齐,以便进行比较和分析。
医学影像处理工具提供了各种配准算法,如基于特征点的配准、基于互信息的配准等。
用户可以选择合适的配准算法,并根据需要进行调整。
Evolis Badge Studio软件用户指南说明书
FAQ BADGE STUDIO SOFTWAREFor m or e infor m ation, please visit ©Evolis, 2021Table of Contents1.BASICS2.INSTALLATION3.CARD DESIGN4.DATABASE5.PRINTING6.LICENSING7.TROUBLESHOOTING1. BASICSHow do I use Ba dge St udio?Watch the how-to videos.Ev olis Ba dge St udio + : upgra de process1.Go to the Menu GENERAL > Badge Studio LicenseA window opens, showing which edition of Badge Studio is cur r ently installed on your com puter, and a text fieldto enter your coupon code.2.Enter your UPGRADE CODE in the text field3.Click on Activate Upgrade to pr oceed with the upgr ade4.After a few seconds, a window confir m s that the upgr ade was per for m ed successfully5.Click OK, and r estar t Badge StudioOnce you r estar t the softwar e, ‘Badge Studio+’ is activated.You can check by looking at the softwar e nam e: ‘Badge Studio+’W ha t is ba dge St udio?Badge Studio is a ver y sim ple, power ful and user fr iendly softwar e to design and pr int ID car ds.W ha t a re t he a v a ila ble edit ions of Ba dge S t udio?Badge Studio is declined in 2 editions. Badge Studio the basic edition to design and pr int your ID car ds and Badge Studio+ included an inter nal database to m anage easily your r ecor dsW hich ca mera models a re support ed by Ba dgeS t udio?All m ain cam er as with a com pliant Dir ectshow and/or WIA/TWAIN dr iver ar e suppor ted.Ca n I ha v e liv e v ideo a cquisit ion?If the cam er a you ar e using suppor ts live video, then yes you can have it in Badge Studio.2. INSTALLATIONW hich Opera t ing Sy st ems a re support ed by Ba dgeS t udio?Badge Studio suppor ts Windows XP SP3,Windows Vista,Windows 7,Windows 8,Windows 10 and Mac OS X10.5+. For now, ther e is no Badge Studio ver sion com pliant with L inux oper ating system.Does Ba dge St udio support64bit OS?Yes, both 32 and 64bit.3. CARD DESIGNCa n I edit ima ges using Ba dge S t udio?Badge Studio includes an integr ated im age m anipulation tool that per for m s im age m anipulations such as cr op, flip, r otation, color balance, contr ast and br ightness as well as m onochr om e conver sions to an im age.Badge Studio can also autom atically r esize im ages to fit into a defined r ectangular ar ea and also includes a Face Cr op tool for easy face detection and cr op.Ca n I a cquire ima ges from a digit a l ca mera, webca m or sca nner using Ba dge St udio?Yes, Badge Studio will wor k with any Dir ectshow, WIA or TWAIN com pliant digital cam er a, webcam or scanner.Ca n I sa v e or ex port a n ima ge loca t ed on ca rd a rea?Yes,Badge Studio will expor t it as one of the available types: .bm p, .gif, .jpg, .m ng, .pbm, .pgm, .png, .ppm, .tif, .xbm and .xpm.4. DATABASEW ha t t y pes of da t a ba ses a re support ed?Badge Studio suppor ts only an inter nal database. You can also im por t your data fr om a delim ited file (such as CSV file), fr om an Excel spr eadsheet or an Access file.This featur e is only available in the Badge Studio+ edition.Is it possible t o link ima ge t o a da t a ba se field?Yes, it is possible, when you cr eate a database, Badge Studio allows you to quickly set up a database field as a sour ce for im ages on your com puter.By a r ight click on the database field,you open its Pr oper ties m enu and you can change the Data Type to Indexed Im age.For m or e details r efer to user guide or help m enu.Is it possible t o connect direct ly t o .X LS a nd .X LS Xda t a ba se files?No, it is not possible. With badge Studio + you can not connect dir ectly to an Excel database, but you can im por t data fr om an Excel spr eadsheet.Ca n I edit da t a ba se records?Yes, Badge Studio+ integr ates a database editor which m anage cr eate, m odify fields and r ecor ds.5. PRINTINGW hich print er models a re support ed by Ba dgeS t udio?Badge Studio was developed to suppor t and pr int with Badgy pr inter m odels only. Badge Studio suppor ts only Badgy, Badgy100 and Badgy200 pr inter s.Ca n I configure a not her print er model?No, Badge Studio was developed to suppor t and pr int with Badgy pr inter m odels.Do I need t o inst a ll a print er driv er t o print wit hBa dge S t udio?Yes. You m ust install the latest Badgy dr iver pr ovided by the Evolis.6. LICENSINGW ha t prot ect ion sy st em is used by Ba dge S t udio?Ther e is no pr otection system in Badge Studio but please note that Badge Studio was developed to suppor t only Badgy pr inter s (so it will not r ecognize other pr inter s) and without a Badgy200 connected or a upgr ade key, you will execute only Badge Studio edition not the Badge Studio+ edition.Ca n I inst a ll ba dge St udio in mult iple PCs?Yes you can but please note that only the PC wher e the Badgy pr inter is connected will be able to pr int.7. TROUBLESHOOTINGI ca nnot use t he Ba dge St udio + v ersion, wha t ca n Ido?o When using a Badgy100, it’s r equir ed to use a coupon to upgr ade fr om Badge Studio to Badge Studio +.o When using a Badgy 200, the Badge Studio + will be accessible dir ectly.Advices:As par t of its continuous im pr ovem ent policy, Evolis is developing new Badge Studio ver sion which include new fixes and im pr ovem ent. Evolis r ecom m ends updating Badge Studio to take full advantage of the latest im pr ovem ents.I wa nt t o print a design from a da t a ba se but print ing does not st a rt, wha t ca n I do?To pr int fr om a database, som e Badge Studio settings m ust be selected. Check the following instr uctions one by one until fixing the issue:o If the issue r em ains event after checking these points, please contact your Evolis r eseller/distr ibutoror contact uso Select the r ecor d(s) to pr int in the Browse Records windows.o Check the cor r ect selection in the Print windows.o If the issue r em ains event after checking these points, please contact your Evolis r eseller/distr ibutoror contact us.Ba dge S t udio is una ble t o det ect my print er, wha tca n I do?When tr ying to select a pr inter fr om Badge Studio Print setting,no pr inter is listed. Check the following instr uctions one by one until fixing the issueo Go to General and click on Clear config. Restar t the softwar e and go back to Print setting, if thepr inter is cor r ectly installed, pr inter will be visible.o If the issue r em ains event after checking these points, please contact your Evolis r eseller/distr ibutoror contact usAdvices:As par t of its continuous im pr ovem ent policy, Evolis is developing new Badge Studio ver sion which include new fixes and im pr ovem ent. Evolis r ecom m ends updating Badge Studio to take full advantage of the latest im pr ovem ents.。
Geomagic studio软件操作指南

Geomagic studio 软件操作指南目录AA004XNCEY软件介绍 (1)Geomagic公司及其主要产品 (1)Geomagic Studio软件的使用范围 (1)Geomagic Studio软件的主要功能 (1)Geomagic Studio软件的优势 (1)计算机要求 (2)2. 软件安装 (3)3. 软件功能介绍 (10)Geomagic studio软件及流程简介 (10)Geomagic Studio 中鼠标控制和主要快捷键 (11)Geomagic Studio 软件的基本模块 (11)4.点阶段 (15)点阶段主要操作命令列表 (15)实验 (15)5.多边形阶段 (25)多边形阶段主要操作命令列表 (25)实验 (26)实验一:毛泽东塑像建模 (26)实验二:建筑物单面墙体建模 (39)6.精确曲面阶段 (46)精确曲面阶段主要命令列表 (46)实验 (47)1软件介绍Geomagic公司及其主要产品Geomagic是一家世界级的软件及服务公司,在众多工业领域如汽车、航空、医疗设备和消费产品得到广泛应用。
公司旗下主要产品为Geomagic Studio、Geomagic Qualify和Geomagic Piano。
其中Geomagic Studio是被广泛应用的逆向工程软件,可以帮助用户从点云数据中创建优化的多边形网格、表面或CAD模型。
Geomagic Qualify 则建立了CAD和CAM之间所缺乏的重要联系纽带,允许在CAD 模型与实际构造部件之间进行快速、明了的图形比较,并可自动生成报告;而Geomagic Piano是专门针对牙科应用的逆向软件。
本项目所使用的主要是Geomagic Studio软件。
Geomagic Studio软件的使用范围:(1)零部件的设计;(2)文物及艺术品的修复;(3)人体骨骼及义肢的制造;(4)特种设备的制造;(5)体积及面积的计算,特别是不规则物体。
DicomObjects用户手册 中文版
1.1结构............................................ ................................................. (3)1.2支持的语言............................................... .................................................................... .......... .4 1.3使用COM对象模型的效果.......................................... .. (4)1.4 DicomObjects中的集合.............................................. .. (4)1.5 Dicom对象的DICOM数据表示........................................................................ .. (5)1.6解释和使用序列............................................. .. (7)1.7私有属性............................................... .................................................................... (7)2第一步- 阅读,查看和写入DICOM文件................................................................... . (9)2.1您的第一个DICOM计划............................................. . (9)2.2将映像写入磁盘............................................ . (10)3通过网络简单地发送和接收图像........................................ . (11)3.1发送图像.................................................. ................................................................ .. (11)3.2接收图像............................................... ..................................................................... (11)4查询/检索(SCU)........................................... .......................................................... .. (13)4.1公共特性............................................... ................................................................... .. (13)4.2 DoQuery ............................................... ................................................................................ . 14 4.3 GetImages ............................................... . (14)4.4 GetUsingMove ................................................ (15)4.5 DoRawQuery ................................................ (15)4.6 MoveSync ................................................ .. (15)4.7 MoveImages ................................................ . (15)4.8基于Dicom连接的Q / R方法........................................... ............................ ....... ......... .. (15)5离线媒体............................................. ................................................. ..... ....... (17)5.1阅读............................................... ................................................. .......... ....... ....... .. (17)5.2创建................................................ ................................................. (18)5.3更新............................................... ................................................. . (19)5.4乘以引用的目录记录............................................. . (19)6打印............................................ ................................................. . (20)6.1使用DicomPrint打印.................................................. .. (20)6.2使用标准化操作打印............................................. . (22)6.3将DICOM图像打印到Windows打印机.......................................... . (22)7将DICOM图像导出到其他格式........................................... . (23)7.1单帧............................................... ................................................. . (23)7.2多帧图像/电影........................................... .. (23)7.3非文件导出............................................. ...................................................................... (23)8高级图像审查站............................................. (24)8.1基本查看控件................................................ . (24)8.2多帧(电影)图像.......................................... .. (24)8.3注释............................................ ................................................. . (25)8.4查找表............................................... ................................................. (28)8.5 DICOM灰度呈现状态............................................. . (28)8.6显示速度优化................................................ . (29)9.1在Web服务器上运行DicomObjects . .... .......................................... .. (31)9.2在Web客户端上运行DicomObjects .......... .... .................................. . (33)10写路由器/修改器.................................. .... .... .............. ...................................................... (35)11编写DICOM服务器............................................. ................................................................ (36)11.1聆听协会的对象........................................... (36)11.2验证协会............................................... .. (37)11.3处理C-STORE操作............................................ . (37)11.4处理查询/检索请求............................................ .. (38)11.5处理C-ECHO请求............................................ .. (42)11.6传输语法和质量问题............................................ (42)11.7性能和可靠性问题............................................. (43)11.8模态WorkList SCP .............................................. (44)11.9打印SCP ............................................... ................................................. (44)11.10存储承诺SCP ................................................ (45)12访问和修改像素数据............................................ (46)12.1原始指针的语言............................................. . (46)12.2使用变量数组的语言............................................. .. (47)13创建DICOM图像.............................................. .................................................................. (48)13.1导入其他格式................................................ .. (48)13.2导入多帧图像.................................................. (49)13.3从划痕............................................... ................................................................... (50)14使用模态WorkList作为SCU ........................................... (52)15语言特定功能.............................................. . (53)15.1 Visual Basic ............................................... .................................................. . (53)15.2 VBScript ................................................ ................................................. (53)15.3应用程序的Visual Basic(例如MS Access)........................................ .. (53)15.4 Microsoft Visual C ++ ................................................ ........................................................ (53)15.5 Borland Delphi和Borland C ++ Builder ........................................... (55)15.6 Java ................................................ ................................................. . (56)15.7其他环境............................................... ................................................. (56)16日志记录................................................ ................................................. .. (57)16.1日志详细信息和级别............................................. ........................................................... .. 57 16.2文件记录............................................... ................................................. (57)16.3 DicomLog控制................................................ . (58)17高级使用............................................... ................................................. (59)17.1超车注册表值............................................ (59)17.2更改默认SOP类的列表.......................................... (59)17.3传输语法选择.................................................. (60)17.4私人SOP类................................................ .................................................................. . (61)17.5私有传输语法 (61)17.6存储承诺............................................... ............................................................................ (61)1简介本用户手册是DicomObjects帮助文件的重要补充。
人像证件卡排版软件Badge Studio软件的使用指南2015版
5
I. 开始使用 Badge Studio
6. 您可以用“文本”工具添加文字。 • 首先绘制文本框,然后双击进行编辑。 • 单击屏幕右侧的“字体”选项卡来选择文本的字体、大小和颜色。
7. 如有必要,可以添加其他项目,如条形码、商标… 8. 您的证卡已经就绪可以打印了。
12
II.数据库
• • “数据库”功能可为软件创建内部数据库,或导入数据。仅 Badge Studio+ 版本支持此功能。 借助数据库,您可以将变量字段(如“姓/名”、证件照…)从一个证卡添加到另一个证卡上,实现证卡自动批量打 印,无需逐个对其修改。
请定期保存证卡文件将所作更改保存到数据库返回证卡方向数据库按添加文本时可以通过字体窗格更改字体
EVOLIS BADGE STUDIO
快速入门指南
目录
简介……………………..………………………………………………………………………………...……………………………….……………3 在 Windows 系统上安装…………….....…………………………………………………………………………………………...………………...4 在 Mac OS 系统上安装………………………………………………………………………………….………………………......………………..5 开始使用 Badge Studio…………………………..…………………………………………………………………….……………….…………….6 1. 一般使用…………………………………….……………………………………………………..……………………………….……………6 a. 界面……............……………………………………………………………………...………………………………………………………..6 b. 首页…………………………………………………...……………………………………………..………………………………………….7 2. 通过“模板”图标创建证卡…………..………………….……………………………………………………..……………….………........8 3. 通过“向导”图标创建证卡………………..………….………………………………………….........................…..……………………..8 4. 从空白文档创建证卡……………………………………..……………………………………………………………………………………11 数据库……………………………………………………………….…………………………………..…………………………………………….13 1. 创建内部数据库………………………………………………………………….…………………………………………………………….13 2. 导入数据库……………………………………………………............................................……………………………………………….16 3. 在证卡上显示数据库字段……………………………………………………………………………….…………………………………....18 其他功能………………………………………………………………………………………………………………………….…...........………...19 1. 使用“线条”工具…………………………………………………………………………………………………..………………………...19 2. 使用“形状”工具……………………………………………………………………………………………………..……………………...19 3. 照片采集……………………………………………………………………………………………………..…...…………………………...19 打印 ………………………………………………………………….……………………….…………………………………..…………….……20 1. 打印设置 ………………………………………………………………………………..…………. ………………..………… ……………20 2. 打印 …………………………………………………….………… ……………………………….……… ………….……….…….………21 2 技术支持 …………………………………………………………………….……………………………….………………..………….…….……22
- 1、下载文档前请自行甄别文档内容的完整性,平台不提供额外的编辑、内容补充、找答案等附加服务。
- 2、"仅部分预览"的文档,不可在线预览部分如存在完整性等问题,可反馈申请退款(可完整预览的文档不适用该条件!)。
- 3、如文档侵犯您的权益,请联系客服反馈,我们会尽快为您处理(人工客服工作时间:9:00-18:30)。
在 Windows 系统上安装
1. 2. 3. 4. 5. 欢迎页:选择语言。 安装:选择安装选项,然后点击“下一步”。 完成安装。 接受一般使用条款。 安裝完成。
请注意:您可随时通过“常规>语言”菜单更改软件的运行语言
4
在 Mac OS 系统上安装
1. 2. 3. 4. 打开 .dmg 格式的文件。 接受一般使用条款。 将 Badge Studio 文件拖入“应用程序”文件夹中。 安裝完成。您可以通过“应用程序”文件夹中的对应图标启动 Button Studio
14
II.数据库
添加、删除或确认记录
添加列
如设置了图片字段,请双击此处打开图片编辑器
15
II.数据库
2. 导入数据库
1. 2. 3. 4. 5. 导入功能允许您将数据从 .csv、.txt 格式文件或 Microsoft Excel 文件导入到 Badge Studio+ 中。 选择要导入的文件类型,然后点击“下一步”。 选择电脑上的数据库文件。 您可以配置相关字段(文本、图片、条码……)。 点击“下一步” 。 通过对面的屏幕,您可以选择希望在 Badge Studio+ 中显示的数据库的列。 点击“下一步” 。
EVOLIS BADGE STUDIO
快速入门指南
目录
简介……………………..………………………………………………………………………………...……………………………….……………3 在 Windows 系统上安装…………….....…………………………………………………………………………………………...………………...4 在 Mac OS 系统上安装………………………………………………………………………………….………………………......………………..5 开始使用 Badge Studio…………………………..…………………………………………………………………….……………….…………….6 1. 一般使用…………………………………….……………………………………………………..……………………………….……………6 a. 界面……............……………………………………………………………………...………………………………………………………..6 b. 首页…………………………………………………...……………………………………………..………………………………………….7 2. 通过“模板”图标创建证卡…………..………………….……………………………………………………..……………….………........8 3. 通过“向导”图标创建证卡………………..………….………………………………………….........................…..……………………..8 4. 从空白文档创建证卡……………………………………..……………………………………………………………………………………11 数据库……………………………………………………………….…………………………………..…………………………………………….13 1. 创建内部数据库………………………………………………………………….…………………………………………………………….13 2. 导入数据库……………………………………………………............................................……………………………………………….16 3. 在证卡上显示数据库字段……………………………………………………………………………….…………………………………....18 其他功能………………………………………………………………………………………………………………………….…...........………...19 1. 使用“线条”工具…………………………………………………………………………………………………..………………………...19 2. 使用“形状”工具……………………………………………………………………………………………………..……………………...19 3. 照片采集……………………………………………………………………………………………………..…...…………………………...19 打印 ………………………………………………………………….……………………….…………………………………..…………….……20 1. 打印设置 ………………………………………………………………………………..…………. ………………..………… ……………20 2. 打印 …………………………………………………….………… ……………………………….……… ………….……….…….………21 2 技术支持 …………………………………………………………………….……………………………….………………..………….…….……22
3.
选择待打印记录时的设置
21
技术支持
• • •
有关使用 Badge Studio 软件的更多信息,请参阅“帮助>目录”菜单中的帮助。 关于技术问题,请参阅网站 上的“技术支持”部分 更新: 我们建议定期更新软件,以获得最新的修正和改进。 访问网站 以检查可用的更新。 更新是免费的。
您的卡片将显示在屏幕上。接下来,您只需要双击想对其进行个性化设置的项目,也可随意 移动这些项目。
1 2 3
9
4
I. 开始使用 Badge Studio
备注:在 Badge Studio+ 中,您可以添加用来创建内部数据库的字段。 要使用这一功能,请在创建向导的第 4 步勾选窗口左下角的复选框“使用数据库”。 软件将自动创建一个内部数据库。 请参见数据库相关章节以获得更多信息。
I. 开始使用 Badge Studio
1. 一般使用
b) 首页
Badge Studio 旨在帮助您自行设计漂亮的证卡,与您掌握多少相关知识无关。 首页提供了以下菜单,帮助您根据需要设计各种卡片,满足您的各种需要:
使用卡片模板
使用 卡片创建向导
使用空白文档创建
打开最近保存的文档
7
I. 开始使用 Badge Studio
1. 2. 3. 4. 要在屏幕右侧显示“数据库”属性,请点击证卡周围灰色部分。 使用鼠标从右侧的“数据库”窗格中将所需项目拖放到证卡中。 要在不同记录之间切换,请使用屏幕顶部的导航箭头。 添加文本时可以通过“字体”窗格更改字体。 窗格会在您选择证卡的文本时自动显示。
18
III.其他功能
1. 使用“线条”工具
请注意:您可随时通过“常规>语言”菜单更改软件的运行语言
5
I. 开始使用 Badge Studio
1. 一般使用
a)
界面
1 4
2
3
5
1. 2. 3. 4. 5.
6
文档工具栏:创建、打开、保存或删除卡片。 视图和打印工具栏:方向、查找记录、打印、缩放。 数据库工具栏:创建、断开连接、导入、刷新、在记录之间跳转、添加、删除记录(仅适用于 Badge Studio+)。 插入对象工具栏:添加文本、形状、条形码、图片… 属性窗口:集中了在证卡上添加对象所需的所有功能。
16
II.数据库
7. 8. 9. 数据库现已导入。 要查看它,点击“窗口”菜单,然后选择“数据库”,或者直接点击顶部工具栏中相应的图标。 要返回证卡编辑窗口,点击上面相应的图标。
返回证卡/方向
“数据库”按 钮
17
请注意:请定期保存证卡文件,将所作更改保存到数据库
II.数据库
3. 显示证卡上的数据库字段
配置各字段类型(文本、日期……)
10
I. 开始使用 Badge Studio
4. 使用空白文档创建证卡
1. 选择证卡方向。屏幕上会显示一个空白文档。 2. 添加背景:可从右边的窗口选择一个默认背景。也可以导入自己的图片。 3. 点击“添加图片”按钮,并划出图片或照片的区域。
2
3
4. 确定此区域后,浏览至文档并选择图片。 5. 图片编辑器会自动打开。您可以 修改图片(改变颜色、截取一部分……)。 修改完成后,点击,选择“线条”工具并在证卡上绘制。 线条的粗细、颜色和样式可以在右边的窗口更改。
使用“形状”工具 1. 选择“形状”工具然后在证卡上绘制图形。 2. 默认图形为黑色的矩形。可以在右边窗口改变图形的样式、颜色、 轮廓、大小… 照片采集 1. 点击“照片采集”按钮。 2. 在证卡上绘制出图片的位置。如果电脑上安装有摄像头,会自动打 开。 3. 确认拍摄的照片。
11
5
I. 开始使用 Badge Studio
6. 您可以用“文本”工具添加文字。 • 首先绘制文本框,然后双击进行编辑。 • 单击屏幕右侧的“字体”选项卡来选择文本的字体、大小和颜色。
7. 如有必要,可以添加其他项目,如条形码、商标… 8. 您的证卡已经就绪可以打印了。
12
II.数据库
• • “数据库”功能可为软件创建内部数据库,或导入数据。仅 Badge Studio+ 版本支持此功能。 借助数据库,您可以将变量字段(如“姓/名”、证件照…)从一个证卡添加到另一个证卡上,实现证卡自动批量打 印,无需逐个对其修改。
13
II.数据库
1. 创建内部数据库
1. 在 Badge Studio 的“菜单”部分,选择 “数据库”,然后选择“创建”。 2. 此时会显示数据库窗口。选择 “编辑记录”按钮。 3. 您可以开始编辑记录。 4. 要添加变量字段,选择“添加列”按钮(见下页) 5. 设置列:为其命名,并选择数据类型(文本、数字、图片)。 6. 完成配置后,您就可以输入信息了。要执行此操作,请点击“添加记录”按钮。每条记录必须经过确 认才能被保存。 7. 完成对记录的编辑后,回到“浏览记录”来查看数据库。
名词解释: 记录:每条记录对应一个证卡副本,其中包含一个或多个变量字段。例如,上述数据库包含 5 条记录。 变量数据/变量字段:需要在不同证卡记录中进行相应改变的证卡数据,如员工的姓名或证件照。
