strusts2课堂总结
学习Struts2经验总结
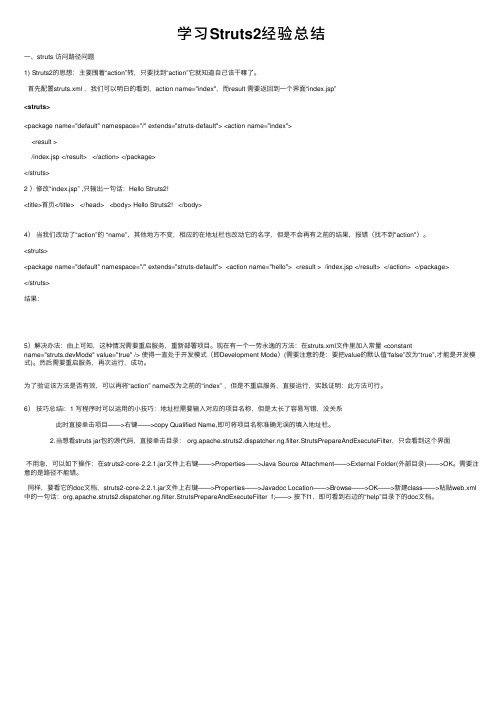
学习Struts2经验总结⼀、struts 访问路径问题1) Struts2的思想:主要围着“action”转,只要找到“action”它就知道⾃⼰该⼲嘛了。
⾸先配置struts.xml ,我们可以明⽩的看到,action name="index",⽽result 需要返回到⼀个界⾯“index.jsp”<struts><package name="default" namespace="/" extends="struts-default"> <action name="index"><result >/index.jsp </result> </action> </package></struts>2 )修改“index.jsp” ,只输出⼀句话:Hello Struts2!<title>⾸页</title> </head> <body> Hello Struts2! </body>4)当我们改动了“action”的 “name”,其他地⽅不变,相应的在地址栏也改动它的名字,但是不会再有之前的结果,报错(找不到"action")。
<struts><package name="default" namespace="/" extends="struts-default"> <action name="hello"> <result > /index.jsp </result> </action> </package></struts>结果:5)解决办法:由上可知,这种情况需要重启服务,重新部署项⽬。
Struts2知识点总结
1.简介Struts 2是Struts 的下一代产品,是在 struts 1和WebWork 的技术基础上进行了合并的全新的Struts 2框架。
其全新的Struts 2的体系结构与Struts 1的体系结构差别巨大。
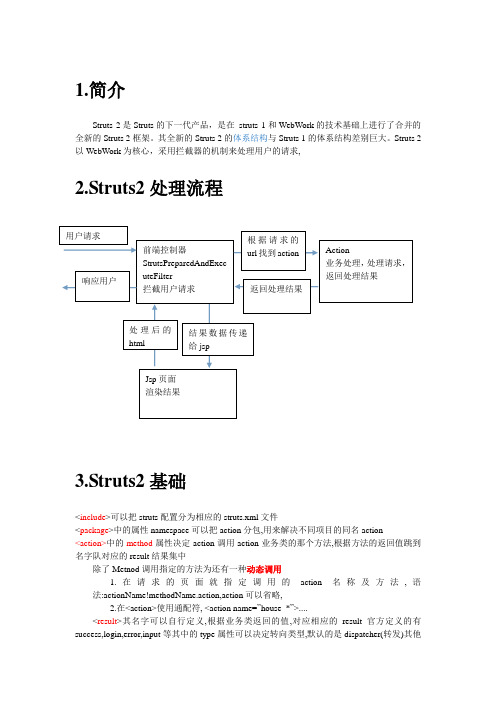
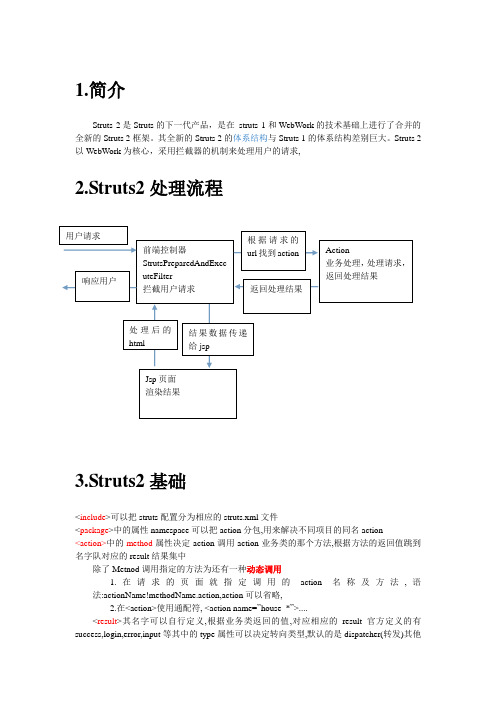
Struts 2以WebWork 为核心,采用拦截器的机制来处理用户的请求,2.Struts2处理流程3.Struts2基础<include >可以把struts 配置分为相应的struts.xml 文件<package >中的属性namespace 可以把action 分包,用来解决不同项目的同名action <action>中的method 属性决定action 调用action 业务类的那个方法,根据方法的返回值跳到名字队对应的result 结果集中除了Metnod 调用指定的方法为还有一种动态调用1.在请求的页面就指定调用的action 名称及方法,语法:actionName!methodName.action,action 可以省略,2.在<action>使用通配符, <action name=”house_*”>....<result >其名字可以自行定义,根据业务类返回的值,对应相应的result 官方定义的有success,login,error,input 等其中的type 属性可以决定转向类型,默认的是dispatcher(转发)其他前端控制器 StrutsPreparedAndExec uteFilter 拦截用户请求 用户请求 Action 业务处理,处理请求,返回处理结果 根据请求的url 找到action 返回处理结果 Jsp 页面 渲染结果结果数据传递给jsp 处理后的html 响应用户的是redirect,请求重定向的指定的URL,redirectAction重定向到指定的Action,chain:将请求转发到指定的Action,json返回JSON对象如果result的内容不是一个具体的jsp页面而是${}形式的这就是动态结果的配置,就是结果页面在配置是不能确定,需要在运行时才能确定,比如管理员和普通用户登录,详细的动态结果配置详见资料Action类实现的方法有三种1.继承ActionSupport (常用)2.实现Action接口3.自己编写方法Action接收参数1属性方式接收参数,2Javabean方式接收参数(常用)3.moderlDriven方式接收参数Struts2访问servletAPI的方法在jsp课程中,服务器保存数据的作用域通常有request,session,application,他们对应的servletAPI 分别是HttpServletRequest,HttpSession,servletContext,同样在struts2控制器(action)中也需要访问这些作用域,有三种方法1.使用ActionContext类提供的方法2.以依然注入(IoC)方式访问,实现响应的接口即可3.使用以耦合方式使用ServletActionContext类访问OGNL与struts标签引入的标签指令<%@taglib uri="/struts-tags" prefix="s"%>理解值栈(存储action属性的地方)和stackcontext(存储request,session的地方)概念,并且使用<s:debug>查看值栈访问的值OGNL访问集合知识点,不常用字符串转换OGNL表达式用户%{}相反的加’’单引号Struts2标签可分为通用标签,控制标签,Ajax标签通用标签又分为数据标签和控制标签数据标签:<s:property><s:debug><s:date><s:set><s:url>和<s:a><s:param><s:include>控制标签<s:if>,<s:elseif><s:else><s:iterator>UI标签理解模板与主题,模板用于生成HTML代码,共同风格和观感的模板组织到一起就成了一个主题,内建的主题有simple,xhtml,css_xhtml(默认),css_xhtml,ajax主题的更改用标签属性theme=”simple”标签:<s:form><s:textfield><s:textarea><s:submit><s:select><s:doubleselect>下拉列框和联动列框属性及实现参观相关代码Ajax标签Datetimepicker是一个日历控件导入相应的包引入<%@taglib uri="/struts-dojo-tags" prefix="sx"%>指令在<head>中添加<sx:head parseContent="true"/>添加标签<sx:datetimepicker name="timer" label="发布时间"/>4.数据校验数据校验分为客户端验证和服务器端验证,sruts2对服务器端的验证有两种,1.使用actionsupport编码实现验证2.使用验证框架实现验证,使用actionsupport编码进行验证的方法有三种,1.直接在action类业务方法中验证,2.重写validate()方法实现验证,3.使用validateXXX()方法实现验证验证的关键点在于当用户名或密码没填写时添加addFieldError()方法,此方法处理与字段相关的错误,比如输入的年龄不合理,响应的jsp输出错误的标签是<s:fielderror fieldname=”/>, addActionError()方法是用来添加与action所处理的业务相关的错误信息,在JSP输出错误的标签是<s:actionerror>如果两种情况有任何一种错误(hasErrors())就return到INPUT结果集中(事先已经配置好) 使用验证框架使用特定的配置框架即可,命名的前半部分是action 的名字,可对全局和局部进行验证!具体查看相关资料5.拦截器拦截器,在AOP(Aspect-Oriented Programming)中用于在某个方法或字段被访问之前,进行拦截然后在之前或之后加入某些操作。
struts2学习总结
6.2:C:就是向库里面插入一条记录,这个相当的简单就是把name的值名称设定和实体bean中的值名称一样它会帮我们自动转型的我们不需要考虑
<s:submitvalue="提交"/>
就这样它就会把这些值传给stu对象,然后我们拿到这个对象就可以插入了
6.3:U:更新就是把当前对象的id拿来然后找到这个对象,做修改在更新数据库表就搞定了
首先我们的在列表界面上有一个链接把id传给它,它查找对象,代码如下:
<ahref='<s:urlaction="stu!updateInput.action"><s:paramname="stu.id"value="id"/></s:url>'>编辑</a>
<filter-class>
org.apache.struts2.dispatcher.FilterDispatcher
</filter-class>
</filter>
<filter-mapping>
<filter-name>struts2</filter-name>
<url-pattern>/*</url-pattern>
5.3:在struts2中是通过标签来对表单和实体bean进行管理的,在struts2中就提供一套标签非常灵活,不想在strtus1那样一大堆一大堆的ongl表达式
struts2课程知识点总结
<s:param
<s:property <s:include <s:push <s:set
<s:debug></s:debug>
<s:action
6、Struts2 类型转换
1、自动类型转换 2、list 列表自动类型转换 3、类型转换错误提示 定义 AddMaterialAction.properties 文件
5、tags(标签库)
引入:<%@ taglib uri="/struts-tags" prefix="s"%> 1、 <form> 标签
<s:form> <s:textfield <s:password <s:textarea <s:select <s:checkboxlist
2、控制标签
………………………
validate="true">
8、Struts2 国际化支持
步骤: 1、JSP 中配置
<s:textfield name="username" key="username"/>
2、struts.properties 中配置
struts.custom.i18n.resources=messageResource
f) session 等 jsp 内置对象的应用
两种方法 1、普通 2 、map
g) action 通配符的配置
* 与 {} 或 *_*
<action name="Student*" class="example.StudentAction"method="{1}">
Struts2知识点总结
Struts2基础知识Struts2概述1.Struts2框架应用javaee三层结构中的web层框架。
2.Struts2框架在struts1和webwork基础之上发展的全新框架。
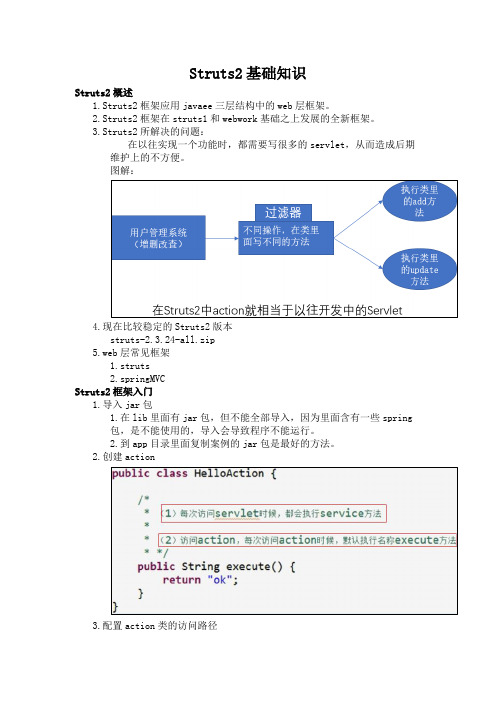
3.Struts2所解决的问题:在以往实现一个功能时,都需要写很多的servlet,从而造成后期维护上的不方便。
图解:4.现在比较稳定的Struts2版本struts-2.3.24-all.zip5.web层常见框架1.struts2.springMVCStruts2框架入门1.导入jar包1.在lib里面有jar包,但不能全部导入,因为里面含有一些spring包,是不能使用的,导入会导致程序不能运行。
2.到app目录里面复制案例的jar包是最好的方法。
2.创建action3.配置action类的访问路径1.创建struts2核心配置文件,该核心配置文件位置和名称是固定的,位置必须在src下面,名称为struts.xml 。
2.引入dtd约束,可以在案例文件中找到,复制在struts.xml文件中即可。
3.action的配置*注意访问路径:http://域名/端口号/项目名/action名.action注意:.action可以省略,但建议不要省略,为了兼容一些老版本的浏览器。
4.配置Struts2的过滤器,可以在案例中的web.xml文件中找到,复制粘贴即可。
Struts2执行过程图解:Struts2配置1.是一种常量标签2.修改Struts2的默认常量值1.常用方式在struts.xml中进行配置。
2.其它两种方式1.在src下面创建struts.properties文件并修改。
2.在web.xml文件中进行修改。
3.Struts2最常用的常量struts.il8n.encoding=UTF-8,解决表单在通过post方式提交中文时,中文乱码的问题。
Struts2笔记(一)可使用全局页面。
1、配置方法:在package标签下配置2、注意:该标签只能在一个package标签中使用,如果有多个标签,需要重新定义。
struts2总结
struts2总结Struts 2是在WebWork2基础发展而来的。
注意:struts 2和struts 1在代码风格上几乎不一样。
Struts 2 相比Struts 1的优点:1、在软件设计上Struts 2 没有像Struts 1那样跟Servlet API 和struts API 有着紧密的耦合。
Struts 2的应用可以不依赖于Servlet API和Struts API 。
2、Struts 2 提供了拦截器,利用拦截器可以进行AOP编程。
3、Struts 2 提供了类型转换器。
4、Struts 2 提供支持多种表现层技术,如:JSP 、freeMarker等。
5、Struts 2 的输入校验可以指定方法进行校验。
6、Struts 2 提供了全局范围、包范围和Action范围的国际化资源文件管理实现。
Struts 2 体系结构:1、Web浏览器请求一个资源。
2、过滤器Dispatcher查找方法,确定适当的Action。
3、拦截器自动对请求应用通用功能,如验证和文件上传操作。
4、Action的execute方法通常用来存储和重新获得信息。
5、结果被返回到浏览器。
搭建Struts 2 开发环境1、找到开发Struts 2的应用需要用到的jar包。
2、编写Struts 2的配置文件。
3、在web.xml中加入Struts 2 MVC启动框架配置。
开发Struts 2 最少用到的jar文件:Struts-core-2.x.x.jar : Struts 2 框架的核心类库xwork-2.x.x.jar : XWork类库,Struts 2 在其上构建ognl-2.6.x.jar : Object Graph Navigation Language ,Struts 2 框架通过其读写对象的属性。
freemarker-2.3.x.jar : Struts 2 的UI标签的模版使用Freemarker编写。
Struts2知识小结
Struts2知识点小结Struts Tag Library对于一个MVC框架而言,重点是实现二个部分:控制器部分和视图部分。
Struts2框架同样如此:控制器部分由Action(以及隐藏的系列拦截器)来提供支持,而视图部分则通过大量标签来提供支持。
Struts2标签库使用OGNL表达式作为基础,且默认支持OGNL, JSTL, Groovy和Velcit y表达式。
且把所有标签都定义在URI为/struts-tags 命名空间下,但我们依然可以依据功能将其分为三类:1. UI标签;a. 表单标签;b. 非表单标签;树、Tab页等;2. 非UI标签;a. 流程控制:条件、循环;b. 数据访问:输出ValueStack中的值;3. AJAX标签;Object Graph Navigation Language, 缩写为OGNL,是类似于EL的脚本语言,一. 控制标签Struts2中的非UI标签包括控制标签和数据标签,其中控制标签可以完成输出流程控制,例如条件、循环等操作,也可完成对集合的合并、排序等操作,它有如下九个:1) if: 选择输出;2) elseIf/elseif: 与if标签结合使用;3) else: 与if标签结合使用4) append: 将多个集合拼接成一个新的集合;5) generator: 将一个字符串解析成一个集合;6) iterator: 将集合迭代输出;7) merge: 将多个集合拼接成一个新集合,与append拼接方式不同;8) sort: 对集合进行排序;9) subset: 截取集合部分元素,形成新的子集;1. iterator标签对集合进行迭代,包括List,Set和数组,Map.. value: 可选,被迭代的集合,通常使用OGNL表达式指定,如无,则使用ValueStac k栈顶集合;. id: 可选,指向集合中元素;. status: 可选,指向迭代时IteratorStatus实例,通过该实例可判断当前迭代元素的属性;每次迭代都有一个IteratorStatus实例,该实例包含以下方法:a. int getCount(): 返回当前迭代了几个元素b. int getIndex(): 返回当前迭代元素的索引c. boolean isEven(): 当前索引是否为偶数d. boolean isFirst(): 当前迭代元素是否是第一个元素e. boolean isLast(): 当前迭代元素是否是最后一个元素f. boolean isOdd(): 当前索引是否为奇数2. if标签根据一个Boolean表达式的值,来决定是否计算,输出标签体等内容。
Struts2学习总结(完整版)
Struts2学习总结(完整版)⼀、搭建struts2环境1、jar包的导⼊主要是到解压其中的⼀个⼯程,得到⾥⾯lib下包含的jar包把这⾥的所有的jar包拷贝到项⽬的WEB-INF⽬录下的lib⽂件夹下⾯。
2、配置struts.xml⽂件注意:必须要放在src⽬录下,因为struts2源码就是这样设计的,只有在src⽬录下才读取得到。
每⼀个package都要extends=”struts-default”,namespace 是访问的路径Action中的name和 package中的namespace组成完整的访问路径3、配置web.xml<filter><filter-name>action2</filter-name><filter-class>org.apache.struts2.dispatcher.ng.filter.StrutsPrepareAndExecuteFilter</filter-class></filter><filter-mapping><filter-name>action2</filter-name><url-pattern>/*</url-pattern></filter-mapping>4、编写的Action类都要继承ActionSupport类或者implements Action接⼝默认action类访问的是⾥⾯的execute⽅法如果要访问特定的⽅法,可以这样:(1)在action 后⾯指定 method=“⽅法名”(2)使⽤通配符 <action name=”example_*” class=”com.XX.YY.ZZ” method=”{1}” />(3)使⽤动态表达式⽐如example!execute(不常⽤)5、接收表单提交的数据(1)属性驱动获取表单参数--在action类中定义与表单的input中 name ⼀样的属性(必须⼀样,否则注⼊不进去)同时还要⽣产属性对应的set ⽅法,因为 action类要调⽤set⽅法把表单中的参数注⼊到属性中(2)模型驱动获取表单参数--模型驱动⾸先action类要实现ModelDrivern,然后重写getModel⽅法--在action类中声明并创建接收表单参数的实体类(Student user = new Student())--原理分析:struts2调⽤action类的getModel⽅法,得到user对象,然后利⽤user对象⾥⾯的set属性的⽅法,设置user对象的属性值--注意,表单的参数name必须要跟Student的属性值⼀致,否则注⼊不进去。
Struts2完全教程总结

Struts2教程Struts2教程1:第一个Struts2程序在本系列教程中我们将学习到Struts2的各种技术。
在本教程中使用的工具和程序库的版本如下:开发工具:MyEclipse6Web服务器:Tomcat6Struts版本:Struts2.0.11.1JDK版本:JDK1.5.0_12J2EE版本:JavaEE5.0在本系列教程中Web工程的上下文路径都是struts2,如果在Web根目录有一个index.jsp文件,则访问路径如下:http://localhost:8080/struts2/index.jsp由于MyEclipse6目前并不支持Struts2,所以我们需要到去下载Struts2安装包。
要想正常使用Struts2,至少需要如下五个包(可能会因为Struts2的版本不同,包名略有差异,但包名的前半部是一样的)。
struts2-core-2.0.11.1.jarxwork-2.0.4.jarcommons-logging-1.0.4.jarfreemarker-2.3.8.jarognl-2.6.11.jarStruts2虽然在大版本号上是第二个版本,但基本上在配置和使用上已经完全颠覆了Struts1.x的方式(当然,Struts2仍然是基于MVC模式的,也是动作驱动的,可能这是唯一没变的东西)。
Struts2实际上是在Webwork基础上构建起来的MVC框架。
我们从Struts2的源代码中可以看到,有很多都是直接使用的xwork(Webwork的核心技术)的包。
既然从技术上来说Struts2是全新的框架,那么就让我们来学习一下这个新的框架的使用方法。
如果大家使用过Struts1.x,应该对建立基于Struts1.x的Web程序的基本步骤非常清楚。
让我们先来回顾一下建立基于Struts1.x的Web程序的基本步骤。
1. 安装Struts。
由于Struts的入口点是ActionServlet,所以得在web.xml中配置一下这个Servlet。
Struts2的学习自我总结

Struts2的学习⾃我总结
Struts2是⼀个轻量的的开源的框架,可以实现mvc的模式,起初struts和webwork两家公司都存在,后来strus的技术要落后⼀些,但是使⽤⼈群⽐较⼴泛,为了避免今后struts被淘汰,struts公司和webwork公司两家合并了,然后有了现在的struts2,struts2和struts有很⼤的区别。
struts2的⼯作流程是这么去⾛的.⾸先,客户端(client)发起⼀个请求(request)给服务器(server),服务器接受了请求之后⾸先通过http协议找到所请求的这个项⽬(webapplication),
找到这个项⽬之后项⽬会去访问web.xml中的配置,然后在配置中找到了struts2的配置之后,会去根据filter中的配置去找对应的配置⽂件,然后找到了strut.xml,然后根据struts.xml配置中的namespace下的action去找对应的返回结果(result)再去反馈给客户端。
今天把struts2的⼀个简单的项⽬部署到服务器之后,运⾏之后报null指针,然后上⽹查询相关的资料,发现时struts-2.1.6版本有⼀个bug,只要配置⽂件的常量(<constant>)设置成<constant name="struts.devMode" value="true" />就不能正常的运⾏,要想使项⽬能够正常的运⾏起来要么就是去掉tomcat安装路径下的空格,要么换⼀个struts2的版本,或者将value的值改成false。
struts2总结

Action注入
<!-- action注入 --> <package name="hjj" namespace="/ts253" extends="struts-default"> <action name="nsklovehjj" class="org.nsk.web.action.InsertAction" method="ok"> <param name="birthday">1992-0312</param> <result name="success">/WEBINF/ch03/showOutBirthday.jsp</result> </action> </package>
配置常用的常量介绍
1访问action的后缀修改所配置的常来 <constant name=”struts.action.extension” value=”do”/> 即,以*.do访问struts里面的action 也可以定义多个访问后缀,value中间用逗号分隔.如value=”do,action,nsk” 2配置默认编码集: <constant name=”struts.i18n.encoding” value=”utf-8” /> 3系统是否自动加载struts.xml.比如,修改了struts.xml,如果value=true,则就可以不必重新加载 项目. <constant name=”struts.configuration.xml.reload” value=”true”/> 默认 value=false; 4输出更详细的错误信息 <constant name=”struts.devMode” value=”true” /> 5指定由Spring负责action对象的创建 <constant name=”struts.objectFactory” value=”spring” /> 6设定上传文件的总大小限制 <constant name=”struts.multipart.maxSize” value=”1024”/> 7设定是否支持动态方法的调用 <constrant name=”struts.enable.DynamicMethodlnvocation” value=”false” />
struts2课堂笔记(第一天)
八、 基于注解的struts2 开发
知识结构(原理及流程------>所有配置文件----->重点配置文件(struts.xml)----------->常量配置(还有Action)------>
Action类的编写------>action中方法调用-------->动态方法调用--------->ServletAPI获取三种方法
今天所学:
一、框架概述
二、Struts2开发快速入门
三、struts2 运行流程分析
四、 struts2 常见配置(配置文件加载顺序,struts.xml常用配置,常量配置)
五、 Action的访问(Action的三种编写方法,详细配置Action , 动态方法调用)
六、在Action中使用Servlet API
四、 struts2 常见配置
学习路径
1)、 struts.xml常量配置(配置文件顺序)、Action访问(Servlet API)、结果集 (使用Struts2 编写简单案例)
2)、 请求数据
3)、 响应页面生成
1、 struts2 配置文件的加载顺序
struts2 配置文件 由核心控制器加载 StrutsPrepareAndExecuteFilter (预处理init(),执行过滤)
init_DefaultProperties(); // [1] ---------- org/apache/struts2/default.properties
init_TraditionalXmlConfigurations(); // [2] --- struts-default.xml,struts-plugin.xml,struts.xml
struts2总结
Struts2总结1.struts2工作原理:1.服务器端提交请求,容器初始化HttpServletRequest对象2.请求的对象被FilterDispatcher过滤器过滤,FilterDispatcher调用ActionMapper,决定请求是否需要调用某个Action3.如果需要调用某个Action,FilterDispatcher把请求的处理交给ActionProxy(Action代理)ActionProxy通过Configuration Manager解析框架的配置文件,找到需要调用的Action 4.Action调用业务逻辑类完成业务逻辑。
在调用Action前后,将调用该Action涉及到的相关拦截器(Interceptor)5.Action执行完毕,ActionInvocation根据struts.xml中的配置找到对应的返回结果(被称为Result)。
返回结果通常是Jsp2.过滤器的配置:<filter><filter-name>FilterDispatcher</filter-name><filter-class>org.apache.struts2.dispatcher.FilterDispatcher</filter-class></filter><filter-mapping><filter-name>FilterDispatcher</filter-name><url-pattern>/*</url-pattern></filter-mapping>3.action的写法:1.Action类不需要继承或实现任何父类或接口,2.如果该Action类是通过表单提交调用,且Action类中需要使用表单提交的请求参数,则必须在Action类中声明与表单域的名字对应的变量,并提供getters/setters方法例如:private String name;private int age;public String getName() {return name;}public void setName(String name) { = name;}public int getAge() {return age;}public void setAge(int age) {this.age = age;}3.Action类中必须有一个public String execute(){}方法,该方法将被自动调用,实现控制逻辑,但是可以通过配置修改方法名3.Action的配置:<struts><package name="primer"namespace="/primer"extends="struts-default"><action name="helloWorldAction"class="cn.itcast.primer.HelloWorldAction"><result name="success">/primer/success.jsp</result> </action></package></struts>各个位置的内容解释:<struts><!-- /primer/helloWorldAction.actionpackage:包* name:包名,唯一的,必选项* namespace:命名空间,唯一的,相当于房间号。
【2018-2019】struts2学习总结-实用word文档 (12页)
本文部分内容来自网络整理,本司不为其真实性负责,如有异议或侵权请及时联系,本司将立即删除!== 本文为word格式,下载后可方便编辑和修改! ==struts2学习总结篇一:struts2根据struts2完全学习手册自己总结一、struts2简介1 struts2的配置文件:(1)struts.xml 配置示例:<?xml version="1.0" encoding="UTF-8" ?><!DOCTYPE struts PUBLIC"-//Apache Software Foundation//DTD Struts Configuration 2.0//EN""/xml/ns/j2ee/web-app_2_4.xsd"><display-name>Struts Blank</display-name><filter><filter-name>struts2</filter-name><filter-class>org.apache.struts2.dispatcher.ng.filter.StrutsPrepareAndExecute Filter</filter-class> </filter><filter-mapping><filter-name>struts2</filter-name><url-pattern>/*</url-pattern></filter-mapping><welcome-file-list><welcome-file>index.html</welcome-file></welcome-file-list></web-app>2 struts2控制器(1)核心控制器: FilterDispatcher (在web应用中负责拦截所有的用户请求)如果用户的请求以 .ation结尾,则该请求被转入struts2框架处理。
J2EE总结Struts2总结
1.Struts1的缺点⑴没有实现model整合技术⑵没有与Freemarket或velocity等模板技术整合的技术⑶由于与ServletAPI耦合严重,测试需要web服务器,比较麻烦,属于侵入式设计,系统重构困难2.Struts2的核心原理是struts1和webwork。
3.Struts2框架的处理流程为:1)浏览器发送请求;2)核心控制器StrutsPrepareAndExecuteFilter根据请求决定调用合适的Action;3)Struts2的拦截器链自动对请求应用通用功能,如workflow、validation或文件上传等功能;4)回调Action的execute方法,该方法通过调用业务逻辑组件来处理用户请求;5)根据Action的execute方法结果,调用相应的视图技术,输出到浏览器中,这些视图如,JSP,Freemarket,velocity等4.Struts2的两个主要配置文件:struts.xml 和struts.properties5.与Struts1对比,Struts2的优点Action不再与ServletAPI耦合,实现B/S向C/S结构的转换Action不再和webWork耦合,代码重用性好支持更多的表现层技术测试更加容易6.MVC框架中M是模型,V是视图,C是控制器。
7.WEB应用中,如何让WEB服务器自动加载Struts2框架?在web.xml中,通过web.xml加载Struts2,任何MVC框架的web应用都需要加载一个核心控制器,Struts2为strutsPrepareAndExecuteFilter类。
8.Struts2的WEB应用如何自动整合其他框架?structs 2框架提供一种类似esclipse的扩展方式,它允许一种“可插拔”的方式安装插件,提供类似Structs2-xxx-plugin.jar的文件,只要该文件放在web应用的WEB-INF/lib路径下,struts2框架将自动加载该框架。
struts2学习总结
HttpServletRequest req = ServletActionContext.getRequest();
HttpSession ses = req.getSession();
ServletContext app = req.getServletContext();
在页面的struts标签中,使用“对象名.属性名”引用
10.action中的result的转发类型。
result name="success" type="dispatcher">/jsp/success.jsp</result>
常见的类型属性有 dispatcher, redirect, redirectAction, stream
<struts>
<package name="example" extends="struts-default" >
<action name="login" class="erLoginAction" method="execute">
<result name="success">/jsp/success.jsp</result>
交请求,struts2的查找次序:
按照就近原则的顺序,分别到struts.xml中到namespace为:
“/path1/path2/path3”, “path1/path2”, “/path1”, “/”的package。
如果丌存在,继续往上找;如果存在此package,则找对应的login.action, 如果找
Struts2知识点总结

1.struts2 步骤1.创建web项目2.添加struts2的必须jar包3.添加支持(配置web.xml文件)4.创建界面和相应的action5.配置struts.xml文件6.部署运行项目2.struts2的工作流程1. 浏览器发送一个请求。
2. 核心控制器FilterDispatcher根据请求决定调用合适的Action。
3. 拦截器(Intercepter)自动对请求应用通用功能,如验证等。
4. 回调Action的execute方法,该execute方法根据请求的参数来执行一定的操作。
5. Action的execute方法处理结果信息将被输出到浏览器中,支持多种形式的视图。
3.struts2的配置文件1.web.xml2.struts.xml(核心管理Action映射) 自己配置的3.struts-default.xml是struts2框架默认加载的配置文件。
它定义struts2一些核心的bean和拦截器。
这些拦截器是以key-value对的形式配置在struts-default.xml中,其中name是拦截器名字,就是后面使用该拦截器的引用点,value则指定拦截器的实现类。
4.struts.properties(核心管理属性) 自己配置的5.default.properties(核心管理属性)4.<struts>标签下的子标签配置1.<bean type="com.opensymphony.xwork2.ObjectFactory" name="struts"class="org.apache.struts2.impl.StrutsObjectFactory" />2.<include file="struts1.xml"></include>3.<constant name=“key” value=“value” />4.<package></package>5.package标签下的配置1.<action name="loginAction" class="com.action.loginAction"><result name="success">/welcome.jsp</result><result name="error">/index.jsp</result></action>2.<global-results><result></result></global-results>3.<global-exception-mappings><exception-mapping result="error"exception="java.long.Exception"></exception-mapping></global-exception-mappings>……………………………………6.action类实现Action接口和继承ActionSupport7.通过ActionContext类获得context(request),再通过context获得session和application context.put("key","value");session.put("key","value");session.put("key","value");public class ServletActionContext (org.apache.struts2)public static PageContext getPageContext()public static HttpServletRequest getRequest()public static HttpServletResponse getResponse()public static ServletContext getServletContext()8.在action中直接使用一个对象,两种方式:1.在提交表单时name属性为:对象.xxxx2.实现ModelDriven<类类型>接口和其方法。
Struts2知识点总结报告
1.简介Struts 2是Struts 的下一代产品,是在 struts 1和WebWork 的技术基础上进行了合并的全新的Struts 2框架。
其全新的Struts 2的体系结构与Struts 1的体系结构差别巨大。
Struts 2以WebWork 为核心,采用拦截器的机制来处理用户的请求,2.Struts2处理流程3.Struts2基础<include >可以把struts 配置分为相应的struts.xml 文件<package >中的属性namespace 可以把action 分包,用来解决不同项目的同名action <action>中的method 属性决定action 调用action 业务类的那个方法,根据方法的返回值跳到名字队对应的result 结果集中除了Metnod 调用指定的方法为还有一种动态调用1.在请求的页面就指定调用的action 名称及方法,语法:actionName!methodName.action,action 可以省略,2.在<action>使用通配符, <action name=”house_*”>....<result >其名字可以自行定义,根据业务类返回的值,对应相应的result 官方定义的有success,login,error,input 等其中的type 属性可以决定转向类型,默认的是dispatcher(转发)其他前端控制器 StrutsPreparedAndExec uteFilter 拦截用户请求 用户请求 Action 业务处理,处理请求,返回处理结果 根据请求的url 找到action 返回处理结果 Jsp 页面 渲染结果结果数据传递给jsp 处理后的html 响应用户的是redirect,请求重定向的指定的URL,redirectAction重定向到指定的Action,chain:将请求转发到指定的Action,json返回JSON对象如果result的内容不是一个具体的jsp页面而是${}形式的这就是动态结果的配置,就是结果页面在配置是不能确定,需要在运行时才能确定,比如管理员和普通用户登录,详细的动态结果配置详见资料Action类实现的方法有三种1.继承ActionSupport (常用)2.实现Action接口3.自己编写方法Action接收参数1属性方式接收参数,2Javabean方式接收参数(常用)3.moderlDriven方式接收参数Struts2访问servletAPI的方法在jsp课程中,服务器保存数据的作用域通常有request,session,application,他们对应的servletAPI 分别是HttpServletRequest,HttpSession,servletContext,同样在struts2控制器(action)中也需要访问这些作用域,有三种方法1.使用ActionContext类提供的方法2.以依然注入(IoC)方式访问,实现响应的接口即可3.使用以耦合方式使用ServletActionContext类访问OGNL与struts标签引入的标签指令<%@taglib uri="/struts-tags" prefix="s"%>理解值栈(存储action属性的地方)和stackcontext(存储request,session的地方)概念,并且使用<s:debug>查看值栈访问的值OGNL访问集合知识点,不常用字符串转换OGNL表达式用户%{}相反的加’’单引号Struts2标签可分为通用标签,控制标签,Ajax标签通用标签又分为数据标签和控制标签数据标签:<s:property><s:debug><s:date><s:set><s:url>和<s:a><s:param><s:include>控制标签<s:if>,<s:elseif><s:else><s:iterator>UI标签理解模板与主题,模板用于生成HTML代码,共同风格和观感的模板组织到一起就成了一个主题,内建的主题有simple,xhtml,css_xhtml(默认),css_xhtml,ajax主题的更改用标签属性theme=”simple”标签:<s:form><s:textfield><s:textarea><s:submit><s:select><s:doubleselect>下拉列框和联动列框属性及实现参观相关代码Ajax标签Datetimepicker是一个日历控件导入相应的包引入<%@taglib uri="/struts-dojo-tags" prefix="sx"%>指令在<head>中添加<sx:head parseContent="true"/>添加标签<sx:datetimepicker name="timer" label="发布时间"/>4.数据校验数据校验分为客户端验证和服务器端验证,sruts2对服务器端的验证有两种,1.使用actionsupport编码实现验证2.使用验证框架实现验证,使用actionsupport编码进行验证的方法有三种,1.直接在action类业务方法中验证,2.重写validate()方法实现验证,3.使用validateXXX()方法实现验证验证的关键点在于当用户名或密码没填写时添加addFieldError()方法,此方法处理与字段相关的错误,比如输入的年龄不合理,响应的jsp输出错误的标签是<s:fielderror fieldname=”/>, addActionError()方法是用来添加与action所处理的业务相关的错误信息,在JSP输出错误的标签是<s:actionerror>如果两种情况有任何一种错误(hasErrors())就return到INPUT结果集中(事先已经配置好) 使用验证框架使用特定的配置框架即可,命名的前半部分是action 的名字,可对全局和局部进行验证!具体查看相关资料5.拦截器拦截器,在AOP(Aspect-Oriented Programming)中用于在某个方法或字段被访问之前,进行拦截然后在之前或之后加入某些操作。
- 1、下载文档前请自行甄别文档内容的完整性,平台不提供额外的编辑、内容补充、找答案等附加服务。
- 2、"仅部分预览"的文档,不可在线预览部分如存在完整性等问题,可反馈申请退款(可完整预览的文档不适用该条件!)。
- 3、如文档侵犯您的权益,请联系客服反馈,我们会尽快为您处理(人工客服工作时间:9:00-18:30)。
一、1、struts2struts2是mvc设计思想的一个实现,可以将项目低耦合,提高扩展性2、struts2和struts1的区别struts2不是struts1的升级,而是继承的下xwork的血统,它吸收了struts1和webwork 的优势。
struts2的action是原型,安全的,struts2的action是单例,非安全3、步骤:1、导入包2、在web.xml文件中,加入struts2的核心拦截器3、在src下放入struts2的xml struts.xml4、urlhttp://localhost:8080/Struts2_01_HelloWorld/demo/hello.action二、1、默认值2、转发和重定向的区别转发:url显示的依然是上一个的url,共享上一次的请求重定向:url显示的是下一个的url,不共享3、urlhttp://localhost:8080/Struts2_02_Default/demo/hello.action4、路径http://localhost:8080/Struts2_02_Default/demo/a/b/c/hello.action1、原路径找不到,http://localhost:8080/Struts2_02_Default/demo/a/b/hello.action2、如果1找不到,http://localhost:8080/Struts2_02_Default/demo/a/hello.action3、如果2找不到,http://localhost:8080/Struts2_02_Default/demo/hello.action3、如果3找不到,http://localhost:8080/Struts2_02_Default/hello.action三、11、自定义action继承ActionSupport2、功能方法必须满足格式public String 名字()throws Exception{....};3、urlhttp://localhost:8080/Struts2_03_Action/demo/a.action四、1、如何给action传入参数注意:赋值的必须有封装的set方法,通过el表达式获取的时候,必须有封装的get 方法1、直接给单个参数赋值,在action里建立一个变量,名字与参数的名字一样2、为对象的某个属性赋值,在action里建立一个对象,将参数改为对象名.属性的格式五、1、转发和重定向的区别转发到下一次的时候,url依然是上一次的url,共享上一次的request重定向到下一次的时候,url是下一次的url,不共享上一次的request2、struts2的result的type转发:共享上一次action重定向:不共享上一次action1、转发到下一个jsp,html:dispatcher2、重定向到下一个jsp,html:redirect3、转发到下一个action:chain转到同一个包下的action转发到不同包下的action4、重定向到下一个action:redirectAction转到同一个包下的action转发到不同包下的action六、1、为了分模块开发,可以设置多个xmL文件。
最后综合到struts.xml注意:路径和包名不能重复七、1、局部转换器,只对某一个action类起作用1、新建一个类,继承 StrutsTypeConverter2、在与action类中的同包下,新建一个文件,名字格式有要求:类名-conversion.properties2、全局转换器1、在src下新建一个文件,名字格式有要求:xwork-conversion.properties3、urlhttp://localhost:8080/struts2_10_Conversion/login.jsp八、1、struts2核心功能就是使用拦截器实现的。
2、自定义拦截器(按照过滤器的思想来学习),用来拦截某个action过滤器是根据url拦截器,拦截器是拦截指定的action1、定义一个类,实现接口Interceptors2、在struts.xml中定义拦截器3、在需要拦截的action下,配置引用拦截器,并且注意最后要加上系统默认的拦截器3、urlhttp://localhost:8080/Struts2_12_Interceptor/demo/delete.actionhttp://localhost:8080/Struts2_12_Interceptor/demo/update.action加上sessionhttp://localhost:8080/Struts2_12_Interceptor/setSession.jsp清除sessionhttp://localhost:8080/Struts2_12_Interceptor/clearSession.jsp九、1、上传1、设置多功能表单和post提交方式enctype="multipart/form-data"method="post"2、在action中定义一个file对象,名字和type=file的input的name属性一致,如果要获取文件的名字,定义一个字符串,字符串的名字是:type=file的input 的name属性+FileName3、处理路径文集4、将上传的文件复制到目标文件中2、urlhttp://localhost:8080/struts2_12_Upload/upload.jsp3、可以使用配置xml的形式上传struts2的核心功能就是使用的拦截器<!-- 配置名字为fileUpload的拦截器 --><interceptor-ref name="fileUpload"><!-- 配置允许上传的文件类型 --><param name="allowedTypes">image/bmp,image/png,image/gif,image/jpeg,image/pjpeg,image/x-png</param><!-- 配置允许上传文件的大小(单位字节) --><param name="maximumSize">80000</param></interceptor-ref><interceptor-ref name="defaultStack"></interceptor-ref><!-- 动态设置保存文件的路径 (Action的属性值)--><param name="savePath">/upload</param>4、上传一般使用struts2+jquery的异步上传插件(uploadify)在上传之前进行一些验证,如果不通过,不提交到服务器。
只有验证通过再发送的服务器5、post和get的区别post可以传输大数据,get只传输小数据,最大是4kbpost请求的时候,url没有参数,get请求的时候,url有参数十、1、下载2、urlhttp://localhost:8080/Struts2_13_Load3、result介绍<result name="success" type="stream"><!-- 这个流用来读取服务器上的文件 --><param name="inputName">imageInputStream</param><!-- 配置要下载的文件的mime类型 --><param name="contentType">${contentType}</param><!-- 配置处理文件的方式,有下载和阅览 --><param name="contentDisposition">${contentType}</param></result>4、编码和解码编码:看得懂--->看不懂解码:看不懂--->看得懂十一、strusts2中的服务器验证,推荐使用js前端验证1、xml配置验证1、全局验证(验证所有与execute签名相同的方法)在验证的action所在包下,建立一个xml文件格式:action的名字-validation.xml2、部分验证(选择性的验证某些与execute签名相同的方法)在验证的action所在包下,建立一个xml文件格式:action的名字-方法名-validation.xml2、使用validate方法验证1、全局验证(验证所有与execute签名相同的方法-struts2的功能方法)1、重写ActionSupport的validate()方法,这个方法会验证所有与execute方法签名相同(public String methodName(){})的方法2、如果不符合要求,调用addFiledError(错误的名字,错误的具体描述)3、如果错误集合不为空(验证失败),会返回input视图4、在要显示的页面使用EL表达式获取错误信息2、部分验证(选择性的验证某些与execute签名相同的方法)1、定义如下格式方法(其中的validateLogin是需要验证的public String login(){}方法)public void validateLogin(){}2,3,4步骤同上3、null和""区别?4、验证器以下是各类现场级和非现场验证在Struts2的列表:日期验证器:<field name="birthday"><field-validator type="date"><param name="min">01/01/1990</param><param name="max">01/01/2000</param><message>Birthday must be within ${min} and ${max}</message></field-validator></field>double 验证器:<field name="percentage"><field-validator type="double"><param name="minExclusive">0.123</param><param name="maxExclusive">99.98</param><message>Percentage needs to be between ${minExclusive}${maxExclusive} (exclusive)</message></field-validator></field>email 验证器:<field name="myEmail"><field-validator type="email"><message>Must provide a valid email</message></field-validator></field>表达式验证器:A Non-Field Level validator that validates based on regular expression supplied.<field-validator type="expression"><param name="expression">....</param><message>Failed to meet Ognl Expression ....</message></field-validator>int 验证器:<field name="age"><field-validator type="int"><param name="min">5</param><param name="max">50</param><message>Age needs to be between ${min} and ${max}</message></field-validator></field>正则验证器:<field name="myStrangePostcode"><field-validator type="regex"><param name="fieldName">myStrangePostcode</param> <param name="expression"><![CDATA[([aAbBcCdD][123][eEfFgG][456])]]></param></field-validator></field>必须验证器:<field name="username"><field-validator type="required"><message>username must not be null</message></field-validator></field>requiredstring validator:<field name="username"><field-validator type="requiredstring"><param name="trim">true</param><message>username must not be null</message></field-validator></field>stringlength 验证器:<field name="username"><field-validator type="stringlength"><param name="minLength">10</param><param name="maxLength">10</param><param name="trim">true</param><message>Your username needs to be 10 characters long </message></field-validator></field>url 验证器:<field-validator type="url"><param name="fieldName">myHomePageURL</param><message>Invalid homepage url</message></field-validator>十二、1、国际化其实就是配置多个properties文件,根据不同的Locale值选择性的显示某个语言2、步骤1、在src下新建一些properties文件,格式是有要求的。
